

Page 1
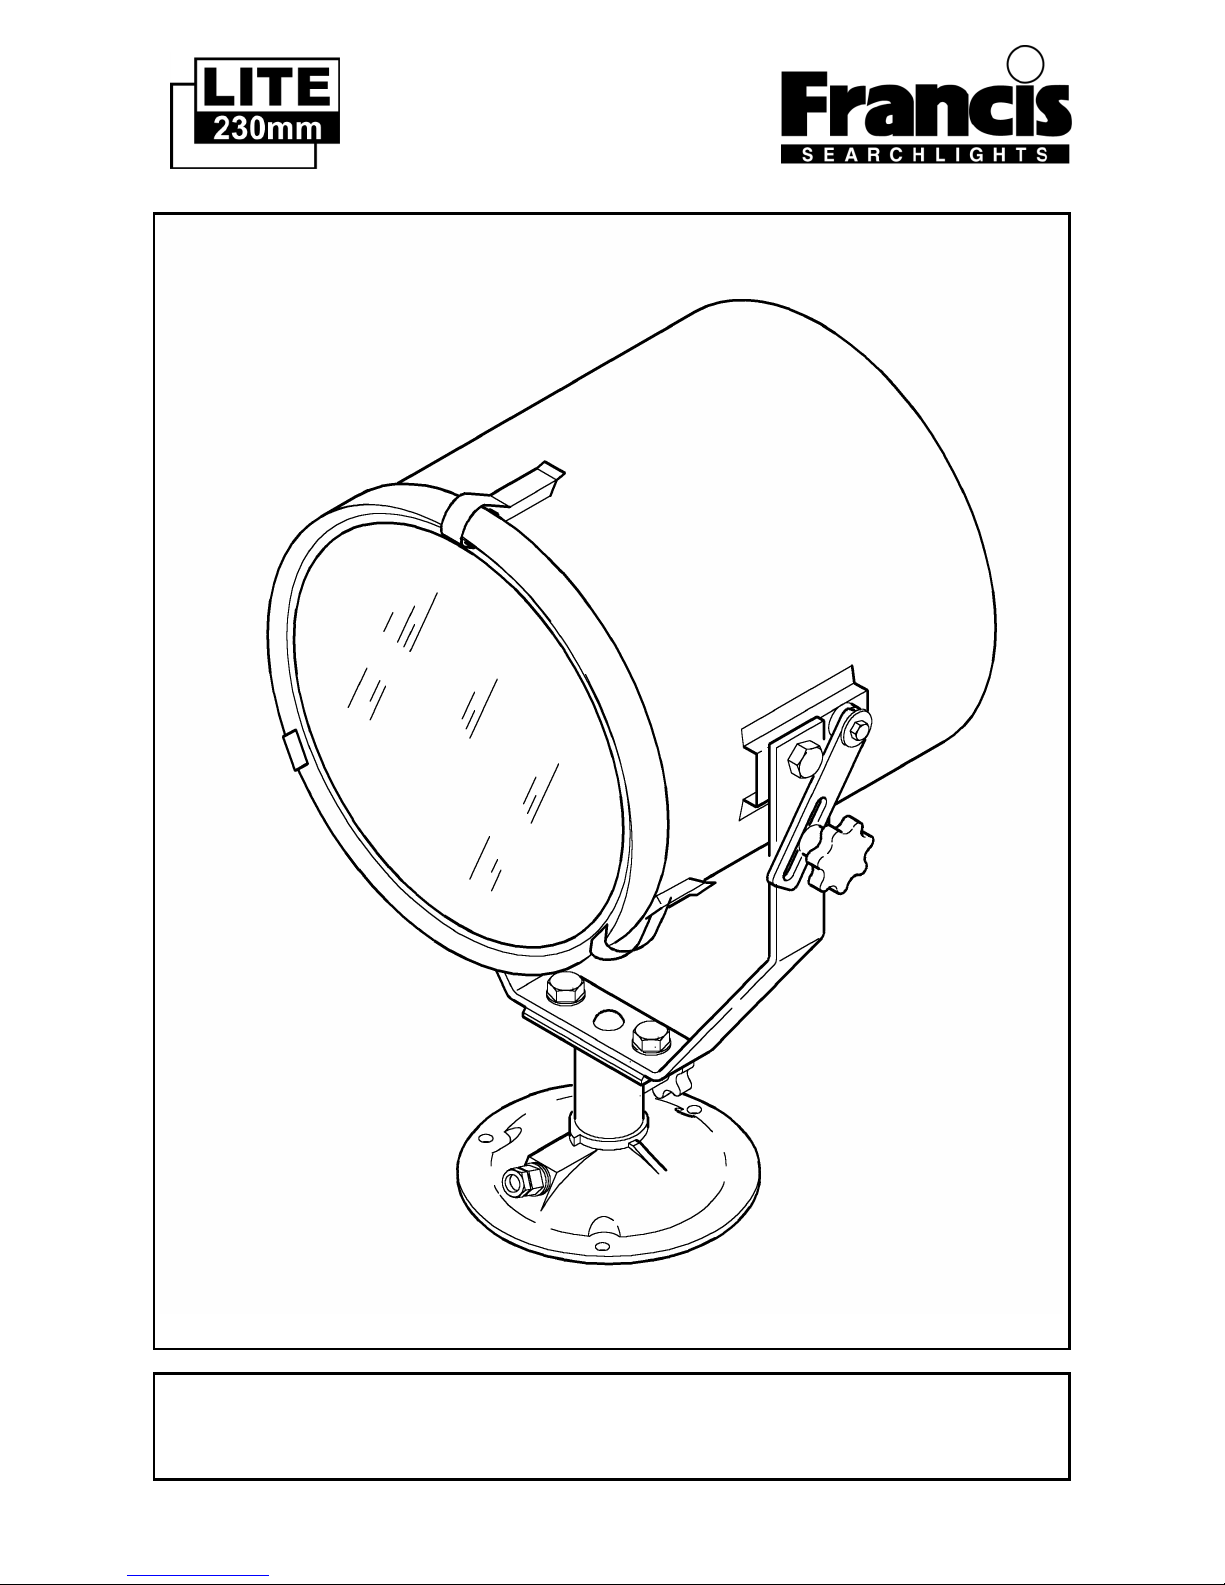
Lite 230 Searchlight
User Information
Page 2

L230 Searchlight
i
Page 3

L230 Searchlight
ii
Contents
Page
USER INFORMATION FOR LITE 230 SEARCHLIGHT 1
INTRODUCTION ......................................................................................... 1
SAFETY PRECAUTIONS ............................................................................. 1
UNPACKING INSTRUCTIONS ....................................................................... 2
INSTALLATION INSTRUCTIONS.................................................................... 2
Safety Precautions ............................................................................. 2
Preparing the Mounting Position ........................................................ 3
Mounting the Searchlight ................................................................ 3/4
Power Supply Requirements ............................................................. 5
OPERATING INSTRUCTIONS ....................................................................... 6
Setting to Work .................................................................................. 6
Testing ............................................................................................... 7
FAULT FINDING ........................................................................................ 7
Fault ................................................................................................... 7
Remedy .............................................................................................. 7
MAINTENANCE AND SERVICING REQUIREMENTS......................................... 8
SPARE PARTS LISTS 9
BARREL ASSEMBLY .................................................................................. 9
LAMPHOLDER GX6.35 . .......................................................................... 10
LAMPHOLDER GY9.5 . ............................................................................ 11
DECK MOUNT ........................................................................................ 12
PEDESTAL ASSEMBLY ............................................................................. 13
CABIN TRAINER MOUNT CONVERSION ..................................................... 14
SEAL KITS ............................................................................................. 15
SPARE PARTS ORDERING ....................................................................... 16
PARTS DISPOSAL ................................................................................... 16
SALES AND SERVICE .............................................................................. 16
GUARANTEE .......................................................................................... 16
Page 4

L230 Searchlight
1
User Information for Lite230 Searchlight
It is imperative that this manual is
read carefully before installing or
using your equipment. For your
future reference this manual
should be kept in a safe place.
Introduction
Thank you for specifying a product
from the Francis Searchlights Ltd
range. All Francis products are
designed to give complete customer
satisfaction and are manufactured to
the highest engineering standards in
order to ensure optimum performance
and service life.
The Lite Series Searchlights combine
design features proven over many
years of service in the most
hazardous conditions in both marine
and land installations.
In order to prolong the life and
performance of your product, we
recommend that you only specify
Francis Searchlights spare parts. This
will also ensure that any warranties
on your equipment will not be
invalidated. Information on spares
ordering and parts is provided in this
manual.
Should you ever need to contact
Francis Searchlights Ltd. regarding
your equipment, please quote the
Product Serial Number at all times.
Please complete the following boxes
for your future reference purposes.
Product
Number
Serial Number
Safety Precautions
The following instructions must be
adhered to in order to ensure a safe
working environment and the safety of
the user.
Note: When manoeuvring the
searchlight into its fixing
position, suitable lifting
points must be chosen in
order to prevent damage
to the equipment or
personal injury.
Prevent rain, snow, condensation
and water droplets from contacting
the lamp as this may cause bulb
failure, and possible shattering;
Quartz halogen lamps run with a
high internal pressure in excess of
atmospheric. Whilst the
construction is inherently strong,
there is a slight risk of the lamp
shattering;
Never look directly into an
illuminated searchlight as this may
cause severe damage to eyesight.
If it is necessary to inspect a lamp
whilst in operation, always wear
suitable protective goggles;
Page 5

L230 Searchlight
2
Should it be necessary to examine
the lamp with the front bezel
removed, always use a protective
shield to ensure a safe working
environment;
Never attempt to clean the lamp
when in use;
Searchlights get hot. Never touch
the unit when lit and always allow
at least ten minutes for cooling
down after turning off;
Ensure the lamp has cooled
sufficiently before removal. During
the cooling down period avoid
mechanical or thermal shock to
the lamp as this may cause
shattering;
If undue force appears necessary
to remove the lamp, the
equipment should be inspected by
a competent person, or contact
the manufacturer;
When breaking a lamp for
disposal, care must be taken to
ensure that the fragments are
safely contained. Precautions
must be taken against flying glass
and other fragments. This
operation should be performed
outdoors or in a well ventilated
area. In ALL cases reference
should be made to the lamp
manufacturers instructions packed
with the lamp;
Due to the vast range of lamps
available, it may appear possible
that more powerful lamps can be
used in the equipment for which it
was designed. Even when the unit
will physically accept a higher
wattage lamp, this substitution is
not recommended as it could be
dangerous.
Unpacking Instructions
Care should be taken when
unpacking the searchlight, so as not
to cause damage to the equipment or
cause personal injury. A visual
inspection of the equipment should be
conducted to check for damage
during transit or damaged lamps.
Enclosed in the packing is the flange
sealing gasket. This should be
retained for installation purposes.
For Cabin, Deck Pedestal and Cabin
Pedestal models, conversion kits are
supplied and should be retained for
installation purposes.
Installation Instructions
The following instructions should be
read and fully understood prior to
installing the equipment to ensure
correct procedures are followed and
all safety precautions are observed.
Note: If the equipment has
been in storage for a
considerable time, it is
advisable to conduct a
routine maintenance
check on all parts before
installation.
Safety Precautions
This equipment should not be
connected to an electrical supply
before being installed. Installation
procedures should be adhered to in
order to ensure a safe working
environment and reduce the risk of
damage or injury.
Page 6
L230 Searchlight
3
Preparing the Mounting
Position
Using the template provided mark out
and drill the fixing holes through the
deck or cabin roof. In the case of
cabin control models, a centre hole is
also required to allow the mechanism
to pass through.
Mounting the Searchlight
For Deck Models:
Fit the ‘O’ ring in position and bolt the
searchlight base securely down. On
an uneven surface it is necessary to
use a suitable sealant, such as
silicone, in order to ensure a weather
proofed joint.
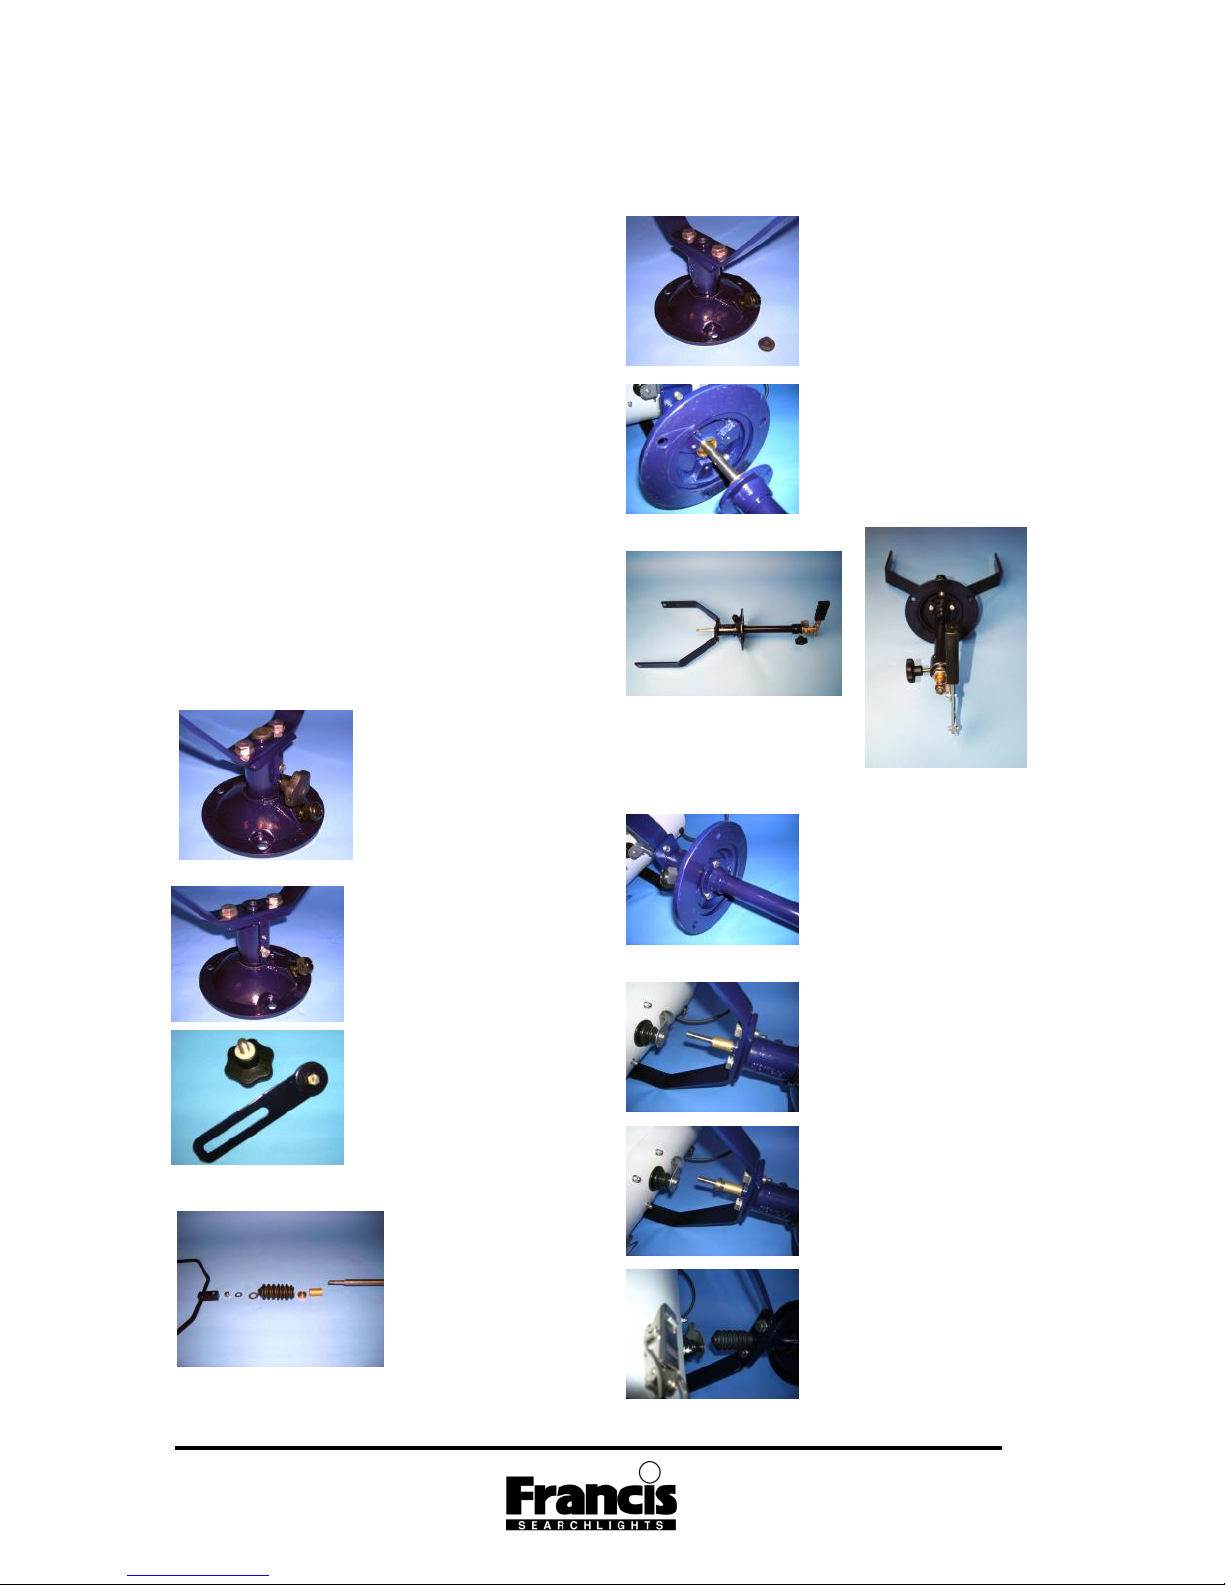
For Cabin/Cabin Pedestal Models:
Remove the base
lock wheel.
Replace lock wheel
with M8 x 10
hexagon screw in
the bottom fixing.
Now remove the
following items as
these are only
required on deck
models barrel lock
wheel, elevation link and fixings.
When installing
the under deck
Mechanism first
separate the
following items.
U-piece
assembly, M8 nyloc nut, M8 plain
washer, M12 plain washer, rubber
bellows, bellows top bush and the
push rod top bush.
Remove the
blanking plug from
the bellows bottom
bush.
Insert the under
deck through the
centre hole making
sure it’s aligned as
photos below.
Fasten the under
deck mechanism
using the 3 off M6 x
16 pan head screws
and spring washers.
Re-Fit the following items:
Push rod top bush.
Bellows top bush.
Bellows.
Page 7
L230 Searchlight
4
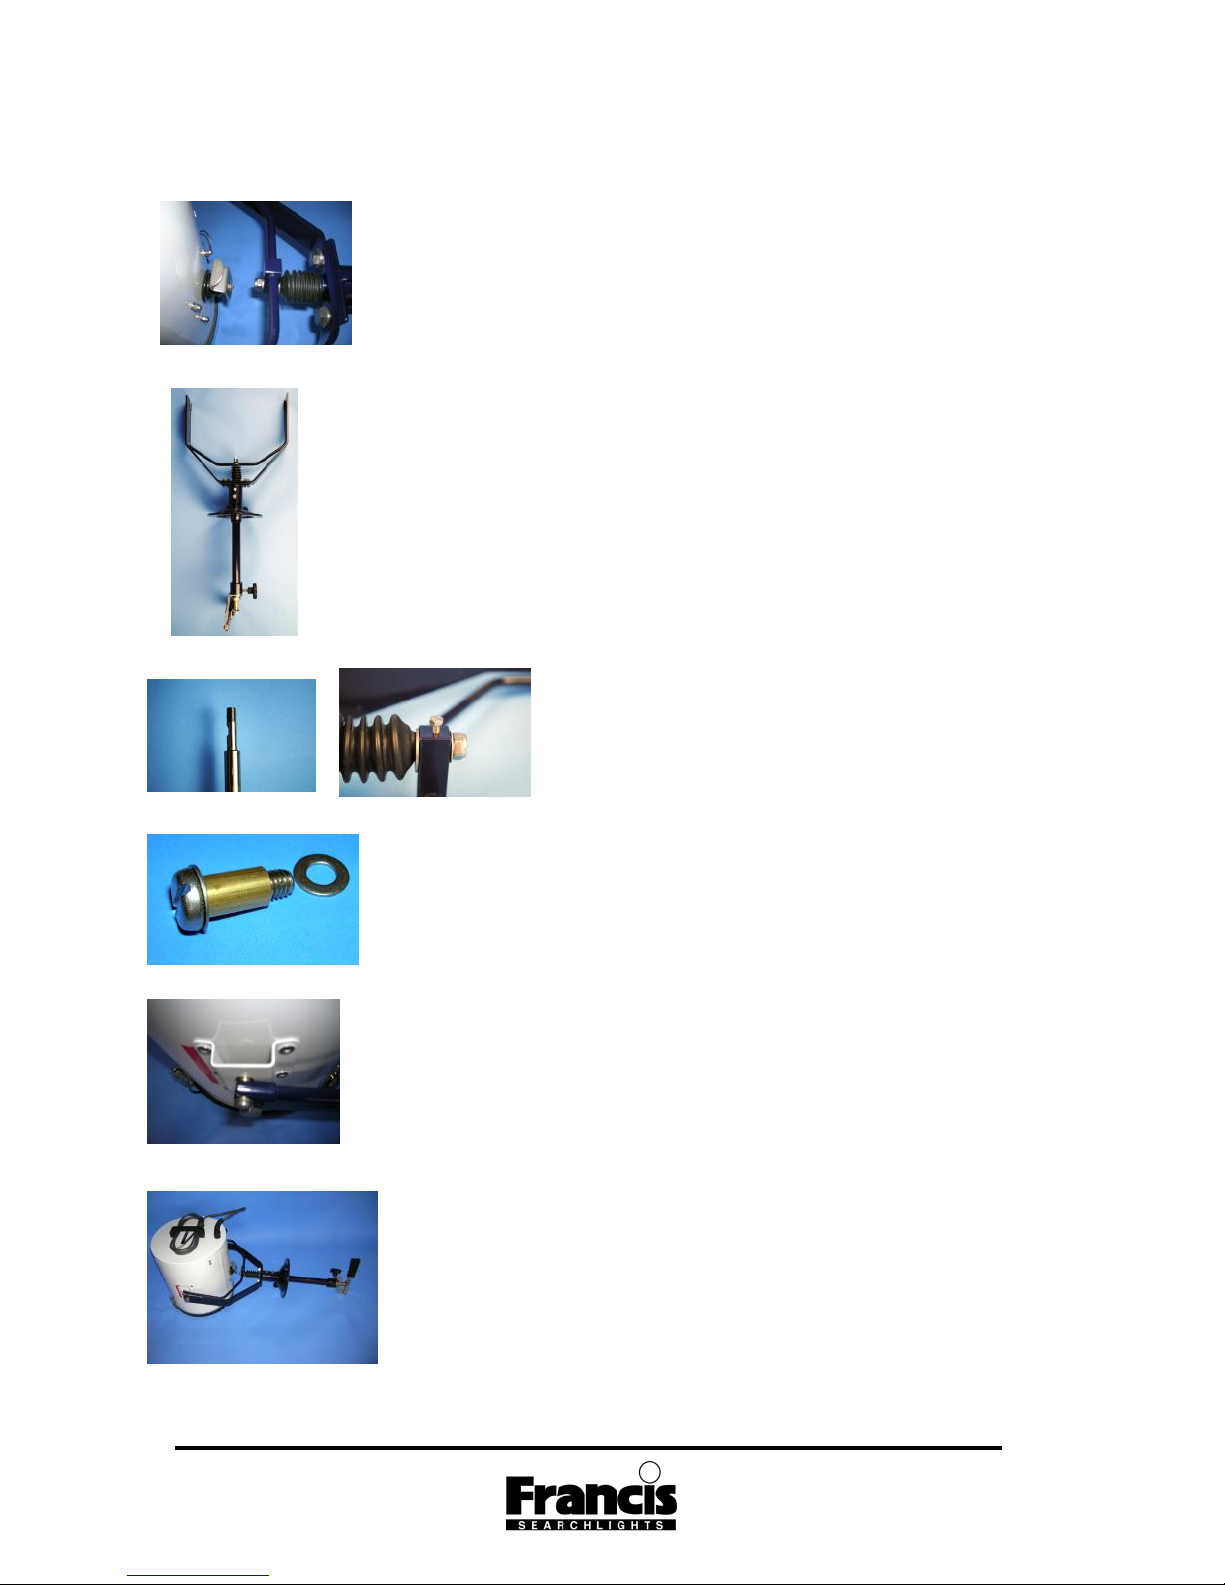
M12 plain washer.
U-Piece assembly.
M8 plain washer.
M8 nyloc nut.
Make sure the
mechanism is in this
position before
tightening the M5 x 8
hexagon screw onto the
flat of the push rod.
U-Piece fixings.
Fix the U-Piece
assembly using the
above fixings make
sure there is a plain
washer both sides of
the U-Piece bush.
Completed.
Make sure the
searchlight pans
and tilts
correctly.
For Pedestal Models:
Mark out and drill through cabin roof
using the template provided.
Remove the cable gland in the base
and replace with the blanking plug
supplied.
Secure the pedestal to the deck using
appropriate fixings and then mount
the searchlight to the pedestal and
secure using the fixings provided. A
drilled hole is also required in the
deck to allow for the connection to an
electrical supply. The searchlight is
supplied with 3 metres of supply cable
so that the installer can choose a
suitable connection point.
Page 8

L230 Searchlight
5
Power Supply Requirements
For safety purposes, only competent
personnel should perform the
electrical installation. All equipment
should be installed to current
Electrical Regulations and Standards.
In order to obtain maximum light
output from the searchlight, it is
essential that the full operating
voltage of the lamp fitted is applied to
the lampholder contacts.
Method of Electrical Connection
Disconnect the supply before working
on the electrical system.
The searchlight must be connected to
a fused electrical supply, using
suitably sized cable.
If the searchlight is positioned a
considerable distance from the
supply, provision must be made in the
cable size in order to overcome the
voltage drop. The following table
should be used for indication only.
12v 100w
Cable Size Max
1.5mm2 2 M
2.5mm
2
3 M
4mm
2
5 M
6mm
2
7 M
10mm
2
12 M
24v 150w 250w
Cable Size Max Max
1.5mm2 5 M 3 M
2.5mm
2
8 M 5 M
4mm
2
13 M 8 M
6mm
2
20 M 12 M
10mm
2
34 M 20 M
120v 300w
Cable Size Max
1.5mm2 13 M
2.5mm
2
21 M
4mm
2
32 M
6mm
2
50 M
10mm
2
84 M
230v 300w
Cable Size Max
1.5mm2 24 M
2.5mm
2
39 M
4mm
2
62 M
6mm
2
96 M
10mm
2
161 M
Whenever possible cable terminations
should be made below deck and with
approved terminal devices.
If a spare auxiliary fuse or circuit
breaker is not available, one of the
correct type and rating should be
fitted and connected to a positive
supply. It is advisable to locate a bus
bar or main connection and avoid any
direct connection to the supply.
When wiring the negative supply, the
direct connection to a battery or
supply, or metal hull/object, should be
avoided. It is advisable to use a
suitable commoning block or
connection.
For ease of use a single pole switch,
of the appropriate rating, should be
fitted in a convenient location. All
cable lengths should be kept to a
minimum.
Page 9

L230 Searchlight
6
Operating Instructions
This equipment is designed for use
out of doors, in free air.
Never place anything on, or cover, the
searchlight when in operation as this
may present a hazard.
The searchlight can be positioned
using the elevation and baseplate
lockwheels. When in the desired
position the lockwheels must be
securely fastened to prevent damage.
The beam of the searchlight can be
internally adjusted to give a variety of
`spreads'. Remove the front bezel
assembly and using the focussing
lever, the lampholder can now be
moved into the desired position,
towards the front for spot or the rear
for flood. When in the correct position
Re-fit the front bezel assembly.
The searchlight is fitted with a
breather unit assembly. This ensures
a steady airflow in order to prevent
any vacuum forming within the barrel.
Note: Ensure that the searchlight
is switched off and the lamp has
had time to cool down before
changing the beam.
Note: This product should not be
used for any purpose other than
for which it was designed. Any
modifications to the product
should not be undertaken before
consulting the manufacturer or
agent.
Setting to Work
Safe service in use necessitates
the strict observance of the
following precautions.
Any article fabricated from quartz or
glass is inherently fragile and care
should therefore be taken at all times
when handling lamps.
Eye protection must be worn when
handling lamps that have been
removed from their packaging
materials. The protective sleeve
should not be removed from the lamp
for safety reasons as there is a
remote possibility of the lamp
shattering violently, especially if it is
submitted to mechanical shock or
vibration.
Quartz lamps should not become
contaminated with oils, grease or
come into contact with skin.
When fitting the lamp:
Always isolate the equipment from
the supply before inserting a lamp;
Ensure the circuit is suitably
fused;
Ensure that the lamp is of the
recommended type and rating;
Check the lampholder is in good
condition. If the contacts show any
sign of corrosion the lampholder
should be replaced;
Check that the lampholder is in a
good dry condition. Never allow
water to collect in the lamp fitting
or come into contact with the
lamp.
Page 10

L230 Searchlight
7
To fit the lamp:
Remove the front bezel assembly
by operating the safety catch and
lifting the latch body;
Cut open one end of the protective
sleeve surrounding the lamp;
Using the sleeve to prevent the
fingers coming into contact with
the lamp, position the two pins
above the holes in the lampholder;
Gently push the lamp into the
lampholder and discard the
protective sleeve;
Position the front bezel assembly
centrally onto the searchlight and
fasten the claw latches, ensuring
the safety catch is engaged.
Testing
Upon correct installation and
connection to an electrical supply, the
equipment can be tested in order to
ensure its correct performance. This
work must be carried out by a
competent person with some
knowledge of electrical equipment.
Equipment required:
Multi-meter with leads;
Ammeter.
Using the equation P=VI the
approximate power output of the
equipment can be calculated in the
following way:
Using the multi-meter take a
voltage reading;
Using the Ammeter, take an amps
reading from the live cable to the
lamp;
Multiply these values together to
give an approximate wattage.
For Example:
Using a 240v 1000w Tungsten
Halogen lamp,
Voltage reading: 240v
Amps reading: 4 amps
Therefore:
Wattage = 240 x4 = 960 watts.
Fault Finding
If a fault occurs the following
procedures should be adopted. Any
work to be carried out should be
conducted by a competent person. A
multimeter should be used for fault
finding purposes.
Fault
Lamp Fails to light
Causes
1) Power not supplied
2) Fuse blown
3) Failed lamp
Remedy
1) Check voltage at supply/battery. If
necessary recharge battery. If
supply is not present fault is at
customer supply. If power is
present, see remedy 2.
2) Check fuse for visual failure. If
none noticeable check fuse for
continuity. If fuse found to be
faulty, replace with new part. If
found to be working correctly see
remedy 3.
Page 11

L230 Searchlight
8
3) Firstly, check supply at lampholder
connecting block (within
searchlight barrel). If supply
present, disconnect unit from
power supply before removing
lamp. If noticeable damage to
filament is present, the lamp will
have failed. The lamp can also be
checked using a multimeter for
continuity of the filament. Replace
new lamp following all precautions
mentioned previously and lamp
manufacturers’ instructions.
Maintenance and Servicing
Requirements
In order to prolong the service life and
performance of your searchlight, the
following maintenance guidelines are
recommended:
Maintenance checks should be
conducted before every voyage or
every three months;
Before checking, disconnect the
equipment from the supply;
Visually check the condition of the
equipment;
Any major or minor structural
damage or defect should be
rectified immediately;
After inspection it may be
necessary to clean the inside of
the searchlight. The following
procedure should be adhered to:
Remove the front bezel;
Clean the front glass inside
and out using a proprietary
glass cleaner or metal polish;
Clean the reflector, if required;
Ensure the lampholder is free
from corrosion or damage;
Check the earthing point for
conductivity;
Check lampholder assembly
for signs of damage or wear.
Upon completion of these
checks, the searchlight should
be tested for full working order
(approximately 15 minutes);
Every six months the external
movement mechanisms, i.e.
lockwheels, elevation and pan
mechanisms, may be lightly
lubricated.
Note:
It is advisable to check all seals
and gaskets for degradation. If
replacement is necessary the kit
numbers are quoted in the back of
the spares lists.
Page 12
L230 Searchlight 9
Spare Parts Lists
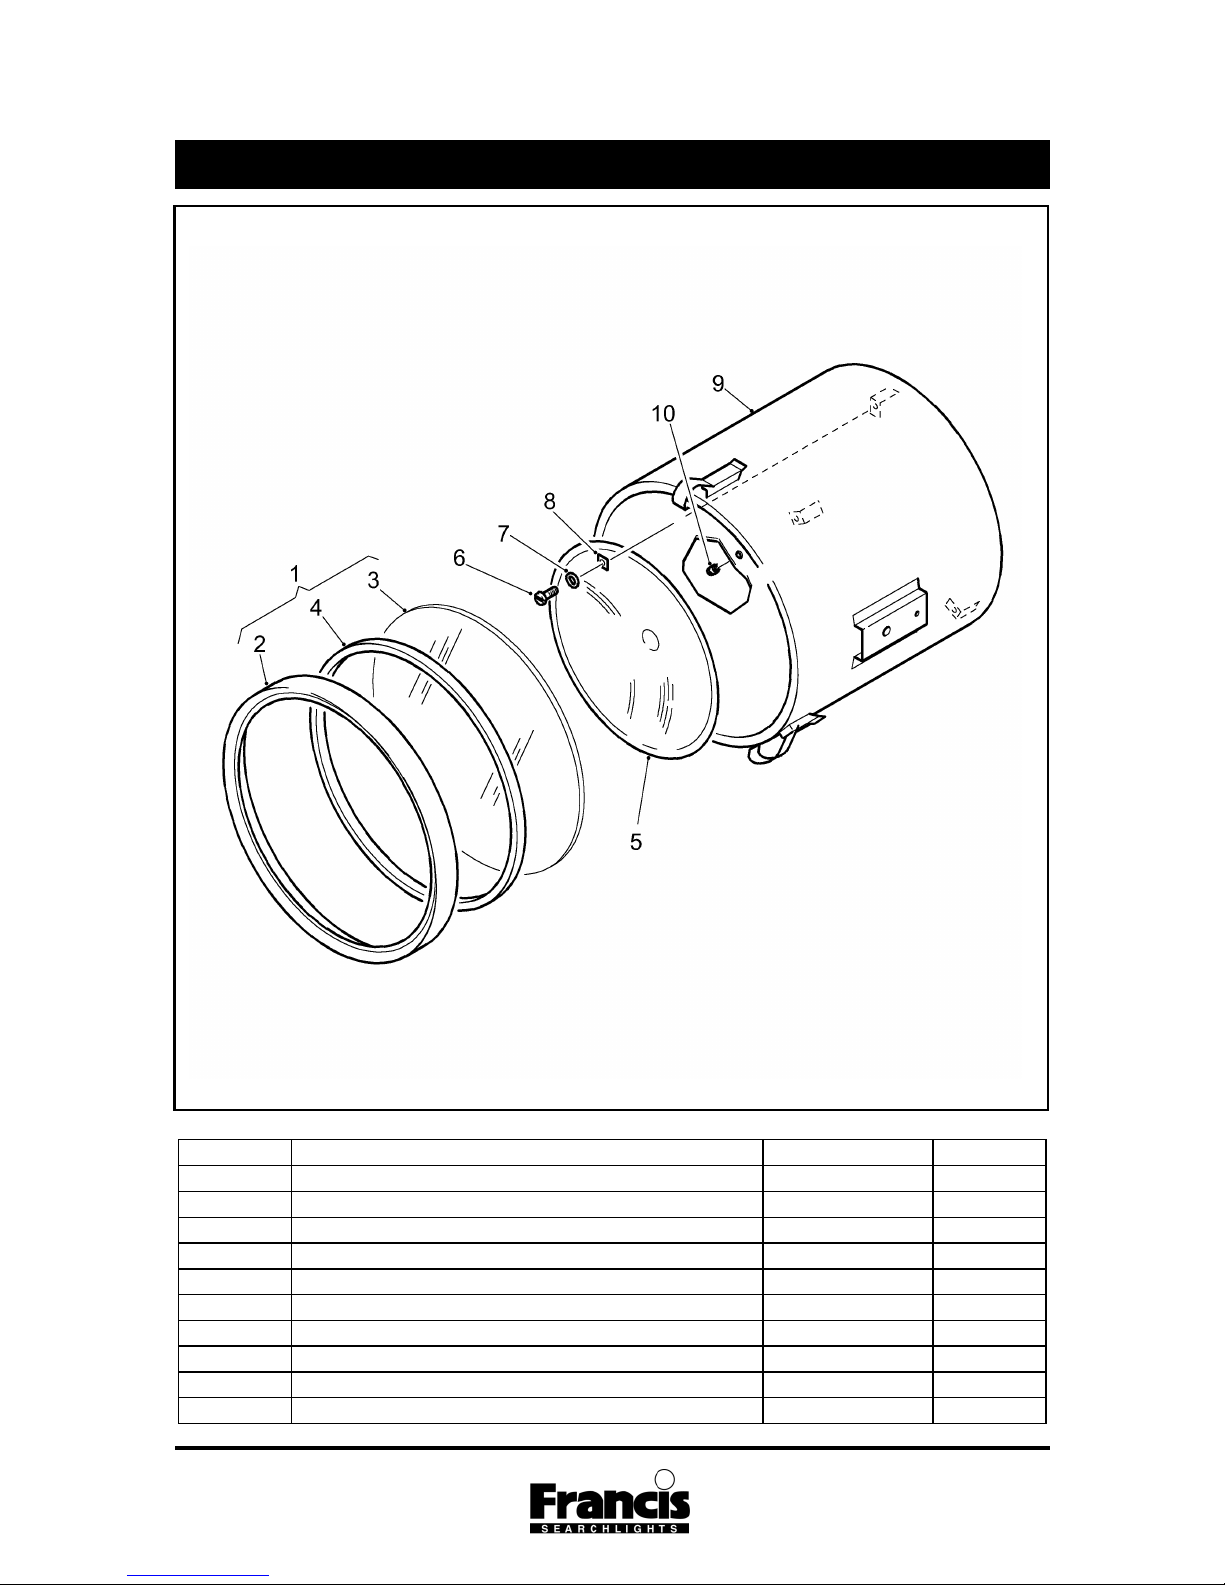
Barrel Assembly - C21147-01
Item No.
Description
Part No.
No. Off
1
Front Bezel Assembly
C21142-01
1
2
Front Bezel
C21119-79
1
3
Front Glass
C21140-00
1
4
Front Glass Gasket
C21141-00
1
5
Reflector
C21120-00
1
6
Screw M4 x 12 Pan Head
C10205-00
3
7
Washer M4 Spring
C08793-00
3
8
Mirror Clip
C20858-01
3
9
Barrel Sub-Assembly
C21146-01
1
10
Breather Unit Assembly
C22268-01
1
Page 13
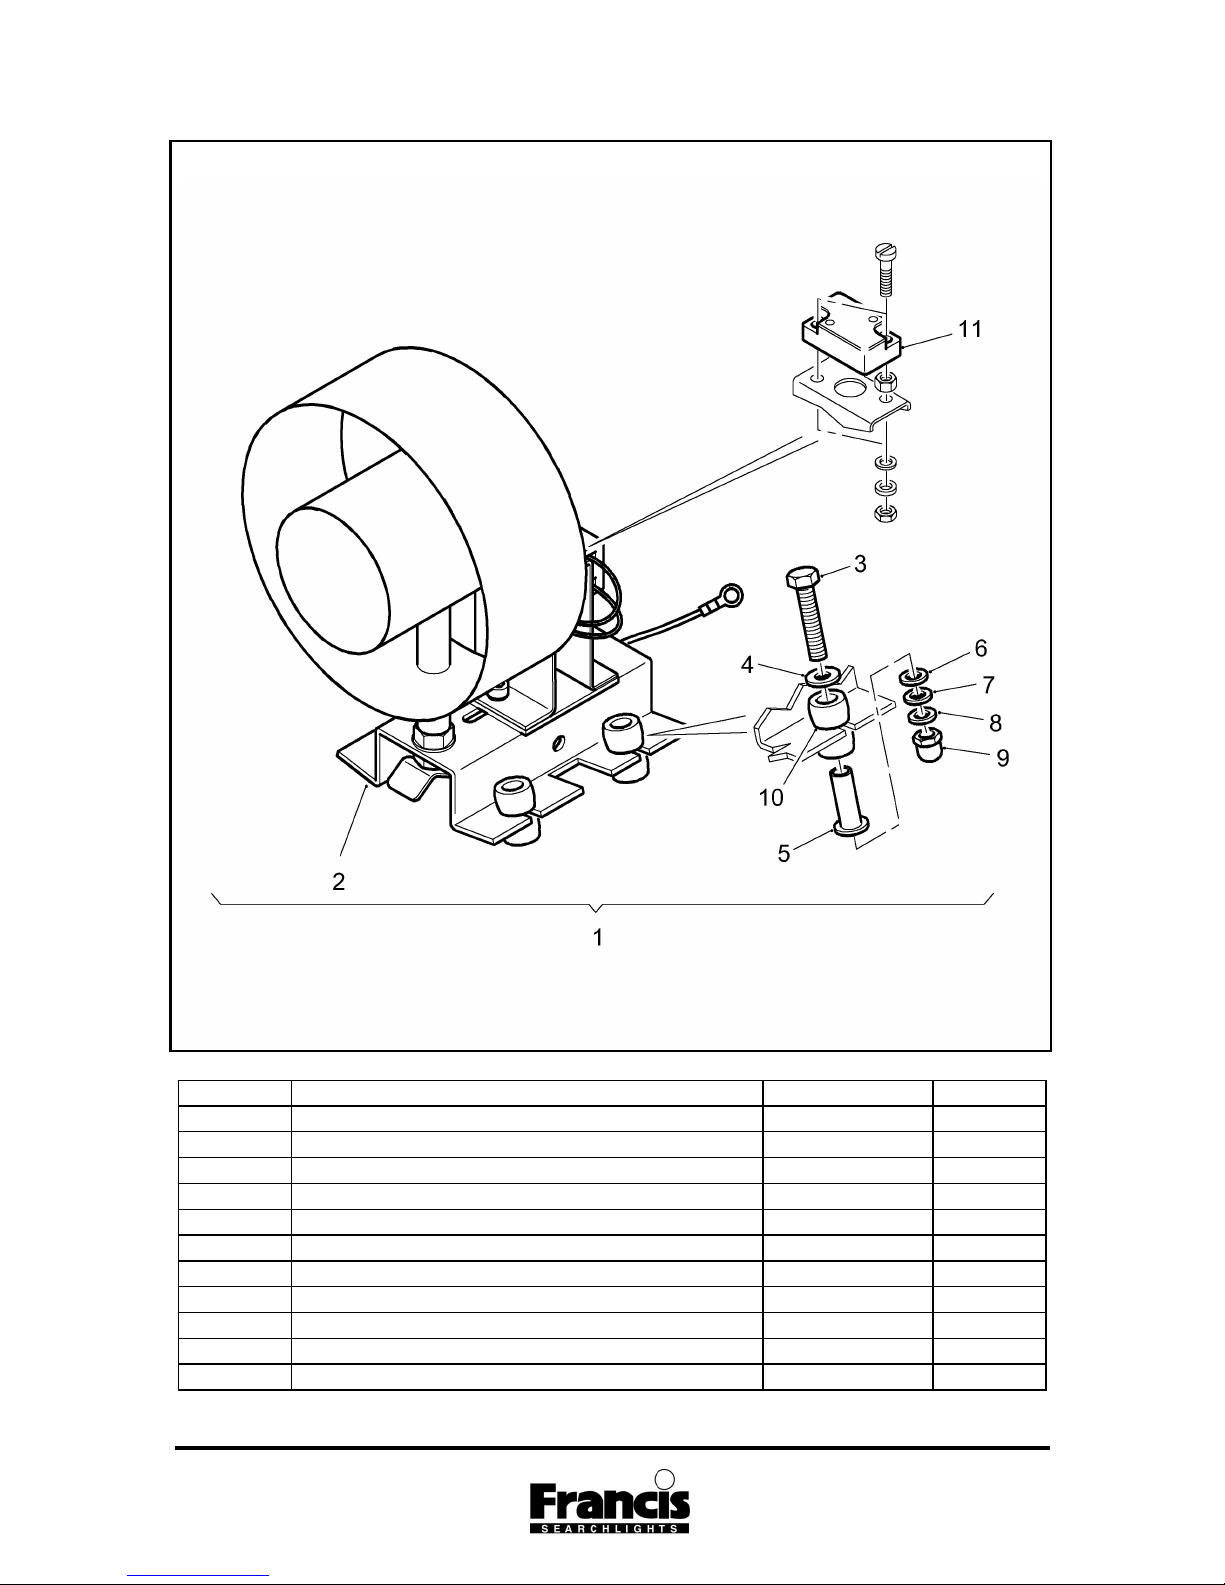
L230 Searchlight 10
Lampholder GX6.35 - C21143-01
Item No.
Description
Part No.
No. Off
1
Lite230 L/H Conversion Kit GX6.35
C21170-01
2
Lampholder Assembly
C21143-01
1
3
Screw M4 x 30 Hex. Head
C16764-00
4
4
Washer M4 x 12 O/D
C20637-00
4
5
A.V. Bush
C16762-01
4
6
Washer M4 Nylon
C15272-00
4
7
Washer M4 Plain
C04376-00
4
8
Washer M4 Spring
C08793-00
4
9
Nut M4 Dome Nut
C11183-00
4
10
A.V. Mount
C16761-00
4
11
Lampholder
C16878-00
1
Page 14
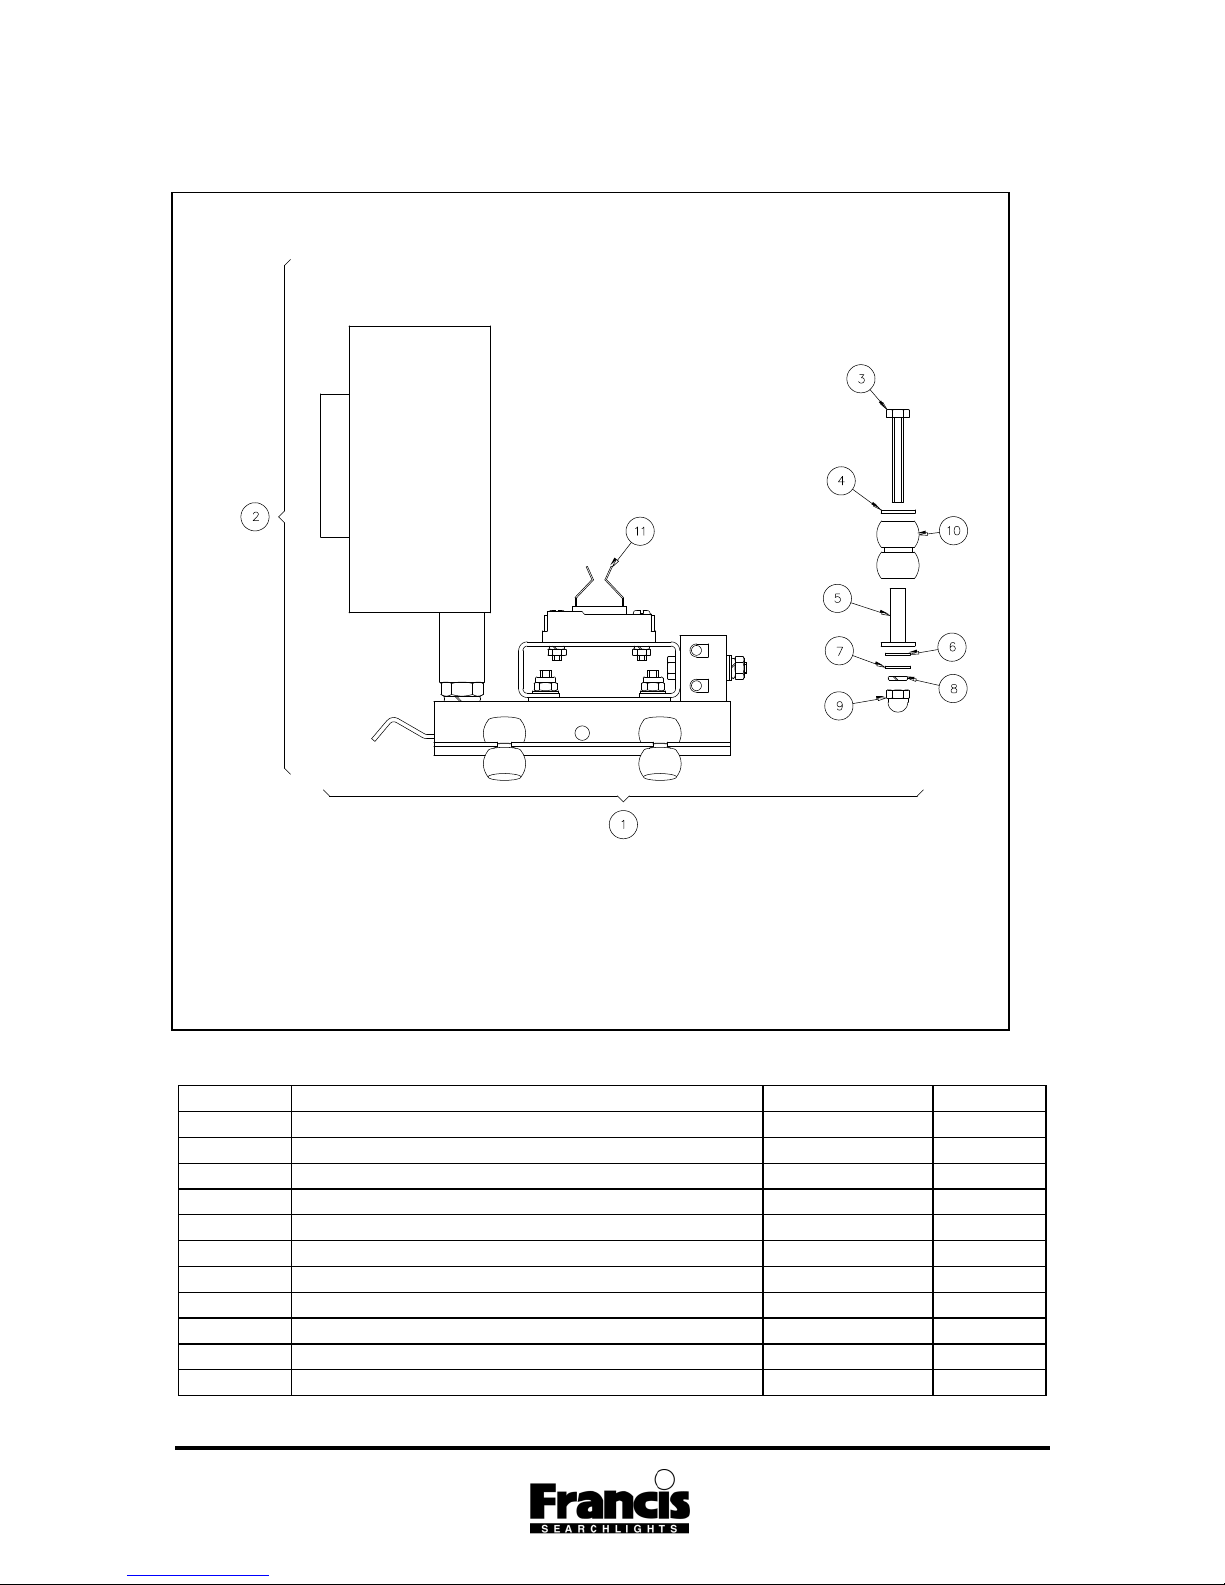
L230 Searchlight 11
Lampholder GY9.5 – C23815-01
Item No.
Description
Part No.
No. Off
1
Lite230 L/H Conversion Kit GY9.5
C23817-01
2
Lampholder Assembly
C23815-01
1
3
Screw M4 x 30 Hex. Head
C16764-00
4
4
Washer M4 x 12 O/D
C20637-00
4
5
A.V. Bush
C16762-01
4
6
Washer M4 Nylon
C15272-00
4
7
Washer M4 Plain
C04376-00
4
8
Washer M4 Spring
C08793-00
4
9
Nut M4 Dome Nut
C11183-00
4
10
A.V. Mount
C16761-00
4
11
Lampholder
C20262-00
1
Page 15
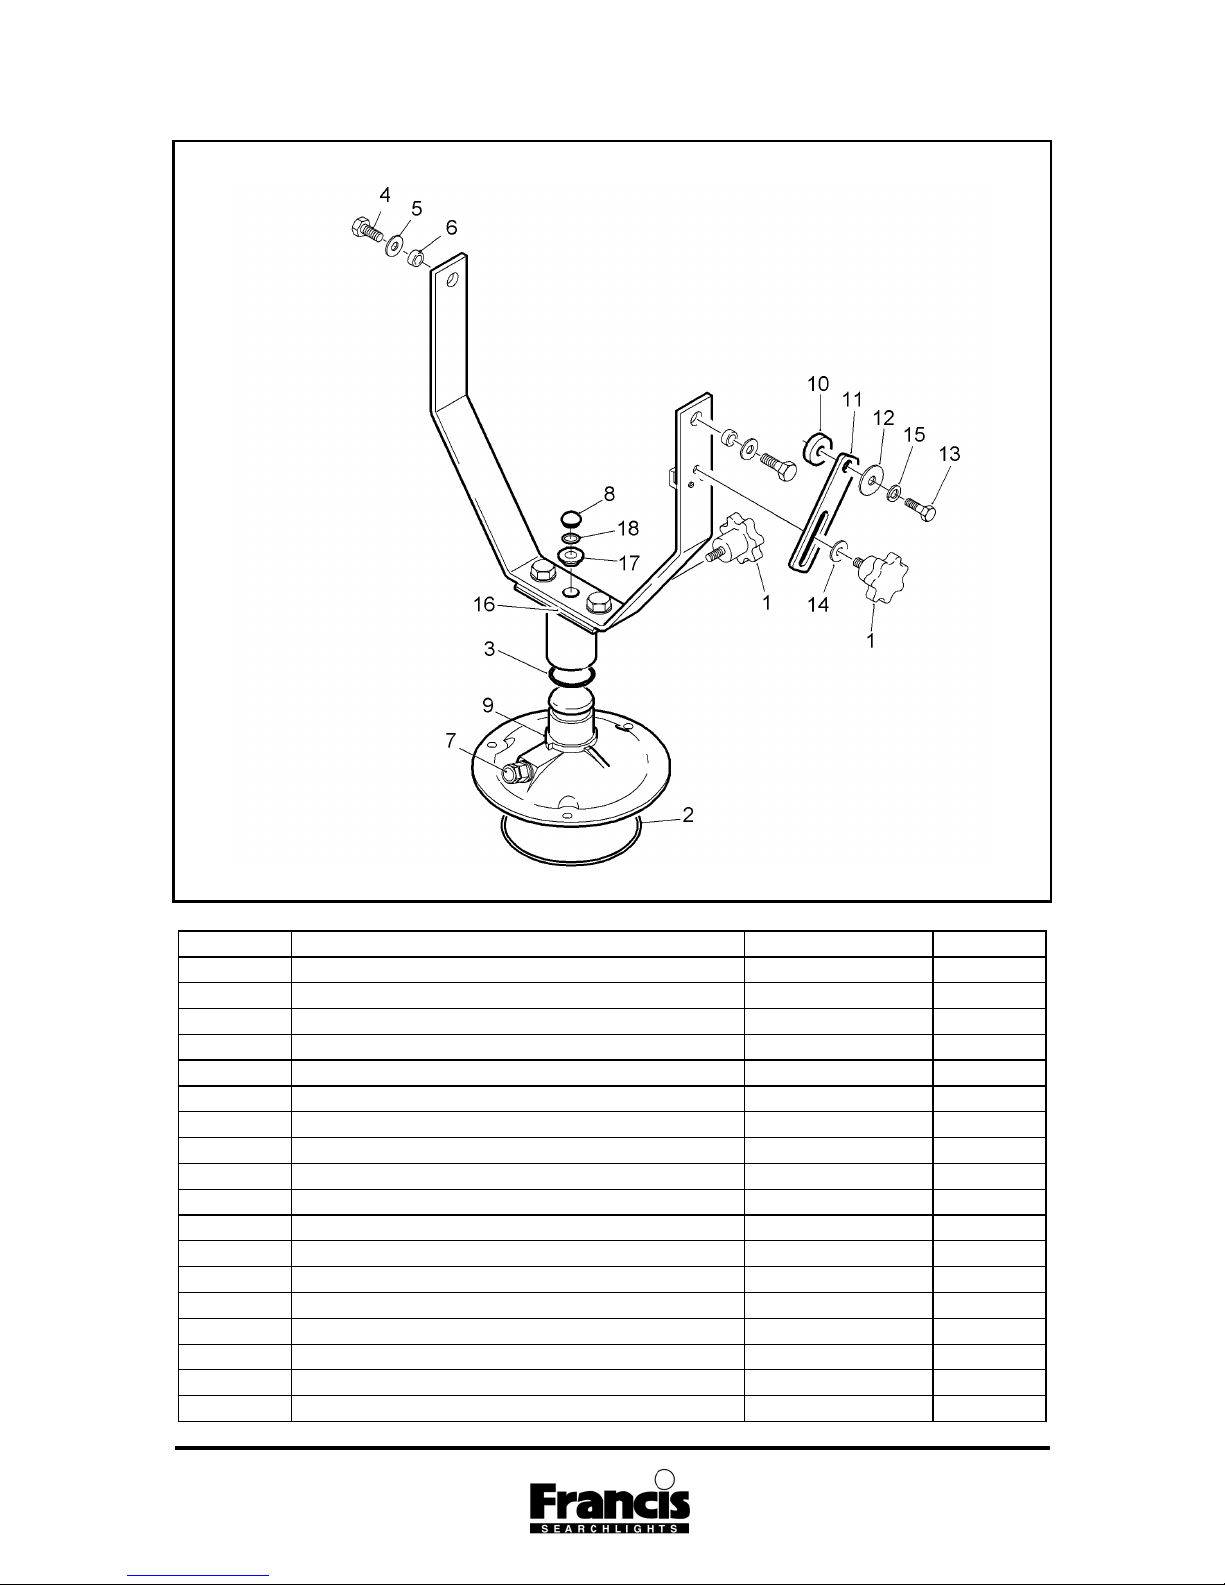
L230 Searchlight 12
Deck Mount - C21166-01
Item No.
Description
Part No.
No. Off
1
Lockwheel Assembly
C11025-01
2
2
`O' Ring Seal Base
C10168-00
1
3
`O' Ring Seal Spigot
C10169-00
1
4
Screw M10 x 20 Hex. Head
C08094-00
2
5
Washer M10 Plain
C08091-00
2
6
Trunnion Spacer
C22263-01
2
7
Cable Gland
C10158-00
1
8
Blanking Plug
C20684-00
1
9
Floating Stop
C08929-79
1
10
Elevation Bush
C20595-79
1
11
Elevation Link
C20594-79
1
12
Elevation Washer
C20596-79
1
13
Screw M6 x 25 Hex. Head
C09580-00
1
14
Washer M8 Plain
C06999-00
1
15
Washer M6 Spring
C10554-00
1
16
Push Rod Seal
C22072-00
1
17
Bellows Bottom Bush
C20269-01
1
18
‘O’ Ring
C21967-00
1
Page 16
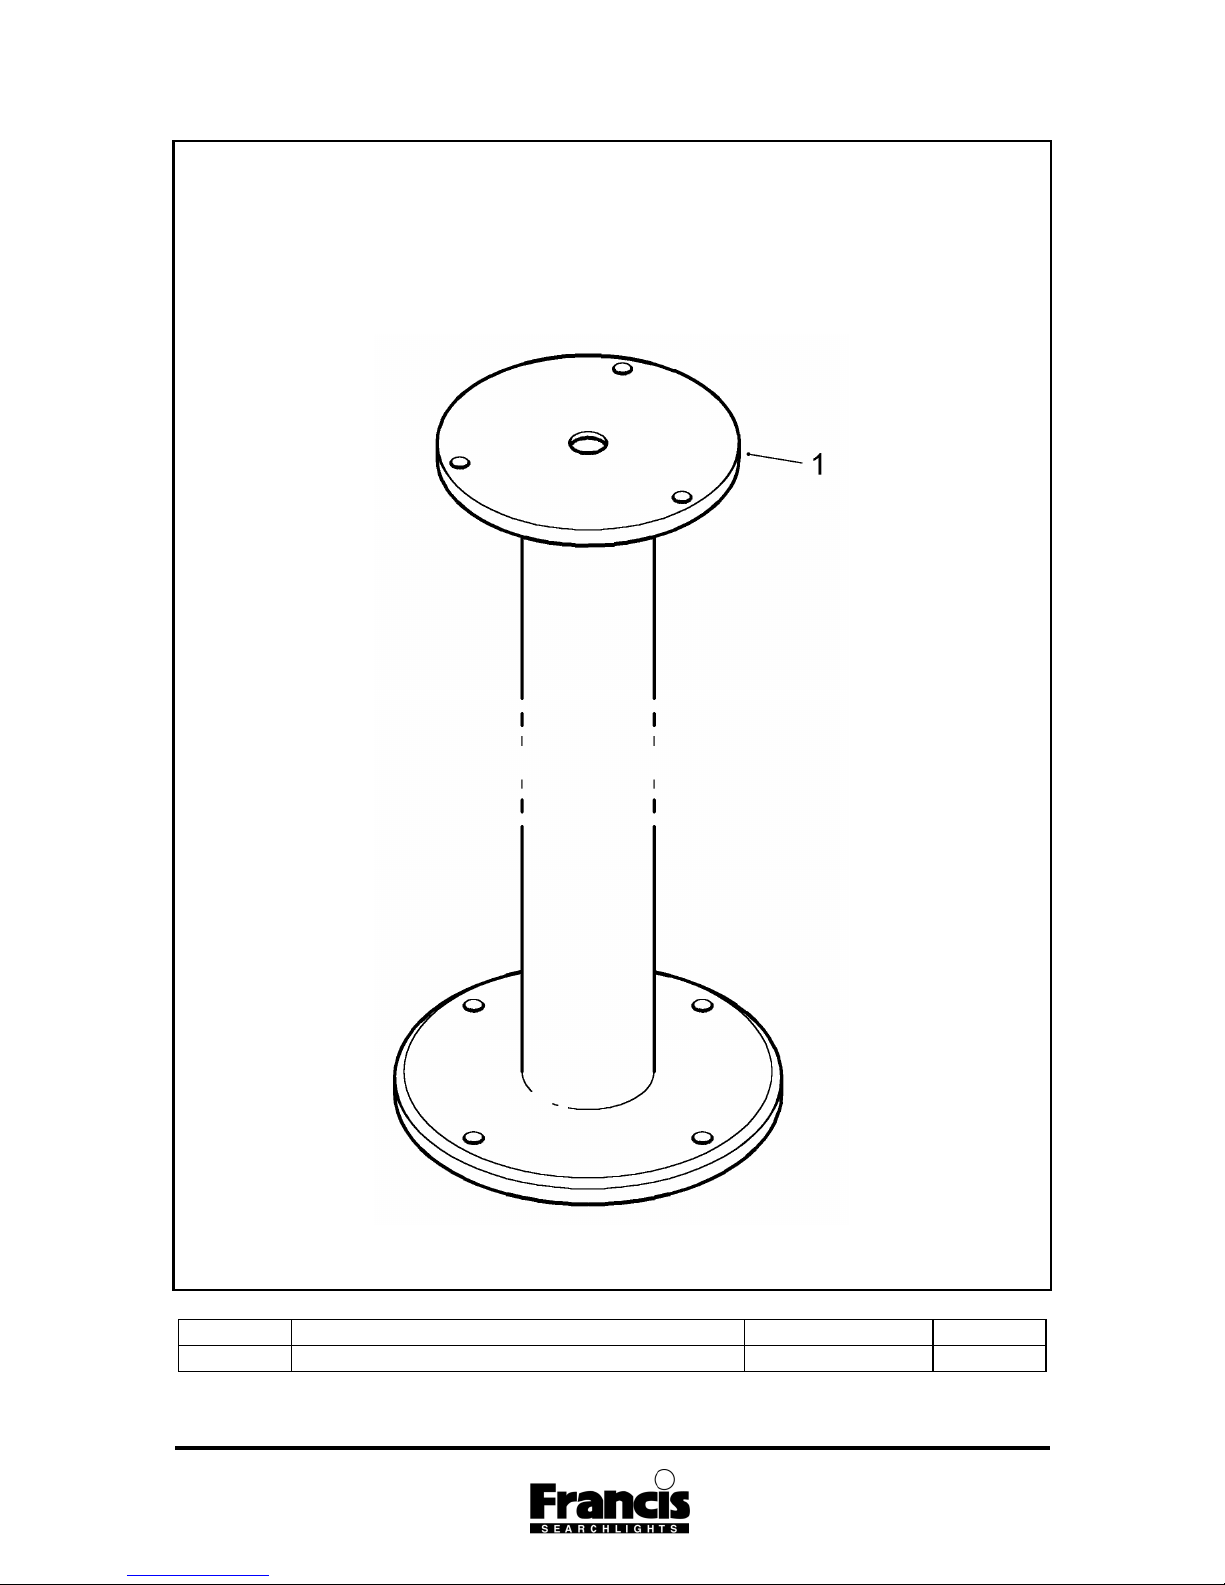
L230 Searchlight 13
Pedestal Assembly - C20719-79
Item No.
Description
Part No.
No. Off
1
Pedestal Assembly
C20719-01
1
Page 17
L230 Searchlight 14
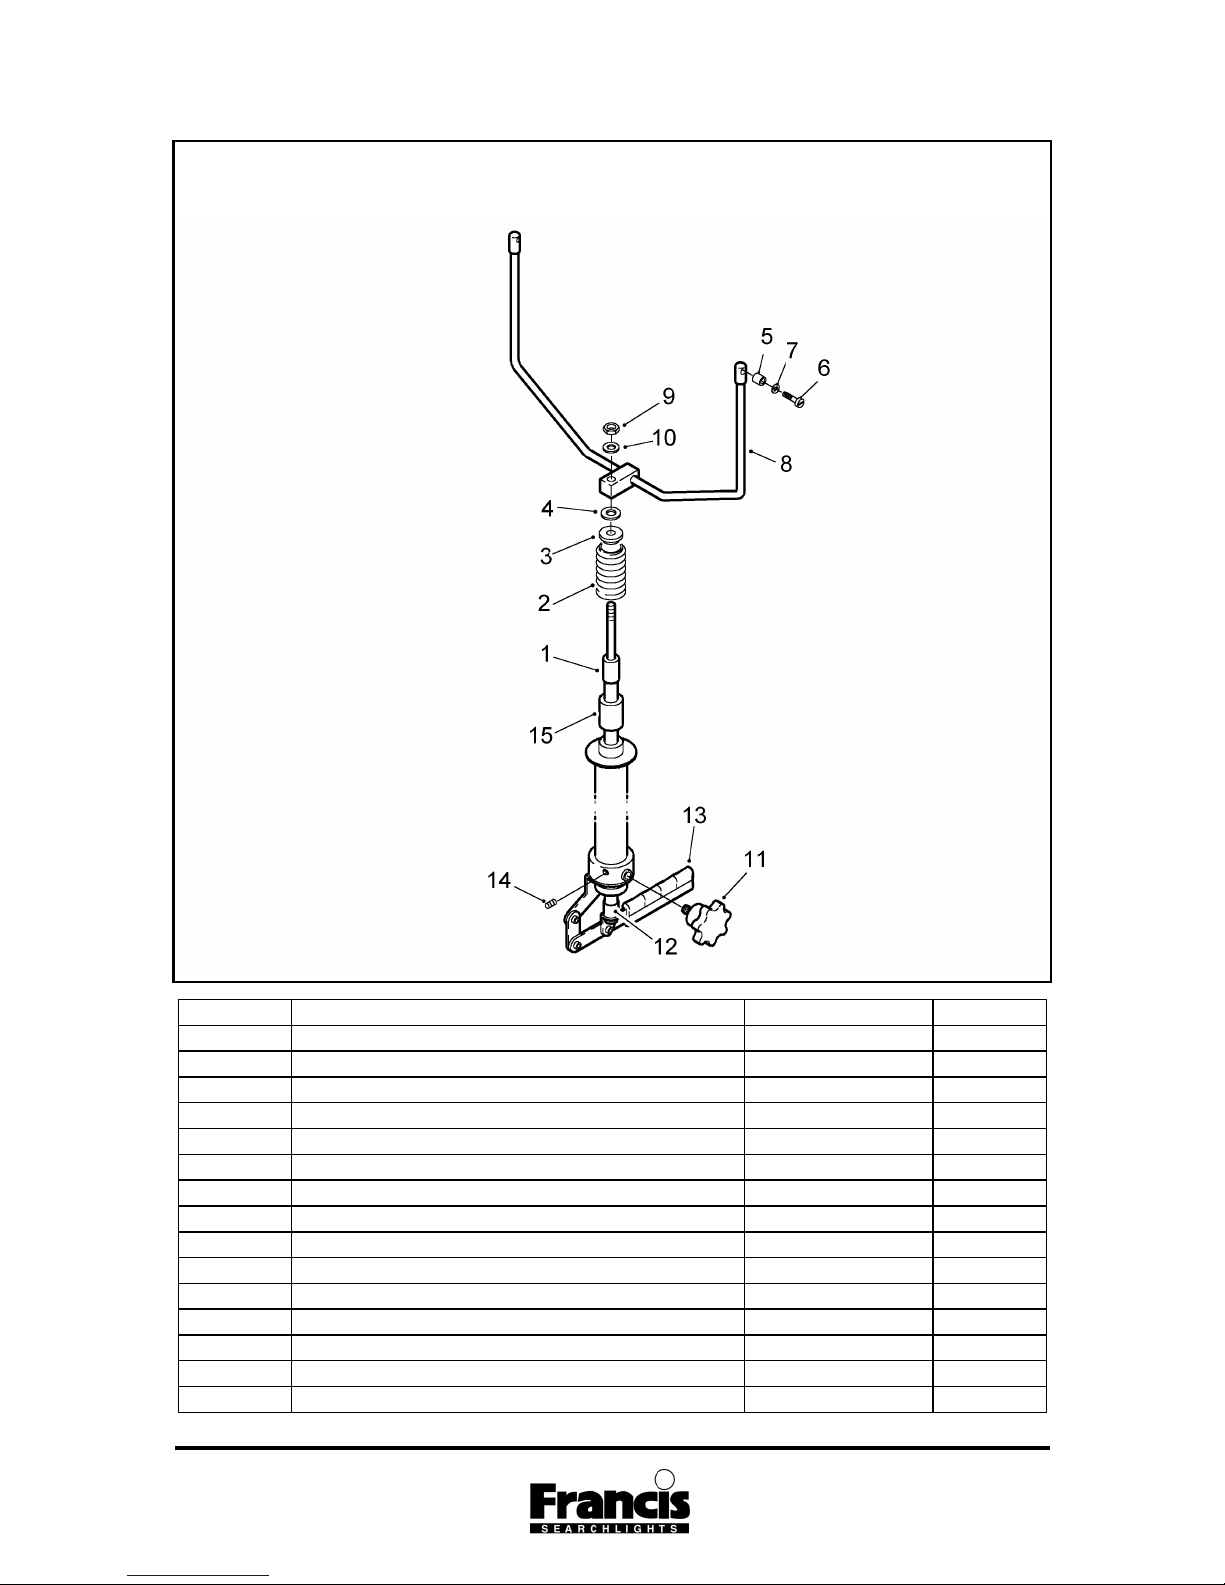
Cabin Trainer Mount Conversion - C21168-01
Cabin Pedestal Trainer Mount Conversion - C21169-01
Item No.
Description
Part No.
No. Off
1
Push Rod Top Bush
C20586-01
1
2
Bellows
C20281-00
1
3
Bellows Top Bush
C20270-01
1
4
Washer M12 Plain
C08370-00
1
5
U-Piece Bush
C08932-01
2
6
Screw M6 x 20 Pan Head
C10174-00
2
7
Washer M6 Plain
C06997-00
4
8
U-Piece Assembly
C21167-79
1
9
Nut M8 Nyloc
C12354-00
1
10
Washer M8 Plain
C06999-00
1
11
Lockwheel Assembly
C20745-01
1
12
Push Rod Bottom Bush
C20587-01
1
13
Handle
C20549-00
1
14
Grubscrew
C06401-00
3
15
Crutch Base Sleeve
C20732-01
1
Page 18

L230 Searchlight 15
Seal Kits
Description
Part No.
Deck Gasket Seal Kit
C21281-01
Cabin Gasket Seal Kit
C21282-01
Deck Pedestal Gasket Seal Kit
C21283-01
Cabin Pedestal Gasket Seal Kit
C21284-01
Page 19

L230 Searchlight 16
Spare Parts Ordering
In order to prolong the life and
performance of your searchlight it is
recommended that only Francis
Searchlights Ltd. spare parts are
specified. Reference should be
made to the relevant spares section
in this manual. The part number
should be quoted at all times so that
a price and delivery time can be
supplied.
Spare parts or accessories can be
obtained from your distributor/agent
or directly from the manufacturer.
Parts Disposal
It is essential that all parts are
disposed of correctly and safely to
ensure no risk to other personnel.
When disposing of lamps the
procedures outlined in this manual
and the lamp manufacturer’s leaflet
must be adhered to.
The reworking or modification of
parts should not be undertaken
before consulting the manufacturer
or agent.
Sales and Service
For sales and service please
contact your agent/distributor or
contact the manufacturer direct at:
Francis Searchlights Limited
Union Road
Bolton
BL2 2HJ
England
Tel: +44 (0) 1204 558960
Fax: +44 (0) 1204 558979
E-mail: [email protected]
http://www.francis.co.uk
Guarantee
This product is covered with a 12
month warranty. Any claim whilst
under warranty should be
addressed to the Quality Manager
at Francis Searchlights Ltd.
Page 20

L230 Searchlight 17
Lite 230 Booklet Part Number C21285-00
Issue 14 October 2016
Agent/Distributor Stamp
The manufacturer reserves the right to change the information contained within
this booklet without prior notice.
Cert No. FM 20940
(ISO 9001:2008)
FRANCIS SEARCHLIGHTS LTD
UNION ROAD, BOLTON, BL2 2HJ,
ENGLAND
Tel: +44 (0) 1204 558960
Fax: +44 (0) 1204 558979
http://www.francis.co.uk
 Loading...