


Operating Guide IN

Frama Matrix F2
2
Operating guide for
Matrix F2
All rights reserved. Frama Group.

Frama Matrix F2
3
INTRODUCTION
Thank you for deciding to purchase the innovative Frama Matrix F2.
The following information in this operating guide is intended as support when you install and operate your Frama
Matrix F2. It also shows how you can easily make settings yourself. With this in mind, please read this guide before
you put your Frama Matrix F2 into service.
Modem approval
In accordance with the Commission Decision 1999/303/EC, this unit has been approved throughout Europe for
connection to the public telephone network as single terminal equipment. In view of the differences existing
between the public telephone networks of various countries, this approval in itself does not provide an absolute
guarantee of proper functioning of the unit at every network terminal point.
If any problems arise during operation, please first contact your supplier or maintenance provider.
Safety precautions / accident prevention
1. Read the operating guide completely and adhere to the instructions in it.
2. Before starting the franking machine the first time, it must be properly registered with the post office. When
doing so, keep to the instructions given by your local Frama sales organization.
3. Each franking mark may be used only once. The Post Office regards repeated use as a punishable offence
and a violation of the general terms and conditions of business.
4. Test franking marks or sample franking impressions are not regarded as valid by the Post Office and items
bearing them may not, therefore, be mailed.
5. Inkjet cassettes and similar printing consumables must be regularly renewed and / or serviced to ensure
high-quality printing.
6. The use of fibrous and other unsuitable envelopes can result in blurred or smeared marks and thus to
illegibility of the franking mark. In view of this, the use of envelopes of this kind cannot be agreed to.
7. In buildings in which the franking system is plugged into the power supply network, a current overload
protector must be fitted.
8. Before installing the system, check the cable (supply cord) and plug. Have damage repaired only by an
electrical specialist.
9. Insert the plug into a mains socket only when the franking machine housing is closed.
10. Always run the mains cable (power cord) away at the back of the franking machine and make sure that no
risk exists of it being damaged or someone tripping over it.
11. Never pull the plug out of the socket by the mains cable (power cord).
12. Never hold any foreign objects in the printing unit (risk of damage).
13. Never put your hand into the printing unit. Your fingers could be injured if the franking machine is switched
on. Be careful if you are wearing long hair, a tie, etc.
14. Please remove the inkjet cassette if you have to transport the franking system somewhere.
15. Keep children away from the franking system.
16. Have franking machine repairs carried out only by a technician from your local Frama sales organization.
Never open the franking system yourself under any circumstances.
17. Never put any hot objects (cigarettes, etc.) onto the housing. Make sure that no moisture can infiltrate into
the machine or the power supply unit.
18. Avoid using aggressive cleaning agents or detergents when cleaning the franking system. Instead, use a
slightly damp cleaning cloth.

Frama Matrix F2
4
Installation notes
Your Frama Matrix F2 was manufactured for use in normal conditions. Please remember: Today’s furniture is
coated with a confusing variety of paints, lacquers and synthetic materials. In view of this, it is quite possible that
some of these materials contain constituents which can attack or soften the plastic feet of our equipment. If
changed in this way by foreign substances, the feet of our equipment can mark your furniture. Frama is unable to
accept any liability in this respect for obvious reasons. With this in mind, use a non-slip underlay.

Frama Matrix F2
5
List of contents
INTRODUCTION ............................................................................................................................................ 3
SAFETY PRECAUTIONS / ACCIDENT PREVENTION ................................................................................................................................... 3
INSTALLATION NOTES .......................................................................................................................................................................................... 4
1. ASSEMBLING AND CONNECTING FRAMA MATRIX F2 ...................................................................... 7
1.1. INSTALLING MATRIX F2 ............................................................................................................................................................................... 8
1.2. CONNECTING MODEM CABLE .................................................................................................................................................................. 8
1.3. CONNECTING SCALES .................................................................................................................................................................................. 8
1.4. CONNECTING SUPPLY UNIT ...................................................................................................................................................................... 8
2. FRAMAONLINE2 ....................................................................................................................................... 9
2.1. ACTIVATING MATRIX F2 ON FRAMAONLINE2 SYSTEM ................................................................................................................. 9
2.2. FRAMAONLINE2 NOTES ON CONNECTION PROBLEMS ............................................................................................................ 11
2.3. LOADING POSTAGE CREDIT .................................................................................................................................................................... 13
3. FRAMA MATRIX F2 PRINTING SYSTEM AND INKJET CASSETTE .................................................... 15
3.1. PUTTING INKJET CASSETTE IN PLACE ................................................................................................................................................. 15
3.2. SETTING FRANKING MARK ...................................................................................................................................................................... 16
4. WORKING WITH FRAMA MATRIX F2 AND SCALES .......................................................................... 18
4.1. FRAMA MATRIX F2 DISPLAY DESIGN .................................................................................................................................................. 18
4.2. ONETOUCH .................................................................................................................................................................................................... 19
4.3. FRANKING ....................................................................................................................................................................................................... 20
4.4. INSERTING AND FRANKING LETTER .................................................................................................................................................... 21
4.5. DETERMINING POSTAL RATES AND POSTAGE (FRANKING POSTAL PRODUCTS) .......................................................... 22
4.6. PRESORTING MAIL USING SCALES ...................................................................................................................................................... 25
4.7. TARING SCALES ............................................................................................................................................................................................ 25
4.8. SWITCHING OFF FRAMA MATRIX F2................................................................................................................................................... 25
5. UTILIZING EXTRA FUNCTIONS............................................................................................................. 26
5.1. SELECTING ADVERTISING MESSAGES ................................................................................................................................................. 26
5.2. FRAMA MATRIX F2 MEMORY BOXES .................................................................................................................................................. 29
5.3. FRAMA MATRIX F2 PRINT INFORMATION ....................................................................................................................................... 30
6. COUNTER READINGS AND COST CENTRES ....................................................................................... 31
6.1. COST CENTRES .............................................................................................................................................................................................. 31
6.2. COUNTER READINGS ................................................................................................................................................................................. 31
7. FRAMA MATRIX F2 PRINTING SYSTEM.............................................................................................. 32
7.1. CHANGING INKJET CASSETTE ................................................................................................................................................................ 32
7.2. CLEANING PRINTING SYSTEM ............................................................................................................................................................... 32
7.3. NOZZLE TEST ................................................................................................................................................................................................. 34
8. ADMINISTRATION MODE (SETTINGS) ............................................................................................... 35
8.1. MAINTAINING BASIC SETTINGS AND COST CENTRES ................................................................................................................ 35

Frama Matrix F2
6
9. DISPLAY MESSAGES AND TECHNICAL DATA .................................................................................... 39
9.1. FRAMAONLINE2 MESSAGES ................................................................................................................................................................... 39
9.2. FRAMA SCALES MESSAGES ..................................................................................................................................................................... 40
9.3. FRAMA MATRIX F2, POSTAGE MESSAGES ........................................................................................................................................ 41
9.4. FRAMA MATRIX F2, INK SYSTEM MESSAGES .................................................................................................................................. 41
10. FRAMA MATRIX F2 TECHNICAL DATA ............................................................................................. 42
10.1. STORAGE AND OPERATING CONDITIONS ..................................................................................................................................... 42
10.2. RECYCLING AND DISPOSAL .................................................................................................................................................................. 42
CE DECLARATION OF CONFORMITY ....................................................................................................... 43

Frama Matrix F2
7
1. Assembling and connecting Frama Matrix F2
The following information given in this whole chapter is for reference only. Your Frama
franking machine will be installed by a service engineer.
Unpack your Matrix F2 from its box. You will find all cables and accessories that are necessary for you
to assemble and immediately use your franking system in the box.
Under separate cover, you will have received the required 6-digit activation code. Please also keep this
information ready at hand.
In the box, you will find:
- Frama Matrix F2 (1)
- Ink-jet cassette (2)
- Power Supply unit (3)
- Operating guide (4)
- Letter scales and cables for scales (optional) (5)
- Modem cable (6)
- Letter catcher (not illustrated)
- Optional acrylic scale stand (not illustrated)

Frama Matrix F2
8
1.1. Installing Matrix F2
Install your Frama Matrix F2 in a place near a mains socket and a direct fax / modem telephone
connection. Select a place without direct sunshine and no heavy vibration. Take all parts out of the
box.
1.2. Connecting modem cable
Connect the modem cable (small square plug) with the Matrix F2 at the
socket (jack) marked with the telephone symbol.
Afterwards, connect the other end of the telephone cable with the
telephone point.
When starting up the first time, we recommend that you use an existing analogue fax connection.
1.3. Connecting scales
A weighing scale that is included with the system must be connected in
order for the system to function. Unpack the scales and, if required, the
scales support available as an accessory at additional cost. Position the
scales next to your Matrix F2 or on the scales support.
Connect the scales cable to the scales connection, which is also at the back of the Matrix F2 and
marked with a scales symbol.
1.4. Connecting supply unit
Pick up the power supply unit. Connect the
supply unit with the supplied adaptor (mains
plug).
Then, connect the cable with the small plug to
the Matrix F2 (see photo).
Make sure the plug fits into place properly. This
is the case when the cable is flat against the
housing.
Check that you have closed the top cover flap
on the Matrix F2. Check whether the scales are free.
Connect the supply unit to the mains socket.
Caution! It can take up to 30 seconds for the Matrix F2 to switch on. During this time, the Frama
F2 will not accept any input from you.

Frama Matrix F2
9
2. FramaOnline2
The following information given in this whole chapter is for reference only. Your Frama
franking machine will be installed by a service engineer.
Loading your Frama Matrix F2 with new postage (credit) takes place through the telephone line and a
built-in analog modem. At the same time, postal rates can be compared / updated and other postal
data is transmitted to the Post Office. This process is convenient and gives you the assurance of always
having postage and the latest postal rates (optional) at your disposal.
In any event, you require your PIN for the Administration mode. Protect your PINs from misuse by
keeping them in a safe place.
2.1. Activating Matrix F2 on FramaOnline2 system
Check whether your Frama Matrix F2 is properly plugged into the telephone socket. If necessary, read
the chapter 1.3 “Connection and start-up“ again. The franking system has to be connected to the
telephone socket only when linking with the FramaOnline2 system and re-crediting.
We have preconfigured your Frama Matrix F2 to suit the most used telephone systems. Sometimes
though, it will be necessary for small changes to be made. The most frequent setting will be the dialing
code (official prefix for an outside line) to obtain the free line signal. Please refere to page 11 in this
respect. In the as-delivered state, NO dialing code (official prefix for an outside line) has been
configured. (i.e. 9 for outside line).
The following steps assume that you have correctly entered the dialling code (official prefix for an
outside line).
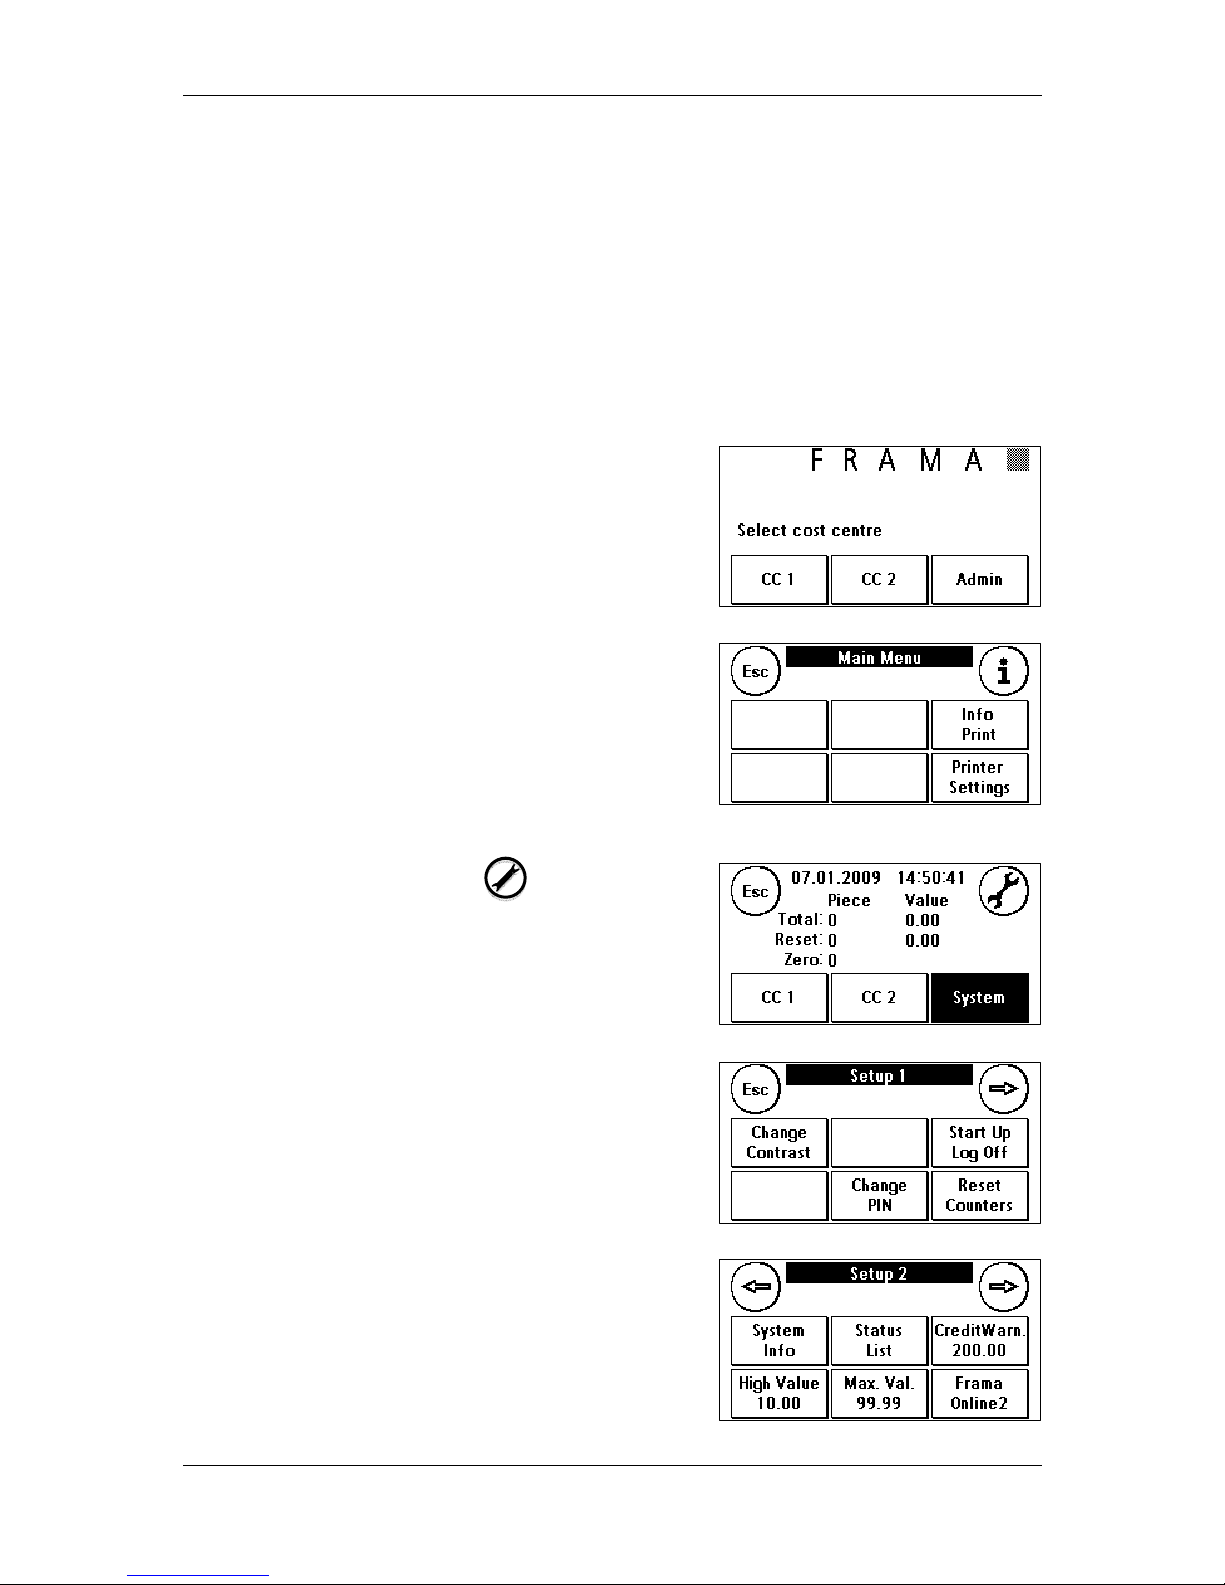
1. Press “Admin” in the cost centre selection display.
2. Enter your PIN. Then, press the ENTER key to get into the
administration mode.
3.
4. Press “
”.
5. Press the “Tool” key (symbol).
Frama Matrix F2
10
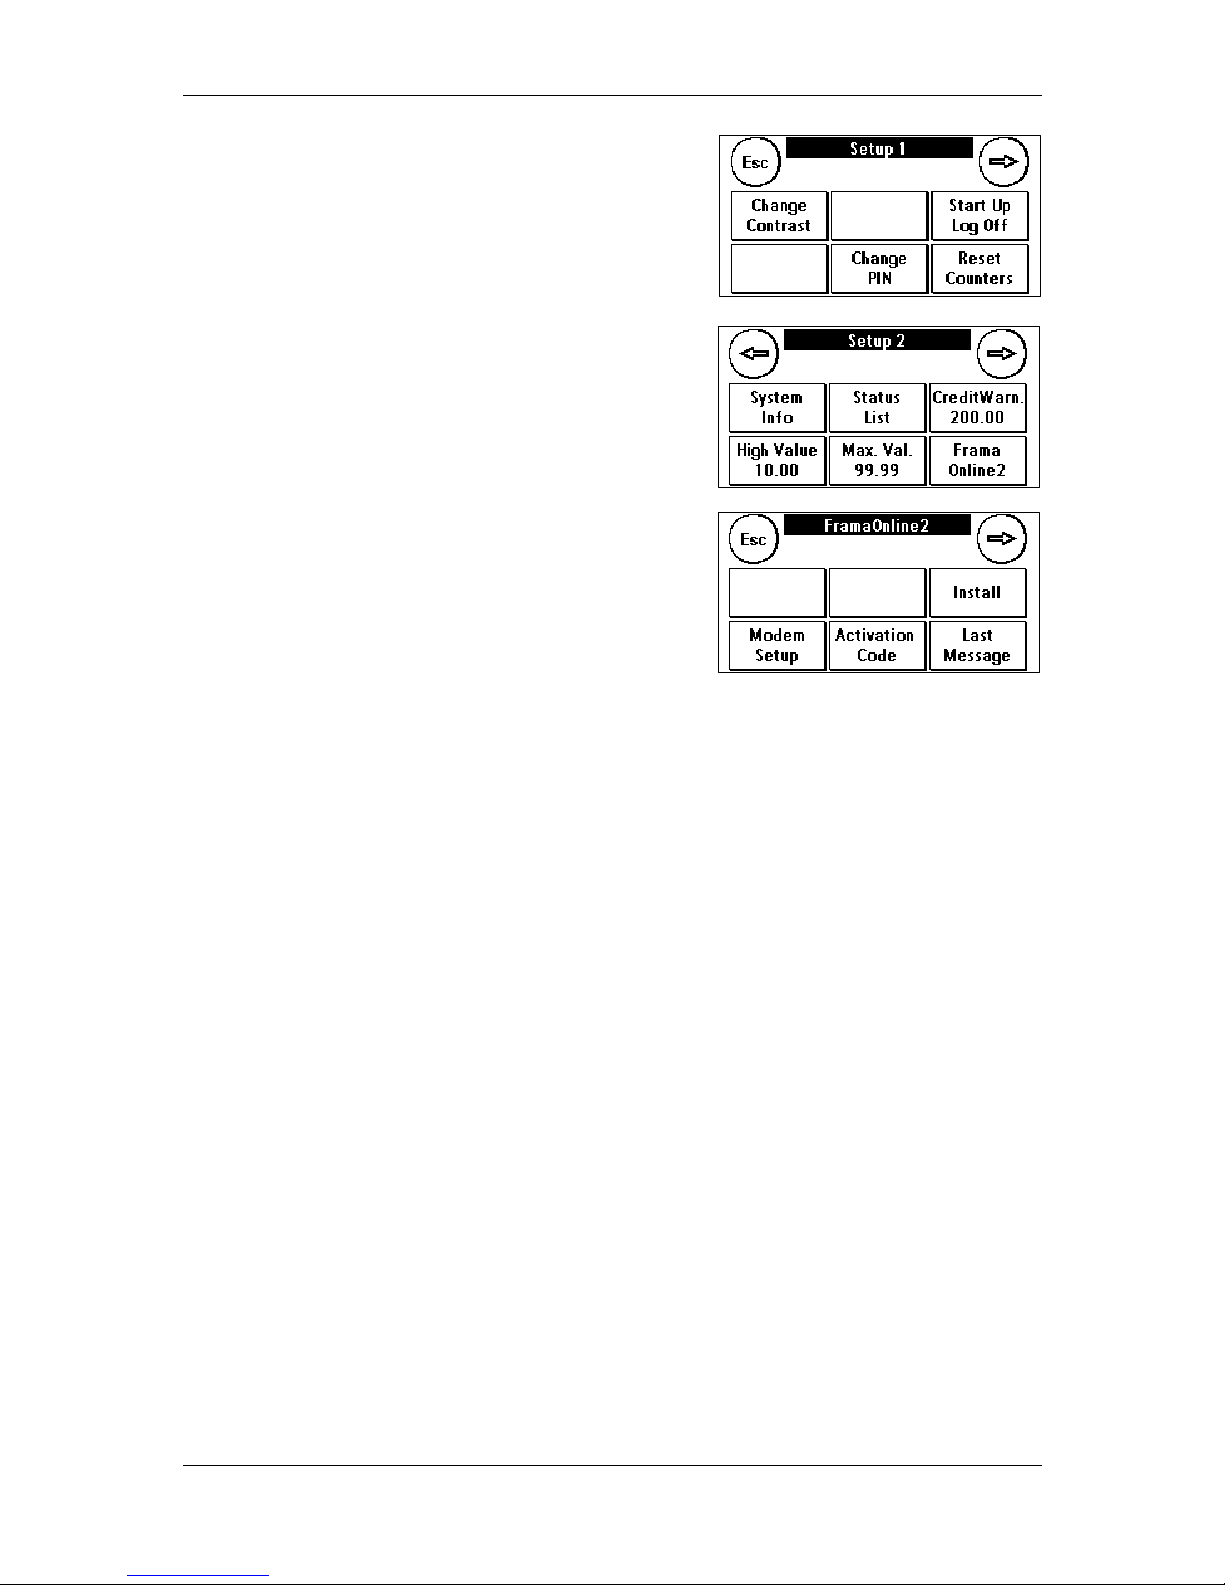
5. Press “Forward” (arrow symbol).
6. Select “FramaOnline2”.
7. Select “Install”. Acknowledge this by pressing ENTER.
8. Your Frama Matrix F2 establishes a link with the
FramaOnline2 data centre. This process can take up to 2
minutes. If the link cannot be established, please check
the modem settings. Please refer to page 12 in this respect.
9. You have now been logged into the FramaOnline2 data centre.
10. The display is shown for 8 seconds. After this time, you will find yourself back in the FramaOnline2
menu.
11. Press ESC. Press the return arrow to get back to the Set-up 1 menu. Press “Start up/Log off” to go
to cost centre selection.

Frama Matrix F2
11
2.2. FramaOnline2 notes on connection problems
2.2.1. Connection interruption
This message appears if the connection between the FramaOnline2 data centre and your Matrix F2 is
suddenly interrupted. Try to make the connection again or repeat the procedure.
2.2.2. No answer
The FramaOnline2 data centre doesn’t answer. Possible causes are a disconnected telephone cable or
an incomplete telephone number for the data centre. Many telephone systems interpret an incomplete
telephone number as an engaged signal. This is identified by your Frama Matrix F2 and thus displayed.
The telephone number is made up of the exchange code for obtaining a free line (with telephone
systems) and the data centre telephone number.
2.2.3. Setting exchange code for calling exchange
Sometimes, when using a Frama Matrix F2 connected with telephone equipment, a “0” or “9” must be
preselected to obtain a free telephone line. Carry out the described steps up to point 6 of the
operating guide “FramaOnline2“ on the last pages.
1. Select “Modem setup“ and press the forward arrow to
have the second page of the modem settings displayed.
2. To be able to enter the required exchange code, press
“External line”. At the same time, this will show your
current setting. Enter the required exchange code, e.g. 0,
and acknowledge your entry by pressing ENTER.
To delete any wrongly entered or unnecessary
exchange code, press CE and quit the display by
pressing ENTER.
3. Press ESC repeatedly until you find yourself back in the
FramaOnline2 menu. Continue as described under
“FramaOnline2“ from point 8 on page 10.

Frama Matrix F2
12
2.2.4. Checking FramaOnline2 telephone numbers in modem settings
1. Press “Modem setup“ in the FramaOnline2 menu.
2. Press “Phone numbers“.
3. Press “FramaOnline2“. The telephone number will be displayed. The correct number is +91 11
45454848
4. To newly enter the telephone number, proceed as follows:
a. Enter the telephone number using the 1 to 10 numeric keypad.
b. Press “ENTER”.
c. Press ESC twice.
2.2.5. Inspection loading
You can carry out so-called inspection loadings with your
Frama Matrix F2. They are for inspecting the counter readings,
checking the postal rate tables and comparing / updating
data with the post office.
The inspection loading must always be carried out when the
franking system requests a connection with the FramaOnline2
data centre, even if you need no new postage credit.
To carry out an inspection loading, press “Inspection” and follow the displayed instructions.
Frama Matrix F2
13
2.3. Loading postage credit
Check whether your Frama Matrix F2 is properly plugged into a suitable direct telephone / fax socket.
If necessary, read the chapter “Connection and start-up“again. The franking system needs to be
connected at the telephone socket only for the time required to load postage credit or for an
inspection loading.
Adding postage and communicating with FramaOnline2 are possible only in the administration mode.
Caution! The administration mode is password (PIN) protected Use the PIN you received in a separate
letter.
The following steps assume that you have activated your Frama Matrix F2 using the FramaOnline2
activation code and a subsequent inspection loading.
1. Press “Admin” in the cost centre selection display.
2. Enter your PIN. Then, press the ENTER key to get into the
administration mode.
3. Press “i”.
4. Press the “Tool” key (symbol).
5. Press“Forward” (arrow symbol).
6. Select “FramaOnline2”.

Frama Matrix F2
14
7. Select “Re-set”.
8. Your Frama Matrix F2 will now establish a link with the FramaOnline2 data centre. If the link
cannot be established, please check the modem settings. The link can last several minutes,
depending on the amount of data to be transferred (postal rate update, etc.).
9. The transaction data will be displayed. The loading process has been completed satisfactorily.
Wait until the display exits itself and then press ESC. Press the return arrow to get back to Set-up
1 menu. Press “Start up / Log off” to go to cost centre selection.
10. Your Matrix F2 is now ready for use.

Frama Matrix F2
15
3. Frama Matrix F2 printing system and inkjet cassette
Caution! Please first put the inkjet cassette in place before
you press “YES” on the shown display.
Your Frama Matrix F2 uses an ink jet cartridge to frank your
mail items. The inkjet cassette also contains the printing head.
With this in mind, handle the inkjet cassette very carefully and
make sure that no pointed objects, such as paperclips, etc.
can damage the sensitive surface of the printing head.
3.1. Putting inkjet cassette in place
Unpack your inkjet cassette and remove the two protective strips
from the printing head.
Don’t touch the gold-coloured contact surfaces. Grease and
perspiration on your skin can leave a film which could results in
“messy” print marks.
On the top of the inkjet cassette you will find two grip surfaces.
Press them together between your thumb and forefinger.
Open the cover flap at the top on the left of the Matrix F2. The
printing carriage will already be in the standby position, waiting for
the inkjet cassette to be put in place.
Put in the inkjet cassette from above. When doing so, make your
movement trace the contour of the cover flap.
Push the new inkjet cassette fully into its guide.
Release the grip surfaces. Press back the inkjet cassette with one
finger to make sure the locking pins are correctly positioned.
The locking pins must engage at the side. Check that the inkjet
cassette is properly seated before you close the cover again (see
photo). The cover must close easily without you applying any
force.

Frama Matrix F2
16
3.2. Setting franking mark
If you have put the new cartridge properly into place, you can
now press “Yes” on the display.
The inkjet cassette will now be tested and calibrated. This
process might take a few seconds. During calibration, the
following will appear in the display “Please wait, calibrating
…“.
If the inkjet cassette being used was already in place in your
Matrix F2, you can choose between recalibration and taking
over the existing calibration data. “Confirm calibration?“
Recalibration can be necessary if the initial calibration did not
result in a satisfactory franking mark, e.g. the printing head
was too cold, etc.
After calibration, your Matrix F2
will ask you to make a test
franking mark. Use an empty
envelope, a folded A4 sheet of
paper or a franking label for this purpose.
Lay the envelope, paper, etc. to be franked, right aligned, in
the Matrix F2.
The envelope / paper, etc. will be franked with a test mark
and ejected to the left.
This is how the test mark looks: On the left-hand side, you can see setting X and on the right-hand
side setting Y. An arrow indicates the setting valid at the time.
The arrows should point where the lines appear to be
“straightest”.
If this is already the case, you only need to confirm the
following displays X and Y by pressing the ENTER key.
Sometimes however, it is necessary for you to change the
setting to optimize the results.
This is how you should proceed: On the left-hand side of the
test mark, X, look for the line which seems to be
“straightest. Note the number beneath it, e.g. “-1“.
Use the + and – keys to select the right number in the display
and then press ENTER to go to the Y setting and then
proceed in the same way.
Print Alignment
Print Alignment X Print Alignment Y

Frama Matrix F2
17
Once more, as requested, print a test franking mark to check your settings. The arrows will now point
exactly at the settings you made, i.e. right where the lines should be “straightest”
If you are still not satisfied, you can reset again by answering the question with “NO”.
Answering with “Yes“, takes you out of the set-up menu and into cost centre selection.

Frama Matrix F2
18
4. Working with Frama Matrix F2 and scales
4.1. Frama Matrix F2 display design
The Matrix F2 display is also the keypad. The benefits of this solution are obvious: You see only the
operating elements that you need at the moment. We call this the ComTouch™.
Elements of the ComTouch™:
CE key Press here to
quit the display and fetch
the previous display.
CC key: This is for changing
the cost centre.
Global information field: Important data, such as the date,
postal rate and variable values in the settings menu are
displayed.
Enter key: This is for
acknowledging entries, such
as when entering the
password.
“i“ key: Press here to
fetch further features /
attributes for the respective
display content.
ESC key: Press this to
also leave the display, but
without saving any
changes.
OneTouch range go to the product by simply pressing a
key. Changes to features / information field on being
pressed: Here, you learn everything about the selected postal
product.
Arrow key: Press this to go
to the next entry step or
display.
Letter symbol:
This
appears when a franking
result acceptable to the
Post Office has been
obtained. It is shown
inverted when deviations
from the standard settings
exist.
Set-up key: This is for
shifting forward to the
settings menu.
All screens shown in this chapter are for reference only and may differ from
your local presentation.

Frama Matrix F2
19
4.2. OneTouch
On pressing a product key (OneTouch key), a product is preselected. After having applied the weight using the scale the
letter symbol appears, signalizing that you can go ahead and
frank your mail item.
If you wish to frank another product, simply pre-select it by
pressing the respective OneTouch.
Pressing the selected OneTouch key again, will bring you to detailed display of the respective product.
Here, through specific selection, you can change individual aspects of the selected product and apply
the weight to the product.
The following pages describe how the predefined arrangement of the OneTouch keys and thus the
products can be adapted to suit your needs.
General notes
The following notes are intended to support you in achieving a sharp, professional postage mark with
your Frama Matrix F2.
- Don’t frank mail items that are thicker than 10 mm. If you do, you will run the risk of the printing
head touching the surface of the mail item and thus smearing the franked mark. With this in
mind, always use original Frama Matrix F2 franking labels for thick mail items and small parcels.
- Please make sure that no pointed objects, such as paper clips, are near the franking zone.
- If you have the impression that lines are missing in the franked mark, please carry out a printing
head test.
- Don’t use very absorbent or fibrous envelopes which could prevent a sharp mark from being
obtained. This could make your franking invalid.
- A certain time after franking, the printing head is sealed to prevent the individual jets from drying.
During this time, “Touch and go!” appears on the ComTouch. Touch the ComTouch™ to
continue.

Frama Matrix F2
20
4.3. Franking
Always first connect the supply unit with your Frama Matrix F2 and only then with the mains power
supply. Normally, you should always leave the system switched on.
4.3.1. Entering code (logging in)
To be able to work with your Frama Matrix F2, you have to
enter a PIN for every cost centre. If you have not defined any
new PINS, PIN “000001” is valid for cost centre 1 and PIN
“000002” for cost centre 2.
Enter your PIN. Acknowledge this by pressing ENTER. A wrong
PIN will be rejected and you must try again.
4.3.2. Selecting postal product via OneTouch function
Your Frama Matrix F2 has a sophisticated control system, i.e. the OneTouch keys. This means that
details of postal rates do not have to be entered. Instead, each postal product is pre-selected
Your Frama Matrix F2 has been preprogrammed with the 18
most important postal products which can be fetched by
touching the OneTouch keys.
The respective postal products are written on the OneTouch
keys. The type of mailing and the destination are defined in
the first line. The weight class is shown in the second line. By
pressing the shown amount (Example here: 0.34) you can fetch further pages with predefined
products.
Each one of these so-called OneTouch keys can be redefined to suit your needs (see chapter 4.5.1).
You can fetch further product pages with the OneTouch capability by touching the postage value:
Products 1 - 6 Products 7 – 12 Products 13 – 18 1–10 Numeric keypad Postal rate guide
Owing to the key size, abbreviations are used for the postal products.
NOTE!
Your Frama Matrix F2 protects you from inadvertently franking high postal rates. As a standard
procedure, all mail items which are franked in excess of £10.00 must be released by touching the
displayed postage amount (it is first shown inverted).
All screens shown in this chapter are for reference only and may differ from
your local presentation.

Frama Matrix F2
21
4.4. Inserting and franking letter
You can now frank your mail item with the selected postal rate.
To do so, put your mail item in your Frama Matrix F2 in such a
way that the right-hand edge is flat against the housing and
push the mail item to the back as far as it will go.
The letter, etc. will be franked and ejected to the left. Hold
until franking begins.
4.4.1. Franking labels
Use only original Frama Matrix F2 franking labels. Frank labels in the normal way, just like a letter.
Frama Matrix F2 franking labels can be used doubly. Turn the label through 180 degrees and frank it
again.
To remove the adhesive label, bend the label at the perforation and peel off the backing paper.

Frama Matrix F2
22
4.5. Determining postal rates and postage (franking postal products)
The postal rate tables of the Post Office are stored in your Frama Matrix F2 and can be kept up to date
via FramaOnline2. Every time you link up with the FramaOnline2 data centre the postal rates are
checked and, can, if necessary, be updated.
Your Frama Matrix F2 is supplied set up for the 18 most widely used postal products.
4.5.1. Working with postal rate module
The following describes how you can adapt what has been assigned to the OneTouch functions to suit
your requirements and even save it. As an example, the product “1st Class Large Letter” has to be
changed to “AirMail Letter, Europe” and subsequently saved.
1. Press twice the OneTouch key which you wish to adapt.
2. Change the product setting for the destination. Press
“1st”.
3. Select the product by pressing “Airmail Letter”.
4. That’s all! You can change the destination and the weight
accordingly to the example above. You can also frank
when in this menu. The letter symbol shows that this is
possible. Press ESC to quit the detailed display of the key.
All screens shown in this chapter are for reference only and may differ from
your local presentation.

Frama Matrix F2
23
Or
5. Press “1-T” to save your change on the previously
selected OneTouch key. That’s all. You have now
assigned a OneTouch key to a product and can fetch this
product again at any time by simply pressing this key.
The integrated OneTouch technology automatically corrects the postage of defined postal products if
the postal rates change.
4.5.2. Postal rate guide
Your Frama Matrix F2 has an integrated postal rate guide for you to ascertain the postage of all
available postal products. You thus also have a clever access capability for mail items that are not used
so often.
Caution! Make sure that no mail items or anything similar is on the scales (zero setting of
scales).
1. Select the postal rate guide by pressing the postal rate
repeatedly.
2. Select the type of mailing, e.g. 2
nd
class or Press the
arrow to show other types of mailing.
3. Select the format, e.g. Large Letter.
4. Add services i.e. Signed For. Press OK.
All screens shown in this chapter are for reference only and may differ from
your local presentation.

Frama Matrix F2
24
5. Ascertain the weight of the mail item using one of the
following three possibilities:
a) Press the appropriate weight key (weight limit, for
example, 100g.)
b) Press “Man“ and enter the weight, e.g. 15 g. Then,
acknowledge your entry by pressing ENTER.
c) If scales are connected: Put the mail item onto the
scales (the weight appears next to the scales
symbol) and then press the scales symbol.
6. That’s all. The postal rate will appear and you can frank the mail item.

Frama Matrix F2
25
4.6. Presorting mail using scales
Connecting the S2 or S5 scales, automatically extends the functional scope of the Matrix F2, i.e. you
can use the scales functions immediately.
In addition to the previously explained functions provided in the postal rate guide for weight
determination, your Matrix F2 has a special weighing mode for you to quickly presort your mail items.
You can use it in advance to presort mail items according to postal product.
1. Select “i“ in the product selection mask to go to the next display.
2. Select “Scale”. You will be in the scales menu.
3. Put your mail items on the scales. The weight will be displayed.
4.7. Taring scales
It is possible for the zero setting of the scales to be wrongly adjusted, e.g. if you had something on the
scales while you were switching on the system. To tare the system, select the function “Tare“ in the
scales menu. Make sure the scales platform is empty before you press “Tare”.
4.8. Switching off Frama Matrix F2
Press CE repeatedly until the entry display for the CC accounts appears. Now, unauthorized access to
your post credit is no longer possible.
CAUTION! Before you unplug your Frama Matrix F2 from the power supply, please wait approx.
30 seconds so that the printing head can completely seal itself.

Frama Matrix F2
26
5. Utilizing extra functions
5.1. Selecting advertising messages
5.1.1. Messages
Your Frama Matrix F2 already has three predefined advertising messages.
These messages are already incorporated:
1st
message:
2nd
message:
3rd
message:
If you wish to use one of the messages, press the “i“ key in the franking mask.
Press the key “Logo”. This key can also be named “Message”
or “Text”. The description depends on the selected advertising
class.
Press “Message” to select from the predefined messages.
Press the arrow to go to the next message.
Briefly press twice on the desired message to select this
message.
Logo
Messag
e
-
1
All screens shown in this chapter are for reference only and may differ from
your local presentation.
Message

Frama Matrix F2
27
5.1.2. Logos
In the same way as when selecting and printing messages, you can save and print up to five
advertising messages, so-called Logos (optional), of your own.
Press “Logo” to select from your own logos. Press the arrow to go to the next logo.
Proceed in the same way as when selecting a message.
5.1.3. Text printing blocks
Your Matrix F2 gives you the possibility of producing your own text printing blocks and thus can draw
attention to holidays, special campaigns and events with your mail. A text block replaces a message or
advertising block.
5.1.4. Entering text
Press the key “Enter text”.
Select the text to be written (text 1 or 2).
In the text entry pages, you have the choice of upper and
lower cases, numbers, special characters, punctuation marks
and spaces.
By pressing “Enter“, you shift to the next line, whereas you
finish the text entry with the ENTER key (symbol!). Use the CE
key to delete a wrong entry.
This is how to proceed:
(Example of entering text: “Visit Frama on www.frama.com“):
1. Press “A-Z” to enter a capital letter. By pressing the
“Down arrow” key, you can obtain other letters. Press the
letter “V“. Press the “Arrow to left” key to shift to small
(lower case) letters.
Logo
Message
-
1

Frama Matrix F2
28
2. Use the small letters in the same way as described under
point 1.
3. Now press the Enter key to write the next line. Your
display should be as follows after you have entered the
words “Visit Frama on”
4. To finish the text entry, press the ENTER key (symbol) so
that the text is saved at the desired key.
5. That’s all. You can now choose from your texts in the
same way as for messages.

Frama Matrix F2
29
5.2. Frama Matrix F2 memory boxes
Memory boxes are used to replace or renew franking-relevant data, such as advertising messages.
Normally, all necessary graphics and data are already stored in your system. In exceptional cases,
however, it might be necessary for this data to be renewed (relocation, telephone number changes,
etc.).
Unplug your Frama Matrix F2 from the power supply. Plug the
memory box in the opening provided for it at the back of the Matrix
F2. Plug the Matrix F2 into the power supply again. The updating of
your data begins automatically.
When the updating process is finished, unplug the Matrix F2 from the power supply again and remove
the memory card.
Please handle your memory box with care. Avoid extremes of heat and don’t touch the contacts. After
its successful application, please send your memory box to your Frama sales organization for a credit
note.
All screens shown in this chapter are for reference only and may differ from
your local presentation.
Frama Matrix F2
30
5.3. Frama Matrix F2 print information
You can print various reports for your Matrix F2 using the so-called print button. The reports are
particularly important. They provide the possibility of printing out condensed information with the
Frama Matrix F2. These reports support you as overviews when you are programming the Frama Matrix
F2 or, for example, they serve as receipts after fetching postage credit via the FramaOnline2 data
centre.
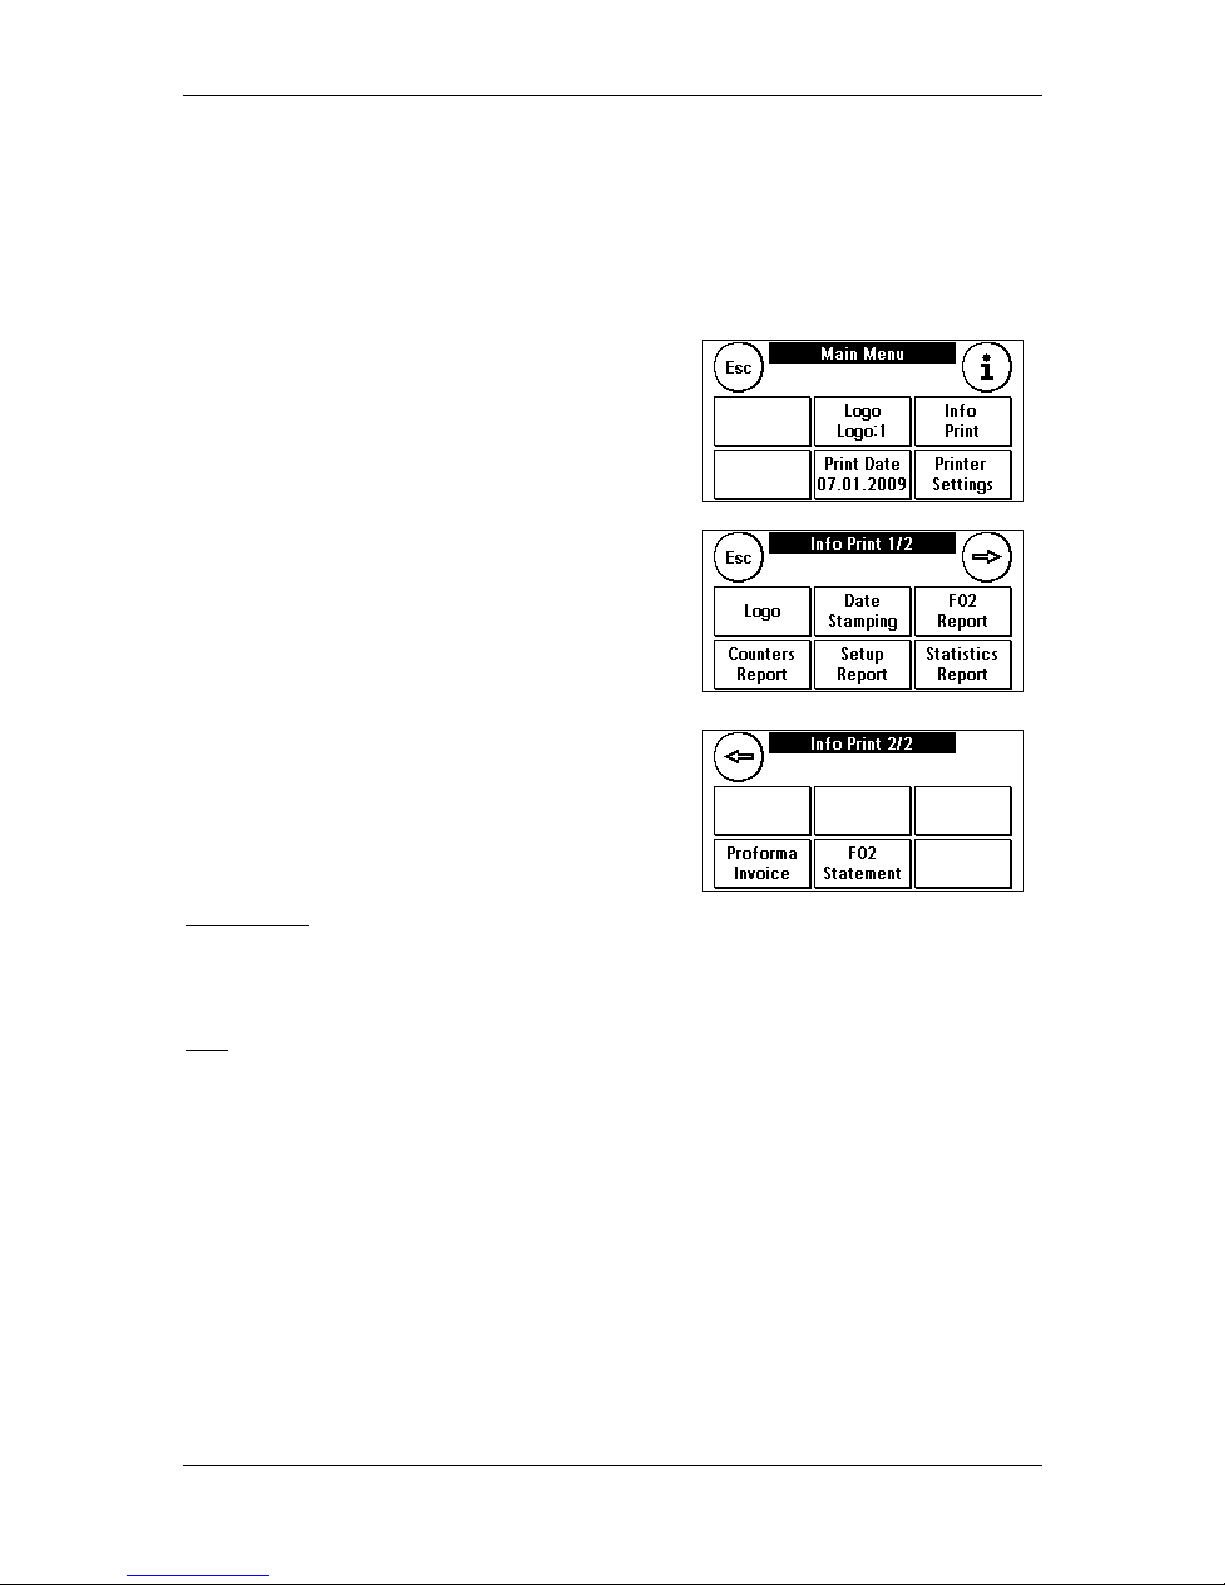
5.3.1. Printing out reports
Press “i” in the franking page to go to the main menu. Here,
select “Info Print”:
You can now choose one of the various reports. Press the
corresponding key and feed an envelope or similar into
your Frama Matrix F2 to print the respective report.
The functions “Date Stamping” and “Logo” are described
farther down.
You can leave the “Info Print” menu by pressing ESC.
Date Stamping
You can convert your Matrix F2 into a “Date Stamping Machine. Select the function “Date Stamping” in
the “Info Print” menu. There is a shift to a different franking mark in this mode. No postage is used.
Logo
The function “Logo“ in the “Info Print“ menu enables you to print only the advertising logo, message
or text. All relevant postal information is faded out. This mode requires no postage.

Frama Matrix F2
31
6. Counter readings and cost centres
6.1. Cost centres
Your Frama Matrix F2 is equipped with various counters which
allow you to monitor the postage usage and the number of
mail items franked.
Additionally, the postage used and the numbers of mail items
are booked against the respective cost centres. These
counters are designated R-Piece and R-Value (R = resetable).
Two cost centres are available to you. The current cost centre
is always shown at the top on the left in the franking page.
Press this key in the franking page to change the cost centre.
Select the desired cost centre and, if necessary, enter the
required PIN.
You maintain and set up the cost centres in the administration mode.
6.2. Counter readings
You can have the current counter readings shown at any time.
To do so, use the franking page and press “i” repeatedly until
the counter readings appear. In addition, you can print out
the counter readings via the function “Info Print”.
Meanings of various counters:
Total: Total counter readings of the franking system (pieces and values franked) since the cost centre
became operational. Owing to in-depth tests carried out before your Frama Matrix F2 was delivered,
the total number counter might already show an initial figure.
Reset Value / Piece: Resettable counters of your franking system. Every cost centre has resettable
counters. The resettable counter of the franking system can be reset in the administration mode.
Credit: This is the postage still available in your franking system.
All screens shown in this chapter are for reference only and may differ from
your local presentation.
Frama Matrix F2
32
7. Frama Matrix F2 printing system
Your Frama Matrix F2 utilizes so-called inkjet cassettes to frank your mail items. The colour cartrige
also contains the printing head. With this in mind, handle the inkjet cassette very carefully and make
sure that no pointed objects, such as paperclips, etc. can damage the sensitive surface of the printing
head. ( Take care not to frank over staples etc, inside envelopes).
7.1. Changing inkjet cassette
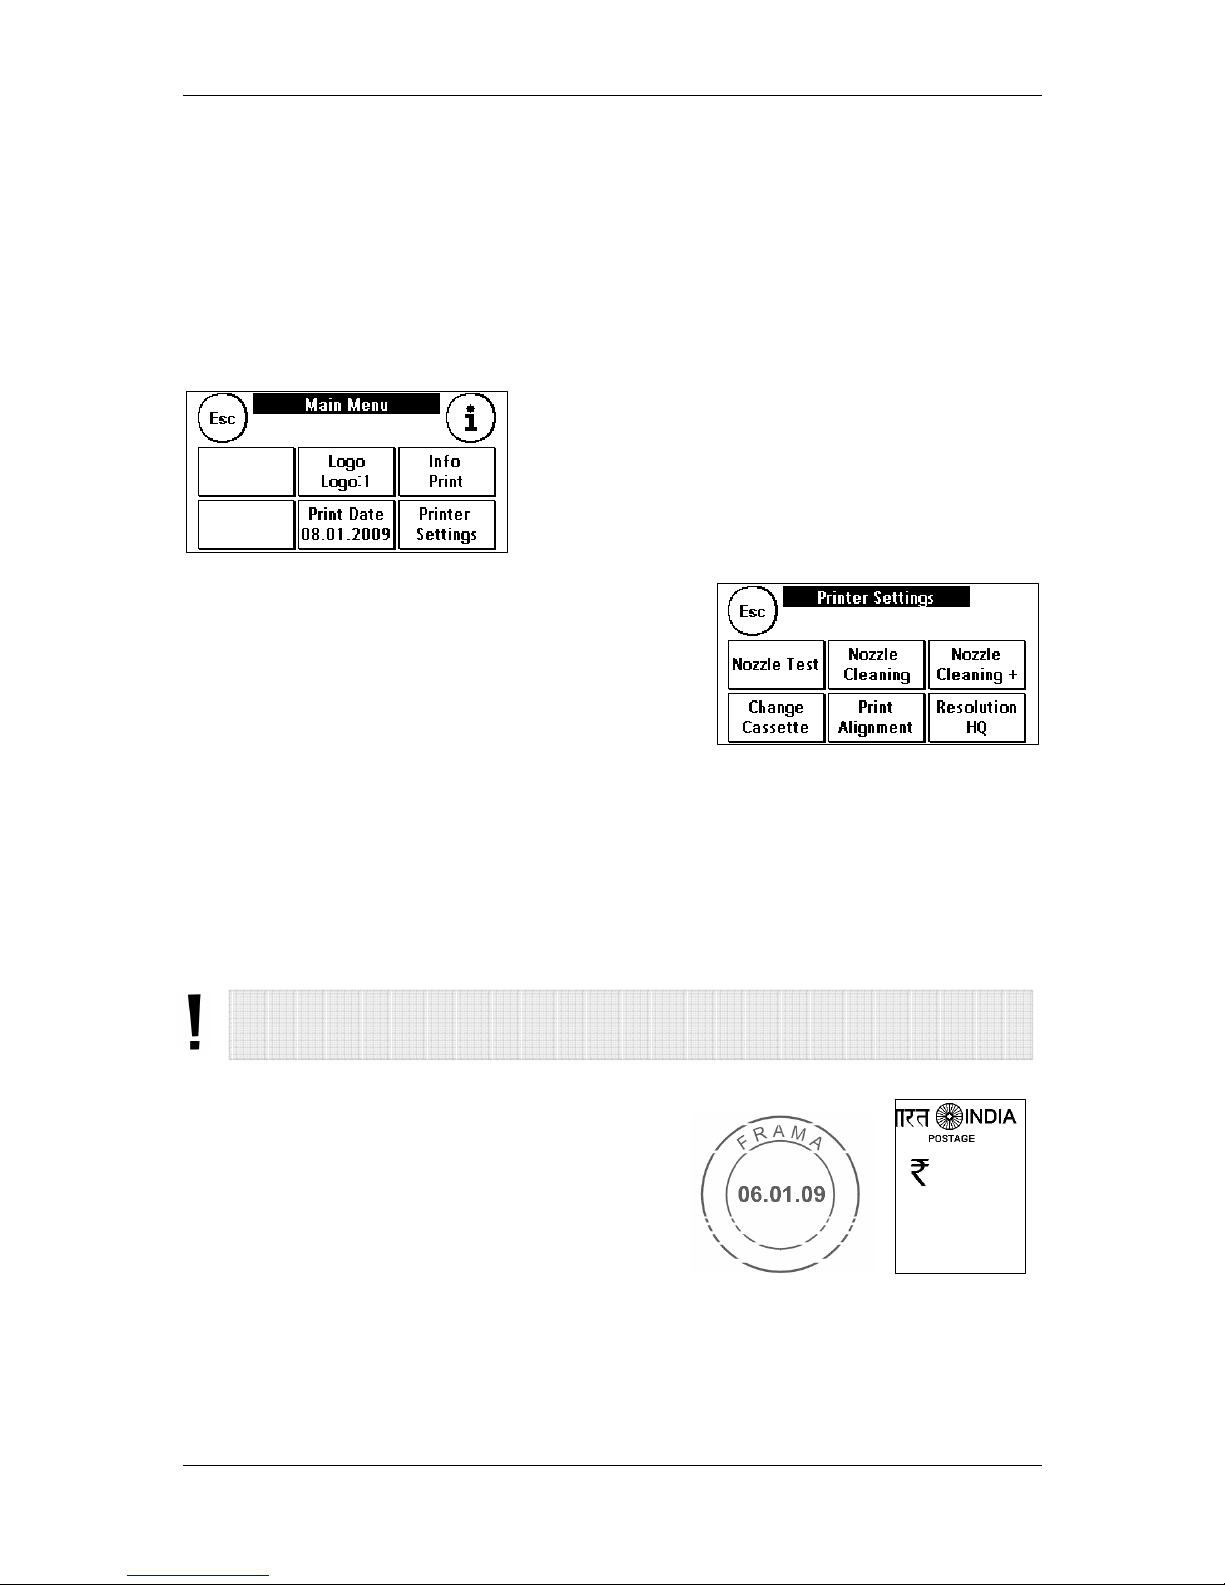
If you wish to change your inkjet cassette, press “i” in the
franking page.
1. Press the key “Printer Settings”.
2. Press “Change Cassette“ and acknowledge your
intention by pressing ENTER.
3. Your Matrix F2 will now bring the inkjet cassette into the
removal position.
4. Open the top cover flap. Remove the inkjet cassette by
squeezing together the grip surfaces on the cartridge
and pulling it out upwards.
Put in a new inkjet cassette. Make sure that you first remove the adhesive tape from the printing head.
Push the new inkjet cassette fully into its guide. Adhere to the instructions in chapter 3.1 to properly
adjust the inkjet cassette. You can repeat this process at any time if you go to the function “Prints
Alignment”.
7.2. Cleaning printing system
From time to time, it might become necessary for the
printing head jets to be cleaned.
Your Frama Matrix F2 provides a cleaning cycle for this
purpose.
Blocked jets are often the result of the main power supply
being switched off before the jets have properly sealed
themselves. With this in mind, please wait at least 30 seconds after franking the last mail item before
you unplug your Matrix F2 from the power supply.
All screens shown in this chapter are for reference only and may differ from
your local presentation.

Frama Matrix F2
33
You can always clean the system if white lines show in the franking mark. For this job, two cleaning
programs are available:
1. Nozzle Cleaning: A normal printing head cleaning operation is carried out. The printing head and
the jets are cleaned.
2. Nozzle Cleaning +: This operation uses a great deal of ink because the jets are flushed and
cleaned thoroughly.
To fetch the required program, press the appropriate key. The cleaning program starts automatically. It
is advisable to run the function “Nozzle test” afterwards to check how satisfactory the cleaning
operation was.

Frama Matrix F2
34
7.3. Nozzle test
A nozzle test is incorporated in your Frama Matrix
F2.
In this test, each individual nozzle in the printing
head is activated. This enables you to easily localize defective jets, and also to determine the scope of
the cleaning program
1. Press the key “Nozzle Test”.
2. Introduce an envelope or something similar into the system for franking.
3. A nozzle test print is made.
4. Check whether all lines have been printed.
5. If not, run the printing head cleaning operation.

Frama Matrix F2
35
8. Administration mode (settings)
First and foremost, the administration mode serves the adjustment of your Matrix F2 which, in many
respects, you can adapt to suit your needs. You cannot frank when you are in the administration mode.
Settings made in the administration mode always apply to both CC accounts Furthermore, it is only
possible for you to link up with the FramaOnline2 data centre when you are in the administration
mode. The following explains in detail the individual functions in the administration mode.
You can also make settings in the respective CC accounts. When doing so though, not all functions of
the administration mode are available to you.
8.1. Maintaining basic settings and cost centres
Proceed as follows to change the basic settings of your Matrix F2:
1. Choose “Admin” in the cost centre selection.
2. Enter your PIN. Then, press the ENTER key to get into the
administration mode.
3. Press “i”.
4. The total counter readings of each cost centre and the
system are displayed in this menu. Press cost centre 1 to
have the values of this cost centre displayed. Proceed in
the same way for cost centre 2. The overall counter
readings are displayed if you press “System“.
5. Press the “Tool” key (symbol) to obtain the basic settings.
The basic settings are divided among three menus. These
are designated Set-up 1, Set-up 2 and Set-up 3.
By pressing the arrow, you can go forward and return by pressing ESC.
The basic settings are divided among the menus Set-up 1, 2 and 3. Each menu describes the functions
and the possibilities for selection.

Frama Matrix F2
36
8.1.1. Set-up 1 menu
1. Change contrast: You can alter the contrast of your
display with this. The standard setting is 50. Press the +
and - keys to adjust the value and acknowledge your
setting with ENTER.
2. Start up / Log off: Use this to restart your Matrix F2
after you have made changes to the basic settings.
Pressing the key once, restarts the Matrix F2 immediately.
3. Saving start menu: This is for defining the desired start page (OneTouch, 1-10 numeric keypads,
Tariff Guided).
4. Change PIN: Touching this key brings you to user
administration. Here you can change the cost centre
name and the respective PIN codes.
Changing cost centre name: Select the cost centre to be
changed by pressing the respective key. Press “Change
CC name“. Enter the name of the cost centre in the same
way as for entering a text print. Acknowledge the name by pressing ENTER.
Changing PIN: Press the key “Change PIN” and enter the current PIN. Press “ENTER”. Enter the
new PIN. Acknowledge the new PIN by pressing ENTER. For safety reasons, you will be requested
to enter the PIN again. Press ESC to return to the Set-up 1 menu.
5. Deleting counters: This is for maintaining the cost centre counters. Select the cost centre whose
resettable counter has to be set to zero. Press ENTER to delete the piece reading and value.
Suitably acknowledge the security query.
8.1.2. Set-up 2 menu
1. System Information: This displays system data that
might be useful when you obtain advice on the phone
after a system malfunction / breakdown. Touch the
keypad to leave the display.
2. Status list: This shows system messages which might be
helpful when you are obtaining advice on the phone.
Touching the keypad, ends the display.
3. Credit warning: Here you can define the minimum postage credit level at which you wish to be
notified. The standard value is 1,500.00 Rs.
All screens shown in this chapter are for reference only and may differ from
your local presentation.

Frama Matrix F2
37
4. High value: This setting stipulates that amount from which, for security reasons, you have to
acknowledge the postage value before this amount can be franked. The standard setting is 100.00
Rs. Enter the desired value and acknowledge it by pressing ENTER.
5. Max. Value: This defines the maximum value which can be franked on a mail item at one time.
The standard value is 9,999.00 Rs. Enter the desired value and acknowledge it by pressing ENTER.
6. FramaOnline2: see chapter 2.

Frama Matrix F2
38
8.1.3. Set-up 3 menu
1. Beep ON/OFF: This serves to switch the key beep on and
off. Pressing “Beep on“, switches off the beep. Pressing
again, switches the beep on again.
2. Switching CC Clear ON / OFF: Using this function, you
can define whether the users of the individual cost
centres may or may not delete their cost centre contents
(counter number and value readings). Select “CC Clear OFF“ so that only you are allowed to delete
counter readings in the administration mode.
3. Stand by ON / OFF: This is for switching the “Stand by“ function on and off as well as for
programming the time lag before the system switches itself into the standby mode.
Switching standby on and programming standby time lag: Press the “Standby“ key. Enter the
desired time lag before the system should switch to standby. If “0 minutes” is entered, the
function switches off. Press “ENTER” to acknowledge.
8.1.4. Restarting system
For your changes to become effective, you have to restart your Frama Matrix F2. To do so, use the
function “Start up /Log off“ in the Setup 1 menu.

Frama Matrix F2
39
9. Display messages and technical data
In the event of a malfunction, a message will appear in the display of your Frama Matrix F2. If you are
unable to eliminate the trouble yourself, you can obtain support on your Frama hotline or from your
local Frama dealer. In this case, keep your Licence Identifier Number ready at hand.
9.1. FramaOnline2 messages
Display message
Cause
Elimination
Modem malfunction:
The installed modem couldn’t be
initialized properly.
Switch the franking system off and
then on, and try to initialize it again. If
the error cannot be eliminated, contact
us on the Frama hotline.
Wrong activation code
You didn’t enter the FramaOnline2
activation code correctly.
Repeat the procedure. Enter the
FramaOnline2 activation code carefully.
No
telephone number
The telephone number required for
dialling the modem is missing.
Enter the required telephone number.
Please refer to page 12 in this respect.
Occupied
All modem ports of the
FramaOnline2 server are occupied.
Try again later. You mig
ht have to
preselect an exchange code because
many telephone systems acknowledge
an incomplete telephone number with
an engaged tone.
No connection
The FramaOnline2 data centre
doesn’t answer.
Try again. Check your telephone cable
connection and that the modem
settings are correct for calling the
exchange.
Connection interruption
Try again.
Your existing connection with the
FramaOnline2 data centre was
suddenly terminated.
Try again. Perhaps wait a few minutes
and then try again.
No dialling
tone No dialling tone can be identified.
Check that the telephone cable is
plugged in properly.
Inspection required
You system must be connected with
the FramaOnline2 service at least
every 30 days to exchange data.
Select “Inspection“ to allow a
connection to be made between your
Frama Matrix F2 and the FramaOnline2
service.
Your franking system has been put
out of service.
Your system was signed off and is
now barred.
Contact your FramaOnline2 data
centre.
Franking system locked
The fra
nking system cannot continue
to frank because a data record
required for franking wasn’t updated.
Select “Inspection“ to allow a
connection to be made between your
Frama Matrix F2 and the FramaOnline2
service. The data record will be
updated during the inspection.

Frama Matrix F2
40
9.2. Frama scales messages
Display message
Cause
Elimination
No signal received from scales
Interfered communication between
Frama Matrix F2 and scales.
Check that the scales cable is plugged
in properly. Switch the franking system
off and then on. If the trouble cannot
be overcome, please contact us on our
hotline.
No response from scales;
Scales communication error
Interfered communication between
Frama Matrix F2 and scales.
Check that the scales cable is plugged
in properly. Switch the franking system
off and then on. If the trouble cannot
be overcome, please contact us on our
hotline.
No valid weight
Interfered communication between
Frama Matrix F2 and scales.
Check that the scales cable is plugged
in properly. Switch the franking system
off and then on. If the trouble cannot
be overcome, please contact us on our
hotline.
The scales don’t come to rest
The scales platform is not at rest.
Consequently, the weight cannot be
ascertained.
Scales should be installed in a
vibration-free place. The draught from
fans, etc. can cause this message.
Scale Overload
The weight put on the platform
exceeds the capacity of the scales.
Please remember: The maximum
capacity of the Frama S2 scales is 2kg
and 5kg for the Frama S5 scales. Avoid
using the scales platform as a place to
keep things.
Scale Underload
A weight was on the scales when the
franking system was switched on.
Always make sure the scales platform
is empty when the franking system is
switched on.

Frama Matrix F2
41
9.3. Frama Matrix F2, postage messages
Display message
Cause
Elimination
High value not confirmed /
acknowledgeed.
Security query.
Touch the postage value shown
inverted in the display. You can
change the postage limit that
activates the message in the set-up.
Change menu 2 in the administration
mode.
Max. postage value exceeded.
Security query. The ascertained value
exceeds the maximum postal rate
that can be franked.
You can change the postage limit that
activates the message in the set-up.
Change menu 2 in the administration
mode.
Low Credit
The credit available in your Matrix F2
has dropped below the set limit of
1,500.00 Rs (standard amount).
Reload postage credit.
If necessary, change the credit limit
using the corresponding function in
the administration mode.
No credit
The remaining amount of postage
credit is not sufficient for franking.
Load a new postage reserve into the
system.
9.4. Frama Matrix F2, ink system messages
Display message
Cause
Elimination
Perform calibration?
You have put in a inkjet cassette that
was already installed in your Matrix
F2.
Select “YES” if you wish to recalibrate
the inkjet cassette or “NO” if you wish
to take over the existing calibration
data.
Please insert an original Frama
inkjet cassette
Wrong type of cartridge.
Please use only original Frama inkjet
cassettes.
Please insert an inkjet cassette
bearing the right country number
The cartridge used by you is for use
in another country.
Put in a new inkjet cassette.
Please put in a ca
rtridge of the
right colour
The cartridge used by you does not
comply with the colour specifications
of your country.
Put in a new inkjet cassette.
Cartridge is empty. Please install
new inkjet cassette
Put in a new inkjet cassette.
The date of
expiry (shelf life) is
past. Put in a new inkjet cassette
The cartridge used has exceeded its
expiry date (shelf life).
Please first look at the latest date for
use (expiry date / shelf life) before
you put your cartridge in place.

Frama Matrix F2
42
10. Frama Matrix F2 technical data
Speed (handling rate) up to 1200 letters/hour (depending on model
configuration)
Max. Letter thickness: 10 mm
Display: graphical touch screen
Preselect / default process: FramaOnline2
Number of integrated advertising messages: 2
Number of customer-specific advertising messages: 5
Dimensions of advertising message: 52 x 25 mm
Dimensions (W x H x D): 305 x 205 x 210 mm
Weight: 6.8 kg
10.1. Storage and operating conditions
Matrix F2 operating conditions:
Temperature range: 10°C – 40°C
Relative air humidity: 10% – 80%
1003577 Inkjet cassette operating conditions:
Temperature range: 10°C – 40°C
Relative air humidity: 10% – 80%
1003577 Inkjet cassette storage conditions:
Temperature range: 10°C – 30°C
Relative air humidity: 5% – 80%
10.2. Recycling and disposal
The WEEE directive (Waste Electrical and Electronic Equipment; 2002/96/EC) was drawn up
for the protection of human health and the environment to ensure that worn-out products
are disposed of while utilizing the best available reprocessing, recovery and technical
recycling possibilities. Your product has been developed and manufactured using top-quality
materials and components which can be recycled and reprocessed.
Don’t throw this product into the household waste.
Please inform yourself about local collection points for electrical and electronic waste products which
are marked appropriately.
When you purchase a replacement product, you can hand over your old product to your specialized
dealer / supplier. Specialized dealers / suppliers have the obligation to take back old products in
accordance with the WEEE directive.

Frama Matrix F2
43
CE DECLARATION OF CONFORMITY
in accordance with the EEC low-voltage directive 2006/95/EG in accordance with appendix III B;
of 12. December 2006
Hereby we explain that those corresponds to below designated products in its conception and design
as well as in circulation the execution the fundamental safety and health requirements of the
Community directive low-voltage brought by us. In the case of a change of the product not coordinated with us this explanation loses its validity.
Manufacturer:
Frama AG
Dorfstrasse 6
CH-3438 Lauperswil
Description of the electrical equipment:
Product name: Matrix F2
Type: Franking system
The agreement with further valid guidelines/regulations following for the product is
explained:
EMC Directive (2004/108/EG) of 15. December 2004
Reference to the harmonised standards:
EN 60950-1:2006/AC:2011
EN 55014-1:2006 + A1:2009 + A2:2011
EN 55014-2:1997 + A1:2001 + A2:2008
EN 55022:2010
EN 55024:2010
EN 61000-6-1:2007
EN 61000-6-3:2007 + A1:2011
EN 61000-3-2:2006 + A1:2009 + A2:2009
EN 61000-3-3:2008
Lauperswil, 01.05.2014
Thomas P. Haug
CEO

Frama Matrix F2
44
The right to make changes in this operating guide is reserved. Frama AG also reserves the right to change and / or adapt parts
of this operating guide and / or the product at any time without prior notice. The shown postal rates and other, only partly valid
information serve solely as examples and make no claim to topicality.

Frama Matrix F2
45
Frama AG Matrix F2
CH-3438 Lauperswil 1017198 R01.01/06.14
Switzerland
 Loading...