

Page 1
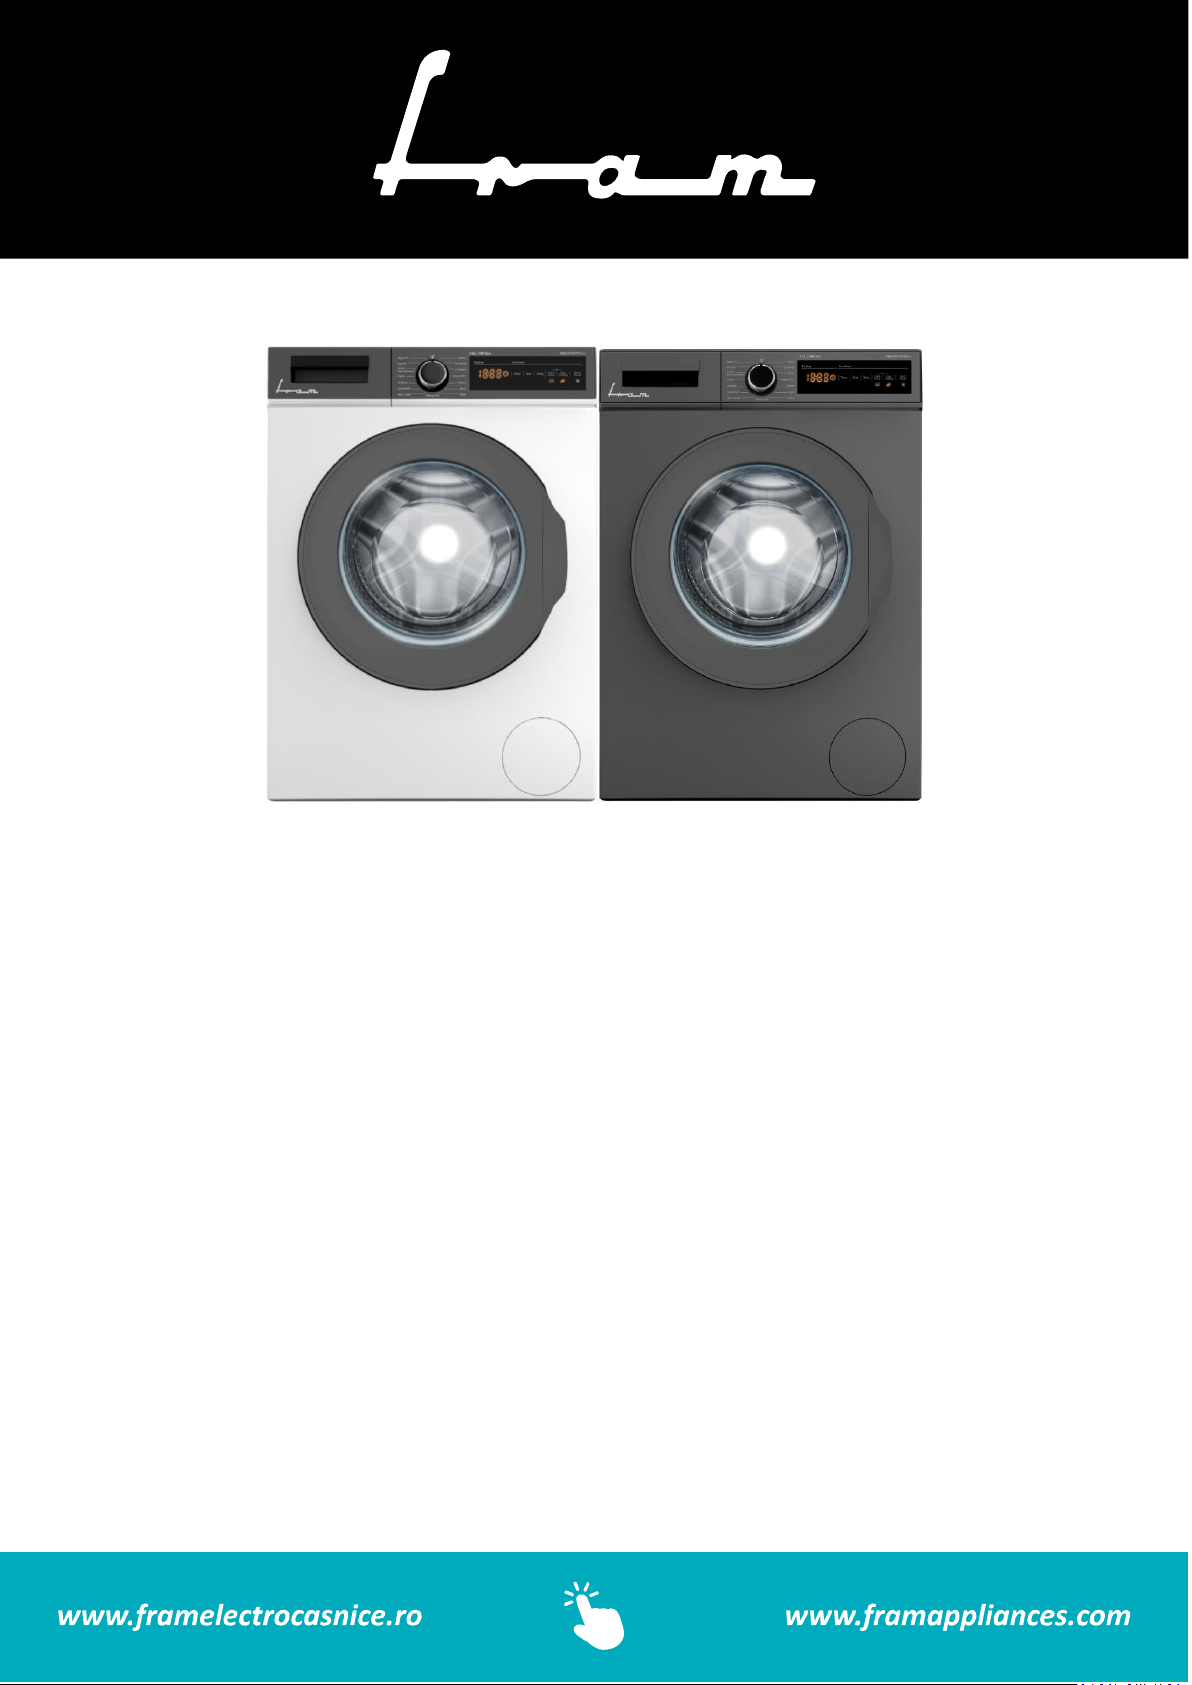
FWM-V914T2TD+++ / FWM-V914T2TSD+++
MAŞINĂ DE SPALAT AUTOMATĂ
Capacitate: 9 kg
1400 rpm
Page 2
1
Înainte de a utiliza acest aparat, citiți cu atenție manualul de instrucțiuni și păstrați-l pentru consultări
ulterioare.
➔Main de spalat automat
➔
➔Certificat de
1.
2.
3.
4.
5.
6.
7.
8.
9.
10.
11.
12.
13.
14.
15.
F R A M !
1. INTRODUCERE
2. CONȚINUTUL PACHETULUI
3. AVERTISMENTE PRIVIND SIGURANȚA
Page 3
2
16.
17. -un loc
unde nu pot ajunge copiii sau arun-
-
18. -
19.
20.
21. Cantitatea de rufe pe care o
22.
23.
R
PERICOL DE ARSURI!
deoarece produsul poate atinge temperaturi
RISC DE DECES CAUZAT DE CURENTUL ELECTRIC!
1.
2.
3. ablu -
4.
5.
6.
RISC DE INUNDARE!
1.
2.
1.
Page 4
3
1.
2.
3.
4.
1.
2.
3.
4.
5.
1.
2.
3.
4.
Page 5
4
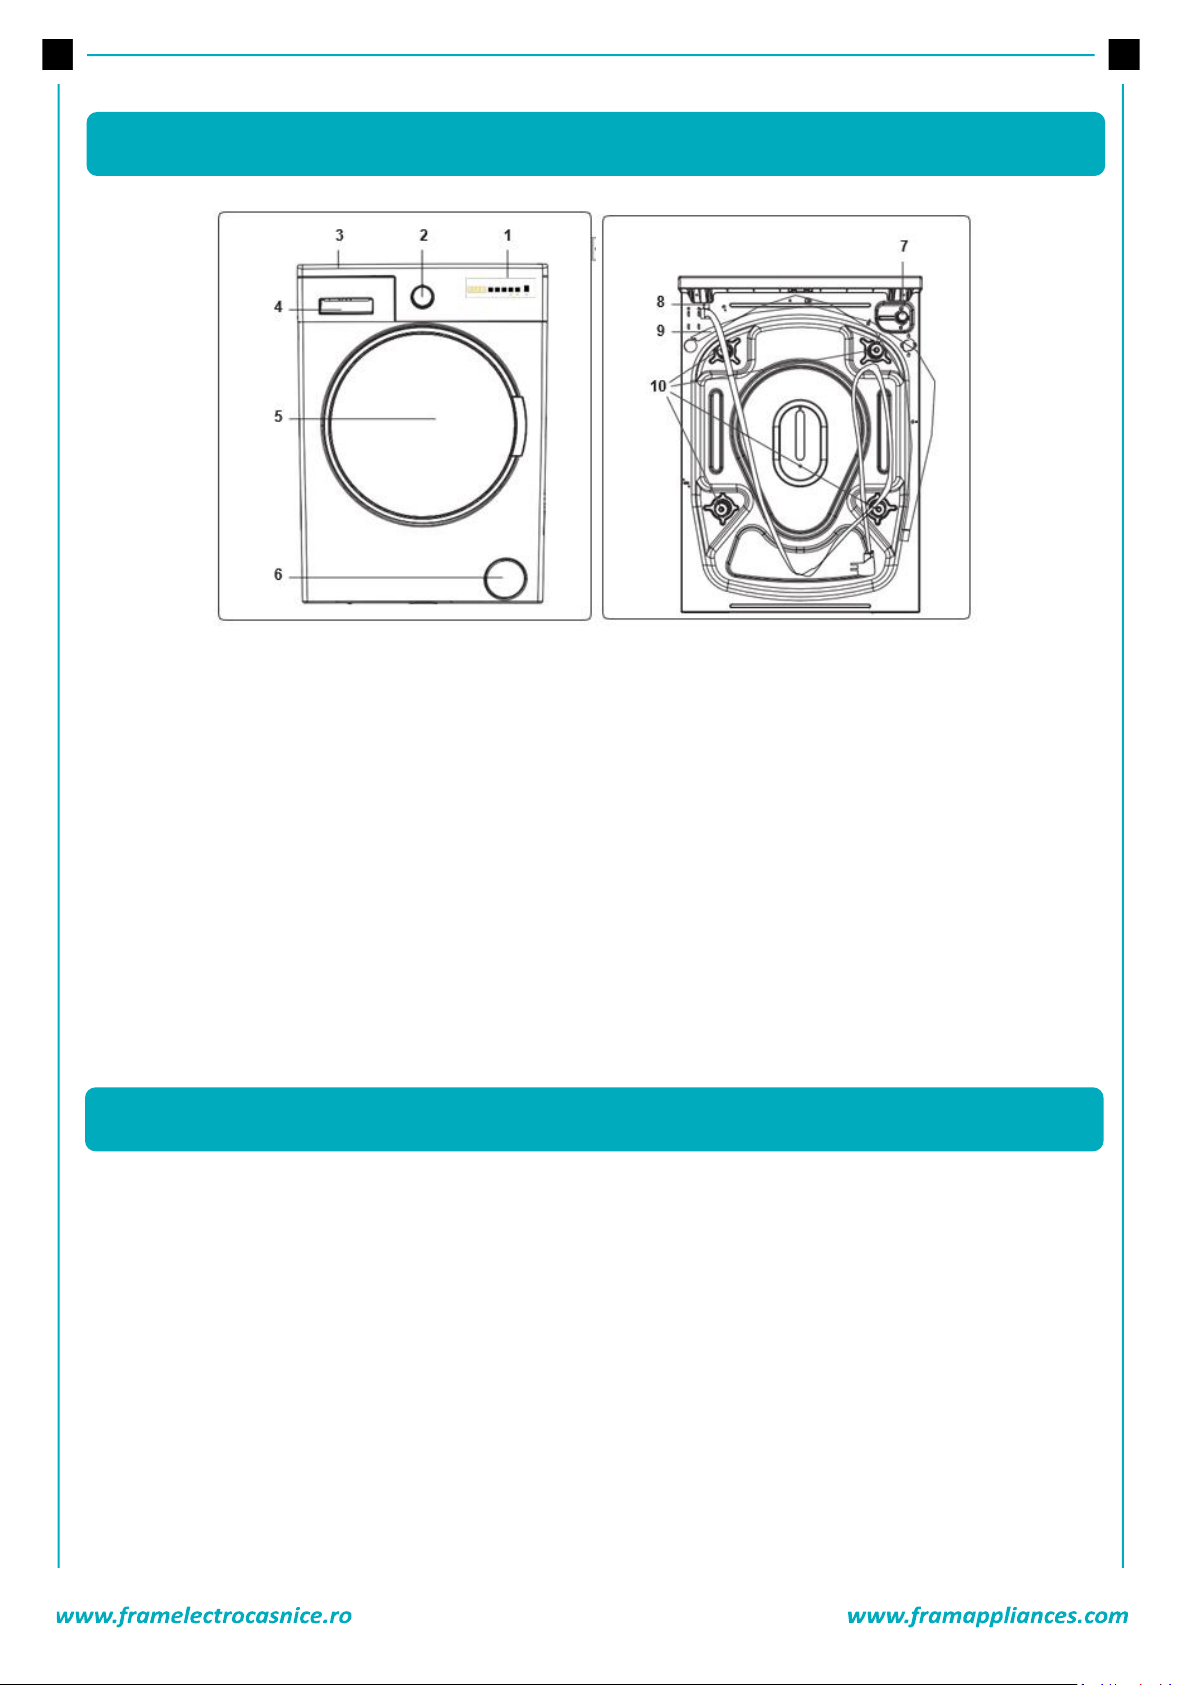
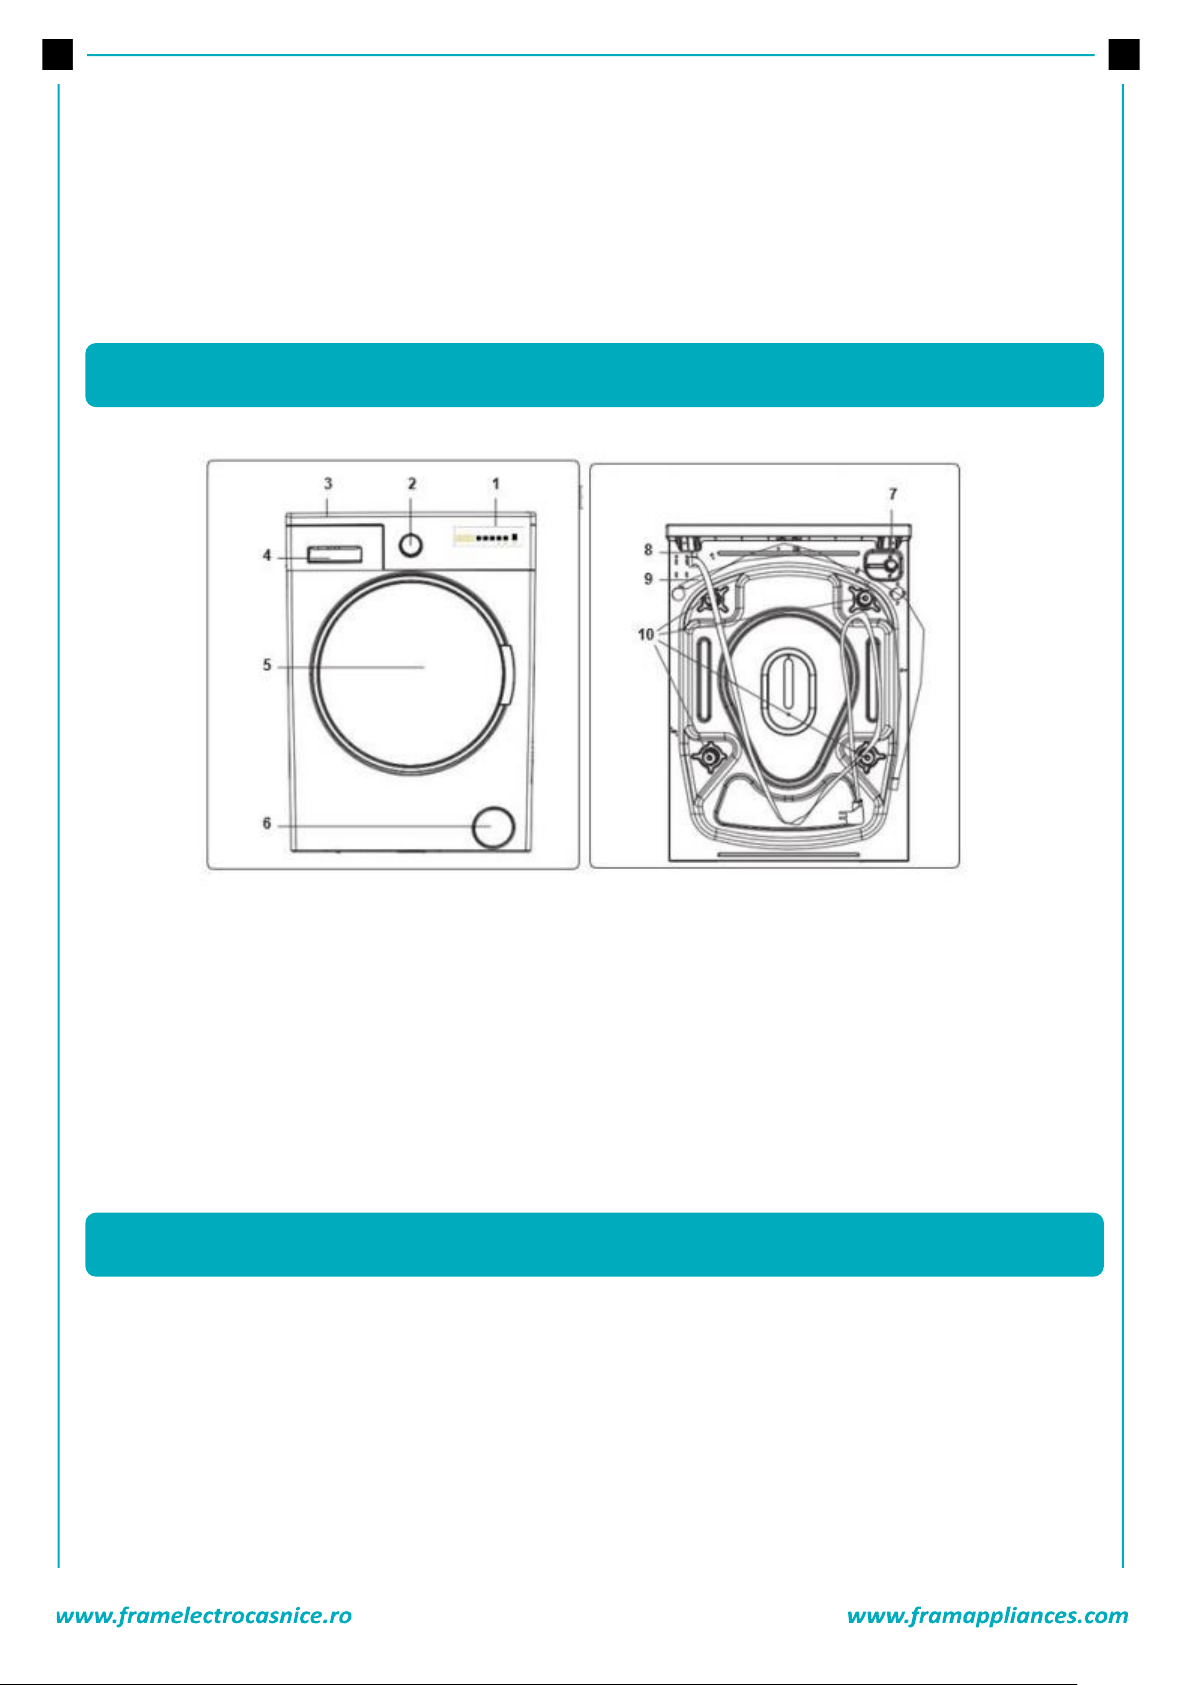
1. electronic
2. Buton programe
3. Parte
4. Sertar de detergent
5. Tambur
6. Capac filtru
7. admisie
8. Cablu de alimentare
9. Furtun de evacuare
10. uruburi de transport
1.
2.
3.
4.
5.
5. INSTALARE
4. DESCRIEREA PRODUSULUI
Page 6
5
Page 7
6
•
•
•
•
•
•
•
•
•
•
•
•
•
Page 8
7
•
•
•
•
1. Sertar de detergent
2. Buton programe
3. A electronic
~ 95 cm
~ 145 cm
~ 140 cm
~ 95 cm
95 cm
150 cm
6. PANOU DE CONTROL
Page 9
8
1. Accesorii pentru detergent lichid
2. Compartiment de detergent
3. Compartiment de balsam
4.
5.
6.
agentul de
calcarului. interiorul
Acest compartiment este destinat pentru dedurizatoare, balsamuri sau amidon.
de pe ambalaj.
balsam lichid.
Page 10
9
7. BUTONUL DE PROGRAM
Page 11
10
•
•
•
•
8. AFIŞAJ ELECTRONIC
9. UTILIZAREA MASINII
Page 12
11
•
•
•
•
•
•
Page 13
12
•
•
•
•
Cantitatea de detergent pe care o introduc
el de-al doilea compartiment al sertarului
de detergent.
oduce în sertarul pentru deter
ccompartiment.
i pentru rufele dvs este mentionata pe ambalajul detergentului.
Cu cât gradul de duritate a apei este mai mare, o cantitate de detergent se va folosi.
nivelul
Balsamurile cu densitare ridicate sunt necesare pentru a fi diluate la un grad înainte de a fi introduse
P
de nivel a detergentului lichid din trusa de accesorii sau aparatul detergentului lichid în al doilea
com
pe a
1. la reeaua de alimentare.
2. .
3.
4.
5.
Page 14
13
1.
2.
3.
4.
1.
2.
3.
1.
2.
Page 15
14
3. FUNCTIE START INTARZIAT
de ore .
4.
5.
Page 16
15
•
•
•
•
•
Page 17
16
•
•
scoaterea rufelor.
• OFF.
•
•
COTTON
Temperatura de spalare
40°, 60°, 70°, 80°, 90°
Capacitate maxima de rufe uscate
9,0
Compartiment pentru detergent
2
Durata program (Min)
230
Tip de rufe / Descriere
4,5 kg),
pijamale etc.)
ECO 40-60
Temperatura de spalare
*40° - 60°
Capacitate maxima de rufe uscate
9,0
Compartiment pentru detergent
2
Durata program (Min)
228
Tip de rufe / Descriere
4,5 kg), pijamale
etc.)
COTTON (Pre-wash)
Temperatura de spalare
--, 30°, 40°, 50°, 60°
Capacitate maxima de rufe uscate
9,0
Compartiment pentru detergent
1&2
Durata program (Min)
164
Tip de rufe / Descriere
4,5 kg), pijamale
etc.)
10. TABEL CU PROGRAME
Page 18
17
COTTON 20°
Temperatura de spalare
--, 20°
Capacitate maxima de rufe uscate
4,5
Compartiment pentru detergent
2
Durata program (Min)
96
Tip de rufe / Descriere
etc.)
COLOURS
Temperatura de spalare
--, 30°, 40°
Capacitate maxima de rufe uscate
3,5
Compartiment pentru detergent
2
Durata program (Min)
222
Tip de rufe / Descriere
etc.)
WOOL
Temperatura de spalare
--, 30°
Capacitate maxima de rufe uscate
2,5
Compartiment pentru detergent
2
Durata program (Min)
43
Tip de rufe / Descriere
RINSE
Temperatura de spalare
-
Capacitate maxima de rufe uscate
9,0
Compartiment pentru detergent
-
Durata program (Min)
30
Tip de rufe / Descriere
ALLERGY SAFE
Temperatura de spalare
--, 30°, 40°, 50°, 60°
Capacitate maxima de rufe uscate
4,0
Compartiment pentru detergent
2
Durata program (Min)
197
Tip de rufe / Descriere
Lenjerie de copii
Page 19
18
SPIN/DRAIN
Temperatura de spalare
-
Capacitate maxima de rufe uscate
9,0
Compartiment pentru detergent
-
Durata program (Min)
17
Tip de rufe / Descriere
HAND WASH
Temperatura de spalare
--, 30°
Capacitate maxima de rufe uscate
2,5
Compartiment pentru detergent
2
Durata program (Min)
90
Tip de rufe / Descriere
OUTDOOR
Temperatura de spalare
--, 30°, 40°
Capacitate maxima de rufe uscate
3,5
Compartiment pentru detergent
2
Durata program (Min)
110
Tip de rufe / Descriere
Textile
etc).
DUVET
Temperatura de spalare
--, 30°, 40°
Capacitate maxima de rufe uscate
-
Compartiment pentru detergent
2
Durata program (Min)
103
Tip de rufe / Descriere
JEANS/ DARK GARMENTS
Temperatura de spalare
--, 30°
Capacitate maxima de rufe uscate
3,5
Compartiment pentru detergent
2
Durata program (Min)
96
Tip de rufe / Descriere
-
Page 20
19
FAST 60 min (*)
Temperatura de spalare
--, 30°, 40°, 50°, 60°
Capacitate maxima de rufe uscate
4,0
Compartiment pentru detergent
2
Durata program (Min)
60
Tip de rufe / Descriere
°C în 60 de minute.
RAPID 15 min (**)
Temperatura de spalare
--, 30°
Capacitate maxima de rufe uscate
2,0
Compartiment pentru detergent
2
Durata program (Min)
15
Tip de rufe / Descriere
Într-
Page 21
20
Numele
programului
Capacitate
kg
Consum de energie
(kWh/ciclu)
Durata programului
Ore : Minute
Consum de
litri/ciclu
Temperatura
max.
°C
umiditate
%
1400 rpm
Capacitate
1/2 1/4
Capacitate
1/2
1/4
Capacitate
1/2 1/4
Capacitate
1/2 1/4
Capacitate
1/2
1/4
Bumbac
90
9
2,4
03:13
84
81
53%
Bumbac
60
9
1,35
03:50
57
57
53%
Eco
40-60
9
1,26
0,71
0,36
03:48
02:54
02:54
57
48
36
45
36
26
53%
53%
53%
Sintetice /
e de exterior
3,5
0,57
01:50
50
42
53%
Rapid
60
4
1,11
01:00
35
58
53%
Bumbac
20
4,5
0,21
01:36
53
20
53%
11. ÎNTREŢINEREA ŞI CURĂŢAREA MAŞINII
Page 22
21
•
•
•
•
AVERTISMENT:
Aceste
•
•
•
•
Page 23
22
•
•
•
•
•
•
Page 24
23
1. Corp
2.
12. CORP PRINCIPAL / TAMBUR
Page 25
24
•
•
DEFECTIUNE
CAUZE POSIBILE
DEPANARE
Conectati masina.
Sigurantele nu sunt bune.
Inlocuiti sigurantele.
Oprirea electricitatii.
Verificati puterea de alimentare.
Butonul Pornire/ Pauza nu
este apasat.
Apasati butonul Start/Pauza.
Comutati butonul programului in
pozitia dorita.
Usa masinii nu este inchisa
complet
Inchideti usa.
Robinetul este oprit.
Furtunul de admisie al apei
Furtun de
înfundat.
admisie a apei.
Filtru admisie înfundat.
complet.
Furtun de evacuare înfundat
sau
-l sau indreptati-l.
Filtrul pompei înfundat.
fost
reglate.
montate pentru transport nu
sunt dezasamblate.
rufe sau acestea nu sunt bine
distribuite.
sprijinirea pe
13. PROBLEME DE FUNCTIONARE
Page 26
25
DEFECTIUNE
CAUZE POSIBILE
DEPANARE
detergent.
Pentru a elimina formarea de
-10 minute,
Gradul de contaminare a
rufelor nu corespunde cu
programul pe care l-
pentru gradul de contaminare al
tabelul de program)
insuficient.
contaminare al rufelor.
Rufe
pr
jos pentru
furtunului de evacuare a apei.
tamburului.
------------------------------------
Particulele nedizolvate ale
rufe ca pete albe.
-
au uscat.
Pete gri apar pe rufe.
Motivul pentru care apar poate
sau întârzie.
nebalansat de control al
rufele uniform.
sunt distribuite adecvat. Data
într-un mod uniform.
Page 27
26
COD DE
DEFECT POSIBIL
CE
E01
-
mai apropiat agent autorizat de service.
E02
Presiunea apei sau nivelul apei din
apropiat agent autorizat de
service.
E03
pompei este înfundat sau conexiunea
service. (*)
E04
-
service.
14. PRECAUTII SI AVERTISMENTE
15. INFORMATII PRACTICE
Page 28

27
-
serie.
DATE TEHNICE
Codul
cu toate
-ul
https: //
-ul nostru web utilizând linkurile de mai jos:
Manuale de utilizare: www.framelectrocasnice.ro
Informatii referitoare la service: www.framelectrocasnice.ro
Page 29
28
F R A M
prealabil al companiei NETWORK ONE DISTRIBUTION.
Copyright © 2020 Network One Distribution. Toate drepturile rezervate.
www.framelectrocasnice.ro; www.framappliances.com; www.nod.ro
Europene.
Importator: Network One Distribution
Str. Marcel Iancu, nr. 3-
Tel: +40 21 211 18 56, www.framelectrocasnice.ro , www.nod.ro
www.framelectrocasnice.ro
Page 30
29
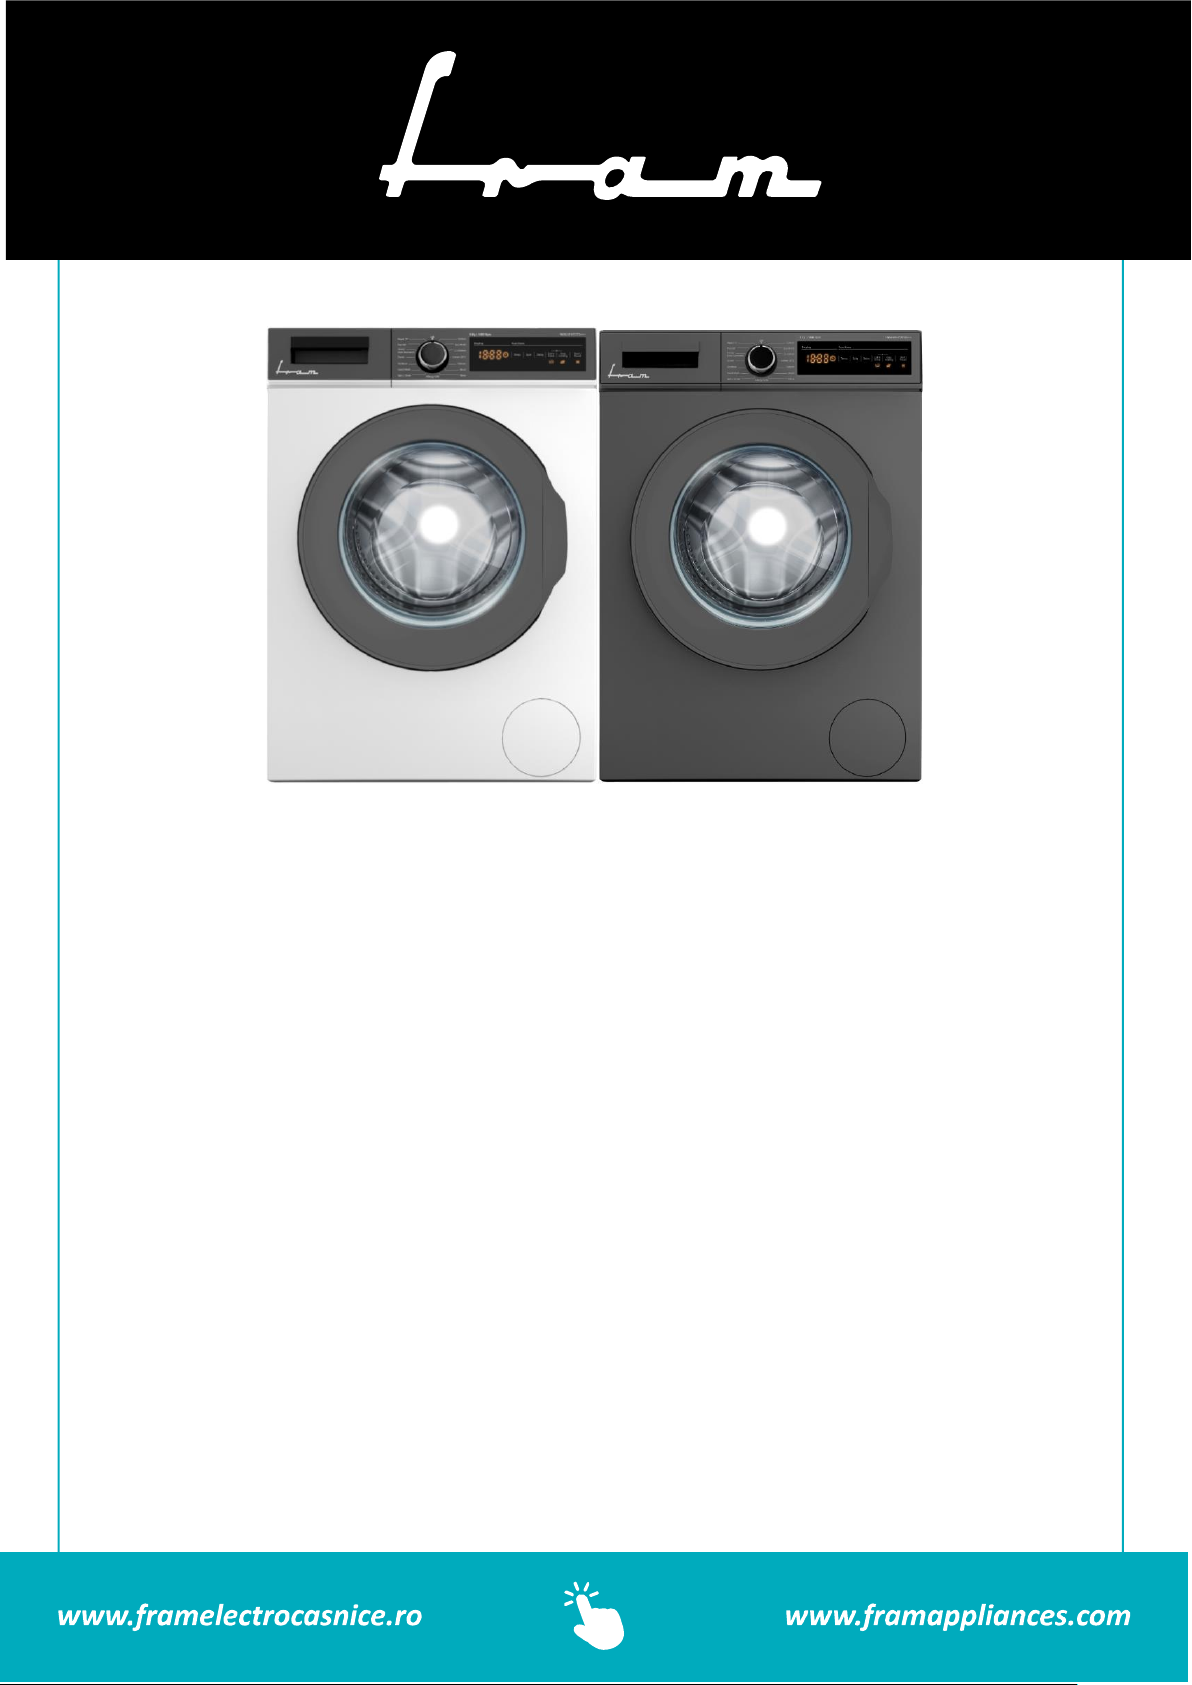
FWM-V914T2TD+++ / FWM-V914T2TSD+++
AUTOMATIC WASHING MACHINE
Loading capacity: 9 kg
Spin capacity: 1400 rpm
Energy class: D
Page 31
30
➔ Automatic washing machine
➔User manual
➔Warranty card
1.
2.
3.
4.
5.
6.
7.
8.
9.
10.
11.
12.
Thank you for choosing this Fram product!
1. INTRODUCTION
2. YOUR PACKAGE CONTAINS
3. SAFETY INFORMATION
Page 32
31
13.
14.
15.
16.
17.
18.
19.
20.
21.
22.
23.
fabric conditioner or similar
products in your machine.
DANGER OF GETTING BURNT!
Do not touch discharging hose and water during discharging as the appliance may reach high
temperatures when running
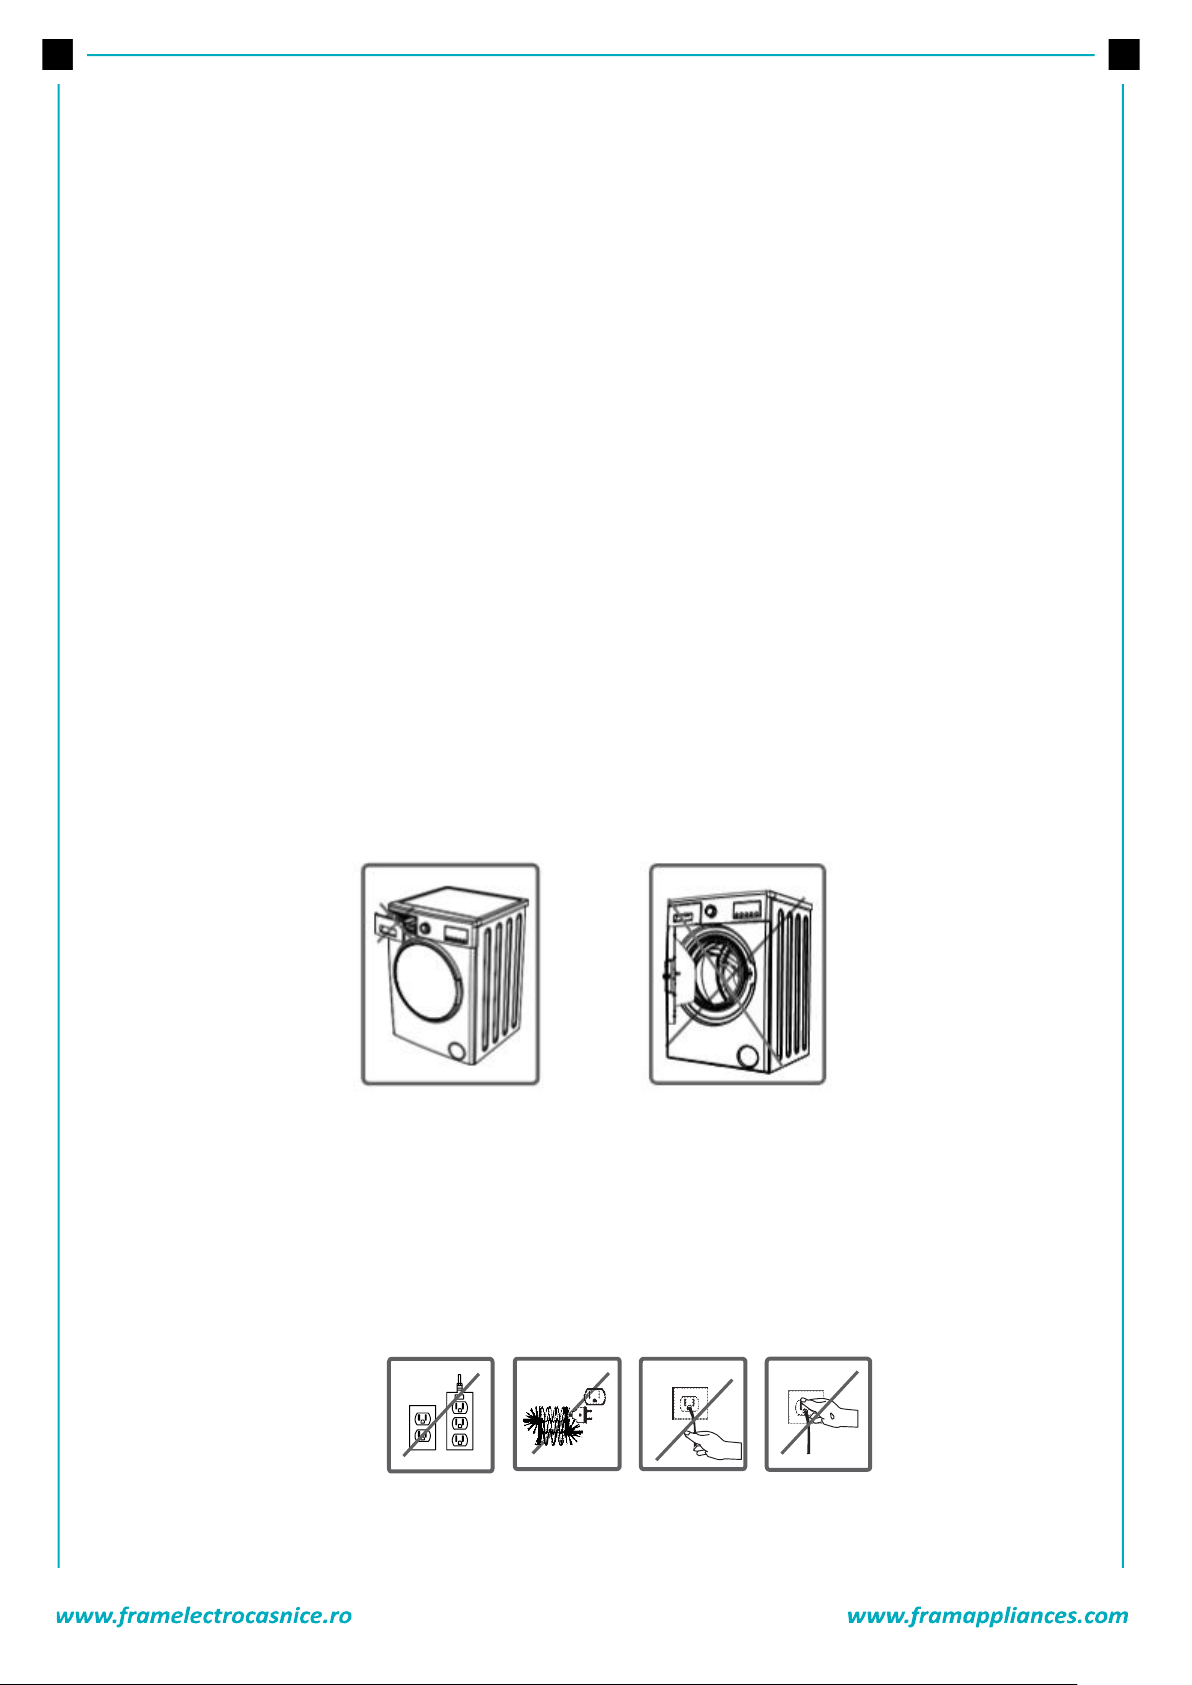
DEATH RISK DUE TO ELECTRICAL CURRENT!
1. Do not use multiple receptacles or extension cord.
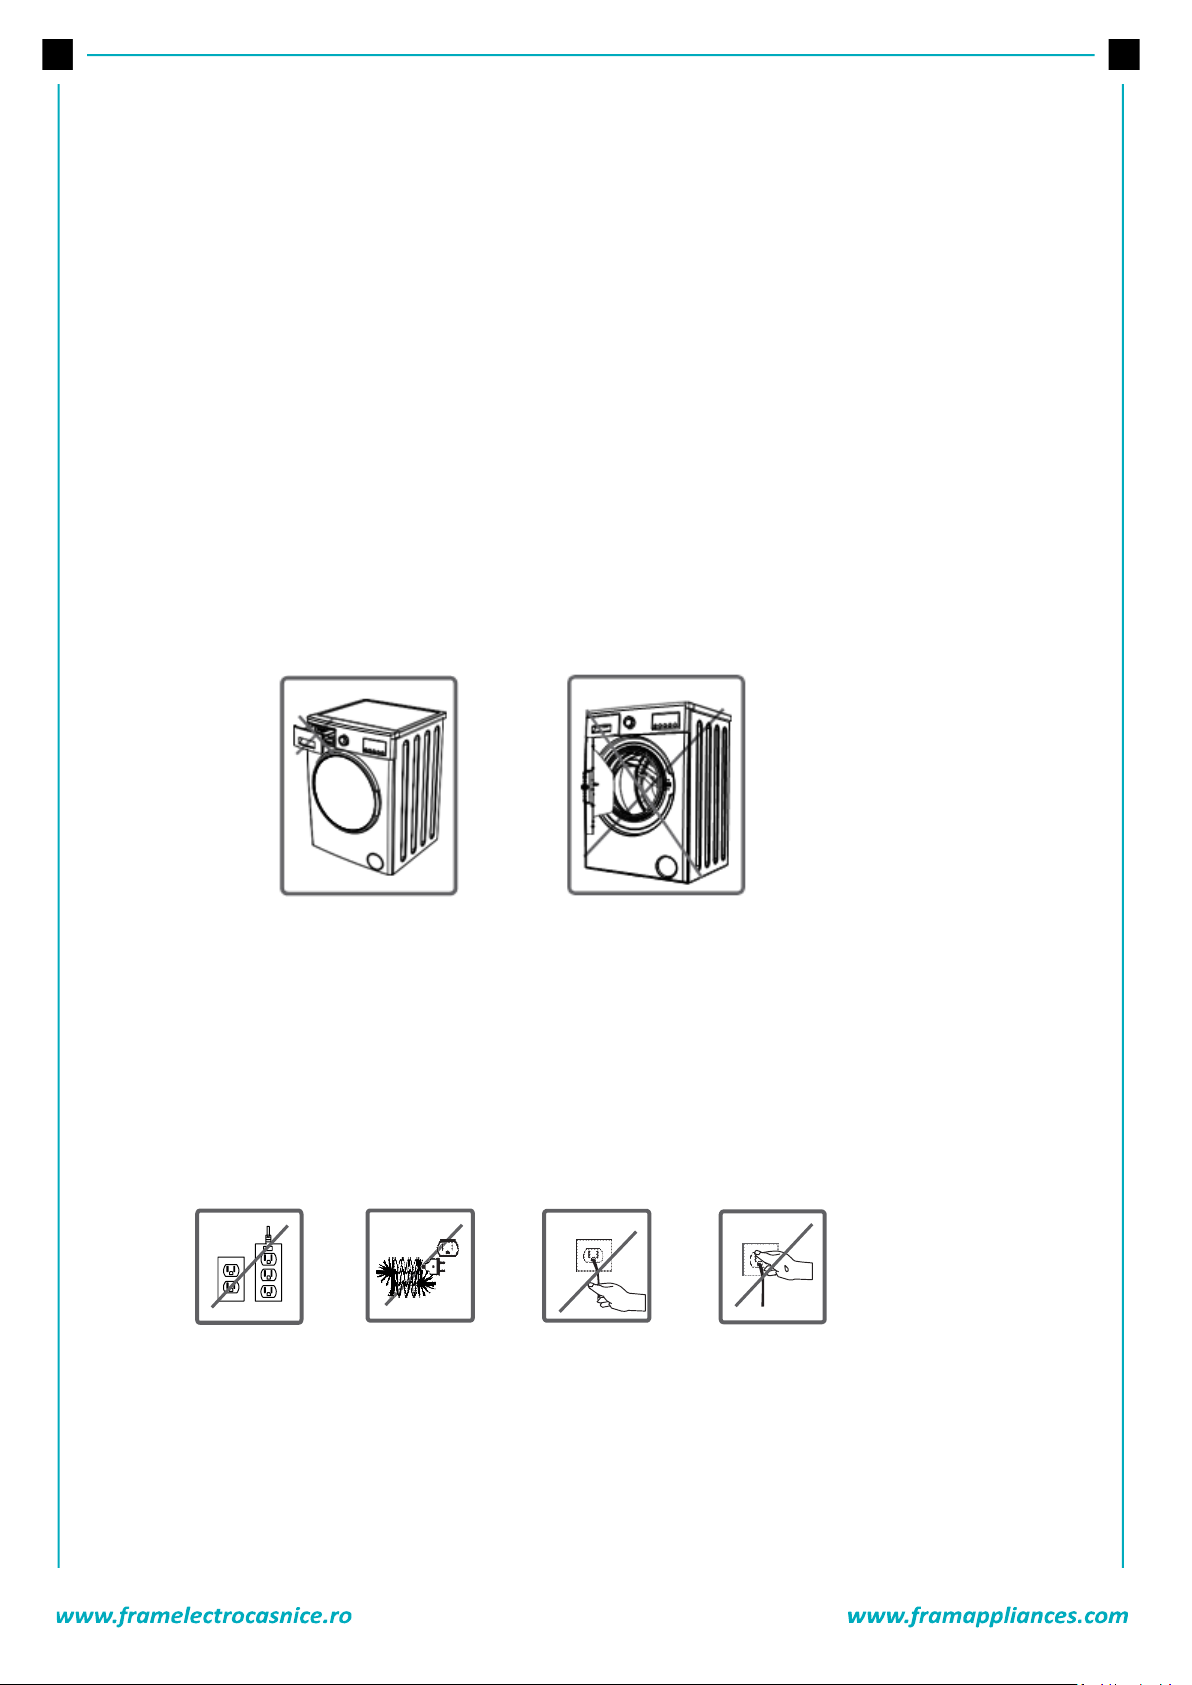
2. Do not plug in damaged plug sockets.
3. Never pull the cable when unplugging always grip the plug itself.
4. Do not plug-in or out the plug from the receptacle with wet hands to prevent electrocution!
5. Never touch the machine with wet hands or feet.
6. Call the nearest authorized service for a replacement if the power cord malfunctions.
Page 33
32
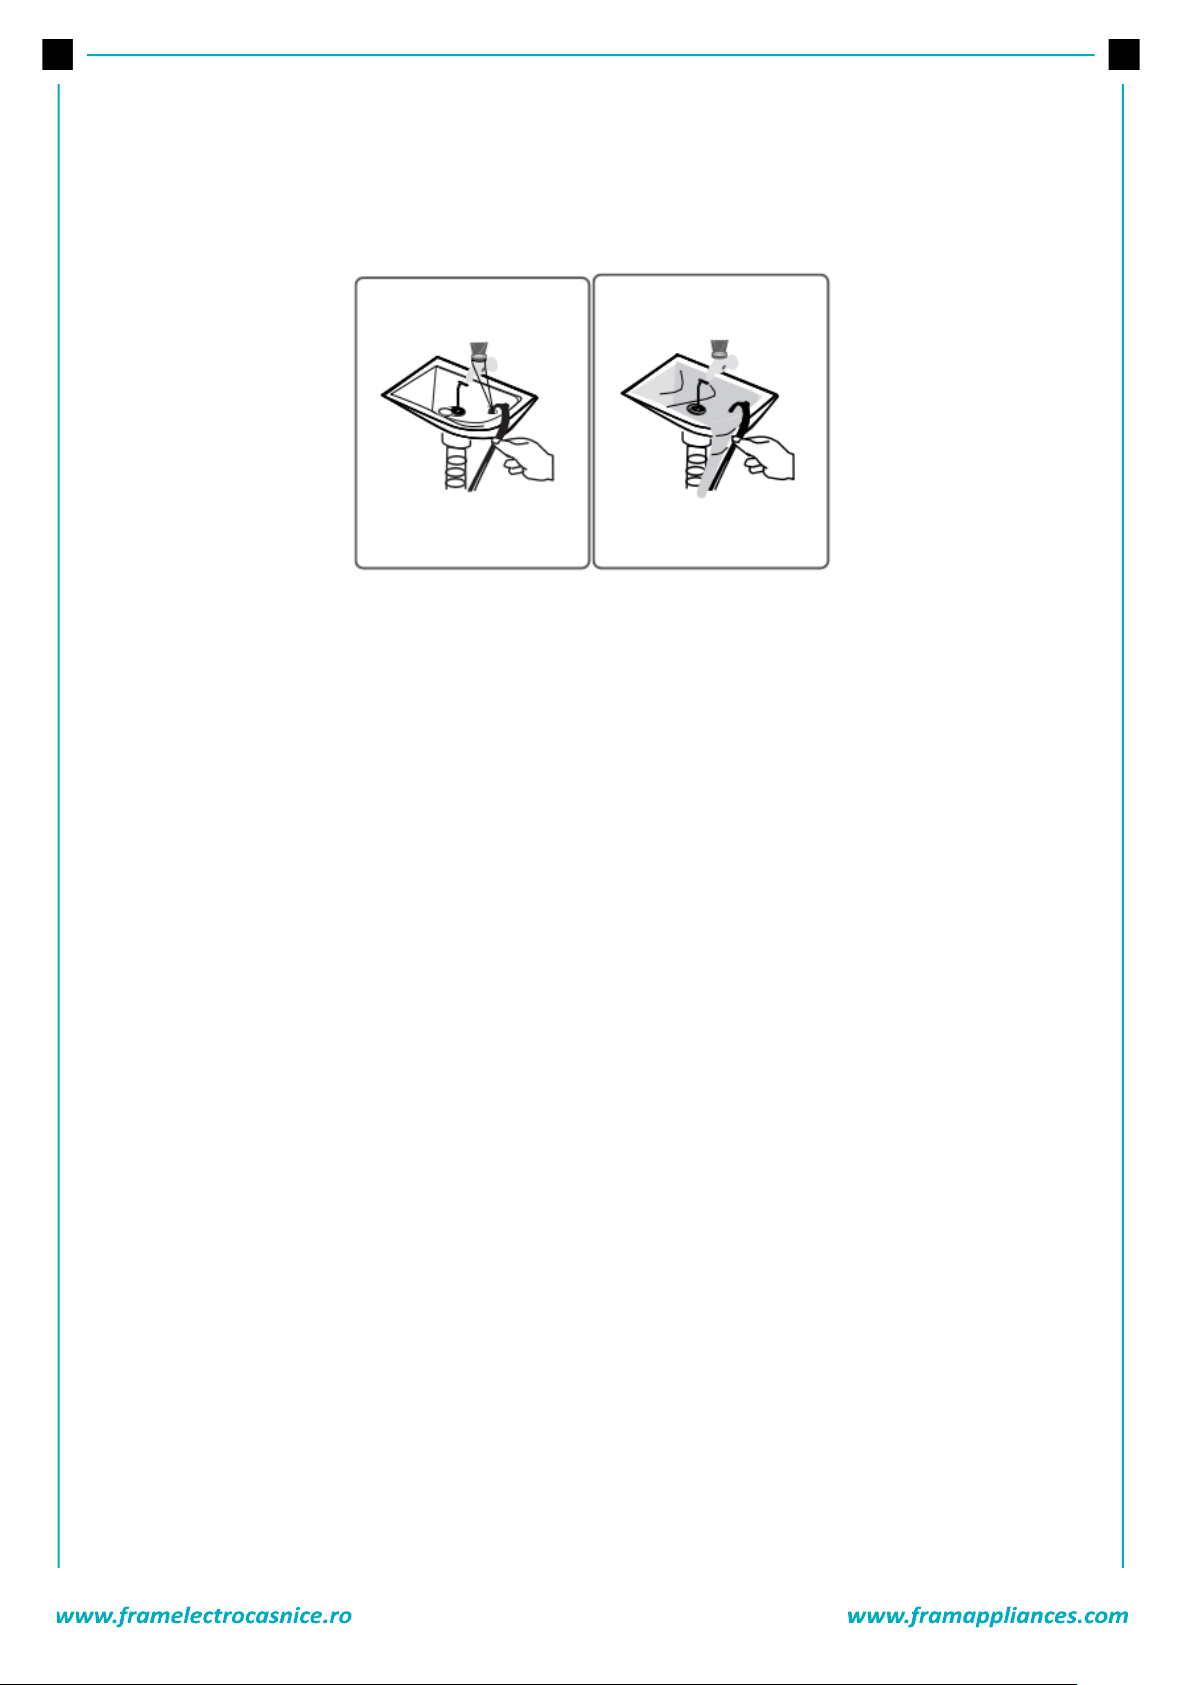
FLOODING RISK!
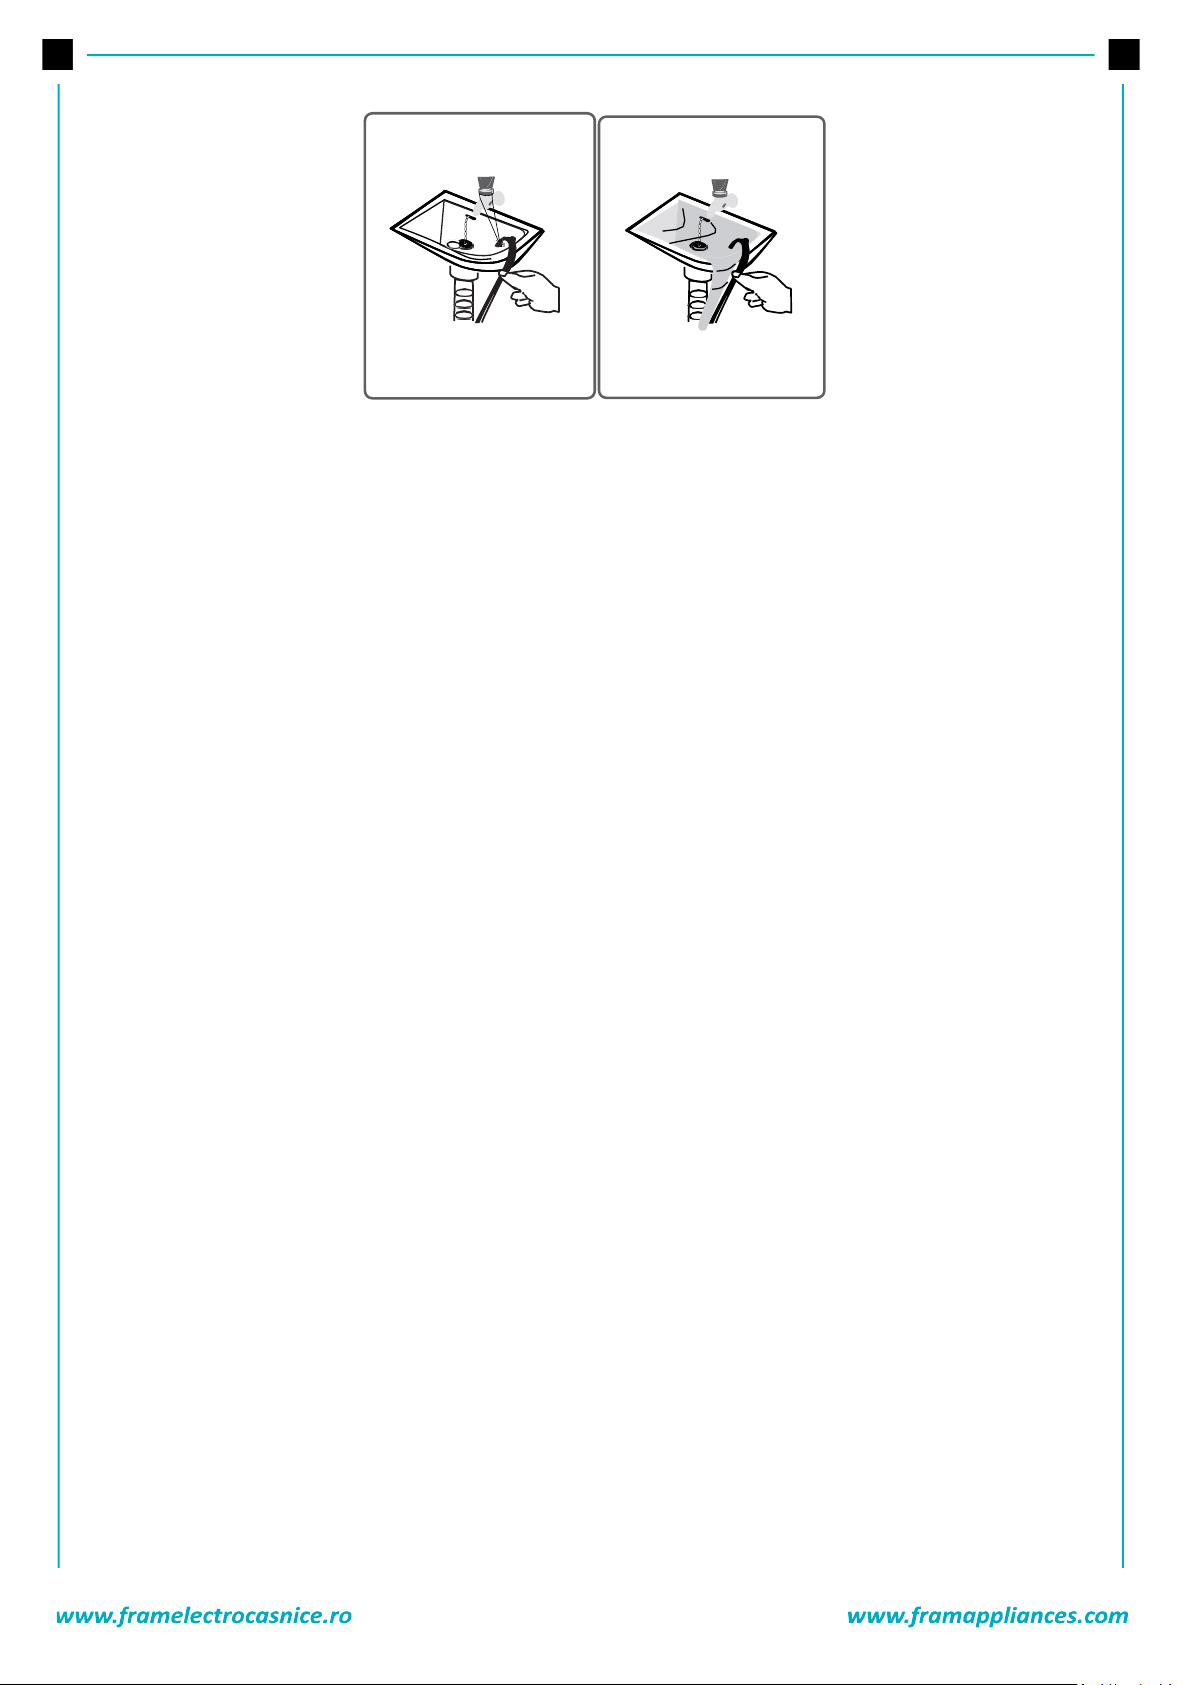
1. Check whether the water runs fast or not before placing the discharge hose on the sink.
2. Take necessary measures to prevent the slipping of your hose.
3. The backfiring force of a hose that is not placed appropriately can displace the hose. Prevent the
stopper inside your sink from blocking the sink hole.
DANGER OF FIRE!
1. Do not keep inflammable liquids near your machine.
2. The sulfur content of paint removers might cause corrosion. For this reason, never use paint-
removing materials in your machine.
3. Never use products that contain solvent material (like washing gas) in your machine.
4. Remove all the objects in the pockets of your laundries (needle, paperclip, lighter, matches etc.)
when placing them your machine.
Fire and Explosion risk may occur.
FALL AND INJURY HAZARD!
1. Do not climb on your machine. The upper table of your machine may break and you might get injured.
2. Tidy the hose, cable and packaging of your machine during installation. You might trip over and fall.
3. Do not turn your machine upside down, or on its side.
4. Do not lift your machine by holding it from extruding parts (detergent drawer, door). These parts
might break and cause you to get injured.
5. There is the risk of tripping and injury if the materials like hose and cables are not properly stored
after your machine is installed.
Machine must be carried by 2 people or more.
CHILD SAFETY!
1. Do not leave children unattended near the machine. Children might lock themselves up into the
machine and death risk might occur.
2. Door glass and surface might be extremely hot while your machine operates. Thus, especially
touching the machine might give damage to the skins of children.
3. Keep packaging material away from children.
4. Poisoning might occur if the detergent and maintenance materials are consumed, and eyes or the
skin might be irritated if they meet the skin. Keep the cleaning materials away from the reach of
children.
Page 34
33
SAVING INFORMATION
Some important information to get more efficiency out of your machine:
The amount of laundry you put in your washing machine should not exceed the maximum amount
indicated. By this way, your machine shall run in saving mode. Not using the pre-wash feature for little and
normal-dirty laundry shall save electricity and water.
1.
2.
3.
4.
5.
6.
7.
8.
9.
10.
REMOVING THE TRANSIT BOLDS
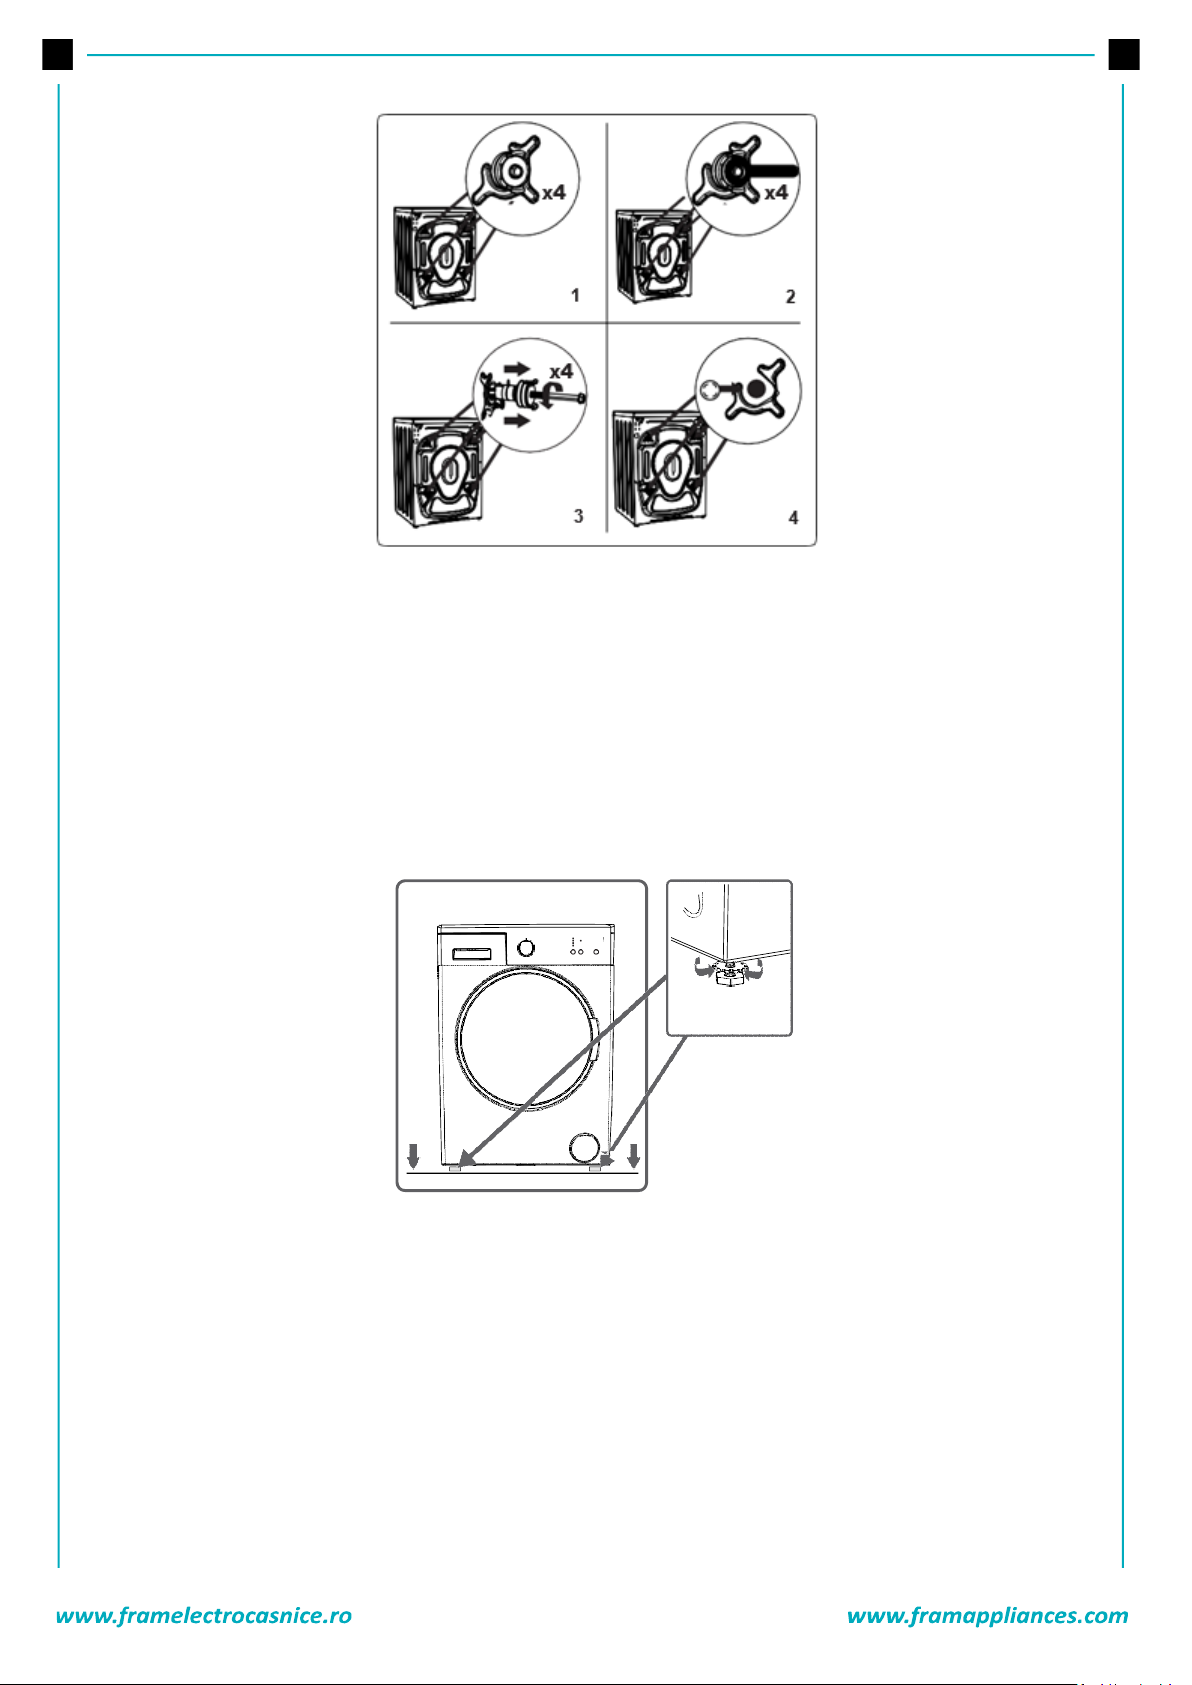
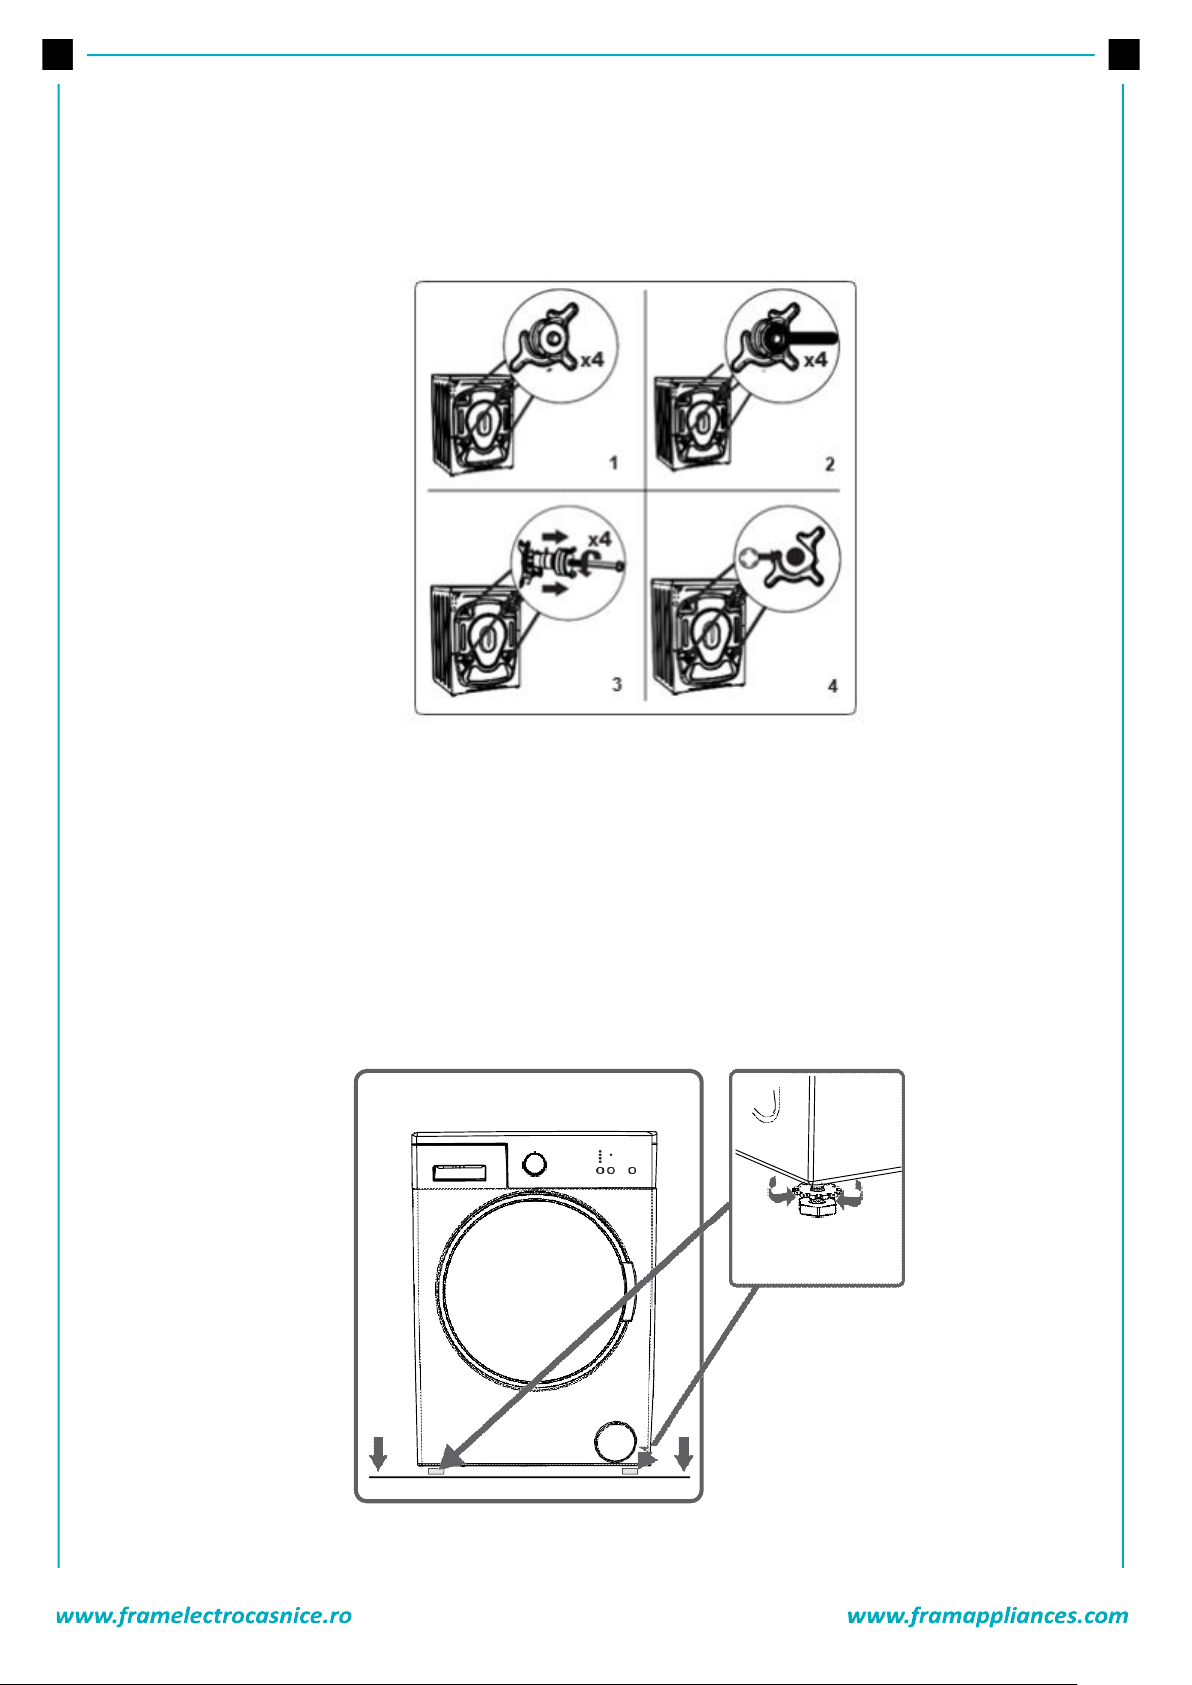
1. Before operating the washing machine, remove the 4 transportation screws and rubber spacers from
the back of the machine. If the screws are not removed, it may cause heavy vibration, noise and
product malfunction, (voiding the guarantee).
2. For this reason, transportation safety screws shall be loosened by being rotated in counterclockwise
using an appropriate wrench.
4. PRODUCT DESCRIPTION
5. INSTALATION
Page 35
34
3. Transportation screws shall be removed by pulling out.
4. Fit the plastic transportation screw taps delivered in accessories bag to the palces where
transportation screws have been removed.
5. The transportation safety screws should be stored to be used in case of transportation.
NOTE: You should absolutely remove the transportation screws of your machine before the first
usage. Faults occurring in the machines operated with transportation screw fitted shall be out of
scope of warranty.
ADJUSTMENT
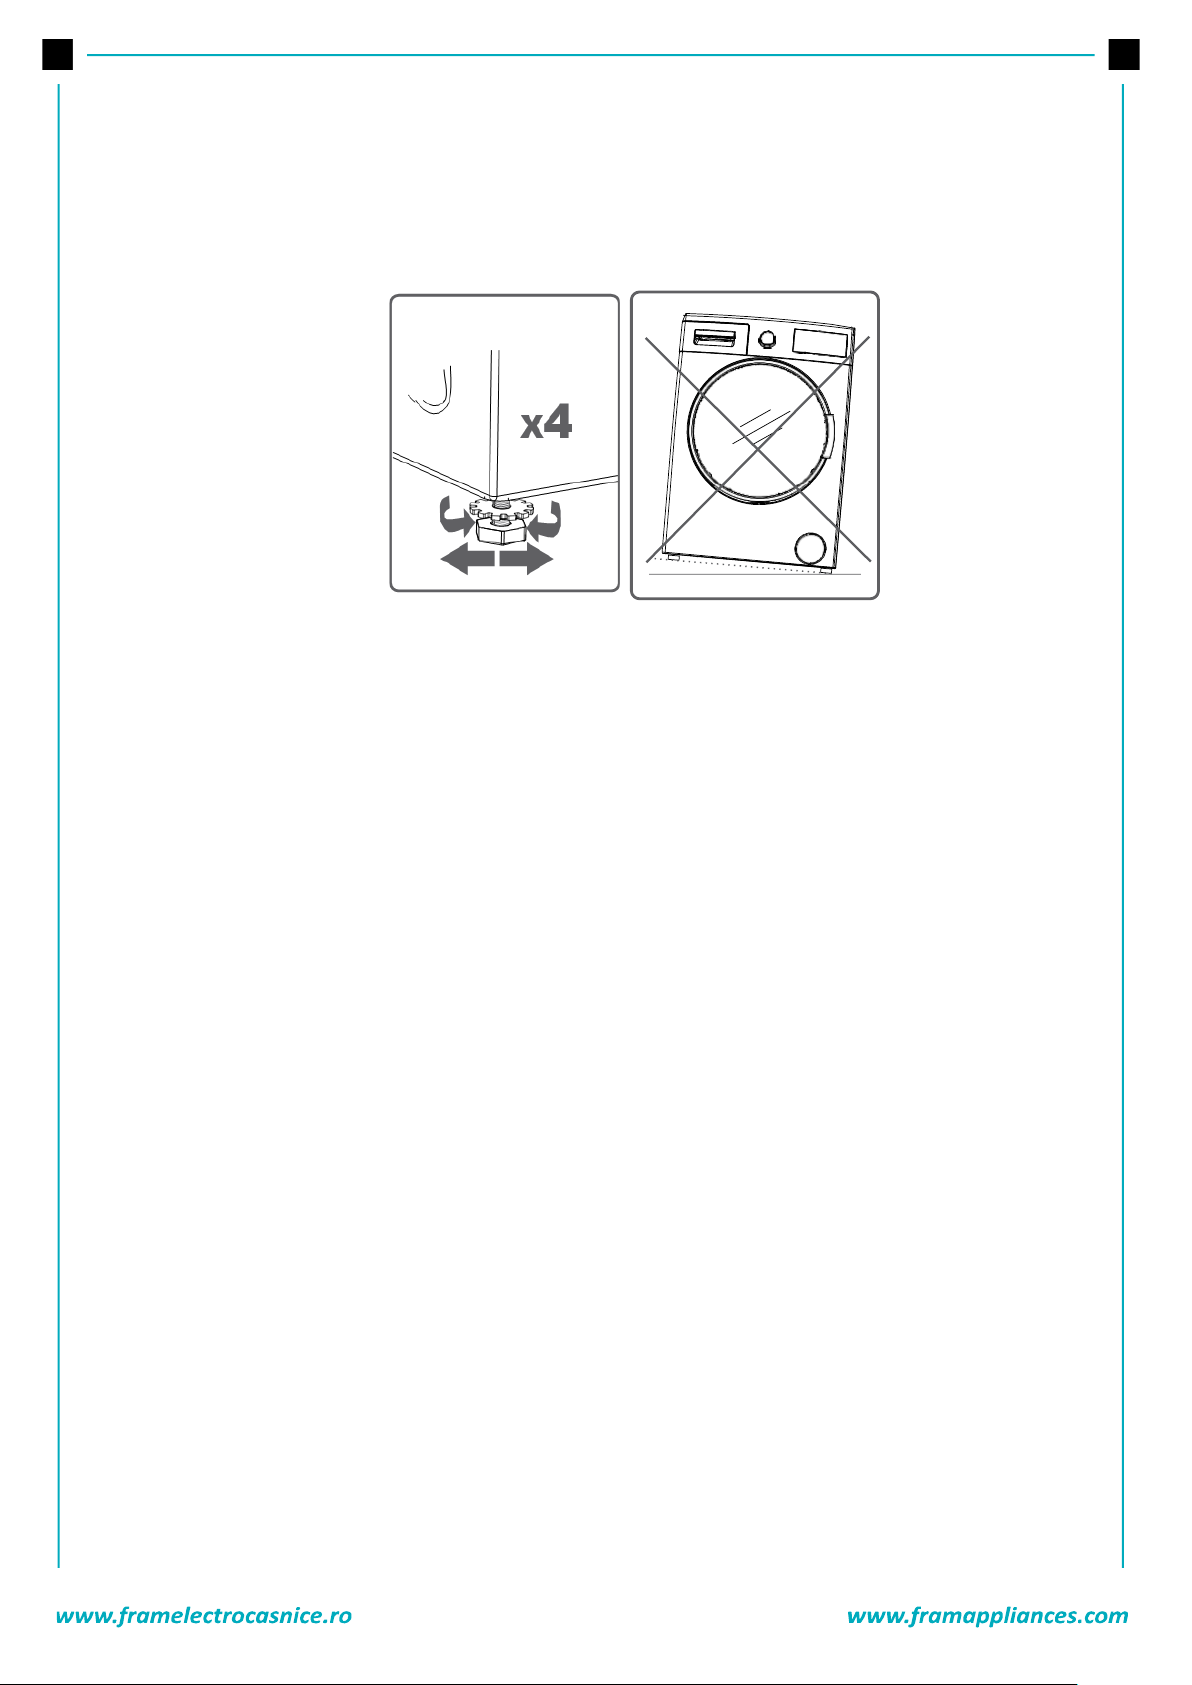
Do not install your machine on a carpet or such grounds that would prevent the ventilation of its base. To
ensure silent and vibration-free operation of your machine, it should be deployed on a non-sliding and firm
ground. You can adjust the balance of your machine through the stays. Loosen the plastic adjustment nut.
Page 36
35
Adjust the stays upward and downward by rotating them.
After maintaining the balance, compress the plastic adjustment nut upward again.
Never put cardboard, wood or suchlike materials under your machine if you are intending to stabilize the
distortions on the ground.
When cleaning the ground, on which your machine rests, be careful not to disorder stays stabilization.
ELECTRICAL CONNECTION
• Your washing machine is set to 220-240V and 50Hz.
• The mains cord of your washing machine is equipped with a specific earthed plug. This plug should
always be inserted to a earthed socket of 10 amps.
• The current value of the fuse should be 10 amps. Fuse current value of the power line connected to
this plug should also be 10 amperes.
• If you do
electrician.
• We do not take the responsibility of the damages that occur due to ungrounded usage.
NOTE: Operating your machine under low voltage will cause the life cycle of your machine to be reduced
and its performance to be restricted.
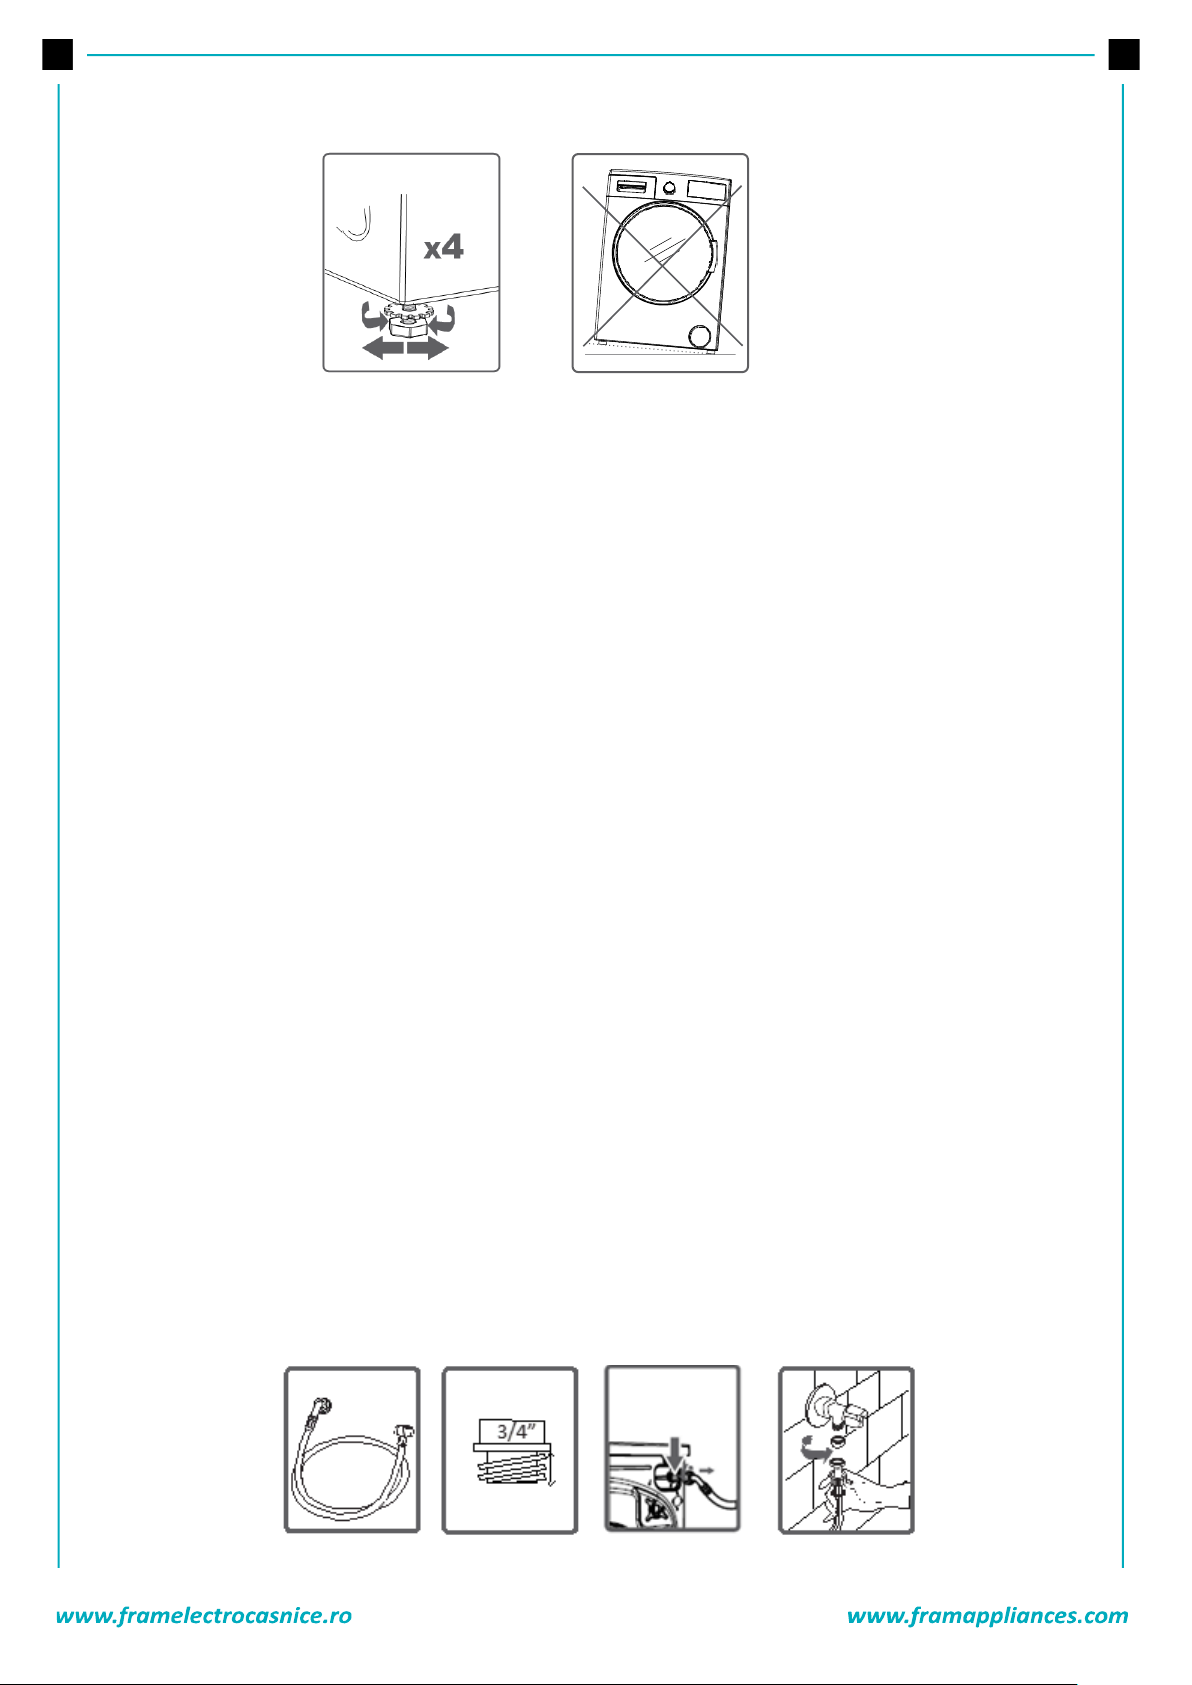
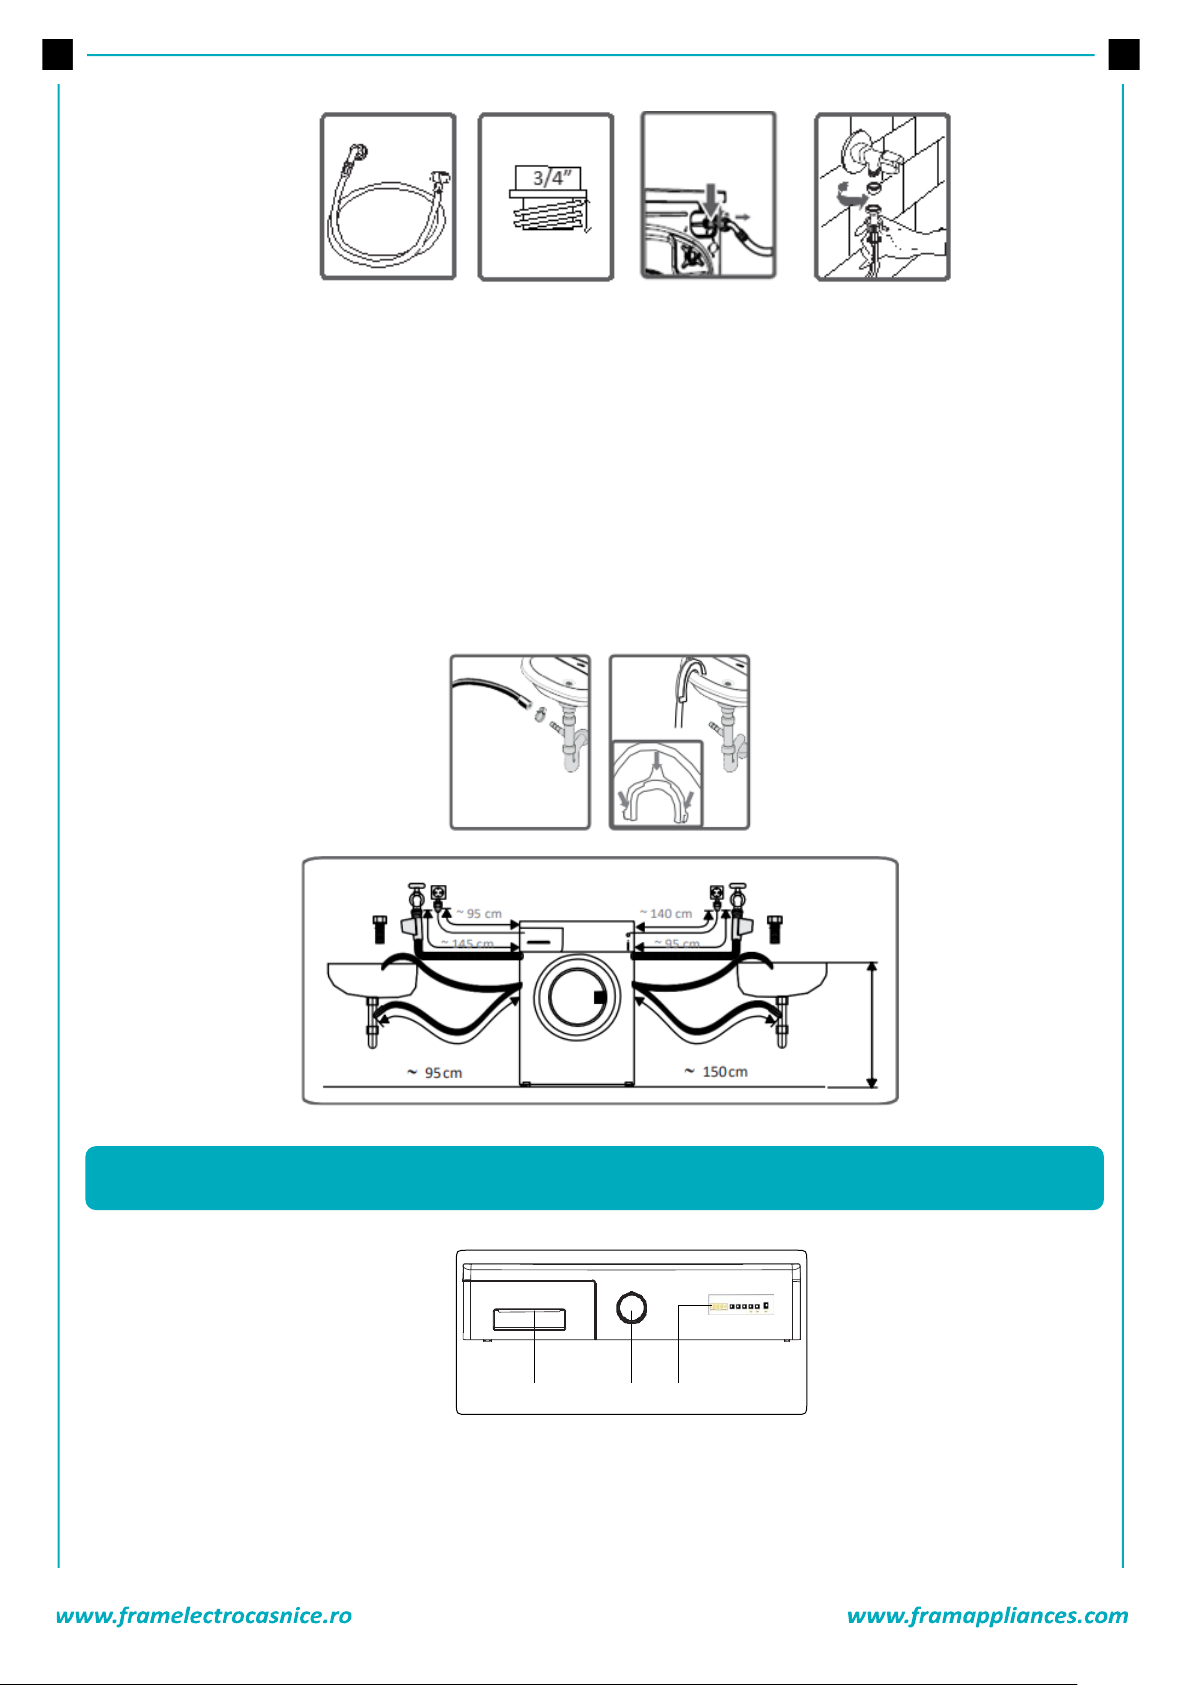
WATER INLET HOSE CONNECTION
• Your machine may have either a single inlet (cold) or double water inlets (cold/hot) based on its
specifications. White-capped hose should be connected to cold water inlet and red-capped hose to hot
water inlet (applicable for machines with double water inlets).
• To eliminate water leakages in points of contact, 1 or 2 nuts are provided in the hose package (applicable
for machines with double water inlets). Fit these nuts to the ends of new water inlet hoses on the side of
faucet.
•
• Connect the white-elbow end of the water inlet hoses to the white-filtered water inlet valve on the rear
side of the machine and the red-elbow end to red-filtered one (applicable for machines with double
water inlets). Tighten plastic parts of the junctions using your hand. In uncertain conditions, have the
connection works be done by a qualified plumber.
• Flow of water with pressure of 0,1-1 Mpa will allow your machine to operate more efficiently.) (0,1 Mpa
pressure means that more than 8 liters of water will flow through a fully-tapped faucet per one minute.)
• Ensure that points of contact do not leak by tapping the faucet completely after carrying making the
connections.
• Ensure that the new water inlet hoses are not bent, broken, crushed and resized.
• If your machine has double hot water inlets, the temperature of hot water inlet should be maximum
70°C.
Page 37
36
Note: Use only the new water inlet hose coming with your machine while making water inlet
connections of your machine. Never use old, used or damaged water inlet hoses.
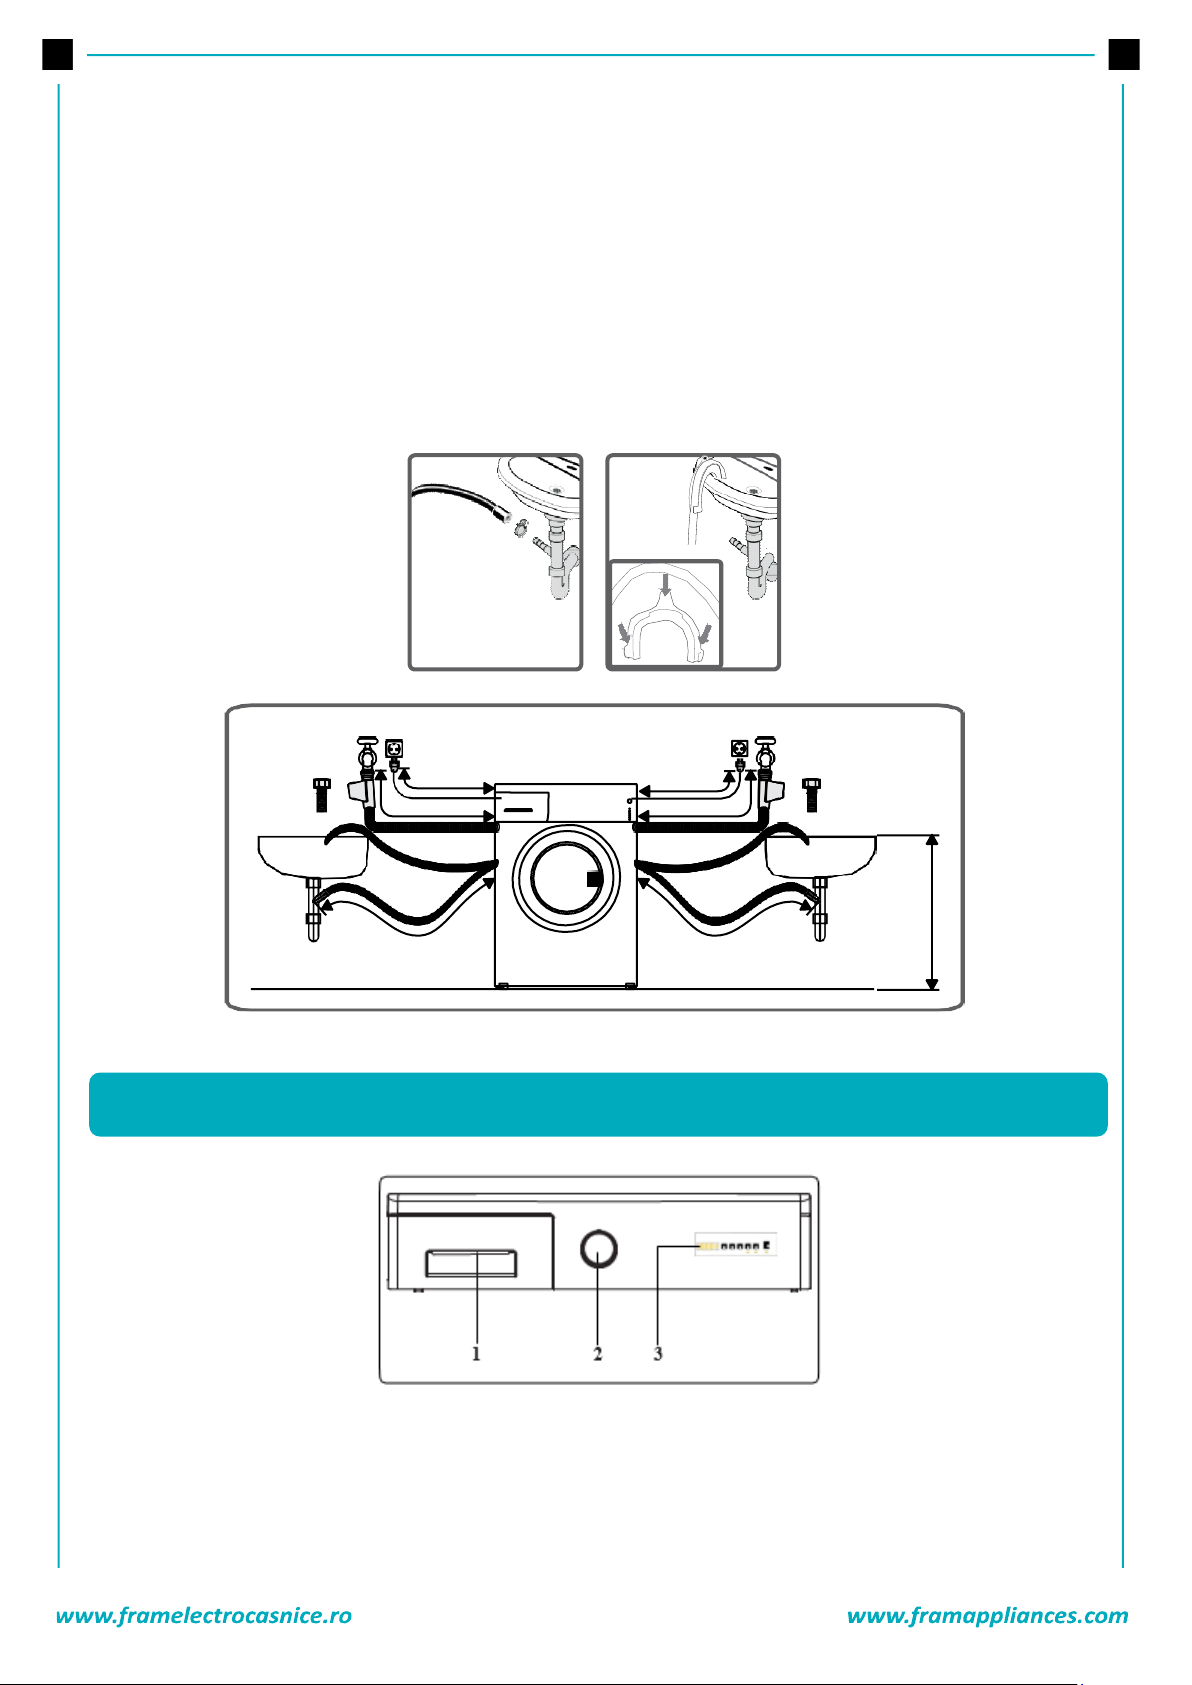
WATER DISCHARGE CONNECTION
• The end of water discharge hose can be fitted to a specific apparatus directly attached to dirty water
discharge hole or outlet joint of the basin elbow.
• Never attempt to extend the water discharge hose by jointing.
• Do not put discharging hose of your machine in a vessel, bucket or sink.
• Make sure that the water discharge hose does not bend, buckle, be crushed or extended. Please note:
The water drain hose should be mounted at a height maximum 100 cm from the ground.
1. Detergent Drawer
2. Program Dial
3. Electronic Display
1 2 3
6. CONTROL PANEL
Page 38
37
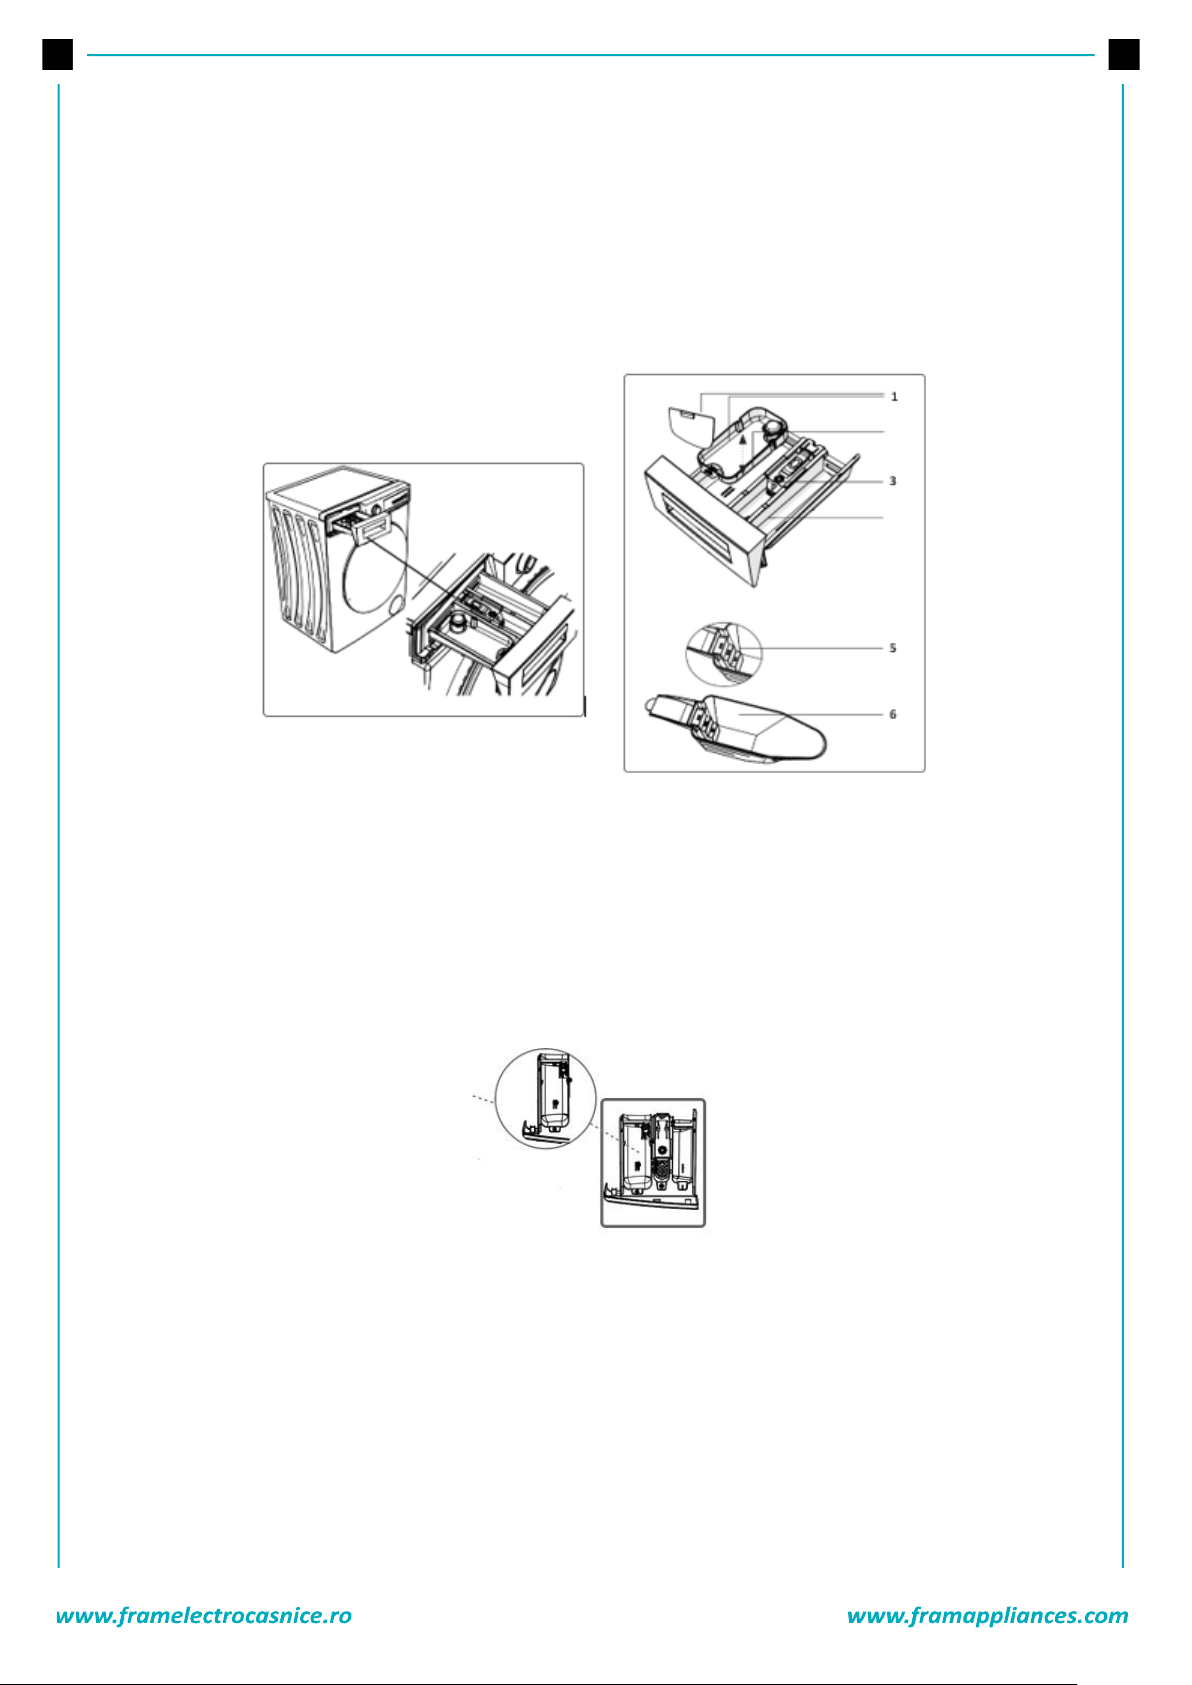
You can use the liquid level determination plate when you want to wash your laundry with liquid detergent.
You can use your liquid detergents in all programs without prewashing. Place the liquid detergent
apparatus in the second compartment (which is available inside the machine) of the detergent drawer and
set the detergent amount. (Use the recommended amount of liquid detergent by detergent producers).
Do not exceed the MAX level, use only for liquid detergent, do not use this apparatus for powder detergent
and take it out.
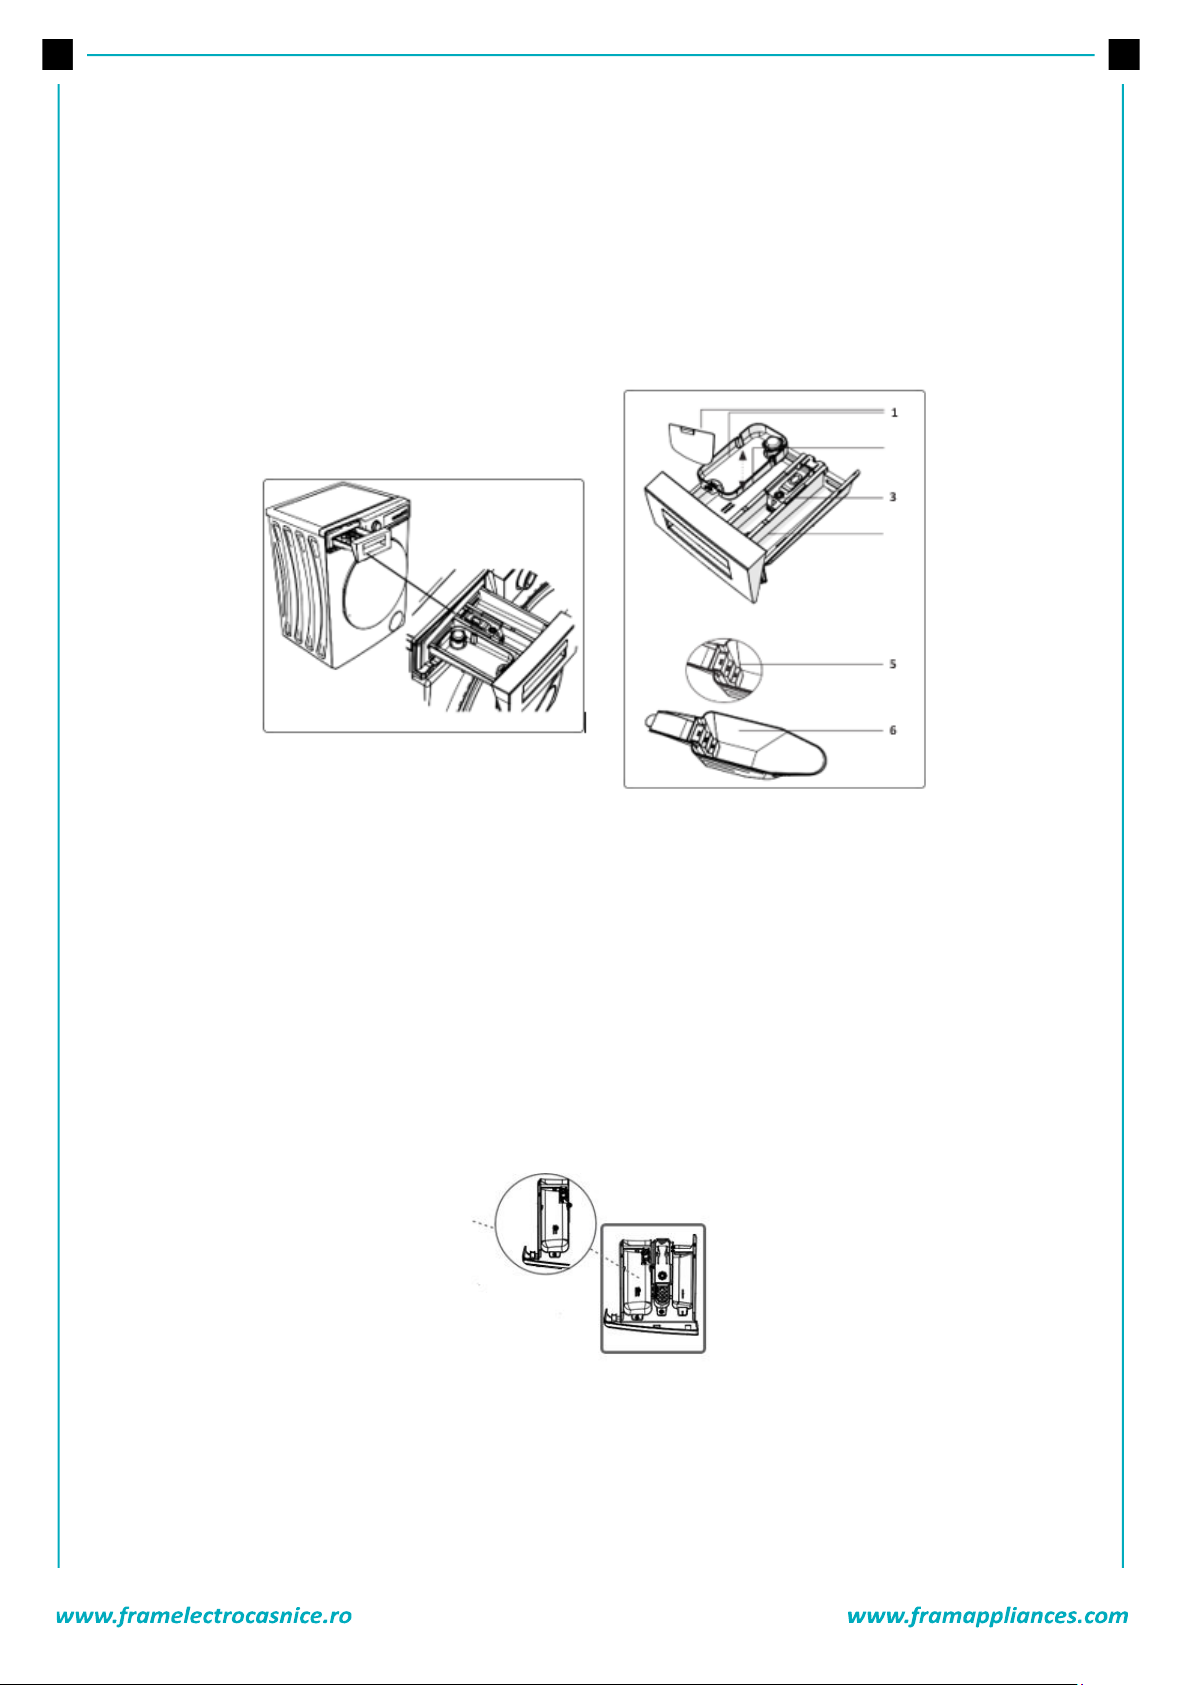
1. Liquid Detergent Attachments
2. Main Wash Detergent Compartment
3. Softener Compartment
4. Pre-Wash Detergent Compartment
5. Powder Detergent Levels
6. Powder Detergent Scoop
This compartment is for softeners, conditioners or starch. Follow the instructions on the packaging. If
softeners leave residue after use, try diluting them or using a liquid softener.
Page 39
38
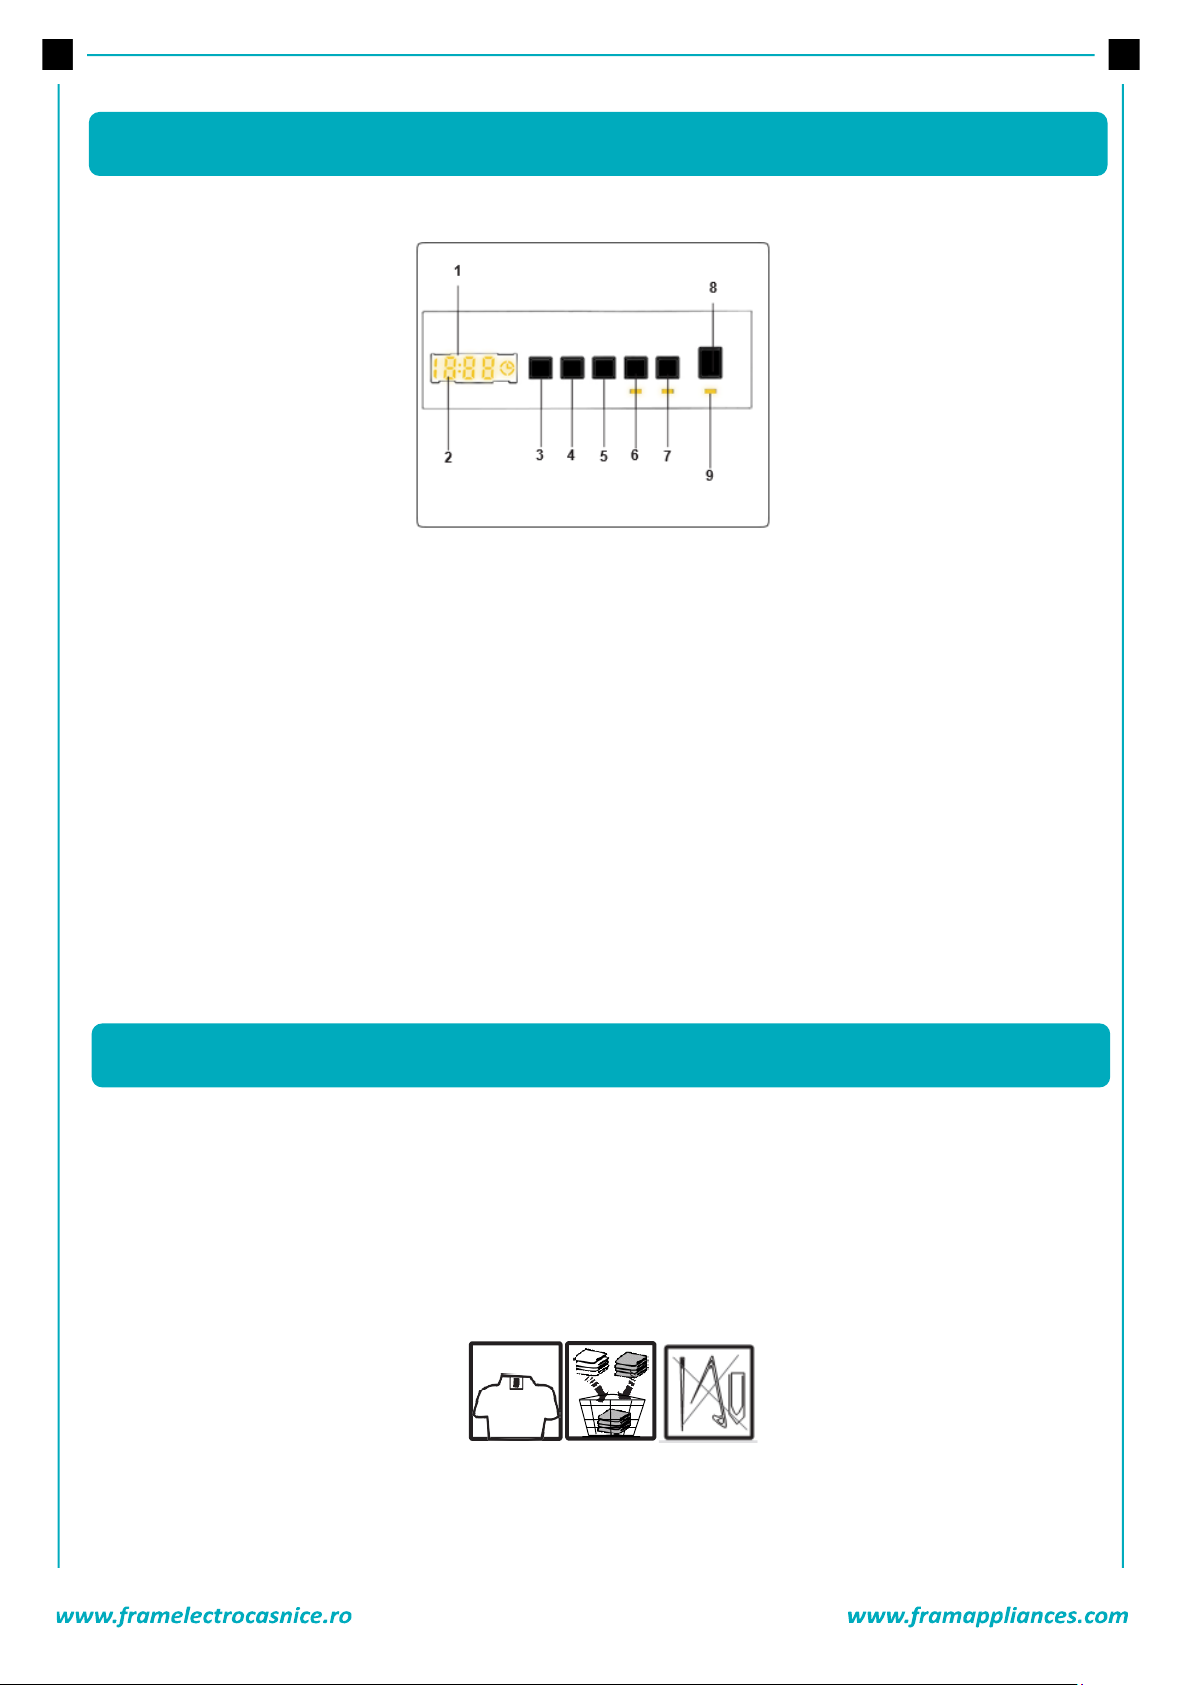
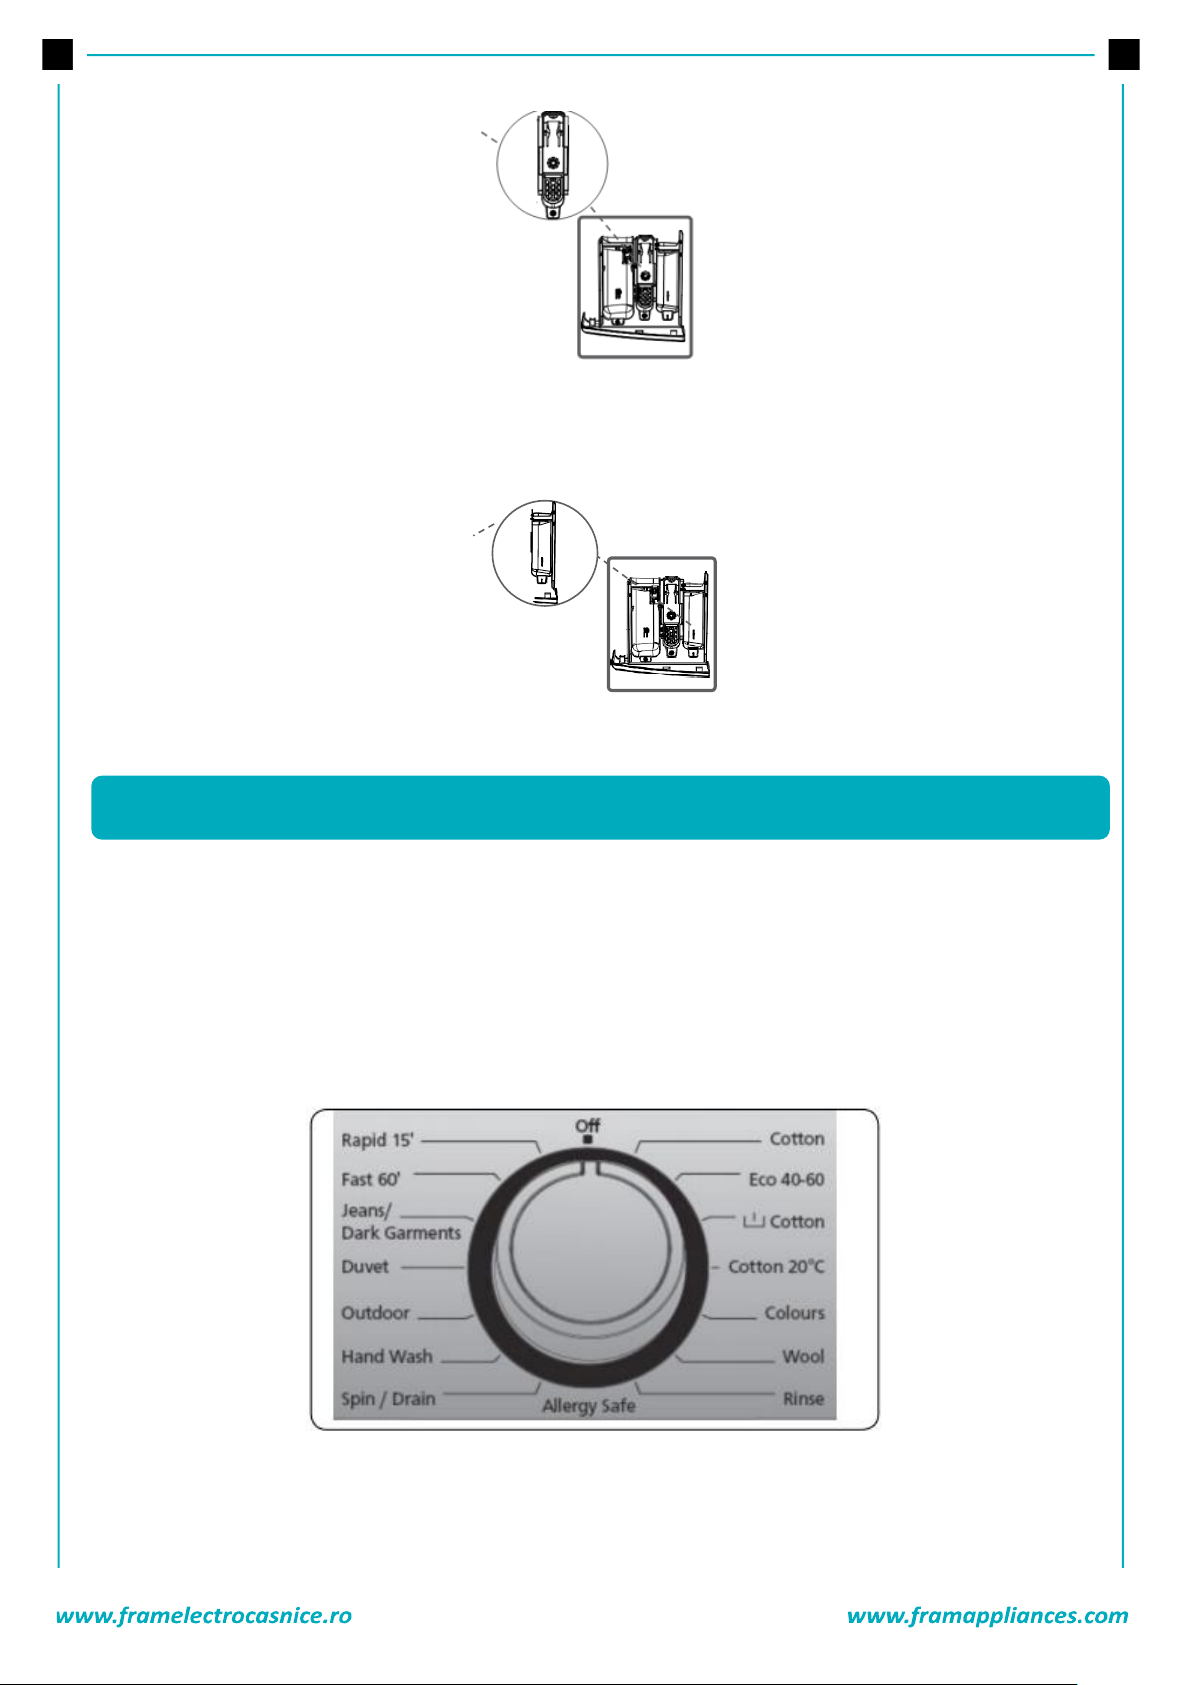
You can select the program you want to wash your laundry in through program knob. You may set the
program selection operation by rotating the program knob in both directions.
Ensure that the program knob is exactly on the program you want to select.
7. CONTROL PANEL
Page 40
39
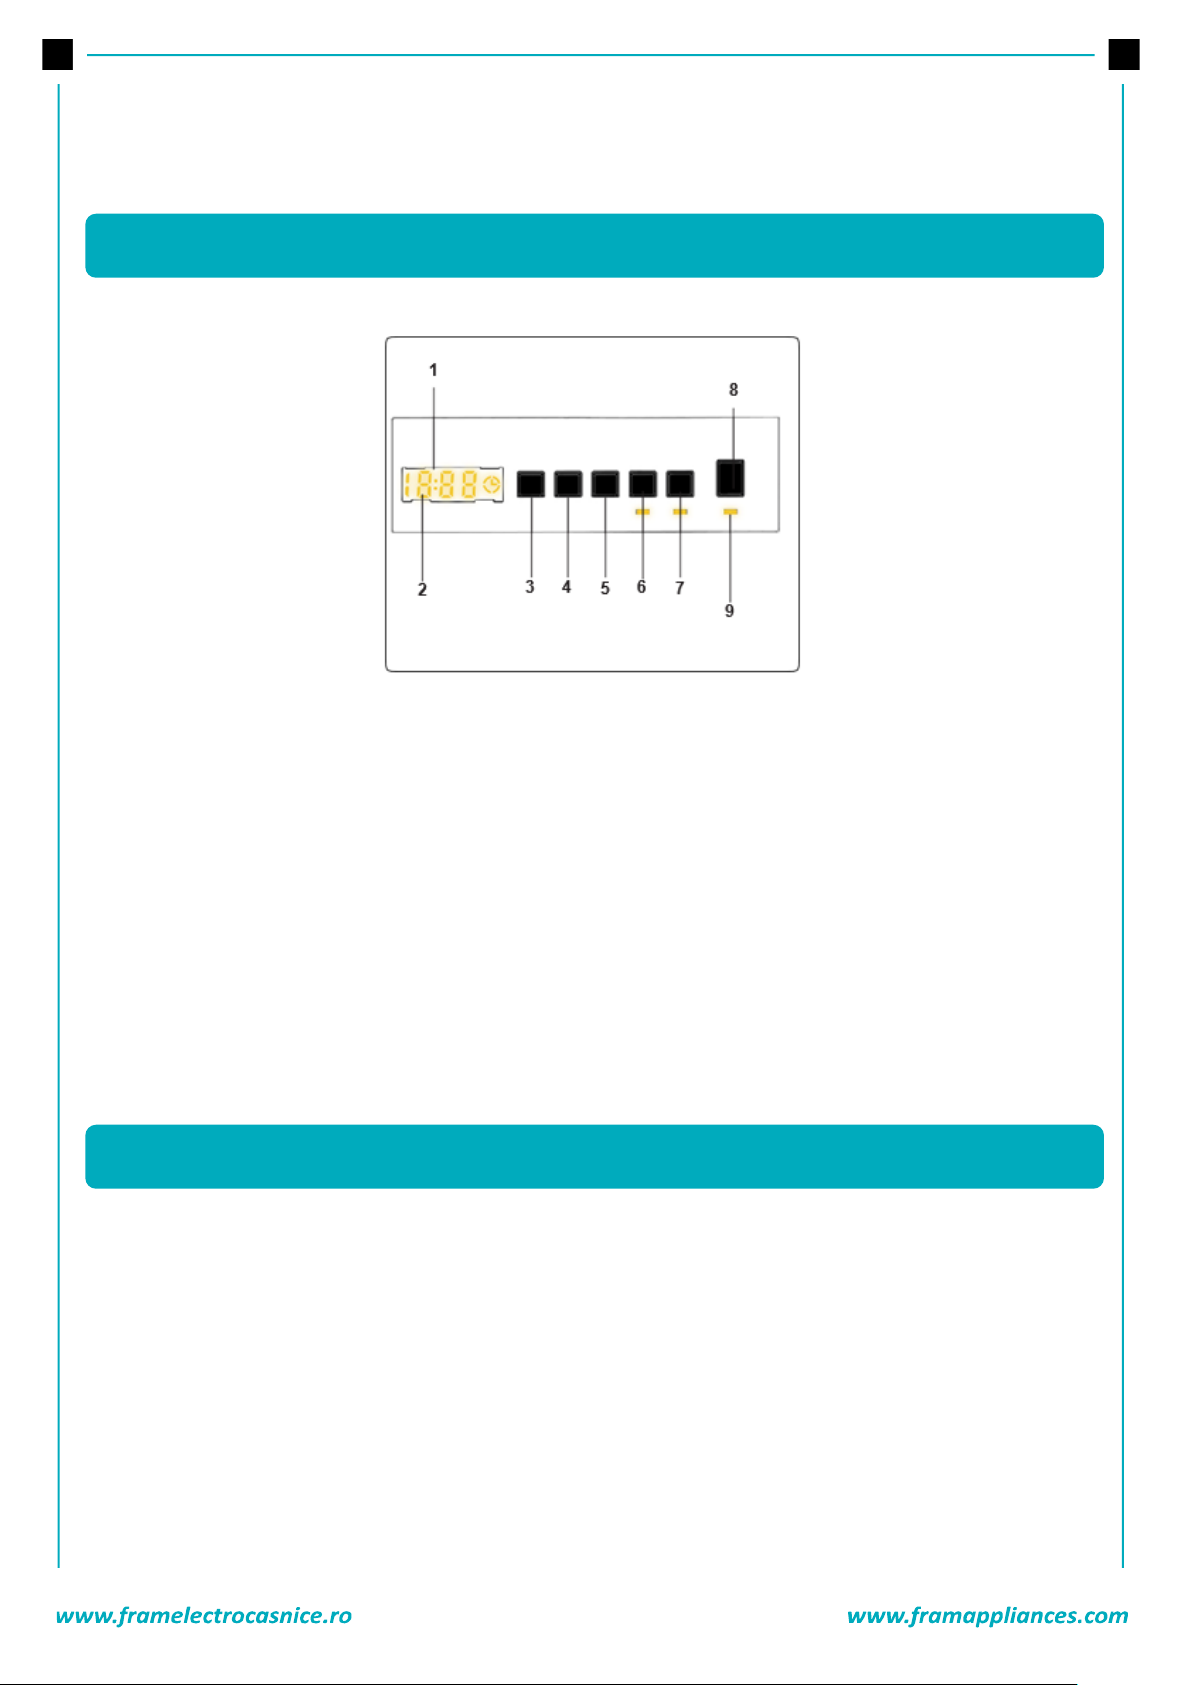
1.
2.
3.
4.
5.
6.
7.
8.
9.
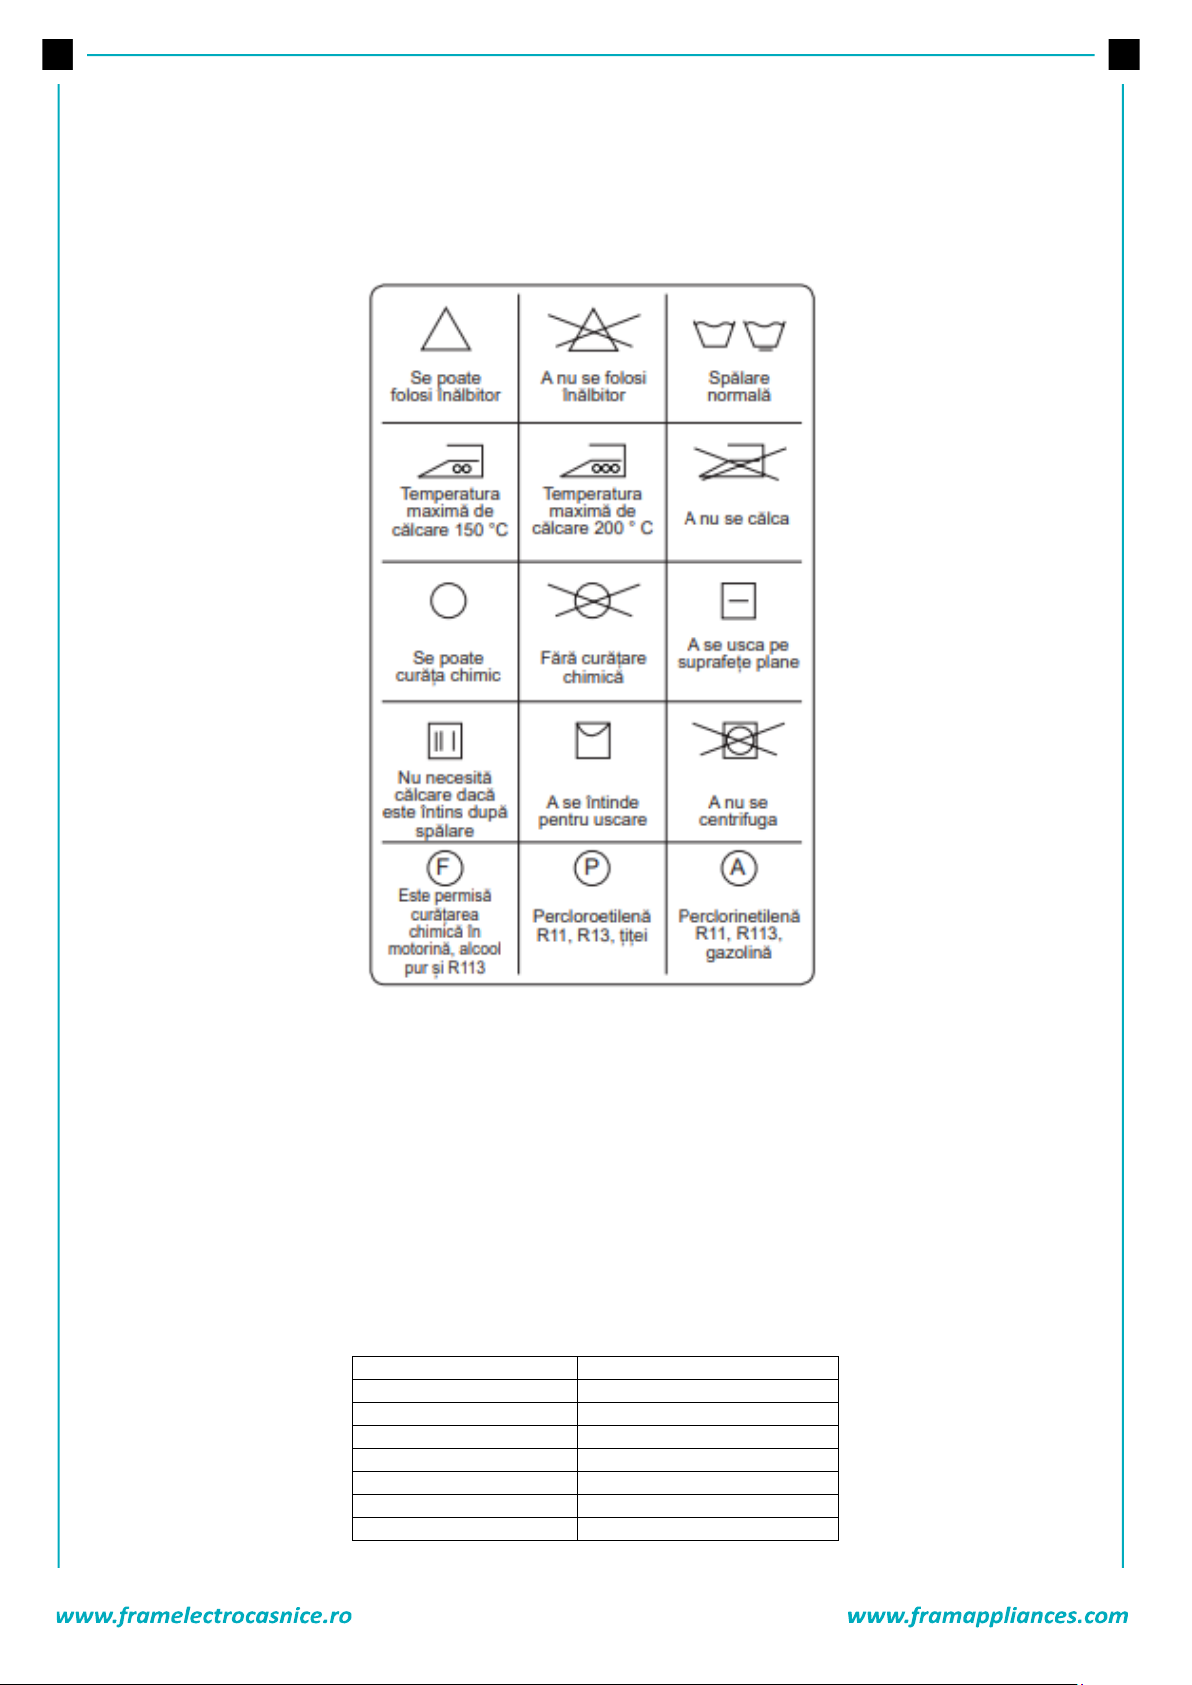
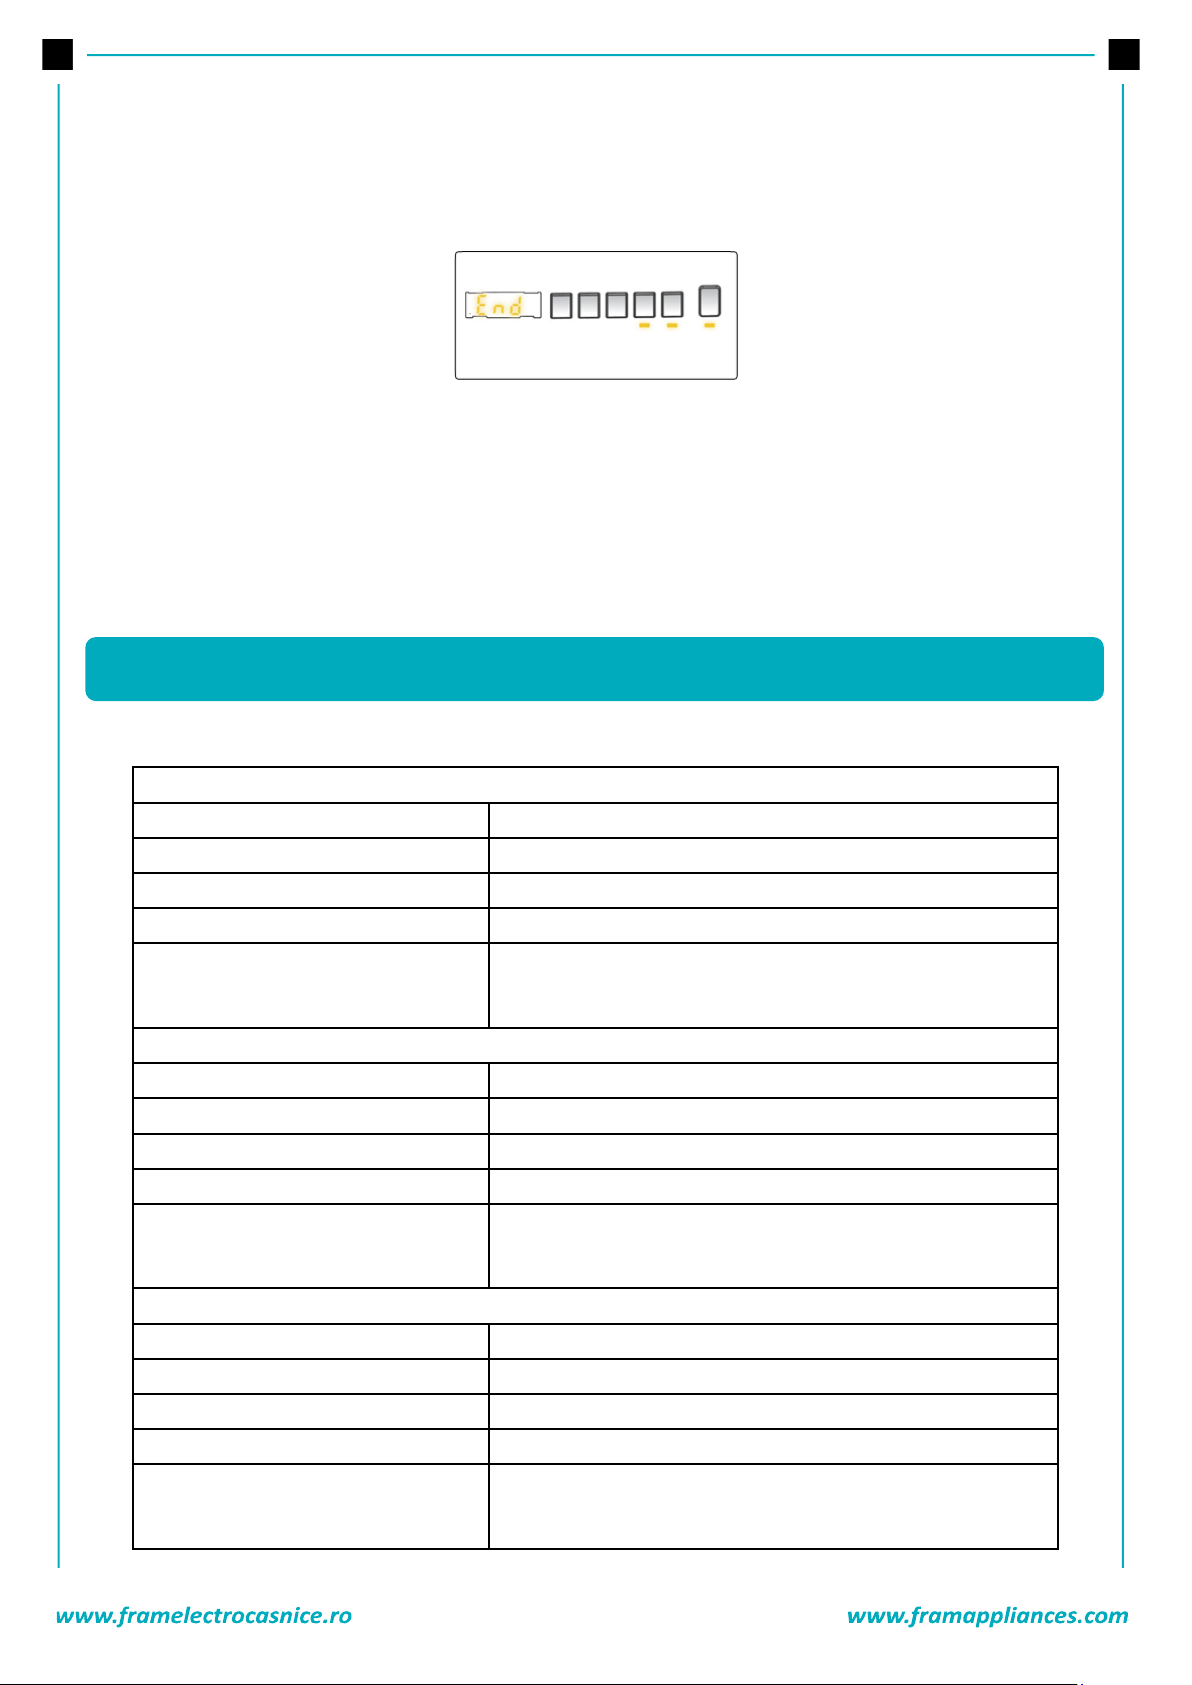
The display panel shows the washing delay timer (if set), temperature selection, spin speed, any
additional functions selected. program is
complete. The display panel also indicates if a fault has occurred with your machine.
SEPARATING LAUNDRIES
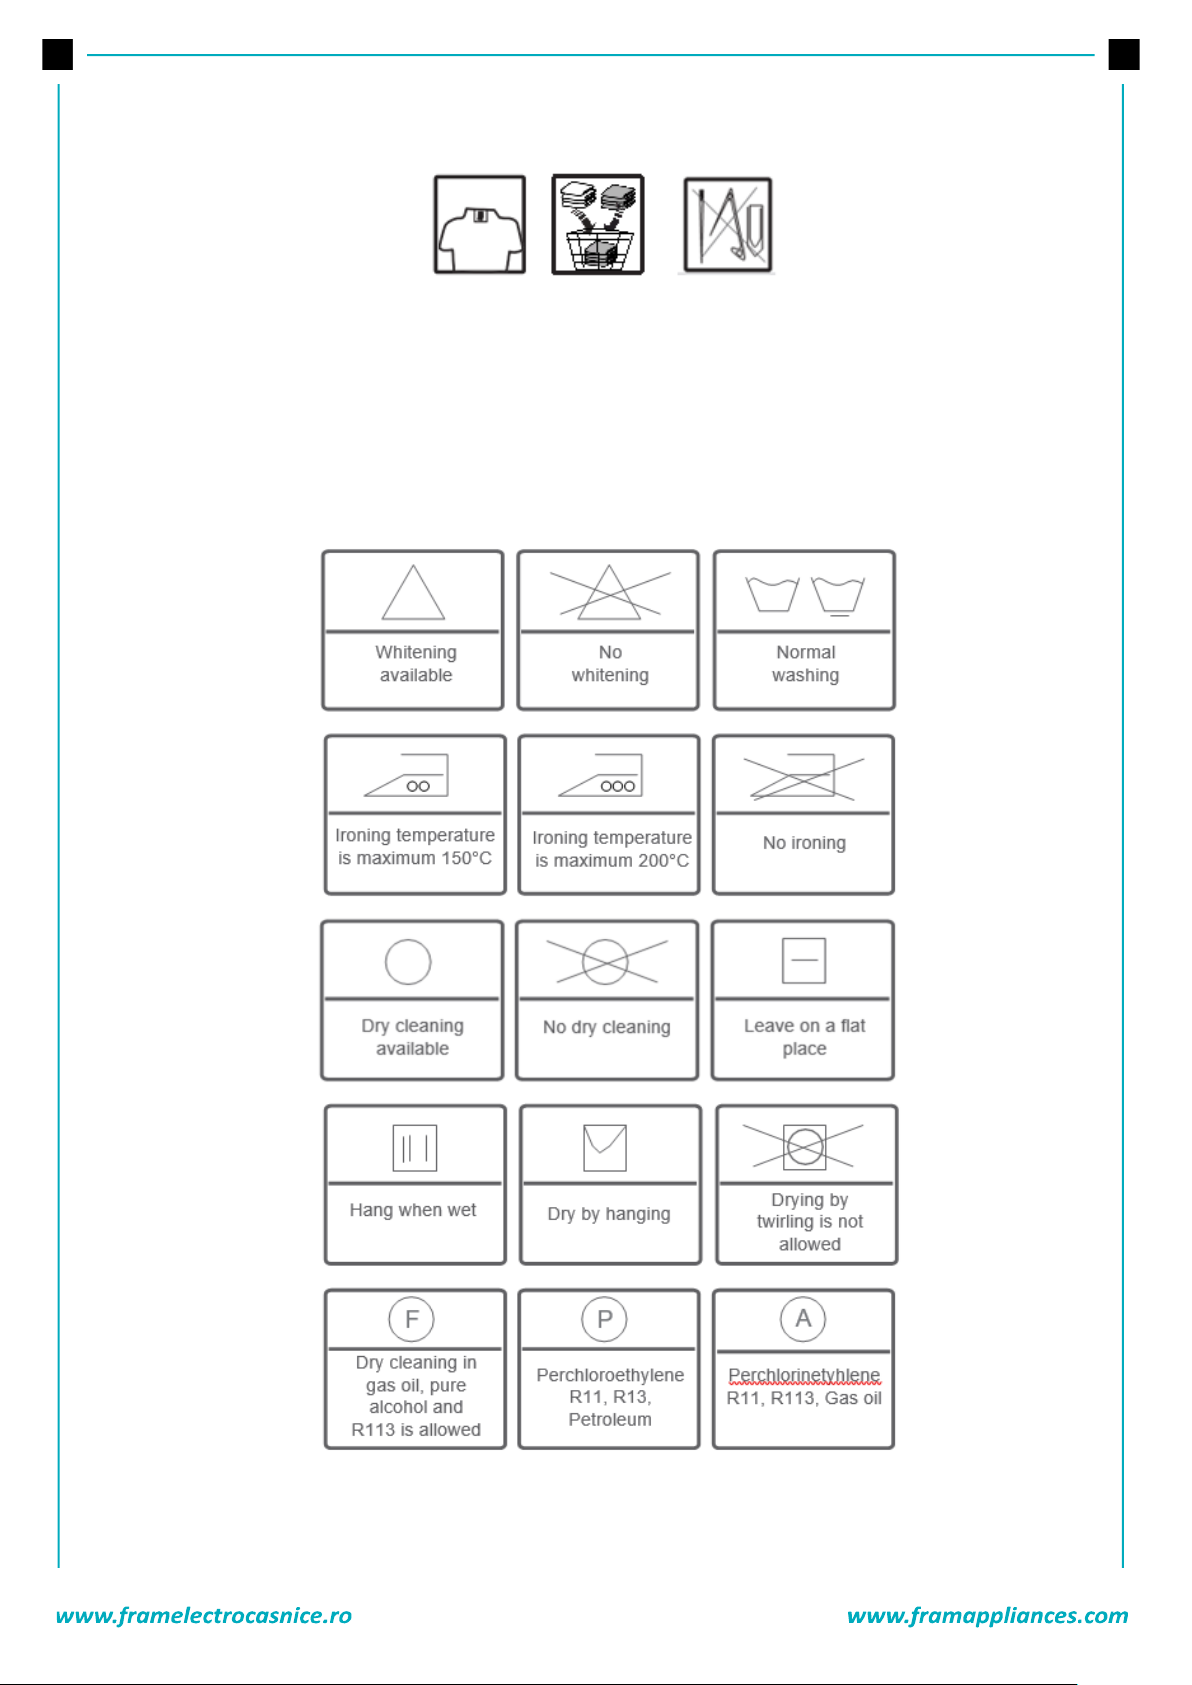
• Your laundry has product labels on them that specify their specifications. Wash or dry your laundry
according to the specifications on the product label.
• Separate your laundries according to their types (cotton, synthetic, sensitive, wool etc.), their
temperatures (cold, 30°, 40°, 60°, 90°) and degree of contamination (slightly stained, stained, highly
stained).
• Never wash your colored and white laundry together.
• Wash your colored laundries separately in the first washing as they may bleed.
• Ensure that there are no metallic materials on your laundries or in the pockets; if so, take them up.
8. ELECTRONIC DISPLAY
9. USING YOUR APPLIANCE
Page 41
40
CAUTION: Faults that will emerge in case of penetration of foreign substances into your machine are
not included within the scope of warranty.
• Zip up and button up your laundries.
• Remove the metallic or plastic hooks of tulle curtains or curtains or place them in a washing net or bag
and then muzzle them.
• Reverse textiles such as pants, knitwear, t-shirt and sweat suit.
• Wash socks, handkerchief and suchlike small laundries in a washing net.
PUTTING LAUNDRIES IN THE MACHINE
• Open the door of your machine.
• Spread your laundries in your machine.
Page 42
41
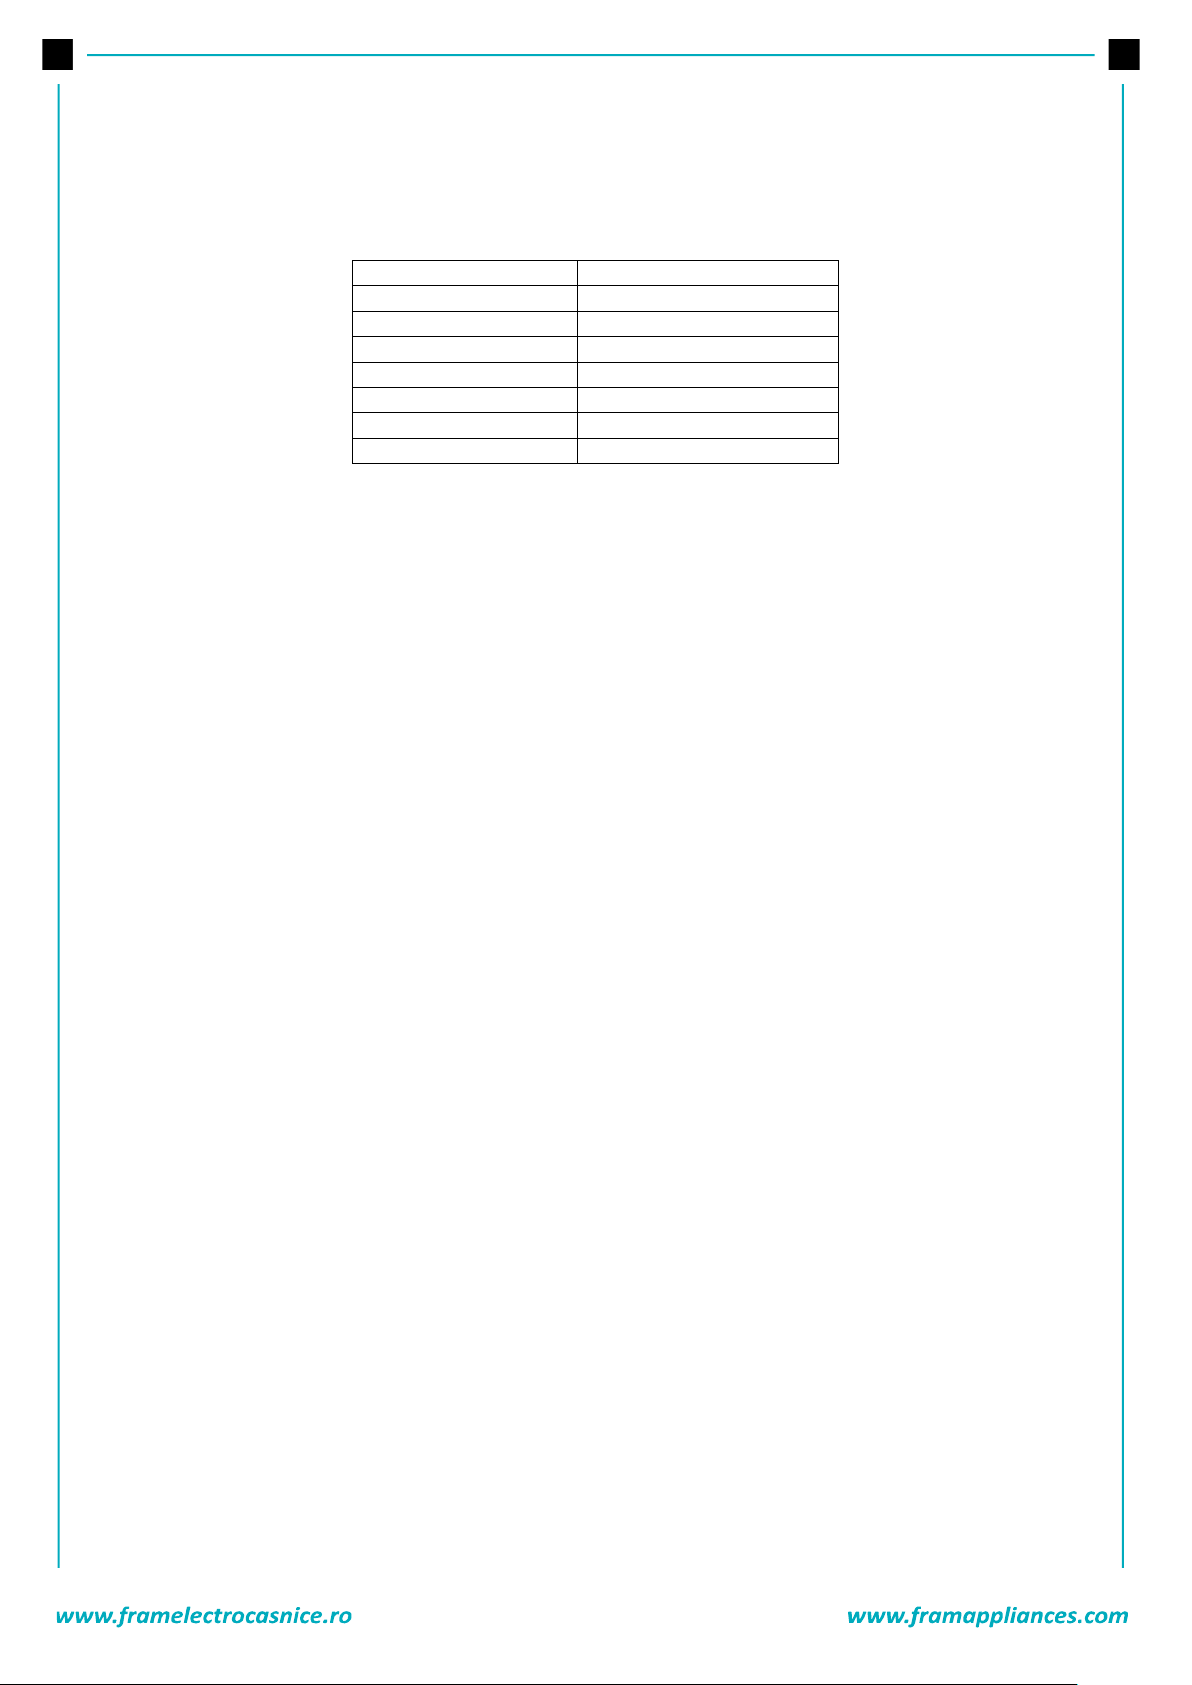
NOTE: Maximum loading capacity may vary based on the laundry type you will wash, degree of
contamination and the program you have chosen. Do not exceed maximum dry loading capacity
indicated in the program table for washing programs.
You can take the following table of weights as an example:
Laundry type
Towel
Linen
Bathrobe
Quilt cover
Pillow slip
Underwear
Tablecloth
• Put each item of laundry separately.
• Ensure that no laundry is stuck between the cover and bellow seal when closing the door of your
machine.
• Push the door of your machine until hearing the locking sound to close it.
• Close the door of your machine properly, otherwise your machine will not start the washing
operation.
ADDING DETERGENT INTO MACHINE
The amount of detergent you will put in your machine will depend on the following criteria:
Your detergent utilization will be based on the degree of contamination of your laundries. Do not
prewash your less stained laundries and put your slight amount of detergent in the 2nd compartment
of the detergent drawer.
For your much stained laundries, select a program including prewashing, and put ¼ of the detergent
you will put in the detergent drawer in the 1st compartment of the detergent drawer while putting the
remaining ¾ of it into 2nd compartment.
Use detergents produced for automatic washing machine in your machine. The amount of detergent
you will use for your laundries is printed on the detergent package.
The higher the degree of hardness of the water the more detergent you will use.
The amount of the detergent you will use will increase as the amount of your laundries increase.
Put the softener in the softener compartment in the detergent drawer. Do not exceed the MAX level.
Otherwise, softener will flow into washing water through flushing.
Softeners with high density are required to be thinned to a degree before being put in the drawer.
Because high-density softener will clog the flush and avoid the flow of the softener.
You can use your liquid detergents in all programs without prewashing. For this, fit liquid detergent
level plate in the accessories bag or the liquid detergent apparatus (*) into 2nd compartment of the
detergent drawer and set the amount of liquid detergent according to the levels on this plate.
Remember to detach the liquid detergent plate.
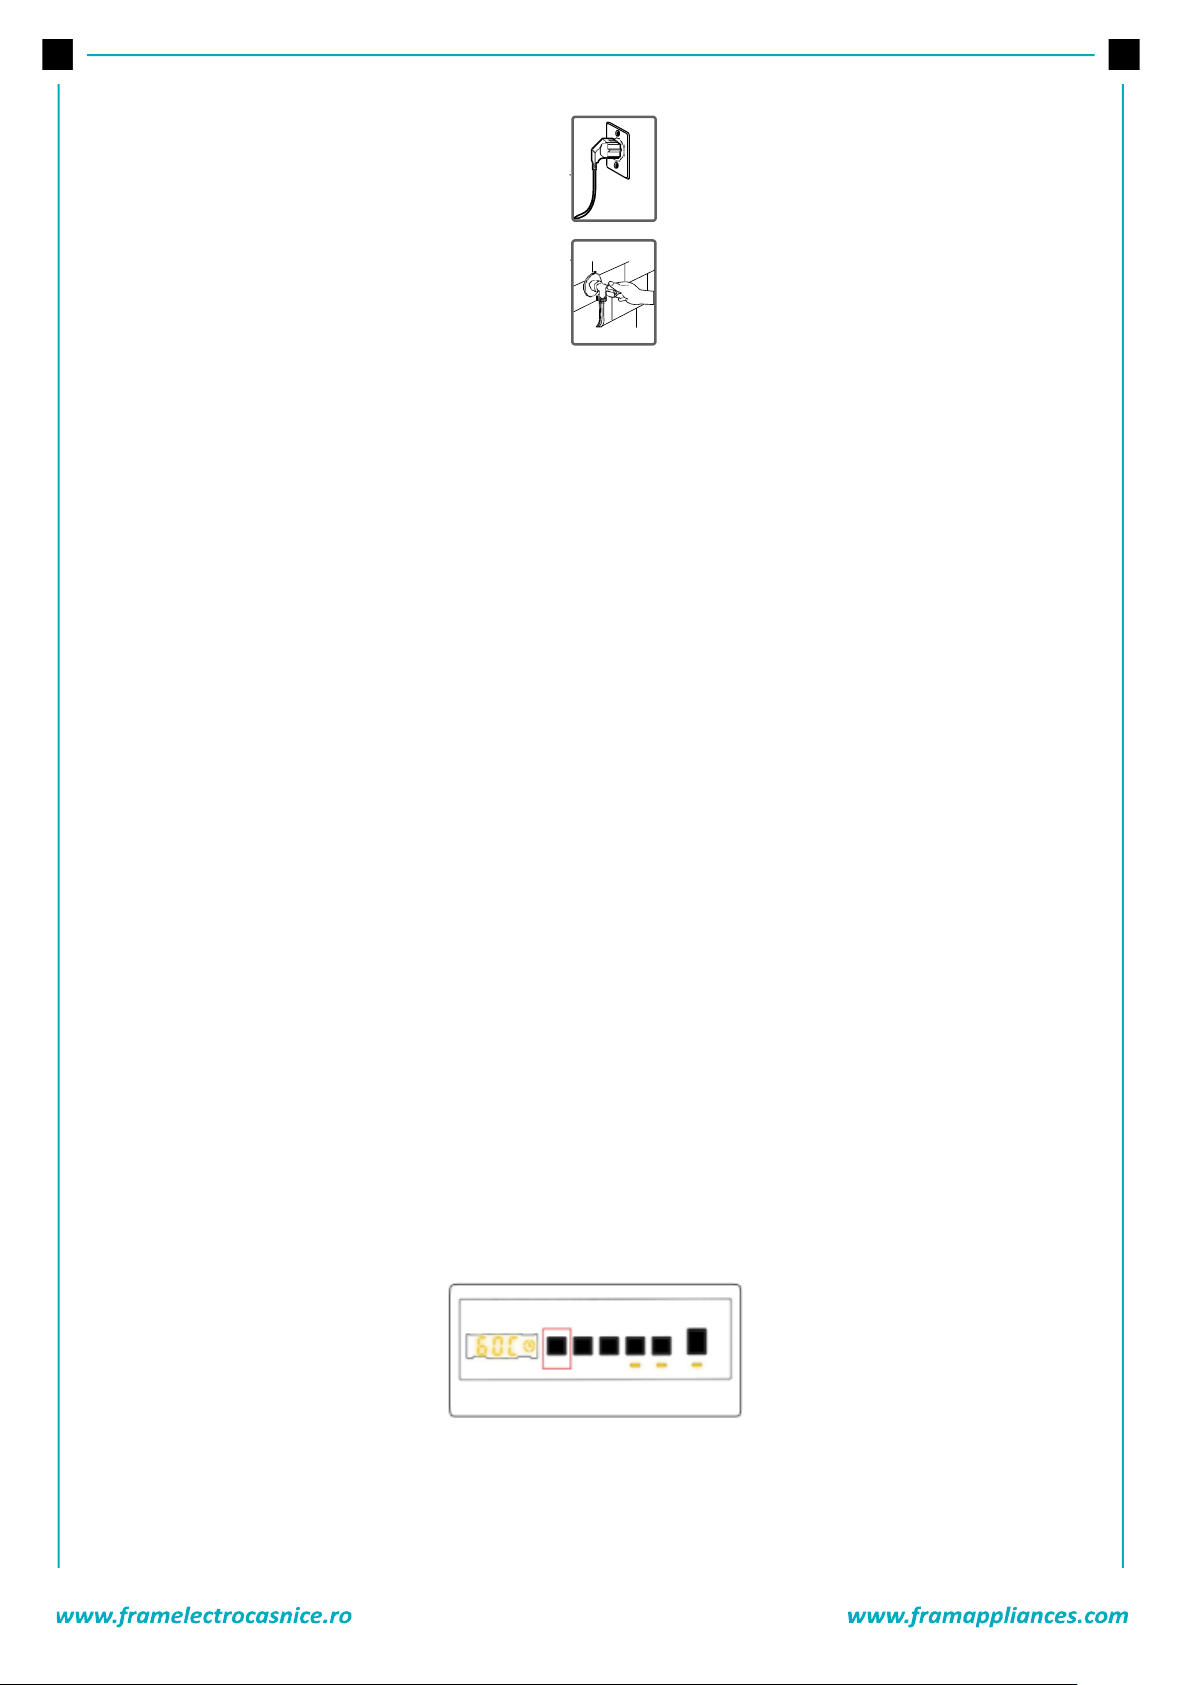
OPERATING YOUR MACHINE
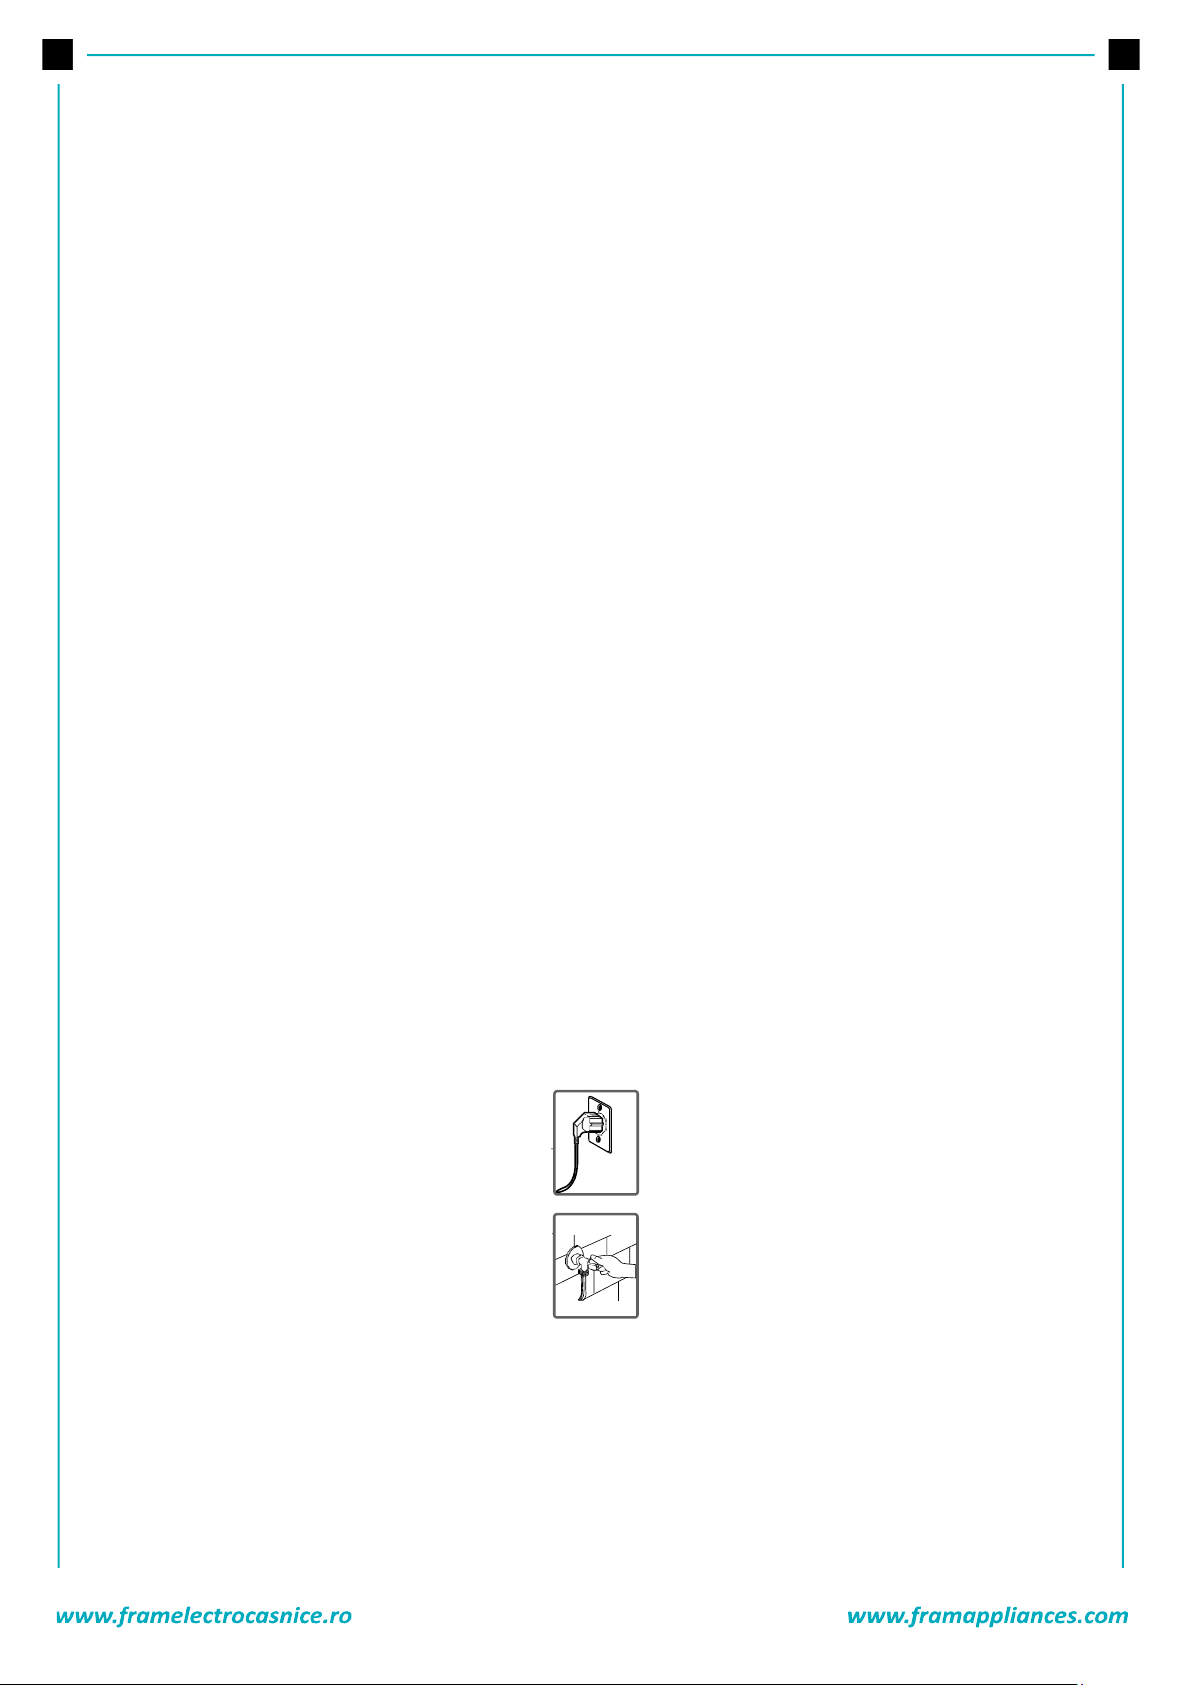
1. Plug your machine in.
2. Open the water faucet.
3. Open the machine door.
4. Spread your laundries in machine.
5. Push the door until hearing the locking sound to close it.
Page 43
42
HALF-LOAD DETECTION SYSTEM
Your machine features a half-load detection system.
In case you put approximately half or less amount of laundries of maximum laundry capacity in your
machine, your machine will run so as to save washing time, water consumption and energy in some
programs. When the half-load function is active, the machine can complete the program you have set in a
shorter time.
SELECTING PROGRAMME
Select the convenient program for your laundries on the program table.
AUXILIARY FUNCTIONS
1. Before starting the program, you can optionally select an auxiliary function.
2. Press on the button of auxiliary function you would like to select.
3. If auxiliary function symbol on electronic display flashes continuously, the auxiliary function you have
selected will be activated.
4. If auxiliary function symbol on electronic display blinks, the auxiliary function you have selected will not
be activated.
REASON FOR NON-ACTIVATION:
1. The auxiliary function you want to use in the washing program you have selected is not applicable.
2. Your machine has passed over the stage, during which the auxiliary function you would like to select
would be implemented.
3. It is not compatible with an auxiliary function you have selected previously.
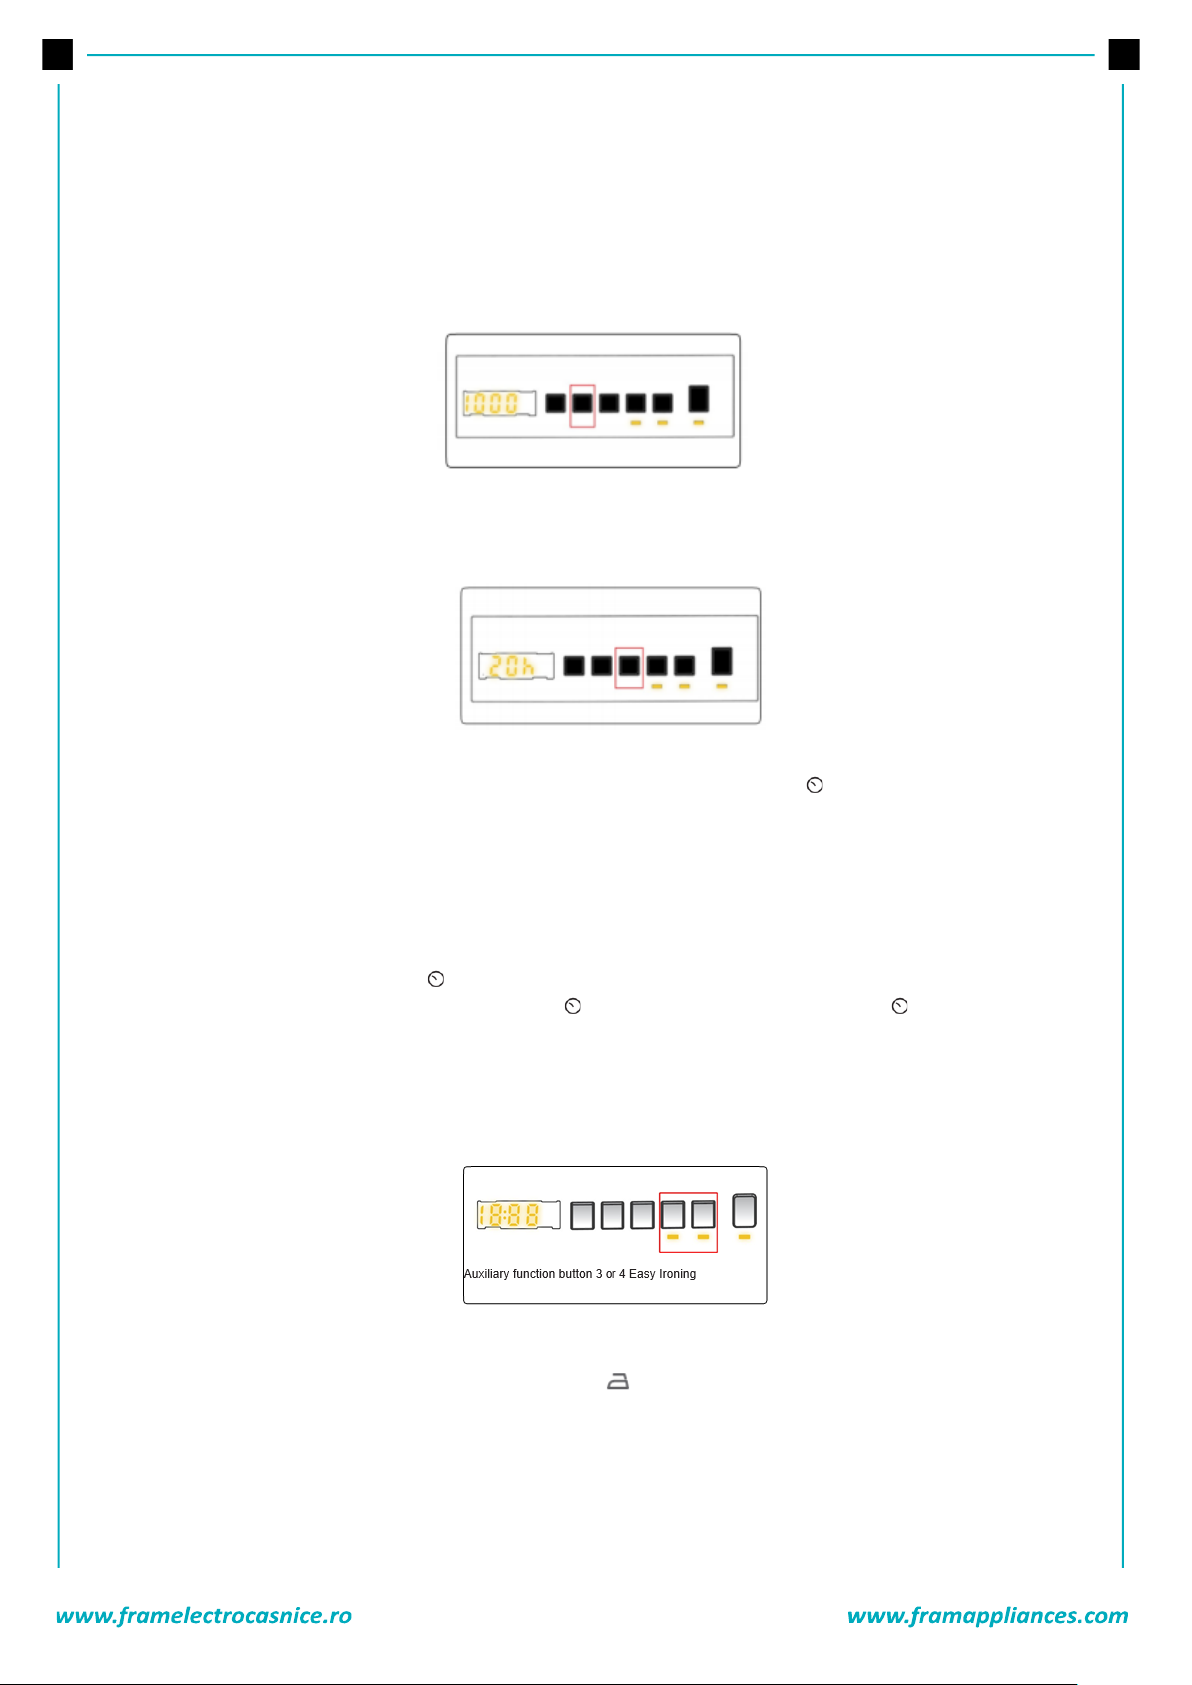
1. TEMPERATURE SELECTION
You can select the washing water temperature with the washing water temperature adjustment button.
Whenever you select a new program, the maximum washing water temperature is shown on the washing
water temperature display.
You can gradually decrease the washing water temperature between the maximum temperature and cold
washing (--) by pressing washing water temperature adjustment button. If you have missed the washing
water temperature you wanted, you can return to the intended temperature by continuously pressing the
washing water temperature adjustment button.
Page 44
43
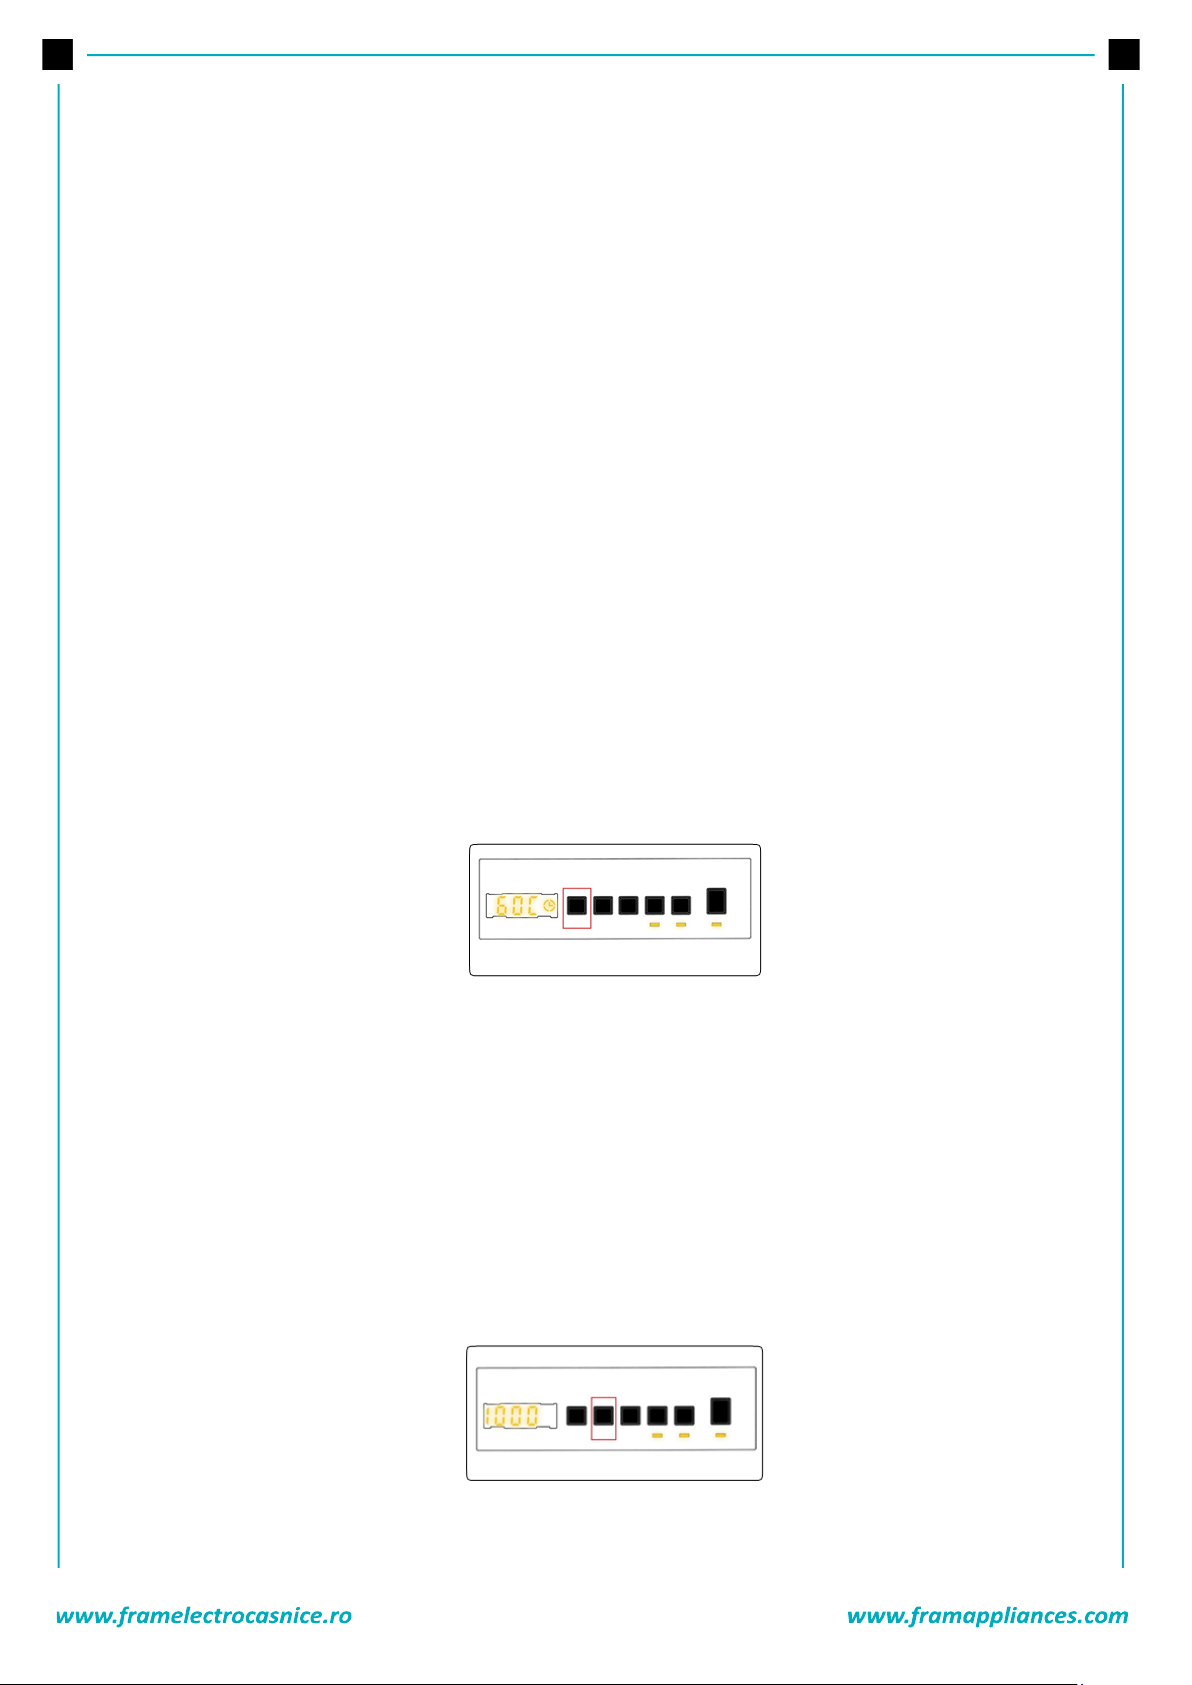
2. SPIN SPEED SELECTION
You can set the spin revolution for your laundries via revolution speed setting button. When you select a
new program, the maximum spin revolution speed of the program you have selected will be viewed on the
display of revolution speed. You can gradually reduce the revolution speed between cancel spinning (--)
options through the maximum spin revolution of the program selected by pressing revolution speed setting
button. If you have skipped the spinning revolution you want to set, you can re-switch to the revolution by
keeping the revolution setting button pressed.
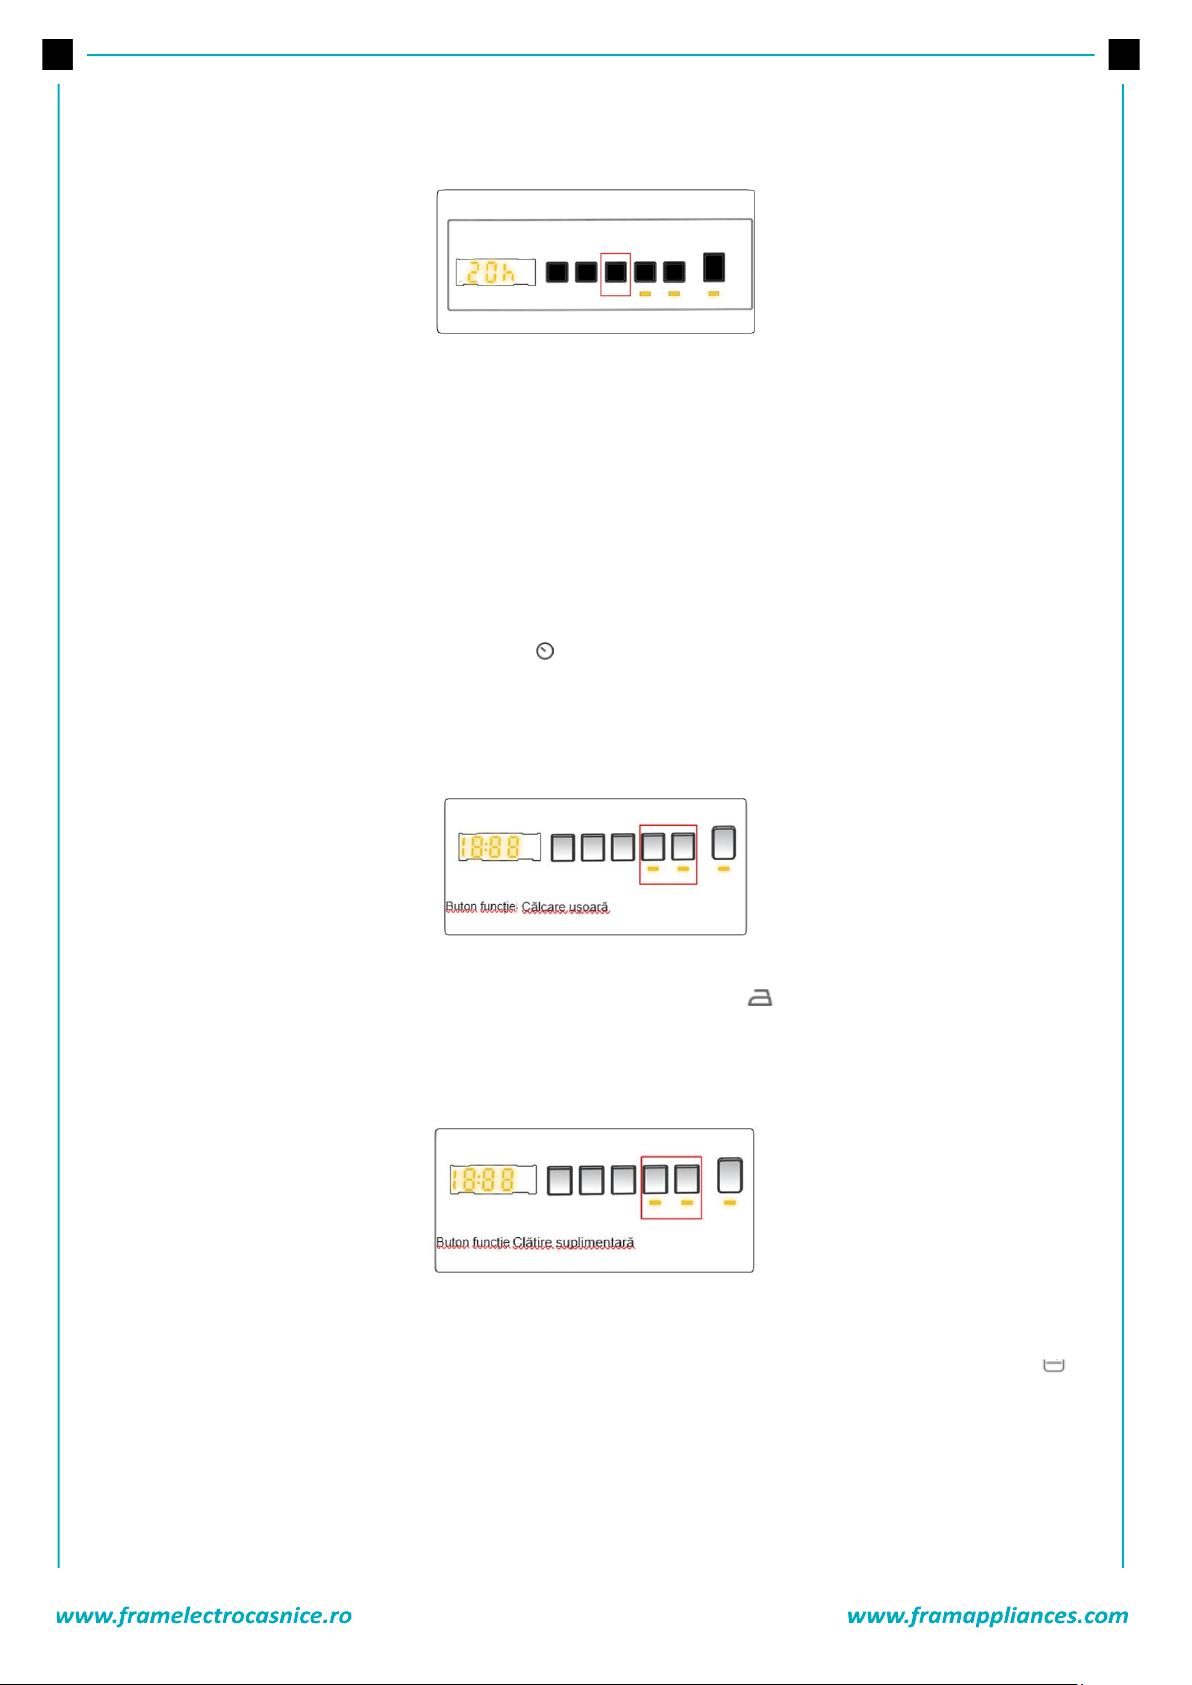
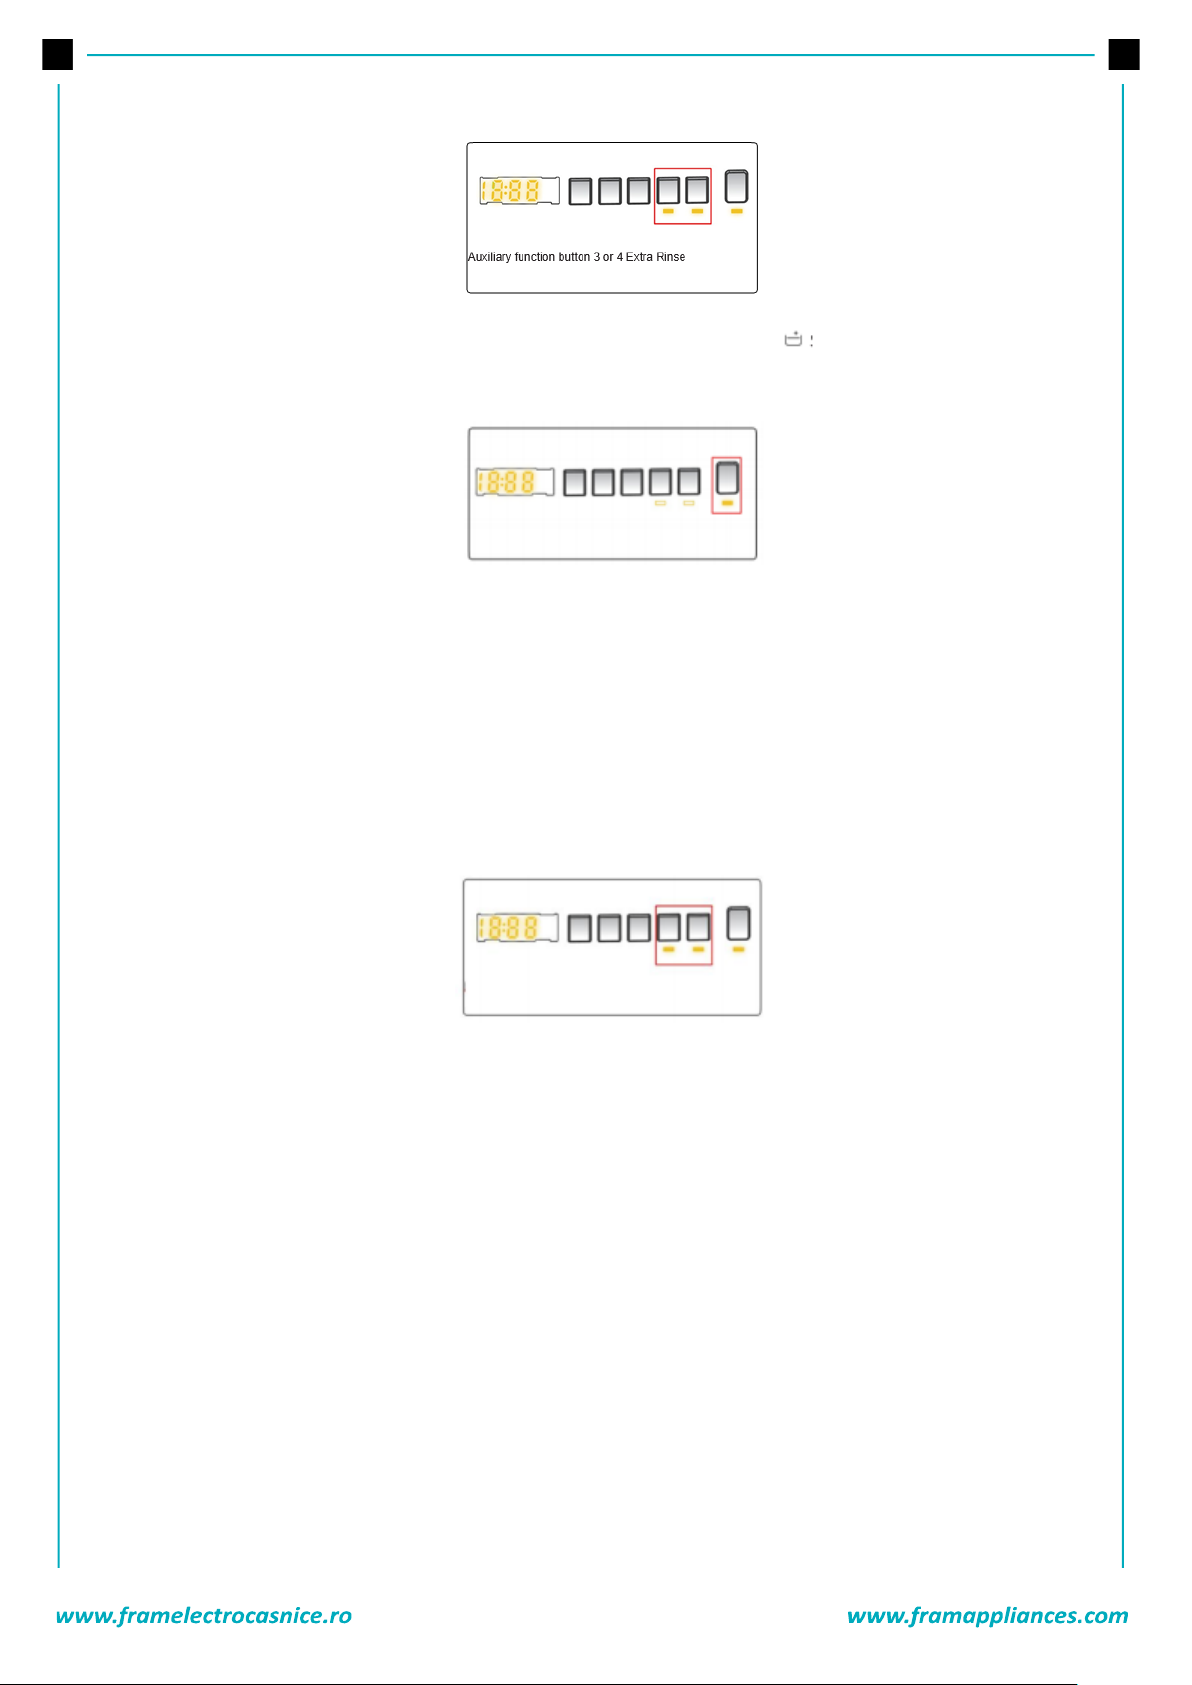
3. DELAY TIMER
You can use this auxiliary function to delay the start time of the washing cycle for 1 to 23 hours.
To use the delay function: Press will light up on the
electronic display. Press the delay key until you reach the time after which you want the machine to start
the washing cycle.
If you have skipped the delay time you would like to set, you can keep pressing the delay key until you
reach that time again. To use the time delay function, you need to press the Start/Pause key to start the
machine.
If you want to cancel the delay: If you have pressed the Start/Pause key to start the machine, you just
need to press the delay key once. will go off on the electronic display. If you have not pressed the Start/
Pause key, press the delay key continuously until goes off on the electronic display. will go off on the
electronic display.
4. EASY IRONING
You can enable your laundries to be taken out less wrinkled as the washing operation is completed by
employing this auxiliary function. You may make the program active by pressing the easy ironing
auxiliary function button when the led light of the symbol turns on.
Page 45
44
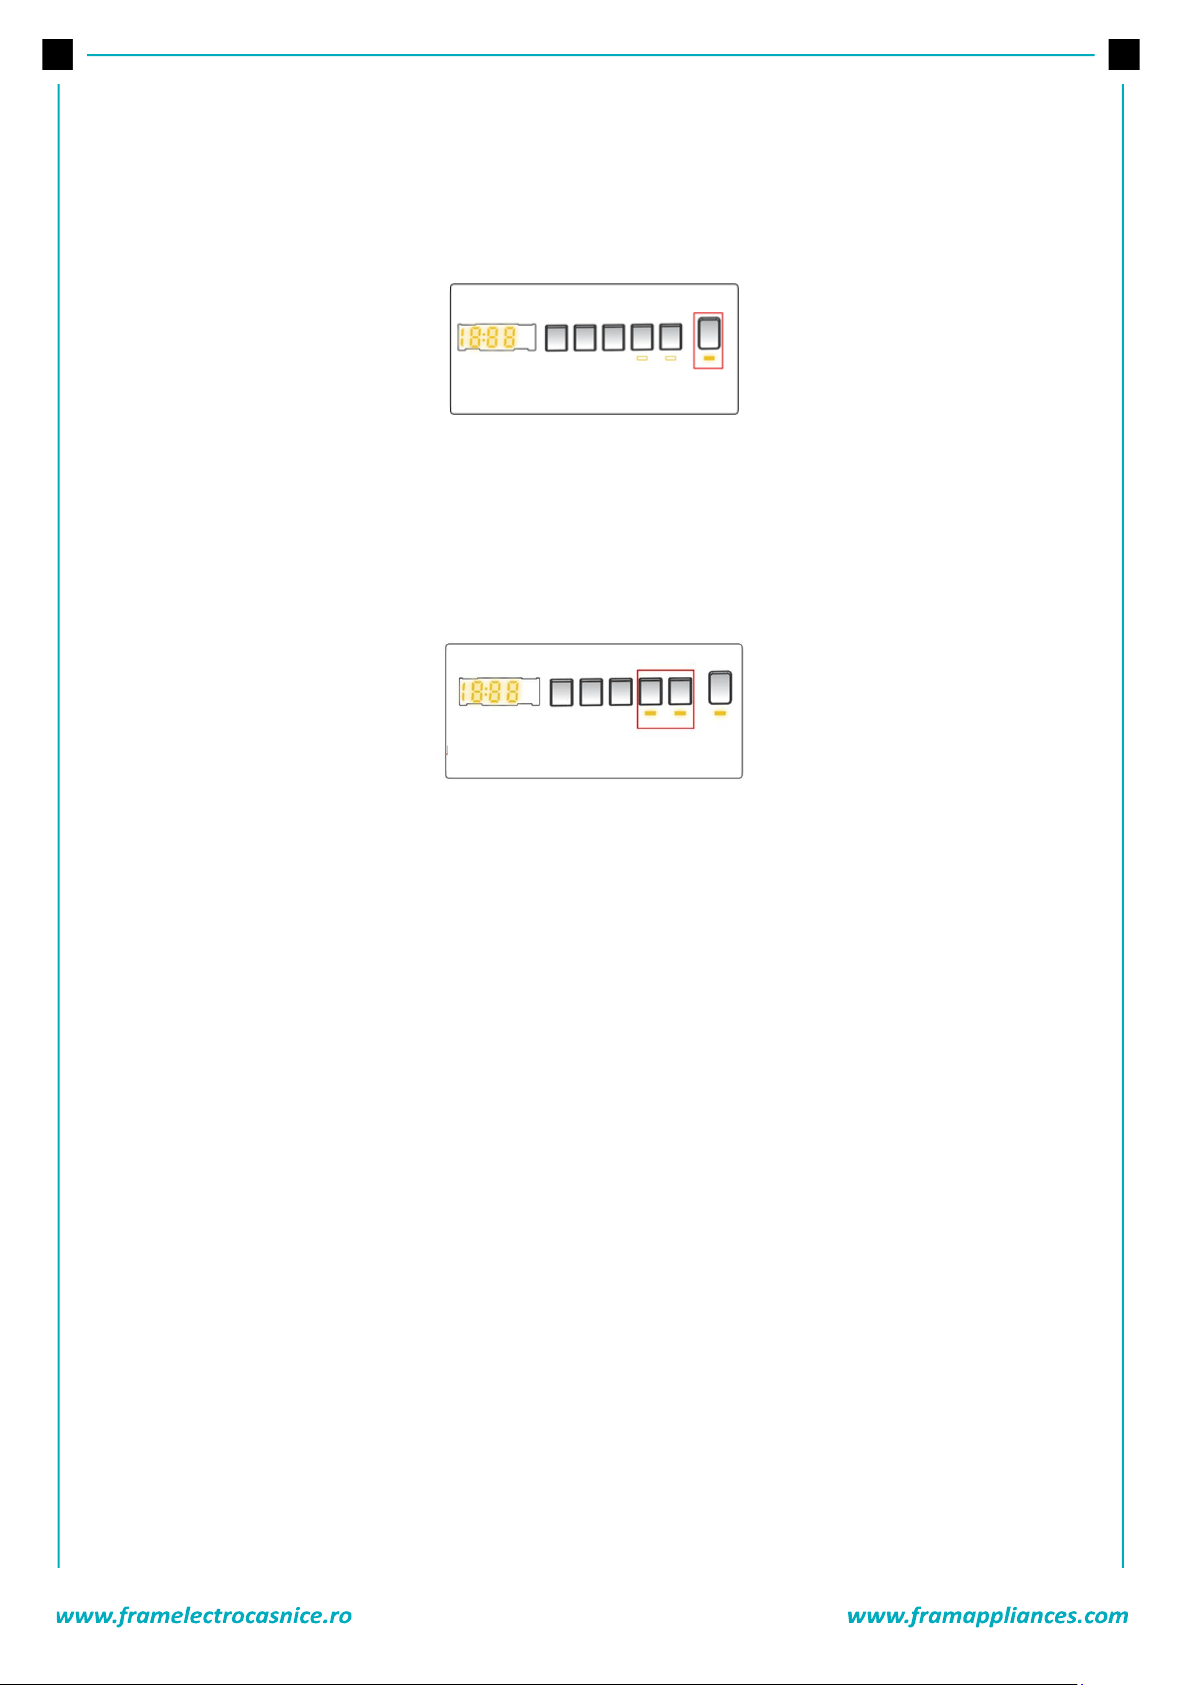
5. EXTRA RINSE
You can add an additional rinse operation to the end of the selected wash program using this additional
function. To select this function, press the Extra rinse button when the symbol is displayed.
6. START/PAUSE BUTTON
By pressing on the Start/Pause button, you may start the program you have selected or suspend a
running program. If you switch your machine to the standby mode, the Start/Pause led on the
electronic display will blink.
7. CHILD LOCK
The Child Lock function allows you to lock the buttons so that the wash cycle you have chosen cannot
be changed unintentionally. To activate child lock, press and hold button 4 and 5 simultaneously for
activated.
If any button is pressed or selected program is changed by the program dial while the child lock is
If the child lock function is active and a program is running, when the program dial is turned to the
CANCEL position and another program is selected the previously selected program continues from
where it was left.
To deactivate the child lock, press and hold button 2 and 3 simultaneously for at least 3 seconds until the
l on the electronic display disappears.
CANCELLING PROGRAM
If you want to cancel any program running:
• Switch the program
• Your machine will stop the washing operation and the program will be cancelled.
• To get rid of the water accumulated in the machine switch the program knob to any program.
• Your machine will perform the necessary discharge operation and cancel the program.
• You can run your machine by selecting a new program.
Page 46
45
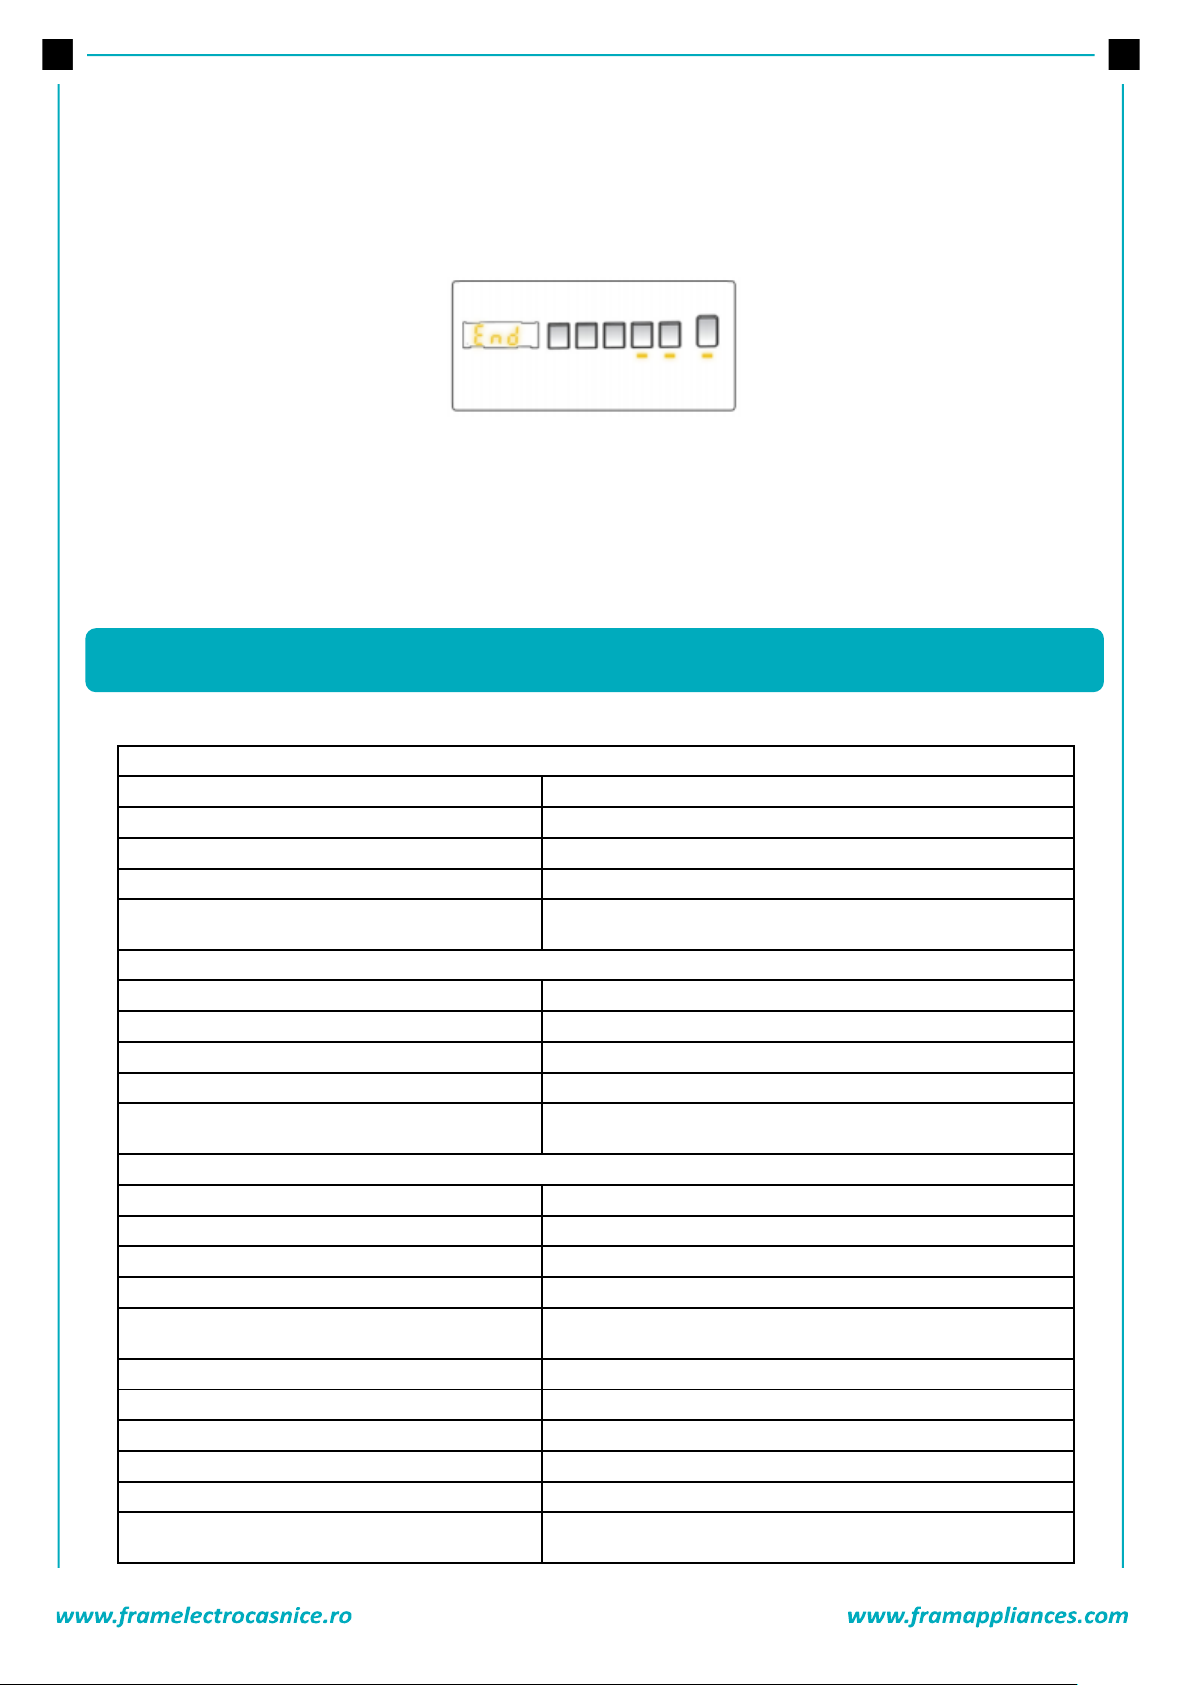
FINISHING PROGRAMME
Your machine will stop by itself as soon as the program you have selected finishes:
• Leave the door of your machine open to allow the inner part of your machine to dry after removing your
laundries.
• Switch the program knob to CANCEL position.
• Unplug your machine.
• Turn the water faucet off.
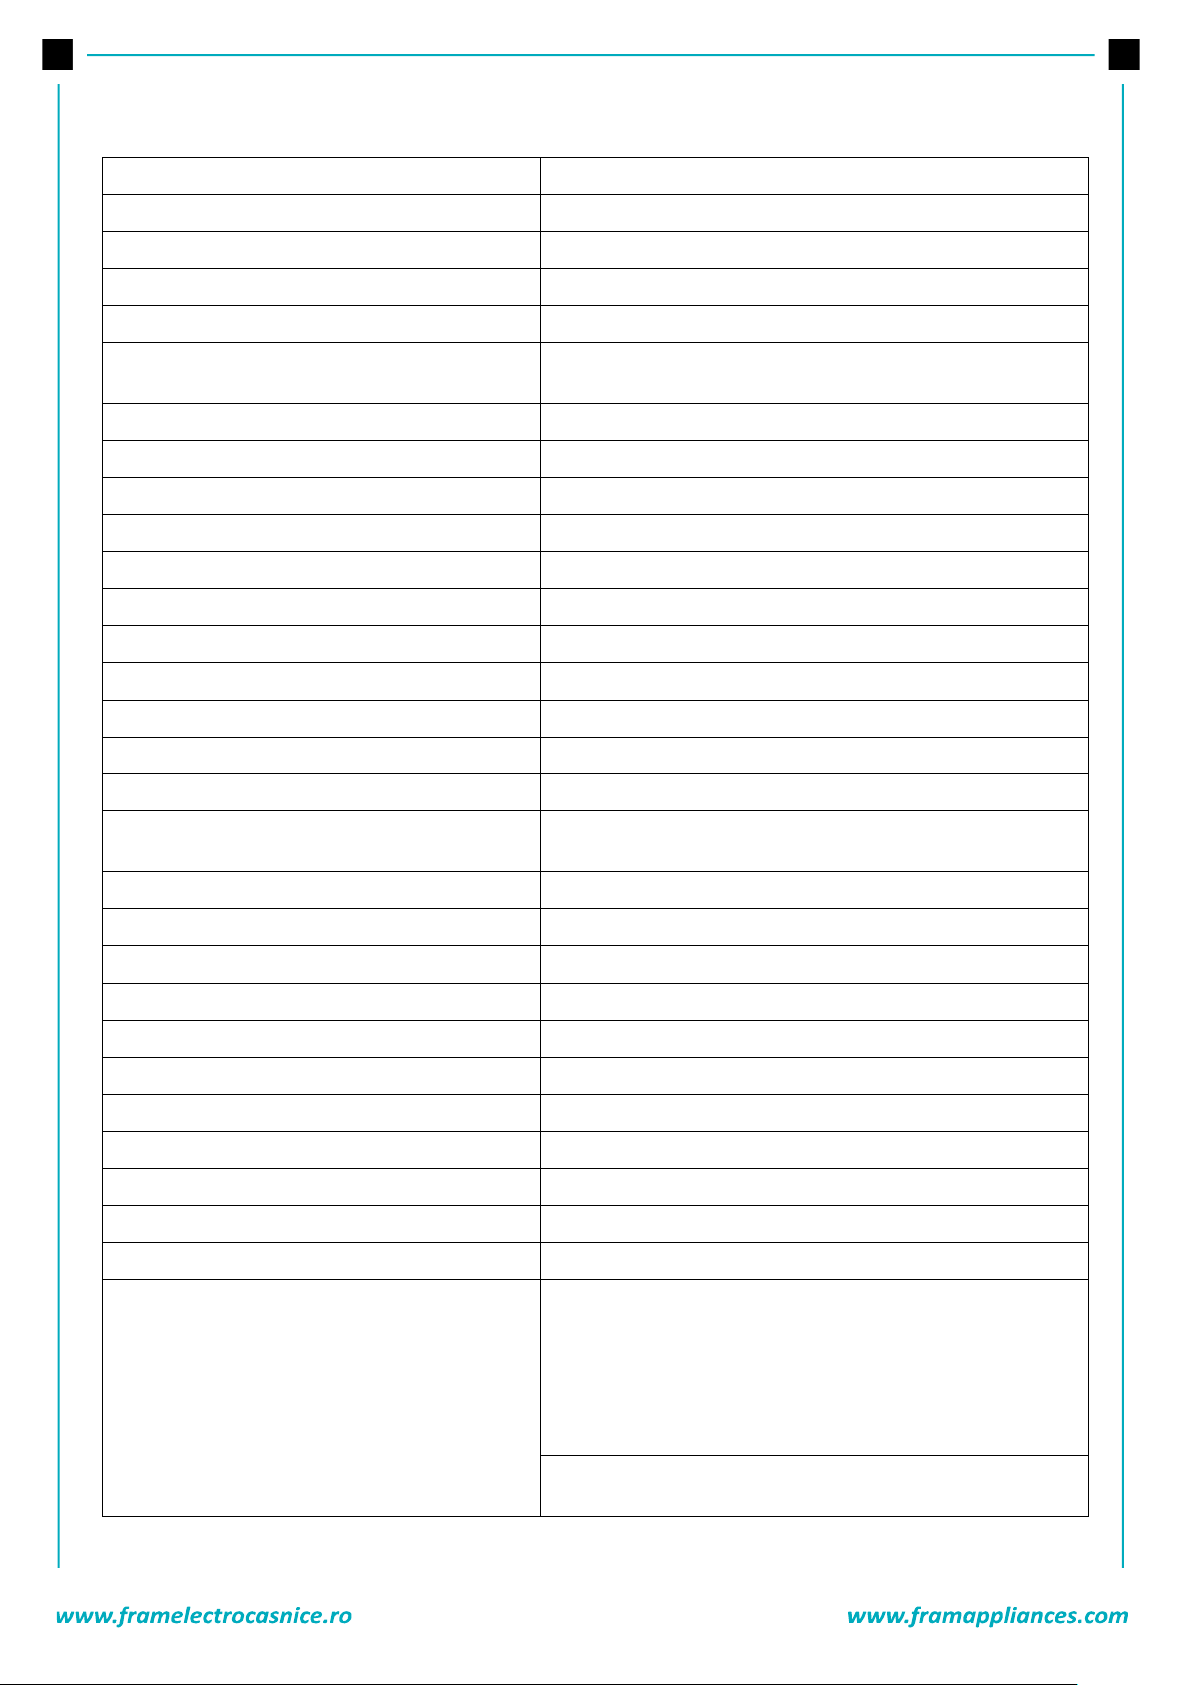
COTTON
Washing temperature (°C)
40°, 60°, 70°, 80°, 90°
Maximum dry laundry amount (kg)
9,0
Detergent compartment
2
Program duration (Min.)
230
Laundry type / Descriptions
Very dirty, cotton and flax textiles. (Underwear, linen,
tablecloth, towel (maximum 4,5 kg), bedclothes, etc.)
ECO 40-60
Washing temperature (°C)
*40° - 60°
Maximum dry laundry amount (kg)
9,0
Detergent compartment
2
Program duration (Min.)
228
Laundry type / Descriptions
Dirty cotton and flax textiles. (Underwear, linen, tablecloth,
towel (maximum 4,5 kg), bedclothes, etc.)
COTTON (Pre-wash)
Washing temperature (°C)
--, 30°, 40°, 50°, 60°
Maximum dry laundry amount (kg)
9,0
Detergent compartment
1&2
Program duration (Min.)
164
Laundry type / Descriptions
Dirty cotton and flax textiles. (Underwear, linen, tablecloth,
towel (maximum 4,5 kg), bedclothes, etc.)
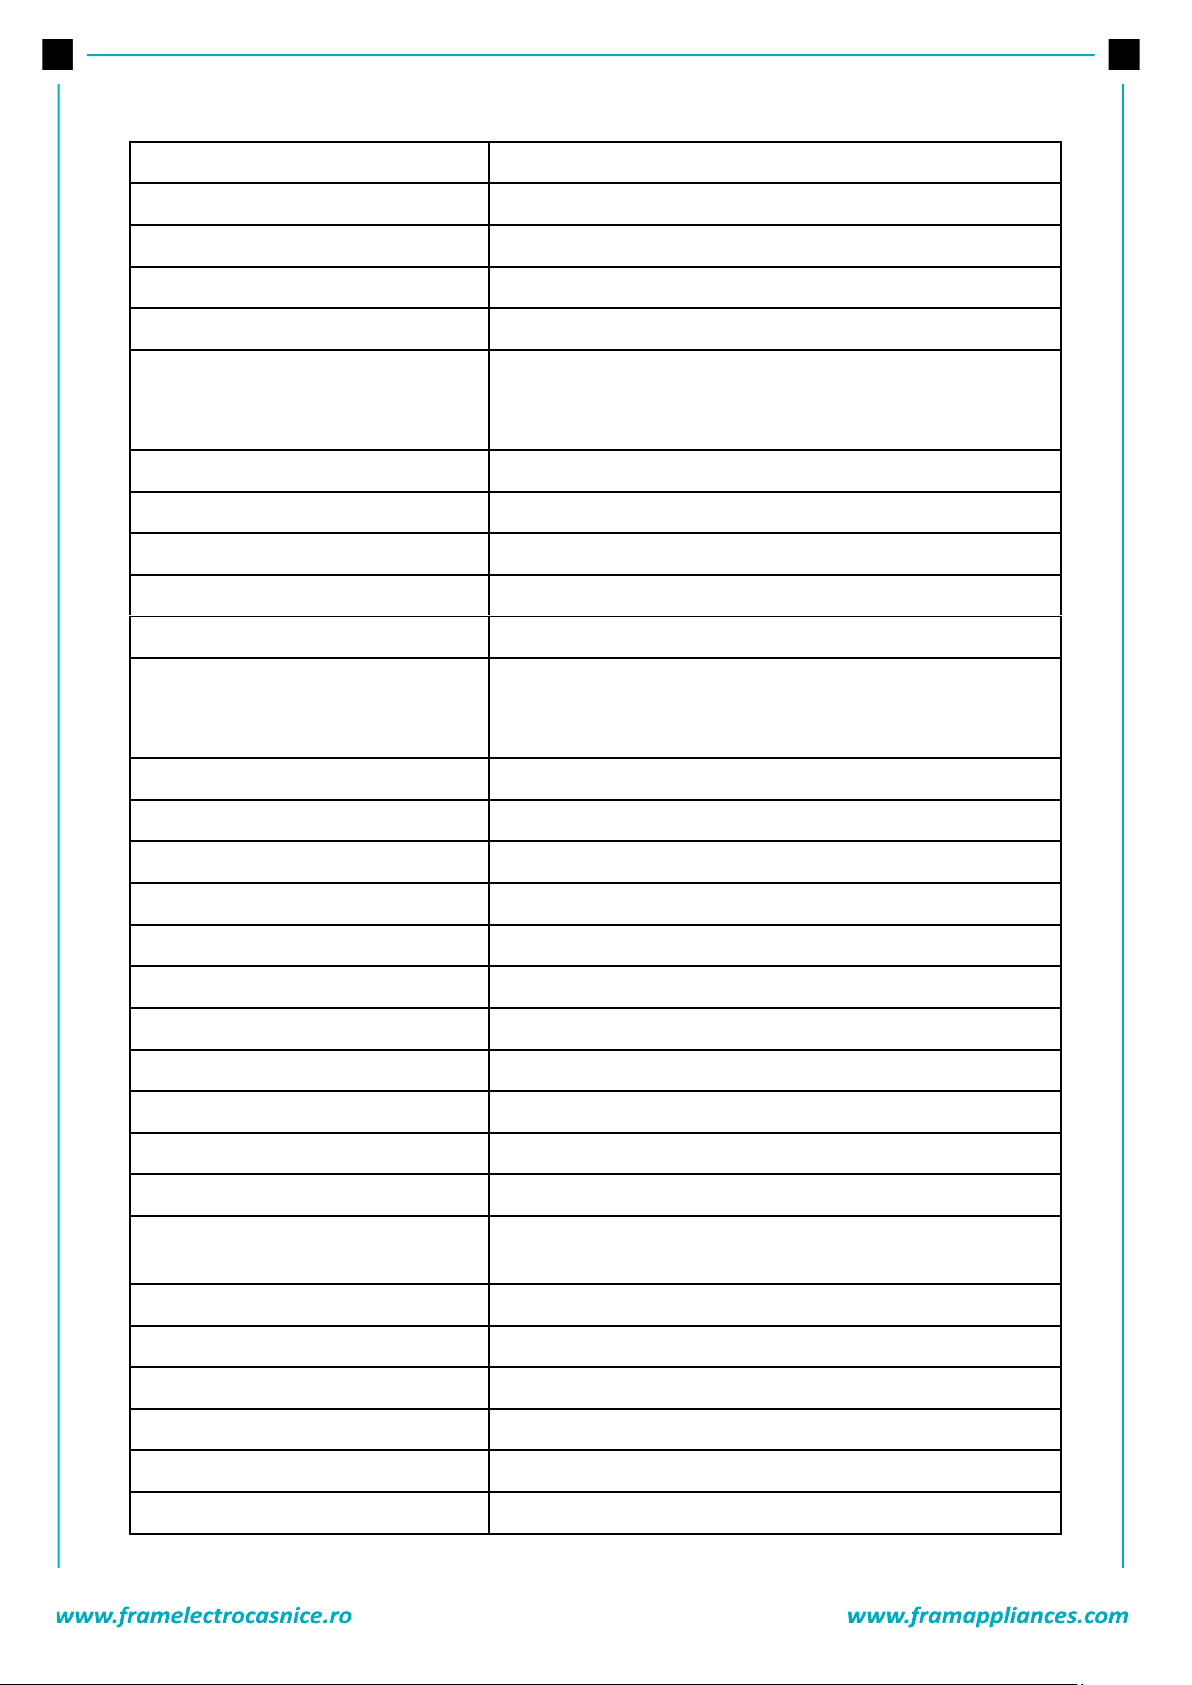
COTTON 20°
Washing temperature (°C)
--, 20°
Maximum dry laundry amount (kg)
4,5
Detergent compartment
2
Program duration (Min.)
96
Laundry type / Descriptions
Less dirty, cotton and linen textiles. (Underwear, bedsheet,
tablecloth, towel (max.2,0 kg) bed cloth, etc.)
10. PROGRAM TABLE
Page 47
46
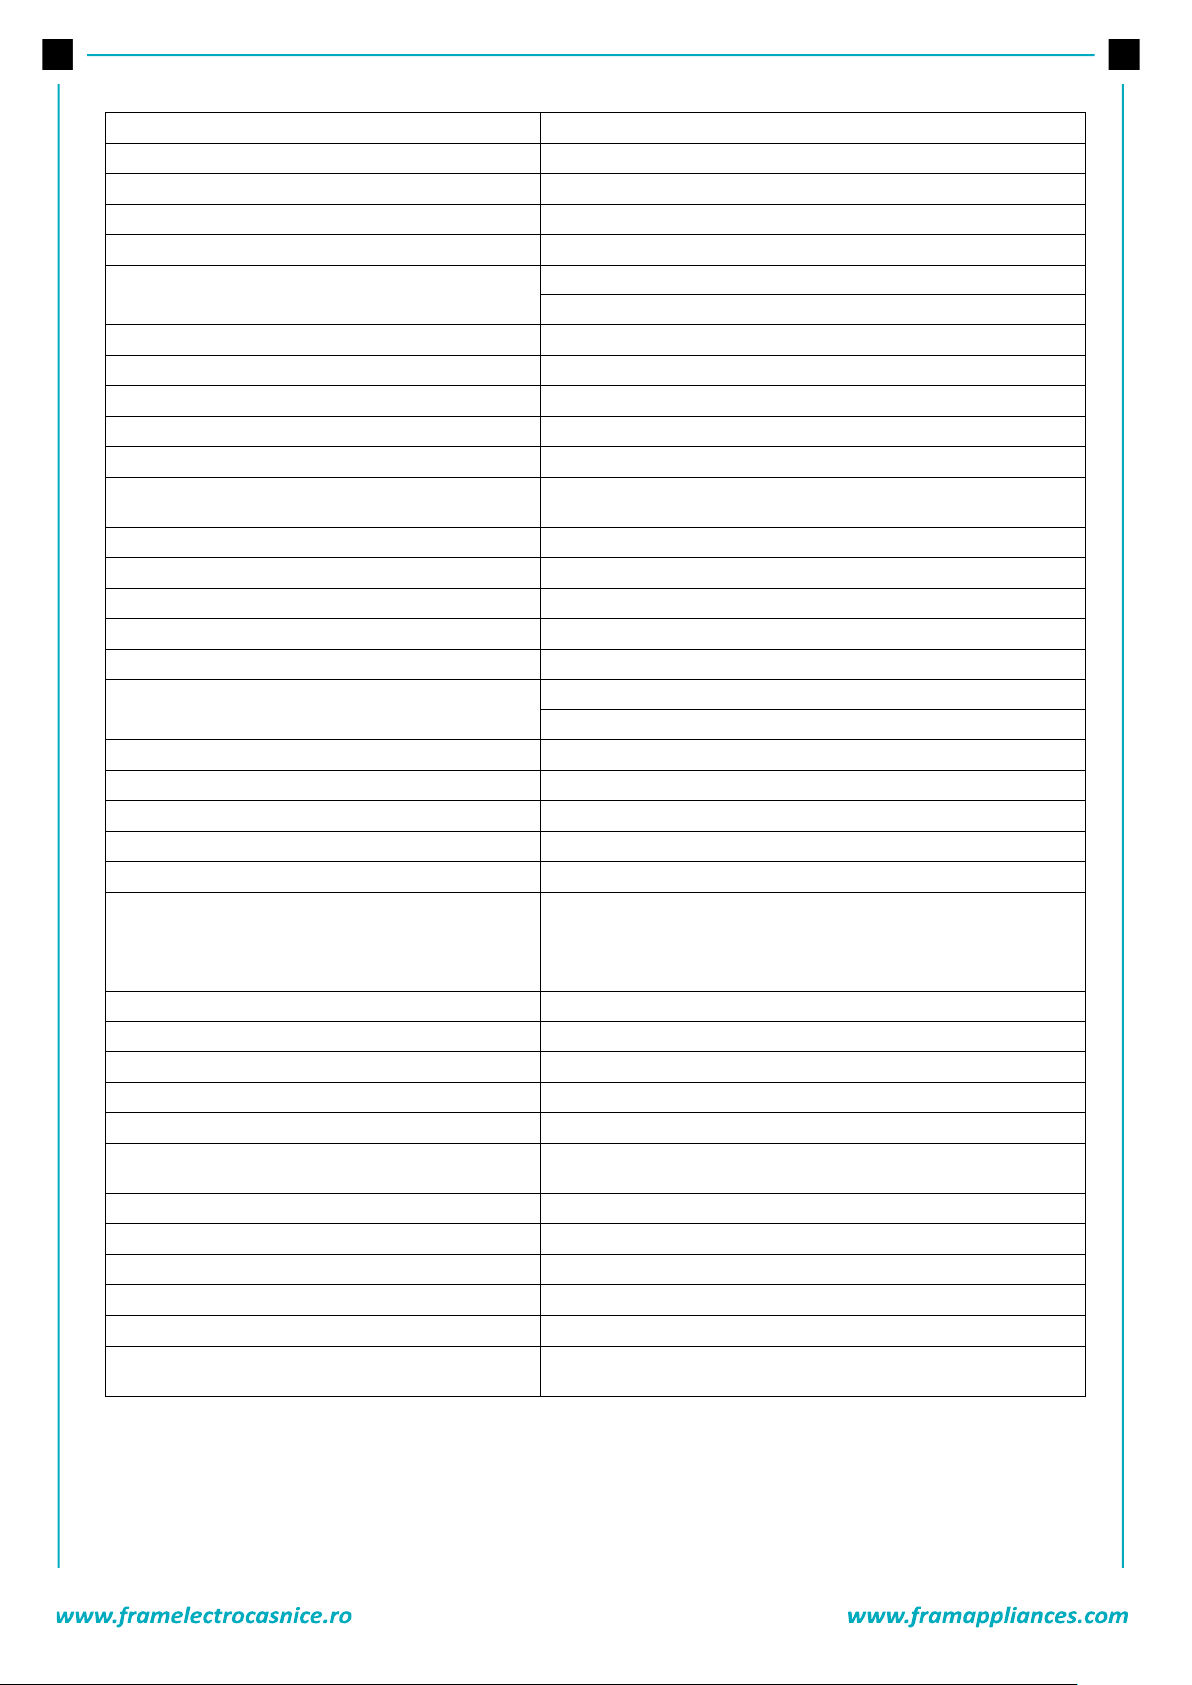
COLOURS
Washing temperature (°C)
--, 30°, 40°
Maximum dry laundry amount (kg)
3,5
Detergent compartment
2
Program duration (Min.)
222
Laundry type / Descriptions
Less dirty, cotton and linen textiles. (Underwear, bedsheet,
tablecloth, towel (max. 2,0 kg) bed cloth, etc.)
WOOL
Washing temperature (°C)
--, 30°
Maximum dry laundry amount (kg)
2,5
Detergent compartment
2
Program duration (Min.)
43
Laundry type / Descriptions
Woolen laundries with machine wash labels
RINSE
Washing temperature (°C)
-
Maximum dry laundry amount (kg)
9,0
Detergent compartment
-
Program duration (Min.)
30
Laundry type / Descriptions
Provides an additional rinse to any type of laundry after the
washing cycle.
ALLERGY SAFE
Washing temperature (°C)
--, 30°, 40°, 50°, 60°
Maximum dry laundry amount (kg)
4,0
Detergent compartment
2
Program duration (Min.)
197
Laundry type / Descriptions
Baby laundry
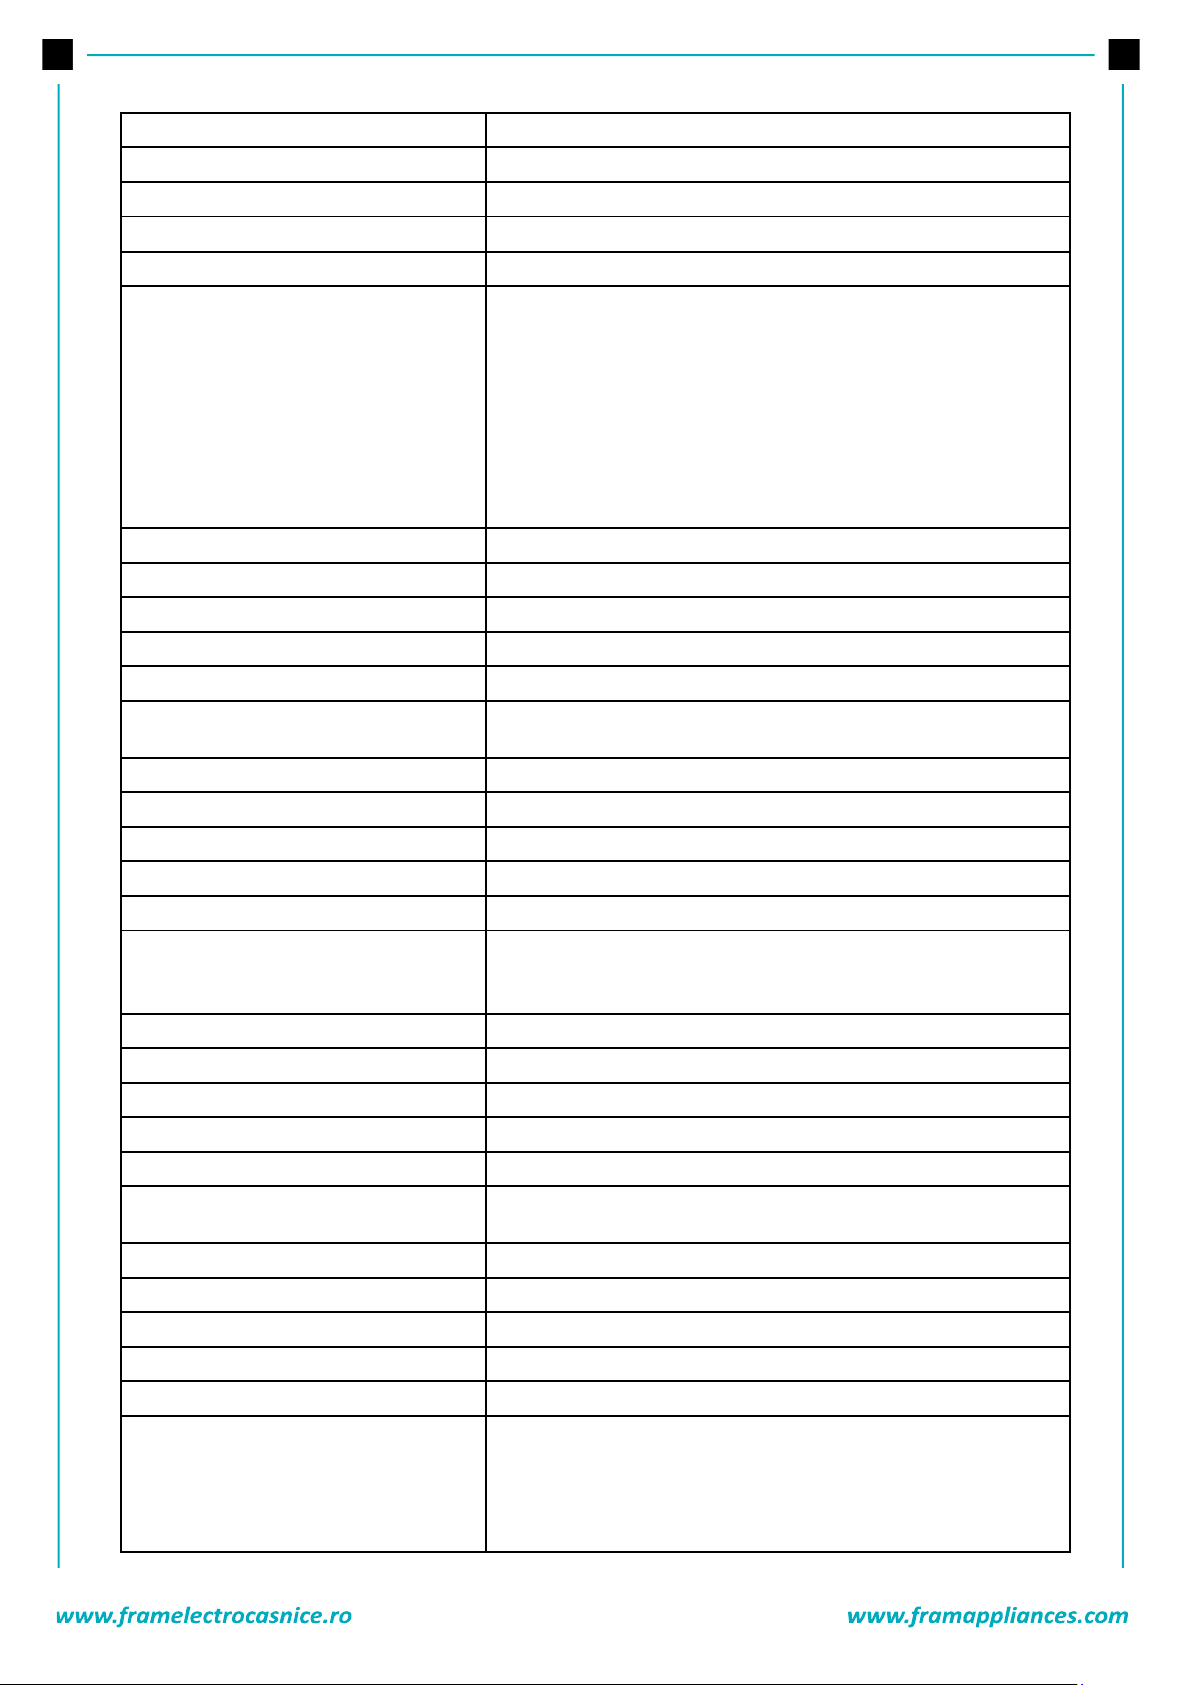
SPIN/DRAIN
Washing temperature (°C)
-
Maximum dry laundry amount (kg)
9,0
Detergent compartment
-
Program duration (Min.)
17
Laundry type / Descriptions
You can use this program for any type of laundry if you want an
additional spin step after the washing cycle. You can use the
drain program to drain the water accumulated inside the
machine (adding or removing laundry). To enable the drain
program, turn the program knob to the spin/ drain program.
After you select
will start to run.
Page 48
47
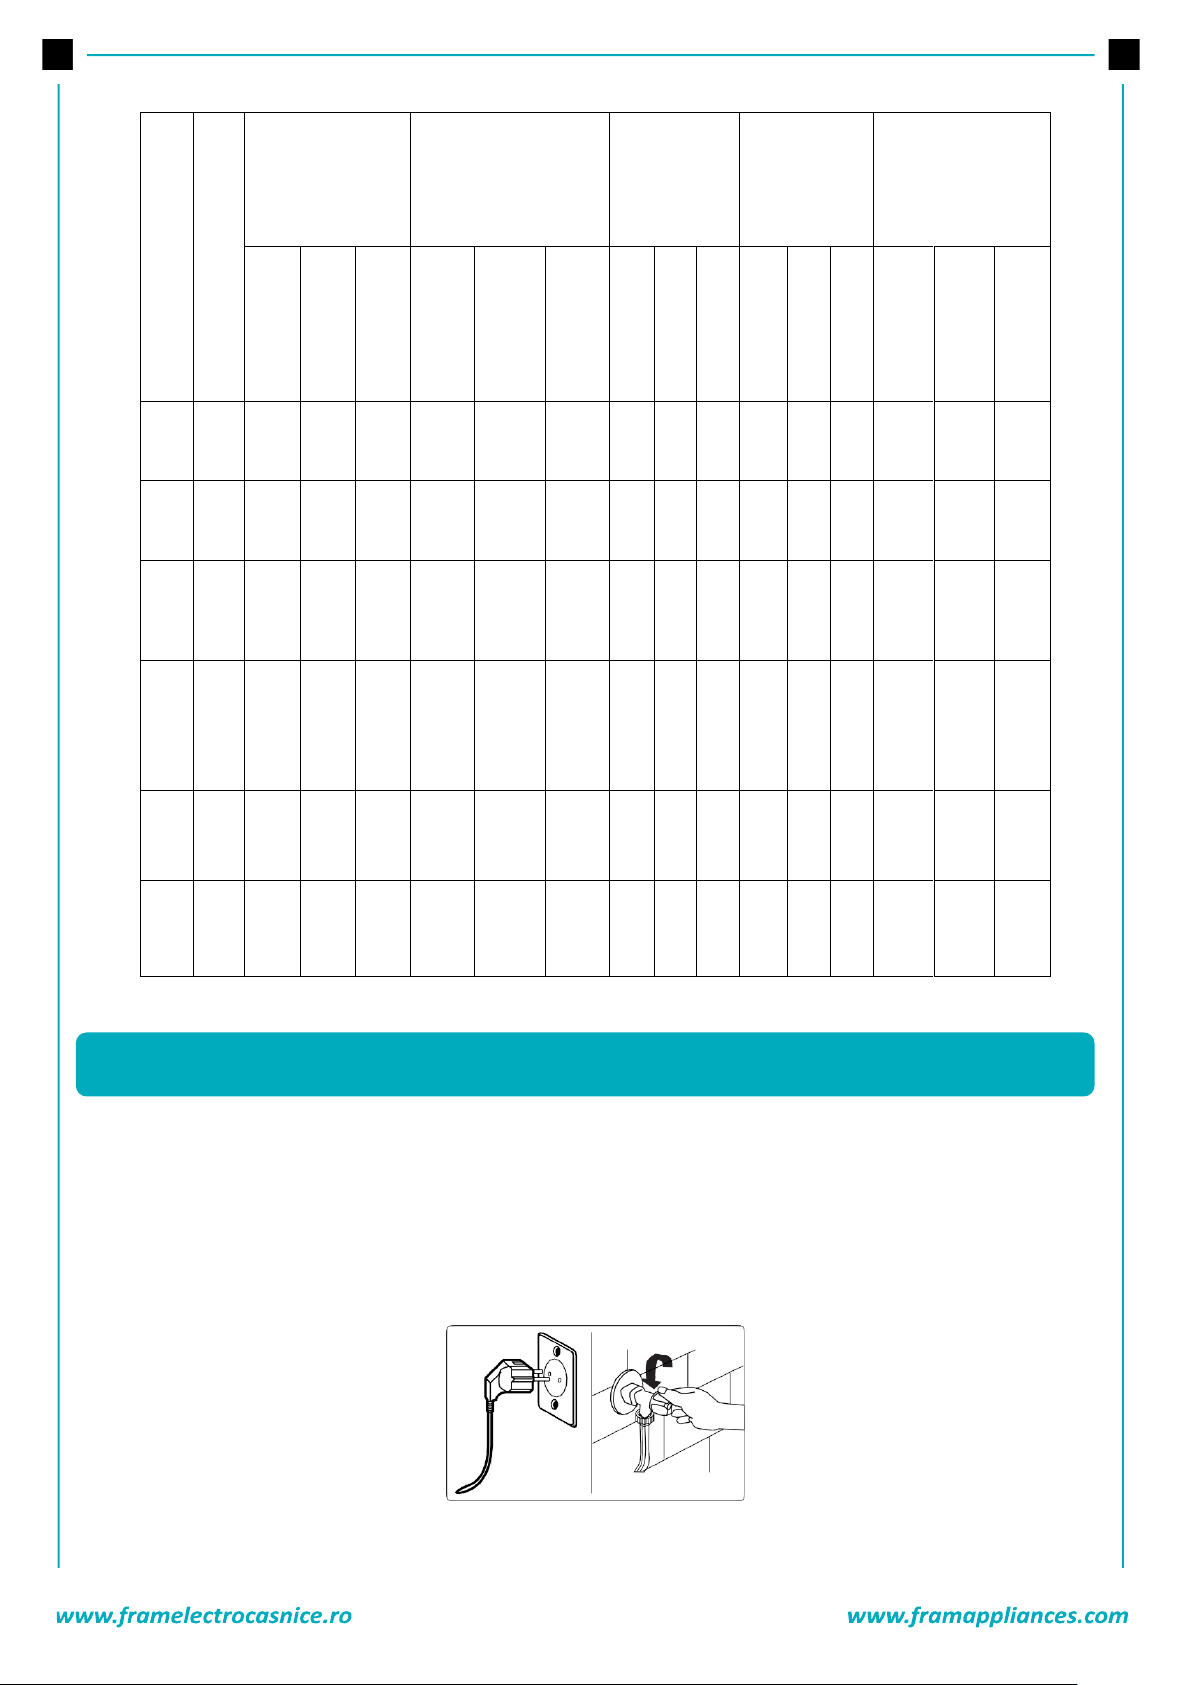
HAND WASH
Washing temperature (°C)
--, 30°
Maximum dry laundry amount (kg)
2,5
Detergent compartment
2
Program duration (Min.)
90
Laundry type / Descriptions
Laundry recommended for hand
wash or sensitive laundry.
OUTDOOR
Washing temperature (°C)
--, 30°, 40°
Maximum dry laundry amount (kg)
3,5
Detergent compartment
2
Program duration (Min.)
110
Laundry type / Descriptions
Very dirty or synthetic-mixed textiles. (Nylon socks, shirts,
blouses, synthetic-including trousers etc.)
DUVET
Washing temperature (°C)
--, 30°, 40°
Maximum dry laundry amount (kg)
-
Detergent compartment
2
Program duration (Min.)
103
Laundry type / Descriptions
For washing a fiber blanket with
a machine washable label. (maximum 2.5 kg)
JEANS/ DARK GARMENTS
Washing temperature (°C)
--, 30°
Maximum dry laundry amount (kg)
3,5
Detergent compartment
2
Program duration (Min.)
96
Laundry type / Descriptions
Black and dark items made of cotton, mixed fiber or jeans.
Wash inside out., Jeans often contains excess dye and may run
during the first few washes. Wash light and dark colored items
separately
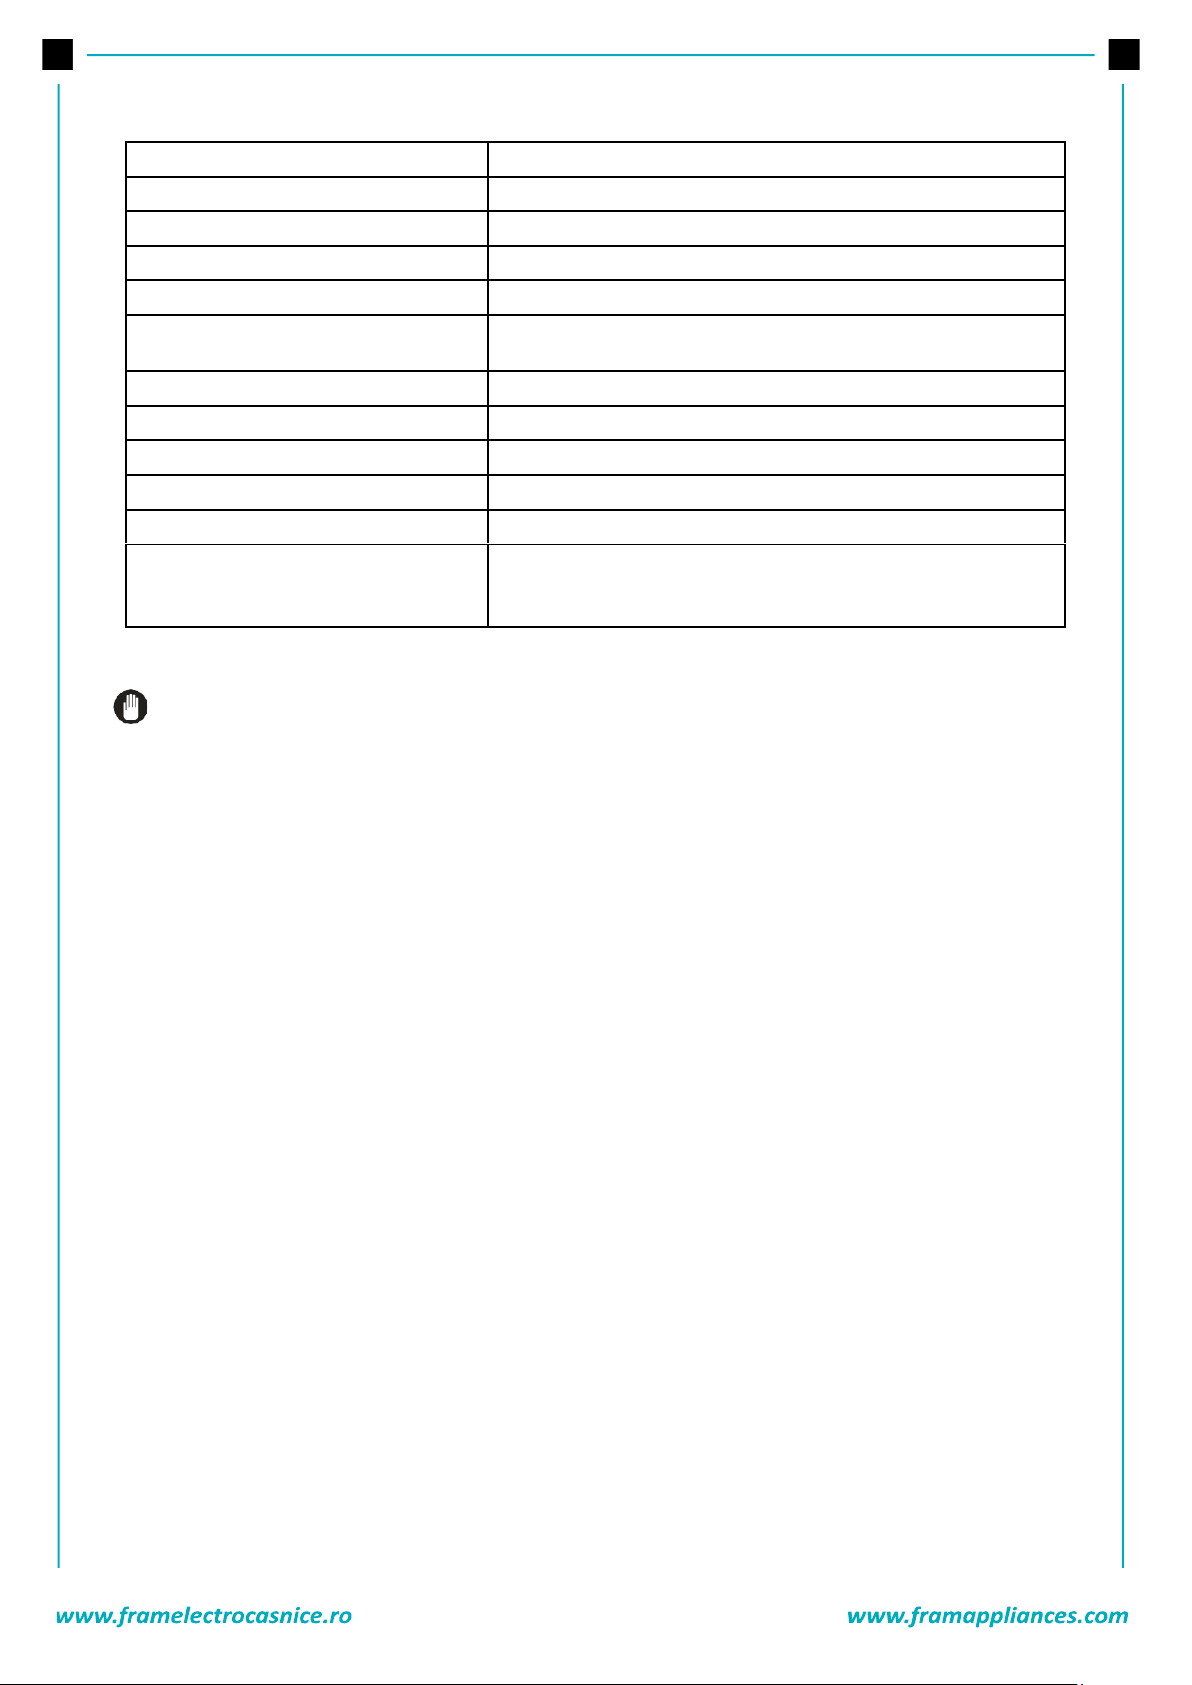
FAST 60 min (*)
Washing temperature (°C)
--, 30°, 40°, 50°, 60°
Maximum dry laundry amount (kg)
4,0
Detergent compartment
2
Program duration (Min.)
60
Laundry type / Descriptions
Dirty, cotton, colored and linen textiles washed at 60°C in 60
minutes.
RAPID 15 min (**)
Washing temperature (°C)
--, 30°
Maximum dry laundry amount (kg)
2,0
Detergent compartment
2
Program duration (Min.)
15
Laundry type / Descriptions
In a short time of 15 minutes, lightly soiled, cotton, colored and
linen textiles you can wash.
NOTE: PROGRAMME DURATION MAY CHANGE ACCORDING TO THE AMOUNT OF LAUNDRY, TAP
WATER, AMBIENT TEMPERATURE AND SELECTED ADDITIONAL FUNCTIONS.
Page 49

48
(*) If your machine includes the rapid washing additional function and you put 2 kg or less of laundry
into your machine, your machine will automatically wash the laundry for 30 minutes.
(**) Due to the short washing time of this program, we recommend that less detergent is used. The
program may last longer than 15 minutes if your machine detects an uneven load. You can open the
door of your machine 2 minutes after the completion of a washing operation. (The 2 minute period is
not included in the program duration).
According to regulation 1015/2010 and 1061/2010, the programme 1 and the programme 2 are
The Eco 40-60 program is able to clean normally soiled cotton laundry declared to be washable at 40°C or
60°C, together in the same cycle, and that this program is used to assess the compliance with the EU ecodesign legislation.
The most efficient programs in terms of energy consumption are generally those that perform at
lower temperatures and longer duration.
Loading the household washing machine up to the capacity indicated by the manufacturer for the
respective programs will contribute to energy and water savings.
Program duration, energy consumption and water consumption values may vary according to wash
load weight and type, selected extra functions, tap water and ambient temperature.
programs at low temperature. The
amount of detergent to be used may vary depending on the amount of laundry and the level of dirtiness
for the detergent to be
used.
The noise and remaining moisture content are influenced by the spinning speed. The higher
spinning speed in the spinning phase, the higher noise and the lower remaining moisture content.
You can access the product database where the model information is stored by reading the QR
code on the energy label.
Page 50
49
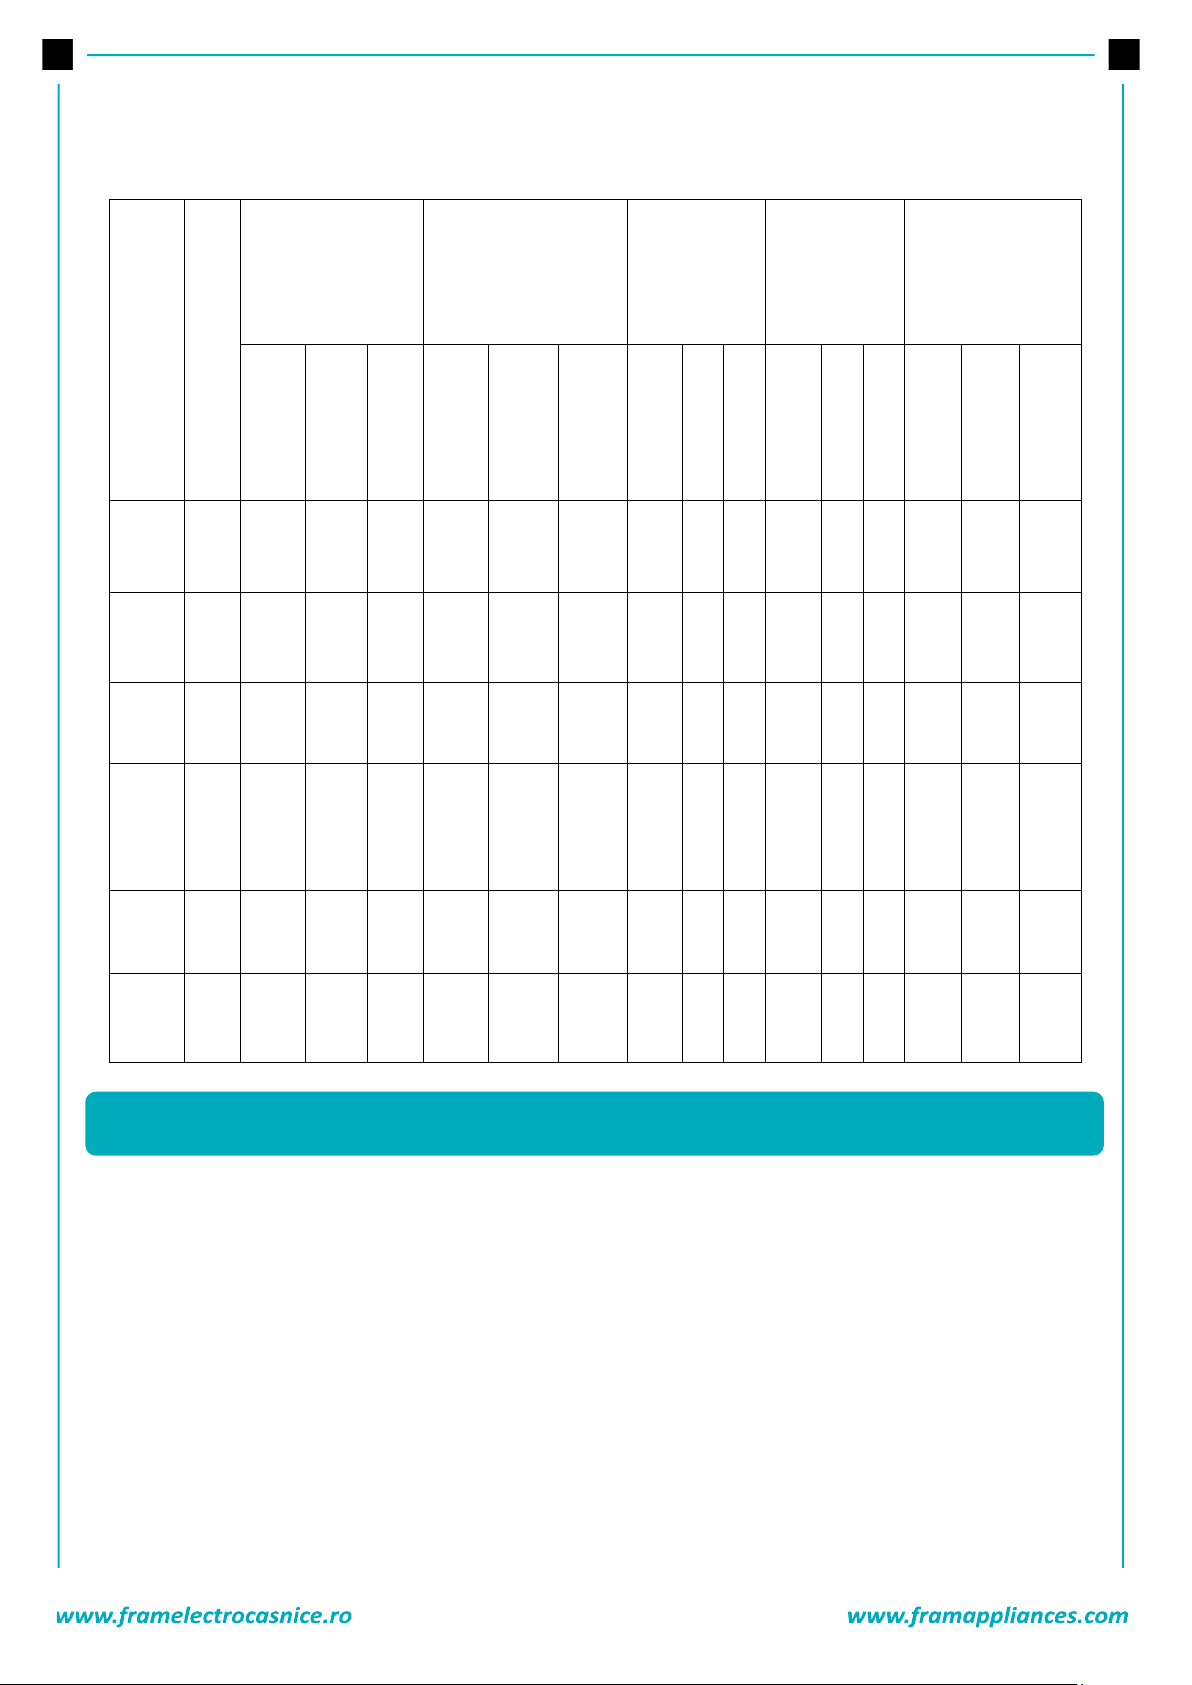
Programme
Name
Rated
Capacity
kg
Energy
Consumption
kWh/cycle
Programme
Duration
Hours:Minutes
Water
Consumption
Litres/Cycle
max.
Temperature
°C
Remaining
Moisture
Content
% 1400
Rpm
Rated
Capacity
1/2 Load
1/4 Load
Rated
Capacity
1/2 Load 1/4 Load
Rated
Capacity
1/2 Load
1/4 Load
Rated
Capacity
1/2 Load
1/4 Load
Rated
Capacity
1/2 Load 1/4 Load
Cotton
90
9
2,4
03:13
84
84
53%
Cotton
60
9
1,35
03:50
57
57
53%
Eco
40-60
9
1,26
0,71
0,36
03:48
02:54
02:54
57
48
36
45
36
26
53%
53%
53%
Easy Care /
Outdoor
3,5
0,57
01:50
50
42
53%
Fast 60
4
1,11
01:00
35
58
53%
Cotton
20
4,5
0,21
01:36
53
20
53%
WARNING!
Unplug your machine before starting the maintenance and cleaning of your machine.
Turn the tap water off before starting the maintenance cand cleaning of your machine.
parts might be damaged if cleaners with solvent agents are used. Do not use
cleaning materials with solvent agents.
11. CLEANING AND MAINTENANCE
Page 51
50
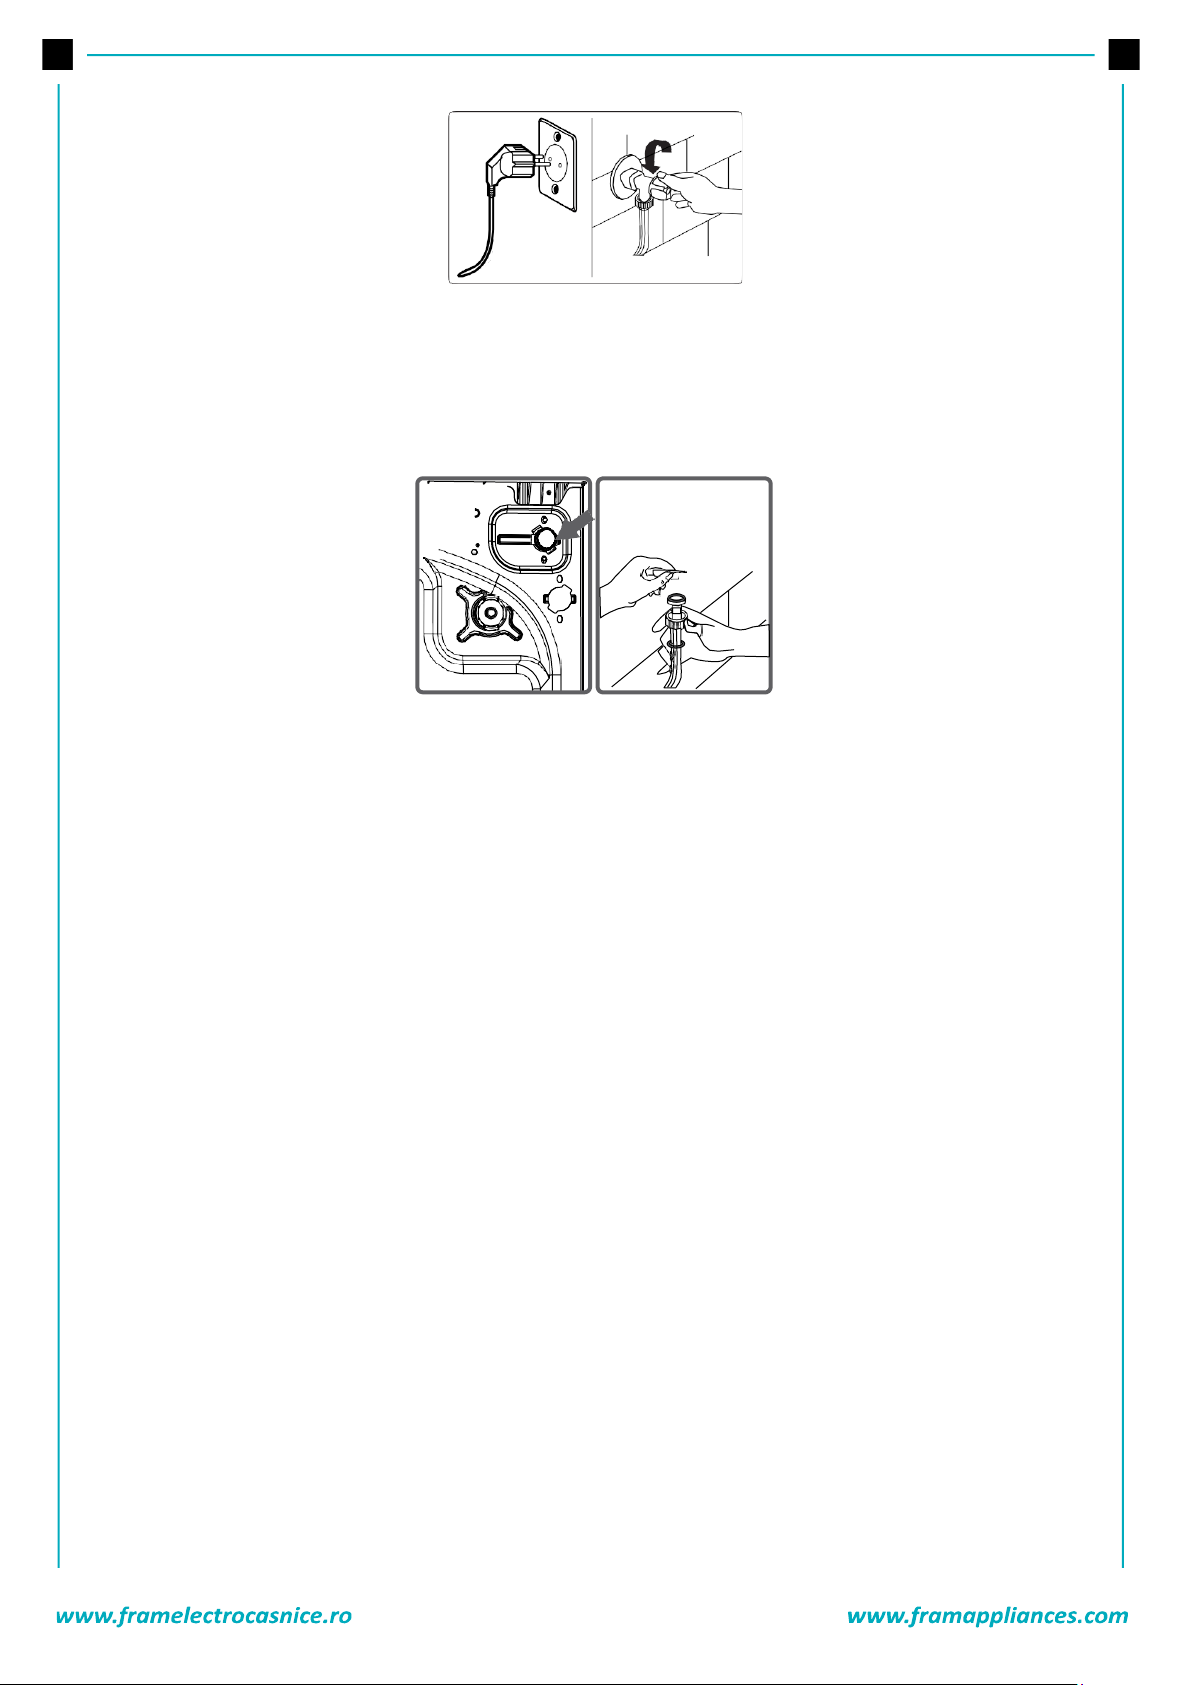
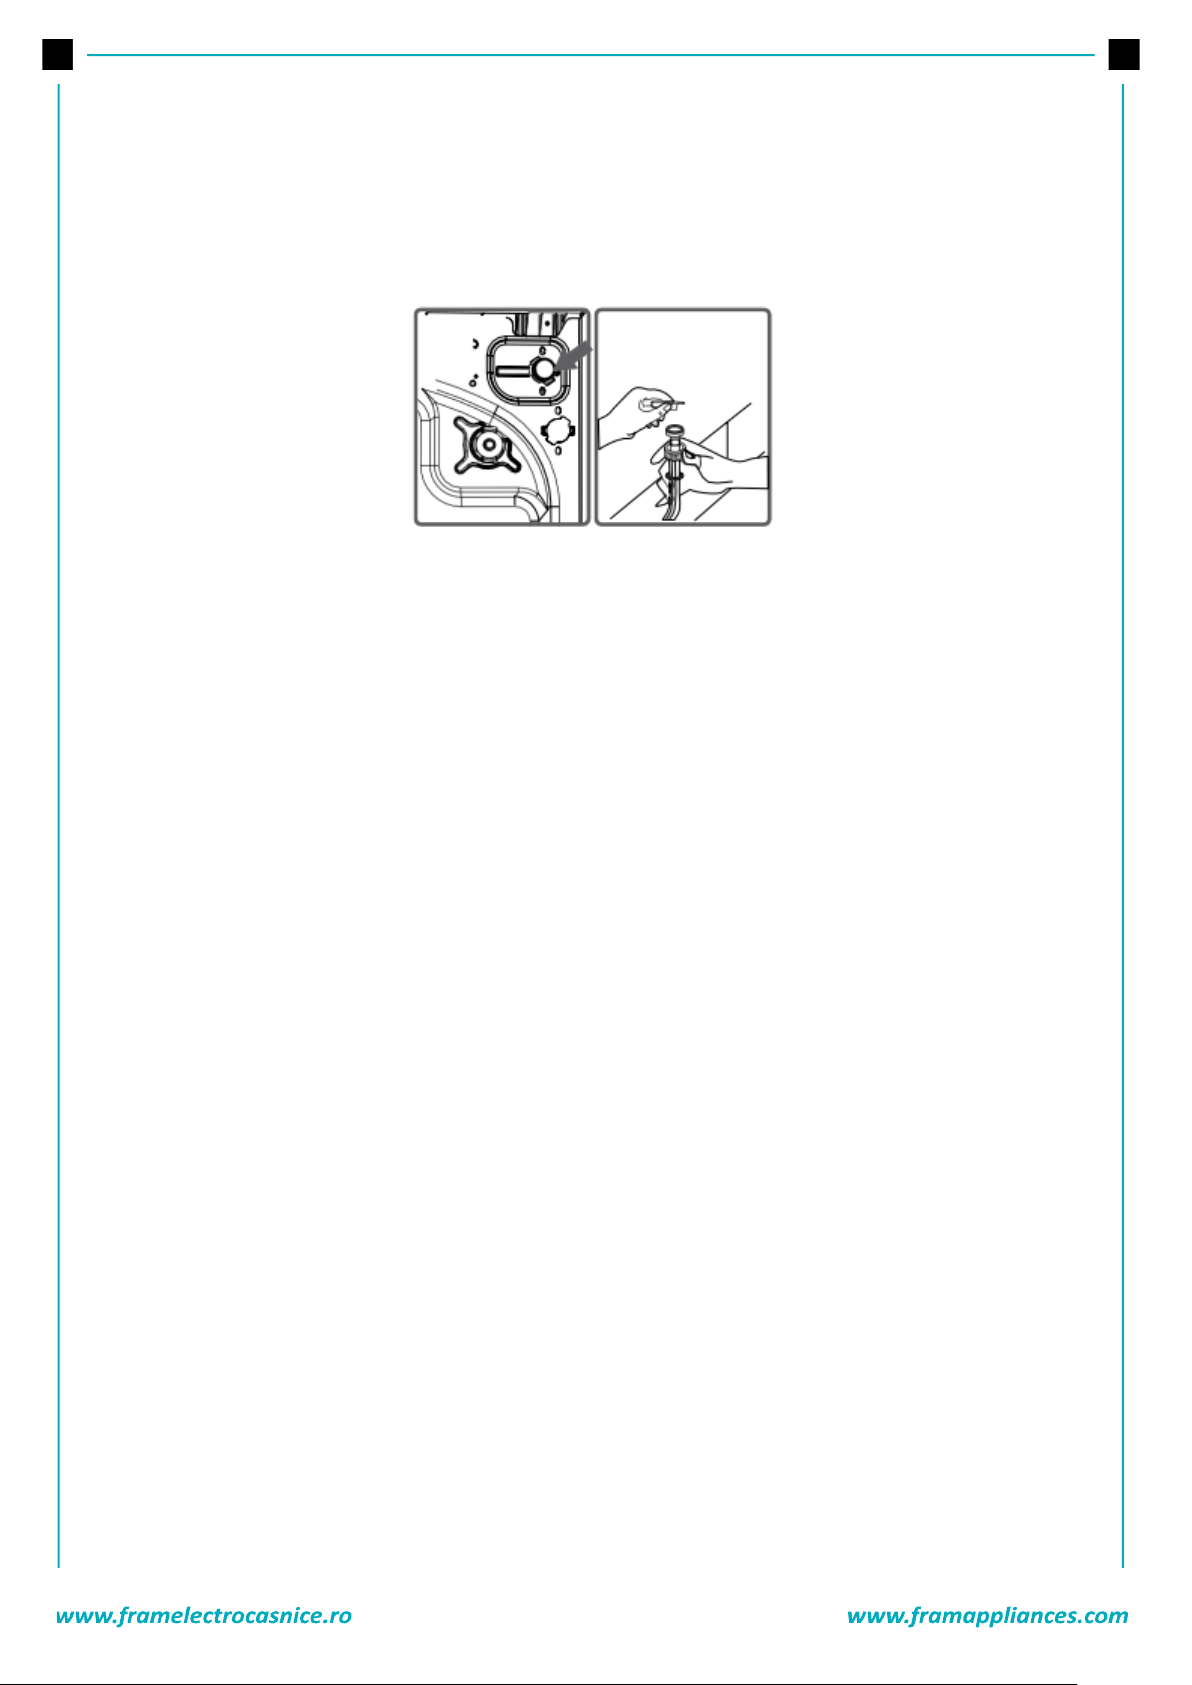
WATER INLET FILTERS
Filters to avoid dirt and foreign substances in the water from penetrating into the machine are available
both on the side of faucet and on the ends of water valves along the water inlet hose of your machine.
If your machine cannot intake enough water despite water faucet being open, these filters should be
cleaned. (It is recommended that you clean you pump filter one in 2 months)
•
•
•
•
CAUTION:
Filters of water inlet valves may be clogged due to contaminated water faucet or lack of necessary
maintenance or valves may be broken down, causing water leaking into your machine continuously.
The breakdowns that may arise due to these reasons are out of the scope of warranty.
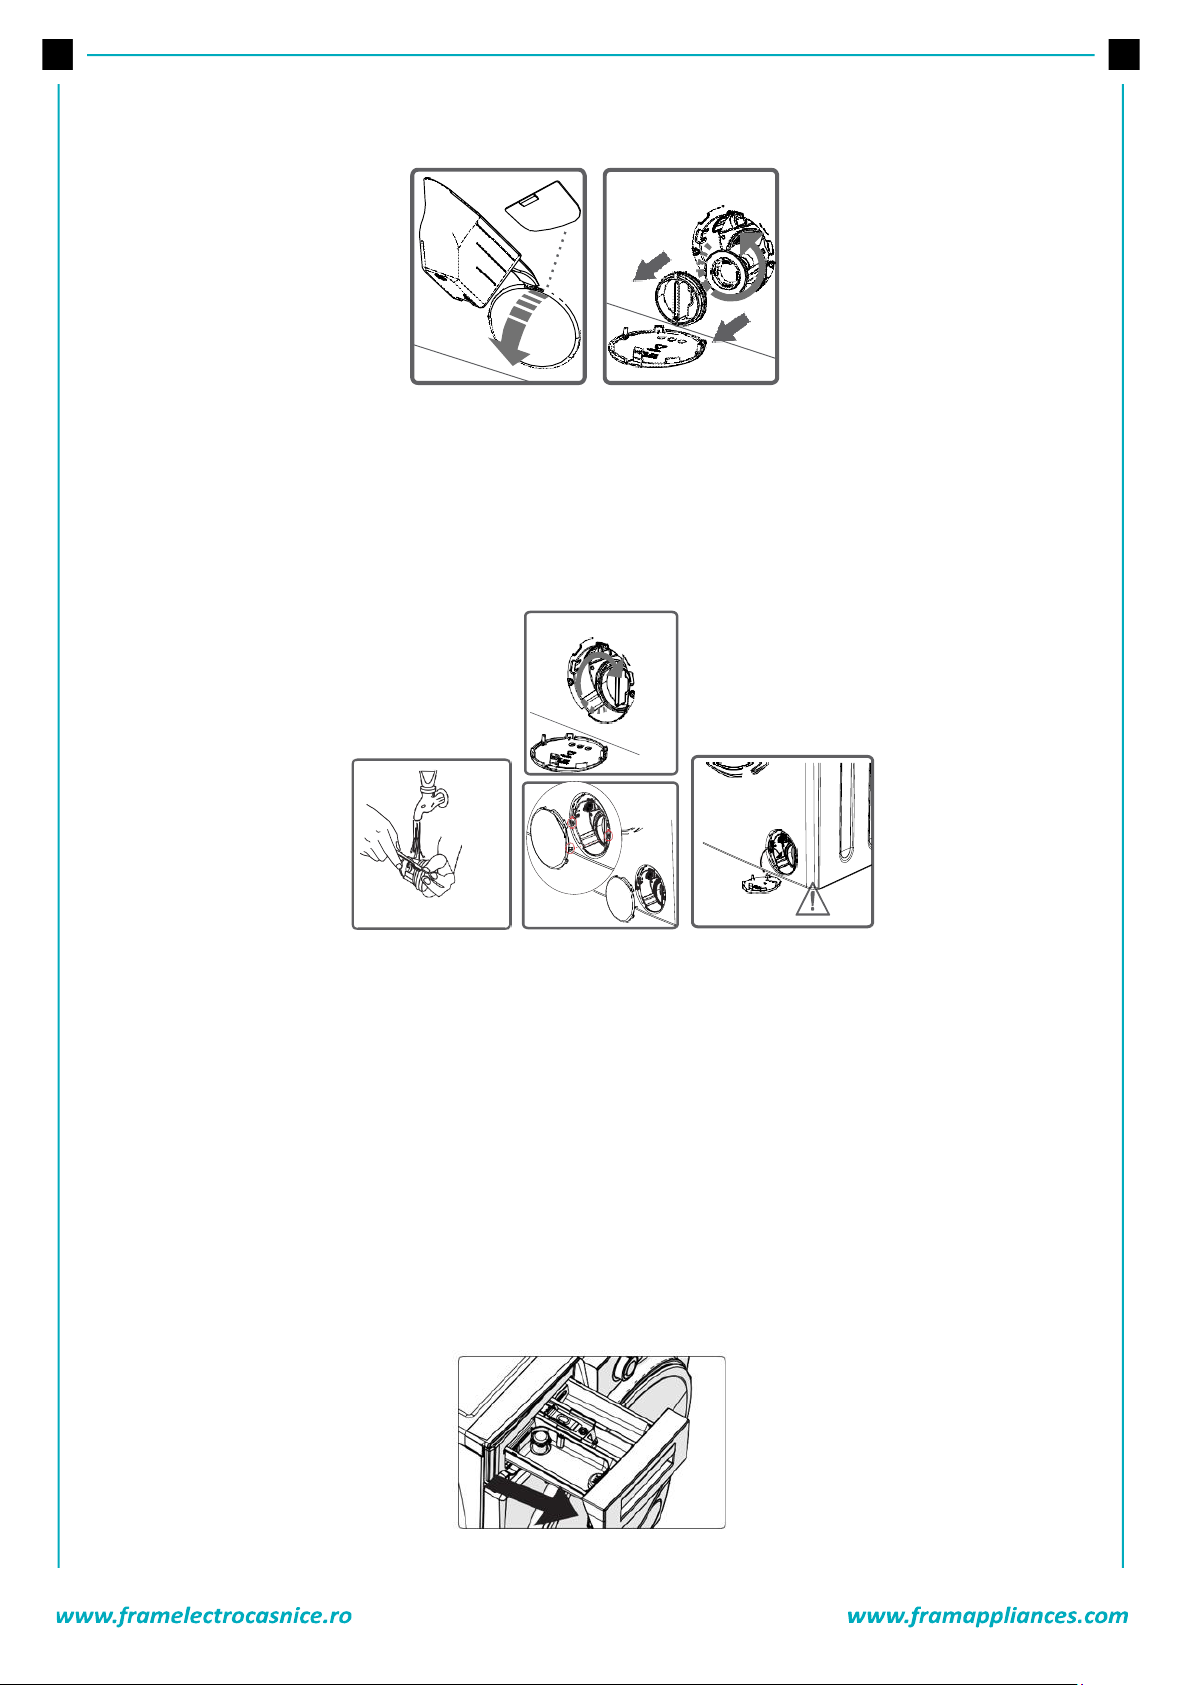
PUMP FILTER
A filter system which avoids threads remaining from your laundries and tiny materials from entering the
pump during water discharging operation carried out by your machine after completing washing so
prolonging the lifecycle of your pump is available. It is recommended that you clean your pump filter once
in 2 months. To clean pump filter:
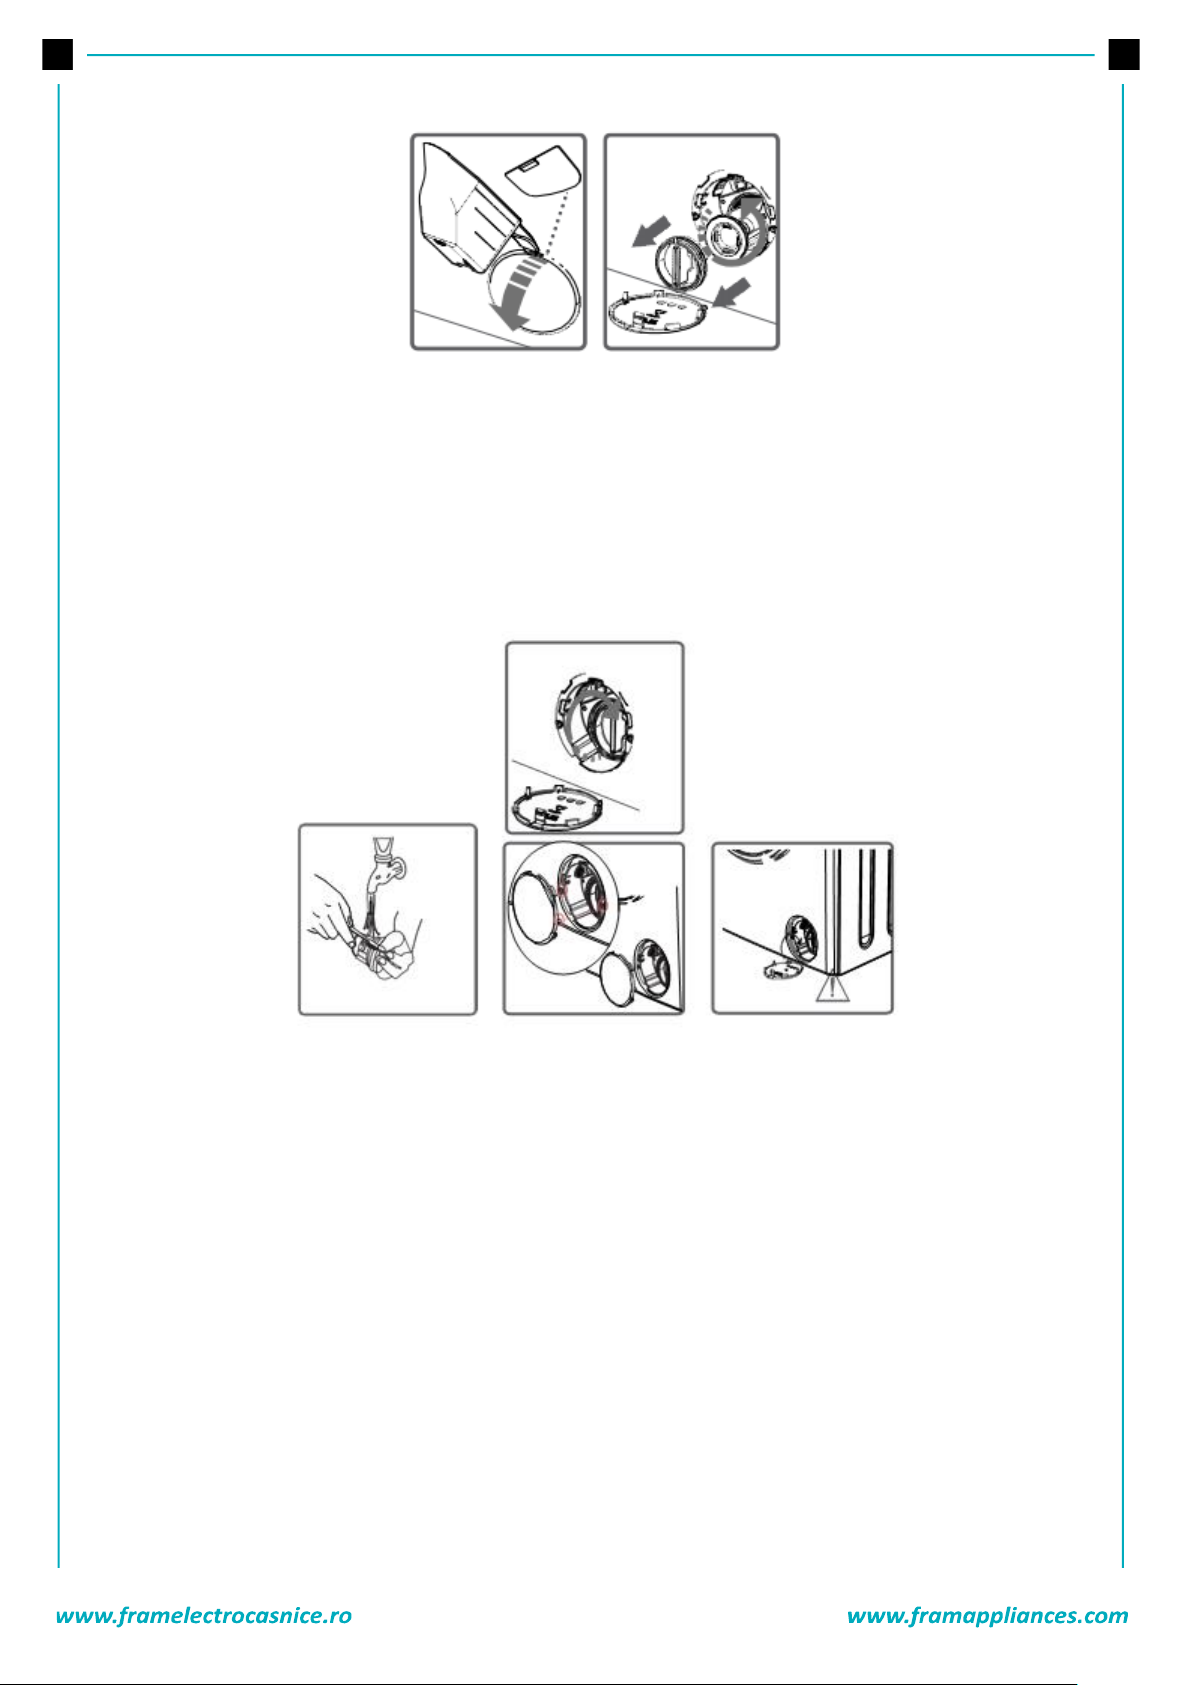
• To open the pump cover, you can use the powder detergent spade or liquid detergent level plate coming
out of your machine.
• Fit the end point of the plastic part to the gap of the pump cover and push it back. This will open the
cover.
• Before opening the filter cover, settle a vessel in front of the filter cover to prevent the water remained
in the machine from flowing on the ground.
• Loosen the filter cover in counterclockwise and then empty water.
Note: You may have to empty the water collection vessel several times according to the amount of water in
the machine.
Page 52
51
• Clean the foreign materials in the filter with a brush.
• After cleaning the filter, fit the cover and tighten it by rotating it in clockwise direction.
• While closing the pump cover, ensure that the parts on the inner side of the cover to match the holes on
the front panel side.
You can reattach the pump cover in the reverse order that you removed it.
As water in the pump may be hot, wait until it cools down.
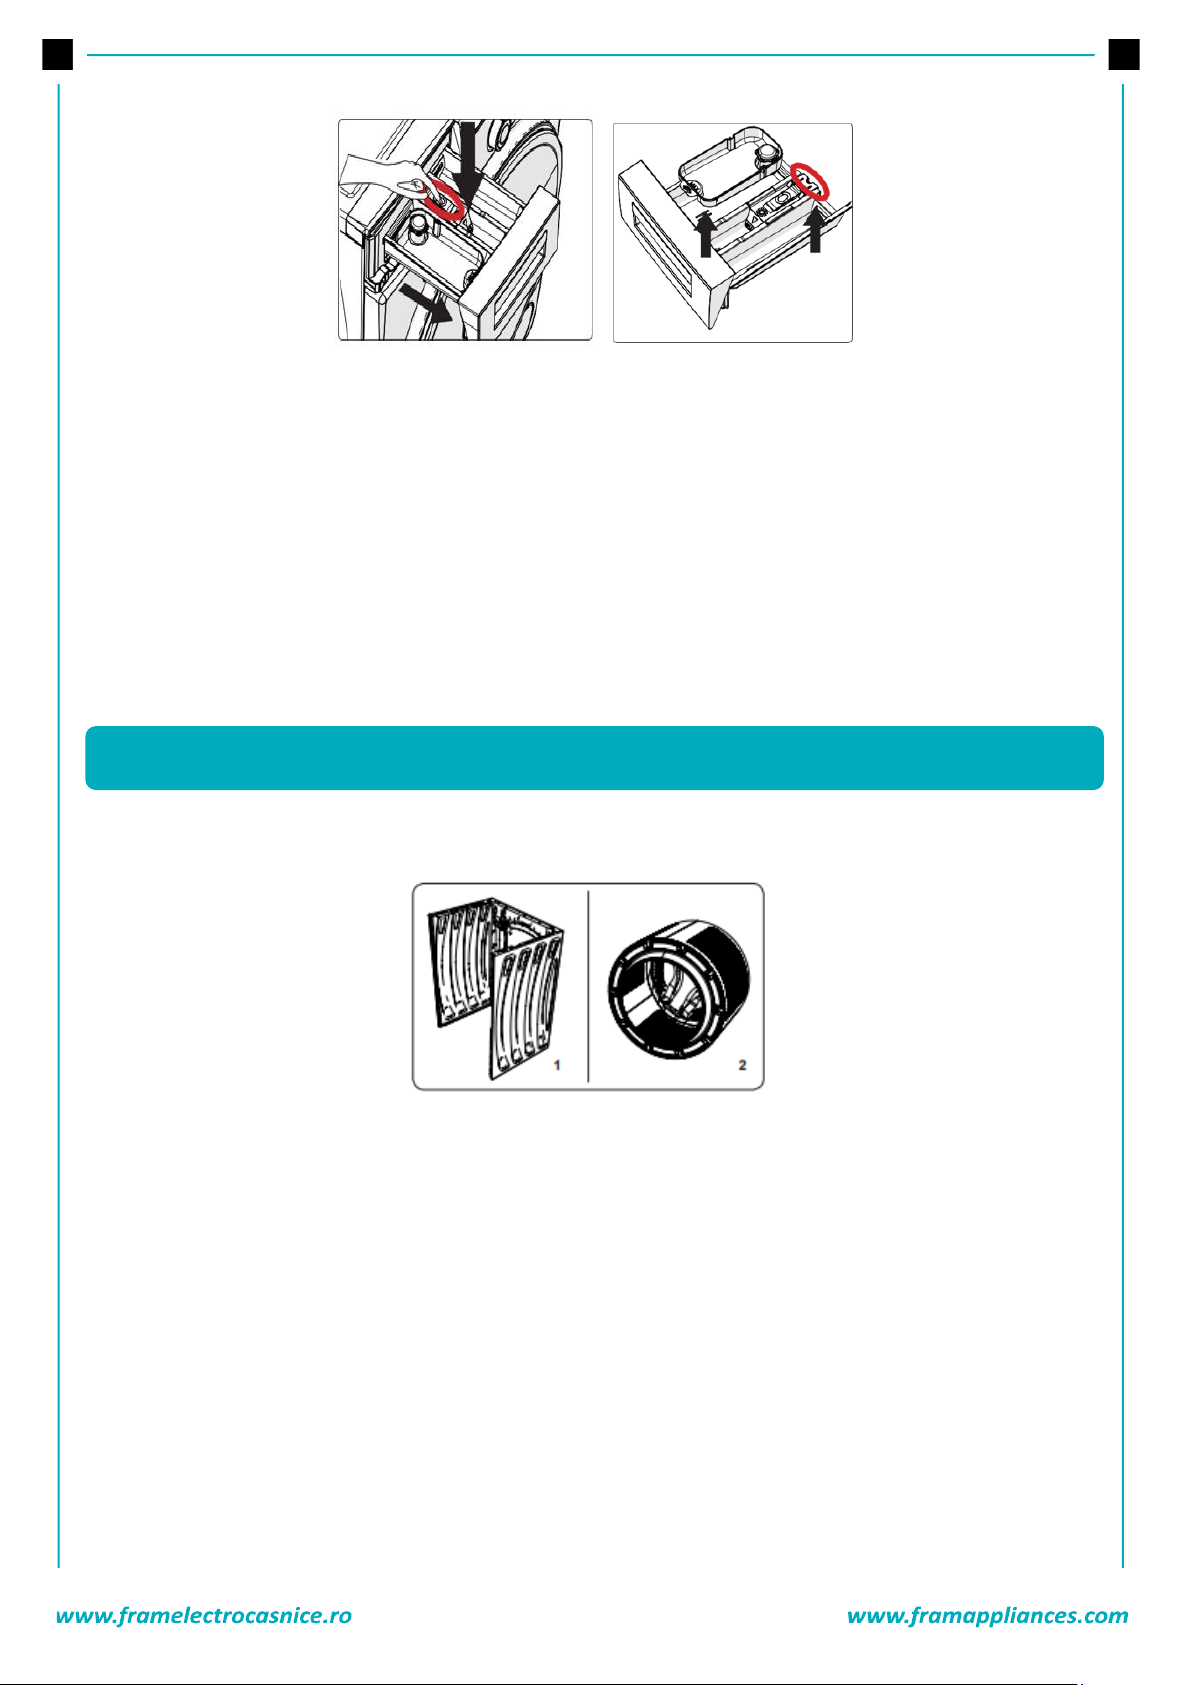
DETERGENT DRAWER
Your detergents may deposit residue in detergent drawer and housing of detergent drawer over time.
To clean the residue formed, disassemble the detergent drawer in particular periods. It is recommended
that you clean your pump filter every 2 months.
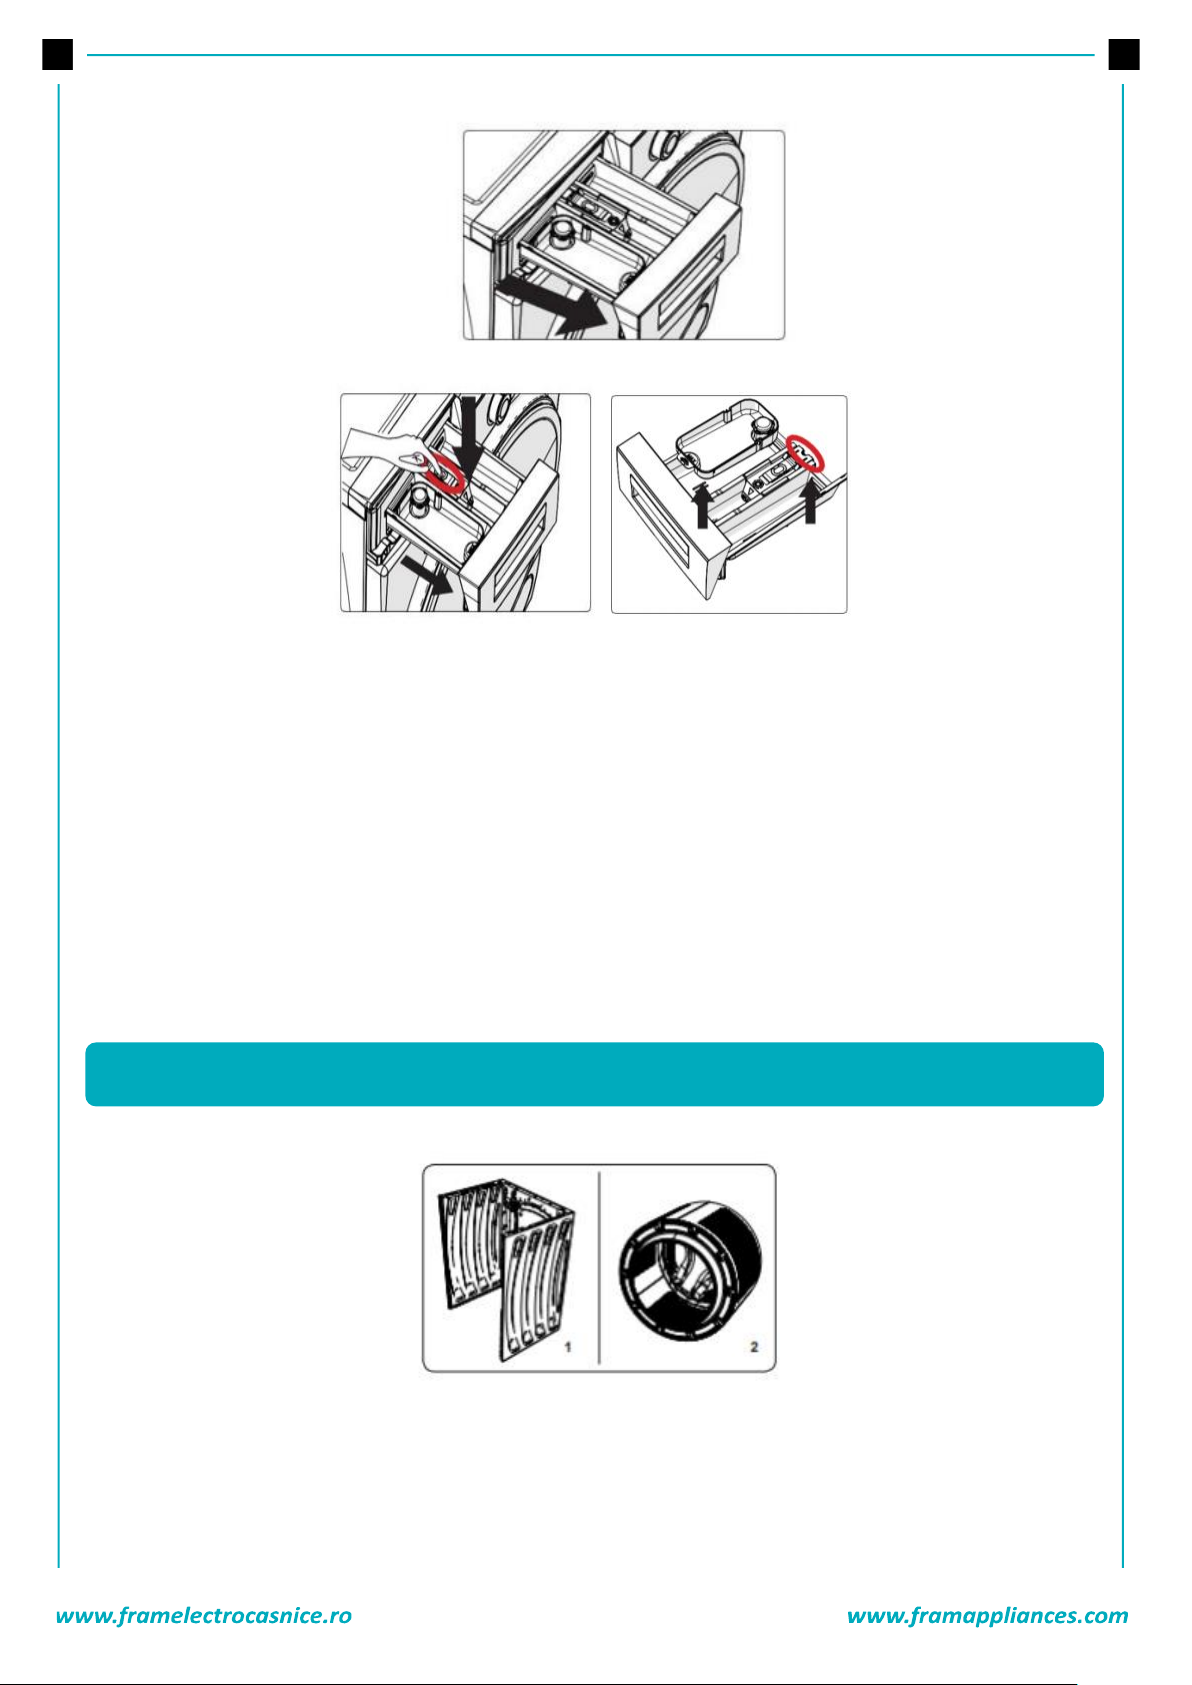
To eject the detergent drawer:
- Pull the detergent drawer up to the end
- Keep on pulling by depressing on the section shown below in the detergent drawer and keep pulling and
then unsettle the detergent drawer
Page 53
52
- Flush it using a brush.
- Collect residues in the housing of the detergent drawer without dropping them inside the machine
- Assemble the detergent drawer after drying it using a towel or dry cloth
Do not wash your detergent drawer in dishwasher.
LIQUID DETERGENT APPARATUS
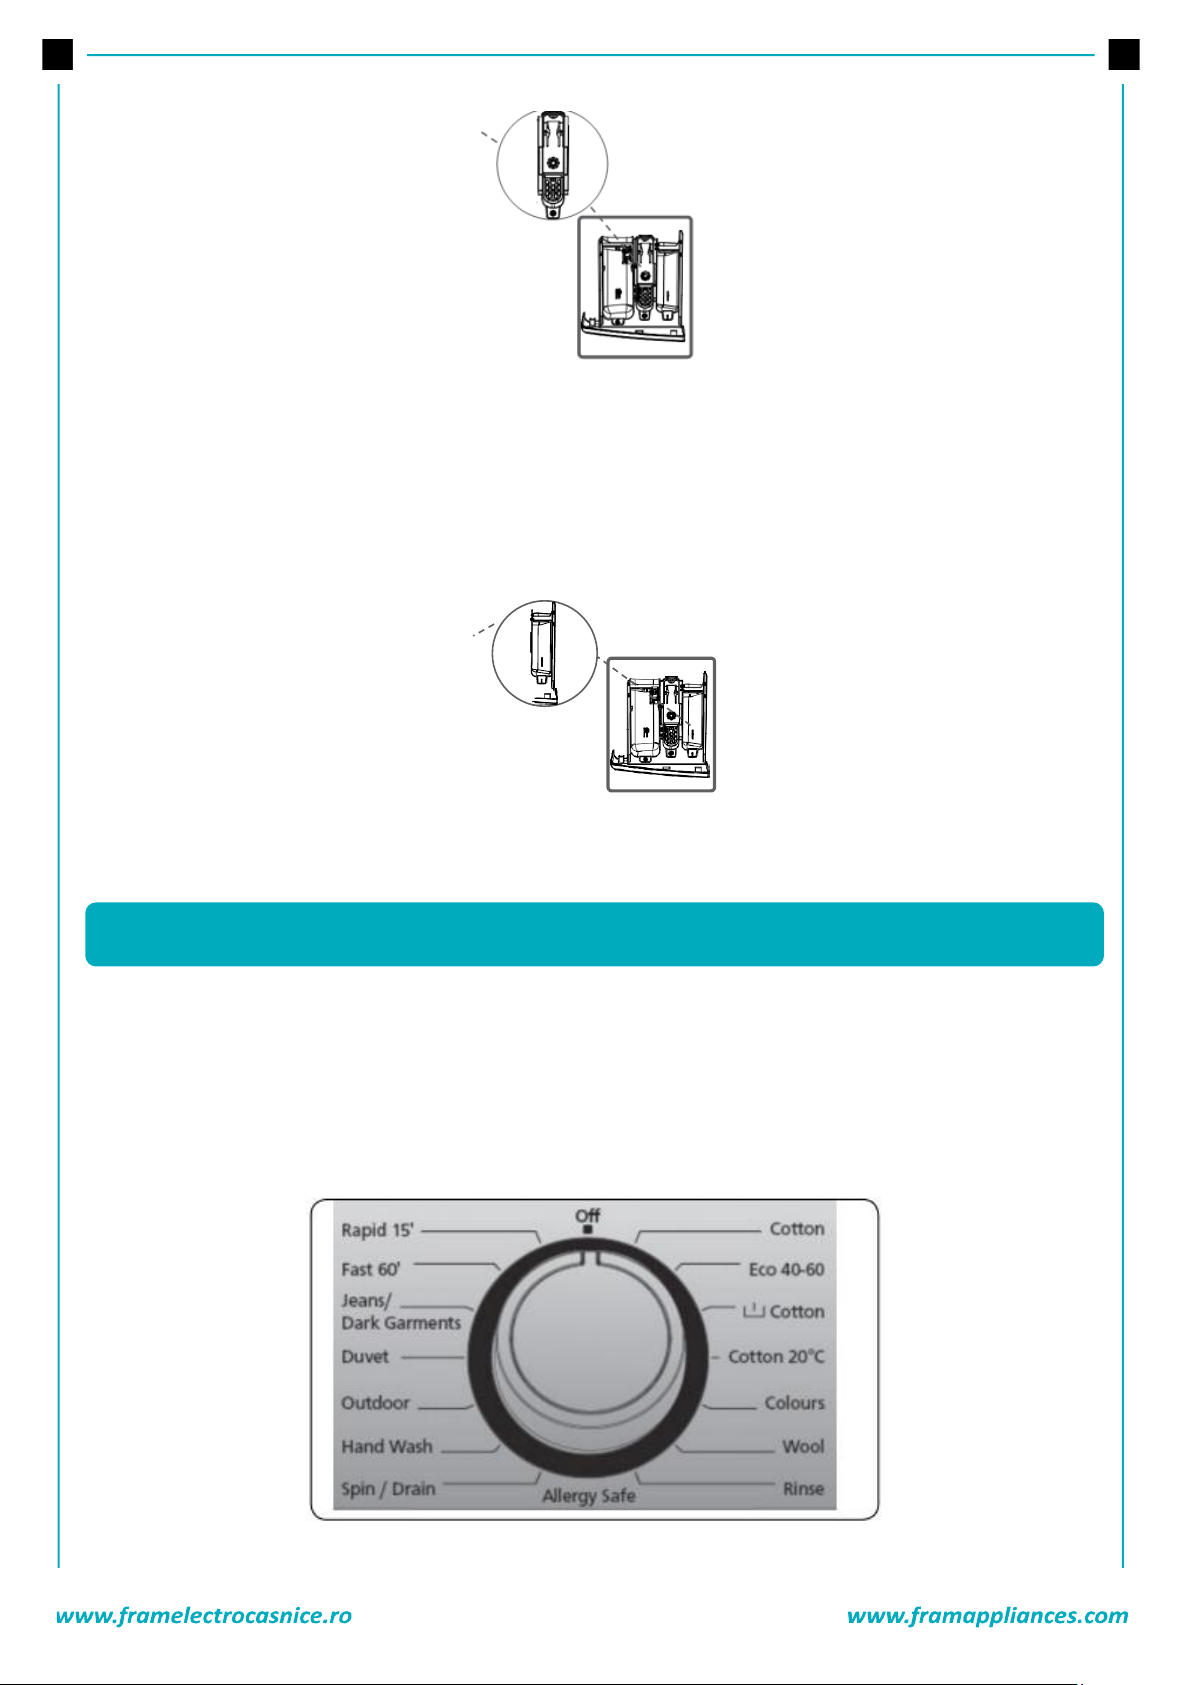
Take out the liquid detergent level apparatus for cleaning and maintenance purposes as shown in the
picture and clean well detergent residues. Put the apparatus back into its place. Make sure no residues are
left inside.
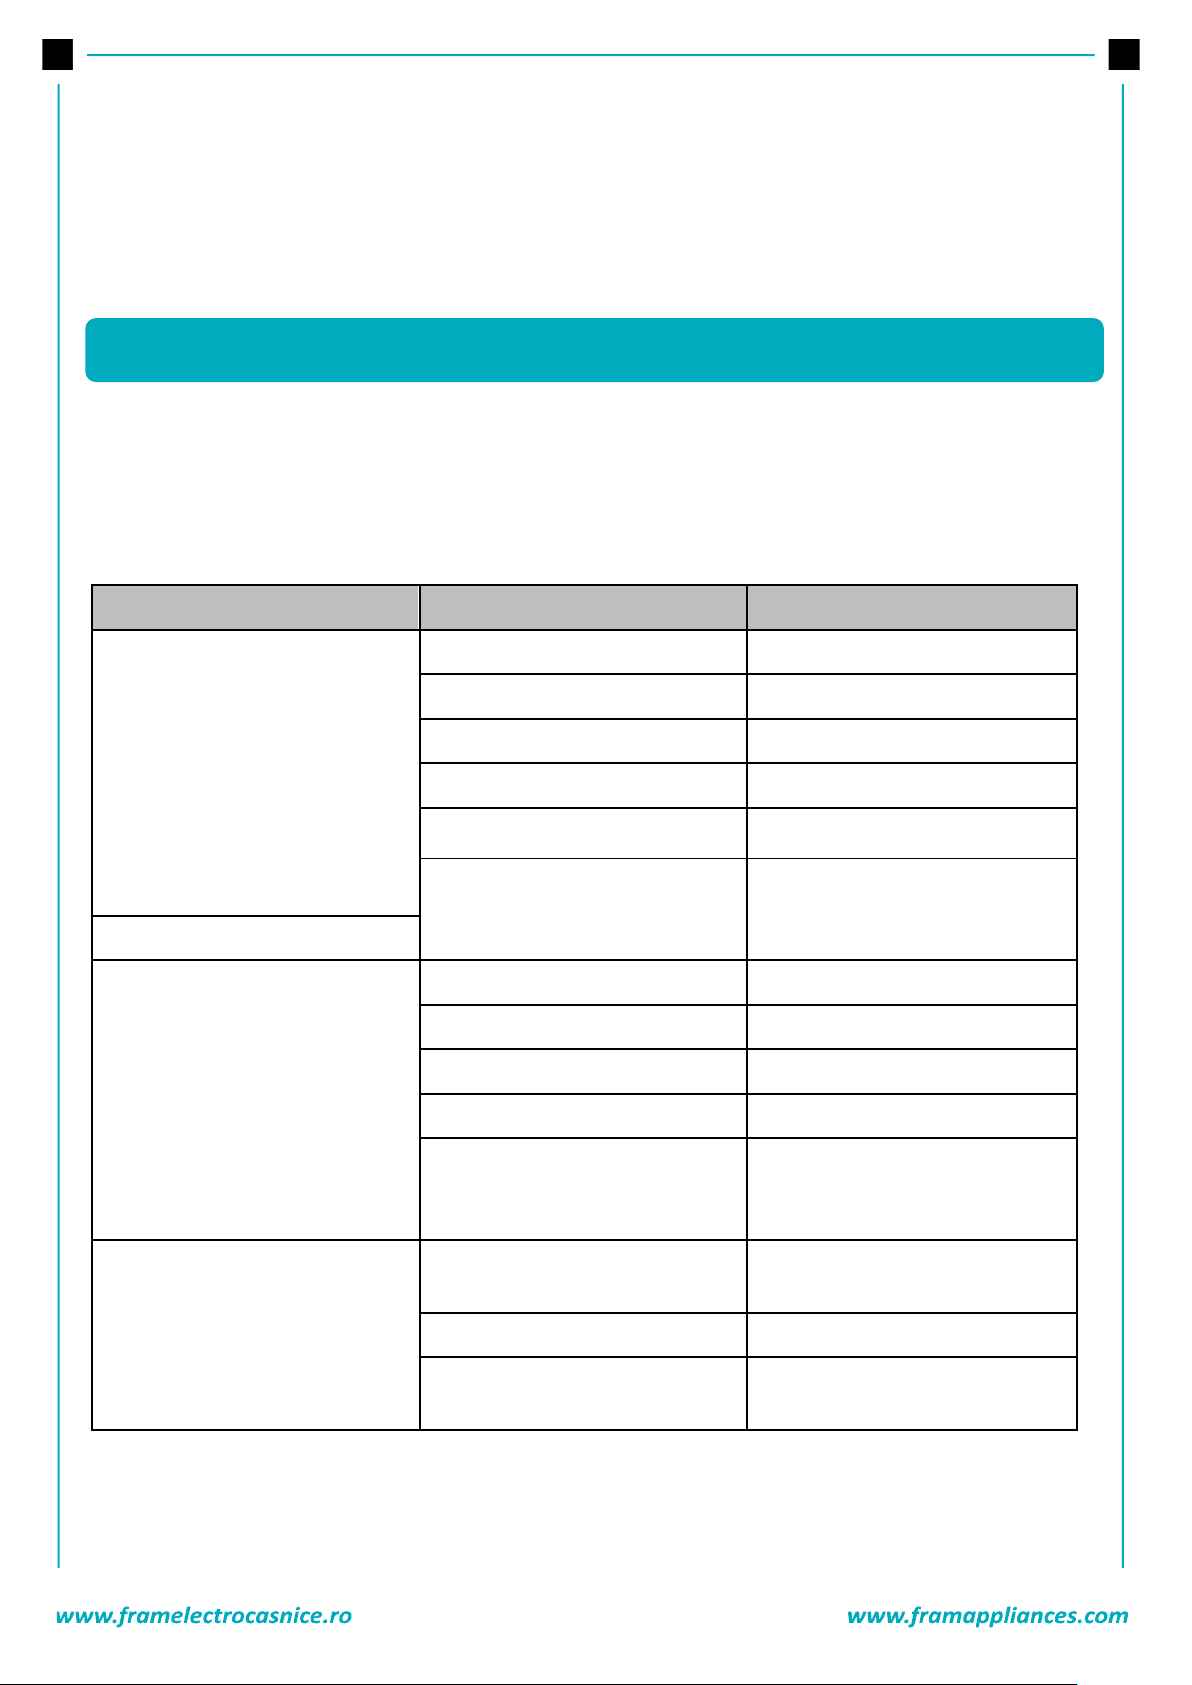
1. Body
Clean the outer body of your machine with warm water and a non-inflammable cleaning agent that will not
abrade the body of your machine. After rinsing with some water, dry it using a soft and dry cloth.
12. BODY / DRUM
Page 54
53
2. Drum
Do not leave metallic objects such as needles, paper clips, coins etc. in your machine. This objects lead to
formation of rust stains in the drum. To clean such rust stains, use a non-chlorine cleaning agent and follow
the instructions of manufacturers of the cleaning agent. Never use wire wool or similar hard objects for
cleaning rust stains.
All repairing operations required for your machine should be carried out by our authorized service. If your
machine requires a repair or if you cannot remove the fault by the help of the information provided as
follows:
• Unplug your machine.
• Turn the water faucet off.
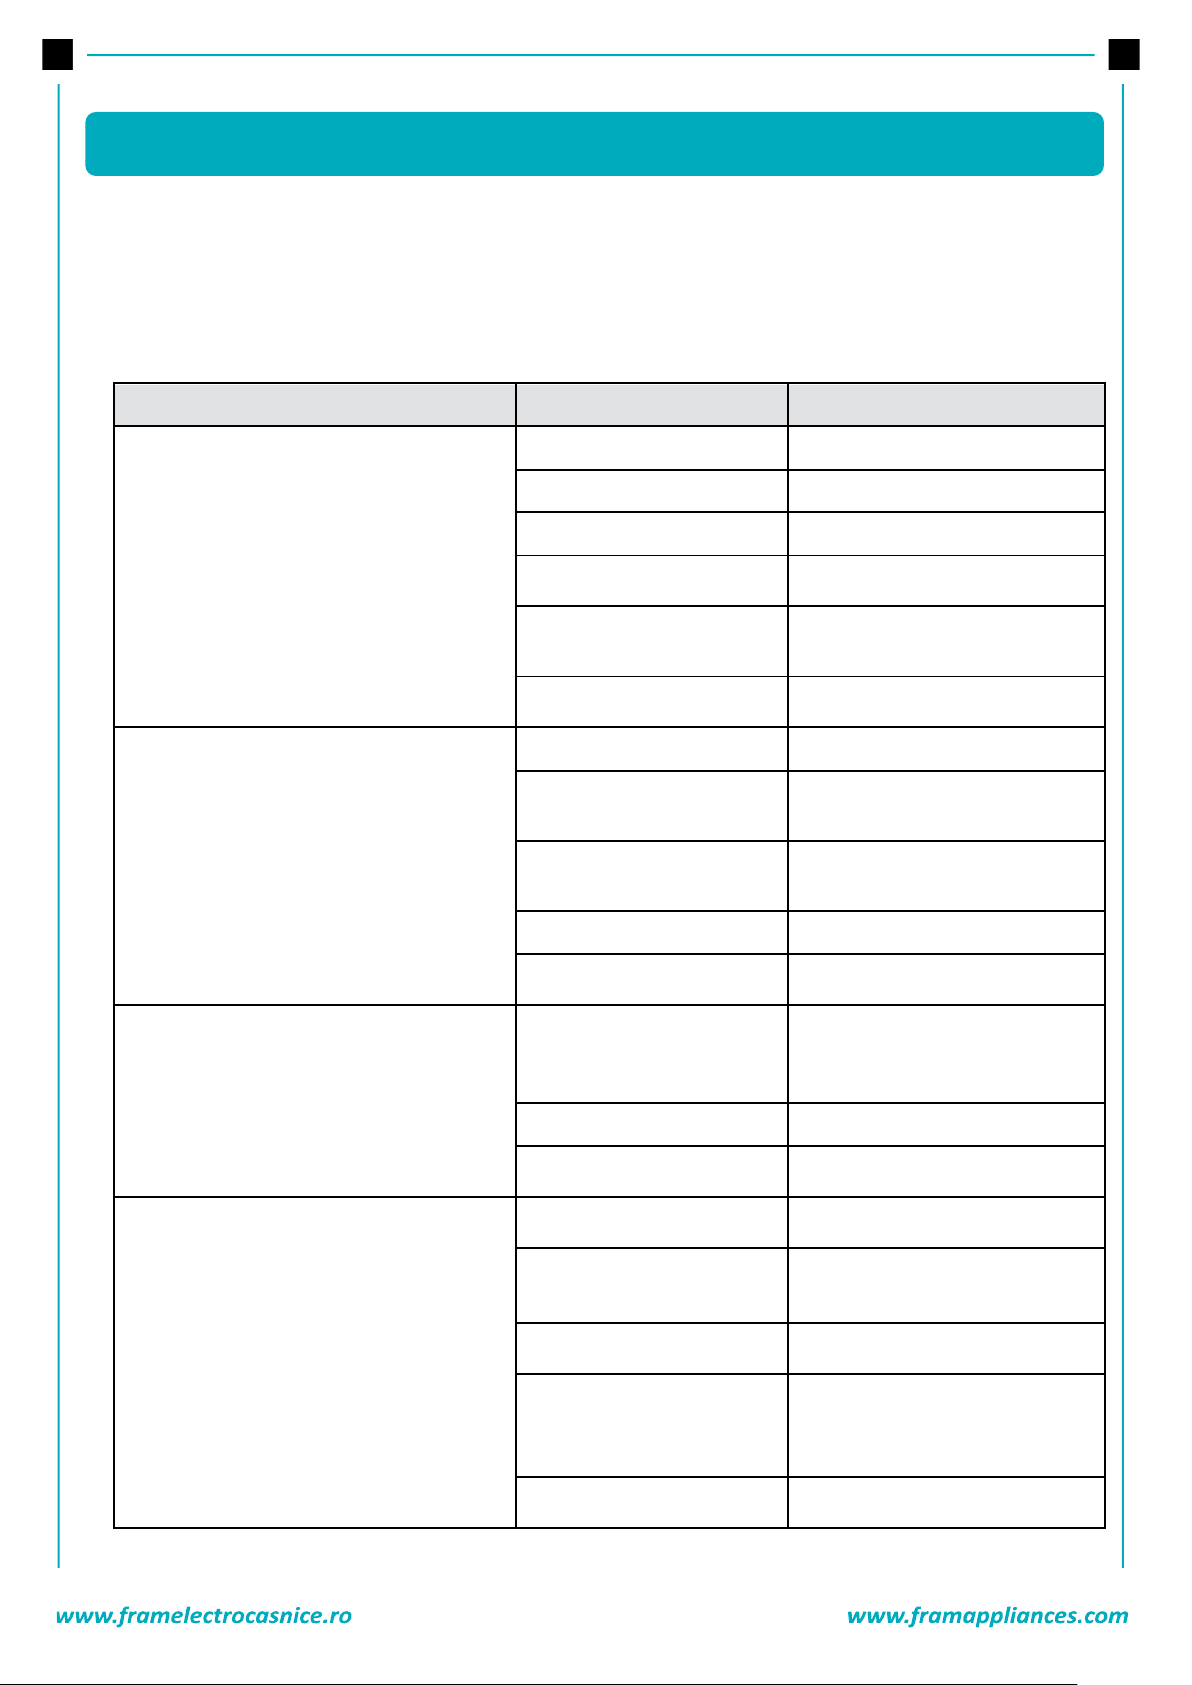
FAULT
POSSIBLE CAUSE
TROUBLESHOOTING
Your machine does not start.
Machine not plugged in.
Plug machine in.
Fuses are faulty.
Replace the fuses.
No mains power supply.
Check mains power.
Start/Pause button not pressed.
Press the Start/Pause button.
Turn the program dial to the desired
position.
The machine door is not completely
closed.
Close the machine door.
Your machine does not intake water.
Water tap is turned off.
Turn tap on.
Water inlet hose may be twisted.
Check water inlet hose and untwist.
Water inlet hose clogged.
Clean water inlet hose filters. (*)
Inlet filter clogged.
Clean the inlet filters. (*)
The machine door is not completely
closed.
Close the machine door.
Your machine does not discharge
water.
Drain hose clogged or twisted.
Check the drain hose, then either
clean or untwist.
Pump filter clogged.
Clean the pump filter. (*)
Laundry is too tightly packed
together in the drum.
Spread your laundry in the machine
evenly.
13. TROUBLESHOOTING
Page 55
54
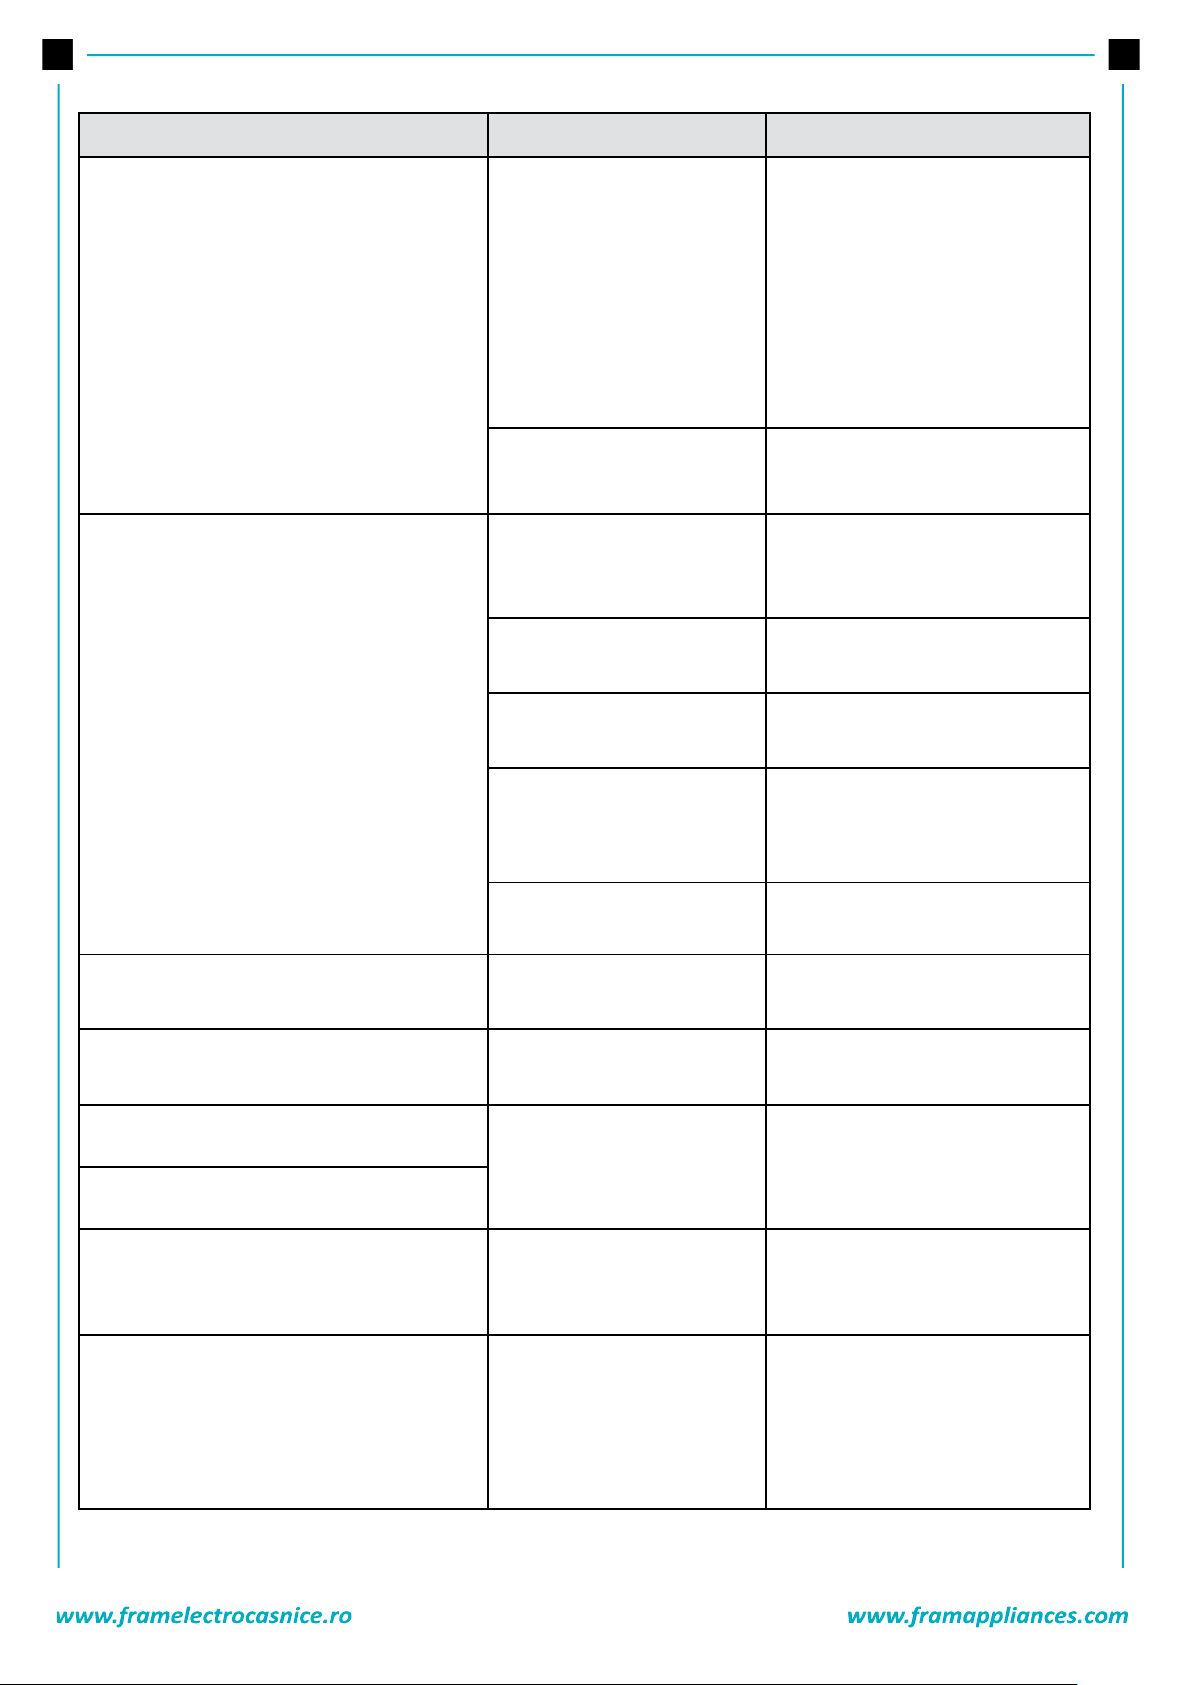
FAULT
POSSIBLE CAUSE
TROUBLESHOOTING
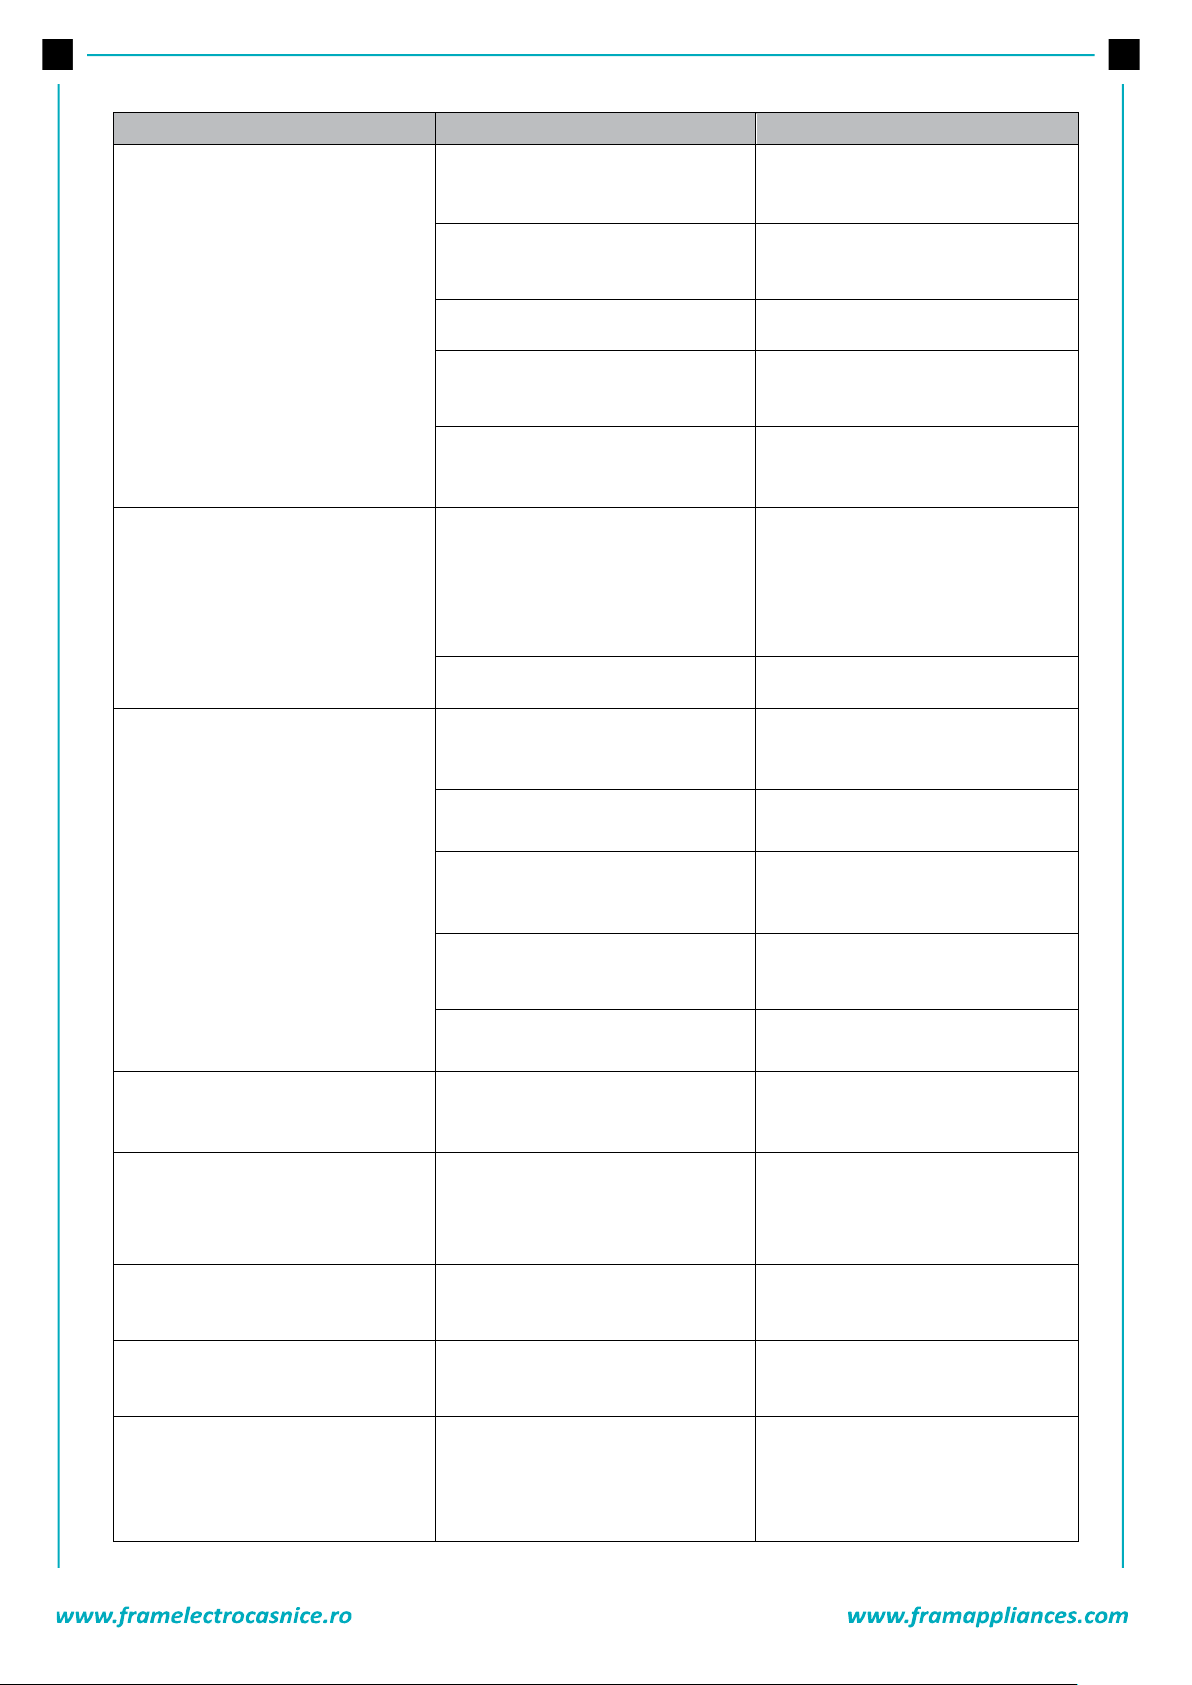
Your machine vibrates.
The feet have not been adjusted.
Adjust the feet. (**)
Transit bolts fitted for
transportation have not been
removed.
Remove the transit bolts from the
machine. (**)
Small load in the drum.
This will not prevent operation of
your machine.
Your machine is overloaded with
laundry or laundry is unevenly
spread.
Do not overload the drum. Spread
laundry evenly in the drum.
Your machine rests on a hard
surface
Do not set up your Washing
Machine on a hard surface
Excessive foam is formed in the
detergent drawer.
Excessive amount of detergent used.
Press the Start/Pause button. To
stop the foam, dilute one
tablespoon of softener into 1/2 liter
of water and pour into the detergent
drawer. Press the Start/Pause
button after 5-10 mins.
Wrong detergent used.
Only use detergents produced for
automatic Washing Machines.
Unsatisfactory washing result
Your washing is too dirty for the
program selected.
Use the information in the program
tables to select the most
appropriate program.
Amount of detergent used
insufficient.
Use the amount of detergent as
instructed on the packaging.
There is too much laundry in your
machine.
Check that the maximum capacity
for the selected program has not
been exceeded.
Hard water.
Increase the amount of detergent
following the
instructions.
Your laundry is too tightly packed
together in the drum.
Check that your laundry is spread
out.
As soon as the machine is loaded
with water, water discharges.
The end of water drain hose is too
low for the machine.
Check that the drain hose is at a
suitable height.
No water appears in the drum
during washing.
No fault. Water is in the unseen part
of the drum.
. . . . . . . . . . . . . . . . . . . . .
Laundry has detergent residue.
Non-dissolving particles of some
detergents may appear on your
laundry as white spots.
Perform an extra rinse, or clean your
laundry with a brush after it dries.
Grey spots appear on the laundry.
There is untreated oil, cream or
ointment on your laundry.
Use the amount of detergent as
instructed on the packaging in the
next wash.
The spin cycle does not take place or
takes place later than expected.
No fault. The Unbalanced load
control system has been activated.
The Unbalanced load control system
will try to spread your laundry. The
spinning cycle will begin once your
laundry is spread. Load the drum
evenly for the next wash.
Page 56
55
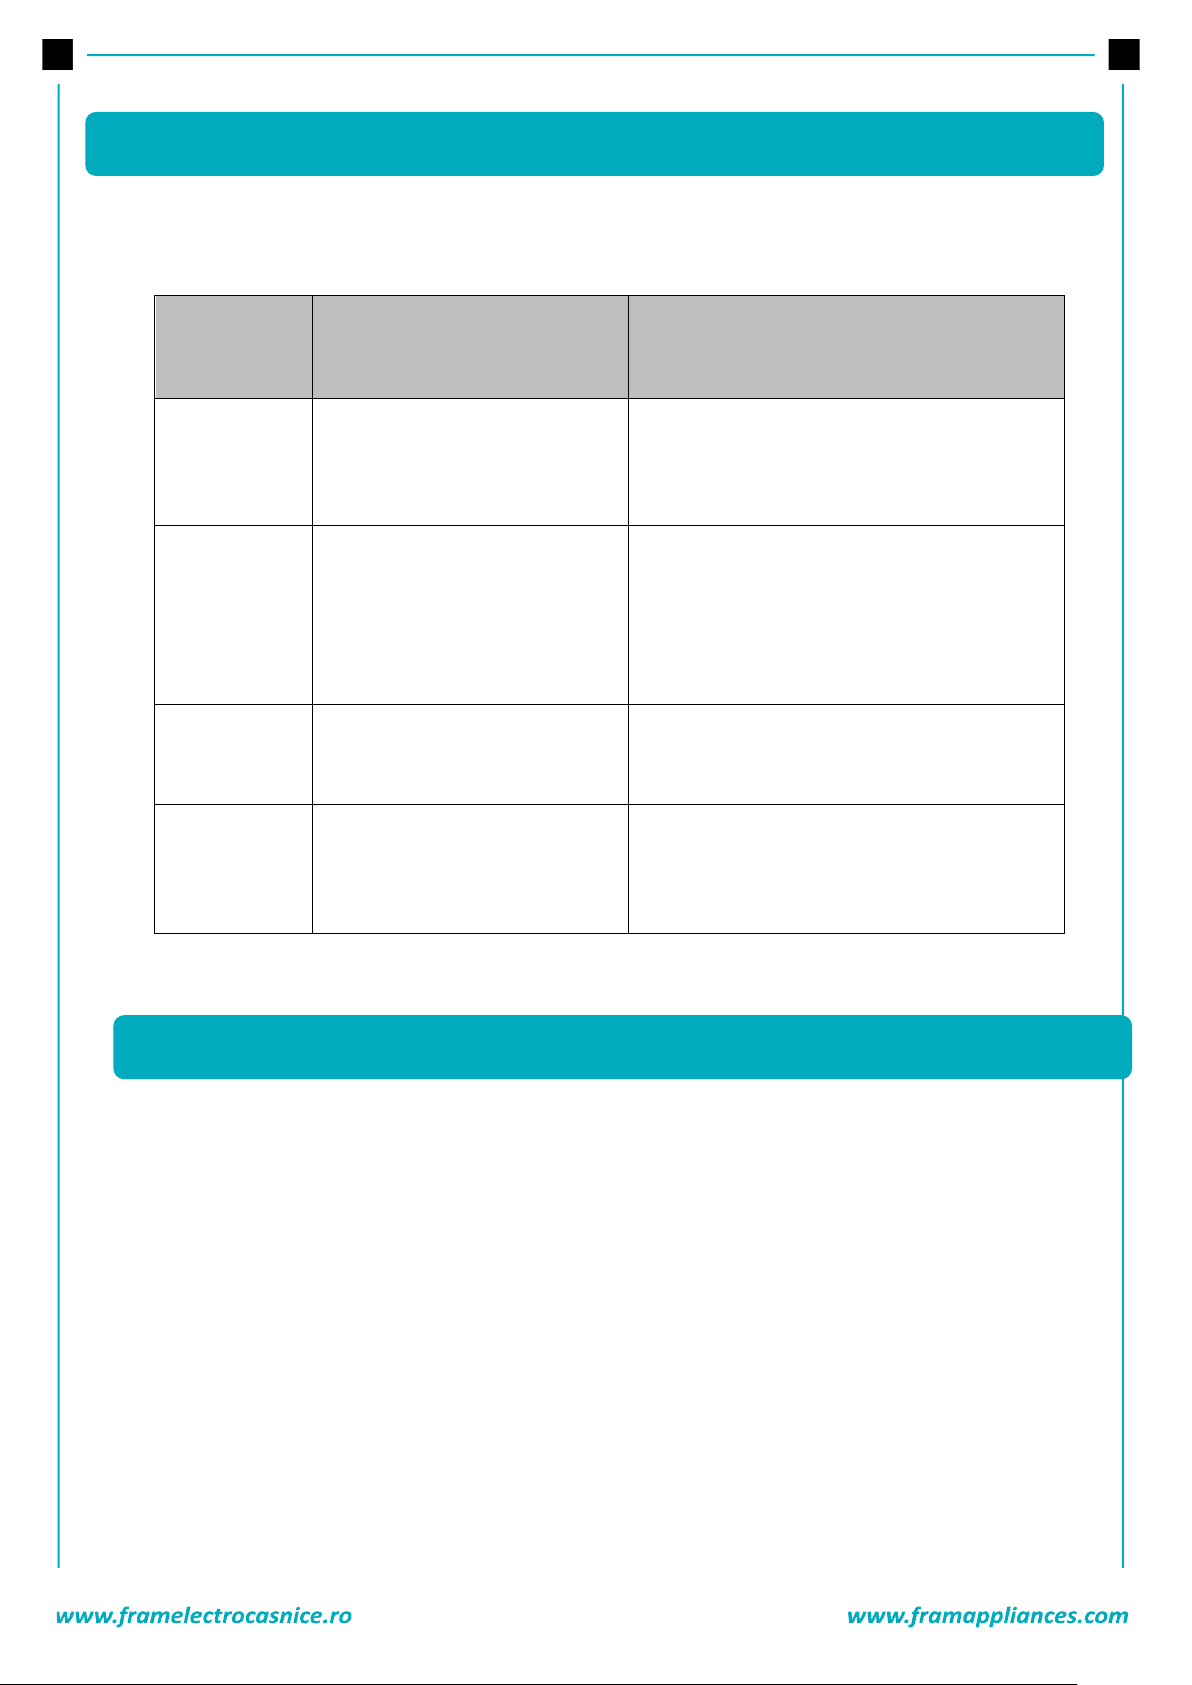
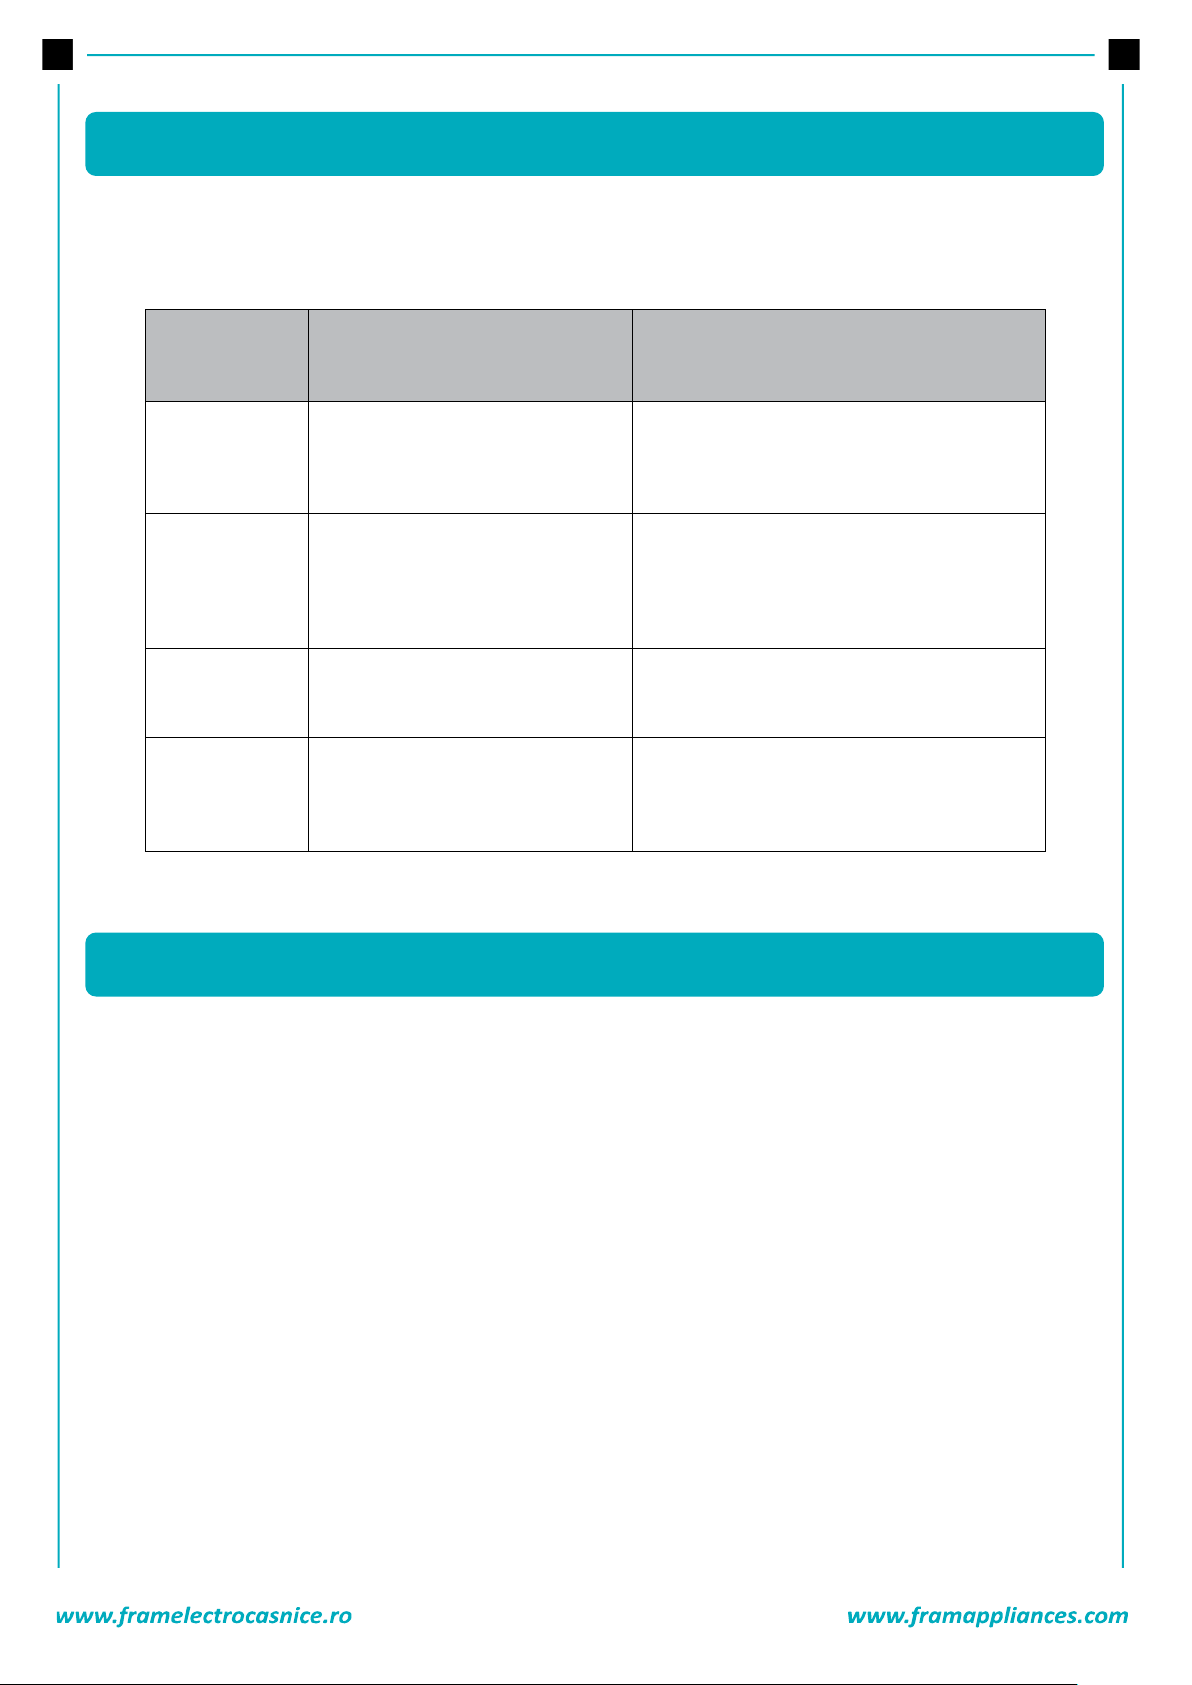
Your machine is equipped with the systems which are capable of both taking necessary precautions and
warning you in case of any breakdown by means of continuous self-check-ing during washing operations.
TROUBLE CODE
POSSIBLE FAULT
WHAT TO DO
E01
The door of your machine is not shut
properly.
Shut the door properly until you hear a click.
If your machine persists to indicate fault, turn
off your machine, unplug it and contact the
nearest authorized service agent immediately.
E02
The water pressure or the water level
inside the machine may be low.
Check the tap is fully turned on. Mains water
may be cut-off. If the problem still continues,
your
machine will stop after a while automatically.
Unplug the machine, turn off your tap and
contact the nearest authorized service agent.
E03
The pump is faulty or pump filter is
clogged or electrical connection of
the pump is faulty.
Clean the pump filter. If the problem persists,
contact the nearest authorized service agent. (*)
E04
Your machine has excessive amount
of
water.
Your machine will discharge water by itself.
Once the water has drained, turn off your
machine and unplug it. Turn off the tap and
contact the nearest authorized service agent.
Alcoholic drinks: Spotted area should initially be washed using cold water, and then be wiped with glycerin
and water and rinsed with vinegar-mixed water.
Shoe shine: Spot should be rubbed out gently without damaging the cloth and be scrubbed and rinsed with
detergent. If not removed, it should be scrubbed using the mixture obtained by adding 1 scale of alcohol
.
Tea and coffee: Stretch the spotted area of your laundry throughout the opening of a vessel, and pour hot
water as much as the type of your laundry can resist. In case the type of your laundry permits, wash with
bleacher.
Chocolate and cocoa: After submerging your laundries in cold water and rubbing it using soap or detergent,
wash it in temperature that fabric type of your laundry can resist. In case the oil stain is still visible, wipe
with oxygen water (3%).
Tomato paste: After rubbing out the dried substances without damaging your laundry, submerge it in
water for 30 minutes, and then scrub and wash it with detergent.
Bouillon-Egg: Remove dried spot residues on your laundry, and then wipe it with a sponge or soft cloth
submerged in cold water previously. Scrub with detergent, wash with diluted bleacher.
14. AUTOMATIC FAULT WARNINGS AND WHAT TO BE DONE
15. PRACTICAL INFORMATION
Page 57

56
Grease and oil stains: Firstly, the residues. Scrub the spot with detergent and wash it with warm soapy
water.
Mustard: Apply glycerin on spotted area. Scrub with detergent and wash. If the spot cannot be removed,
wipe with alcohol. (For synthetic and color fabrics, a mixture of 1 scale of alcohol and 2 scales of water
should be used.
Fruit: Stretch the spotted area of your laundry throughout the opening of a vessel and pour cold water on
it. Do not pour hot water on the spot. Wipe with cold water and apply glycerin. Allow 1-2 hours, wipe with
a few drops of white vinegar, and rinse it.
Grass stain: Wipe the stained part with detergent. If the type of your cloth permits bleacher using, wash
with bleacher. Wipe your woolen laundries with alcohol. (For color fabrics, a mixture of 1 scale of pure
alcohol and 2 scales of water)
Oil paint: Spot should be removed by applying thinner before drying. Then it should be wiped with
detergent and washed.
Burn stain: If your laundry is suitable for applying bleacher, you can add bleacher into washing water. For
wool fabric, a cloth previously submerged in oxygen water should be covered over the stain and it should
be ironed after putting a dry cloth on this cloth. It should be washed after being rinsed properly.
Blood stain: Submerge your laundries in cold water for 30 minutes. If the stain is not removed, then
submerge in a mixture of water and ammoniac (3 spoons of ammoniac in 4 liters of water) for 30 minutes.
Crema, ice cream and milk: Submerge your laundries in cold water and scrub the spotted area with
detergent. If the spot is not removed, apply bleacher to the extent suitable for your laundries. (Do not use
bleacher for color laundries.)
Mould: Mould stains should be cleaned as soon as possible. Stain should be washed with detergent water,
nevertheless if it cannot be removed, it should be whipped with oxygen water (3%).
Ink: Subject the spotted area to running water and wait until the flow of inked water ends. Then wipe it
with lemon-added water and detergent and wash it after allowing 5 minutes.
Page 58

57
CUSTOMER CARE AND SERVICE
Always use original spare parts.
When contacting our Authorized Service Centre, ensure that you have the following data available: Model
and Serial Number.
The information can be found on the rating plate. Subject to change without notice.
TECHNICAL DATA
The technical information is situated in the rating plate on the internal side of the appliance and on the
energy label.
The QR code on the energy label supplied with the appliance provides a web link to the information related
to the performance of the appliance in the EU EPREL database.
Keep the energy label for reference together with the user manual and all other documents provided with
this appliance.
It is also possible to find the same information in EPREL using the link https:// eprel.ec.europa.eu and the
model name and product number that you find on the rating plate of the appliance.
Thank you for purchasing this product. If you need support with your product, visit our website using the
links below.
Get User manuals: www.framelectrocasnice.ro
Get Service information: www.framelectrocasnice.ro
Environment friendly disposal
You can help protect the environment!
Please remember to respect the local regulations: hand in the non-
appropriate waste disposal center.
Page 59
58
FRAM is a registered trademark of Network One Distribution SRL. Other brands and product names
are trademarks or registered trademarks of their respective holders.
No part of the specifications may be reproduced in any form or by any means or used to make any
derivative such as translation, transformation, or adaptation without permission from NETWORK
ONE DISTRIBUTION.
Copyright © 2013 Network One Distribution. All rights reserved.
www.framelectrocasnice.ro; www.framappliances.com; www.nod.ro
This product is in conformity with norms and standards of European Community.
Importer: Network One Distribution
Marcel Iancu, 3-5, Bucharest, Romania
Tel: +40 21 211 18 56, www.framelectrocasnice.ro, www.nod.ro
www.framelectrocasnice.ro
 Loading...