

Page 1
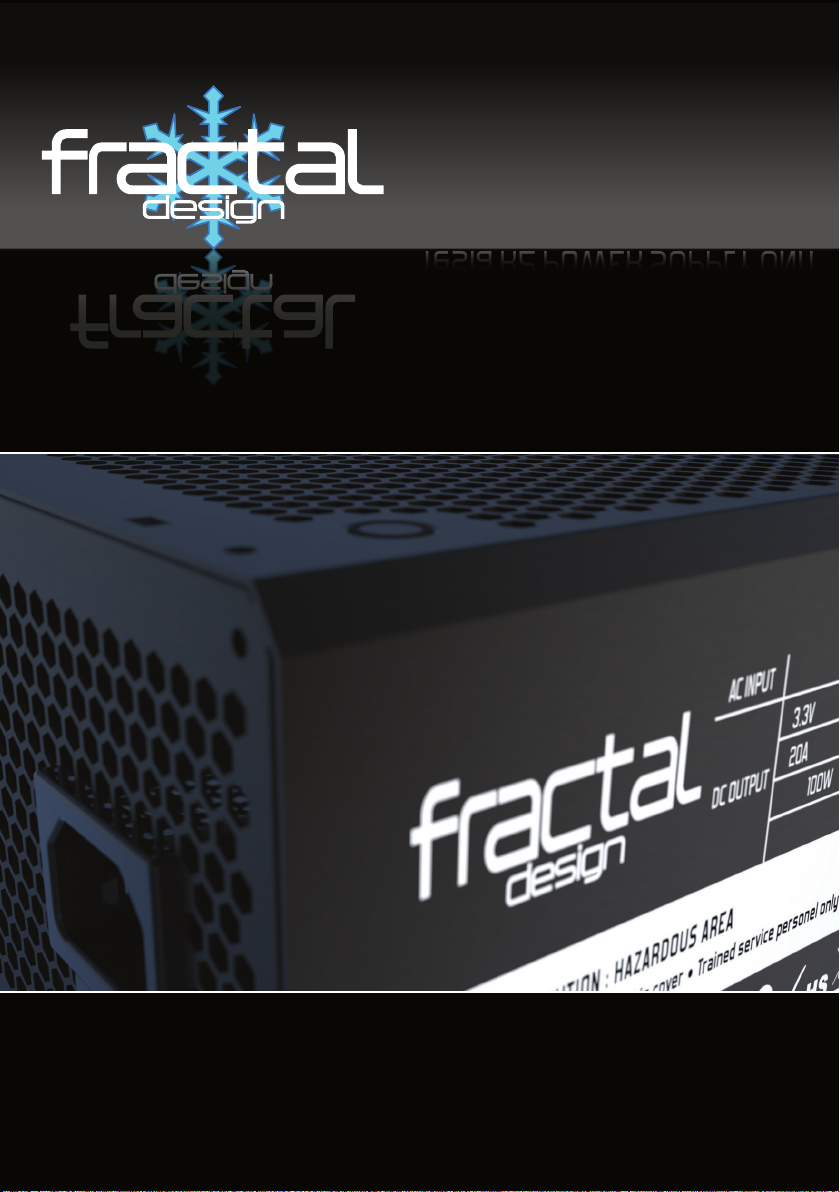
Tesla R2 POWER SUPPLY UNIT
Tesla R2 POWER SUPPLY UNIT
USER’S MANUAL
Page 2

About Fractal Design – our concept
Without question, computers are more than essential technology – they have become
integral to our lives. Computers do more than make living easier; they often dene the
functionality and design of our ofces, our homes, ourselves.
The products we choose represent how we want to describe the world around us, and how
we want others to describe us. Many of us are drawn to designs from Scandinavia, which
are organized, clean and functional while remaining stylish, sleek and elegant.
We like these designs because they harmonize with their surroundings and become nearly
transparent. Brands like Georg Jensen, Bang Olufsen, Skagen Watches and Ikea are just a
few that represent this Scandinavian style and efciency.
In the world of computers components there is only one name you should know,
Fractal Design.
For more information and product specications, visit www.fractal-design.com
Rev. 1.0
Table of Contents:
Safety Information, Installation and Troubleshooting
ENGLISH ................................................................................................ 1
GERMAN ................................................................................................ 4
FRENCH ................................................................................................. 7
SPANISH ..............................................................................................10
ITALIAN.................................................................................................13
JAPANESE ...........................................................................................16
KOREAN ............................................................................................... 19
Support
Europe and Rest of World: support@fractal-design.com
North America: support.america@fractal-design.com
DACH (Germany-Switzerland-Austria): support.dach@fractal-design.com
Tesla R2 Series Specication
ENGLISH .............................................................................................. 22
Page 3
1
Tesla Series
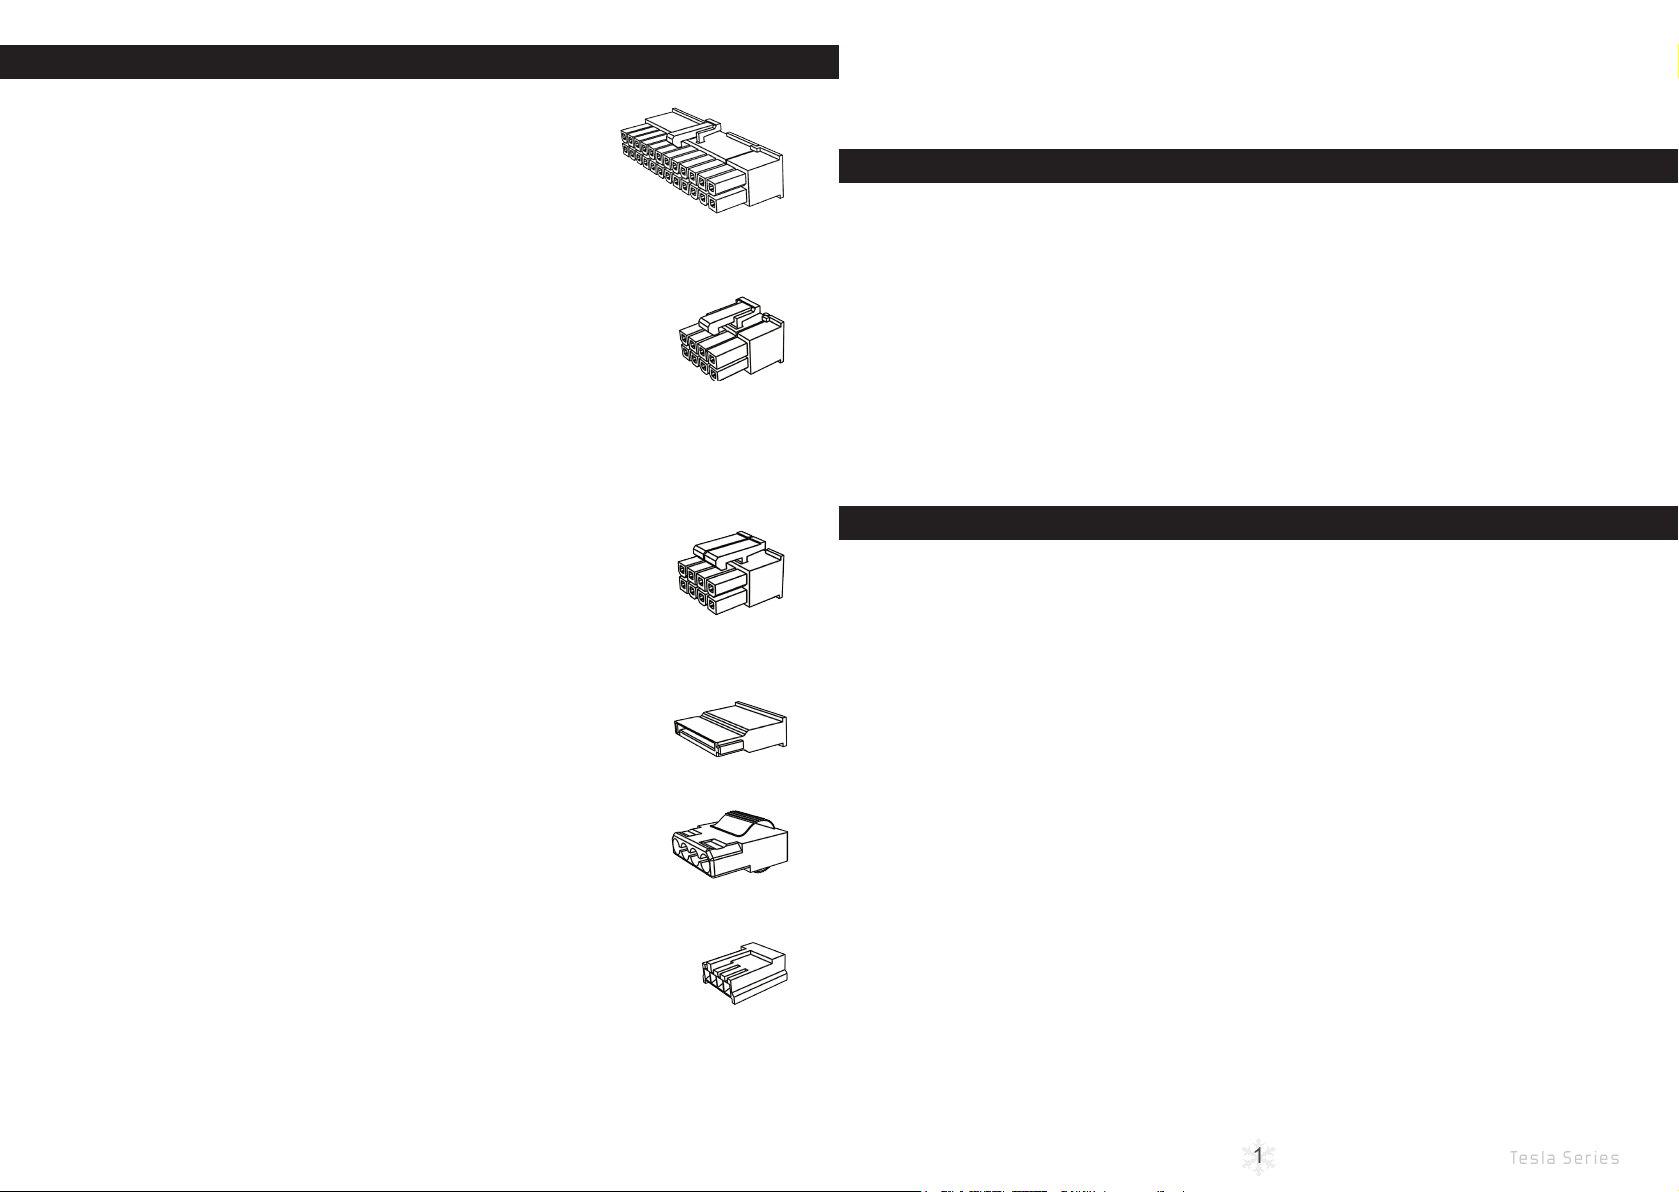
DC Connectors
ATX 24-pin [20+4]
Provides power to the motherboard – can be split into 20-pin and
4-pin connectors, for compatibility with older ATX motherboards.
WARNING: Do not use the 4-pin connector of this cable as a ATX 12V 4-pin
connector – they are incompatible.
ATX12V / EPS12V 8-pin [4+4]
Provides power to modern CPUs – can be split into two 4-pin con-
nectors, for compatibility with older motherboards and systems with
limited power consumption.
NOTE: Some motherboards, typically dual processor systems, may require a
secondary 12V connector – refer to the motherboard manual for details and
connector locations.
PCI-E 8-pin [6+2]
Provides power to high-performance graphics cards – can be split into
6-pin and 2-pin connectors for use with graphics cards that require
6-pin connectors, or used together for
graphics cards that require 8-pin connectors.
WARNING: ATX12V and the PCI-E connectors are incompatible and cannot
be interchanged – do not force the connectors.
SATA
Provides power to modern hard drives, optical drives and other devices that require an SATA power cable.
Thank you and congratulations on your purchase of a Fractal Design
Tesla R2 Power Supply Unit (PSU). Please, thoroughly read the following information and
instructions before using your new PSU.
Safety Information
The following information is provided for personal safety and the correct operation of the PSU:
• Never open the PSU case – the power unit can discharge hazardous voltages.
Additionally, there are no user-serviceable components inside.
• Only operate the PSU in safe and dry environments.
• Never insert objects into the fan grill, or the open ventilation areas, of the PSU.
• Do not modify PSU cables and/or connectors.
• Do not use the 4-pin connector of the ATX 24-pin cable as a ATX12V 4-pin cable – they
are incompatible.
• The ATX12V and the PCI-E connectors are incompatible and cannot be interchanged –
do not force the connectors.
Installation
If replacing an existing power supply, continue with Section A; if not, skip to Section B.
Part A: Removing the existing PSU
1. Disconnect both ends of the AC power cord
2. Open the computer case and disconnect the power cables from all devices
3. Remove the existing PSU from the case
4. Continue with Section B
Part B: Installing the new Fractal Design PSU
Do not connect the AC power cord to the new PSU before completing steps 1 through 4.
Peripheral
Provides power to older hard drives, optical drives and other non-
SATA devices.
Floppy
Provides power to any device that requires a oppy disk drive power
connector.
1. Mount the PSU in the computer case – refer to the case manual for further instructions.
2. Connect the ATX 24-pin cable to the motherboard.
3. Connect the ATX12V cable(s) to the CPU.
4. Connect the appropriate power cables to all other devices, such as graphics cards,
hard drives, optical drives.
5. Close the computer case.
6. Connect the AC power cord and switch the button on the back of the PSU to the ON position.
Congratulations! You have successfully installed your new Tesla R2 Series PSU.
The PSU is now in standby mode waiting for the motherboard to turn it on.
Page 4
2
3
Fractal Design
Tesla Series
Troubleshooting
Computer does not start
Open the computer case and check if the standby LED on the motherboard is lit.
Note: The LED can be in various shapes and in different positions on the motherboard – refer to the
motherboard manual for more details.
Motherboard LED is ON
In this case, the PSU is supplying the motherboard with standby power. Several common
issues can cause it not to turn on, please check the following before returning the PSU to the
reseller:
1. Ensure that the ATX12V cable or cables are connected correctly – consult the mother-
board manual for more details.
2. Ensure that the case’s power button cable is correctly connected to the motherboard –
consult the motherboard manual for more details.
As an alternative, connect the two “Power Button” pins on the motherboard to the reset button
cable from the case, then push the reset button. This will conrm whether or not the case’s power
button is working correctly.
3. Disconnect all non-essential devices. Leave the PSU connected to the CPU, system
memory (RAM), CPU cooling and motherboard.
If the computer starts in this conguration, reconnect the other components one by one
to identify the faulty device.
4. If possible, connect the PSU to a different set of essential devices to conrm it is faulty.
Motherboard LED is OFF
In this case, the motherboard could be faulty, or not supplied with standby power from the
PSU. Please check the following before assuming that the PSU is faulty and returning it to
the reseller:
1. Ensure that the main power cord is connected to both the PSU and to a live power
source. Check the power outlet with another electric device, such as a lamp, to ensure
that it provides power.
2. Ensure that the switch on the back of the PSU is in the ON position (marked “I”).
3. Disconnect and reconnect the ATX power cables attached to the motherboard.
4. If possible, connect the PSU to a different motherboard, to conrm whether the PSU or
the motherboard is faulty.
NOTE: Over time dust can accumulate on the fan grill, and produce excessive noise – clear the accumulation using a can of compressed air.
Electrical noise / humming / coil whine
Typically, electrical noise is caused by minor incompatibility issues between components,
such as between the power supply and the VRM modules on a graphics card. This noise
may only occur at certain load combinations, and can therefore often be avoided by making
slight changes to the power load.
Please try altering the following settings before returning the PSU to the reseller:
• Power saving features of the CPU and motherboard, such as C1E (Enhanced Halt
State) and EIST (Enhanced Intel SpeedStep® Technology) – refer to the motherboard
manual for more details on which features the motherboard supports and how to change
their settings
• Graphics card driver options, including the “vsync” option – refer to the graphics card
manual for instructions on how to changes these settings.
If the noise level is not reduced after adjusting power load settings, Fractal Design considers
loud electrical noise an acceptable cause for a warranty claim.
Limited Warranty and Limitation of Liability
Fractal Design Tesla R2 Series PSUs are guaranteed for thirty-six (36) months from the date
of delivery to end-user, against defects in materials and/or workmanship. Within this limited
warranty period, products will either be repaired or replaced at Fractal Design discretion. Warranty claims must be returned to the agent who sold the product, shipping prepaid.
The warranty does not cover:
• Products which have been used for rental purposes, misused, handled carelessly or ap-
plied such away that is not in accordance with its stated intended use.
• Products damaged from an Act of Nature including, but not limited to, lightning, re, ood
and earthquake.
• Products whose serial number and/or the warranty sticker have been tampered with or
removed.
Computer powers on but then immediately turns off
Refer to the same troubleshooting steps as for the “Motherboard LED is ON” section above.
Power supply is noisy
All Fractal Design power supplies have been developed with low noise levels as a high priority. However, PSUs are typically never completely silent. PSU noise should be barely perceptible with the computer case closed.
Mechanical noise / Fan noise
All fans generally get louder with time and wear. This is not a cause for a typical warranty
claim. If the fan is excessively noisy on a brand new power supply,
please contact the reseller.
Page 5
4
5
Fractal Design
Tesla Series
Vielen Dank und herzlichen Glückwunsch, dass Sie ein Tesla R2-Netzteil von Fractal De-
sign erworben haben. Bitte lesen Sie folgende Informationen und Anweisungen aufmerksam
durch, bevor Sie Ihr neues Netzteil verwenden.
Sicherheitsinformationen
Die folgenden Informationen dienen der persönlichen Sicherheit und dem richtigen Einsatz des
Netzteils:
• Öffnen Sie niemals das Netzteilgehäuse – das Netzteil kann gefährliche Spannungen
freisetzen. Außerdem benden sich keine vom Benutzer reparierbaren Komponenten im
Inneren.
• Betreiben Sie das Netzteil nur in sicheren und trockenen Umgebungen.
• Stecken Sie niemals Gegenstände in der Lüftergrill oder die offenen Belüftungsächen
des Netzteils.
• Modizieren Sie Kabel und/oder Anschlüsse des Netzteils nicht.
• Verwenden Sie den 4-poligen Anschluss des 24-poligen ATX-Kabels nicht als 4-poliges
ATX-12-V-Kabel – sie sind nicht kompatibel.
• ATX-12-V- und PCIe-Anschlüsse sind nicht kompatibel und können nicht ausgetauscht
werden – üben Sie keine Gewalt auf die Anschlüsse aus.
Installation
Wenn Sie ein vorhandenes Netzteil austauschen, fahren Sie mit Abschnitt A fort; falls nicht, springen Sie
zu Abschnitt B.
Abschnitt A: Bestehendes Netzteil entfernen
1. Trennen Sie das Netzkabel von Computer und Steckdose.
2. Öffnen Sie das Computergehäuse, trennen Sie die Netzkabel von allen Geräten
3. Entfernen Sie das bestehende Netzteil aus dem Gehäuse
4. Fahren Sie mit Abschnitt B fort
Abschnitt B: Neues Fractal Design-Netzteil installieren
Warnung: Schließen Sie das AC-Netzkabel erst an das neue Netzteil an, nachdem Sie die Schritte 1 bis
4 abgeschlossen haben.
1. Montieren Sie das Netzteil in das Computergehäuse – weitere Anweisungen entnehmen
Sie bitte der Anleitung Ihres Gehäuses.
2. Schließen Sie das 24-polige ATX-Kabel am Motherboard an.
3. Schließen Sie das/die ATX-12-V-Kabel an den Prozessor an.
4. Verbinden Sie die entsprechenden Netzkabel mit allen anderen Geräten, wie Grakkar-
ten, Festplatten, optischen Laufwerken.
5. Schließen Sie das Computergehäuse.
6. Schließen Sie das AC-Netzkabel an, stellen Sie den Schalter an der Rückseite des Netz-
teils auf die Ein-Position ein.
Herzlichen Glückwunsch! Sie haben Ihr neues Netzteil der Tesla R2-Serie erfolgreich installiert. Das Netzteil bendet sich jetzt im Bereitschaftsmodus und wartet darauf, dass sich das
Motherboard einschaltet.
Problemlösung
Computer startet nicht
Öffnen Sie das Computergehäuse; prüfen Sie, ob die Bereitschafts-LED am Motherboard
leuchtet.
Hinweis: Die LED kann verschiedene Formen und Positionen am Motherboard aufweisen – bitte beachten Sie die Anleitung zu Ihrem Motherboard.
Motherboard-LED leuchtet
In diesem Fall versorgt das Netzteil das Motherboard mit Bereitschaftsstrom. Verschiedene
allgemeine Probleme können dazu führen, dass sich der Computer nicht einschaltet; bitte
prüfen Sie Folgendes, bevor Sie das Netzteil an den Händler zurückgeben:
1. Stellen Sie sicher, dass das/die ATX-12-V-Kabel richtig angeschlossen sind – beachten
Sie die Anleitung zum Motherboard.
2. Stellen Sie sicher, dass das Kabel der Ein-/Austaste des Gehäuses richtig am Mother-
board angeschlossen ist – beachten Sie die Anleitung zum Motherboard.
Alternativ verbinden Sie die beiden Pins der Ein-/Austaste am Motherboard mit dem Reset-Tasten-
kabel des Gehäuses; dann drücken Sie die Reset-Taste. Dadurch können Sie herausnden, ob die
Ein-/Austaste des Gehäuses richtig funktioniert.
3. Trennen Sie alle nicht erforderlichen Geräte.
Lassen Sie das Netzteil an Prozessor, Systemspeicher (RAM), Prozessorkühlung und
Motherboard angeschlossen.
Falls der Computer in dieser Konguration startet, schließen Sie die anderen Komponenten zur Identikation des fehlerhaften Gerätes nacheinander wieder an.
4. Falls möglich, schließen Sie das Netzteil zur Überprüfung an ein anderes Set essentiel-
ler Geräte an.
Motherboard-LED leuchtet nicht
In diesem Fall könnte das Motherboard defekt sein oder es wird vom Netzteil nicht mit Be-
reitschaftsstrom versorgt. Bitte prüfen Sie Folgendes, bevor Sie das Netzteil als fehlerhaft
deklarieren und an den Händler zurückgeben:
1. Stellen Sie sicher, dass das Hauptnetzkabel am Netzteil und an einer funktionierenden
Steckdose angeschlossen ist. Prüfen Sie die Funktionstüchtigkeit der Steckdose mit
einem anderen Elektrogerät, wie z. B. einer Lampe.
2. Stellen Sie sicher, dass der Schalter an der Rückseite des Netzteils auf der Ein-Position
steht (mit „I“ gekennzeichnet).
3. Versuchen Sie, die am Motherboard angeschlossenen ATX-Netzkabel zu trennen und
wieder anzuschließen.
4. Schließen Sie das Netzteil, falls möglich, an ein anderes Motherboard an; prüfen Sie so,
ob Netzteil oder Motherboard defekt sind.
Computer schaltet sich ein, dann aber sofort wieder aus
Beachten Sie dieselben Problemlösungsschritte wie im Abschnitt „Motherboard-LED leuchtet“
weiter oben.
Page 6
6
7
Fractal Design
Tesla Series
Netzteil ist laut
Bei der Entwicklung aller Fractal Design-Netzteile wurde darauf geachtet, dass sie möglichst
geräuscharm arbeiten. Dennoch arbeiten Netzteile typischerweise nie komplett lautlos. Netzteilgeräusche sollten kaum wahrnehmbar sein, wenn das Computergehäuse geschlossen ist.
Mechanische Geräusche / Lüftergeräusche
Im Allgemeinen werden alle Lüfter durch Verschleiß lauter. Dies ist kein Grund für einen typi-
schen Gewährleistungsanspruch. Falls der Lüfter bei einem brandneuen Netzteil übermäßig
laut ist, wenden Sie sich bitte an den Händler.
Hinweis: Mit der Zeit sammelt sich Staub am Lüftergrill an und sorgt für einen lauteren Betrieb – beseitigen Sie Staubablagerungen mit einem Druckluftreiniger.
Elektrische Geräusche / Summen / Spulenepen
Elektrische Geräusche werden üblicherweise durch kleinere Kompatibilitätsprobleme zwischen Komponenten, wie z. B. Netzteil und VRM-Modulen an einer Grakkarte, verursacht.
Diese Geräusche können nur bei bestimmten Lastkombinationen auftreten; daher lassen sie
sich häug beseitigen, indem Sie leichte Änderungen an der Netzlast vornehmen.
Bitte versuchen Sie, folgende Einstellungen zu ändern, bevor Sie das Netzteil an den Händler zurückgeben:
• Energiesparfunktionen von Netzteil und Motherboard, z. B. C1E (Enhanced Halt State)
und EIST (Enhanced Intel SpeedStep® Technology) – bitte entnehmen Sie der Anlei-
tung des Motherboards, welche Funktionen das Motherboard unterstützt und wie sie die
entsprechenden Einstellungen ändern
• Grakkartenoptionen, inklusive „vsync“-Option – Anweisungen zur Änderung dieser
Einstellungen entnehmen Sie bitte der Anleitung zur Grakkarte.
Falls sich der Geräuschpegel nach Anpassung der Netzlasteinstellungen nicht reduziert, erachtet Fractal Design laute elektrische Geräusche als akzeptablen Grund für einen Gewährleistungsanspruch.
Merci et félicitations pour votre achat d‘un bloc d‘alimentation (PSU) Fractal Design Tesla R2.
Veuillez lire attentivement les informations et les instructions suivantes avant d‘utiliser votre
nouveau bloc d‘alimentation.
Informations relatives à la sécurité
Les informations suivantes sont fournies pour la sécurité des personnes et pour le bon fonctionnement du
bloc d‘alimentation :
• Ne jamais ouvrir le boîtier du bloc d‘alim. – le bloc d‘alimentation peut se décharger de
tensions dangereuses. En outre, il n‘y a pas de composants réparables par l‘utilisateur à
l‘intérieur.
• Ne faire fonctionner le bloc d‘alimentation que dans des environnements sûrs et sec.
• Ne jamais insérer d‘objet dans la grille du ventilateur, ni dans les ouvertures des zones
de ventilation du bloc d‘alim.
• Ne pas modier les câbles ni les les connecteurs du bloc d‘alim.
• Ne pas utiliser le connecteur 4 broches du câble ATX 24 broches en tant que câble
ATX12V 4 broches - ils sont incompatibles.
• Les connecteurs ATX12V et PCI-E sont incompatibles et ne peuvent pas être échangés –
ne pas forcer les connecteurs.
Installation
En cas de remplacement d‘un bloc d‘alimentation existant, poursuivre à la Section A ; sinon, passer à la
Section B.
Section A : Enlever le bloc d‘alimentation existant
• Débranchez le cordon d‘alimentation de l‘ordinateur et de la prise électrique
• Ouvrir le boîtier de l‘ordinateur et déconnecter les câbles d‘alimentation de tous les péri-
phériques
• Enlever le bloc d‘alimentation existant du boîtier
• Poursuivre à la Section B
Beschränkte Gewährleistung und Beschränkungen der
Haftbarkeit
Die Netzteile der Tesla R2-Serie von Fractal Design sind durch eine Gewährleistung abgedeckt, dass sie
ab Lieferdatum an den Endverbraucher sechsunddreißig (36) Monate frei von Material- und/oder Produk-
tionsfehlern sind. Innerhalb dieser beschränkten Gewährleistungsdauer werden Produkte nach eigenem
Ermessen von Fractal Design entweder repariert oder ersetzt. Bei Gewährleistungsansprüchen müssen
Sie sich an den Händler wenden, der Ihnen das Produkt verkauft hat (Versand vorausbezahlt).
Die Gewährleistung deckt nicht ab:
• Produkte, die zur Vermietung verwendet, missbraucht, sorglos behandelt oder unsachgemäß einge-
setzt wurden.
• Produkte, die durch Naturkatastrophen, u. a. inklusive Blitz, Feuer, Hochwasser und Erdbeben,
beschädigt wurden.
• Produkte, deren Seriennummer und/oder Gewährleistungsaufkleber verändert oder entfernt
wurde(n).
Section B : Installer le nouveau bloc d‘alimentation Fractal Design
AVERTISSEMENT : Ne pas brancher le cordon d‘alimentation au nouveau bloc d‘alimentation avant
d‘avoir réalisé les étapes 1 à 4.
1. Monter le bloc d‘alimentation dans le boîtier de l‘ordinateur - vous référer au manuel du
boîtier pour de plus amples instructions.
2. Brancher le câble ATX 24 broches sur la carte mère.
3. Brancher le(s) câble(s) ATX12V sur le processeur.
4. Connecter les câbles d‘alimentation appropriés à tous les autres périphériques, tels que
les cartes graphiques, les disques durs, les lecteurs optiques.
5. Refermer le boîtier de l‘ordinateur.
6. Brancher le cordon d‘alimentation secteur et mettre le bouton au dos du bloc
d‘alimentation sur la position ON (MARCHE).
Félicitations ! Vous avez réussi à installer votre nouveau bloc d‘alimentation de la gamme
Tesla R2. Le bloc d‘alimentation est maintenant en mode veille en attendant la carte mère
pour s‘allumer.
Page 7

8
9
Fractal Design
Tesla Series
Dépannage
L‘ordinateur ne démarre pas
Ouvrir le boîtier de l‘ordinateur et vérier si la DEL de veille de la carte mère est allumée
Remarque : La DEL peut être sous différentes formes et à différents emplacements sur la
carte mère - se référer au manuel de la carte mère pour plus de détails.
Bruit mécanique / bruit de ventilateur
Tous les ventilateurs deviennent en général plus bruyant avec le temps et l‘usure. Ce n‘est
pas une cause typique de réclamation au titre de la garantie. Si le ventilateur est trop bru-
yant sur une alimentation ambant neuf, veuillez contacter le revendeur.
REMARQUE : Au l du temps la poussière peut s‘accumuler sur la grille du ventilateur, et produire un
bruit excessif - éliminer cette accumulation en utilisant un aérosol d‘air comprimé.
La DEL de la carte mère est allumée
Dans ce cas, le bloc d‘alimentation fournit à la carte mère une alimentation de veille. Plusieurs problèmes ordinaires peuvent l‘empêcher de s‘allumer, veuillez vérier les points su-
ivants avant de retourner le bloc d‘alimentation au revendeur :
1. S‘assurer que le câble et les câbles ATX12V sont connectés correctement - consulter le
manuel de la carte mère pour plus de détails.
2. S‘assurer que le bouton d‘alimentation du boîtier est correctement relié à la carte mère consulter le manuel de la carte mère pour plus de détails.
Sinon, connecter les deux broches du „ bouton d‘alimentation „ sur la carte mère au câble du bou-
ton de réinitialisation du boîtier, puis appuyer sur le bouton de réinitialisation. Cela conrme si oui
ou non le bouton d‘alimentation du boîtier fonctionne correctement.
3. Déconnecter tous les périphériques non essentiels. Laisser le bloc d‘alimentation relié
au processeur, à la mémoire du système (RAM), au refroidissement du processeur et à
la carte mère. Si l‘ordinateur démarre dans cette conguration, reconnecter les autres
composants un par un pour identier le périphérique défectueux.
4. Si possible, connecter le bloc d‘alimentation à un ensemble de périphériques différent
pour conrmer qu‘il est défectueux.
La DEL de la carte mère est éteinte
Dans ce cas, la carte mère peut être défectueuse, ou ne pas être alimentée en veille par
le bloc d‘alimentation. Veuillez vérier les points suivants avant de supposer que le bloc
d‘alimentation est défectueux et de le retourner au revendeur :
1. S‘assurer que le cordon d‘alimentation principal est relié à la fois au bloc d‘alimentation
et à une source d‘alimentation secteur. Vérier la prise de courant avec un autre appareil électrique, comme une lampe, an de s‘assurer qu‘elle fournit de l‘énergie.
2. S‘assurer que le commutateur à l‘arrière du bloc d‘alimentation est en position ON
(MARCHE) (marquée „I“).
3. Débrancher et rebrancher les câbles ATX reliés à la carte mère.
4. Si possible, connecter le bloc d‘alimentation à une autre carte mère pour conrmer si
c‘est le bloc d‘alimentation ou la carte mère qui est défectueux.
L‘ordinateur s‘allume, mais s‘éteint ensuite immédiatement
Se reporter aux mêmes étapes de dépannage que pour la section „La DEL de la carte mère
est allumée“ ci-dessus.
Bruit électrique / bourdonnement / bobine stridente
En règle générale, le bruit électrique est causé par des problèmes d‘incompatibilités mineures entre les composants, tels qu‘entre l‘alimentation et les modules VRM sur une carte
graphique. Ce bruit peut ne se produire qu‘avec certaines combinaisons de charges, et peut
donc souvent être évité en faisant de légers changements à la charge d‘alimentation.
Veuillez essayer de modier les paramètres suivants avant de retourner le bloc
d‘alimentation au revendeur :
• Les fonctionnalités d‘économie d‘énergie du processeur et de la carte mère, comme
C1E (Enhanced Halt State) et EIST (Enhanced Intel SpeedStep® Technology) – se reporter au manuel de la carte mère pour plus de détails sur les fonctionnalités prises en
charge par la carte mère et la façon de modier leurs paramètres
• Les options du pilote de la carte graphique, y compris l‘option „vsync“ – se reporter au
manuel de la carte graphique pour obtenir des instructions sur la façon de modier ces
paramètres.
Si le niveau de bruit n‘est pas réduit après le réglage des paramètres de charge
d‘alimentation, Fractal Design considère le bruit électrique comme une cause acceptable de
réclamation sous garantie.
Garantie limitée et limites de la responsabilité
Les blocs d‘alimentation de la gamme Fractal Design Tesla R2 sont garantis pendant trente six (36) mois
à compter de la date de livraison à l‘utilisateur nal, contre les défauts de matériaux ou de fabrication.
Dans cette période de garantie limitée, les produits sont soit réparés soit remplacés à la discrétion de
Fractal Design. Les réclamations sous garantie doivent être retournées à l‘agent qui a vendu le produit,
port payé.
La garantie ne couvre pas :
• Les produits qui ont été utilisés à des ns de location, mal utilisés, manipulés avec négligence ou
appliqués d‘un façon non conformé avec l‘usage prévu indiqué.
• Les produits endommagés par une catastrophe naturelle, y compris, mais sans s‘y limiter, la foudre,
les incendies, les inondations et les tremblements de terre.
• Les produits dont le numéro de série et / ou l‘autocollant de garantie a été supprimé ou altéré.
L‘alimentation est bruyante
Toutes les alimentations Fractal Design sont développées avec comme priorité les faibles
niveaux sonores. Toutefois, les blocs d‘alimentation ne sont généralement jamais complètement silencieux. Le bruit d‘un bloc d‘alimentation doit être à peine perceptible lorsque le boî-
tier de l‘ordinateur est fermé.
Page 8

10
11
Fractal Design
Tesla Series
Gracias y enhorabuena por la compra de una fuente de alimentación (PSU) de la serie Tesla
R2 de Fractal Design. Lea completamente la siguiente información e instrucciones antes de
utilizar su nueva fuente de alimentación.
Información de seguridad
La siguiente información se proporciona por seguridad personal y para utilizar correctamente la fuente de
alimentación:
• Nunca abra la carcasa de la fuente de alimentación ya que la unidad de potencia puede
descargar voltajes peligrosos. Además, dentro de la unidad no hay elementos que pueda
reparar el usuario.
• Utilice la fuente de alimentación únicamente en lugares seguros y secos.
• Nunca inserte objetos en la rejilla del ventilador o en las áreas de ventilación abiertas de
la fuente de alimentación.
• No modique los cables y/o conectores de la fuente de alimentación.
• No utilice el conector de 4 contactos del cable ATX de 24 contactos como un cable
ATX12V de 4 contactos, ya que son incompatibles.
• Los conectores ATX12V y PCI-E son incompatibles y no se pueden intercambiar (no
fuerce los conectores).
Instalación
Si va a cambiar una fuente de alimentación existente, continúe con la Sección A. De lo contrario, pase a
la Sección B.
Sección A: Quitar la fuente de alimentación existente
1. Desconecte el cable de alimentación del equipo y de la toma de corriente eléctrica.
2. Abra la carcasa del equipo y desconecte los cables de alimentación de todos los dispositivos.
3. Quite la fuente de alimentación existente de la carcasa.
4. Continúe con la Sección B.
Sección B: Instalar la nueva fuente de alimentación de Fractal Design
ADVERTENCIA: no conecte el cable de alimentación de CA a la nueva fuente de alimentación antes de
completar los pasos 1 a 4.
1. Instale la fuente de alimentación en la carcasa del equipo (consulte manual de la carcasa
para obtener más instrucciones).
2. Conecte el cable de ATX de 24 contactos a la placa base.
3. Conecte los cables ATX12V a la CPU.
4. Conecte los cables de alimentación apropiados a todos los dispositivos, como por
ejemplo tarjetas grácas, unidades de disco duro y unidades ópticas.
5. Cierre la carcasa del equipo.
6. Conecte el cable de alimentación de CA y coloque el botón situado en la parte posterior
de la fuente de alimentación en la posición de ENCENDIDO.
¡Enhorabuena! Acaba de instalar correctamente su nueva fuente de alimentación de la serie
Tesla R2. La fuente de alimentación se encuentra ahora en el modo de espera esperando a
que la placa base lo encienda.
Solución de problemas
El equipo no se inicia
Abra la carcasa del equipo y compruebe si el LED de espera de la placa base está iluminado.
Nota: el LED puede tener varias formas y encontrarse en diferentes posiciones en la placa base. Consulte el manual de la placa base para obtener más detalles.
El LED de la placa base está encendido
En este caso, la fuente de alimentación está proporcionando alimentación para el estado de espera a la
placa base. Son varios los problemas habituales que pueden causar que no se ponga en marcha. Compruebe lo siguiente antes de devolver la fuente de alimentación al revendedor:
1. Asegúrese de que el cable ATX12V o los cables están conectados correctamente. Con-
sulte el manual de la placa base para obtener más detalles.
2. Asegúrese de que el cable del botón de alimentación de la carcasa está correctamente
conectado a la placa base. Consulte el manual de la placa base para obtener más detalles.
Como alternativa, conecte los dos contactos del „Botón de alimentación“ de la placa base al cable
del botón de restablecimiento de la carcasa y, a continuación, pulse este último botón. Esta opera-
ción conrmará si el botón de alimentación de la carcasa está funcionando correctamente o no.
3. Desconecte todos los dispositivos que no sean esenciales. Deje la fuente de alimentación conectada a la CPU, a la memoria del sistema (RAM), al módulo de refrigeración de
la CPU y a la placa base. Si el equipo se inicia en esta conguración, vuelva a conectar
el resto de componentes uno por uno para identicar el dispositivo defectuoso.
4. Si es posible, conecte la fuente de alimentación a un conjunto diferente de dispositivos
esenciales para conrmar que está defectuosa.
El LED de la placa base está apagado
En este caso, la placa base podría estar defectuosa o no recibir energía de la fuente de alimentación
para el estado de espera. Compruebe lo siguiente antes de asumir que la fuente de alimentación está
defectuosa y devolverla al revendedor:
1. Asegúrese de que el cable de alimentación principal está conectado tanto la fuente de
alimentación como a una toma de corriente activa. Compruebe la toma de corriente
eléctrica con otro dispositivo eléctrico, como por ejemplo una lámpara, para asegurarse
de que proporciona energía.
2. Asegúrese de que el conmutador situado en la parte posterior de la fuente de alimenta-
ción se encuentra en la posición de ENCENDIDO (marca „I“).
3. Desconecte los cables de alimentación ATX acoplados a la placa base y vuelva a
conectarlos.
4. Si es posible, conecte la fuente de alimentación a una placa base diferente para con-
rmar si es aquella o la fuente de alimentación la que está defectuosa.
El equipo se enciende pero, a continuación, se apaga inmediatamente
Consulte los mismos pasos de solución de problemas descritos en la sección „El LED de la
placa base está encendido“ anterior.
La fuente de alimentación emite ruido
Todas las fuentes de alimentación de Fractal Design se han desarrollado con niveles de bajo
ruido como máxima prioridad. Sin embargo, las fuentes de alimentación normalmente nunca
son totalmente silenciosas. El ruido de la fuente de alimentación apenas debe percibirse con
la carcasa del equipo cerrada.
Page 9

12
13
Fractal Design
Tesla Series
Ruido mecánico o del ventilador
Generalmente, todos los ventiladores se hacen más ruidosos con el tiempo y el uso. Este
hecho no supone una causa para llevar a cabo una reclamación de garantía típica. Si el
ventilador es excesivamente ruidoso en una nueva fuente de alimentación de marca, póngase en contacto con el revendedor.
NOTE: con el paso del tiempo se puede acumular polvo en la rejilla del ventilador, lo que puede producir un ruido excesivo. Limpie la acumulación de polvo utilizando aire comprimido.
Ruido, zumbido o silbido eléctrico
Normalmente, el ruido eléctrico está causado por problemas menores de incompatibilidad
entre componentes, como por ejemplo entre la fuente de alimentación y los módulos VRM
de una tarjeta gráca. Este ruido puede que solo se produzca con ciertas combinaciones de
carga y, por lo tanto, suele poder evitarse llevando a cabo pequeños cambios en la carga de
potencia.
Intente cambiar las siguientes conguraciones antes de devolver la fuente de alimentación
al revendedor:
• Las funciones de ahorro de energía de la CPU y de la placa base, como por ejemplo
C1E (Enhanced Halt State, es decir Estado de parada mejorado) y EIST (Enhanced
Intel SpeedStep® Technology, es decir, Tecnología Enhanced Intel SpeedStep®). Con-
sulte el manual de la placa base para obtener más detalles sobre qué funciones admite
la placa base y cómo cambiar su conguración.
• Las opciones del controlador de la tarjeta gráca, incluida la opción „vsync“. Consulte el
manual de la tarjeta gráca para obtener instrucciones sobre cómo cambiar esta con-
guración.
Si el nivel de ruido no se reduce después de ajustar la conguración de carga de potencia,
Fractal Design considerará el ruido eléctrico elevado una causa admisible para una reclamación de garantía.
Garantía limitada y limitación de responsabilidad
Las fuentes de alimentación de la serie Tesla R2 de Fractal Design están garantizadas durante treinta y
seis (36) meses a partir de la fecha de entrega al usuario nal contra defectos materiales y/o de mano
de obra. Dentro de este período de garantía limitada, los productos se repararán o reemplazarán, lo que
Fractal Design estime más oportuno. Las reclamaciones de garantía se deben devolver al agente que
vendió el producto, con portes pagados.
La garantía no cubre:
• Productos que hayan sido utilizados para alquiler, que se hayan utilizado indebidamente, que se
hayan manipulado sin cuidado o que se hayan aplicado de una forma que no esté contemplada en
el uso indicado.
• Productos dañados por la fuerza de la naturaleza como por ejemplo, sin limitación, tormentas, incendios, inundaciones y terremotos.
• Productos cuyo número de serie y/o pegatina de garantía se hayan manipulado o quitado.
Grazie e complimenti per l‘acquisto dell‘alimentatore (PSU) Fractal Design Tesla R2! Si prega
di leggere attentamente le seguenti informazioni e istruzioni prima di utilizzare il nuovo PSU.
Informazioni sulla sicurezza
Le seguenti informazioni sono fornite per la sicurezza personale e il corretto funzionamento del PSU:
• Non aprire il case del PSU; l‘alimentatore potrebbe scaricare tensioni pericolose. Inoltre,
all‘interno non vi sono componenti riparabili dall‘utente.
• Utilizzare il PSU in ambienti sicuri e asciutti.
• Non inserire oggetti nella griglia della ventola o nelle aree di ventilazione aperta del PSU.
• Non modicare i cavi e/o i componenti del PSU.
• Non utilizzare il connettore a 4 pin del cavo ATX a 24 pin come cavo ATX 12 V a 4 pin;
sono imcompatibili.
• I connettori ATX 12 V e PCI-E sono incompatibili e non sono intercambiabili; non forzare i
connettori.
Installazione
Se si sostituisce un alimentatore esistente, proseguire con la Sezione A; in caso contrario, passare alla
Sezione B.
Sezione A: Rimozione del PSU esistente
1. Scollegare il cavo di alimentazione dal computer e dalla presa elettrica
2. Aprire il case del computer e scollegare i cavi di alimentazione da tutti i dispositivi
3. Rimuovere il PSU esistente dal case
4. Proseguire con la Sezione B
Sezione B: Installazione del nuovo PSU Fractal Design
AVVISO: Non collegare il cavo di alimentazione CA al nuovo PSU prima di completare le fasi da 1 a 4.
1. Montare il PSU nel case del computer; per ulteriori istruzioni, fare riferimento al manuale
del case.
2. Collegare il cavo ATX a 24 pin alla scheda madre.
3. Collegare i cavi ATX 12 V alla CPU.
4. Collegare i cavi di alimentazione adeguati a tutti gli altri dispositivi, tra cui schede gra-
che, dischi rigidi, unità ottiche.
5. Chiudere il case del computer.
6. Collegare il cavo di alimentazione CA e accendere (ON) il tasto sul retro del PSU.
Congratulazioni! Ha installato correttamente il nuovo PSU serie Tesla R2. Il PSU è ora in mo-
dalità standby, in attesa che la scheda madre si accenda.
Page 10

14
15
Fractal Design
Tesla Series
Risoluzione dei problemi
Il computer non si avvia
Aprire il case del computer e controllare se il LED di standby sulla scheda madre è acceso
Nota: il LED può essere in varie forme e in diverse posizioni sulla scheda madre; per ulteriori dettagli, fare
riferimento al manuale della scheda madre.
Il LED della scheda madre è acceso
In tal caso, il PSU sta fornendo alla scheda madre alimentazione di emergenza. Diversi problemi comuni
possono causarne la mancata accensione, Si prega di controllare quanto segue prima di riportare il PSU
al rivenditore:
1. Assicurarsi che il cavo o i cavi ATX 12 V siano collegati correttamente; per ulteriori det-
tagli, consultare il manuale della scheda madre.
2. Assicurarsi che il cavo del tasto di alimentazione del case sia collegato correttamente
alla scheda madre; per ulteriori dettagli, consultare il manuale della scheda madre.
In alternativa, collegare i due pin del „tasto di alimentazione“ sulla scheda madre al cavo del tasto
di ripristino del case, quindi premere il tasto di ripristino. In tal modo si può controllare se il tasto di
alimentazione del case funziona correttamente.
3. Scollegare tutti i dispositivi non essenziali. Lasciare il PSU collegato alla CPU, alla memoria del sistema (RAM), al raffreddamento della CPU e alla scheda madre. Se il computer si avvia in questa congurazione, ricollegare gli altri componenti uno per uno per
identicare il dispositivo difettoso.
4. Se possibile, collegare il PSU ad un altro set di dispositivi essenziali per controllare se è
difettoso.
Il LED della scheda madre è spento
In tal caso, la scheda madre potrebbe essere difettosa oppure non viene fornita alimentazione di
emergenza da parte del PSU. Controllare quanto segue prima di presumere che il PSU sia difettoso e
riportarlo al rivenditore:
prega di contattare il rivenditore.
NOTA: nel tempo la polvere può accumularsi sulla griglia della ventola, causando un rumore
eccessivo; eliminare l‘accumulo di polvere con una bomboletta di aria compressa.
Rumore elettrico/ronzio/rumore ad alta frequenza
In genere, il rumore elettrico è causato da piccoli problemi di incompatibilità tra i componenti,
ad esempio tra l‘alimentatore e i moduli VRM su una scheda graca. Questo rumore può
avvenire solo a certe combinazioni di carico e può quindi essere evitato modicando legger-
mente l‘intensità di corrente.
Provare a modicare le seguenti impostazioni prima di riportare il PSU al rivenditore:
• Le funzioni di risparmio energetico della CPU e della scheda madre, ad esempio C1E
(stato di interruzione avanzato) e EIST (tecnologia Intel SpeedStep® avanzata); per
ulteriori dettagli sulle funzioni supportate dalla scheda madre e sulla modica delle rela-
tive impostazioni, fare riferimento al manuale della scheda madre.
• Le opzioni del driver della scheda graca, compresa l‘opzione „vsync“; per istruzioni
sulla modica di queste impostazioni, fare riferimento al manuale della scheda graca.
Se il livello di rumore non si riduce dopo la regolazione delle impostazioni dell‘intensità di
corrente, Fractal Design considera l‘eccessivo rumore elettrico una causa accettabile per un
reclamo in garanzia.
Garanzia limitata e limitazione delle responsabilità
I PSU serie Fractal Design Tesla R2 sono garantiti per trentasei (36) mesi dalla data di consegna all‘utente nale in caso di difetti nei materiali e/o nella fabbricazione. Entro questo
periodo della garanzia limitata, i prodotti verranno riparati o sostituiti a discrezione di Fractal
Design. I reclami in garanzia devono essere consegnati all‘agente che ha venduto il prodotto,
con le spese di spedizione prepagate.
1. Assicurarsi che il cavo di alimentazione principale sia collegato al PSU e ad una sorgente di corrente continua. Controllare la presa elettrica con un altro dispositivo, ad esempio una lampada, per assicurarsi che fornisca corrente.
2. Assicurarsi che l‘interruttore sul retro del PSU sia acceso (ON) (contrassegnato con „I“).
3. Scollegare e ricollegare i cavi di alimentazione ATX collegati alla scheda madre.
4. Se possibile, collegare il PSU ad un‘altra scheda madre per controllare eventuali guasti
del PSU o della scheda madre.
Il computer si accende, ma si spegne subito
Fare riferimento alle stesse procedure di risoluzione dei problemi della sezione „Il LED della
scheda madre è acceso“ precedente.
L‘alimentatore è rumoroso
Tutti gli alimentatori Fractal Design sono stati sviluppati con bassi livelli di rumorosità come
principale priorità. Tuttavia, in genere i PSU non sono mai del tutto silenziosi. Il rumore PSU
può essere appena percettibile con il case del computer chiuso.
Rumore meccanico/rumore della ventola
In genere tutte le ventole diventano più rumorose con il tempo e l‘usura. Ciò non dà diritto ad
un reclamo in garanzia tipica. Se la ventola è troppo rumorosa su un nuovo alimentatore, si
La garanzia non copre:
• I prodotti noleggiati, utilizzati in modo improprio, maneggiati senza cura o utilizzati in
modo non conforme con le istruzioni per l‘uso fornite in dotazione.
• I prodotti danneggiati da fenomeni naturali, inclusi, ma non solo, fulmini, incendi, alluvioni
e terremoti.
• Prodotti con il numero di serie e/o l‘adesivo della garanzia manomessi o cancellati.
Page 11
16
17
Fractal Design
Tesla Series
Fractal Design Tesla R2 電源ユニット(PSU)をお買い上げいただきありがとうございました。 次の
情報と指示を十分にお読みになった上で本製品をご利用ください。
安全情報
次の情報は個人の安全とPSUの正しい操作のために提供されます。
• PSUケースは絶対に開けないでください。電源装置が危険電圧を放出するおそれがあります。
また、ユーザーが自分で修理できる部品は内部にありません。
• 本PSUは安全で、濡れていない環境でのみお使いください。
• 本PSUのファングリル、または換気装置のむき出しの部分に物体を挿入しないでください。
• PSUのケーブルやコネクタを改良しないでください。
• ATX 24ピンケーブルの4ピンコネクタをATX 12V 4ピンケーブルとして使用しないでくださ
い。互換性がありません。
• ATX12VとPCI-Eコネクタには互換性がなく、入れ替えることができません。無理に使わないで
ください。
取り付け
既存の電力供給装置と入れ替える場合はセクションAに進み、入れ替えない場合はセクションBに
スキップしてください。
セクションA: 既存のPSUを取り外す
1. コンピュータと電気コンセントから電源コードを外します。
2. コンピュータケースを開き、すべての装置から電源ケーブルを外します。
3. ケースから既存のPSUを取り出します。
4. セクションBに進んでください。
セクションB: 新しいFractal Design PSUを取り付ける
警告: ステップ1から4まで完了するまでは、AC電源コードを新しいPSUに接続しないでください。
1. コンピュータケースにPSUを取り付けます。詳しい指示はケースのマニュアルを参照してくだ
さい。
2. ATX 24ピンケーブルをマザーボードに接続します。
3. ATX12VケーブルをCPUに接続します。
4. 適切な電源ケーブルをグラフィックスカード、ハードドライブ、光学ドライブなど、その他全部
の装置に接続します。
5. コンピュータケースを閉じます。
6. AC電源コードを接続し、PSUの背面にあるボタンをオンの位置に切り替えます。
おめでとうございます。 あなたの新しいTesla R2シリーズPSUが正常に取り付けられました。 PSU
はスタンバイモードにあり、マザーボードの指示で作動モードに入るのを待っています。
トラブル対処方法
コンピュータが 起動しない
コンピュータケースを開いて、マザーボードのスタンバイLEDが点灯しているかどうか確認してく
ださい。
注記: LEDはさまざまな形状をして、マザーボードのさまざまな場所に配置されます。詳細はマザ
ーボードのマニュアルを参照してください。
マザーボードLEDが点灯している
この場合、PSUはマザーボードに待機電源を供給しています。 コンピュータが起動しない理由に
はいくつかの原因が報告されています。PSUを販売店に返却する前に、以下を確認してください。
1. ATX12Vケーブルが正しく接続されていることを確認します。詳細はマザーボードのマニュア
ルを参照してください。
2. ケースの電源ボタンケーブルがマザーボードに正しく接続されていることを確認します。詳
細はマザーボードのマニュアルを参照してください。
あるいは、マザーボードの2つの「電源ボタン」ピンをケースのリセットボタンケーブルに接
続し、リセットボタンを押します。 これでケースの 電 源 ボタンが 正しく機能しているかどうか
がわかります。
3. 重要でない装置の接続をすべて外します。 PSUは、CPU、システムメモリ(RAM)、CPU冷却お
よびマザーボードに接続されたままにします。 コンピュータがこの構成で起動した場合、そ
の他のコンポーネントをひとつずつ再接続し、欠陥のある装置を特定します。
4. 可能であれば、PSUを別の一連の重要な装置に接続し、それに欠点があることを確認しま
す。
マザーボードLEDが点灯していない
この場合、マザーボードに欠陥があるか、PSUから待機電源が供給されていません。 PSUに欠陥
があると見なして販売店に返却する前に、以下を確認してください。
1. メインの電源コードがPSUと本稼働の電源の両方に接続されていることを確認します。
照明器具など、他の電気装置で電気コンセントを調べ、電気が供給されていることを確認し
ます。
2. PSUの背面のスイッチがオンの位置(「I」のマークがあります)にあることを確認します。
3. マザーボードに取り付けられたATX電源ケーブルの接続を外し、再度接続します。
4. 可能であれば、PSUを別のマザーボードに接続し、PSUまたはそのマザーボードに欠陥があ
ることを確 認します。
コンピュータの電源が入るが、直後に停止する
上記の「マザーボードLEDが点灯している」セクションのトラブル対処方法ステップを参照してくだ
さい。
電源供給がうるさい
Fractal Designの電源供給はすべて、低い騒音レベルを高い優先度として開発されています。しか
しながら、一般的に、PSUが完全に無音になることはありません。 PSUの騒音は、コンピュータケー
スを閉じた状態で、かすかに聞こえる程度であるべきです。
Page 12

18
19
Fractal Design
Tesla Series
機械騒音/ファン騒音
通常、いかなるファンも時間の経過や損耗とともに騒音を出すようになります。 このことは通常の
保証請求の理由にはなりません。 新品の電源供給装置でファンが過度に騒音を出す場合、販売
店にお問い合わせください。
注記: 時間の経過とともにほこりがファングリルに積もり、過度の騒音を出します。圧縮空気の缶
スプレーを利用して積もったほこりを除去してください。
電気騒音/ブーンという音/コイル鳴き
通常、電気騒音はコンポーネント間の軽微な非互換性により発生します。たとえば、電源供給装置
とグラフィックスカードのVRMモジュールの間で発生します。この騒音は特定の組み合わせの負
荷でのみ発生する場合があり、そのため、多くの場合、電源負荷をわずかに変更することで回避
で き ま す 。
PSUを販売店に返却する前に次の設定を変更してみてください。
• C1E (Enhanced Halt State)やEIST (Enhanced Intel SpeedStep® Technology)など、CPUや
マザーボードの節電機能。マザーボードでサポートされる機能やその設定の変更方法に関
する詳細は、マザーボードのマニュアルを参照してください。
• 「vsync」オプションを含む、グラフィックスカードのドライバオプション。設定変更方法に関
する指示はグラフィックスカードのマニュアルを参照してください。
電力負荷設定を調整しても騒音レベルが減らない場合、Fractal Designは大きな電気騒音を保証
請求の容認可能な理由と見なします。
Fractal Design Tesla R2 전원공급장치(PSU)를 구입해 주셔서 감사드리고 축하합니다. 새
PSU를 사용하기 전에 다음의 내용과 지침을 빠짐없이 읽어주십시오.
안전 정보
다음 정보는 사용자의 안전 및 PSU의 올바른 작동을 위해 제공됩니다.
• PSU 케이스를 절대 열지 마십시오, 전원공급장치에서 위험한 전압을 방출할 수
있습니다. 또한, 케이스 내부에는 사용자가 수리 가능한 부품이 없습니다.
• 안전하고 건조한 환경에서만 PSU를 작동하십시오.
• PSU의 팬 그릴 또는 열려 있는 통풍 구역에 절대 물체를 삽입하지 마십시오.
• PSU 케이블 및/또는 커넥터를 변경하지 마십시오.
• ATX 24핀 케이블의 4핀 커넥터를 ATX 12V 4핀 커넥터로 사용하지 마십시오. 서로 호환
가능하지 않습니다.
• ATX12V와 PCI-E 커넥터는 호환 가능하지 않으며 서로 교환하여 사용할 수 없습니다.
커넥터를 강제로 연결하지 마십시오.
설치
기존 전원공급장치를 교체하는 경우 섹션 A를 계속하고, 그렇지 않으면 섹션 B로
건너뛰십시오.
섹션 A: 기존 PSU 제거
限定保証と責任限定
Fractal Design Tesla R2 シリーズPSUは、最終消費者への配送日から36カ月間、製品または製造の
不備に関して保証されます。 この限定された保証期間において、製品はFractal Designの判断によ
って修理または交換されます。 保証請求は製品を販売した代理店に元払いで返却する必要があ
ります。
以下は保証に含まれません。
• 賃貸目的、誤用、不注意な扱い、または明記された本来の用途に一致しない使い方により故
障した製品
• 落雷、火災、洪水、地震を含むがそれらに限定されない天災により損傷を受けた製品
• シリアル番号または保証ステッカーが改ざんされた、またははがされた製品
1. 컴퓨터와 전원 콘센트에서 전원 코드의 연결을 끊습니다.
2. 컴퓨터 케이스를 열고 모든 장치에서 전원 케이블의 연결을 끊습니다.
3. 기존 PSU를 케이스에서 제거합니다.
4. 섹션 B를 계속합니다.
섹션 B: 새 Fractal Design PSU 설치
경고: 1에서 4단계를 완료하기 전에 새 PSU에 AC 전원 코드를 연결하지 마십시오.
1. PSU를 컴퓨터 케이스에 장착합니다. 자세한 지침은 케이스 설명서를 참조하십시오.
2. ATX 24핀 케이블을 마더보드에 연결합니다.
3. ATX12V 케이블을 CPU에 연결합니다.
4. 적절한 전원 케이블을 그래픽 카드, 하드 드라이브, 광학 드라이브 등 다른 모든 장치에
연결합니다.
5. 컴퓨터 케이스를 닫습니다.
6. AC 전원 코드를 연결하고 PSU 뒷면의 버튼을 ON 위치에 놓습니다.
축하합니다! 새 Tesla R2 시리즈 PSU를 성공적으로 설치하셨습니다. PSU는 이제 대기
모드로 마더보드에서 켜 주기를 기다리고 있습니다.
Page 13

20
21
Fractal Design
Tesla Series
문제해결
컴퓨터가 시작하지 않습니다
컴퓨터 케이스를 열고 마더보드의 대기 LED가 켜져 있는지 확인하십시오.
참고: LED는 다양한 모양이며 마더보드에 따라 위치가 다릅니다. 자세한 내용은 마더보드
설명서를 참조하십시오.
마더보드 LED가 켜져 있습니다
이 경우, PSU가 마더보드에 대기 전원을 공급하고 있는 것입니다. 여러 가지 일반적인
문제로 인해 마더보드가 켜지지 않을 수 있습니다. PSU를 재판매업체에 반품하기 전에 다음
사항을 확인하십시오.
전기적 소음 / 윙하는 소리 / 코일이 울리는 소리
일반적으로, 전기적 소음은 전원공급장치 및 그래픽 카드의 VRM 모듈과 같은 부품 간의
사소한 비호환성 문제로 인해 발생합니다. 이 소음은 특정한 부하 조합에서만 발생하기
때문에 종종 전력 부하를 약간 변경하면 소음을 제거할 수 있습니다.
PSU를 재판매업체에 반품하기 전에 다음 설정을 변경해 보십시오.
• C1E(Enhanced Halt State) 및 EIST(Enhanced Intel SpeedStep® Technology)와
같은 CPU 및 마더보드의 절전 기능 – 마더보드에서 지원하는 기능 및 설정을 변경하는
방법에 대한 자세한 내용으 마더보드 설명서를 참조하십시오.
• „vsync“ 옵션을 포함한 그래픽 카드 드라이버 옵션 - 설정을 변경하는 방법은 그래픽
카드 설명서를 참조하십시오.
1. ATX12V 케이블이 제대로 연결되었는지 확인합니다. 자세한 내용은 마더보드 설명서를
참조하십시오.
2. 케이스의 전원 버튼 케이블이 마더보드에 제대로 연결되었는지 확인합니다. 자세한
내용은 마더보드 설명서를 참조하십시오. 대안으로 마더보드의 „전원 버튼“ 핀 2개를
케이스의 재설정 버튼 케이블에 연결한 다음, 재설정 버튼을 누릅니다. 이렇게 하면
케이스의 전원 버튼이 제대로 작동하는지 여부를 확인할 수 있습니다.
3. 필수 장치가 아닌 모든 장치의 연결을 끊습니다. PSU를 CPU, 시스템 메모리(RAM),
CPU 냉각 및 마더보드에 연결된 상태로 둡니다. 이 상태에서 컴퓨터가 시작되면 다른
부품을 하나씩 다시 연결하여 결함이 있는 장치를 찾습니다.
4. 가능하면 PSU를 다른 필수 장치 세트에 연결하여 결함이 있는지 확인합니다.
마더보드 LED가 꺼져 있습니다
이 경우, 마더보드에 결함이 있거나 PSU로부터 대기 전원이 공급되지 않을 수 있습니다.
PSU에 결함이 있다고 간주하고 재판매업체에 반품하기 전에 다음 사항을 확인하십시오.
1. 주전원 코드가 PSU 및 작동 전원에 모두 연결되어 있는지 확인합니다.
램프 등 다른 전기 장치를 사용하여 전원 콘센트에 전기가 통하는지 확인합니다.
2. PSU 뒷면의 스위치가 („I“로 표시된) ON 위치에 있는지 확인합니다.
3. 마더보드에 부착된 ATX 전원 케이블의 연결을 끊었다가 다시 연결합니다.
4. 가능하면 PSU를 다른 마더보드에 연결하여 PSU에 결함이 있는지 마더보드에 결함이
있는지 확인합니다.
컴퓨터 전원이 켜지지만 바로 꺼집니다
위 „마더보드 LED가 켜져 있습니다“ 섹션과 동일한 문제해결 단계를 참조하십시오.
전력 부하 설정을 조정한 후에도 소음이 줄지 않을 경우 Fractal Design은 과도한 전기적
소음을 보증 대상으로 인정합니다.
제한 보증 및 책임 제한
Fractal Design Tesla R2 시리즈 PSU는 최종 사용자에게 인도된 날로부터 36개월간 재료
및/또는 제작 상의 결함에 대해 보증합니다. 이 제한 보증 기간 동안 제품은 Fractal Design의
판단에 따라 수리 또는 교체됩니다. 보증 요청은 제품을 판매한 대리점에 배송 비용을 미리
지불하고 제출해야 합니다.
다음과 같은 제품은 보증을 받을 수 없습니다.
• 임대용으로 사용되거나, 오용되거나, 부주의하게 취급되거나, 기술된 사용 용도에
일치하지 않은 방식으로 사용된 제품
• 번개, 화재, 홍수, 지진을 포함한(단, 이에 국한되지는 않음) 자연재해에 의해 손상된
제품
• 일련번호 및/또는 보증 스티거가 훼손되거나 제거된 제품
전원공급장치에서 소음이 납니다
모든 Fractal Design 전원공급장치는 소음 수준을 낮추는 문제를 염두에 두고
개발되었습니다. 그렇지만, PSU가 전혀 소음을 내지 않는 경우는 없습니다. PSU 소음은
컴퓨터 케이스를 닫을 경우 거의 들리지 않아야 합니다.
기계적인 소음 / 팬 소음
모든 팬은 오래 사용하여 닳게 되면 더 큰 소음이 납니다. 이러한 경우는 일반적인 보증
대상에 해당하지 않습니다. 새 전원공급장치의 팬에서 과도한 소음이 나면 재판매업체에
문의하십시오.
참고: 시간이 지나면 팬 그릴에 먼지가 쌓여 과도한 소음을 낼 수 있습니다. 압축 공기를
사용하여 먼지를 털어내십시오.
Page 14
22
23
Fractal Design
Tesla Series
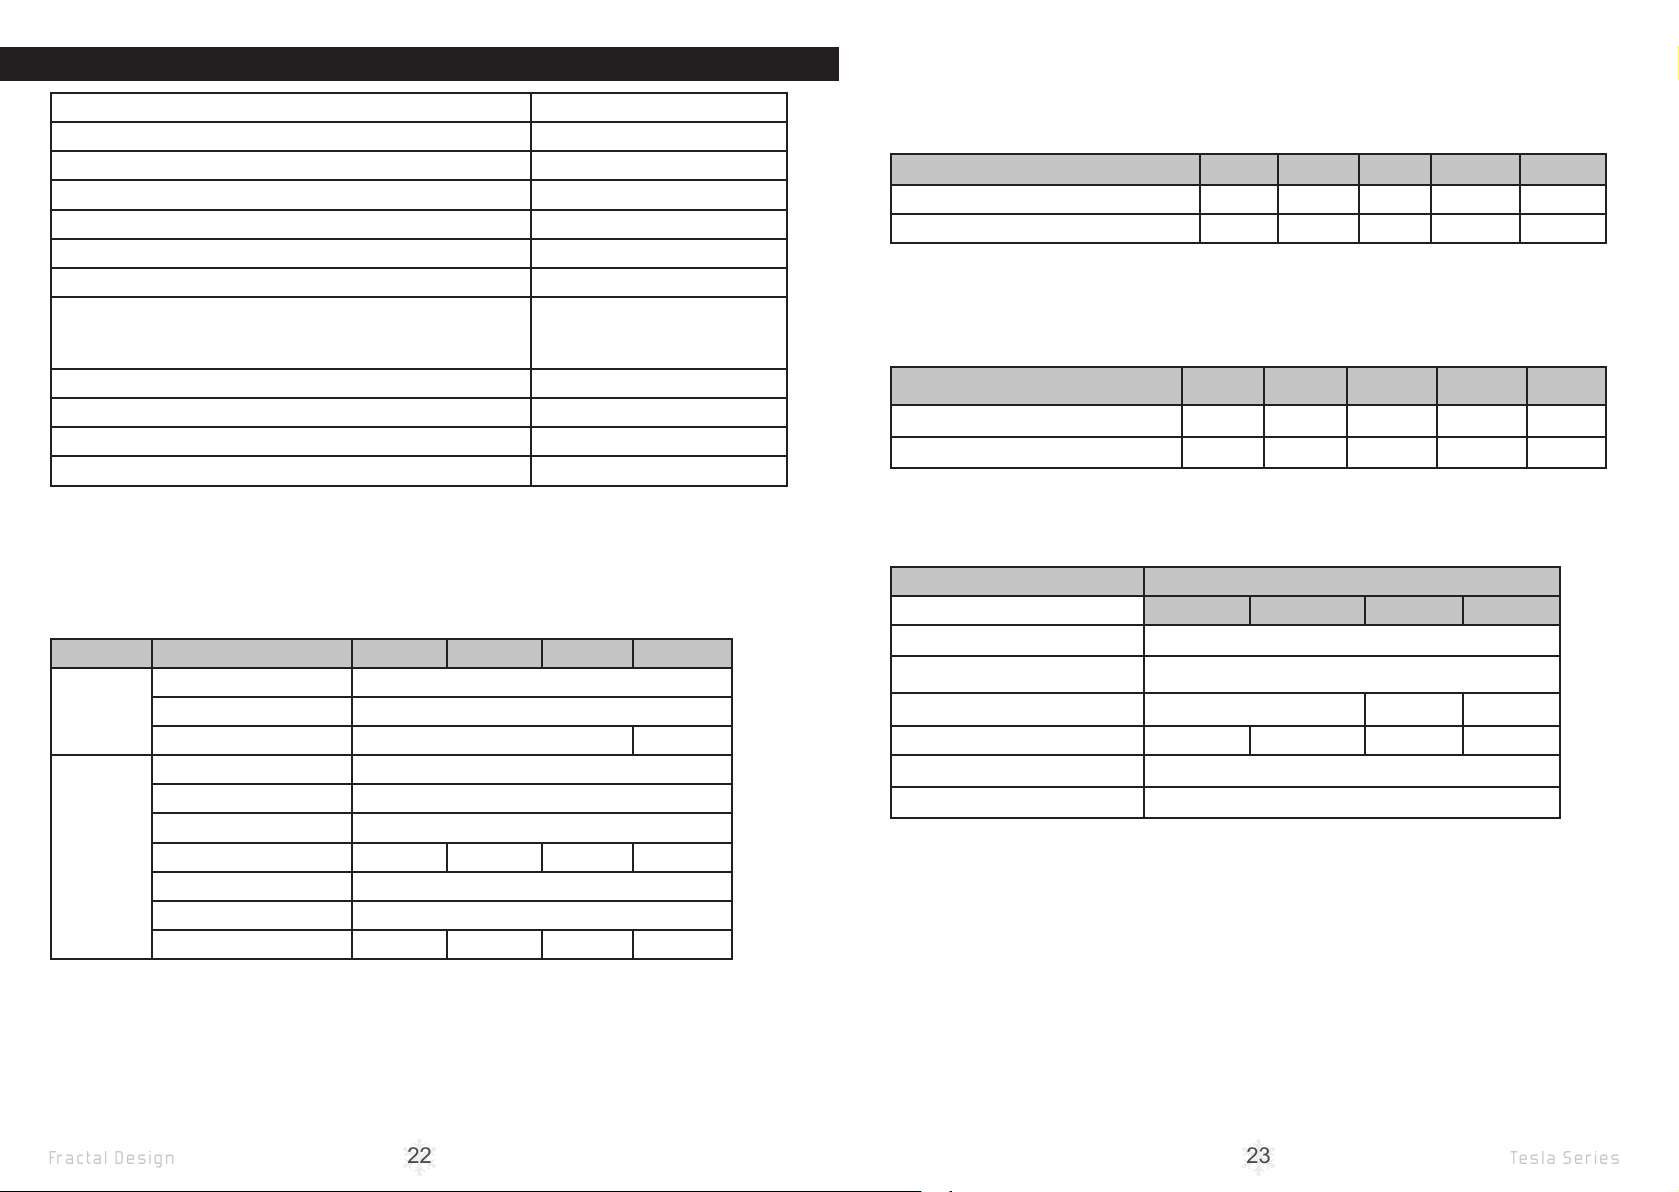
Tesla R2 Series Specication
Power supply unit (PSU) specication compliance ATX 2.31
General Specication
Dimensions (mm) 150*86* 165
Life expectancy (MTBF) at maximum output load 100,000 hours
Power factor correction (PFC) Active
Fan type 135mm, sleeve / ball bearing
Operating temperature 0-40°C (50°C at 80% load)
Operating humidity 10-90%
Protected against Over power
Over voltage
Short circuit
Efciency 80 PLUS® Gold certied
Safety approvals UL, cUL, TÜV
Electromagnetic compatibility (EMC) standard compliance CE, FCC, C-tick
Hazardous materials WEEE/RoHS compliant
Power Specication
500W 650W 800W 1000W
Voltage 90-264V AC
AC Input
DC Output
Frequency 47-63 Hz
Current 10A/5A 15A/ 7.5A
3.3V 20A
5V 20A
3.3V and 5V combined 100W
12V 41.5A 54A 66A 80A
-12V 0.5A
5V Standby (+5Vsb) 2.5A
Total Power 500W 650W 800W 1000W
DC Voltage Regulation
Maximum difference between DC output voltage and nominal value under any load,
line and environmental conditions within specication. The following are the maxi-
mum values allowed by Fractal Design quality control; typical values are lower.
3.3V 5V 12V -12V +5Vsb
ATX Specication <5% <5% <5% <10% <5%
Fractal Design Tesla R2 Series <3% <3% <3% <8% <3%
Ripple and Noise
Peak-to-peak values of periodic or random signals present on the DC rails over a frequency
band of 10Hz to 20Mhz. The following are the maximum values allowed by Fractal Design
quality control; typical values are lower.
3.3V 5V 12V -12V +5Vsb
ATX Specication <50 mV <50 mV <120 mV <120 mV <50 mV
Fractal Design Tesla R2 Series <40mV <40mV <70 mV <60 mV <40mV
Cable conguration
Connector type Quantity
500W 650W 800W 1000W
ATX 20+4 pins 1
ATX12V/EPS12V 4+4 pins 1
PCI-E 6+2 pins 2 4 6
SATA 5 6 7 9
Peripheral 2
Floppy 1
Package contents
Tesla R2 PSU in protective bag Velcro cable ties & zip ties
User's Manual (this book) Mounting Screw pack
AC Power cord (localized)
Page 15

www.fractal-design.com
 Loading...