

Fractal Audio FX8 Owner's Manual
MULTI-EFFECTS PEDALBOARD
OWNER’S
MANUAL
VERSION 1.02

Inside Front Cover
Certificate of Conformity
Fractal Audio Systems, USA, hereby declares on its own responsibility that the following product:
FX8 Digital Multi-eects Pedalboard Processor
covered by this certicate and marked with CE label, conforms to following standards:
EN60065
(IEC 60065)
EN 55103-1 Product family standard for audio, video, audio-visual, and entertainment
EN 55103-2 Product family standard for audio, video, audio-visual, and entertainment
Safety requirement for mains operated electronic and related apparatus for
household and similar use.
lighting control apparatus for professional use. Part 1: Emission.
lighting control apparatus for professional use. Part 2: Immunity.
with reference to regulations in following directives: 73/23/EEC, 89/336/EEC.
December 2014
Cliord Chase, President
Fractal Audio Systems
EMC/EMI
This equipment has been tested and found to comply with the limits for a Class B Digital device, pursuant to
part 15 of the FCC rules. These limits are designed to provide reasonable protection against harmful interference in residential installations. This equipment generates, uses and can radiate radio frequency energy
and, if not installed and used in accordance with the instructions, may cause harmful interference to radio
communications. There is no guarantee that interference will not occur in a particular installation. If this
equipment does cause harmful interference to radio or television reception, which can be determined by
turning the equipment o and on, the user is encouraged to try to correct the interference by one or more
of the following measures:
Reorient or relocate the receiving antenna.
Increase the separation between the equipment and receiver.
Connect the equipment to an outlet on a circuit dierent from that to which the receiver is connected.
Consult the dealer or an experienced radio/TV technician for help.
i
Legal Notices
Fractal Audio Systems FX8 Owner’s Manual. Contents Copyright © 2014. All Rights Reserved.
No part of this publication may be reproduced in any form without the express permission of
Fractal Audio Systems.
Fractal Audio Systems, FX8, Humbuster, are trademarks of Fractal Audio Systems. Manufacturer names and product names mentioned herein are trademarks or registered trademarks of
their respective owners, which are in no way associated with or aliated with Fractal Audio
Systems. The names are used only to illustrate sonic and performance characteristics.
Important Safety Instructions
WARNING: To reduce the risk of re or electric shock, do not expose this
appliance to rain or moisture.
CAUTION: To reduce the risk of re or electric shock, do not remove screws.
There are no user serviceable parts inside. Refer servicing to qualied service
personnel.
1. Obey all warnings on the FX8 and in this User Guide.
2. Keep away from sources of heat such as ducts, registers or appliances that produce heat.
3. Connect only to a standard grounded AC outlet of 100–240V, 47–63 Hz.
4. Keep the power cord in good condition. Do not kink, bend, or pinch.
5. If the cord becomes damaged, discard and replace it.
6. If not using your FX8 for extended periods of time, disconnect from AC power.
7. Protect the unit from rain and excessive moisture.
8. Refer servicing to qualied personnel only.
9. Stop operation of the unit and obtain service if:
10. Liquids or excessive moisture enter the unit.
11. The unit operates incorrectly or performance is inconsistent or erratic.
12. The unit has been dropped and/or the enclosure damaged.
13. Prolonged exposure to high volume levels can cause hearing damage and/or loss. The
use of hearing protection in high volume situations is recommended.
ii

TABLE OF CONTENTS
1 : INTRODUCTION .................1
Quick Overview .....................1
Pre/Post: The Old Way... ..............2
Pre/Post: The FX8 Way... ..............2
Quick Connect Guide ................3
Stompbox Mode ....................4
A Note On Mono & Stereo ...........4
Humbuster Cables ...................4
2 : HARDWARE OVERVIEW ..........5
The Top Panel .......................5
The Rear Panel ......................9
3 : SETUP GUIDE ...................11
Setup For Both PRE And POST Eects 12
Setup For PRE Eects Only ..........13
Setup For POST Eects Only ........14
Checking Levels ....................15
Connecting Pedals & Switches ......16
Connecting a Computer ............18
4 : THE RELAYS ....................19
5 : CREATING PRESETS .............21
What Is a Preset? ...................21
What Is a Block? ....................21
Preset Examples ....................22
Stompbox Mode ...................23
Loading Presets ....................23
Working With Blocks ................24
Block Inventory ....................25
Editing Eect Blocks ................26
Saving Changes ....................27
X/Y Switching ......................28
Preset CPU Limits ...................29
FX8-Edit ............................30
6 : PRESET CONFIGURATION .......31
Overview ..........................31
Congure PRE And POST ...........31
Congure Series & Parallel ..........32
Intelligent Parallel Fx ...............33
Congure True Bypass ..............34
Per Scene Relay States ..............34
7 : SCENES ........................35
Overview ..........................35
Selecting Scenes ...................36
Setting Up Scenes ..................36
Sticky Scene Select .................38
Scene Revert .......................38
8 : TRUE BYPASS ...................39
Overview ..........................39
Preset Bypass Conguration ........39
Automatic True Bypass .............40
9 : BLOCKS GUIDE .................41
The MIDI Block .....................42
The Relay Block .....................43
Mix Page Common Parameters .....44
The Noise Gate .....................45
The Output Section .................45
10 : MODIFIERS ...................47
Overview ..........................47
Creating a Modier .................47
Modier Example: Wah Pedal .......48
Modier Sources Overview .........49
Modier Tips And Tricks. . . . . . . . . . . . .49
Advanced Modier Parameters .....50
Internal Controllers .................53
External Controllers ................54
11 : TEMPO ........................55
Preset Tempo .......................56
Auto Delay .........................56
The Metronome ....................56
12 : THE LOOPER ..................57
Looper Parameters .................58
Global Looper Location .............59
Looper MIDI Control ................60
13 : THE TUNER ....................61
Advanced Tuner Functions ..........61
14 : SETUP MENUS ................62
The Global Menu ...................62
The I/O Menu ......................64
The Utility Menu ...................69
The Controllers Menu ...............71
15 : ADDITIONAL TOPICS ..........72
Global Volume Pedal Setup .........72
Advanced Level Parameters .........73
Spillover ...........................74
Frequently Asked Questions ........75
Unity Gain FAQ .....................77
16 : SPECIFICATIONS & DEFAULTS ..78
MIDI Implementation ...............79
Factory Default MIDI CC Settings ....80
MIDI Program Change Numbers ....81
WARRANTY .......................83
EULA .............................84
iii

Thank You!
Thank you for purchasing the FX8. Like every Fractal Audio product, it was created to be what we would want
and expect as guitar players ourselves.
While even extremely critical musicians agree that our amp modeling technology stands shoulder-toshoulder with the almighty tube amp, we still love that tube amps are ubiquitous. We rely on innovation and
tradition. The legacy of tube amps is completely intertwined with music history. And the simple fact remains
that digital amp modeling may not be for everyone (yet).
In eects processing, however, digital technology has a greater foothold, having been in widespread use
for decades. Our own eects have been vetted and championed for years by some of the world’s most
demanding and discriminating players—celebrities and unsung heroes alike. Now, with the FX8, we’ve taken
this technology out of the rack and onto the oor with a unit specically designed to work with traditional
guitar amps.
The FX8 oers over 130 dierent “Fractal-Quality” eects. You can build a virtual pedalboard with up to
eight simultaneous eects from an inventory of classic and cutting-edge stompboxes and studio processors
arranged in virtually any conguration. “Dial in” with basic controls, or go deeper with optional advanced
parameters. Use the onboard relays to control your amp’s switchable functions, and attach expression pedals
or footswitches. You can control the FX8 with traditional “tap dance” foot switching or via Fractal’s widely
acclaimed “Scene” technology. Save the result to any of the 128 built-in pedalboard memory locations, each
of which can be completely dierent. And that’s only the beginning…
Most importantly, we want to stress that the FX8 was designed from the beginning with uncompromising
quality and performance as the end goal. The signal path produces pristine quality audio so there’s no “tone
suck” when you connect it between your cherished guitar and amp. And why should there be? The entire
point is that when you take a “no compromises” approach, high-powered digital equipment delivers exactly
what musicians want and expect.
So thank you again for choosing the FX8. We can’t wait to hear what you will do with it.
Fractal Audio Systems
January 2015
iv

1 : INTRODUCTION
1 : INTRODUCTION
The FX8 is an advanced multi-eects pedalboard processor, perfect for guitar, bass, and other instruments.
It is built “like a tank” with a steel chassis and aircraft aluminum end panels. The unit features eleven quiet,
durable, solid-state footswitches with no mechanical contacts to fail, plus 27 LEDs in three colors. The easyto-use interface includes a bright display, six buttons, and ve knobs.
The FX8 was designed rst and foremost for the best possible sound quality, with converters that deliver
pristine audio, ultra-low noise levels, and no “tone suck.” It uses a powerful processor to run the same highquality eect algorithms that have made our Axe-Fx processor so successful. Its Humbuster™ outputs help
defeat ground hum (when used with Humbuster™ Cables). It also features upgradeable rmware so we can
deliver updates with exciting new features.
We hope you nd the FX8 easy to use and this manual easy to read. The most important sections are those
which introduce the concepts behind how the unit works. If nothing else, be sure to review this section, plus
Section 2 : Hardware Overview, Section 3 : Setup Guide, Section 4 : The Relays and Section
5 : Creating Presets
QUICK OVERVIEW
The FX8 contains 128 dierent presets
arranged in 16 lettered banks.
Each preset is like a whole new pedalboard,
with up to eight eect blocks (Wah,
Drive, or Phaser, for instance).
Most blocks oer X/Y switching for twice as
many sounds from the same eight blocks.
Each preset also contains eight scenes.
Think of a scene as a preset within a
preset. Scenes eliminate “tap dancing”
by turning multiple eects on or o
at a single tap. . . and much more!
Two TRS relays can switch your amplier
and can be controlled by the onboard
footswitches or programmed per-scene.
The FX8 features buered truebypass
with analog relays to switch all processing
completely out of the signal path.
Setting levels is easy, with soft switches to
increase headroom and automatic unity gain.
Onboard jacks for two external
footswitches or expression pedals make
it easy to control sound functions.
The FX8 has built in looper, a tuner, and
a dedicated tap tempo footswitch.
MIDI and USB also provide powerful
options for control, editing, and more.
FX8-EDIT, a free software editor, makes
it possible to edit presets, eects, and
more when connected to a Mac or PC.
And much more! Please take the time to
familiarize yourself with this manual.
Should you need any assistance with the FX8,
please visit http://www.fractalaudio.com
1
1 : INTRODUCTION
AKER CAB
PRE EFFECTS POST EFFECTS
AMPLIFIER
AKER CAB
KEY CONCEPTS
Musicians are not exactly famous for RTFM (“Reading Their Fancy Manuals”) but in the name of instant
gratication, here are a few key concepts so that you “play now, read later” types can jump right in.
PRE/POST: THE OLD WAY...
Look over this diagram of a traditional rig,
showing how some eects are PRE (between
the guitar and the amp) and some eects are
POST (in the amp’s FX loop).
Send Return
POST EFFECTS
PRE EFFECTS
PRE/POST: THE FX8 WAY...
Here’s the same type of setup on the FX8,
which plays the role of both
PRE and POST eects.
Notice that (aside from the
speaker cable) this setup uses
four dierent patch cables?
That’s why we call it . . .
“The Four Cable Method.”
Creative right? Whatever you
call it, we think this is the best
and most exible way to set up
the FX8.
FX8
Preamp
Secon
Send Return
Power
Secon
SPE
AMPLIFIER
2
Preamp
Secon
Power
Secon
SPE
1 : INTRODUCTION
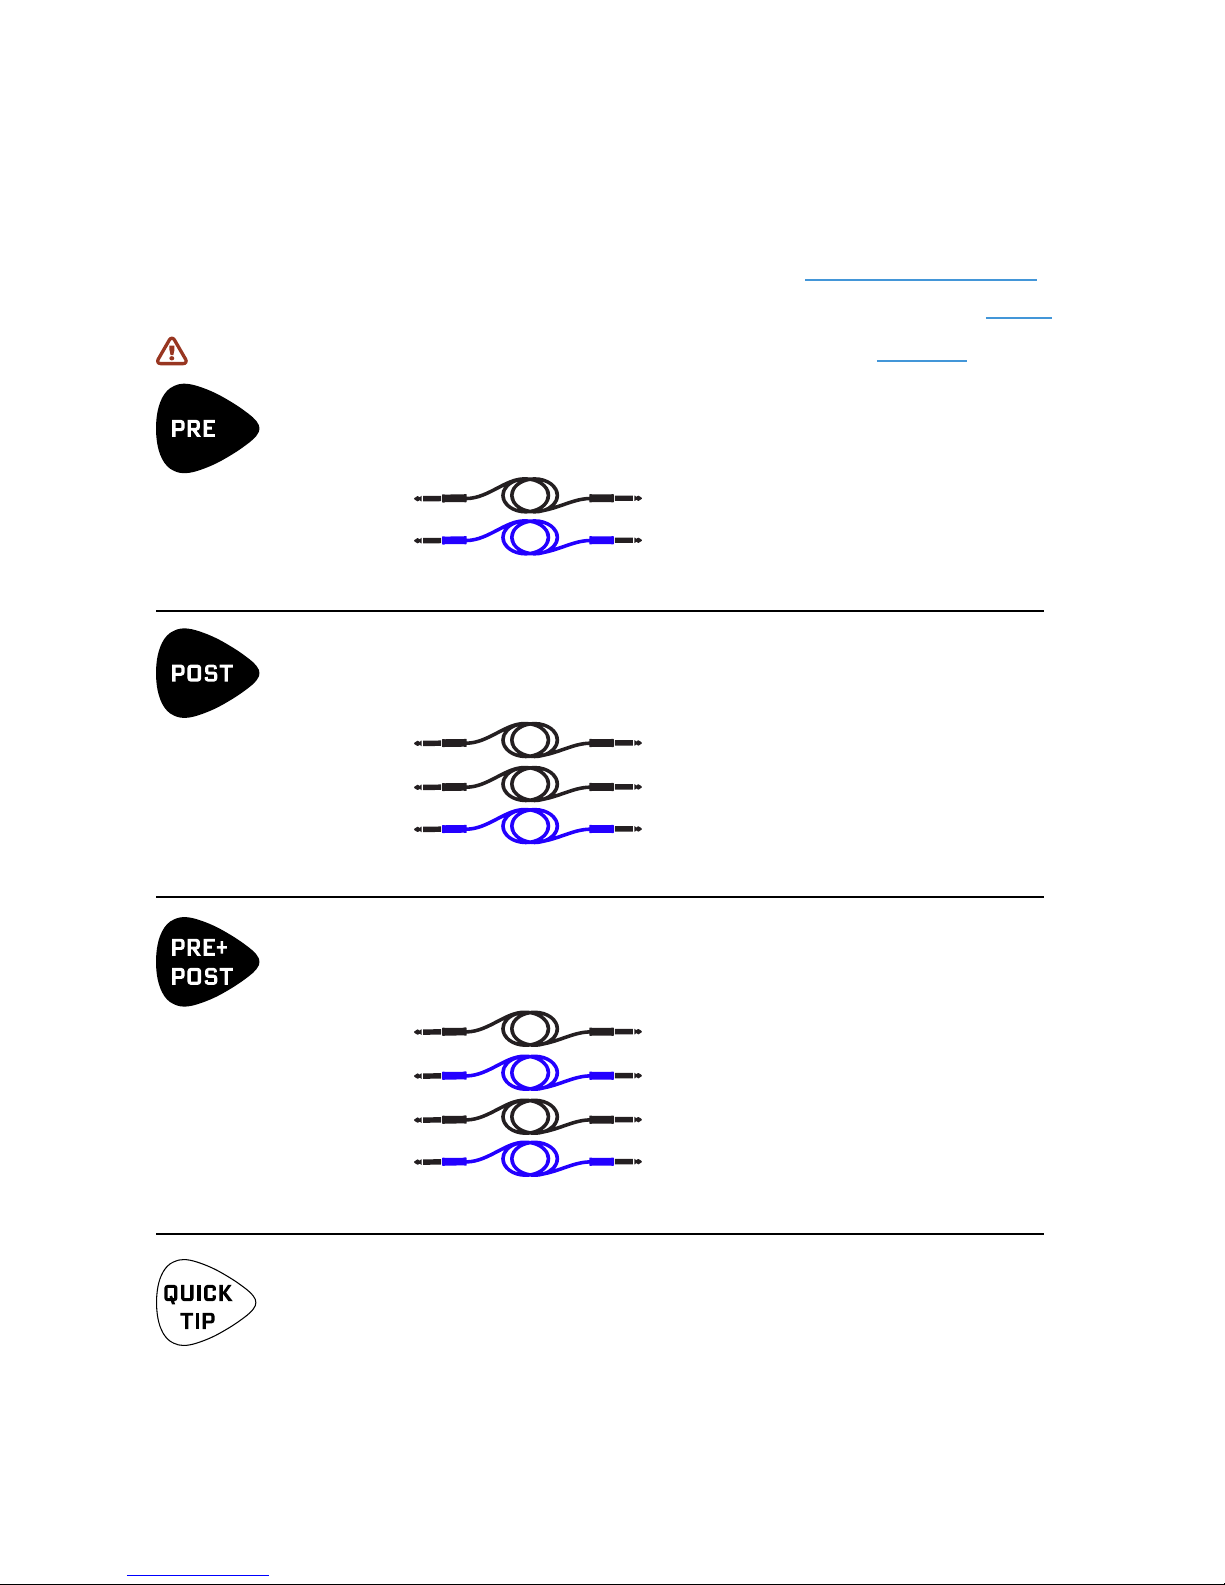
QUICK CONNECT GUIDE
Here is a simple overview of what cables you’ll need to connect your FX8 in three dierent scenarios.
You can nd fully detailed diagrams and descriptions for this subject in Section 3 : Setup Guide.
Humbuster™ cables should ideally be used between FX8 OUTPUTS and your amplier (see page 4)
Important: Do NOT connect anything to the FX8 relays until you read Section 4.
TO USE THE FX8 LIKE TRADITIONAL PEDALS BETWEEN GUITAR AND AMP…
Connect as follows:
Guitar Output Jack
FX8 OUT [PRE] LEFT (Humbuster™) -> Front input of your amp/modeler
Presets A1 through B8 with eight PRE eects are perfect for this type of setup.
TO USE THE FX8 IN YOUR AMP’S SEND/RETURN LOOP…
Connect as follows:
Guitar Output Jack
Amp’s FX Loop SEND
FX8 OUT [POST] LEFT (Humbuster™) -> Amp’s FX Loop RETURN
Presets C1 through D8 with eight POST eects are perfect for this type of setup.
TO USE BOTH PRE AND POST IN ONE RIG…
This is also known as the FOUR CABLE METHOD or “4CM.” Connect as follows:
Guitar Output Jack
FX8 OUT [PRE] LEFT (Humbuster™) -> Front input of your amp/modeler
FX8 IN [PRE] LEFT
Amp’s main Guitar Input
FX8 IN [POST] LEFT
FX8 IN [PRE] LEFT
Amp’s FX Loop SEND FX8 IN [POST] LEFT
FX8 OUT [POST] LEFT (Humbuster™) -> Amp’s FX Loop RETURN.
Presets E1 through G8 with eight POST eects are perfect for this type of setup.
TO INSERT, CHANGE, or EDIT AN EFFECT, and STORE the preset…
Press the desired FOOTSWITCH or turn NAV to select the desired slot (1–8)
Turn VALUE until the desired eect is shown.
Press ENTER to insert the eect. Press EDIT to access its parameters.
To save any and all changes, press STORE, ENTER, ENTER.
3
1 : INTRODUCTION
STOMPBOX MODE
Throughout this manual, we will refer to the main operating
mode of the FX8 as “Stompbox Mode,” so called because
you typically use this mode to turn eects on or o with the
footswitches during a performance.
The FX8 powers up into Stompbox Mode, and returns to it
when you press EXIT. Other modes allow you to edit eects,
tune your guitar, or set up system parameters.
A NOTE ON MONO & STEREO
If you are NOT planning on connecting the FX8 in stereo, there are a few things you should know. The FX8
comes pre-congured for stereo rigs but you can connect it to any mono rig with no issues.
If you are NOT running in stereo, you may nd that certain settings produce slightly unexpected
sounds. For example, panners become tremolos when one channel is missing. Stereo enhancers or
certain types of modulation may not be apparent at all. Later you’ll learn to dial in mono or stereo
eects as desired. For now, just keep in mind the possibility that if something doesn’t sound as
expected, you may be playing a stereo eect into a mono rig.
You might be tempted to poke around on the SETUP: I/O: AUDIO menu and start changing things.
We would suggest you read up on these parameters rst (The I/O Menu, p. 64).
Meanwhile, please don’t be surprised or think that something is wrong if your stereo ping-pong
delay sounds more like a ping (with no pong) delay when connected to a mono rig!
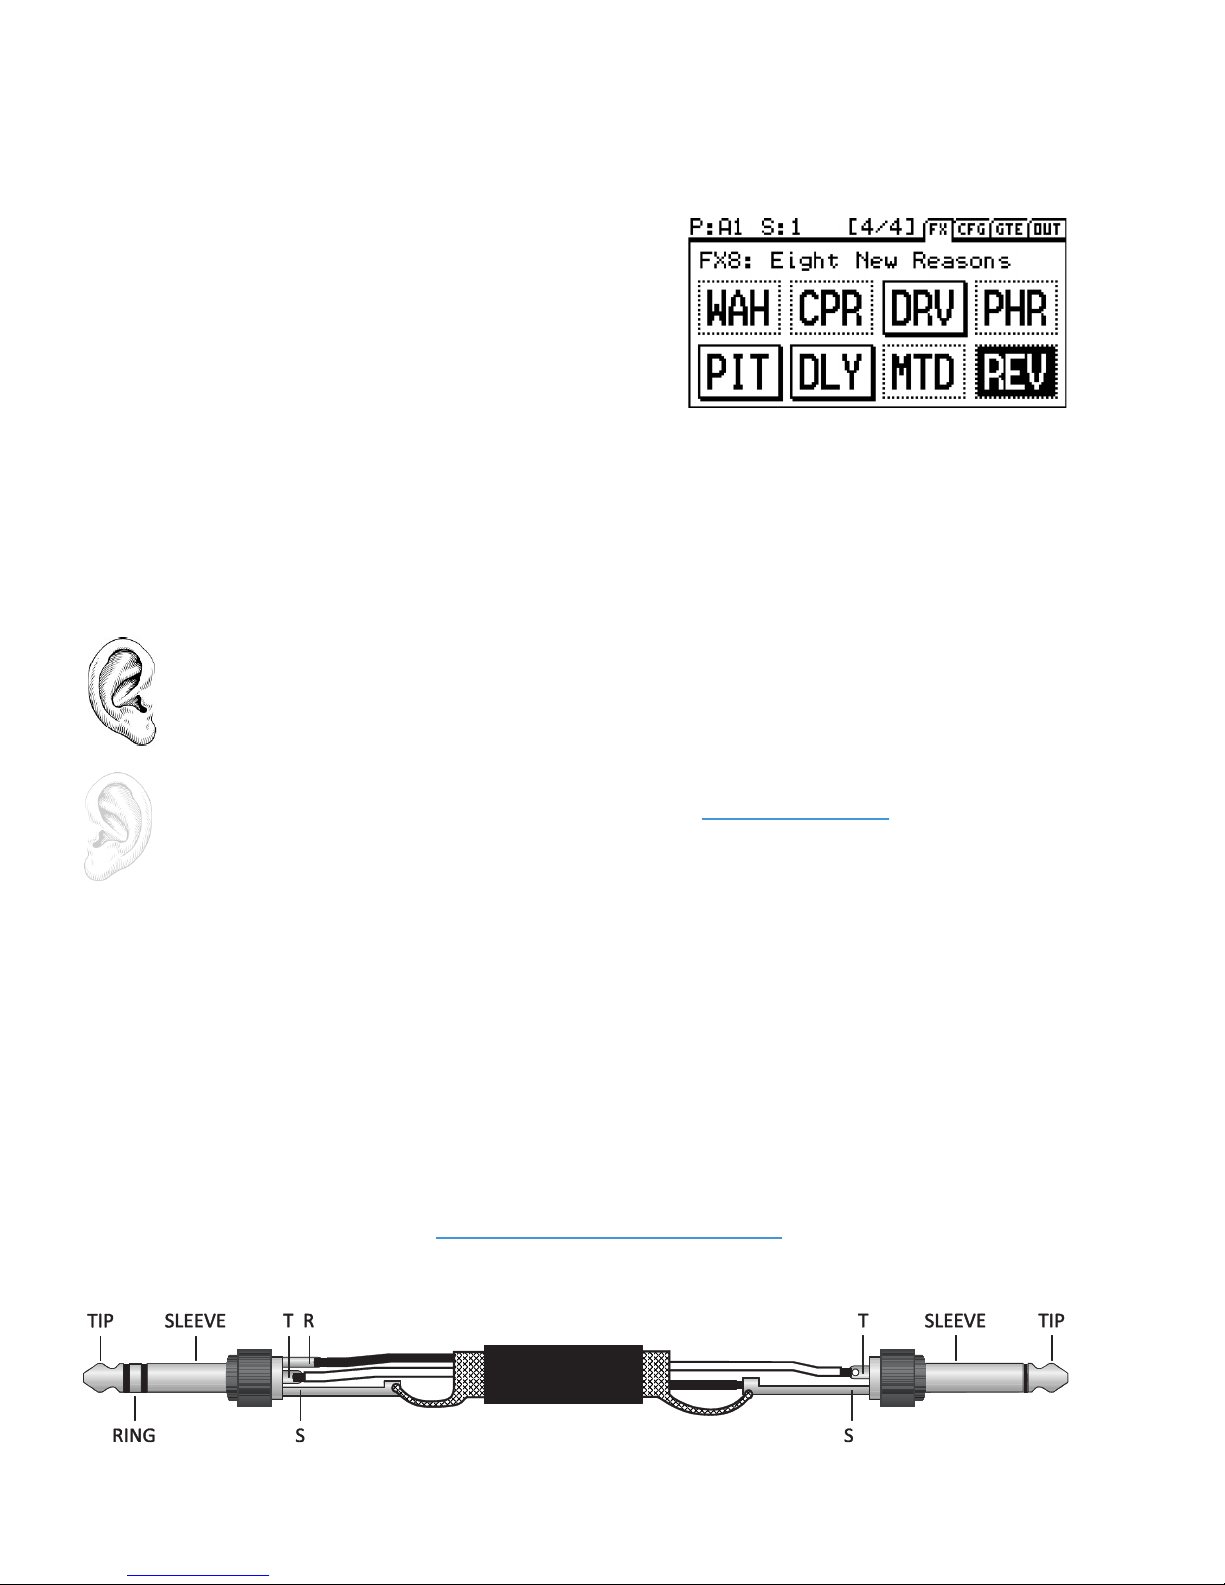
HUMBUSTER CABLES
Standard 1/4” guitar cables are ne for all audio connections to and from the FX8, but there is a better
option for connecting its outputs to your amp, modeler or other device. Humbuster™ technology on all
FX8 outputs can signicantly reduce unwanted noise due to the common problem of a ground loop. For
this to work, you need to use a special Humbuster™ cable you can buy or make yourself.
A Humbuster™ cable has one TRS end (like a balanced cable) and one TS end (like a guitar cable). The TRS
end connects to the FX8. The TS end connects to your amp.
Humbuster™ cables are available from http:/www.fractalaudio.com/cables or you can make your own by
following the diagram below. Be sure to use high-quality connectors and shielded cable.
4

2 : HARDWARE OVERVIEW
2 : HARDWARE OVERVIEW
Understanding the FX8 hardware will help you use it to full eect (pun intended). Here’s a guide.
THE TOP PANEL
The FX8 is housed in a powder-coated steel chassis with an aircraft aluminum bezel and end-caps.
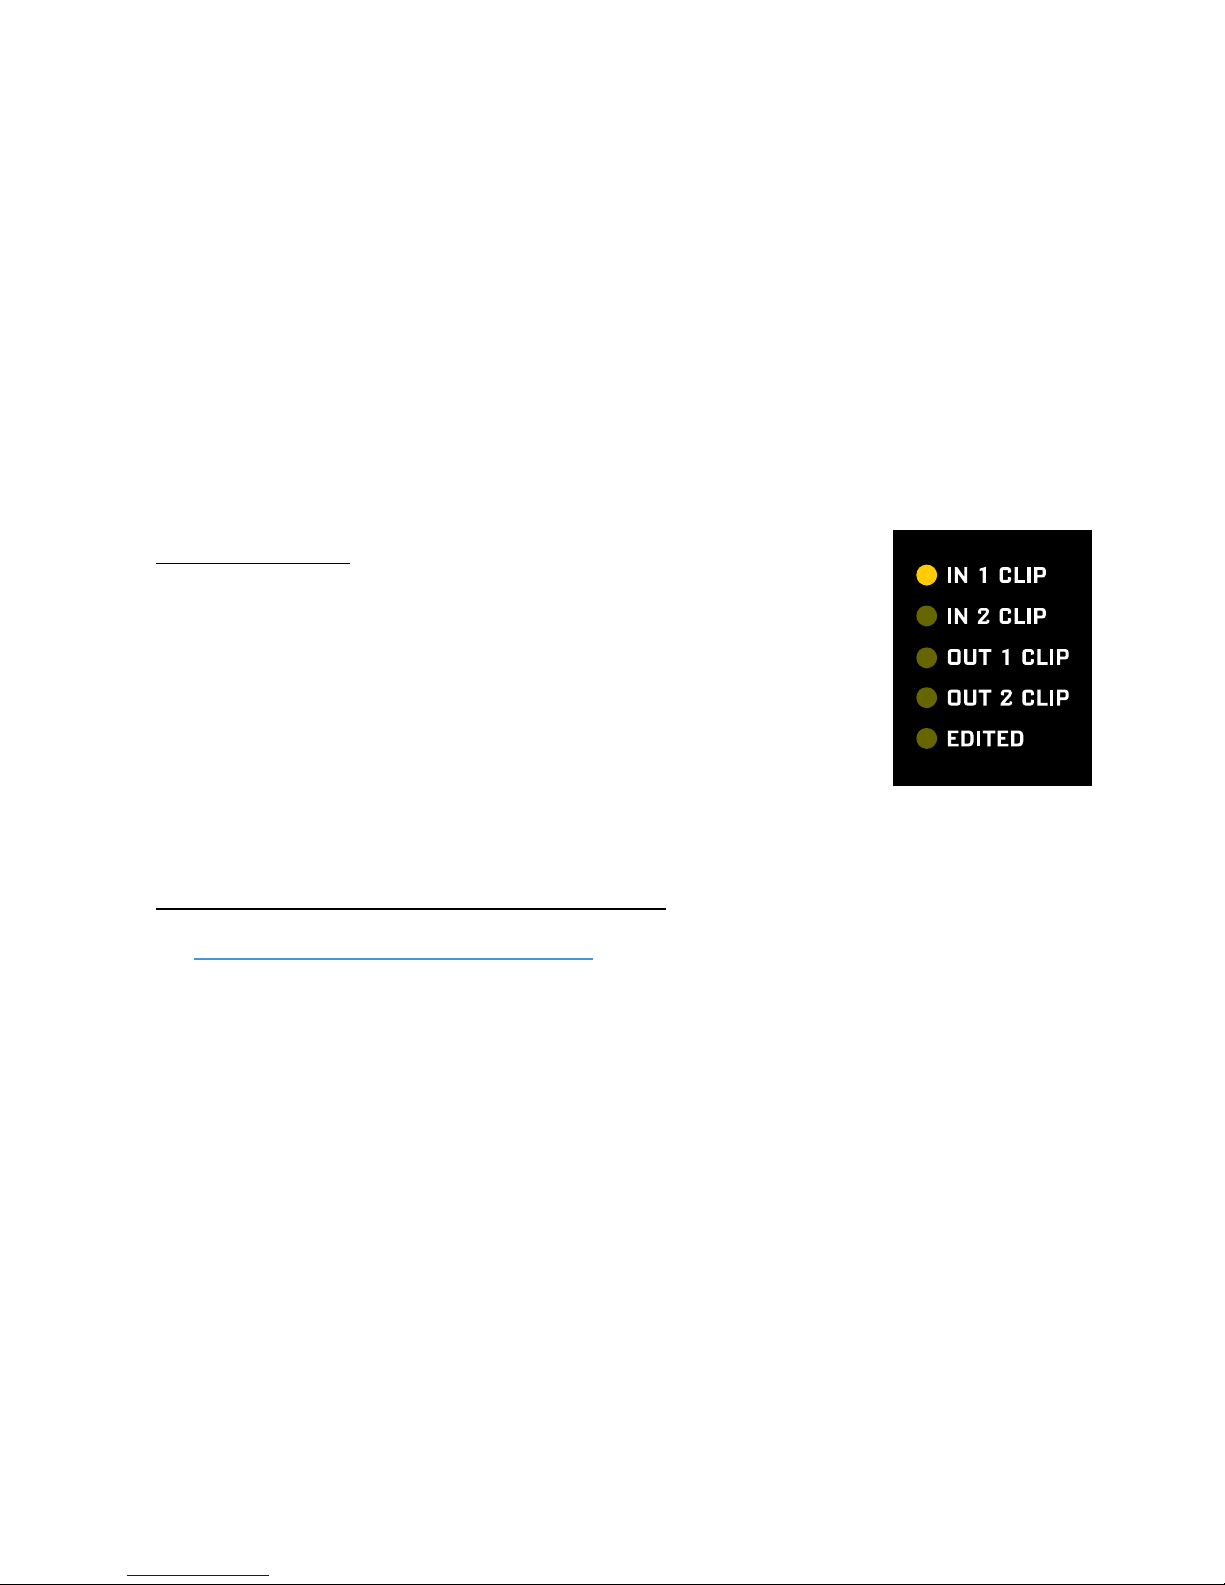
STATUS LEDs communicate important information:
IN 1 CLIP – This LED is lit when the signal at In [Pre] approaches clipping.
IN 2 CLIP – This LED is lit when the signal at In [Post] approaches clipping.
OUT 1 CLIP – This LED is lit when the signal sent to Out [Pre] approaches clipping.
OUT 2 CLIP – This LED is lit when the signal sent to Output [Post] approaches clipping.
EDITED – This LED is lit when any unsaved change has been made to the current preset.
The 160 × 80 pixel LCD is where all menu screens are displayed.
5

2 : HARDWARE OVERVIEW
Six Buttons provide access to various functions and menus:
SETUP – Provides access to the four SETUP menus (which you then select using footswitches).
ENTER – Executes commands, commits changes, accesses sub-menus, and more.
PAGE – Steps through menu pages, shown as “tabs.” TIP: Double-click to go back one page!
EXIT – Works as cancel, escape, and more.
EDIT – Opens the EDIT MENU for the currently selected eect.
STORE – Used to store the current preset to memory so it can be recalled in the future.
Five KNOBS (aka “Rotary Encoders” for you pocket-protector types) oer dierent functions depending
on which screen is shown in the display. Most screens show ve (or fewer) knobs for easy 1:1 operation.
NAV – In Stompbox Mode, this navigates between the eight eect slots.
In “knob” screens, it changes the value of the rst on-screen knob.
In “menu” screens, it scrolls up and down through the menu.
VALUE – In Stompbox Mode, this steps through the eects list for the current slot.
In “knob” screens, it changes the value of the second on-screen knob.
In “menu” screens, it changes the highlighted parameter.
A/PRESET – In Stompbox mode, this steps through PRESETS/BANKS (see Section 5).
In “knob” screens, it changes the value of the third on-screen knob.
In “menu” screens, it changes the parameter labeled ‘A’.
B/SCENE – In Stompbox mode, this selects a SCENE (see Section 7) within the current preset.
In “knob” screens, it changes the value of the fourth on-screen knob (if any).
In “menu” screens, it changes the parameter labeled ‘B’.
C - In “knob” screens, it changes the value of the fth on-screen knob (if any).
In “menu” screens, it changes the parameter labeled ‘C’.
The HANDLE also serves as a GUARD to protect the knobs of the FX8 from being kicked and broken.
6
2 : HARDWARE OVERVIEW
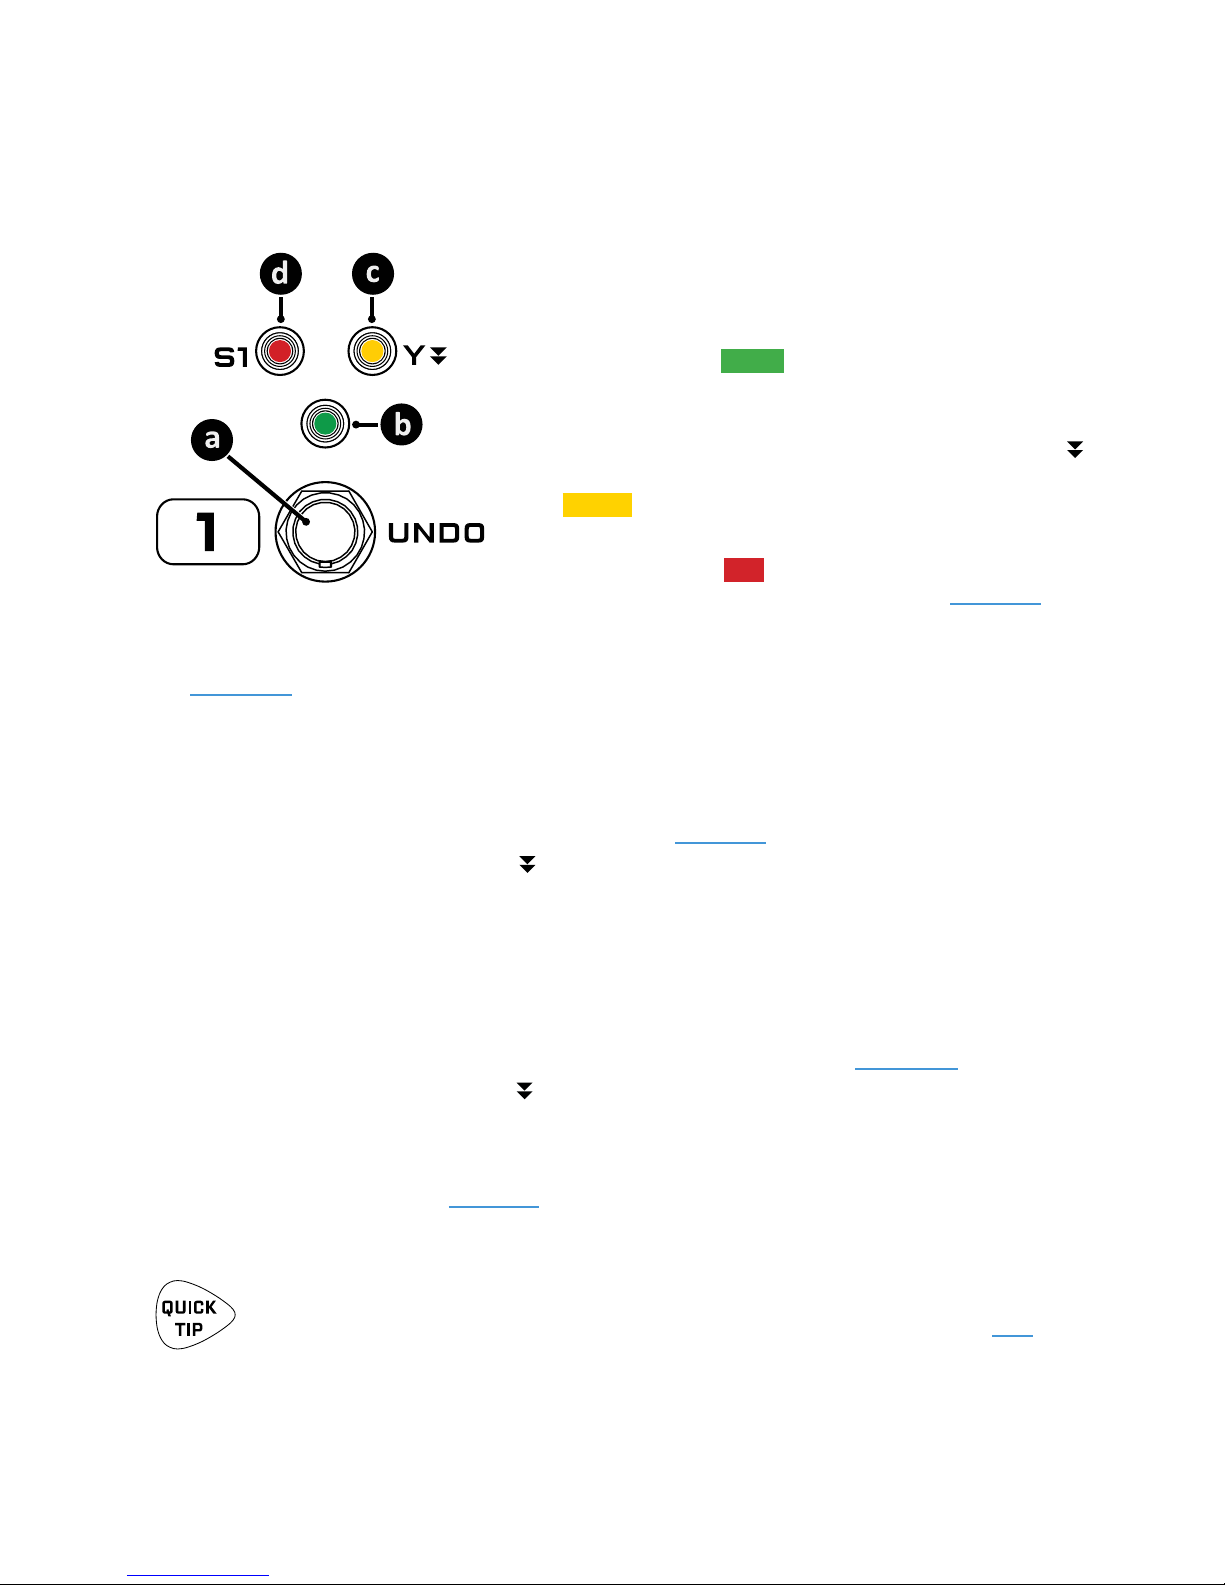
There are eight main FOOTSWITCHES corresponding to the eights eect slots. Each has three LEDs.
a. FOOTSWITCH – Step on it! Footswitches are used to toggle
eects, select scenes, etc. The FX8 utilizes our proprietary Solid
State Switches (SSS™) with no mechanical contacts to break or fail.
Switching is fast and quiet.
b. BYPASS LED – The green LED above the footswitch shows
whether the corresponding eect is ON or OFF.
c. Y LED – Many eects on the FX8 oer X/Y switching for two
dierent sound settings from a single block. Press and hold
footswitch to toggle the X/Y state of the corresponding eect.
The amber LED indicates that an eect has been switched to its Y
setting. See
d. SCENE LED – Eight red LEDs labeled S1, S2, etc. indicate which
Scene is loaded within the current preset. (See Section 7 for
more on Scenes.)
Note that many footswitches also have special functions indicated for Looper Mode (REC, PLAY, UNDO, etc).
See Section 12 for more on using the Looper.
the
The SCENE/PRESET/BANK footswitch has two dierent functions:
SCENE – Tap this footswitch once to enter Scene Select Mode. (The red LED will remain lit.) The next
press of footswitch 1–8 will select a Scene within the current preset. For example, to select Scene 4,
press SCENE and then #4. For more on Scenes, see Section 7.
PRESET/BANK – Press and hold
ashing BANK UP or BANK DN footswitches to change Banks, and use footswitches 1–8 to select a
Preset within the bank shown (or tap PRESET/BANK again to cancel and return to Stompbox Mode.
The LOOPER/TRUE BYPASS/BANK UP footswitch has three functions:
LOOPER – Tap this footswitch once to enter Looper Mode. (The LED will remain lit.) In Looper Mode,
the main footswitches operate the Looper functions shown to the right of each footswitch. To exit
Looper Mode press this footswitch again. For more on the Looper, see Section 12.
TRUE BYPASS – Press and hold
will ash in the main display. During True Bypass, signals at IN [PRE] and IN [POST] are shunted via
high quality analog relays to OUT [PRE] and OUT [POST] (respectively). With True Bypass engaged,
there is no digital conversion of any kind. Tap the footswitch again to disengage True Bypass. For
more on True Bypass, see Section 8.
BANK UP – When the FX8 is in Preset/Bank Select mode (see #8 above) this footswitch steps UP
through the lettered banks.
You can reverse these functions so True Bypass activates immediately on a tap and the Looper requires
Press & Hold. Find LOOPER MODE/TRUE BYPASS in the GLOBAL menu under setup (see p. 63).
this footswitch to enter Preset/Bank Select Mode. Press the
the TRUE BYPASS footswitch to engage True Bypass. A message
7

2 : HARDWARE OVERVIEW
TO USE STICKY PRESET/BANK SELECT MODE…
The FX8 returns to Stompbox Mode immediately after you select a Preset. If you want the unit to remain
indenitely in Preset/Bank Select Mode so you can change from Preset to Preset with single foot taps,
please enable “STICKY PRESET/BANK SELECT MODE” in the GLOBAL menu under SETUP:
1. Press the SETUP button.
2. Press footswitch 1 to select the GLOBAL menu.
3. Page to SETTINGS.
4. Use NAV and VALUE to set STICKY PRESET BANK SELECT to “ON”.
5. Press EXIT 2x.
Now whenever you press and hold the PRESET/BANK footswitch, the FX8 will remain in preset bank
select mode until you tap that same footswitch again. The LED for the currently selected preset will ash
with the PRESET/BANK LED to remind you that you are in STICKY mode.
In case you’re curious, there’s also a STICKY SCENE SELECT MODE (see page 38).
The TEMPO/TUNER/BANK DOWN footswitch has three functions:
TEMPO – Tap this footswitch to set the global tempo. The LED ashes to show the tempo.
For more on Tempo, see Section 11 on p. 55.
TUNER – Press and hold
Press the TUNER footswitch again to exit. For more on using the tuner, see Section 13 on p. 61.
BANK DOWN – When the FX8 is in Preset/Bank Select mode (see #8 on p. 7) this footswitch steps
DOWN through the lettered banks.
the TEMPO footswitch to enter Tuner Mode. The LED will remain lit.
8
2 : HARDWARE OVERVIEW
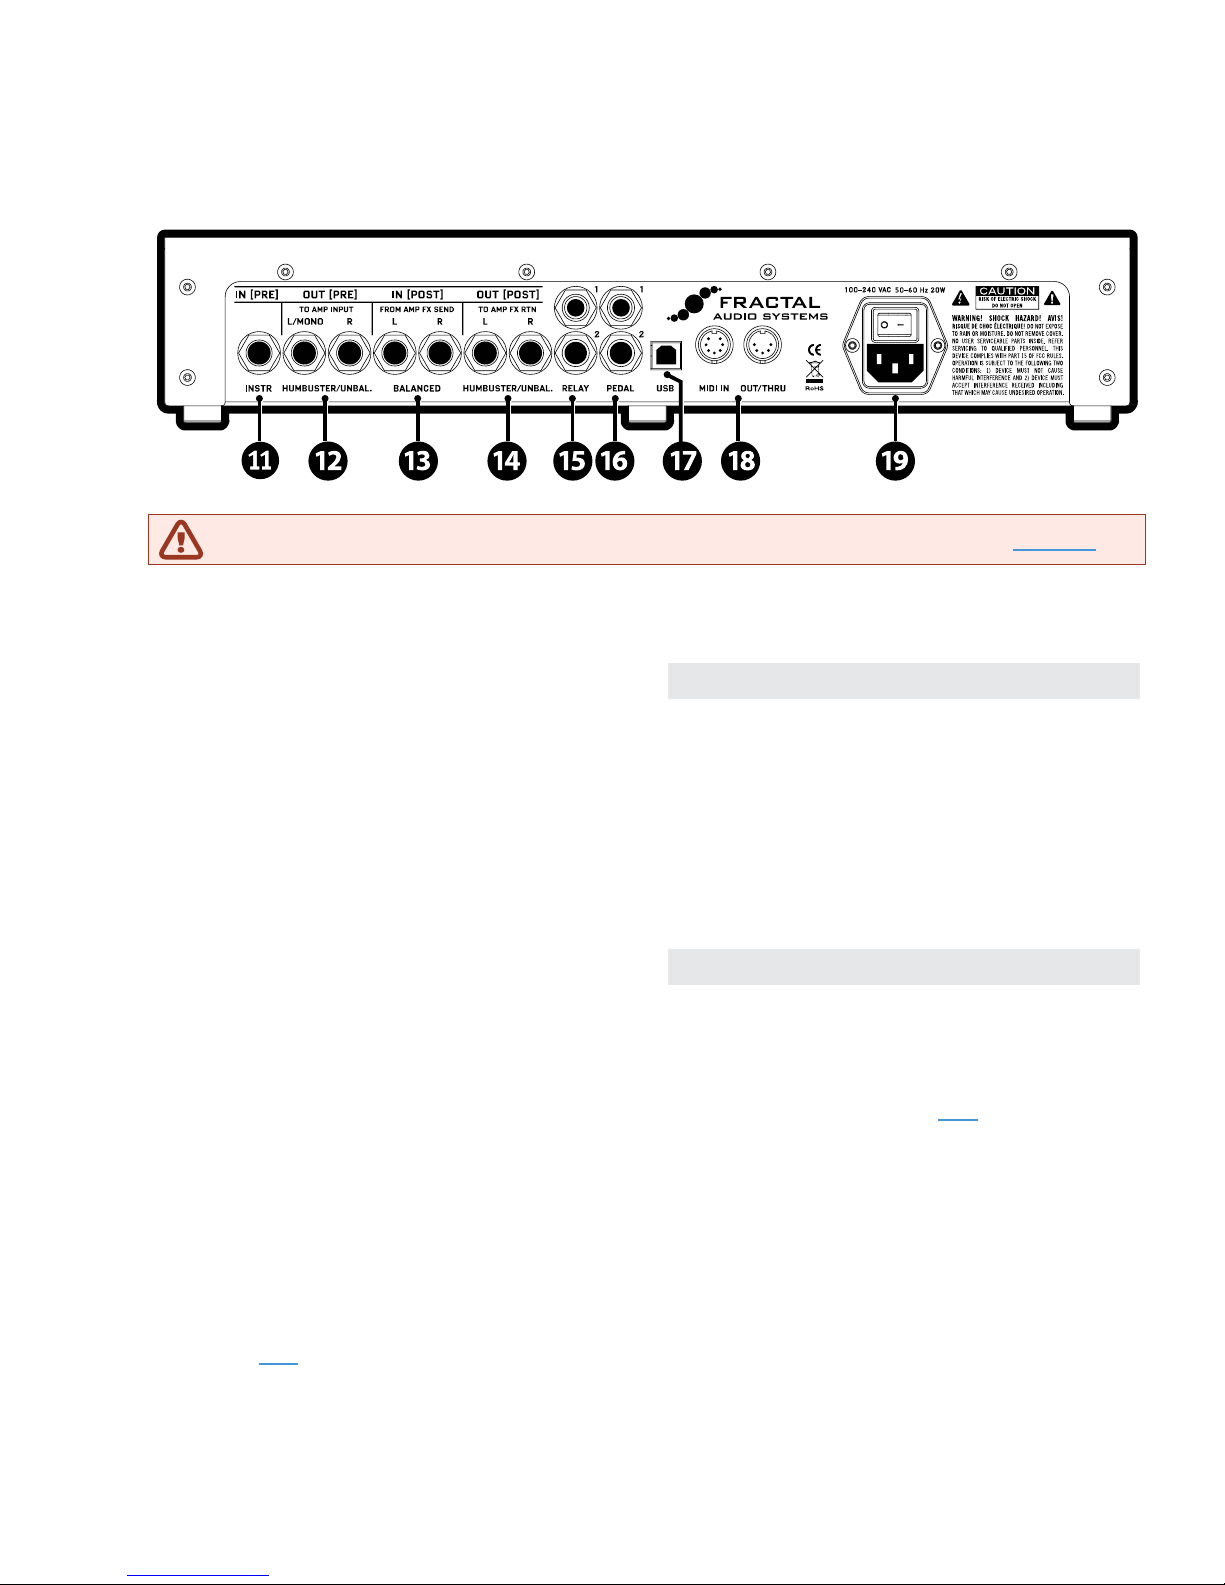
THE REAR PANEL
WARNING! Do NOT connect anything to the RELAY jacks until you read the WARNINGS in Section 4.
IN [PRE] (INSTRUMENT IN)
(Unbalanced 1/4” Jack)
Connect your guitar (or any instrument level
source) using a regular guitar cable here. You
can also connect the output of other guitar
pedals or anything else that’s designed to be
used in front of an amp. This jack feeds signal
only to eects designated as “PRE”.
OUT [PRE] L/R
(1/4” Tip-Ring-Sleeve Humbuster™ Jacks)
The output of eects designated as “PRE”
appears at these jacks. You’ll typically connect
to the MAIN (GUITAR) INPUT of an amp,
preamp, or modeler using Humbuster™ cables.
A NOTE ABOUT [PRE] AND [POST] I/O
The various input and output jacks of the FX8
are labeled [PRE] and [POST] because the FX8
has two fully independent eect chains. You
place “PRE” eects between the guitar and amp
like traditional stompboxes, and “POST” eects
in the amp’s FX loop. You can use either or both
of these paths, and the next section covers how
to create the setup that works best for you.
Humbuster™ Technology on all OUT [PRE] and OUT [POST] jacks can signicantly reduce ground
hum, common in guitar rigs. It requires a special cable you can make or buy. (See p. p. 4 for details).
IN [POST] L/R – (Balanced 1/4” Tip-Ring-Sleeve Jacks)
Connect the FX LOOP SEND of your amplier (or the output of your separate preamp) here to feed
signal to any eects designated as “POST”.
OUT [POST] L/R (1/4” Tip-Ring-Sleeve Humbuster™ Jacks)
The signal from eects designated as “POST” appears at these jacks. You’ll typically connect to the
EFFECTS LOOP RETURN of an amp (or the input(s) of a separate power amp) using Humbuster™ cables
(See p. p. 4 for details).
9

2 : HARDWARE OVERVIEW
RELAY 1, RELAY 2 (1/4” Tip-Ring-Sleeve Jacks)
Two fully-independent TRS relays allow the FX8 to switch the channels or other functions of a
connected amplier or other device. The state of each relay can be changed manually (via a footswitch)
or by a pre-programmed setting in a SCENE. See p Section 4 : The Relays for more.
PEDAL 1, PEDAL 2 (1/4” Tip-Ring-Sleeve Jacks)
These jacks are used to connect up to two external expression pedals or switches to control various
functions of the FX8. Use the PEDAL page in the I/O menu under SETUP to calibrate each connected
pedal. For more on using these jacks, see Connecting Pedals & Switches, p. 16.
USB – This provides the FX8 with two-way “MIDI-over-USB” capabilities.
The MIDI IN port of the FX8 allows you to control various MIDI functions of the FX8 including preset
and scene selection, eect bypass, X/Y changes, parameter changes, and more.
The MIDI page of the I/O menu under SETUP is used to congure MIDI Channel and other options (see
I/O: MIDI Page, p. 66.)
The MIDI OUT/THRU jack transmits Program Change, Control Change, and other MIDI data to
connected devices (such as an Axe-Fx II or an amplier with MIDI channel switching capabilities).
MIDI data can be sent manually using the MIDI Block, which is inserted like an eect assigned to a
footswitch (see “The MIDI Block” on page 42) or programmed to be sent automatically when you
select a Scene (see Section 7 : Scenes).
Main Power Input and switch – Insert the supplied power cable and connect the other end to
a grounded AC power receptacle. The FX8 has a universal power supply, which means it can be
connected to power around the globe simply by changing the cable. The main power switch is built in
to the receptacle.
We recommend switching the FX8 o when it will not be in use for an extended period of time.
10
3 : SETUP GUIDE
This section covers the basics of setting up your FX8.
WARNING! Before making connections, switch o ALL power
and reduce volume on your amp to minimum.
WARNING! Take extreme care NEVER to connect the SPEAKER
outputs of any amplier to the FX8 as this will seriously damage
one or both units.
3 : SETUP GUIDE
WARNING! Do NOT connect anything to the RELAY jacks until
you read and heed the WARNINGS in Section 4
11
3 : SETUP GUIDE
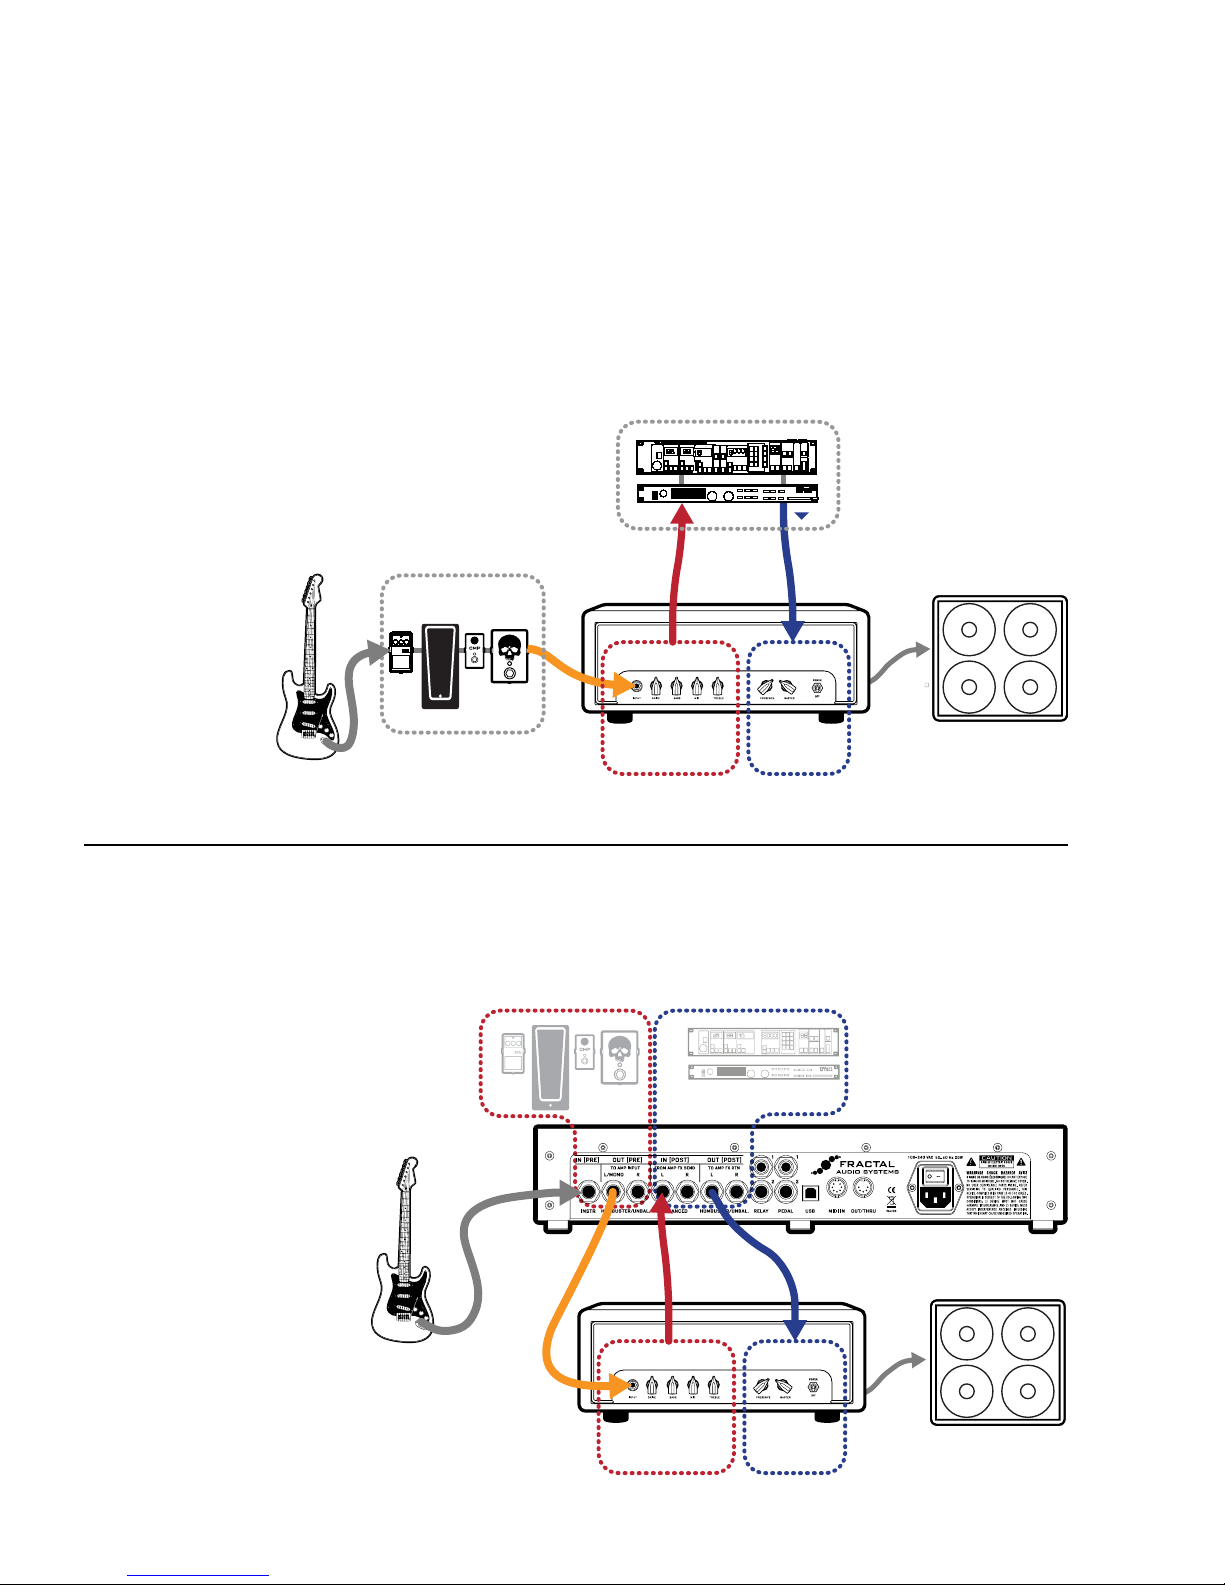
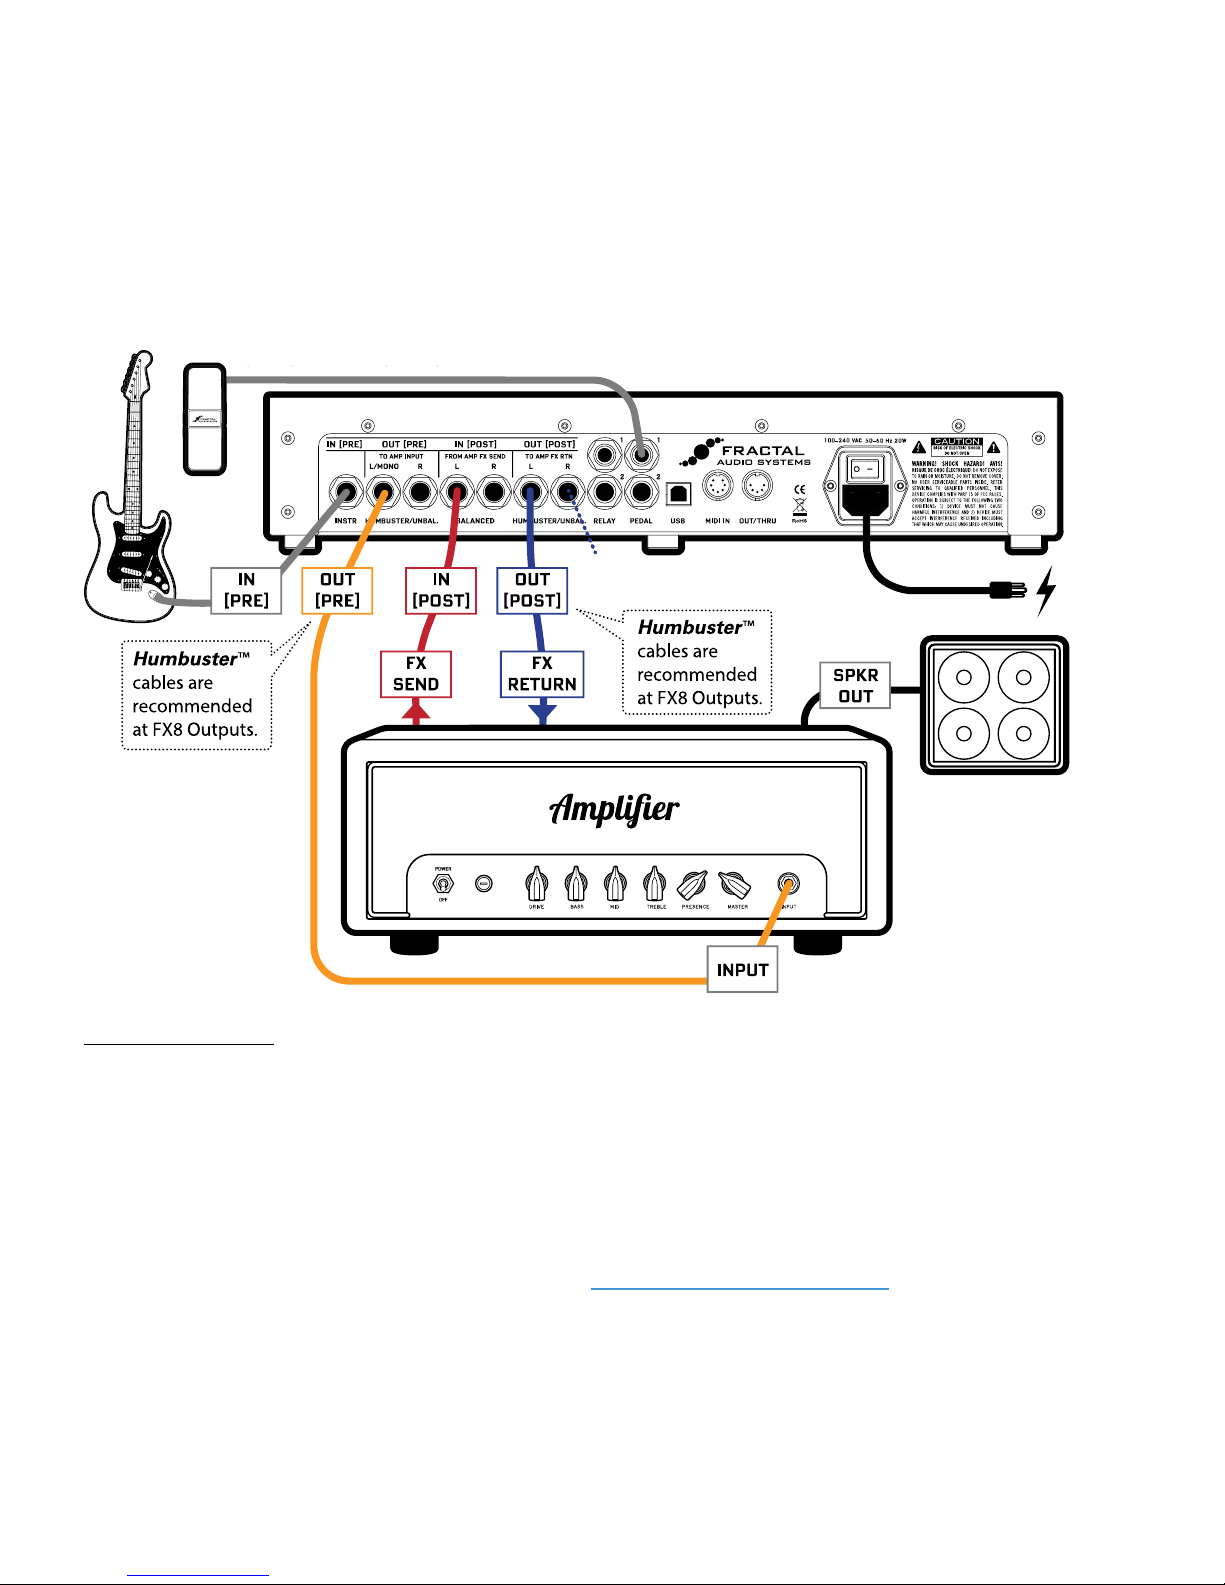
SETUP FOR BOTH PRE AND POST EFFECTS
This is the most exible FX8 setup, taking full advantage of the unit’s capability for separate “PRE” and
“POST” eect chains. Connecting in this manner is also known as the “Four Cable Method” or “4CM.” Find
factory presets for this type of setup in Banks C and D (plus other banks as well).
Optionally connect 1–2 optional expression pedals such as Fractal Audio Systems EV-1 .
Connect OUT [POST] R to a
second amp for stereo post (oponal)
SIGNAL FLOW:
The GUITAR is connected to IN [PRE] on the FX8. Signal is processed by eects designated as “PRE” and then
routed to OUT [PRE] LEFT, which is connected to the guitar INPUT of your amplier. Your amp outputs
signal to its rear-panel FX SEND jack. This is connected to IN [POST] LEFT on the FX8. The signal is now
processed by eects designated as “POST” and routed to OUT[POST]LEFT, which is connected to your
amplier’s FX RETURN jack. You could easily connect OUT [POST] RIGHT to the FX RETURN of a second
amp for stereo (or connect OUT [POST] LEFT and RIGHT to the dual inputs of a stereo power amp).The
amplier’s SPEAKER output is connected as usual to its speaker cabinet.
Humbuster™ cables help reduce ground loop hum. See “Humbuster Cables” on page 4 for details.
A head is shown in the above diagram. A combo with an eects loop is equally suitable for this type of setup.
NOTE: For this setup, you’ll probably want to make one global change.
Open the GLOBAL menu (press SETUP followed by Footswitch 1) and nd the SETTINGS page.
NAV to
Press EXIT twice to save and return to Stompbox Mode.
GLOBAL LOOPER LOCATION and then use VALUE to select “OUT POST”.
12
3 : SETUP GUIDE
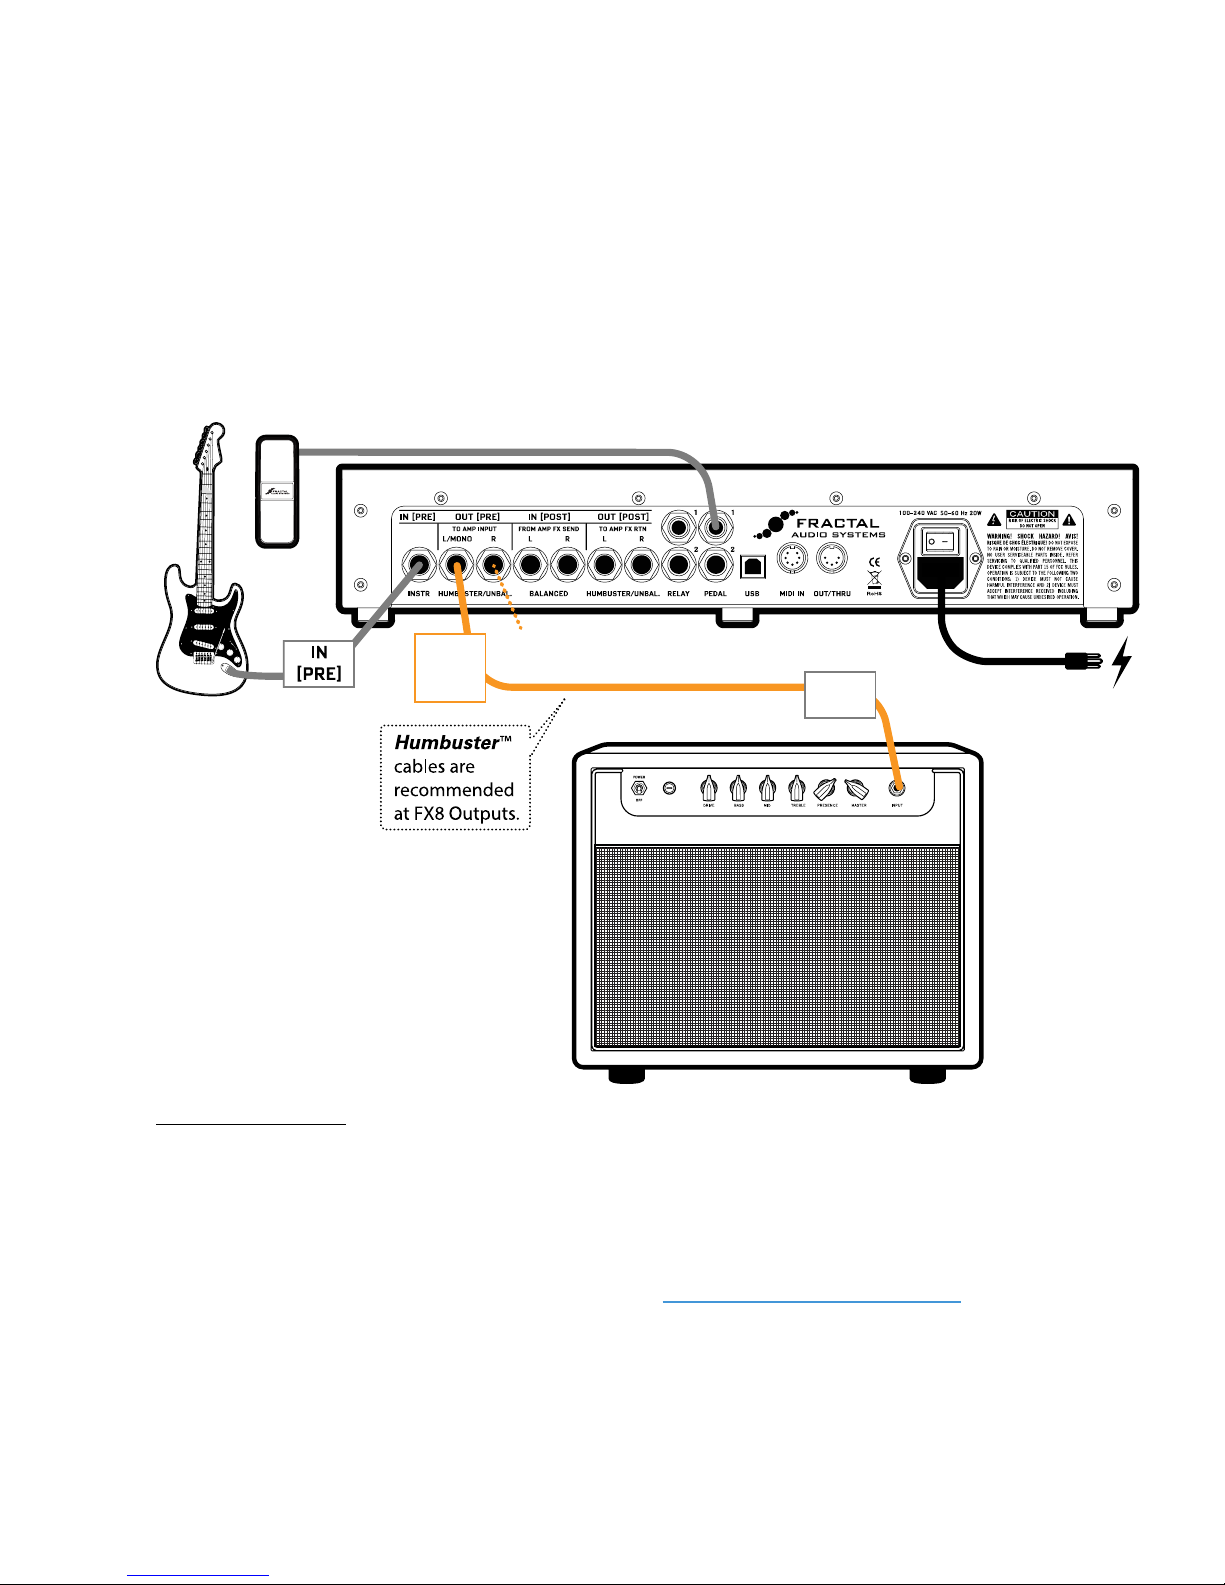
SETUP FOR PRE EFFECTS ONLY
Here the FX8 is used in a simple setup with PRE eects only (between guitar and amp) with presets presumably
congured so all eects are PRE. This is exactly like using traditional guitar pedals—with the exception that
there are no batteries or short cables to fail ;-)
Find factory presets for this type of setup in Banks A and B.
Optionally connect 1–2 optional expression pedals such as Fractal Audio Systems EV-1 .
OUT
[PRE]
L
Connect OUT [PRE] R to a
second amp for stereo (oponal)
INPUT
Comb 50
Comb
SIGNAL FLOW:
Here, signal ows out from the GUITAR to the IN [PRE] of the FX8. It is processed by the eects—all designated
as “PRE”—and then routed to OUT [PRE] LEFT, which is connected via Humbuster™ cable to the guitar
INPUT of your amplier. (You could easily connect OUT [PRE] Right to the input of a second amp for stereo.)
A combo is shown, but a head with a separate speaker cabinet is equally suitable for this setup.
Humbuster™ cables help reduce ground loop hum. See “Humbuster Cables” on page 4 for details.
The FX8 is connected to a grounded AC outlet.
This is also a great way to connect the FX8 to an Axe-Fx. Use the FX8 for PRE eects and the Axe-Fx for amp
and cab sims, and POST eects. Add MIDI cable and the FX8 can even select Axe-Fx presets.
13
3 : SETUP GUIDE
Optionally connect 1–2 optional expression pedals such as Fractal Audio Systems EV-1 .
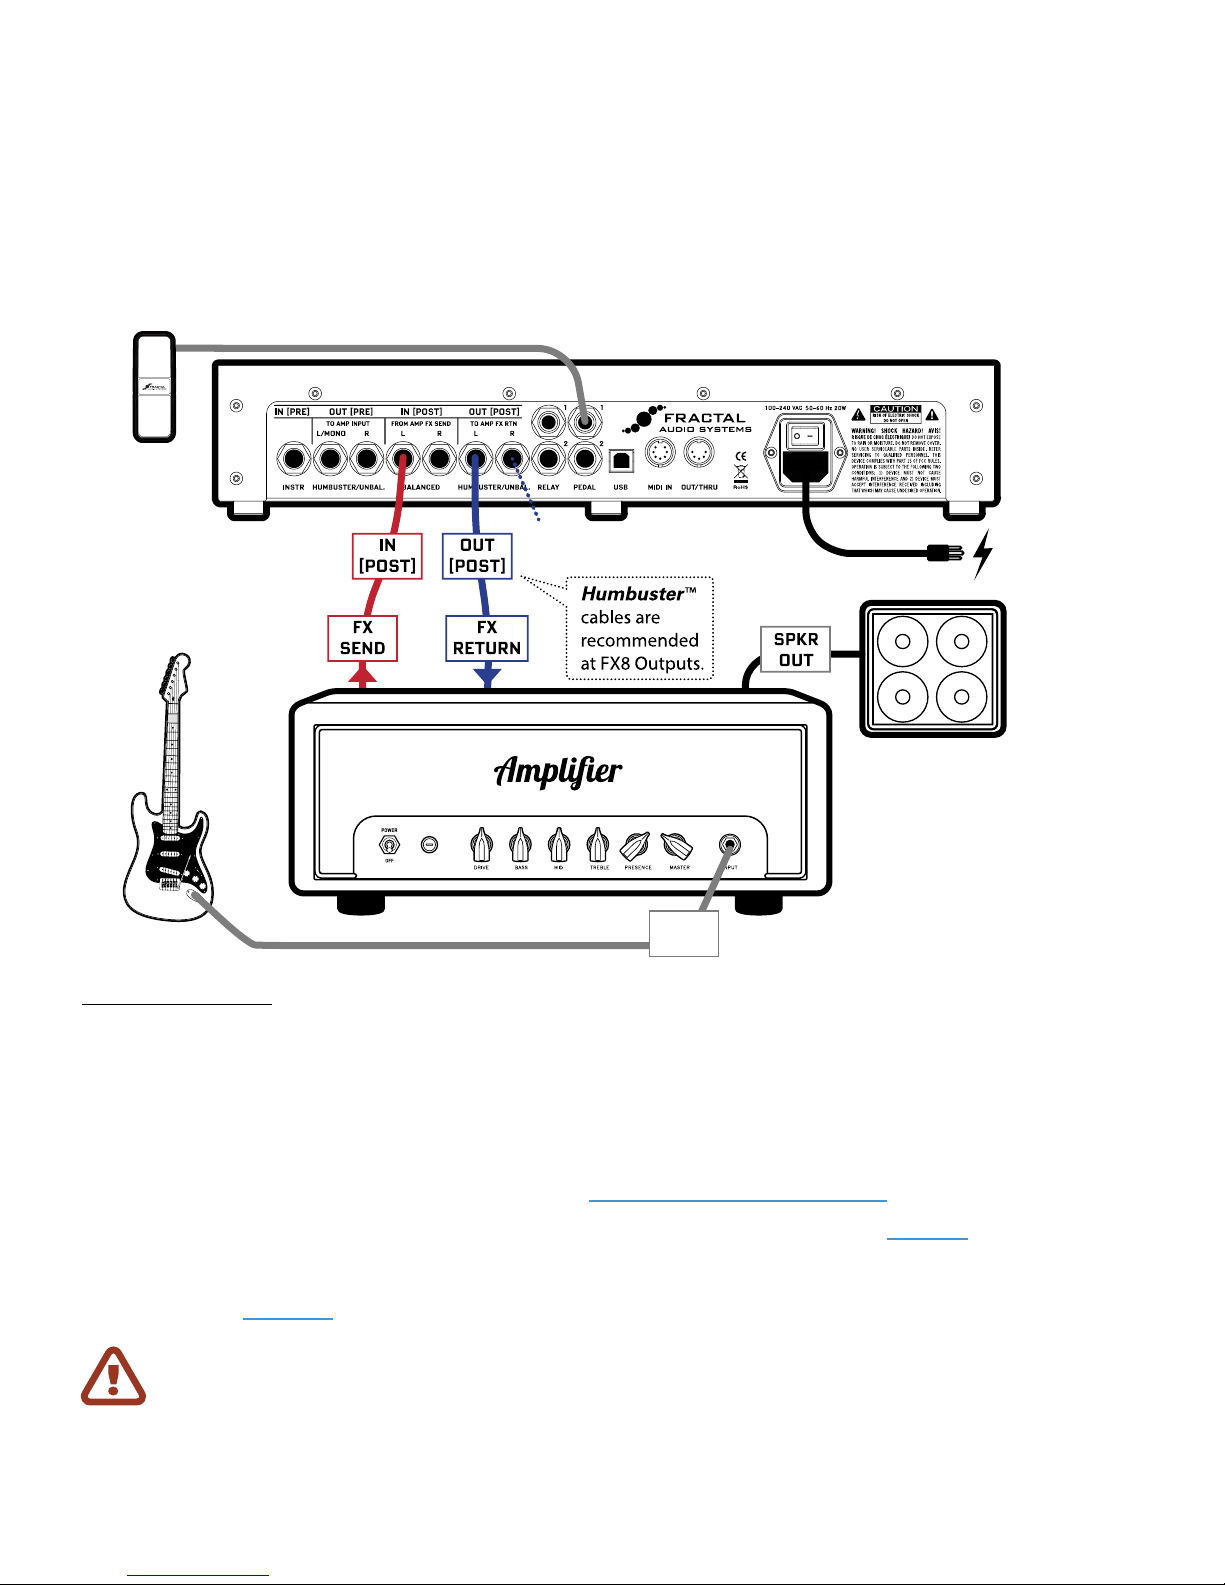
SETUP FOR POST EFFECTS ONLY
Here the FX8 is used in the eects loop of an amp with presets presumably congured so all eects are
POST. Find factory presets for this type of setup in Banks E and F.
Connect OUT [POST] R to a
second amp for stereo (oponal)
Equally well-suited
for bass, acousc, etc.
INPUT
SIGNAL FLOW:
Here, signal ows out from the GUITAR to the Guitar INPUT of your amplier. Your amp’s preamp outputs
to its rear-panel FX SEND jack. This is connected to IN [POST] on the FX8. The signal is processed by the
POST eects of the FX8 and routed to OUT [POST] LEFT which is connected to your amplier’s FX RETURN.
You could easily connect OUT [POST] RIGHT to the FX RETURN of a second amp for stereo (or connect
OUT [POST] LEFT and RIGHT to the dual inputs of a stereo power amp). The amplier’s SPEAKER output
is connected to a speaker cabinet, as it normally would be. (If your amp is a combo, it has a built-in speaker.)
Humbuster™ cables help reduce ground loop hum. See “Humbuster Cables” on page 4 for details.
If you’re interested in this setup, you should also know that the PRE/POST setup on page 12 oers the
ability to use True Bypass on the PRE chain only. This gives you the exibility to have a POST ONLY setup and
still switch in any desired PRE eects such as wah, whammy, or volume as needed. Learn more about True
Bypass in section Section 8.
IMPORTANT: For this setup, you’ll need to make two global changes.
Open the GLOBAL menu (press SETUP followed by Footswitch 1) and nd the SETTINGS page.
First, NAV to
Next, NAV to GLOBAL LOOPER LOCATION and then use VALUE to select “OUT POST”.
Press EXIT twice to return to Stompbox Mode.
GLOBAL DETECTOR and then use VALUE to select “IN 2 [POST]”.
14
CHECKING LEVELS
Setting proper levels through your entire signal path is critical.
Four front panel LEDs alert you when clipping occurs.
The FX8 comes ready-to-use for the typical guitar and amp. Chances are, you won’t
need to adjust levels. The most common issue will probably be a hot guitar clipping
the instrument input (“IN1”) You can check this by performing the following test:
Wire up your rig as desired.
Play your instrument. Choose your loudest pickup and set all the guitar controls to
wide open. Play hard. Big open chords and low “chugs” will help push the levels.
If none of the CLIP LEDs on the FX8 top panel light, you’re all set!
IF IN 1 CLIPS...
This means your incoming guitar signal is too hot.. Adjusting is simple:
Press SETUP, press footswitch 2 for the I/O menu and make sure you are
on the LEVELS page.
3 : SETUP GUIDE
Increase the setting for
dB to 12.0 dB.
Be aware that as you increase this PAD setting you also increase the
noise oor, so set it as low as possible.
If IN1 still clips, you’ll need to adjust levels at your guitar or somewhere else before the FX8.
INPUT 1(PRE) PAD from the default setting of 6.0
IF INPUT 2 OR EITHER OUTPUT CLIPS...
See “Advanced Level Parameters” on page 73, covering the various controls and settings used to
solve clipping problems.
15
3 : SETUP GUIDE
CONNECTING PEDALS & SWITCHES
Each of the two onboard PEDAL jacks of the FX8 allows you to connect one expression pedal or one
external footswitch. You can use a connected pedal or switch to change eect parameters or to operate any
of a long list of global functions and many factory presets are ready for one or even two pedals.
Learn to assign pedals and switches to sound parameters in Section 10 : Modiers
Learn to assign pedals and switches to global functions in Section 14 : Setup Menus
The Fractal Audio Systems EV-1 Expression/Volume Pedal (sold separately) is ideal for the FX8.
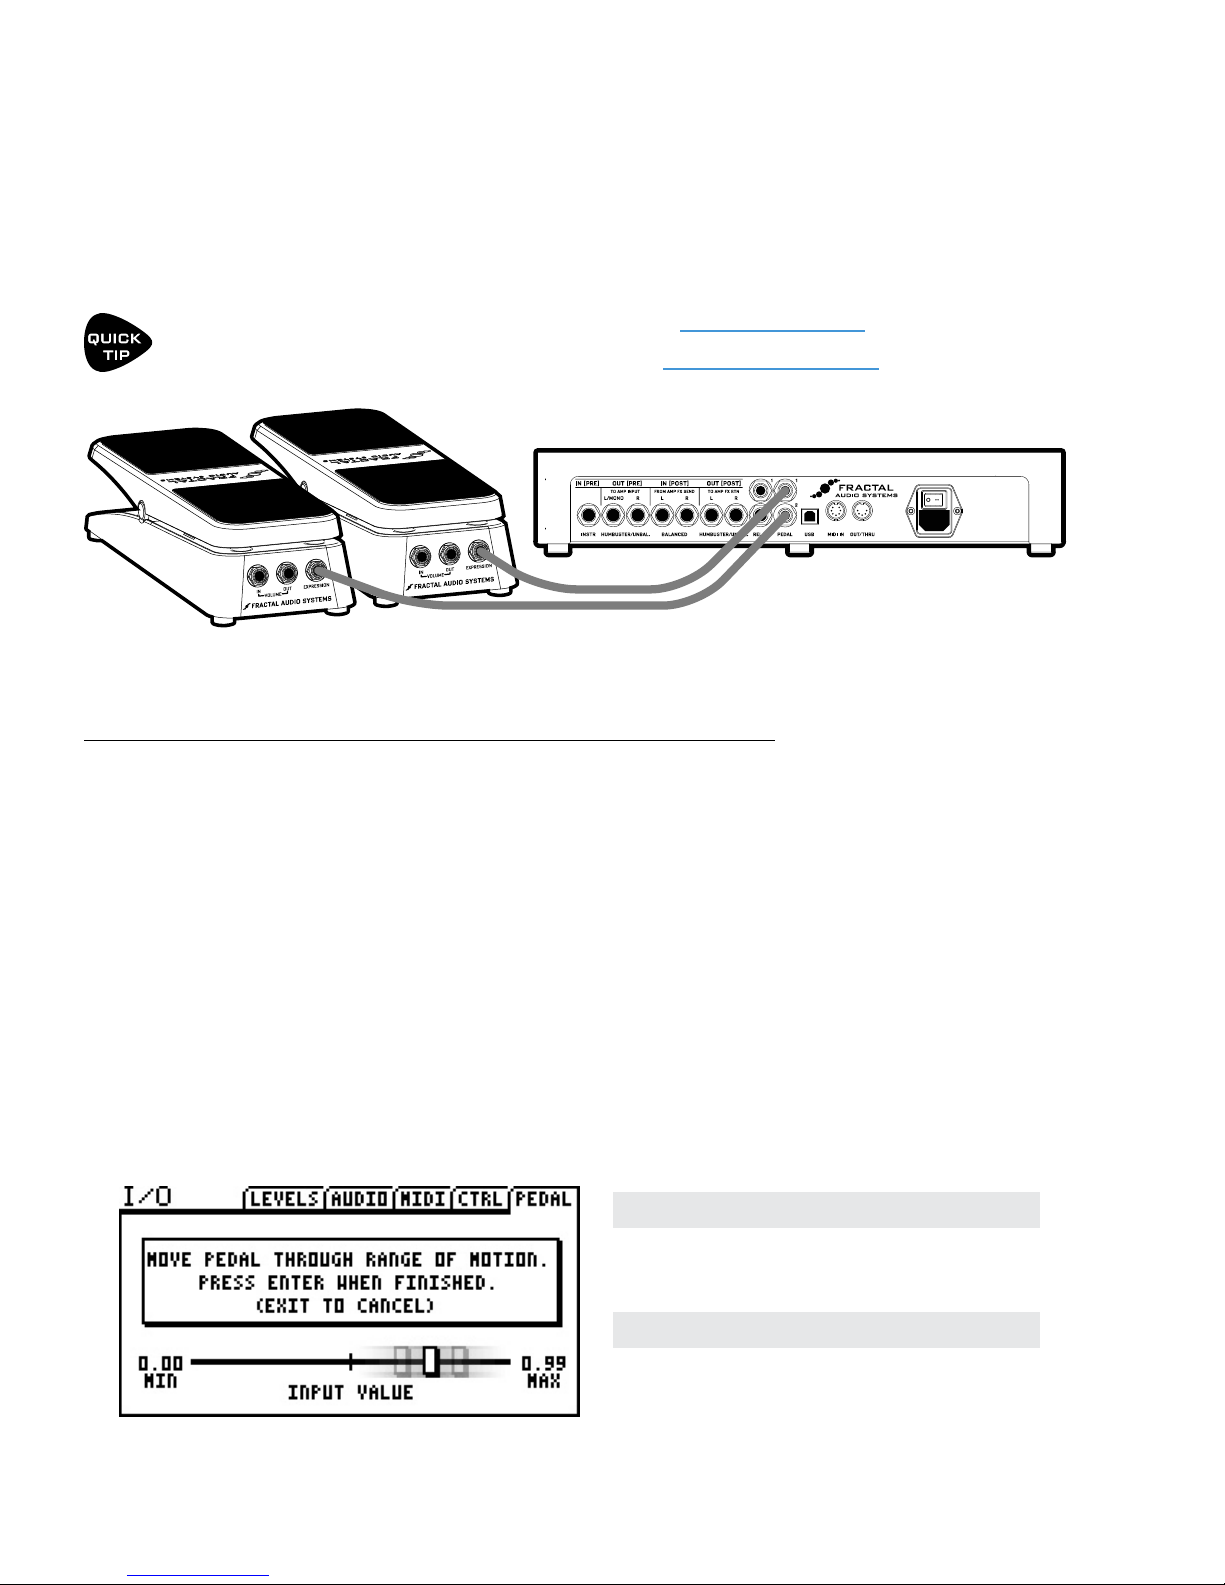
TO CONNECT & CALIBRATE AN EXPRESSION PEDAL...
Your expression pedal(s) should have a linear resistance taper, a max resistance of 10kΩ to 100kΩ, and must
be used with Tip-Ring-Sleeve (TRS) cables. (If you are not familiar with TRS cables, see the FAQ on the next
page.)
Calibration is required for the FX8 to recognize the full range of your particular expression pedal.
Connect your expression pedal to the PEDAL 1 or PEDAL 2 jack with a TRS cable, then follow these
instructions to calibrate:
Press the SETUP button, followed by the #2 footswitch to select the I/O menu.
Press the PAGE button until you reach the PEDAL page.
Ensure that the pedal TYPE is set to “CONTINUOUS”.
Navigate to the PEDAL # CAL function and press the ENTER button.
Follow the on-screen instructions to perform calibration.
During calibration, you should see the
“slider” move on-screen as you move the
pedal. It does not need to reach “MAX”,
but a good quality pedal should demonstrate a wide range of motion.
16
3 : SETUP GUIDE
TO CONNECT & SET UP AN EXTERNAL FOOTSWITCH...
Footswitches are less versatile but sometimes all you need is an on-o stomp! Any type of external
switch may be used—momentary or latching, make or break—as long as its contacts make and break the
connection between tip and sleeve on a regular 1/4”guitar cable. (You do not need a TRS for a foot switch.)
Calibration is not necessary, but you do need to set the TYPE as desired:
Press the SETUP button, followed by the #2 footswitch to select the I/O menu.
Press the PAGE button until you reach the PEDAL page.
Set your the pedal TYPE:
When a latching (aka toggle) switch is connected, set TYPE to “LATCHING”.
When a momentary switch (such as a sustain pedal) is connected, you have two options:
Set TYPE to “MOMENTARY” and the FX8 will recognize alternate stomps
as ON and OFF, creating a “virtual” latching footswitch.
Set TYPE to “CONTINUOUS” if you want the switch to turn on
when you press, and o when you release it.
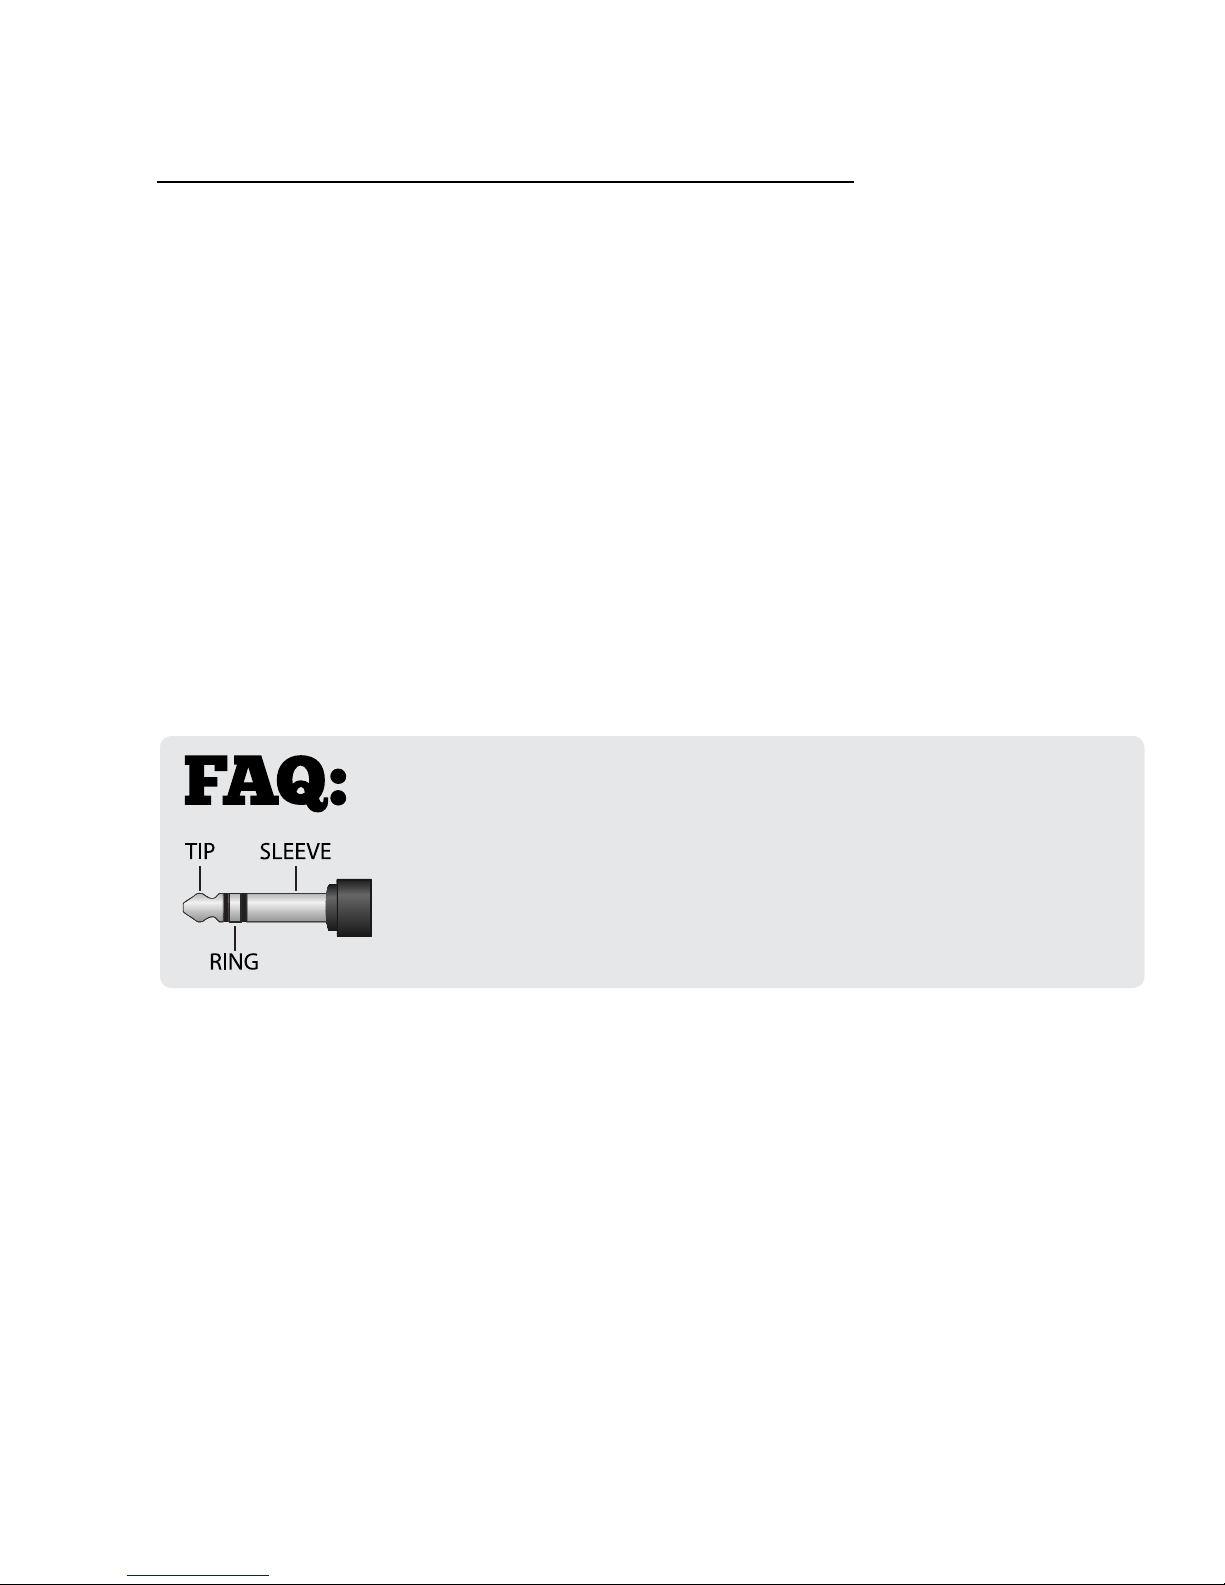
WHAT IS TRS? “TRS” stands for TIP-RING-SLEEVE and describes the
conguration of a 1/4" endplug or jack with three connectors. Normal
guitar cables are TS (Tip-Sleeve) since they lack the ring required for a third
connection. Switching some amps requires only a tip-sleeve cable, and the FX8
works just ne in these cases, but as always, contact your amp manufacturer to
be sure that the amp’s switching is based on shorting the tip to the sleeve.
17
3 : SETUP GUIDE
(Not Included)
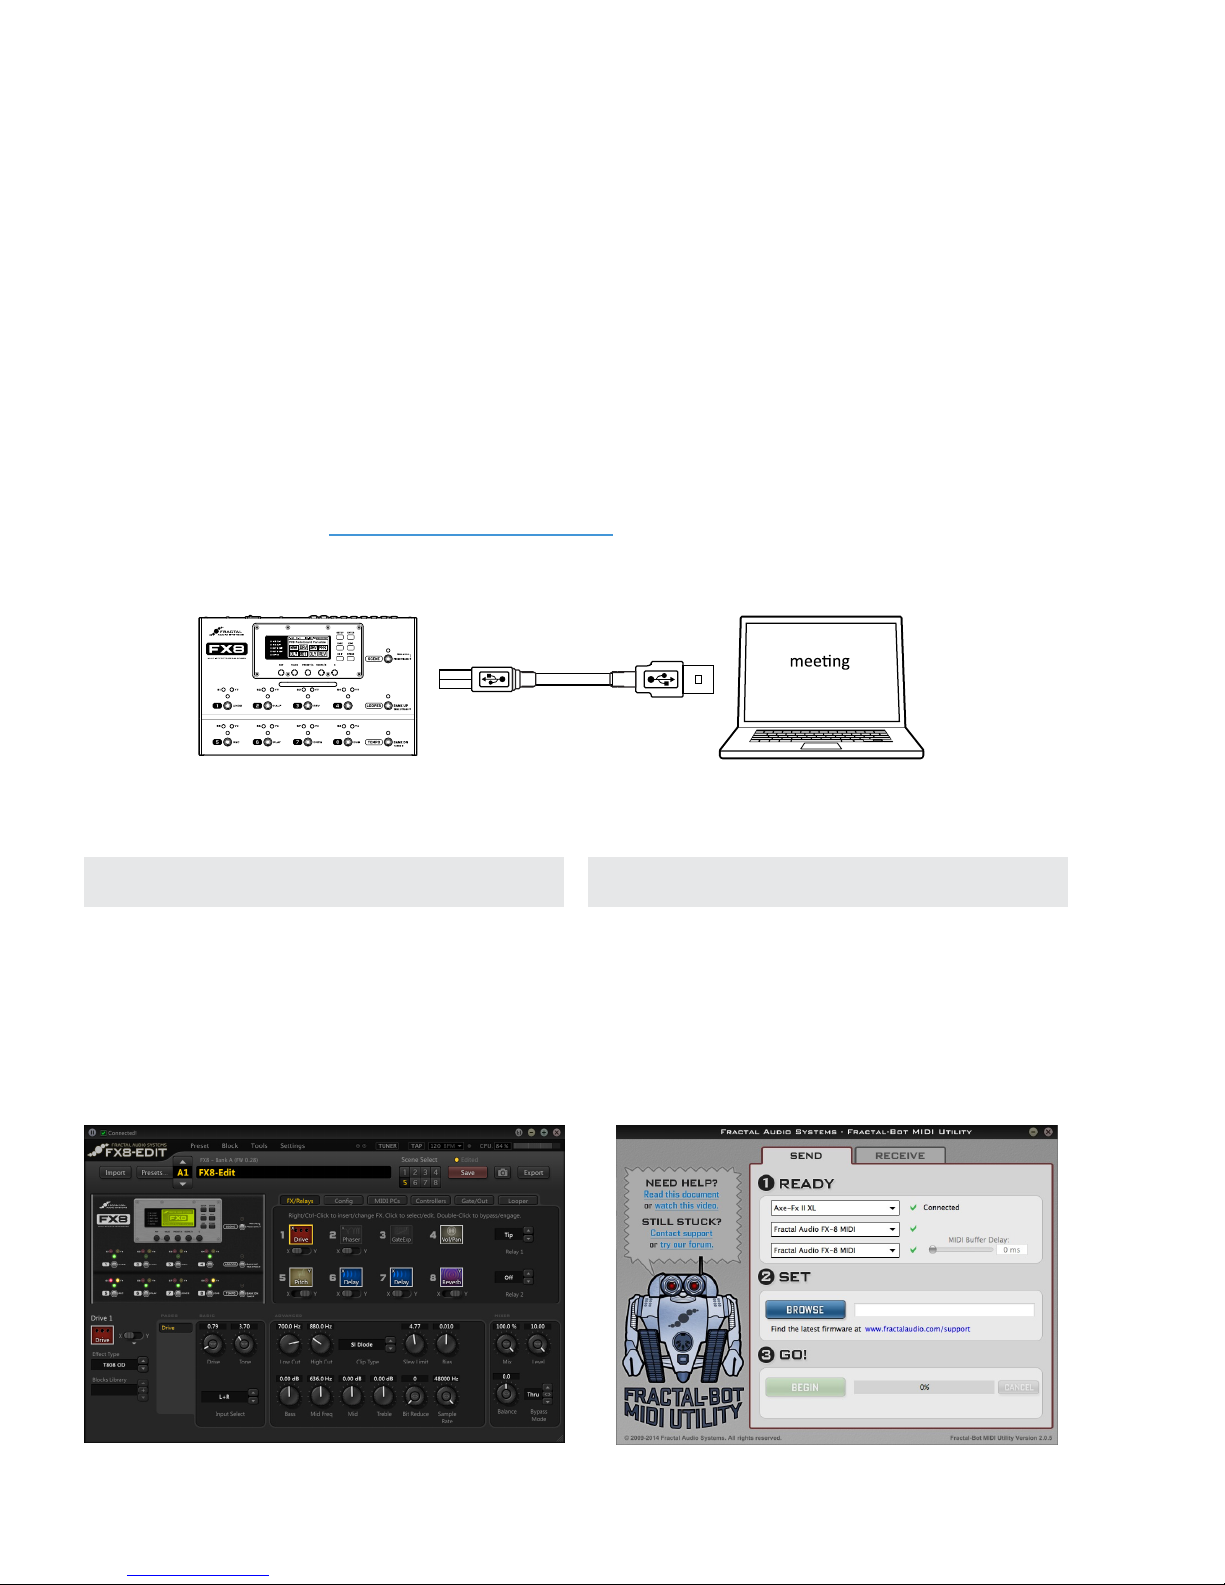
CONNECTING A COMPUTER
Connecting the FX8 to a computer via USB is completely optional, but it does provide some great benets.
Our free utilities provide a great platform for those who want to take their experience to the next level. USB
is also the best way to install rmware updates and make or restore backups.
The rst step is to connect your FX8 and computer with a USB cable (not provided).
No driver is required. The FX8 is plug and play.
Install Fractal-Bot™ for rmware updates, backups, and installing presets or banks you download or
keep on your computer or memory stick.
Install FX8-Edit™ for a graphical way to work with FX8 presets.
Find both programs at http://www.fractalaudio.com
Mac or PC
minimum
requirements
FX8 USB Cable
Mac Minimum Requirements:
OS X 10.6.8 or newer
CPU: Intel Processor
Memory: 512MB minimum
USB 2.0 Support required
Computer
Windows Minimum Requirements:
OS: WinXP (SP3), Vista (SP2), Win7 (SP1) Win8
x86 or x64 version are supported for all.
CPU: Intel Core 2 @1.6 GHz or better,
or AMD equivalent
Memory: 1GB minimum
USB 2.0 support required
FX8-EDIT
FRACTAL-BOT
18
4 : THE RELAYS
4 : THE RELAYS
IMPORTANT! The relays of the FX8 are designed for use ONLY with ampliers that use “short-to-sleeve”
type switching. Do NOT connect the FX8 relays to the switch jacks of an amp that uses voltage dierential
switching or any other type of switching aside from short-to-sleeve, or serious damage can occur to both
units. If you are not 100% sure, contact your amp manufacturer to determine whether your amp is
compatible with short-to-sleeve switching. The FX8 relay jacks are compatible with TRS cables, TS cables,
or TRS-to-dual-TS split cables. The relays are also fully isolated from the electrical ground of the FX8.
The FX8 features two TRS (Tip-Ring-Sleeve) relays that can be used to switch the channel or other
functions of a connected amplier or device. If the warning above seems stern, that’s because the last thing
we want is for anyone to damage their amp or FX8. In fact, short-to-sleeve relay switched amps are quite
common, and your amp may well be perfectly compatible. We need to trust and require you however, to
understand how your amp works and make the right choices about connecting it to the FX8 relay jacks.
Your amp manufacturer should be able to help if you read them the warning above.
An answer to the Frequently Asked Question “What is TRS?” appears on page 17.
CONTROLLING THE RELAYS...
You can control each relay with your choice of a footswitch or per-scene programming.
To control a relay with a Footswitch, you must insert a RELAY BLOCK into your preset. The next section
covers building presets with blocks. See “The Relay Block” on page 43.
You can also program any Scene to control the relays.
See “To Set Relay States For a Scene...” on page 37.
Regardless of how an FX8 relay is controlled, it can be switched to any of the following states:
Setting What’s Connected?
OFF Nothing.
TIP Tip to Sleeve.
RING Ring to Sleeve.
BOTH Tip AND Ring to Sleeve.
WHAT IS A RELAY? A relay is an electrically operated switch. It is activated
or deactivated by a circuit (the FX8 in this case) to make or break a connection in a
dierent circuit (your amp). The FX8 uses fast, quiet, high-quality relays. Each one contains two discrete
switches and is able to make all of the connections shown in the table above.
19

4 : THE RELAYS
This page intentionally left blank.
20
5 : CREATING PRESETS
5 : CREATING PRESETS
WHAT IS A PRESET?
The FX8 has 128 memory slots for PRESETS arranged as sixteen BANKS (lettered A–P) with eight presets
each. Think of each preset as a fully independent pedalboard with its own eects, settings, conguration,
controllers, and more. You create and store presets using the FX8 front panel or the optional FX8-Edit software.
Every memory is a “USER” preset which can be edited or overwritten. Some players will use a lot of presets—
perhaps one for each band, gig, guitar, or even song. Some players will use very few presets, maybe just one.
However you use presets, understanding them is key to understanding the FX8.
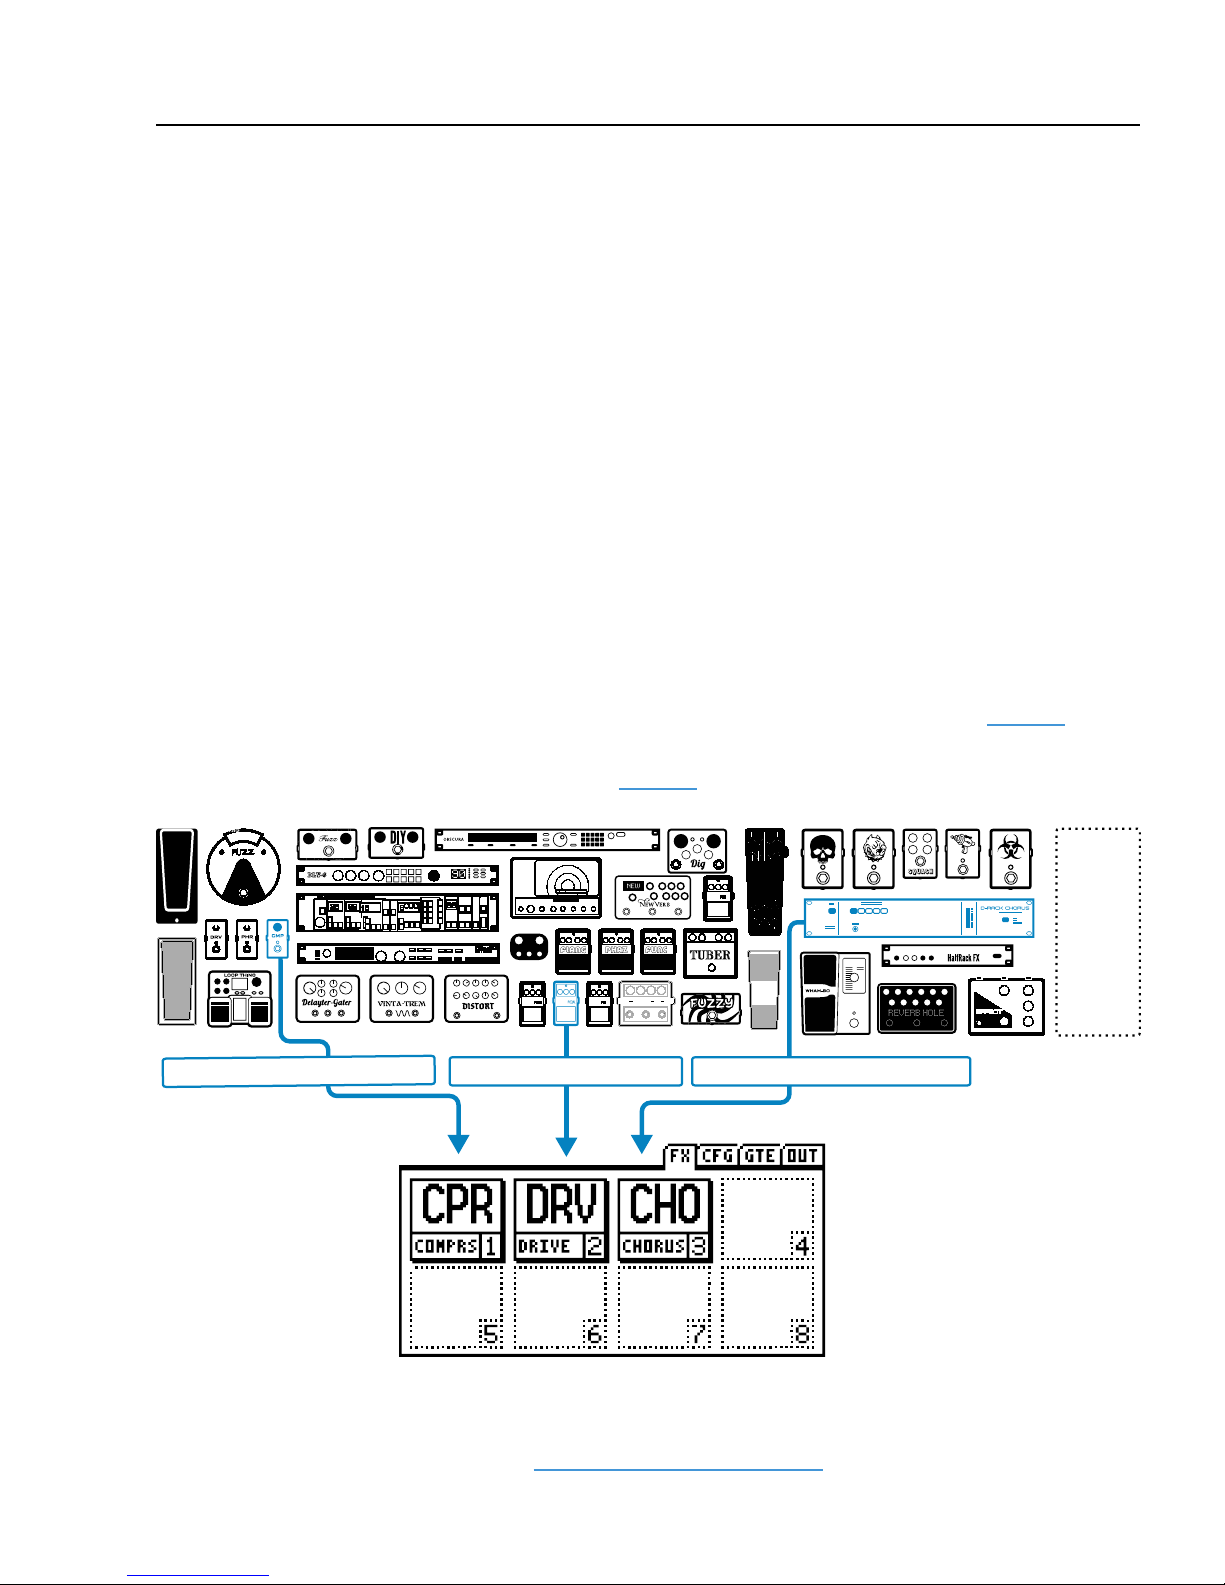
WHAT IS A BLOCK?
A block is a virtual eect. Each preset has eight slots enabling you to insert up to eight blocks. Some blocks
have a single specic function (e.g. “RELAY 1”) but most represent a general eect category (such as “DRIVE”)
with the ability to select a specic “TYPE” (Such as Face Fuzz, Fat Rat, Treble Boost, etc.). Every preset has its
own complete inventory of blocks—one or two of each type (the complete list appears on page 25).
In the example below, a Compressor Block, a Drive Block, and a Chorus Block have been inserted into the slots
of a sample preset. (You’ll learn to insert eects on page 24.)
AND
MANY
MORE...
Drive 1 set to “Blues OD”Compressor 1 set to “Pedal 1” Chorus 1 set to “Dimension”
...and so on.
Many blocks also oer X/Y switching, which gives them two independent switchable sounds. For
example, the “Blues OD” above might double as a “Shred Distortion” when you press and hold its
footswitch. For more information, see "X/Y Switching" on page 28.
21
 Loading...