

Fractal Audio Axe-Fx III Owner's Manual
Manual Version 1.0g for Axe-Fx III Firmware 1.x

Inside Front Cover

Declaration of Conformity
Manufacturer’s Name: Fractal Audio Systems, LLC
Manufacturer’s Address: 4 Wilder Drive, Plaistow, NH 03865 USA
Declares that the product:
Product name: Axe-Fx III Product option: None
Conforms to the following Product Specications:
Safety: EN60065:2014
EMC: EN55013:2013
EN55020:2007+A11:2011
EN55024:2010
EN61000-3-2:2014
EN61000-3-3:2013
Supplementary Information:
The product herewith complies with the requirements of
the Low Voltage Directive 2006/95/EC
and the EMC Directive 2004/108/EC.
Clifford Chase
President / CEO
January 22, 2018
EMC/EMI
This equipment has been tested and found to comply with the limits for a Class B Digital device, pursuant
to part 15 of the FCC rules. These limits are designed to provide reasonable protection against harmful
interference in residential installations. This equipment generates, uses and can radiate radio frequency
energy and, if not installed and used in accordance with the instructions, may cause harmful interference to
radio communications. There is no guarantee that interference will not occur in a particular installation. If
this equipment does cause harmful interference to radio or television reception, which can be determined
by turning the equipment off and on, the user is encouraged to try to correct the interference by one or
more of the following measures:
Reorient or relocate the receiving antenna.
Increase the separation between the equipment and receiver.
Connect the equipment to an outlet on a circuit different from that to which the receiver is connected.
Consult the dealer or an experienced radio/TV technician for help.
i
Legal Notices
Fractal Audio Systems Axe-Fx III Owner’s Manual. Contents Copyright © 2018. All Rights Reserved.
No part of this publication may be reproduced in any form without the express written permission of Fractal Audio Systems.
Fractal Audio, the Fractal Audio Systems logo, Axe-Fx, Humbuster, UltraRes, FASLINK are trademarks of Fractal Audio Systems.
Manufacturer names and product names mentioned herein are trademarks or registered trademarks of their respective owners,
which are in no way associated with or afliated with Fractal Audio Systems, LLC. The names are used only to illustrate sonic and
performance characteristics.
Important Safety Instructions
WARNING: To reduce the risk of re or electric shock, do not expose this
appliance to rain or moisture.
CAUTION: To reduce the risk of re or electric shock, do not remove screws.
There are no user serviceable parts inside. Refer servicing to qualied service
personnel.
1. Obey all warnings on the Axe-Fx III chassis and in this User Guide.
2. Keep away from sources of heat such as ducts, registers or appliances that produce heat.
3. Connect only to a standard grounded AC outlet of 100–240V, 47–63 Hz.
4. Keep the power cord in good condition. Do not kink, bend, or pinch.
5. If the cord becomes damaged, discard and replace it.
6. If not using your Axe-Fx III for extended periods of time, disconnect from AC power.
7. Protect the unit from rain and excessive moisture.
8. Refer servicing to qualied personnel only.
9. Stop operation of the unit and obtain service if:
- Liquids or excessive moisture enter the unit.
- The unit operates incorrectly or performance is inconsistent or erratic.
- The unit has been dropped and/or the enclosure damaged.
10. Prolonged exposure to high volume levels can cause hearing damage and/or loss. The use of
hearing protection in high volume situations is recommended.
A Manual for Online and Print
This manual is intended for use in desktop, tablet, or smart phone readers. It includes clickable links and bookmarks to make
navigation and cross-reference easy. We recommend against printing, because rmware updates tend to make older versions
obsolete. That said, considerations have been taken for those who prefer paper. You are granted permission to print this PDF for
personal use only. A copy center or online printer can print and bind from the PDF le. Hopefully those with screen readers can
forgive the considerations taken for those who prefer paper: all links also include a page or section numbers, page spreads have
extra margins towards the binding edge, and blank pages/white space has been inserted to preserve page and chapter flow.
ii

TABLE OF CONTENTS
1 INTRODUCTION .........................1
Welcome to the Axe-Fx III ..................1
Feature Summary ........................2
The Setup menu .........................3
Quick Connect Guide .....................4
Setting Levels ...........................5
Humbuster™ Cables ......................6
Mono vs. Stereo .........................6
The Home Page: Presets ..................7
Intro to the Layout Grid ....................8
Intro to Scenes and Channels ...............9
Grid Editing: Quick start ..................10
Block Editing: Quick start .................10
USB Overview ..........................11
Fractal-Bot & Axe-Edit III ..................11
Connecting Pedals Directly ................12
Global Expression Pedal Setup .............13
Global Volume Pedal Setup ...............13
2 HARDWARE OVERVIEW ..................14
The Front Panel .........................14
The Rear Panel .........................16
3 USB .................................18
Computer Integration ....................18
USB Inputs and Outputs ..................19
Mac OS X System Audio ..................20
Re-Amping ............................21
4 SETTING UP ...........................22
General Principles .......................22
FRFR/Direct. . . . . . . . . . . . . . . . . . . . . . . . . . . . 23
FRFR monitor + FRFR to Front-of-House ......24
Power Amp & Guitar Speakers .............25
Power Amp & Cab + FRFR/Direct ...........26
Four-Cable Method (“4CM”) ...............27
FX Processor only (“Post”) ................28
FX Processor only (“Pre”) .................29
Inserting Outboard Gear ..................30
Multi I/O Setups ........................31
5 PRESETS .............................32
Overview ..............................32
The Layout Grid ........................33
Working with Blocks .....................33
Connector Cables .......................35
Block Inventory .........................37
Example Preset Grids ....................38
Editing Effect Blocks .....................39
Saving Changes ........................40
Preset CPU Limits .......................41
6 SCENES & CHANNELS ...................42
Overview ..............................42
Changing Channels ......................43
Setting Up Channels ....................43
Selecting Scenes .......................44
The Default Scene. . . . . . . . . . . . . . . . . . . . . . . 44
Selecting Scenes & Channels Remotely ......45
Program Change Mapping ................46
Sending MIDI with Scenes ................46
Scenes, Channels & Modiers .............47
Scene Revert ...........................47
7 LEVELING PRESETS .....................48
A Method for Leveling. . . . . . . . . . . . . . . . . . . . 49
Block Bypass Levels .....................50
8 BLOCKS GUIDE .........................51
9 MODIFIERS ...........................99
Creating a Modier ......................99
Modier Tutorial: Wah Pedal ..............100
Modier Tips And Tricks .................100
Modier Sources Overview ...............101
Modier Parameters ....................102
Internal Controllers .....................105
External Controllers ....................106
Modiers List .........................106
Tutorial: Scene Controllers ...............107
10 TEMPO. . . . . . . . . . . . . . . . . . . . . . . . . . . . .108
Synchronizing Sound Parameters ..........109
11 THE TUNER .........................110
Advanced Tuner Functions ...............110
Mini Tuners ...........................110
12 SETUP MENU ........................112
The Foot Controllers Menu ...............112
The Global Settings Menu ................112
The I/O Menu .........................114
The IR Capture Utility ...................116
The MIDI/Remote Menu .................117
The Utilities Menu ......................120
13 FC PROGRAMMING ...................121
14 IR CAPTURE .........................122
Method 1 Setup: Mic Only ................123
Method 2 Setup: Mic + Di ................124
Capturing Impulse Responses ............125
15 ADDITIONAL TOPICS ..................126
Fractal-Bot ...........................126
Backing Up & Restoring .................126
Firmware Updates ......................127
Recovery .............................128
Getting Help ..........................128
Loading User Cabs .....................129
Axe-Change ...........................130
Frequently Asked Questions ..............131
Shortcuts ............................133
Spillover .............................134
LFO Waveforms & Phase ................135
Tempo Cross Reference .................136
MIDI Reference Tables ..................137
16 SPECIFICATIONS .....................140
MIDI Implementation ...................142
WARRANTY ...........................143
EULA ................................144
iii

iv

1 INTRODUCTION
1 INTRODUCTION
WELCOME TO THE AXE-FX III
The Axe-Fx III is the latest product in our long line of industry-leading guitar processors, and the world’s most
powerful unit of its kind. Axe-Fx III runs our latest “Ares” amp models, plus UltraRes™ speaker cab simulations
and legendary effect algorithms, all with signicantly more raw power than any previous Fractal Audio Systems
product. Our vision for the new platform was to exceed anything done previously — to create a product that
sounds better, does more, and is easier to use than ever before.
Fractal Audio Systems is known for accurate amp modeling with the sound and feel of real tube amps. The
Axe-FxIII carries this torch high, with all of our current models and room for many new ones to come, all running
on a new platform designed for the future. “Ares” picks up where “Quantum” left off, with improvements and
upgrades coming all the time. Some may ask: “how can it still be getting better after all these years?” In the AxeFx III, we discover that there is always room for improvement and evolution when the commitment to excellency is
real.
The hardware has been completely re-designed around a streamlined new workflow. The centerpiece is a dazzling
new high-contrast full-color display with 30x the resolution of previous products. This display works alongside
ve new endless-rotary push encoders. These “Push-knobs” do different things on different pages, with labels to
show dynamic functions. The end result is a user experience that’s immediately more intuitive. The display also
excels at animation for meters, modiers, and more.
Power and resources are vastly expanded. Two 1-GHz “Keystone” DSPs benchmark at 2.8x the power of the AxeFx II, and there are two additional processors dedicated to graphics and USB. Peripherals include 4Gb of blazing
fast PC1600 DDR3 memory, hundreds of Mb of FLASH memory, a proprietary FPGA and more. The number of
inputs and outputs has more than doubled in comparison to previous products. Routing flexibility has also been
upgraded with dedicated Input and Output blocks for highly flexible preset and rig design. All 1/4" outputs feature
our Humbuster™ technology to help reduce the noise caused by ground loops.
Better sound quality has been achieved through an audiophile-grade signal path. The difference shines through
in lower noise floor, pristine clarity, and better USB audio performance than most dedicated audio interfaces.
Computer audio integration now includes a professional-quality 24-bit/48k 8×8 interface. Record multiple tracks
of processed audio at the same time, plus a DI. The re-amping workflow is improved with independent monitoring
of backing tracks and re-processed guitar tones while you dial in a sound.
Physically, the Axe-Fx III continues our tradition of combining extraordinary design with manufacturing quality
rugged enough to withstand the rigors of life on the road. The unit is housed in a steel enclosure with a one-piece
anodized aluminum faceplate/bezel featuring a glowing Axe-Fx III logo.
Axe-Edit™ III, a fully re-tooled version of our editor for Mac or PC, is packed with great new features including
Quickbuild mode, a Scene Manager, and window scaling on monitors up to 5k and beyond.
Of course the unit features upgradeable rmware, meaning the best is very likely yet to come via our free updates.
We hope you will enjoy using the Axe-Fx III as much as we’ve enjoyed creating (and playing) it.
1

1 INTRODUCTION
FEATURE SUMMARY
Rugged 3U steel chassis with a sleek anodized aluminum
front panel and illuminated “Axe-Fx III” logo.
Two 1-GHz “Keystone” DSPs benchmark
at 2.8x the power of the Axe-Fx II.
4Gb blazing fast PC1600 DDR3 memory, hundreds
of Mb of FLASH memory, proprietary FPGA.
Dedicated processors for graphics and USB.
VALUE knob optical encoder lifespan
rated for 1,000,000+ rotations.
Audiophile-quality signal path yields the best
sound quality, lowest THD, and lowest noise floor
of any product we’ve ever created by far.
Auto-switching front/rear instrument
inputs, both with “Secret Sauce IV”.
Three stereo inputs: 1 with XLR/1/4" combo
jacks, two with balanced 1/4" inputs.
Four stereo outputs: 1 with XLR outs, 1 with
both XLR and 1/4", and 2 with 1/4".
Humbuster technology on all 1/4" outputs
helps reduce noisy ground loops.
Front panel headphones output.
Front panel LED meter bridge for instant visibility of levels.
Easy-to-use interface allows intuitive and efcient editing.
Stunning color display with 30x the
resolution of our previous products.
Animated on-screen metering for every
block, input, output, and more.
5 soft-knobs with on-screen labels
for turn and push functions.
512 Preset memories, each an entire rig
with amp(s), cab(s) and effects.
New 14×6 grid layout allows larger presets.
New “Zoom” view shows the entire grid on one page.
8 nameable “Scenes” per preset store
settings like “presets within a preset”.
Revolutionary new “Channels” concept for fast,
seamless switching of up to four channels per block.
Built-in tools to copy Channels and Scenes within a preset.
Hundreds of accurate amp models with
real tube amp sound and feel.
New Cabinet block with a “Cab-Lab” style
multichannel mixer loads up to four IRs.
2,048 Factory cabs, 189 “Legacy” Cabs (from Axe-Fx
II), 2,048 User Cabs and 16 Scratchpad memories.
Factory IRs from Fractal Audio, AustinBuddy, Celestion, Dr.
Bonkers, ML Sound Lab, OwnHammer, John Petrucci, Chris
Traynor, James Santiago, Valhallir, York Audio, and more.
Presets can now contain up to four of each
Compressor, Drive, and Delay blocks.
New blocks: Plex Delay, Ten-Tap Delay,
Multiplexer, Realtime Analyzer and more.
Effect Types create classic sounds at the
turn of a knob. Types include 37 drives, 44
reverbs, 32 delays, and many more.
New fully modeled analog Tri-stereo Chorus type.
Improved Pitch block with faster pitch detection.
Improved Reverb is even richer and smoother than ever.
New fully parametric “Input EQ” in Amp block.
Fully revamped 5.8 minute stereo Looper with undo.
Tone Matching to clone any tone, now in UltraRes.
Built-in IR Capture Utility shows data in
either Time or Frequency domain.
New Input and Output blocks make
routing more flexible than ever.
Improved and faster Tuner featuring a new interface.
8×8 USB Audio with better audio performance
than most dedicated interfaces.
Dedicated USB Input block for reamping/processing tracks.
MIDI-over-USB between Axe-Fx III and a computer is
10× faster than the same connection on Axe-Fx II.
MIDI IN, OUT and THRU ports.
Rich MIDI implementation allows extensive remote control.
The new “Scene MIDI” block enables each scene to
transmit up to 8 PC/CC messages when loaded.
Optional MIDI PC/Bank transmission
when a new preset is loaded.
Two on-board PEDAL jacks for expression
pedals like the Fractal Audio EV-1 and EV-2.
New FASLINK 2 connector for our next-gen
“FC”Series Foot Controllers.
New “Client-Server” architecture allows multiple FC
series foot controllers and Axe-Edit to control the Axe-
Fx III and update each other seamlessly and instantly.
Daisy-chain FC series foot controllers for a “Mega
Pedalboard” or to allow player and tech to share
switching responsibilities on “cloned” systems.
Future proof: as ever, fully upgradeable rmware
means free updates for years to come.
Built-in backup rmware allows recovery in the
event of complications during update.
And much more.
2

1 INTRODUCTION
THE SETUP MENU
Throughout this manual, you will be directed to the Setup menu of the Axe-Fx III for a range of options
including I/O, MIDI, global settings, and more. It includes the following areas:
The Foot Controllers menu includes all settings for a connected FC Series controller.
The Global Settings menu includes options which govern the behavior of the Axe-Fx III.
The I/O menu contains settings for all inputs and outputs, including levels, audio options, and
switches or expression pedals connected directly to the Axe-Fx III.
The IR Capture utility is used to create impulse responses for use in the Cab block.
The MIDI/Remote menu contains MIDI settings, plus several pages of remote controller assignments
for the many remote-control functions of the Axe-Fx III.
The Utilities menu contains informative readouts plus a control to adjust screen brightness.
Access and use the Setup menu as follows:
Press HOME.
Push the “E” soft knob for the SETUP main menu.
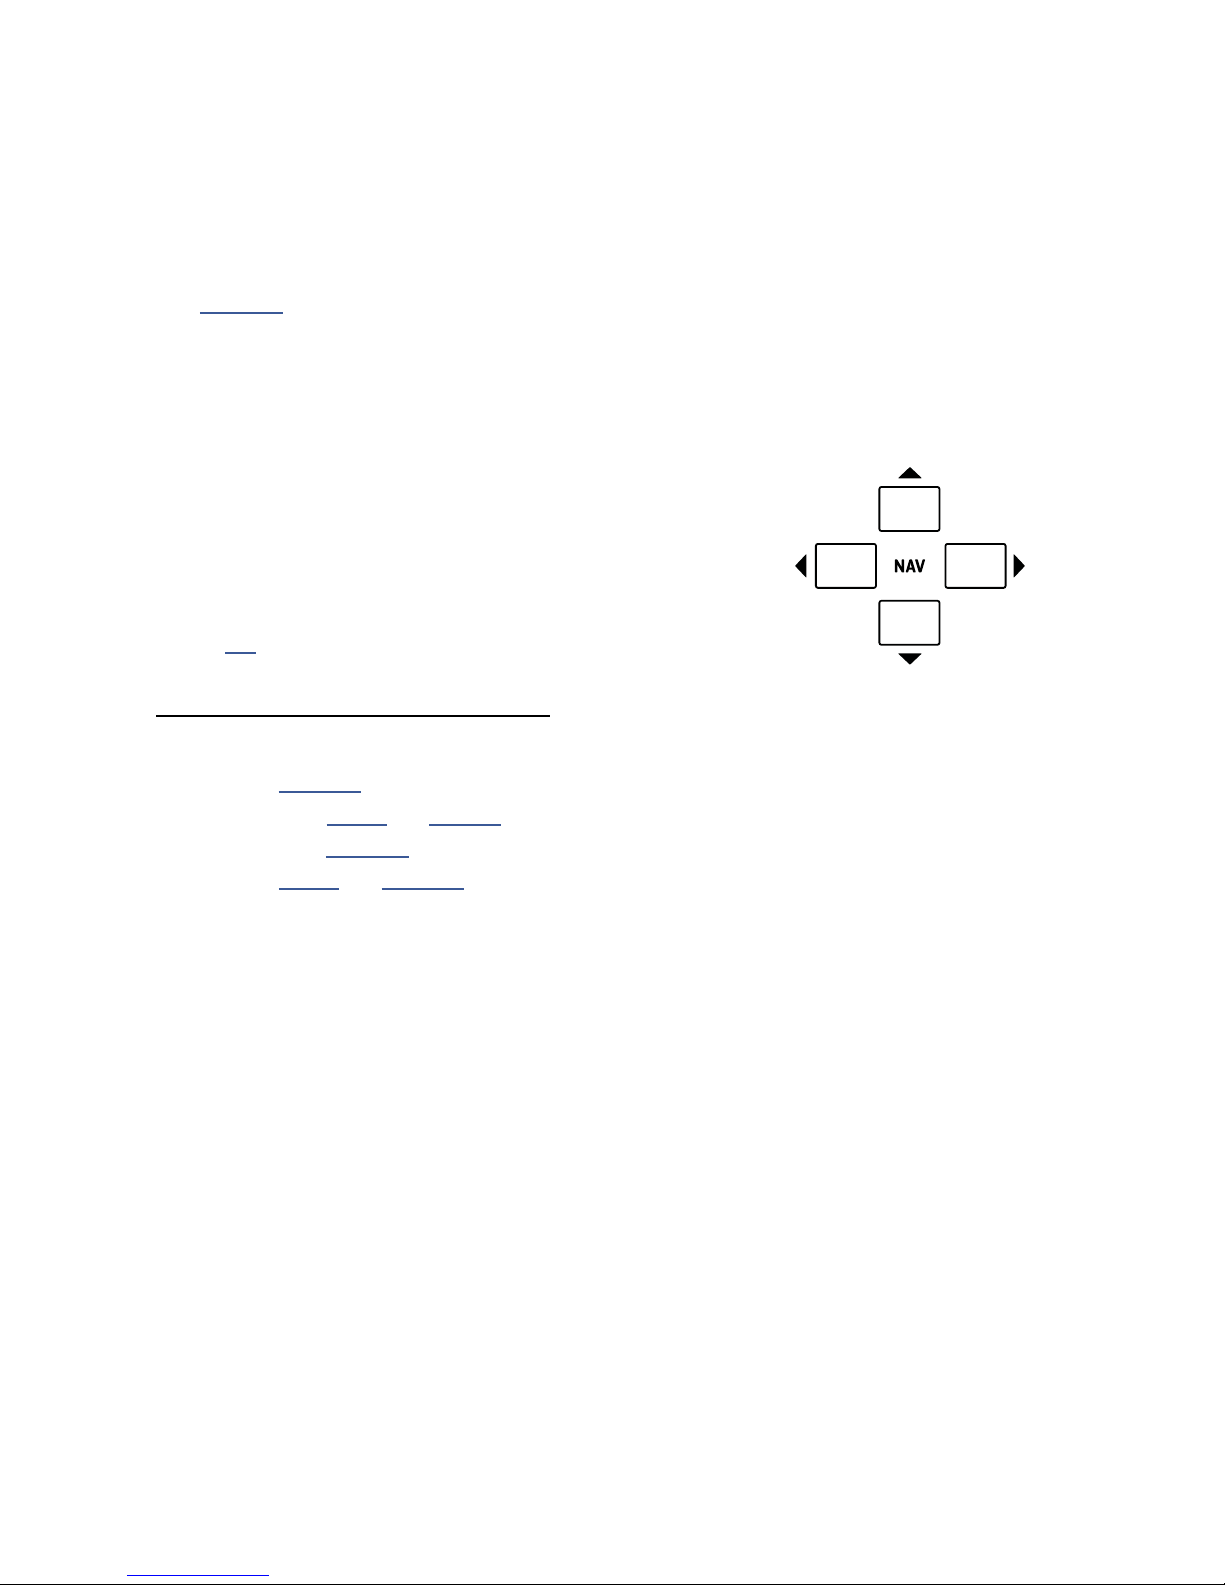
Use the NAV buttons to select a sub-menu and press ENTER to make a selection.
Use PAGE and NAV buttons to get around, VALUE and knobs A–E to make changes.
Setting changes under SETUP never need to be stored. All changes take effect immediately.
Press HOME at any time to return home.
Use these links for instant access to the Setup menu topics in this manual:
SETUP
Foot Controllers Section 13
Global Settings Page 112
I/O Page 114
IR Capture Section 14
MIDI/Remote Page 117
Utilities Page 120
3
1 INTRODUCTION
Audio Interface or Mixer
QUICK CONNECT GUIDE
Perhaps the best and most flexible way to enjoy your Axe-Fx III is through a full-range system such as Studio
Monitors, a high-quality PA, or full range cabinets designed specically for guitar. All of the factory presets are
designed for this type of setup.
The Axe-Fx III is incredibly flexible, however, and many other types of setups are supported, including those
which integrate with tube amps, USB recording, 3rd-party outboard equipment, and much more.
Find additional rig diagrams in Section 4.
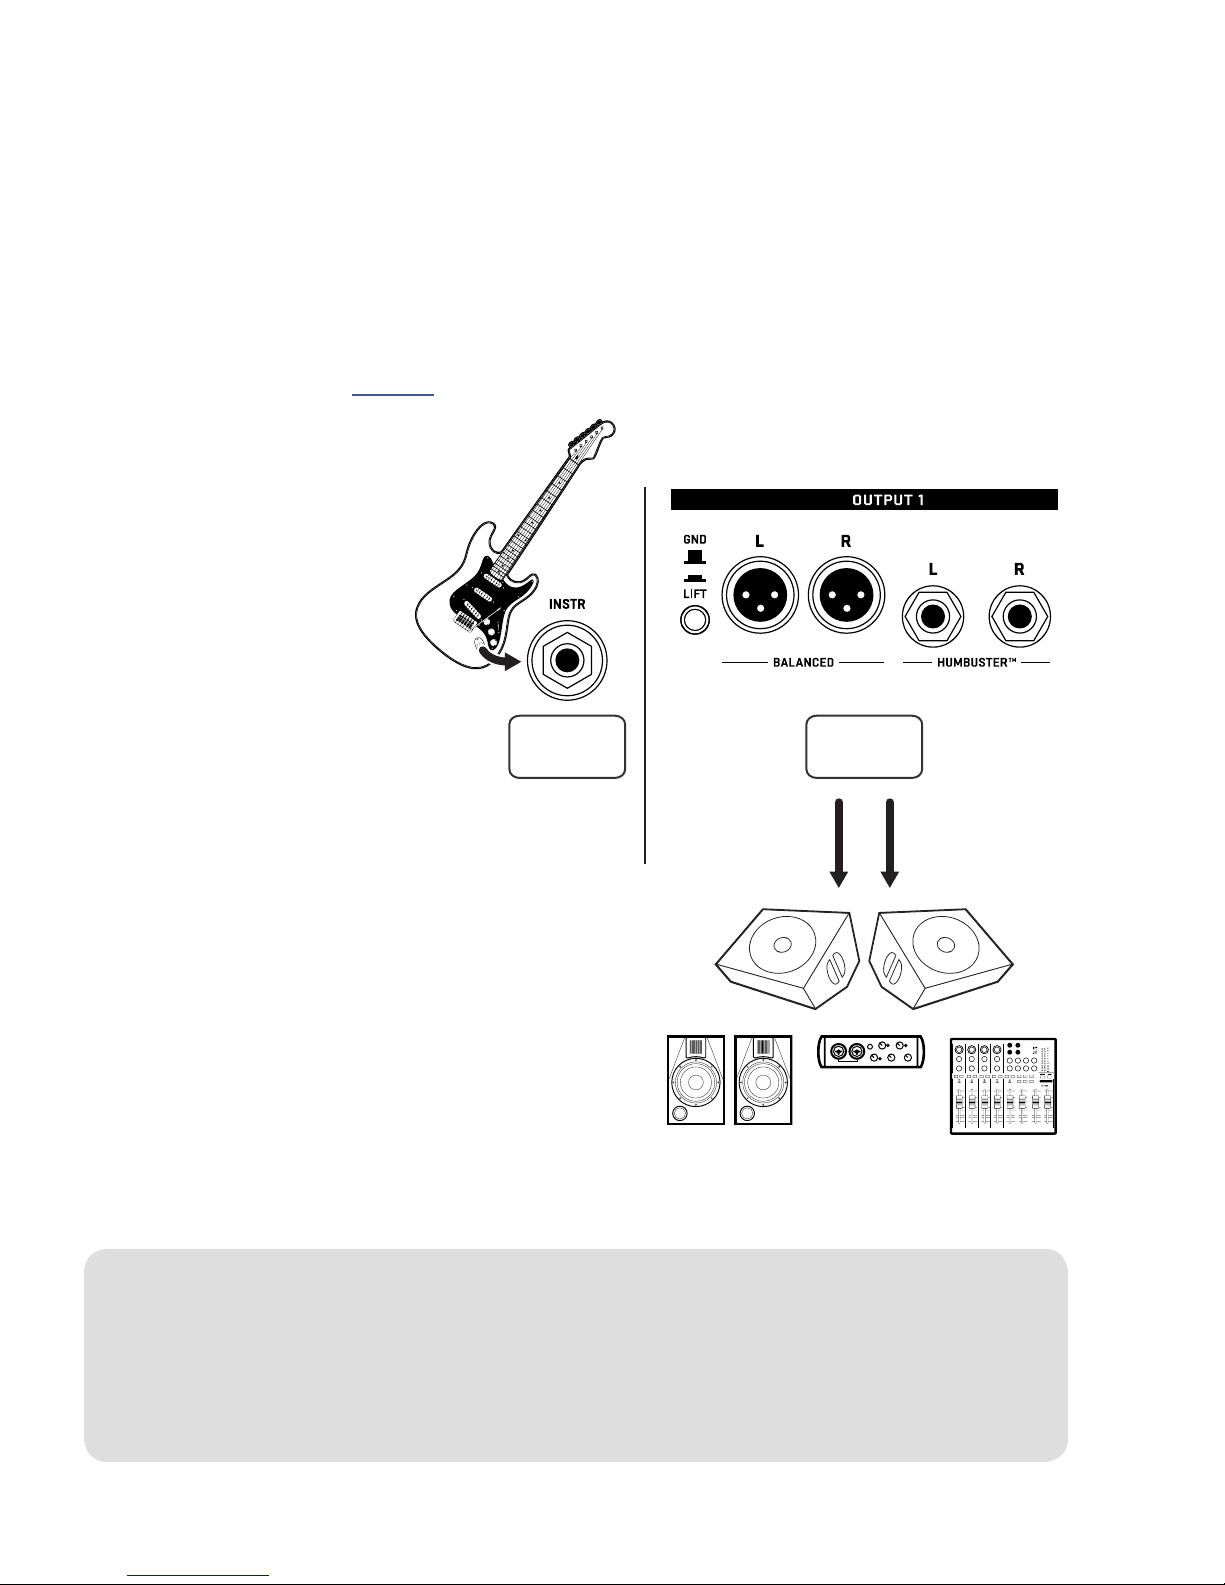
The most basic setup instructions appear below:
Begin with all level knobs turned down.
q
Connect your guitar to the front or
rear Instrument input (Input 1).
The Axe-Fx III is also perfect for
bass and other instruments.
Connect Output 1 to your mixer, studio
w
monitors, audio interface, PA system, fullrange speakers, power amp inputs, etc.
• For a mono rig, use Out 1 Left.
• For optional stereo, connect Out 1 Right.
• Use XLR outputs to connect to balanced
inputs, or use the 1/4" outputs when
connecting to unbalanced inputs.
• Use Humbuster cables with 1/4" outputs
to reduce hum from ground loops.
Turn up the front panel OUT 1 knob and adjust the
e
level on your monitors as desired.
Explore factory presets by turning the VALUE wheel.
Select Scenes within a preset by using NAV Up/Down.
INPUT
1
OUTPUT
1
Use
Out 1 L
for
Mono
FRFR speakers, Studio Monitors
Add
Out 1 R
for
Stereo
WHY FULL RANGE?
A Full-Range Flat Response (“FRFR”) system aims to reproduce the entire audio spectrum without compromise.
In comparison, most guitar speakers are narrow range, with no ability to accurately reproduce extended lows
and highs. A 1×12 open-back combo is never going to sound like a 4×12 stack. In comparison, full-range
flat response studio monitors, high-quality PA speakers, and FRFR speakers designed specically for guitar
should be able to reproduce anything you play through them.
4
1 INTRODUCTION
SETTING LEVELS
Setting proper levels is critical, but easy, with abundant meters to inform you about levels on the Axe-Fx III.
INPUT LEVELS
The Axe-Fx III comes ready-to-use for the typical guitar or bass, but you should
check that your guitar output level is not clipping the inputs.
Connect a guitar to the Instrument input. Choose your loudest pickup setting and
set all the guitar controls to “wide open.” Play loudly to push the levels as you watch
the front panel INPUT 1 meter LEDs. A red LED indicates that clipping is occurring
or imminent. If you see the input meters clipping, pad the input as follows:
Page to the Input page of the I/O menu under SETUP.
Reduce Input 1/Instrument input levels using the A knob.
In general, you should set input levels as high as possible without clipping.
Inputs 2, 3 and 4 can be adjusted using the same method. Each has its own Input trim parameter on the
Input page of the I/O menu under SETUP.
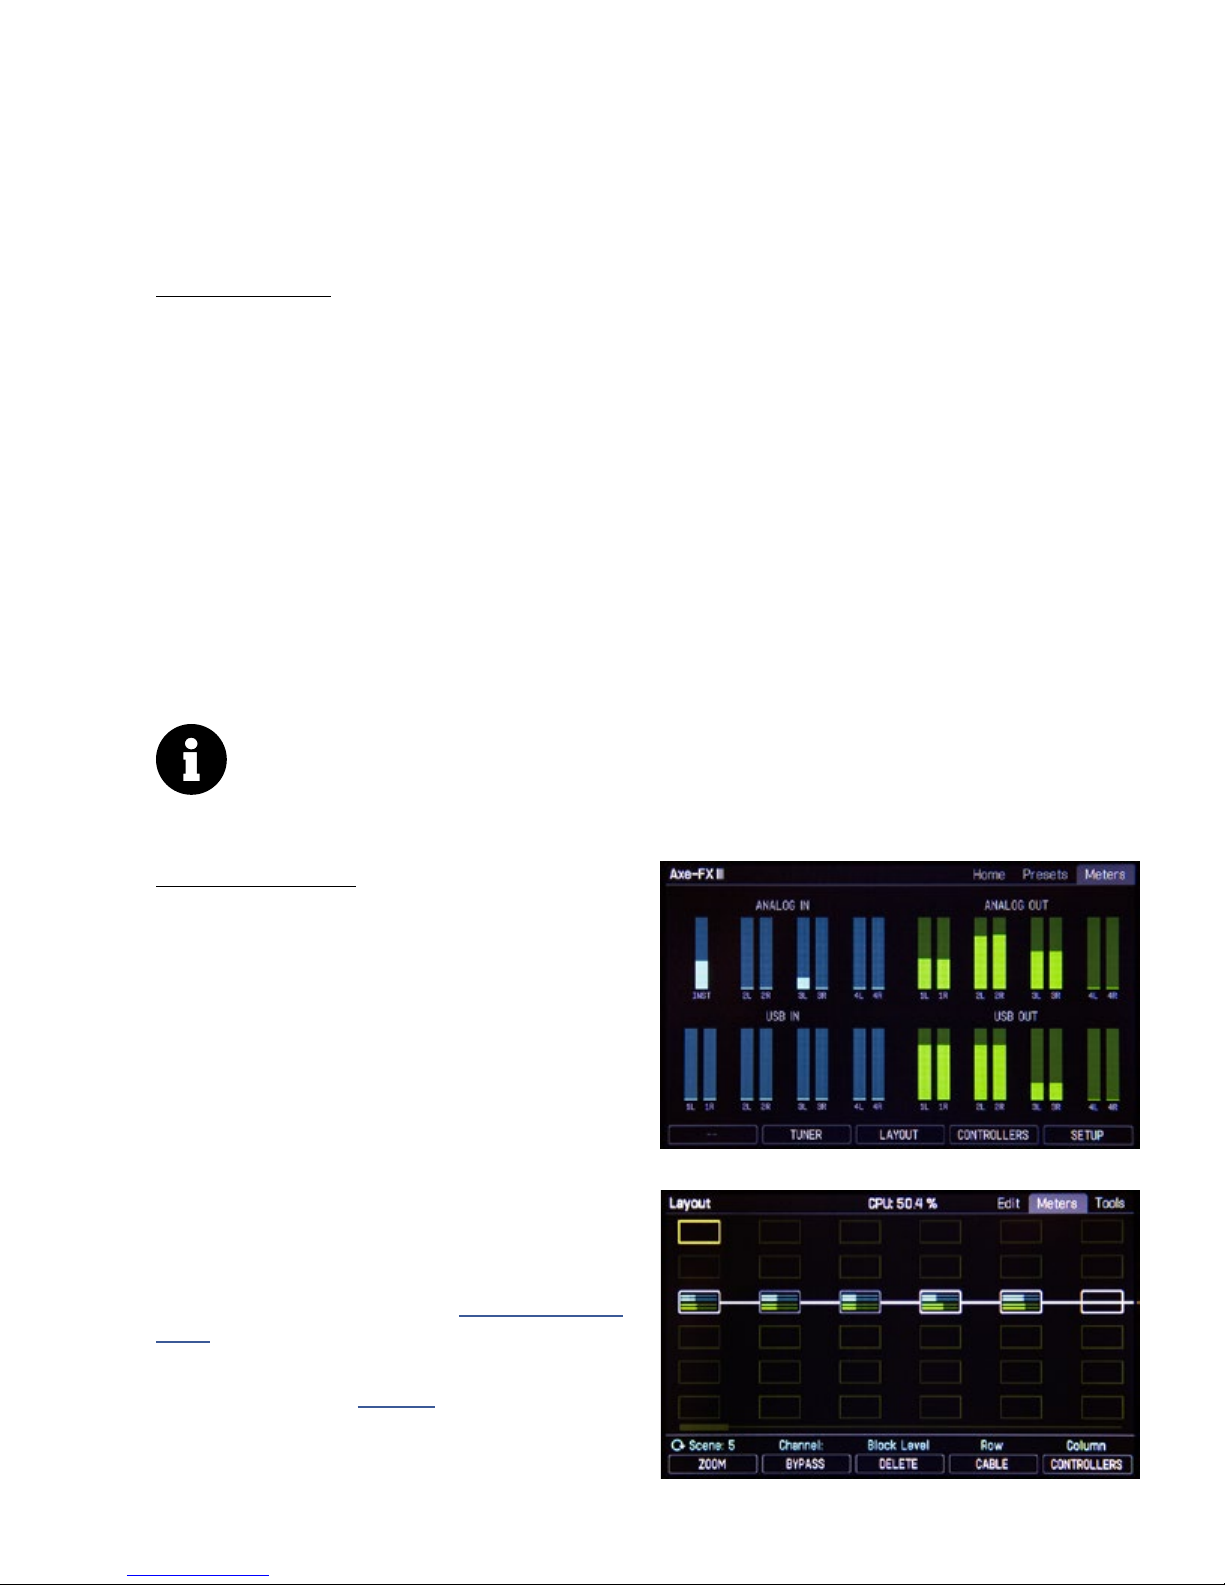
You can also monitor all levels on the Meters page of the Home menu.
Except at very low settings (5% or less), input level adjustments do not affect gain levels. As you
adjust the level to the A/D converter, its output compensates accordingly, so your signal remains
exactly the same when it hits the grid and any virtual amps or effects.
OUTPUT LEVELS
Output levels are very easy to monitor on the front
panel meter bridge, and easy to control using the four
front panel LEVEL knobs. You can also monitor output
levels in higher resolution by paging to the Meters page
from the Home page.
Outputs 1-2 are ready to be connected to consumer
line inputs (-10 dbV). If you are connecting to
professional-grade equipment operating at +4dBu, set
the nominal output levels as follows:
Page to the Audio page of the
I/O menu under SETUP.
Adjust Output 1: Output Level or
Output 2: Output Level to +4dBu.
The Meters page of the Home menu shows all I/O levels.
Learn more about the I/O Menu on “The I/O Menu” on
p. 114.
Every block in every preset also has its own Level
control. Learn more on Page 48.
The Layout also has a Meters view showing block levels.
5
1 INTRODUCTION
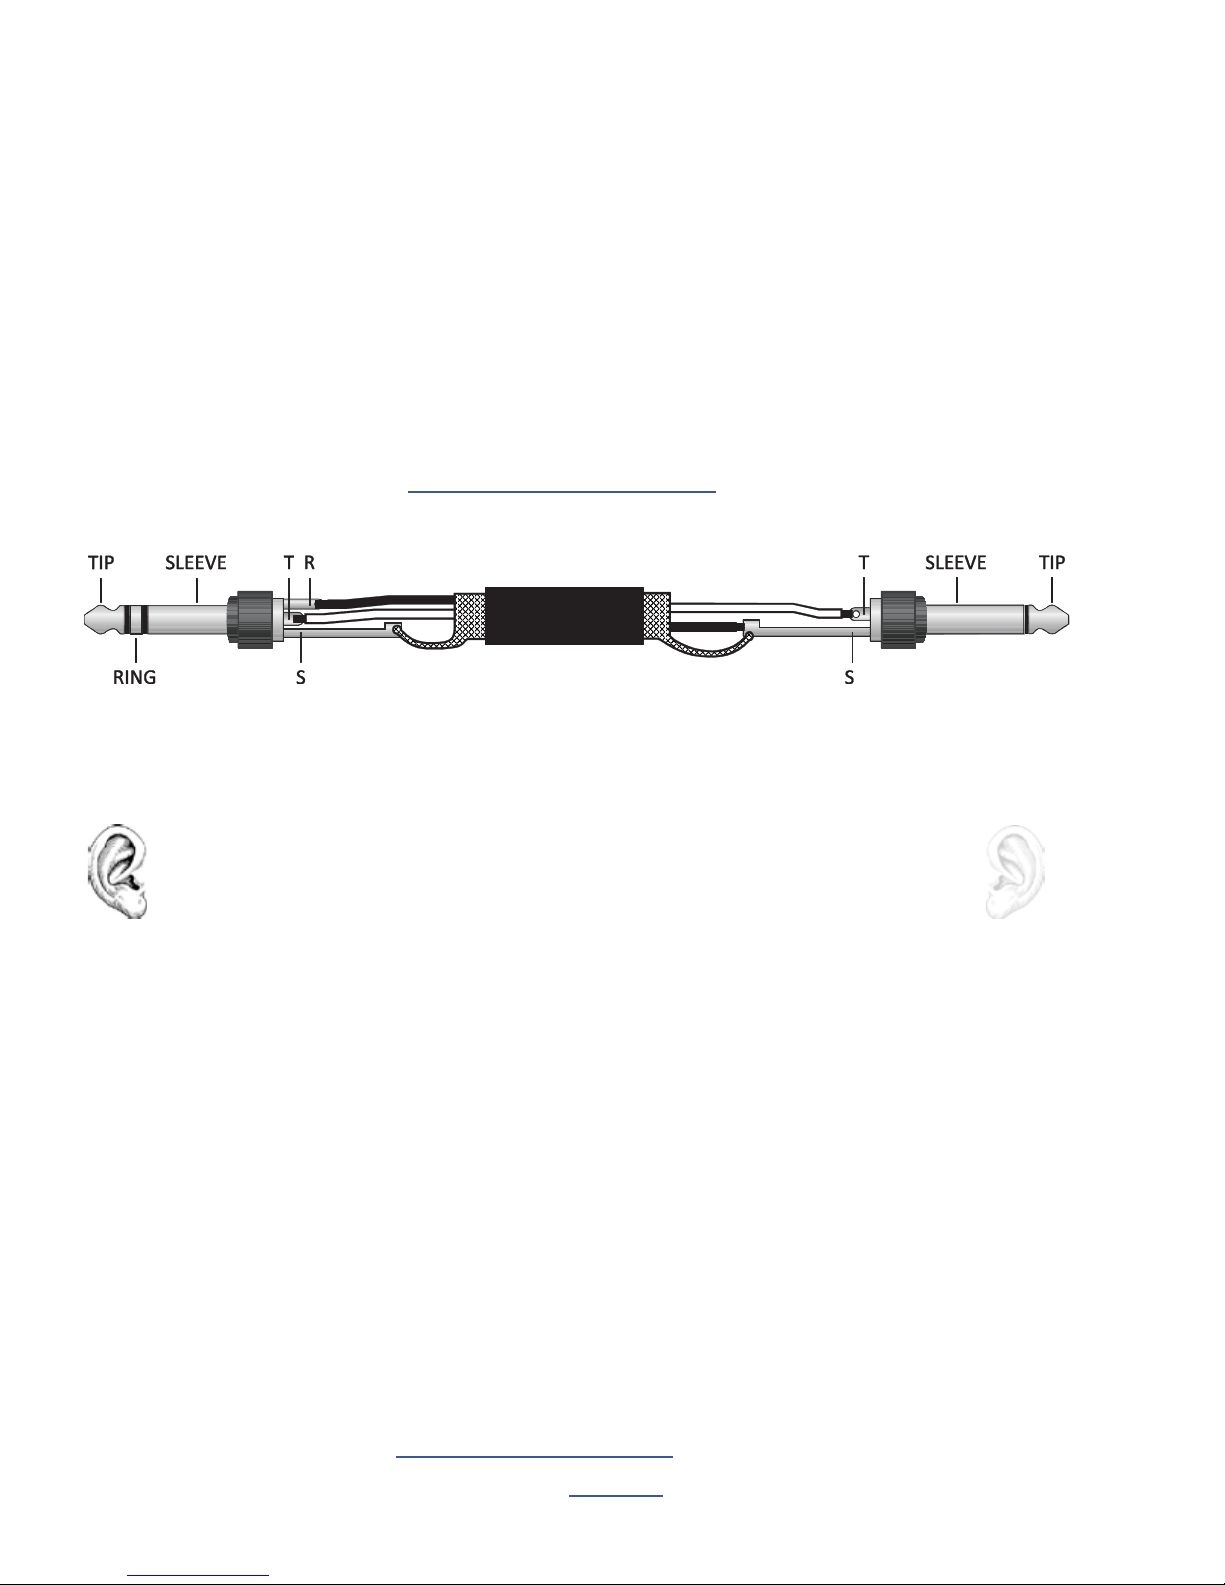
HUMBUSTER™ CABLES
Use XLR cables between the Axe-Fx III XLR outputs and the XLR inputs of mixers, monitors, and other devices.
When connecting to 1/4" balanced inputs, use an XLR-to-1/4" (TRS) cable or adapter to keep the connection
balanced.
For unbalanced 1/4" inputs on other devices, standard 1/4" (guitar) cables may be used, but there is a better
option. Humbuster technology on all 1/4" outputs of the Axe-Fx III can signicantly reduce unwanted noise due to
the common problem of a ground loop. For this to work, you must use a special Humbuster cable with one TRS
end (like a balanced cable) and one TS end (like a guitar cable). The TRS end connects to the Axe-Fx III. The TS
end connects to your amp.
Humbuster cables are available from http:/www.fractalaudio.com/cables. You can make your own by following
the diagram below. Be sure to use high-quality connectors and shielded cable.
MONO VS. STEREO
The Axe-Fx III comes pre-congured for stereo but you can connect it in mono with no
issues. If you are NOT running in stereo, you may nd that certain presets or settings produce
unexpected results. For example, a panner sounds like a tremolo when one channel is missing.
A ping-pong delay may ping but never pong. Stereo enhancers or certain types of modulation
may not be apparent at all. Tone may change completely if amps or cabs have been panned.
Here is an overview of several scenarios, with recommended settings for each.
Stereo: No special settings required.
Half-Stereo: Leaving the Axe-Fx III in its default stereo conguration but connecting
only one (Left) output results in a “half-stereo” setup. This works ne, aside from the
exceptions mentioned above (ping-pong, panning, etc). No special settings required.
Dual Mono: If you want to force your rig to mono, dual mono is one choice. Sonically, this
is identical to half-stereo, with the same limitations, except that mono signal is produced
at both the left and right jacks so you can connect to two monitors. To switch to dual
mono, open SETUP: I/O: Audio and set Mode for the desired output to “COPY L->R”.
Summed Mono: In this setup, left and right channels are added together resulting in an identical
mono signal at both left and right outputs. This has the advantage of not discarding half of
the sound, but summing has its own issues. For example, short delays or phase differences
between channels can result in strange artifacts or even total cancellation. To switch to
summed mono, open SETUP: I/O: Audio and set Mode for the desired output to “SUM L+R”.
On the Axe-Fx III, a flexible block-based I/O system makes it easy to use different outputs with different
settings for different purposes. See “Input & Output Blocks” on p. 52.
All options of the I/O menu under SETUP are detailed in Section 12.
6
1 INTRODUCTION
THE HOME PAGE: PRESETS
Once you have connected your Axe-Fx III you can begin to audition factory preset sounds. Remember that aside
from a few templates, the factory presets are designed for use with full-range speakers / monitors / headphones.
(See Section 4 for details on many other types of setups.)
The Axe-Fx III contains 512 preset memories, each a fully independent rig with its own amps, cabs, effects,
settings, controllers, and more. When you consider everything that is possible with Scenes and new Channels, a
single preset can easily cover an entire song, or even a whole show.
Here’s how to explore the factory presets:
Press HOME to show the Home page,
where you can switch presets.
To change presets, turn the VALUE
knob or use the NAV buttons.
Many factory presets contain extra Scenes.
You can switch between Scenes using the NAV buttons.
See p. 9 for an introduction to Scenes.
Previous
OTHER HOME MENU FUNCTIONS
The push functions of the ve knobs provide access to other areas:
Tuner (Page 110)
Layout grid (Page 8 and Page 33)
Controllers (Page 105)
Setup (Page 3 and Page 112).
A mini-Tuner appears at the top of the Home page itself!
The Home menu also provides access to the Presets directory page,
listing all presets in a scrolling list sorted by number.
Preset
Previous Scene
Next
Preset
Next Scene
PAGE to Presets for the directory.
To sort alphabetically by name, press the “Sort A–Z” button.
The ENTER key loads the selected preset and returns to the Home page.
The Meters page provides visual indication of all input and output levels, including USB.
7
1 INTRODUCTION
INTRO TO THE LAYOUT GRID
Behind every Axe-Fx III preset is the Grid, a matrix of rows and columns that is the key to unlocking the true
potential of this unit. In the world of traditional gear, our options are limited by budget, space, weight, and the
limits of the equipment itself. Building a rig means hard choices. With the Axe-Fx III however, a limited selection
of gear is instead replaced by a vast, ever-growing “inventory” of virtual amps, cabs, effects, and more. Every
preset gives you the flexibility to design a unique rig composed of different components.
Let’s lay out the terms of preset creation. To create a preset, virtual pieces of gear are selected from the
inventory and placed as blocks into the slots of the layout grid. Each block represents a different component like
a wah pedal, amp, or reverb unit. Blocks are then connected together using virtual cables. You can create splits,
merges or multiple parallel paths as needed. Passive shunts carry signal through otherwise empty spaces on the
grid. Special input and output blocks connect to the various jacks and USB signals of the Axe-Fx III.
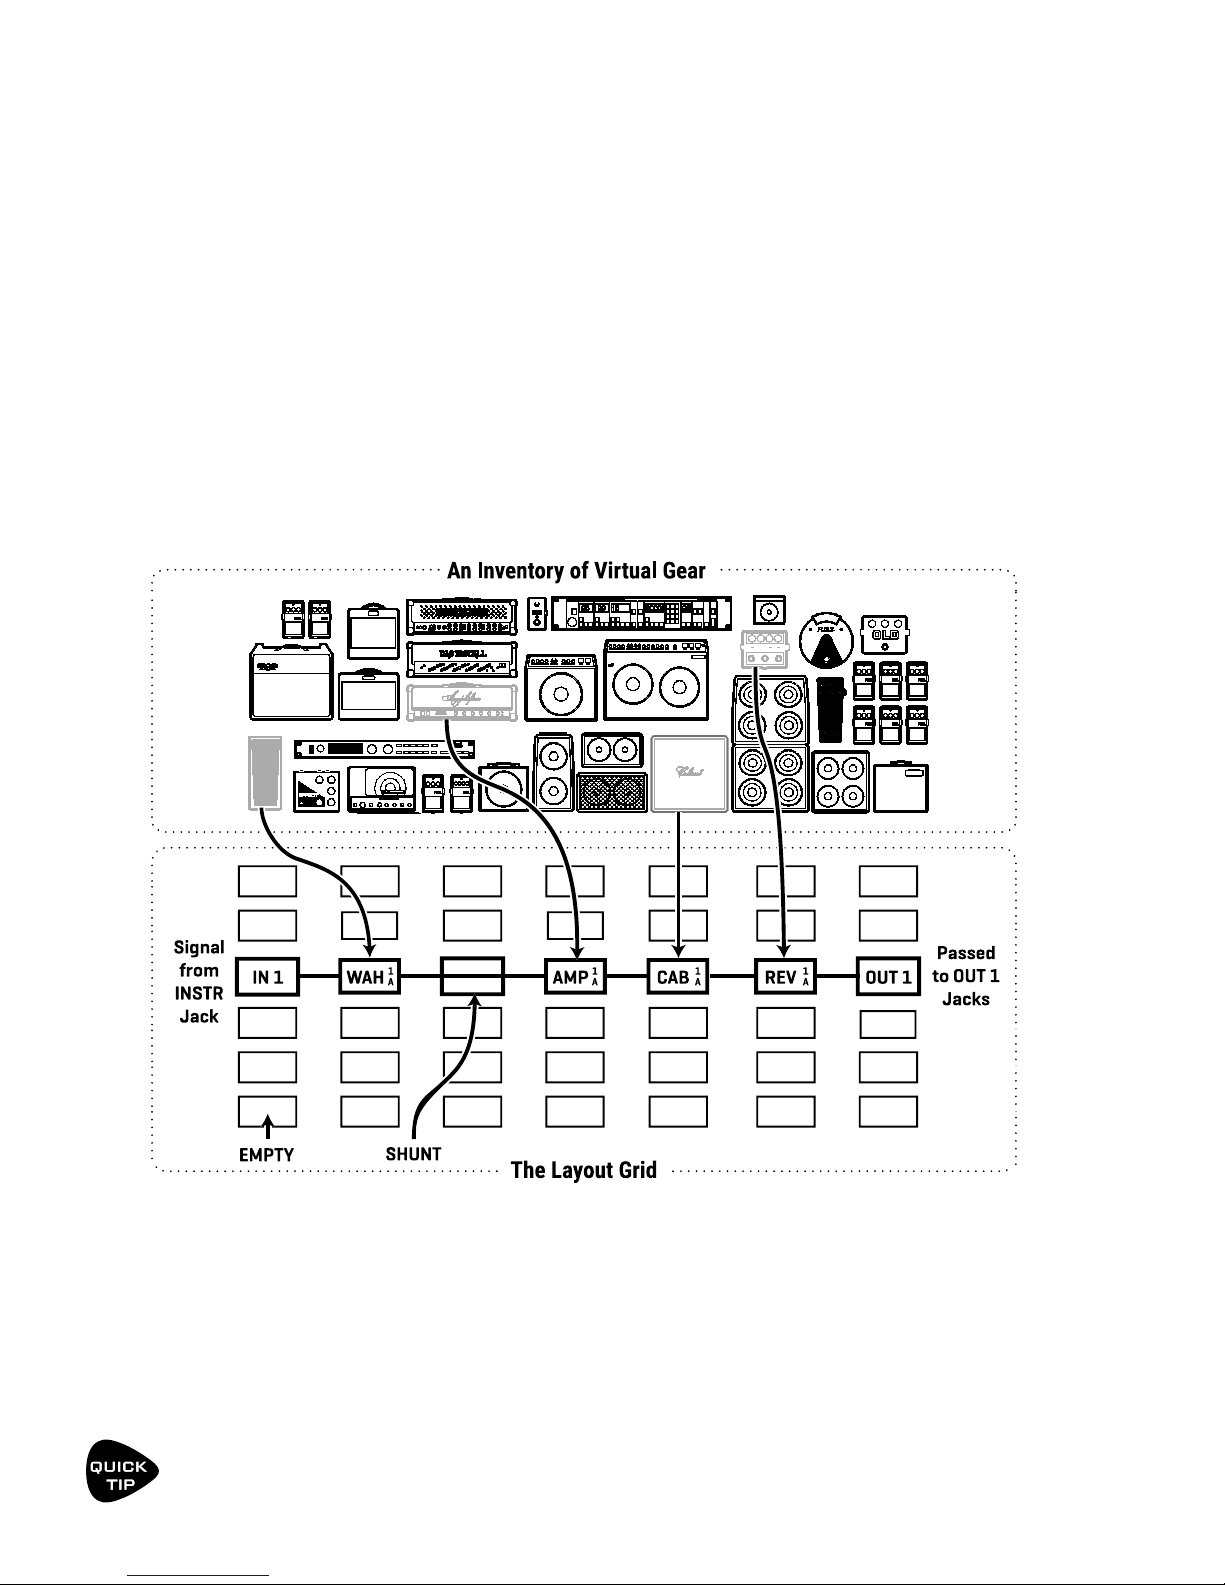
The following illustration shows the inventory concept with several items placed on the grid as blocks.
Let’s review what is happening above. Signal flow begins at the Input block on the left. It is then routed to a
Wah block, which in turn feeds a shunt. The shunt has no effect on the sound and is shown only to introduce the
idea of how it carries signal from one location to another. The shunt is connected to an Amp block (we might
set its type to “Plexi 100W High”), which in turn feeds a Cab (one of the many “4×12” options, perhaps). This is
connected to a Reverb and then to an Output block. In this limited example, many grid spaces are empty, and only
half of the columns are actually shown! The size of a preset is limited only by the grid structure, block inventory,
and total processing power (“CPU”). You will nd that you can create very large virtual rigs with multiple amps,
cabs, and effects.
A new “ZOOM” feature shows the whole grid at once. Look for the ZOOM button on Layout menu pages.
8
1 INTRODUCTION
INTRO TO SCENES AND CHANNELS
Imagine a rack system like the ones used by guitar players over the past 35+ years. In this system, various effect
pedals, amps, and rack units are connected with a central switching system, which places other components in or
out of the signal path. Some of the effects may also have settings that the switcher can control remotely—like the
channels on an amp, or preset selection on a delay. Using the switcher, you would set up different combinations
and settings and then save each as a preset: Clean, Rhythm, Lead, etc.
If (as discussed on the previous page) each Axe-Fx III preset is like an entire rig, then Scenes are similar to the
presets of the system described above. A Scene stores whether each block is engaged or bypassed, and which
of up to four “channels” it should be on. A Channel is like a preset within a block. Each block has up to four
channels, and each channel has fully independent parameters. For example, Channel A of a Drive block might
be a “clean boost”, B could be a “screamer” type with low gain and medium level, C could be that same screamer
“dimed”, while D is a super-saturated fuzz. That’s four different sounds from just one block, and almost every
block has four channels! By combining different blocks and channels, Scenes offer an incredibly powerful way to
create sounds.
Scenes also offer a big advantage over presets in that when you change scenes, the Axe-Fx III doesn’t need to
reload an entire rig. Instead, it just instantly sets the blocks and channels as needed for the new scene. Reverb
and delay effects are easy to set up for “spillover” so tails can ring out. On the Axe-Fx III, scenes even have their
own names, which is especially helpful.
SCENES AND CHANNELS: A VISUAL EXAMPLE
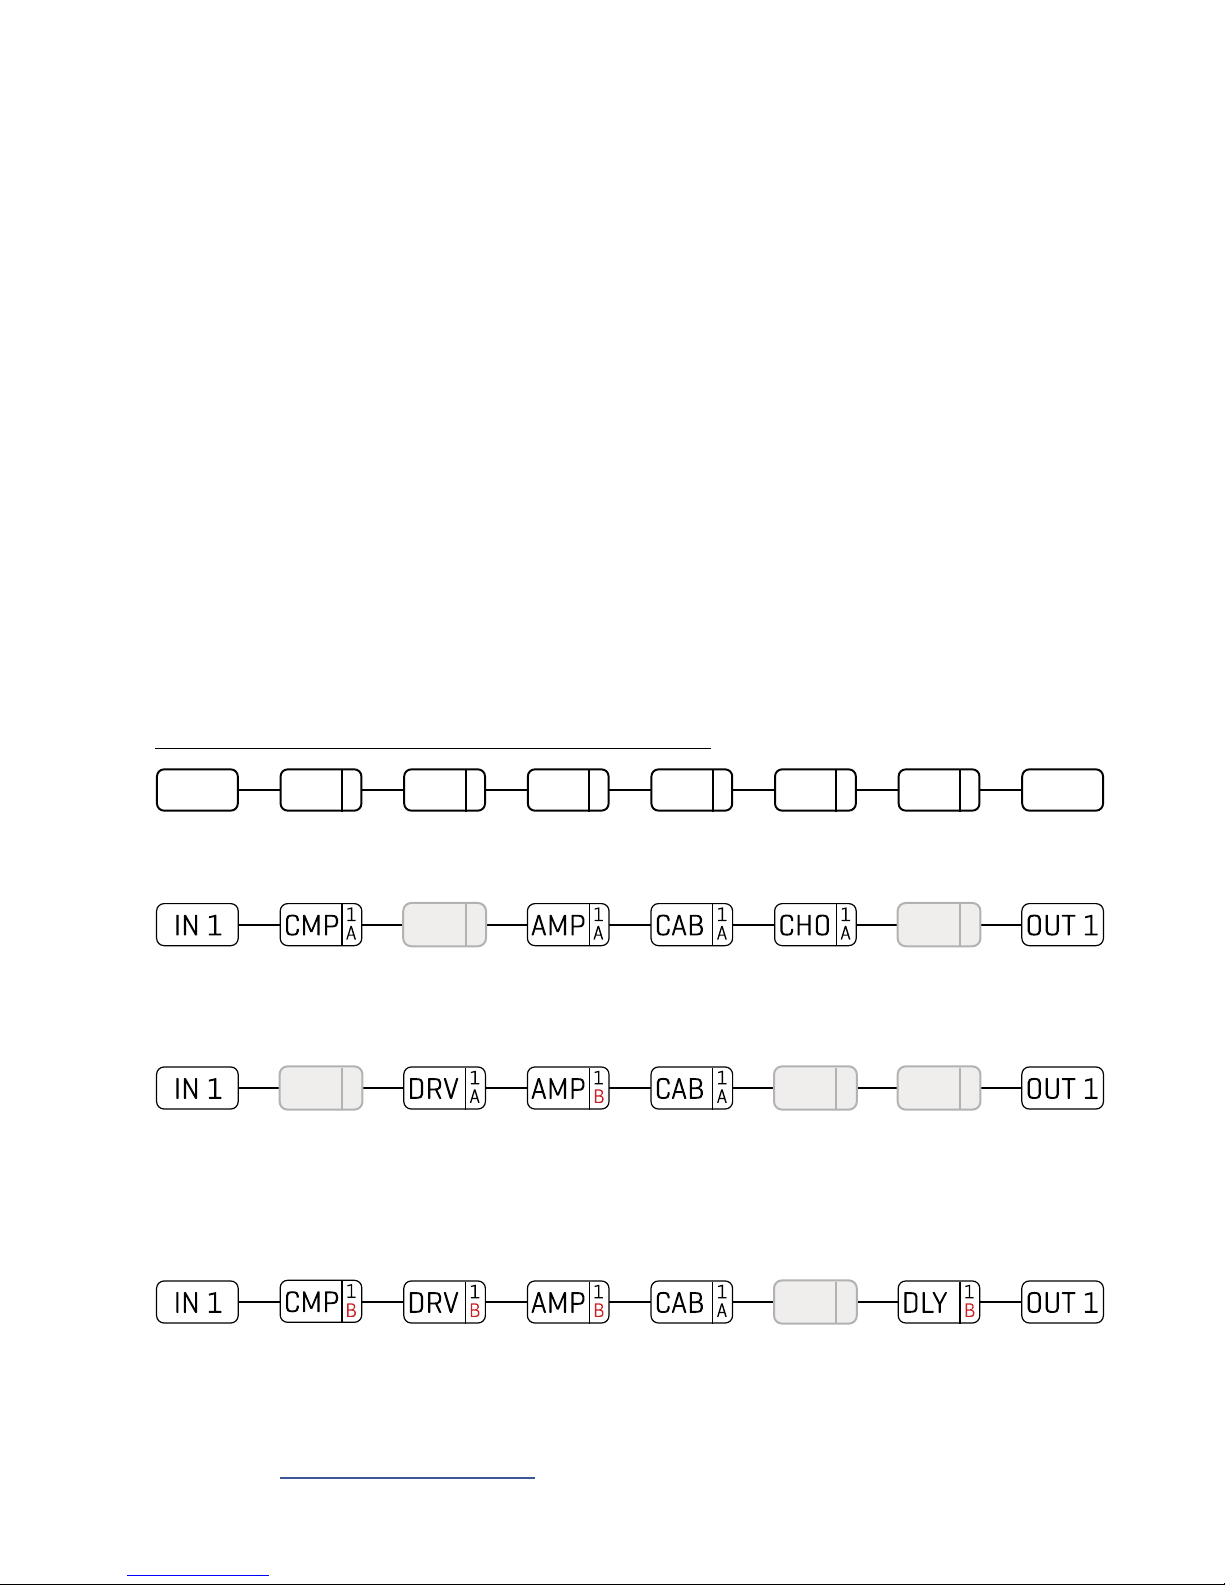
IN 1 CMP
Here is our preset. The Input 1 block feeds a Compressor followed by a Drive, then into an Amp and Cab,
followed by Chorus and a little Delay, ending up at the Output 1 block.
1
A
DRV
DRV
SCENE 1 – “Clean”: For scene 1, the Drive and Delay blocks are bypassed. We dial in the Compressor, Amp,
Cab, and Chorus for a classic clean tone. Notice that the amp says “1A”. This means we are using Amp 1, set
to channel A. Let’s imagine it as the “ODS-100 Clean” model. We name the scene “Clean”.
CMP
SCENE 2 – “Crunch”: To create scene 2, we bypass the Compressor, Chorus and Delay and engage the Drive.
The Channel of the Amp block is changed from “A” to “B”, which we dial in as a “Euro Blue” model. Remember,
each channel has a totally independent set of settings, so we can dial in every amp parameter exactly as we
wish for this scene: Drive, Treble, Mid, Bass, Master, and many, many more. We dial in Channel “A” on the drive
block with a good “screamer” sound by selecting the “TS808 OD” type. Let’s name this scene “Crunch”.
1
A
1
A
1
A
AMP
1
A
CAB
1
A
CHO
CHO
CHO
1
A
DLY
DLY
1
A
1
A
DLY
1
A
1
A
1
A
OUT 1
SCENE 3 – “Lead”: Here’s our soaring lead. The Chorus is bypassed. We’ve changed the compressor to
Channel “B” and dialed it in for sustain. The amp is the same as the “Crunch” scene but Drive changes to “B”,
which we’ll make a “Fat Rat”. The Delay is on channel “B” dialed in with higher mix and feedback.
Learn more in “Scenes & Channels” on p. 42
9
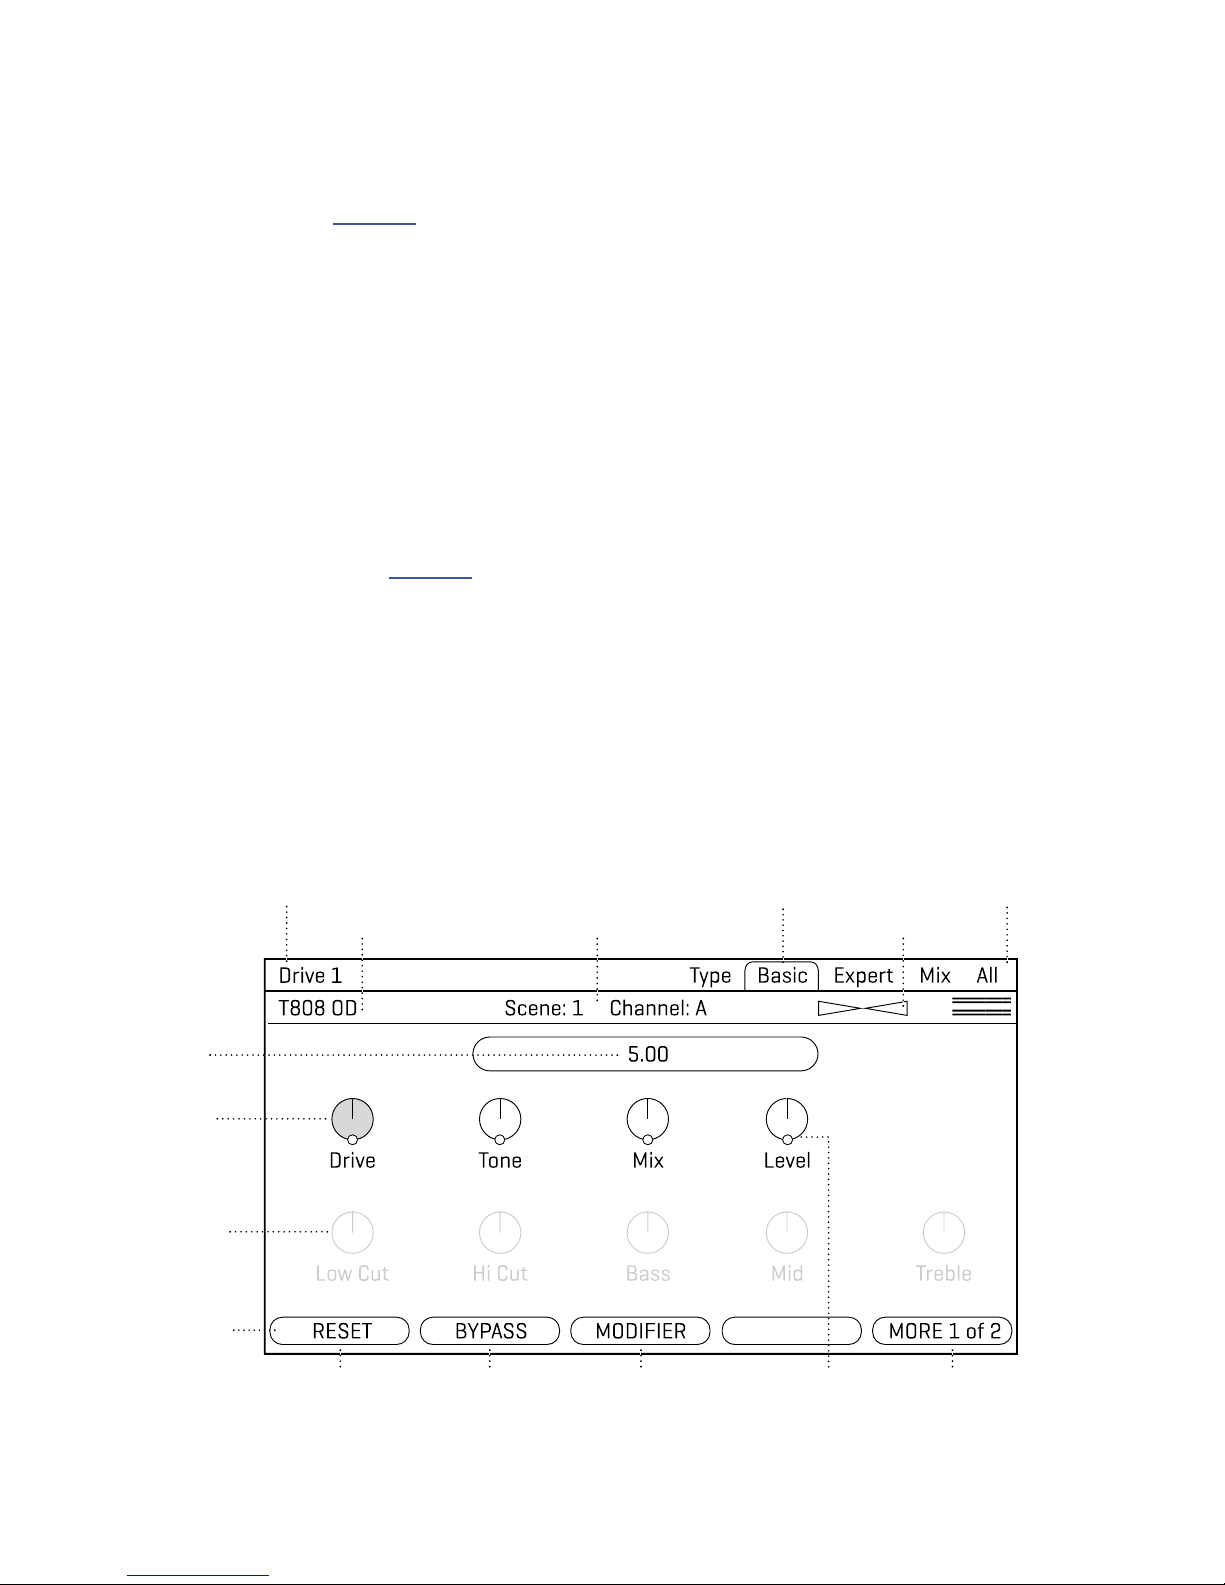
1 INTRODUCTION
Block Name and Number Menu Pages (Tabs) I/O Meters
to change rows
Scene/Channel
GRID EDITING: QUICK START
Learn more about the grid in Section 5. Meanwhile, here’s a very quick primer:
From the Home page, press LAYOUT (knob C) or ENTER to show the grid (the Edit page of the Layout
menu). Note that the “push” function of the main VALUE knob also serves as a shortcut to Layout.
Use the NAV buttons to move the cursor around the grid.
Turn the VALUE knob to cycle through the inventory of blocks. When you nd the
block you want, press ENTER to conrm. Press EXIT to cancel changes.
On the grid, “push” functions of the B, C, and D knobs allow you to toggle a block’s Bypass state,
Delete a block, or create/remove a connector Cable between any two blocks in adjacent columns.
To save any changes, press STORE, ENTER, ENTER.
BLOCK EDITING: QUICK START
Learn more about editing blocks in Section 5. Meanwhile, here’s a very quick primer:
On the grid, select the desired block and press EDIT to open its menu.
Use the PAGE buttons to navigate menu pages.
Many blocks have a TYPE page, which allows you to dial in classic settings instantly. Examples
include setting an amp to “USA Lead+”, a drive to “Face Fuzz”, or a reverb to “Large Spring”.
Use the A, B, C, D, and E knobs to edit on-screen parameters. From
any block’s Edit menu, press EXIT to return to the grid.
To save any changes, press STORE, ENTER, ENTER.
The stylized diagram below shows a typical edit menu page with annotations:
Parameter
Value Box
Parameter
Highlighted
Inactive Row
is dimmed
(NAV Up/Down
Push Functions
Block Type
Current
Current
)
(A—E)
Resets
this Block to
defaults
Bypass or
Engage this
block
Adds a Modifer
to the current
parameter
A yellow dot
shows Modifier
capability
TunerCurrent Scene/Channel
Reveals the
Selector
10
1 INTRODUCTION
USB OVERVIEW
USB provides the Axe-Fx III with a host of great features. A 16-core, 500 MHz microcontroller provides 16
channels of flawless USB audio (8 in, 8 out) allowing the Axe-Fx III to be the center of your music workstation. The
audiophile-grade signal path components and converters provide better audio performance than most dedicated
USB audio interfaces. With 8×8 channels you can record multiple tracks of processed audio and DI signals,
monitor backing tracks, audition stereo re-amps in real-time, and more. A USB audio sound source can even be
placed on the grid for processing via the dedicated USB Input block.
USB is also required to use Axe-Edit and Fractal-Bot, the companion software products for the Axe-Fx III.
See Section 3: USB, on p. 18 for full details on the USB capabilities of the Axe-Fx III.
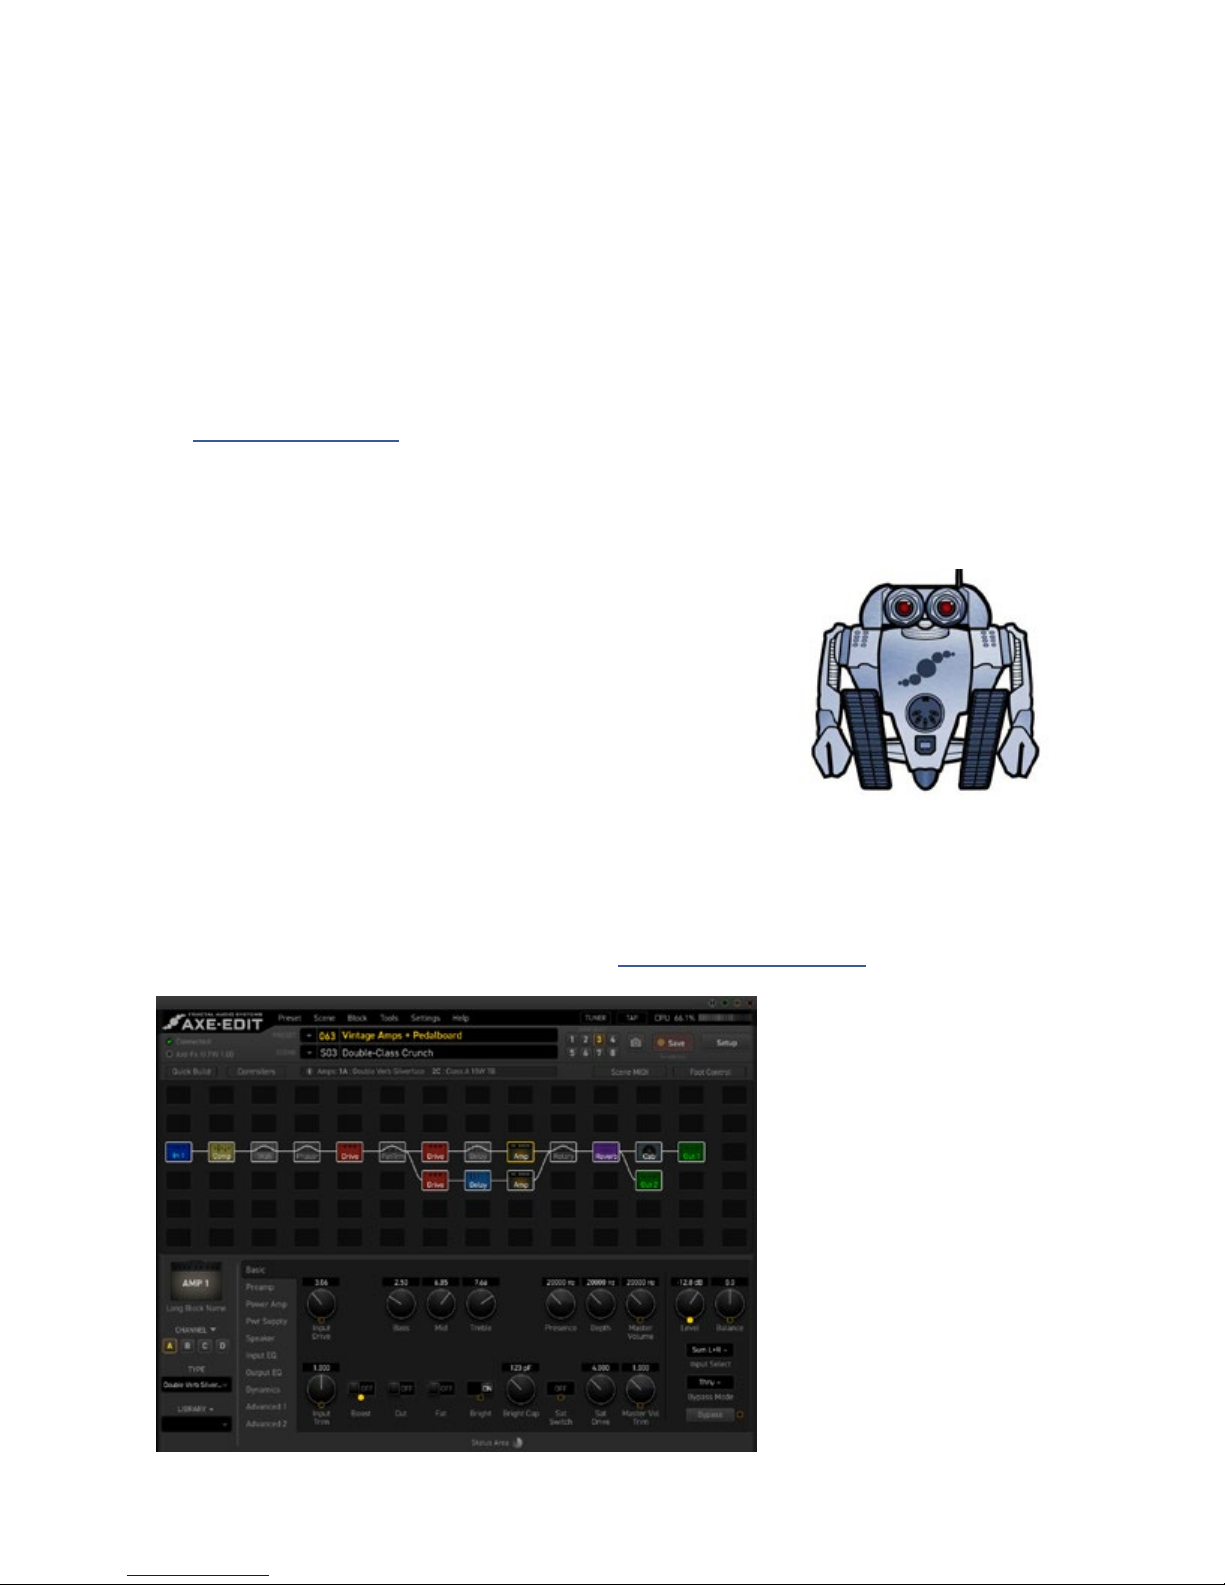
FRACTAL-BOT & AXE-EDIT III
In addition to providing audio and MIDI capabilities, connecting the
Axe-Fx III to a computer via USB allows you to use companion software
applications Fractal-Bot and Axe-Edit III.
Fractal-Bot is a small, simple program used to update the Axe-FxIII when
new rmware is released. It includes tools to backup or restore presets
and other custom settings, and can be used to install downloaded presets
or cabs.
Axe-Edit III is a full-featured software editor/librarian for the Axe-Fx III.
If you are comfortable with audio software or plug-ins, you will probably
enjoy using this program to work with the Axe-Fx III. While every function
of the Axe-Fx III can be operated from the unit’s front panel, Axe-Edit III brings a new level of convenience,
including some “power-user” routines that aren’t possible on the unit itself (e.g. Block Library and Scene Swap). It
also provides great tools for managing presets and banks, installing Cab Packs, and more.
You can download Axe-Edit III for Mac or Windows at http://www.fractalaudio.com.
11
1 INTRODUCTION
CONNECTING PEDALS DIRECTLY
This section is for pedals connected to the local “Expression” jacks of the Axe-Fx III.
For pedals connected to a connected via MIDI or an FC Series controller, see the next page.
Each of the two local Expression jacks of the Axe-FxIII allows you to connect one expression pedal or one
external footswitch. A connected pedal or switch can change effect parameters, or operate any of a long list of
global functions. Many factory presets are ready for use with one or more pedals.
TO CONNECT & CALIBRATE AN EXPRESSION PEDAL...
Expression pedals for the Axe-Fx III should have a linear resistance taper and must have a maximum resistance in
the range of 10–100kΩ. Expression pedals must be used with Tip-Ring-Sleeve (TRS) cables!
Connect your expression pedal to the desired jack with a TRS cable, then follow these instructions to calibrate:
Page to the Pedal page of the I/O menu under SETUP.
Ensure that Pedal Type is set to “CONTINUOUS”.
Navigate to the Calibrate Pedal function and press the ENTER button.
Follow the on-screen instructions to perform calibration.
TO CONNECT A SWITCH...
Follow the instructions above and simply set Type to “MOMENTARY” or “LATCHING” based on what you’re
connecting. (If you’re not sure, check with the switch manufacturer or try both settings to see which works
better.) Calibration is not required. You can use a normal guitar cable (TS) for switches.
THE EV-SERIES EXPRESSION PEDAL
The Fractal Audio Systems EV series of expression pedals are perfect for use with all Fractal Audio Systems
products. The EV-1 is a full-sized expression pedal. The EV-2 is a compact version. These pedals feature rugged
cast metal casings, a high quality 100kΩ potentiometer, and built-in analog volume pedal capability. Learn more
at https://www.fractalaudio.com.
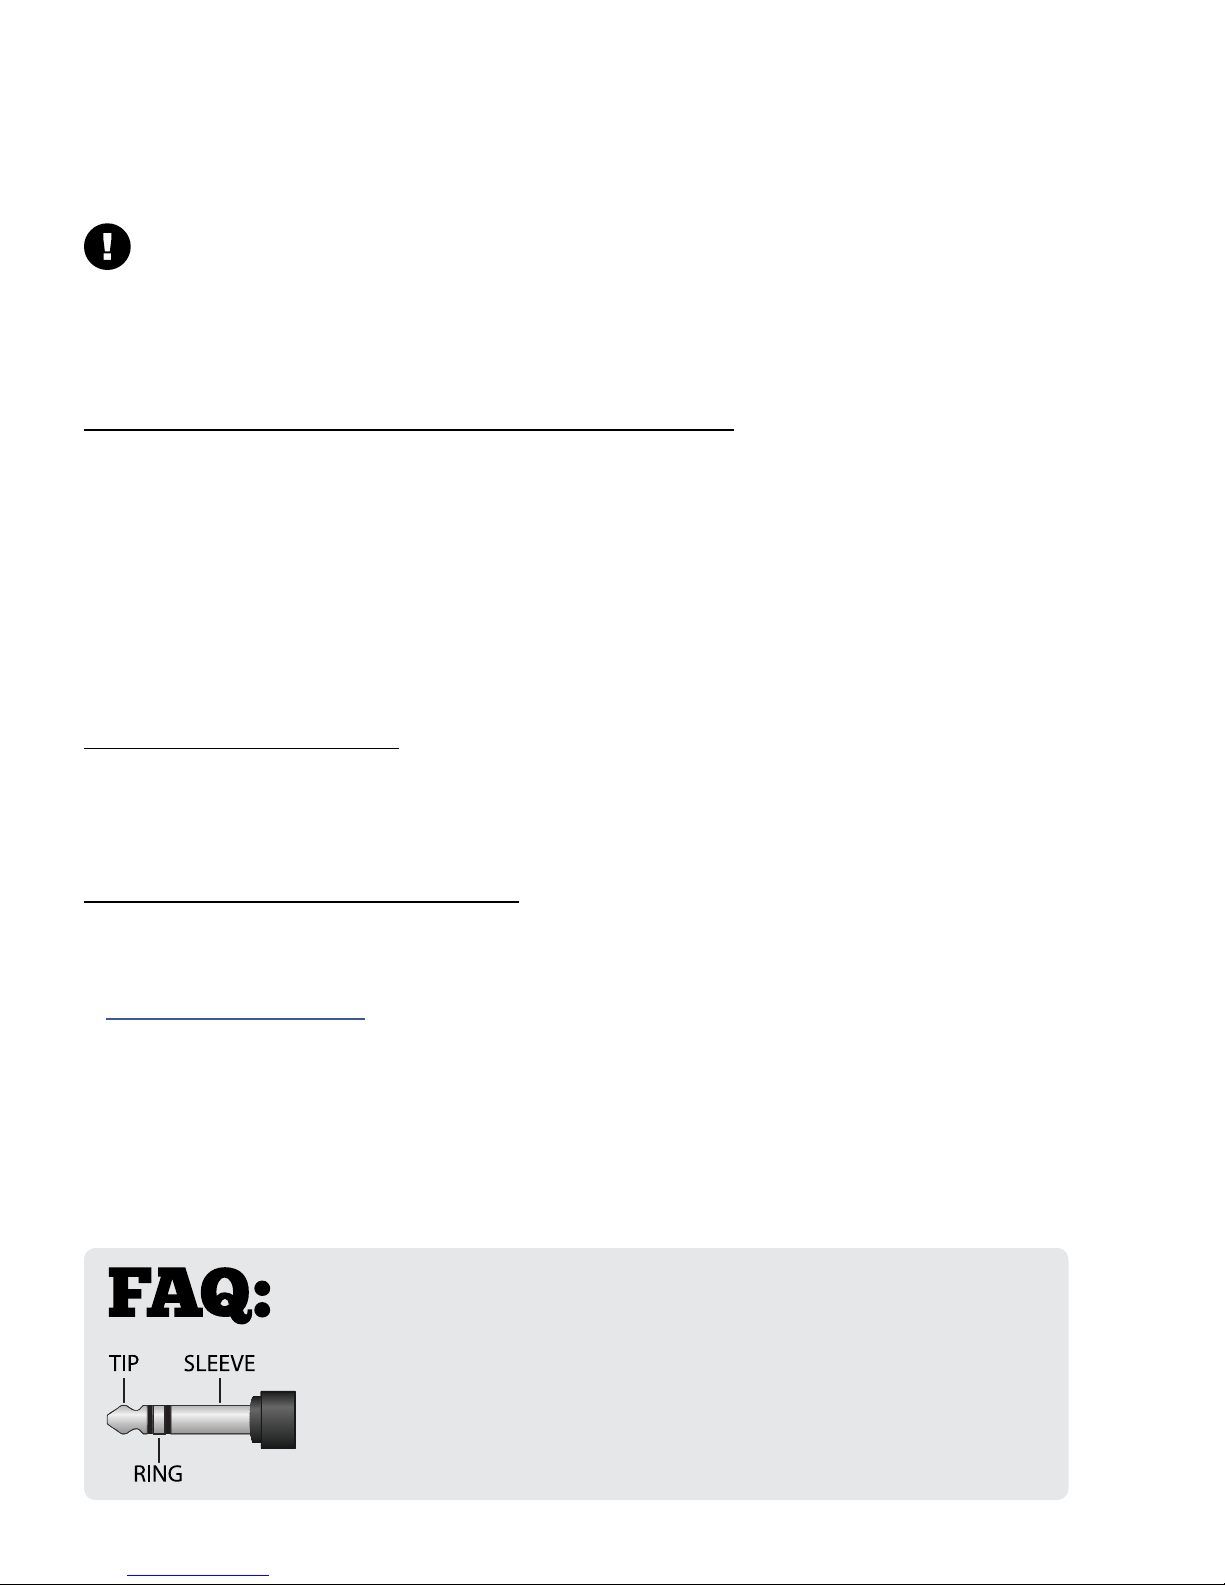
WHAT IS TRS? “TRS” stands for TIP-RING-SLEEVE and describes the
conguration of a 1/4" end plug or jack with three connectors. Normal guitar
cables are “TS” (Tip-Sleeve) since they lack the ring required for a third contact.
Expression pedals require TRS cables because full control voltage is transmitted to
them on one contact (the tip), while less than full voltage is returned to on another
(the ring) so the host device is able to sense and utilize the pedal position. The
third contact (sleeve) is connected to ground.
12

1 INTRODUCTION
GLOBAL EXPRESSION PEDAL SETUP
Once you have connected and calibrated a pedal according to the instructions on the previous page, or if you are
using a MIDI or FC-connected pedal, you can globally assign it as “External 1”. Numerous factory presets are set
up to respond to this global controller.
To set up “External 1” to respond to your connected pedal:
1. From the Home page, open SETUP: MIDI/Remote: External.
2. NAV to External 1.
3. Turn the A or VALUE knob to assign the external controller to your selected entry:
Select “PEDAL 1” or “PEDAL 2” for the onboard Expression jacks.
Select “FC__ PEDAL __” for a pedal connected via an FC series controller.
Select a number if your pedal is transmitting a MIDI CC#. For example, by default, the Fractal Audio
Systems MFC-101 transmits CC#11 for XP1 and CC#16 for XP2.
4. EXIT when nished. Most of the rst 100 Factory Presets contain a Wah block you can test with.
Learn more about assigning pedals and switches to sound parameters in Section 9: Modiers.
GLOBAL VOLUME PEDAL SETUP
The Axe-Fx III allows remote control of the volume at all input and output blocks. If you have a second pedal, or if
you want to use one pedal for global volume instead of expression, follow the instructions below to set it up.
Adjusting Input volume affects gain/distortion and the behavior of level-dependent blocks like the compressor or
gate. Adjusting Output volume does not affect level-dependent blocks, but scales everything you hear including
effect tails. For all other volume options, you can insert a Volume block anywhere in your preset and control it
with a pedal as described in “Modiers” on p. 99.
First ensure that you have an expression pedal connected and ready to use. Then:
1. From the Home page, open SETUP: MIDI/Remote: Other.
2. NAV to the entry for the volume you want to control: Input 1, 2, 3, or 4, or Output 1, 2, 3, or 4.
3. Turn the A or VALUE knob to assign a controller to your selected entry.
Select “PEDAL 1 or PEDAL 2” for the onboard Expression jacks
Select “FC__ PEDAL __” for a pedal connected via an FC series controller.
Select a number if your pedal is transmitting a MIDI CC#. For example, by default, the Fractal Audio
Systems MFC-101 transmits CC#11 for XP1 and CC#16 for XP2.
4. Test and EXIT when nished.
Learn about other options for global remote control in “The MIDI/Remote Menu” on p. 117.
13
2 HARDWARE OVERVIEW
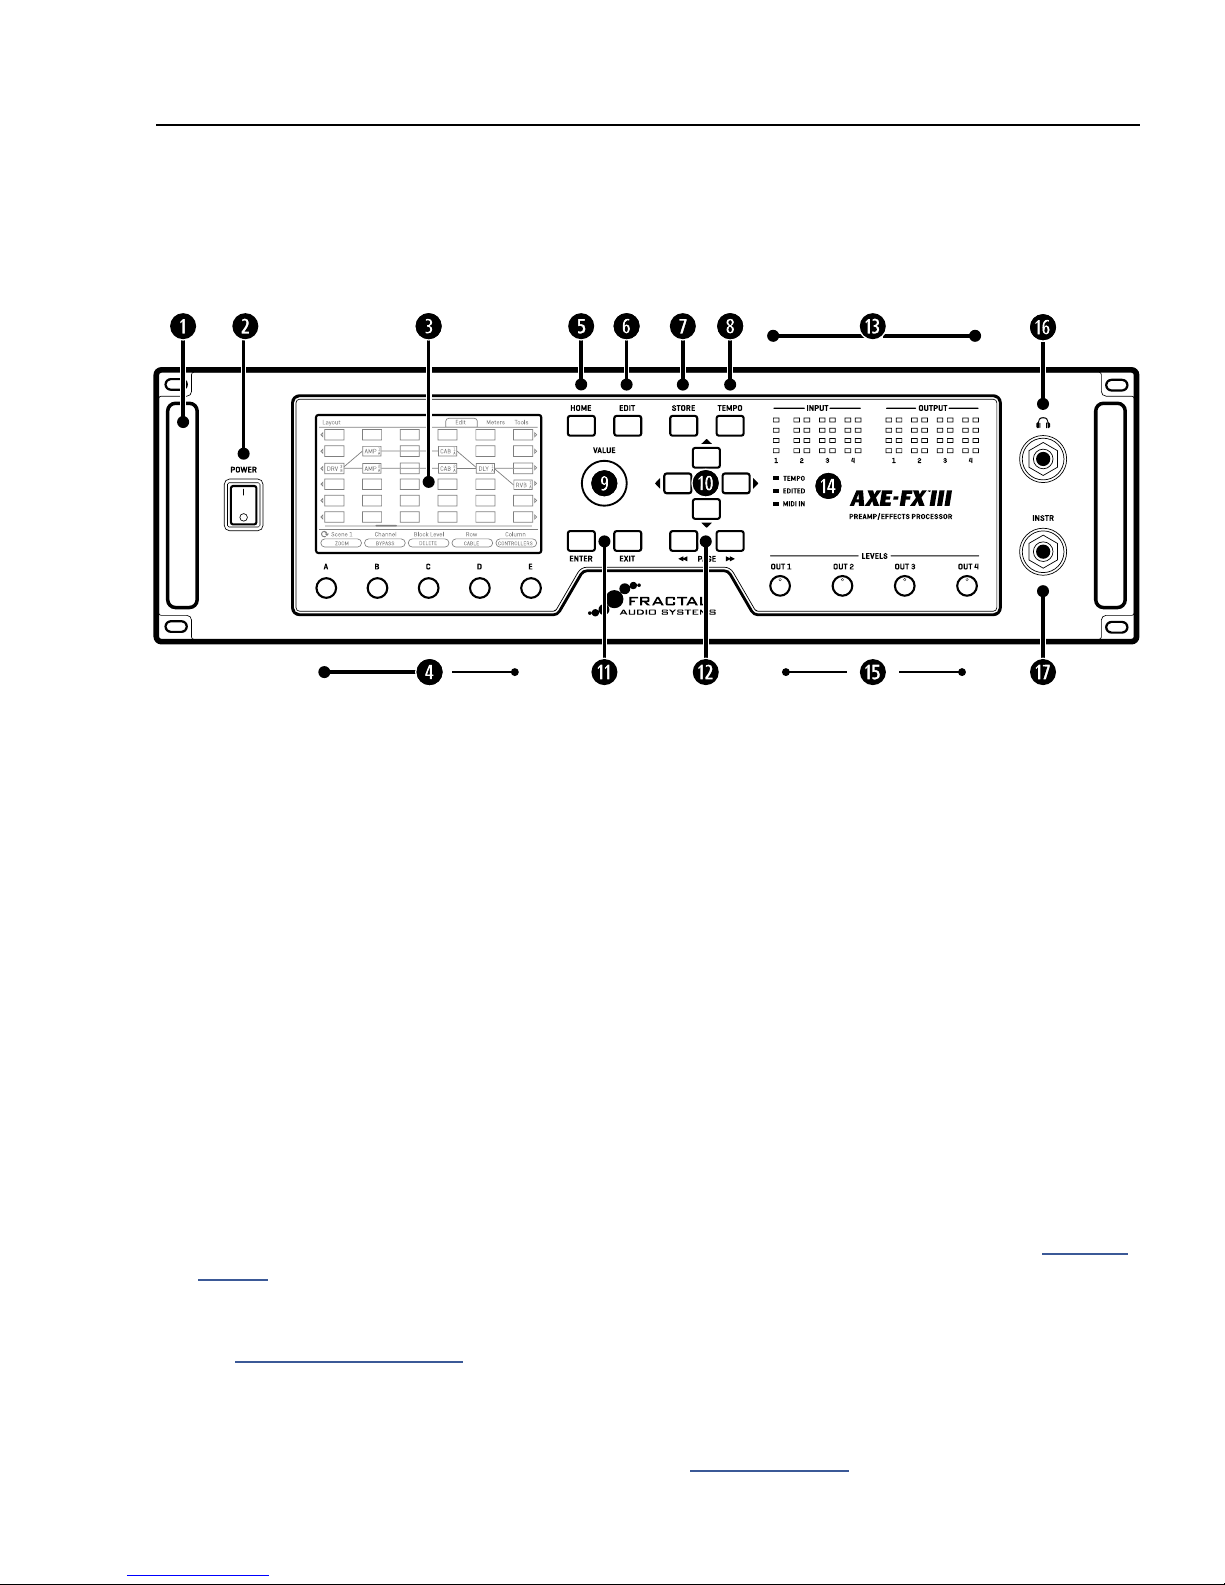
THE FRONT PANEL
2 HARDWARE OVERVIEW
Chassis — The Axe-Fx III is housed in a rugged 3U steel chassis with a sleek anodized aluminum front panel.
q
A pair of high-strength handles make the unit easy to manage.
Power Switch — The front panel power switch turns the Axe-Fx III on or off and features pop suppression.
w
Color Display — A large 800×480 color display features 30x the resolution of our previous models. This new
e
display is optimized for readability in the most difcult conditions, with greater brightness and contrast than
“off-the-shelf” displays.
A, B, C, D, and E knobs — Five endless rotary push-encoders perform different functions depending on which
page is shown in the display. Most Edit pages show one or two rows of ve knobs for easy 1:1 operation. On
vertical menu pages, knob functions are indicated on-screen by labels (“A” through “E”).
The Push functions of the ve knobs are shown on-screen as buttons.
HOME Button — This button shows the Home menu—a convenient starting point for loading or editing
presets, and accessing the tuner, controllers, metering, and global setup options.
EDIT Button — This button opens the Edit menu for a block selected on the Layout grid. You can also tap
EDIT sequentially to step through all blocks in the current preset (top-to-bottom, left-to-right). See “Presets”
on p. 32 for more on editing presets.
STORE Button — Enters the Store menu where you can save presets and enter names for presets or scenes.
See “Saving Changes” on p. 40.
TEMPO Button — Tap this button once to show the Tempo page of the Controllers menu, or tap 2+ times to
set a new tempo. The tempo can also be entered using MIDI or a remote switch. After setting the tempo,
press EXIT to go back to back to wherever you were. See “Tempo” on p. 108.
14

2 HARDWARE OVERVIEW
VALUE Knob — The VALUE knob performs different functions on different menu pages. In the Home menu,
it selects presets. In Layout (grid) pages, it is used to add or modify blocks on the grid. In Edit menus, it
changes parameter values, selects from lists, and more. A hidden “push” function enters the Layout (grid) of
the current preset from other pages or menus.
NAV Buttons — The four NAV buttons perform different functions on different menu pages. On the preset
a
pages of the Home menu, they select and load Presets (Left/Right) and Scenes (Up/Down). In other menu
pages, they select between on-screen parameters or options, moving the “focus” of the VALUE knob, as
indicated by a blue highlight and brighter blue text.
ENTER and EXIT Buttons — The ENTER button executes commands, commits changes, accesses sub-menus,
s
and more. EXIT works for cancel, escape, and various other functions.
PAGE LEFT and PAGE RIGHT Buttons — These buttons step through menu pages, shown as “tabs” at the top
d
of the display.
Meter Bridge — Eight LED meters show the level of every input and output. NOTE: In contrast to our previous
f
products, the red LEDs now all come on at -1 dBFS and are therefore a more immediate indication of
clipping. You can also nd on-screen meters on the Meters pages of the Home menu and the Layout.
Status LEDs — Three LEDs indicate important information. The Tempo LED flashes to show the current
g
Tempo. The Edited LED lights whenever the current preset has been altered but not saved. The MIDI In LED
lights while MIDI data is being received at the MIDI Input or via USB.
Output Level Knobs 1–4 — These knobs independently control the volumes at the corresponding rear panel
h
outputs. The Output 1 knob simultaneously controls Output 1 XLR and quarter-inch jacks, and the headphone
output level. Outputs 3 and 4 are at unity gain when set fully clockwise.
Headphones Output — 1/4" Stereo Jack — Connect headphones here to monitor Output 1 (see above).
j
Front Panel Instrument Input (mono) — (1) 1/4" Jack (unbalanced) — Plug your instrument into this jack
k
intended specically for use with electric, acoustic, and bass guitars. See Notes below for details about both
front and rear instrument inputs.
NOTES ABOUT BOTH FRONT & REAR INSTRUMENT INPUTS
The front Instrument input always over-rides the rear. This allows you to build a rig using the
rear input—with a wireless unit, for instance—and then use the front input at any time simply by
plugging in a cable there. There are no options for this; the input always switches automatically.
Both front and rear Instrument inputs feature Secret Sauce IV circuitry, which lowers the
noise floor using a proprietary technique along with special analog input circuitry.
You can use traditional effect pedals between your guitar and the Axe-Fx III. You may need
to trim the input when using a loud guitar or pedal. See “Setting Levels” on p. 5.
The Input 1 block sets the impedance for Input 1 automatically, or can be manually overridden for
“loading” effects on your pickups. See “Input 1/Instrument Impedance” on p. 54.
15

2 HARDWARE OVERVIEW
THE REAR PANEL
ANALOG INPUTS
Axe-Fx III inputs are extremely flexible. Any input can be placed as a block on the grid for use in any number of
scenarios. Example rig diagrams are provided in Section 4.
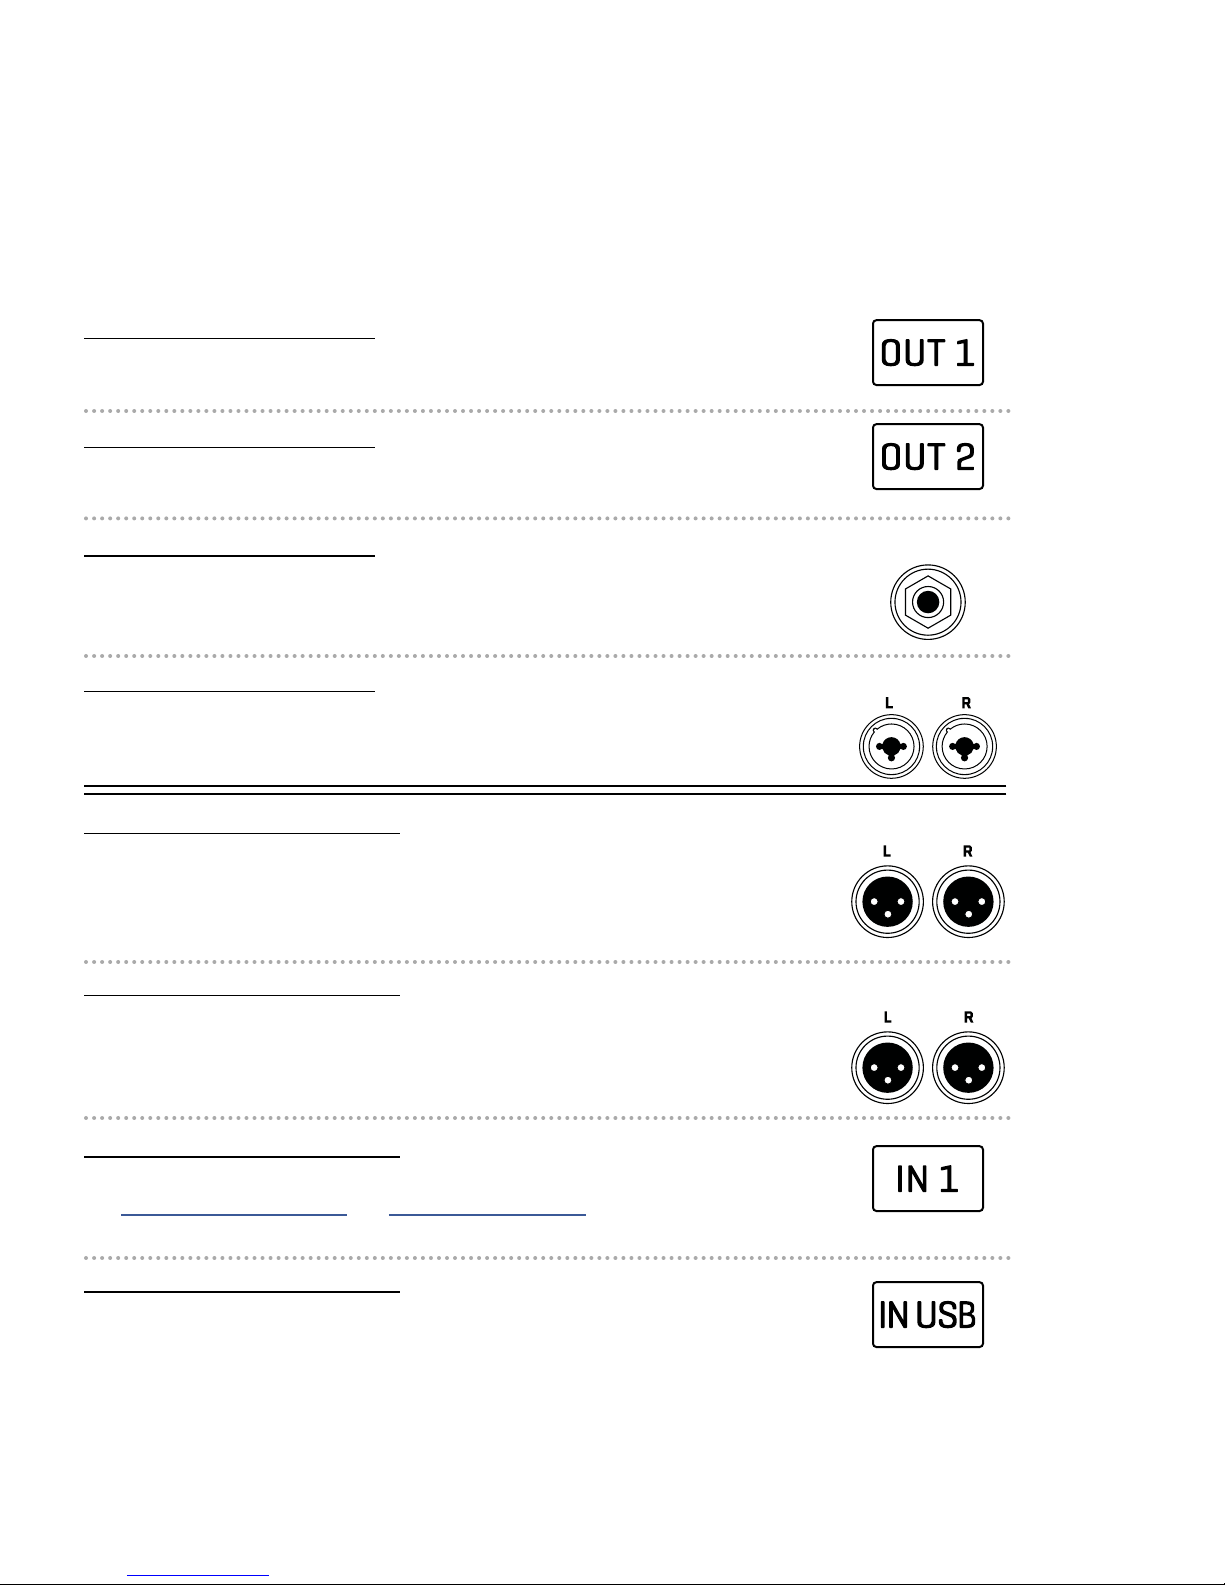
Input 1 [Instrument] (mono) — (1) 1/4" Jack (unbalanced) — Plug your instrument into this jack intended
l
specically for use with electric, acoustic, and bass guitars. See Notes (previous page) for details.
Input 2 L+R (stereo) — (2) XLR/1/4" Combo Jacks (balanced) — These combo jacks combine XLR female and
;
1/4" jacks in one, accepting either balanced or unbalanced line level signals.
Input 3 L+R (stereo) — (2) 1/4" Jacks (balanced) — Input balanced or unbalanced line level signals.
2)
Input 4 L+R (stereo) — (2) 1/4" Jacks (balanced) — Input balanced or unbalanced line level signals.
2!
Balanced audio connections are resistant to noise and interference. It is best to use XLR or TRS (3-conductor)
cables when connecting Axe-Fx III inputs 2, 3 and 4 to the balanced outputs of other devices. Regular TS-type
“patch” cables (2-conductor) are sufcient when connecting to unbalanced outputs.
ANALOG OUTPUTS
As with inputs, outputs are placed as blocks on the grid for use in any number of scenarios; though in this case
the various XLR and 1/4" Humbuster jacks suggest different uses for different outputs. Example rig diagrams are
provided in “Setting Up” on p. 22.
Humbuster technology on all 1/4" outputs can signicantly reduce hum from ground loops. Humbuster Cables are
available at http://shop.fractalaudio.com. Learn more on p. 6.
Output 1 L+R (stereo) — (2) XLR-Male (balanced) and (2) 1/4" Jacks (Humbuster)
2@
Use the XLR jacks to connect Output 1 to balanced inputs, employing the provided ground lift switch if
necessary to reduce 60-cycle hum. Use the 1/4" unbalanced Humbuster outputs to connect to unbalanced
inputs, such as those on guitar power amps and other devices.
16

2 HARDWARE OVERVIEW
Note that Output 1 is utilized as the main output in all factory presets.
Output 2 L+R (Stereo) — (2) XLR-Male Jacks (balanced) — Use the XLR jacks to connect to balanced inputs.
2#
Use the ground lift switch if necessary to reduce unwanted 60-cycle hum.
Output 3 L+R – (Stereo) — (2) 1/4" Jacks (Humbuster) — Use these 1/4" unbalanced outputs to connect to
2$
unbalanced inputs, such as those on some guitar power amps or other devices.
Output 4 L+R – (Stereo) — (2) 1/4" Jacks (Humbuster) — Use these 1/4" unbalanced outputs to connect to
2%
unbalanced inputs, such as those on some guitar power amps or other devices.
Outputs 3 and 4 are designed for unity gain applications such as the popular “Four-Cable Method” and other
scenarios. Set the OUT 3 and OUT 4 Level knobs fully clockwise for unity gain. See the relevant rig diagrams
in Section 4 for more information.
Digital Inputs and Outputs — This includes both S/PDIF and AES/EBU format input and output jacks. Only
2^
one or the other pair can be active at any time depending on the setting of the SPDIF/AES Select parameter
found in SETUP: I/O: Audio. These jacks transmit and receive at a xed rate of 48k. The Axe-Fx III defaults to
using its internal clock but can also use Word Clock signals received at the digital input. Find descriptions of
these and other related parameters on “I/O: AUDIO Page” on p. 114.
Expression Inputs — (2) 1/4" Jack — These are used to connect an external expression pedal or switch to
2&
control various functions of the Axe-Fx III. See “Connecting Pedals Directly” on p. 12 for more information.
FASLINK II Connector — The FASLINK II connector allows you to connect the Axe-Fx III with our new FC-6
2*
or FC-12 foot connectors. A standard XLR cable powers the FC without an external “wall wart” adapter, and
carries 2-way communications.
NOTE: The FASLINK II port on the Axe-Fx III is designed for our FC Series of foot controllers and is NOT
compatible with the FASLINK port on our MFC-101 MIDI foot controller. Connecting an Axe-Fx III to an MFC-101
via FASLINK should not cause any damage, but it will not work.
USB — This provides the Axe-Fx III with 8×8 USB audio and 2-way MIDI capabilities when connected to a
2(
compatible Mac or PC for use with Axe-Edit III, Fractal-Bot, a DAW or other audio/MIDI applications. Drivers
are required for Windows. No Driver is required for Mac OS X. Connect the Axe-Fx III via USB and it will
appear under System Preferences and all Audio/MIDI apps.
MIDI Ports — The MIDI IN port of the Axe-Fx III allows you to control various MIDI functions including preset
3)
and scene selection, effect bypass, channel changes, parameter changes, and more. Messages received
at the MIDI IN port are passed to the MIDI THRU port. The MIDI OUT port transmits MIDI data to connected
devices.
See “The MIDI/Remote Menu” on p. 117 for details on how to congure the MIDI Channel and other options.
MIDI messages can also be transmitted by presets or by the Scene MIDI block, see “The Scene MIDI Block”
on p. 95.
AC Power Receptacle — Insert the supplied power cable and connect the other end to a grounded AC power
3!
receptacle. The Axe-Fx III has a universal power supply, which means it can be used around the world by
simply changing the cable.
17
3 USB
3 USB
COMPUTER INTEGRATION
With a USB connection to a computer, the Axe-Fx III functions as an 8-in/8-out 24-bits 48kHz ultra-low latency
audio interface for Mac and Windows computers. A driver is required for use under Windows. This extremely highquality audio interface is powerful enough to be the centerpiece of a Digital Audio Workstation (DAW).
In addition, a computer connection provides high-speed “MIDI-over-USB” for remote control of the Axe-Fx III,
backups, updates, editing, and more.
WINDOWS MINIMUM REQUIREMENTS
OS: Windows 7 SP1 or newer (all versions compatible with x86 or x64).
CPU: Intel Core 2 @1.6 GHz or better, or AMD equivalent.
Memory: 1GB minimum.
USB: USB 2.0 support required.
Driver: The Axe-Fx III is fully class-compliant, but driver installation is still required for use under Windows.
The Windows driver can be downloaded at http://www.fractalaudio.com/support.
Step-by-step instructions are included with the installer.
MAC MINIMUM REQUIREMENTS
OS: OS X 10.6.8 for MIDI-over-USB (Fractal-Bot, Axe-Edit III, Cab-Lab, etc.).
OS X 10.9 or later required for USB audio. An issue in older OS X versions causes audio pops.
CPU: Intel Processor.
Memory: 512MB minimum.
USB: USB 2.0 support required.
Driver: No driver is required for Mac OS. The Axe-Fx III is class-compliant.
Important: If you are using a USB-C to USB adapter on a newer Apple computer, always plug the USB-C end of
the adapter into a USB-C or Thunderbolt 3 (USB-C) port on your Mac rst, and then connect the USB cable of
your Axe-Fx III to the adapter.
MIDI-OVER-USB
The USB connection also carries high-speed “MIDI-over-USB”. On the computer, the Axe-Fx III MIDI In port inputs
MIDI data from the Axe-Fx III. The Axe-Fx III MIDI Out port transmits data from the computer to the Axe-Fx III.
MIDI-over-USB performs the same functions as regular 5-pin MIDI, only faster. For example, the Axe-Fx III will
process an incoming MIDI Program Change message whether that message is transmitted through the unit’s own
MIDI IN port, or via the Axe-Fx III MIDI Out port of a connected computer.
18
3 USB
USB INPUTS AND OUTPUTS
Each of the 16 USB audio channels is “hard-wired” to a specic Axe-Fx III input or output.
As with all USB Audio devices, inputs and outputs are dened with respect to the computer.
COMPUTER INPUTS 1+2
Source: The output of the OUT 1 block on the grid.
Applications: Record the stereo processed output of the Axe-Fx III.
COMPUTER INPUTS 3+4
Source: The output of the OUT 2 block on the grid.
Applications: Record a second stereo processed signal.
grid block
grid block
COMPUTER INPUTS 5+6
Source: The signal at the Input 1/Instrument jack (front or rear).
Note: Input 1 is mono, so the same signal is fed to both Left and Right channels.
Applications: Record a DI signal for re-amping.
COMPUTER INPUTS 7+8
Source: The signal at the Input 2 jacks. (Left = 7, Right= 8)
Applications: Record a stereo source without processing.
COMPUTER OUTPUTS 1+2
Destination: The Output 1 D/A converter which feeds all Output 1 jacks, Headphones,
and possibly SPDIF/AES. USB audio is added to the signal from the OUT 1 grid block
(if any) and this mix is passed to the output converters.
Applications: Play stereo audio from the computer through the Axe-Fx III.
COMPUTER OUTPUTS 3+4
Destination: The Output 2 D/A converter which feeds the Output 2 jacks, and possibly
SPDIF/AES.
Applications: Play a second stereo signal through the Axe-Fx III. Ideal for backing
tracks so they can be fully independent from processed guitar at Output 1.
IN 1/INSTR
INPUT 2
OUTPUT 1
OUTPUT 2
COMPUTER OUTPUTS 5+6
Destination: The input of the IN 1 block IF Input 1 Source is set to “USB”.
See “Input 1 Source” on p. 114 and “Input Blocks” on p. 52.
Applications: Route tracks to the Axe-Fx III for processing. Ideal for re-amping a DI.
COMPUTER OUTPUTS 7+8
Destination: The IN U (USB) grid block. Signal appearing here will be processed by the
block’s noise gate, etc.
Applications: Route additional DAW track(s) to the Axe-Fx III for processing without
requiring changes to SETUP: I/O: Audio.
grid block
grid block
19

MAC OS X SYSTEM AUDIO
By default, Mac OS X system audio plays through USB Channels 1+2 of a connected device.
Audio from apps such as iTunes will therefore be mixed in at output 1— which is also the destination for
processed guitar signals in all factory presets. (See “Input & Output Blocks” on p. 51 for more on routing
processed signals to different outputs.)
If you want backing tracks and guitar signals to appear at different output jacks, you might think at rst that
you need to change every factory preset to use a different output. Not so. A simple setting change on your
computer allows you to change the Axe-Fx III channels for System Audio including iTunes and other nonmultitrack apps. To change this setting:
1. First ensure that the Axe-Fx III is selected as your output device.
Connect the Axe-Fx III to your Mac as described on p. 18
Open the Output pane of Sound preferences (choose Apple menu > System Preferences, click Sound,
then click Output) and Select the Axe-Fx III.
2. Open Audio MIDI Setup (nd it in Utilities, inside your computer’s Applications folder).
3. Select the Axe-Fx III device from the list, then click Congure Speakers.
3 USB
4. Make sure that the Conguration is set to “Stereo” and then select the desired left and right channels:
Analog 1 and Analog 2 for Output 1 L+R
Analog 3 and Analog 4 for Output 2 L+R
Analog 5 and Analog 6 for the Input 1 block when Input 1 Source is set to “USB”.
Analog 7 and Analog 8 for the Input USB block.
5. Click Done to nish.
EXAMPLE:
Let’s say your Axe-Fx is connected to a mixer for live performance. You want to use the Axe-Fx III as your
audio interface and have processed guitar on one set of mixer channels and iTunes backing tracks on a
different set of mixer channels. Route Mac system audio to Analog 3+4. Then Axe-Fx III output 1 L+R will be
processed guitar, and Axe-Fx III output 2 L+R will be the backing tracks. You also have the benet of two Axe-
Fx III front panel level knobs.
Of course, if you are using a multi-channel audio application such as Logic or Mainstage, you can simply
select the desired outputs on a track-by-track basis. The above only applies to system audio.
20

3 USB
RE-AMPING
The Axe-Fx III USB Audio capabilities are perfect for “re-amping”, a method in which the raw un-processed DI
output of a guitar is recorded and then re-processed later through the amp, cab, and effects of your choice.
Re-amping has many benets. First, it allows you to record when inspiration strikes, capturing a DI instead of
obsessing over tone. Later, you can redesign a sound as your track’s production advances. Also, punches and
edits made on the DI track are essentially rendered inaudible by the re-amping process.
In comparison to other products, the Axe-Fx III allows you to use the unit in the best and most effective re-amping
workflows, including being able to dial in new tones while simultaneously listening to the track for context.
STEP 1: RECORDING
The following tutorial assumes that the Axe-Fx III has been selected as the audio interface in your Digital Audio
Workstation (DAW), and that you have connected Output 1 L/R to studio monitors, or that you are monitoring
through the Axe-Fx III headphones jack. The details for each step below may vary slightly from one DAW to
another, but this guide should be easy to adapt to your own environment.
1. In your DAW, select Axe-Fx III as the main audio interface. Set the main outputs to Axe-Fx III Outputs 1+2.
2. Create a new project in the DAW, and set its sample rate to 48kHz. Record or insert any backing tracks.
3. Connect your guitar to the Instrument input and select a preset well-suited to the material you’re recording.
4. For this tutorial, we will record both the processed output and the DI.
Create a mono track. Name this track something like “Guitar DI”. Set its input to Input 5. This is the DI
output of the Axe-Fx III. This will record the signal at the Input 1 Instrument jack with no processing.
Create a stereo track. Name this track something like “Guitar Reference 1”. Set its inputs to Axe-Fx III
Inputs 1+2. This will record the processed guitar signal sent on the grid to the OUT 1 block.
5. Arm both of your guitar tracks for recording, making sure that Software/Input Monitoring is NOT enabled.
6. Hit RECORD and roll the track. You should see signal on both tracks. Be aware: while the processed track will
show “hot” levels, the signal level on a DI track will appear to be very low. This is NORMAL! You are recording
the instrument level signal exactly as it comes out of your guitar with no pre-amplcation.
STEP 2: RE-AMPING
For basic re-amping, we will temporarily change one setting on the Axe-Fx III. Press HOME and open SETUP.
Navigate to the I/O menu, and change Input 1 Source to “USB (CHANNELS 5/6)”. Remember to change this back
when you nish re-amping.
1. MUTE the “Guitar Reference 1” track.
2. Change the output of your “DI” track to Axe-Fx III Output 5/6.
3. To demonstrate that re-amping is working, choose a totally different preset on your Axe-Fx III. Solo your DI
track, then rewind and hit PLAY. You should hear the DI being processed by your new Axe-Fx III preset.
4. Record the re-amp. Create a stereo track. Name this track something like “Guitar Re-Amp 1”. Set its inputs to
Axe-Fx III Inputs 1+2.
5. Arm your re-amping track for recording, making sure that Software/Input Monitoring is NOT enabled.
6. Rewind, hit RECORD, and roll the track. The output of the preset is recorded.
Again, the method described here is basic, but it should serve as a guide to get you started. Review the previous
page to inspire other workflow ideas.
21

4 SETTING UP
4 SETTING UP
This section provides an overview of popular Axe-Fx III setups. This is just the beginning. The number of inputs and
outputs, combined with the new modular Input/Output block approach, makes possible an incredible number of rig
designs, whether combining applications or creating totally new ones.
GENERAL PRINCIPLES
POWER
When creating a new setup, begin with all level knobs turned down and all devices powered off.
The Axe-Fx III features pop suppression on startup, but speakers or
monitors should still be powered on last whenever possible.
Basic surge/spike protection is recommended.
AXE-FX III INPUTS
When connecting a guitar to the Axe-Fx III, the front or rear Input 1/Instrument jacks are preferable.
These feature “Secret Sauce IV” circuitry, which lowers the noise floor using a proprietary
technique and special analog input circuitry. The front jack overrides the rear one, so you can
connect without changing menu settings even when the rear jack is utilized in a rack system.
You can also connect guitars and other instruments to Inputs 2, 3 or 4 with no problems. These are
designated as “LINE” level but accommodate high impedance sources so as not to load down guitar pickups.
When connecting the outputs of other devices to inputs on the Axe-Fx III, use appropriate
cables and connectors, i.e. for balanced signals use XLR cables or balanced 1/4" connectors.
Regular guitar cables are ne for unbalanced connections to the inputs of the Axe-Fx III.
Setting Input Levels correctly is important. See “Setting Levels” on p. 5.
AXE-FX III OUTPUTS
If a connected device has balanced XLR inputs, it is best to use
the XLR outputs of the Axe-Fx III with XLR cables.
If a connected device has balanced 1/4" TRS inputs, it is best to use the
balanced XLR outputs of the Axe-Fx III with XLR-to-TRS cables.
If a connected device has unbalanced inputs, use the unbalanced 1/4" outputs of the Axe-Fx III. Humbuster
cables are not required, but can help prevent the noise associated with ground loops. Purchase Humbuster
cables at shop.fractalaudio.com or from your nearest Fractal Audio Systems dealer. (See p. 6.)
MONO/STEREO
Any setup can easily be adapted for mono or stereo with some simple changes to input and output settings.
See “Mono vs. Stereo” on p. 6 for an introduction, and “I/O: AUDIO Page” on p. 114 for more detail.
USING THE AMP BLOCK WITH TRADITIONAL GUITAR SPEAKERS
When using the Axe-Fx III amp block into traditional (not FRFR) guitar speakers, certain advanced
parameters warrant special consideration. On the “Speaker” page of the Amp block, set Speaker
Drive to zero. You may also wish to zero Speaker Compression. Also consider matching LF
Resonance Frequency to match the resonance of your connected cab — if you know it.
22
4 SETTING UP
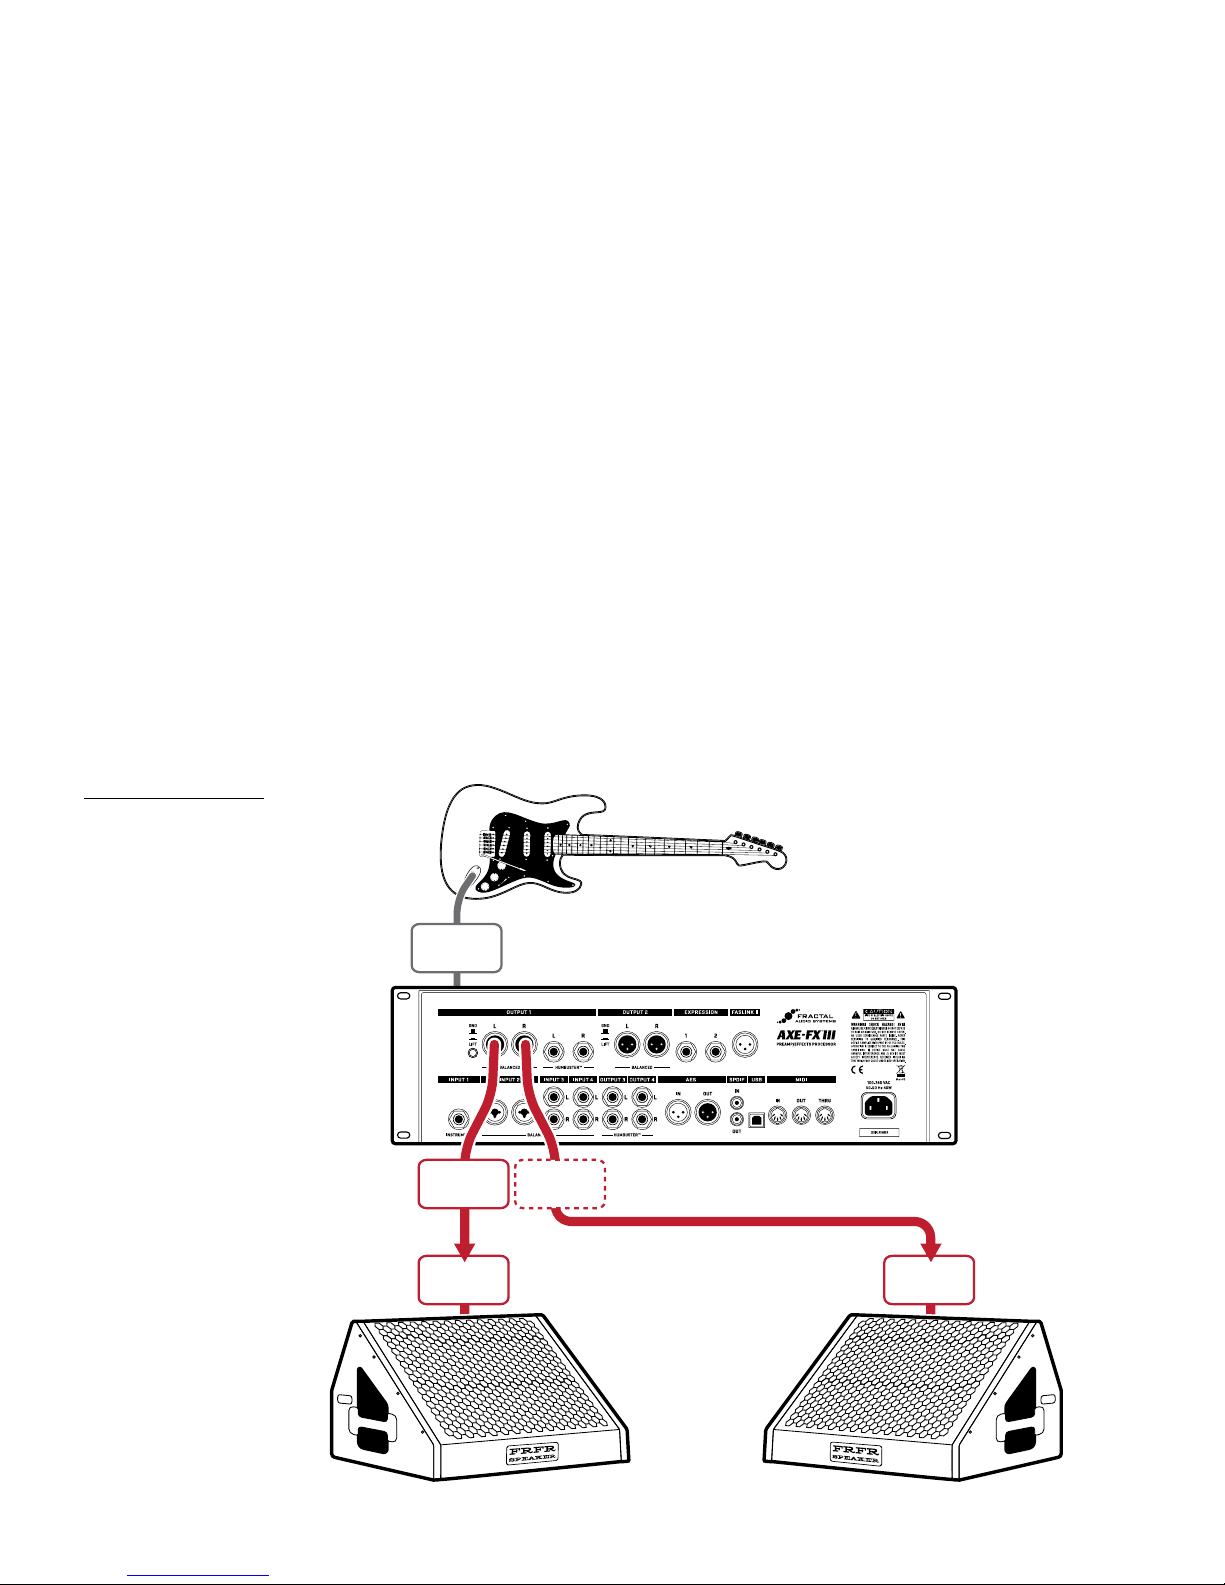
FRFR/DIRECT
Global Settings: Default
Presets: Factory or Custom
This type of setup takes full advantage of the ability of the Axe-Fx III to recreate all aspects of an “end-to-end” guitar
chain—stompboxes, amps, cabs, post effects, and more. It is the most versatile and popular setup, representing the
ultimate in tonal flexibility.
Output 1 is connected directly into full-range, flat response (“FRFR”) speakers such as those offered especially
for guitar players by a number of manufacturers. Such systems are typically self-amplied (“active” or “powered”),
but may consist of separate “passive” full-range speakers and a full-range power amp. Other suitable FRFR
systems include high-quality PA speakers (including “Personal Monitor” wedges) or studio monitors.
In some cases, signal from the Axe-Fx III may pass through a mixer rst. That’s ne, as long as you connect to line
inputs. You do NOT need to use a mic preamp! Contact your mixer’s manufacturer if you have any questions.
All Global and I/O settings are at default values. All Axe-Fx III factory presets are designed for this setup.
Adjust overall levels using the front panel OUT 1 knob.
This is also the setup for a Digital Audio Workstation (DAW). Just add a computer connected via USB (don’t forget
drivers if you’re running Windows) and the speakers connected to your Axe-Fx III become the main monitors for the
DAW. Headphones can also be used.
CONNECTIONS
Connect your guitar to
Input 1 (Instrument).
Connect Output 1 to the
input of your FRFR System.
The presets used for this
setup also work great
with headphones.
INSTR
IN
OUTPUT1LOUTPUT
LINE
INPUT
Front
or Rear
1R
Optional
for Stereo
LINE
INPUT
PERSONAL
FRFR
MONITORS
23
4 SETTING UP
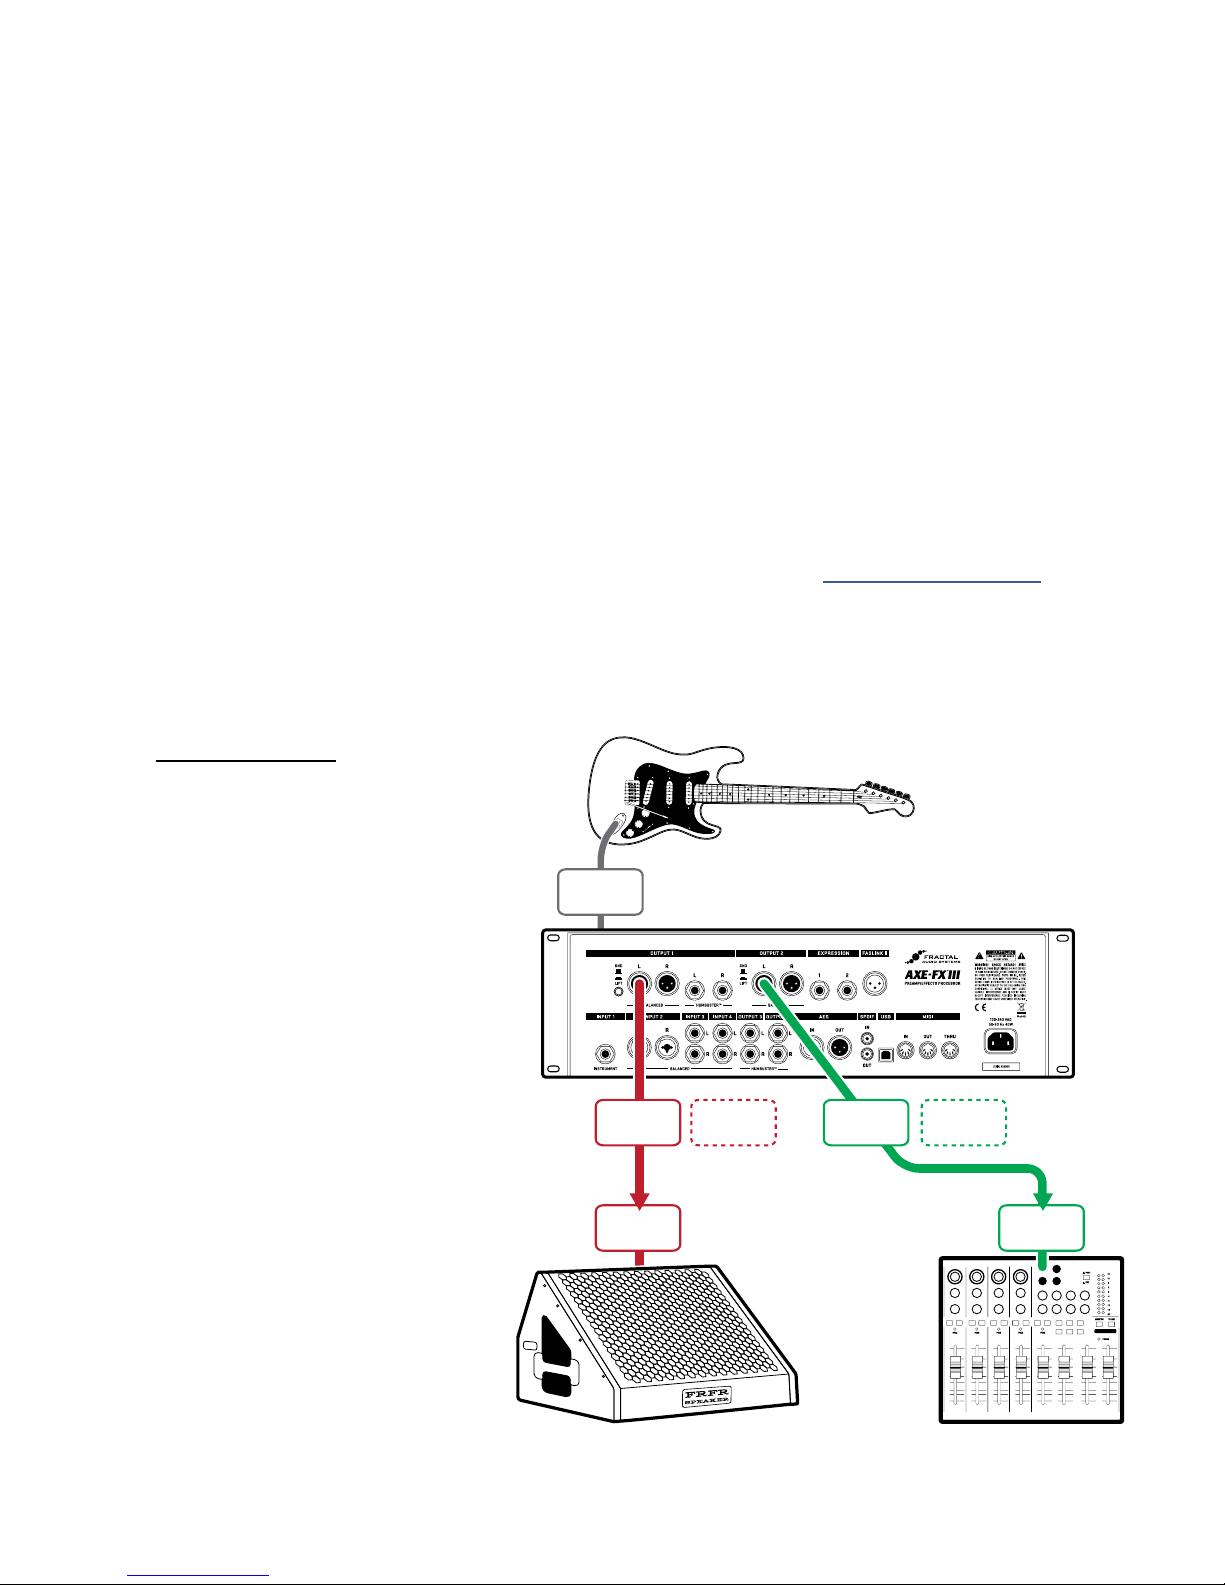
FRFR MONITOR + FRFR TO FRONT-OF-HOUSE
Global Settings: “Out 2 Copy Out 1” Turned ON
Presets: Factory or Custom
This type of setup is similar to the previous FRFR/Direct setup except that it also sends signal to a mixer for front-
of-house mixing (and possible band monitors). In this conguration, the Axe-Fx III creates a fully modeled end-to-
end guitar signal path for the ultimate in tonal flexibility—stompboxes, amps, cabs, post effects, and more.
Output 1 is connected directly to your own monitors. Use full-range flat response (“FRFR”) monitor speakers such
as those offered especially for guitar players by a number of manufacturers. These might be self-powered or
passive, with an external power amp. High-end PA monitor wedges can also be fantastic for this purpose.
Output 2 is used as an independent copy of Output 1. For this example, this is accomplished with a Global settings
change rather than inserting an Output 2 block in every preset. (See “Connections” below for details.)
In the event that your monitors are stereo but front-of-house wants mono, consider whether you want to send them
half-stereo or summed stereo and change SETUP: I/O: OUTPUT 2 Mode (see “Mono vs. Stereo” on p. 6).
Adjust you own monitor level using the front panel OUT 1 knob.
Adjust your send level to front-of-house using the front panel OUT 2 knob. One advantage of this setup is that you
can adjust stage levels and house levels independently.
CONNECTIONS
Connect your guitar to
Input 1 (Instrument).
Connect Output 1 to the input
of your FRFR System.
In SETUP: I/O: Audio, set
Output2CopyOutput1 to “ON”.
Connect Output 2 to the
front-of house system.
This will presumably be a
balanced connection, so use
XLR cables if so.
If you are working with a sound
technician, be sure to tell
them that you are outputting
a hot LINE level input — NOT a
microphone level signal. They
should use a balanced line input
without a preamp.
Also tell them you are sending
a fully processed “mix-ready”
sound, and that — at least to
start — they should initialize
the channel with no EQ or
processing.
INSTR
IN
OUTPUT
1L
LINE
INPUT
Front
or Rear
OUTPUT
1R
Optional
for Stereo
PERSONAL
FRFR MONITOR
OUTPUT2LOUTPUT
2R
FRONT-OF-HOUSE
MIXER/PA
Optional
for Stereo
LINE
INPUT
24
 Loading...