

Page 1
optimail 30
Postage meter
Operator Manual
Page 2
2
optimail 30 – Display and keyboard
Multifunction keys
(soft keys)
Display
Confirm input
Acknowledg e messages
Press briefly
back to higher-level menu /window
Hold
key pressed:
back to the Home menu
Call up menu for:
– Special functions
– Administration and Statistics
– System Settings
–…
TELESET / load postage
Show registers
Clear inputs
Quick sel ec t :
display/select
saved postage settings
Numeric keys
– Enter numbers
– Enter letter s, punctuatio n
and special characters
Shift key:
Switch upper/lower
case letters
Arrow keys
– navigate
– scroll
– increase/decrease values
Page 3

Contents
3
About this operator manual ______________________________________6
1 Safety tips ____________________________________________________7
2 A short description of the optimail 30 _____________________________8
3 The basics of operation ________________________________________11
3.1 Turning on/off __________________________________________11
3.2 Stand-by ______________________________________________ 12
3.3 Access control – MASTER / USER _________________________12
3.4 The user interface ______________________________________ 13
3.4.1 Key functions __________________________________________13
3.4.2 Display symbols ________________________________________14
3.4.3 Description of operating procedures and menu sequences
in the present Operator Manual ____________________________16
3.4.4 The Home menu _______________________________________17
3.4.5 The menu _____________________________________________18
3.4.6 Lists _________________________________________________19
3.4.7 Adjustment menus _____ _________________ ________________20
3.4.8 Popup windows ________________________________________20
3.5 Text input __________ ________________ ___________________21
3.6 Test imprint ______________________ __ ___ ___ _____________22
4 Setting the meter imprint _______________________ ___ ___ ___ ___ __ __23
4.1 Postage value _________________________________________23
4.2 Endorsement __________________________________________25
4.3 Advert ________________________________________________26
4.4 Date _________________________________________________28
4.5 Imprint offset __________________________________________30
5 Metering _____________________________________________________ 31
5.1 Selecting / changing an account ___________________________31
5.2 Positioning and metering a letter ___________________________33
6 Postage calculation
(optional)
_____________________________________ 36
6.1 The Postage calculation menu _____________________________36
6.2 Setting postal rates for postage calculation ___________________38
6.3 Weighing, postage calculation, metering _____________________41
Page 4

optimail 30 Operator Manual
4
7 Special functions _____________________________________________ 43
7.1 Postage correction __________________ _________________ __43
7.2 Redate _______________________________________________44
7.3 Reply Mail metering _____________________________________45
7.4 Stamping incoming mail _________________________________46
7.5 Moistening and sealing letters
(optional)
______________________47
7.6 Using an external postage calculator _______________________49
7.6.1 Connecting the postage calculator to the optimail 30 ___________49
7.6.2 Operating optimail 30 with an external postage calculator _______ 50
8 Memory _____________________________________________________ 51
8.1 Setting postage or postal rates for postage calculation
with memory items _____________________________________51
8.2 Saving memory items ___________________________________ 52
8.3 Renaming memory items ________________________________53
8.4 Deleting memory items __________________________________ 54
9 Displaying and printing registers ________________________________55
10 Loading postage – TELESET ___________________________________ 56
11 Account administration ________________________________________ 58
11.1 Setting up a new account ________________________________ 58
11.2 Assigning / blocking USER card(s) for an account _____________60
11.3 Viewing and printing account statistics ______________________ 61
11.4 Changing / clearing down / deleting an account _______________ 61
11.5 Clearing down all accounts _______________________________ 63
12 Imprint management __________________________________________ 64
12.1 Loading imprint data from cards ___________________________ 64
12.2 Using / renaming / deleting adverts _________________________65
12.3 Deleting endorsements __________________________________66
13 Advanced settings & system information _________________________67
13.1 Viewing / printing / sending system information _______________67
13.2 Displaying and clearing down the item counter ________________68
13.3 High postage value – setting the threshold ___________________ 68
13.4 Low postage warning – setting the threshold _________________69
13.5 Setting the access rights _________________________________ 69
13.6 Setting the display contrast _______________________________70
13.7 Setting audible signals __________________________________71
13.8 Clock ________________________________________________ 72
Page 5

Contents
5
13.8.1 Correcting the time ______________________________________72
13.8.2 Summer time changeover ________________________________73
13.8.3 Setting the time zone ____________________________________74
13.9 Changing the stand-by time _______________________________74
13.10 Changing the user interface language _______________________75
13.11 Setting the meter type ___________________________________76
13.12 Modem settings – changing dialing parameters _______________77
13.13 Changing dialup numbers ________________________________ 79
13.14 Integrated scale
(optional)
_________________________________81
13.14.1 Loading a new rate table _________________________________81
13.14.2 Deleting rate tables _____________________ ________________82
13.14.3 Turning automatic endorsement selection on/off _______________82
13.14.4 Taring ________________________________________________83
13.14.5 Setting the gravity ______________________________________84
13.15 Re-authorization ________________________________________84
14 Maintenance and care _________________________________________85
14.1 Cleaning the postage meter _______________________________85
14.2 Changing the ribbon cassette _____________________________86
14.3 Sealer
(optional)
_________________________________________88
14.3.1 Cleaning ______________________________________________88
14.3.2 Checking the water level and topping up water ________________89
14.3.3 Replacing felts _________________________________________90
14.4 Changing the battery ____________________________________93
14.5 Warranty _____________________________________________95
15 Tips for troubleshooting _______________________________________ 96
Appendix
Access rights for selected functions _______________________________102
Menu (overview) ______________________________________________104
Country codes _______________________________________________105
Glossary ____________________________________________________109
Technical Data _______________________________________________111
Index _______________________________________________________ 114
Service _____________________________________________________119
Page 6

optimail 30 Operator Manual
6
About this operator manual
Please read this operator manual before using the optimail 30
postage mete r. Please keep the manual n ear the optim ail 30 at
all times for reference.
This operator manual describes the optimail 30
– in its standard version
– with integrated scale and
– with sealer.
Functions which are only available with certain configurations
are recognizable by a suffix, e.g.
(optional)
.
Quick Reference
The Quick Reference gives you an overview of the operating
menu and metering with the optimail 30.
Installation Guide
Please read the “Inst allation Guide” to find out how t o install and
register the optimail 30.
The following keywords and symbols identify the safety tips in
this operator manual:
Warning! indicates a potential hazard which may result in
injury.
Caution! indicates a potential hazard that may result in damage to the optimail 30 or impair the metering process.
The following symbols and text features are used in this
operator manua l:
• Bullets precede instructions.
– Dashes precede list items .
REGISTER Menu names and options from the operating menu are written
in capital letters.
“Incorrect value.” Messages are highlighted by quotation marks in the text.
A tip offers advice or additional suggestions for improving the
operation.
Chapter “The basics of operation” on page 16 explains how
operating and menu sequences are described.
Page 7

Safety tips
7
1 Safety tips
The optimail 30 is a digital postage meter with a thermal printer for metering letter
mail. The optimail 30 complies with the pertinent safety regulations for office
information equipmen t.
Please observe the following tips for your own safety:
• Install and commission the optimail 30 according to the instructions in the
installation gu ide.
• When you move the optimail 30 from a cold environment (i.e. below 50°F):
wait at least 24 hours before connecting the optimail 30. The optimail 30 requires
this period to adapt to the ambient conditions.
• Use only the power and modem cables provided or approved by FrancotypPostalia. Make sure that cables are not damaged.
• Connect the optimail 30 only to a grounded single-phase power socket.
• Make sure the socket for connecting the optimail 30 is close by and easily
accessible at all times.
• Do not remove any parts of the housing.
• Never cover the ventilation slots in the housing.
• Switch off the optimail 30 before cleaning the posta ge meter or mov ing it to another
location.
• Make su re that no liquids or foreign object s penetrate the interior of the optim ail 30.
If this happens , pull out the main s plug im mediatel y. Have the optim ail 30 checked
by a service technician before using it again.
• Pull out the power plug in the event of d anger! Call the after-sales service.
• Only use original ribbon cassettes from Francotyp-Postalia.
Observe the information enclosed with every package.
• Only use the batteries provided by Francotyp-Postalia. Observe the instructions
enclosed with the battery for correct use and disposal.
• Maintenance and repair work should only be carried out by qualified personnel
authorized by Francotyp-Postalia. Otherwise your warranty will be voided.
You will be liable for any damages arising.
Page 8
optimail 30 Operator Manual
8
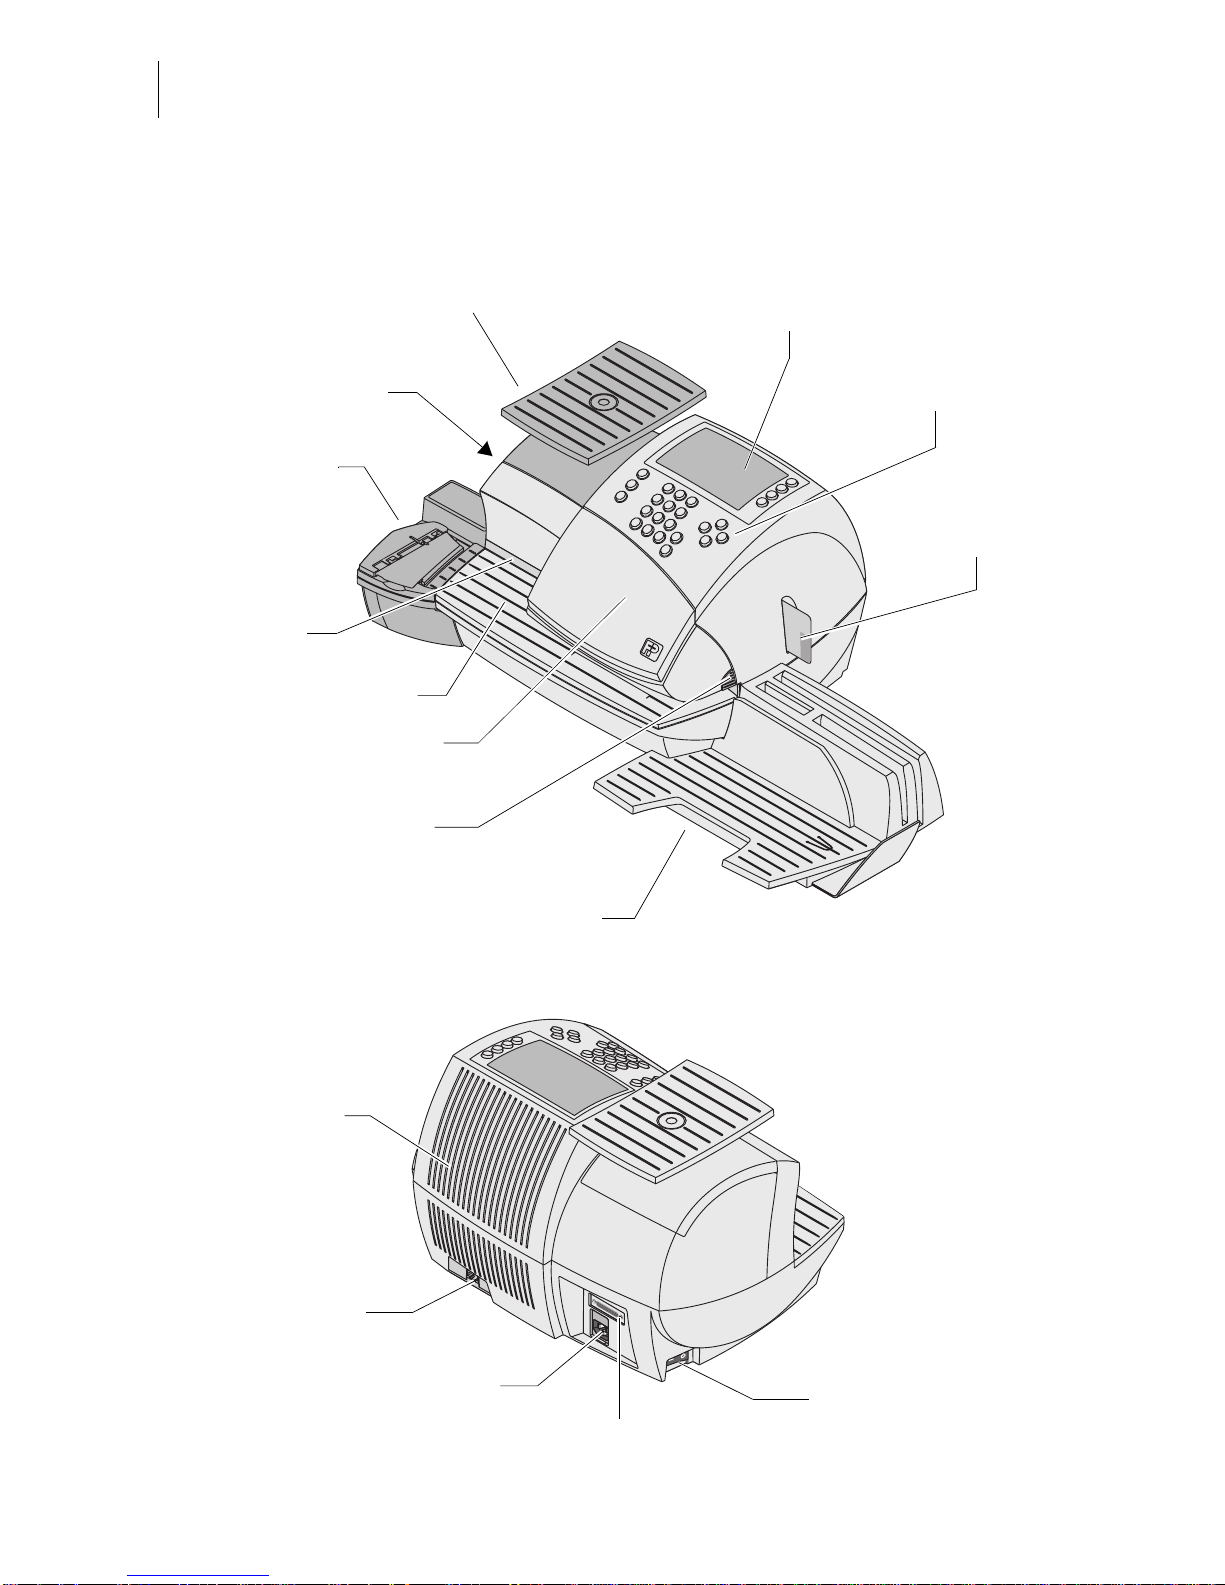
2 A short description of the optimail 30
Scale with scale pan
(optional)
Power switch
Power connection
Modem so c ket
Sealer
(optional)
Serial interface (25-pin)
Display
Ventilation slots
Power switch
Letter guide
Letter receiving tray
Flap with ribbon
cassette behind
Card reader
with card
Catch tray
Flap release key
(ribbon cassette compartment)
Keyboard
Page 9

A short description of the optimail 30
9
Things worth knowing about optimail 30
The optimail 30 is a post age meter for small and
medium-sized mail volumes. It meters letters up to a
thickness of 0.24" (6 mm) and self-adhesive FP labels.
With up to 30 meter imprints per minute you manage
your dail y mail volume in virt ually no ti me at all.
Menu-controlled operation
No matter which function you need – from setting the
meter imprint to editing system parameters – with the
clearly structured user interface on the backlit display
you quickly and easily perform these tasks.
Metering
The optimail 30 shows all major metering information at
a single glance. You onl y hav e to pu t the lette r in pla ce
– the optimail 30 feeds the letter, me ters it and ejects the
ready to send letter to the right.
Letters as advertising medium
In addition to the meter imprint the optimail 30 can
simultaneously pr int an advert of your choice on the
envelope.
TELESET
Load postage into the optimail 30 with the TELESET
process via a built-in modem – fast, comfortable and, if
need be, 24 hours a day.
Protection against
unauthorized use
Access cards in check card format protect the optimail 30 against unauthorized use and allow individual
access rights to be assigned (MASTER/USER).
Flexible and always up to date
New adverts, endorsements or new U.S. Po stal Service
tariffs – simply load updated data into your optimail 30
with the chip card.
Thermal printing
The thermal prin ting process pro vides a cl ean, smudg eproof imprint. The s olid ink on the ribbo n is heated up as
it passes the thermal print head, the liquefied ink penetrates the paper of the envelope and remains permanently bonded.
The ribbon cassette is simple to replace with just a few
actions.
Page 10

optimail 30 Operator Manual
10
Additional functions
The optimail 30 offers a n umber of convenient ad ditional
functions that will soon be among your favorites:
– Memory function for frequently used U.S. Postal
Service products.
– Account function for separat e registration and billing
of portage costs.
– Redate and postage correct ion for correcting wro ng
meter imprints.
– Reply Mail metering.
– Incoming mail stamp . Print date and time on incom-
ing mail.
– Print lists for account data, register states, system
information and other information.
– Variable print offset for changing the meter imprint
position on the enve lope.
Catch tray
The convenient catch tray with adjustable stop is ideal
for stacking the processed letters and provides additional storage space.
Options
The following components are available to extend the
machine’s range of functions:
– Integrated scale. When the i ntegrated scale is imple-
mented, the ‘Postage calculation’ function is avail-
able. Depending on the postal rates the optimail 30
fast and reliably calculates the postage value.
– Sealer. Manual ly pass the open envelop e through the
sealer. The moistened flap will be closed in the
optimail 30 during subsequent metering.
Page 11
The basics of operation
11
3 The basics of operation
In this chapter you wi ll learn about the basic optim ail 30 functions and how to han dle
the postage mete r user interface.
3.1 Turning on/off
Push the power swi tch, the toggle switch on th e left side of th e postage mete r, to turn
the optimail 30 ON or OFF.
Caution! Wait for at least one minute before you turn the optimail 30 on
again.
Turning on
• Push
I (= ON) on the power switch.
The display lights up and a start routine
starts. The optimai l 30 tests and activa tes all
machine components. This procedure takes
some time and is accompanied by signal
tones and display messages.
Finally the Home menu appears.
The optimail 30 is ready and displays the
following metering options:
The home menu (example)
– The postage and, if applicable, the
endorsement imprint are the settings
saved under MEM 1.
– Current date.
– An account has been set when an access
card (MASTER or USER) has been
plugged or access control was disabled.
– The advert i s rul ed by the curr ent ac count .
Turning off
• Push
O (= OFF) on the power switch.
The optimail 30 switches off. The display light
goes out.
Page 12
optimail 30 Operator Manual
12
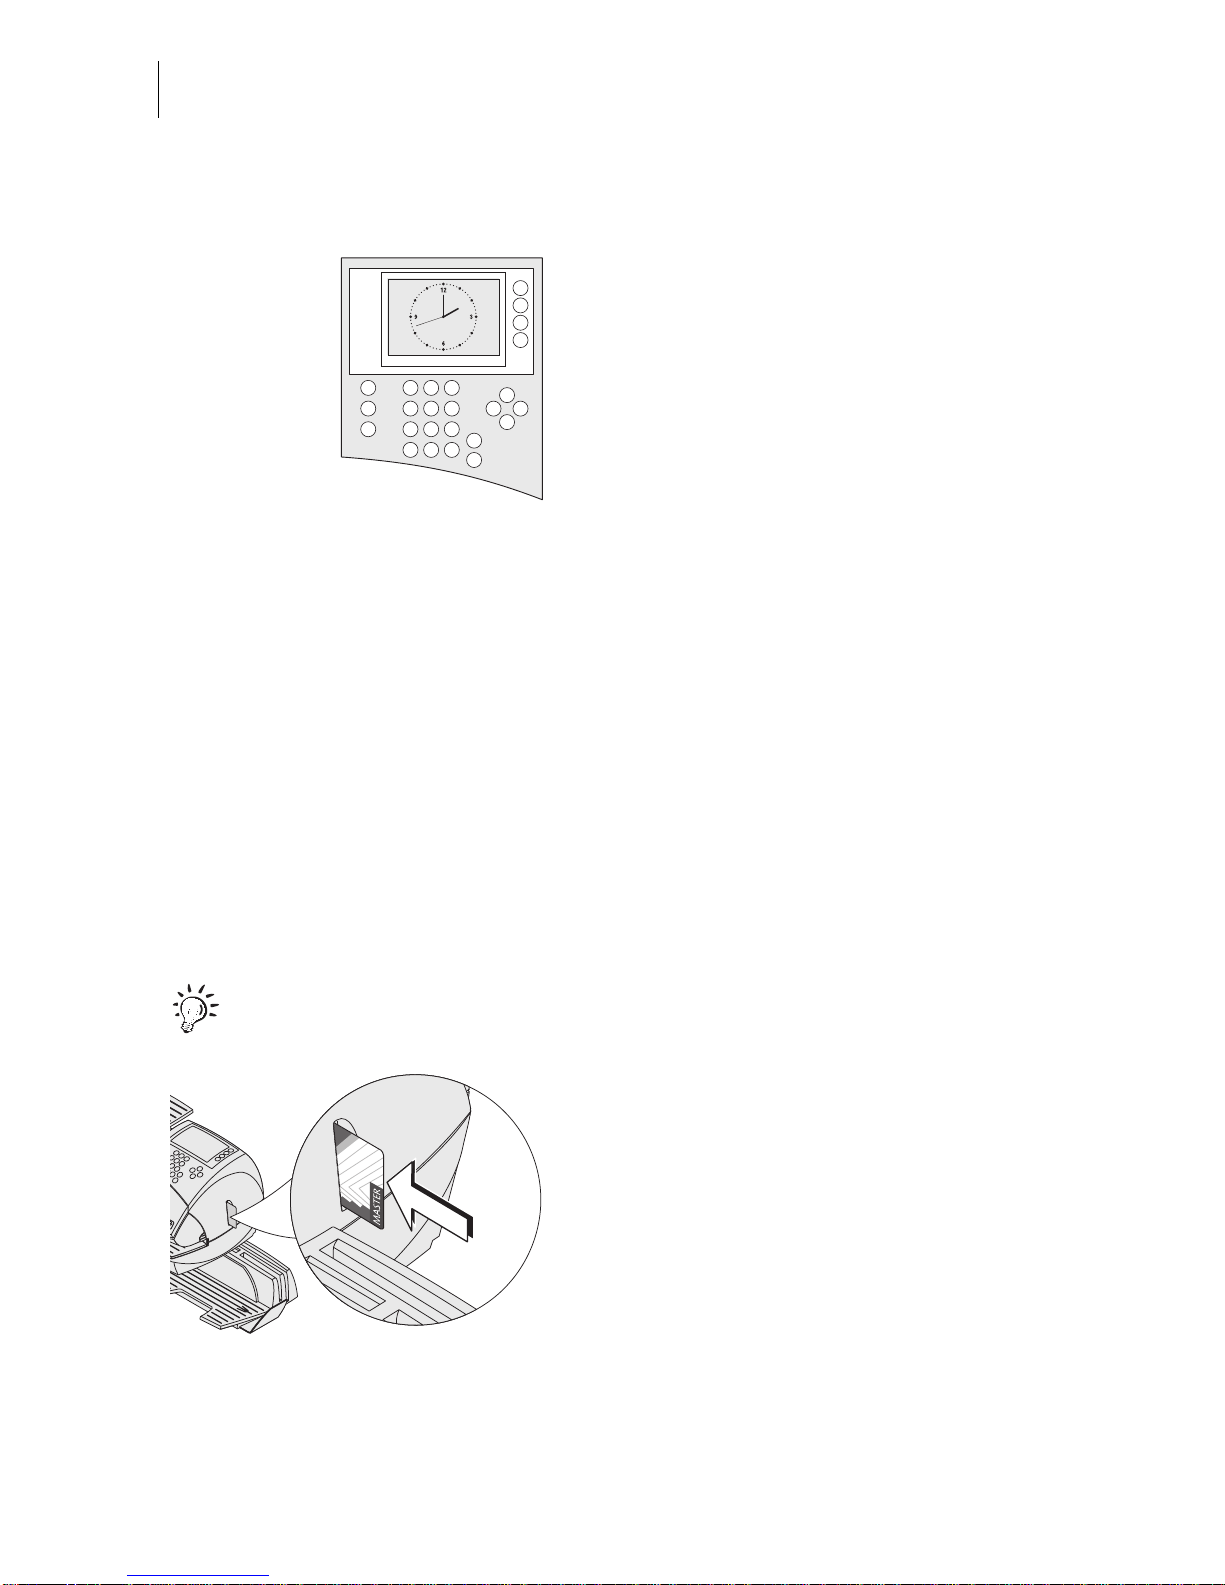
3.2 Stand-by
When in st and-by the optimail 30 displays a
clock. The display is dark.
The optimail 30 goes to stan d-by if you do not
feed any letters or press any keys for some
time. You can reactivate the opt im ail 30 by
pressing any key.
Refer to Chapter 13.9 on page 74 on how to
set the stand-by period.
3.3 Access control – MASTER / USER
The MASTER and USER cards, commonly referred to as access cards, control the
access rights to the postage meter.
The card labeled MASTER allows access to all functions.
Cards labeled USER allows access to certain functions only.
– Billing metering to assigned accounts.
– Saving and editi ng memory items.
– Assigning an advert to the current account.
Access control with cards can also be disabled. Metering is then possible without
access card on all accounts.
For an overview of all access rights refer to page 102.
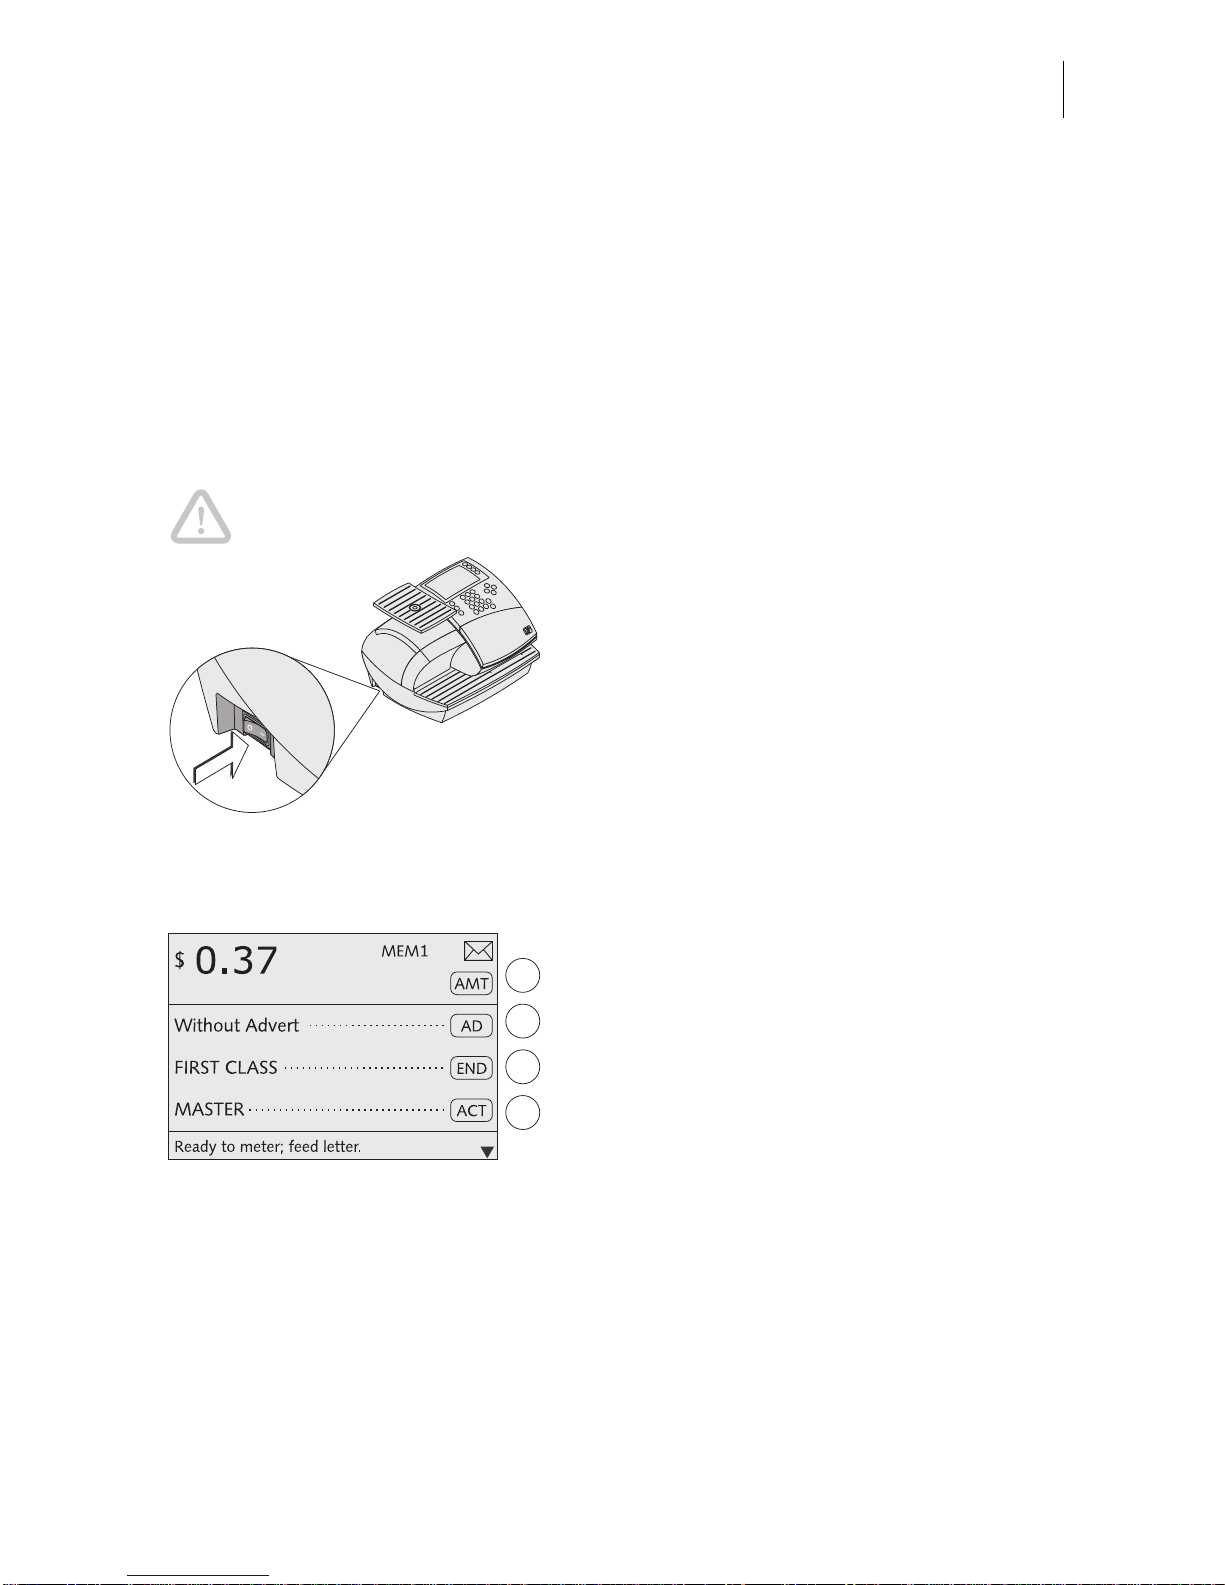
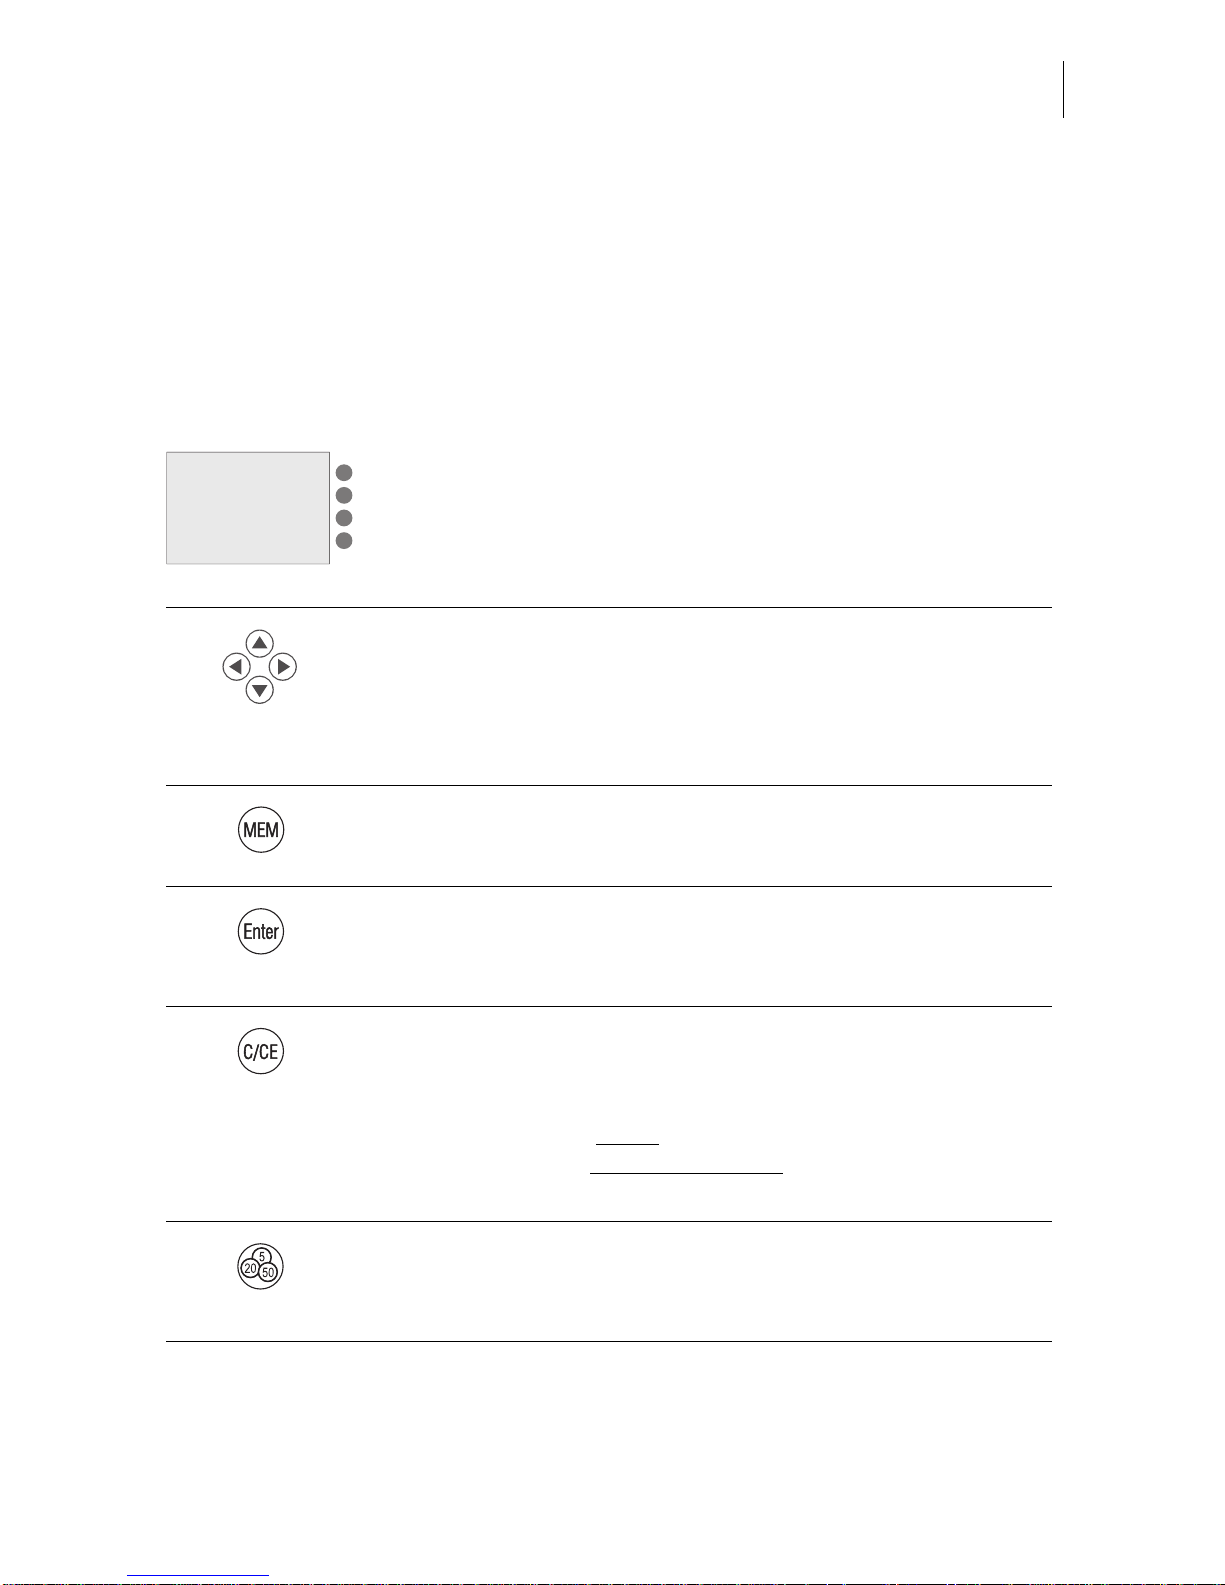
Inserting an access card
• Insert the access card in the card reader.
The chip on the card must face the rear.
• Push in the access card against a slight
resistance al l the w ay to the s top. You can
feel the card snap in.
Removing an access card
• Simpl y pull the acc ess card out of the card
reader.
Page 13
The basics of operation
13
3.4 The user interface
This chapter covers the optimail 30 use r interface. You will b e introduced to the me nu
and window types, the used symbols, the modes of operation and how the present
manual presents menu/operating sequences.
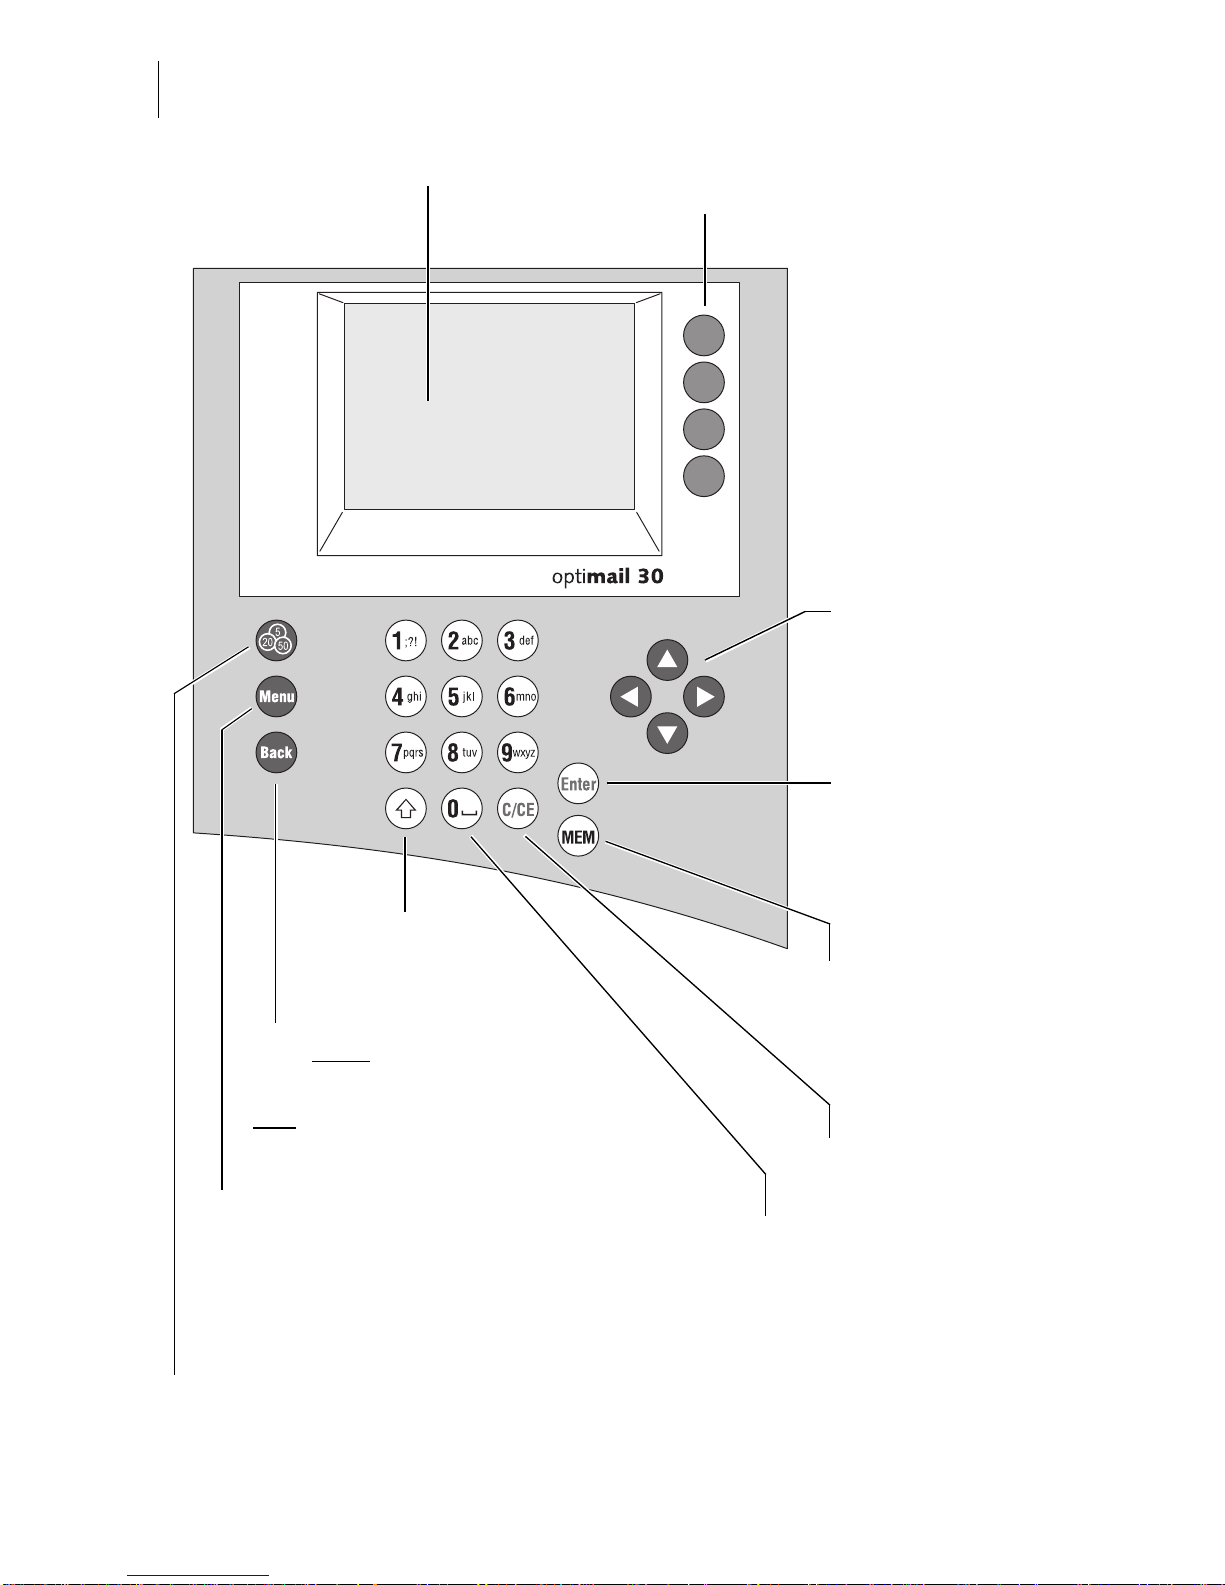
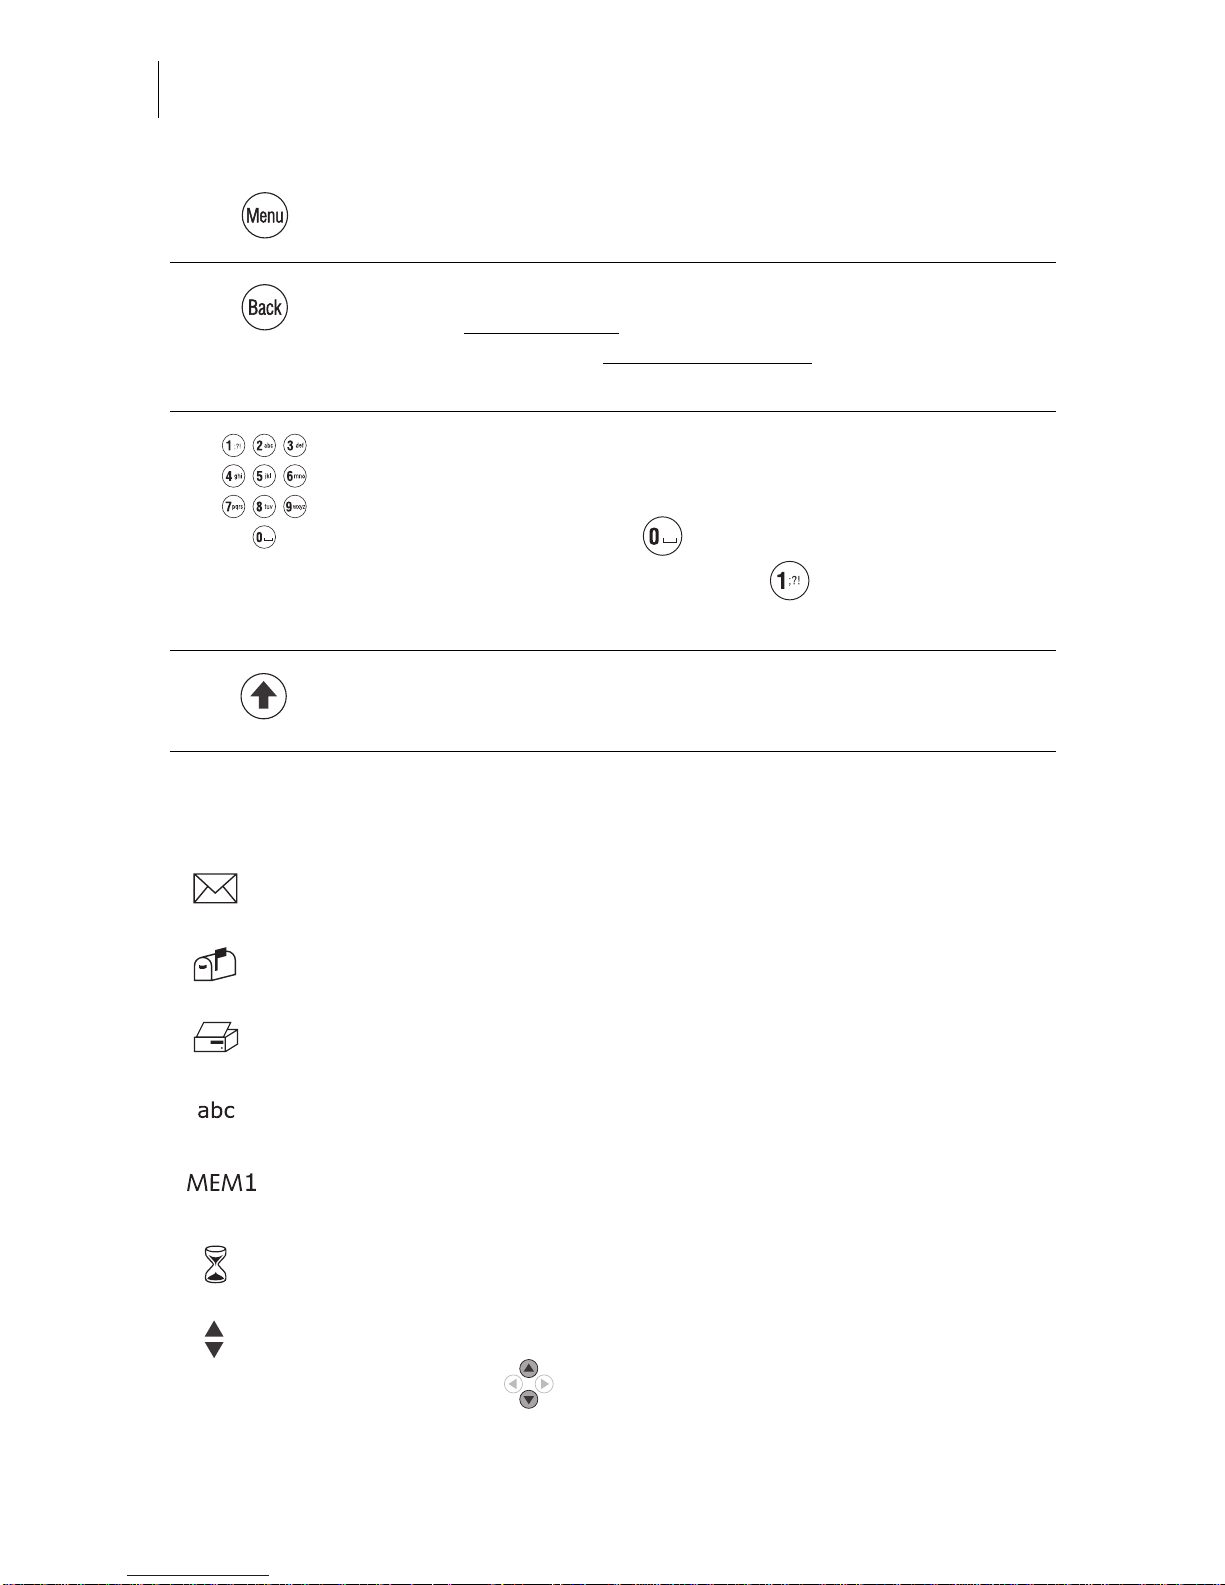
3.4.1 Key functions
Multifunction keys
The ke ys to the right of the disp lay are m ultifunction k eys (als o
called soft ke ys). T hese k e ys are a ssigned diff erent fu nctions .
Displa y t e xt a nd sy mbols indi cate the cu rrently ass igned function.
Arrow keys
– For scrolling in menus, lists…
– For cursor movement (e.g. when typing text).
– For increasing/d ecreas ing value s (when changin g selected
system parameters).
Memory
Displays saved products and selects them for metering.
Enter key
– Confirm input.
– Acknowledge messages.
Clear
Special function when selecting postal rates in the postage
calculation me n u:
– Pressing the key briefly
clears one item each.
– Keeping the key pressed for longer
(approx. 2 seconds)
clears all selected postal rates.
Opens the TELESET menu for:
– Loading postage.
– Calling up register values.
Page 14
optimail 30 Operator Manual
14
3.4.2 Display symbols
Opens the MENU for system settings, administration, special
and service functions for the optimail 30.
Back key
– Key pressed briefly
: back to last menu/window.
– Keeping the key pressed for l onger
(app rox. 2 seconds):
Back to the Home menu.
Numeric keys
– For typing numbers.
– For typing text (account names, etc.).
To insert blanks: key .
Available special characters, key :
. , : !; ? % & ’ " ( ) * + - / < = > \ ^ _ @ # € $ £ ¥
Shift key
Switch upper/lower case letters during typing.
The letter symbol indicates: The optimail 30 is ready for metering.
You can feed and meter mail.
The letter bo x symbo l indicates th e Incoming mail stamp is enabled and
ready. You can load incoming mail.
The printer symbol indicates the Print lists function
A list, report, preview image… can be printed.
The text symbol indicates that text can be typed.
The numeric keys are released for text input.
MEM and the memory location number indicate the selected memory
item.
The hourgla ss symbol a ppears when th e optimail 30 requires some more
time (e.g. w hen updating data) . Please wait until the procedure is fi nished.
Arrows in the s ta tus bar ind ic ate the pre se nce of further options th at you
can select.
Use the arrow keys to scroll forward or backward.
Page 15
The basics of operation
15
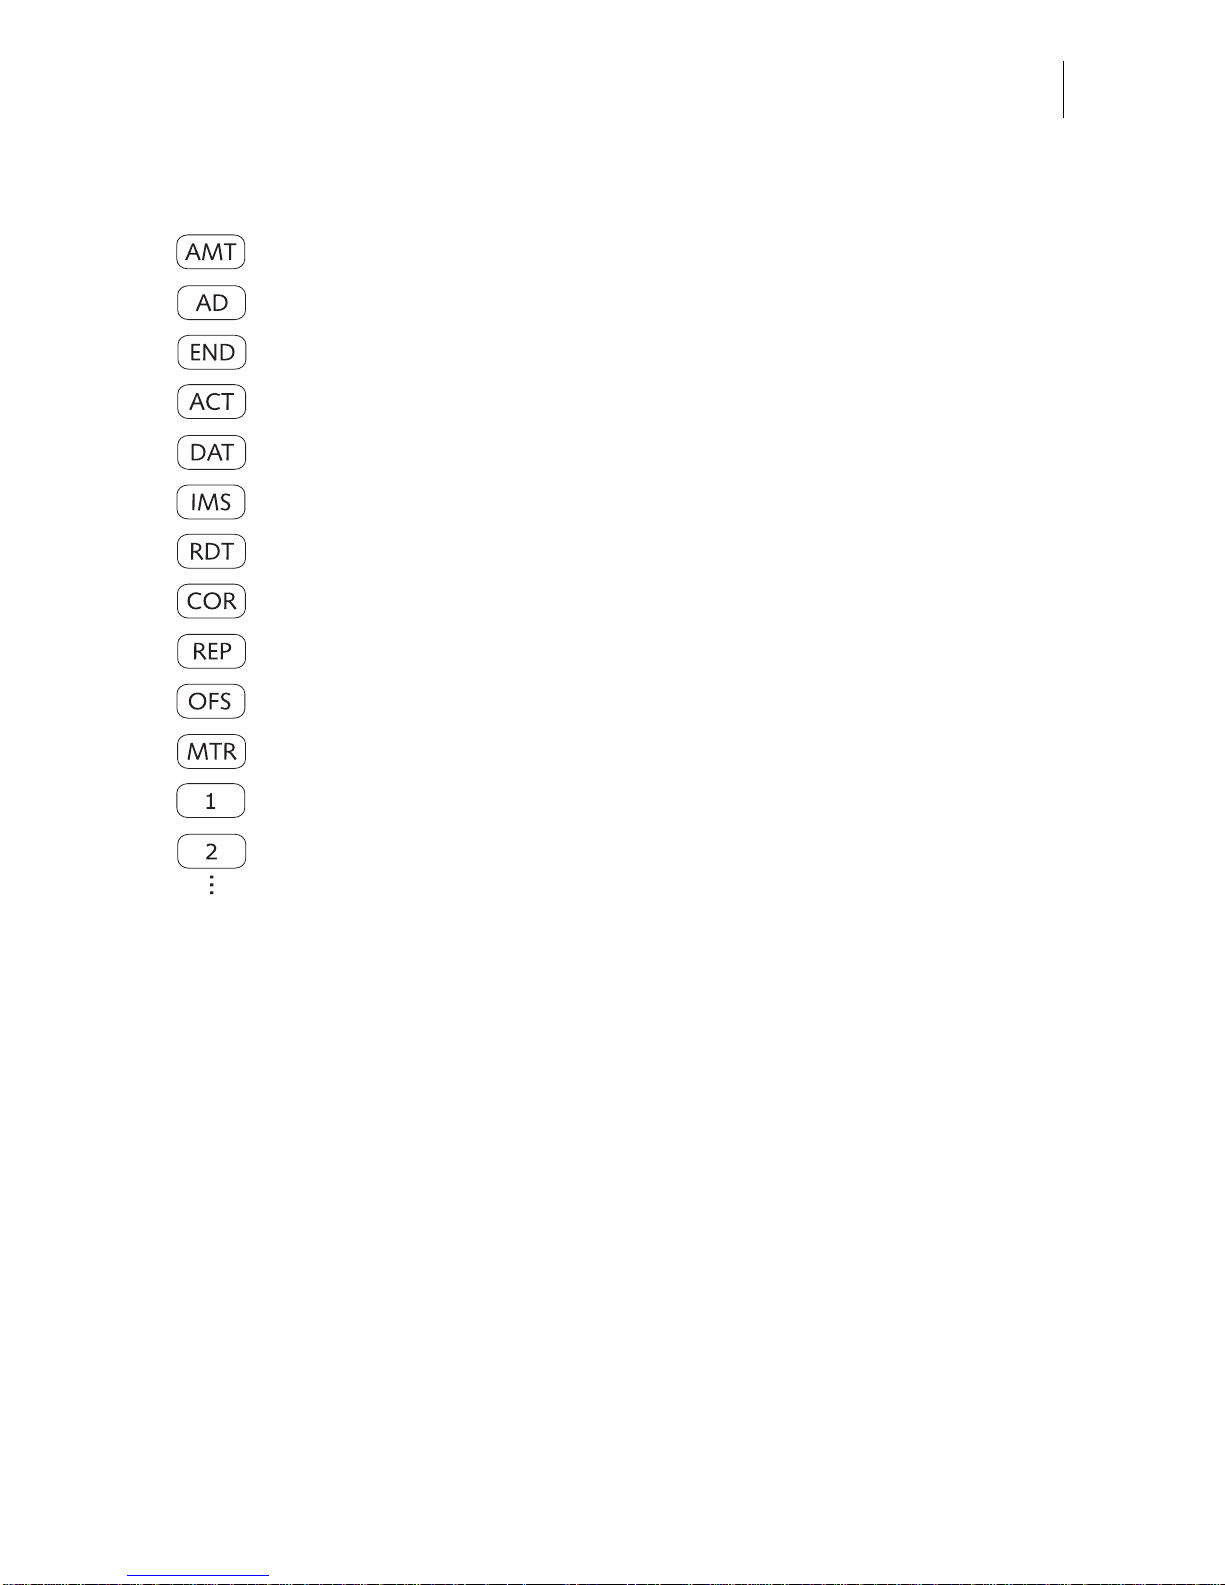
The following symbols indicate the multifunction key assignment:
Set Postage.
Set advert.
Set Endorsement.
Change Account
Set Date.
Switch to Incoming mail stamp function.
Switch to Redate function.
Switch to Correction function.
Switch to Reply Mail function.
Adjust Imprint offset.
Return to the Meter function.
In lists: Select a setting saved in the displayed location (e.g. a memory
item, an advert, an endorsement).
Page 16

optimail 30 Operator Manual
16
3.4.3 Description of operating procedures and menu sequences
in the present Operator Manual
Illustrations of display screens show current
settings and what to type.
The multifunction key that must be pressed to
trigger an action/function is shown in black.
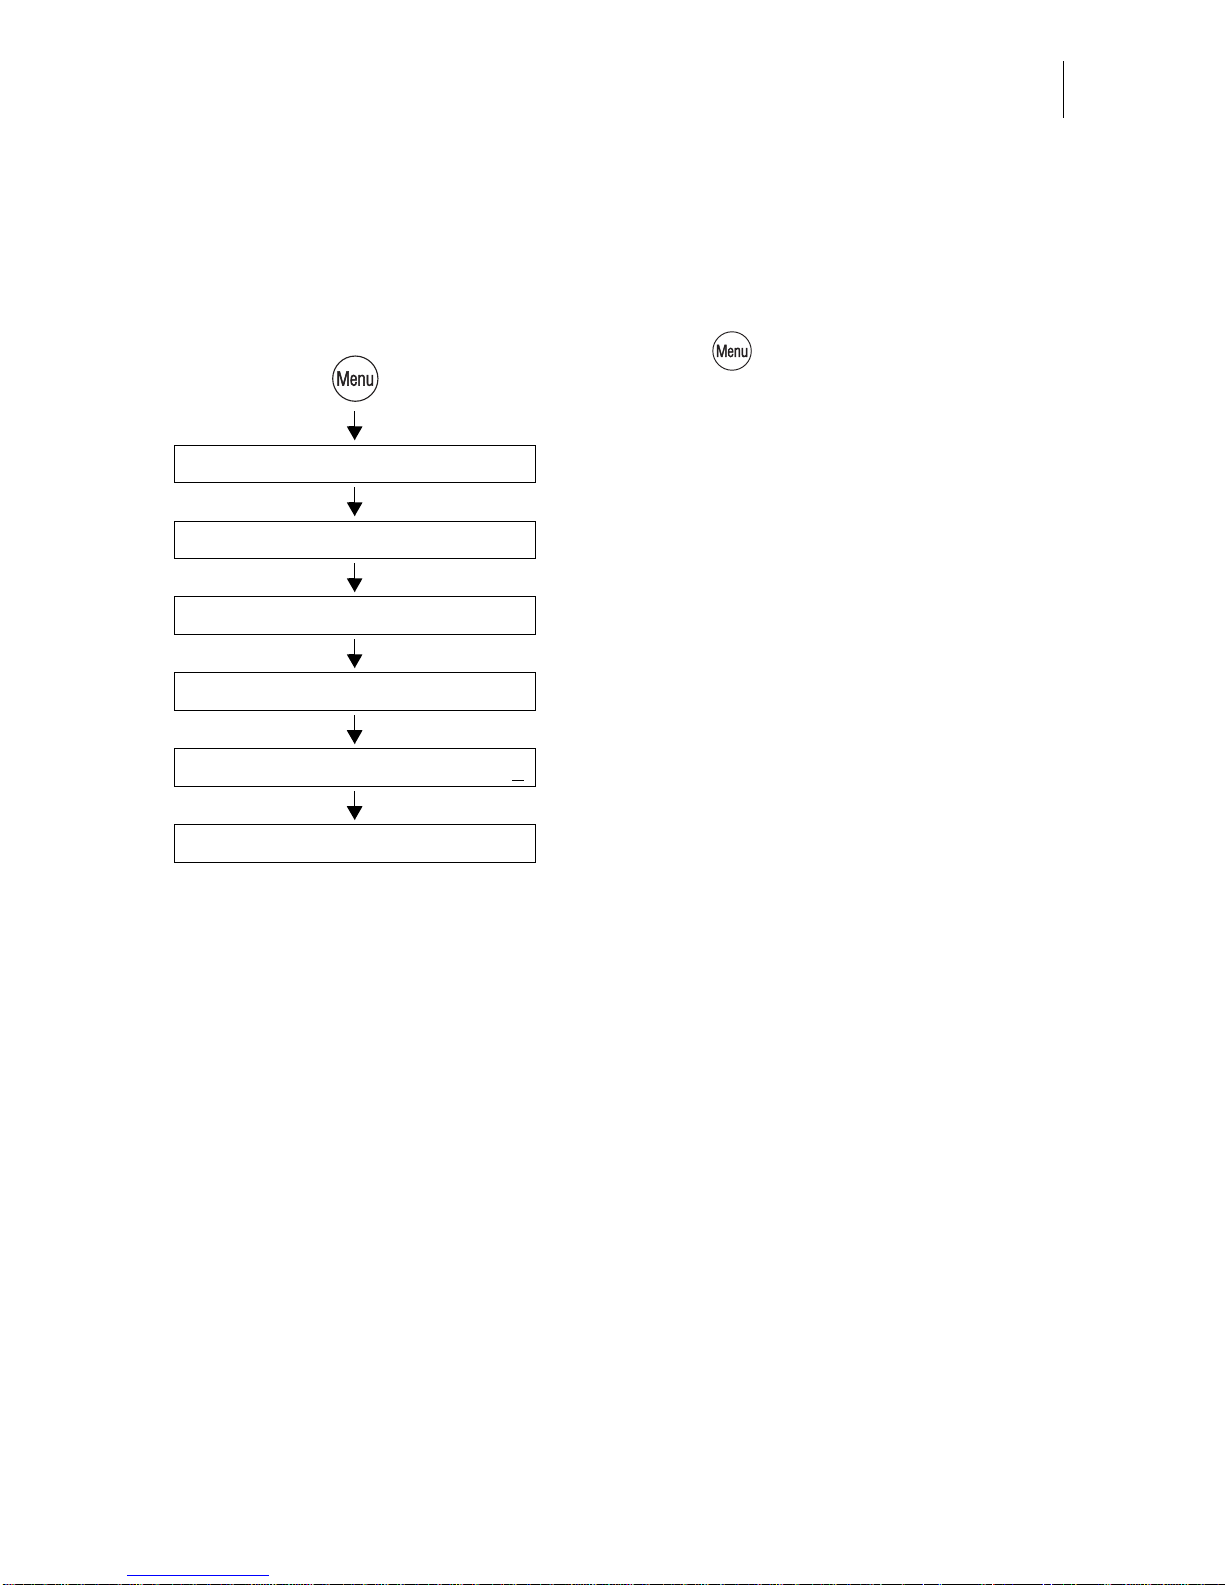
The ‘way’ through the menu to reach a function as well as inputs/set tings for this function
are indicated as follows:
• Press the key.
• Select in the menu:
SYSTEM SETTINGS STANDBY TIME.
• Type the desired time.
• SAVE the setting shown.
Standby Time
Type time: 5 min
System Settings
Save
Page 17
The basics of operation
17
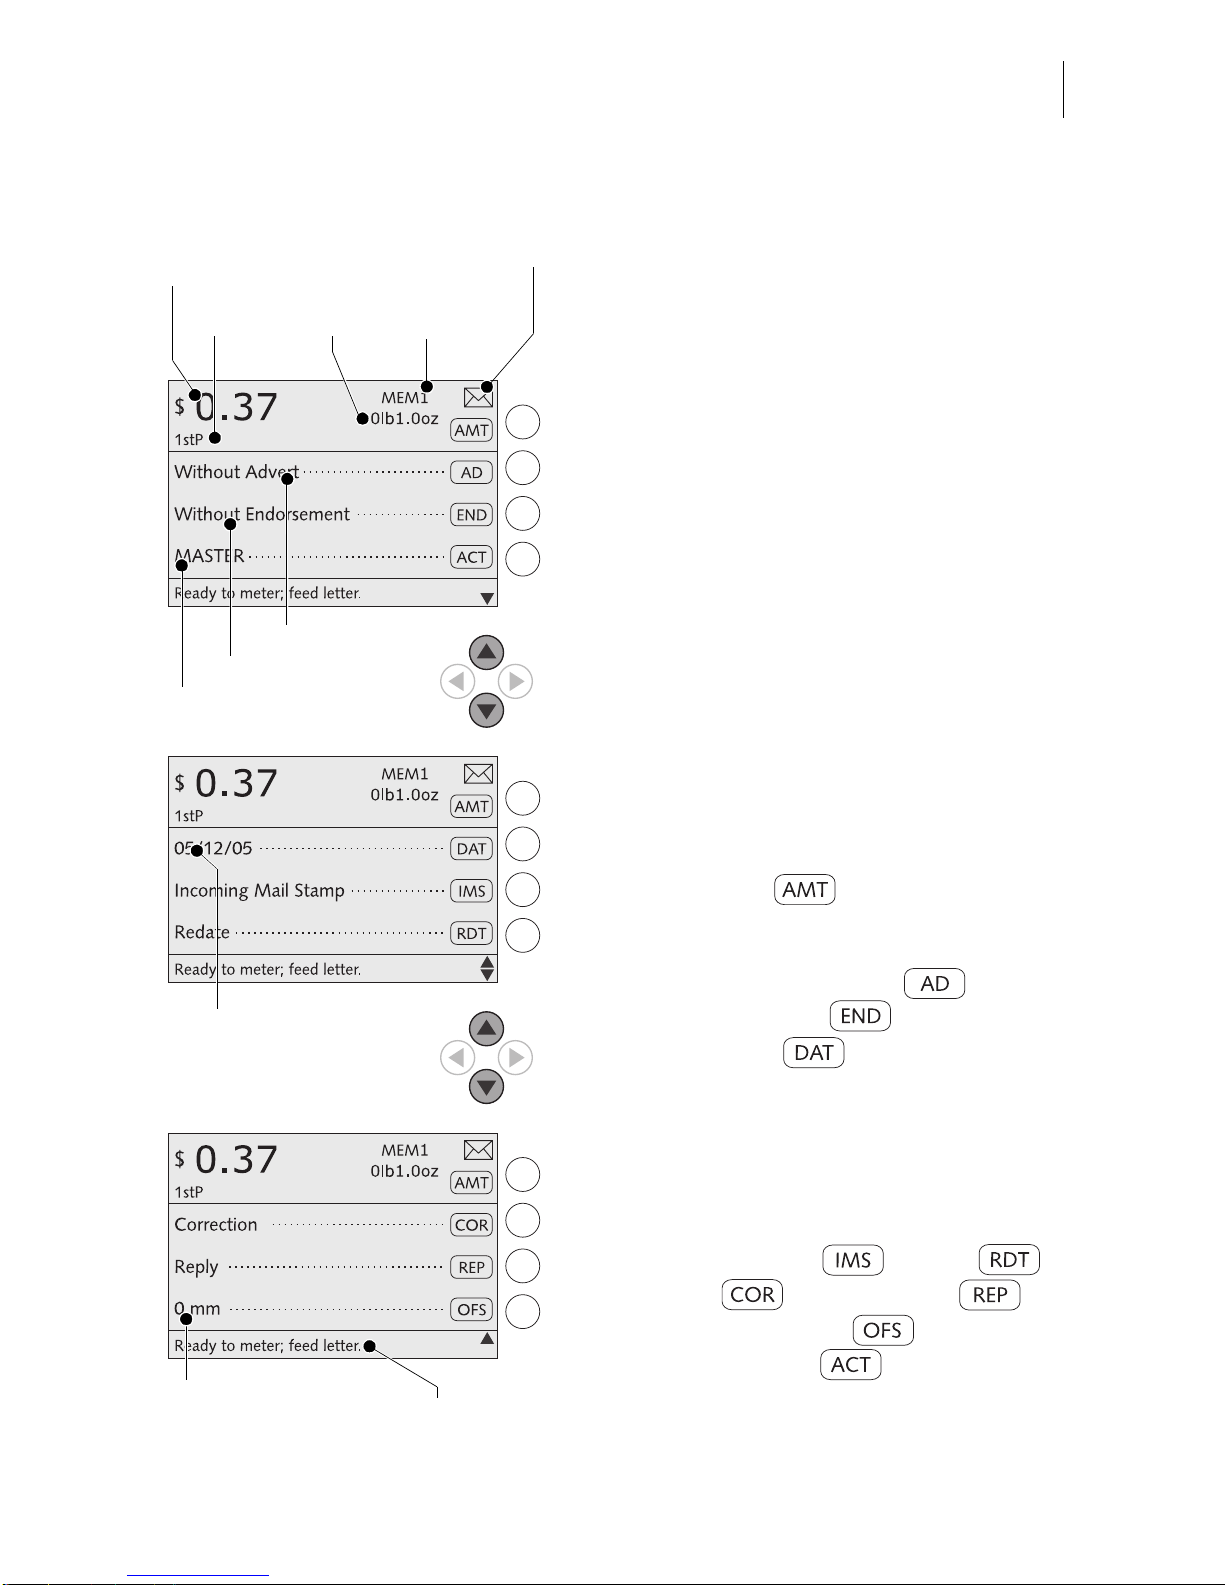
3.4.4 The Home menu
The home menu appears after the machine
was turned o n and th e start routine h as been
successfully completed. It displays the current metering settings (postage, advert,
endorsement…).
Dispatch data and weight only appear when
the postage calculation function is used
(optimail 30 with scale only)
.
An account has been set and is indicated in
the home menu when an access card (MASTER or USER) has been plugged or access
control was disabled.
Symbols indicate the multif unction key
assignment and inform about the current
settings. Chapter 3.4.2 explains the used
symbols.
The status bar informs of the current operating state and gives additional hints.
In the Home menu you can
– set the postage and
enter the Postage calculation menu
(optimail 30 with scale only)
– select an advertising imprint and an
endorsement imprint
– change the date for the meter
imprint.
–weigh
(optimail 30 with scale only)
–meter.
You can also
– switch to the special functions
Incoming mail stamp ,
Redate ,
Correction and Reply mail .
– define an imprint offset .
– change the account (when access
to this function is permitted).
Current account
Advert
Postal ra te
Postag e
Weight
Selected
memory item
Ready for mete ring
Status bar
Imprint offset
Date in meter imprint
Endorsemen t
Page 18
optimail 30 Operator Manual
18
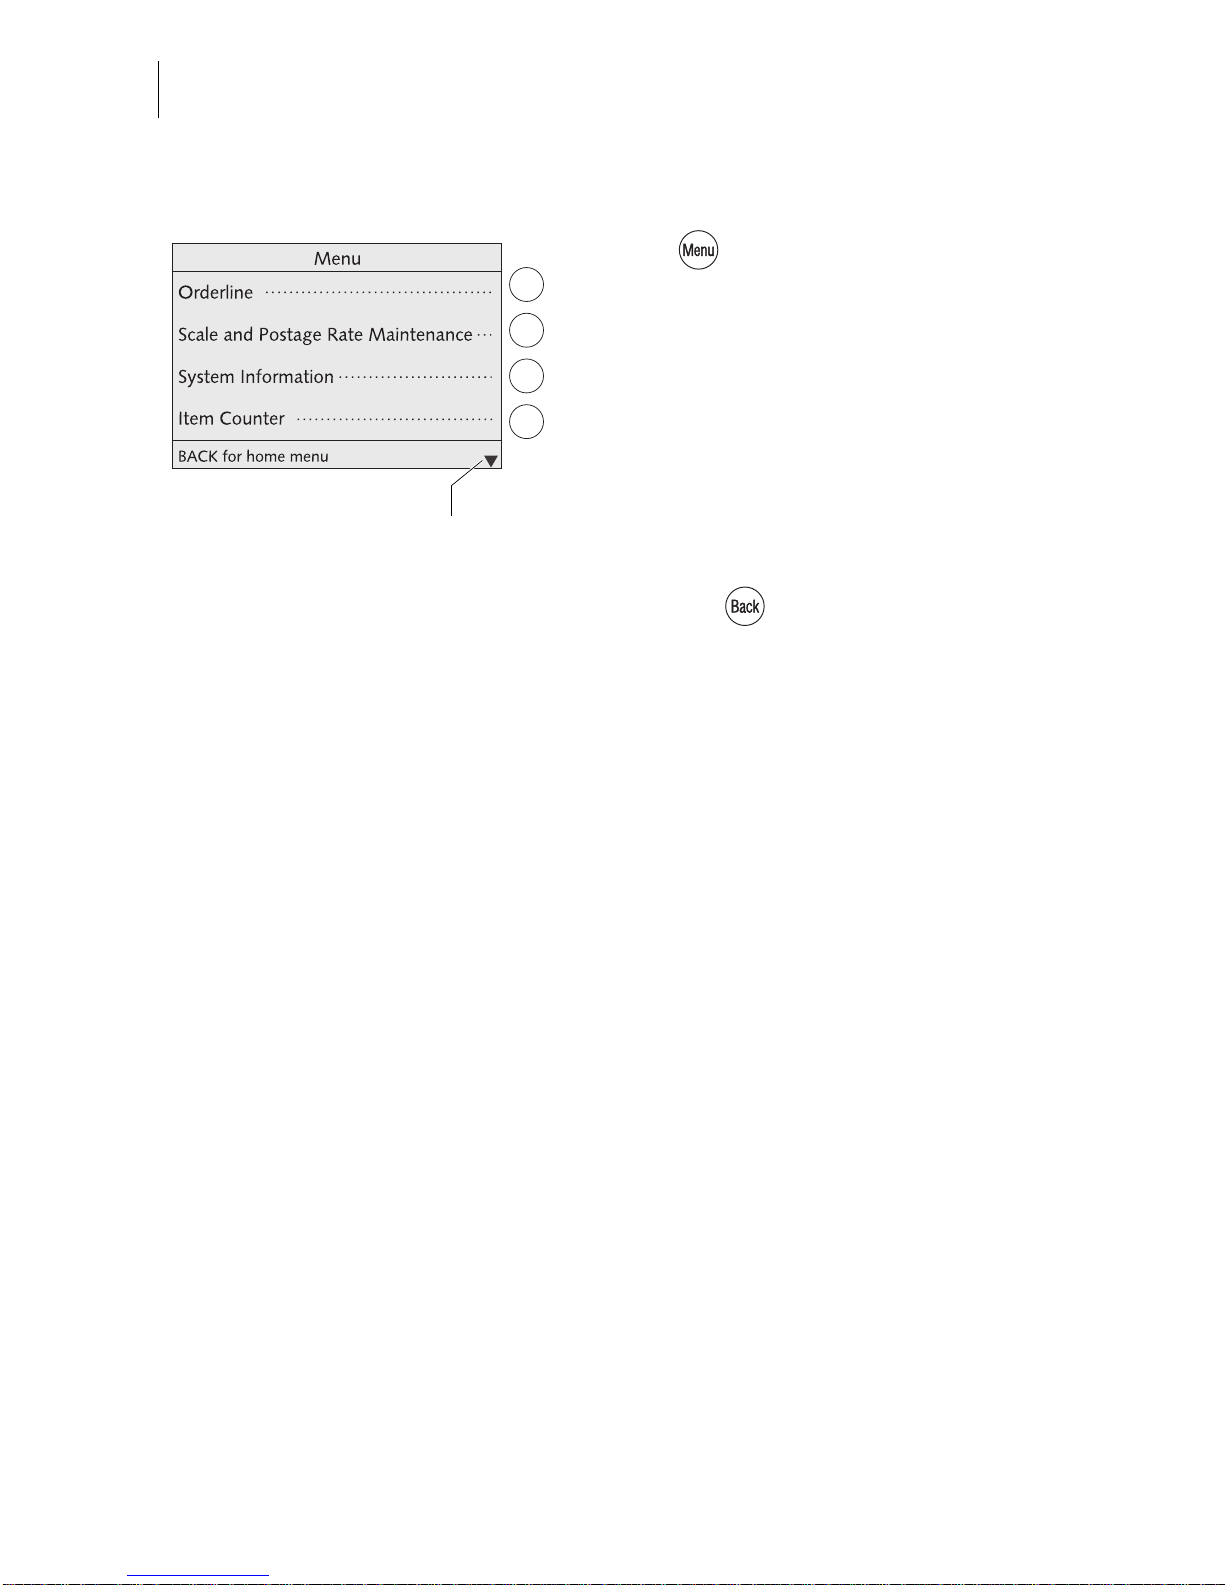
3.4.5 The menu
Use key to open the MENU.
From this menu you ca n acces s the adm inis-
tration func tions, the syst em settings and s ervice functions.
Use the arrow keys to scroll to t he next page
and back.
Use the mu lti func ti on keys to selec t the functions. Dependin g on the function a menu with
further options, a n adjustm ent m enu, a list…
appear.
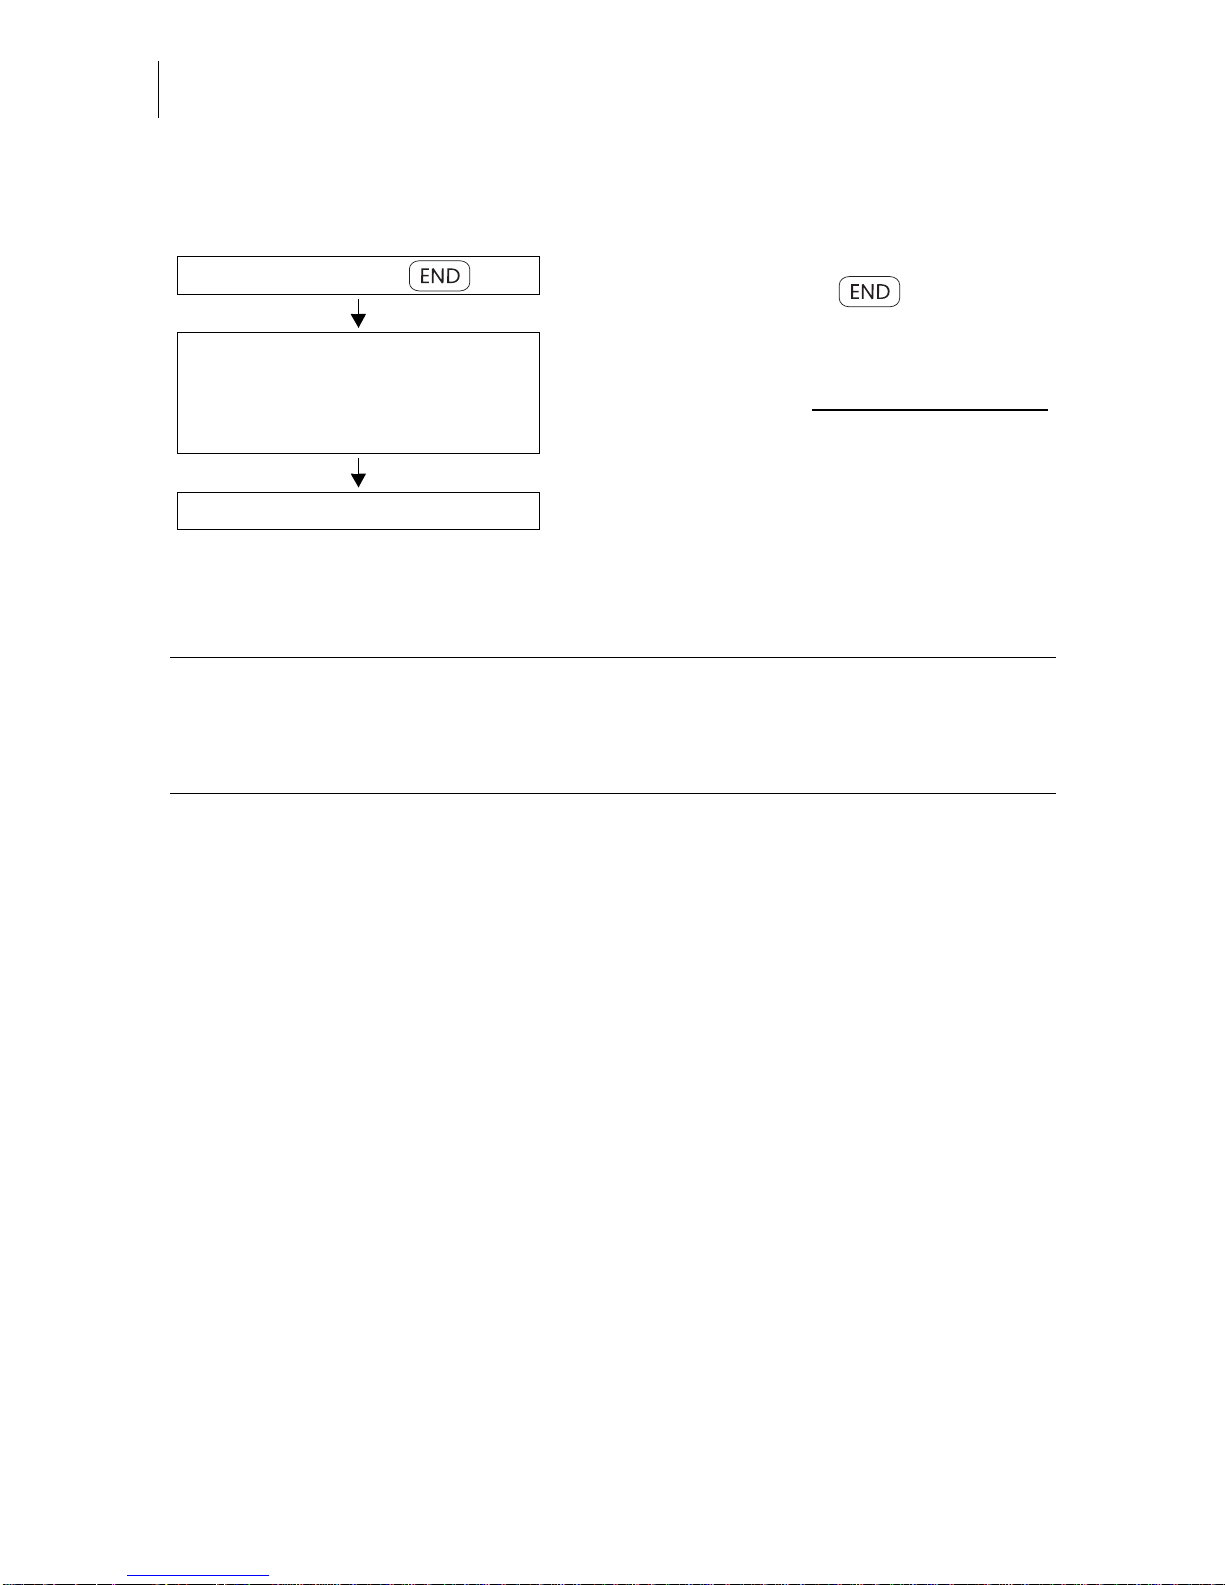
Pressing the key always returns you to
the higher-level menu.
A quick overview of MENU has been provided on page 104.
Other functions :
scroll with arrow keys
Page 19
The basics of operation
19
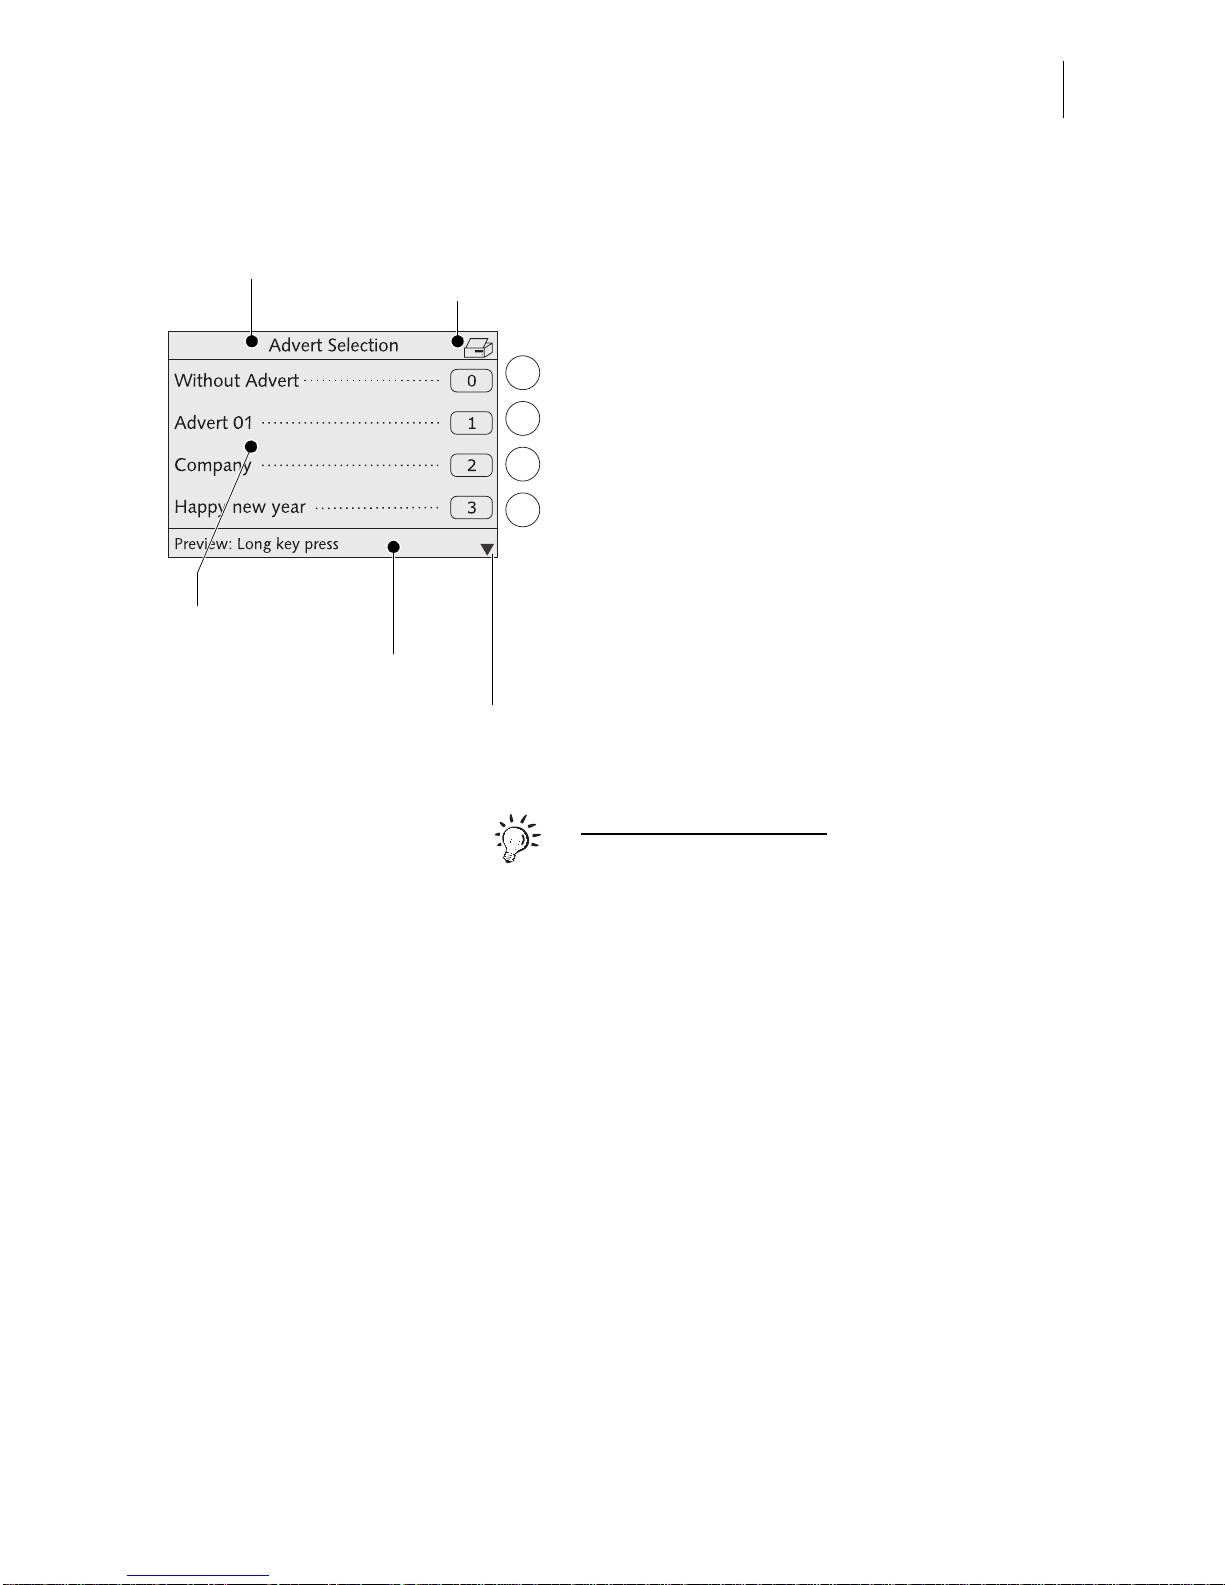
3.4.6 List s
Lists (e.g. for memory items, adverts) offer all
available settings in list form. The assigned
number appears on the display right.
You can scroll the list with the arrow keys if
more than four memory items are available.
Use the multifunction keys to select one of
the available settings.
The caption displays the list’s title.
A symbol in t he caption ca n indicate a certain
operating state. In the example shown the
printer symbol indicates the list can be
printed.
The status bar indicates useful additional
functions.
For the advanced user:
Keeping the multifunction key pressed (for
approx. 2 seconds) in some lists displays a
preview and gives you access to a choice of
administrative functions.
For example: from th e m emo ry l is t yo u hav e
direct access to a menu where you can edit
the memory items.
Status bar
Caption
Possible settings
Symbo lizes the
Print list s function
Next page: scroll
with arrow keys
Page 20
optimail 30 Operator Manual
20
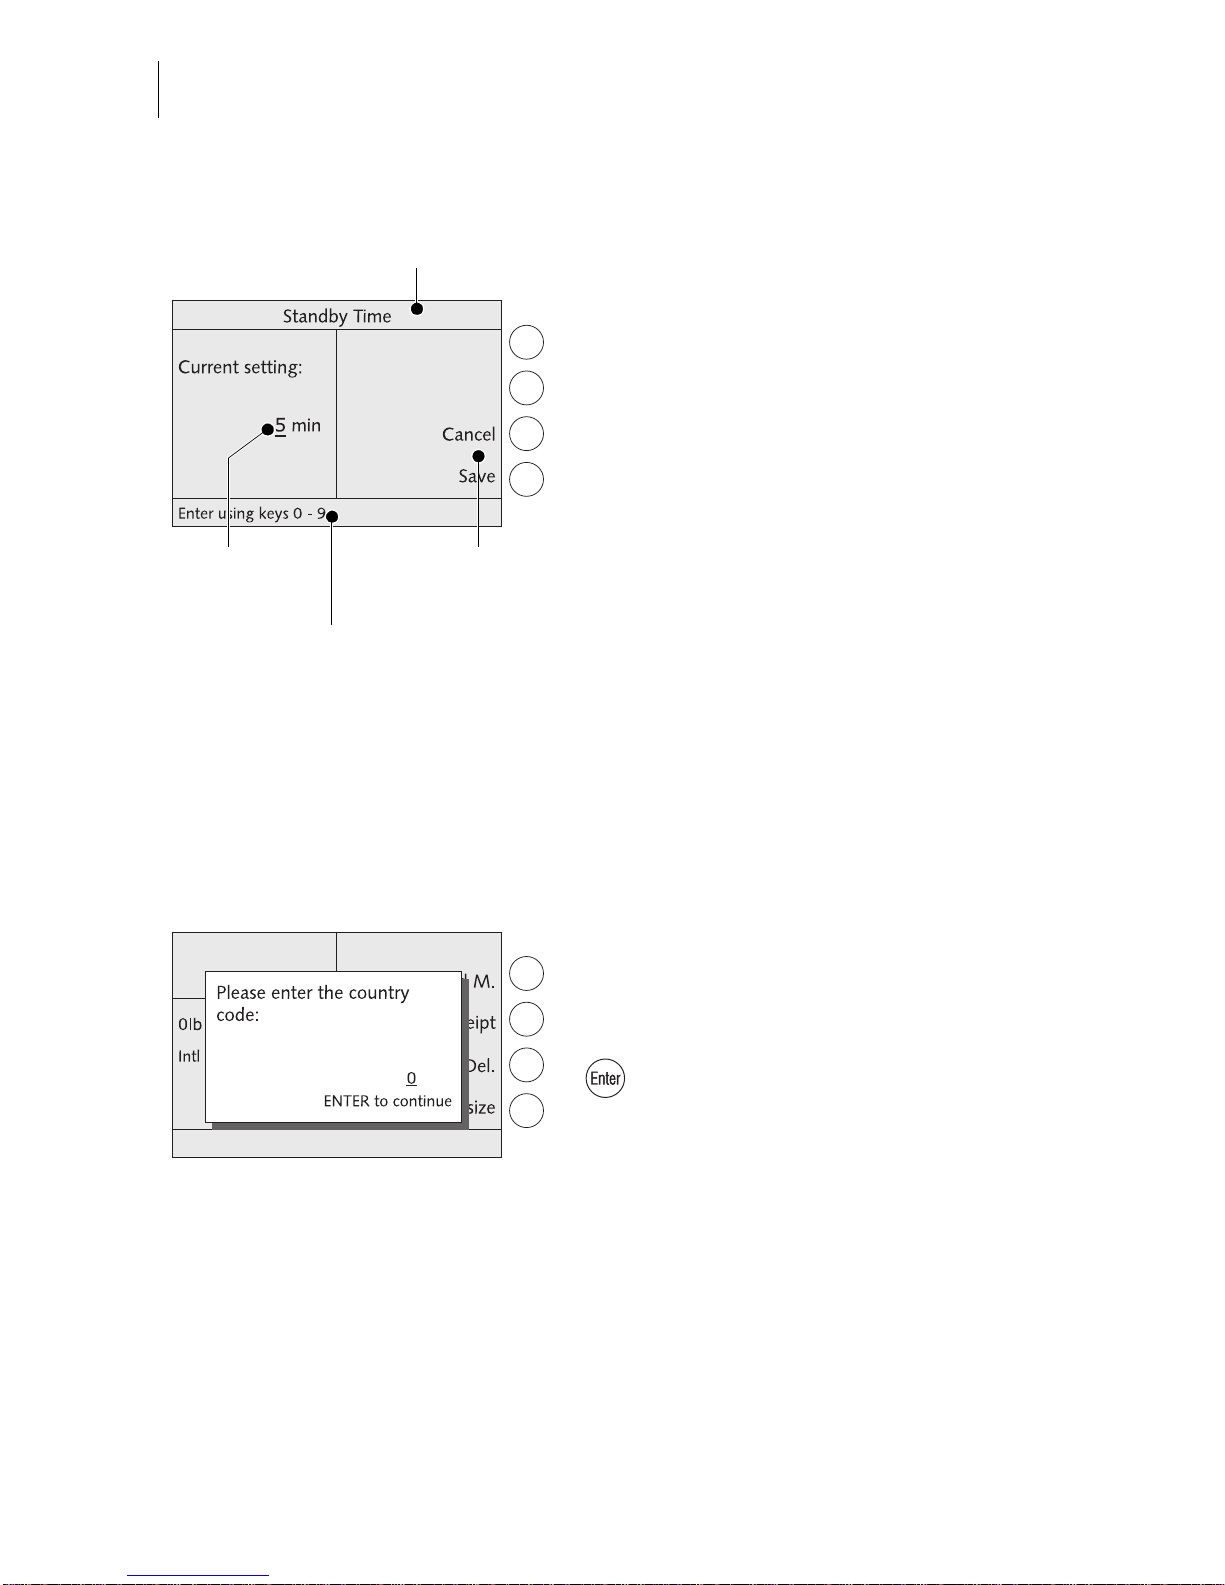
3.4.7 Adjus tment m enu s
The optimail 30 opens a separate menu each
for editing system p arameters and for ty ping,
editing, clearing user-specific data.
Structure and function of these menus are
similar. On the display left the optimail 30
shows the current setting. To the right you
see other settings and functions you can
select with the multifunction keys.
A cursor, the flashi ng underscore
_ indicates
a box where you can type text or numbers.
The caption displays the menu’s title. A symbol in the caption can in dicate a certa in operating state.
The status bar informs of special fe atures
and gives additional hints.
Adjustment men us ca n a ls o c om pri se graphical el ements for visualization.
3.4.8 Popup windows
A popup window prompting for input opens
for some setting s. M es sages a ls o app ear as
a popup.
Confirm messages and popup inpu t w ith the
key.
Some popup messages feature auto-confirmation, i.e. they automatically close after
some time.
Status bar
Caption
Possible settings
and functions
Text box
with cursor
Page 21
The basics of operation
21
3.5 Text input
Letters including umlaut characters and accents, punctuation marks and special
characters are assigned to the numeric keys for entering texts such as account
names or short dialing abbreviations. Page 14 shows available special characters.
Typing characters
A cursor
_ marks the point whe re a character
can be typed in a text box.
• Press the appropriate numeric key as
many times in rapid succession until the
desired character appears in the display.
After a short time the cursor jumps one digit
to the right. You can now type the next character.
Switching upper/lower case letters
• Press the key.
Deleting characters
• Use the arrow keys to position the
cursor on the character to be deleted.
• Press the key to delete the character.
Inserting characters
• Use the arrow keys to position the
cursor on the point in the text where the
character is to be inserted.
• Ty pe the des ire d chara cter.
Flashing cursor
Symbolizes the
text input mode
Deletes the
text displayed
Page 22

optimail 30 Operator Manual
22
3.6 Test imprint
You can check the settings for the metering
process by doing a test imprint with postage
value “0.00” (zero impr int).
• Type the postage value “0” in the home
menu.
“0” is displayed in the status bar.
• Confirm the postage value with the
multifu nction key.
The postage value “0.00” is set.
• Fold a sheet (letter size) in the middle.
• Place the folded sheet on the letter
receiving tray:
– side to be printed face up
– the folded edge must touch the letter
guide.
• Push the sheet in direction of the arrow
until the optimail 30 feeds the sheet.
A roller pushes the sheet again st ribbon and
print head and printing starts as soon as the
letter sensor detects the sheet.
The optimail 30 prints the zero imprint and
ejects the imprinted sheet to the right.
Folded edge
Page 23
Setting the meter imprint
23
4 Setting the meter imprint
The present chapter describes the m eter imprint sett ings required by U.S. Posta l
Service and the optional advertising imprint.
The following settings in the home menu define the meter imprint:
– Postage value (see Chapter 4.1)
– Endorsement (see Chapter 4.2)
– Advert (see Chapter 4.3)
– Date (see Chapter 4.4).
Refer to Chapter 4.5 on how to use the ‘Imprint offset’ function to laterally displace
the meter imprint position.
With the memory you can easil y and quic kly set th e postage and th e endorse-
ment. Refer to Chapter 8 on how to use the optimail 30 memory function.
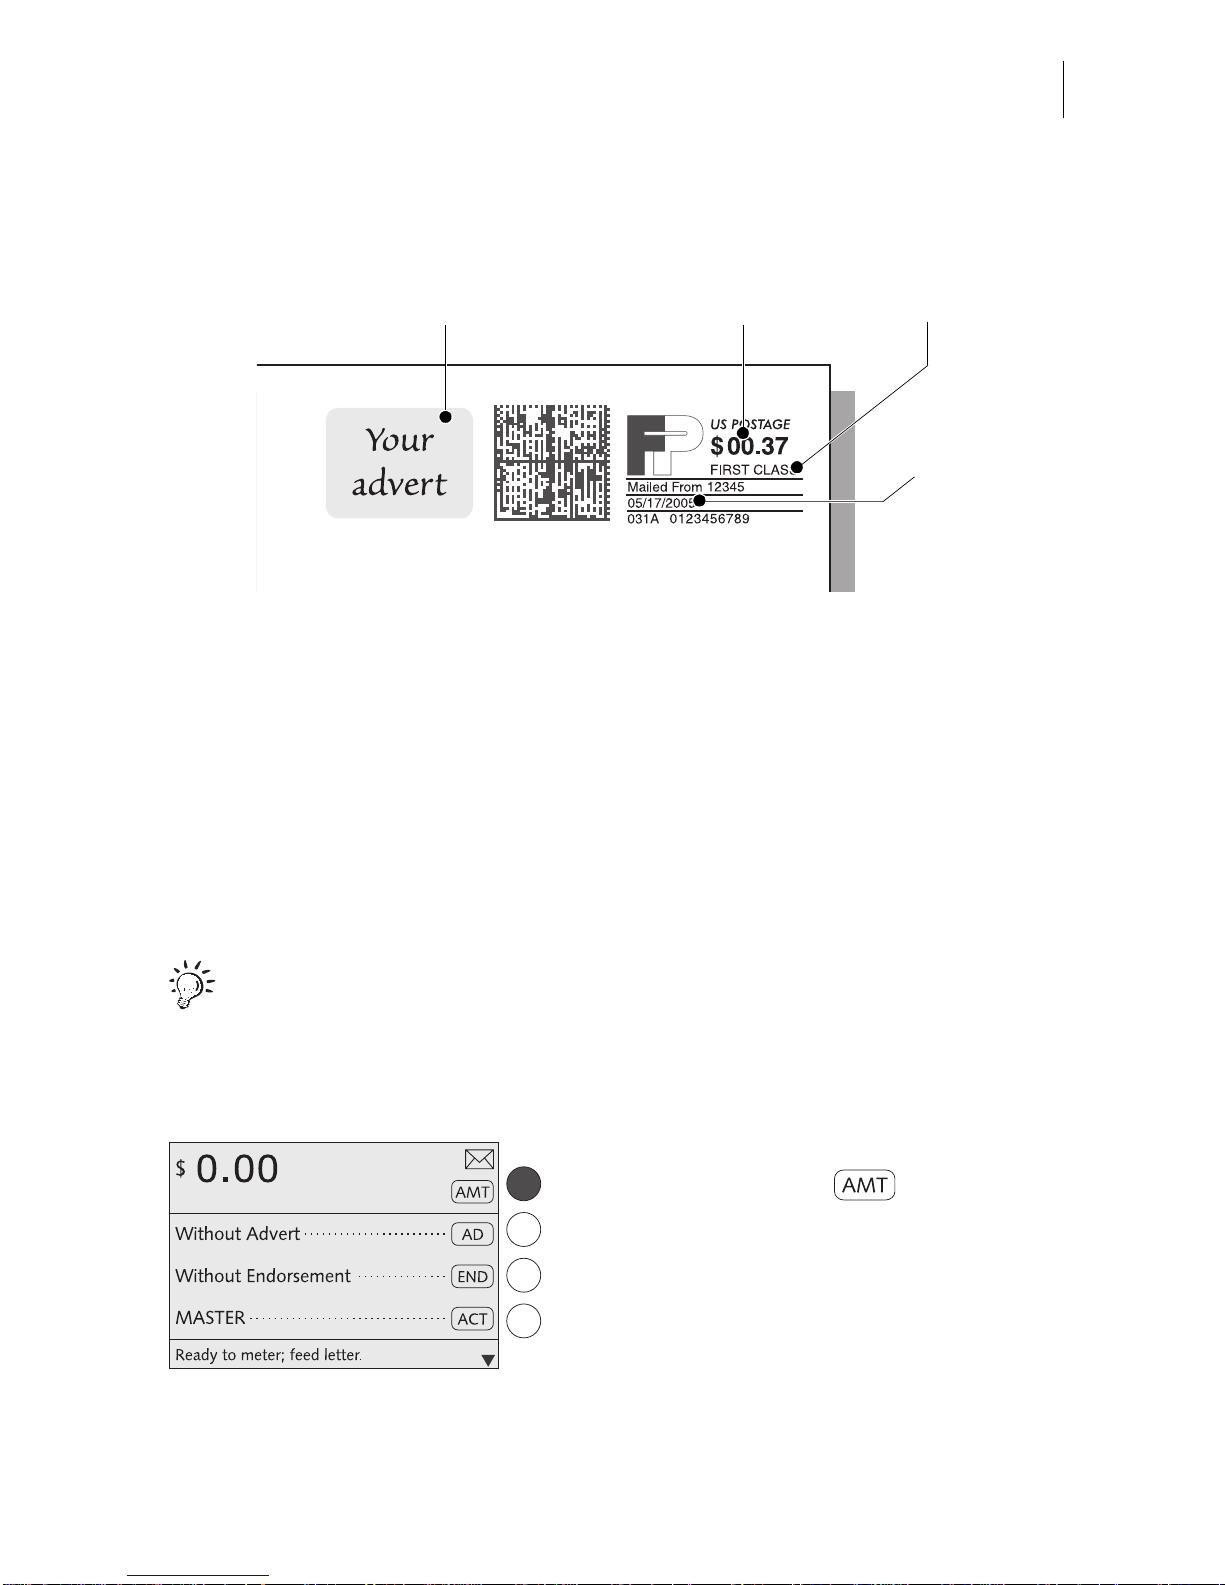
4.1 Postage value
In the home menu:
• Press the key next to .
Postage value Advert
Date
Endorsement
Page 24
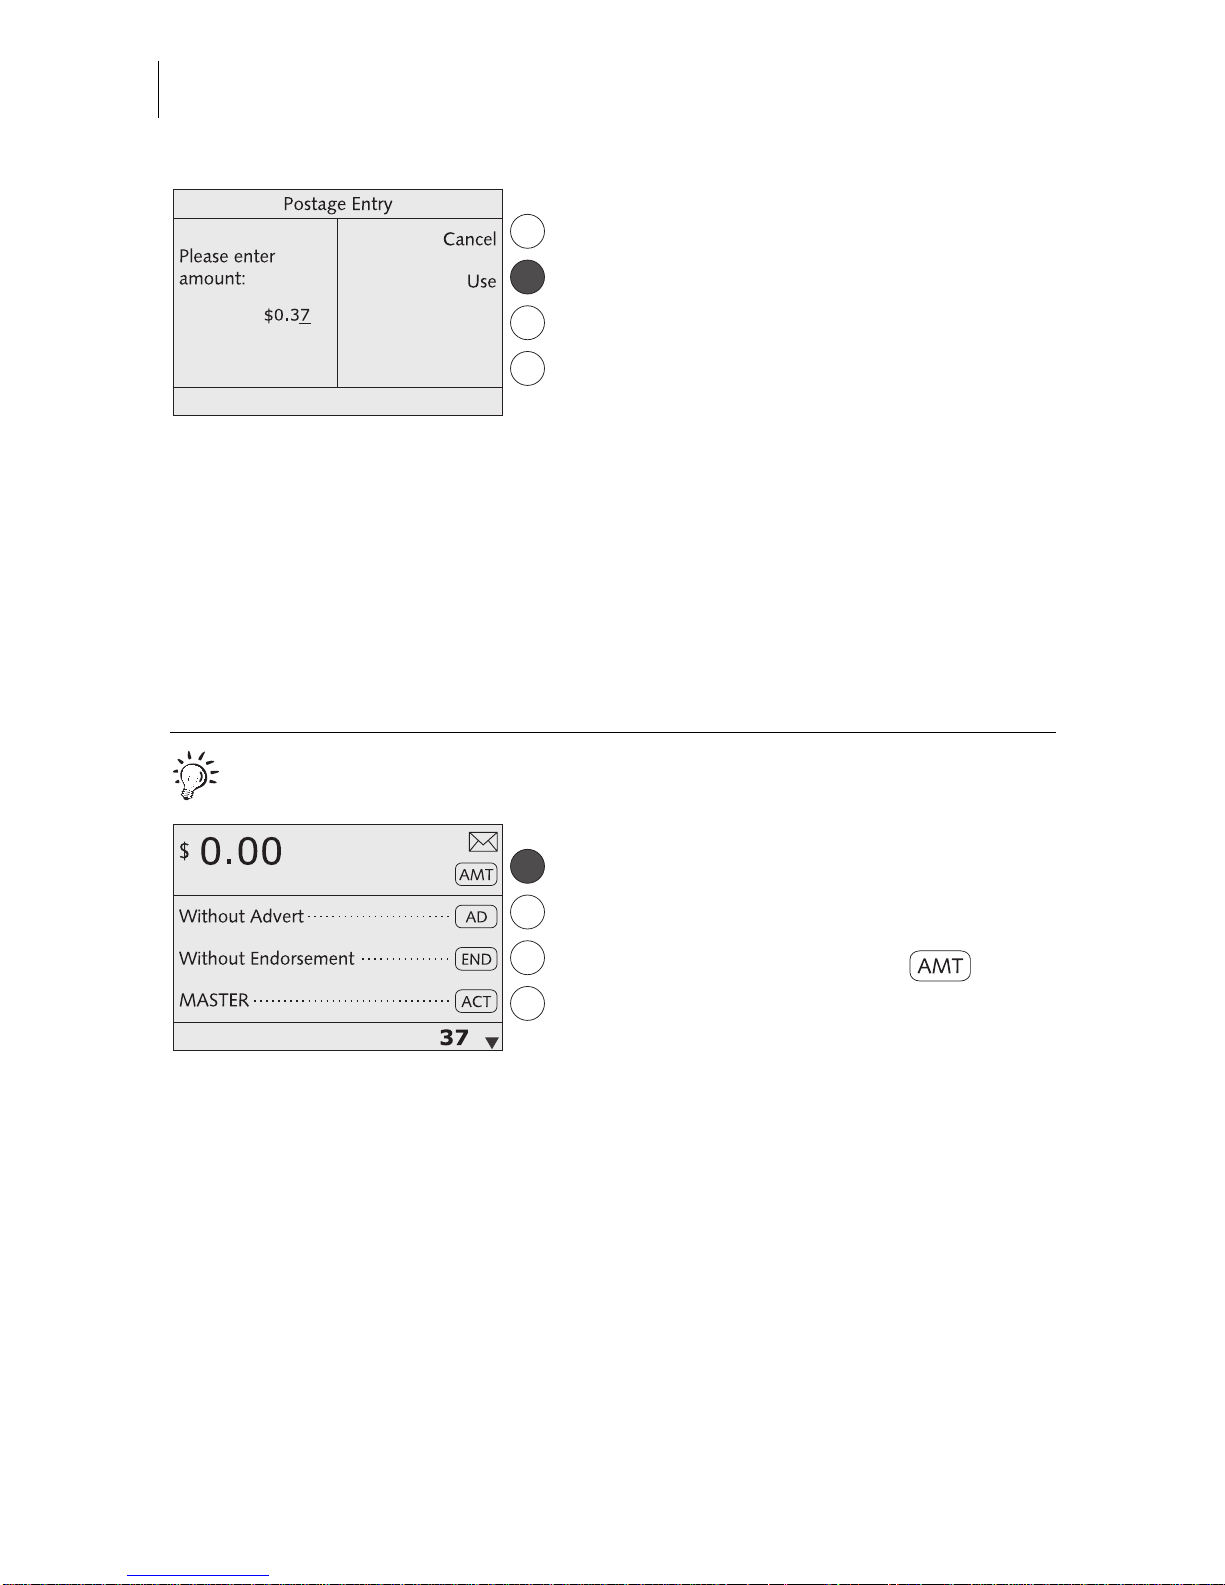
optimail 30 Operator Manual
24
• Type the desired postage value.
• Press USE to set the postage value.
The optimail 30 returns to the home menu.
The postage value is set.
High postage
The optimail 30 issues a warning if you set
too high a postage. The optimail 30 thus
helps you to prevent overmetering and loss
of postage. You can edit the limit for this
monitoring function in the SYSTEM SETTINGS menu (see Chap ter 13.3 on page 68).
Quick results for the advanced user.
In the home menu:
• Type the desired postage value.
The postage is displayed in the status bar.
• Confirm with the key next to .
Page 25
Setting the meter imprint
25
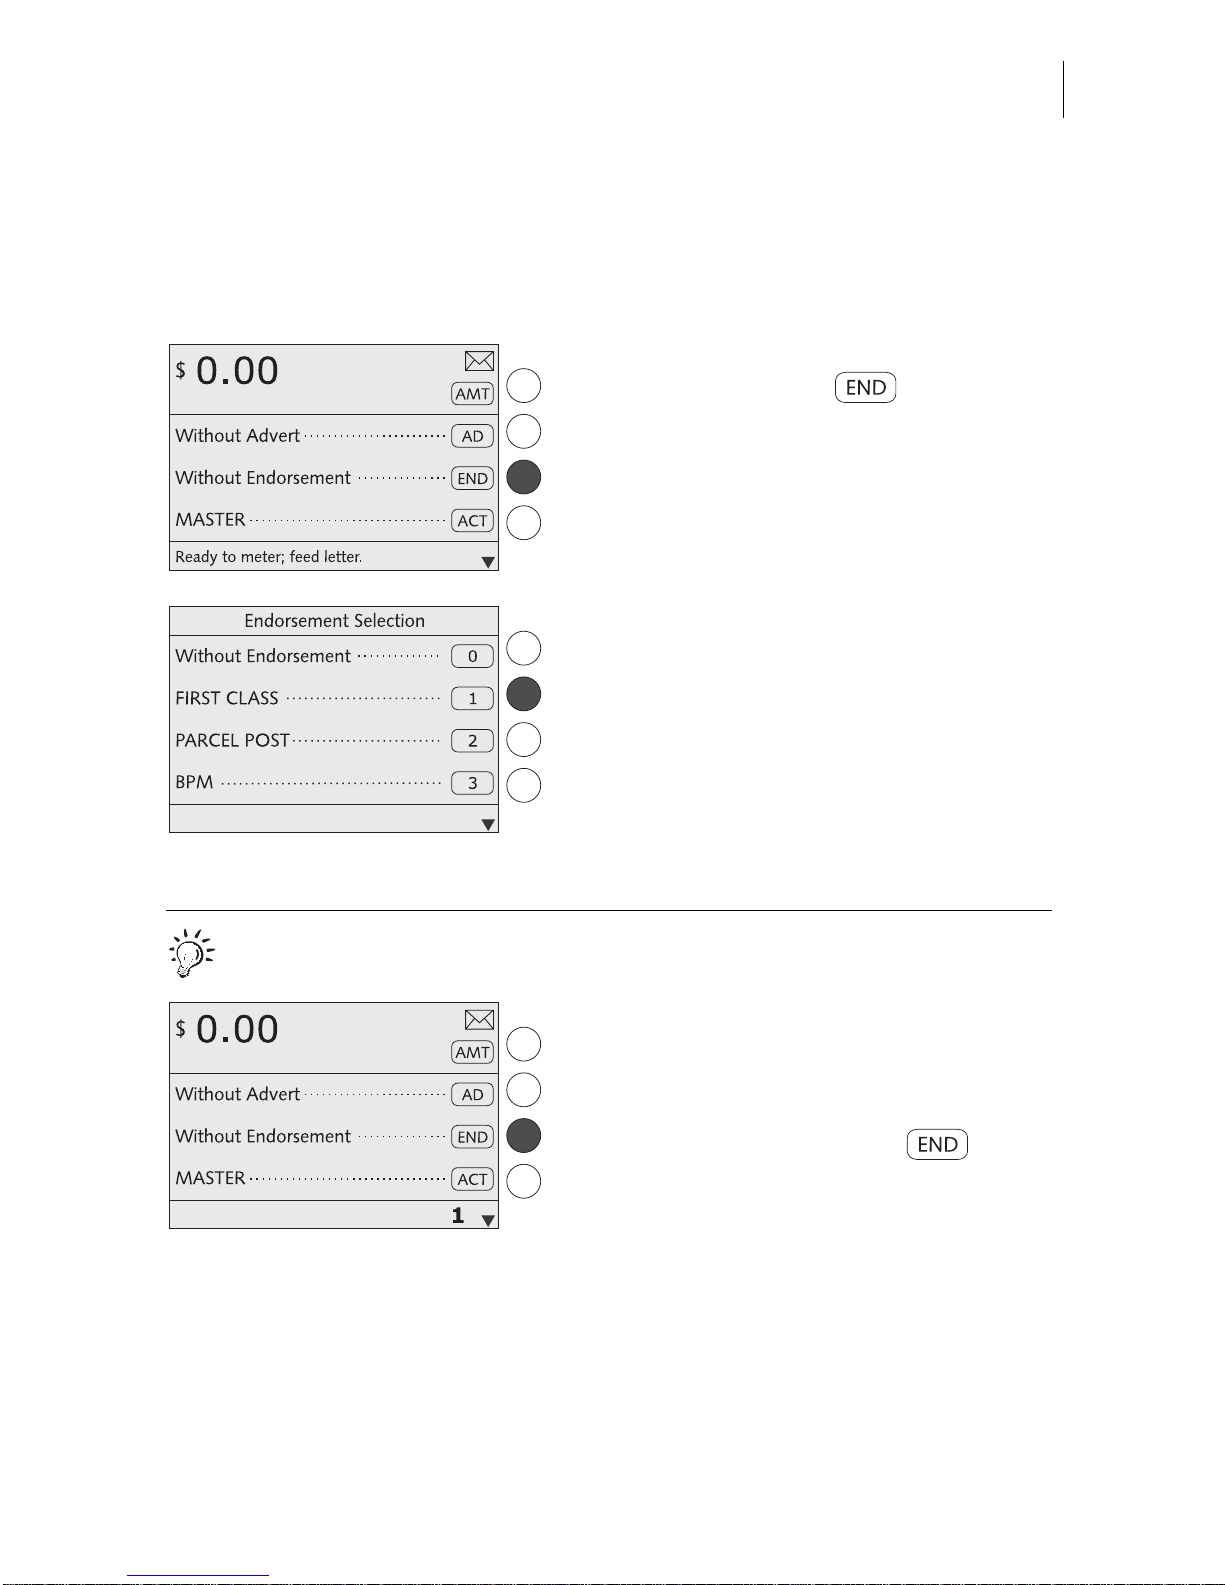
4.2 Endorsement
You can mark special mail types with an appropriate endorsement (e.g. First Class,
Priority, Media Mail).
In the home menu:
• Press the key next to .
You see a list with all available endorsements.
• Select the desired endorsement. In the
example it is “First Class” (endorsement
No. 1).
The optimail 30 returns to the home menu.
The endorsement is set.
Quick results for the advanced user.
In the home menu:
• Type the desired endorsement number.
The number is displayed in the stat us bar.
• Confirm with the key next to .
Page 26
optimail 30 Operator Manual
26
4.3 Advert
You can print an advert of your choice on your mail. The optimail 30 offers the
following options for advert printing:
– The postage meter ca n hold a ma ximum of 6 different adverts . The save d adverts
are available to all users.
– Advert on USER card. On request Fr ancotyp-Postali a will suppl y USER cards wit h
an advert of your choice. The advert is read from the card as soon as the card is
inserted.
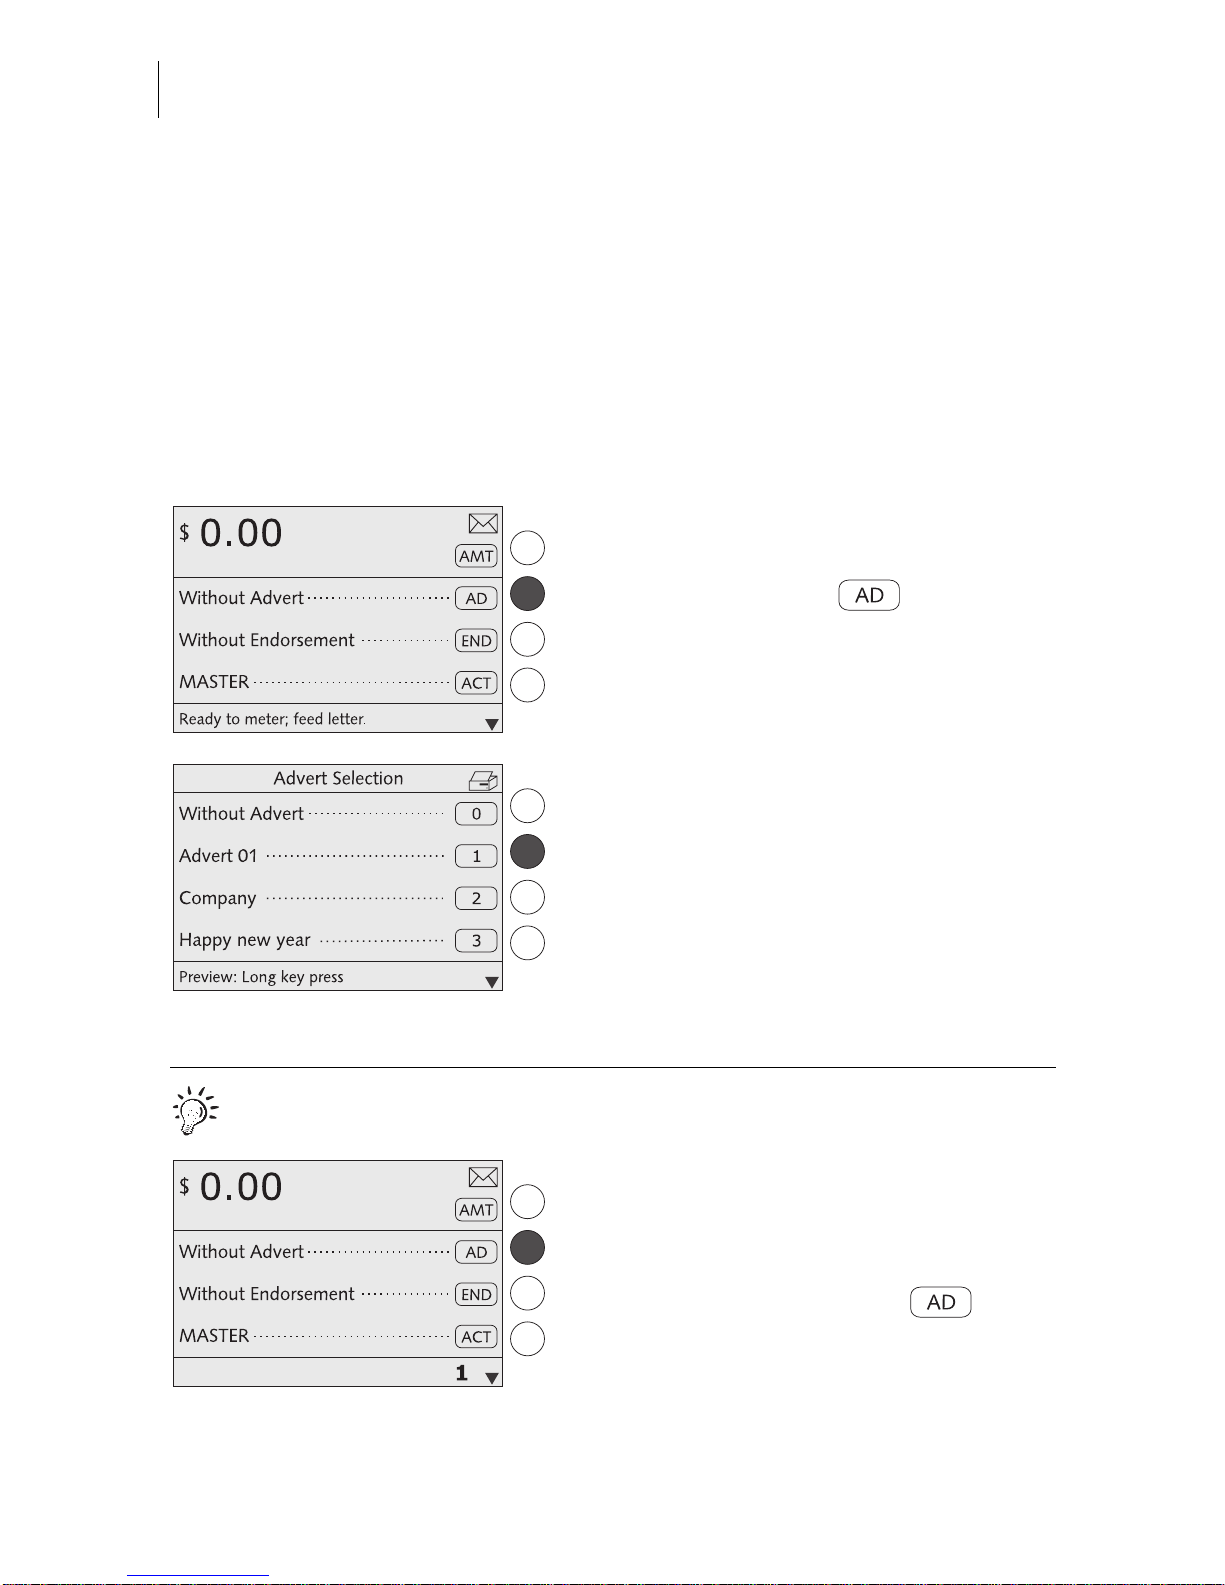
Setting the advert
In the home menu:
• Press the key next to .
You see a list with all available adverts.
• Selec t the desire d advert. In the ex ample it
is “Advert 01”.
The optimail 30 returns to the home menu.
The advert is set.
Quick results for the advanced user.
In the home menu:
• Type the desired advert number.
The number is disp layed in the status bar.
• Confirm with the key next to .
Page 27

Setting the meter imprint
27
Using the advert from the USER card
• Insert USER card with advert.
• Press the key next to .
The advert from the USER card appears
at the end of the list
.
• Pres s the key n ext to the last advert in the
list.
The optimail 30 returns to the home menu.
The advert on the USER card is set for
metering.
You can also define th e adver t on the USER
card as the default advert for this account
(see page 59).
The advert is the n used fo r the m eter im print
immediately a fter the USER card is p lugged.
Page 28
optimail 30 Operator Manual
28
4.4 Date
The date for the meter imprint is set automatically to the current date by the system
clock. You can set the date of the meter imprint forward by up to 30 days. The
optimail 30 does not permit forward da tin g o f m ore th an 30 da ys o r ba ck ward da tin g
for metering.
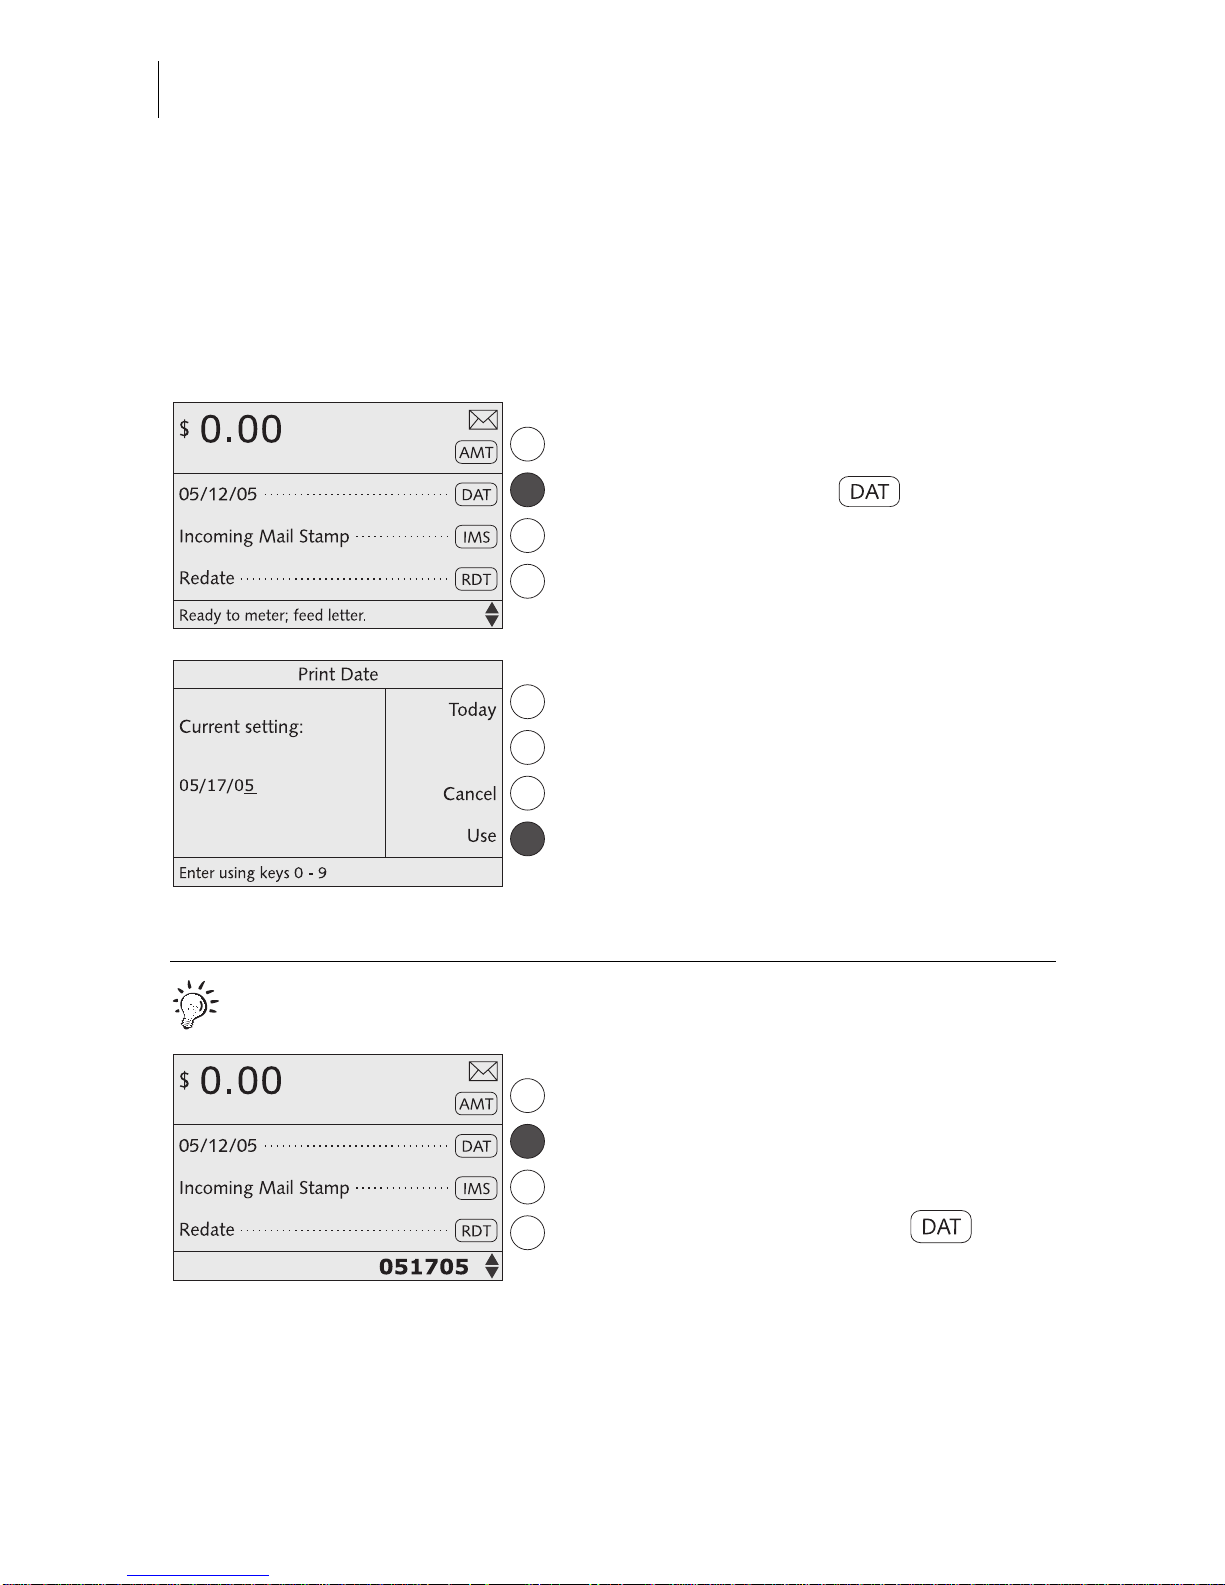
Setting the metering date
In the home menu:
• Press the key next to .
• Type the new date.
• Press USE to set the date.
The optimail 30 returns to the home menu.
The metering date is set.
Quick results for the advanced user.
In the home menu:
• Type the metering date.
The numbers you typed are displayed in the
status bar.
• Confirm with the key next to .
Page 29
Setting the meter imprint
29
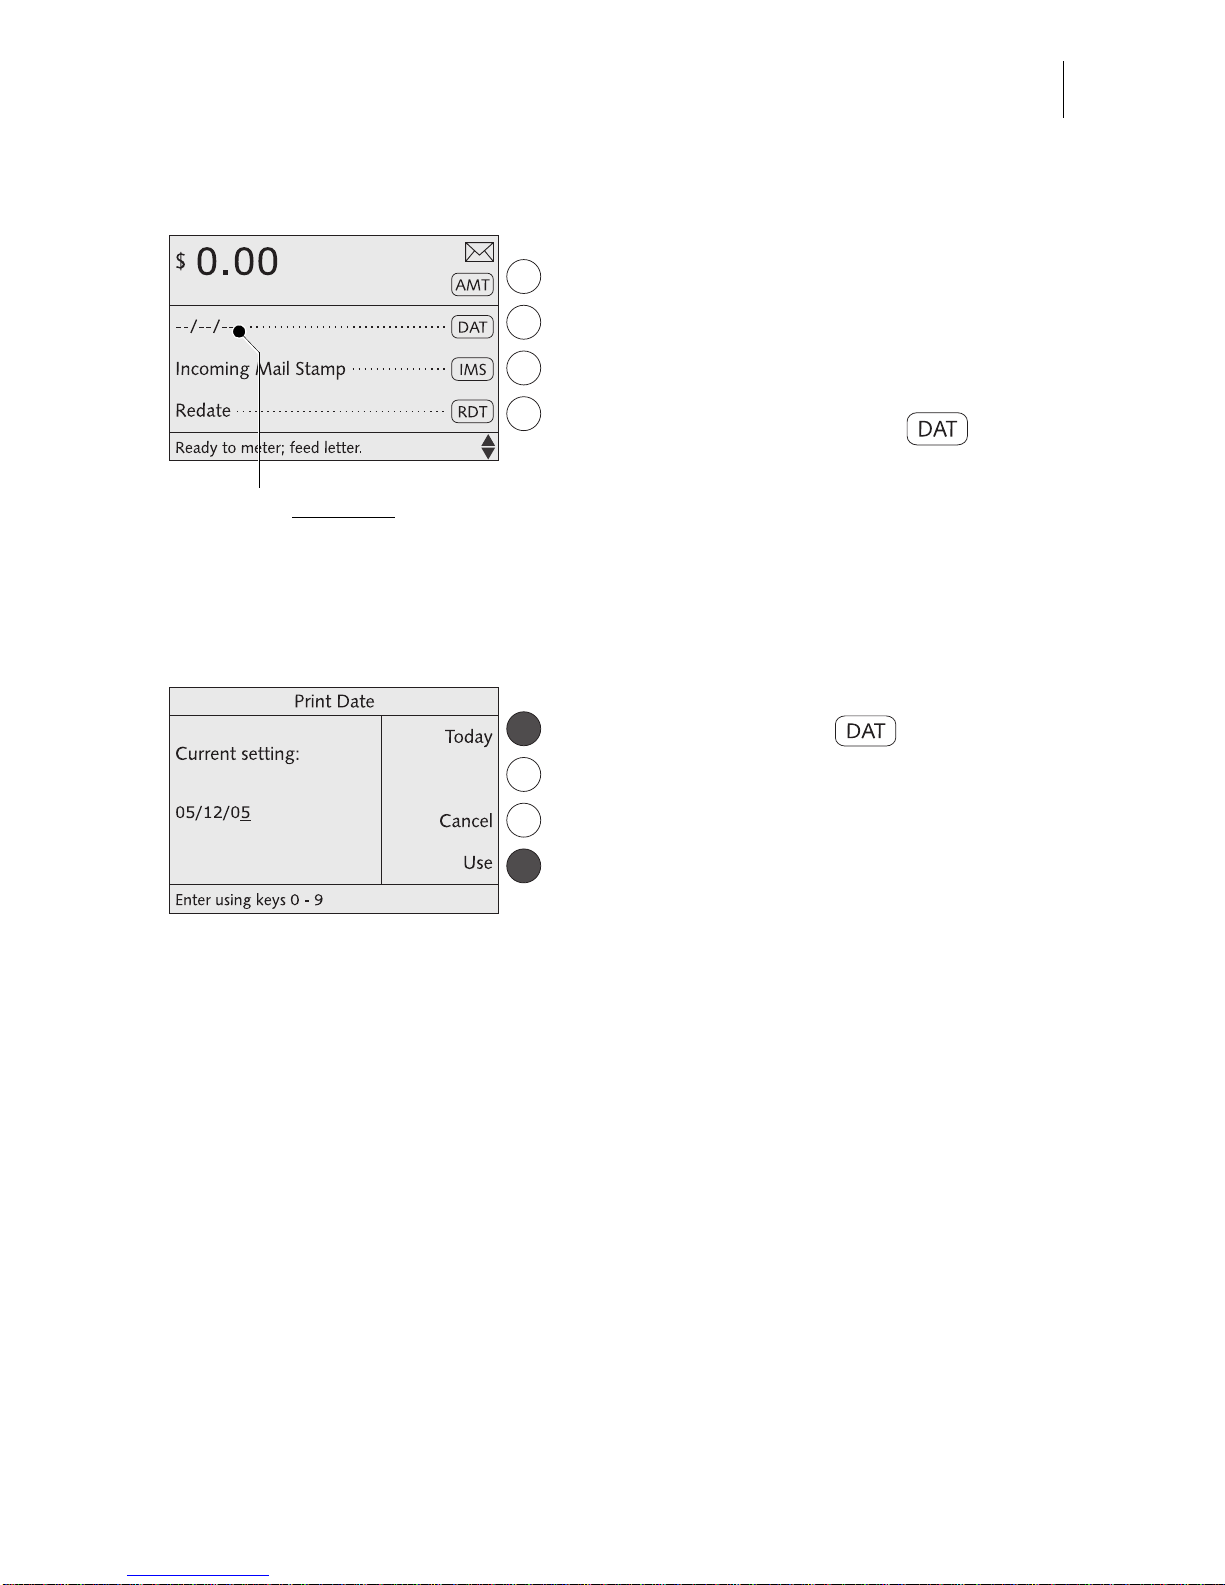
Metering without date
The optimail 30 can omit the date in the
meter imprint. Please heed the U.S. Postal
Service regulations.
In the home menu:
• Type “000000” as the date.
• Confirm with the key next to .
The home menu indicates “– – / – – / – –”
instead of the date. No date appears in the
meter imprint.
Resetting the metering date to the
current date
In the home menu:
• Press the key next to .
• Press TODAY to set the current date.
• Press USE to set the date.
The optimail 30 returns to the home menu.
The current date is set for metering.
Metering without dat e
Page 30
optimail 30 Operator Manual
30
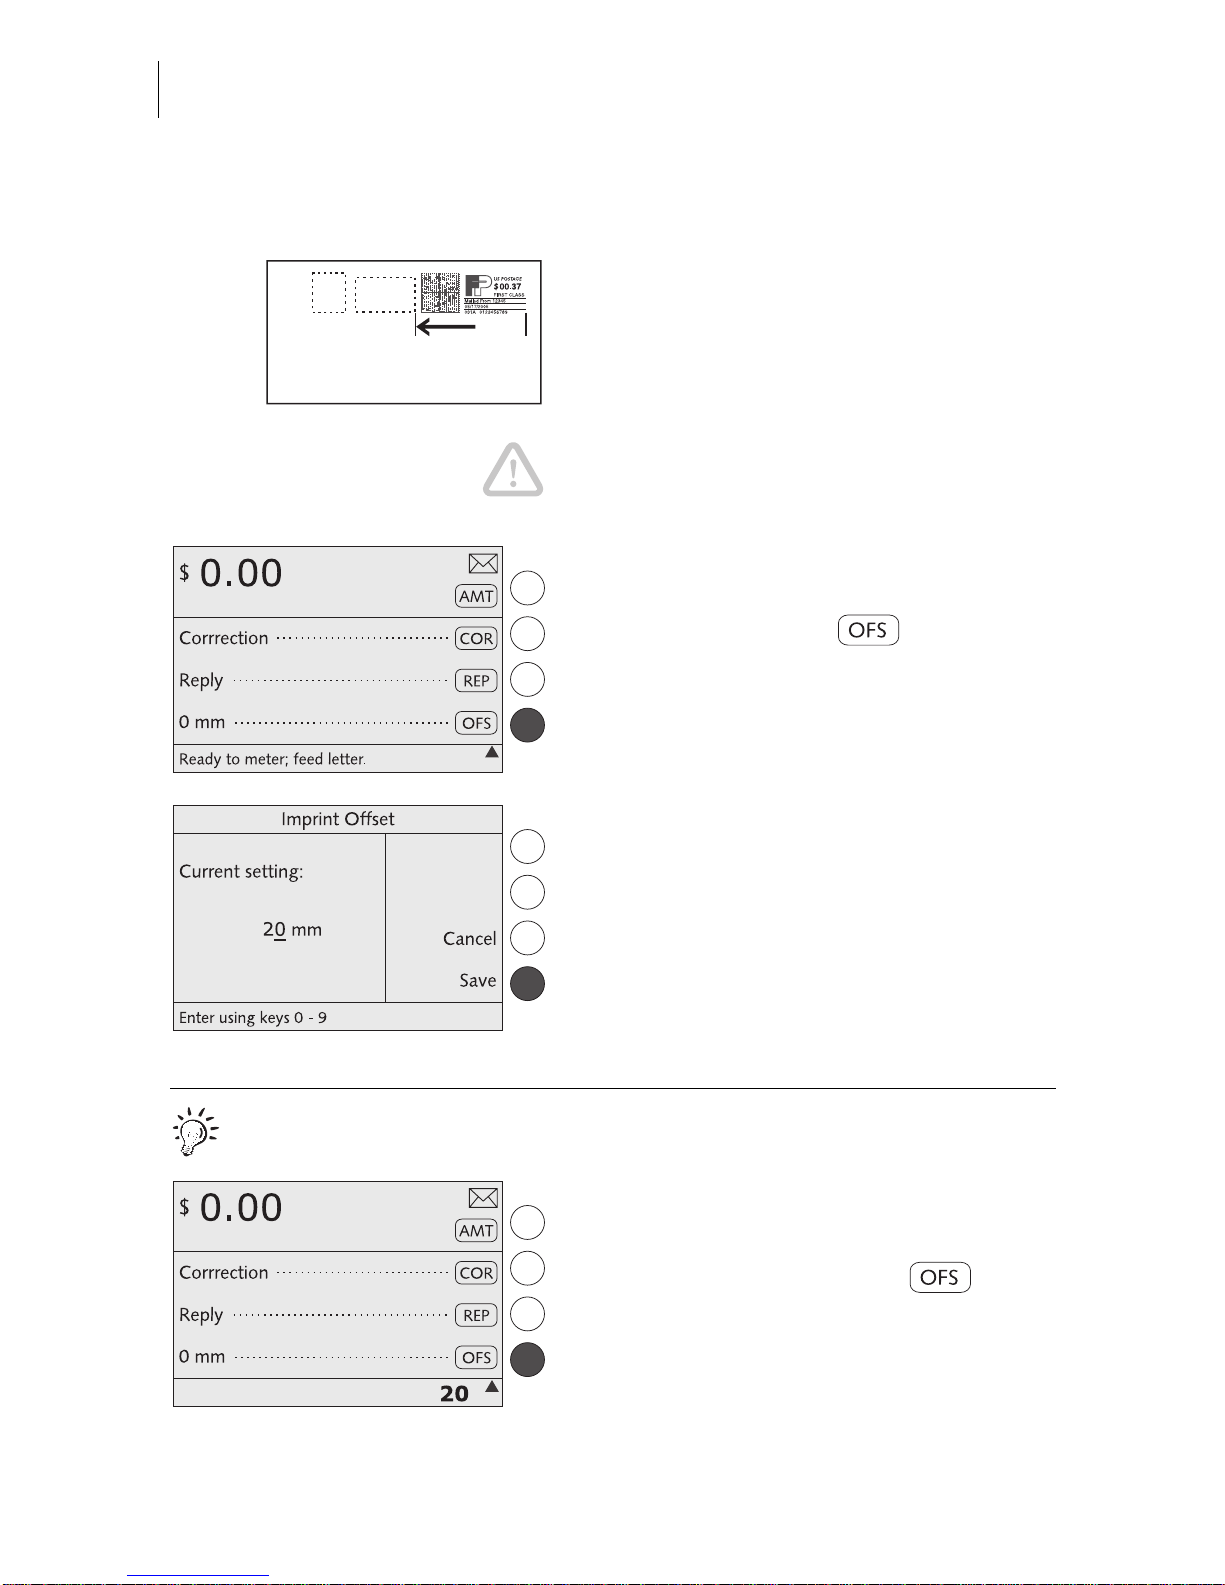
4.5 Impri nt offset
The optimail 30 prints the meter imprint at a
fixed offset to the right letter edge. You can
increase this offset and thus shift the meter
imprint to the left by adjusting the imprint offset.
Caution! The impri nt offset set also applies
to imprinting of labels and all other print
functions (printing of lists, incoming mail
stamps…).
In the home menu:
• Press the key next to .
• Type the desired value
(0 mm = default position without offset).
• SAVE the imprint offset.
The optimail 30 returns to the home menu.
The imprint o ffset is set an d remains effect ive
until it is changed – even if the machine is
switched off.
Quick results for the advanced user.
In the home menu:
• Type the desired imprint off s et value.
• Confirm with the key next to .
Page 31

Metering
31
5 Metering
In this chapter you c an read how to set the acco unt to record po stage cos ts and how
to insert letters, postcards and metering labels correctly. You will receive important
information and tips on how to p revent in complete or ille gible meter i mprints a nd how
to protect the prin ting system from dama ge. Please refer to C hapter 4 for further information on how to set meter imprint parameters.
5.1 Selecting / changing an account
An account m ust alway s be s elected for mete ring. The current settin g is visi ble in the
home menu; you can recognize it by the symbol.
Setting the account via an access card
• Insert the USER or MASTER card in the
card reader. The chip on the card must
face the rear.
• Pus h in the card agai nst a slight resi stance
all the way to the stop. You can feel the
card snap in.
The optimail 30 selects the account configured on the access card as well as the
defaults for adv erts an d addi tional text i t co ntains.
The home menu shows the account name.
The postage costs of all subsequent metering procedures will be charged to this
account.
Account 1 is always assigned to the MASTER card (account 1 = MASTER account).
Page 32
optimail 30 Operator Manual
32
Changing the account
You can only ch ange the accou nt when working with the MASTER card or when access
control was disabled.
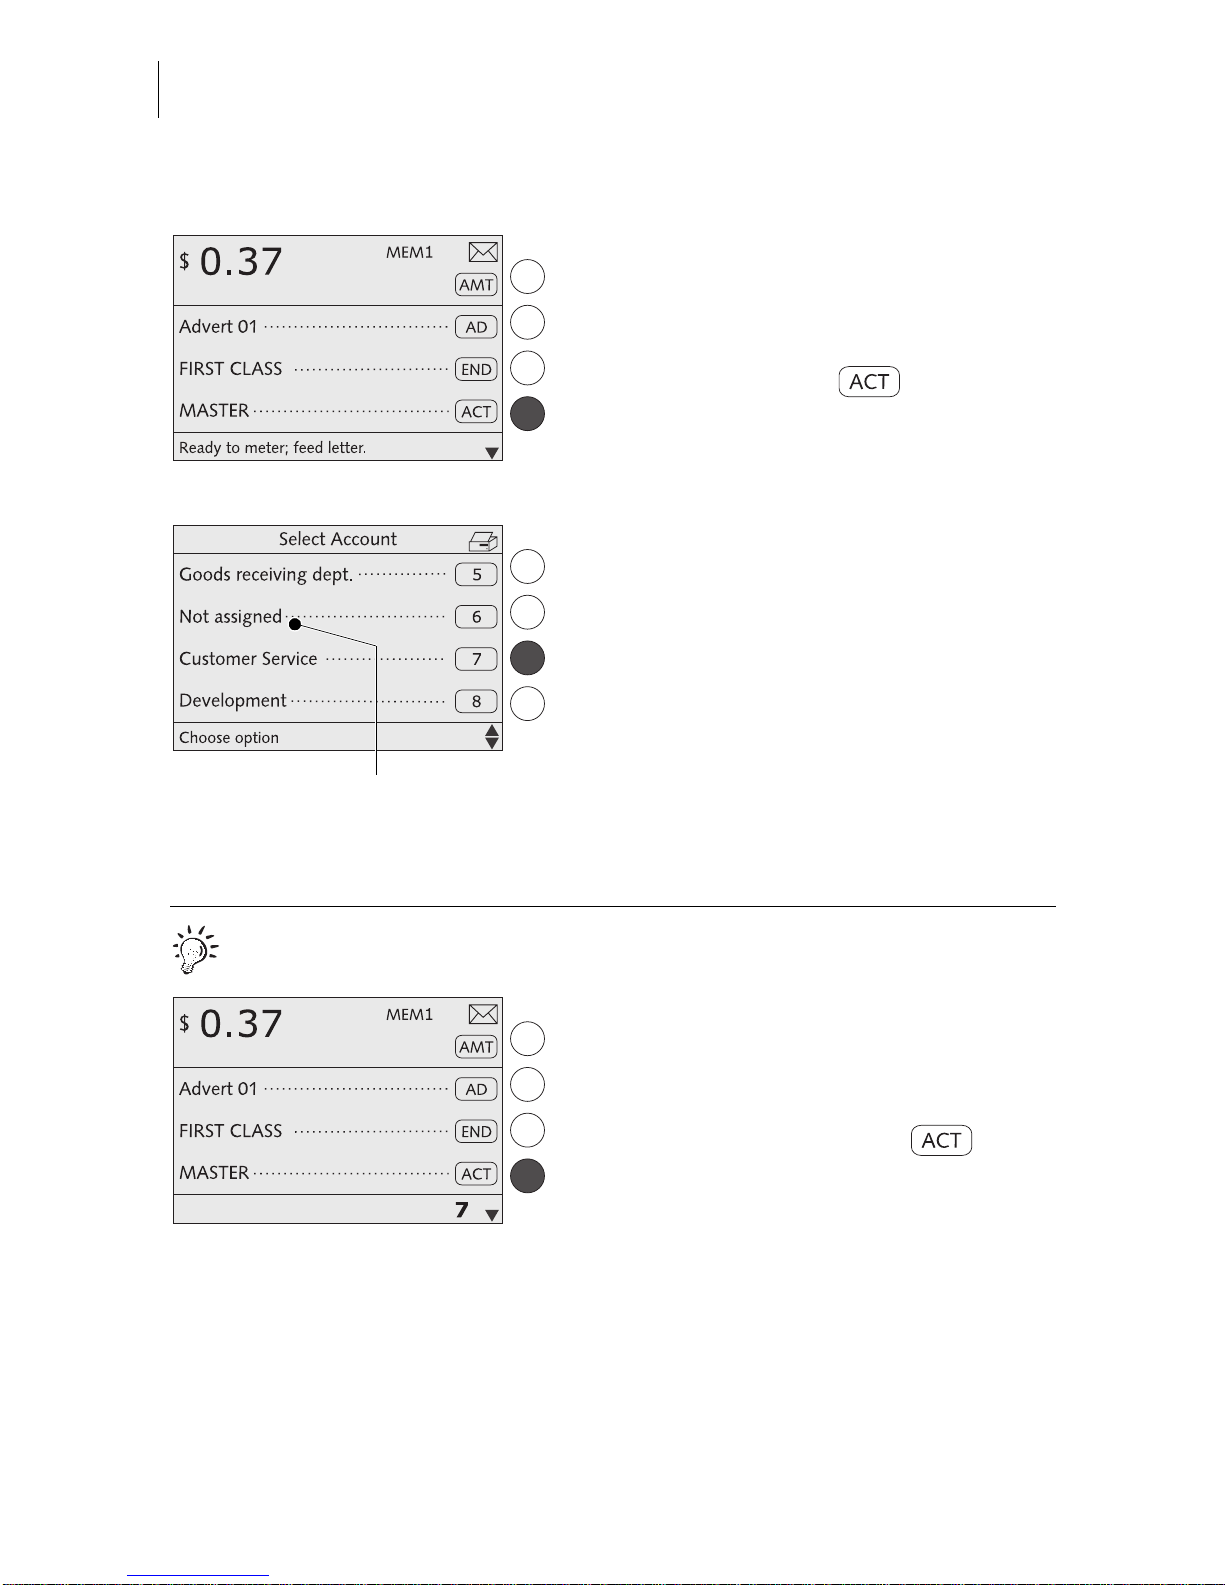
In the home menu:
• Press the key next to .
The optimail 30 opens a list containing all
accounts. You see the account names and
numbers.
• Select the desired account.
In the example: “Customer Service”
(account No. 7).
The optimail 30 returns to the home menu.
The account is set.
You can only se lect those accoun ts that were
defined in the ACCOUNT ADMINISTRATION menu. You cannot select accounts
tagged “Not assigned”.
Quick results for the advanced user.
In the home menu:
• Type the desired account number.
The number is disp layed in the status bar.
• Confirm with the key next to .
Not assigned = acc ount is not
availabl e fo r metering
Page 33
Metering
33
5.2 Positioning and metering a letter
The optimail 30 allows letters up to a thickness of 0.24" (6 mm) and postcards to be
metered. Format and material of mail pieces must meet the specifications on
page 113.
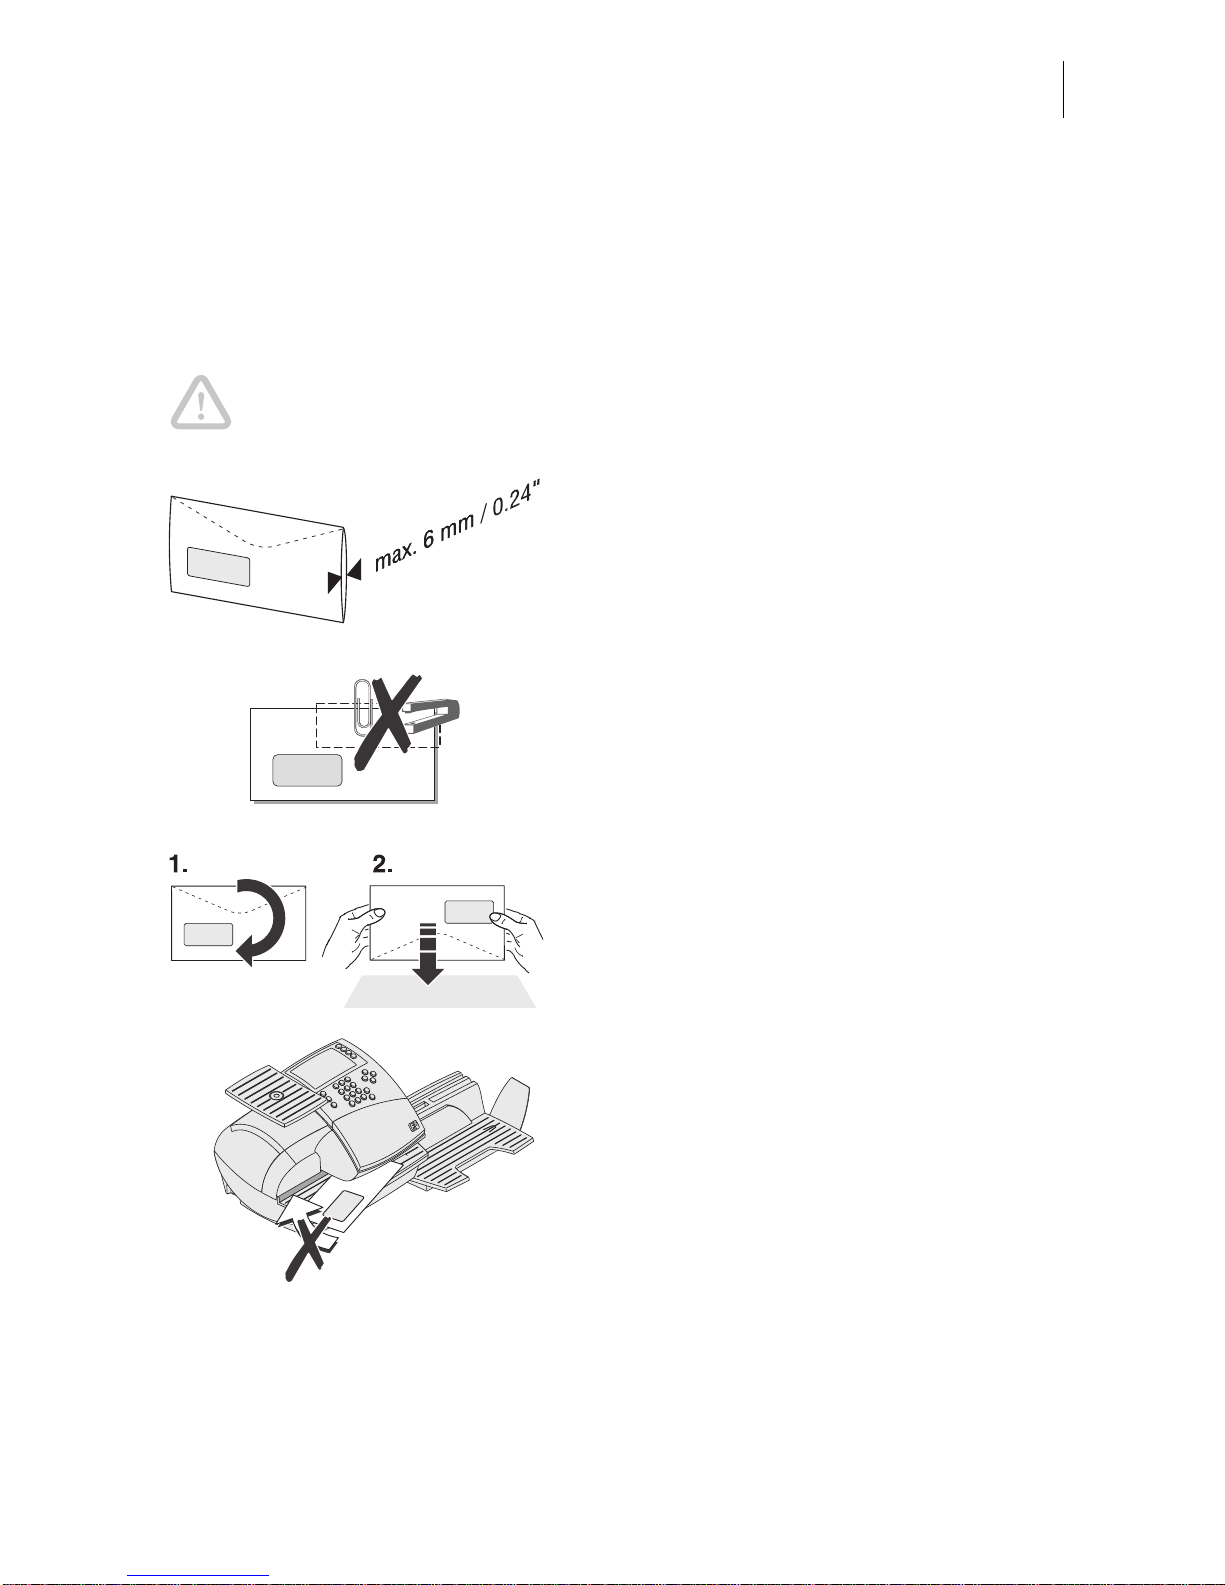
Caution! You can avoid poor meter imprint quality, ribbon breaks and print
head damage by simple, preventive measures:
– Several sheets in an envelope may result
in thickness differences in the print area
that may cause an irregular imprint.
In this case meter the empty envelope or
use the special FP double labels.
– Use envelopes with as smooth a surface
as possible. This gives the best printing
results.
– Make sure the letters do not contain any
staples or paper clips in the imprinting
area.
– Jog the top edge of th e envelo pes on a flat
surface prior to metering. By aligning the
letter contents at the top edge you create a
smooth area for the meter imprint.
– A standard s ize letter you best let go during
printing. Larger envelopes could do with
some support.
– To not try to align or move a letter once the
optimail 30 has started feeding it.
Page 34

optimail 30 Operator Manual
34
The catch tray can be adapted to different
envelope sizes by displacing the stop.
The stop features four catches for the most
common sizes.
Metering…
You can start metering if the optimail 30 is
ready for metering (letter symbol in the top
right corner and appropriate information in
the status bar).
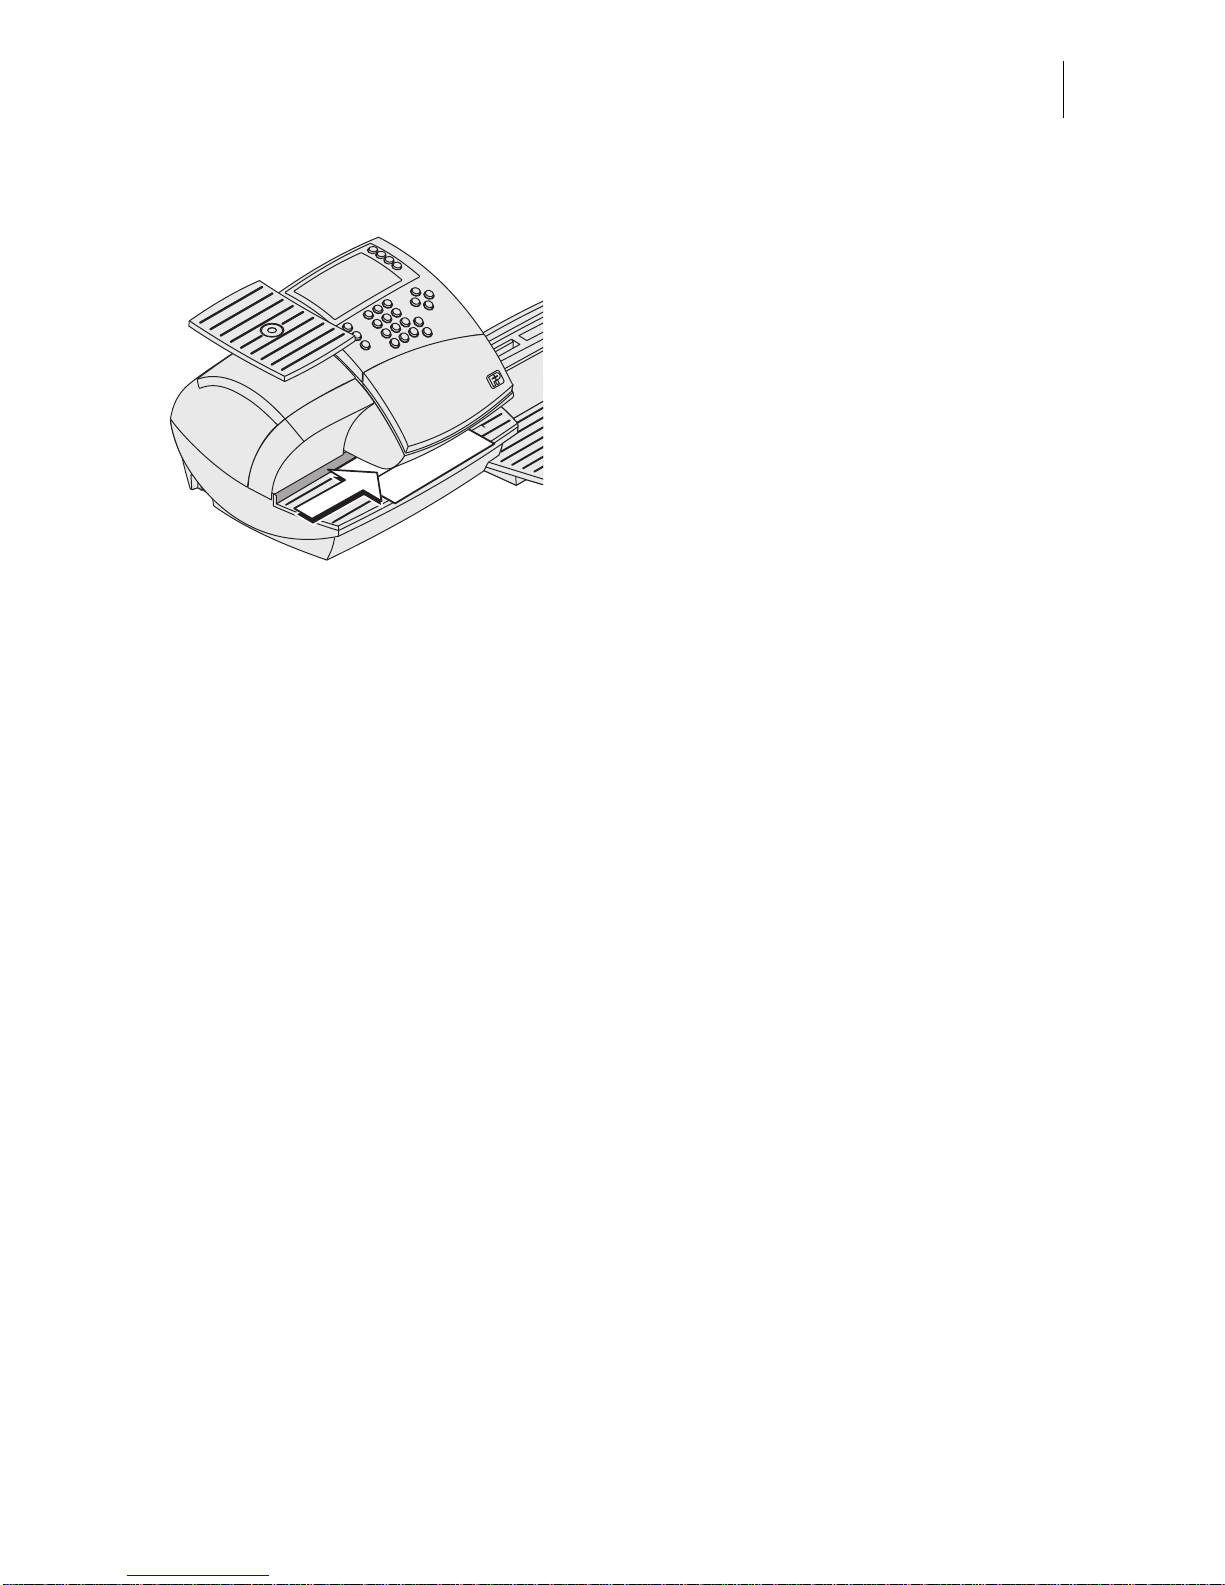
Positioning a letter/postcard
• Place the letter on the letter receiving tray:
– side to be printed face up (address field
is visible )
– the top edge must to uc h the le tter guide.
• Push the letter in direction of the arrow until
the letter sensor detects the letter.
A roller pushes the sheet again st ribbon and
print head and printing starts as soon as the
optimail 30 detects the letter.
The illustration shows the approximate position where the optimail 30 starts feeding the
letter.
The imprinted letter is ejected to the right.
Refer to Chapter 7.5 on page 47 on how to
simultaneously moisten and meter letters.
Ready to meter display
Letter guide
Page 35
Metering
35
Loading metering labels
The optimail 30 can imprint self-adhesive
double labels. Double labels suitable for
optimail 30 are available from FrancotypPostalia.
• Pla ce the dou ble labels on the letter recei ving tray:
– side to be printed face up
– the long edge must touch the letter
guide.
• Push the double label in direction of the
arrow until the letter sensor detects the
double label.
The illustration shows the approximate position where the optimail 30 starts feeding the
double label.
The imprinted double label is ejected to the
right.
Page 36

optimail 30 Operator Manual
36
6 Postage calculation
(optional)
6.1 The Postage calculation menu
The ‘Postage calc ulation’ func tion is avail able on an optimail 30 with integra ted scale
(available as an option) only.
Calling up the Postage calculation menu
• In the home menu press the key next to
briefly.
The menu for entering the postage appears.
• Select CALCULATE POSTAGE.
The optimail 30 opens the postage calculation menu. The display area for the current
postal rates is empty. You can now select the
desired postal rates.
or
• In the home menu keep the key next to
pressed for some time (approx.
2 seconds).
The optimail 30 opens the postage calculation menu with the current postal rates. You
can now
– make additions to the cu rrent setting s (e.g.
choose special services)
or
– delete the current setting step by step and
select new settings.
Display of current settings
The display left shows
– the selected postal rates
– the weight
– the postage.
The postage only appears if all necessary
postal rates we re select ed and the displa yed
weight exceeds 0 oz.
Menu area
for postal rate s
Postal rates
Postage val ue
Weight
Display area:
Page 37

Postage calculation
37
Selecting postal rates
Selectable postal rates are shown in the display right.
You can scroll the list with the arrow keys if
more than four memory items are available.
Use the multifunction keys to select the
postal rates.
Deselecting postal rates
Press the key to clear (deselect)
selected postal rates from the display area.
– To clear separately: Press key briefly.
– To clear all: Keep the key pres sed for
approx. 2 seconds.
Changing to the home menu
Pressing the key returns you to the
home menu.
The optimail 30 saves the current setting s to
the home men u when the postag e calculation
menu is left.
Menu area
for postal rate s
Display a rea for the
current setting
Status bar
Other postal rates:
scroll with arrow keys
Page 38

optimail 30 Operator Manual
38
6.2 Setting postal rates for postage calculation
In the home menu:
• Press the key next to briefly.
The optimail 30 opens the postage calculation menu.
• Select CALCULATE POSTAGE.
The optimail 30 opens the postage calculation menu. The display area for the selected
postal rates is empty.
Selecting postal rates
The optimail 30 success ively prom pts yo u to
specify all necessary details.
• Select the desired setting by pressing the
appropriate multifunction key.
All selected postal rates are shown in the display area (display left).
The postage appears as soon as all necessary postal rates are selected and the displayed weight exceeds 0 oz.
The example shows the following settings:
– Package Service PkgS
– Media Mail MedM
Page 39
Postage calculation
39
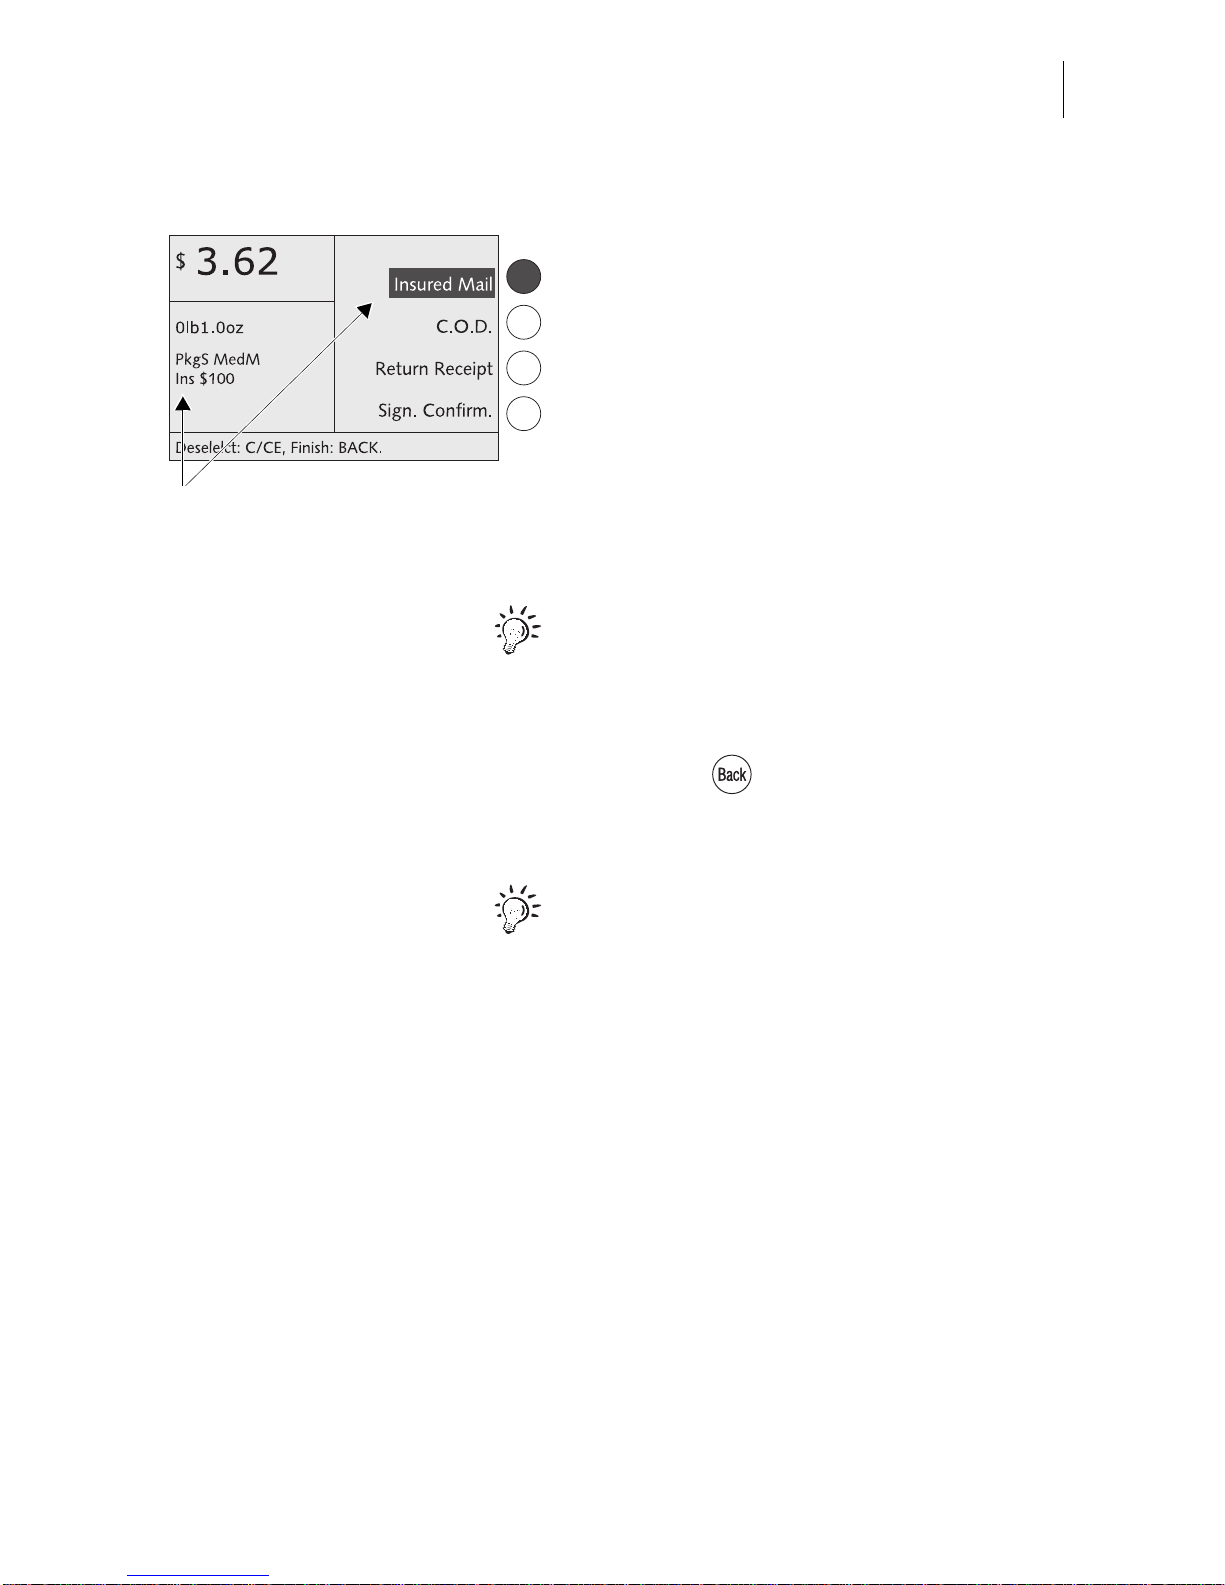
Selecting special services
• Select the desired special service by
pressing the appropriate multifunction key.
This is INSURED MAIL in the example.
You can select severa l special service item s.
The optimail 30 supports you in observing
postal regulations and does not permit any
illegal combinations.
All selected sp ecial services are shown in the
display area (display lef t).
The selected special services are also
inverted in the display area (display right).
You can press the appropriate multifunction
key to deselect a special service.
When the desired postal rates are set:
• Press the key to return to the home
menu.
You can save frequently used mail settings
as memory items and directly access these in
the home menu. Refer to Chapter 8 on how
to use the optimail 30 memory function.
Selected special service
Page 40
optimail 30 Operator Manual
40
Things that must be heeded when setting
postal rates
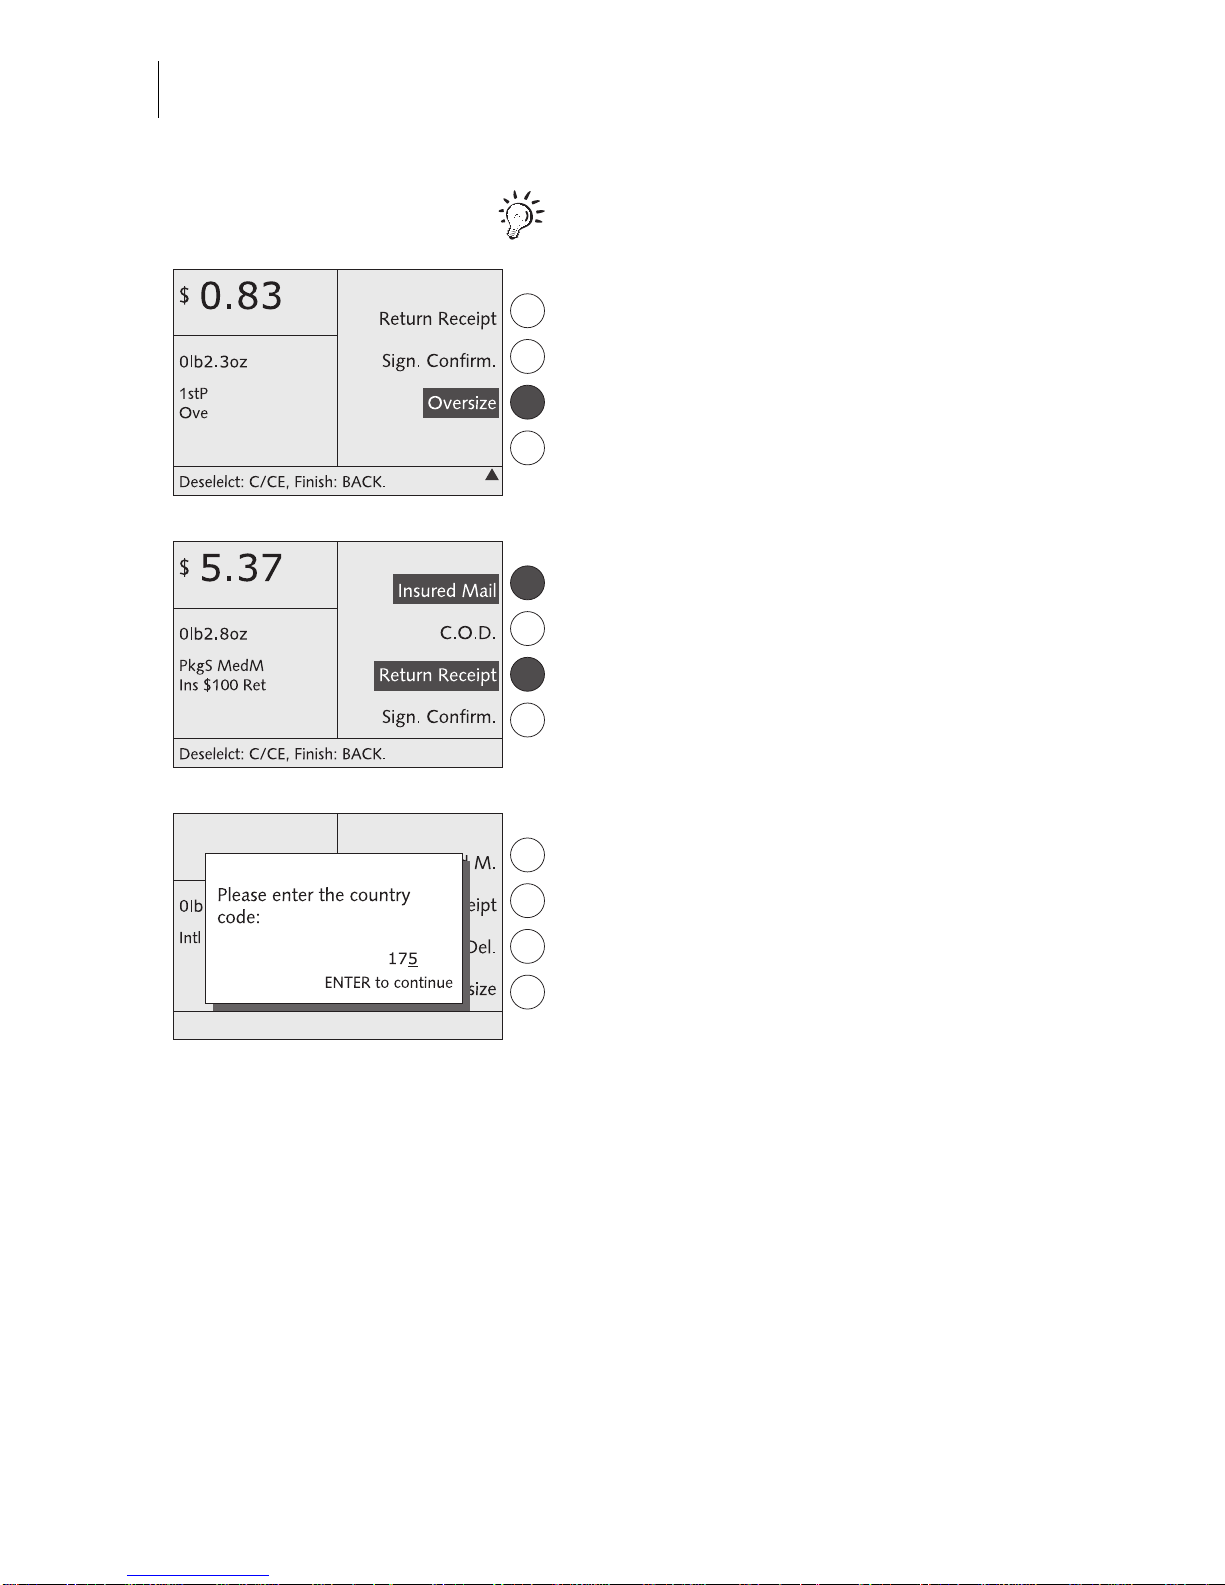
You must se lect Oversiz e if the size of a mail
piece exceeds de fined limits for lengt h, width
and thickness.
There are special services U.S. Pos tal Service only offers in conjunction with a second
special servi ce. For example: Return R eceipt
and Signature Confirmation are permitted in
conjun ction with Registered, Insured or
C.O.D. only.
The optimail 30 may open a popup window to
prompt for additional input. You must, for
example,
– type the first three digits of the
destination ZIP code for so me mail typ es
(e.g. Package Service BPM),
– specify the three -digit cou ntry code for all
mail going abroad (see page 105),
– specify the mail piece value for Insured
Mail, Registered Mail, C.O.D.
Page 41

Postage calculation
41
6.3 Weighing, postage calculation, metering
Caution! Please h eed the follow ing notes on h ow to use t he integrated s cale:
– The scale is designed for a maximum weight of 6.6 lb. (3 kg).
– The optimail 30 can determine a new wei ght only if the scale has been
emptied beforehand. You must therefore empty the scale pan before you
place a new mail piece to be weighed.
You can weig h your mai l pieces in t he home menu but a lso in the postage ca lculation
menu.
• Select the desired postal rates in the postage calculation menu (see Chapter 6.2)
or set them via the memory (see
Chapter 8.1).
• Place the mail piece on the scale pan.
A beep signals the scal e has determ ined the
mail piece weight.
Note
: This tone cannot be heard if the
optimail 30 audible signal was disabled.
The weight determined by the scale is set.
The optimail 30 sets the appropriate postage
for metering using the selected postal rates
and the displayed weight.
The optimail 30 also sets the appropriate
endorsement if automatic endorsement
selection is enabled. Read Chapter 13.14.3
on page 82.
• If ne cessary: Press the key to return to
the home menu.
• Check the other settings for the meter
imprint and – if necessary – edit them
accordingly (dat e, adv ert, imprint offset…).
Page 42

optimail 30 Operator Manual
42
• Take the mail piece from the scal e pan and
meter as usual (see Chapter 5.2).
The ‘High postage’ monitoring function is
inacti ve if you use the ‘Postage calculation’
function.
Page 43

Special functions
43
7 Special functions
7.1 Postage correction
You can correct faulty meter imprints on an al ready met ered letter. The correctio n
print must always be printed on the non-address-side of the mail piece.
If you have metere d a postage val ue which is too low, print a corr ection with th e missing amount on the non-address-side of the mail piece.
Print postage correction
In the home menu:
• Press the key next to .
The optimail 30 sets the Correction imprint.
• Enter the amount to be imprinted on the
mail piece in additio n to the posta ge value
already metered.
• Confirm with the key next to .
• Position the mail piece the non-addressside face up.
The optimail 30 prints th e cor rection im print.
Page 44
optimail 30 Operator Manual
44
7.2 Redate
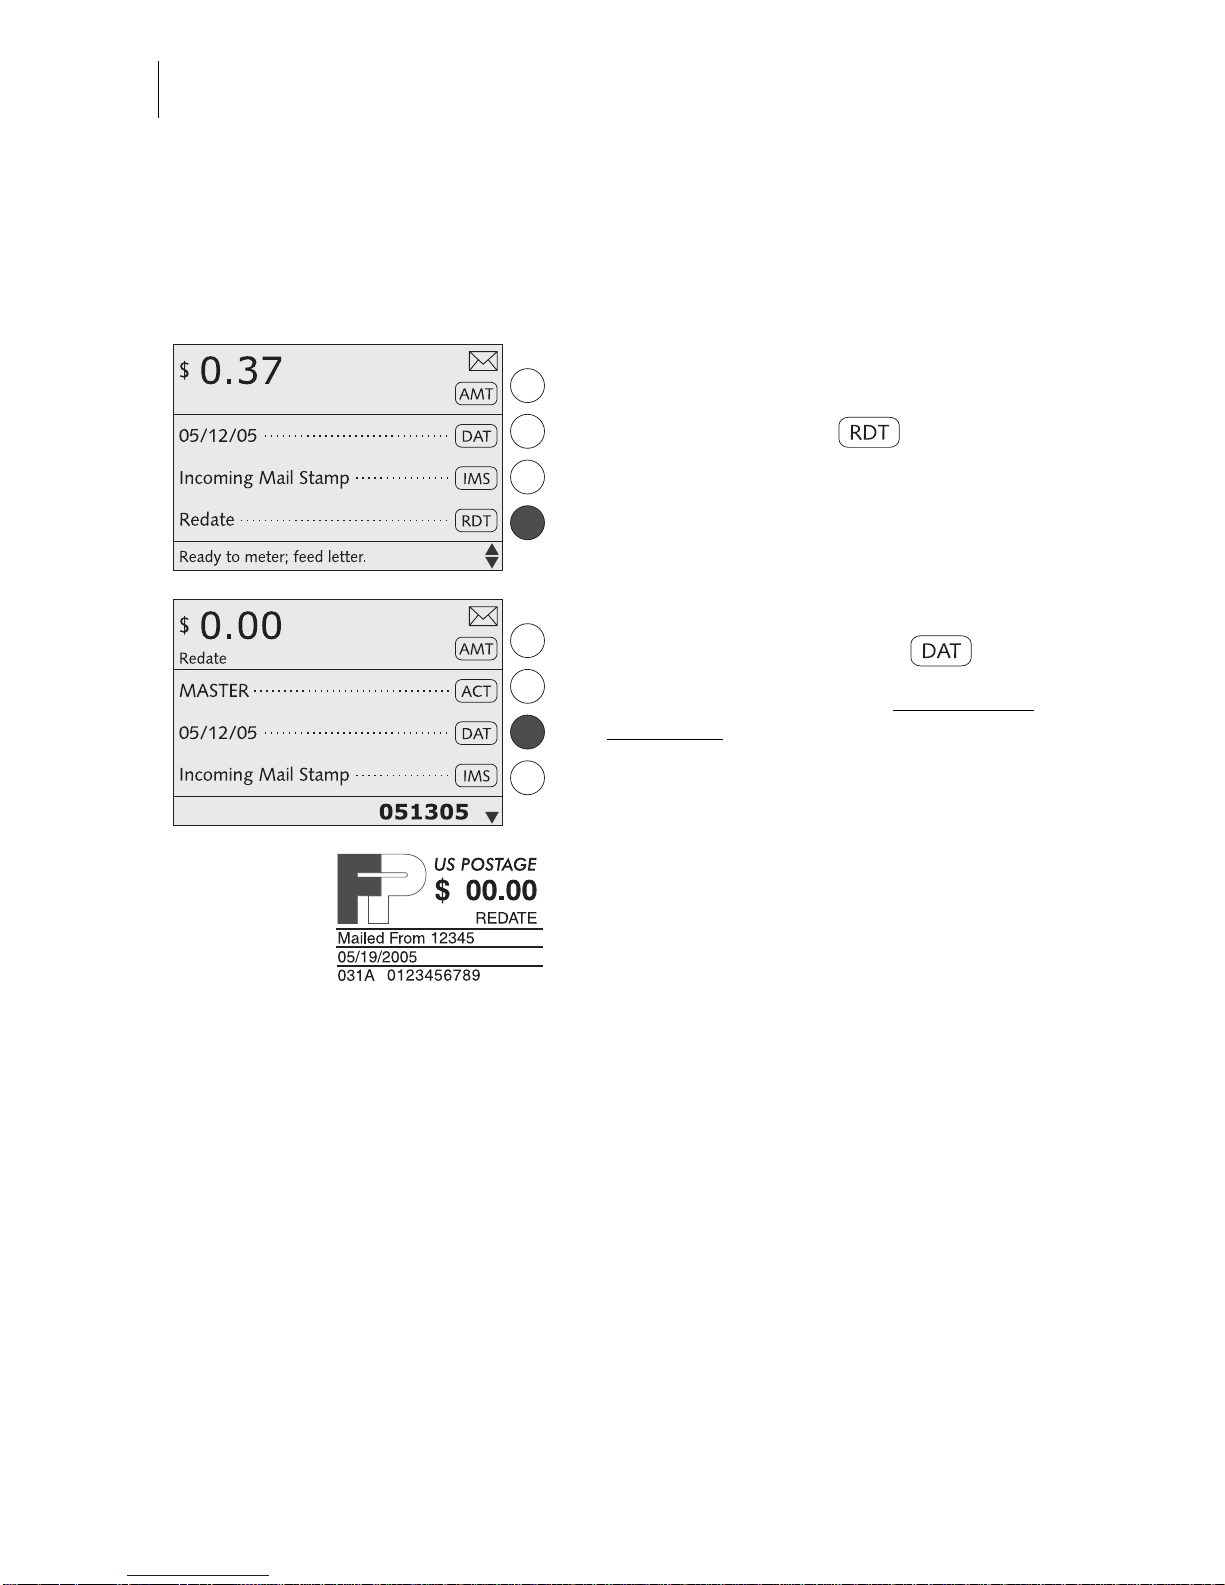
If the meter imprint s hows an incorrect date, you can print a correct ion with the correct
date on the non-address-side of the mail piece already metered.
Print redate
In the home menu:
• Press the key next to .
The optimail 30 sets the Redate imprint.
• Enter new date to be imprinted.
• Confirm with the key next to .
• Position the mail piece the non-addressside face up.
The optimail 30 prints the redate imprint.
Page 45

Special functions
45
7.3 Reply Mail metering
You can meter reply mail with the optimail 30. When metering reply mail the
optimail 30 prints a normal meter imprint without date
.
Setting reply mail
In the home menu:
• Press the key next to .
The optimail 30 sets Reply.
• Sel ect the des ire d m ete r impri nt (p os tag e,
endorsement…).
• Load reply envelope/card as usual.
The optimail 30 prints the reply meter imprint.
Page 46

optimail 30 Operator Manual
46
7.4 Stamping i ncoming mail
You can use the Incoming mail stamp function to mark your incoming mail (0.24"/
6 mm maximum thickness).
Setting the incoming mail stamp
In the home menu:
• Press the key next to .
The optimail 30 sets the incoming mail
stamp.
Date of incoming mail
You can set the in coming mai l stamp date a s
desired. Redating is permissible. Read
page 28 to find out how to set the date.
The time is incl uded in in coming mail stamps
with the current date only.
Imprint offset
The incoming mail stamp default position is
approximately 0 .4" (1 cm) from the right e dge
of the mail piece. Read page 30 to find out
how to set the imprint offset.
Stamping incoming mail
• Load incoming mail with the side to be
printed face up.
The optimail 30 prints the incoming mail
stamp and ejects the mail piece to the right.
The incoming mail stamp shown to the left
bears date and time.
Date in incoming mail stamp
Back to
meterin g fu nction
Page 47

Special functions
47
7.5 Moistening and sealing letters
(optional)
Operating the optimail 30 with the specially available sealer lets you se al and meter
letters in a single step.
The sealer is filled with tap water and installe d on the left side of the optim ail 30. Two
catches fasten the sealer to the postage meter housing. For further information on
how to set up the sealer please refer to the Installation Guide.
The sealer is suitable for all commercially available gummed envelopes whose flaps
are not longer than 3" (78 mm).
The present chapter explains how to use the
sealer. Please refer to Chapters 4 and 5 on
how to set the meter imprint and to meter.
Moistening the envelope flap
• Hold the letter with the open flap facing
down.
• Engage the letter at the sealer in arrow
direction.
The illustration shows the correct letter position in the sealer:
– the flap is beneath the stop
– the stop edge is exactly in the flap groove.
Stop edge
Stop
Page 48

optimail 30 Operator Manual
48
• Guide the letter through th e sealer with an
arched motion as shown in the illustration.
This will pass the gummed flap edge along
the moistening felt and moisten it.
• Align the letter top edge with the postage
meter letter guide and push in the letter in
arrow direction until the optimail 30 feeds
and meters the letter.
Sealing moistened envelope flaps
We recommend that you firmly press on the
envelope flaps after metering to make sure
the envelopes are firmly sealed.
• Stroke your hand firmly over the envelope’s/letter stack’s flap area.
Large-sized mail pieces
You best guide large-sized mail pieces with
both hands during
moistening. You sh oul d
support the mail piece only slightly as soon
as the postage meter has started feeding it.
Letter guide
Page 49

Special functions
49
7.6 Using an external postage calculator
As standard, the optimail 30 features a 25-pin interface. You can connect existing
FP letter and parcel scale, a so-called postage calculator, to this interface.
The FP postage calcul ator determines the we ight and calculates th e correct postage.
The data required by U.S. P ost al Serv ice (po stage and endors ement if req uired) ar e
automatically sent to the optimail 30 and set in the home menu.
7.6.1 Connecting the postage calculator to the optimail 30
You need a special interface cable to connect the postage calculator to the
optimail 30. A suitable interface cable is available from Francotyp-Postalia.
Caution! Read the Operator Manual for your FP postage calculator before
you connect it to the optimail 30 to learn how to connect a postage meter to
the FP postage ca lculator and h ow to set up op eration with a po stage met er.
• Turn off the optimail 30.
• Turn off the FP postage calculator.
• Plu g the 25-pin interface cable s upplied by
Francotyp Postalia to the 25-pin interface
on the optimail 30 and tighten the screws.
• Conn ect the inte rface cable to the FP postage calculator.
• Turn the optimail 30 on again.
• Turn on the FP postage calculator.
• Set up the F P posta ge ca lcu lator for operation with an optimail 30. In particular,
heed the settings for automatic endorsement transfer (endor semen t se tting on the
optimail 30).
Power switch
Page 50
optimail 30 Operator Manual
50
7.6.2 Operating optimail 30 with an external postage calculator
Caution! Also read the Operato r Manual for you r FP postage calc ulator. Pay
special attention to the information of how to safely operate the FP postage
calculator.
• Turn on the optimail 30 and FP postage
calculator.
The optimail 30 must dis play the home menu
and be ready for metering.
• Determine the postage with the
FP postage calculator.
The data required by U.S. Postal Service
(postage and endo rsement if ap plic able) are
automatically sent to the optimail 30 and set
in the home menu.
• Check the other settings for the meter
imprint and – if necessary – edit them
accordingly (advert, imprint offset…).
• Meter the mail piece with the optimail 30.
Page 51

Memory
51
8 Memory
The basic optimail 30 version features 4 memory items. An optimail 30 with integrated scale features 9 memory items. Each memory item can hold a postage with
appropriate endorsement.
An optimail 30 with integrated scale
can store the postal rates for pos tage calculation
instead of postage and endorsement.
In the MEMORIZED RATES me nu you can save and delete m emory items, overwrite
them with a new assignment and assign them names of your choice.
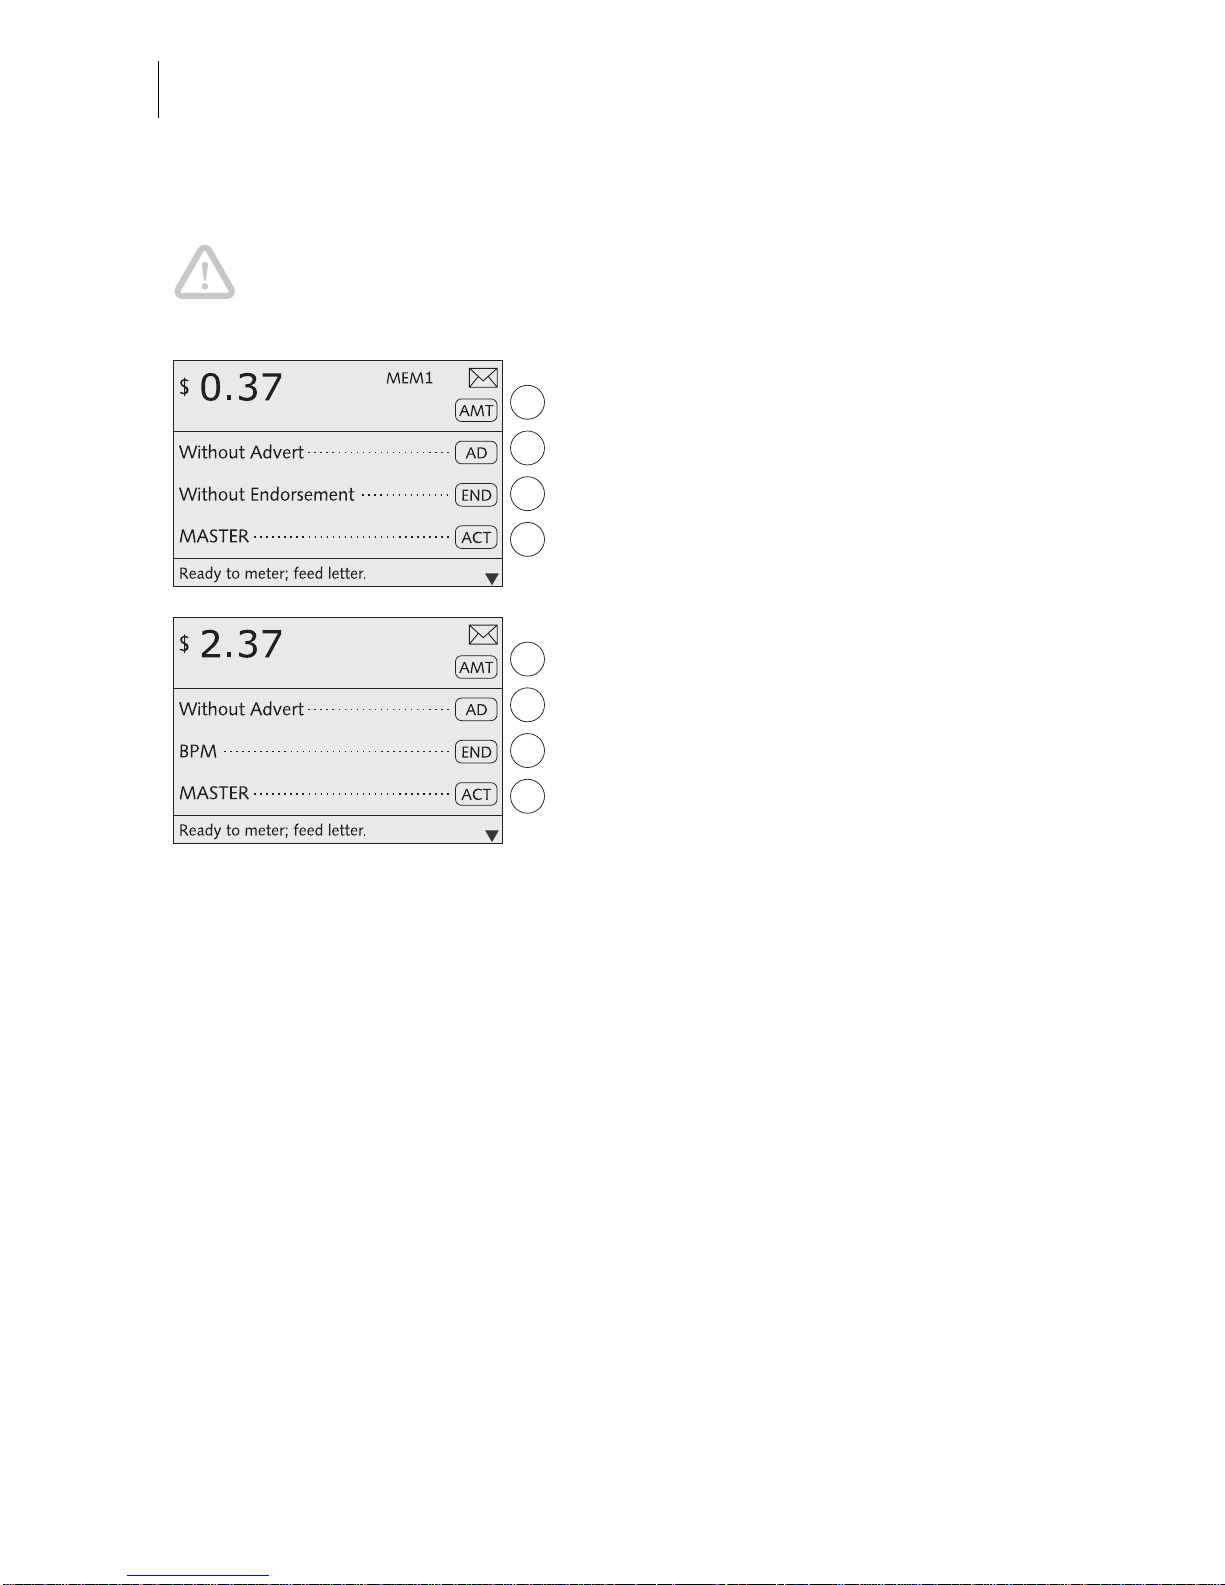
8.1 Setting postage or postal rates for postage calculation
with memory items
• Press the key.
You see a list with all available memory
items.
• Sel ect the desired memory . In the example
it is memory No. 3 (postage $ 2.37 with
endorsement “BPM”).
The optimail 30 returns to the home menu
and displays the set memory (MEM 3).
The saved setting (postage and endorsement
or
postal rates for postage calculation)
are selected.
Quick results for the advanced user :
• Ty pe the memory item numbe r in the home
menu.
• Confirm with the key.
Page 52
optimail 30 Operator Manual
52
8.2 Saving memory items
As memory you a lways s ave the current settin gs in th e ho me menu, i .e. the po stage
and the endorsement
or
postal rates for postage calculation
(optimail 30 with integrated
scale only)
. Please refer to Chapter 4 on how to set the postage an d the endorsemen t.
Please refer to Chapter 6 for more information on ‘postal rates’.
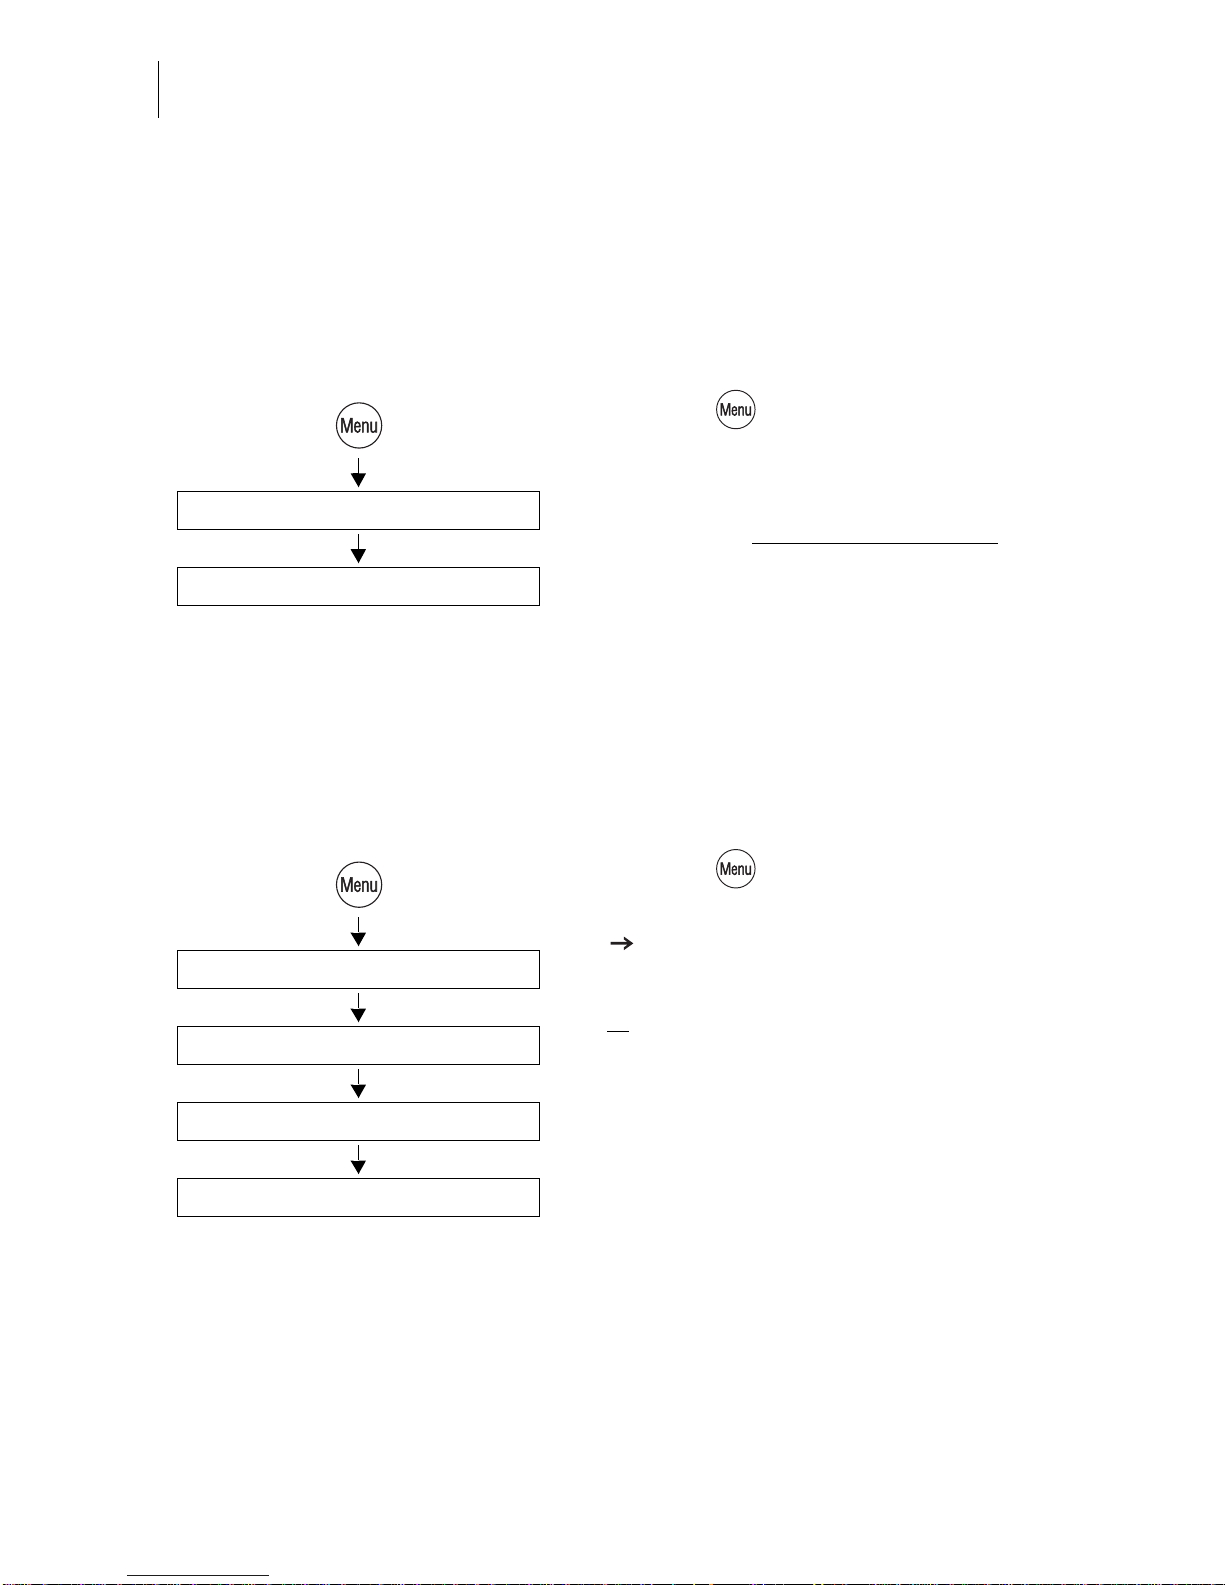
• Press the key.
• Selec t in the menu: MEMORIZED RATES.
• Select the memory number under which
you wish to save the settings.
The optimail 30 opens the Memorized Rates
menu. The display left shows the old assignment.
• Press NEW to adopt the current setting in
the home menu.
The new assignment
is shown.
• Press SAVE to save the current assignment as memory item.
Memory 1
The optimail 30 uses the settings saved
under Memory 1 as power-on default.
Select memory: 1 … 4 (9)
New
Memorized Rates
Save
Functions in the NEW MEMORIZED RATE menu and their meanings
(optimail 30 with scale only):
LESS WEIGHT Sets the displayed weight to “0lb 0.0 oz”.
Saving writes the postal rates and the
“0lb 0.0 oz” weight to a memory item.
You must weigh your mail piece each time
you call up such a memory item.
INC WEIGHT Indicates the current weight again.
Page 53
Memory
53
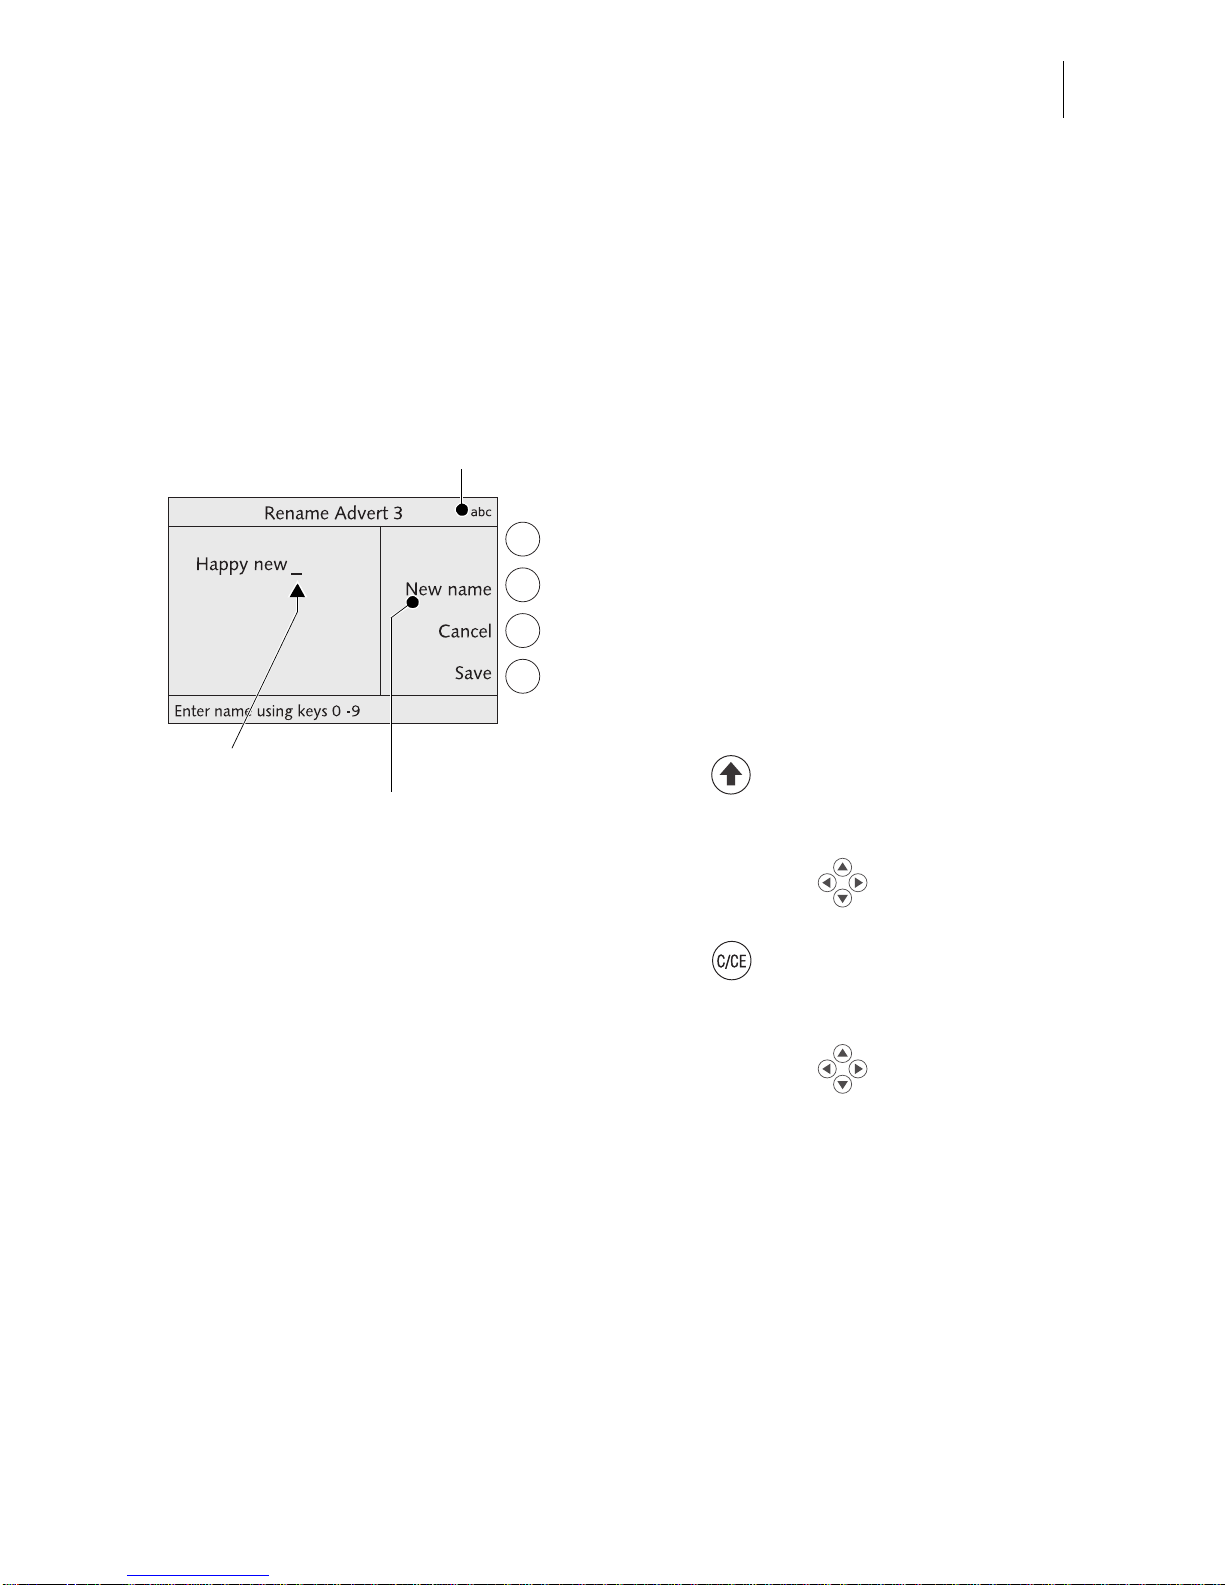
8.3 Renaming memory items
You can name each of th e mem ory i tems. The m emory item sel ection list shows this
name instead of the saved assignment.
• Press the key.
• Sel ect in the menu: MEMORIZED RATES.
• Sel ect the memory th e nam e of which you
wish to change.
• Use RENAME to open the menu for the
memory names.
• Wit h NEW NAME you can del ete the entire
name shown.
• Type the desired name.
In the example this is “Canada-Let ter/Air mail”.
• Press SAVE to save the name.
The memory item selection list now shows
this name instead of the saved setting.
New Name
Select memory: 1 … 4 (9)
Rename
Memorized Rates
Enter name Canada-Letter/Airmail
Save
Page 54

optimail 30 Operator Manual
54
8.4 Deleting memory items
You can overwri te sup erfluou s mem ory items with a new ass ignm ent or del ete the m.
• Press the key.
• Selec t in the menu: MEMORIZED RATES.
• Select the memory you wish to delete.
• Press DELETE t o delete the saved setting.
The memory list indicates “Not assigned”.
Saved postal rates for postage calculation:
The optimail 30 automatically deletes those
memory items that do not comply with the
new rate table as soon as the new table has
come into force. This is the case when United
States Postal Se rvice has ceased to offer the
product saved in the memory item.
Select memory: 1 … 4 (9)
Delete
Memorized Rates
Page 55

Displaying and printing registers
55
9 Displaying and printing registers
The optimail 30 saves important parameters and informati on on used p ostage in re gisters. You can view and print the register states.
• Press the key.
The REGISTER menu displays the current
register states.
Printing registers
• Load an empty sheet or a double label as
usual.
The optimail 30 prints the register report.
The registers store the following information:
DESCENDING – R1 Postage still available in Dollars
ASCENDING – R2 Total value of
all meter imprints performed
CONTROL TOTAL – R3 Sum total of all loaded sums
TOTAL ITEMS – R4 Total number of meter imprints performed
(including zero imprints)
Page 56

optimail 30 Operator Manual
56
10 Loading postage – TELESET
TELESET is the load ing of the desire d postage cre dit via modem. The modem is in tegrated into the optimail 30. To load postage you dial the Teleset data center (TDC)
with the optim ail 30 and call the de sired amount . Billing occ urs accordin g to your contract with the United Stat es Postal Service.
Regular contact with the Teleset data center
For reasons of safety the United States Postal Service demands that the postage
meter connect with the Teleset data center at regular intervals.
The optimail 30 issues a m essage when a contact with the Teleset data cente r is due.
You must then start TELESET as usu al. Simply lo ad a sum of $ 0 if you do no t need
any postage for the time being.
The optimail 30 will disab le vital fu nctions u ntil a cont act with th e Teleset data center
could be establ ish ed if you fail to react to the mes sa ge within an adequate peri od of
time. Please contact the Francotyp-Postalia Ser vice if you have any questions.
Loading postage
The optimail 30 must be connected to the
telephone line for the duration of the loading
process. Make sure the modem dialing properties and the Teleset d ata center (T DC) telephone number are set correctly.
• Press the key.
• Select TELESET to call up the loading
procedure.
• Accept the amount to be loaded
or
use CHANGE to open the menu for the
amount to be loaded. Type the desired
amount.
• Confirm with LOAD.
Change
Type amount to load: $ 100
Teleset
Load
If desired:
Page 57

Loading postage – TELESET
57
The optimail 30 checks whether the desired
amount can be loaded. The optimail 30 will
not accept impermissible amounts – an
appropriate message appears.
To load the indicated amount:
• Use LOAD to establish the connection to
the Teleset data center.
Loading continues automatically. You can
monitor the progress in the display. Please
stand by. Data exchange takes some time.
The new residual amount is indicated when
loading ends.
Use REPORT to view and print the loading
report.
Page 58

optimail 30 Operator Manual
58
11 Account administration
With the optimail 30 account administration function you can record and evaluate
metering proced ures separated by accounts. Ac counts can be sections /departments
of a company or individual companies within a community office.
You can define up to nine ac counts in you r optima il 30 and set up access rights with
MASTER and USER cards. Acco unt 1 is defined ex works and perman ently assigned
to the MASTER card (MASTER account).
Refer to Chapter 5.1 on page 31 on how to select accounts for metering.
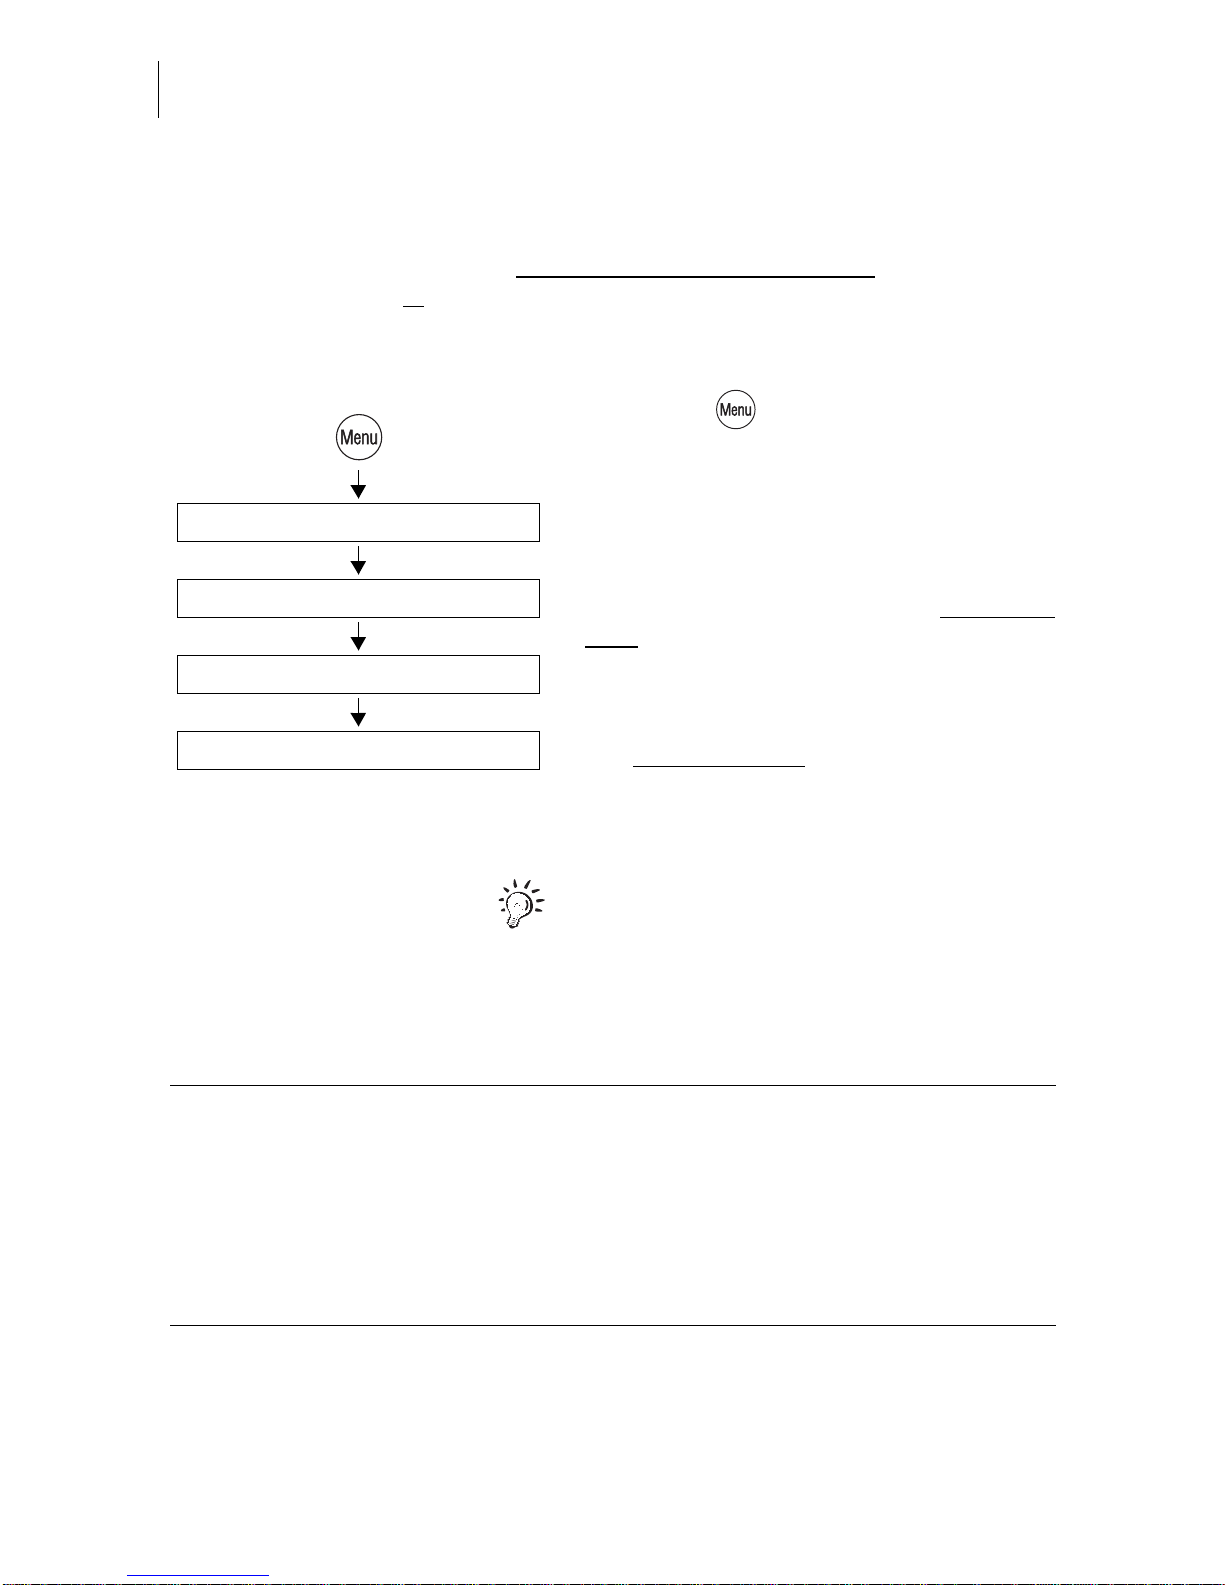
11.1 Setting up a new account
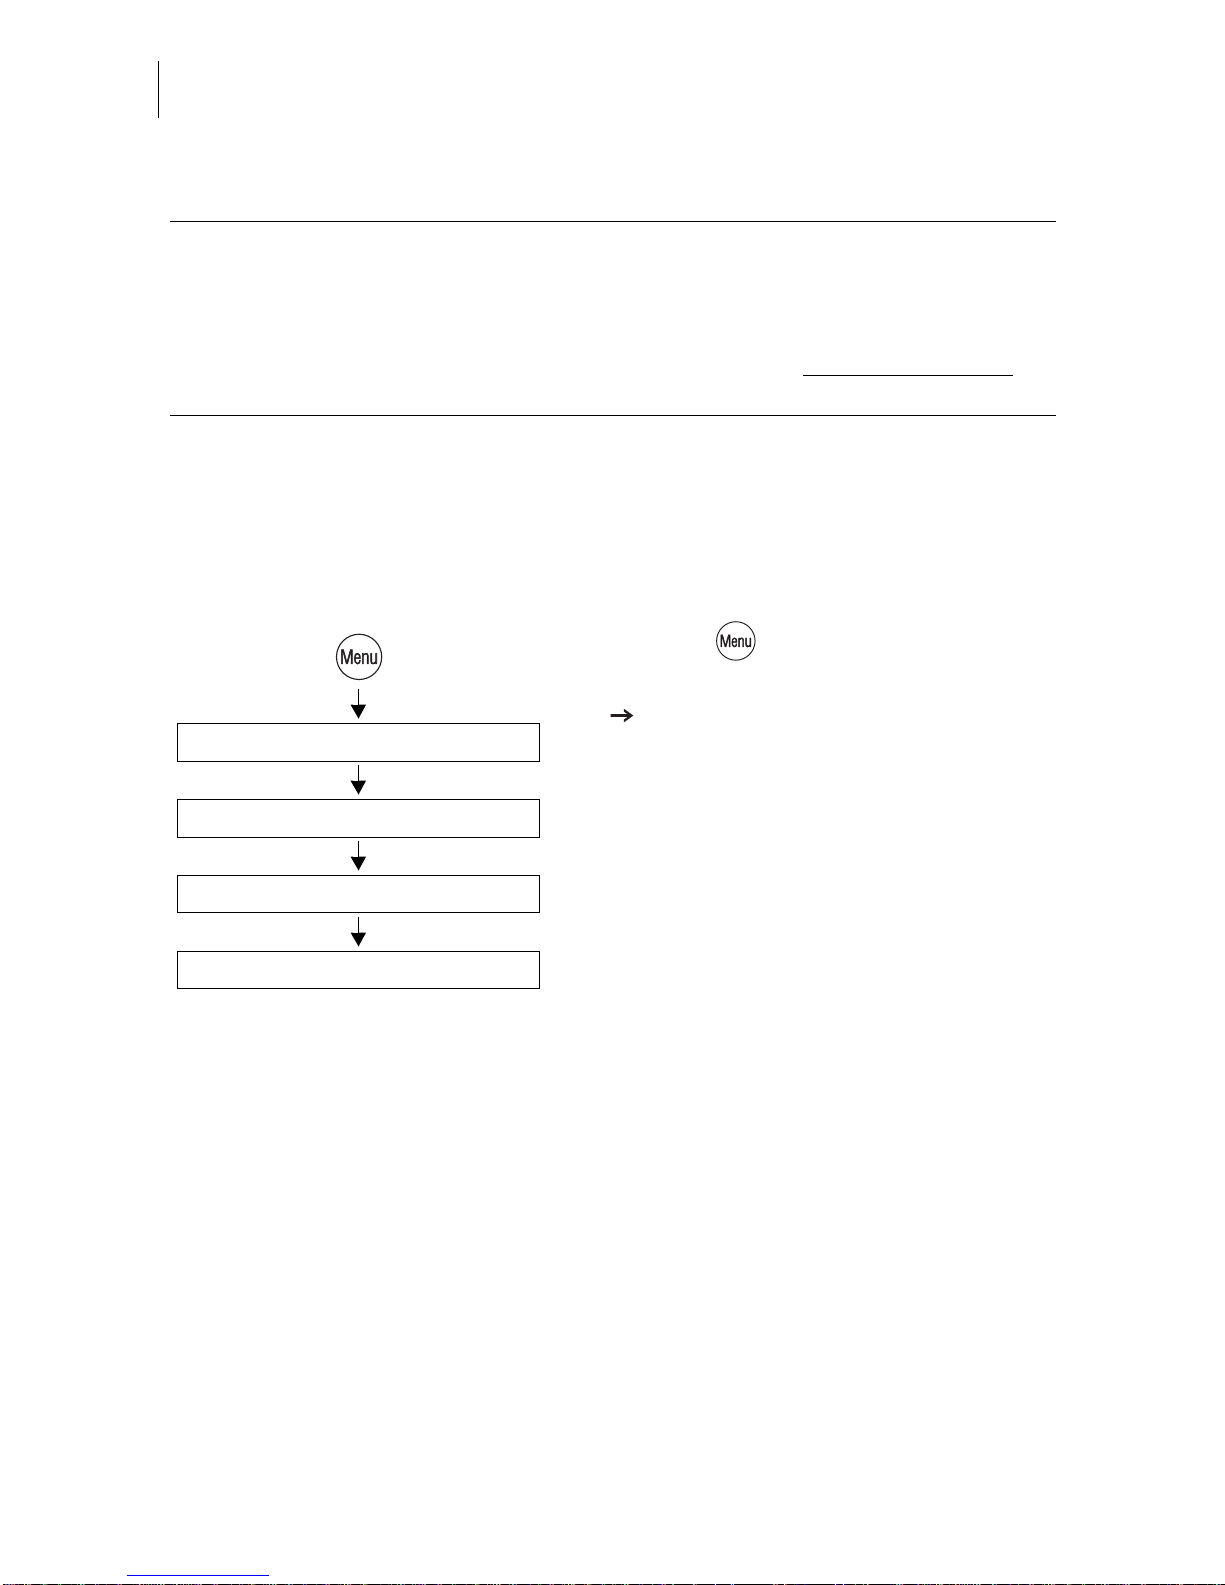
• Press the key.
• Select in the menu:
ACCOUNT ADMINISTRATION
DISPLAY / EDIT / NEW.
• Select a NOT ASSIGNED account in the
list.
The optimail op ens t he procedure for setting
up the account.
• Simply follow the instructions on the
display.
The optimail 30 success ively prom pts yo u to
specify all necessary details.
Possible settings are explained on the next
page.
• Press CONTINUE to save the displayed
parameter.
• If all parameters are complete: SAVE the
new account.
Save
Display / Edit / New
Not assigned
Account administration
Enter name
Continue
Page 59

Account administration
59
Possible account parameters and their meaning:
Name Letters, special char-
acters and numbers
Refer to page 21 for information on
how to type text.
Default advert NO DEFAULT The advert selected last remains
set in the home menu when you
select an account.
WITHOUT ADVERT The selection made automatically
becomes effective when you
change to the account.
All saved
adverts
FROM CARD When you insert the
‘USER with advert’ card the
advert on the card is selected.
The advert from the USER card always appears at the end of the list.
Prerequisites: – The account is set up.
– The ‘USER with advert’ card must be assigned to the
account and inserted.
Teleset access YES TELESET is released.
The account user is authorized to
load postage.
NO TELESET is locked.
Cards YES At least one USER card is assigned
to the account.
NO No USER card is assigned to the
account.
Page 60

optimail 30 Operator Manual
60
11.2 Assigning / blocking USER card(s) for an account
Each account (except MASTER account) can be assigned one or several USER
cards. The USER card allows access to the assigned account only. You can block
the USER card(s) in order to protect the optima il 3 0, e.g. when a card is lo st.
• Press the key.
• Select in the menu:
ACCOUNT ADMINISTRATION
DISPLAY / EDIT / NEW.
• Selec t the acco unt for whi ch a card is to be
programmed.
• Use CHANGE to open the procedure for
changing the account parameters.
• Press CONTINUE until the menu for card
assigning/blocking appears.
• Selec t NEW CARD to assign the accoun t a
USER card
or
BLOCK CARD all USER cards for this
account.
• Follow the instructions on t he display to
assign a USER card.
• Complete the procedure of changing
account parameters with SAVE.
You can overwr ite no longer us ed or blocked
USER cards with a new acco unt assignment.
New card / Block card
Select account for the USER card
Change
Display / Edit / New
Account administration
Continue
Save
Page 61

Account administration
61
11.3 Viewing and printing account statistics
You can view and print the postage used by the separate accounts and the number
of meter imprints in an overview. The printed list also includes the current settings of
all accounts.
• Press the key.
• Select in the menu:
ACCOUNT ADMINISTRATION
STATISTICS.
Printing account statistics
The account statistics comprise 2 pages.
• Load an empty sheet or a double label for
each page.
11.4 Changing / clearing do wn / deleting an account
• Press the key.
• Select in the menu:
ACCOUNT ADMINISTRATION
DISPLAY / EDIT / NEW.
• Select the account to be changed.
The ACCOUNT ADMINISTRATION menu
appears. The display left indicates the current account parameters (name, default
advert…) and the usage data (po stage us ed
and number of meter imprints since las t Clear
down).
Refer to page 59 for an explanation of the
account parameter meanings.
Note: The USER card allows access to the
assigned account only. The administration
menu for this account opens immediately
after ACCOUNT ADMINISTRATION.
Statistics
Account administration
Display / Edit / New
Select the account to be changed
Account administration
Clear Down / Delete / Change
Page 62

optimail 30 Operator Manual
62
• You can CHANGE, CLEAR DOWN or
DELETE the account shown.
Functions in the ACCOUNT ADMINISTRATION menu and their meaning:
CLEAR DOWN Clears down all incurred postage data
(Postage used) and the number of meter
imprints performed (Items) for the account
shown.
DELETE Deletes the account shown, including all
account data.
CHANGE Opens the procedure for changing the
account parameters (name, default
advert…).
The optimail 30 successively displays the
parameters you are authorized to change.
You can keep or change the current parameters.
Press CONTINUE to save the displayed
parameters.
When the procedu re is finished, sel ect SAVE
or
CANCEL to either save or discard all
changes.
Page 63

Account administration
63
11.5 Clearing down all accounts
• Press the key.
• Select in the menu:
ACCOUNT ADMINISTRATION
CLEAR DOWN ALL.
Following a secu rity prompt the postage used
and the number of meter imprints are
cleared down for all accounts
.
Clear Down All
Account administration
Page 64

optimail 30 Operator Manual
64
12 Imprint management
The optimail 30 offers a number of powerful management functions for managing
individual imprint elements. Among these are the assignment of custom names for
endorsements , graphica l preview an d printing o f adve rts as well a s deletin g of superfluous adverts a nd endorsements. You c an load new adverts and en dorsements from
chip cards.
The following chapters explain the functions in more detail.
12.1 Loading imprint data from cards
You can easi ly load impri nt da ta (adv erts, endorsem ents) from c hip card s. O rder th e
card with desired imprints from Francotyp-Postalia.
• Press the key.
• Select in the menu:
LOAD FROM CHIP CARD.
• Remove the access card and insert the
card with imprint data.
The optimail 30 shows all imprint data saved
on the card.
• You ca n LOAD ALL or SELECT ind ividual
imprints.
Insert a card
Load All / Select
Load from Chip Card
Imprint on the card (in the
example: ad verts)
Page 65

Imprint management
65
12.2 Using / renaming / deleting adverts
• Press the key.
• Select in the menu:
IMPRINT MANAGEMENT MANAGE
ADVERTS.
• Select the desired advert.
The ADVERT MANAGER menu shows a
simplified graphical preview of the advert.
• You can R ENA ME o r DE LETE t he a dve rt.
Functions in the LOAD FROM CARD menu and their meaning:
LOAD ALL Loads all data from the card into the
optimail 30.
SELECT optimail 30 prompts for each imprint:
“Do you want to load: YES/NO”.
When you have answered all prompts, the
selected imprints are flagged with OK.
Use LOAD to load the selected imprint data
into the optimail 30.
Manage Adverts
Select advert
Imprint Management
Rename / Delete
Functions in the ADVERT MANAGER menu and their meaning:
RENAME Opens the menu where you can change the
name.
You can change the name that a ppears in the
home menu and in the advert lists as you lik e.
For notes on how to type text see page 21.
DELETE Deletes the adv ert on displa y after a sec urity
prompt.
USE Selects the advert for metering.
Page 66
optimail 30 Operator Manual
66
12.3 Deleting endorsements
• In the home menu:
Press the key next to .
• In the ENDORSEMENT SELECTION list:
keep the multifu nction key for th e endors ement to be deleted pressed for some time
(approx. 2 seconds).
The EDIT ENDORSEMENT menu displays
the selected endorsement.
• Select DELETE.
In the home menu:
Open the administration menu:
Keep the multifunction key for
the desired endorsement imprint
pressed for some time.
Delete
Functions in the EDIT ENDORSEMENT menu and their meaning:
DELETE Deletes the endorsement on display after a
security prompt.
USE Selects the endorsement for metering.
Page 67

Advanced settings & system information
67
13 Advanced settings & system information
13.1 Viewing / printing / sending system information
You can view and print all major machine parameters as a list. optimail 30 also lets
you send the data to the after-sales service.
• Press the key.
• Select in the menu:
SYSTEM INFORMATION.
• Choose the topic you want information on.
Sending system information
With the ALL INFORMATION function you
transmit – only upon request by FrancotypPostalia please – data to the FP after-sales
service.
– Modem / Telephone /
–Scale
– Ra te Table
– Security Device
– System
– Ink Ribbon
– Endorsement S tatistics
(Send) All Information
System Information
Available reports and information:
MODEM / TELEPHONE Modem name and dialing parameters
Saved telephone numbers
SCALE
(optional)
Technical information on th e in teg rated scale
RATE TABLE Available rate tables and validity
SECURITY DEVICE Technical information, among others the
machine state, validity and battery state
SYSTEM Machine number, software and imprint data
INK RIBBON Ink ribbon parame ters and usage inf ormation
ENDORSEMENT STATISTICS Information on the endorsement usage
Page 68
optimail 30 Operator Manual
68
13.2 Displaying and clearing down the item counter
Apart from stor ing the total num ber of met er imprin ts in re gister (R 4) and the accoun t
counters the optimail 30 features a customizable item counter. This item counter
counts all meter imprints. Independently of other optimail 30 counter functions you
can reset the item counter to zero or use it as a daily or job counter.
• Press the key.
• Select in the menu: ITEM COUNTER.
• CLEAR DOWN cl ears the displayed
counter state without security prompt
.
13.3 High postage value – setting the threshold
The ‘High pos tage valu e’ f unctio n issues a wa rning wh en the s et pos tage ex ceeds a
defined threshold. You can also disable this warning function.
• Press the key.
• Select in the menu: SYSTEM SETTINGS
HIGH POSTAGE SETTING.
• Type the desired threshold
or
select WARNING OFF to disable the
warning function.
• SAVE the setting shown.
Clear down
Item counter
High Postage Setting
Type threshold / Warning off
System Settings
Save
Page 69

Advanced settings & system information
69
13.4 Low postage warning – setting the threshold
The ‘Low postage w arning’ function warns you when the available postage in your
optimail 30 drops below a preset threshold. You can also disable the low postage
warning.
• Press the key.
• Select in the menu: SYSTEM SETTINGS
LOW POSTAGE WARNING.
• Type the desired threshold
or
select WARNING OFF to disable the warning function.
• SAVE the setting shown.
13.5 Setting the access rights
Caution! Disabling the access rights will disable the account access restric-
tions. Every user can meter on all accounts.
You can only change the access right status if the MASTER card is fitted.
• Press the key.
• Select in the menu: SYSTEM SETTINGS
ACCESS RIGHTS.
The ACCESS RIGHTS menu appears.
The current access rights setting is shown in
the display left.
• Turn access rights ON or OFF.
• SAVE the setting shown.
Low Postage Warning
Type threshold / Warning off
System Settings
Save
Access Rights
On / Off
System Settings
Save
Page 70
optimail 30 Operator Manual
70
13.6 Setting the display contrast
You can adapt the display contrast to increase the readability.
• Press the key.
• Select in the menu: SYSTEM SETTINGS
DISPLAY CONTRAST.
• Use INCREASE or DECREASE to adapt
the display contrast.
You can see the change immediately in the
display. Cha nge s ettings until you c an easil y
read the display.
• SAVE the setting.
Access rights - possible settings and their meaning:
ON Metering is possible with a valid access card
(MASTER or USER) only.
OFF No access restrictions for metering.
Metering is possible without access card
on
all accounts.
Display Contrast
Increase / Decrease
System Settings
Save
Page 71

Advanced settings & system information
71
13.7 Setting audible signals
The optimail 30 confirms each keypress with a bee p. A serie s of aud ible si gnals indicates an error. You can restrict the scope of audible signals to warnings or turn off
the audible signal altogether.
• Press the key.
• Select in the menu: SYSTEM SETTINGS
AUDIBLE SIGNALS.
• Use ALL SIGNALS OFF/ON or JUST
WARNINGS to adapt the current setting.
• SAVE the setting shown.
Audible Signals
Off / On / Just Warnings
System Settings
Save
Audible signal - possible settings and their meaning:
ON Audible signal with each keypress,
with each message…
OFF No audible signals
WARNINGS ONLY Import ant audible signals only,
audible signals with errors
Page 72

optimail 30 Operator Manual
72
13.8 Clock
The optimail 30 features a battery-backed system clock adjusted at the factory. It is
rarely necessary to correct the time. The optimail 30 automatically corrects the time
when summer t ime starts and ends. You can disable this automatic functio n and manually correct the time for summer time.
Use the ‘Time Zone’ function to set the applicable local time.
The FP after-sales se rvice is responsibl e for making change s to the basic settin g and
for correcting larger time offsets.
13.8.1 Correcting the time
• Press the key.
• Select in the menu: SYSTEM SETTINGS
CLOCK CALIBRATE CLOCK.
You will see the current time and the set
correction.
• Use +2 SECONDS / -2 SECONDS to cor-
rect the time.
You can set the sys tem cloc k early or lat e by
up to 5 minutes.
• SAVE the setting shown.
Clock
Calibrate clock
System Settings
+2 Seconds / -2 Seconds
Save
Page 73
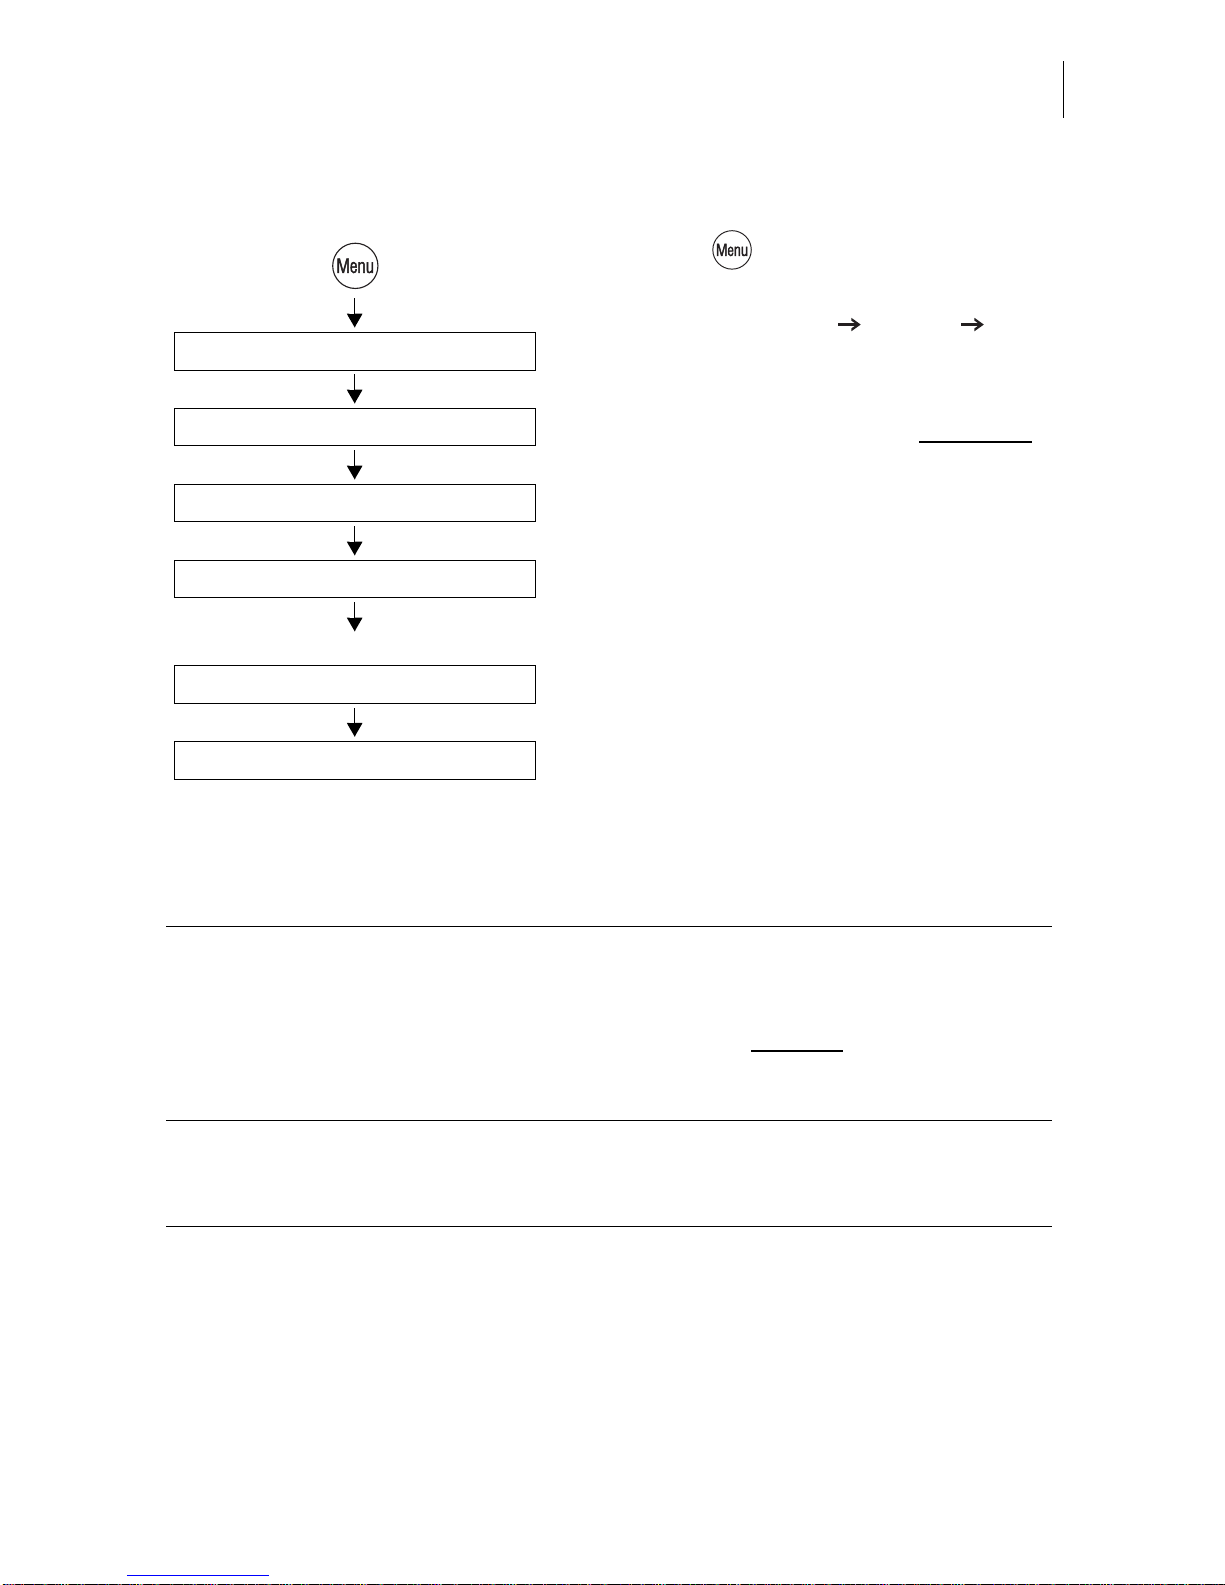
Advanced settings & system information
73
13.8.2 Summer time changeover
• Press the key.
• Select in the menu:
SYSTEM SETTINGS CLOCK
SUMMER TIME CHANGEOVER.
The SUMMER TIME CHANGEOVER menu
shows the current setting in the display left
for
– automatic changeover
– summer time
–time.
The table below explains the possible settings.
• You can turn the automa tic fun ction ON or
OFF.
If the automatic function is turned off:
• Set the correct summer time by hand.
• SAVE the setting shown.
Summer time On / Off /
Save
Clock
Summer Time Changeover
System Settings
Automatic On / Off /
If “Aut omatic : O ff” is set:
Summer time changeover - possible settings and their meaning:
Automatic ON The optimail 30 automatically corrects the
time when summer time starts and ends.
OFF The optimail 30 does not
automatically
correct the time when summer time starts
and ends.
Summer time ON The clock is set to summer time.
OFF The clock displays the set standard time.
Page 74

optimail 30 Operator Manual
74
13.8.3 Setting the time zone
• Press the key.
• Select in the menu: SYSTEM SETTINGS
CLOCK TIME ZONE.
The TIME ZONE menu shows the current
setting in the display left
:
– time offset relative to UTC
– time z one name (only if app licable to the
set time offset).
• Use +0.5 / -0.5 (hours) to set the appropri-
ate time zone.
• SAVE the setting shown.
13.9 Changing the stand-by time
The stand-by time is the time after the last metering procedure or the last keypress
the opti mail 30 waits un til it switches to the clock display. The factory setting is
5 minutes.
• Press the key.
• Select in the menu: SYSTEM SETTINGS
STANDBY TIME.
• Type the desired time.
• SAVE the setting shown.
Clock
Time Zone
System Settings
+0.5 / -0.5 (hours)
Save
Standby Time
Type time: 5 min
System Settings
Save
Page 75

Advanced settings & system information
75
13.10 Changing the user inter face language
The optimail 30 user interface supports English and German.
Switching the user interface to German
• Press the key.
• Select in the menu: SYSTEM SETTINGS
CHANGE LANGUAGE.
• Select the language DEUTSCH (DE).
The menu language immediately changes
from English to German. The rate table as
well as the names for accounts, adverts…
remain unchanged.
• Save the settings (SPEICHERN).
The German user interfac e language
remains selected until you change it to
English again.
Switching the user interface to English
• Press the key.
• Select in the menu:
SYSTEMEINSTELLUNGEN
SPRACHE UMSCHALTEN.
• Select the language ENGLISH (EN).
• SAVE the language setting.
Change language
Deutsch (de)
System settings
Speichern
Sprache umschalten
English (en)
Systemeinstellungen
Save
Page 76

optimail 30 Operator Manual
76
13.11 Setting the meter type
The ‘Meter type’ se ttin g defines whether op tim ai l 30 display s a nd p r int s th e po sta ge
in the $0.00 or the $0.000 format.
• Press the key.
• Select in the menu: METER TYPE.
• Select <0.00>/<0.000> to change the current setting.
• SAVE the setting shown.
<0.00> / <0.000>
Save
Meter Type
Meter Type - possible settings and their meaning:
<0.00> Displays and prints the postage in integer
Cents.
<0.000> Displays and prints the postage in
tenths of Cents.
Page 77

Advanced settings & system information
77
13.12 Modem settings – changing dialing parameters
You must set the modem paramete rs for the optimail 30 to match your telephone co nnection. The mo dem c onf igurati on is part of t he log -in proced ure duri ng comm issio ning. You should verify and, i f necessary , correct the s ettings if ch anges were made to
your telephone sy ste m.
• Press the key.
• Select in the menu:
MODEM AND TELEPHONE NUMBERS
SET MODEM PARAMETERS.
The optimail 30 opens the procedure for setting the modem parameters.
• Follow the instructions on the display.
The optimail 30 prompts you for:
– phone type
– access method
– the exchange digit if applicable.
• Press CONTINUE to set the displayed
parameter.
When fin ished the optimail 30 displays all
valid parameters.
• If the modem parameters shown are
correct: SAVE.
The table on the next page shows and
explains the possible settings.
Set Modem Parameters
Select Phone type
Modem and Telephone Numbers
Save
Continue
Page 78

optimail 30 Operator Manual
78
Modem parameters – possible settings and their meaning
Phone type DIRECT LINE optimail 30 is connected to a direct line.
EXTENSION optimail 30 is connected to an
extension.
Access method
(only with phone type
extension)
EXCHANGE DIGIT Defines how the exchange is dialed from
the extension.
Usually you would dial EXCHANGE
DIGIT.
The hook flash time of the integrated
modem has been fixed to 500 ms.
HOOK FLASH
Exchange digit The exchange digit
depends on the
telephone system.
Use the numeric keys to type the
exchange digit. The exchange digit can
comprise several d igits.
Normally, a “0” is used.
A W indicates the
modem wa its for the
dialing tone.
Use WAIT to define waiting for the dialing tone after the exchange digit was
dialed.
A comma (,) indicates a
dialing pause.
Use PAUSE to insert a dialing delay of
2 seconds.
Page 79

Advanced settings & system information
79
13.13 Changing dialup numbers
The optimail 30 comes with major dialup number s for postage meter ope ration saved
ex works.
Caution! Change the dial up num bers onl y whe n instru cted to d o so by
Francotyp-Postalia. Wrong dialup numbers can cause troubles, e.g. during postage loading.
Changing a dialup number
• Press the key.
• Select in the menu:
MODEM AND TELEPHONE NUMBERS
CHANGE DIALUP NUMBERS.
• Select the dialup number to be changed.
The optimail 30 opens the menu where you
can change the stored dialup numbers.
• Chan ge the stored dial up number or type a
new number.
• SAVE the displayed dialup number.
The dialup numbers and their meaning:
TDC Dialup number of the Teleset data center.
The optimail 30 dials this number during the
TELESET process.
ORDERLINE Use this p hone n umb er to or der acc esso ries
and consumables.
View the number under:
MENU ORDERLINE.
SERVICE Help line dialup number
For your questions and issues regarding
optimail 30 operation.
REMOTE DIAGNOSE The optimail 30 dials this number when send-
ing data to after-sales service.
Select the number to be changed
Type the dialup number
Change Dialup Numbers
Modem and Telephone Numbers
Save
Page 80

optimail 30 Operator Manual
80
Functions in the CHANGE DIALUP NUMBERS menu and their meaning:
SPACE Inserts a space character. This can improve
the dialup number readability.
Spaces are ignored during dialing.
NEW NO. D eletes t he displayed dialup number.
You can then type a new number.
Page 81
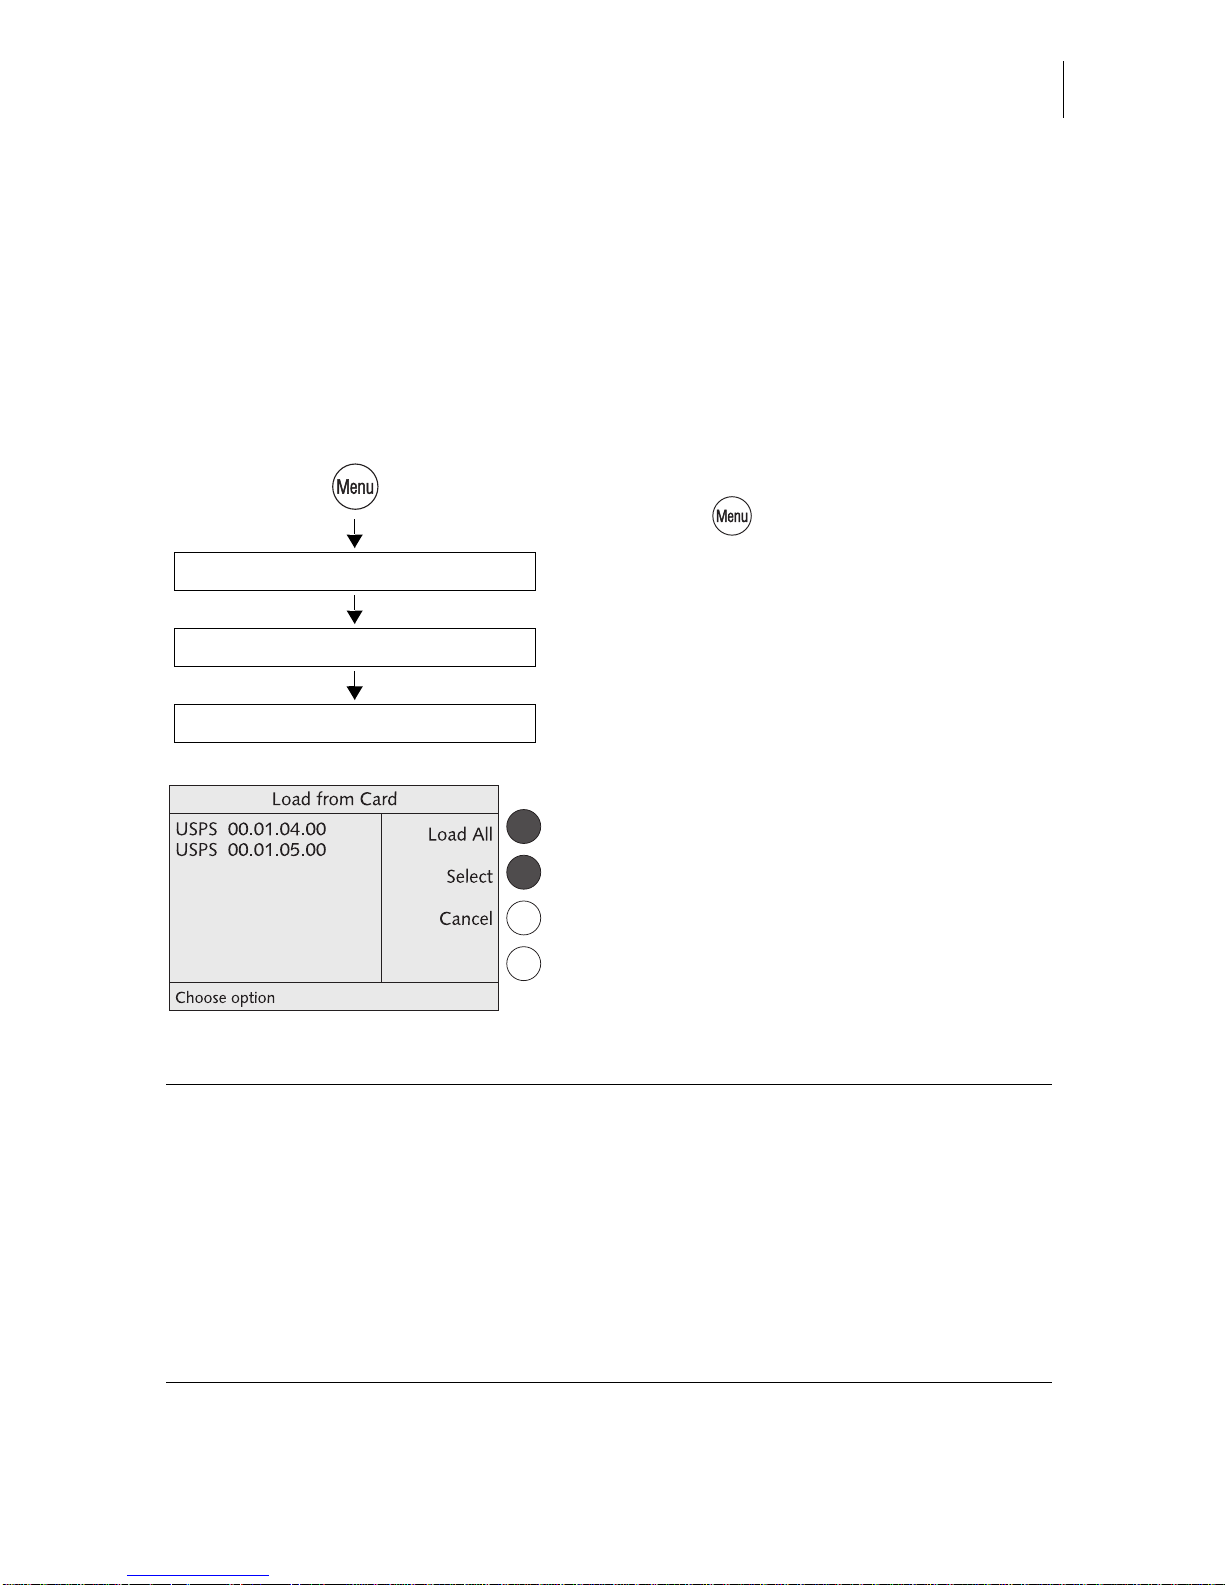
Advanced settings & system information
81
13.14 Integrated scale
(optional)
13.14.1 Loading a new rate table
You must update the rate table fo r postage calcul ation if postage regulations or rates
have changed. The optimail 30 supports loading of new rate tables from chip card.
Order the new rate table card from Francotyp-Postalia.
The optimail 30 automatically monitors the validity of rate tables. The system clock
controls the switchover to the valid rate table.
Loading rate tables from card
• Press the key.
• Select in the menu:
LOAD FROM CHIP CARD.
• Remove access card and insert the rate
table card.
The optimail 30 shows the rate table(s )
saved on the card.
• You can LOAD ALL or SELECT a rate
table.
Insert rate table card
Load All / Select
Load from Chip Card
Functions in the LOAD FROM CARD menu and their meaning:
LOAD ALL Loads all rate tables from the card into the
optimail 30.
SELECT optimail 30 prompts for each rate table:
“Do you want to load: YES/NO”.
When you have answered all prompts, the
selected rate tables are flagged with OK.
Use LOAD to load the selected rate tables
into the optimail 30.
Page 82

optimail 30 Operator Manual
82
13.14.2 Deleting rate tables
Caution! You cannot select a rate table to be deleted. All rate tables saved
in the optimail 30 will be deleted.
Metering is impossible without valid rate table!
• Press the key.
• Select in the menu: SCALE AND
POSTAGE RATE MAINTENANCE
DELETE RATE TABLE.
• Confirm the security prompt with YES.
All rate tables sa ved in the opt imail 30 will be
deleted after a security prompt.
Before you can meter a gain yo u must l oad a
rate table.
13.14.3 Turning automatic endor sement selection on/off
This parameter defines whether postage calculation is to control the endorsement
selection in the home menu.
• Press the key.
• Select in the menu: SCALE AND
POSTAGE RATE MAINTENANCE
AUTOMATIC ENDORSEMENT
SELECTION.
• Turn the automati c endorsem ent sele ction
ON or OFF.
• SAVE the setting shown.
Delete Rate Table
Scale and Postage Rate Maintenance
Automatic Endorsement Selection
Automatic On / Off /
Scale and Postage Rate Maintenance
Save
Page 83

Advanced settings & system information
83
13.14.4 Taring
The integrated scale is automatically tared if deviations from the zero point are
detected. This is indicated by a popup message.
You must tare the scal e if you wish to weigh with a pre-load (e.g. when using an extra
scale pan).
• Setting the desired initial state for the
scale: Remove load from scale or place
pre-load in position.
• Press the key.
• Select in the menu: SCALE AND
POSTAGE RATE MAINTENANCE
ZERO ADJUST.
A popup mess age indi cating th at the s cale is
being tared appears in the display for some
seconds. The scale is tared as soon as the
message disappears.
Functions in the AUTOMATIC ENDORSEMENT SELECTION menu and
their meaning:
ON For postage calculation the optimail 30
selects an appropriate endorsement on the
basis of the sel ected posta l rate s and uses it
for metering.
OFF The optimai l 30 does not automa tically select
an endorsement. During metering the
optimail 30 prints the endorsement selected
in the home menu.
Zero Adjust
Scale and Postage Rate Maintenance
Page 84

optimail 30 Operator Manual
84
13.14.5 Setting the gravity
To determine the weight the scale measures the gravity between the earth and the
object on the scale pan. This force depends on the latitude and the distance to the
geocenter. To have the exact weight displayed you must therefore specify the location of your postage meter with scale.
• Press the key.
• Select in the menu: SCALE AND
POSTAGE RATE MAINTENANCE
GRAVITY SETTING.
• Select the location (state).
The optimail 30 saves the setti ng and returns
to the SCALE AND POSTAGE RATE MAINTENANCE menu.
13.15 Re-authorization
You must inform Francotyp-Postalia of the new location for your optimail 30 if you
wish to operate the optimail 30 at another location (e.g. after a move). At the new
location you m ust re-autho rize your o ptimail 30 by estab lishing a modem conne ction
to the data center.
• Make sure the opti ma il 30 is connected to
the telephone line and the dialing parameters for the modem are correctly set up.
• Press the key.
• Select in the menu:
SYSTEM SETTINGS RE-AUTHORIZE.
• Confirm the security prompt with YES.
Re-Authorizatio n starts. Y ou can moni tor the
progress in the d isplay. It takes s ome time to
establish the connection and to exchange
data. Please stand by.
Gravity Setting
Select location (state)
Scale and Postage Rate Maintenance
Re-Authorize (remote)
System Settings
Page 85

Maintenance and care
85
14 Maintenance and care
Have your optimail 30 serviced and cleaned regula rly by a service tech nician.
This guarantees long-term, trouble-free operation. Ask about our low-cost care and
maintenance agreement.
You can do the following work yourselves:
– Cleaning the outside.
– Changing the ribbon cassette.
– Changing the battery.
– Topping up water for envelope flap moistening
(optimail 30 with sealer)
.
– Clean/replace rocker with moistening felt
(optimail 30 with sealer)
.
– Replace absorption felt
(optimail 30 with sealer)
.
14.1 Cleaning the postage meter
Warning! Make sure that no liquids or foreign objects penetrate the interior
of the optimail 30. If this happens, pull out th e power pl ug immediat ely. Hav e
the optimail 30 checked by a service technician before using it again.
• Turn off the postage meter.
• Unplug the power cable from the socket.
• Clean the outside of the postage meter
machine housing, the catch tray and,
where available, the scale pan with a
slightly damp cloth.
You can use also use a commercially avai lable washing-up liquid.
Power switch
Page 86

optimail 30 Operator Manual
86
14.2 Changing the ribbon cassette
Caution! Only use original ribbon cassettes from Francotyp-Postalia.
• Open the flap of the ribbon cassette compartment by lightly pres si ng the rele as e
catch.
The flap swings up automatically.
• Holding it as shown in the illustration pull
out the used ribbon cassette in arrow
direction.
• Take the new ribbon cassette from the
packing.
A cardboard strip may be present in the
ribbon cassette as transport fixture (see the
illustration).
• If present: Remove the cardboard strip.
• Tension the ribbon. Turn the white ribbon
spool in the direction of the arrow.
Transport fixture
(cardboard st rip)
Ribbon spool
Page 87
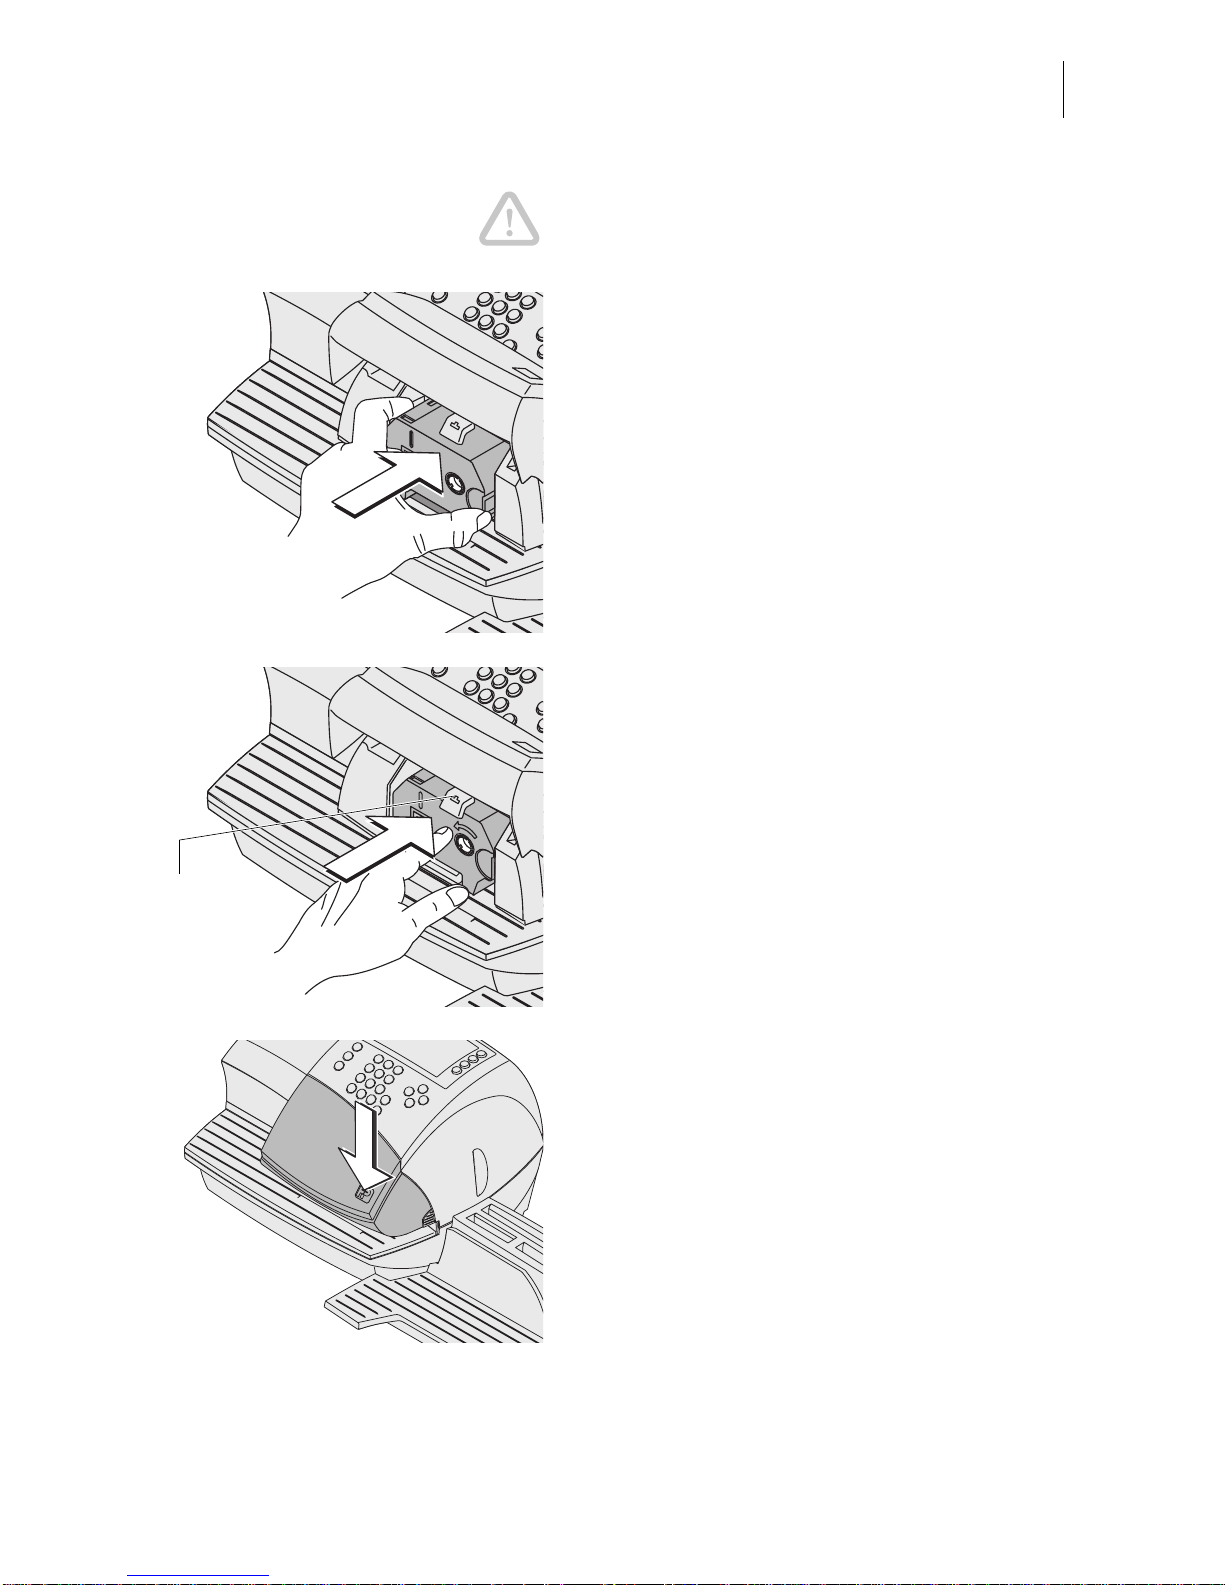
Maintenance and care
87
Caution! Make sure not to crease or tear the
ribbon when inserti ng it. Otherwise the ribbon
might break.
Also make sure the edges of the ribbon do
not fold over. F old ed rib bon s are thicker and
prematurely fill the take-up ribbon spool.
• Place the ribbon cassette on the letter
receiving tray with the ribbon facing downwards.
• Hold the ribbon cassette as shown in the
illustration and carefully insert it in the
cassette slot. The cassette must easily
slide into the cassette slot.
• Ins ert the cas sette unt il the latch sna ps in.
• Close the flap. You can feel the lock snap
in.
Cassette
latch
Page 88
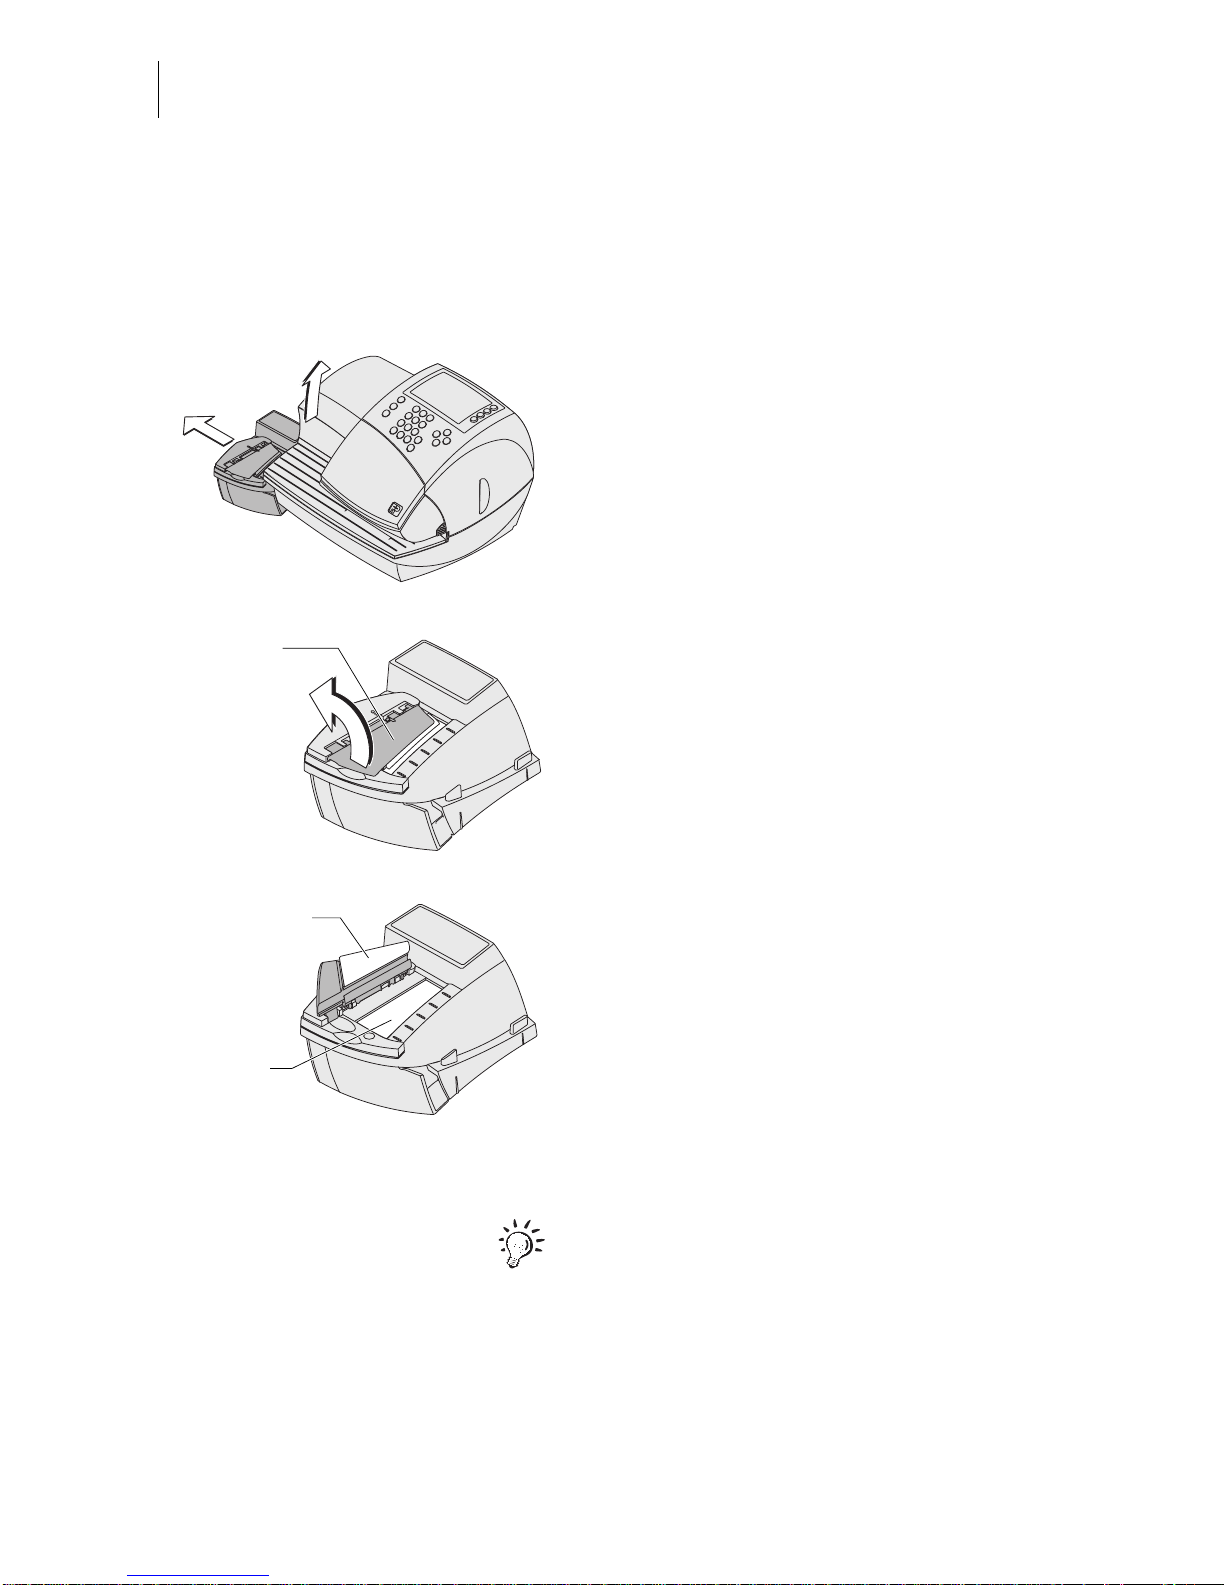
optimail30 Operator Manual
88
14.3 Sealer
(optional)
14.3.1Cleaning
To remove glue residues the sealer should be cleaned once a month.
•Separate the sealer from the postage
meter:
Slightly lift the postage meter on the left
side and pull the sealer away to the left.
•Swing up the rocker with the moistening
felt.
•Thoroughly rinse absorption and moistening felts under running water.
•Wipe the housing with a damp cloth. You
can use also use a commercially available
dishwashing detergent.
•Top up the water (see page89).
•Dry the sealer.
•Connect the sealer to the postage meter.
For further information on how to connect the
sealer to the postage meter please refer to
the Installation Guide.
Rocker with
moistening felt
Moistening felt
Absorption
felt
Page 89
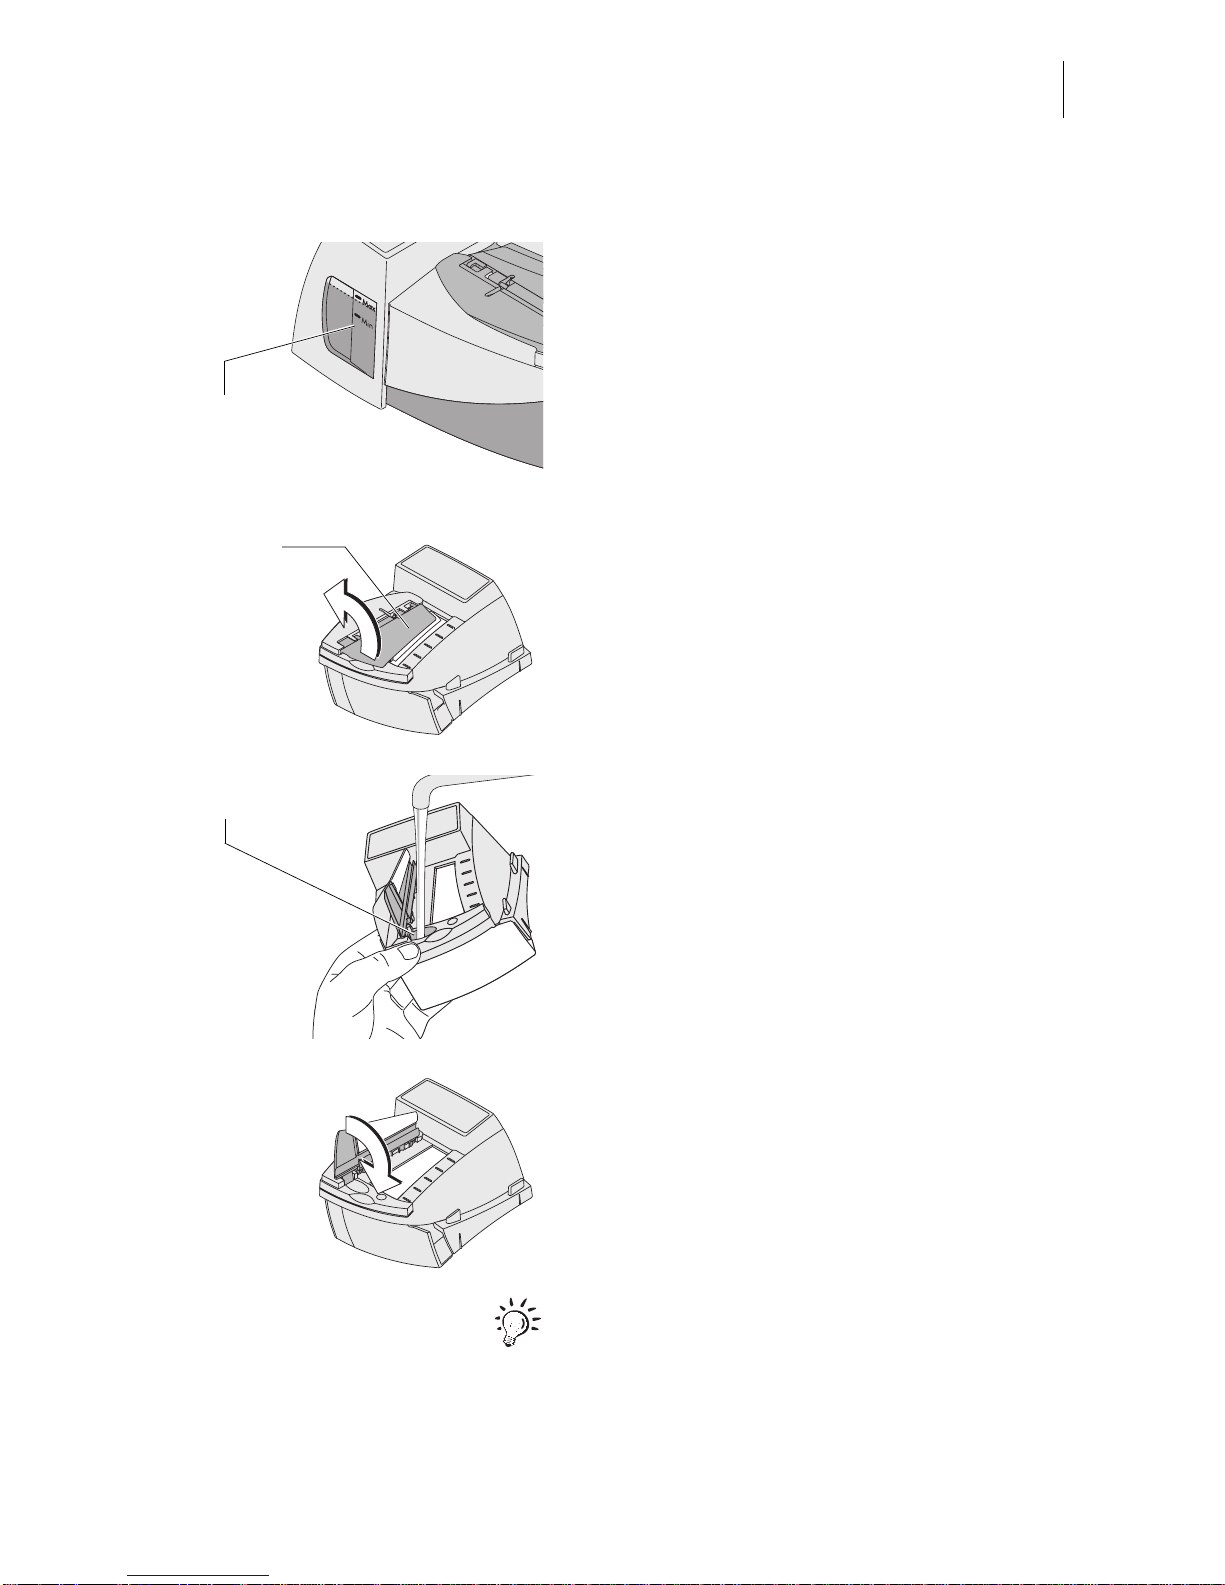
Maintenance and care
89
14.3.2 Checking the water level and topping up water
• Check the water level in the sealer regularly.
Make sure the seal er is alw a ys fill ed at least
to the “Min” mark to prevent the felts from
drying up. When felts with glue residues dry
up they harden to the point of becoming prematurely useless .
Topping up water
• Separate the sealer from the postage
meter: Slightly l ift the postage meter o n the
left side and pull the seale r away to the left.
• Swing up the rocker with the moistening
felt.
The filler hole for topp ing up the sealer is now
accessible.
• Top up sealer with tap water.
• Check the water level.
The water level in the sealer should
roughly reach to the “Max” mark.
• Swing down the rocker.
• If necessary: dry the sealer outside.
• Connect the sealer to the postage meter.
Francotyp-Postalia offers a special bottle
with filling hose as acc essory. This bottle lets
you top up the sealer right at the installation
site.
Lateral water
level gauge
Rocker w it h
moistening felt
Filler hole
Page 90

optimail 30 Operator Manual
90
14.3.3 Replacing felts
• Separate the sealer from the postage
meter:
Slightly lift the postage meter on the left
side and pull the sealer away to the left.
• Empty the water reservoir.
Removing the rocker wi th moistening felt
• Slightly tilt the rocker and pull it off in an
obliquely upwa rd direc tio n.
Removing the absorption felt
• Grip the absorption felt with pliers or tweezers and pull it out upwards.
Rocker with moist en i n g felt
Absorption felt
Page 91
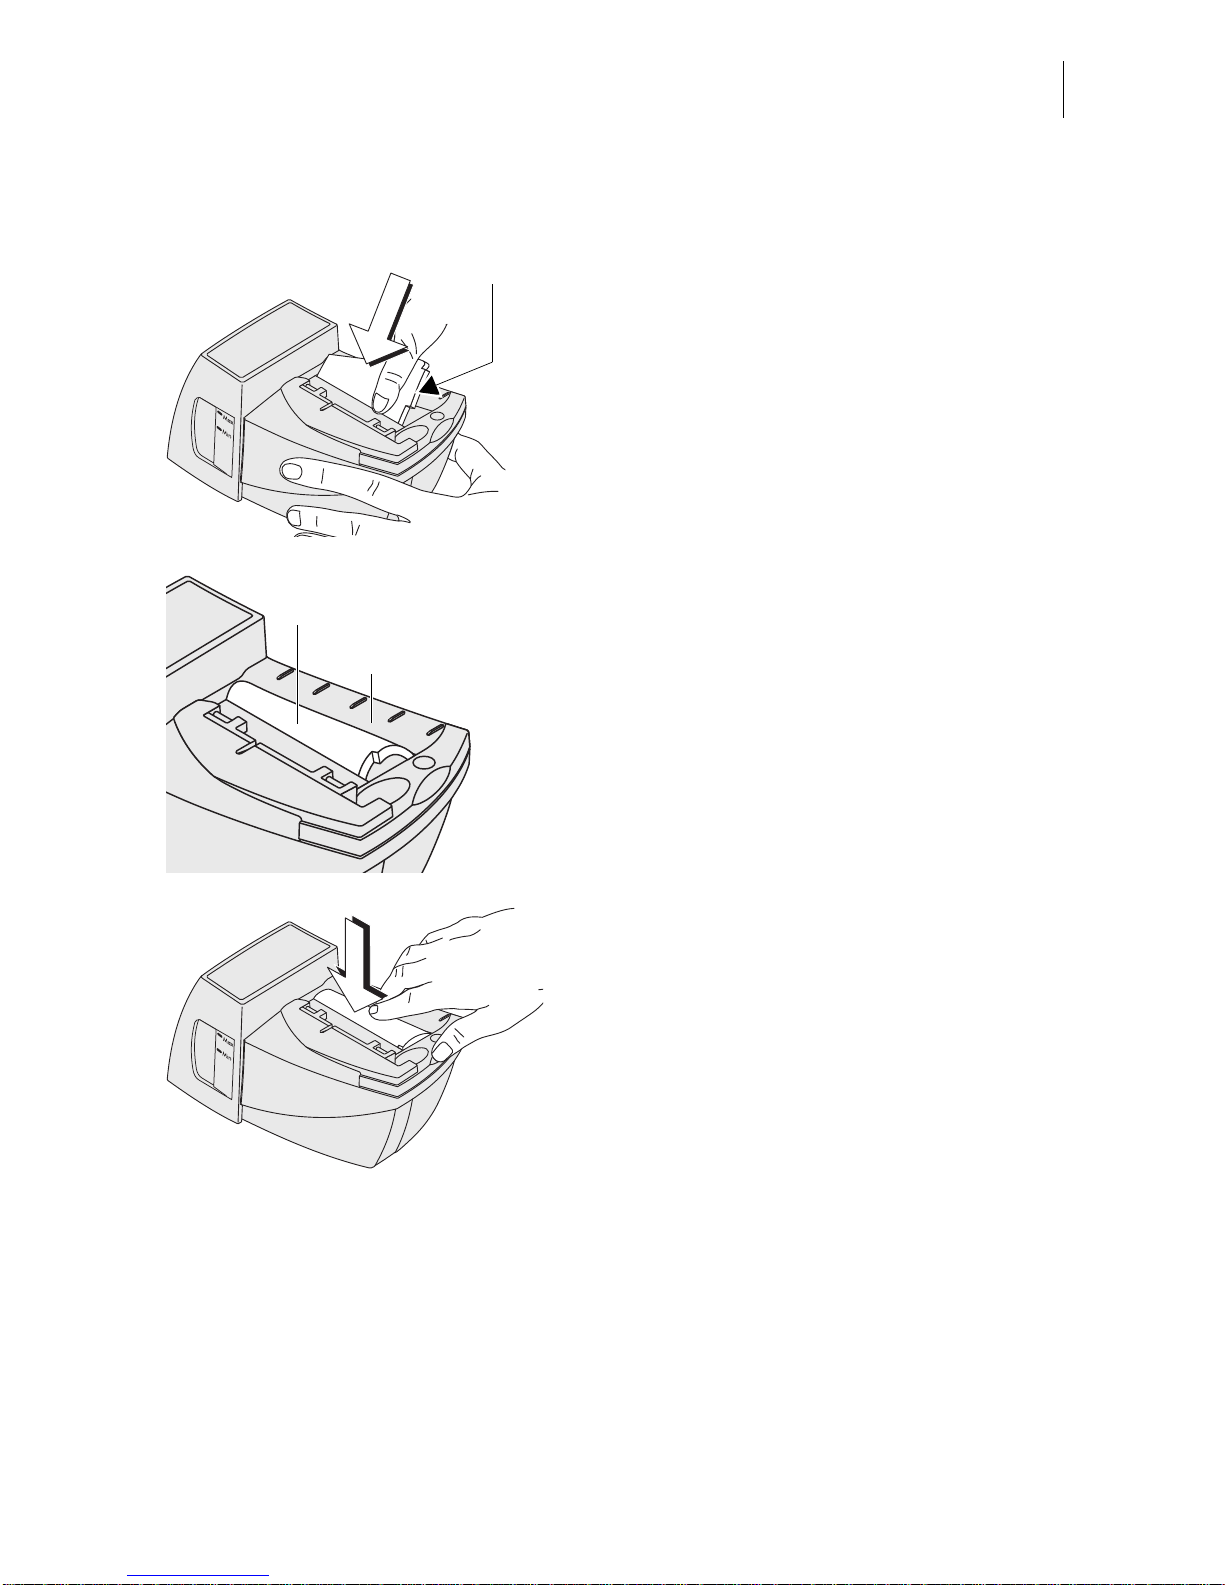
Maintenance and care
91
Installing the absorption felt
• Install a new absorption felt as shown in
the illustration. The felt should be halfway
in the sealer.
• Bend the upper part of the felt to the right
and push it beneath the letter receiving tray
until it reaches the stop in the contour.
• Eve nly push the arc hed absorption felt with
your hand into the water reservoir. Make
sure that the felt is correctly seated, in particular at the edges. The stop in the positioning contour must fit precisely in the
opening of the letter receiving tray.
• As a final measur e, stroke with you r fi nger
over the felt repeatedly to eliminate any
irregularities.
Positioning
contour
Absorption felt
Letter receiving tray
Page 92

optimail 30 Operator Manual
92
Installing the rocker with moistening felt
The rocker features two clips that engage on
the two bolts at the sealer.
• Fit the ne w roc ke r su ch that one leg of t he
leg spring is located in the rocker groove
and the other leg in the sealer slot.
• Hold sealer in place, and exerting moderate pressure, push the rocker onto the
sealer such that the two clips engage on
the bolts.
Check
• Check the correct seat:
– The absorption felt must be perpendicu-
larly suspended in the water reservoir.
Its lower edge should roughly reach the
bottom.
– The gap between rocker and sealer
housing must be uniform. (The rocker
must neither jut out nor touch the housing.)
• Top up water (see page 89).
• Connect the sealer to the postage meter.
For further informat ion on how to conne ct the
sealer to the postage meter please refer to
the installati on guide.
Leg spring
Bolt
Clip
Absorption felt
Rocker
Uniform gap
Page 93

Maintenance and care
93
14.4 Changing the battery
The optimail 30 monitors the charging state of the battery. An appropriate message
appears in the display when it is time to change the battery.
Caution! Only use the batteries provided by Francotyp-Postalia
90.4701.8004.00. Observe the instructions enclosed with the battery.
• Remove the access card.
• Switch off the optimail 30.
• Unplug the power cable from the socket.
• Unplug the power cable.
• Remove the modem cable.
Push down the spring on the connector
and pull the connector out of the modem
socket.
• Remove the catch tray (if present):
Slightly lift the postage meter on the right
side and pull the catch tray away to the
right.
• Remove the sealer (if present): Slightly lift
the postage me ter on the left side and pull
the sealer away to the left.
• Rem ov e t he sc ale pan (if present): Pull off
scale pan upwards.
Power switch
Modem cable
Power cable
Page 94

optimail 30 Operator Manual
94
• Turn the postage meter on its back and
hold it in place.
You now have ac cess to the battery compartment on the bottom of the postage meter.
• Press the clip lock on the battery compartment cover in the direction of the arro w and
remove the battery compartment cover.
• Remove exhausted battery.
• Insert new battery (90.4701.8004.00).
Heed the polarity! The symbols in the battery compartmen t indicat e the correc t position.
• Close the battery compartment.
Clip lock
Battery compartment cover
Page 95

Maintenance and care
95
• Put the postage meter on its feet again.
• Reattach accessories (catch tray, scale
pan…).
• Reestablish all cable connections.
You can now use the postage meter again.
For further information on how to install the
catch tray, scale pan and sealer and how to
connect the machine please refer to the
Installation Guide.
14.5 Warranty
All our machines are subjected to strict quality checks.
Please return the m achine to us in its original packaging if y ou should have to claim
warranty. We recommend that you keep the packaging material for such a case.
The warranty period f or ne w machi nes is 15 ,000 me teri ng p r oc edu res or 12 mo nths .
The warranty does not cover the following wear parts:
51.0019.5014.00 Rubber roller
51.0034.2006.00 Felt, bottom (absorption felt)
51.0034.2007.00 Felt, top (moistening felt)
90.4701.8004.00 Battery (Lithium) 3.6 V SL-360/S
Page 96

optimail 30 Operator Manual
96
15 Tips for troubleshooting
An error message appears on the display in
case of an error or handling error. An additional beep may also indicate an error (see
Chapter 13.7 on page 71).
Make sure to carefully read the error message. You will be given hints on the error
cause and what you can do to remedy it.
You can correct many minor errors and
issues occu rring during optimai l 30 operation
yourself.
Please contact the after-sales service if you
cannot remedy an error by means of the display information and the hints given in the
present Operator Manual.
Problem Possible cause and remedy
…general errors
Blank display Check whether the pow er cable is plugged in correc tly
and the power switch is turned on.
Functions are ‘miss in g’
in the display
Access to these functions is not possible with the
access c ard inserted.
Heed the access rights
(see pages 102 to 104)
.
optimail 30 fails to
recognize the chip card
Card is inserted incor rectly.
Remove the card and insert it in the card reader again
(chip facing the rear)!
Wrong card type inserted.
optimail 30 behaves
erratically or fails to react
Software issue.
Turn off the optimail30. Wait at least one minute.
Turn the optimail 30 on again.
Page 97

Tips for troubleshooting
97
…during metering / during meter imprint setting
Jam / machine blocked Turn off the optimail 30. Wait at least one minute.
Turn the optimail 30 on again.
Metering is impossible/
optimail 30 is not ready
for metering
No access card inserted.
Insert access card (USER or MASTER).
Card reader does not recognize access card.
Remove access card and insert it again.
No valid postage was set.
Set postage
(see Chapter 4.1, page 23)
.
No more postage credit in the postage meter.
Load new postage
(see Chapter 10, page 56)
.
The last postage loading / last connection to the
Teleset data center was too long ago.
Perform Teleset function (amount of $ 0 is sufficient).
Ribbon cassette is missing.
Insert new ribbon cassette
(see Chapter 14.2, page 86)
.
Poor imprint quality
(e.g. imperfections,
distorted imprint)
Env elope paper qua lity does not me et specific ation or
too great thickness differences in the imprint area of
the letter.
Only use material that meets the specifications
(see page 113)
.
Heed the comprehensive notes on how to avoid poor
imprints
(see page 33)
.
The use of a label may solve this issue.
If these measures fail to correct the error:
Call the after-sales service.
Problem Possible cause and remedy
Page 98

optimail 30 Operator Manual
98
…during weighing and postage calculation
(optimail 30 with scale)
Endorsement imprint is not
automatically selected
Automatic endorsement imprinting is disabled
(see Chapter 13.14.3, page 82)
.
External FP postage
calculator fails to transfer
data to the optimail 30.
Check that the postage calculator is properly connected and set up for operation with optimail 30
(see
Chapter 7.6.1, page 49 and postage calculator Operator Manual)
.
Flashing postage Country-specific regulations apply to the selected
product. Please heed the U nited States Post al Service
regulations.
Missing postage
in the display
No postal ra tes s electe d or th e pos tal r ate s are i ncom plete or incorrect.
Select complete postal rates
(see Chapter 6.2, page 38)
.
The weight is mi ssing in order to calcula te the postage
(display reads = 0 lb 0.0 oz).
Place the mail piece on the scale pan.
Weight is outside the permitted limits
The displayed weight does not match the selected
postal rates.
Select other postal rates or repeat weighing
(see Chapter 6, page 36)
.
Weight display:
no weight is determined for
the letter on the scale
The scale pan was still occupied when another letter
was placed on it. The optimail 30 can determine a new
weight only if the scale has been emptied beforehand.
Empty the scale pan. Place the letter.
The weight on the pan is too low or the scale is over-
loaded.
Use scale f or mail pieces within the permissib le weight
range only
(see page 113)
.
Scale fails to detect zero point.
Tare the scale
(see page 83)
.
Problem Possible cause and remedy
Page 99

Tips for troubleshooting
99
(continued)
Weight display:
no weight is determined f or
the letter on the scale
optimail 30 f ai ls to det ec t the i nteg rated scal e or scale
is defective.
Turn off the optimail 30. Wait at least one minute.
Turn the optimail 30 on again.
If these measures fail to correct the error:
Call the after-sales service.
…with TELESET (postage loading)
Desired amount cannot
be loaded
Impermissible amount.
Change amount and repeat loading.
No access to TELESET
function
Current account has no permission to load postage.
TELESET function
aborts
optimail 30 fails to establish connection to the Teleset
data center.
Check modem setting.
Check TDC phone number.
…with menu settings, during maintenance and care
Fai lure to load from card The card contains n o va lid data. Wro ng card inserted?
Insert a card.
optimail 30 fails to recognize the card.
Card is defective.
Call the after-sales service.
Problem Possible cause and remedy
Page 100

optimail 30 Operator Manual
100
…when topping up water for envelope flap moistening/sealing
(optimail 30 with sealer)
Envelopes are not
properly sealed
Stroke your hand firmly over the envelope’s/letter
stack’s flap area.
Envelope flaps are not
moistened properly
Felts are soiled/dried out.
Clean sealer
(see Chapter 14.3.1, page 88)
.
Top up water
(see Chapter 14.3.2, page 89)
.
Moistening felt is worn.
Replace rocker with mo istening felt
(see Chapter 14.3.3,
page 90)
.
Absorption felt is worn.
Replace absorption felt
(see Chapter 14.3.3, page 90)
.
Moistening felt incorrectly seated in the rocker.
Correct moistening felt position
(see page 101)
.
Absorption felt incorrectly seated in the sealer.
Surface is curved.
Check and if neces sary correct absorption felt pos ition
in the sealer
(see page 92)
.
Problem Possible cause and remedy
 Loading...