

Page 1

Optimail
Postage meter
Operator Manual
Page 2
About this Operator Manual
2
Please read this operator manual before using the
Optimail postage meter.
Please keep the manual near the Optimail at all
times for reference.
Quick Reference Guide
The quick reference gives you an overview of the
most frequently used functions.
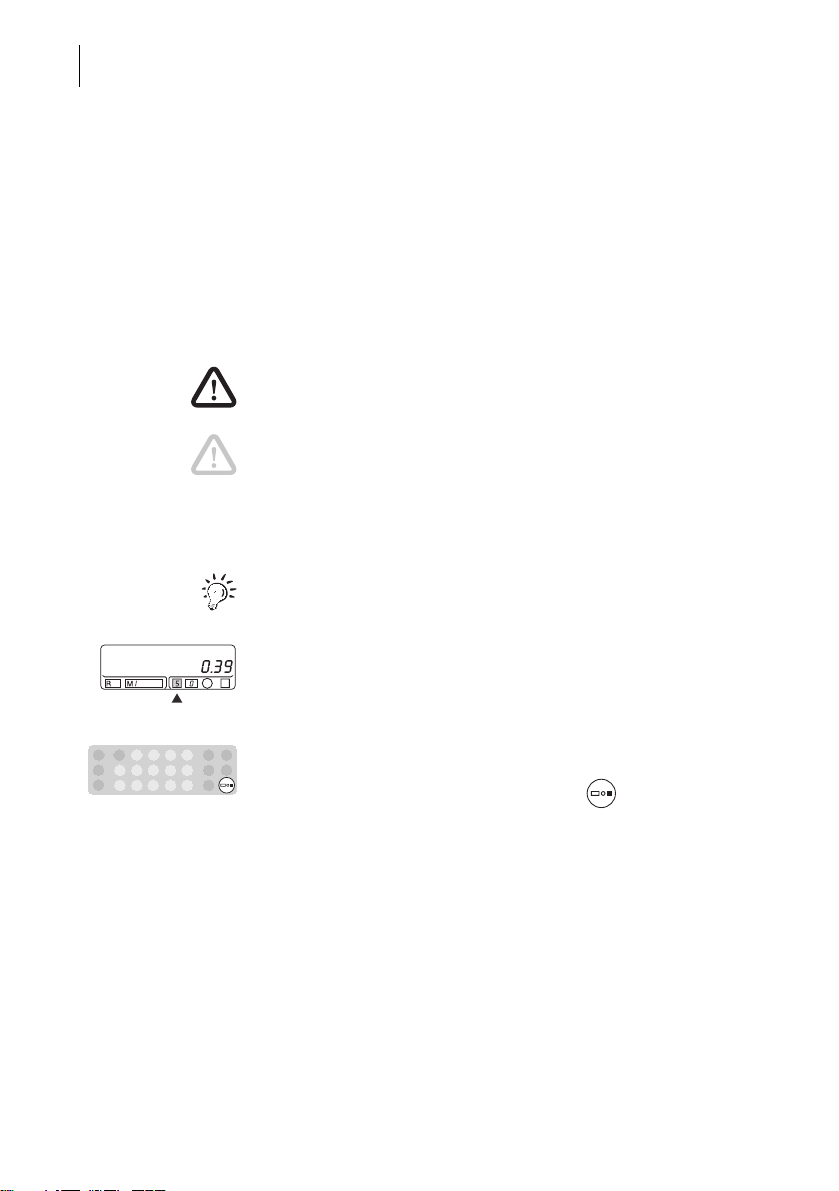
The following keywords and symbols identify the
safety tips in this operator manual.
Warning! indicates a potential hazard which may
result in injury.
Caution! indicates a potential hazard that may result
in damage to the Optimail or impair the metering
process.
The following symbols and graphic representations
are used in this operator manual:
A tip offers advice or additional suggestions for
improving the operati on.
Displays show the inputs and current settings. Fields
which refer to the text have a dark background. An
arrow points out a field to which you should pay
special attention.
The keys to be pressed are highlighted in the key
field symbol.
In the example: Press the Postage value key.
Page 3
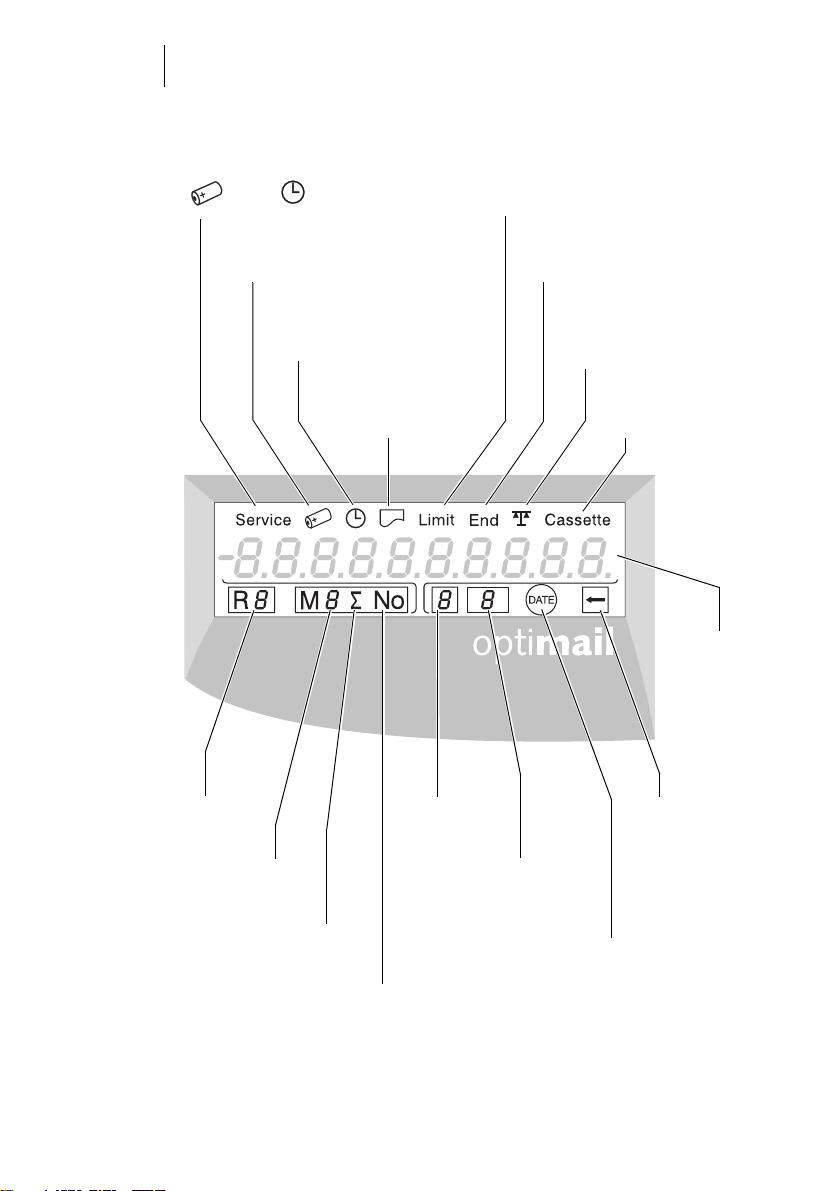
Optimail – Display
3
– Next maintenance due
– Fault: Display with error number,
and/or
Available postage warning:
Low postage
Service: Memory component /
data backup measure
– Time display
– Fault: System clock
Print:
Account/register report
Incoming mail stamp
Register
(1 … 8)
Account
(1 … 9)
Advertisement
Endorsement
Incoming mail stamp
No postage,
metering not possible
Postage scale connected,
automatic postage value /
endorsement setting
Fault: Ribbon cassette
or mail jam
Flashing:
Print offset ON
4)
1)
Display for
– Postage value
–Time
– Register values
–…
1)
Postage used by
the account
Number of meter imprints
of the account
Date in the meter imprint
Page 4
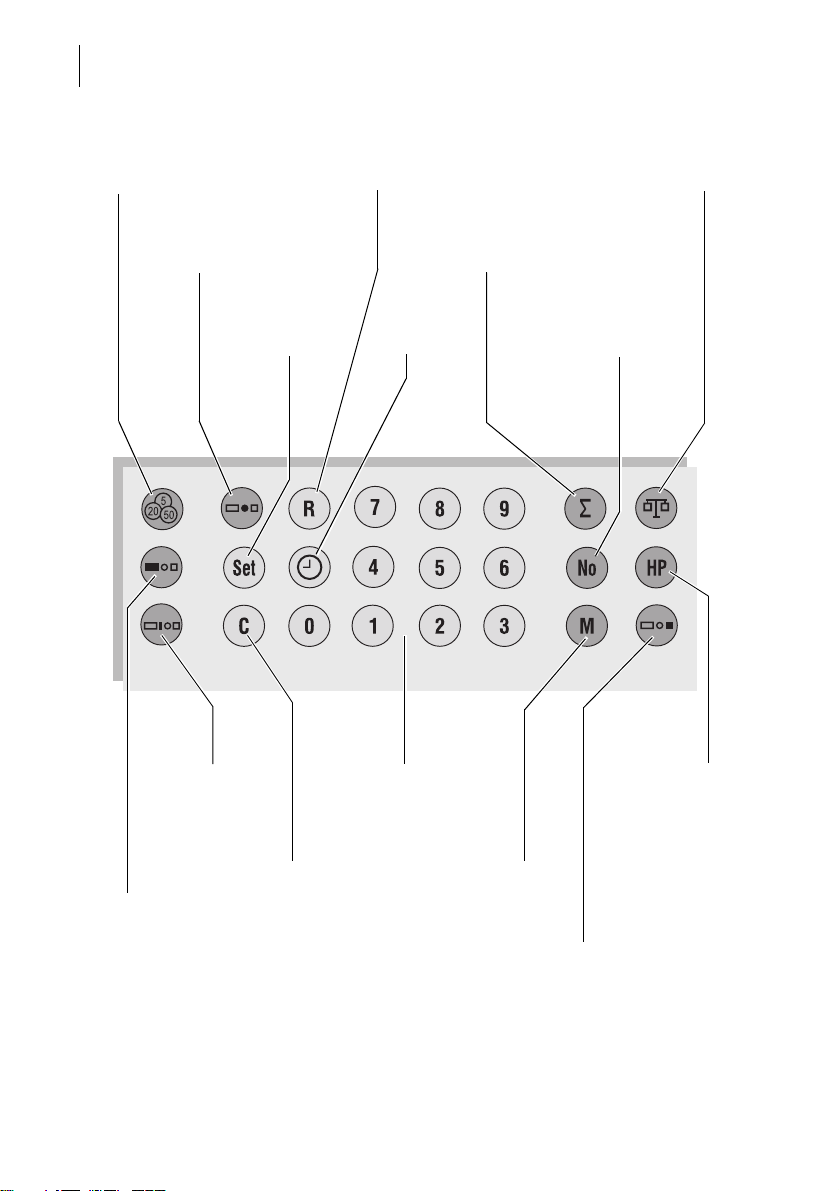
Optimail – Keyboard
4
TELESET
Display/set print offset
Display/set date
Program basic
settings
1)
register
Display
Connect/disconnect
postage scale
Display postage used
by an account
Display/set
time
Display number of meter
imprints of an account
4)
Set endorsement
Numeric keys:
Enter numerical values
Delete, abort input
Change account
Set
–Advertisement
– Incoming mail stamp
2)
Set postage value
Legend
1) in incoming mail stamp mode only
2) optional, only if special incoming mail stamps are ordered
3) close ‘incoming mail stamp mode’ or ‘account/register report print mode’
4) only available if the Optimail displays the postage in tenths of a cent (‘0.000’)
High postage value
– Confirm for metering
–Set limit value
Back to metering
3)
Page 5

Contents
1 Safety tips ___________________________________________________7
2 A short description of the Optimail _______________________________8
3 Switching Optimail on/off ______________________________________10
4 Metering ____________________________________________________11
4.1 Setting the postage value __________________________________12
4.2 Setting the advertisement __________________________________13
4.3 Setting the optional endorsement ____________________________14
4.4 Date of the meter imprint / print without date ___________________15
4.5 Changing the account _______ ___ ___ ___ ___________________ __16
4.6 Positioning and metering a letter _____________________________17
5 Account function _____________________________________________ 18
5.1 Showing account data _____________________________________18
5.2 Printing an account report __________________________________20
5.3 Deleting account information ________________________________21
6 Displaying and printing register values __________________________22
7 Loading postage – TELESET ___________________________________24
5
8 Basic settings _______________________________________________28
8.1 Setting the date __________________________________________28
8.2 Setting the time __________________________________________29
8.3 Setting a high postage value ________________________________30
9 Using the incoming mail stamp function _________________________31
9.1 Things worth knowing about incoming mail stamp _______________31
9.2 Stamping incoming mail ___________________________________31
9.3 Setting a print offset ______________________________________33
9.4 Selecting another incoming mail stamp
10 Using Optimail with the postage scale ___________________________35
10.1 Connecting the postage scale _______________________________35
10.2 Weighing and metering ____________________________________36
11 Maintenance and care _________________________________________38
11.1 Cleaning _______________________________________________38
11.2 Changing the ribbon cassette __________________ ___ ___ ___ ____39
(optional)
_________________34
Page 6

Optimail Operator Manual
6
12 Error messages and tips for helping yourself _____________________ 41
12.1 Error messages – device faults _____________________________41
12.2 Error messages – TELESET _______________________________ 44
12.3 Tips for helping yourself ___________________________________ 47
Appendix
Instructions for installation ______________________________________51
Setting the outside dialing parameters for the modem _________________ 59
Glossary ____________________________________________________ 61
Technical data ________________________________________________ 63
Index _______________________________________________________ 65
Service _____________________________________________________ 69
Page 7

Safety tips
1 Safety tips
The Optimail is a fully electronic postage meter for metering letters.
The Optimail complies with the pertinent safety regulations for office information
equipment. Please observe the following tips for your own safety.
• Only use the power and interface cables supplied with the machine by
Francotyp-Postalia. Makes sure that the cables are not damaged.
• Connect the Optimail to a grounded single-phase power socket only. Make sure
your office power supply con form s to the powe r requ irem en ts show n on the s eri al
number plate of the Optimail.
• Make sure the socket for connec ting the Opti mail is clo se by and the ma ins plug is
easily accessible at all times.
• Switch off the Optimail and all devices connected to it before plugging in or
removing interface cables.
• Never plug in interface cables during a thunderstorm.
• Switch off the Optimail before cleaning it or moving it to another location.
• Make sure that no liqu ids or forei gn object s penetrate the interio r of the O ptimail . If
this happens, pull out the mains plug immediately. Have the Optimail checked by
your local servicing dealer before using it again.
7
• Only have maintena nce and repai r work done by q ualified pers onnel authori zed by
Francotyp-Postalia. Fai lure t o do so will result in voidi ng of you r warrant y and los s
of your postal licence. You will be liable for any damages.
The Optimail is des igned s o that you ca n inst all and st art it yo ursel f. Pleas e read th e
chapter “Instructions for installation” in the appendix to this manual. You are also
welcome to contact our Service department who will help you get started.
Page 8

Optimail Operator Manual
8
2 A short description of the Optimail
Display
Letter guide
Letter receiving tray
Operating instructions
(removable, with advertisements and endorsements)
flap/ribbon cassette compartment
with ribbon cassette behind
Keyboard
Release key
(for flap/ribbon cassette
compartment)
Keylock
with key
Power connection
25-pole port for connecting
the postage scale
Modem socket
(for loading postage via
TELESET)
Page 9

A short description of the Optimail
Things worth knowing about the Optimail
The Optimail is a postage meter for small mail
volumes. It meters letters up to a thickness of 0.2"
(5 mm) and self-adhesive FP labels.
9
Mode of operation
Very clean meter imprints
Fast cassette change
TELESET
Extended functions
All the information for the metering process is
electronically stored. The memory component
provides space for new advertisements.
The settings for the meter imprint can be selected
quickly and easily at the push of a button. The display shows you th e current setti ngs at a gla nce. You
only have to put the letter in place – the Optimail
takes the letter, meters it, and ejects the ready to
send letter to the right.
The thermal printing process provid es a clean,
smudge-proof imp rint. The solid ink on t he ribb on is
heated up as it passes the the rmal printhe ad. Under
pressure, the liquefied ink penetrates the paper of
the envelope and remains permanently bonded.
The ribbon cassette can ea sily be rep laced with ju st
a few actions.
You load postage with the TELESET process via a
built-in modem – fast, comfortable and, if need be,
24 hours a day.
– Automatic date setting.
– Separate registration and accounting of the
postage costs for up to 9 accounts.
– Printing of account information and register data.
– Warning of high postage values and insufficient
available postage.
– Incoming mail stamp function to register inc oming
mail.
Operation with postage scale
You can combine O ptimail with a pos tage scale from
Francotyp-Postalia. The postage scale then controls
setting of the postage value.
Page 10
Optimail Operator Manual
ON
OFF
10
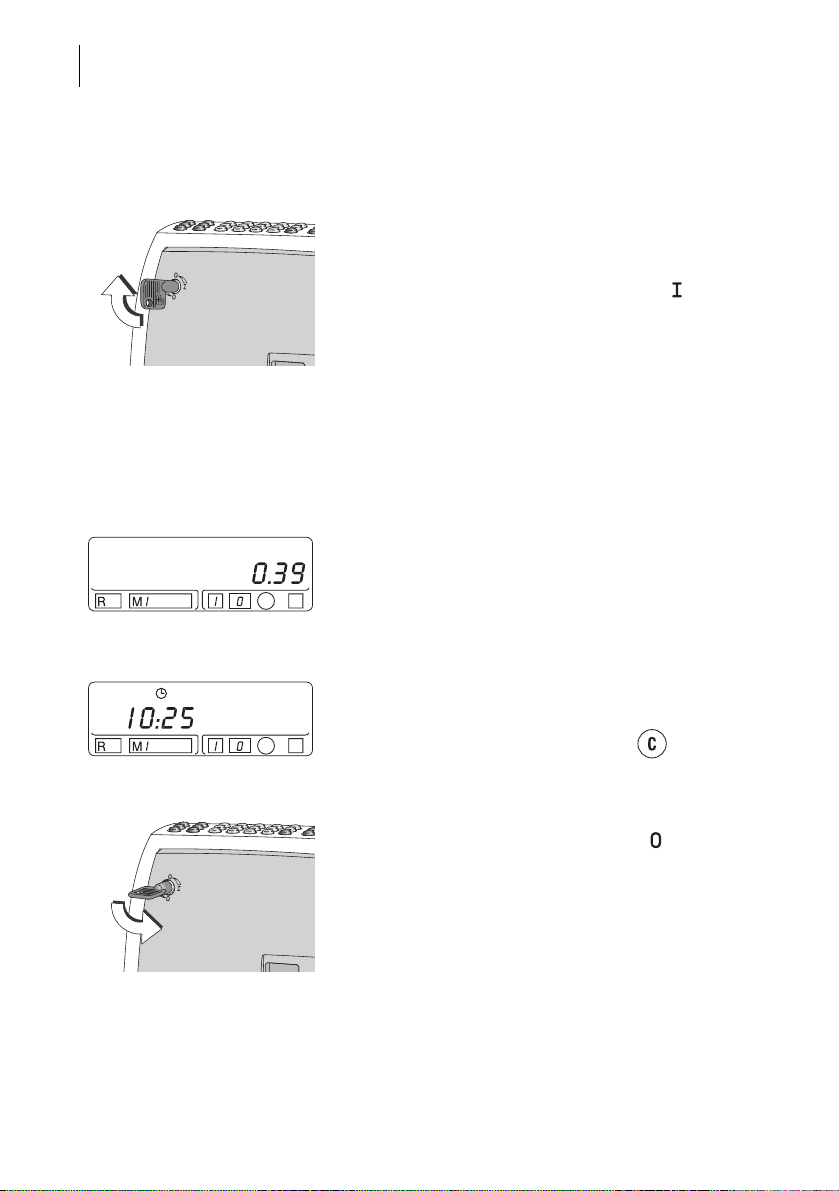
3 Switching Optimail on/off
Switching on
• Insert the key in the keylock on the back of the
Optimail.
• Turn the key to the horizontal position ( = ON).
Self-test
Ready for metering
Sleep mode
The display shows a dash running from the right to
the left side. This is conc luded w ith t wo beeps . Now
all segments of the display will briefly illuminate,
followed by another beep. The current date is then
displayed.
After about 18 seconds, the self-test is completed.
The Optimail will beep again and the last set postage
value appears. The Optimail is ready for metering.
If the Optimail is not used for about one minute, i.e.
no imprints are made or no key is pressed, the
postage meter switches over to the time display.
Reactivate the Optimail with the key .
Switching off
• Turn the key to the vertical position ( = OFF).
• Remove the key. Your Optimail is now safe from
unauthorized use.
Page 11
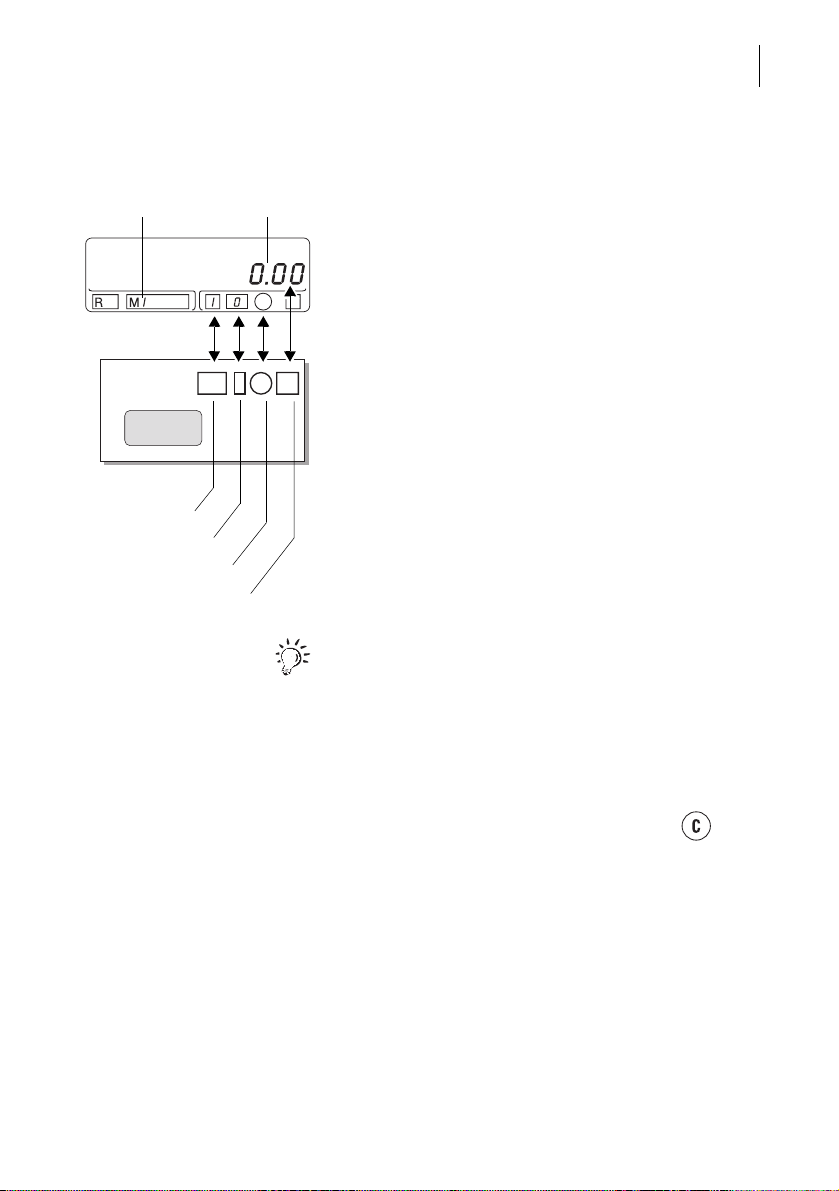
4 Metering
Advertisement
Current account Postage value
Endorsement
Date
Postage value
Metering
The display shows all the settings for the meter
imprint at a glance:
– Postage value
–Date.
– Endorsement
– Advertisement
The symbolic representation of the stamp in the
display makes orientation easier.
You will also find the stamp image symbol on the
keys for setting th e meter imprint. Th e assigned field
is shown filled on the respective keys.
11
Input errors
You can test the current printing settings in a trial
run. Set the postage value “0” for trial runs.
The Optimail will not accept incorrect inputs. An
acoustic signal warns you that the setting is not
possible with the entered values. The previous
setting reappears in the display.
You can delete wrong entries with the key .
The Optimail aborts the setting and shows the
previous setting in the display.
Page 12
Optimail Operator Manual
12
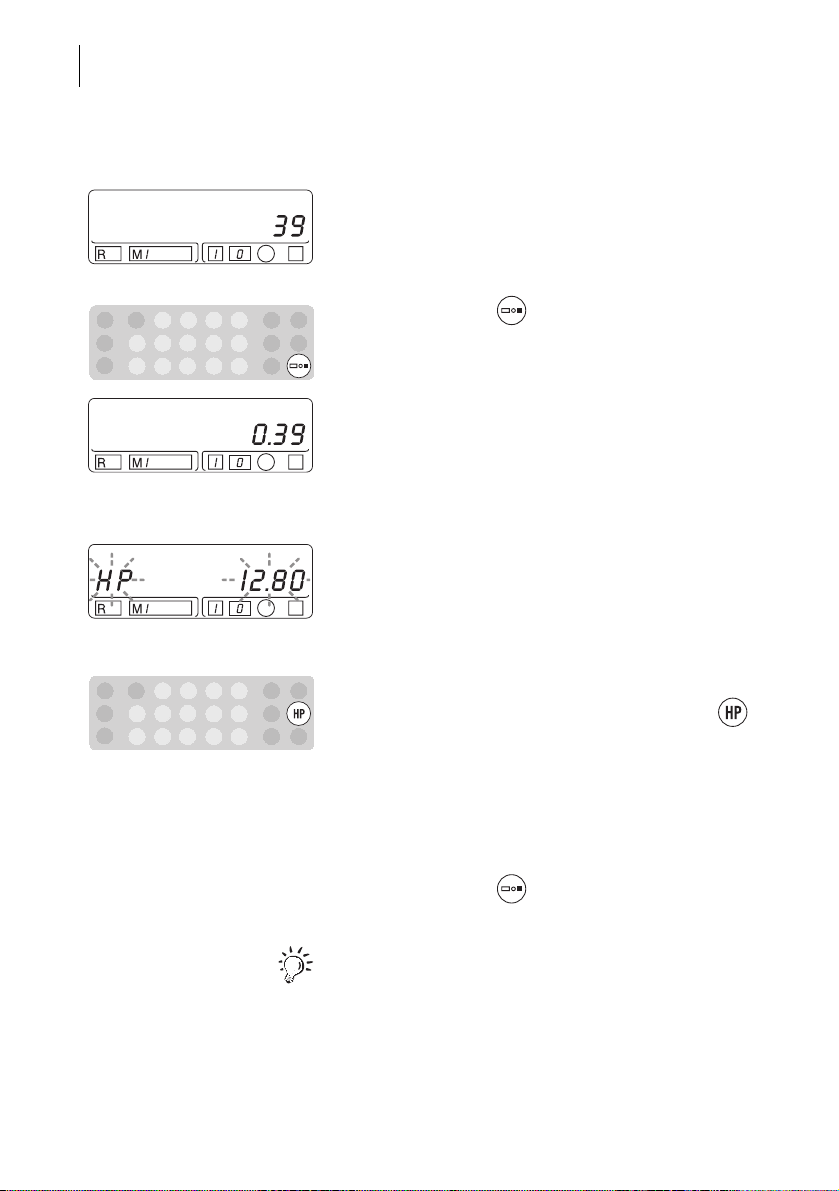
4.1 Setting the postage value
• Type the desired postage value with the numeric
keys.
You can check the entered number sequence in the
display.
• Confirm with the key.
The display shows the set postage value with
decimal point.
Message ‘High postage value’
If an acoustic signal s ounds and HP and the po stage
value flash in the display after confirming the
postage value, the ‘High postage value’ is exceede d.
In this way the Optimail helps you to prevent
overmetering and loss of postage.
If you want to meter with the set postage value …
• Confirm the displayed postage val ue with the
key again.
If you have accidentally set too high a postage
value …
• Type a new postage value.
• Confirm with the key.
Read Chapter 8.3 to find out how to chan ge the limit
for the ‘High postage value’ message.
Page 13
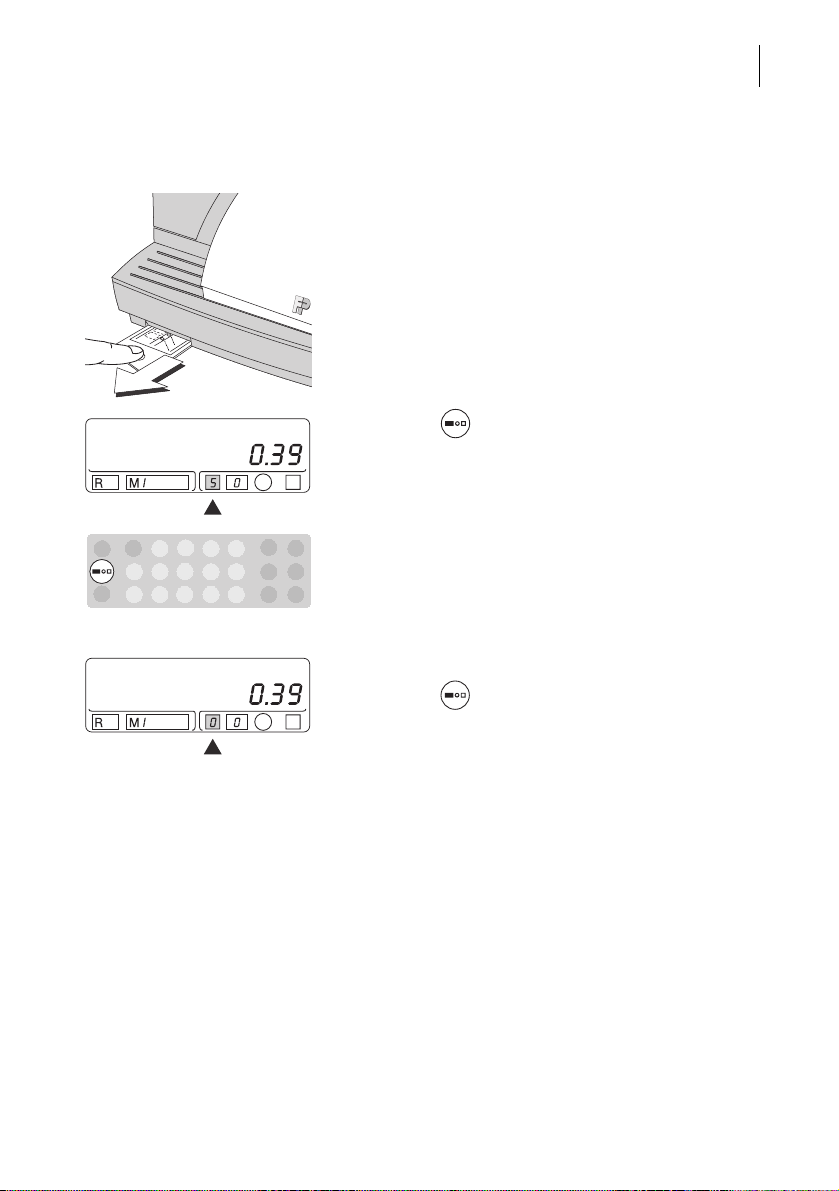
4.2 Setting the advertisement
Francotyp-Postalia can equip the Opti mail with up to
9 different advertisements according to the
customer’s wishes.
The available advertisements and the assigned
numbers can be found as operating hints on the
Optimail (can be pulled out at the front left).
• Select the image you want to use and find the
number next to it.
• Press the key repeatedly until the desired
number appears in the appropriate field of the
stamp image symbol.
Metering
13
Metering without advertisement
• Press the key repeatedly until “0” appears in
the appropriate field of the stamp image symbol.
Page 14
Optimail Operator Manual
14
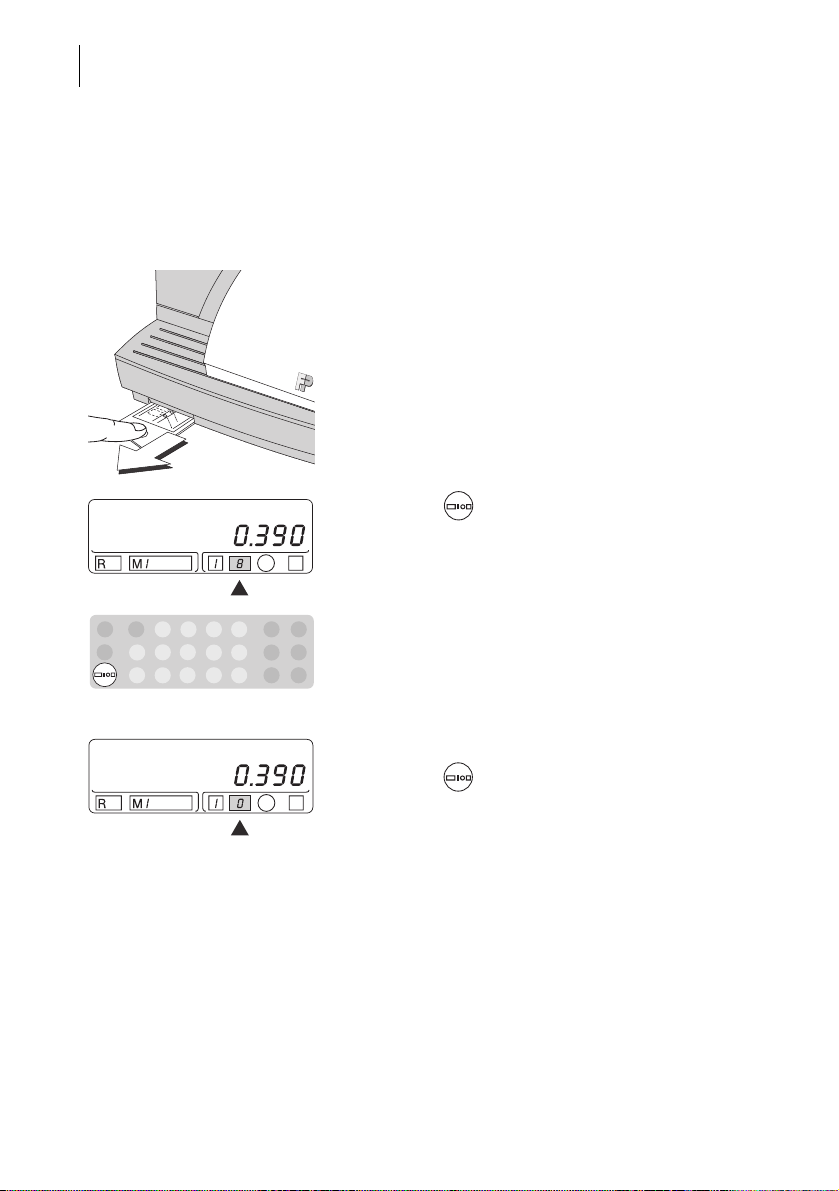
4.3 Setting the optional endorsement
Specific types of mail can be marked with the
respective endorsement imprint (e.g. FIRST
CLASS, PRIORITY, NON-PROFIT ).
This function is avai lable only if the Op timail displays
the postage in tenths of a cent. To switch to the
‘0.000’ meter type, please contact FrancotypPostalia.
The available endorsements and the assigned
numbers can be found as operating hints on the
Optimail (can be pulled out at the front left).
• Select the endorsement you want to use and find
the number next to it.
• Press the key repeatedly until the desired
number appears in the appropriate field of the
stamp image symbol.
Metering without endorsement
• Press the key repe atedly until “0” appears in
the appropriate field of the stamp image symbol.
Page 15
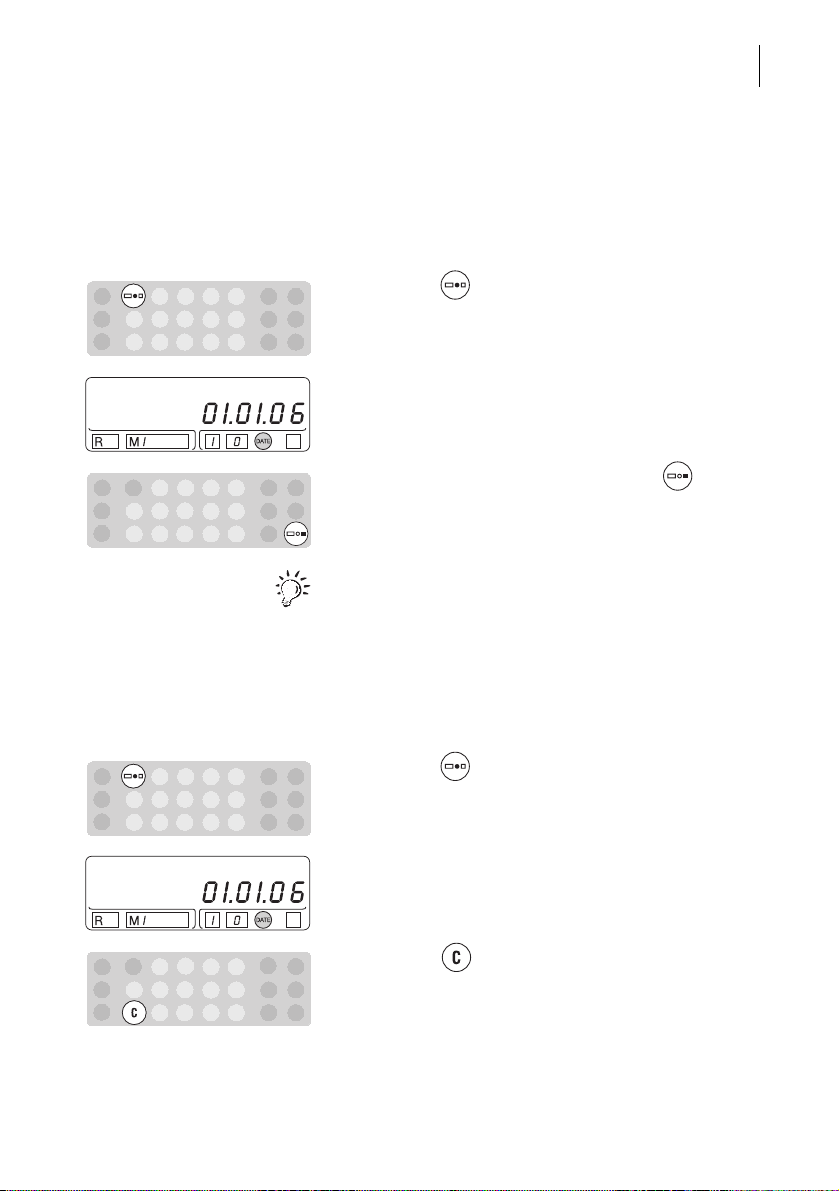
4.4 Date of the meter imprint / print without date
The built-in clock s ets th e d ate for the meter imprint
automatically.
Show date
• Press the key.
The displayed date appears in the meter imprint
when metering.
• You can end the date display with the key.
The display shows the postage value again.
Read Chapter 8.1 to find out how to chan ge the date
of the system clock.
Metering
15
Printing without a date
The Optimail allows the date to be omitted from the
meter imprint. Please take note of the cu rrent posta l
regulations.
• Press the key.
The Optimail shows the set date.
• Press the key.
Page 16

Optimail Operator Manual
16
4.5 Changing the account
The Optimail returns to the postage value display.
Short signal tones a nd th e fl as hing
that the meter imprint contains no date.
Printing the date again
“DATE” indicate
• Press the key. The Optimail shows the set
date.
• End the date display with the k ey. The display
shows the postage value again.
The Optimail can record and evaluate meterings
separately according to accounts (M1 to M9).
• Press the key repeatedly until your account
number appears at the b ottom of the displ ay in the
‘M’ field.
All subsequent meterings are recorded for this
account. The ac cou nt rem ain s set until you sele ct a
new account.
In Chapter 5 you will find detailed informa tio n about
the account function.
Page 17
4.6 Positioning and metering a letter
1. 2.
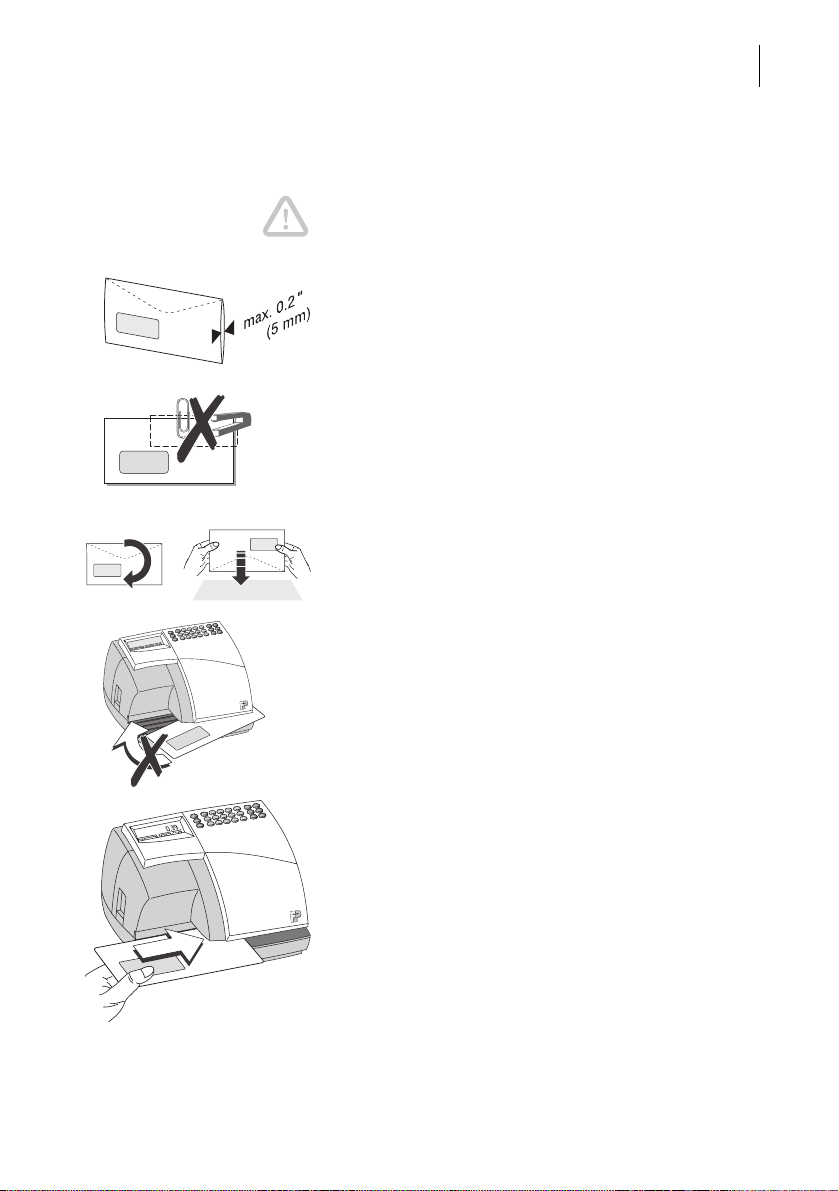
Caution! By simple preventive measures and spe-
cial care when positioning letters, you can avoid
gaps in the imprint, tearin g the ribbon and damaging
the thermal print head:
– You can meter letters up to a thickness of 0.2"
(5 mm). The difference in thickness in the printing
area in letters containin g sev era l sh eets can lead
to an irregular imprint. In this case , meter the emp-
ty envelope or use FP labels.
– Use envelopes with as smooth a surface as
possible. This gives optimum imprint quality.
– Make sure you remove all staples and pa per clips
from the area around the imprint.
– Before imprinting, knock the upper edge of the
envelopes again st a smooth unde rlay. By alig ning
the content of the letter with the upper edge of the
envelope you get an even surface to achieve bet-
ter meter imprints.
– During metering, it is best to let go of normal for-
mat letters (e.g. Commercial #6¾, #10).
Give large envelopes (e. g. #14) a little support.
– Under no circumstances should you attempt to
straighten the envelope whilst it is being printed.
Metering
17
How to feed a letter
• Place the letter on the letter receiving tray:
– The side to be printed facing upwards, the
address fi eld visible.
– The top edge must be flush with the l etter guid e.
• Push in the letter in the direction of the arrow until
the Optimail grips the letter.
As soon as the mail sensor detects a letter, a roller
presses the letter against the ribbon and print head
– the printing st arts. The imprinted letter is ejected to
the right.
Page 18
Optimail Operator Manual
18
5 Account function
Record
Evaluate
5.1 Showing account data
With the account function, the Optimail offers a tool
for recording and evaluating the incurred postage
costs. Nine account memories are available.
Accounts may be the divisions/departments of a
company or individual companies in shared office
facilities.
Simply set the desired account for metering. The
Optimail stores the number and value of meter
imprints.
You can read the number and postage used for
every account. You can also print out an account
report of all accounts if you want to.
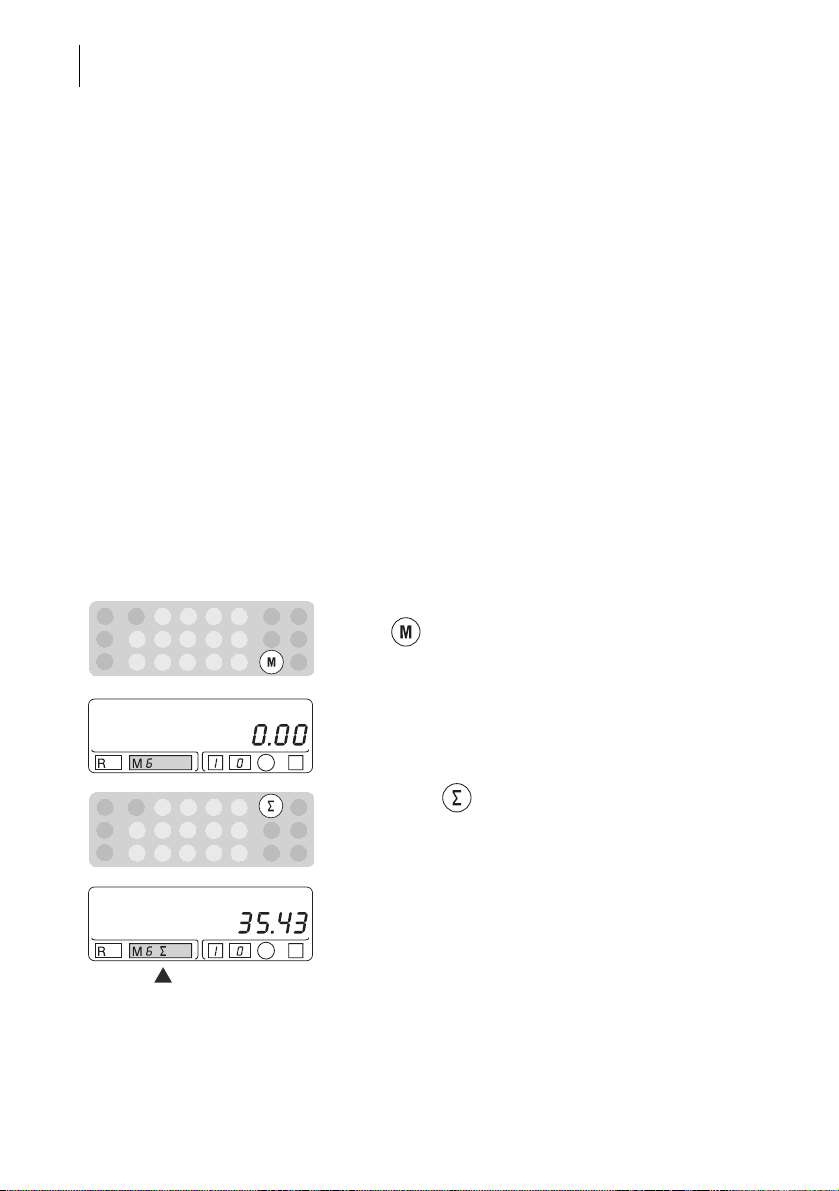
Reading postage used by an account
• Select the desired account (M1-M9) by pressing
the key.
The selected account appears in the ‘M’ field.
• Press the key.
The Optimail displays the postage costs which have
been accumulated for this account since last
resetting the counter to zero.
Page 19
Account function
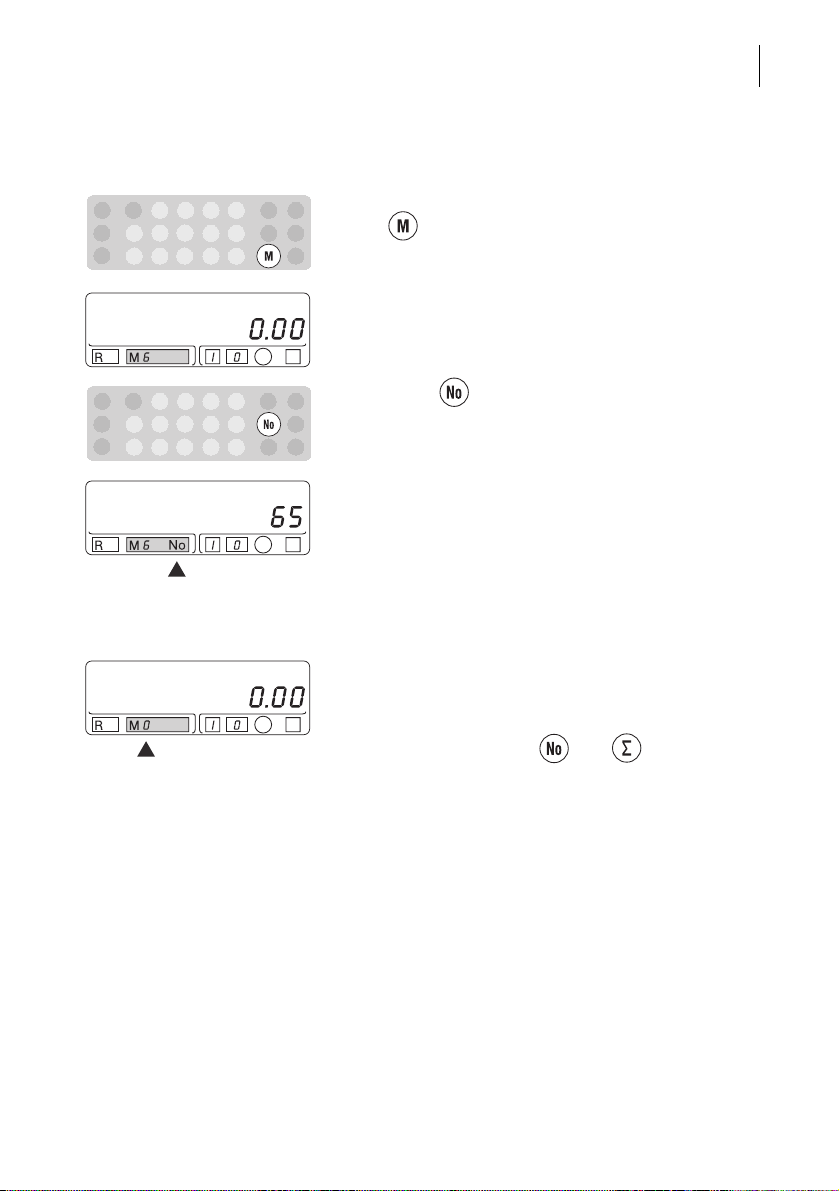
Reading the number of meter imprints
for an account
• Select the desired account (M1-M9) by pressing
the key.
The selected account appears in the ‘M’ field.
• Press the key.
The Optimail displays the number of meter imprints
which have been made for this account since last
resetting the counter to zero. Zero imprints are not
recorded.
19
The ‘M0’ account
The grand total for all accounts is stored under the
‘M0’ account.
With the ‘M0’ a ccount y ou c an c heck the g rand to tal
of all accounts using the and keys.
Page 20
Optimail Operator Manual
+
ON
20
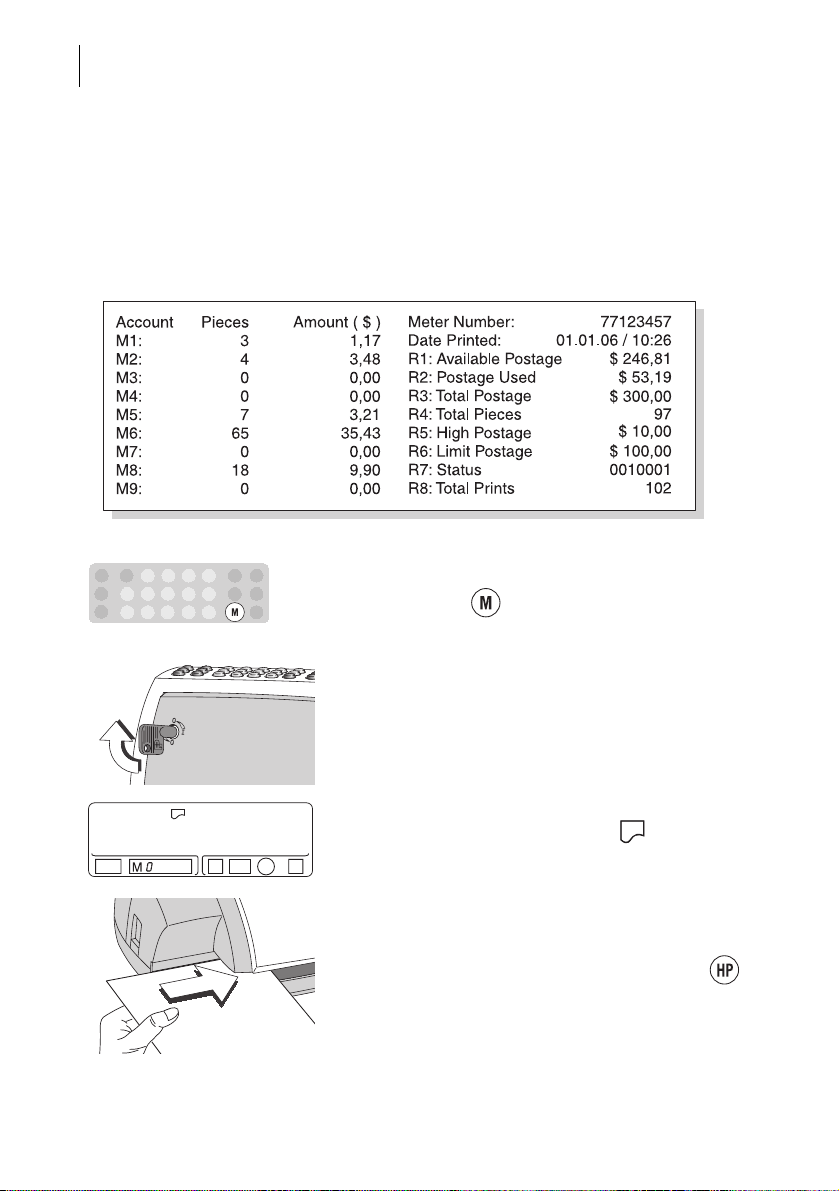
5.2 Printing an account report
Account report (sample)
The account report c ontains the accou nt information
(postage used and quan tity ) of a ll a cc ou nts and the
register states of your Optimail.
The Optimail must be switched off.
• Keep the key pressed and switch on the
Optimail with the keylock.
• You can release the key as soon as “M 0” for the
account and the printing sy mbol are visible in
the display.
• Insert an FP label or any sheet as normal.
The Optimail prints the account report.
• You return to the metering function with the
key.
Page 21

5.3 Deleting account information
To delete account information, reset the postage
used counter and the piece counter individually to
zero.
• Select the desired account (M1-M9) by pressing
the key.
The selected account appears in the ‘M’ field.
Set the postage used counter to zero
• Keep the key pressed and press the key
briefly.
The postage used counter is deleted for the set
account. The Optimail displays “0.00” for the
postage used.
Account function
21
Reset piece counter to zero
• Keep the key pressed and press the key
briefly.
The piece counter is deleted for the set account. The
Optimail displays “0” pieces.
The data of the a ccount ‘M0’ canno t be zeroed in this
way. However, when the information of individual
accounts is deleted, the appropriate values are
subtracted from the ‘M0’ account.
Page 22

Optimail Operator Manual
22
6 Displaying and printing register values
The Optimail saves important parameters and
postage used information in registers.
You can have the individual registers shown in the
display and printed a s an overview toge ther with the
account evaluation.
The following information is stored in the individual
registers:
R 1
R 2
R 3
R 4
R 5
R 6
R 7
R 8
Available Postage – available postage in $
Postage Used – sum of all meter imprints in $
Total Postage – sum of all loaded amounts in $
Total Pieces – number of all meter imprints (not
including zero imprints)
High Postage – set limit for the ‘HP’ warning (in $)
Limit Postage – set limit for the low postage
warning (in $)
Status – information abou t mach ine se ttings for the
service technician
Total Prints – number of all meter imprints
(including zero imprints)
Page 23
Displaying and printing register values
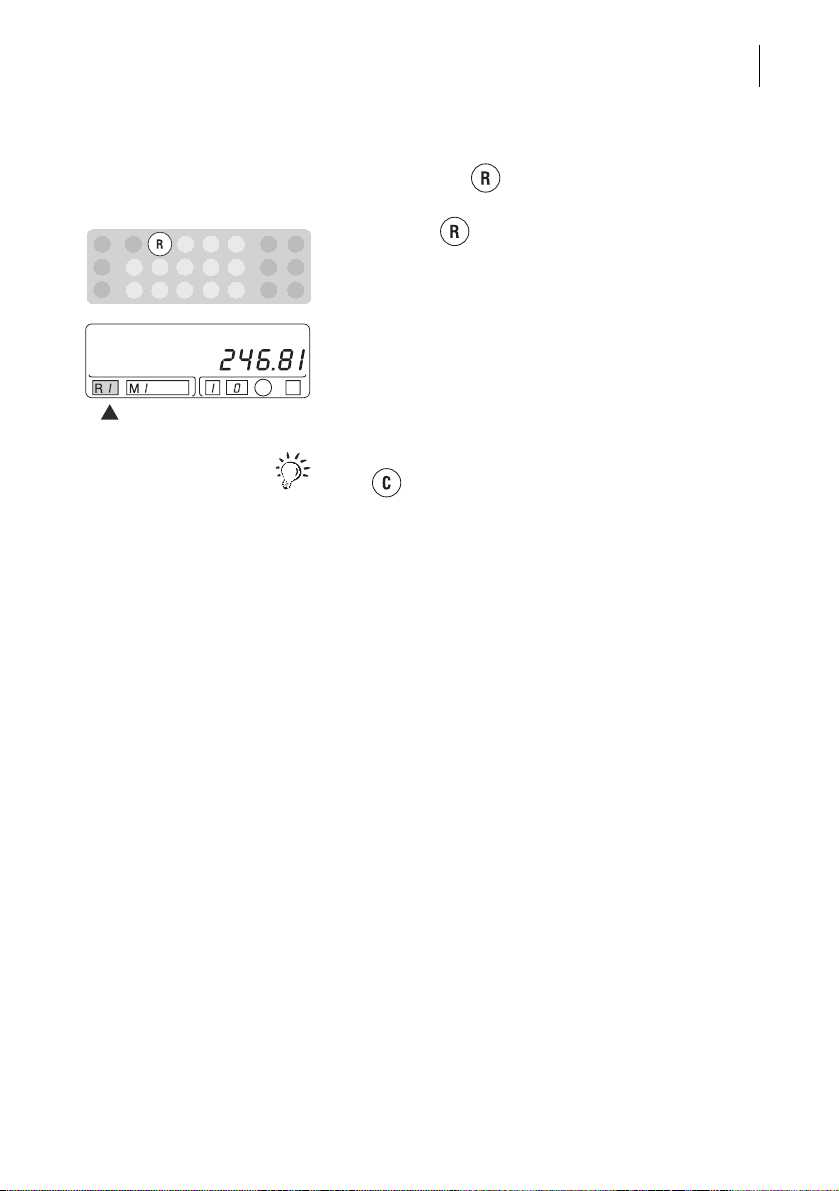
Show register values
By pressing the key, you can scroll through all
of the registers.
• Press the key repeatedly until the register
number you want to display appears in the ‘R’
field.
The appropriate register value appears in the
display.
You return to the postage v alue display func tion with
the key.
Printing register values
The register values and account information are
summarized in the account report.
Read Chapter 5.2 to find out how to print the acc ount
report.
23
Page 24

Optimail Operator Manual
24
7 Loading postage – TELESET
Notes on the TELESET procedure
TELESET is the loading of the desired postage
credit via modem from the TELESET data center.
The modem is built into the Optimail. After entering
your PIN (personal identification number) and the
desired amount, the Optimail establishes a
connection to the TELESET data cen ter for the time
of the actual loading process.
Accounting is as per your contract with the United
States Postal Service.
Permissible amounts
Permissible amounts for calling postage:
From 10 to a maximum $ 5,000 in steps of $ 10.
The Optimail will not accept impermissible amounts/
incorrect inputs. The amount last used then
reappears in the display .
Security features
For reasons of safety, the United States Postal
Service demands that the postage meter connect
with the TELESET data center at regular intervals.
During this contact, the TDC checks the registers
and other parameters.
An internal counter allows your postage meter to
determine when the next conta ct with the T ELESET
data center must be made.
When it is time to contact the TDC, the message
“Call-FPxx” (possible mes sages are: -FP44, -FP45,
FP46, FP47) will appear i n the displ ay. If you d o not
respond to this message within a reasonable
amount of time the postage meter will discontinue
operation until communication is made.
All you need to do to establish communi c ation is
conduct a normal TELE SET p os tag e loading. If you
do not need posta ge, you may ask for a reset of ze ro
dollars. If you have any questions, call service.
Page 25

Loading postage – TELESET
Technical note: Please do not use telephones
connected to the same telephone socket during
postage loading if possible. Unnecessary charges
may be incurred when you lift and do not rep lace the
telephone handset during the loading process, as
the modem cannot terminate the charged
connection.
Start TELESET
Caution! The Optimail locks after 8 attempts to
confirm a false pers onal id entifi cation numbe r (PIN).
Your Optimail can only be rele ased for m etering and
loading postage again by the after-sales service.
• Make sure the Optimail is connected to the
telephone socket.
• Switch on the Optimail as usual and wait until the
last set postage value appears in the display.
• Make sure the scales functi on is switch ed off. The
scales symbol must not show in the display.
25
Enter your PIN
• Type the 8-digit personal identification number
(PIN) of your Optimail (“12345678” in the
example).
• Confirm with the key.
You are now in the TELESET mode. The amount
used for the last postage loading appears in the
display ($ 100 in the example).
Page 26

Optimail Operator Manual
26
Enter the desired amount
Confirm the amount again
Enter amount and load postage …
• Leave the amount as it is or overwrite with a new
value.
• Confirm the desired amount the key.
The loading process now continues running
automatically (establish connection, data
exchange…). During the loading process, the word
“Reset” and the amount being loaded will appear
alternately in the display.
If you have change d the a mount th e wo rd “Chang e”
and the new preset amount will alternately appear in
the display.
When the display shows the countdown on the left
side:
• To load the displayed amount, confirm with the
key within 30 seconds.
…completed successfully
The countdown gives information on the remaining
time to confirm.
The postage is loaded when an acoustic signal
sounds and the postage value appears in the
display.
• Check the new available postage (register R1).
To do this, press the key once.
Page 27

Loading postage – TELESET
Interrupt TELESET
You can interrupt the procedure as long as the
connection to the TELESET data center has not yet
been established. To do so:
• Wrong entries (e.g. when entering amounts) can
be deleted with the key.
• You can enter a new amount and continue the
procedure
or
exit the TELESET mode with the key.
27
During connection setup
• Press the key.
The Optimail aborts TELESET mode.
The display shows the postage value again.
You will find help for TELESET errors in
Chapter 12.2.
Page 28

Optimail Operator Manual
28
8 Basic settings
8.1 Setting the date
The battery buffered clo ck provides the curren t date
and time. The set date appe ars in th e me ter i mp rint
when metering.
• Enter 2 digits each for th e month, day and year for
the new date.
Example: 010206 for the 2nd January 2006.
• Confirm the entered date with the key.
You will see the set date and “DATE” in the stamp
image symbol.
• End the date display with the k ey. The display
shows the postage value again.
The Optimail will not accept incorrect date inputs.
The last set date reappears.
Page 29

8.2 Setting the time
p.m.
Basic sett ings
• Enter the new time.
Example: 723 for the time 7:23.
• Keep the key pressed.
The new time and the c lock symbol appear in th e
display. The display changes between ‘a.m.’ and
‘p.m.’:
– A small vertical bar that appears to the left of the
displayed time indicates ‘p.m.’
– When the bar is not present the displayed time is
‘a.m.’.
• Release the key when the display shows the
desired time setting ‘a.m.’ or ‘p.m.’.
The time is now set. Th e postage value reappears in
the display after about 2 seconds.
The Optimail will not accept incorrect time inputs.
The time last set is retained.
29
Page 30

Optimail Operator Manual
30
8.3 Setting a high postage value
The ‘High Postage’ function indicates when the
postage value exceeds the set limit.
• Type the desired high postage value (in the
• Press the key. The value disapp ears from the
• Press the key.
The new limit is stored. The postage value display
reappears.
You can verify the high postage value set by
checking register 5. Read Chapter 6 on page 22.
example: 550 for a limit of $ 5.50).
display.
Page 31

Using the incoming mail stamp function
+
ON
9 Using the incoming mail stamp function
9.1 Things worth knowing about incoming mail stamp
You can use the incoming mail stamp function to
register yo ur incoming mail. It uses t he postage
meter’s date, time and printing unit. Adjusting/
changing date and time is poss ible in metering mode
only.
You receive a standar d in com in g m ail sta mp as t he
basic equipment (see illustration). On request,
special stamps to your specifications can be
installed. A stamp area of 1 .2" x 4.7" (30 x 120 mm)
is available for your text and graphic designs.
You can print the inc oming mail stamp on envelopes
up to 0.2" (5 mm) thick or directly on documents.
The Optimail prints the incoming mail stamp around
0.3" (8 mm) from the upper edge and 0.4" (10 mm)
from the right-hand edge of the incoming mail.
31
You can set a print offset to relocate the imprint up
to 3.9" (99 mm) to the left.
To print the inco ming mail stam p on anoth er area of
the envelope, you can insert the incoming mail
folded. Please note the maximum processable
thickness 0 .2" (5 mm).
9.2 Stamping incoming mail
Starting incoming mail stamp mode
The Optimail must be switched off.
• Press and hold the key and switch on the
Optimail us ing the key-operated switch.
• As soon as the symb ol appea rs in the display ,
you can release the key.
Page 32

Optimail Operator Manual
32
The incoming mail stamp mode is active,
which can easi ly be see n in the d isplay by time, date
and the and symbols. The symbol
indicates readiness for printing.
The following incoming mail stamp settings are
active after switching on:
– Date and time.
– Standard incoming mail stamp
(incoming mail stamp no. 1)
–No print offset.
Adjusting the settings
– Date and time can only be set in metering mode.
Switch to metering mode with the key and
adjust date and ti me as norma l. Read Chap ter 8.1
and 8.2).
– For setting a print offset read Chapter9.3 on
page 33.
– If several incoming mail stamps are available, you
can select the imprint. Read Chapter 9.4 on
page 34.
Printing the incoming mail stamp
Please note informatio n on handling of the lette rs on
page 17.
• Insert the incoming mail (envelope or document)
on the letter receiving tray so that the side to be
printed is face up.
The Optimail grips the incoming mail, prints the
incoming mail stamp and ejects it to the right.
For stamping thin p aper you should p lace a she et of
paper (e.g. copying paper) under the incoming mail.
Page 33

Leaving incoming mail stamp mode and
switching to metering mode
• Using the key, you can switch directly into
All settings from the incoming mail stamp mode
(different incoming mail stamp, print offset) are lost.
In incoming mail stamp mode you can also switch off
the Optimail wit h the ke y-operat ed switc h as no rmal.
9.3 Setting a print offset
The Optimail pr ints the in comi ng m ail s tamp around
0.4" (10 mm) from the right-hand edge of the inco ming mail. You can set a print offse t, and thus increase
the distance by a maximum of 3.9" (99 m m).
• Enter the desired distance with the numeric keys.
Using the incoming mail stamp function
metering mode without restarting
Example: 20 mm (0.8").
33
.
• Confirm with the key.
A flashing arrow pointing to the left shows that the
imprint has moved.
By pressing the key you can display the setting
of the print offset.
Switching off the print offset
• Enter “0” for the print offset.
• Confirm with the key.
Page 34

Optimail Operator Manual
34
9.4 Selecting another incoming mail stamp
Francotyp-Postalia can equip the Optimail with
additional incoming mail stamps according to the
customer’s wish es.
• Press the key repeatedly until the desired
incoming mail stamp number appears in the
appropriate field of the stamp image symbol.
(optional)
Page 35

Using Optimail with the postage scale
25-pole port / connecting
the postage scale
10 Using Optimail with the postage scale
10.1 Connecting the postage scale
You can connect a Francotyp-Postalia postage
scale to the standard 25-pole port. The necessary
interface cable is delivered with the FP postage
scale.
Caution! Switch off the Optima il and the FP postage
scale before plugging or removing the interface
cable.
Caution! Read the operator manual of the FP
postage scale before connecting it to the Optimail.
• Switch off the Optimail and the FP postage scale.
• Connect the FP postag e s ca le to the 2 5-po le po rt
of the Optimail with the interface cable.
• Screw the plugs of the interface cable to Optimail
and the FP postage scale.
• Switch on the Optimail and the FP postage scale.
35
The FP postage scale used and the factory set
machine parameters of the Optimail influence the
interaction of these two devices. Our after-sales
service will be glad to help you set up your system
optimally.
Page 36

Optimail Operator Manual
36
10.2 Weighing and metering
Caution! Read the operato r manual of your postage
scale. Familiarize yourself especially with safe
handling of the FP postage scale.
• Switching on the FP postage scale and Optimail.
• Press the key on the Optimail.
The scales symbol in the display in dic ate s t hat
the Optimail is ready to ac cept data from the postage
scale.
• Select the desired mail data on the FP postage
scale.
• Place the mailpiece on the weighing tray.
The FP postage scale determines the weight and
calculates the right postage value.
The postage value and the endorsement setting
(optional) are transferred automatically to the
Optimail.
An acoustic signal signals the end of data
transmission. The Optimail displays the new
settings.
• Check the other settings for the meter imprint
(advertisement, date …) if necessary.
• Remove the mailpiece fro m the weigh ing tray and
meter it in the usual way.
Switching off the scales function
• Press the key on the Optimail.
The scales symbol in the display goes out.
The connection to the FP postage scale is
interrupted.
Page 37

Using Optimail with the postage scale
Hints for operation with the postage scale
– Endorsements are only automatically set if your
FP postage scale is harmonized with the
endorsement imprint dat a sa ved in yo ur Optima il.
Read the operator manual of your FP postage
scale for instructions on setting up this function.
– The ‘High postage’ function is switched off as long
as an FP postage s cal e is controlling th e p os tage
value setting on the Optimail.
– The Optimail can be configured so that
the postage value transferred by the postage
scale is only valid for one meter im print
.
Proceed as follows when you want to meter a
stack of identical mailpieces: Weigh and meter
one of the mailpieces in the normal way. Then
switch off the scale s func tion. You ca n now m eter
any number of further mailpieces with the
displayed postage value.
37
Page 38

Optimail Operator Manual
38
11 Maintenance and care
11.1 Cleaning
For security reasons, maintenance and repair may
only be performed by our after-sales service points
registered with the Post Office authorities.
Have your postage meter cleaned and serviced
regularly by the after-s ales service. T his guarantees
long-term, trouble-free op eration. Ask a bout our lowcost care and maintenance agreement.
You can do the following work yourself.
– Cleaning the outside of the housing
( Chapter 11.1)
– Changing the ribbon cassette ( Chapter 11.2).
Warning! Make sure that no liquids or foreign
objects penetrate the interior of the device. If this
happens, pull out the mains plug immed iately. H ave
the Optimail checked by your local servicing dealer
before using it again.
• Switch off the Optimail.
• Clean dirt from he housing with a slightly damp
cloth. You can use also use a commercially
available washing-up liquid.
Page 39

11.2 Changing the ribbon cassette
Transport fixture
(if any)
Ribbon spool
The message “Cassette” in the display indicates
when you need to change the ribbon cassette.
Caution! Only use original ribbon cassettes from
Francotyp-Postalia.
• Open the flap of the rib bon cass ette com partment
by lightly pressing the release catch.
The flap swings up automatically.
• Pull out the used ribbon cassette to the front.
• Remove the new ribbon cassett e from its packing.
Maintenance and care
39
• If necessary, remove the transport fixture (red
paper strip).
Caution! Make sure you do not crease or tear the
ribbon when inserting it. This prevents breaking of
the ribbon.
Make sure the edges of the ribbon do not fold over.
Creased ribbons a re th ick er a nd p r em atu rel y fill the
used ribbon spool.
• Tensioning the ribbon. Turn the white ribbon spool
in the direction of the arrow.
Page 40

Optimail Operator Manual
40
•
Place the ribbon cassette on the letter receiving
tray with the ribbon facing downwards.
• Push in the ribbon cassette carefully to the stop.
The ribbon cassette must slide easily into the
holders in the cassette compartment.
Labels attached to the letter receiving tray and the
inside of the cassette compartment provide
additional information about changing the cassette.
• Close the flap. The catch snaps in audibly.
• Acknowledge the message with the key.
Page 41

Error messages and tips for helping yourself
12 Error messages and tips for helping yourself
Caution! Do not remove any parts of the housing.
Only have maintenance and repair work done by
qualified personnel authorized by FrancotypPostalia. Failure to do so will result in voiding of you r
warranty and loss of y our po stal licen ce. Yo u wi ll be
liable for any damages.
You can eliminate minor faults and problems with
the Optimail yourself. In this chapter you will find
help and tips for eliminating and avoiding faults.
12.1 Error messages – device faults
The self-diagnosis s ystem of the O ptim ail giv es yo u
information about the respective operating state.
Acoustic signal
Error messages in the display
An acoustic signal is issu ed in the case of op erating
errors. The Optimail does not accept the input/
action.
The Optimail signals errors and warning with the
corresponding error messages in the display. You
will find an overview o f the error message s and what
to do in the event of a fault in the following list.
41
Error message Possible cause and remedy
“Service” without
symbols: Next service is due.
“Service” + two-digit error code
For the error codes 01 to 18:
Always
call Service!
error code/without other
Page 42

Optimail Operator Manual
42
Error message Possible cause and remedy
Error code 19 appears for a limited time: V al ues
are stored incorrectly in the account memories.
Delete all the account information or call Service
( Chapter 5.3).
Error code 19 appears and Optimail is locked
:
Call Service!
Switch off the Optimail, wait briefly and switch
back on.
If the fault is not eliminated after switching on and
off several times, call Service.
If error code 21 appears when switching on:
A letter was already inserted when switching on.
Remove the letter. Confirm the error messages
with the key.
If the error cannot be eliminated like this, call
Service.
Caution! Jam! Do not re mov e t he jammed
letter by force. The ribbon could tear.
Always clear a mail jam like this:
Press any key (exce pt
the key !) or s witc h o ff.
The Optimail releases the letter. Remove the
letter.
Then check the ribbon cassette. Remove the
ribbon cassette and tighten the ribbon if
necessary ( Chapter 11.2).
If there is no mail jam, the ribbon cassette is
empty.
Press the key – the Optimail terminates
printing and ejects the metered letter.
Changing the ribbon cassette ( Chapter 11.2).
Page 43

Error messages and tips for helping yourself
Error message Possible cause and remedy
No ribbon cassette ins erted or the ribbon cassett e
is defective.
Insert ribbon cassette ( Chapter 11.2).
Acknowled ge the error message wit h th e key.
The flap of the ribbon cassette co mpartment is not
closed properly.
Close the flap. Acknowledge the error message
with the key.
Low postage.
The limit for the low postage warning is set at the
factory for $100.00.
Load new postage soon ( Chapter 7).
No postage. The set postage value cannot be
metered.
Load new postage ( Chapter 7).
43
Call Service.
Caution! The Optimail ca n only be used
for another 3000 m eter imprints or
3 months and then locks automatically.
Call Service.
Caution! The Optimail ca n only be used
for another 3000 m eter imprints or
3 months and then locks automatically.
Last postage loading was too long ago. Load
postage.
For detailed information, see page 24.
Page 44

Optimail Operator Manual
44
12.2 Error messages – TELESET
If an error occurs durin g loading of postage, an error
code is displayed. There are two types of errors:
– Temporary problems with establishing connection
Error code starts with the letter “C”.
– Errors which lead to the loading process being
aborted. Error code starts with the letter “E”.
“C” codes
The connection to the TELESET data cente r is only
temporarily disturbed. The procedure is repeated
automatically up to 3 times.
Error message Correction by
Code Cause User
C 13 Link disrupted.
TELESET
data center
Servicing
dealer
C 18 Line quality too poor.
C 14
C 23
C 39
C 26
C 29
C 27
C 28
C 31
Processing in TELESET data
center not possible at present
(maintenance work).
Modem has not received dial
tone (Telephone line not
connected?).
TELESET data center busy or
does not answer.
Telephone number has
changed. Call will be repeated
automatically with new number.
Page 45

Error messages and tips for helping yourself
“E” codes
Error codes starting with the letter “E” signal abortion
of the remote value setting. The two-digit error
number indicates the cause.
Proceed as follows:
• Acknowledge the error message with the
key.
• Eliminate the cause of the error yourself o r call the
TELESET data center or Service. Please observe
the notes in the table below.
• Start loading postage again.
Error message Correction by
Code Cause User
TELESET
data center
45
Servicing
dealer
E 16
E 24
E 25
E 17
E 19
E 20
E 21
E 29
E 30
E 32
E 46
E 33
Wrong dialing procedure.
Modem not operating.
Modem not operating or
defective.
Internal error.
Loading procedure terminated
by operator.
Connection could no t be se t up
within 70 seconds.
Processing not possib le in
TELESET data center.
Postage meter unknown in
TELESET data center.
Page 46

Optimail Operator Manual
46
Error message Correction by
Code Cause User
TELESET
data center
Servicing
dealer
E 34
Postage meter not registered
with TELESET data center.
Postage meter not yet
E 35
approved by TELESET data
center.
E 36
E 37
Postag e cann ot be calle d up b y
postage meter.
Loading amount exceeds postage availa ble.
E 38 Postage account denied.
E 40
E 41
Postag e regis ter not co rrec t.
E 42
E 43 Impermissible postag e amount.
E 44
Maximum total loaded postage
reached.
E 50
E 51
Wrong PIN number.
E 52
E 99 Internal error.
Page 47

12.3 Tips for helping yourself
Error messages and tips for helping yourself
47
Problem Possible cause and remedy
Blank displa y. No power conne cti on.
Date and/or time incorrect. Reset the date and/or time
Endorsement cannot be set. Your Optimail is set to the ‘0.00’ meter type, i.e. it
Gaps in the imprint / irregular
imprint.
Check whether the power cable is plugged in
correctly and the Optima il is switched on ( keylock
in horizontal position).
( Chapter 8.1 and 8.2).
displays the po stage in full cent s. When configured
like this, the Optimail cannot print endorsements.
To switch to the ‘0 .000’ me ter type, p lease co ntact
Francotyp-Postalia.
Your Optimail has no endorsements available.
Please contact the Francotyp-Postalia for
retrofitting.
Difference in thickness in the imprint area (especially when metering letters containing several
sheets).
Before imprinting, knock the upper edge of the
envelopes against a smooth underlay.
Please note information on page 17.
Meter the empty envelope or use FP labels.
Page 48

Optimail Operator Manual
48
Problem Possible cause and remedy
Letter jammed / mail jam. Caution! Jam! Do not re mo v e th e jamme d
letter by force. The ribbon c o uld tear.
Always clear a mail jam like this:
Press any key (exce pt
the key !) or s witc h o ff.
The Optimail releases the letter. Remove the
letter.
Then check the ribbon cassette. Remove the ribbon cassette and tighten the ribbon if necessary
( Chapter 11.2).
Optimail blocked. Switch off the Optimail. Wait briefly and switch
back on.
Metering not possible. Account M0 is set. No metering can be performed
on account M0.
Set an account between M1 and M9.
No postage available (display: Limit End).
The set postage value cannot be metered. Load
new postage ( Chapter 7).
Metering not possible.
Repeated ‘beeping’ and
flashing of the DATE symbol
when switching on.
Scales function is switched on (display: ) but
no postage scale is connected.
Disable the sc ales function with the key.
Built-in clock sto ppe d.
Set the date ( Chapter 8.1) and time ( 8.2).
If this does not work or if this problem occurs
repeatedly, please contact Service.
Page 49

Error messages and tips for helping yourself
Problem Possible cause and remedy
…when using a postage scale
49
Optimail does not accept the
postage value determined by
the postage scale.
Endorsement is not set
automatically / is no t c orre ctl y
set by the postage scale.
The interface cable is not connected correctly.
Check whether the interface cable is plugged and
screwed into both devices correctly.
Data transmission is faulty.
Switch off the Optimai l and the posta ge scale , wait
briefly and switch back on.
Optimail is not ready to receive data from the
postage scale.
On the Optimail: Press the key.
On the postage scal e: Remo ve the mai lpiece from
the weighing tray and place it back on the tray
again.
The postage scale is not set up properly for
operation with the Optimail. Read the operator
manual of your postage scale.
The postage scale is not set up properly for
automatic endorsement setting (e.g. automatic
endorsement setting is switched off). Read the
operator manual of your postage scale.
There is no suitabl e en dorsement for the dispat ch
setting.
Page 50

Optimail Operator Manual
50
Page 51

Appendix
Instructions for installation
The following overview lists the operating steps for
installing the Optimail.
Appendix - Instructions for installation
51
Overview
Step 1: Unpacking
Step 2: Checking the contents of the package
Step 3: Installing Optimail
Step 4: Inserting the ribbon cassette
Step 5: Connecting the Optimail
Step 6: Switching on
Step 7: Loading postage
The individual o perating steps are des cribed in detail
on the following pages.
Page 52

Optimail Operator Manual
52
Step 1: Unpacking
• Open the top of the box.
• Lift the Optimail carefully out of the box.
• Remove the packing shells from the right and left.
• Remove the Optimail from the protective foil.
• Unpack the accessories.
Do not throw away the packagin g. Use it again when
you need to transport the Optimail or send it in to
Service.
Step 2: Checking the contents of the package
Warning! D o not sta rt operating the Optima il if p arts
are damaged or missing. Please contact FrancotypPostalia.
• Check that the contents of the package are
complete and free from any damage.
1
6
5
4
3
2
Page 53

Scope of de livery:
1 Optimail postage meter
2 Power cable
3 Phone cable
4 Ribbon cassette
5Keys, 2
6 Operator Manual and Quick Reference Guide
For the TELESET procedure you will receive a PIN
(Personal identification number) from FrancotypPostalia to authorize your Optimail.
Step 3: Installing Optimail
• Choose an installation site with the following
Appendix - Instructions for installation
ambient conditions:
– Room temperature 50°F to 104°F/10°C to 40°C
(The best printing quality is achie ve d at a room
temperature of 59°F to 95°F/15°C to 35°C.)
– No direct sunlight
– Power socket in the i m mediate vicinity.
53
• Place the Optimail on a firm, level, horizontal
base.
Page 54

Optimail Operator Manual
Transport fixture
(if any)
Ribbon spool
54
Step 4: Inserting the ribbon cassette
• Open the flap of the ribbon casset te compartme nt
by lightly pressing the release k ey.
The flap swings up automatically.
Caution! Make sure you do not crease or tear the
ribbon when inserting it. This prevents breaking of
the ribbon.
Make sure the edges of the ribbon do not fold over.
Creased ribbons a re th ic ke r and prem aturely fill the
used ribbon spool.
• Remove the new ribbon cass ette f rom its pac king.
• If necessary, remove the transport fixture (red
paper strip).
• Tensioning the ribbon. Turn the white ribbo n spool
in the direction of the arrow.
Page 55

Appendix - Instructions for installation
• Place the ribbon cassette on the letter receiving
tray with the ribbon facing downwards.
• Push in the ribbon cassette carefully to the stop.
The ribbon cassette must slide easily into the
holders in the cassette compartment.
Labels attached to the letter receiving tray and the
inside of the cassette compartment provide
additional information about inserting the ribbon
cassette.
55
• Close the flap. The catch snaps in audibly.
Continue with step 5.
Page 56

Optimail Operator Manual
56
Step 5: Connecting the Optimail
Warning! Only use power and phone cables pro-
vided with the Optimail or approved by FrancotypPostalia.
Make sure that conne cting cabl es are no t damag ed.
Connect the Optimail to a grounded single-phase
power socket only. Make sure your office power
supply conforms to the power requirements shown
on the serial number plate of the Optimail.
Power connection Postage scale connection Modem connection
Power cable
Spring
Phone cable
Power cable
• Plug the power cable plug into the mains socket.
The mains socket is at the rear of the Optimail.
• Plug the mains plug into a g rounded si ngle-phas e
power socket.
Page 57

Appendix - Instructions for installation
ON
Phone cable
• Plug the phone cable into the Optimail’s modem
socket. The modem socket is at the rear of the
Optimail. The spring on the plug must be facing
the side panel.
• Connect the phone cable to the telephone socket.
The Optimail is confi gured for one of the following
types of connection to the telephone line according
to your order.
– Main line with DTMF dialing method (Dual Tone
Multifrequency)
– Extension with dual tone multifrequency (DTM F)
dialing method – outside line sei zur e w ith d igi t “0”
and pause
You will find further informat ion about the connection
types and setting the o uts ide di ali ng p aram et ers for
the built-in modem on page 59.
57
Step 6: Switching on
Caution! When you move the Optimail from a cold
environment (i.e. below 50°F/10°C):
Wait at least 2 hours before starting the postage
meter. The Optimail adapts to room temperature.
Any condensation evaporates.
Switching on
• Insert the key provided in the keylock on the back
of the Optimail.
• Turn the key to the horizontal position ( = ON).
Page 58

Optimail Operator Manual
58
Self-test
Step 7: Loading postage
The display shows a dash running from the right to
the left side. This is conc luded w ith t wo beeps . Now
all segments of the display will briefly illuminate,
followed by another beep. The current date is then
displayed.
After about 18 seconds, the self-test is completed.
The Optimail will b eep aga in a nd the postage value
display appears.
Before you can meter letters with the Optimail for the
first time, you have to load a cer tain postage amount
into your Optimail (at least $10). Read Chapter 7 on
page 24 to find out how to load postage.
We will gladly provide support for installing and
commissioning your Optimail.
Simply contact our Service.
Page 59

Appendix - Setting the outside dialing parameters for the modem
Outside dialing parameters
Setting the outside dialing parameters for the modem
The outside dialing parameters for the modem are
set for your telephone connection before the
Optimail leaves the factory (according to your order).
You can check the programmed outside dialing
parameters and reset them if you change your
telephone connecti on. The following example s show
the proced ure for the four typical connection types.
Example 1:
Main line with dual tone multifrequency dialing (DTMF)
Main line: You do no t h ave to dial a digit (e.g. ‘0’) or
press the R key to dial into the public telephone
network (outside line seizure).
You will recognize dual tone multifrequency dialing
from the audible ‘tones’ when dialing.
This is how you set the outside dialing
parameters:
59
Page 60

Optimail Operator Manual
Outside dialing parameters
60
Example 2:
Extension with dual tone multifrequency dialing (DTMF)
Outside line seizure with digit ‘0’ and pause
Extension: You have to dial a digit (e.g. ‘0’) to dial
into the public telephone network.
You will recognize dual tone multifrequency dialing
from the audible ‘tones’ when dialing.
This is how you set the outside dialing
parameters:
Page 61

Appendix – Glossary
Glossary
Incoming mail stamp Additional Optimail function – the Optimail prints
date and time on your incoming mail. You can
print the incoming ma il stamp on envel opes up to
a thickness of 0.2" (5 mm) or directly on documents.
Labels Special self-adhesive labels which you can
meter and stick onto your mail.
Necessary for large, he avy and thick mail pieces.
Use only double labels from Francotyp-Postalia
for the Optimail (two labels on one backing
sheet)
Meter imprint Metering mail for carrying by the U.S. Postal
Service.
When metering, the Optima il prints among other
things the indica, the po stage value, the date and
the machine identification on the envelope.
An advertisement and an endorsement can als o
be printed.
61
Modem Electronic unit built into the Optimail which
enables e xchange of code n umbers and desire d
postage amounts over the telephone line.
Personal Identification Number
(PIN)
TELESET Postage meter accounting system of the
You will receive a Personal Identification
Number (PIN) for your Optimail from FrancotypPostalia. The PIN is your authorization to load
postage by the TELESET method.
Francotyp-Postalia. The Optimail and the
Teleset data center exchange value
specifications v ia m odem wh en loadi ng pos tage
which release the desired postage amount.
Page 62

Optimail Operator Manual
62
TELESET data center
(TDC)
Trial run
(Zero imprint)
Data center of Francotyp-Postalia. Postage is
released and accounts managed.
The Teleset data center is at your service
24 hours a day via the built-in modem.
Meter imprint with the postage value ‘0’ (zero
imprint). This enables you to check the settings
for the meter imprint.
Page 63

Appendix – Technical data
Technical data
Dimensions 12.6" x 7.5" x 11.4" (width x height x depth)
(320 mm x 190 mm x 290 mm)
Weight 13.45 lb. (6.1 kg)
Power supply 115 V AC / 60Hz
(as shown on the serial number plate)
Mains current max 0.6 A
Power consumption 90 W (in sleep mode: 6 W)
Protection rating I
Fuse slow blow 0.63 A
Display LCD
Printing process thermal printing process
Accounting process TELESET (via modem)
Equipment – integrated modem
– battery buffered system clock
– 25-pole port for connecting postage scale (RS-232)
– up to 9 adverts
– up to 9 endorsemen ts
– incoming mail st amp function
– account function for 9 accounts
– printing of acco unt information and register values
– high postage warning
– low postage warning
63
Ambient conditions 50°F to 104°F (+10°C to +40°C)
do not expose to direct sunlight
recommended for optimum printing quality:
59°F to 95°F (+15°C to +35°C)
Noise emission L
<70 dB (workplace-related)
WA
Page 64

Optimail Operator Manual
64
Ribbon cassette up to 1,600 imprints without advert
storage at 32°F to 89.6°F (0°C to +32°C),
do not expose to direct sunlight
Mail piece specifications thickness up to 0.2" (5 mm)
self-adhesive labels from Francotyp-Postalia,
minimum label size 1.77" x 5.12" (45 x 130 mm)
Page 65

Index
Appendix – Index
65
A
Account
Account function
Account report
Advertisement
Available postage
Available postage warning
3
account ‘M0’
changing
current
delete information
reset piece counter to zero
reset postage used counter to zero
set for metering
show number of meter imprints
show postage used
total postage used by all
evaluate
recording the postage costs
close print mode
print
sample
available logos
set
13
current limit
19
16
11
18
20
20
21
16
18
19
18
4
3,
11
8,
13
22
22
B
Back to metering mode
4,
33
D
Date
3,
11
hide date
of the meter imprint
set
show date
21
21
19
Delete
Display
DTMF. See dual tone multifrequency dialing
Dual tone multifrequency dialing
15
28
15
4,
11
3,
8
15
57, 59,
60
E
Eliminating faults
57,
47
3,
11
8,
14
41
44
60
44
41
49
18
general tips
when loading postage
when metering
when using a postage scale
Endorsement
available
set
14
Error messages
device faults
TELESET
Extension
F
Feed a letter
17
C
CALL - FP… (message)
Cancel
4,
11
input
load postage
TELESET
Cleaning
Clearing a mail jam
Connecting
phone cable
postage scale
power cable
27
27
38
42,
56,
57
8
56
H
24
48
High postage
change limit
message
metering
show limit
HP. See High postage
30
12
12
22
Page 66

Optimail Operator Manual
66
I
Incoming mail stamp
adjust settings
print
32
select imprint
set
4
set print offset
standard imprint
Incoming mail stamp mode
4,
close
switch on
Input
abort
delete
errors
incorrect
Installation
33
4
4,
11
51,
3, 31,
61
32
34
33
31
31
11
11
53
K
Key
8,
53
Key functions
Keyboard
Keylock
4
4,
8
8
L
Labels
61
available advertisements
available endorsements
changing ribbon cassette
Letter guide
Letter receiving tray
Limit
Loading postage (TELESET)
8
8
22
M
Main line
Meter imprint
Metering
Metering mode, return to
Mode of operation
57,
59
17
labels
17
letter
17
thick le tters
11,
61
17
4,
9
Modem
connection types
on main line
outside dialing parameters
Modem socket
57
57
8
57
N
Notes about this manual
Number of imprints
2
22
O
Optimail
general overview
things worth knowing about …
Outside dialing parameters
8
9
59
P
Personal identification number
Phone cable
PIN. See Personal identification number
Position the letter
Postage call. See TELESET
Postage scale
connecting
See also Scales function
8
8
40
24
using
Postage used
by all accounts
by an account
total
Postage value
high
set
Power cable
Power connection
Print offset
display/set
53, 56,
57
17
8,
35
9,
35
19
22
12
12
18
4,
11
53,
56
8,
3
56
4
25,
61
Q
Quantity
33
for all accounts
for an account
Quick reference
19
19
2
Page 67

Appendix – Index
67
R
Ready for metering
Register
Register values
Release key
Ribbon cassette
Ribbon cassette compartment
3,
close print mode
printing
show
23
change
fault
42,
inserting
10
22
23
39
43
4
8
8,
53
54
S
Safety tips
Scales function
Scales symbol
Scope of delivery
Self-test
Service
Sleep mode
Stamp image symbol
Switching off
Switching on
Symbols in the display
2,
7
switch off
switch on
using
incoming mail stamp mode
Optimail
scales function
incoming mail stamp mode
Optimail
scales function
36
36
36
36
53
10
69
10
11
10
36
10,
57
36
3
T
Technical data
Telephone connection
Telephone systems
TELESET
error messages
interrupt
notes on ...
permissible amounts
start
Thermal printing process
Time
8
a.m. / p.m.
display
set
Total
loaded amounts
pieces
postage
prints
Trial run
63
59
4, 9,
25
29
22
22
11,
57
24
44
27
24
29
10
22
62
24
9
22
U
Unpacking
52
W
33
Weighing and metering
36
Z
31
Zero imprint
62
Page 68

Optimail Operator Manual
68
Page 69

Service
Service
Every Optimail is thoroughly checked before leaving
the factory. Should any faults occur in spite of our
extensive quality control, please contact FrancotypPostalia help line.
Our main office will be pleased to tell you the
address of your local servicing dealer.
Francotyp-Postalia, Inc.
140 N. Mitchell, Suite 200
Addison, IL 60101-7200
Customer Service (800) 341-6052
email info@fp-usa.com
Internet www.fp-usa.com
69
Page 70

51.0019.8195.00 Rev. 00 AE-Nr. 06-0019
2006–09 / xxx / helbig berlin
 Loading...