

Page 1

Table of Contents
Read this First ...............................................................................................11
Warning............................................................................................................1
General information..........................................................................................1
Unpacking Instruction ..................................................................................22
Installation ...................................................................................................123
Determine the best location for the System...................................................12
Install the Document Feed Trays...................................................................12
Install the HCDF.............................................................................................13
Install the maxiFeeder....................................................................................13
Fill the Sealing Liquid Reservoir.....................................................................14
Connect the System to Mains Power Supply and Power Up ..................154
Power Up........................................................................................................15
Set the Service phone number.......................................................................16
Set the Language...........................................................................................17
Connect the System to the Internet ..........................................................195
Options for Connection...................................................................................19
Set up a Wired Connection............................................................................20
Set up a Wireless Connection........................................................................21
Test the Connection........................................................................................23
Test the System ...........................................................................................246
Create an Automatic Job................................................................................24
Shut Down the System...................................................................................25
Page 2

Page 3
Read this First1
Warning
Ensure you have read and fully understood the safety requirements
as written in the Safety Guide for Document Systems.
General information
This manual describes the unpacking and installation of the complete system and the steps
for the first use.
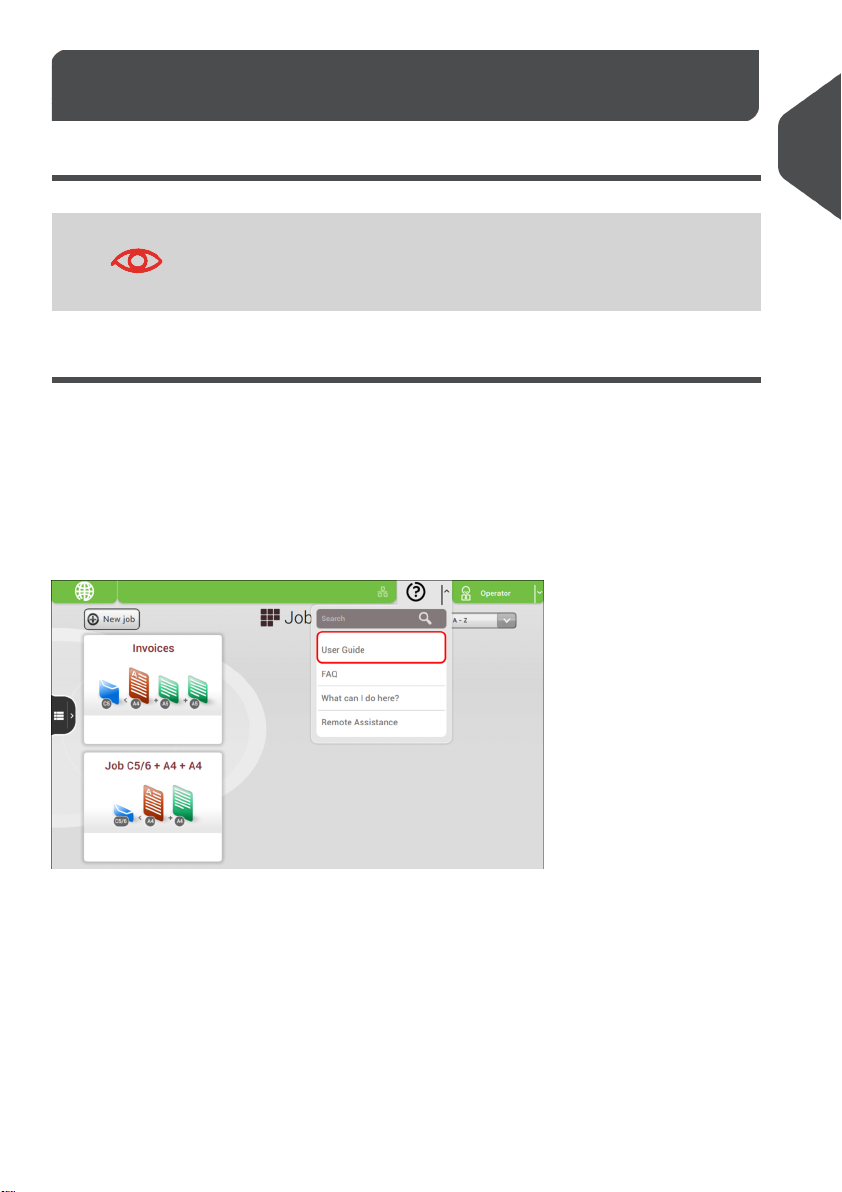
User Guide
The (electronic) user guide of the system is part of the User Interface. It can be found under
the question mark button on the control panel.
1
English
1
Page 4
Unpacking Instruction2
2
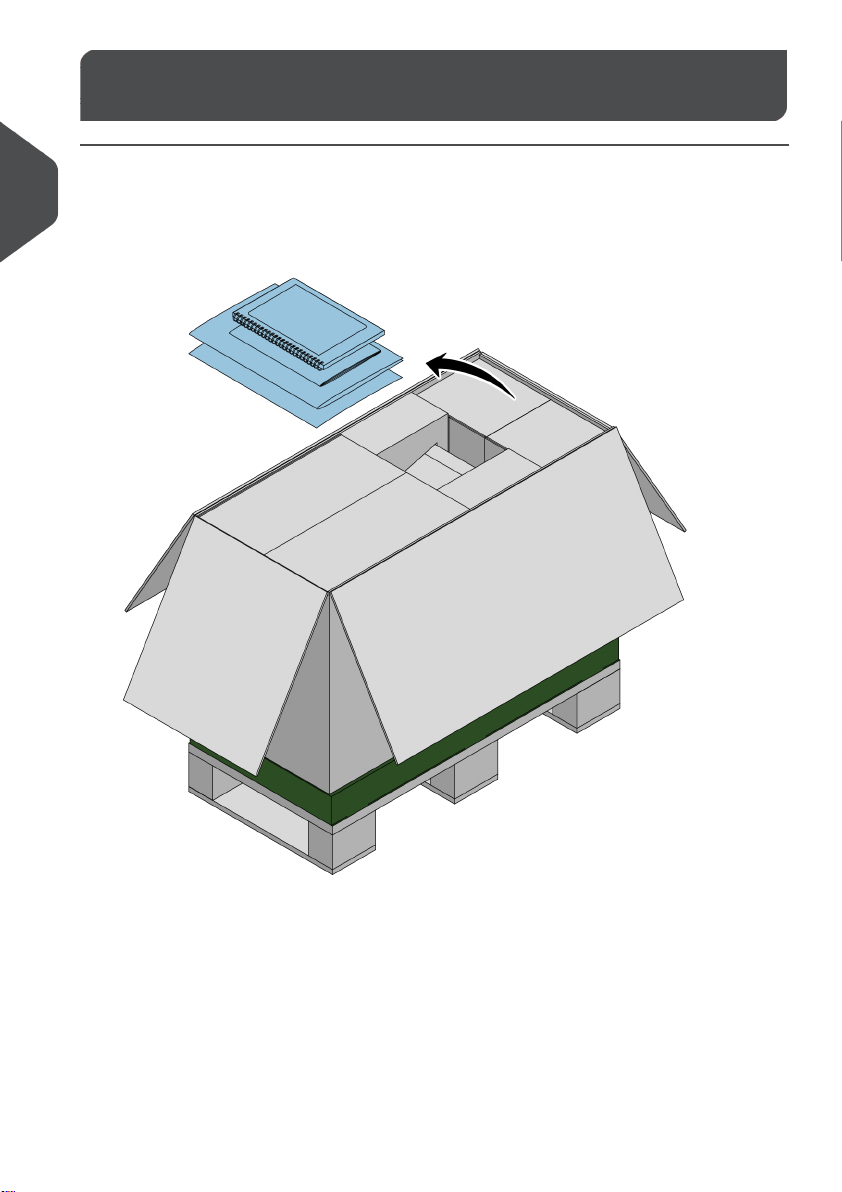
1. Open the box and place the delivered documentation aside. The following documents
should be delivered:Installation Guide (this document);Safety Guide;Quick Start Guide.
English
2
Page 5
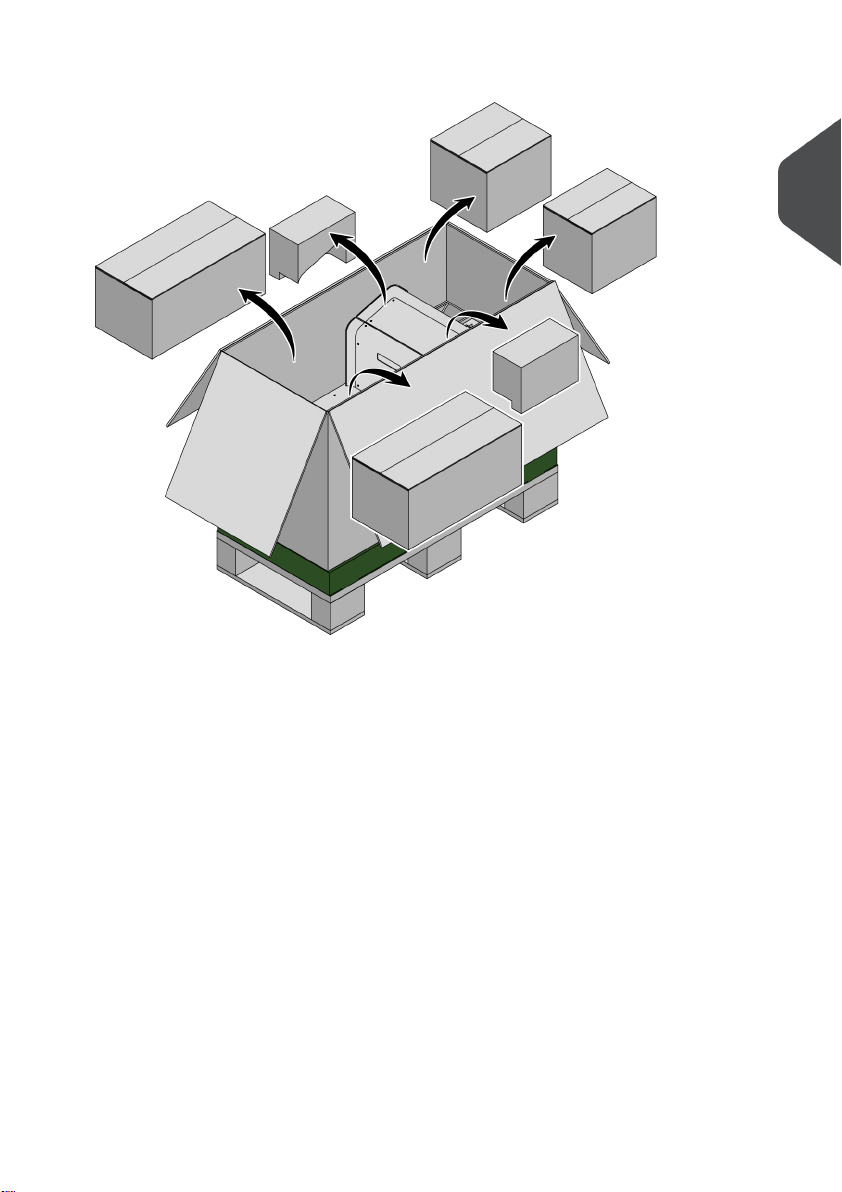
2. Remove two blocks of packaging material and 4 boxes.
2
English
3
Page 6
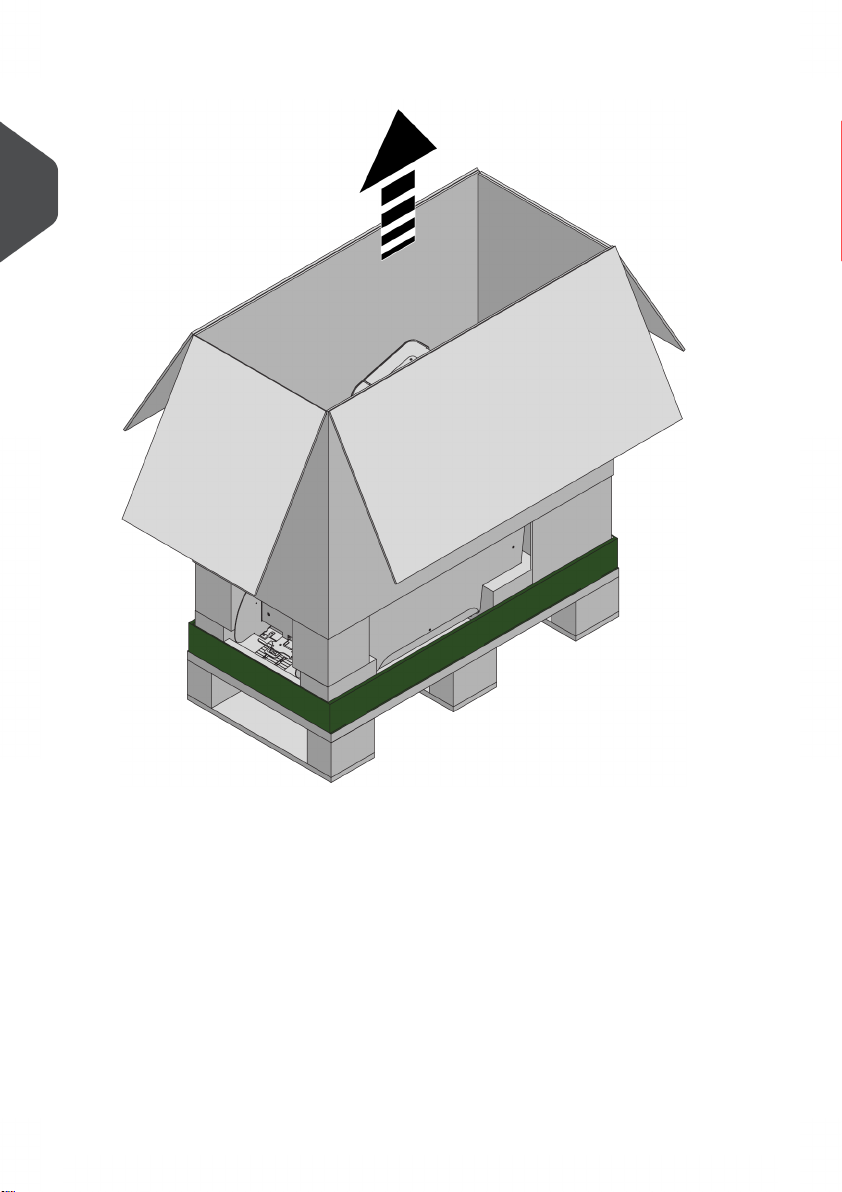
3. Lift the box and remove it from the tray.
2
English
4
Page 7
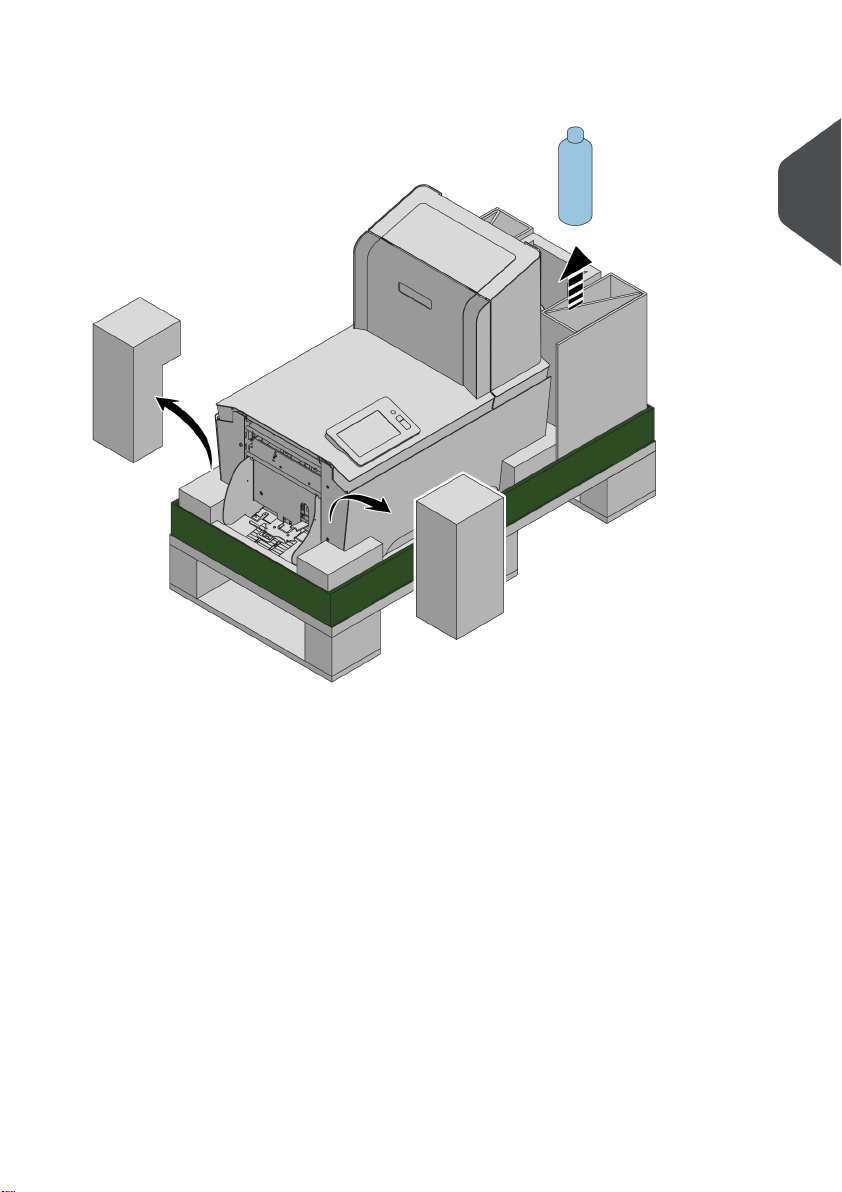
4. Remove the two blocks packaging material on both sides. Remove the bottle with
sealing fluid that has been packed inside a carton packaging block.
2
English
5
Page 8
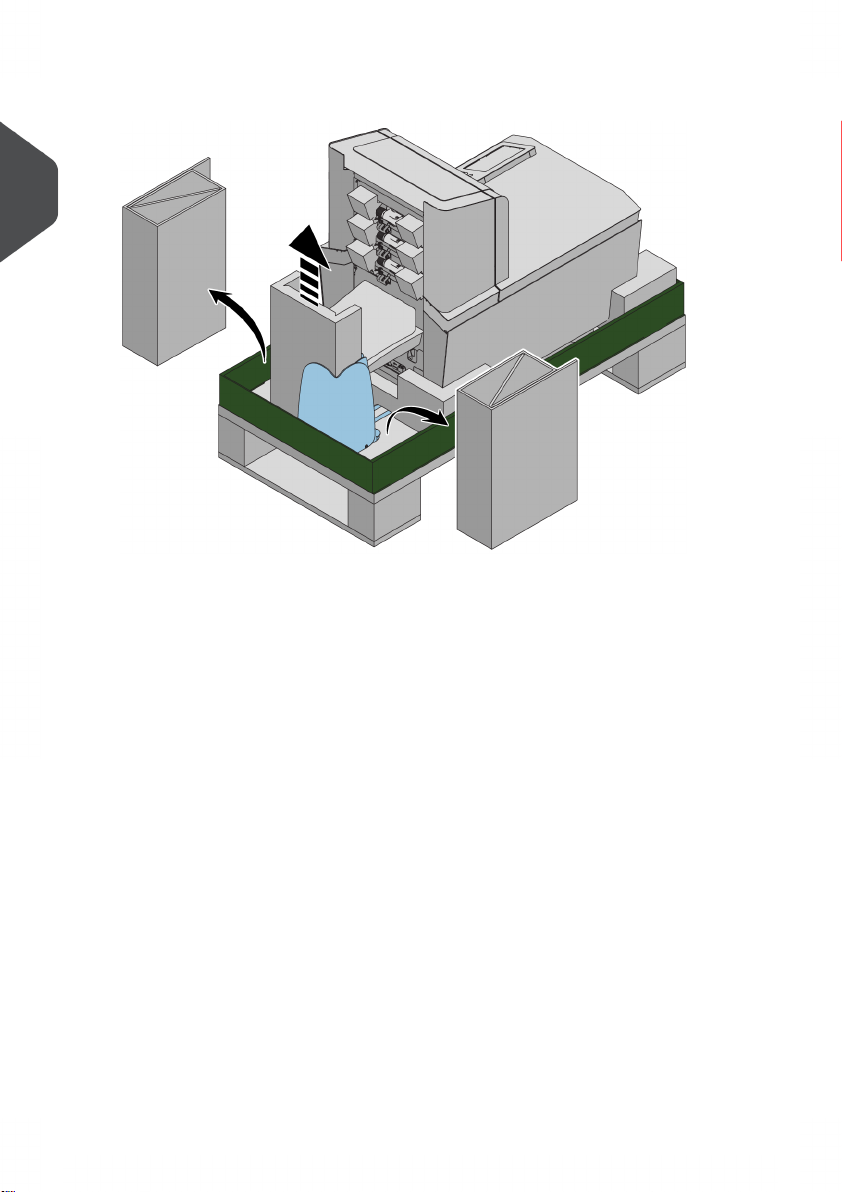
5. Remove both carton packaging blocks and the packaging material located behind the
collator.
2
English
6
Page 9
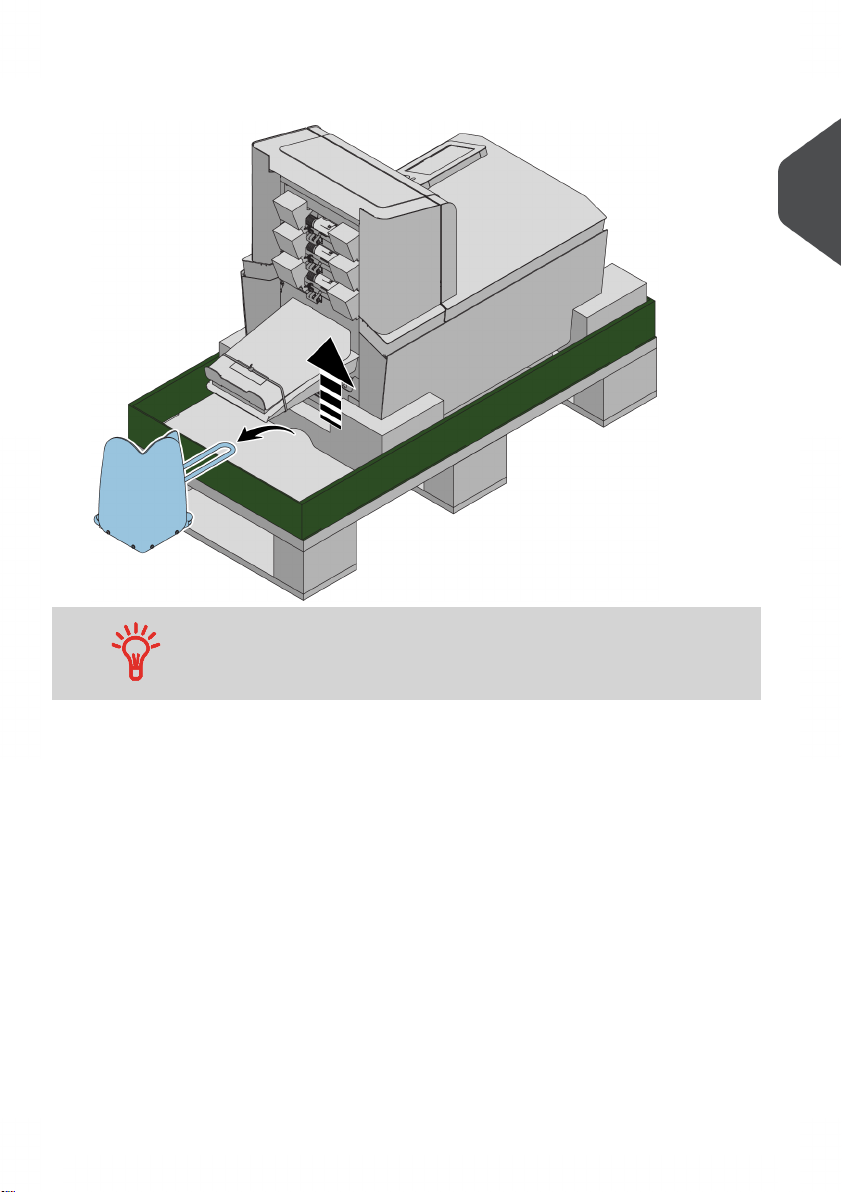
6. Slightly lift the system in order to remove the optional side exit catch tray (only in case
an optional side exit has been ordered/delivered).
Please refer to Mounting Instruction 67 if, for some reason, it is
desired to convert your side exit catch tray from RH to LH or vice
versa.
2
English
7
Page 10

7. Lift the system and place it on a stable surface (e.g. optional furniture).
2
English
8
Page 11

8. Remove the packaging materials from the following places: Cardboard below the loc,
at the document insert position;The foam blocks at the feeders;Band and foam block
at collator.
Do not connect to mains yet.
2
English
9
Page 12

9. In case of a High Capacity Document Feeder:Cut both wire straps at the High Capacity
Document Feeder;Remove the transportation plate.
2
English
10
Page 13

10. Check the contents of the boxes. One box contains the document feeders, main lead,
LAN cable and a plastic bag containing three spare moistening brushes and a spare
moistening cloth.The contents of the other boxes depends on what optional has been
ordered:MaxiFeeder;High Capacity Document Feeder;Rear catch tray;Side exit. In
this case the side exit catch tray is packed in the (large) system box.If no optional
accessories have been ordered the boxes are empty.
2
English
11
Page 14

Installation3
Determine the best location for the System
Install the system on a stable surface.1.
3
2. Make sure that the system is suitable for the local mains voltage. Refer to the type
plate.
3. The power connection must be easily accessible, preferably close to the system. For
English
safety reasons, it is essential that the system is connected to a socket outlet that has
a protective earth connection.
Install the Document Feed Trays
As the paper detection actuators are fragile, take care of them when
you install the document feed trays.
Place the document feed trays in position:
Hold the document feed tray slightly inclined as shown in the figure.1.
2. Place the front end of the document feed tray underneath the two black rollers.
3. Move the document feed tray upwards (lifting the black rollers), until it is possible to
‘hook’ the feeder into place.
4. Move the document feed tray towards the machine and move the hooks over the
mounting points (on both sides).
5. Let the document feed tray rest on the machine.
12
Page 15

Install the HCDF
To install the feeder tray of the HCDF:
As the paper detection actuators are fragile, take care of them when
(re)placing document feed trays.
1. Pull down lever A.
2. Hook in the feeder tray.
3. Release lever A.
3
English
Install the maxiFeeder
The maxiFeeder should be installed at the position of feeder no. 1.
Install the maxiFeeder as follows:
Move the feeding plate of the maxiFeeder to the rear position.1.
2. Lift the paper feed rollers with the front edge of the maxiFeeder.
13
Page 16

3. Move the maxiFeeder forward until it hooks behind the frame axle.
4. Connect the connector A to the socket B.
3
English
The maxiFeeder is auto-detected by the system when the system is switched on. This
makes it easy to switch over from the standard document feeder tray to the maxiFeeder
and vice versa.
To make use of a maxiFeeder it is not necessary to (re-)program the jobs.
Fill the Sealing Liquid Reservoir
Open the front cover B.1.
2. Fill the reservoir A to the "Max" lip with sealing liquid.
3. Close the front cover B.
Before starting the job, wait approximately 5 minutes for the brushes to moisten or use
moistened brushes. For instructions on the installation of brushes, see the User Guide,
section Clean and replace brushes.
If the liquid reservoir is almost empty the touchscreen shows a message to warn you that
you should refill the reservoir.
14
Page 17

Connect the System to Mains
4
Power Supply and Power Up
Power Up
To start up the system:
You can severely damage the machine if it is connected to the
incorrect mains voltage. Before plugging in the machine, check if
the local voltage is the same as the voltage mentioned on the type
plate.
1. Connect the system to the mains power supply.
2. Use the power switch A to switch the system on.
4
English
15
Page 18

3.
Press the button next to the display.
The touch screen shows the Job list screen.
4
English
Set the Service phone number
Make sure that the service phone number is correct. If not, change the number. Proceed
as follows:
Log in as a service technician and open the service menu.1.
16
Page 19

2. Select the tab "Configuration" and tap [Customisation].
3. Check the Service phone number and change if necessary.
4. Logout to return to the operator level.
Set the Language
Go to the (operator) settings menu.1.
4
English
17
Page 20

2. Tap [Localisation] and select the desired language from the pull down menu.
4
English
18
Page 21

Connect the System to the In-
5
ternet
Options for Connection
Connect the system to the internet in one of the following ways:
• Wired connection with the gigabit ethernet connection:
Connect with DHCP (Automatic IP address)-
- Manual Configuration
• Wireless connection:
Search for SSID-
- Manually configure SSID
In all cases, you can use proxy for the connection.
Log on as Supervisor to complete this procedure.
5
English
19
Page 22

Set up a Wired Connection
Set up a wired connection as follows:
Connect the system to a LAN with a network cable. The figure shows the LAN
1.
connector (B).
5
English
2. Open the supervisor settings menu.
3. Tap the Settings tab, [Connectivity].
4. Tap [LAN settings].
20
Page 23

5. Select Wired from the Connection type pulldown menu.
5
6. Set Automatically obtain IP address (DHCP) to Yes or No. If Yes, the system
connects automatically to the LAN. If No, set up a connection manually. Enter the
necessary details to setup a manual connection.
Set up a Wireless Connection
Set up a wireless connection as follows:
Open the supervisor settings menu.1.
2. Tap the Settings tab, [Connectivity].
3. Tap [LAN settings].
English
21
Page 24

4. Select Wireless from the Connection type pulldown menu.
5
English
5. Choose if you want to enter the SSID manually or if you want to search for a wireless
network. If you want to search for a network, tap [Choose network].
6. When you have entered the network details or selected a network from the search,
tap [Connect] to connect to the network.
When the system connected successfully to the network, the screen shows Connected.
22
Page 25

Test the Connection
When you have connected to a network, test the connection as follows:
Open the supervisor settings menu.1.
2. Tap the Settings tab, [Connectivity].
3. Tap [Test connections].
4. Tap the [Test] button.
The system tests the IP addresses that are defined at the LAN settings. If the result is 'Not
OK', make sure that the settings are correctly defined.
5
English
23
Page 26

Test the System6
Create an Automatic Job
Proceed as follows if you want to create an automatic job:
From the Job list menu, tap [New job].1.
2. Tap [Automatic] to start an Automatic job.
6
English
3. Fill the envelope hopper, load your documents and tap [1x] to create an example mail
set.
4. Make sure that the address position and the envelope stop position is correct. If
not, adjust the address position and envelope stop position.
5. If necessary, tap the counter symbol to set the counters. See counter settings.
6. Tap [Start] to start the job.
7. Tap [Stop] to finish the job.
Tap [Save] if you want to save the settings of the Automatic job to a new job.
24
Page 27

Shut Down the System
1.
Press the button next to display to shut down the system.
When the system is busy, it completes and inserts the current set, stops and will be shut
down.
6
English
25
 Loading...