

Page 1
FlexiScale
A Rate Calculating Scale for Letters and Small Packages
Operation Manual
Version 1.1
April 13, 2007
Page 2

Contents
Section 1. Introduction.........................................................................................................3
1.1 Intended Use................................................................................................................ 3
1.2 Safety Tips ..................................................................................................................... 3
Section 2. Installing the FlexiScale...............................................................................4
2.1 Unpacking the FlexiScale ......................................................................................4
2.2 Setting up the FlexiScale....................................................................................... 4
Section 3. Display and Keyboard.....................................................................................6
3.1 Display..............................................................................................................................6
3.2 Sleep Mode..................................................................................................................... 6
3.3 Keyboard.........................................................................................................................6
3.3.1 SOFT KEYS...............................................................................................................6
3.3.2 NUMERIC KEYS......................................................................................................7
3.3.3 OPERATOR KEYS.................................................................................................... 7
Section 4. Operation...............................................................................................................8
4.1 System Prompts..........................................................................................................8
4.2 Soft Keys.........................................................................................................................8
4.3 Mailing or Shipping an Item................................................................................8
4.4 Weighing a Letter or Package............................................................................9
4.5 Selecting Extra Services ........................................................................................9
4.6 Operation Examples ...............................................................................................10
Section 5. Advanced Features.........................................................................................12
1.1 Multiple Labels...........................................................................................................12
2.2 Piece Counting...........................................................................................................12
3.3 Remote Rate Change..............................................................................................13
Section 6. Setup Features/Options Key.................................................................... 14
6.1 System Setup..............................................................................................................14
6.2 Configuration.............................................................................................................. 14
6.3 Rate Tables..................................................................................................................14
6.4 Service............................................................................................................................14
Section 7. Rate Changes.....................................................................................................15
Section 8. Troubleshooting.............................................................................................16
Section 9. Cleaning the FlexiScale ...............................................................................18
Section 10. Technical Specifications.........................................................................19
Section 11. Service..............................................................................................................20
Appendix A Rates, Special Services and Functions...........................................21
Appendix B International Country Codes............................................................... 22
2
Page 3

Section 1. Introduction
1.1 Intended Use
The FlexiScale is a rate calculating scale for letters and small packages weighing
between 0.1 oz. and 30 lb. Rates include international and domestic U.S.P.S., domestic
U.P.S. and domestic FedEx Express. Appendix A includes a complete list of included
rates.
Prior to using the scale, please read this manual carefully and completely.
1.2 Safety Tips
The FlexiScale complies with standard safety regulations for office equipment of its type.
Before operating a FlexiScale, read the following tips to assure safe operation.
• After the FlexiScale has been in weather below 50 degrees Fahrenheit, wait at
least two hours before installation.
• If any liquid is spilled onto the FlexiScale, disconnect the plug from the outlet
immediately. Before connecting the scale again, have it checked by a local
service representative.
• Interface cables should not be handled unless both the scale and the postage
meter are powered off. Never attempt to plug or unplug the interface cable during
a thunderstorm.
• Repairs to the FlexiScale should be conducted by a local service representative.
Attempting to repair the scale yourself will void all warranty rights.
3
Page 4

Section 2. Installing the FlexiScale
2.1 Unpacking the FlexiScale
Your package includes the following parts:
• FlexiScale
• Weighing platter
• Operator’s manual
• AC Adaptor
• Interface cable
2.2 Setting up the FlexiScale
After unpacking the scale, a small amount of preparation is required before the scale can be used
for mailing or shipping. Refer to the diagram below as needed.
POWER
CONNECTOR
ON/OFF
SWITCH
RATE CARD
COVER
INTERFACE
PORT
Step 1. Remove the platter protection.
Remove the plastic platter by lifting up on it. Then, remove the cardboard protector that is
situated between the four legs of the platter. Place the platter on top of the scale and
move it around until the four legs of the platter line up with the four holes in the top of the
scale. When the legs of the platter are aligned with the holes in the scale, press d own on
the platter until it rests firmly in place.
Step 2. Install the postage meter.
If you are using the FlexiScale without an FP postage meter, continue to Step 4.
4
Page 5

Step 3 Locate the interface cable.
After placing the scale in its area of use, locate the interface cable. Connect the small
end of the interface cable to the connector on the rear of the scale. Connect the large
end of the interface cable to the connector on the rear of the meter. Configure the scale
for your meter type (See Section 6). Locate the AC Adapter. Connect the female end of
the AC Adapter to the connector on the back of the scale, and then plug the opposing
end of the adapter into an AC outlet.
Step 4 Turn the power switch to the “ON” position to begin Initialization.
Step 5 Initialization-entering the origin postal code.
When the power switch is in the “ON” position for the first time, the scale prompts for the
origin postal code. Enter the origin zip code. The scale displays the postal code entered
and prompts you to verify (Yes or No) if the postal code displayed is correct. If the postal
code is correct, press the “ENTER” key to complete the initialization. If the postal code is
incorrect, press the “C/CE” key and enter the correct postal code.
5
Page 6
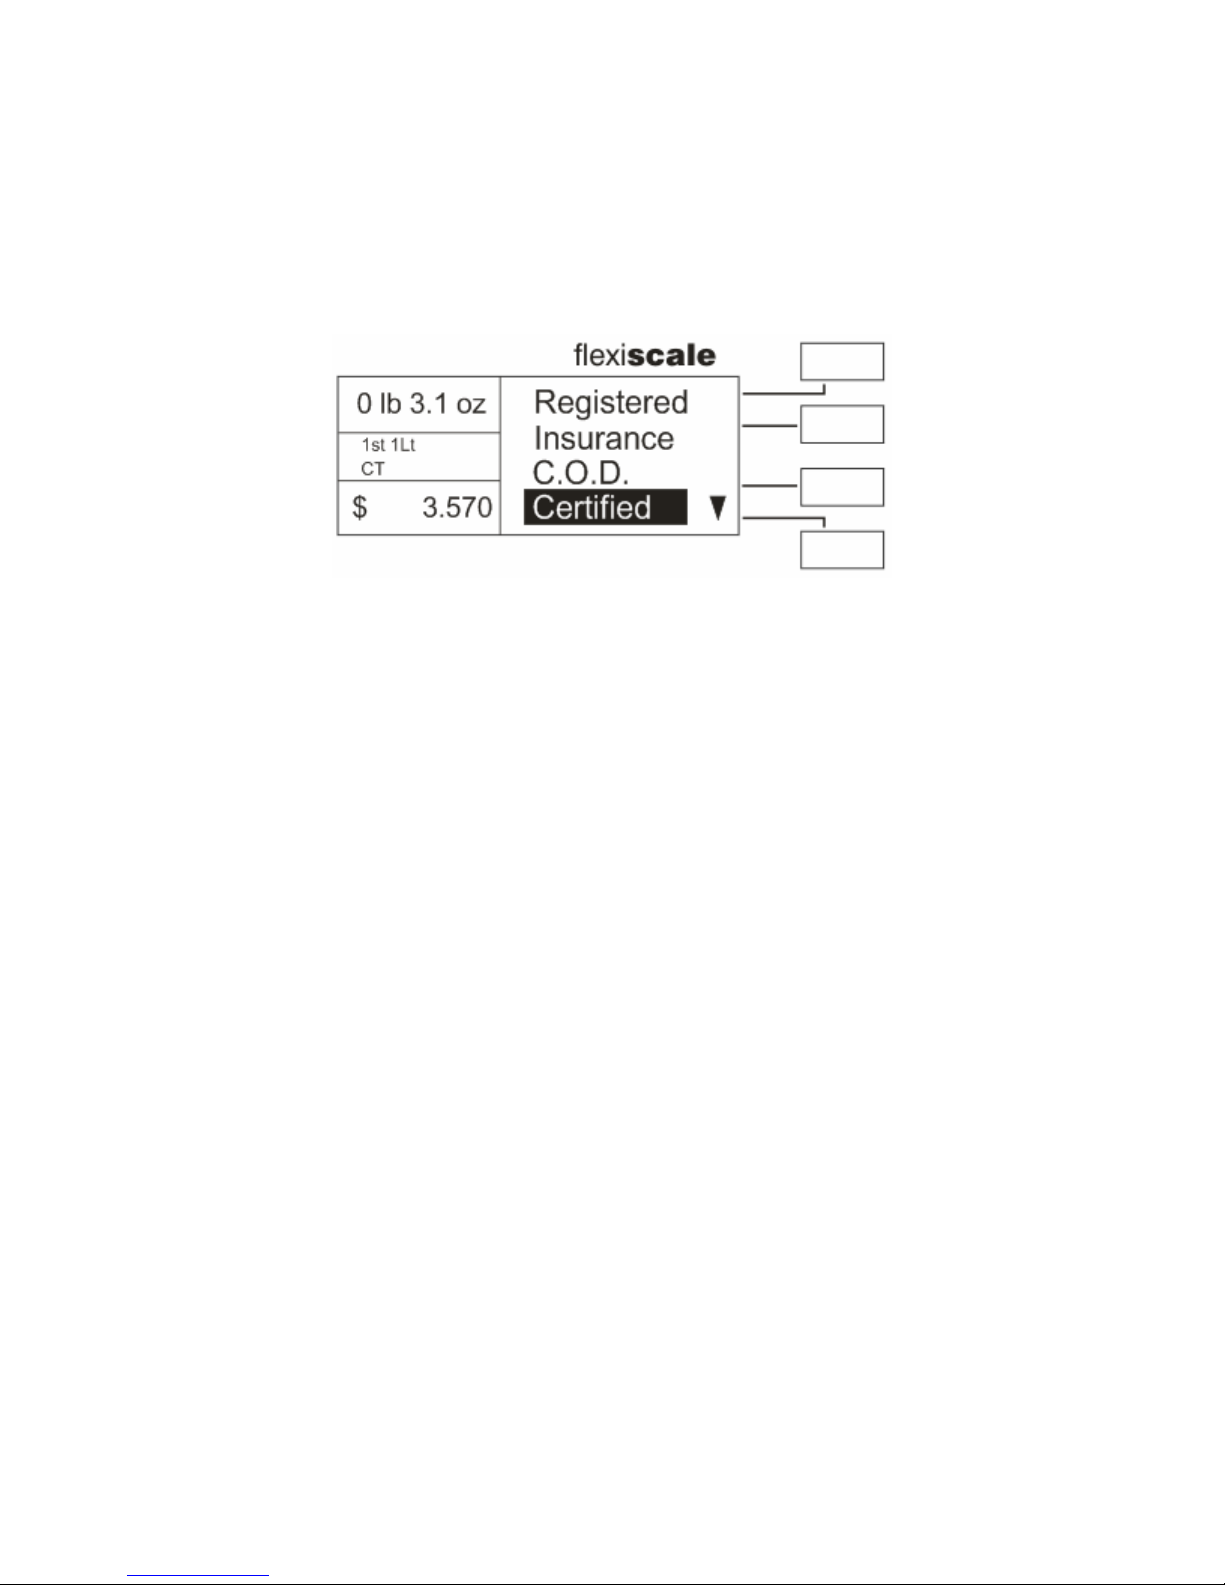
Section 3. Display and Keyboard
3.1 Display
The display is an LCD (Liquid Crystal Display) capable of displaying various sizes of
characters and graphic images.
As shown in the diagram above, the scale displays the class of mail available, selected
extra services, weight and calculated rate. When additional information is needed, the
scale will prompt for the information in pop-up windows or display other menu selections.
3.2 Sleep Mode
If the scale is left unattended for five minutes, it will automatically go to sleep (darken
display) to conserve energy. While in the “SLEEP” mode, the scale retains the last
transaction information in memory. When weight is placed on the platter or a key is
pressed, the display returns to normal operating mode.
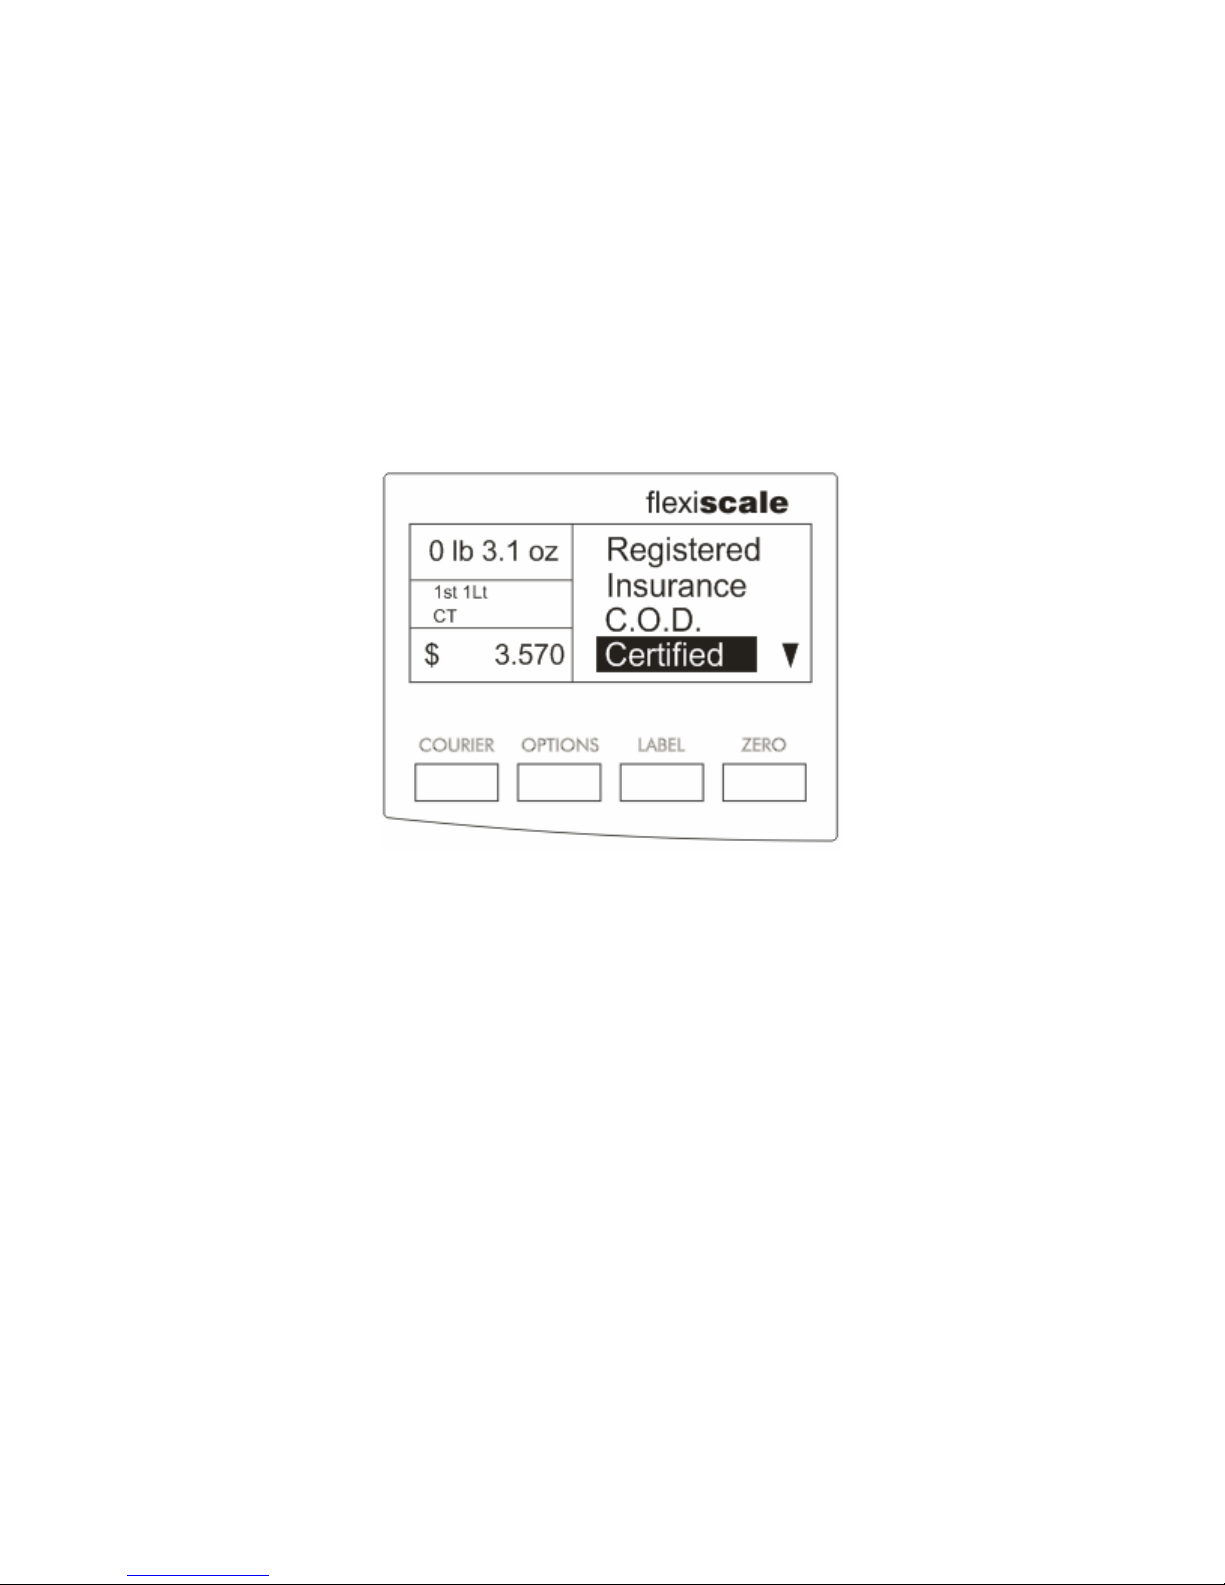
3.3 Keyboard
The keyboard is composed of numeric keys, operator keys and four soft keys. The four
operator keys are located directly beneath the display. The numeric keys are grouped on
the far right side of the keyboard while the four soft keys are located directly to the right of
the display.
3.3.1 SOFT KEYS
The four keys located to the right of the graphic display are the soft keys. These
keys interact with the graphic display and are used to make menu selections that
guide you through the rate calculation process. The two arrow keys to the right of
the soft keys allow you to move the soft key selections up and down as indicated
by the arrow in the display.
6
Page 7
3.3.2 NUMERIC KEYS
The numeric keys (0-9) are used when numeric data needs to be entered into the system.
The ENTER key is used to enter the displayed data while the C/CE key is used to clear
the current numeric entry. The C/CE key also returns you to the previous screen.
3.3.3 OPERA TOR KEYS
The four keys shown in the diagram below are located below the display and perform a
variety of operator functions related to rate calculations as well as actual scale operation.
In each case, pressing the key will activate the chosen function, or display multiple
selections.
Courier Key. The “COURIER” key is used to select one of the available carriers (e.g. U.S.P.S.,
FedEx or U.P.S.) to use for rate calculation.
Options Key. The “OPTIONS” key allows access to the scale’s extra features including piece
counting, service menus and system setup. Refer to Section 6 for the system
setup procedures.
Label Key. The “LABEL” key is used to print either single or multiple postage tapes. If a
U.S.P.S. postage value appears in the display , pressing the “LABEL” key once will
send the charges to the meter, generating a postage tape. Pressing and holding
the “LABEL” key for three seconds activates the function to generate a quantity of
labels on the postage meter. Refer to Section 5.1 for the multiple labels
procedure.
Zero Key. The “ZERO” key is used to zero or tare the scale. When the scale is in the
weighing mode with nothing on the weighing platter and this key is selected, the
scale zeroes the weight. If a container is on the scale and the key is selected, the
weight of the container is tared.
7
Page 8

Section 4. Operation
4.1 System Prompts
The FlexiScale prompts for information in two ways.
• Numeric Entry- This type of prompt appears as a text box with underscores.
Use the numeric keys to enter the requested data and press the “ENTER”
key to complete the entry. If you make a mistake during the entry, press the
“C/CE” key to start over.
• Menu- These prompts are answered by selecting the appropriate keyboard
soft key.
4.2 Soft Keys
During normal operation, the soft keys represent class of mail and extra service keys that
are not present on the keyboard. The following are notes on the soft keys:
• The scale displays the selected soft key selection in a reverse video mode.
This will only be seen at the extra services level.
• If more than four menu selections are available, an arrow appears indicating
that additional selections are available by pressing either the up or down
arrow key.
4.3 Mailing or Shipping an Item
There are a number of basic steps to shipping a letter or package. Some carriers may
require fewer steps. Refer to Section 4.6 for detailed examples.
1. Place the letter or package on the scale’s platter and allow the weight indication
to stabilize. For more information on weighing an item, see Section 4.4.
2. Press the “C/CE” key until the class of mail and rate no longer appear on the left
side of the display.
3. Press the soft key corresponding to the desired class of mail.
4. If necessary, press the soft key corresponding to the item’s subclass of mail, e.g.
letter for international rates.
5. If desired, select an extra service (i.e. registered, insurance, etc.). For more
information on selecting extra services, see Section 4.5.
8
Page 9

4.4 Weighing a Letter or Package
Before weighing an item, make sure the scale shows a zero weight indication. If it does
not, remove all items from the platter and press the “ZERO” key.
To weigh an item, place it on the center of the weighing platter. Once the weight stabilizes,
the scale displays the weight. If the scale detects motion, it blanks the weight display. If
the scale detects motion for an extended period of time, it displays “UNSTABLE”. If the
item weight exceeds the scale’s weight capacity, it displays “OVER WEIGHT”.
4.5 Selecting Extra Services
After selecting the class of mail, press the corresponding “EXTRA SERVICES” soft key to
select a service.
When a value must be entered to determine the extra service fee, the scale allows for a
numeric entry . As the number is entered, the value shifts to the left until the required value
is indicated. Press the “ENTER” key to accept the input.
To select another extra service, press another “EXTRA SERVICES” soft key. To cancel a
selected extra service, press the “highlighted” soft key again.
9
Page 10

4.6 Operation Examples
To calculate a First Class Letter rate:
Action Resulting Display
1. Press the C/CE key until you see the
“READY SCREEN” as shown at
right. NOTE: If this screen does not
appear, press the “COURIER KEY”
and select U.S.P.S.
2. Place your mail on the weighing
platter and select First Class rates by
pressing the “1ST CLASS” soft key.
3. Select First Class Letter rates by
pressing the “1ST LETTER” soft key
10
Page 11

To calculate an international rate:
Action Resulting Display
1. Press the “C/CE” key until you see the
“READY SCREEN” as shown at right.
NOTE: If this screen does not appear,
press the “COURIER” key and select
“U.S.P.S.”
2. Place your mail on the weighing
platter and press the
“INTERNATIONAL” soft key.
3. Place the “1ST INTL” soft key. The
display will prompt for a country
code.
4. Use the numeric keypad to enter the
country code for your letter’s
destination from Appendix B. (In this
example, the country code is 137 for
Canada.) After entering a valid
country code the calculated rate will
appear.
11
Page 12

Section 5. Advanced Features
1.1 Multiple Labels
The multiple labels function is used to print a quantity of labels. The maximum number of
labels that may be printed is 99.
1. Press “ZERO” key.
2. Place an item on the scale.
3. Select a class of mail and the desired extra services.
4. Press and hold the “LABEL” key for three seconds. The scale prompts for the number
of labels to be printed.
5. Enter the number of labels you want to print.
6. Press the “ENTER” key to print the labels.
2.2 Piece Counting
This function is used to count items of identical weight.
·All items placed on the scale must be of the same weight.
·The minimum sample count is 10
·The minimum weight per piece must be 0.1 ounces.
·The total weight of the items sampled must be 1.0 ounces or greater.
1. Remove all items from the scale
2. Press the “ZERO” key.
3. Press the “OPTIONS” key.
4. Press the “PIECES” soft key . The scale prompts you to place a 10 piece sample count
on the scale.
5. Place the 10 piece sample count on the scale and press the “ENTER” key. The scale
displays the item count.
6. Remove the sample count from the scale.
7. Place the items to be counted on the scale. As items are added to or removed from
the scale the display reflects an accurate count.
8. Press the “C/CE” key to return to normal scale operation.
12
Page 13

3.3 Remote Rate Change
This function is used to download rates from the remote service center.
• Before starting, the scale must be connected to an FP T-1000 meter with modem
switching capability, and that meter must be connected to an available phone line.
• Once underway, you may press the “C/CE” at any time to exit the remote rate
change.
1. Remove all items from the scale.
2. Press the “ZERO” key.
3. Press the “OPTIONS” key.
4. Press the “RATE CHANGE” soft key. The scale prompts you to press the
“ENTER” key to begin or the “C/CE” key to exit.
5. Press the “ENTER” key to begin. The scale displays the current status of the
remote rate change. NOTE: You may be required to press the “ENTER” key at
certain times during this process.
6. Upon successful completion of the remote rate change, press the “C/CE” key to
return to normal scale operation.
13
Page 14

Section 6. Setup Features/Options Key
6.1 System Setup
The system setup function configures the scale for the customer’s specific application.
The service menu is accessed through this menu.
Press the “OPTIONS” key. The scale displays the available selections on the soft keys.
To exit the system setup, press the C/CE key.
6.2 Configuration
The configure menu is used to configure the meter type, endorsement type, beep on/off
and origination ZIP code.
1. Perform directions in section 6.1.
2. Press the “CONFIGURE” soft key. The scale lists the available areas to setup.
3. Choose the soft key that corresponds to the area you wish to setup. Follow the
instruction on the screen or choose the appropriate soft key.
6.3 Rate Tables
The rate tables menu displays the current rate table that the scale is using. When a rate
table is selected, the menu shows the table’s version number and effective date.
1. Perform directions in section 6.1. The scale lists the available areas to setup.
2. Choose the “RATE TABLES” soft key.
3. Choose the rate table for which you wish to view information.
6.4 Service
This menu is reserved for Francotyp-Postalia technical personnel and requires a
password to gain entry.
14
Page 15

Section 7. Rate Changes
When the U.S.P.S. changes their rates, you can use the Rates-by-Modem feature or the
rate card in your scale will need to be replaced. A new rate card can be obtained from
your local FP dealer. To install, proceed as follows:
1. Turn the scale’s AC power switch to the “OFF” position.
2. Remove the weighing platter from the scale.
3. Remove the rate card cover from the scale.
4. Install the rate card in the scale with the component side of the module facing the rear
of the scale.
15
Page 16

Section 8. Troubleshooting
Problem Possible causes and solutions
No power:
Display is blank
• Check to make sure FlexiScale is
plugged in and the switch is in the “ON”
position.
Weighing tray is empty,
but displayed weight is not zero.
Postage values are not
transferred from scale
to the postage meter.
Scale did not automatically reset:
• Press the “ZERO” key to reset displayed
weight.
Meter without power:
• Check to see if meter is plugged in and
the switch is in the “ON” position.
Data transfer interrupted:
• Check if interface cables are tightly
connected to both units.
“Scale interface” key is not activated on
meter
• Check if the scale symbol appears in the
meter display. If not, press the “scale
interface” key.
Chosen rates are not U.S.P.S.:
• U.P.S. and FedEx rates cannot be
transferred to the meter.
16
Page 17

ERROR MESSAGES
If the scale encounters an error condition caused either by the operator or the meter, the
scale will beep and display a message to alert the operator. A description of each error
follows:
Message Error Condition
Invalid ZIP Code
Invalid Ctry Code
Over Weight
Ov Limit
Under
Invalid
Not Avl
Cty Err
Indicates that an invalid ZIP code was
entered.
Indicates that an invalid country code was
entered.
Indicates that the weighing capacity of the
scale has been exceeded.
Indicates that the weight for the class of
service selected is too heavy.
Indicates that the weight for the class of
service selected is too light.
Indicates that the selected function,
service or rate is invalid.
Indicates that the selected special service
is not available with the selected class of
mail.
Indicates that the selected country code
is not valid.
RRC is not supported
MODEM is not available
Any other error codes encountered during the remote rate change process should be
noted and communicated to remote service center personnel.
Indicates that the meter currently
connected to the scale does not support a
remote rate change.
Indicates that the meter’s MODEM is not
functioning for some reason.
17
Page 18

Section 9. Cleaning the FlexiScale
If you choose to clean your scale, never allow liquid to get inside the housing. Clean only
the outside of the scale using a damp cloth. A small amount of rubbing alcohol may be
used.
18
Page 19

Section 10. Technical Specifications
Capacity: Flexi 5: 5 lb x 0.1oz
Display: 128 x 48 dpi, graphic LCD
Keypad: 24-key silicone rubber type
Legal-for-Trade Operating T emperature Range:
41℉ to 95 ℉
(5 ℃ to 35 ℃)
Non-Legal-for-Trade Operating Temperature Range:
32℉ to 104 ℉
(0 ℃ to 40 ℃)
Power Source: AC Adapter, 9VDC, 500 m A, included
Serial Port: Full Duplex RS-232,
Male DSUB9
Weight: Net Weight:7.9 lb (3.6 kg)
Shipping Weight:11.5 lb (5.36 kg)
Dimensions: 224mm x 288mm x 96mm (Width x Depth x Height)
FCC Warning: This equipment generates, uses, and can radiate radio frequency energy and if not
installed and used in accordance with the instruction manual, may cause interference to radio
communication. It has been tested and found to comply with the limits for Class “A” computing
devices pursuant to Subpart J of part 15 of FCC rules, which are designed to provide reasonable
protection against such interference when operated in a commercial environment.
Flexi 10: 10 lb x 0.1oz
Flexi 15: 15 lb x 0.1oz
Flexi 30: 0-4 lb x 0.1 oz, 4-30 lb x 0.5oz
19
Page 20

Section 11. Service
Every FlexiScale is checked thoroughly before leaving the factory. Should any faults
occur in spite of our extensive quality control, please contact your local servicing dealer
listed below, or call (800) 341-6052 for a dealer near you.
FP Authorized Dealer
FP Mailing Solutions
(Francotyp-Postalia, Inc.)
140 N. Mitchell Ct., Suite 200
800.341.6052
www.fp-usa.com
20
Page 21

Appendix A Rates, Special Services and Functions
UNITED STATES POSTAL SERVICE (USPS)
• 1st Class Letters, Flats and Parcels/Priority Mail
• 1st Class Presorted Letters and Flats
• 1st Class Automation Letters and Flats (All)
• Parcel Post
• Media Mail (Book)
• Express Mail (PO-Adr)
• International
First Class International, Priority Mail International
• Library
• Bound Printed Matter Nonpresorted Flats and Parcels
UNITED PARCEL SERVICE (UPS)
• Next Day Air Letter/ Package
• 2nd Day Air Letter/Package
• Ground Commercial/Residential
FEDERAL EXPRESS (FEDEX)
• Priority Overnight Letter/Package
• Standard Overnight Letter/Package
• Economy 2 Day
SPECIAL SERVICES
• Registered with Insurance
• Insurance
• Return Receipt
FUNCTIONS
• Print Label
• Postal Code Origin
• Auto Set
• Special Services
• Zero
• Endorsements
• Carrier Selection
• Multiple Labels
• Meter Interface
• Set Meter
• Remote Rate Change
• Collect on Delivery (COD)
• Certified
• Piece Count
21
Page 22

Appendix B International Country Codes
172 Gabon 243 Nicaragua
100 Afghanistan 173 Gambia 244 Niger
101 Albania 174Georigia, Republic of 245 Nigeria
102Algeria 175 Germany 246 Norway
103 Andorra 176 Ghana 247 Oman
104 Angola 177 Gibraltar 248 Pakistan
105 Auguilla 178 Great Britain & No. Ireland 249 Panama
106 Antigua & Barbuda 179 Greece 250 Papua New Guinea
107 Argentina 180 Greenland 251 Paraguay
108 Armenia 181 Grenada 252 Peru
109 Aruba 182 Guadeloupe 253 Philippines
110 Ascension 183 Guatemala 254 Pitcairn Islands
111Australia 184 Guinea 255 Poland
112 Austria 185 Guinea-Bissau 256 Portugal
113 Azerbaijan 186 Guyana 257 Qatar
115 Bahamas 187 Haiti 258 Reunion
116 Bahrain 188 Honduras 259 Romania
117 Bangledesh 189 Hong Kong 260 Russia
118 Barbados 190 Hungary 261 Rwanda
119 Belarus 191 Iceland 262 St. Christopher & Nevis
120 Belgium 192 India 263 Saint Helena
121 Belize 193 Indonesia 264 Saint Lucia
122 Benin 194 Iran 265 Saint Pierre & Miquelon
123 Bermuda 195 Iraq 266 St. Vincent & The Grenadines
124 Bhutan 196 Ireland 267 San Marino
125 Bolivia 197 Israel 268 Sao Tome & Principe
126 Bosnia-Hercegovina 198 Italy 269 Saudi Arabia
127 Botswana 199 Jamaica 270 Senegal
128 Brazil 200 Japan 271 Serbia-Montenegro
129 British Virgin Islands 201 Jordan 272 Seychelles
130 Brunei-Darussala 202 Kazakhstan 273 Sierra Leone
131 Bulgaria 203 Kenya 274 Singapore
132 Burkina Faso 204 Kiribati 275 Slovak Republic (Slovakia)
133 Burma(Myanmar) 205 Korea,Dem People's Rep. 276 Slovenia
134 Burundi 206 Korea, Republic of 277 Solomon Islands
135 Cambodia 207 Kuwait 278 Somalia
136 Cameroon 208 Kyrgyzstan 279 South Africa
137 Canada 209 Laos 280 Spain
138 Cape verde 210 Latvia 281 Sri Lanka
139 Cayman Islands 211 Lebanon 282 Sudan
140 Central African Republic 212 Lesotho 283 Suriname
141 Chad 213 Liberia 284 Swaziland
142 Chile 214 Libya 285 Sweden
143 China 215 Liechtenstein 286 Switzerland
144 Colombia 216 Lithuania 287 Syrian Arab Rep
145 Comoros 217 Luxembourg 288 Taiwan
146 Congo Rep of 218 Macao 289 Tajikistan
313 Congo Dem Rep of 219 Macendonia 290 Tanzania
148 Costa Rica 220 Madagascar 291 Thailand
149 Cote d'lvoire 222 Malawi 292 Togo
150 Croatia 223 Malaysia 293 Tonga
151 Cuba 224 Maldives 294 Trinidad & Tobage
152 Cyprus 225 Mali 295 Tristan da Cunha
153 Czech Republic 226 Malta 296 Tunisia
154 Denmark 315 Marshall Islands, Rep of 297 Turkey
155 Djibouti 227 Martinique 298 Turkmenistan
156 Dominica 228 Mauritania 299 Turks & Caicos Islands
157 Dominican Republic 229 Mauritius 300 Tuvalu
158 Ecuador 230 Mexico 301 Uganda
159 Egypt 317 Micronesia, Fed States of 302 Ukraine
160 EI Salvador 231 Moldova 303 United Arab Emirates
161 Equatorial Guinea 232 Mongolia 304 Uruguay
162 Eritrea 233 Montserrat 305 Uzbekistan
163 Estonia 234 Morocco 306 Vanuatu
164 Ethiopia 235 Mozambique 307 Vatican City
165 Falkland Islands 236 Nambia 308 Venezuela
166 Faroe Islands 237 Nauru 309 Vietnam
167 Fiji 238 Nepal 310 Wallis & Futuna Islands
168 Finland 239 Netherlands 311 Western Samoa
169 France 240 Netherlands Antilles 312 Yemen
170 French Guiana 241 New Caladonia 314 Zambia
171 French Polynesia 242 New Zealand 315 Zimbabwe
22
Page 23

FP Mailing Solutions
(Francotyp-Postalia, Inc.)
140 N. Mitchell Ct., Suite 200
800.341.6052
www.fp-usa.com
 Loading...