

Page 1
Operator Manual
ultimail
Franking System
Page 2

2
The control panel – display and keyboard
Multi function keys
(soft keys)
Numeric keys:
– Enter digits
– Enter letters, punctuation
and special characters
Display
(illuminated)
C/CE key:
– Delete input
– Call default setting
In the home menu, press C/CE for 3 seconds:
Home menu is reset to standard
Arrow keys
Back to the home menu Info key:
Display help
Go back to the higher
window / menu level
SET UP menu:
Change system
settings
Start/Stop key:
Start letter transport/
franking
Franking labels
Loading postage:
TELESET
Display
postage register
Multi function keys
(soft keys)
Enter key:
– Confirm the input
– Acknowledge error messages
Page 3

Contents
3
About this Operator Manual _____________________________________7
1 Safety tips ____________________________________________________ 8
2 A short description of the ultimail _______________________________ 10
3 Switching the ultimail ON / OFF _________________________________13
4 ultimail operating basics _______________________________________15
4.1 Access control by MASTER / USER card ____________________ 15
4.2 The operating menu _____________________________________16
4.3 Trial run (zero test print) __________________________________19
5 Setting the franking imprint _____________________________________ 22
5.1 Postage value / Royal Mail product _________________________23
5.1.1 Setting the postage value / product using the memory __________23
5.1.2 Setting mailing data _____________________________________ 26
5.1.2.1 Selecting the mailing data for a new product __________________26
5.1.2.2 Editing a product _______________________________________ 29
5.1.3 Setting the weight ______________________________________30
5.1.3.1 Setting the weight of the mail piece manually _________________30
5.1.3.2 Using the integrated scales: weighing mail pieces (optional) _______ 31
5.1.4 Entering the postage value manually ________________________32
5.2 Date _________________________________________________ 34
5.3 Logo / advertising imprint _________________________________35
5.4 SMS text _____________________________________________37
6 Franking ____________________________________________________ 38
6.1 Preparations ___________________________________________38
6.1.1 Setting up catch tray ____________________________________38
6.1.2 On the sealer: adjust letter guide (ultimail with sealer only) __________38
6.1.3 On the feeder: adjust letter guide (ultimail with feeder only) __________40
6.1.4 Switch on / off seal function (ultimail with feeder / sealer only) _________ 41
6.2 Change account ________________________________________ 42
6.3 Positioning and franking a letter ____________________________43
6.3.1 ultimail with hand feed tray _______________________________43
6.3.2 ultimail with sealer (optional) _______________________________44
6.3.3 ultimail with feeder (optional) _______________________________ 46
6.3.3.1 Positioning letters in stack ________________________________ 46
6.3.3.2 Positioning single letters _________________________________ 48
6.4 Franking labels (optional) __________________________________49
Page 4

ultimail Operator Manual
4
7 Special functions _____________________________________________ 50
7.1 Using the DX feature (optional) _____________________________ 50
7.1.1 Things worth knowing about the DX feature __________________ 50
7.1.2 Franking DX-mail _______________________________________ 51
7.2 Working with the batch counter ____________________________ 52
7.3 Using the ultimail as incoming mail stamp ___________________ 55
7.4 Seal only function (ultimail with feeder / sealer only) _________________ 56
7.5 Differential weighing (optional) ______________________________ 57
7.6 Using an external postage scale ___________________________ 60
7.6.1 Connecting an external postage scale ______________________ 60
7.6.2 Using ultimail with an external postage scale _________________ 61
8 Postage register ______________________________________________ 62
9 Loading postage – TELESET ___________________________________ 63
10 Account administration ________________________________________ 66
10.1 Set up a new account ___________________________________ 66
10.2 Change settings for existing accounts _______________________ 69
10.2.1 Change standard setting for the logo and the SMS text _________ 69
10.2.2 Release / block TELESET access __________________________ 72
10.2.3 Changing budgets and assigning credits ____________________ 73
10.2.4 Change name _________________________________________ 75
10.3 Generate / block USER card(s) for an account ________________ 76
10.4 Switch on / off “access card required?” ______________________ 78
10.5 Display and print account information _______________________ 79
10.6 Set account counter to zero ______________________________ 81
10.6.1 Set one account to zero _________________________________ 81
10.6.2 Set all accounts to zero __________________________________ 81
10.7 Delete accounts ________________________________________ 82
10.7.1 Delete one account _____________________________________ 82
10.7.2 Delete all accounts _____________________________________ 82
11 Memory administration ________________________________________ 83
11.1 Displaying and printing memory assignment __________________ 83
11.2 Saving settings ________________________________________ 84
11.3 Renaming memories ____________________________________ 85
11.4 Delete memories _______________________________________ 86
Page 5

Contents
5
12 Print image data administration _________________________________ 87
12.1 Logo display and printing _________________________________87
12.2 Change the logo names __________________________________ 88
12.3 Enter / change / save SMS texts ___________________________ 89
12.4 Loading print image data from card _________________________93
12.5 Delete print image data __________________________________94
13 Advanced settings and system information _______________________95
13.1 Setting the operating mode _______________________________95
13.2 Display, print and send system information ___________________97
13.3 Display and reset item counter ____________________________98
13.4 Display and reset advert counter ___________________________99
13.5 Setting low postage warning – limit ________________________100
13.6 Tone signal __________________________________________ 101
13.7 Display contrast _______________________________________102
13.8 Time ________________________________________________ 103
13.8.1 Adjusting the current time _______________________________103
13.8.2 Summer / winter time ___________________________________104
13.8.3 Setting time zone ______________________________________ 106
13.9 Setting standby time ___________________________________107
13.10 Setting Memory 1 as standard after standby _________________108
13.11 Setting print head standby time ___________________________110
13.12 Setting letter transport run-on time ________________________ 111
13.13 Manage rate tables ____________________________________112
13.13.1 Loading rate table from card _____________________________112
13.13.2 Loading rate table from the data centre _____________________ 113
13.13.3 Delete all rate tables ___________________________________114
13.14 Integrated scales (optional) _______________________________ 115
13.14.1 Tare ________________________________________________115
13.14.2 Setting gravity ________________________________________116
13.14.3 Switching automatic endorsement selection on / off ___________ 117
13.14.4 Setting weighing mode __________________________________118
13.14.5 Switching differential weighing mode on / off (optional) __________119
13.15 Connection to data centre _______________________________ 120
13.15.1 Internal Modem _______________________________________120
13.15.2 External Modem (optional) ________________________________124
13.16 Changing phone numbers _______________________________ 126
13.17 Selecting the user interface language ______________________128
13.18 High-quality print ______________________________________ 129
Page 6

ultimail Operator Manual
6
13.19 New PC Protocol ______________________________________ 130
13.20 TELESET & RSI ______________________________________ 131
13.21 Generate MASTER card ________________________________ 133
13.22 Enable / disable optional functions ________________________ 134
13.22.1 Memory administration extension (ultimail without integrated scales only) 134
13.22.2 Account administration extension _________________________ 135
13.22.3 Differential weighing feature _____________________________ 136
13.22.4 InfoPrint _____________________________________________ 137
14 Maintenance and care ________________________________________ 138
14.1 Cleaning the ultimail franking system ______________________ 138
14.2 Changing the ink cartridges ______________________________ 139
14.3 Adjust the ink cartridges ________________________________ 144
14.4 Cleaning the print system _______________________________ 145
14.4.1 Start automatic cleaning the print system ___________________ 145
14.4.2 Manually cleaning the print heads _________________________ 146
14.5 Replacing the ink pad insert _____________________________ 148
14.6 Filling the water tank (feeder / sealer ultimail) ____________________ 151
14.7 Adjust moistening level (feeder / sealer ultimail) __________________ 153
14.8 Cleaning / changing the moistening sponge (feeder / sealer ultimail) __ 154
14.9 Cleaning / changing the moistening brush (feeder / sealer ultimail) ___ 158
14.10 Changing the battery ___________________________________ 160
15 Troubleshooting _____________________________________________ 162
15.1 Problems and remedies ________________________________ 162
15.2 Removing letter jams ___________________________________ 170
15.3 How to prevent jamming and double-feeding during batch mailing 172
15.4 Attach adjustable letter guide to feeder / sealer ______________ 174
15.5 Error codes (sample) ___________________________________ 175
15.6 Display and print diagnostics list __________________________ 180
16 Withdrawal and disposal of the ultimail franking system ___________ 181
Appendix
Moving the ultimail to another location _____________________________ 183
Access rights ________________________________________________ 192
SET UP menu (overview) _______________________________________ 194
Glossary ____________________________________________________ 195
Technical Data _______________________________________________ 197
Declaration of Conformity _______________________________________ 202
Index _______________________________________________________ 203
Service _____________________________________________________ 213
Page 7
About this Operator Manual
7
About this Operator Manual
Please read this Operator Manual before using the ultimail
franking system. Please keep the manual near the ultimail at all
times for reference.
This Operator Manual applies to all configurations and
equipment varieties of franking machines ultimail 60 and
ultimail 90. Functions which are only available with certain
configurations are recognisable by a suffix, e.g. (optional).
In this Operator Manual, ‘ultimail’ stands for the franking
systems ultimail 60 and ultimail 90.
Quick Reference Guide The Quick Reference Guide gives you an overview of the
operating menu and franking with the ultimail.
The following keywords and safety signs identify the safety tips
in this Operator Manual.
Warning! indicates a potential hazard which may result in
injury.
Warning! indicates a potential danger of injury caused by
rotating components. Danger areas of the ultimail are marked
with such a safety sign.
Caution! indicates a potential hazard that may result in
damage to the ultimail or impair the franking process.
The following symbols and text features are used in this
Operator Manual:
MEMORY Menu names and options from the operating menu are written
in capital letters.
“Please select …” Prompts and messages are highlighted by quotation marks.
A tip offers advice or additional suggestions for improving the
operation.
Display graphics show inputs and current settings. The multi
function key(s) to be pressed is / are marked in black.
Page 8

ultimail Operator Manual
8
1 Safety tips
The ultimail is a digital franking system with an inkjet printer for franking letter mail.
The ultimail complies with the pertinent safety regulations for office information
equipment.
Please observe the following tips for your own safety:
• Installation and commissioning of the franking system ultimail are only done by
qualified personnel authorised by Francotyp-Postalia.
• Only operate the ultimail system on a grounded single-phase power socket. Make
sure your office power supply conforms to the power requirements shown on the
serial number plates.
• Use only cables provided or approved by Francotyp-Postalia. Make sure that
cables are not damaged.
• Make sure the socket for connecting the ultimail is close by and easily accessible
at all times.
• Do not reach into the danger areas marked with a safety sign.
Keep long hair, fingers, loose clothing pieces, shawls and jewellery away from
moving machine parts.
• Do not remove any part of the safety and protective equipment. Do not make them
inoperative. Do not remove any parts of the housing.
• Never cover the ventilation slots in the housing.
• Pull out the power plug in the event of danger! Call the after-sales service.
• Make sure that no liquids or foreign objects penetrate the interior of the ultimail.
If this happens, pull out the power plug immediately. Have the ultimail franking
system checked by Francotyp-Postalia service before starting it up again.
• The ‘Sealer ultimail’ is intended for use with the ultimail 60 franking machine.
It is not possible to operate the sealer without the ultimail franking machine.
• The ‘Feeder ultimail’ is intended for use with the ultimail 60 / ultimail 90 franking
machine. It is not possible to operate the feeder without the ultimail franking
machine.
Page 9

Safety tips
9
• We recommend to use only approved FP equipment and FP original parts. The
manufacturer FP has established reliability, safety and applicability. The manufacturer cannot assess the reliability, safety and applicability for products not approved
by FP, and therefore not vouch for such products.
• Ingestion of the ink can be hazardous to your health. Avoid contact with the eyes.
Keep the ink cartridges away from children. Further instructions for use are
enclosed with the ink cartridges.
• Only use the batteries provided by Francotyp-Postalia. Observe the instructions
enclosed with the battery for correct use and disposal.
• Only have maintenance and repair work done by qualified personnel authorised by
Francotyp-Postalia. Otherwise your warranty will be voided. You will be liable for
any damages.
• Observe the specific notes for moving the ultimail franking system on page 183 if
you wish to install the ultimail at another location.
Page 10

ultimail Operator Manual
10
2 A short description of the ultimail
The ultimail is a digital franking machine with horizontal letter
transport and ink jet technology (ink jet print with two ink
cartridges arranged side by side).
Structure In its basic version, the franking system consists of the franking
machine, hand feed tray and catch tray.
The franking machine is available as model
– ultimail 60 with a processing speed up to 60 letters/minute
– ultimail 90 with a processing speed up to 90 letters/minute
Menu-supported
user interface
The back-lit display is clear and easy to read and understand.
Simply follow the instructions in the display, whether for setting
the franking imprint, modifying the system settings or service
functions, e.g. changing cartridges.
Help No illegal entries are allowed by the ultimail – you are informed
by an appropriate message. A help function offers additional
advice and support.
Franking At a glance, the home menu will show you the current settings
for the franking imprint. You simply position the letter – the
ultimail will take the letter, frank it and place it in the catch tray
ready for dispatch.
You can frank
– mail pieces up to a thickness of 6.35 mm (¼") of an ink
absorbent material
– self-adhesive labels.
Logo imprint and
text messages
ultimail can print a logo of your choice on every mail piece. Also,
the ultimail has the ability to print user editable text messages
(SMS texts).
TELESET Load new postage by the TELESET procedure – fast, com-
fortably and, if necessary, 24 hours a day.
Protection against
unauthorised use
The MASTER / USER card functionality protects the ultimail
against unauthorised use and facilitates the assignment of
individual access rights.
Flexible and up to date New logos, type of mail endorsements or rate changes of the
Royal Mail – you can easily load the latest data in your ultimail.
Page 11

A short description of the ultimail
11
Additional functions The following functions will soon be among your favourites:
– Account function. Recording and accounting of postage
according to accounts.
– Memory function for frequently used Royal Mail products.
– Stamp of receipt. Imprint ‘Received on: …’ for stamping
incoming mail.
– Print lists for account data, postage register states, system
information.
– Warning in case of too low amount of postage available.
– Remote diagnostics. You can transfer important system
data to the Francotyp-Postalia service.
Options The following components and features are available for
functionality extension:
– Label dispenser to print self-adhesive labels for large / thick
mail pieces.
– Integrated scales. The space saving, integrated scales
quickly and reliably determines the weight of your mail. The
determined weight directly affects the product settings.
– Differential weighing. Weighing mode for convenient
franking of letter stacks. The ultimail determines the weight of
the complete letter stack and sets the postage for each letter
when feeding – according to the change in weight.
– Sealer ultimail. Automatic sealer to moisten and seal letters.
The letters are positioned manually.
– Feeder ultimail. Automatic feeder with sealer. The letters
are separated from the stack, optionally moistened and
sealed, and fed to the ultimail franking machine.
– Dynamic scales. Additional module for the ultimail 90 for
weighing and franking mixed mail and parcels. To retrofit
your ultimail with dynamic scales, please contact FrancotypPostalia.
– To run InfoPrint, a PC-based Francotyp-Postalia data
management and archiving software application, you can
enable the InfoPrint function of the ultimail with a machinespecific release code.
Page 12

ultimail Operator Manual
12
Options
(continued)
– GSM modem (external modem). As an alternative to the
internal modem, the GSM modem can be used for communication with the data centre.
– The mailcredit Kit allows you to connect the ultimail to a
computer and thereby via the internet to the data centre.
Furthermore, you can update the software of your ultimail
franking machine with mailcredit.
You will find an overview of the ultimail system components on
pages 210 to 212.
Page 13
Switching the ultimail ON / OFF
13
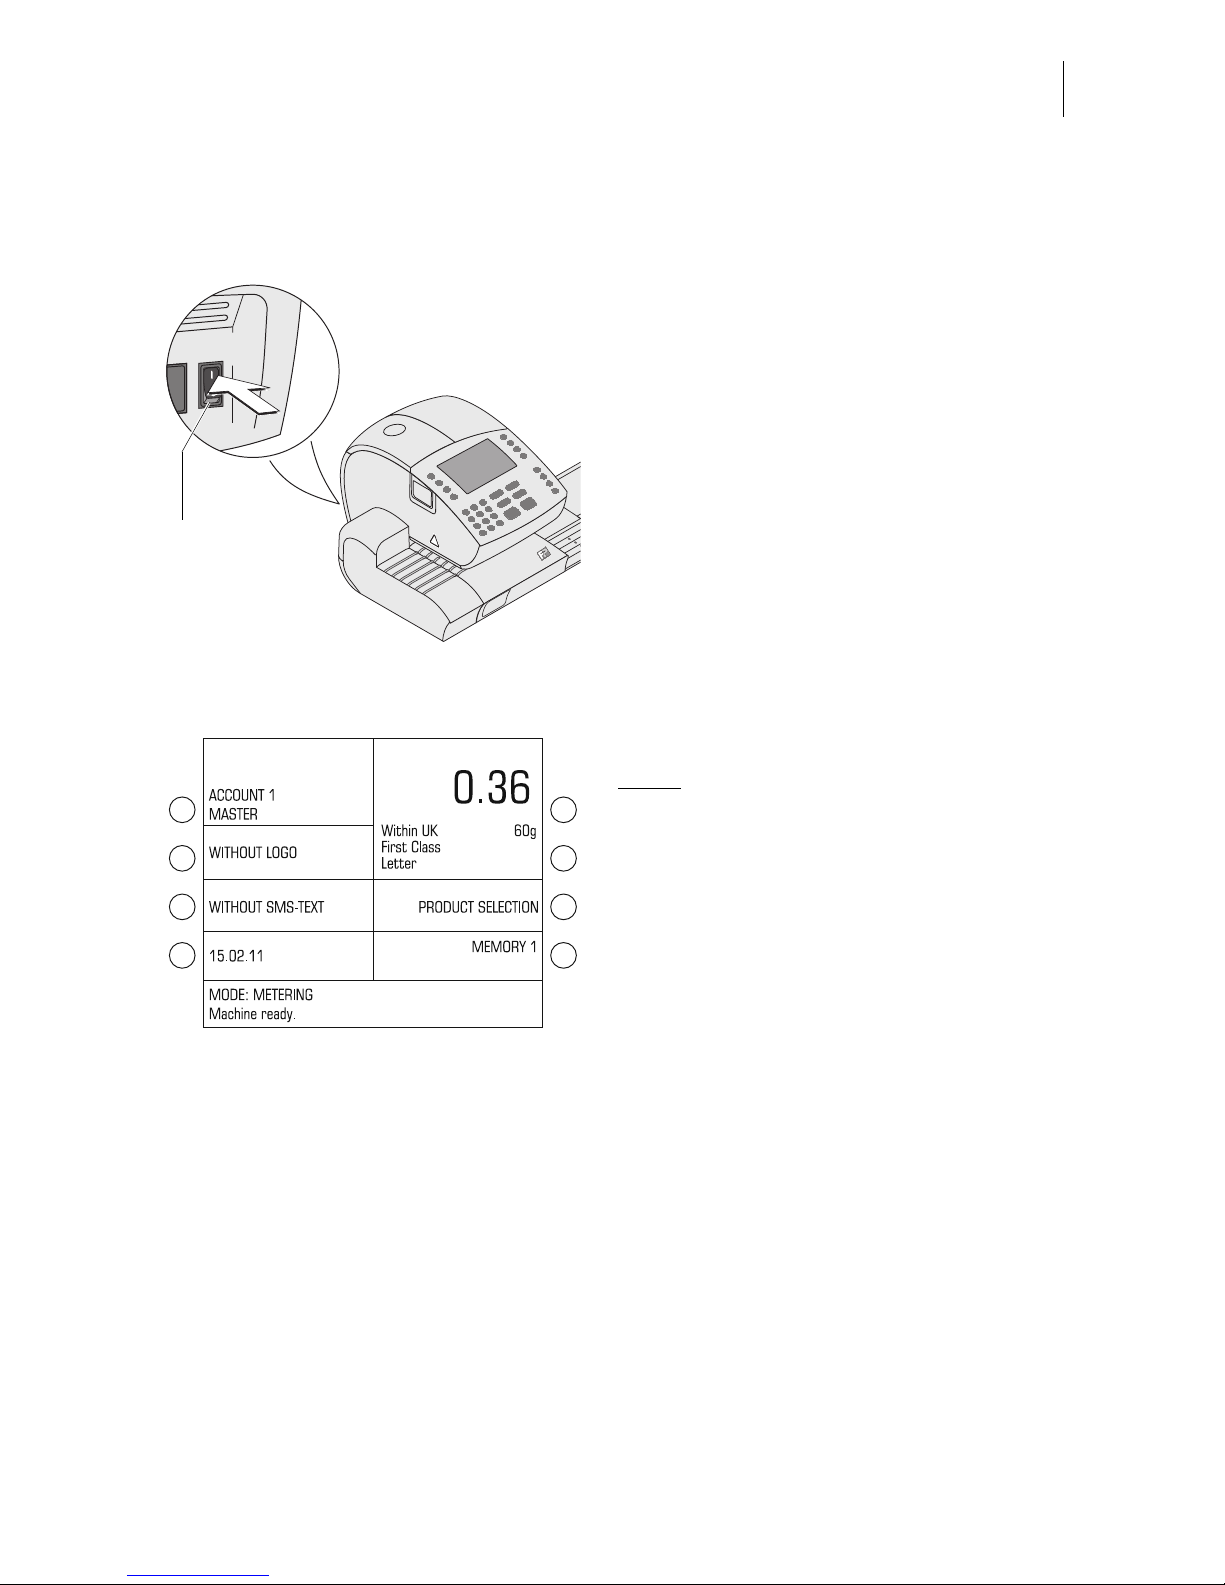
3 Switching the ultimail ON / OFF
Use the power switch on the back of the
franking machine to switch the ultimail
franking system ON / OFF.
Switching on
• Switch the power switch on the back of
the franking machine to the
I position.
The display lights up and a start routine is
initiated. All system components are now
checked and activated by the ultimail.
The self-test is accompanied by signalling beeps and information on display.
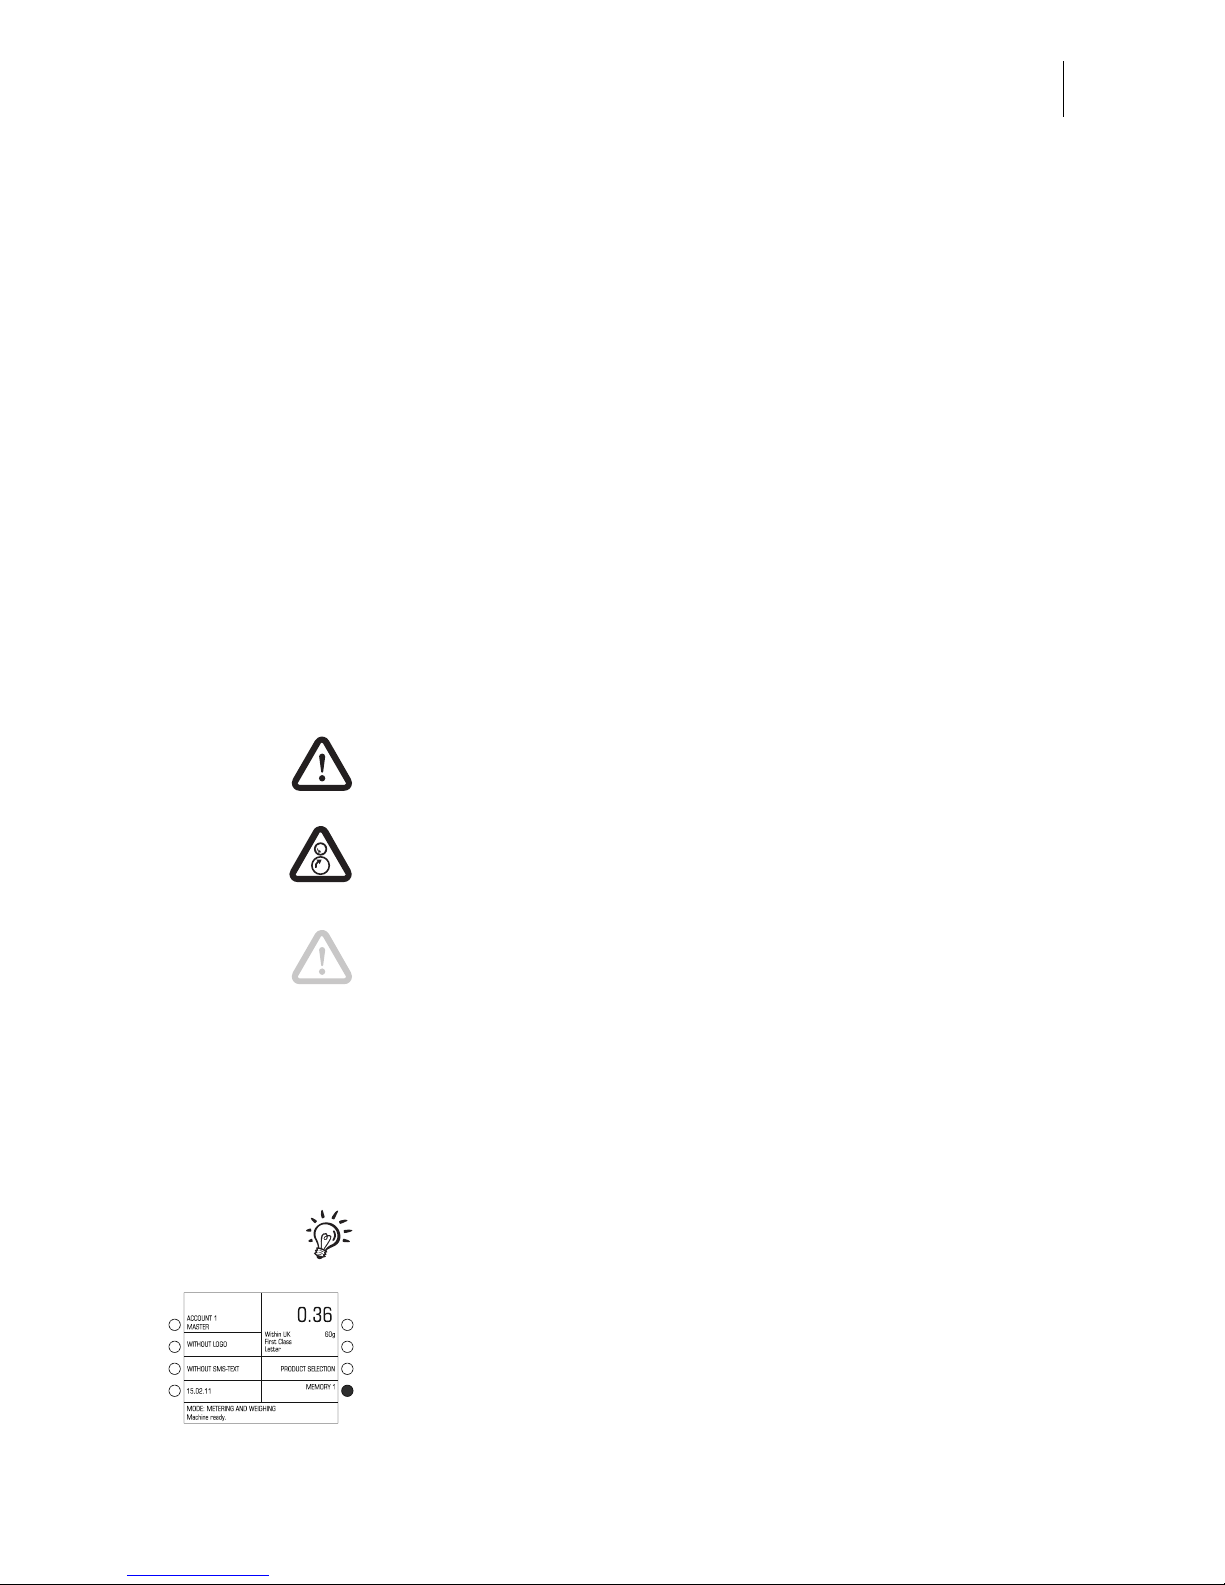
The home menu appears in the display.
The ultimail is ready for operation.
Notes:
The example shows the complete home
menu.
ACCOUNT only appears if an access
card (MASTER or USER) is plugged in or
if access control is switched off.
A postage value only appears if
– all required mailing data are selected,
– the displayed weight value exceeds 0 g
and
– an access card (MASTER or USER) is
plugged in or if access control is
switched off.
METERING stands for franking mode.
Power switch
(back of the
machine)
ON
Home menu (example)
Page 14
ultimail Operator Manual
14
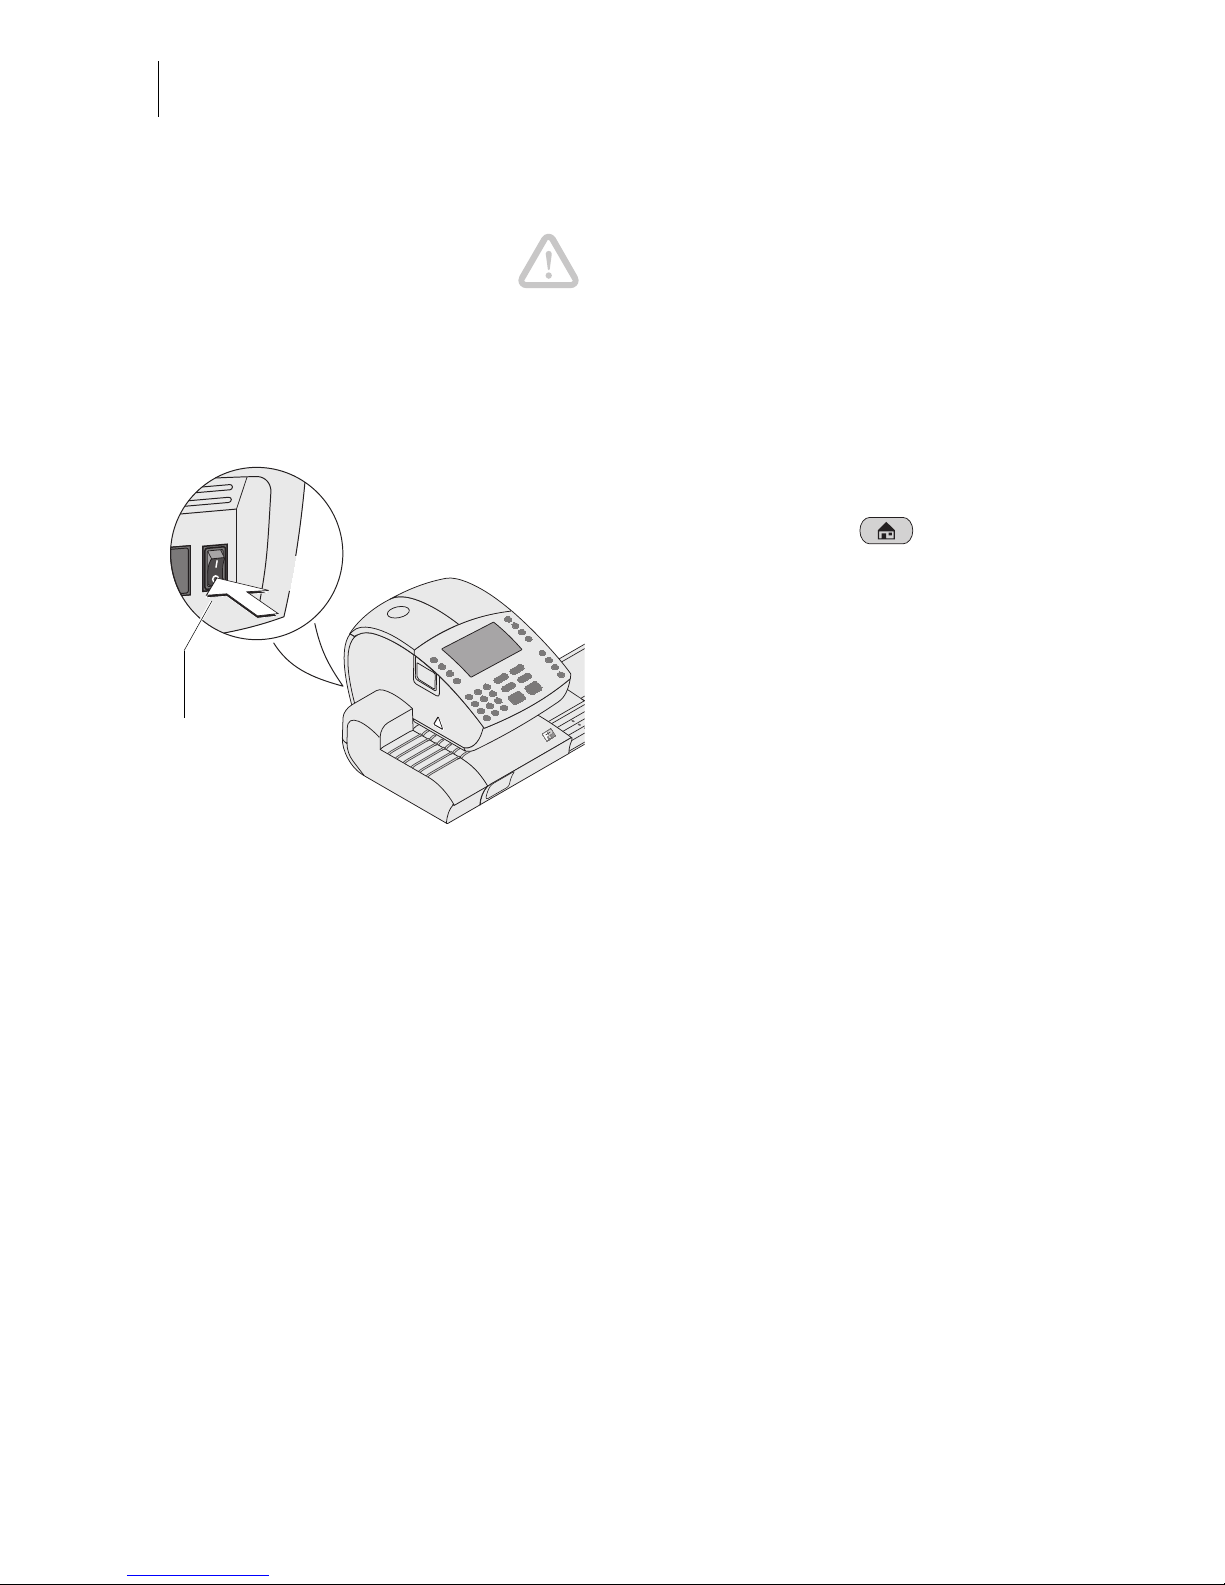
Switching off
Caution! Always switch the ultimail off
using the power switch. Never simply pull
the power cord or interrupt the power in
any other way before the printing system
has moved to sealed position. That way
you can prevent drying and maintain a
constant printing quality.
• We recommend going to home menu
before switching the ultimail off.
To do so, press the key.
• Switch the power switch to the
O position.
The ultimail finishes all operations which
are currently in process and moves the
printing system to sealed position. This
switch off routine may take some time.
ultimail switches off. The display illumination switches off as well.
OFF
Power switch
(back of the
machine)
Page 15
ultimail operating basics
15
4 ultimail operating basics
In this chapter you will learn about the basic ultimail functions and how to use the
operating menu.
4.1 Access control by MASTER / USER card
MASTER card and USER card, both designated as access cards, control access
rights to the ultimail.
A MASTER card
allows you to access all functions.
A USER card
allows you to access selected functions only.
– Franking to the assigned account.
– Entering and changing of SMS texts.
– Assigning a logo and SMS text to the account.
The authorisation for franking can be set so that no access card is necessary.
Then franking will be possible without MASTER card or USER card to all
accounts (refer to chapter 10.4 on page 78).
You will find an overview of the access rights on page 192.
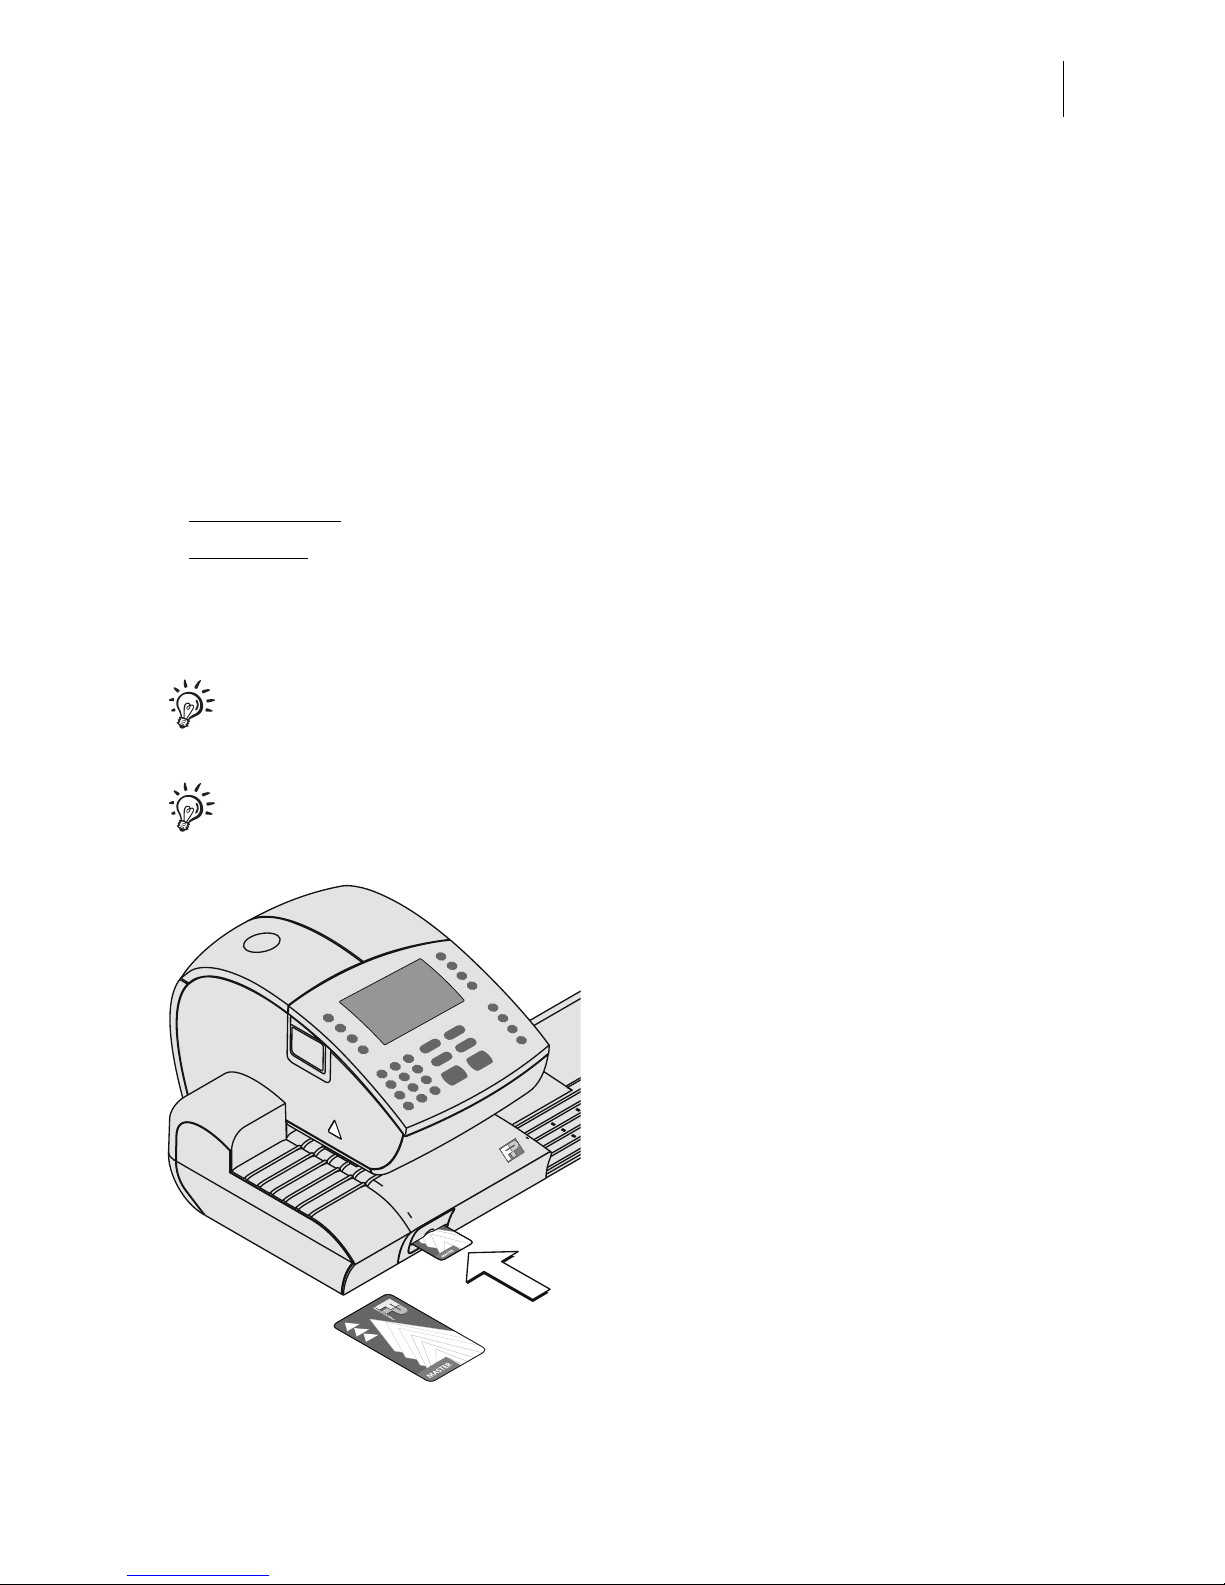
How to insert the access card into the
card reader
• Insert access card into the card reader
in the direction of the arrow. The chip
on the card should face downward.
• Push access card in as far as it goes.
You will feel the card snap in.
How to remove the access card
• Simply pull access card out of the card
reader.
Page 16
ultimail Operator Manual
16
4.2 The operating menu
In this chapter you will get to know the home menu and product selection menu. All
other ultimail menus work in a similar way. You will soon get used to the other
windows (SET UP menu, input, prompt, error message, help).
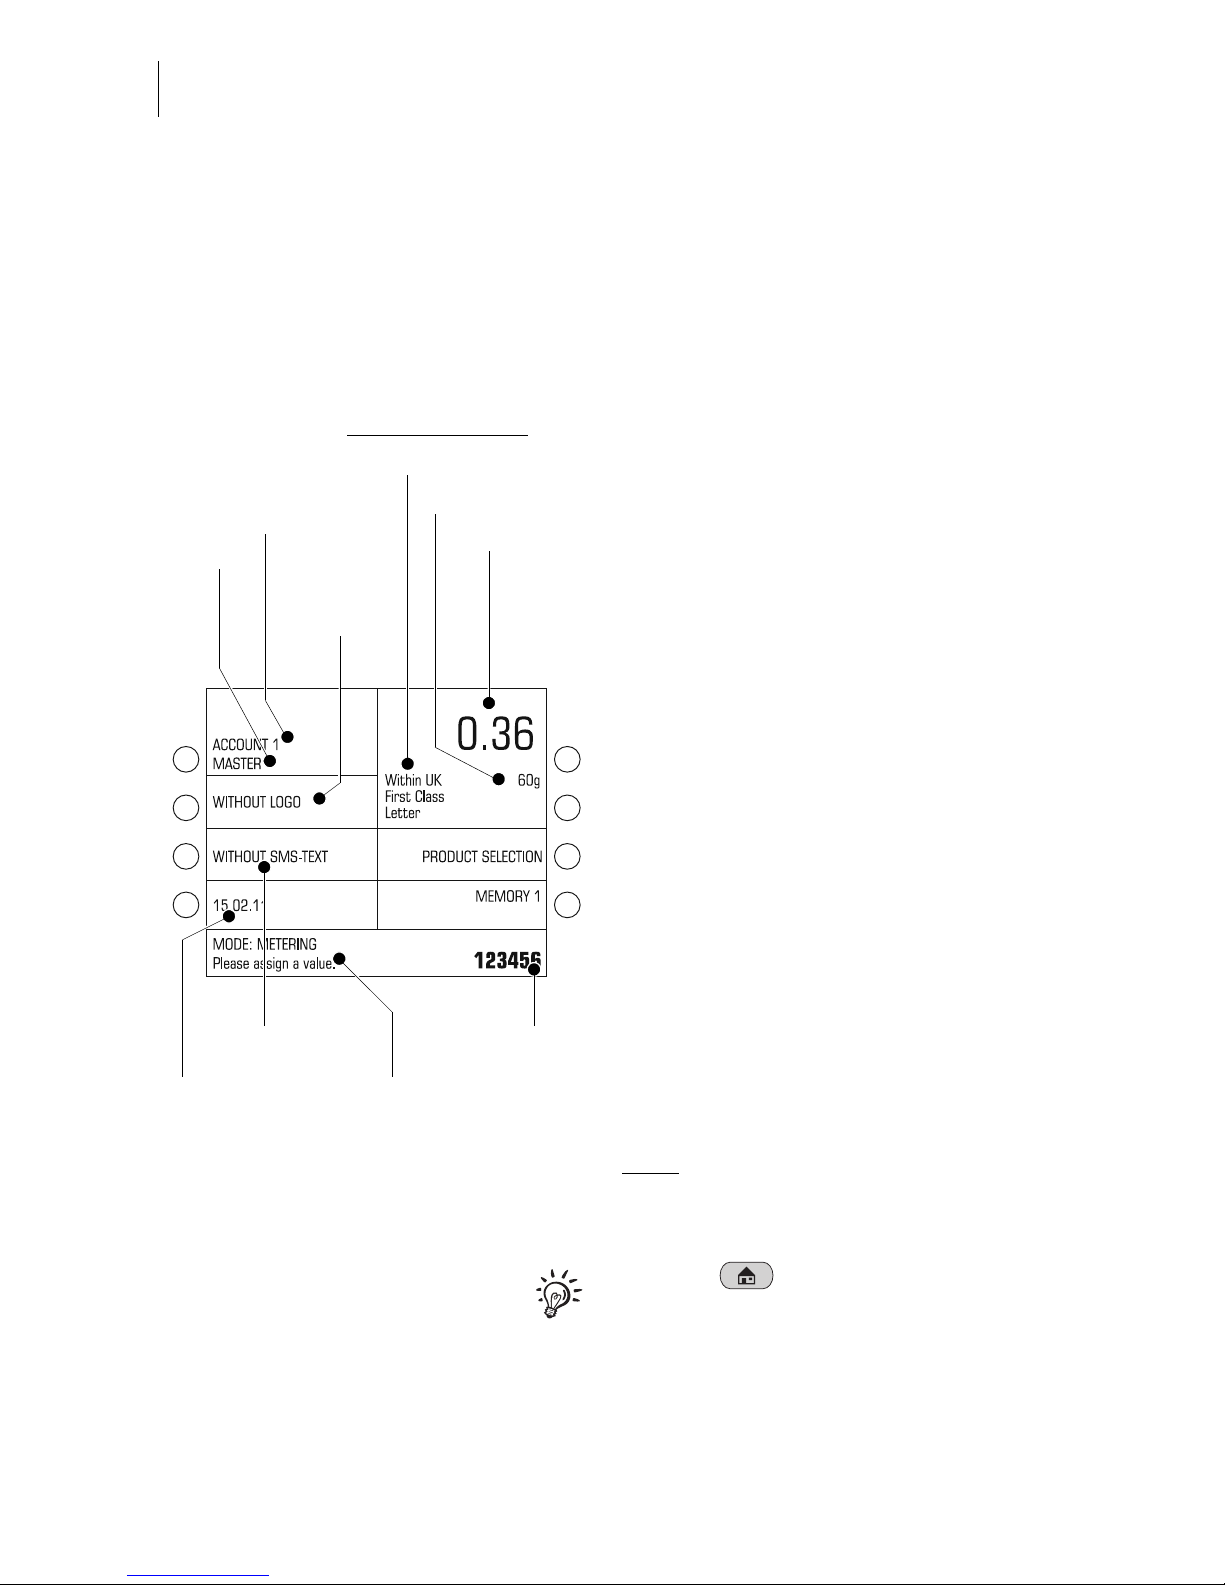
The home menu
The home menu appears after switching
on. At a glance, you will see all settings
for franking (product, date, advertising
imprint…).
A postage value only appears if
– all required mailing data are selected
– the displayed weight value exceeds 0 g
– an account is set / an access card
(MASTER or USER) is plugged in.
The keys to the left and right of the display are multi function keys (also called
soft keys). You can see the assigned
function immediately next to the key in the
display.
In the home menu, you can
– set logo, SMS text, date.
– call saved product settings (memory)
– go to product selection menu to set
mailing data
– change account (if access to this
function is permitted)
– weigh letters (ultimail with scales only)
–frank.
Note:
In the ultimail user interface,
the franking mode is shown as
‘MODE: METERING …’.
With the key you go back to home
menu from other menus.´
Postage value
Status line
Current account:
Name
Mailing data
Input field
Weight
Logo
(advertising
imprint)
Product of Royal Mail:
Number
Date of
franking imprint
SMS text
Page 17

ultimail operating basics
17
Displaying the product selection menu
Open the product selection menu where
you set mailing data and weight from the
home menu.
You can choose to
– set a new product or
– display / edit current product settings.
To set a new product
press the multi
function key in the home menu to the right
of PRODUCT SELECTION. The ultimail
opens the product selection menu. The
field showing the current product settings
is empty.
To display / edit the product press one of
the two multi function keys to the right of
the product in the home menu. (These
are the two keys at the top right next to
the display.) The ultimail opens the
product selection menu displaying the
current product settings.
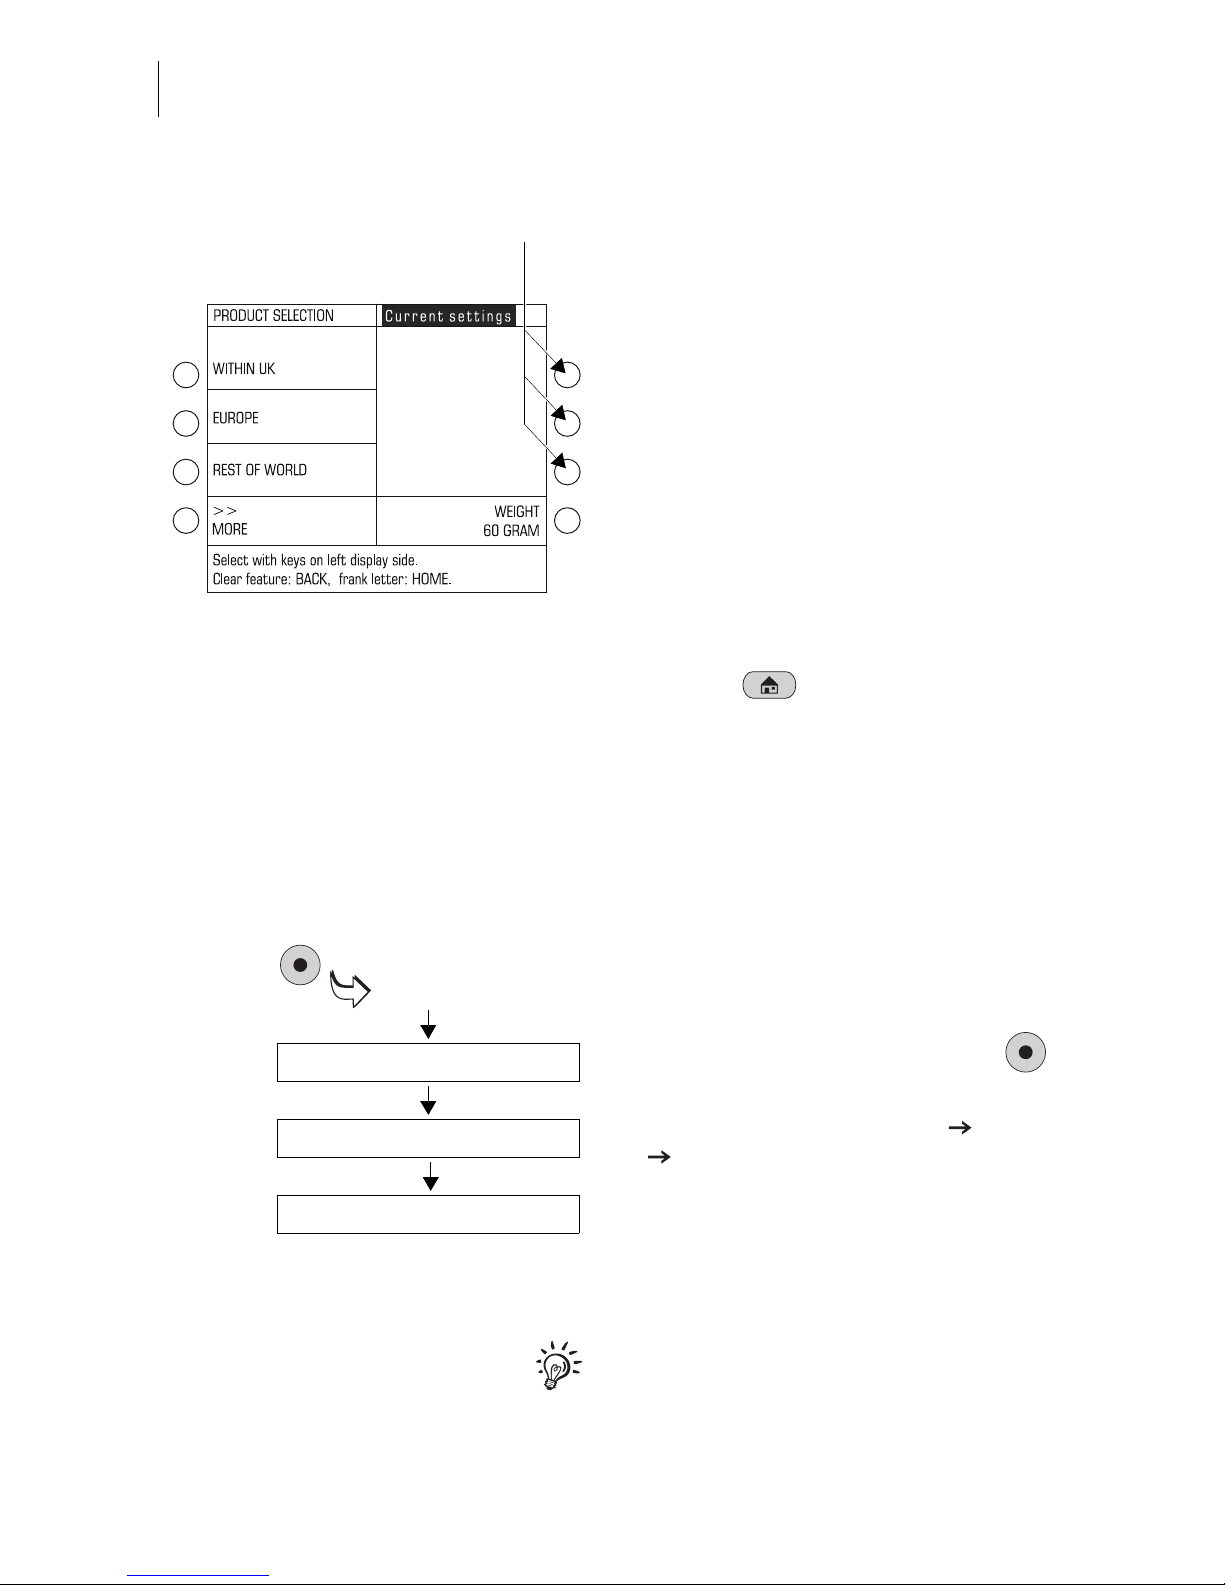
The product selection menu
The display field shows the current
product settings:
the postage value, all mailing data
selected, and the weight.
A postage value appears only if
– all necessary mailing data have been
selected,
– the weight displayed exceeds 0 grams,
and
– an account has been set / an access
card (MASTER or USER) has been
plugged.
The mailing data available for selection
are shown in the display left.
Displaying / editing
the set product
Setting a
new product
Mailing data available
for selection
Display field
for the current
product setting
Display field for
the set weight
Page 18
ultimail Operator Manual
18
In the product selection menu you can
– select mailing data (using the multi
function keys to the left of the display).
When more than four items are available: scroll using MORE / PREVIOUS.
– manually specify the weight (using the
multi function key to the right of
WEIGHT).
– weigh letters (ultimail with scales only).
Some of the multi function keys are
without function in the product selection
menu (see the figure).
Return to home menu
• With the key you go back to the
home menu.
When you exit the product selection
menu, the ultimail saves the current
settings.
How menu sequences are visualised
The ‘path’ through the operating menu to
the different functions is represented in
this way:
• Go to the SET UP menu using the
key.
• Select SYSTEM SETTINGS MORE
TONE SIGNAL.
You will see menu names, options or
functions which you should select one
after the other by pressing the associated
multi function keys.
For fast orientation you will find an overview of the SET UP menu on page 194.
Multi function keys:
without function here
SET UP
SYSTEM SETTINGS
MORE
TONE SIGNAL
Page 19
ultimail operating basics
19
4.3 Trial run (zero test print)
You can check the settings for franking
imprint and the print quality by doing a
trial run with postage value ‘0000’ (zero
test print).
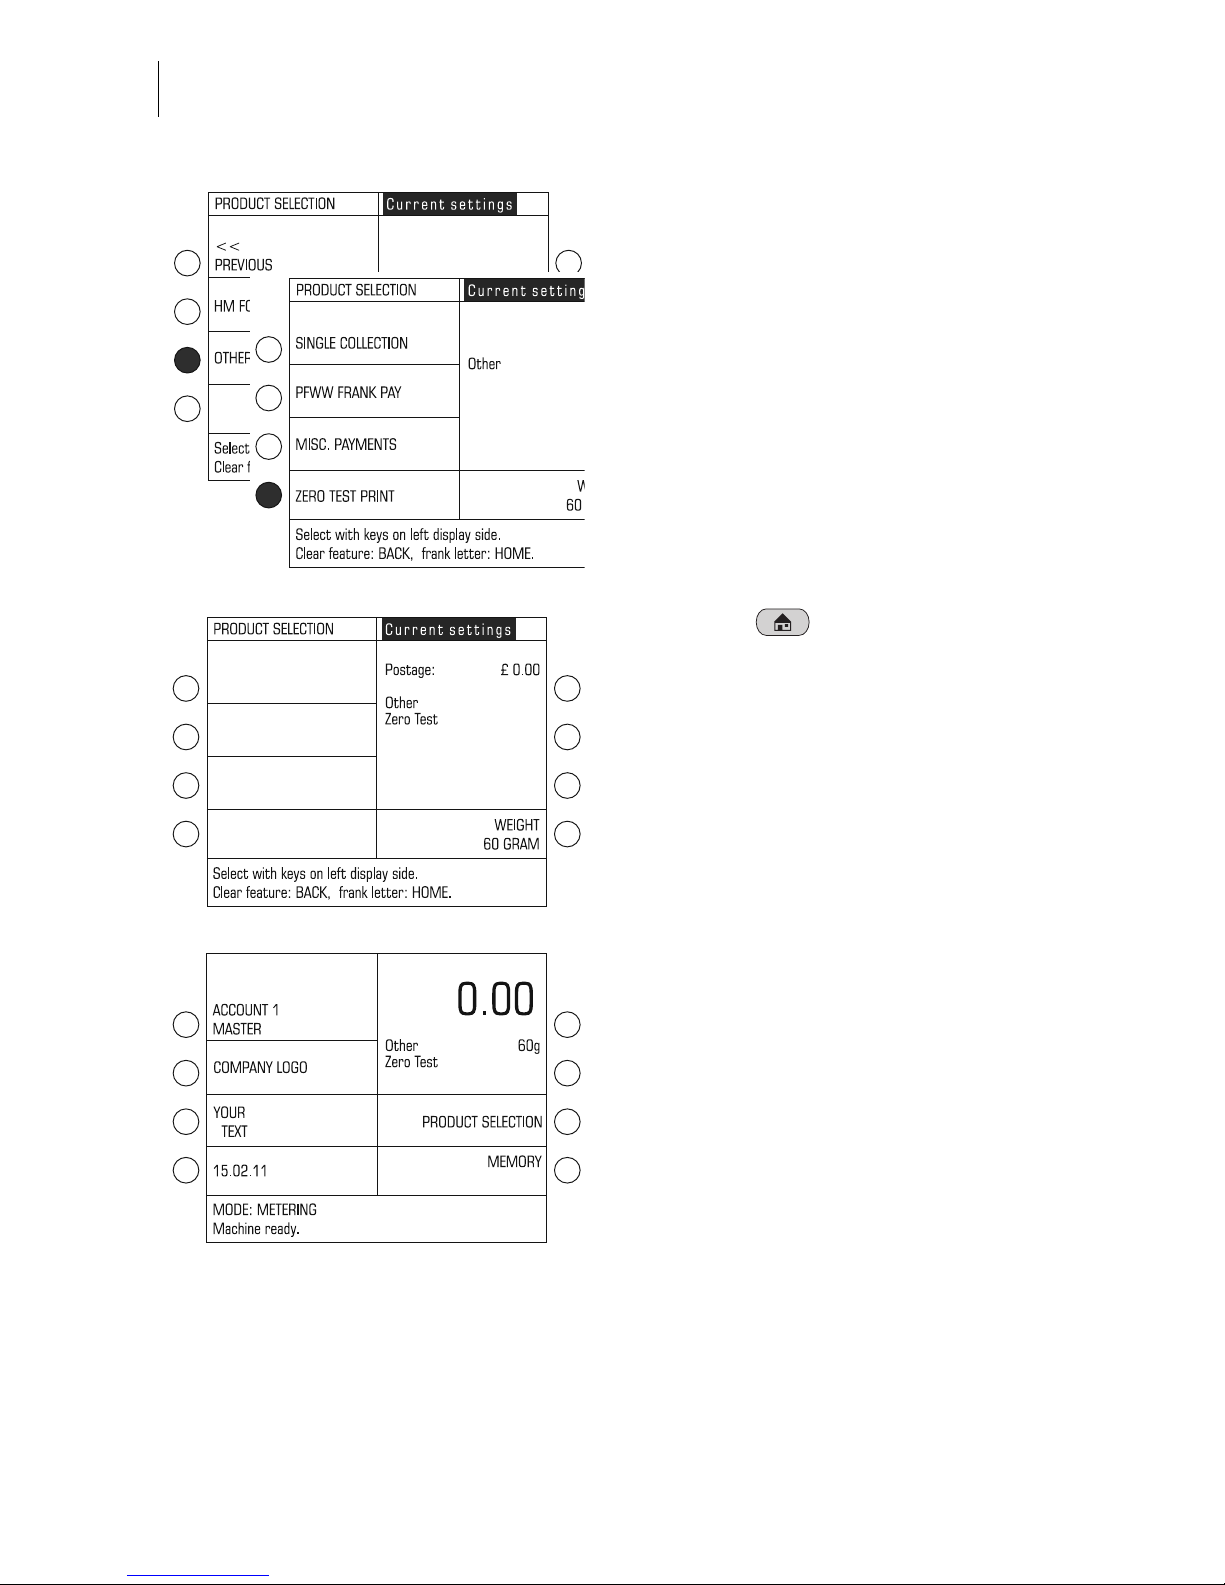
Setting the zero test print
• In the home menu:
Press the multi function key next to
PRODUCT SELECTION.
The ultimail opens the product selection
menu.
• Scroll using MORE until the OTHER
option appears.
Page 20
ultimail Operator Manual
20
• Select OTHER.
• Select ZERO TEST PRINT.
• Press the key to change to the
home menu.
The postage value for the zero test print
is set to £ 0.00.
You can feed an empty envelope for a
trial run.
Page 21
ultimail operating basics
21
• Place an empty envelope on the letter
receiving tray
– side to be printed face up
– the upper edge flush to the letter
guide face.
• Push the envelope in until the letter
sensor recognises the envelope and
starts letter transport.
The ultimail feeds the envelope, prints,
and places the printed envelope in the
catch tray.
Position, in the same way, an empty
envelope for trial run at the sealer or at
the feeder. For details on how to use
sealer and feeder, read chapter 6.
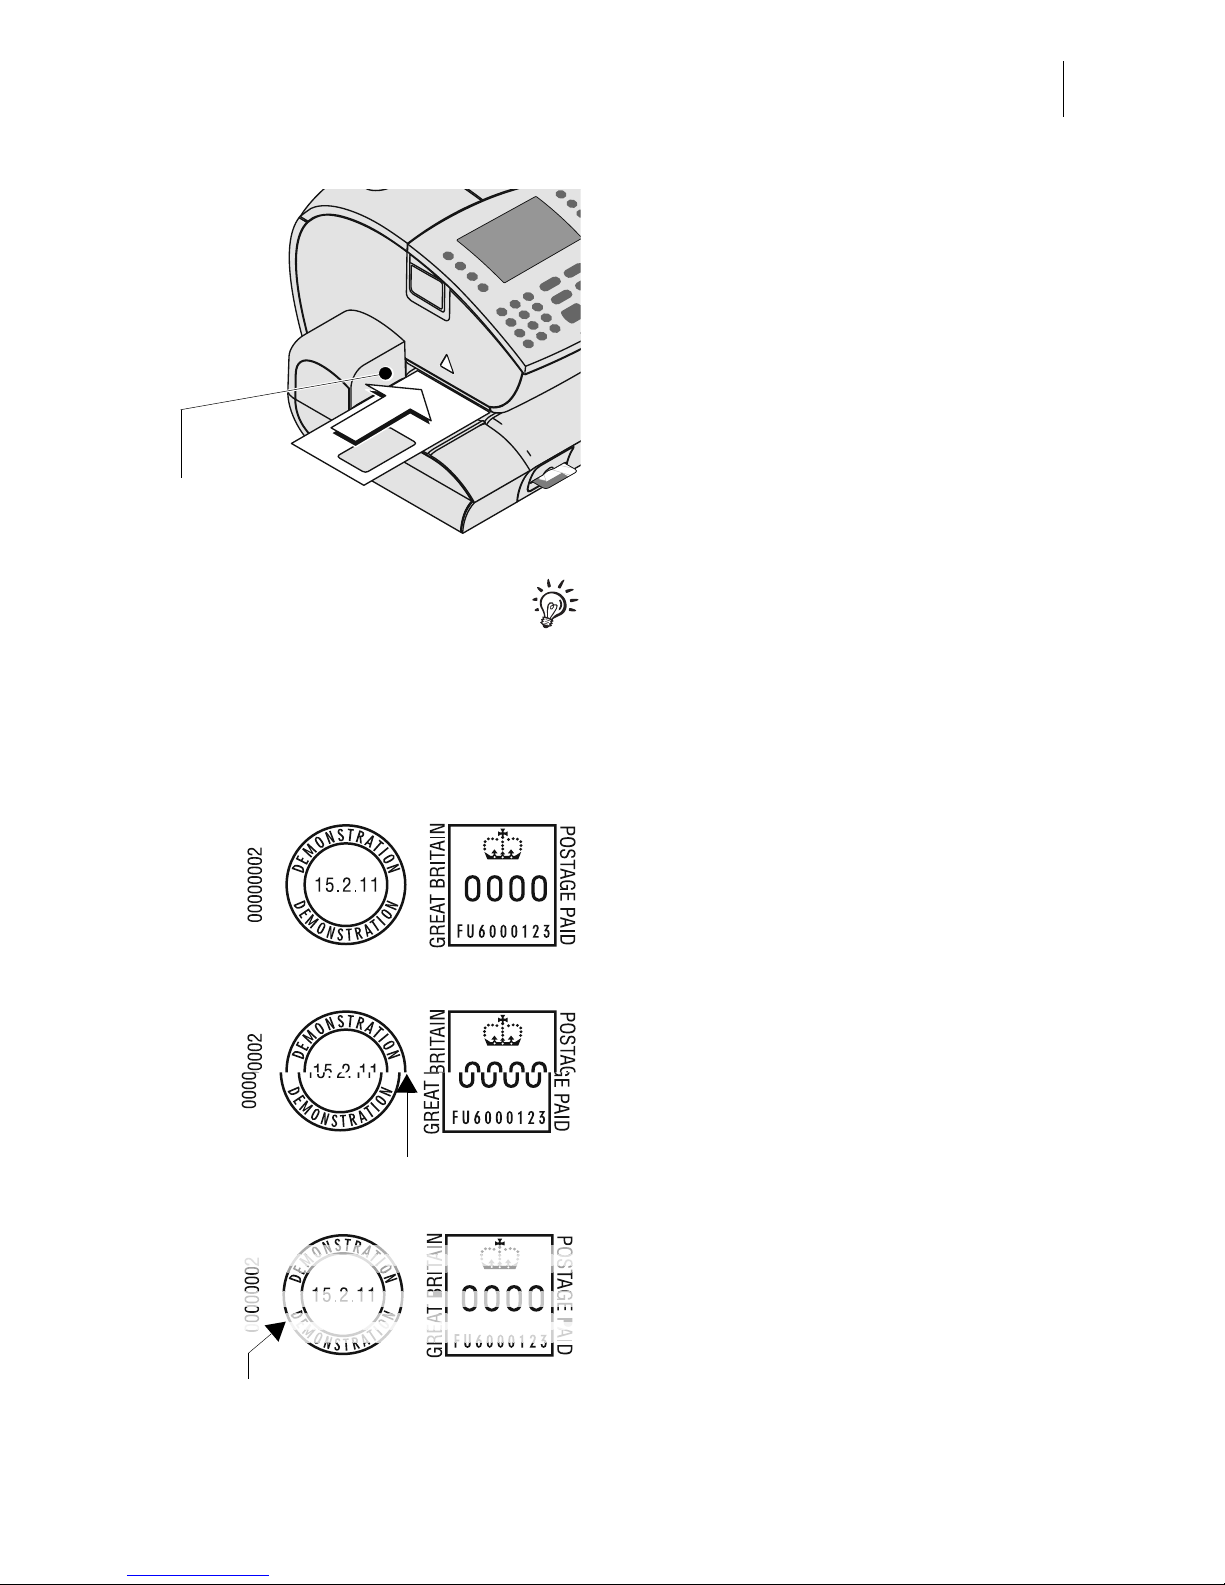
Check print quality
Make sure your ultimail prints flawless
franking imprints without misalignments.
• Examine the imprint. It must not contain
any gaps or misalignments.
This illustration shows a flawless imprint.
If the imprint exhibits misalignment:
• Adjust the ink cartridges
(see chapter 14.3).
If the imprint contains gaps or blurs:
• Clean the ink cartridges
(see chapter 14.4).
Letter guide face
Misalignment
Gaps
Page 22

ultimail Operator Manual
22
5 Setting the franking imprint
Set up the franking imprint by selecting the product and other settings in the home
menu:
– Product of Royal Mail / postage value (see chapter 5.1)
– Date = current date of deposit of the mail piece (see chapter 5.2)
– Logo / advertising imprint (see chapter 5.3)
– SMS text (see chapter 5.4).
Specific types of mail can be marked with the respective type of mail endorsement
(e.g. FIRST CLASS, OVERSEAS MAIL). In order for this to function, the automatic
endorsement setting has to be enabled in the SET UP menu (see page 117). Type of
mail endorsements cannot be set manually.
After switching the ultimail on
, the
settings for the franking imprint are as
follows:
– Product settings (mailing data, weight
and postage value) are default settings
that are stored in MEMORY 1.
– Current date.
– The logo and SMS text are determined
by the currently set account.
Refer to chapter 6.2 on how to change
the account.
Postage value
Type of mail
endorsement
Date
Logo
(advertising imprint)
Serial number
Machine identification
SMS text
Page 23
Setting the franking imprint
23
5.1 Postage value / Royal Mail product
ultimail uses the selected mailing data and the indicated weight to automatically set
the postage, i.e. the price for the Royal Mail product. The following chapters describe
in detail how to select mailing data and how to set the weight.
A postage value appears in the home and product selection menus only if
– all necessary mailing data have been selected,
– the weight displayed exceeds 0 grams, and
– an account has been set / an access card (MASTER or USER) has been plugged.
5.1.1 Setting the postage value / product using the memory
Use the memory to fast and easily set up a product.
The home menu lets you retrieve up to 20 saved combinations of mailing data, weight
and postage. You can display the available memories under MEMORY.
Refer to chapter 11 on how to save, edit, or delete memories.
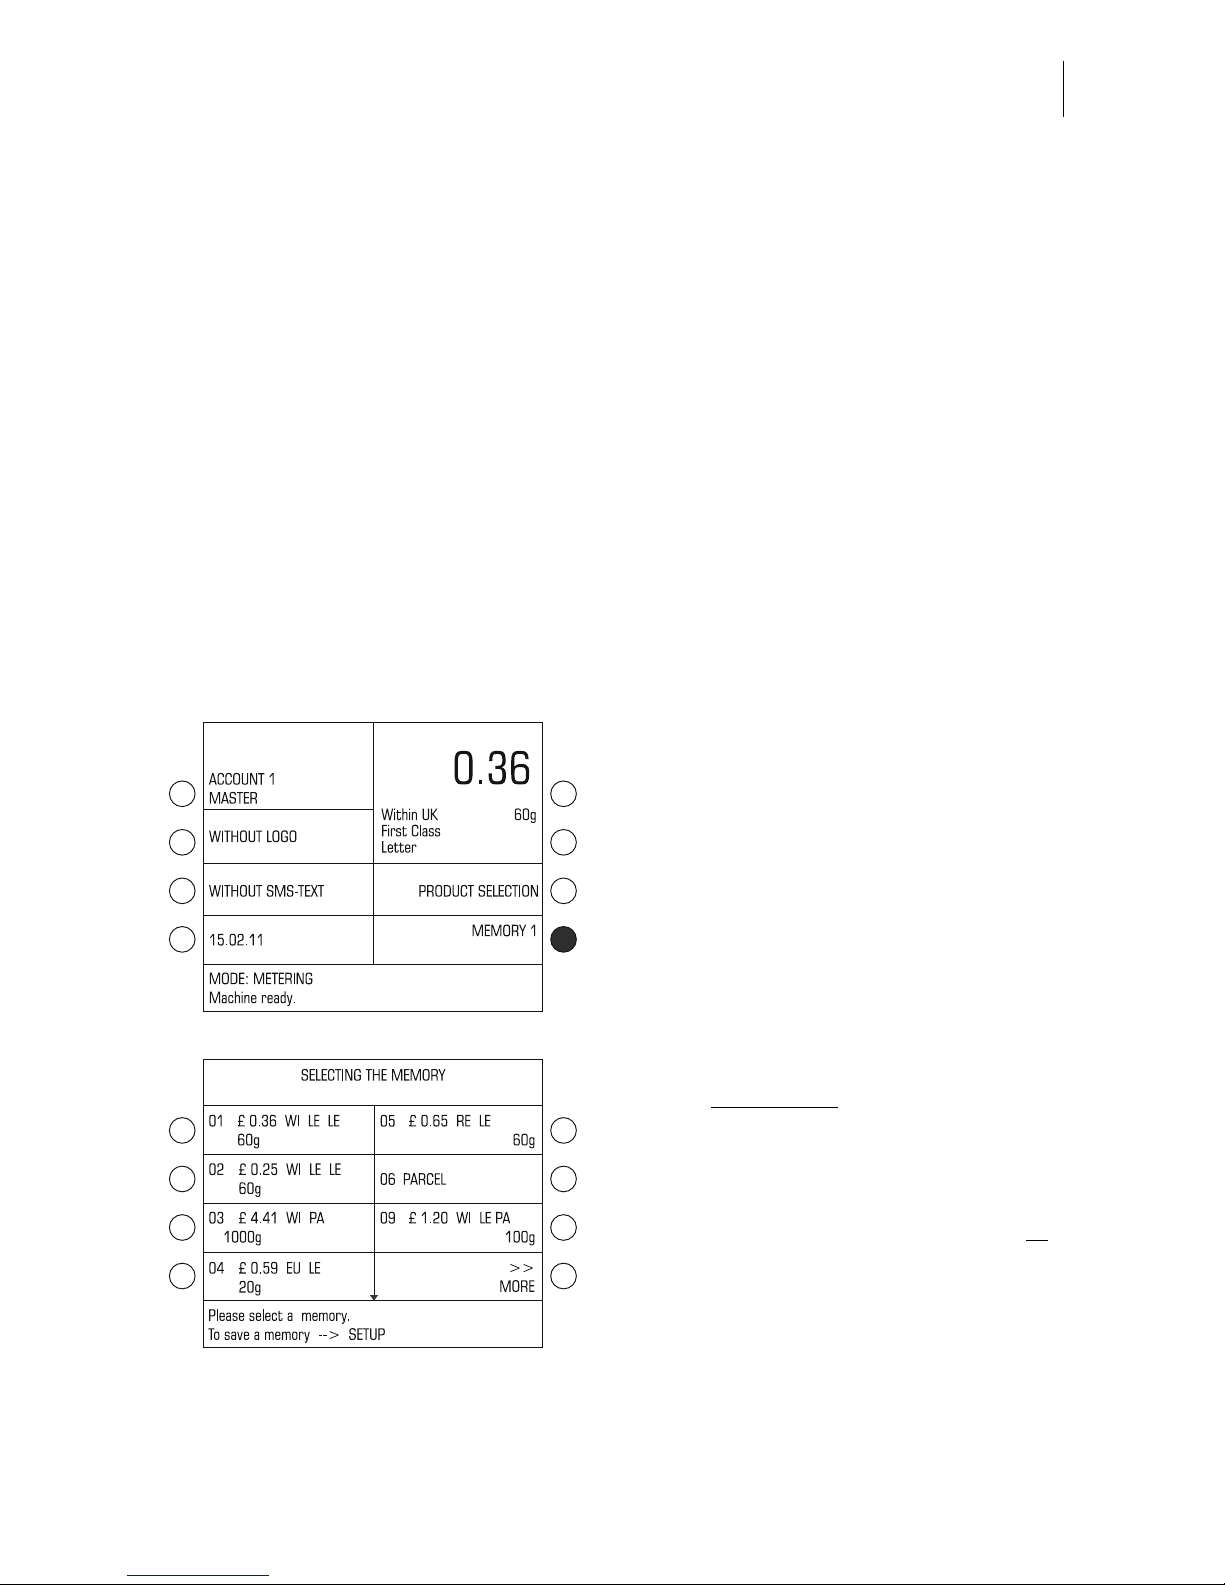
• In the home menu, press the key next
to MEMORY.
The SELECTING THE MEMORY menu
displays all assigned
memories for
selection.
The list of memories shows
– the memory number
– the saved assignment in short format or
the memory name.
You can scroll the list with the arrow keys
if more than 8 memories are available.
Page 24
ultimail Operator Manual
24
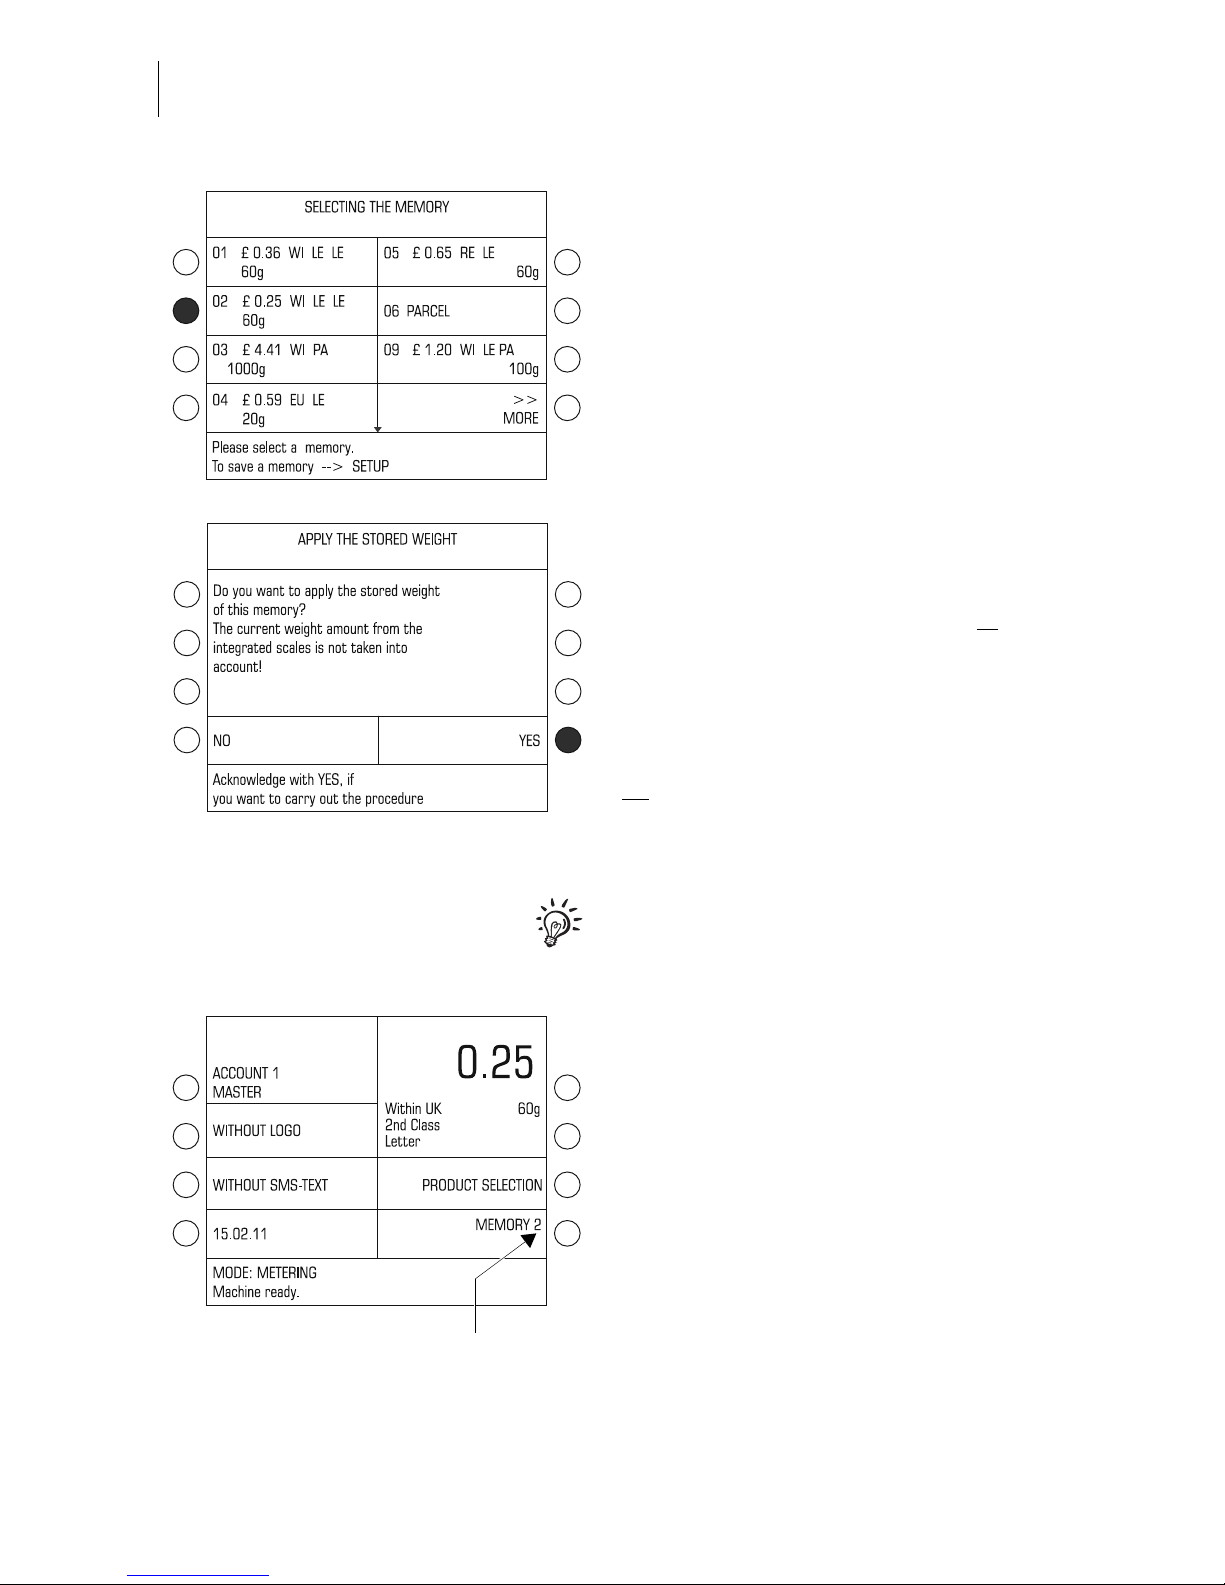
Using a memory
• Press the key next to the desired
memory in the SELECTING THE
MEMORY menu.
When retrieving memories you have the
choice of either applying the weight
determined by the scales or specified
manually for postage calculation, or to
apply the weight contained in the
memory.
• Use YES to set the weight saved in the
memory.
Or
• Use NO to keep the weight shown in
the home menu (= current weight).
This query does not appear if the current
weight = 0 g. The weight of the memory is
set.
The ultimail returns to the home menu.
The saved data and the corresponding
postage are set.
Following MEMORY the number of the
set memory appears.
Memory set
Page 25

Setting the franking imprint
25
Showing the complete memory
assignment
You can display a comprehensive description of the saved product for each
memory:
• Press the key next to the desired
memory in the SELECTING THE
MEMORY menu for at least 3 seconds
.
To use the memory shown:
• Confirm with the key.
To return to the SELECTING THE
MEMORY menu:
• Press to close the menu.
Printing the memory list
• Press the key in the SELECTING
THE MEMORY menu.
• Position an empty envelope / card.
• Position more envelopes if necessary.
Or
• Use the key to print the list on
labels (ultimail with label dispenser only).
You can also call up the memory directly in the home menu:
• Type the memory number in the home
menu.
• Confirm with the key next to MEMORY.
Page 26
ultimail Operator Manual
26
5.1.2 Setting mailing data
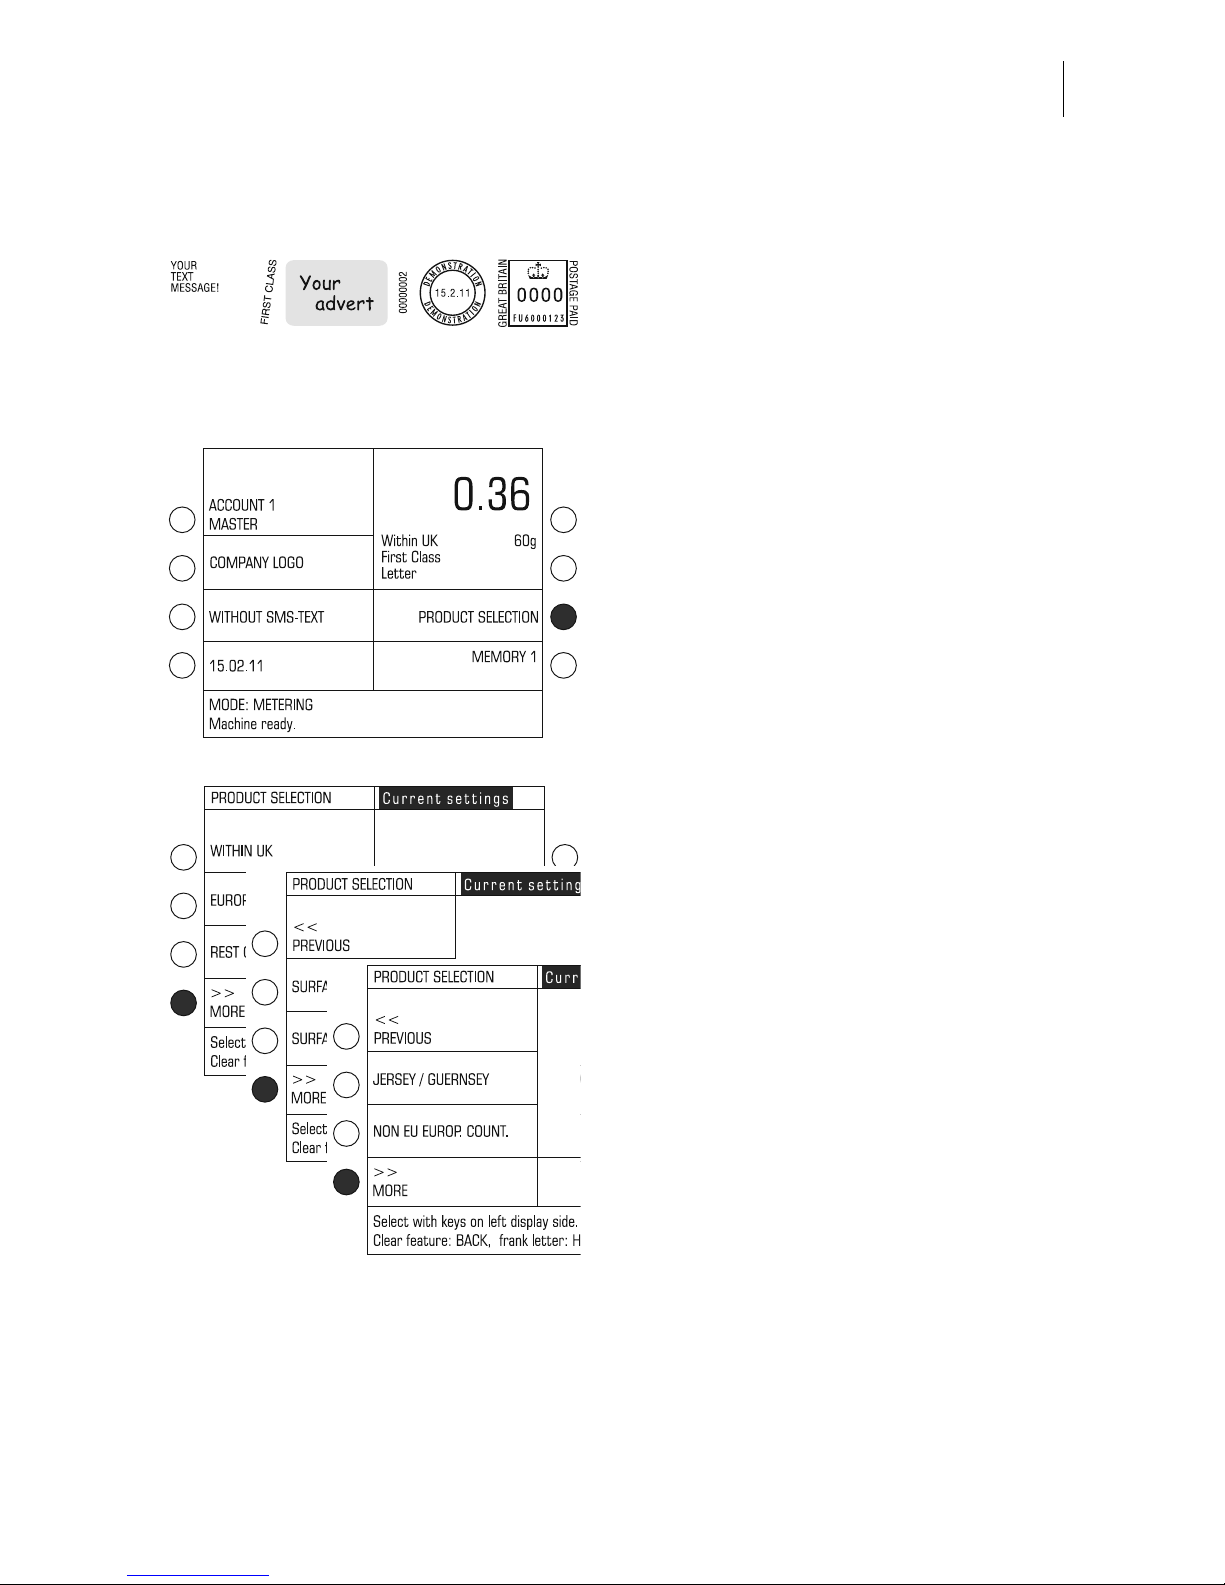
5.1.2.1 Selecting the mailing data for a new product
You set the mailing data in a dialogue with the franking machine, i.e. the ultimail
requests all the data required for calculating postage one after the other. Select the
desired mailing data using the multi function keys to the left
of the display.
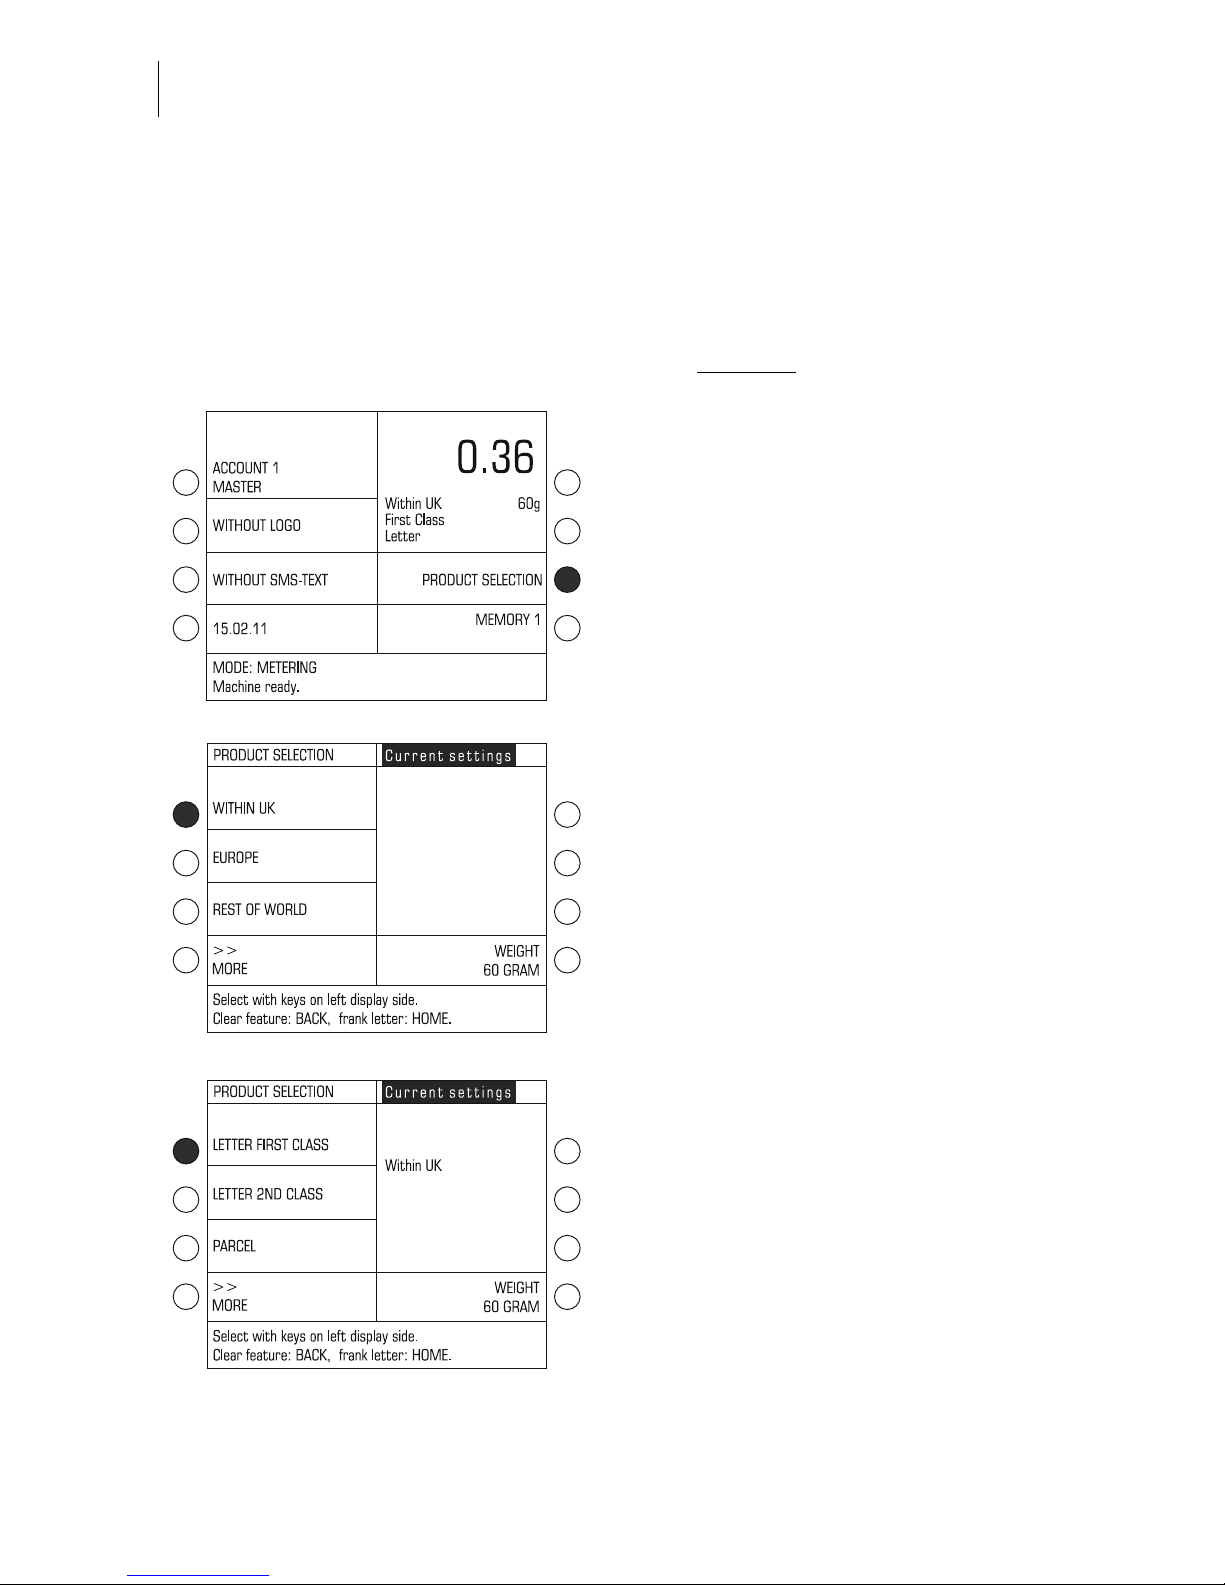
• Press the key next to PRODUCT
SELECTION to open the product
selection menu.
• Select the desired setting using the
associated multi function key.
In the example: WITHIN UK.
The selected setting appears in the
display field under “Current settings”.
The display left shows the available mail
types.
• Select the next setting. In the example
this is LETTER FIRST CLASS.
• Proceed in this manner to set all
required mailing data for your mail
piece.
Page 27

Setting the franking imprint
27
The postage value appears in the display
field as soon as all necessary mailing
data are selected and the displayed
weight exceeds 0 g.
If you want to use special Royal Mail services (e.g. Recorded delivery), continue
with “Using special services”.
If no special service is to be utilised,
continue by setting the weight.
– Refer to page 30 on how to manually
specify the weight.
– For details of how to use the integrated
scales
, please refer to page 31.
Using special services
Depending on the selected product settings you can use special services of
Royal Mail (e.g. Recorded delivery).
• Use the multi function keys to select the
desired service. In the example:
RECORDED DELIVERY.
You can select several special services
for one delivery. The ultimail assists you
complying with postal regulations by not
allowing combinations that do not exist.
Deselecting a special service:
• Press the assigned multi function key
again.
The special service is deleted from the
current settings.
Continue setting the weight:
– Refer to page 30 on how to manually
specify the weight.
– For details of how to use the integrated
scales
, please refer to page 31.
Page 28
ultimail Operator Manual
28
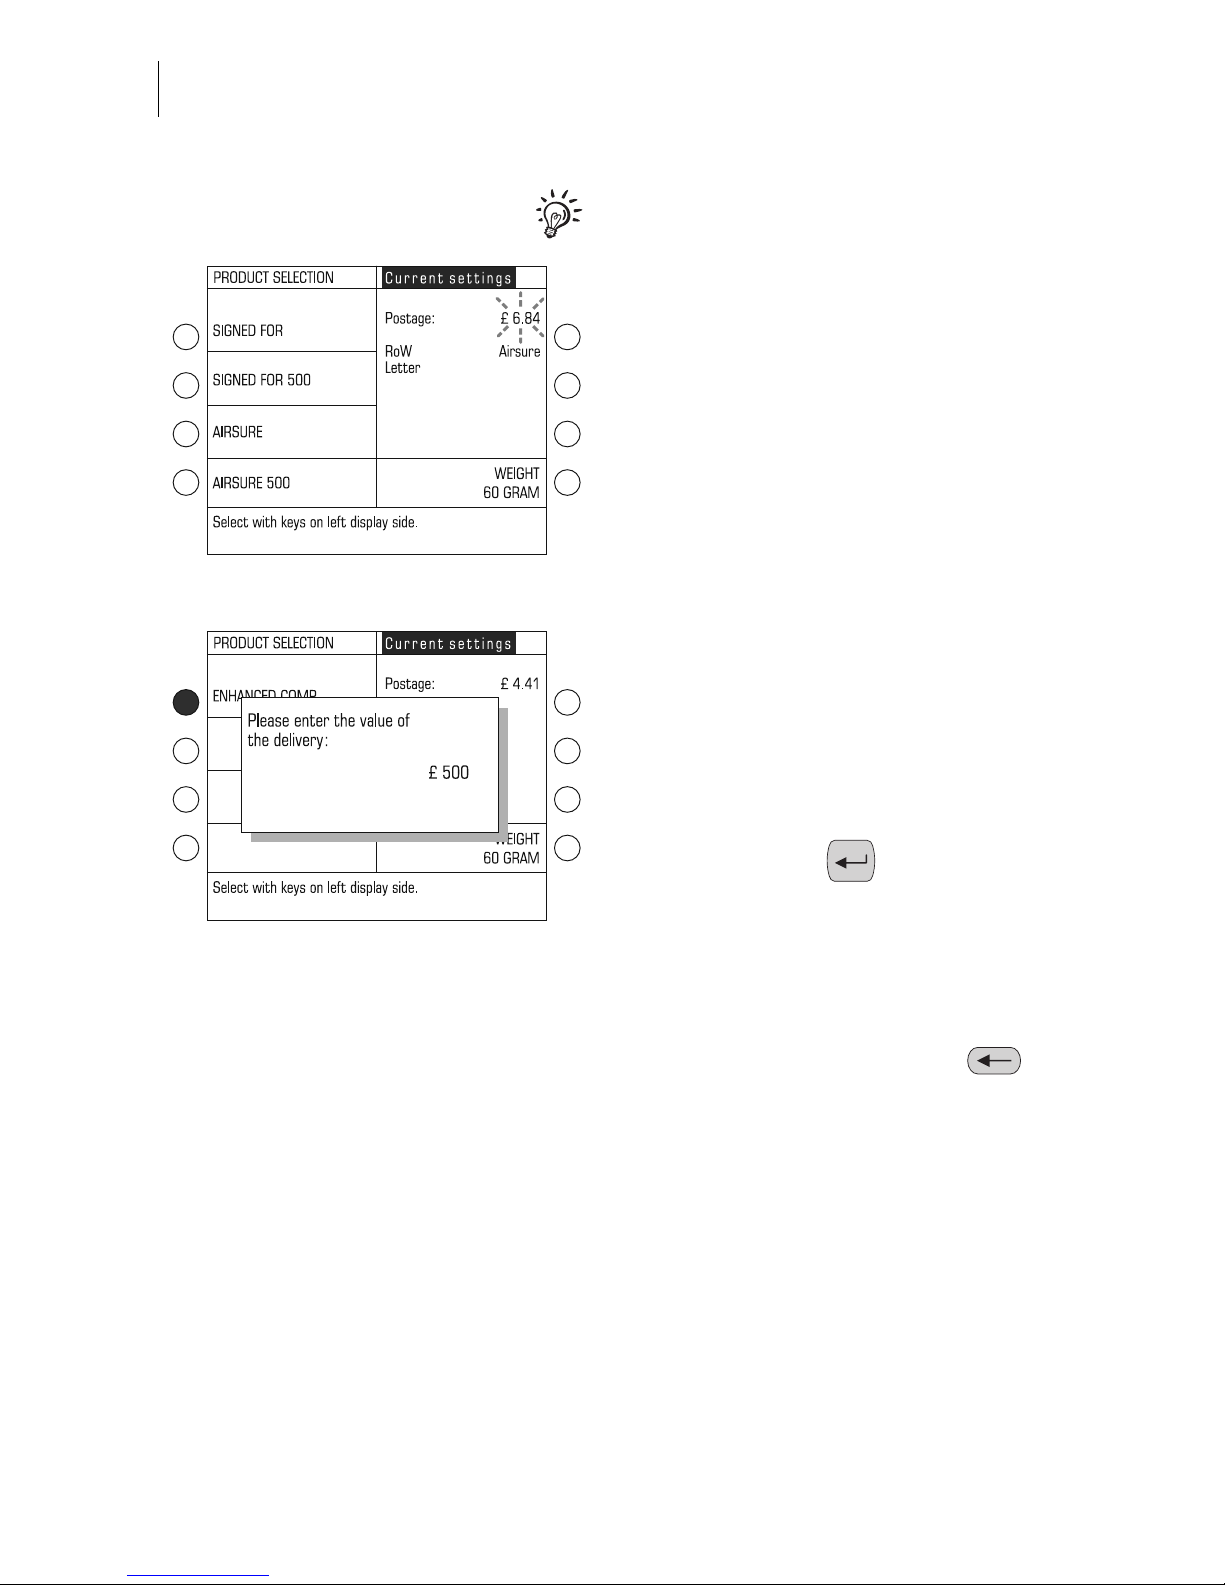
Special features with regard to
product setting
A flashing postage value indicates
special features of the product setting
(e.g. country-specific particularities,
dispatch with selected settings not
permitted in all countries). Please contact
Royal Mail to be informed of the latest
regulations.
ultimail may use a pop up to prompt you
for additional entries.
For example, you have to enter the value
of the mail piece when using ENHANCED
COMPENSATION.
• Specify the mail piece value.
• Confirm with the key.
The value set for the mail piece is displayed beneath the special service in the
display left.
This value remains saved until you deselect this special service or leave the special services selection using the
key.
Page 29
Setting the franking imprint
29
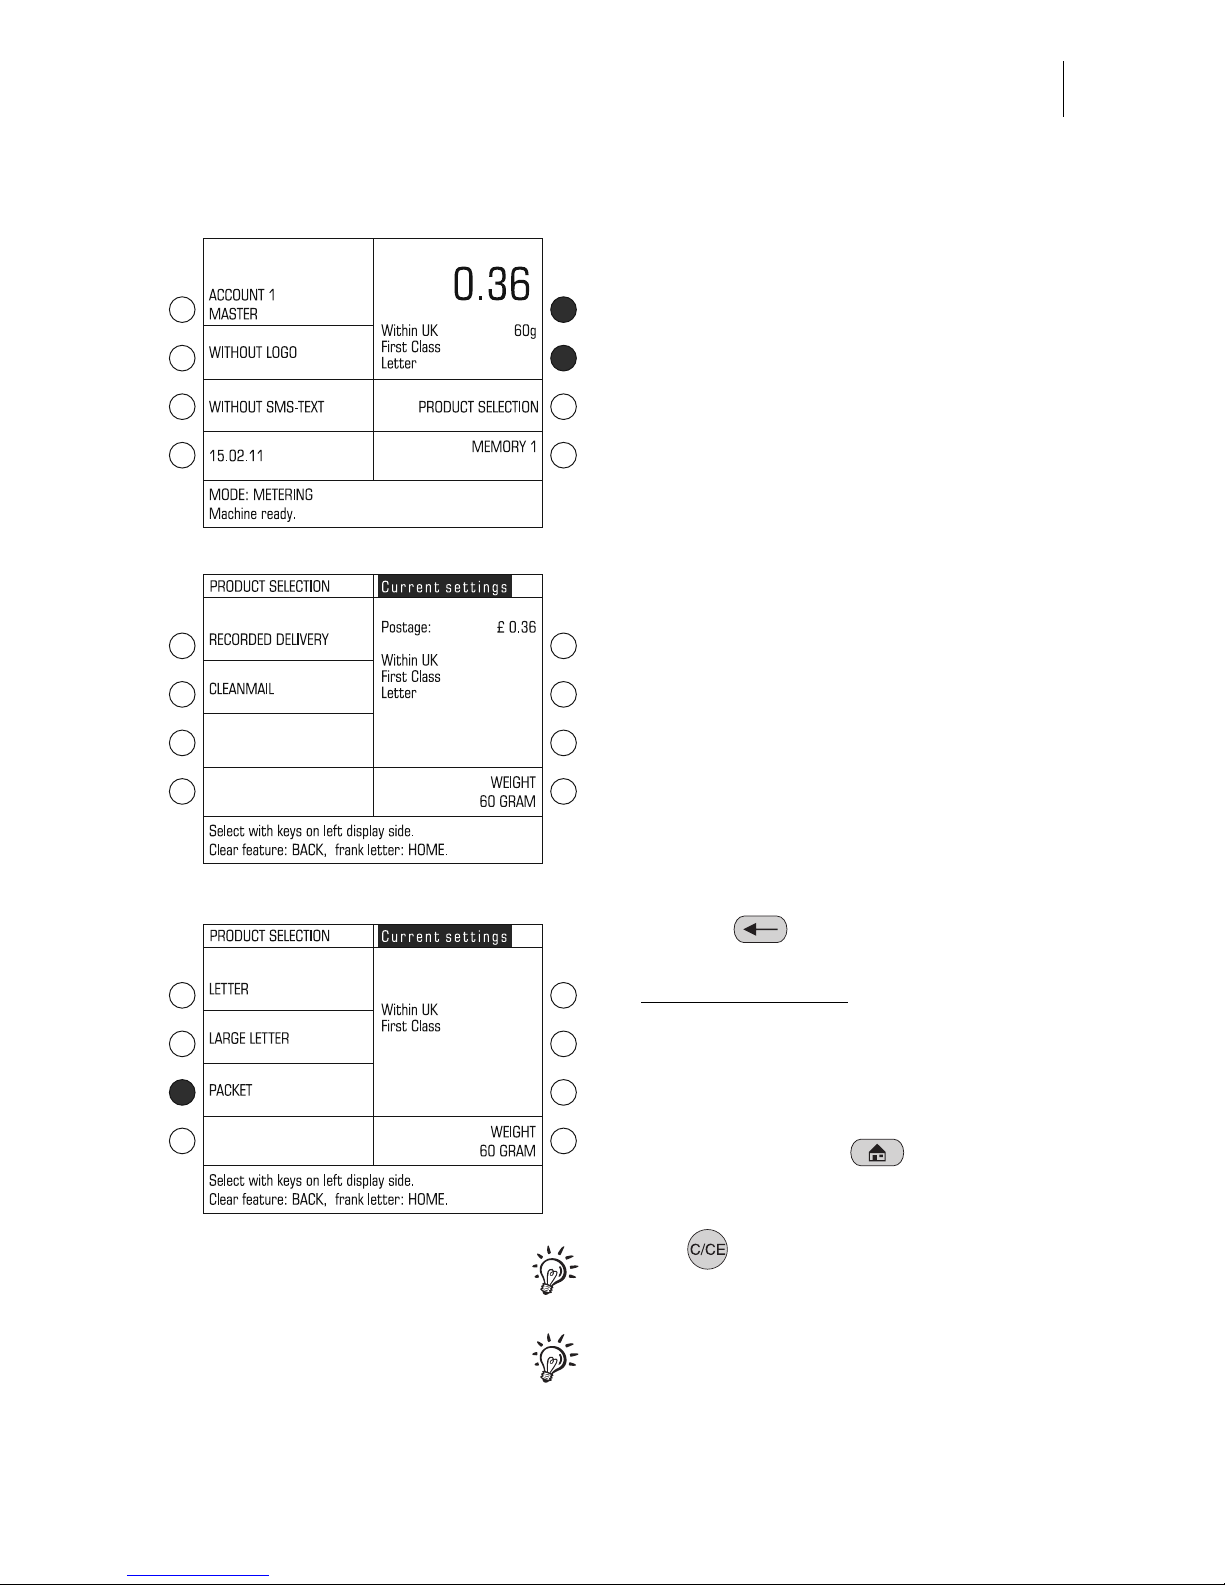
5.1.2.2 Editing a product
• Press one of the two multi function keys
to the right of the postage value /
product display.
The ultimail opens the product selection
menu displaying the current product
settings.
For the selected product you can
– select / deselect special services
(see page 27)
– set a new weight (see page 30)
– delete the current setting step by step
and select new settings.
Editing mailing data
• Use the key to delete the
current settings step by step
as far as necessary
.
In the example, the ‘Letter’ setting is to be
changed to ‘Packet’.
• Select new mailing data.
• To frank, press the key to
change to the home menu.
Press for approx. 3 seconds to
entirely delete the current selection.
Chapter 5.1.2.1 describes how to select
the mailing data.
Page 30
ultimail Operator Manual
30
5.1.3 Setting the weight
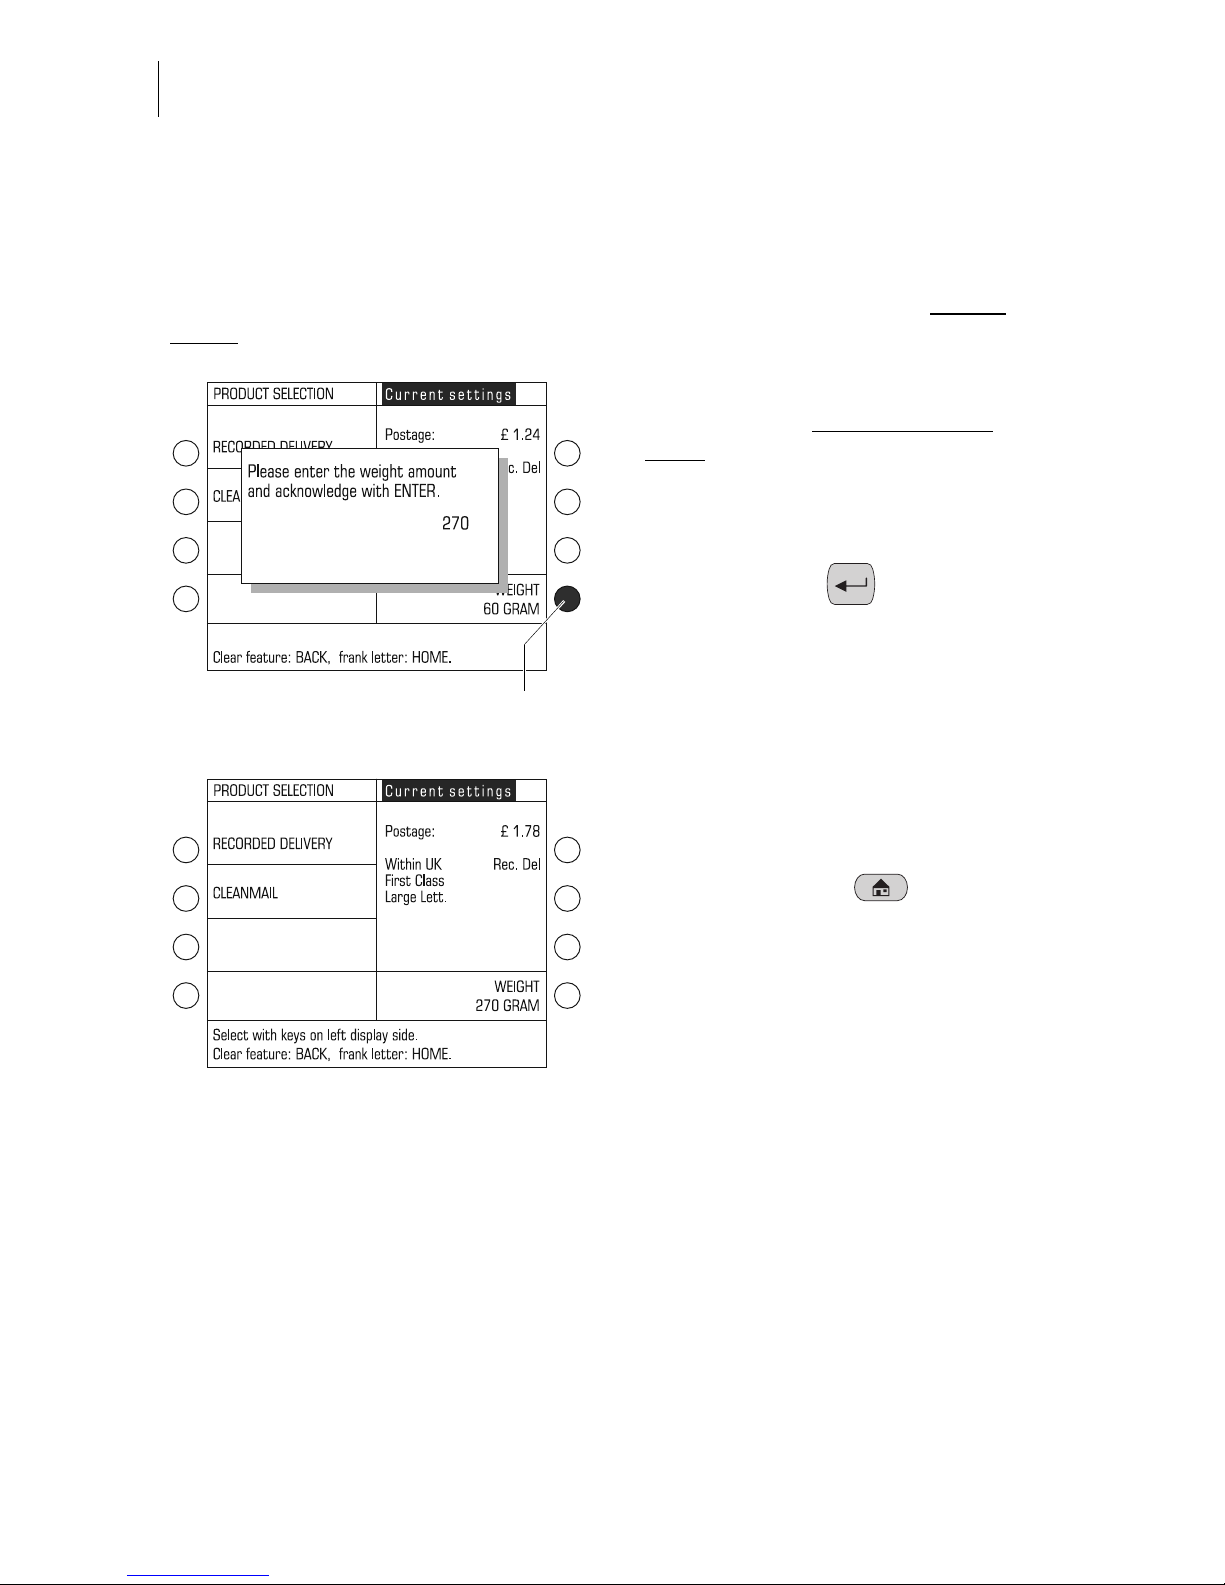
5.1.3.1 Setting the weight of the mail piece manually
You must always set the weight of your mail pieces by hand if you work without
scales. You can set the weight by hand in the product selection menu only.
• Press the multi function key next to
WEIGHT in the product selection
menu
.
The pop up for the weight appears.
• Type the weight in grams.
• Confirm with the key.
The ultimail closes the pop up.
The weight is set.
ultimail sets the appropriate postage
value for franking using the selected
mailing data and the displayed weight.
• To frank, press the key to
change to the home menu.
Manual
weight input
Page 31

Setting the franking imprint
31
5.1.3.2 Using the integrated scales: weighing mail pieces (optional)
Using the ultimail with scales lets you quickly and reliably determine the weight for
each mail piece and accordingly set the postage. You can perform weighing in the
home menu but also in the product selection menu.
This chapter describes how to use the integrated scales in the METERING AND
WEIGHING mode. On how to use the optional ‘Differential weighing’ function
(METERING AND DIFF. WEIGHING mode), please refer to chapter 7.5 on page 57.
Caution! Please read the following notes on how to use the integrated
scales:
– The scales are designed for a maximum weight of 5 kg.
– The ultimail can determine a new weight only if the scales have been
emptied beforehand. You must therefore empty the weighing platform
before you place a new mail piece to be weighed.
• Place the mail piece on the weighing
platform.
The ultimail determines the weight.
A beep indicates that a new weight has
been set when the acoustic signal of the
ultimail was set to ON (see chapter 13.6
on page 101).
The ultimail sets the appropriate postage
value for franking using the selected
mailing data and the displayed weight.
• To frank, press the key to
change to the home menu.
Page 32

ultimail Operator Manual
32
5.1.4 Entering the postage value manually
There may be particular cases where the ultimail fails to calculate the postage. In
such a situation you have to enter the postage value manually.
• In the home menu: Press the key next
to PRODUCT SELECTION.
The ultimail opens the product selection
menu.
• Scroll using MORE until the OTHER
option appears.
• Select OTHER.
Page 33

Setting the franking imprint
33
• Select the desired option.
In the example: PARCEL FORCE
WORLD WIDE FRANK.
The ultimail opens a pop up for entering
the postage value.
• Enter the postage value of the mail
piece.
• Confirm with the key.
The ultimail closes the pop up.
The postage value is set.
• To frank, press the key to
change to the home menu.
Page 34

ultimail Operator Manual
34
5.2 Date
The date for the franking imprint is set automatically to the current date by the system
clock. You can set the date forward. The ultimail does not allow dating ahead too
much in advance as well as setting the date backward.
• In the home menu, press the key next
to the date.
The pop up for the date appears. The
date indication of the ultimail consists of
2 digits each for the day (DD), the month
(MM) and the year (YY).
You can just enter the day (DD) as well.
Month and year will be added by the
ultimail to form the next possible date.
• Type the new date.
• Confirm with the key.
The ultimail closes the pop up and sets
the new date in the home menu.
Reset to current date:
• Press the key.
• Confirm with the key next to the date
display.
You can also set the date for the franking imprint directly in the home menu:
• Type new date.
The entered value appears at the bottom
right of the status line.
• Confirm with the key next to the date
indication.
Page 35

Setting the franking imprint
35
5.3 Logo / advertising imprint
When franking mail pieces you can also print a logo / an advert of your choice on
your mail piece. ultimail offers you the following configurations of equipping with
advertising imprints:
– ultimail can save up to 9 different logos. All saved logos are available to all users.
For logo administration, read chapter 12.
– Logos on a USER card. You can order USER cards with a logo of your choice from
Francotyp-Postalia. This logo is only available to the holder of the USER card and
cannot be loaded into the franking machine.
Select / set logo
• In the home menu, press the key next
to the logo.
The SELECTING LOGO menu offers all
logos available in your ultimail.
• Press the key next to the desired logo.
In the example, this is the
COMPANY LOGO (logo no. 2).
The ultimail goes back to home menu.
The advertising imprint is set.
You can view the advertising imprints:
Press the key next to the desired logo in
the SELECTING LOGO menu for at least
3 seconds. A simplified preview image of
the logo appears in the display.
Page 36

ultimail Operator Manual
36
Using the logo from a USER card
• Insert a USER card with logo.
• In the home menu, press the key next
to the logo.
The logo on the USER card always
appears in the last position in the
SELECTING LOGO menu.
• Press the key next to the last logo in the
list. In the example this is ADVERT-01.
The ultimail returns to the home menu.
The logo stored on the USER card is set
for franking.
You can also define the logo on the
USER card as the default logo for this
account (see page 70). In this case the
logo on the card is used for the franking
imprint immediately after the USER card
is plugged.
If you know the logos and the associated codes saved in the ultimail, you can
directly set the advertising imprint in the home menu:
• Type the logo number.
The entered number appears at the
bottom right of the status line.
• Confirm with the key next to the logo.
Logo on USER card
Page 37

Setting the franking imprint
37
5.4 SMS text
When franking, you can print a freely editable text message. This text appears on the
very left side of the franking imprint. In case you frank without a logo, the SMS text
will move to its position.
Caution! If you want to print both, a logo and an SMS text: Use sufficiently
sized envelopes. Otherwise, the text message may be cut off.
• In the home menu, press the key next
to the SMS text.
The SELECTING SMS TEXT menu
offers all stored SMS texts.
• Press the key next to the desired
SMS text. In the example, this is
“YOUR TEXT MESSAGE”.
The ultimail goes back to the home menu.
The SMS text is set.
You can also directly set the SMS text in
the home menu:
The procedure is described on page 36
by the example of the advertising imprint.
Read page 89 on how to enter SMS texts
or edit available texts.
Page 38

ultimail Operator Manual
38
6Franking
6.1 Preparations
6.1.1 Setting up catch tray
The catch tray can be adjusted to various envelope formats – up to ISO B4 maximum.
Work without catch tray when processing larger formats.
• Slide the two limit guides until they fit
the envelope format you want to
process.
6.1.2 On the sealer: adjust letter guide (ultimail with sealer only)
The letter guide ensures that letters are fed in straight run. You adjust the letter guide
to the envelope format using the bar. The format markings on the letter receiving tray
facilitate the adjustment.
Caution! For adjusting the letter guide, always hold in the recessed grip at
the bar. Never push or pull the adjustable letter guide. The letter guide might
break off.
• Fold the adjustable letter guide up
vertically to letter receiving tray:
Simply press down the recess grip on
the letter guide.
Page 39

Franking
39
The letter guide moves upwards.
• Hold the bar in the grip recess and slide
it so that the letter guide outside is
directed to the suitable format marking.
The letter guide is adjusted correctly if the
format marking arrow points to the
exterior of the letter guide.
For large envelopes:
• Adjust bar so that it is flush with the
housing edge.
• Fold letter guide down to letter receiving tray.
Page 40

ultimail Operator Manual
40
6.1.3 On the feeder: adjust letter guide
(ultimail with feeder only)
The letter guide ensures that letters are fed in straight run. You adjust the letter guide
to the envelope format using the bar. The format marks on the letter receiving tray
facilitate the adjustment.
Caution! For adjusting the letter guide, always hold in the recessed grip at
the bar. Never push or pull the adjustable letter guide. The letter guide might
break off.
• Fold the adjustable letter guide up
vertically to letter receiving tray: Simply
press down the recess grip on the letter
guide.
The letter guide moves upwards.
• Hold the bar in the grip recess and slide
it so that the exterior of the letter guide
is directed to the suitable format
marking.
The letter guide is adjusted correctly if the
format marking arrow points to the
exterior of the letter guide.
Page 41

Franking
41
For large envelopes:
• Position the extension bracket.
• Position a sample letter.
• Hold the bar in the grip recess and slide
the letter guide so that it fits the letter
format. The sample letter should have
enough clearance between letter guide
face and adjustable letter guide (about
2 to 3 mm).
6.1.4 Switch on / off seal function (ultimail with feeder / sealer only)
Seal
If the letters are to be sealed:
• Place the switch to the rear into
seal position.
• Check filling level in water tank.
• Fill the water tank if required. Read
chapter 14.6 on page 151.
Please note
:
Permanently reliable sealing results can
be assured only when you use ‘sealit’
sealing liquide.
Only use envelopes that are suited for
sealing by machinery. For details to
envelope specifications, read page 200.
Non seal
If you do not want to seal letters or if they
are already sealed:
• Place the switch to the front into
non seal position.
Extension bracket
Page 42

ultimail Operator Manual
42
6.2 Change account
You can only change the account if you work with MASTER card or if all accounts are
released for franking (in account mode: ACCESS CARD REQUIRED: OFF).
If you work with USER card
the account for the USER card is set automatically and
cannot be changed.
For account set up and account data evaluation, use account administration in SET
UP menu (see page 66).
How to change the account:
• Press the key next to the account
display in the home menu.
The ultimail opens SELECT ACCOUNT
menu. The created accounts are listed by
account numbers. If more than
8 accounts are set up, you can scroll
through the accounts list using MORE /
PREVIOUS.
• Press the key next to the desired
account. In the example, this is account
10789 “Service”.
The ultimail goes back to home menu.
The selected account is set.
You can also directly set the account in the home menu.
• Type the account number.
The entered number appears at the
bottom right of the status line.
• Confirm with the key next to the
account display.
Page 43

Franking
43
6.3 Positioning and franking a letter
You can use the ultimail to frank letters and postcards. Format and material of mail
pieces must meet the specifications on page 199.
We recommend using envelopes made of ink-absorbent material with as smooth a
surface as possible. This gives the best printing results.
For thicker deliveries you should frank the empty envelope or use labels.
Also use self-adhesive labels to attach on the mail piece when the envelope material
is not ideal for inkjet printing.
How to position letters at the hand feed tray, work with sealer or feeder and frank
labels, read on the following pages.
You can select total pieces prior to franking. This ultimail function will help you
to have the franked deliveries readily stacked by numbers for the dispatch.
Read chapter 7.2 on page 52.
6.3.1 ultimail with hand feed tray
If the ultimail is ready for operation you
can feed your mail pieces for franking.
‘Ready for operation’ means:
– ultimail shows the home menu
– the postage value is displayed
– the status line shows
“MODE: METERING…
Machine ready.”
• Place the letter on the hand feed tray so
that:
– the side to be printed is face up
(address is visible)
– the upper edge is flush to the letter
guide face.
• Push the envelope in until the letter
sensor recognises the envelope and
starts letter transport.
The ultimail feeds the envelope, prints,
and places the franked envelope in the
catch tray.
Letter guide face
Page 44

ultimail Operator Manual
44
6.3.2 ultimail with sealer
(optional)
If the ultimail is ready for operation you
can feed your mail pieces for sealing and
franking.
‘Ready for operation’ means:
– ultimail shows the home menu
– the postage value is displayed
– the status line shows
“MODE: METERING…
Machine ready.”
Feeding single mail pieces
• Place the letter on the letter receiving
tray at the sealer so that:
– the envelope flap is face down
– the side to be printed is face up
(address window is visible)
– the upper edge is flush to the letter
guide face.
• Push the envelope in until the letter
sensor recognises the envelope and
starts letter transport.
The sealer feeds the letter, moistens the
flap (if seal function is switched on) and
transfers the letter to the franking machine. The franked letter is placed in the
catch tray.
Letter guide
face
Page 45

Franking
45
Feeding similar mail pieces
Especially when franking large quantities
of similar mail pieces, you can save time
by optimised letter feed.
• Arrange letters so that address areas
are face up.
• Loosen letter stack with the upper edge
on a level base and shake smooth.
• Scale up the letter stack so that the top
letter is the first protruding when positioned.
• Hold the fanned out letter stack with
your left hand and place it on the letter
receiving tray as shown in the figure.
• Push with your right hand the top letter
in the direction of the arrow. Make sure
that the upper edge is flush to the letter
guide face.
• Once the letter is fed you can follow
with the next letter from the stack.
Press down moistened envelope flaps
To ensure that envelopes are well sealed,
we recommend pressing down the envelope flaps firmly after franking.
• Stroke your hand firmly over the
envelope’s / letter stack’s flap area.
Page 46

ultimail Operator Manual
46
6.3.3 ultimail with feeder
(optional)
6.3.3.1 Positioning letters in stack
Caution! Observe the following notes for stack processing:
– Only position letters in stack which are to be printed with the same franking
imprint (postage, type of mail endorsement…).
– Position letters of the same format only (max. 353 mm x 250 mm).
– Only position letters of nearly the same thickness ( 1 mm).
The ultimail processes letters of a thickness up to 6.35 mm.
– Observe limits of stack heights.
Prepare letter stack
• Sort out any deliveries which are
unsuited for stack processing.
You feed such mail pieces individually
and manually (see page 48).
• Take about as many mail pieces as the
ultimail will be able to process in one
stack. Maximum stack height depends
upon the material.
Markings at the letter guide face at the feeder indicate stacking height limits for letters
and postcards .
–
+
Stack height
Type / material of mail pieces Permissible stack height
Letters 50 mm
about 70 letters, contents: 1 sheet,
non folded
Postcards
of a paper weight of
at least 250 g/m
2
30 mm, about 100 cards
Postcards
of a paper weight of
less than 250 g/m2
15 mm, about 80 cards
Page 47

Franking
47
• Arrange the letter stack so that all
envelope flaps are face down.
• Align upper edges flush:
Loosen letter stack with the upper edge
on a level base and shake smooth.
• Fan the letter stack so that the lower
letter is the first protruding when
inserted in the feeder.
Positioning and franking a letter stack
If the ultimail is ready for operation you
can feed the letter stack for franking.
‘Ready for operation’ means:
– ultimail shows the home menu
– the postage value is displayed
– the status line shows
“MODE: METERING…
Machine ready.”
• If necessary, adjust the letter guide.
The letter stack should have a
clearance of about 2 to 3 mm between
the letter guide face and the adjustable
letter guide.
• Fan the letters so that the lower letter is
protruding.
• Place the letters with the flap side face
down on the belt conveyor. Make sure
that no mail pieces can penetrate
underneath the adjustable letter guide.
Letter upper edges
Letter guide face
Page 48

ultimail Operator Manual
48
Letter transport starts automatically when
the sensor recognises the letter stack.
The feeder separates the letters
individually from the stack, moistens the
flap (if seal function is switched on) and
transfers the letter to the franking
machine. The franked letter is placed in
the catch tray.
As soon as the feeder is empty, the
ultimail stops.
Press down moistened envelope flaps
To ensure that envelopes are well sealed,
we recommend pressing down the
envelope flaps firmly after franking.
• Stroke your hand firmly over the
envelope’s / letter stack’s flap area.
6.3.3.2 Positioning single letters
Position mail pieces that are not suited for stack processing individually and manually
to the feeder.
• Place the letter on the belt conveyor so
that:
– the envelope flap is face down
– the side to be printed is face up
(address window is visible)
– the upper edge is flush to the letter
guide face.
• Push the envelope in direction of the
arrow until the letter sensor recognises
the envelope and starts letter transport.
Letter guide face
Page 49

Franking
49
6.4 Franking labels (optional)
The ultimail uses the ‘Label dispenser’ option to print self-adhesive labels. You can
order suitable labels for the ultimail from Francotyp-Postalia.
Caution! Only use original FP labels. Do not put in more than the prepackaged 40 labels. We can ensure correct label processing only when you
comply with this.
• Remove labels from the package.
• Remove banderole.
• Insert labels into the label dispenser
with support material face down. The
paper side to be printed is face up.
• Push in against a slight resistance all
the way to the stop.
• Set the franking imprint as usual.
Note:
When franking labels, the length of
the franking imprint is restricted. You can
either print a logo or
an SMS text. The
respective other imprint has to be
switched off (setting: WITHOUT LOGO /
WITHOUT SMS TEXT).
If ultimail is ready for operation, you can
start label printing.
Franking a label
• Press the key.
The ultimail prints a label.
Franking several identical labels
(only possible in home menu)
• Type the number of labels.
• Press the key.
The ultimail prints the number of labels
you have set. During franking the status
line shows the number of labels still to be
franked.
Page 50

ultimail Operator Manual
50
7 Special functions
7.1 Using the DX feature (optional)
7.1.1 Things worth knowing about the DX feature
The ultimail can frank mail pieces for
dispatch by the private carrier DX. You
can switch between carriers in the
SET UP menu.
In order to use the DX feature it has to be
activated in your ultimail, the DX imprint
and a DX license number have to be
stored in the franking machine. Then the
additional function ‘Second Carrier’ is
available in the SET MODE menu.
For activation of the DX feature in your
ultimail please contact your FP-Partner.
Special features of the DX mode
– The postage costs for DX franking
procedures are settled directly with the
private carrier.
– The postage calculation function of the
ultimail is not available in DX mode.
– You can use an external postal scale
(e.g. a flexiscale) for postage
calculation in DX mode.
– DX franking imprints will not be cap-
tured in the registers, account statistics
or the resettable item counter.
Page 51

Special functions
51
7.1.2 Franking DX-mail
Switching DX mode on
• Go to the SET UP menu using the
key.
• Select MODE SETTING SECOND
CARRIER.
DX mode The ultimail sets the DX mode. The status
line shows SECOND CARRIER.
Franking DX-mail
• Enter the desired postage in pence.
The entered value appears at the bottom
right of the status line.
• Confirm with the postage value key.
(This is the multi function key at the top
right – directly next to the postage
value display.)
• Adjust all other settings for the imprint
(logo, SMS text, type of mail endorsement and date) as usual.
• When the ultimail is ready for franking
in DX mode:
• Position the mail piece as usual.
SET UP
MODE SETTING
SECOND CARRIER
Page 52

ultimail Operator Manual
52
Switching DX mode off
• In home menu, press the key for
about 3 seconds.
The ultimail goes back to the ‘normal’
METERING (franking) mode.
7.2 Working with the batch counter
You can use the batch counter function to frank a preset number of letters.
This function is especially useful for stack processing with feeder:
– The ultimail will stop once the total number of letters is finished.
– You can start again with key and frank the next stack.
• Go to the SET UP menu using the
key.
• Select MODE SETTING PRESELECT COUNTER.
A pop-up prompts you to enter the
desired amount.
• Type the desired number.
• Confirm with the key.
SET UP
MODE SETTING
PRE-SELECT COUNTER
Page 53

Special functions
53
ultimail closes the pop-up window and
sets the new value for the pre-select
counter.
You can also set the pre-select counter
directly in the SET MODE menu: Enter
the desired number and confirm with the
key next to PRE-SELECT COUNTER.
• Go back to home menu with key.
In the home menu, the status line will
always show the current number of mail
pieces still to be franked. Once the
number set is franked, the display jumps
back to the preset number defined in the
pre-select counter.
Switching pre-select counter off
• In the SET MODE menu, type “0”.
• Confirm with key next to PRE-SELECT
COUNTER.
When the machine is switched off, the
pre-select counter is reset to default
value “0”.
Pre-select counter is active
(current setting: 50)
Number of mail pieces
still to be franked
Page 54

ultimail Operator Manual
54
Selecting total pieces in the home
menu
You can also select total pieces directly in
the home menu for “single use”.
The pre-select counter in the SET UP
menu remains unchanged, i.e. after the
set number of pieces has been processed, the status of the pre-select counter in the SET UP menu will be re-set.
• Type the desired number.
The entered number appears at the
bottom right of the status line.
• Press the key.
• Position the mail pieces as usual.
You will see the number of mail pieces
still to be franked in the status line.
Number of mail pieces
still to be franked
Page 55

Special functions
55
7.3 Using the ultimail as incoming mail stamp
For registering your incoming mail (up to a thickness of 6.35 mm), you can use the
ultimail as incoming mail stamping machine. For this function, use the INCOMING
STAMP mode. The ultimail will print ‘Received on: …’ together with the date
displayed. All users can use this function, even without access card.
Setting incoming mail stamp function
• Go to the SET UP menu using the
key.
• Select MODE SETTING
INCOMING STAMP.
The ultimail sets the incoming mail stamp
and goes back to home menu.
In the home menu, the status line shows
INCOMING STAMP.
Change date
If necessary, you can change the date in
the same way as for the franking imprint
(see page 34).
Print “Received on: …”
• Feed incoming mail in single pieces
and manually. Place the side to be
printed face upwards!
The ultimail prints the incoming mail
stamp and ejects the mail to the righthand side.
End “Incoming stamp” mode
• In home menu, press the key for
about 3 seconds.
The ultimail goes back to METERING
(franking) mode.
SET UP
MODE SETTING
INCOMING STAMP
Page 56

ultimail Operator Manual
56
7.4 Seal only function (ultimail with feeder / sealer only)
You can seal letters with the feeder or the sealer without franking them.
Switch on sealer
• Push the ‘seal envelope’ switch to the
rear into
seal position.
See also page 41.
Please note
:
Permanently reliable sealing results can
be assured only when you use ‘sealit’
sealing liquide.
The envelopes must be suited for
mechanical sealing (see page 200).
Setting “Only transporting” mode
• Open the SET UP menu with key.
• Select MODE SETTING ONLY
TRANSPORT, NO PRINTING.
The ultimail goes back to home menu.
In the status line, you will see
MODE: ONLY TRANSPORTING.
• Position the letters, as usual, at the
sealer or feeder.
Press down moistened envelope flaps
To ensure that envelopes are well sealed,
we recommend pressing down the envelope flaps firmly after franking.
SET UP
MODE SETTING
ONLY TRANSPORT, NO PRINTING
Page 57

Special functions
57
7.5 Differential weighing (optional)
The differential weighing function enables you to conveniently frank large amounts of
similar mail pieces. You simply place a stack of mail pieces on the weighing platform,
then remove them one by one for franking. The ultimail constantly checks for changes
in weight and sets the postage value for each letter accordingly.
For enabling the differential weighing function you need an authorisation code.
Please contact your FP-Partner. Read chapter 13.22.3 on page 136.
Setting the differential weighing mode
• Open the SET UP menu with key.
• Select SYSTEM SETTINGS
INTEGRATED SCALES.
• Press key next to DIFFERENTIAL
WEIGH. The setting changes between
OFF and ON.
If DIFFERENTIAL WEIGH. ON is
displayed:
• Press the key to return to the
home menu.
The mode METERING AND DIFF.
WEIGHING is set and remains effective
until it is changed again – even if the
machine is switched off.
SET UP
SYSTEM SETTINGS
INTEGRATED SCALES
Differential weighing is active
Page 58

ultimail Operator Manual
58
Using the differential weighing mode
Caution! The integrated scales are de-
signed for a max. weight of 5 kg. Never
place more than 5 kg on the weighing
platform.
• Set the mailing data (see chapter 5.1).
• Press the key to change to the
home menu.
• Place the letter stack or a box with
letters on the weighing platform.
No weight and postage value are
displayed.
• Remove one
letter from the stack or
from the box.
The ultimail determines the change in
weight and calculates the postage value.
• Position the letter as usual.
• Handle the remaining mail pieces in the
same way.
Page 59

Special functions
59
When you empty the weighing platform
the ultimail asks you if the set weight is to
be used.
• Acknowledge with YES to frank the last
letter of the stack.
Or
• Press NO to discard the displayed
weight (e. g. because you removed the
empty box last). The ultimail does not
determine a postage value. Processing
of the letter stack is completed.
Page 60

ultimail Operator Manual
60
7.6 Using an external postage scale
7.6.1 Connecting an external postage scale
The ultimail is equipped as a standard feature with a 9-pin interface. You can connect
to this interface an existing postage scale made by Francotyp-Postalia (e.g. a flexiscale). For connecting an external postage scale to the ultimail, you need a special
interface cable. You can order an interface cable from Francotyp-Postalia.
Warning! Read the Operator’s Manual of your FP postage scale before
connecting it to ultimail. Obtain information particularly, on the safe handling
of the FP postage scale.
Caution! Only ever use the correct cable for the ultimail, do not use other
cables supplied with other franking machines (e.g. optimail).
• Switch off the ultimail franking system.
• Switch off the FP postage scale.
• Plug the interface cable you obtained
from Francotyp-Postalia in the
9-pin interface marked by the sign
and tighten screws. The interface is
located on the back of the machine.
• Connect the interface cable to the FP
postage scale.
• Switch on the ultimail.
• Switch on the FP postage scale.
• Set up the FP postage scale for operation on ultimail.
OFF
Power switch
(back of the
machine)
Page 61

Special functions
61
7.6.2 Using ultimail with an external postage scale
You only use the external postage scale with the ultimail to determine and set
the weight. The postage calculation of the scale is not used in connection with the
ultimail.
• Switch on the ultimail and wait for the
start routine to finish.
• Switch on the FP postage scale and
wait for the start routine to finish.
• At the ultimail select franking imprint
settings (mailing data, logo, …)
ultimail has to be ready for franking:
– Display shows the home menu
– Mode: METERING … (franking).
• Place the mail piece on the weighing
platform of the FP postage scale.
ultimail sets the postage value using the
selected mailing data and the weight
received from the external postage scale
• Frank the mail piece with ultimail.
Please heed the following note if the
ultimail features integrated scales and an
external postage scale:
When calculating the postage value,
ultimail always applies the weight value
transmitted last.
Page 62

ultimail Operator Manual
62
8 Postage register
The ultimail saves important parameters and postage used information in registers.
You can have the register states displayed and printed on an empty envelope or a
label.
• Press key.
You will see the current register states:
R1 – DESCENDING
Postage available.
R2 – ASCENDING
Total value of all franking imprints
performed.
R3 – CONTROL TOTAL
Sum of all loaded values (total).
R4 – TOTAL PIECES
Number of franking imprints performed
(including zero test prints).
Print register
• Press the key.
• Position an empty envelope or a card.
Or
• Print the information on labels using
key (ultimail with label dispenser only).
Page 63

Loading postage – TELESET
63
9 Loading postage – TELESET
TELESET is the loading of the desired postage credit. To load postage, your ultimail
establishes a connection with the Teleset data centre (TDC) and loads the desired
amount. Accounting is as per your contract with the Royal Mail.
Permissible amounts which may be loaded:
You may load amounts to a maximum of £ 9,990 in steps of £ 10. The permissible
maximum amount depends on the postage credit left on your ultimail. When topping
up, you must not exceed the upper postage credit limit of £ 9,999.99 (Register R1 –
Descending).
There are the following options for connecting with the Teleset data centre:
– Internal modem
– External GSM modem
– mailcredit (web access via a PC and the Francotyp-Postalia mailcredit software).
The Teleset procedure as such runs in the same manner – regardless of the type of
connection to the Teleset data centre in use.
Whenever the ultimail connects to the Teleset data centre, a number of check and
update routines are run in the background. These processes may take some time.
Loading postage
• Make sure the connection set up in the
ultimail (internal modem, GSM modem
or mailcredit) is ready to establish a
connection with the Teleset data centre
(TDC).
• Open the SELECT TELESET menu
using the key.
• Select RUN TELESET to start the
TELESET procedure.
Page 64

ultimail Operator Manual
64
Now simply follow the instructions in the
display.
• Keep the indicated loading amount or
overwrite with a new amount.
• Acknowledge with CONTINUE.
After a security prompt the ultimail establishes a connection with the Teleset data
centre. Messages in the display inform
about the status (connection establishment, data transfer …).
Please note: If you have entered a new
reset amount, you will be asked to confirm the process again within 30 seconds.
At the end of the remote setting, the
ultimail will show the new descending.
• Press CONTINUE to end the TELESET
process.
Page 65

Loading postage – TELESET
65
Display / print booking report
In the SELECT TELESET menu you can
display a booking report for the last load
procedure and print it on an envelope or
label.
• Open the SELECT TELESET menu
using the key.
• Select BOOKING REPORT FOR LAST
LOAD PROCEDURE.
The ultimail will display information
relating to the last load procedure.
• Press the key.
• Position an empty envelope / a card.
ultimail prints the booking report.
Or
• With the key, print the booking
report on a label (ultimail with label dispenser
only).
SELECT TELESET
BOOKING REPORT…
Page 66

ultimail Operator Manual
66
10 Account administration
You can use the account administration to register and evaluate postage used
separately for each account. Accounts may be sections / departments of an
enterprise or single companies of shared offices.
You can save, for each account, a standard setting for the logo and the SMS text, limit
the postage available (set a budget), and define authorisations connected with the
MASTER / USER card function.
The ultimail 60 has 10 accounts as standard. If need be, the number of accounts can
be upgraded to 50 accounts. The ultimail 90 has a standard administration of up to
50 accounts. It can be extended to 200 accounts. For the account administration
extension you need a machine-specific authorisation code. Please contact your FP
partner and read chapter 13.22.2.
For the maximum number of available accounts and number of accounts in use, see
SET UP menu DISPLAY SYSTEM INFORMATION.
How to set up accounts for franking, read in chapter 6.2 on page 42.
10.1 Set up a new account
• Go to the SET UP menu using the
key.
• Select ACCOUNT ADMINISTRATION
SET UP NEW ACCOUNT.
Now simply follow the instructions in the
display. You are prompted by the ultimail
to enter, one after the other, all required
information:
– account number
– account name
– standard logo
– standard SMS text
– TELESET access
– define type of budget and limits.
If all information is completely entered,
the ultimail signals “You have successfully set up the account…”.
• Confirm the message with .
SET UP
ACCOUNT ADMINISTRATION
SET UP NEW ACCOUNT
Page 67

Account administration
67
Possible settings and their meaning:
Account number from 2 to 99999 Account 1 is permanently assigned
to MASTER card (MASTER
account).
Account name Letters, special
characters and digits
Please find more information to text
input on pages 89 to 92.
Standard logo NO STANDARD LOGO When you set up the account for
franking, the last selected logo will
remain set in the home menu.
WITHOUT LOGO The selected logo is automatically
set to the account during the
change.
all available logos
Standard
SMS text
NO STANDARD
SMS TEXT
When you set up the account for
franking, the last selected SMS text
will remain set in the home menu.
WITHOUT SMS TEXT The selected SMS text is automati-
cally set to the account during the
change.
all available SMS texts
TELESET access ON TELESET is released.
The account user is authorised to
load postage.
OFF TELESET function is blocked.
Page 68

ultimail Operator Manual
68
Budget UNLIMITED The total postage of the ultimail is
available.
RESTRICTED Account is supplied with a certain
credit (= current limit).
When the credit is used up, the ultimail blocks the account until a new
credit is assigned (see
chapter 10.2.3 on page 73).
MONTH The account is provided with a
monthly credit (= monthly limit).
In addition, you define the current
credit for the account (current limit).
On every change of the month, the
ultimail sets the credit (current limit)
back to the monthly limit. You can
change the current limit at any time,
independently from that.
Possible settings and their meaning:
Page 69

Account administration
69
10.2 Change settings for existing accounts
10.2.1 Change standard setting for the logo and the SMS text
You will find information on the meaning
of possible settings for the logo and the
SMS text on page 67.
• Go to the SET UP menu using the
key.
• Select ACCOUNT ADMINISTRATION
ACCT EDIT.
The EDIT ACCOUNT … menu appears.
You can see the account number in the
head line.
Now you can change the standard logo
and SMS text settings for the account
displayed.
Define a standard SMS text
• Press the key next to the current
SMS text.
The SPECIFY STANDARD SMS TEXT
menu appears.
• Select the desired SMS text with the
associated key.
From now on, this SMS text is the new
default setting for this account. The ultimail goes back to the EDIT ACCOUNT
menu.
SET UP
ACCOUNT ADMINISTRATION
ACCT EDIT
Setting standard logo
Account number
Setting standard SMS text
Page 70

ultimail Operator Manual
70
Define a standard logo
• Press the key next to the current logo.
The SPECIFY STANDARD LOGO menu
appears.
• Select the desired logo with the
associated key.
From now on, this logo is the new default
setting for this account. The ultimail goes
back to EDIT ACCOUNT menu.
Defining a logo on the USER card as
default logo
• Plug USER card with logo.
• Go to the SET UP menu using the
key.
• Select ACCOUNT ADMINISTRATION
ACCT EDIT.
• Press the key next to the current logo.
The logo on the USER card always
appears in the last position
in the
SELECTING LOGO menu.
• Press the key next to the last logo in the
list (ADVERT-01).
From now on the logo stored on the
USER card is the default setting for this
account. When the USER card is
plugged, the logo on the card is used for
the franking imprint.
Logo on USER card
Page 71

Account administration
71
Other account Specify logo / SMS text for other
accounts
If you wish to change settings of another
account:
• Open the menu for selecting accounts
with SELECT ANOTHER ACCOUNT.
• Select the account the settings of which
you want to change.
The ultimail goes back to EDIT
ACCOUNTS … menu. Now you can
change the standard logo and the
standard SMS text for this account.
You can also select an account in the following way:
• Type the account number.
• Confirm with SELECT ANOTHER
ACCOUNT.
Page 72

ultimail Operator Manual
72
10.2.2 Release / block TELESET access
• Go to the SET UP menu using the
key.
• Select ACCOUNT ADMINISTRATION
ACCT EDIT.
The EDIT ACCOUNT … menu appears.
You can see the account number in the
head line.
If you wish to change the TELESET
access for other accounts select the
desired account using the SELECT
ANOTHER ACCOUNT function.
Release / block TELESET
In the EDIT ACCOUNT … menu:
• Press the key next to ACCESS TO
TELESET until the desired setting is
displayed.
ON = release
OFF = block.
From that moment, the displayed setting
for TELESET access is activated.
SET UP
ACCOUNT ADMINISTRATION
ACCT EDIT
Block / release
TELESET access
Account number
Page 73

Account administration
73
10.2.3 Changing budgets and assigning credits
More information on the meaning of
budget settings can be found on page 68.
• Go to the SET UP menu using the
key.
• Select ACCOUNT ADMINISTRATION
ACCT EDIT FURTHER
FUNCTIONS.
The FURTHER FUNCTIONS
ACCOUNT … menu appears.
In the head line, you can see the account
number.
If you wish to change the budget settings
for other accounts
select the desired
account using the SELECT ANOTHER
ACCOUNT function.
Setting budget type
In the FURTHER FUNCTIONS
ACCOUNT … menu:
• Press the key next to BUDGET TYPE
several times until the desired setting
UNLIMITED, RESTRICTED or
MONTH is displayed.
The budget type set will determine which
additional functions for credit setting
(limits) appear.
FURTHER FUNCTIONS
SET UP
ACCOUNT ADMINISTRATION
ACCT EDIT
Account number
Page 74

ultimail Operator Manual
74
Setting the current credit
In the FURTHER FUNCTIONS
ACCOUNT … menu:
• Type the amount for credit which you
want to make available for the account.
• Set the new credit using the key next to
CURRENT LIMIT.
The displayed current limit is available to
this account for franking.
Specify the monthly credit
In the FURTHER FUNCTIONS
ACCOUNT … menu:
• Type the amount of credit which you
want to make available to the account
each month.
• Specify the credit using the key next to
MONTHLY LIMIT.
On the first day of the month, the ultimail
sets the current limit automatically to the
specified monthly limit. You can directly
change the current limit at any time, independently from that.
Page 75

Account administration
75
10.2.4 Change name
• Go to the SET UP menu using the
key.
• Select ACCOUNT ADMINISTRATION
ACCT EDIT FURTHER
FUNCTIONS EDIT NAME.
The ultimail opens the menu for changing
the account name.
If you wish to change the name of another
account select the desired account with
the SELECT ANOTHER ACCOUNT
function.
In the EDIT NAME menu:
• Change the name of the account.
• Register the new name with
CONTINUE.
The new account name is saved.
Read pages 89 to 92 on how to enter text.
FURTHER FUNCTIONS
SET UP
ACCOUNT ADMINISTRATION
ACCT EDIT
EDIT NAME
Page 76

ultimail Operator Manual
76
10.3 Generate / block USER card(s) for an account
When you generate a USER card you permanently assign an account to it. To allow
several users the access to an account, you can program one account for several
identical USER cards.
Each user has, with his USER card, only access to his account, including all authorisations and budget specifications set to it.
To protect the ultimail, in case of USER card loss, for instance, from unauthorised
franking, you can disable the assignment between account and USER card(s).
• Insert the MASTER card.
• Go to the SET UP menu using the
key.
• Select ACCOUNT ADMINISTRATION
ACCT EDIT ASSIGN / REMOVE
USERCARD.
The ASSIGN / REMOVE USERCARD
menu appears. In the head line, you can
see the account number.
• Use the SELECT ANOTHER
ACCOUNT function to select the
account for which you want to assign a
USER card.
Assign USER card to an account
In the ASSIGN / REMOVE USERCARD
menu:
• Press the key next to ASSIGN
USERCARD.
Now simply follow the instructions in the
display:
• Remove MASTER card.
ASSIGN / REMOVE USERCARD
SET UP
ACCOUNT ADMINISTRATION
ACCT EDIT
Page 77

Account administration
77
• Insert a USER card.
The ultimail programs the USER card for
the displayed account and signals when
the procedure is successfully completed.
• Remove USER card.
The USER card is valid for the assigned
account.
• To generate further USER cards or for
any other settings in the account
administration, insert the MASTER
card again.
You can rewrite USER cards which are
no longer needed or invalid by another
account assignment.
Block USER card(s)
In the ASSIGN / REMOVE USERCARD
menu:
• Press the key next to CANCEL
ASSIGNMENT.
The assignment account – USER card(s)
is cancelled without further prompt.
• Confirm the final message “The link...
has been deleted” with .
All USER card(s) assigned to this
account are invalid now.
Page 78

ultimail Operator Manual
78
10.4 Switch on / off “access card required?”
Caution! Mode ACCESS CARD REQUIRED: OFF. This setting cancels
access restrictions to accounts. Every ultimail user can frank on all accounts
and call all account data.
• Go to the SET UP menu using the
key.
• Select ACCOUNT ADMINISTRATION.
• Press the key next to MODE: ACCESS
CARD REQUIRED.
The setting switches over between ON
and OFF.
The displayed setting is active.
SET UP
ACCOUNT ADMINISTRATION
MODE: ACCESS CARD REQUIRED
Possible settings and their meaning:
ON Franking is possible only with a valid
access card (MASTER card or USER
card).
OFF No access restrictions for franking.
Franking is possible without access card
on all accounts.
Page 79

Account administration
79
10.5 Display and print account information
The ultimail displays the current settings for individual accounts and ascending
information in various views. For more information on the overview contents, read
page 80.
Information about the account …
• Go to the SET UP menu using the
key.
• Select ACCOUNT ADMINISTRATION
ACCOUNT/S DISPLAY.
The ultimail displays a menu with
information to the related account. Use
the arrow keys to scroll.
To display information about another
account:
• Select the desired account with the
SELECT ANOTHER ACCT function.
Information about all accounts
To display information about all accounts:
• In the INFORMATION ACCOUNT …
menu, select DISPLAY ALL
ACCOUNTS.
The ultimail displays a list with information about all accounts.
Type of mail list
• Go to the SET UP menu using the
key.
• Select ACCOUNT ADMINISTRATION
DISP. TYPE OF MAIL STATS. (ALL
ACCT).
The ultimail displays the evaluation of the
imprints of type of mail endorsements.
SET UP
ACCOUNT ADMINISTRATION
ACCOUNT/S DISPLAY
SET UP
ACCOUNT ADMINISTRATION
DISP. TYPE OF MAIL STATS. (ALL ACCT)
Page 80

ultimail Operator Manual
80
Print information
• Press the key.
• Position an empty envelope or a card.
• If necessary, position further
envelopes / cards.
Or
• Use the key to print the account
information on labels (ultimail with label
dispenser only).
With the InfoPrint software tool from Francotyp-Postalia you can administrate
and evaluate account information comfortably on the PC. For further information refer to page 137.
Overview of account information:
Information about the
account …
Displays data for one
account:
– Current settings (standard logo, standard SMS text,
budget type and limits, TELESET access).
– Remaining postage.
– Postage used (postage costs used by the account
since the last zero reset).
– Total pieces (number of franking imprints by the
account since the last zero reset).
Information about
all accounts
List of all accounts (listed by numbers)
Displays:
– Account number (ID).
– Account name.
– Postage used (postage costs of individual accounts
since the last zero reset).
– Piece (number of franking imprints by individual
accounts since the last zero reset).
Type of mail list Evaluation of endorsements across all accounts.
Display of:
– Postage used for franking imprints with
endorsement, specified as per types of mail.
– Number of franking imprints with endorsement,
specified as per types of mail.
– Total postage used and total pieces of all imprints.
Page 81

Account administration
81
10.6 Set account counter to zero
10.6.1 Set one account to zero
• Go to the SET UP menu using the
key.
• Select ACCOUNT ADMINISTRATION
ACCT EDIT.
The EDIT ACCOUNTS … menu appears.
You can see the account number in the
head line.
• In order to reset another account to
zero: Select the desired account with
the SELECT ANOTHER ACCOUNT
function.
• Press the key next to SET ACCOUNT
TO ZERO.
• Follow the instructions in the display.
10.6.2 Set all accounts to zero
• Go to the SET UP menu using the
key.
• Select ACCOUNT ADMINISTRATION
DELETE / ZERO ALL ACCT SET
ACCOUNTS TO ZERO.
• Follow the instructions in the display.
SET ACCOUNT TO ZERO
SET UP
ACCOUNT ADMINISTRATION
ACCT EDIT
SET UP
ACCOUNT ADMINISTRATION
DELETE / ZERO ALL ACCT
SET ACCOUNTS TO ZERO
Page 82

ultimail Operator Manual
82
10.7 Delete accounts
10.7.1 Delete one account
• Go to the SET UP menu using the
key.
• Select ACCOUNT ADMINISTRATION
ACCT EDIT FURTHER
FUNCTIONS.
The FURTHER FUNCTIONS … menu
appears. You can see the account
number in the head line.
• To delete another account
: Select the
desired account with the SELECT
ANOTHER ACCOUNT function.
• Press the key next to DELETE ACCT.
• Follow the instructions in the display.
10.7.2 Delete all accounts
• Go to the SET UP menu using the
key.
• Select ACCOUNT ADMINISTRATION
DELETE / ZERO ALL ACCT
DELETE ACCOUNTS.
• Follow the instructions in the display.
Use this function to delete all accounts
set in the ultimail, except the Master
account (account 1).
FURTHER FUNCTIONS
SET UP
ACCOUNT ADMINISTRATION
ACCT EDIT
DELETE ACCT
SET UP
ACCOUNT ADMINISTRATION
DELETE / ZERO ALL ACCT
DELETE ACCOUNTS
Page 83

Memory administration
83
11 Memory administration
To fast and conveniently set the postage, you can save frequently used Royal Mail
products as memory items. The basic ultimail version features 4 memory slots
(upgradable, see chapter 13.22.1). An ultimail with integrated scales features
20 memory slots. Ex factory, everyday products of Royal Mail are pre-set as memory
items.
The ultimail continuously refers to the valid rate table to determine the postages for
the memories. The ultimail thus ensures your postages are correct even when postal
rates have changed (price changes).
Upon activation of a new rate table, the memories will be erased and reprogrammed.
Refer to chapter 5.1.1 on page 23 on how to set products for franking using
the memory.
11.1 Displaying and printing memory assignment
• Go to the SET UP menu using the
key.
• Select EDIT MEMORY.
The list of memories shows
– the memory number
– the saved assignment in short format
or
the memory name.
Printing the memory list
• Press the key.
• Position an empty envelope or a card.
• Feed further envelopes / cards if
required.
Or
• Use the key to print the list on
labels (ultimail with label dispenser only).
The ultimail needs some time to generate
the imprint and then prints the list of
available memories.
SET UP
EDIT MEMORY
Memory 7 = not occupied
Memory with plain text name
(renamed)
Page 84

ultimail Operator Manual
84
11.2 Saving settings
• Set the mailing data and the weight in
the product selection menu.
• Go to the SET UP menu using the
key.
• Select EDIT MEMORY.
• Press the key next to the memory
number under which you wish to save
the settings.
(You can overwrite existing memories
with a new assignment).
The EDIT MEMORY menu appears.
• Select SAVE COMPLETE MEMORY or
SAVE MEMORY WITHOUT WEIGHT.
The ultimail saves the current setting.
The new assignment appears in the
memory list.
Note on “Memory 1”
The setting you save as memory 1 is be
the default settings
.
SET UP
EDIT MEMORY
Save mailing data and displayed weight
(in the example: 100 g)
Do not
save displayed weight
(saves “0 g” as the weight)
Possible settings and their meaning:
SAVE COMPLETE MEMORY The ultimail saves the complete current
product setting (mailing data, displayed
weight, and the appropriate postage).
SAVE MEMORY WITHOUT WEIGHT The ultimail saves the mailing data and
“0 g” as the weight.
Page 85

Memory administration
85
11.3 Renaming memories
You can name each of the memories. The memory selection list shows this name
instead of the saved assignment.
• Go to the SET UP menu using the
key.
• Select EDIT MEMORY.
• Press the key next to the memory you
wish to rename.
The EDIT MEMORY menu appears.
• Select RENAME MEMORY.
The ultimail opens a menu where you can
edit the memory name.
• Edit the memory name as desired.
• Press the key next to SAVE to save the
memory name.
The memory selection list now shows this
name instead of the saved data.
For more details on the text input function
refer to pages 89 to 92.
The list of memories shows the name of
the saved assignment again if you leave
the input box for the name empty.
SET UP
EDIT MEMORY
Page 86

ultimail Operator Manual
86
11.4 Delete memories
• Go to the SET UP menu using the
key.
• Select EDIT MEMORY.
• Press the key next to the memory you
wish to delete.
The EDIT MEMORY menu appears.
• Press the key next to DELETE
MEMORY.
The selected memory is immediately
deleted without query.
You cannot delete MEMORY 1 because
ultimail accesses the product stored in
this slot as the default setting.
SET UP
EDIT MEMORY
Memory selected
for deleting
Page 87

Print image data administration
87
12 Print image data administration
The ultimail offers a large number of efficient functions to manage individual print
image components. This includes plain text input for logos, graphical preview, logo
and SMS text (freely editable) printing and the possibility to print lists. You can easily
load print image data from chip card.
The following chapters present the functions in detail.
12.1 Logo display and printing
You can see the logos saved in the ultimail in the display and print these.
• Go to the SET UP menu using the
key.
• Select EDIT PRINT IMAGE / SMS
TEXT LOGO DISPLAY / PRINT.
You will see an overview of the saved
logos.
• Press the key next to the desired logo.
The display will show a simplified graphic
version of the logo. The head line will
show number and logo name.
•With or
(ultimail with label dis-
penser only) start the printing process.
Or
• With go back to overview.
SET UP
EDIT PRINT IMAGE / SMS TEXT
LOGO DISPLAY / PRINT
Page 88

ultimail Operator Manual
88
12.2 Change the logo names
Each logo has a name under which the motif is saved in the ultimail. You can change
these names according to your requests.
• Go to the SET UP menu using the
key.
• Select EDIT PRINT IMAGE / SMS
TEXT LOGO NAME EDIT.
• Among the overview of saved logos,
choose the logo name of which you
wish to change.
Note
: The name for a logo on the USER
card cannot be changed.
The ultimail opens a menu for editing the
name.
• Change the name for the logo as
desired.
• Save the name with CONTINUE.
The ultimail updates the data and shows
a prompt.
• Confirm the prompt with CONTINUE.
Read more about text input function on
the ultimail on page 89.
SET UP
EDIT PRINT IMAGE / SMS TEXT
LOGO NAME EDIT
Page 89

Print image data administration
89
12.3 Enter / change / save SMS texts
ultimail can save up to six text messages (SMS texts). You may set the saved
SMS texts for the franking imprint in the home menu.
• Go to the SET UP menu using the
key.
• Select EDIT PRINT IMAGE / SMS
TEXT EDIT SMS TEXT.
The numbers of the SMS texts and the
saved texts are displayed in an overview.
• Select the SMS text you want to enter
or change.
The display will show the menu where
you can enter and change SMS texts.
Enter and save texts
ultimail is capable of printing a 5-line
SMS text with up to 20 characters per
line.
A cursor _ marks the position for input.
• Press the numeric key for the desired
character as many times in rapid succession as necessary to display the
desired character.
After a short time, the cursor jumps one
place to the right. Now you can enter the
next character.
• Enter all further characters for the
desired text in the same manner.
• Save the text with CONTINUE.
The ultimail updates the data and shows
a prompt.
• Confirm the prompt with CONTINUE.
SETUP
EDIT PRINT IMAGE / SMS TEXT
EDIT SMS TEXT
Cursor
New text
Abort text input –
stored text remains unchanged
Save new text
Number of SMS text
Page 90

ultimail Operator Manual
90
Change / correct texts
• Use the functions CURSOR LEFT and
CURSOR RIGHT to place the cursor to
the corresponding place in the text.
• Overwrite the marked character with
the desired new character.
Deleting characters
• You can delete characters with the
key. Every key actuation deletes the
character that is currently marked by
the cursor.
Deleting SMS texts
See page 94 to read how to completely
delete SMS texts you do not need any
longer.
Text input is described in detail on the
following pages.
Key assignment for text input
Characters are entered with the numeric keys
to .
The assignment is printed to the housing
beneath the key.
Punctuation and special characters
. 1 , ? ! - & ’
are entered with the key.
Blanks are inserted with the key.
Line breaks To force a line break, you have to fill the
line with blanks, if necessary, until the
cursor jumps to the next line.
Page 91

Print image data administration
91
Example
You wish to save the following SMS text: VACATION
21.-28.12.
While entering a new SMS text, the text
field is empty and the cursor stands at the
first position of the first line.
How to enter the text:
Press 3 times (=V).
Press once (=A).
Press 3 times (=C).
Press once (=A).
Press once (=T).
Press 3 times (=I).
Press 3 times (=O).
Press twice (=N).
To change to the next line, fill-in the first
line with 12 blank characters:
Press once (=blank).
When the cursor has jumped one place
to the right: Enter the next blank.
Repeat until the cursor jumps to the
next line.
The cursor will now stand at the
beginning of the second line.
Press 4 times (2).
Press twice (1).
Press once (.).
Text field
Cursor
Page 92

ultimail Operator Manual
92
Press 6 times (-).
Press 4 times (2).
Press 4 times (8).
Press once (.).
Press twice (1).
Press 4 times (2).
Press once (.).
The text field displays the text exactly as
it will be subsequently printed during
franking.
• Press CONTINUE to save the text.
A message display informs on the update
of the saved data.
• Confirm the prompt with CONTINUE.
The new SMS text is saved and can be
set for franking immediately.
We recommend doing a trial run with
postage value “0.00” (zero test print) to
check the new SMS text.
Text field with
new text
Page 93

Print image data administration
93
12.4 Loading print image data from card
You can easily load print image data (e.g. logos, type of mail endorsements) from
cards. Order the card with the desired print images from Francotyp-Postalia.
• Insert the MASTER card.
• Go to the SET UP menu using the
key.
• Select EDIT PRINT IMAGE / SMS
TEXT LOAD.
• Keep card(s) with data ready for
loading.
• Follow the instructions in the display.
The ultimail will guide you step by step
through the loading process.
Displays and security prompts will protect
you against inadvertent loading and
rewriting of data. Carefully read all information in the display.
SET UP
EDIT PRINT IMAGE / SMS TEXT
LOAD
Page 94

ultimail Operator Manual
94
12.5 Delete print image data
You can delete print image data which are no longer required (logos, SMS texts,
types of mail). Therefore you gain memory space, for new logos, for instance.
• Go to the SET UP menu using the
key.
• Select EDIT PRINT IMAGE / SMS
TEXT DELETE.
• Press the key next to the print image
data which you wish to delete, e.g.,
LOGO DELETE.
An overview of all saved print image data
appears.
• Press the key next to the print image to
be deleted.
If you wish to delete the selected data
now:
• Confirm the security prompt with
CONTINUE.
The ultimail deletes the data. A message
will inform you about the end of the
deleting process.
• Confirm the message with CONTINUE.
A USER card allows you to delete
SMS-texts only. The menu for selecting
the SMS text will open immediately.
SET UP
EDIT PRINT IMAGE / SMS TEXT
DELETE
Page 95

Advanced settings and system information
95
13 Advanced settings and system information
13.1 Setting the operating mode
You can operate the ultimail in different operating modes. Information about the
meaning of the operating modes and special functions can be found on the next page.
• Go to the SET UP menu using the
key.
• Select MODE SETTING.
• Press the key next to the desired mode.
The ultimail sets the selected mode and
goes back to home menu. In the status
line, you can see the mode set.
The set mode is active and is maintained
until the ultimail is switched off or until
another mode is selected.
Back to METERING (franking) mode
Shortcut: In most cases you can switch to
the franking mode directly, without having
to leave the home menu.
• In the home menu, press the key
for about 3 seconds.
SET UP
MODE SETTING
Operating modes Special function(s)
Page 96

ultimail Operator Manual
96
The default mode of systems with integrated scales is called METERING AND
WEIGHING. The WEIGHING display cannot be hidden. Using this message
ultimail indicates that you can conveniently determine the weight of your mail
pieces in this mode.
Possible settings and their meaning:
METER (FRANK) ITEMS The ultimail prints the franking imprint
for dispatch with Royal Mail.
In the home menu, the status line
shows MODE: METERING … (default
setting after every switching on).
You will find information on how to set
the franking imprint and on franking in
chapters 5 and 6.
PRINT LOGO ONLY The ultimail prints only the logo
(advertising imprint). See also
chapter 13.4 on page 99.
INCOMING STAMP The ultimail prints ‘Received on: …’
together with the date.
Read chapter 7.3 on page 55.
ONLY TRANSPORT, NO PRINTING The franking machine transports letters
without printing. This mode can be used
in connection with a feeder or sealer
(see chapter 7.4 on page 56).
SECOND CARRIER
(optional)
The ultimail franks letters for dispatch by
the private carrier DX (see chapter 7.1
on page 50). Only available if ordered
from Francotyp-Postalia.
PRE-SELECT COUNTER The ultimail processes a selectable
number of mail pieces in the operating
mode set before (see chapter 7.2 on
page 52).
Page 97

Advanced settings and system information
97
13.2 Display, print and send system information
• Go to the SET UP menu using the
key.
• Select DISPLAY SYSTEM
INFORMATION.
You will see system information. You can
scroll up and down the list with the arrow
keys.
Print system information
Have some empty envelopes or cards
ready. The ultimail will print system
information in several parts.
• Press the key.
• Position an empty envelope or a card.
The ultimail needs some time for print
image creation. Letter transport is not
started before that. The ultimail prints the
first list of system information.
• Position further envelopes if required.
Or
• Print the information on labels using
the key (ultimail with label dispenser
only).
You can follow the print process progress
in the display.
Send system information
With the SEND TO FP SERVICE DEPT.
function you transmit data to the
Francotyp-Postalia service.
Start this function only when requested to
do so by Francotyp-Postalia.
SET UP
DISPLAY SYSTEM INFORMATION
Page 98

ultimail Operator Manual
98
13.3 Display and reset item counter
The item counter will count all franking imprints (including zero test pints) in the
METERING (franking) mode. In all other modes PRINTING LOGO,
INCOMING STAMP and ONLY TRANSPORTING the item counter is not activated.
• Go to the SET UP menu using the
key.
• Select SYSTEM SETTINGS MORE.
You can see the current value of the item
counter
under DELETE ITEM COUNTER.
How to reset the item counter to zero:
• Press the key next to DELETE ITEM
COUNTER.
• Confirm with YES.
The item counter is reset to zero.
If you do not wish to set the item counter
to zero, abort with NO. The displayed
total pieces are maintained.
SET UP
SYSTEM SETTINGS
MORE
Page 99

Advanced settings and system information
99
13.4 Display and reset advert counter
The advert counter counts all imprints in PRINTING LOGO mode.
• Go to the SET UP menu using the
key.
• Select SYSTEM SETTINGS MORE.
You can see the current value of the
advert counter under DEL. ADVERT
COUNTER.
How to reset the advert counter to zero:
• Press the key next to DEL. ADVERT
COUNTER.
• Confirm with YES.
The advert counter is reset to zero.
If you do not wish to set the advert
counter to zero, abort with NO. The
displayed total pieces are maintained.
SET UP
SYSTEM SETTINGS
MORE
Page 100

ultimail Operator Manual
100
13.5 Setting low postage warning – limit
The ultimail signals when the remaining postage falls below a certain limit. You can
set the limit for low postage warning.
ultimail warns you, if
– the descending register (R1) falls below the set limit
– the remaining budget (current limit) of the account falls below the set limit.
• Go to the SET UP menu using the
key.
• Select SYSTEM SETTINGS MORE.
How to change the limit for low postage
warning:
• Type the desired limit. The value
appears at the right-hand side of the
status line.
• Assign the value with the key next to
LOW POSTAGE WARNING.
The limit for low postage warning is set
and maintained until the next change is
made.
You can reset the default setting for low
postage warning (£ 100) with the C/CE
key.
SET UP
SYSTEM SETTINGS
MORE
 Loading...