

Page 1
postbase vision
Mailing system
Reference Guide
Page 2
PostBase Vision
2
About this Reference Guide
Target audience This Reference Guide is intended for operators and administra-
tors of the PostBase Vision mailing system.
Contents This Reference Guide describes the installation and commis-
sioning, the proper use as well as cleaning and maintenance of
the PostBase Vision mailing system. Functions that are only
available for particular system configurations are marked by an
additional note, e.g. (optional).
Further documents The Installation and safety manual is an excerpt from this Ref-
erence Guide. It contains information for your safety and
describes how to set up and commission the PostBase Vision
mailing system.
The Quick Reference Guide (leaflet) provides an overview of
the most important functions for everyday use.
In this Reference Guide, the product name appears in its plain
form “PostBase Vision”.
The following keywords and signs identify the safety instructions
and additional information in this manual:
Warning! indicates a potentially hazardous situation which
could result in death or serious injury if disregarded.
Caution! indicates a potentially hazardous situation which
could result in minor or moderate injury if disregarded.
Caution! indicates an increased risk or a risky situation which
could result in damage to property if disregarded.
A tip offers advice or additional suggestions for improving the
operation.
Illustrations The display illustrations in this manual are examples that may
differ from the actual display on your PostBase Vision.
The explanation of the safety signs and product safety labels on
the PostBase Vision mailing system can be found on page 173.
Page 3

Contents
About this Reference Guide _____________________________________ 2
1 For your safety ________________________________________________ 8
2 PostBase Vision mailing system – Short profile ____________________10
2.1 Things worth knowing about the PostBase Vision ______________10
2.2 PostBase Vision postage meter ____________________________ 13
2.3 PostBase Vision Feeder (optional) ___________________________15
3 Installation and commissioning _________________________________ 17
Step 1: Unpacking and checking the contents of the package _________ 17
Step 2: Assembling the PostBase Vision _________________________20
Step 3: Assembling the sealer (optional) ___________________________22
Step 4: Connecting the PostBase Vision _________________________23
Step 5: Turning on the PostBase Vision __________________________25
Step 6: Installing the PostBase Vision ___________________________ 25
Step 7: Installing the PostBase Vision Feeder (optional) _______________ 31
4 The basics of operation ________________________________________37
4.1 Turning the PostBase Vision on / off ________________________ 37
4.2 Standby (Sleep mode) ___________________________________38
4.3 Screen elements and operation philosophy ___________________39
4.3.1 The touch screen _______________________________________39
4.3.2 The Home screen ______________________________________ 42
4.3.3 The menu bar __________________________________________43
4.3.4 The menu _____________________________________________ 43
4.3.5 Selection lists __________________________________________ 44
4.3.6 Setting menus _________________________________________ 44
4.3.7 On-screen keyboard ____________________________________ 45
4.3.8 Pop-up windows ________________________________________46
4.3.9 Procedures / wizards ____________________________________46
4.4 Setting the display angle _________________________________ 47
4.5 Setting the display brightness _____________________________ 47
4.6 Setting the volume ______________________________________48
4.7 Inserting labels _________________________________________49
4.8 Setting up the catch tray _________________________________ 50
4.9 Using the Drop Stacker (optional) ____________________________ 50
3
Page 4

PostBase Vision
4
5 Setting the meter imprint _______________________________________ 51
5.1 Postage / USPS product _________________________________ 52
5.1.1 Setting the product using a shortcut ________________________ 52
5.1.2 Setting mailing data _____________________________________ 53
5.1.3 Setting the weight ______________________________________ 54
5.1.3.1 Weighing a mail piece ___________________________________ 54
5.1.3.2 Entering the weight manually _____________________________ 55
5.1.3.3 Differential weighing (optional) ______________________________ 56
5.2 Date _________________________________________________ 58
5.3 Advertising imprints _____________________________________ 59
5.4 Imprint offset __________________________________________ 60
5.5 Test print – testing the meter imprint settings _________________ 61
6 Metering ____________________________________________________ 63
6.1 Logging on / switching users ______________________________ 63
6.2 Setting up / changing cost accounts ________________________ 64
6.3 Feeding letters and metering ______________________________ 65
6.3.1 Hand feed tray _________________________________________ 65
6.3.2 Sealer (optional) _________________________________________ 66
6.3.3 Feeder (optional) ________________________________________ 69
6.3.3.1 Preparing letter stacks and setting up feeder _________________ 69
6.3.3.2 Switch the sealing function on / off _________________________ 70
6.3.3.3 Setting the letter thickness _______________________________ 71
6.3.3.4 Feeding letters in stack and metering _______________________ 72
6.3.3.5 Working with the batch counter ____________________________ 74
6.4 Metering labels ________________________________________ 76
6.5 Correcting faulty meter imprints ___________________________ 78
6.5.1 Postage correction _____________________________________ 78
6.5.2 Redate _______________________________________________ 79
6.6 Displaying and resetting the item counter ____________________ 80
7 Displaying and printing registers ________________________________ 81
8 Download postage ____________________________________________ 82
9 Special functions _____________________________________________ 83
9.1 Print Advert Only _______________________________________ 83
9.2 Print Numbers _________________________________________ 84
9.3 Feed Only / Count mail pieces (PostBase Vision with feeder) __________ 86
9.4 Seal Only (PostBase Vision with feeder) __________________________ 87
9.5 Stamping incoming mail (optional) ___________________________ 88
Page 5

Contents
10 Manage shortcuts _____________________________________________ 90
10.1 Saving a product as a shortcut ____________________________ 90
10.2 Renaming a shortcut ____________________________________91
10.3 Deleting a shortcut ______________________________________ 92
10.4 Resetting shortcuts to default _____________________________ 92
11 Managing printed text and QR codes _____________________________93
11.1 Entering a new text _____________________________________ 93
11.2 Generating a newQR code _______________________________ 94
11.3 Changing a text /QR code ________________________________ 95
11.4 Deleting a text /QR code _________________________________96
12 Local cost account administration _______________________________97
12.1 Display / print cost account report __________________________ 97
12.2 Display / print usage data for a defined cost account ___________98
12.3 Deleting usage data _____________________________________ 99
12.4 Matching cost accounts to advertising imprints _______________100
13 Synchronizing _______________________________________________102
14 Advanced settings & system information ________________________ 104
14.1 System information ____________________________________104
14.2 Contact Information ____________________________________104
14.3 Access control / Administrator PIN ________________________ 105
14.4 Low postage warning ___________________________________ 106
14.5 Sound signals ________________________________________ 107
14.6 Color of the menu bar __________________________________108
14.7 User interface language _________________________________ 108
14.8 Standby time _________________________________________ 109
14.9 Product after standby ___________________________________ 109
14.10 Auto Off _____________________________________________110
14.11 Automatic date advance ________________________________ 110
14.12 Switching weighing mode (optional) _________________________113
14.13 Ethernet / Wi-Fi connection (Connectivity settings) ____________114
14.13.1 Displaying connectivity settings ___________________________114
14.13.2 Setting up a new network connection / changing settings _______114
14.13.3 Deleting the Wi-Fi connection ____________________________ 118
14.14 Change ZIP / Re-authorization ___________________________118
5
Page 6

PostBase Vision
6
15 Ordering consumables _______________________________________ 119
15.1 Placing an order ______________________________________ 119
15.2 Displaying order status _________________________________ 120
15.3 Displaying address data ________________________________ 120
16 Maintenance and care ________________________________________ 121
16.1 Cleaning the housing ___________________________________ 121
16.2 Cleaning the sensors ___________________________________ 122
16.3 Cleaning the print system _______________________________ 125
16.3.1 Starting automatic print system cleaning ____________________ 125
16.3.2 Cleaning ink cartridge by hand ___________________________ 126
16.4 Test Imprint – Check print quality _________________________ 128
16.5 Print system: show ink level _____________________________ 129
16.6 Changing the ink cartridge ______________________________ 130
16.7 Replacing the transport brush ____________________________ 134
16.8 Calibrating the touch screen _____________________________ 136
16.9 PostBase Vision Feeder (optional) __________________________ 137
16.9.1 Filling with sealing liquid ________________________________ 137
16.9.2 Adjust moistening level _________________________________ 140
16.9.3 Cleaning / changing the moistening sponge _________________ 141
16.9.4 Cleaning / changing the moistening brush __________________ 145
16.10 Sealer (optional) ________________________________________ 147
16.10.1 Cleaning ____________________________________________ 147
16.10.2 Checking the liquid level and filling with sealing liquid _________ 148
16.10.3 Replacing felts ________________________________________ 149
17 Tips for troubleshooting ______________________________________ 152
17.1 Error messages _______________________________________ 152
17.2 Possible causes and remedy ____________________________ 152
17.3 Remedying a letter jam _________________________________ 163
17.4 Inserting the letter guide at the ramp (PostBase Vision Feeder) ______ 165
17.5 Correcting the moistening felt position on the rocker (Sealer) _____ 166
17.6 Removing / inserting the security device ____________________ 167
17.7 Manually moving the ink cartridge to the exchange position _____ 169
18 Decommissioning and disposing of the mailing system ____________ 172
Page 7

Appendix
Graphical symbols, safety signs and product safety labels on the
PostBase Vision mailing system __________________________________ 173
Glossary ____________________________________________________175
Technical Data _______________________________________________ 177
Product variants and equipment __________________________________ 181
Supplies ____________________________________________________182
The Security Device (PSD) ______________________________________ 182
License _____________________________________________________183
Security Declaration for data usage _______________________________185
United States Patents __________________________________________ 185
FCC Compliance Statement _____________________________________ 186
Index _______________________________________________________187
Service _____________________________________________________195
Contents
7
Page 8

PostBase Vision
8
1 For your safety
The PostBase Vision complies with the relevant safety regulations for information
technology equipment in office environments.
Before installing, commissioning and using the PostBase Vision mailing system,
please read this safety information carefully.
For your own safety, please observe the following instructions:
Proper use
• PostBase Vision is a digital mailing system with ink-jet print technology for
metering mail.
• The PostBase Vision mailing system is intended only for use in enclosed offices or
office-like environments. Observe the operating conditions specified in the “Technical Data” section.
• The PostBase Vision mailing system is intended exclusively for processing mail
pieces in accordance with the specifications described in the “Technical Data” section.
Prevention of electrical hazards
• Operate the PostBase Vision mailing system only on a grounded single-phase
power socket. Make sure that the power connection conforms to the power requirements indicated on the type plates.
• Make sure the sockets for connecting the PostBase Vision mailing system are
close by and easily accessible at all times.
• Unplug the PostBase Vision mailing system power plugs from the sockets in case
of an emergency.
• Take care to ensure that no foreign objects penetrate the PostBase Vision mailing
system interior.
• Be extremely careful when handling liquids.
• When refilling the sealing liquid, make sure that no live parts become wet.
• Unplug all power plugs of the PostBase Vision mailing system prior to cleaning the
mailing system.
Prevention of mechanical hazards
• Keep long hair, fingers, loose clothing pieces, neck ties, scarves, jewelry and the
like away from moving machine parts.
• Do not remove any parts of the housing.
• Do not remove any equipment related to safety or protection. Do not make them
inoperative or unable to function.
Page 9

For your safety
Accessories and consumables
• We recommend to use only approved FP equipment and FP original parts.
The manufacturer FP has established reliability, safety and applicability. The manufacturer cannot assess the reliability, safety and applicability for products not
approved by FP, and therefore not vouch for such products. Full functionality of the
PostBase Vision mailing system is only guaranteed at the time of delivery if original
Francotyp-Postalia ink cartridges are used.
• Use the supplied power and connection cables or cables that have been approved
by Francotyp-Postalia. Make sure that the cables are not damaged.
• When handling ink cartridges, observe the hazardous substance labeling and the
product information enclosed with each package.
Avoid eye contact with the ink. Ingestion of the ink can be harmful to health. Keep
the ink cartridges away from children. Detailed information can be found on the
safety data sheet, available at sdb.francotyp.com.
General safety instructions
• Install and commission the PostBase Vision mailing system as described in the
“Installation and commissioning” section.
• Never transport the PostBase Vision mailing system by attachments such as weighing platform, label compartment, display or drawer. The best way to transport the individual components is to hold them on the side at the bottom in the recesses on the
housing.
• If the mailing system was previously in a cold environment (i.e. below 50 °F /
10 °C): Unpack the mailing system and wait at least two hours before connecting
and commissioning the PostBase Vision mailing system. The PostBase Vision
needs this time to adapt to the environmental conditions. Any condensed moisture
will escape.
• The “PostBase Vision Feeder” is designed for operation on the PostBase Vision
postage meter. It is not permissible to operate the Feeder without the
PostBase Vision postage meter.
• Only have maintenance and repair work carried out by qualified personnel
approved by Francotyp-Postalia. Otherwise any warranty claims may become void.
• Note: When a letter is fed, letter transport will start automatically after a short delay.
Do not be startled.
9
Page 10

PostBase Vision
10
2 PostBase Vision mailing system – Short profile
2.1 Things worth knowing about the PostBase Vision
PostBase Vision, the new mailing system from the PostBase
series for small to medium-sized mail volumes. It is characterized by its intuitive operation via the 5-inch large swiveling color touch display. The new inkjet print system with
only one ink cartridge ensures clean, offset-free prints.
Modular design The modular design allows the mailing system to be flexibly
adapted to the structure and quantity of your outgoing mail.
The basic model consists of the PostBase Vision postage
meter with scale, hand feed tray and catch tray.
This basic model can easily be expanded with optional components, e.g. for automatic feeding of shipments from the
stack.
The PostBase Vision mailing system is available in various
versions with cycle speeds ranging from 35 letters per
minute to 85 letters per minute.
Intuitive operation After turning on at the touch of a button, the clearly arranged
operator guidance in the touch screen always takes you
quickly and safely to the desired destination.
PostBase Vision also shows what to do on the display for
tasks that are not everyday occurrences, such as changing
the ink cartridge. Thanks to this operating concept, even
inexperienced and occasional users can quickly get to grips
with the PostBase Vision mailing system.
Metering To meter, simply place the letter on it – the PostBase Vision
Letters as
advertising medium
will seize the letter and meter it, after which it is exited to the
right side ready for dispatch.
Metering is possible on mail pieces made of ink-absorbing
material – postcards to 0.4" (10 mm) thick letters in ISO B4
format – and special self-adhesive labels.
In addition to printing postage, you can print two custom
advertisements of your choice on every mail piece you
send. These can be graphic advertising motifs, text messages or information displayed as QR code (optional).
Page 11

PostBase Vision mailing system – Short profile
Load postage Easily load postage for metering from the data center direct-
ly into your mailing system. If desired, PostBase Vision will
also ensure that you have sufficient credit and will prompt
you to visit the postage shop if necessary.
Remote services:
Flexible and up to date
The PostBase Vision ensures you are always using the current postage rates. Whether new postage rates, advertising
motifs or machine software – all updates are loaded directly
into your mailing system via synchronization.
Access control The PostBase Vision mailing system can be protected
against unauthorized use via a PIN.
www.discoverFP.com The discoverFP customer portal is available to all users of
the PostBase Vision mailing system.
Your password-protected access will provide you with all
the important information about your mailing system, for
example, the complete overview of your data (orders, contracts, invoices, …), information on available updates, the
accessories shop and consumables and much more.
The discoverFP customer portal is also the place where you
can conveniently manage cost accounts, user profiles and
advertising motifs from your laptop / PC. A number of convenient reporting functions are available on the customer
portal for evaluating the consumption data of your mailing
system.
11
Additional functions The PostBase Vision mailing system offers a range of con-
venient additional functions. Among these are:
– The space saving, integrated scale quickly and reliably
determines the weight for letters and parcels. The determined weight directly affects the product settings.
– Shortcut function for frequently used postal products.
– Cost account function for recording and evaluating
postage costs by cost account.
– Label printing. The PostBase Vision can print self-
adhesive labels, for large or thick mail pieces or for
envelopes that are not suited for ink-jet printing.
– Print lists of register states and loading report.
– Variable imprint offset for changing the meter imprint
position on the envelope.
Page 12

PostBase Vision
12
Options The following options are available for expanding the basic
model and enhancing its functionality:
– PostBase Vision Feeder (automatic feeder with sealer).
The letters are removed individually from the stack,
optionally moistened and sealed and then transferred to
the postage meter.
– Sealer. Manually pass the open envelope through the
sealer. The moistened flap will be closed in the
PostBase Vision during subsequent metering.
– For larger mail volumes, the Drop Stacker with a capac-
ity of up to 250 letters (format: ISO DL, contents: 1 sheet
ISO A4) is the practical alternative to the catch tray.
The items ejected by PostBase Vision fall into the Drop
Stacker and are carefully stacked there. The finished mail
pieces can be easily removed from there in stacks – even
during operation.
– Differential weighing is a special weighing mode of the
integrated scale that helps you save time when weighing
and metering large amounts of similar mail pieces.
– Received stamp for labeling incoming mail.
Page 13

PostBase Vision mailing system – Short profile
Label compartment
ON/OFF button
Catch tray
Scale with weighing platform
Drawer
Access flap to print system
Drawer latch lever
Hand feed tray (illustrated here)
Optional: manual sealer
Stylus for touch screen operation
(is inserted on the right of the
display housing)
Touch screen
(motor adjustable)
2.2 PostBase Vision postage meter
13
Page 14
14
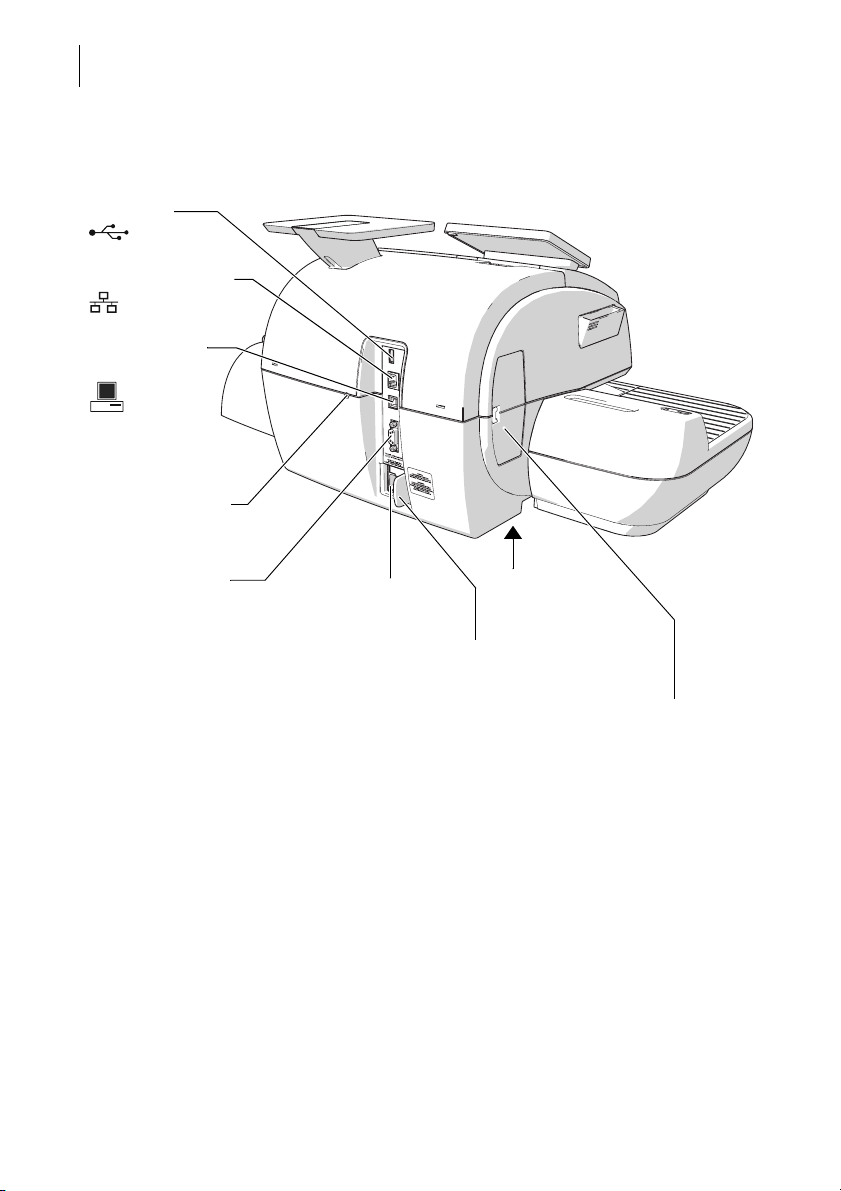
USB port
Power connection
PC connection
(not used)
Ethernet / LAN port
Cover flap, at rear
Revenector security device
Slider for unlocking
the security device
Type plate
(on the bottom side)
CAN BUS
(Feeder connection)
Emergency release
for ink cartridge
PostBase Vision
Postage meter – rear view
Page 15
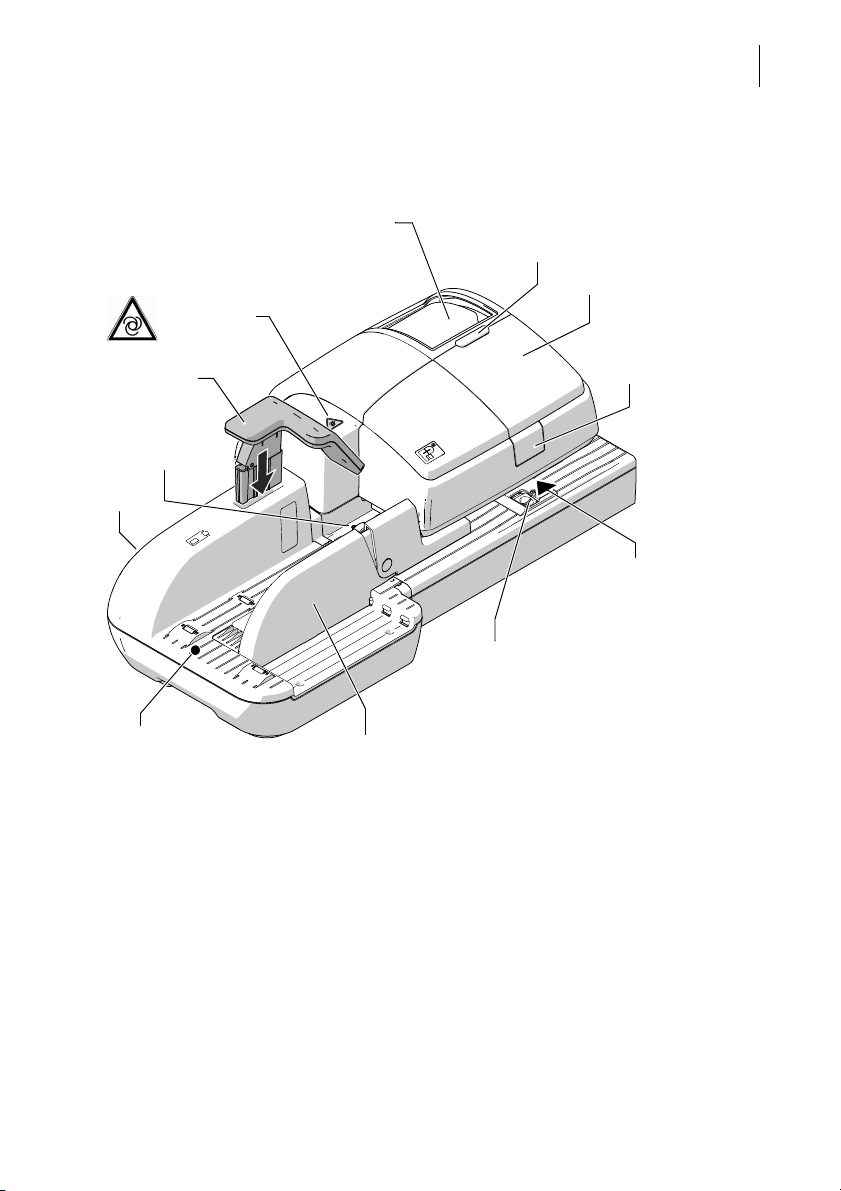
PostBase Vision mailing system – Short profile
Brush for moistening
envelope flaps
(under roller transport)
Flap with viewing pane, below
– Sealant tank
– LED status indicator
Letter guide (adjustable)
Ramp
Seal / non seal switch
Open flap:
Press key
Roller transport
Release key (move
roller transport upward)
Letter receiving tray
(inclination adjustable)
Safety sign
Pendulum
Sensor for
letter detection
2.3 PostBase Vision Feeder (optional)
15
Page 16

PostBase Vision
Power connection
Termination plug (plugged in
the factory)
Tray
with sponge
Catches (lugs) for coupling
with the postage meter housing
CAN BUS (connection to
postage meter)
Type plate
16
Feeder – rear view
Page 17
Installation and commissioning
3 Installation and commissioning
This chapter describes how to set up and commission the PostBase Vision mailing
system in the following versions
– with hand feed tray (basic model)
– with manual sealer
– with the “PostBase Vision Feeder”.
Caution! Carry out the steps for commissioning the PostBase Vision mailing
system in precisely the given order. Only in this way it is possible to ensure
the successful commissioning of your mailing system.
Step 1: Unpacking and checking the contents of the package
• Unpack all packages.
Keep the packing. Use it again if you need to
transport the mailing system or send it in to
the Customer Support.
17
• Check that the contents of the packages
are complete and free from any damage.
The scope of delivery is listed on the
following pages.
Warning! Damage or the absence of parts
can lead to injuries and hazards due to
electrical voltage.
Do not start operating the PostBase Vision
mailing system if parts are damaged or missing. Please contact the Francotyp-Postalia
Customer Support.
Page 18
PostBase Vision
1
2
3
4
5
6
7
8
9
10
1
2
18
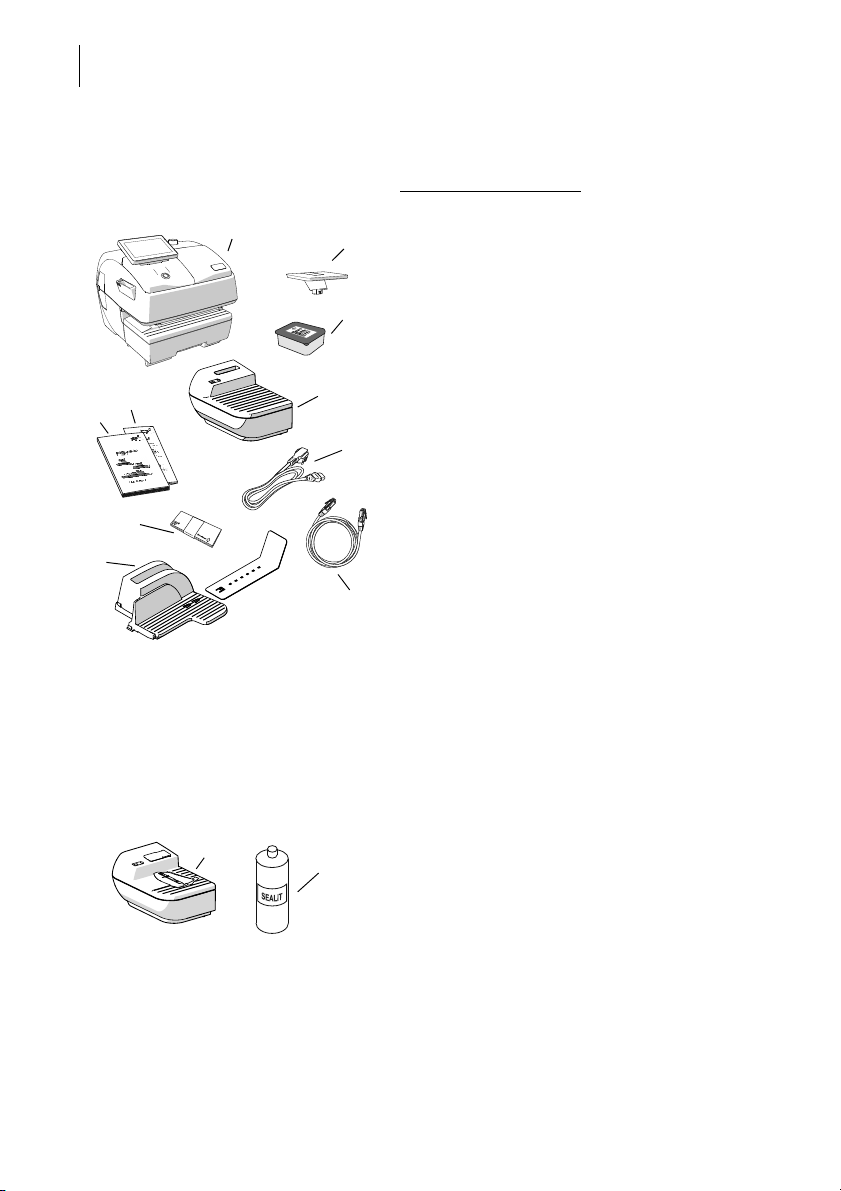
PostBase Vision postage meter
(1 box)
Scope of delivery
Standard configuration
:
1 PostBase Vision postage meter
2 Weighing platform
3 Ink cartridge (packaged)
4 Hand feed tray
5 Power cable
6 Ethernet cable
7 Catch tray and stop
8 Labels
9 Installation and safety (brochure)
10 Quick Reference Guide (leaflet)
Extra delivery (by e-mail or post)
❑ R-PIN (Repository-PIN)
Optional, only if ordered separately
Sealer
(1 box)
1 Manual sealer
2 Bottle of SEALIT (sealing liquid)
Page 19
Installation and commissioning
1
3
4
5
6
2
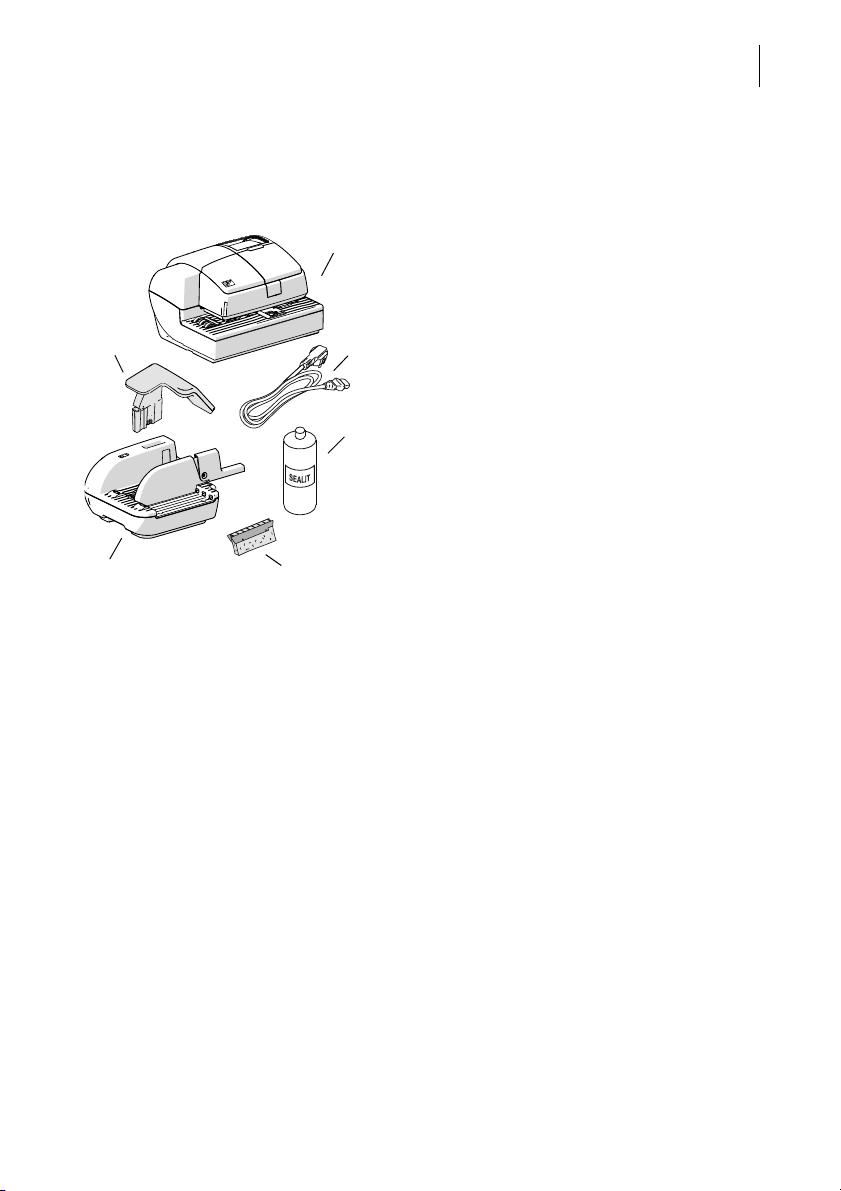
Optional, only if ordered separately
19
PostBase Vision Feeder
(2 boxes)
Drop Stacker
(1 box, not illustrated)
1 Feeder (automatic feeder with sealer)
2 Power cable
3 Bottle of SEALIT (sealing liquid)
4 Replacement sponge holder with sponge
5 Ramp
6 Pendulum
The delivery package of the Drop Stacker is
shown and listed in the installation instructions which come together with the Drop
Stacker.
Page 20
PostBase Vision
Long slot
20
Step 2: Assembling the PostBase Vision
Installation site The installation site for the PostBase Vision
mailing system must meet the following
requirements:
– Firm, level, low vibration and horizontal
base, which offers sufficient space for the
mailing system in the ordered version.
The dimensions of the individual components can be found at page 177.
– Room temperature in the range from 59 °F
to 95 °F / 15 °C to 35 °C.
– No direct sunlight.
– Relative humidity within a range of 15 % to
80 %, non-condensing.
– Power socket in the immediate vicinity.
– Network connection with internet access.
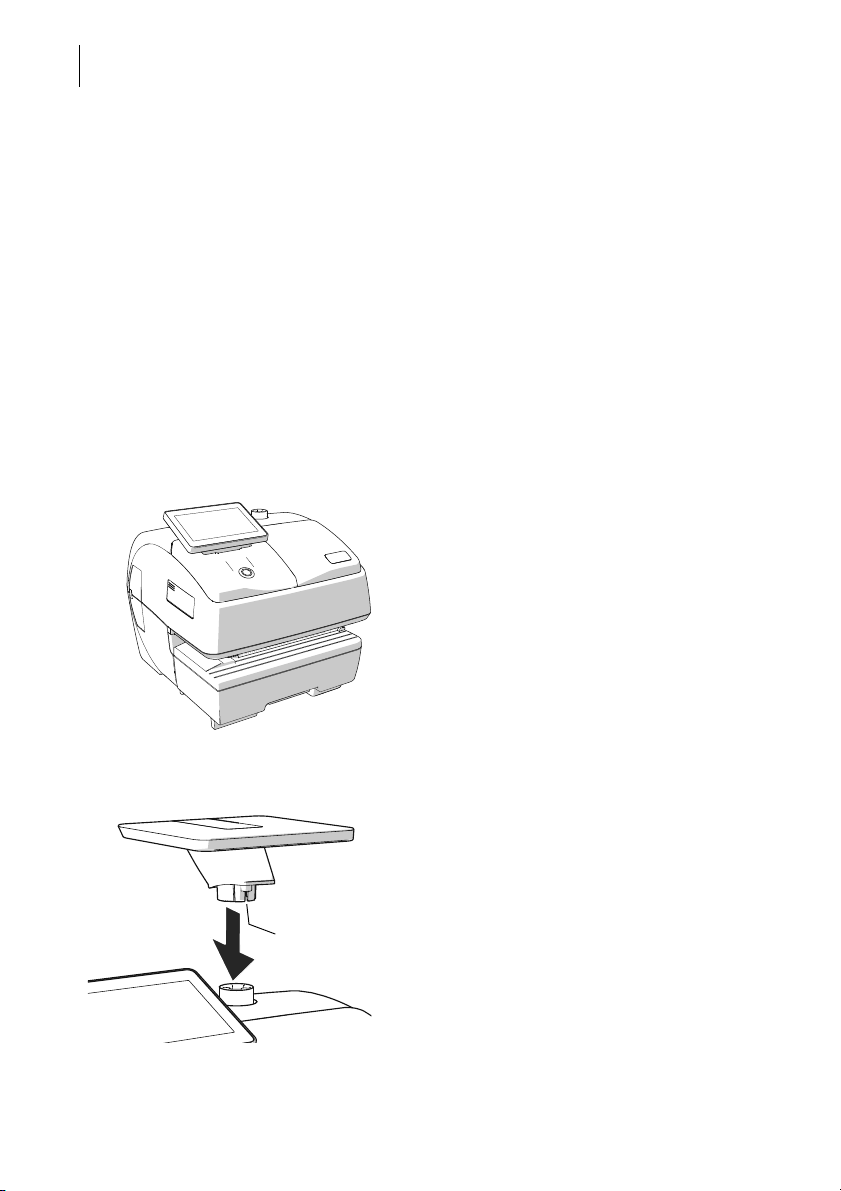
• The PostBase Vision postage meter must
be placed on a suitable surface.
• Remove the protective film from the
display.
Assembling the weighing platform
• Hold the weighing platform as shown in
the illustration and place it onto the scale
receptacle. The long slot in the foot of the
weighing platform must slide in the coun-
terpart on the scale receptacle.
Page 21
Installation and commissioning
Catches
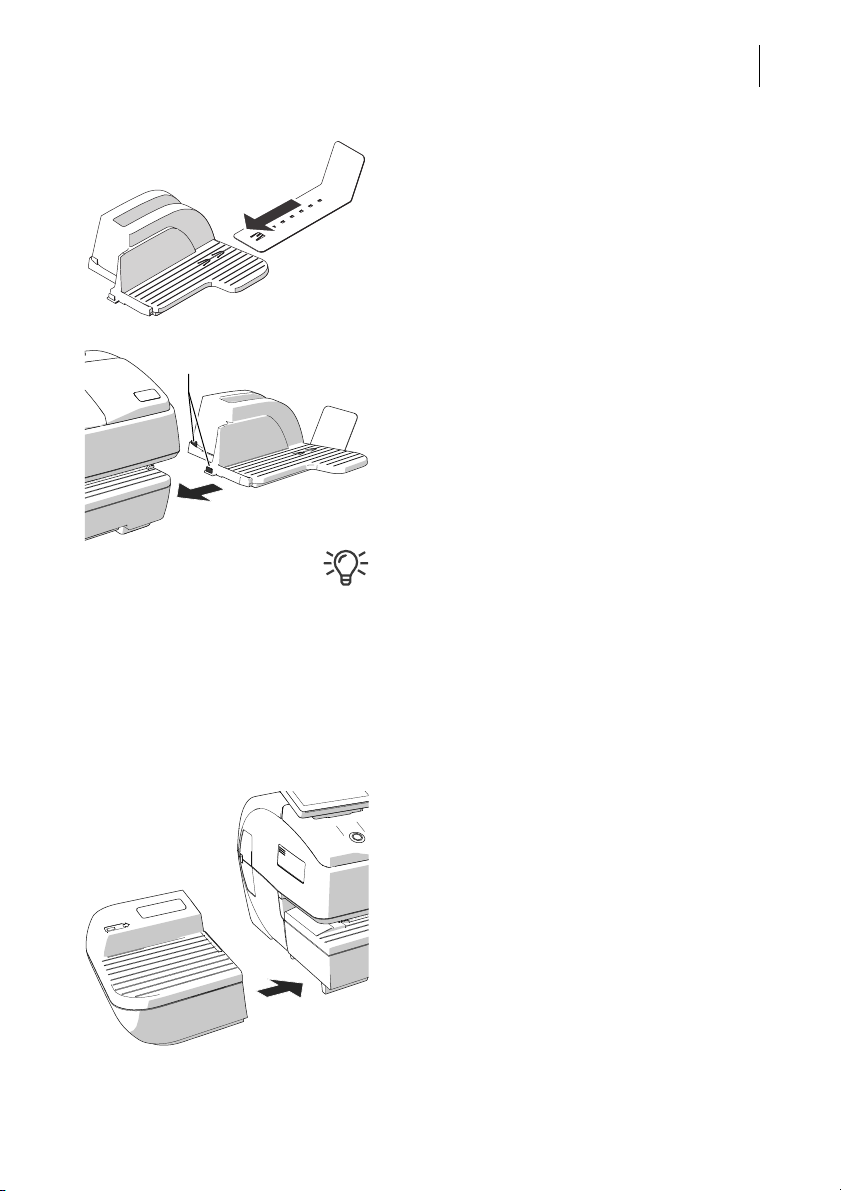
Assembling the catch tray
• Attach the catch bracket to the catch tray:
To do this, insert the catch bracket into the
guides on the underside of the catch tray.
• Place the catch tray to the right of the
postage meter.
• Slightly lift the postage meter on the right
side. The bottom side of the housing
features slots where the catch trays are
fastened.
• Slide the catch tray under the postage
meter so that the catches engage in the
slots.
• Carefully place the postage meter on the
catch tray.
Assembling the Drop Stacker
Instead of the catch tray, the optionally available Francotyp-Postalia Drop Stacker can be
placed to the right of the postage meter.
For details on setting up the Drop Stacker,
refer to the installation instructions supplied
with the Drop Stacker.
21
Attaching the hand feed tray
(only on the basic model)
• Place the hand feed tray for manually feeding the items to the left of the postage
meter.
• Slightly lift the postage meter on the left side
and push the hand feed tray towards the
postage meter so that the front sides are
flush.
• Carefully lower the postage meter so that
the catches of the hand feed tray engage in
the slots on the bottom side of the postage
meter.
Page 22
PostBase Vision
22
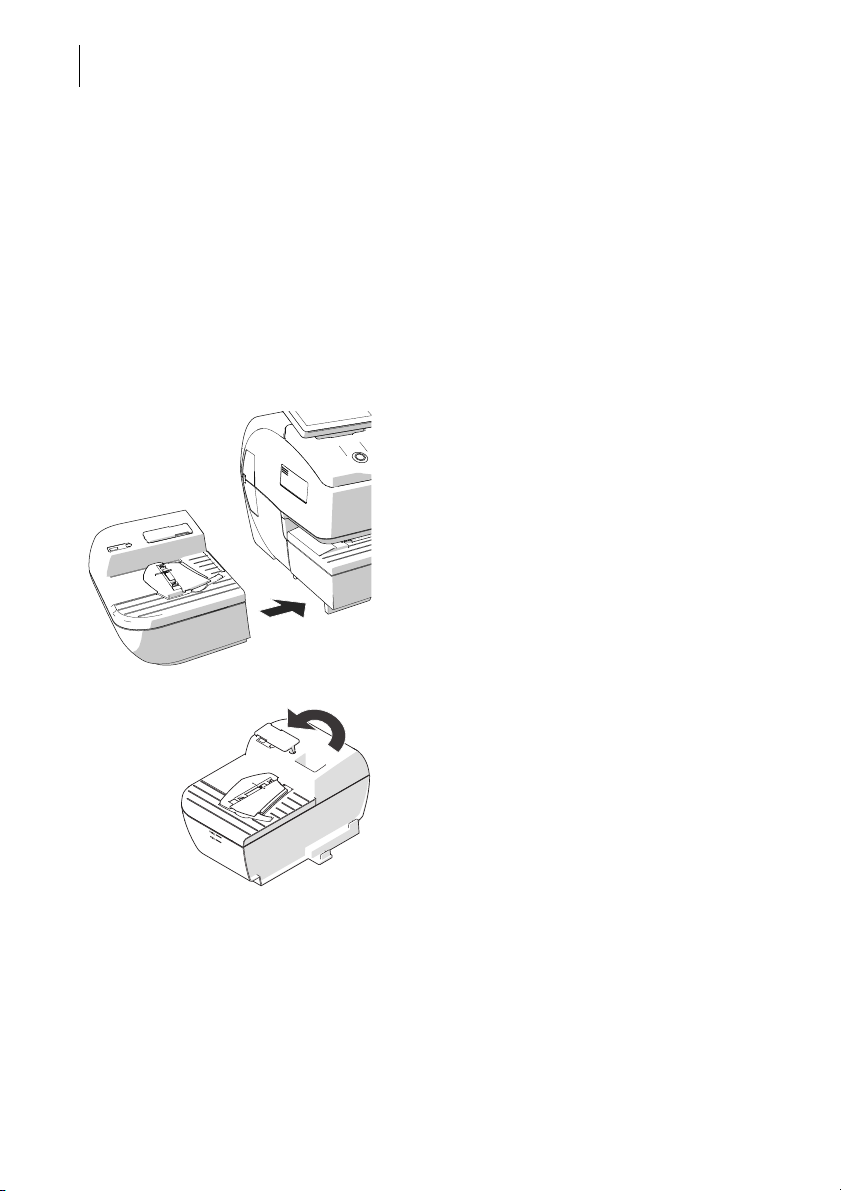
Step 3: Assembling the sealer (optional)
The sealer is positioned to the left of the
postage meter instead of the hand feed tray.
The catches on the right side of the sealer
and slots (on the left side of the bottom side
of the postage meter) mechanically couple
the two components and fasten them in
position relative to each other.
Assembling the sealer
• Place the sealer to the left of the postage
• Gently lift the postage meter on the left side
• Carefully lower the postage meter so that
meter.
and push the sealer towards the postage
meter so that the front sides are flush.
the catches of the sealer engage in the
slots on the bottom side of the postage
meter.
Filling with sealing liquid
• Swivel the cover of the filling opening to the
side.
Page 23
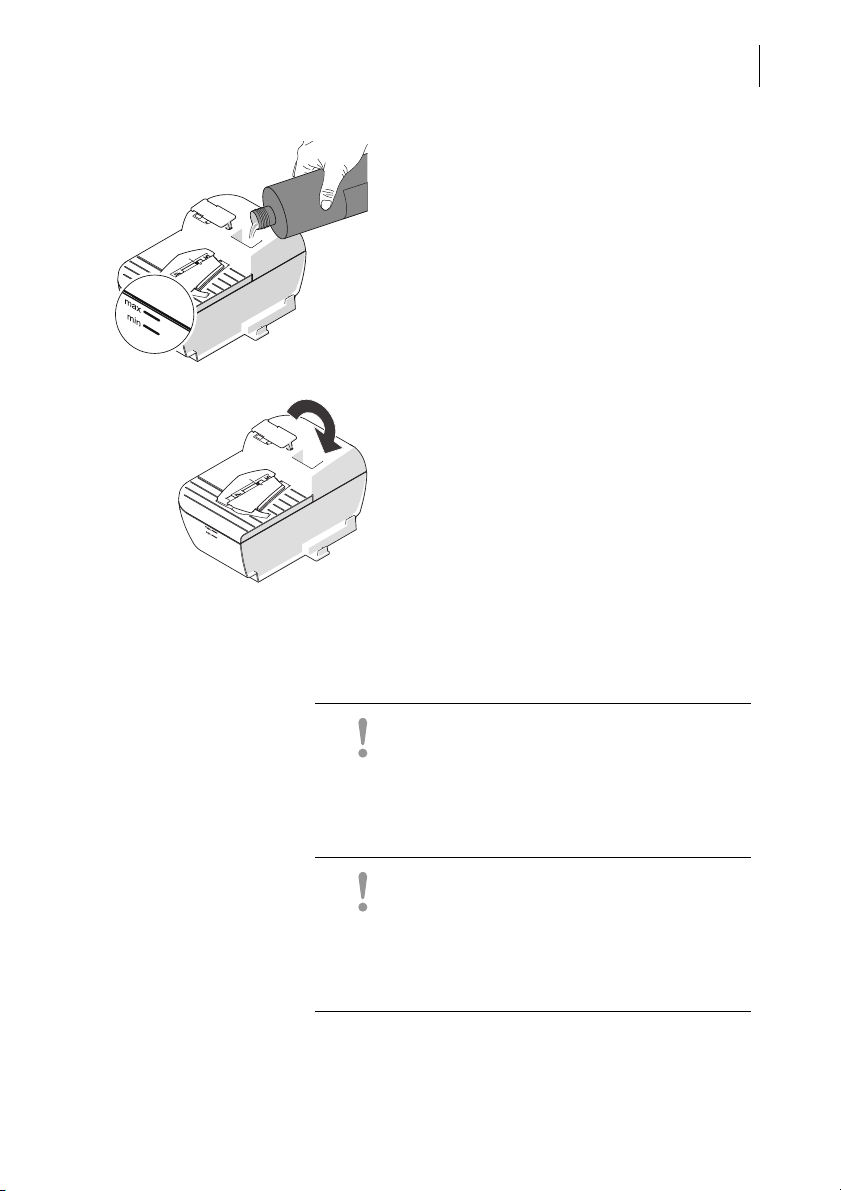
Installation and commissioning
• Fill sealer with SEALIT sealing liquid.
• Check the filling level. The sealer should
be filled roughly up to the “max” mark.
• Close the filling opening with the cover.
• If necessary: Dry the sealer outside.
23
Step 4: Connecting the PostBase Vision
Caution! If the PostBase Vision was previously in a cold environment (i.e. below 50 °F /
10 °C): Wait at least 2 hours after unpacking
before connecting the postage meter. The
PostBase Vision needs this time to adjust to
the environmental conditions.
Caution! Do not connect the PostBase Vision
Feeder (the optional automatic feeder) until
Step 7. The PostBase Vision postage meter
must be fully installed to do this. Otherwise
the Feeder will not be recognized by the postage meter. The mailing system will not work.
Page 24
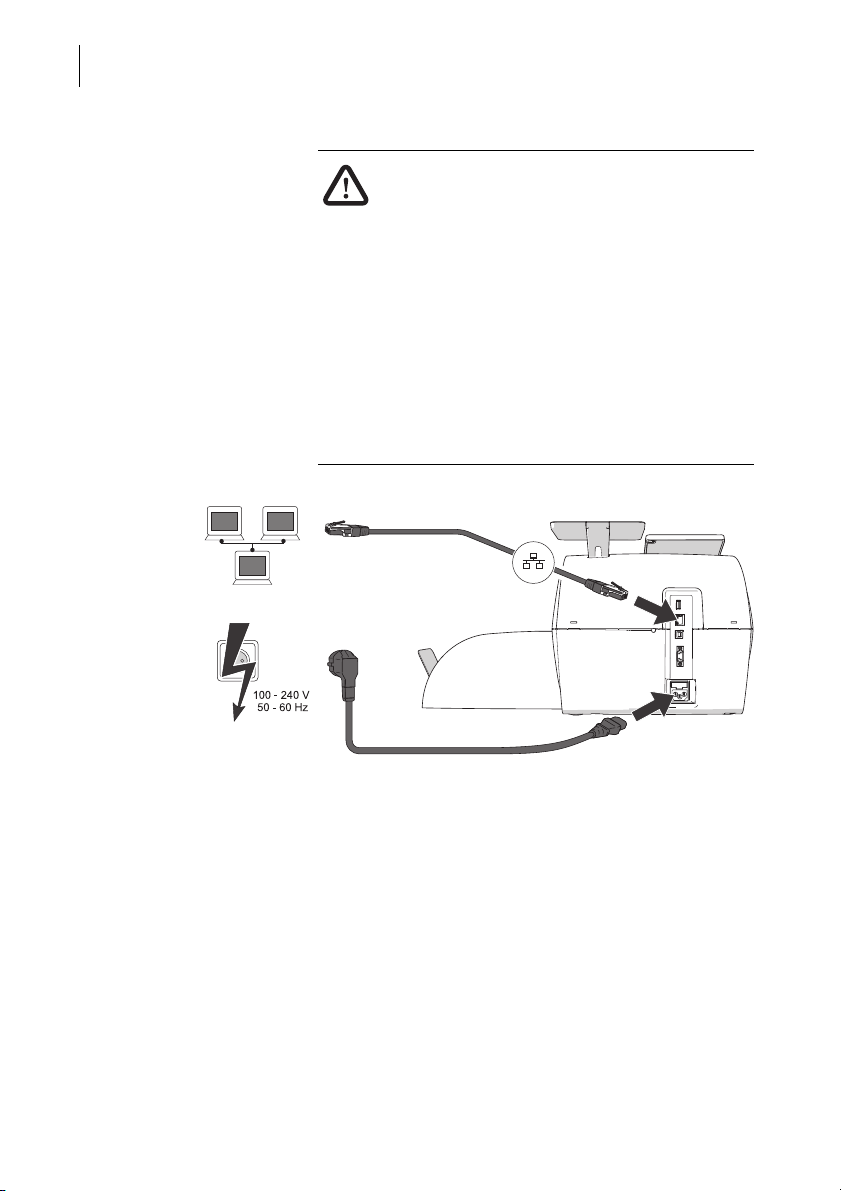
PostBase Vision
Ethernet cable
Power cable
24
Warning! Danger from electrical voltage if
improperly connected.
• Use the supplied power and connection
cables or cables that have been approved
by Francotyp-Postalia. Make sure that the
cables are not damaged.
• Only connect the PostBase Vision to a
grounded single-phase power socket.
Make sure that the power connection conforms to the power requirements indicated
on the type plate.
• Make sure that the power socket is nearby
and easily accessible at all times.
Connection
Computer Network / Router
If you want the PostBase Vision to use the
wired connection to your local area network
(LAN):
• Connect the Ethernet cable to the postage
meter and the local network / router.
Power connection (electric) • Plug the power cable into the power
connection for the postage meter.
• Only then plug the power cable into the
power socket.
Page 25
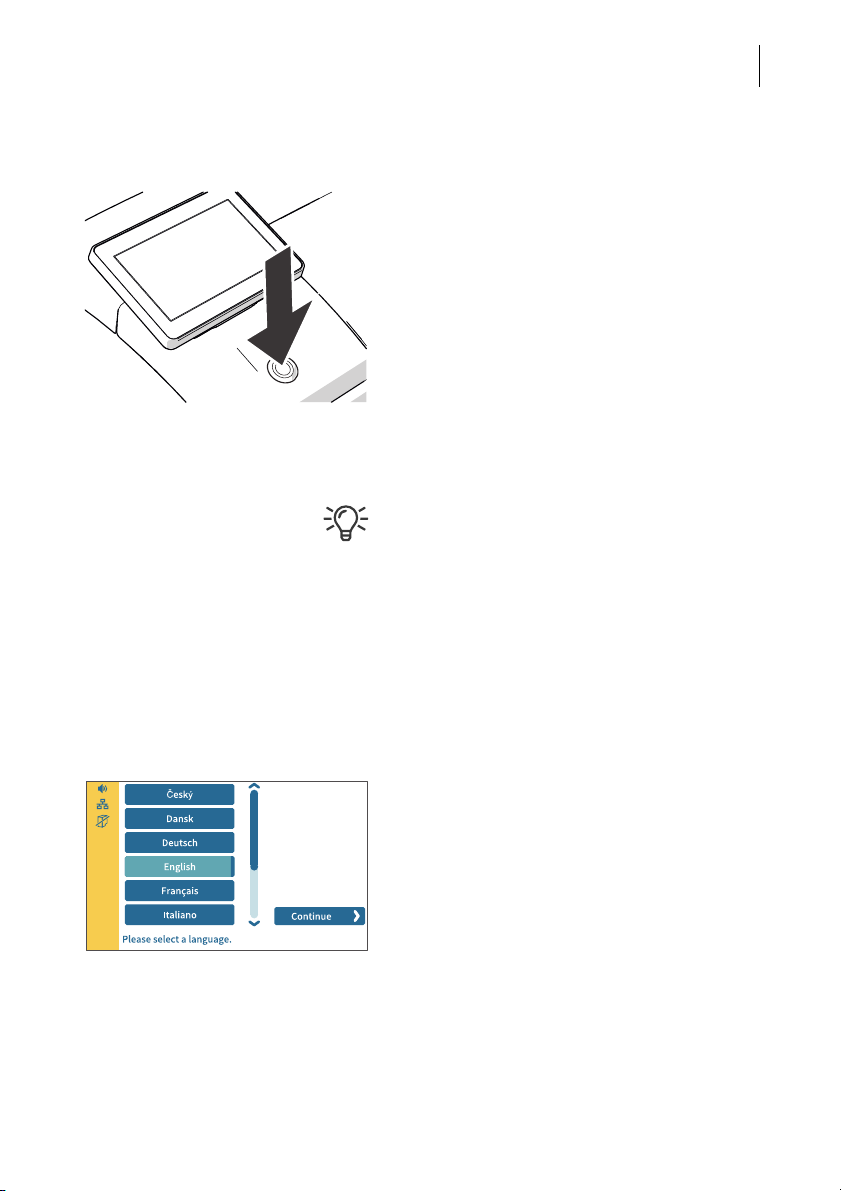
Step 5: Turning on the PostBase Vision
• Press the ON/OFF button.
The LED lighting (button, weighing platform
and letter entrance area) lights up and the
system starts. The progress of the process
can be followed on the display.
PostBase Vision greets the user – acoustically accompanied – and finally starts the
installation procedure.
Step 6: Installing the PostBase Vision
For information on using the touch screen
and stylus, the “swiping” method of operation
and other basic functions are described in the
reference guide, “The basics of operation”
chapter.
Installation and commissioning
25
The PostBase Vision will guide you step-bystep through the installation procedure. Simply follow the instructions on the display.
• Have the R-PIN ready (received separately
from the rest of the delivery).
Language
• Tap the desired language.
• Confirm the selection with the C
button and resume the installation.
ONTINUE
Page 26
PostBase Vision
26
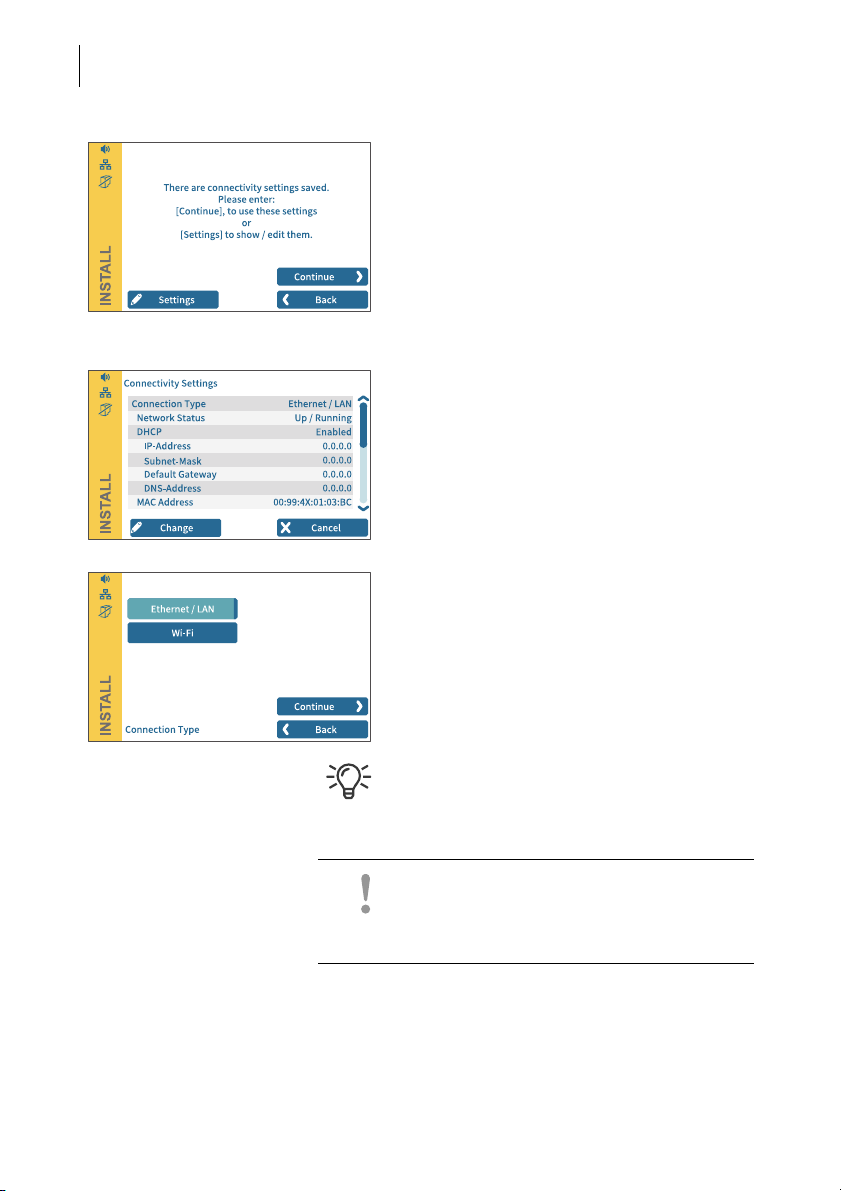
Connectivity settings
Default settings for an Ethernet connection
are stored for contacting the FP infrastructure. Establishing the connection should run
seamlessly with these settings.
To test the connection to the FP infrastructure with this default setting:
• Tap the CONTINUE button.
If no connection is established, the “Connectivity Settings” must be adjusted:
• Tap C
HANGE to open the entry wizard for
setting up the network connection.
• First select the desired connection type.
• Confirm the selection and continue with the
CONTINUE button.
• Set the appropriate parameters for the network step by step. If necessary, ask your
network administrator.
The “Connectivity Settings” overview
shows and explains the possible settings
(see page 115).
Caution! During the further course of installation, the PostBase Vision may start up
multiple times. Do not disconnect the
PostBase Vision from the power supply.
Page 27
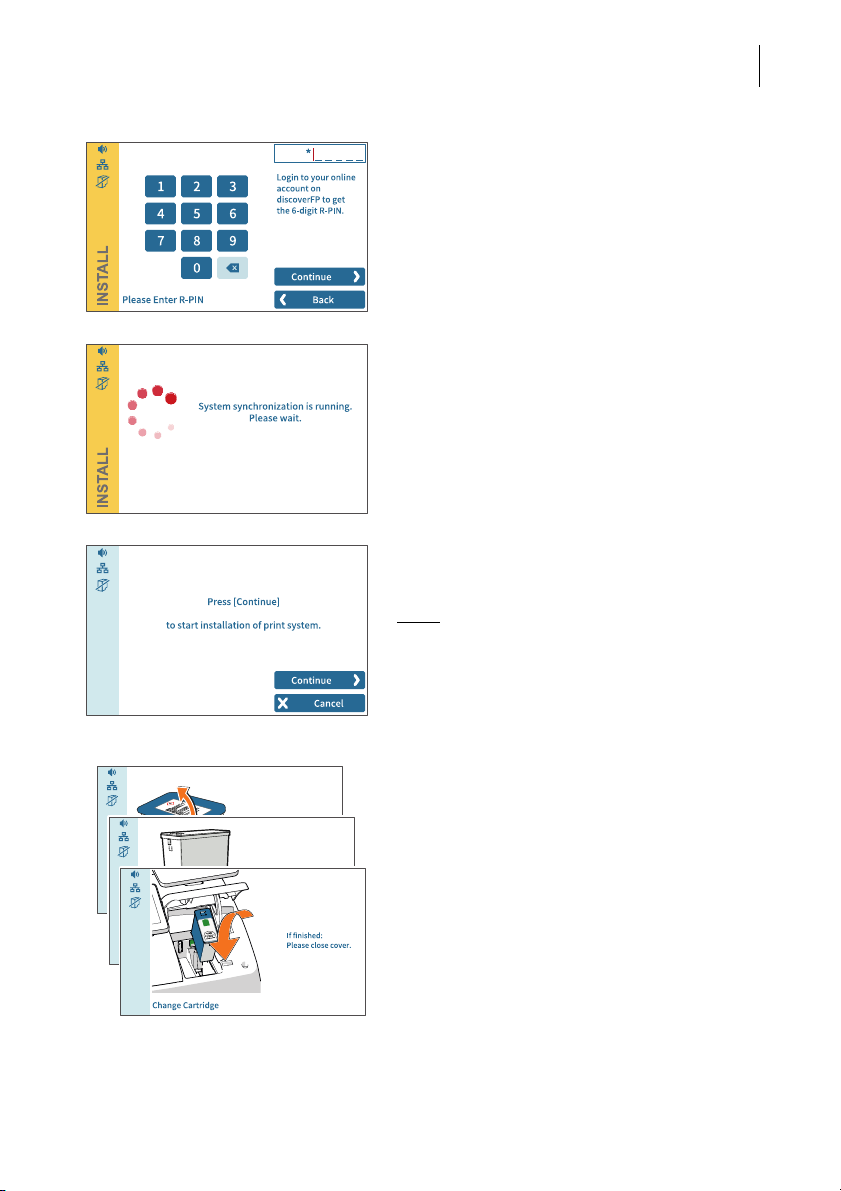
Installation and commissioning
R-PIN
• Enter the R-PIN (Repository-PIN).
• Confirm with CONTINUE and resume the
installation.
Synchronization …
PostBase Vision now loads software and
data and then restarts.
• Follow the information and instructions on
the display.
Inserting the ink cartridge
27
•Tap C
Note:
ONTINUE to insert the ink cartridge.
Do not touch the cover flap of the print
system or otherwise obstruct the automatic
opening.
PostBase Vision moves the print system to
the change position and then opens the
cover flap. The flashing green LED indicates
that no cartridge has been inserted yet.
The screen sequence in the display shows
the sequence of the cartridge change.
The insertion of the cartridge is described in
detail below.
Page 28
PostBase Vision
28
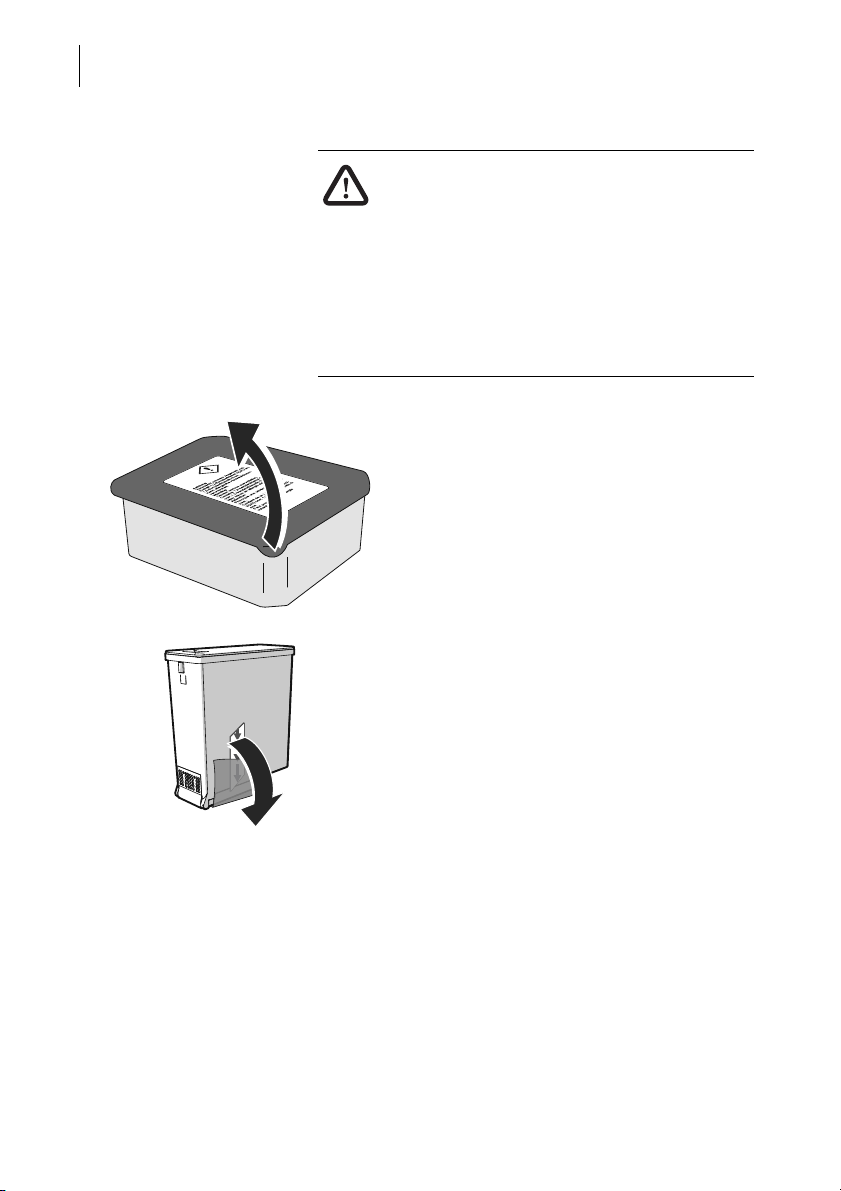
Caution! The ink causes severe eye irritation
and can cause allergic skin reactions. Ingestion of the ink can be harmful to health.
• Observe the hazardous substance mark-
ing on the cartridge packaging and the ink
cartridge.
• Avoid eye contact with the ink.
• Avoid ingestion of the ink.
• Keep the ink cartridges away from children
• Open the cartridge packaging.
• Remove the ink cartridge from the
packaging.
• Pull off the safety strip (nozzle protection).
Page 29
Installation and commissioning
Catch
LED
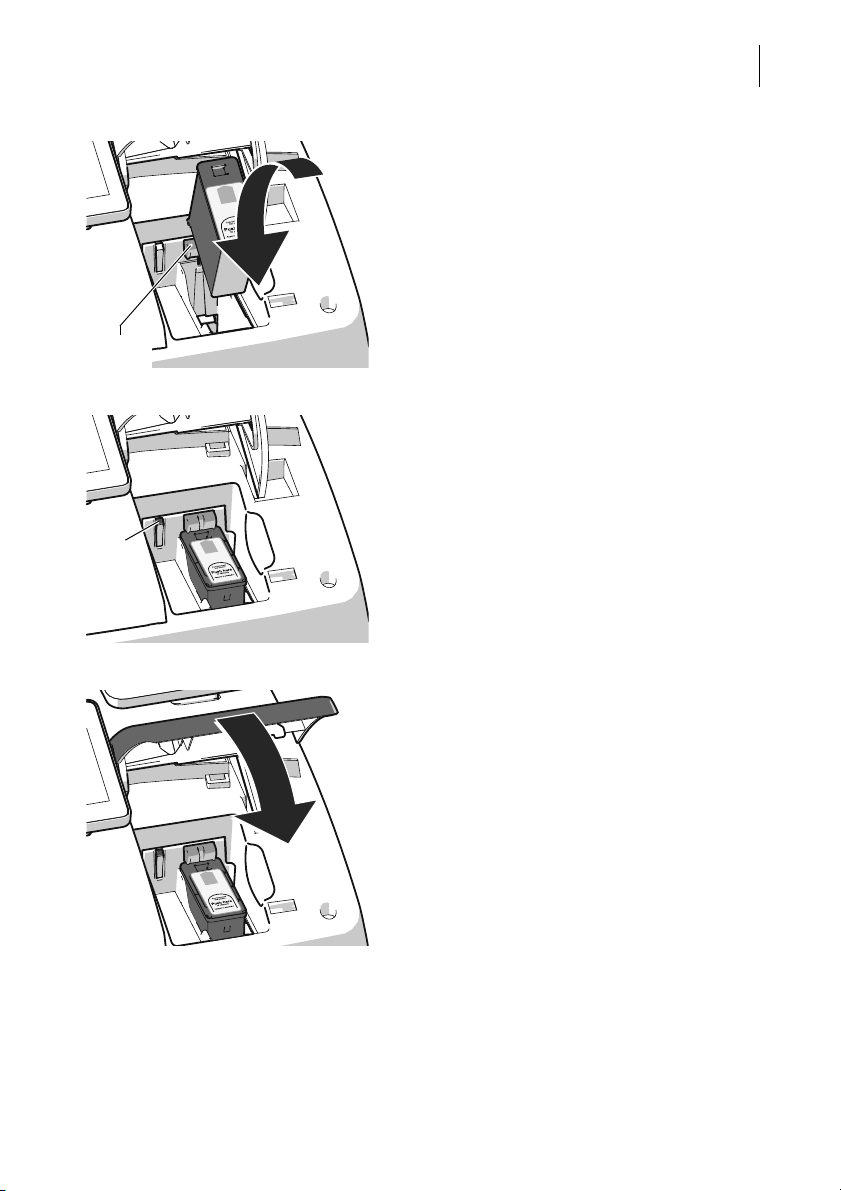
• Hold the ink cartridges so the contacts are
facing to the rear of the PostBase Vision.
The green arrow on the cartridge points to
the green catch on the cartridge holder.
• Insert the ink cartridge into the cartridge
holder.
• Press the ink cartridge down and click it
into place at the rear.
If the cartridge is inserted correctly, the green
LED lights up continuously.
29
• Close the cover flap of the print system:
In the area of the PostBase Vision logo,
press down the cover flap until the lock
engages.
Page 30

PostBase Vision
Icon:
Full cartridge
30
Please wait: The PostBase Vision will now
prepare the cartridge for use.
PostBase Vision displays the “Full cartridge”
icon in the menu bar.
Load postage / Contact data center
In order to meter, the PostBase Vision must
have corresponding postage credit. This requires contact with the data center.
• Follow the instructions on the display.
Home screen (example) Installation complete
When PostBase Vision displays the Home
screen, the postage meter installation has
been successfully completed.
To install the “PostBase Vision Feeder”, continue with Step 7.
ENU button is used to access other
The M
system settings (e.g. PIN protection, standby
time).
Volume, display inclination and brightness
can be adjusted directly on the display frame.
Page 31

Installation and commissioning
3 seconds
Ramp
Feeder
PostBase Vision
postage meter
Step 7: Installing the PostBase Vision Feeder (optional)
Caution! Only connect the Feeder once the
PostBase Vision postage meter is fully
installed. Otherwise the PostBase Vision will
not recognize the feeder. The mailing system
will not work.
Turning off the postage meter
• Press the ON/OFF button for three
seconds.
The PostBase Vision will complete any current actions, return the display to its home
position, and then turn itself off.
Setting up the feeder
31
• Place the ramp, feeder and postage meter
as shown in the illustration above.
• When assembling, ideally proceed from
left to right (starting at the ramp).
Page 32

PostBase Vision
32
The components are mechanically coupled
with catches (each on the right housing side)
and slots (each on the underside at the left)
and are secured in position relative to each
other in this way.
• Lift the feeder slightly, align it to the ramp
and lower it carefully. The catches on the
ramp must snap into the slots on the
Feeder.
• Couple the feeder to the postage meter in
the same way.
• Remove the protective film from the transparent cover flap.
Mounting the pendulum
• Insert the base of the pendulum into the
fixture of the ramp.
• Press down firmly on the pendulum until it
clicks into the shaft.
Page 33

Installation and commissioning
Connecting the feeder
Caution! If the feeder was previously in a
cold environment (i.e. below 10 °C / 50 °F):
Wait at least 2 hours after unpacking before
connecting the feeder. The feeder needs this
time to adjust to the environmental conditions.
33
Connection on the postage meter • Connect the feeder connection cable to the
CAN-BUS interface of the postage meter.
Screw the connector on tightly.
Power connection • Plug the power cable into the power con-
nection for the feeder.
• Only then plug the power cable into the
power socket.
Page 34

PostBase Vision
34
Filling the sealant tank with sealing liquid
Warning! Electrical hazard due to short
circuits. Be extremely careful when handling
liquids. When filling the tank, make sure that
no live parts become wet. However, if this
does occur: Immediately disconnect the
power plug. Have the PostBase Vision mailing system checked by the Customer Support before using it again.
The sealant tank is located under the transparent flap. To open the flap:
• Press the key.
• Remove the sealant tank from the housing.
Page 35

Installation and commissioning
• Unscrew sealant tank screw cover.
• Fill the sealant tank with SEALIT sealing
liquid.
• Replace sealant tank screw cover and
tighten.
35
• Turn sealant tank upside down in a nondangerous area (e.g. over a sink) to check
if the cover is well sealed.
• Insert sealant tank into the feeder with the
cover downward.
Page 36

PostBase Vision
36
• Close the flap.
Turning on the mailing system
• Press the ON/OFF button.
The LED lighting on the postage meter lights
up and the system starts up. You can follow
the running startup procedure in the display.
Upon system startup, PostBase Vision activates the connected system components the LED status indicator (sealing function
ON/OFF) on the feeder starts to light up.
After the system has started up successfully,
the Home screen with the additional F
EEDER
button appears on the display.
The PostBase Vision mailing system with
feeder is ready for operation.
Page 37

The basics of operation
3 seconds
4 The basics of operation
In this chapter, you will learn the basic functions of the PostBase Vision mailing system and how to use the touch screen.
4.1 Turning the PostBase Vision on / off
The PostBase Vision mailing system can remain connected to the network at all
times and is therefore always quickly ready for operation. Use the round button in
front of the display to turn the PostBase Vision mailing system ON / OFF.
Turning on
• Press the ON/OFF button.
The LED lighting on the postage meter (ON/
OFF button, weighing platform, letter
entrance area) lights up and the system
starts. The progress of the process can be
followed on the display. PostBase Vision
greets the user – acoustically accompanied –
the display moves to the last position used
and finally the Home screen appears on the
display.
If access control is activated, you must enter
your PIN during the start routine.
37
Turning off
• Press the ON/OFF button for three
seconds.
The PostBase Vision will complete any current actions, return the display to its home
position, and then turn itself off.
Page 38

PostBase Vision
3 seconds
38
Disconnecting the PostBase Vision from
mains
Caution! Make sure to always turn the
PostBase Vision off with the ON/OFF button
before disconnecting the PostBase Vision
from mains. Never pull the power plug or
separate the power supply in any other way
before the printing system has reached its
sealed position. This is the only way to prevent
drying up and to ensure a permanently high
print quality.
• Press the ON/OFF button for three seconds to turn the PostBase Vision off.
When the illumination is off:
• Unplug the power plug from the power
socket.
4.2 Standby (Sleep mode)
If you do not use the mailing system for a
while, it automatically switches to Sleep
mode (standby).
The display is dark and the ON/OFF button is
illuminated in standby.
Briefly touch the display to “wake up”
PostBase Vision.
As an alternative, you can briefly press the
ON/OFF button.
Page 39

The basics of operation
4.3 Screen elements and operation philosophy
This chapter introduces the user interface of the PostBase Vision mailing system.
You will learn how to use the touch screen, the screen elements and the various
menus, window types and icons.
4.3.1 The touch screen
The touch screen of the PostBase Vision mailing system reacts to pressure (=
resistive display). With this type of touch screen, it does not matter whether you use
your finger, fingernail, pen or gloves.
The touch screen supports different methods of operation: Tapping and Swiping.
Depending on the desired action, you can select your preferred method.
General operating instructions
Tapping • Briefly tap the desired element on the
screen (in the example, this is the button
with the postage).
PostBase Vision carries out the corresponding action (in the example, the product selection opens).
39
Swiping • For example, press your finger in the area
where you want to navigate.
• Hold down the area and move your finger
in the desired direction.
Page 40

PostBase Vision
Scrollbar
Slider
Screen navigation
40
Operating scrollbars • Press the slider and move it in the desired
direction.
You can also tap the arrows to scroll up or
down the list.
Scrolling through lists In lists and menus, dots symbolize the num-
ber of available screens (pages). The dark
blue dot indicates the current screen.
• Tap the arrows to scroll through the list.
• Tap on a dot to jump directly to this screen.
Stylus for touch screen operation
The supplied stylus for touch screen operation is located in the back of the display housing on the right. You can simply pull the stylus
out to the right.
It is best to put the stylus back in its place in
the display housing after use. It is well-protected from loss there.
Page 41

The basics of operation
Buttons Buttons stand out from the background due
to their color. Depending on their function,
they can assume different states:
Button is active
(it can be tapped).
Button is active (it can be tapped).
This color is used for buttons with special
functions, such as shortcuts.
Button is selected.
The button is currently being tapped.
Button is deactivated
(it cannot be tapped).
41
Standard buttons The term “standard button” refers to the but-
tons SAVE, OK, CANCEL, BACK and CONTINUE.
The marking can vary depending on the
function.
Page 42

PostBase Vision
Postage / select product
Info panel:
– Date
– e.g. Imprint Offset
– Current postage credit
Advertising imprint
(advert / text / QR code)
Current product setting
(weight and mailing data)
Shortcut 1
(selected)
Menu bar
Use feeder (optional)
Shortcuts
(swiping selection list)
Cost account
Open menu, access to
– System settings
– Special functions
– Administrative functions
– Maintenance and service
functions
Display additional
shortcuts
Label printing
42
4.3.2 The Home screen
After turning on the unit and successfully completing the start routine, the Home
screen appears on the display. It shows the current meter settings. The color-coded
menu bar on the left of the window shows status information, e.g. volume, network
connection and ink level, and provides access to additional functions.
Functions In the Home screen:
– current settings are displayed
– you have access to all settings relating to
the meter imprint
– you meter your mail pieces
– you can weigh your mail pieces
– you have access to additional functions
using the buttons in the menu bar
Operation philosophy To select a function / setting, tap the button.
Depending on the function selected,
PostBase Vision then opens a selection list,
a setting menu or a menu with additional
selection options.
You can also simply “swipe” the selection list
with the shortcuts.
Page 43

4.3.3 The menu bar
Functions:
Displays
:
Volume
Network connection
(LAN / Wi-Fi)
Ink level
Read news about your
mailing system
Order consumables
Open menu
Additional menu functions
Menu (example)
Menu bar (example) The highlighted area on the left of the window
4.3.4 The menu
The basics of operation
is the menu bar.
In the menu bar, you can see important
status information at a glance, such as the
volume of the sound signals, the type of
network connection and the filling level of the
ink cartridge.
In the Home screen, the menu bar also has
buttons that give you access to system settings and other useful functions.
You can adjust the color of the menu bar
according to your taste. Read more about it in
chapter 14.6 on page 108.
You can use the MENU button to open the
menu in which you have access to the
system settings, administrative functions,
special features, and service functions.
Use the arrows to scroll through the menu.
By tapping the dots, you jump directly to the
corresponding menu screen.
You can also move through the menu by
swiping (to the right or left).
43
Page 44

PostBase Vision
Current setting
Display additional
selection options
Current setting
Apply current setting
44
4.3.5 Selection lists
Selection lists (e.g. for adverts, text messages) offer all available settings. The current setting is highlighted in color (light blue
with a dark blue bar).
Use the arrows to scroll through the list.
By tapping the dots, you jump directly to the
corresponding screen of the selection list.
You can also move through the list by swiping
(to the right or left).
To apply the desired setting, tap the corresponding button.
4.3.6 Setting menus
A separate menu opens for adjusting and selecting settings. Setting menus are
available in various versions, e.g. as a list with possible settings for selection or
with a keypad for entering digits.
Lists
The left area shows the available settings.
The current setting is highlighted in color
(light blue with a dark blue bar).
If there are more than six choices, scroll or
swipe the list.
Use OK to apply the current setting and exit
the setting menu.
Use C
ANCEL to discard your entry and exit the
setting menu.
Page 45

4.3.7 On-screen keyboard
Current input
Information text
(if available)
Button assigned according to
function (not available here)
Delete entry
Delete
Text field (here: 5 lines for text
as an advertising imprint)
Cursor
Toggle button
assignment
Line break
(only for certain functions)
The basics of operation
Input via numeric keypad
Use the keypad in the left area to input values. The display field at the top right shows
your entry.
The keypad is always adjusted to the respective situation: If available, the bottom left button is assigned an operating action adjusted
to the current function, e.g. entering a decimal point.
The information text provides information
about special features and additional notes.
Use OK to apply the current setting and exit
the setting menu.
ANCEL to discard your entry and exit the
Use C
setting menu.
45
PostBase Vision opens the on-screen keyboard to enter text, numbers and special
characters, e.g. for an individual text as
advertising imprint, for entering shortcut
names and searching cost accounts.
The entered text can be seen at the top of the
display. Use the arrows to the left and right of
the text field to move the cursor in the text.
You can place the cursor directly at the
desired text position by tapping it.
The on-screen keyboard allows you to enter
letters, numbers and a number of special
characters.
Page 46

PostBase Vision
46
4.3.8 Pop-up windows
The buttons for switching the assignment are
each adjusted to the current situation:
Enters capital letters.
Switches to numbers, punctuation and
special characters.
Scrolls (between the available special
characters and digits).
Switches back to letters.
Use OK to apply the displayed text.
Use CANCEL to discard your entry and exits
the text entry.
Some settings open a window that partially
covers the current window (pop-up window).
The pop-up calls for an action. Messages,
label printing and batch processing with
feeders also appear as pop-ups.
Some pop-up messages acknowledge themselves, i.e. after a certain time they disappear
automatically.
4.3.9 Procedures / wizards
PostBase Vision guides you step-by-step
through all the necessary entries for comprehensive settings, e.g. when configuring the
network connection. Different window types
are used depending on requirements.
ONTINUE to apply the current setting
Use C
and proceed to the next step.
ACK to return to previous steps.
Use B
Page 47

The basics of operation
Lower
Raise
Darker
Brighter
4.4 Setting the display angle
The display angle can be adjusted by using the motor. Simply press the sensitive
areas to the left and right of the icon on the display frame.
• Press and hold the desired function (raise /
lower) until the display is in the desired
position.
When turning off the unit, PostBase Vision
lowers the display to its home position. When
the unit is turned on, the display returns to the
set position.
4.5 Setting the display brightness
You can adjust the brightness to your preferences to ensure good legibility of the
display texts and best rendering of the contrasts. Simply press the sensitive areas to
the left and right of the icon on the display frame.
47
• Press and hold the desired function
(brighter / darker) until the display shows
the desired setting.
Page 48

PostBase Vision
Quieter
Louder
Display:
Off
Quiet
Normal
Maximum
48
4.6 Setting the volume
You can see the current volume setting for
the sound signals in the menu bar at the top
left.
To adjust the volume, press the sensitive
areas to the left and right of the speaker icon
on the display frame.
• Press and hold the desired function (louder
or quieter) until the test signal is at the
desired volume.
Turning off the speaker
• Turn the volume “down” until you see the
icon.
Note:
The sound signal volume when the
system starts is fixed and cannot be
changed.
Page 49

The basics of operation
4.7 Inserting labels
Caution! We recommend to use only labels that have been approved by
Francotyp-Postalia. The manufacturer FP has established reliability, safety
and applicability. The manufacturer cannot assess the reliability, safety and
applicability for products not approved by FP, and therefore not vouch for such
products. We can ensure correct label processing only when you comply with
this.
To fold the label compartment out:
• Press on the knurled surface until you hear
a click, then release.
49
• Remove package band from the package
of labels.
• Insert the complete package (50 labels) in
the label compartment:
– The side to be printed on faces up.
– Insert the package of labels in direction
of the imprinted arrow as far as it will go.
Page 50

PostBase Vision
50
4.8 Setting up the catch tray
The catch tray can be adapted to different
envelope sizes (up to ISO B4 / 10" x 14") by
displacing the catch bracket.
The stop features several catches for the
most common sizes.
4.9 Using the Drop Stacker (optional)
The Drop Stacker, which is available from Francotyp-Postalia as an optional additional component for the PostBase Vision mailing system, is placed instead of the
catch tray to the right of the postage meter. Retrofitting the PostBase Vision with the
Drop Stacker is also very easy. Especially for larger quantities of outgoing mail, the
Drop Stacker with a capacity of up to 250 letters (ISO DL containing one sheet ISO A4) is a
practical alternative to the letter catch tray.
Installation
• Install the Drop Stacker according to the
assembly instructions. (The detailed
assembly instructions for the Drop Stacker
are included in the package).
Adapting to the envelope format
• You can move the right side wall in direction of the arrow using the handle. Catch
points, which are spaced apart by approx.
0.6" / 15 mm allow adjustment to match the
different envelope formats.
To remove the letter stack …
Thanks to the specially shaped shaft bottom,
the carefully stacked mail pieces can be easily
accessed from the bottom and removed
stackwise, even when the machine is running.
Page 51

Setting the meter imprint
Advert imprint Date Postage
Product details
Serial number of the
postage meter
Data matrix symbol
Advert imprint
5 Setting the meter imprint
This chapter describes the required settings for metering and additional possible
advertising imprints:
51
– Postage / USPS product (see chapter 5.1)
– Date (see chapter 5.2)
– Advert imprints (see chapter 5.3).
Refer to chapter 5.4 on how to use the “Imprint offset” function to laterally displace
the meter imprint position.
You can test the current meter settings using a zero imprint. Read more about it in
chapter 5.5.
Refer to chapter 6.5 on how use correction imprints for already metered mail pieces.
Note: The examples in this manual show actual postal products. In case the USPS
changes their products / services on short notice, corresponding software updates to
the rate table will be made available to the mailing system in time. However, this does
not apply to the documentation delivered with you mailing system.
Page 52

PostBase Vision
Selected
shortcut
Available
shortcuts
Screen navigation
for the shortcut list
52
5.1 Postage / USPS product
PostBase Vision sets the postage, i.e. the price for the postal product using the
chosen mailing data (destination, type, mail piece dimensions, and additional
services if applicable), in conjunction with the displayed weight.
You simply select the mailing data step by step in the product menu. The built-in scale
is available for weighing the items.
The different ways to set the product are described below:
– The easiest way to set the product is via shortcut. Refer to chapter 5.1.1.
– To read the step-by-step instructions on how to select mailing data, refer to
chapter 5.1.2.
– You can learn how to determine the weight of your mail pieces with the built-in scale
in chapter 5.1.3.1.
– Differential weighing – an optional weighing mode for the built-in scale – can be
used for conveniently presorting your outgoing mail according to postage classes.
Read more about it in chapter 5.1.3.3.
– For mail pieces whose weight exceeds the scale’s weighing range, enter the weight
manually. Read more about it in chapter 5.1.3.2.
5.1.1 Setting the product using a shortcut
Depending on the equipment, you can call up to 20 shortcuts directly from the Home
screen. Typical postal products are already saved at the factory in the postage meter
as shortcuts. When new tariffs are introduced, PostBase Vision also automatically
updates the shortcuts.
Available shortcuts
You can see the shortcuts available on your
mailing system below in the Home screen. If
more than 5 shortcuts are assigned, arrows
and dots for navigation appear below the
shortcuts.
You can
– use the arrows to scroll the shortcut list
– to jump directly to one screen, tap the cor-
responding dot
– swipe the shortcut list to the right or left.
Page 53

5.1.2 Setting mailing data
Setting the meter imprint
Using a shortcut
• Tap the desired shortcut.
If necessary:
• Weigh the mail pieces.
The product with the corresponding postage
is set for metering.
To save a product as a shortcut: press and
hold the corresponding shortcut.
Refer to chapter 10 to learn how to save
products as shortcuts, rename and delete
shortcuts as well as reset them to factory
defaults.
In the Home screen:
• Tap postage.
PostBase Vision opens the product menu.
53
Selecting mailing data
The PostBase Vision opens the product
menu and requests all necessary information
on the mail piece in turn.
• Tap each of the desired settings.
The selected mailing data appears on the
right of the display. As soon as all the necessary mailing data has been set, the postage
appears.
When the desired mailing data is set:
•C
ONFIRM and return to the Home screen.
Page 54

PostBase Vision
54
5.1.3 Setting the weight
5.1.3.1 Weighing a mail piece
This chapter describes how to use the built-in scale in standard weighing mode. If the
optional differential weighing mode is set, the info panel in the Home screen, displays
“Differential weighing”. Refer to chapter 14.12 on page 113 to learn how to set the
weighing mode.
Caution! Please observe the following instructions for handling the built-in
scale:
– Observe the maximum permissible weight (depending on equipment).
– The scale only determines a new weight if the scale has previously been
unloaded. Therefore, always clear the weighing platform before placing a
mail piece on it for weighing.
– The scale does not determine a new weight while the letter transport unit
is running. Wait until the letter transport unit stops before placing a mail
piece on the weighing platform.
– When weighing large format mail pieces, make sure that the mail pieces
do not touch the display housing. This prevents the weighing results from
being falsified and insufficient metering.
• Place the mail piece on the weighing
platform.
PostBase Vision emits a tone when the scale
has determined the weight of the mail piece.
Page 55

Setting the meter imprint
Set weight
The weight determined by the scale is set.
PostBase Vision sets the postage based on
the weight displayed and the mailing data
selected.
You can weigh your mail pieces both in the
Home screen and in the product menu using
the built-in scale.
5.1.3.2 Entering the weight manually
PostBase Vision allows you to manually enter the weight for certain products. If the
weight can be entered manually, the “Manual weight input” function is available in the
product menu. You need this function, for example, for mail pieces whose weight
exceeds the weighing range of the built-in scale.
In the Home screen:
• Tap postage.
PostBase Vision opens the product menu.
• Set the desired mailing data.
55
• Tap the M
ANUAL WEIGHT INPUT option.
PostBase Vision opens the weight setting
menu.
• Enter the weight.
• Confirm with OK.
PostBase Vision uses the set weight to
calculate the postage.
Page 56

PostBase Vision
56
5.1.3.3 Differential weighing (optional)
PostBase Vision optionally supports differential weighing (stack weighing). This
allows you to weigh and meter larger quantities of similar mail pieces quickly and conveniently. You simply place a stack of letters on the scale and remove one letter at a
time. PostBase Vision measures the change in weight and determines the appropriate postage. You can meter each letter immediately or weigh all letters from the stack
and sort them by postage. Letters with the same postage can then be metered
together in a single operation.
Caution! Please observe the following instructions for handling the built-in
scale:
– Observe the maximum permissible weight (depending on equipment).
– The scale does not determine a new weight while the letter transport unit
is running. Wait until the letter transport unit stops before placing a mail
piece on the weighing platform.
– When weighing large format mail pieces, make sure that the mail pieces
do not touch the display housing. This prevents the weighing results from
being falsified and insufficient metering.
• Set the weighing mode to “Differential
weighing”:
ENU DIFFERENTIAL WEIGHING.
M
PostBase Vision displays the “Differential
weighing” mode in the Home screen.
• Place the letter stack or a box with letters
on the weighing platform.
Two short sounds indicate that the scale has
registered the load.
Page 57

Setting the meter imprint
The Home screen still shows the old weight
and the old postage.
• Take one letter from the stack or from the
box.
• PostBase Vision determines the weight
change and calculates the postage.
57
When you clear the weighing platform,
PostBase Vision asks if you want to use
the last weight determined.
• Confirm with Y
ES to determine the postage
for the last letter of the stack.
Or
• Select NO to discard the determined weight
(e.g. because you last took the empty box
from the weighing platform).
PostBase Vision does not determine a
postage.
Page 58

PostBase Vision
Date in the future
58
5.2 Date
The system clock automatically sets the date for metering on the current date for the
meter imprint. You can forward the date for the meter imprint to meter mail pieces for
shipment in the next few days today. PostBase Vision does not allow unauthorized
entries, e.g. a meter date that is too far ahead or backdating.
You can see the currently set date in the Home screen.
Setting the metering date
• Open the M
ENU.
• Choose C
HANGE DATE.
PostBase Vision opens the setting menu for
the metering date.
• Type the desired date.
You can use |<< to reset the metering data to
the current date.
• Confirm the displayed date with OK.
If the date is in the future, an icon appears
before the set date.
Page 59

Setting the meter imprint
Advertising imprints
5.3 Advertising imprints
When metering, PostBase Vision can print up to two advertising imprints of your
choice on the mail pieces. Advertising imprints may include:
– Graphical adverts
–Text
– Information encrypted as QR code.
You can print the advertisement in any order.
Setting an advertising imprint
In the Home screen:
• Tap one of the two advertising imprint
buttons.
PostBase Vision opens a selection list with
all available advertising imprints.
59
• Tap the desired advertising imprint.
PostBase Vision returns to the Home screen.
The advertising imprint is set for metering.
: Long texts may be cut off on the button
Note
in the Home screen.
• Set the second advertising imprint in the
same way.
Refer to chapter 11 to learn how to enter,
change and delete texts and QR codes.
Page 60

PostBase Vision
Set imprint offset
60
5.4 Imprint offset
PostBase Vision prints the meter imprint at a
fixed offset from the right mail piece edge.
You can increase this offset and thus shift the
meter imprint to the left by adjusting the
imprint offset.
If an imprint offset is set, it appears together
with an icon in the Home screen.
Setting an imprint offset
• Open the M
• Choose I
ENU.
MPRINT OFFSET.
PostBase Vision opens the setting menu for
the imprint offset.
• Type the desired amount for the offset.
• Confirm the displayed imprint offset with
OK.
The imprint offset for the meter imprint is set
and remains effective until the next change –
even after the unit is turned off.
The info panel in the Home screen shows the
set imprint offset.
Page 61

Setting the meter imprint
5.5 Test print – testing the meter imprint settings
Using a test print, you can assess the settings for the meter imprint.
Test print (example) The indication VOID overprinting the data
matrix symbol as well as the postage value
$000.000 identify the test print as an invalid
meter imprint.
You must never dispatch test prints to the
USPS.
Test prints are not logged in the registers.
Setting a test print
• Set the desired parameters for the meter
imprint (advert, date, imprint offset etc.).
In the Home screen:
• Tap postage.
• Set the desired product.
Once all necessary mailing data are set, you
can perform a test print. The T
PRODUCT option is shown at the end of the
additional services list.
• Choose T
EST PRINT PRODUCT.
61
EST PRINT
PostBase Vision prompts you for a test print.
Print test print on a label
•Tap 1L
ABEL to print the test print on a
label.
PostBase Vision generates the test print and
prints it on a label.
Page 62

PostBase Vision
Contact area
62
Print test on an empty envelope
• Position an empty envelope (or a postcard)
for the test print:
– Side to be printed face up.
– The top edge is flush with the contact
area.
• Push the envelope in the direction of the
arrow and release
.
PostBase Vision generates the test print and
then draws in the envelope and prints.
You can read more about the topic “Feeding
letters” in chapter 6.3.
Page 63

Metering
Press briefly
6 Metering
In this chapter, you will learn how to log on to PostBase Vision as a user, set up a
cost account to record postage, place letters on the hand feed tray, work with the
feeder and the sealer and meter labels to be attached to mail pieces. Also, the
counter functions available for metering are described. For extensive information
on how to set the meter imprint, see chapter 5.
6.1 Logging on / switching users
A user-specific access control can be set up for PostBase Vision. In this case, select
the user during system startup and enter the appropriate PIN. This loads the corresponding user profile. Among other things, the following settings are defined in the
user profile: Name, PIN, budgets, allocated cost account(s), default cost account and
the approval to load postage.
Switching user
•Briefly
PostBase Vision displays the list of users.
• Select the desired user.
• Enter the PIN and confirm.
press the ON/OFF button.
63
PostBase Vision loads the user profile and
then displays the Home screen.
The mailing system’s administrator can set
up and manage users in the discoverFP
customer portal.
Page 64
PostBase Vision
Set cost account
64
6.2 Setting up / changing cost accounts
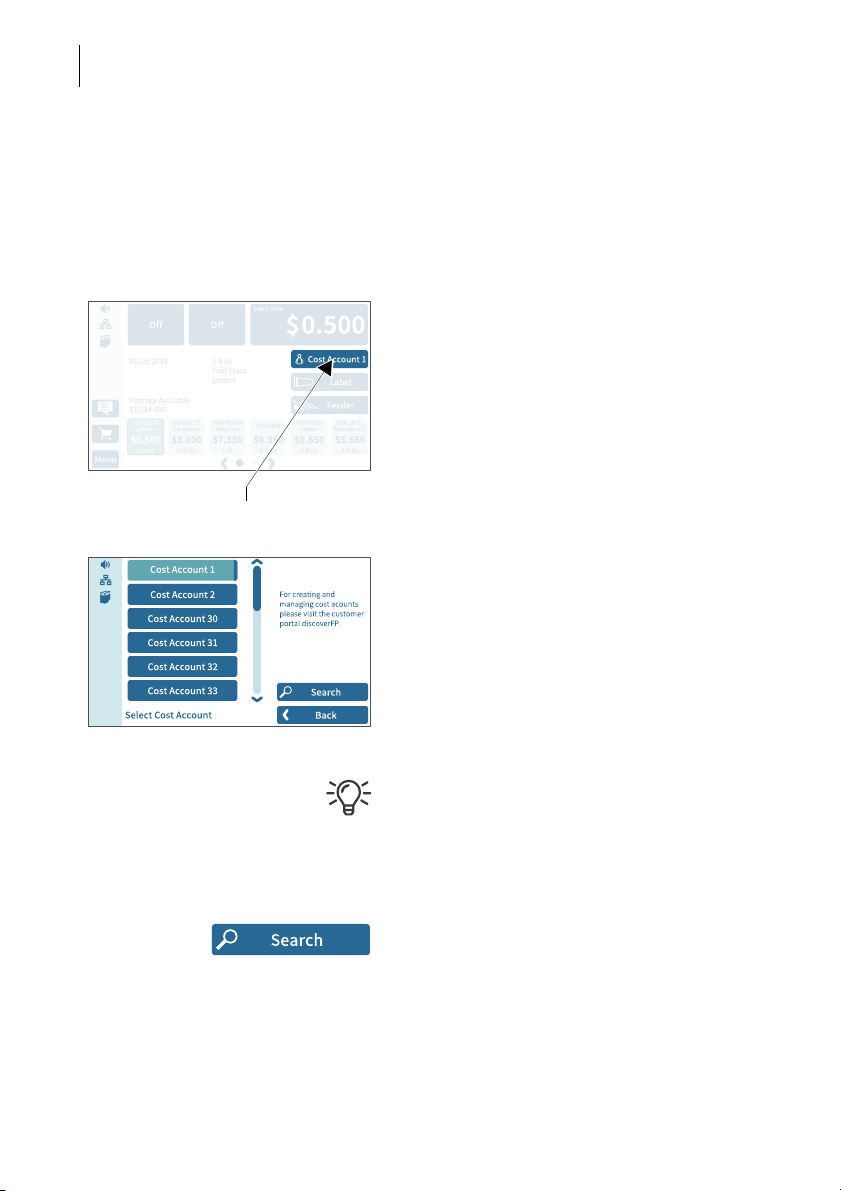
If the cost account function for your mailing system is set up on the discoverFP customer portal, all meterings are booked to the current cost account. You can see the
currently set cost account in the Home screen on the cost account button (the button
directly below the postage).
• Tap the cost account button on the Home
screen.
PostBase Vision opens a selection list with
all available cost accounts. The current cost
account is highlighted in color (light blue with
a dark blue bar). In this example it is
“Cost Account 1”.
• Tap the desired cost account.
PostBase Vision sets the cost account and
returns to the Home screen.
If users are set up, only the cost accounts
approved for the currently active users will be
available for selection.
Searching for cost accounts / filter list
• Open cost account search with S
EARCH.
You can use the search function to search for
a specific cost account or filter the list. This
way you can get to the desired cost account
quickly, especially for long lists.
Page 65

• Enter the character sequence that the cost
PostBase Vision is ready for metering
Contact area
account should contain. Upper/lower case
have no influence on the search results.
• Confirm with OK.
The filtered list of cost accounts appears. The
selection list only shows those cost accounts
that contain this character sequence at any
point in the name.
6.3 Feeding letters and metering
6.3.1 Hand feed tray
On a PostBase Vision with hand feed tray, you
feed mail pieces individually. Please heed
the mail piece specifications on page 179.
If the Home screen shows a postage, you
can feed mail pieces for metering.
Metering
65
• Place the letter on the hand feed tray:
– The side to be printed facing up (address
field is visible).
– The upper edge is flush with the contact
area.
• Push the letter in the direction of the arrow
and release
PostBase Vision feeds the letter, prints and
ejects the metered letter to the right into the
catch tray.
You can feed more letters one by one while
the letter transport is running.
.
Page 66

PostBase Vision
Stop
Stop edge
Rocker with
moistening felt
Contact area
PostBase Vision is ready for metering
66
6.3.2 Sealer (optional)
You can moisten the envelope flap with the
sealer prior to metering. The moistened flap
will be pressed down by the postage meter
during transport.
For already sealed letters or post cards, use
the sealer simply as a hand feed tray (see
chapter 6.3.1).
If the Home screen shows a postage, you
can feed mail pieces for metering.
Please heed the mail piece specifications on
page 190.
Moistening the envelope flap
• Hold the letter with the open flap facing
downward.
• “Latch in” the letter in the sealer in the
direction of the arrow.
The image shows the correct position of the
letter in the sealer:
– The flap is below the stop.
– The stop edge is exactly in the flap fold.
Page 67

Metering
• Guide the letter through the sealer as
shown in the image while turning slightly.
This guides the glue on the flap edge below
the moistening felt and moistens it.
• Align the upper edge of the letter on the
contact area in the direction of the arrow
and release
.
67
Pressing down the moistened envelope
flaps
To ensure that the envelope is securely
sealed, we recommend pressing down the
envelope flaps after metering.
• Use your hand and forcefully stroke along
the stack of letters in the area of the envelope flaps.
Page 68

PostBase Vision
68
Large-sized mail pieces
Preferably use both hands to feed largesized mail pieces while moistening them
.
Once the postage meter has detected the letter, you should only lightly support the letter.
Page 69

Metering
Contact area
6.3.3 Feeder (optional)
Equipped with the feeder, PostBase Vision can feed letters and postcards from a
stack and process them. Please heed the mail piece specifications and the envelope
specifications for automatic sealing on pages 179 to 180.
6.3.3.1 Preparing letter stacks and setting up feeder
Caution! Potential danger due to automatic start-up.
When the PostBase Vision is ready for metering, the letter transport starts up
as soon as an object covers the sensor for letter detection. For this reason,
do not place your hand anywhere near the sensor. Do not allow any objects
to reach the sensor area. This way, you can avoid accidentally starting the
letter transport.
69
To set up the feeder, you can open the M
ENU. PostBase Vision is not ready
for metering at this time and the letter transport cannot start.
Preparing letter stacks
• Sort letter stacks so that all envelope flaps
are facing downward.
• Align top edges flush:
Position the letter stack with the letter top
edges on a level surface, loosen up and jog
to align.
Adjusting the letter guide
• Place a stack of letters:
– Side to be printed (address side)
facing up.
– The letter top edges are on the contact
area.
– Do not exceed permissible stack height
(2.2" / 55 mm).
• Adjust the letter guide so that it is flush with
the letter stack.
Page 70

PostBase Vision
70
Fold the letter guide down
If the letter guide is in the way when feeding
large-sized mail pieces, you can fold the
letter guide down.
• Carefully
pull out the letter guide up to the
stop.
• Fold the letter guide down as shown in the
illustration and place it onto the tabletop.
Adjusting the incline of the ramp
• Press the release key down to the left to
unlock the letter receiving tray.
• Lift up the ramp or lower the release key to
fasten the ramp.
6.3.3.2 Switch the sealing function on / off
If the letters (up to a max. thickness of 0.3" /
7 mm) are to be sealed:
• Set the seal / non seal switch to the rear, to
the seal position.
The sealing function is switched on. The LEDs
below the sealant tank flap light up brightly
If the letters are not to be sealed, or have
already been sealed:
• Set the seal / non seal switch to the front in
the non seal position.
The sealing function is switched off. The LEDs
below the sealant tank flap are dimmed.
.
Page 71

6.3.3.3 Setting the letter thickness
“Letter thickness” button
If you want to meter letters with a thickness of 0.24" - 0.4" (6-10 mm), use the
“thick letters” function of the feeder for the best results.
• In the Home screen, tap FEEDER.
PostBase Vision opens the pop-up
“Automatic Feeding”. On the button for letter
thickness, you see the current setting
(Normal or Thick.
• In the pop-up, tap on the button for the
letter thickness.
Metering
71
• Select N
ORMAL or THICK depending on the
letters you are metering.
The selected setting is highlighted in color
(light blue with a dark blue bar).
• Apply the displayed setting by tapping OK.
If “thick letters” is set, it takes PostBase Vision
significantly longer to process the letters.
Remember to reset the setting back to
ORMAL for an optimal processing speed.
N
Page 72

PostBase Vision
PostBase Vision is ready for metering
Pendulum
72
6.3.3.4 Feeding letters in stack and metering
Once the feeder has been set up (see chapter 6.3.3.1 to 6.3.3.3) and the desired
meter imprint is set (see chapter 5), you can start processing. PostBase Vision also
offers the option to define a unit quantity before metering. Read more about it in chapter “Working with the batch counter” on page 74.
Caution! Automatic start-up. When the
PostBase Vision is ready for metering, the
letter transport starts up as soon as a letter is
placed on the feeder. Do not be startled.
You can start processing from the Home
screen or from the pop-up “Automatic
Feeding” simply by feeding a stack of letters.
• Swivel the pendulum upward.
Page 73

Metering
Contact area
Interrupt processing
• Place the prepared stack of letters:
– Side to be printed (address side) facing
up.
– The letter top edges are on the contact
area.
– Do not exceed permissible stack height
(2.2" / 55 mm).
• Swivel the pendulum downward.
: Especially when metering curved or
Note
thin letters in the stack, we recommend the
use of the pendulum. The pendulum stabilizes the letter stack and the sensors can
detect the letters.
Processing starts automatically. The letters
are taken from the stack one by one, moistened and sealed if necessary, metered and
stacked in the catch tray ready for mailing.
You can interrupt the processing by tapping
on the S
TOP button.
73
Starting / continuing processing …
After an interruption or if letters are already in
the feeder:
• In the Home screen, tap F
EEDER.
PostBase Vision opens the pop-up
“Automatic Feeding”.
• Start/continue processing with S
TART.
Process single letters with the feeder in the
same way. In place of the letter stack, simply
place a single letter / postcard on the feeder.
Page 74

PostBase Vision
Delete
74
6.3.3.5 Working with the batch counter
With the batch counter, PostBase Vision offers the option to define a unit quantity of
the mail pieces you want to meter. This function helps you to prepare the finished mail
pieces for mailing counted in a stack.
Caution! Automatic start-up. When the
PostBase Vision is ready for metering, the
letter transport starts up as soon as a letter is
placed on the feeder. Do not be startled.
Once the Home screen shows the desired
meter settings:
• In the Home screen, tap F
EEDER.
PostBase Vision opens the pop-up
“Automatic Feeding”.
• Open the setting menu for the batch counter by tapping A
MOUNT.
• Enter the desired amount of letters to
meter.
• Apply the displayed setting by tapping OK.
Page 75

Metering
Number of mail pieces
left to meter
The pop-up shows the set amount.
• Place the prepared stack of letters.
For more details on setting up the feeder
and to place stacks of letters, refer to
pages 69 to 73.
Processing starts automatically. The letters
are taken from the stack individually, moistened and sealed if necessary, metered and
stacked in the catch tray ready for mailing.
The pop-up shows the number of mail pieces
left to meter.
You can interrupt the processing at any time
with the S
TOP button.
75
Page 76

PostBase Vision
Number of labels
76
6.4 Metering labels
Thanks to the integrated label feeder, PostBase Vision can automatically feed and
print self-adhesive metering labels to be attached to mail pieces. A detailed description on how to insert labels is provided in chapter 4.7.
Caution! We recommend that you only use the metering labels that can be
ordered through Francotyp-Postalia. The manufacturer FP has established
reliability, safety and applicability. The manufacturer cannot assess the
reliability, safety and applicability for products not approved by FP, and
therefore not vouch for such products.
We can only guarantee correct label processing with the use of FP approved
products.
Metering a label
• In the Home screen, tap L
PostBase Vision opens the pop-up
“Print label”.
ABEL.
• Press S
TART to print the set meter imprint
onto the label.
Metering several identical labels
• In the Home screen, tap L
ABEL.
PostBase Vision opens the pop-up
“Print label”.
• Open the setting menu for the amount of
labels by tapping A
MOUNT.
• Entered the desired amount of labels and
confirm with OK.
• Press START to print the set number of
labels.
Page 77

Metering
Number of labels left to print
PostBase Vision prints the set number of
meter labels. The counter shows the number
of labels left to print.
The pop-up shows the number of labels left
to print.
Interrupt label printing at any time with the
TOP button.
S
77
Page 78

PostBase Vision
78
6.5 Correcting faulty meter imprints
6.5.1 Postage correction
You can correct faulty meter imprints on an already metered letter. If you have
metered a postage which is too low, print a correction with the missing amount on the
non-address side of the mail piece.
Setting the CORRECTION imprint
In the Home screen:
• Tap postage.
PostBase Vision opens the product menu.
• Tap the S
PECIALS option
(is shown at the end of the list).
• Choose C
ORRECTION.
• Type the amount to be imprinted on the
mail piece in addition to the postage
already metered and confirm OK.
•C
ONFIRM the displayed product setting and
return to the Home screen.
Print postage correction
The Home screen shows the current settings
for the correction imprint. You can change
the settings (e.g. date, imprint offset) in the
same way as with a regular meter imprint.
• Position the mail piece the
non-address side face up
.
PostBase Vision prints the correction imprint.
When printing the postage correction,
advertising imprints are not available.
Page 79

Metering
6.5.2 Redate
If the meter imprint shows an incorrect date, you can print a correction with the new
mailing date on the non-address side of the already metered mail piece.
Setting the REDATE imprint
In the Home screen:
• Tap postage.
PostBase Vision opens the product menu.
79
• Tap the S
PECIALS option
(is shown at the end of the list).
• Choose R
•C
ONFIRM the displayed product setting and
EDATE.
return to the Home screen.
Setting the date
• Open the M
ENU.
• Choose CHANGE DATE.
• Set the new mailing date.
• Confirm the displayed date with OK.
Print redate
When the Home screen shows the desired
settings for the redate imprint:
• Position the mail piece the
non-address side face up
.
PostBase Vision prints the redate imprint.
When printing the redate imprint, advertising
imprints are not available.
Page 80

PostBase Vision
80
6.6 Displaying and resetting the item counter
Apart from the counter for meter imprints in the register and the local account counters, the PostBase Vision features an item counter for meter imprints you can use as
you like. The item counter counts all meter imprints. Test prints are not registered.
Independently of other counter functions, you can reset this item counter to zero or
use it as a daily or job counter.
Displaying the item counter
• Open the M
ENU.
•Select P
IECE COUNTER.
PostBase Vision opens a pop-up, in which
you can see the number of mail pieces that
have been metered since the last reset.
• Tap on N
O to return to the menu without
deleting the item counter.
Resetting the item counter
• In the pop-up confirm the query by tapping
ES.
Y
PostBase Vision resets the item counter to
zero and shows the menu again.
Page 81

Displaying and printing registers
7 Displaying and printing registers
The PostBase Vision mailing system saves important parameters and information on
used postage in registers. You can view and print the register states.
81
• Open the M
• Choose R
The P
the current register states.
Printing registers
• Tap the P
• Tap the 1 L
on a label.
Or:
• Position an empty envelope (or a postcard)
to print the report.
The registers store the following information:
DESCENDING Available postage (= credit)
POSTAGE USED Total value of all meter imprints performed
ONTROL TOTAL Sum total of all loaded sums
C
TOTAL ITEMS Number of all meter imprints performed
ENU.
EGISTERS.
OSTAGE DOWNLOAD RECEIPT displays
RINT button.
ABEL button to print the report
LAST AMOUNT Last amount loaded
AST DATE Date and time of last postage loading
L
Page 82

PostBase Vision
82
8 Download postage
To load postage, you connect to the data center with your postage meter and call the
desired amount. Billing occurs according to your contract with the USPS.
If users are enabled, postage download might not be available. In that case, please
contact the system administrator.
Loading postage
• Make sure PostBase Vision has a network
connection.
• Open the M
ENU.
• Choose D
OWNLOAD POSTAGE.
• Keep the displayed amount.
Or
Type the desired amount.
• Confirm the displayed amount with
OAD POSTAGE and continue.
L
To load the displayed sum:
• Confirm the confirmation prompt with Y
PostBase Vision will then establish a
connection to the data center. Loading
continues automatically. Please stand by.
Data exchange may take some time.
The new descending amount is displayed
when loading is complete.
• Use R
EPORT to view and print the loading
report.
ES.
Page 83

Special functions
Counter Set advertising imprints
Set imprint
offset
9 Special functions
9.1 Print Advert Only
With the special function “Advert Only” you can print advertising imprints (graphical
adverts, text messages and QR codes) that are stored in your PostBase Vision Mailing System.
83
• Open the M
• Choose S
• Choose A
ENU.
PECIAL FUNCTIONS.
DVERT ONLY.
PostBase Vision opens the “Advert Only”
menu.
The two advertising imprint buttons on the
upper left show the print image for this special function. You can assign each one of
these buttons either an advert, a text message or a QR code, just like in the Home
screen.
You can start printing when both buttons
show the desired imprints. Proceed exactly
as when metering:
• Position an envelope / a postcard.
Or
• Start label printing.
Or
• Use the feeder.
For detailed information on feeding letters,
label printing and using the feeder, please
read chapter 6.
The “Advert Only” special function has its
own counter. PostBase Vision shows the
number of imprints on the upper right side of
the display. When quitting the “Advert Only”
function, the counter is reset to “0”.
Page 84

PostBase Vision
Display field (next
number to be printed)
Set start value / direction of counting
Set imprint
offset
Set advertising imprints
Start value
“Direction of counting” button
(shows the current setting)
84
9.2 Print Numbers
With the special function “Print Numbers”, you can print a 6-digit consecutive number
vertically on your mail. You can set any start value and choose the direction of counting (ascending or descending). Additional advertising imprints are possible.
• Open the M
ENU.
• Choose SPECIAL FUNCTIONS.
• Choose P
RINT NUMBERS.
PostBase Vision opens the “Print Numbers”
menu.
The current settings for printing numbers are
displayed:
– the next number to be printed
(= start value)
– direction of counting
– advertising imprints
– imprint offset.
By default, the start value is set to “000001”
and the direction of counting to “Ascending”.
Setting the start value and direction of
counting
•Tap the S
TART VALUE button.
PostBase Vision opens the menu for setting
the start value and direction of counting.
• Enter the desired start value
.
You can choose any number between
1 and 999999.
To change the direction of counting:
• Tap the “direction of counting” button.
The indication on the button toggles between
1-2-3 ASCENDING and 3-2-1 DESCENDING.
• Confirm the displayed settings (start value
and direction of counting) with OK.
Page 85

Special functions
Printing numbers
When the “Print Numbers” screen shows the
desired settings you can start printing. Proceed exactly as when metering:
• Position an envelope / a postcard.
Or
• Start label printing.
Or
• Use the feeder.
For detailed information on feeding letters,
label printing and using the feeder, please
read chapter 6.
When quitting the function, the start value is
reset to “000001” and the direction of counting to “1-2-3 Ascending”.
85
Page 86

PostBase Vision
Counter
86
9.3 Feed Only / Count mail pieces (PostBase Vision with feeder)
With the special function “Feed Only”, mail pieces may be run through the mailing
system without being printed. In this way, you can count mail pieces and prepare your
bulk mail for dispatch in counted stacks. You can also test letter transport with this
feature. This special function is only available on PostBase Vision systems with
feeder.
• Open the M
• Choose S
• Choose F
ENU.
PECIAL FUNCTIONS.
EED ONLY.
PostBase Vision opens the “Automatic Feeding” pop-up for the “Feed Only” function.
All settings for automatic feeding, preparing
and positioning letter stacks are done exactly
as when metering mail. For detailed information, please read chapter 6.3.3.
• Position letter stack on the feeder / start
letter transport.
The “Feed Only” special function has its own
counter. PostBase Vision shows the number
of transported mail pieces on the upper right
side of the display.
When quitting the “Feed Only” function, the
counter is reset to “0”.
Page 87

Special functions
Counter
9.4 Seal Only (PostBase Vision with feeder)
With the special function “Seal Only”, you can seal and count letters without printing
(up to 0.3" / 7 mm). This special function is only available on PostBase Vision systems with feeder. Please heed the mail piece specifications on page 180.
87
• Open the M
• Choose S
• Choose S
ENU.
PECIAL FUNCTIONS.
EAL ONLY.
PostBase Vision opens the “Automatic Feeding” pop-up for the “Seal Only” function.
All settings for automatic feeding, preparing
and positioning letter stacks are done exactly
as when metering mail. For detailed information, please read chapter 6.3.3.
• On the feeder, switch on the seal function:
Set the switch to the position seal (see also
chapter 6.3.3.2, page 70).
• Position letter stack on the feeder / start
letter transport.
The “Seal Only” special function has its own
counter. PostBase Vision shows the number
of transported mail pieces on the upper right
side of the display.
When quitting the “Seal Only” function, the
counter is reset to “0”.
Page 88

PostBase Vision
Set advertising
imprint
Set incoming mail stamp
Counter
Set imprint offset
Set date
88
9.5 Stamping incoming mail (optional)
With the optional feature “Date of Mail Entry”, PostBase Vision can print a stamp with
date and time onto you incoming mail. An advertising imprint is also possible.
PRINT DATE OF MAIL ENTRY – possible settings:
• Open the M
• Choose S
• Choose D
ENU.
PECIAL FUNCTIONS.
ATE OF MAIL ENTRY.
PostBase Vision opens the “Print Date of
Mail Entry” menu.
The current settings for printing incoming
mail are displayed:
– incoming mail stamp
– advertising imprint
– date for the incoming mail stamp
– imprint offset.
Note
: The table below describes the possible
settings. Changing these settings is done in
the usual manner.
Incoming mail stamp Depending on your order, one or several
incoming mail stamps are available.
Incoming date You can backdate incoming mail stamps up
to 7 days.
Incoming mail stamps with the current date
may also contain the time of day (depending
on the selected incoming mail stamp).
Page 89

RINT DATE OF MAIL ENTRY – possible settings:
P
Offset You can adjust the position of the incoming
mail stamp (default position: about 0.4" /
1 cm from the right letter edge).
Advert imprint In addition to the incoming mail stamp, you
can set an advertising imprint, as with metering (advert, text or QR code).
Printing incoming mail stamp
You can directly imprint incoming mail conforming to the specifications on page 179 in
format, thickness and material. For other
incoming mail, print self-adhesive labels.
• Position incoming mail with the side to be
printed on facing up on the hand feed tray /
the feeder.
Or
• Start label printing.
Special functions
89
PostBase Vision prints the incoming mail
stamp.
For detailed information on feeding letters,
label printing and using the feeder, please
read chapter 6.
The “Print Date of Mail Entry” special function
has its own counter. PostBase Vision shows
the number of prints on the upper right side of
the display.
When quitting the “Print Date of Mail Entry”
function, the counter is reset to “0”.
Page 90

PostBase Vision
Shortcut
(assigned)
Press longer
Name
Postage
Weight
90
10 Manage shortcuts
By default, PostBase Vision offers you typical USPS products as shortcuts. You can
assign all shortcuts – depending on the version, you have up to 20 storage spaces
available – with postal products of your choice. You can see the current assignment
directly on the short cut button in the Home screen.
You can delete shortcuts, overwrite them with a new assignment, issue your own
names and also revert to the default assignment. Whenever a new rate table goes
into effect, the shortcuts are updated and may receive a new default assignment.
10.1 Saving a product as a shortcut
You can always save the product set in the Home screen as a shortcut (mailing data
and weight). The product stored on the first shortcut is used by PostBase Vision as
the default setting after it is turned on.
• Set the product that you would like to save
as a shortcut.
To set mailing data and weight, please
read chapters 5.1.2 and 5.1.3.
• Press the button N
seconds.
Or:
Press on an existing shortcut for about two
seconds to overwrite it with a new assignment.
EW for about two
• To save the product on this shortcut, confirm the query in the pop-up with YES.
The current assignment is displayed on the
shortcut button:
– Name (mailing data, if necessary, strongly
abbreviated)
– Postage
–Weight.
Once all of the storage spaces have been
assigned, the N
EW button will no longer
appear.
Page 91

Manage shortcuts
Preview
10.2 Renaming a shortcut
When a shortcut is saved, PostBase Vision automatically issues a name. This name
is generated from the selected mailing data and may in some cases not fit on the button. You can easily change the names of the shortcuts.
91
• Open the M
• Choose M
• Choose R
ENU.
ANAGE SHORTCUTS.
ENAME.
• Tap on the shortcut you want to change.
PostBase Vision opens the on-screen
keyboard. The text field shows the shortcut
name.
• Enter the desired name.
The preview (top left) shows how the new
name will appear on the shortcut.
• Confirm with OK.
For information on how to use the on-screen
keyboard, please refer to chapter 4.3.7 on
page 45.
Page 92

PostBase Vision
92
10.3 Deleting a shortcut
Shortcuts that you no longer need can be overwritten with a new assignment or
deleted. You cannot delete the first shortcut. PostBase Vision uses it as the default
setting after it is turned on.
• Open the M
• Choose M
• Choose D
ENU.
ANAGE SHORTCUTS.
ELETE.
• Tap on the shortcut that you want to delete.
After the confirmation prompt, this shortcut is
deleted.
Shortcuts with an assignment defined by the
rate table (default shortcuts) cannot be permanently deleted. These shortcuts will be
available again after the mailing system has
restarted.
10.4 Resetting shortcuts to default
When shortcuts are reset, all shortcut storage spaces are emptied and the default
shortcuts defined by the rate table are restored.
• Open the M
• Choose M
• Choose R
ENU.
ANAGE SHORTCUTS.
ESET TO DEFAULTS.
After the confirmation prompt, PostBase Vision
resets all shortcuts.
Page 93

Managing printed text and QR codes
11 Managing printed text and QR codes
PostBase Vision can print freely editable text messages and optionally also QR codes,
including an accompanying message. Depending on the version, you have up to
12 storage spaces available, which can be assigned to a text message or QR code
of your choice. In this chapter, you will learn how to generate, change and delete
these kinds of text messages and QR codes.
11.1 Entering a new text
• Open the MENU.
• Choose P
RINTED TEXT/QR-CODE.
93
• Tap the N
PostBase Vision opens the on-screen keyboard.
• Enter the desired text.
Note
text. Once the maximum line length has
been reached, PostBase Vision will not
allow you to enter anything further in this
line. You insert line breaks manually.
• Confirm with OK.
The text is stored and appears immediately in
the selection list for advertising imprints.
For information on how to use the on-screen
keyboard, please refer to chapter 4.3.7 on
page 45.
You can also enter new text in the selection
list for advertising imprints directly. As long as
not all storage spaces have been assigned,
the button “New” will appear in the list.
EW TEXT button.
: You have five lines available for your
Page 94

PostBase Vision
94
11.2 Generating a newQR code
• Open the MENU.
• Choose P
• Tap the N
RINTED TEXT/QR-CODE.
EW QR CODE button.
PostBase Vision opens the on-screen keyboard with a prompt to enter the URL.
• Enter the URL (Internet address) that you
want to have encrypted in the QR code.
Note: You have five lines available for your
text. Once the maximum line length has
been reached, PostBase Vision will not
allow you to enter anything further in this
line. You insert line breaks manually.
• Confirm the URL displayed and continue
with the CONTINUE button.
• Now, enter the text that you want to appear
next to the QR code in clear text.
: Five short lines are available for this
Note
accompanying text. Once the line length
has been fully used, PostBase Vision will
not allow you to enter anything further in
this line. You insert line breaks manually.
• Confirm with OK.
The QR code with the accompanying text is
stored and appears immediately in the selection list for advertising imprints.
For information on how to use the on-screen
keyboard, please refer to chapter 4.3.7 on
page 45.
You can also generate new QR codes in the
selection list for advertising imprints directly.
As long as not all storage spaces have been
assigned, the button “New QR code” will
appear in the list.
Page 95

11.3 Changing a text /QR code
• Open the MENU.
• Choose P
• Choose C
PostBase Vision displays all of the saved
texts / QR codes.
• Tap on the text / QR code that you want to
change.
PostBase Vision opens the on-screen keyboard.
• Change or overwrite the text as you like or
enter the data for the QR code.
• Confirm with OK.
The new text / QR code is stored and appears
immediately in the selection list for advertising imprints.
Managing printed text and QR codes
RINTED TEXT/QR-CODE.
HANGE.
95
You can also open texts / QR codes in the
selection list for editing. Tap on the text / QR
code you would like to change until the onscreen keyboard opens.
Page 96

PostBase Vision
96
11.4 Deleting a text /QR code
• Open the MENU.
• Choose P
• Choose D
RINTED TEXT/QR-CODE.
ELETE.
PostBase Vision displays all of the saved
texts / QR codes.
• Tap on the text / QR code that you want to
delete.
PostBase Vision deletes the text and informs
you that it has been deleted in a pop-up
above it.
The storage space that has become available
can be used to enter a new text or QR code.
Page 97

Local cost account administration
12 Local cost account administration
The PostBase Vision mailing system offers you the option to record and analyze mailings separately by cost account. To do so, cost accounts must be set up in the discoverFP customer portal. After synchronizing with the customer portal (refer to
chapter 13 for more information), the cost account function will have been added to
your mailing system.
The usage data are stored both in the mailing system’s local cost account counters
as well as sent to the customer portal regularly for recording and analysis. The local
cost account counter and data storage in the portal run independently from one
another.
The reporting and administration functions available on the PostBase Vision mailing
system for cost accounts are described below.
12.1 Display / print cost account report
• Open the MENU.
• Choose LOCAL ACCOUNTS.
• Choose S
PostBase Vision shows the list of all cost
accounts with the current usage data (value
and number of mailings).
HOW REPORT.
97
Print report
• Tap the P
The pop-up for printing labels appears and
shows the number of labels to be printed
(= number of cost account report pages).
• Tap the S
account report on labels.
Or:
• Insert an empty envelope / postcard onto
the hand feed tray or the feeder.
PostBase Vision prints the first page of the
cost account report.
If necessary:
• Insert another envelope / postcard to print
the following pages.
RINT button.
TART button to print the cost
Page 98

PostBase Vision
98
12.2 Display / print usage data for a defined cost account
• Open the MENU.
• Choose L
• Choose R
PostBase Vision opens the selection list with
all cost accounts. The current cost account is
highlighted in color.
• Tap on the cost account that you want to
see usage data for.
PostBase Vision displays the usage data
(value and number of mailings) for this cost
account.
Print report
• Tap the P
The pop-up for label printing appears.
• Tap the START button to print the cost
account report on a label.
OCAL ACCOUNTS.
EPORT ONE ACCOUNT.
RINT button.
Or
:
• Insert an empty envelope / postcard onto
the hand feed tray or the feeder.
PostBase Vision prints the report for this cost
account.
Page 99

Local cost account administration
12.3 Deleting usage data
You can delete the usage data for individual cost accounts or for all cost accounts at
once. Clearing the cost account counters has no effect on the cost account statistics
in the customer portal.
Set one account to zero
• Open the M
ENU.
99
• Choose L
• Choose C
OCAL ACCOUNTS.
LEAR COUNTER.
PostBase Vision opens the selection list with
all cost accounts. The current cost account is
highlighted in color.
• Tap on the cost account for which you want
usage data to be deleted.
After a confirmation prompt, the value and
amount of mailings for this cost account are
reset to zero.
Set all accounts to zero
• Open the M
• Choose L
• Choose C
ENU.
OCAL ACCOUNTS.
LEAR ALL COUNTERS.
After a confirmation prompt, the usage data
(value and number of mailings) for all cost
accounts are deleted. All cost account counters are reset to zero.
Page 100

PostBase Vision
Display field with cost account
Set default advertising imprints
100
12.4 Matching cost accounts to advertising imprints
You can assign default advertising imprints to each cost account. When setting the
cost account, the advertising imprints are then automatically set according to this
default setting.
• Open the M
• Choose L
• Choose A
ENU.
OCAL ACCOUNTS.
DVERT MATCHING.
PostBase Vision opens the selection list with
all cost accounts. The current cost account is
highlighted in color.
• Tap on the cost account that you want to
match advertising imprints to.
PostBase Vision opens the window for
setting the default advertising imprints.
You see
– the cost account and
– the two advertising imprint buttons with the
current default setting.
• Select the desired setting for both advertising imprints.
: The table on the next page shows and
Note
explains the possible settings. The settings
themselves are made in the same way as in
the home screen.
• Tap OK to save the displayed default value
for this cost account.
 Loading...