

Page 1
Franking machine
Operator Manual
First steps
Page 2

PostBase Mini
2
About this Manual
Please read this manual before installing and using the PostBase Mini franking
machine. Please keep this manual near PostBase Mini for quick reference.
This Operator Manual is directed at the users of the PostBase Mini.
This manual describes installation and comissioning of the PostBase Mini franking
machine and gives basic information on operating the PostBase Mini. Functions that
are described here but are not available for each PostBase Mini (among other things
because of postal requirements in the individual countries) are identified as (not avail-
able in all countries).
Further documents For complete specifications of the PostBase Mini, refer to the
Operator Manual PostBase Mini (Reference Guide) – available as a download from Francotyp-Postalia.
The Installation instructions (flyer) shows an overview of the
steps during installation.
Information on country-specific features and particularities can
be found in the Addendum to the Operator Manual (if available
in your country).
Safety tips The following keywords and signs identify the safety tips in this
manual:
Warning! indicates a potential hazard that may result in injury.
Caution! indicates a potential hazard that may result in dam-
age to the machine or impair the franking process.
In this manual, the product name appears in its plain form
‘PostBase Mini’.
Text features
and symbols
The following symbols and text features are used in this
manual:
• Bullets precede instructions.
– Dashes precede list items.
Menu names and options from the operating menu are written
in small capitals, e.g. M
ENU.
A tip offers advice or additional suggestions for improving the
operation.
Illustrations The display figures in this manual are generic examples that
may differ from the actual display on your PostBase Mini.
As currency, Euro is used exemplarily.
Page 3

Contents
3
About this Manual _____________________________________________ 2
1 Safety tips ____________________________________________________4
2 A short description of the PostBase Mini __________________________ 6
3 Installation and commissioning __________________________________9
Step 1: Unpacking and checking the contents of the package ____________9
Step 2: Assembling PostBase Mini _______________________________ 10
Step 3: Removing the transport fixture _____________________________11
Step 4: Connecting PostBase Mini ________________________________ 12
Step 5: Turning the PostBase Mini on _____________________________13
Step 6: Installing PostBase Mini __________________________________13
4 The basics of operation ________________________________________ 19
4.1 Turning the PostBase Mini on / off __________________________19
4.2 Standby ______________________________________________ 20
4.3 Screen elements and operation philosophy ___________________ 21
4.3.1 The touch screen _______________________________________ 21
4.3.2 The Home screen ______________________________________ 23
4.3.3 The Product calculation menu _____________________________24
4.3.4 The Menu _____________________________________________ 26
4.3.5 Lists _________________________________________________ 26
4.3.6 Adjustment menus ______________________________________ 27
4.3.7 Pop-up windows ________________________________________ 28
4.3.8 Procedures (wizards) ____________________________________ 29
5 Franking ____________________________________________________30
5.1 Setting the franking imprint _______________________________ 30
5.2 Positioning and franking a letter ____________________________31
Appendix
Connection settings (Overview) ___________________________________ 33
Technical Data ________________________________________________ 36
Declaration of conformity ________________________________________38
License ______________________________________________________ 39
Security Declaration for data usage ________________________________41
United States Patents ___________________________________________ 41
Customer Support / Warranty _____________________________________ 43
Page 4

PostBase Mini
4
1 Safety tips
PostBase Mini is a digital franking machine with ink-jet print technology for franking
mail. PostBase Mini complies with the pertinent safety regulations for office information equipment.
Please observe the following tips for your own safety:
Prevention of electrical hazards
• Operate the PostBase Mini only on a grounded single-phase power socket. Make
sure your office power supply conforms to the power requirements indicated on the
power supply unit’s serial number plate.
• Use only with specified power supply unit: XP POWER LTD. - VEH40US24.
• Make sure the socket for connecting the PostBase Mini is close by and easily
accessible at all times.
• Unplug the mains plug in case of an emergency. Call the Customer Support.
• Take special care that no foreign objects or liquids penetrate the interior of the
PostBase Mini.
• Unplug the mains plug prior to cleaning the PostBase Mini.
Prevention of mechanical hazards
• Do not remove any equipment related to safety or protection. Do not make them
inoperative or unable to function.
• Do not remove any parts of the housing.
Accessories and consumables
• We recommend to use only approved FP equipment and FP original parts. The
manufacturer FP has established reliability, safety and applicability. The manufacturer cannot assess the reliability, safety and applicability for products not approved
by FP, and therefore not vouch for such products. The full functioning of the
PostBase Mini franking machine at the time of delivery can only be guaranteed
when using original Francotyp-Postalia ink cartridges.
• Use only the power supply unit provided with the PostBase Mini or approved by
Francotyp-Postalia. Make sure that the power supply unit is not damaged.
Page 5

Safety tips
5
• Use the supplied cables or cables that have been approved by Francotyp-Postalia.
Make sure that cables are not damaged.
• Ingestion of the ink can be hazardous to health. Avoid contact with the eyes. Keep
the ink cartridges away from children. Further instructions for use are enclosed with
the ink cartridge.
• We recommend to use only the batteries provided by Francotyp-Postalia.
The manufacturer FP has established reliability, safety and applicability.
Observe the instructions enclosed with the battery for correct use and disposal.
General safety tips
• Install the PostBase Mini according to the instructions.
• When you move the PostBase Mini from a cold environment (i.e. below 10 °C /
50 °F): Unpack the PostBase Mini and wait at least two hours before connecting
the PostBase Mini. The PostBase Mini requires this period to adapt to the ambient
conditions. Any condensation evaporates.
• Have maintenance and repair work done only by qualified personnel authorised by
Francotyp-Postalia. Otherwise, your warranty may become void.
Page 6
PostBase Mini
6
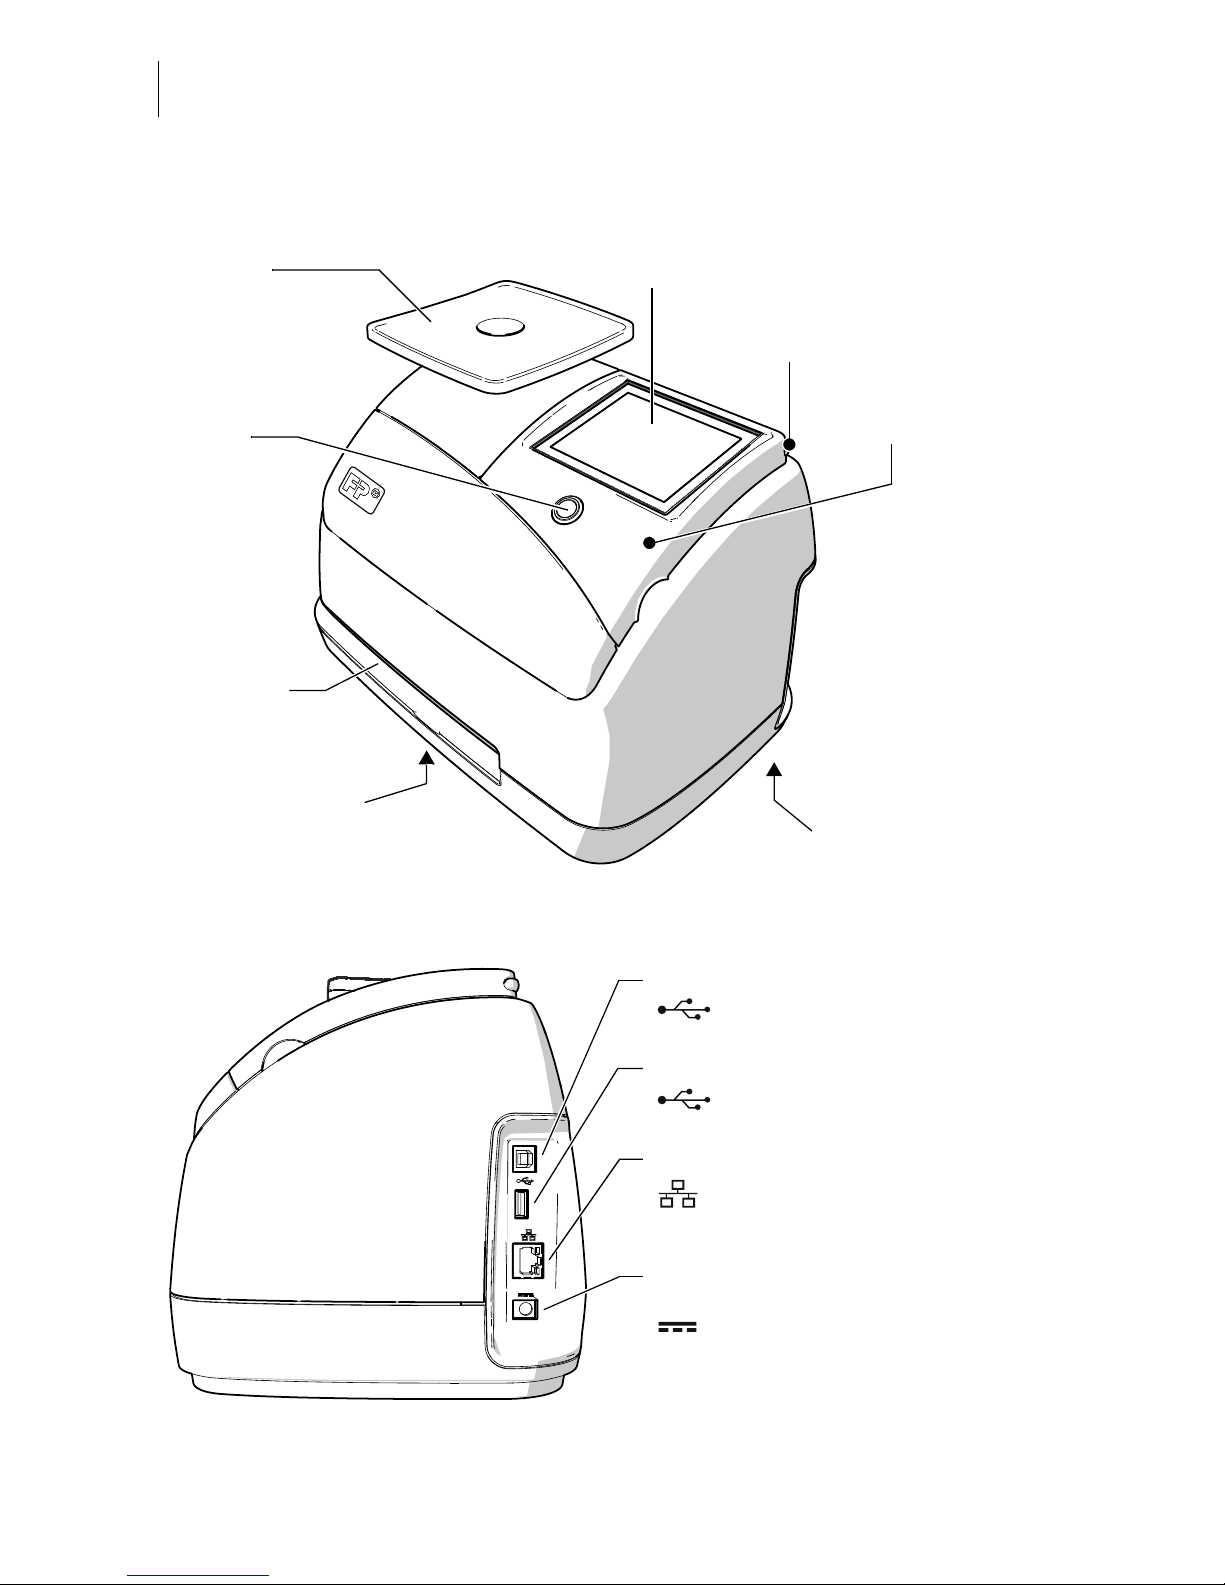
2 A short description of the PostBase Mini
Connections (view from the right)
Scale with
weighing platform
Button
ON / OFF
Battery compartment
(at the bottom)
Letter slot
Display / touch screen
Operating panel
ink cartridge below it
Stylus for touch screen operation:
pull out to the right
Serial number plate
(at the bottom)
Connection for the external
power supply unit
LAN port / Network interface
PC connection
USB
Connection for an optional external device
USB
Use only with specified power supply unit:
XP POWER LTD. - VEH40US24
Page 7

A short description of the PostBase Mini
7
Things worth knowing about PostBase Mini
PostBase Mini is a digital franking machine for small
mail volumes featuring a touch screen. It stands out due
to its compact design and intuitive handling. The reliable
ink-jet technology delivers clean franking imprints.
Intuitive handling PostBase Mini makes do with only a single button,
arranged in the centre: for switching on and off. For all
other operations, the clearly designed user interface in
the 3.5 inch colour display guides you fast and easy to
the desired destination.
Franking Simply switch on the PostBase Mini, select a postal
product, position a letter – done!
Franking is possible on mail pieces made of ink-absorbing material – postcards to 6 mm (0.23") thick letters in
ISO B4 format – and special self-adhesive labels.
Letters as advertising medium In addition to printing postage, you can print an adver-
tisement of your choice on every mail piece you send.
When using the optional PC control software, this can
also be a text message (if available in your country).
Download postage You conveniently download the postage for franking
online from the data centre into your franking machine.
If desired, PostBase Mini can also, by itself, make sure
there is always sufficient postage available and prompt
you automatically to download postage.
(Availability and handling of features relating to postage accounting
depend on the respective countries.)
Remote Services:
flexible and up to date
The PostBase Mini ensures you are always using the
current postal rates. Whether new postage rates, new
adverts or a software update – the franking machine
downloads current data from the data centre.
Page 8

PostBase Mini
8
Additional functions Weighing – the space saving, integrated scale quickly
and reliably determines the weight of letters and parcels. The determined weight directly affects the product
settings.
Account function – PostBase Mini allows for registration and billing of postage costs to accounts.
Access control – PostBase Mini can be protected
against unauthorised use via a PIN (Personal Identification Number).
Controlling PostBase Mini via PC software (optional).
Francotyp-Postalia offers software for controlling and
administration of the PostBase Mini franking machine
via PC, e.g. NavigatorBasic, NavigatorPlus,
RemoteOne, ReportOne (not available in all countries).
Page 9
Installation and commissioning
9
3 Installation and commissioning
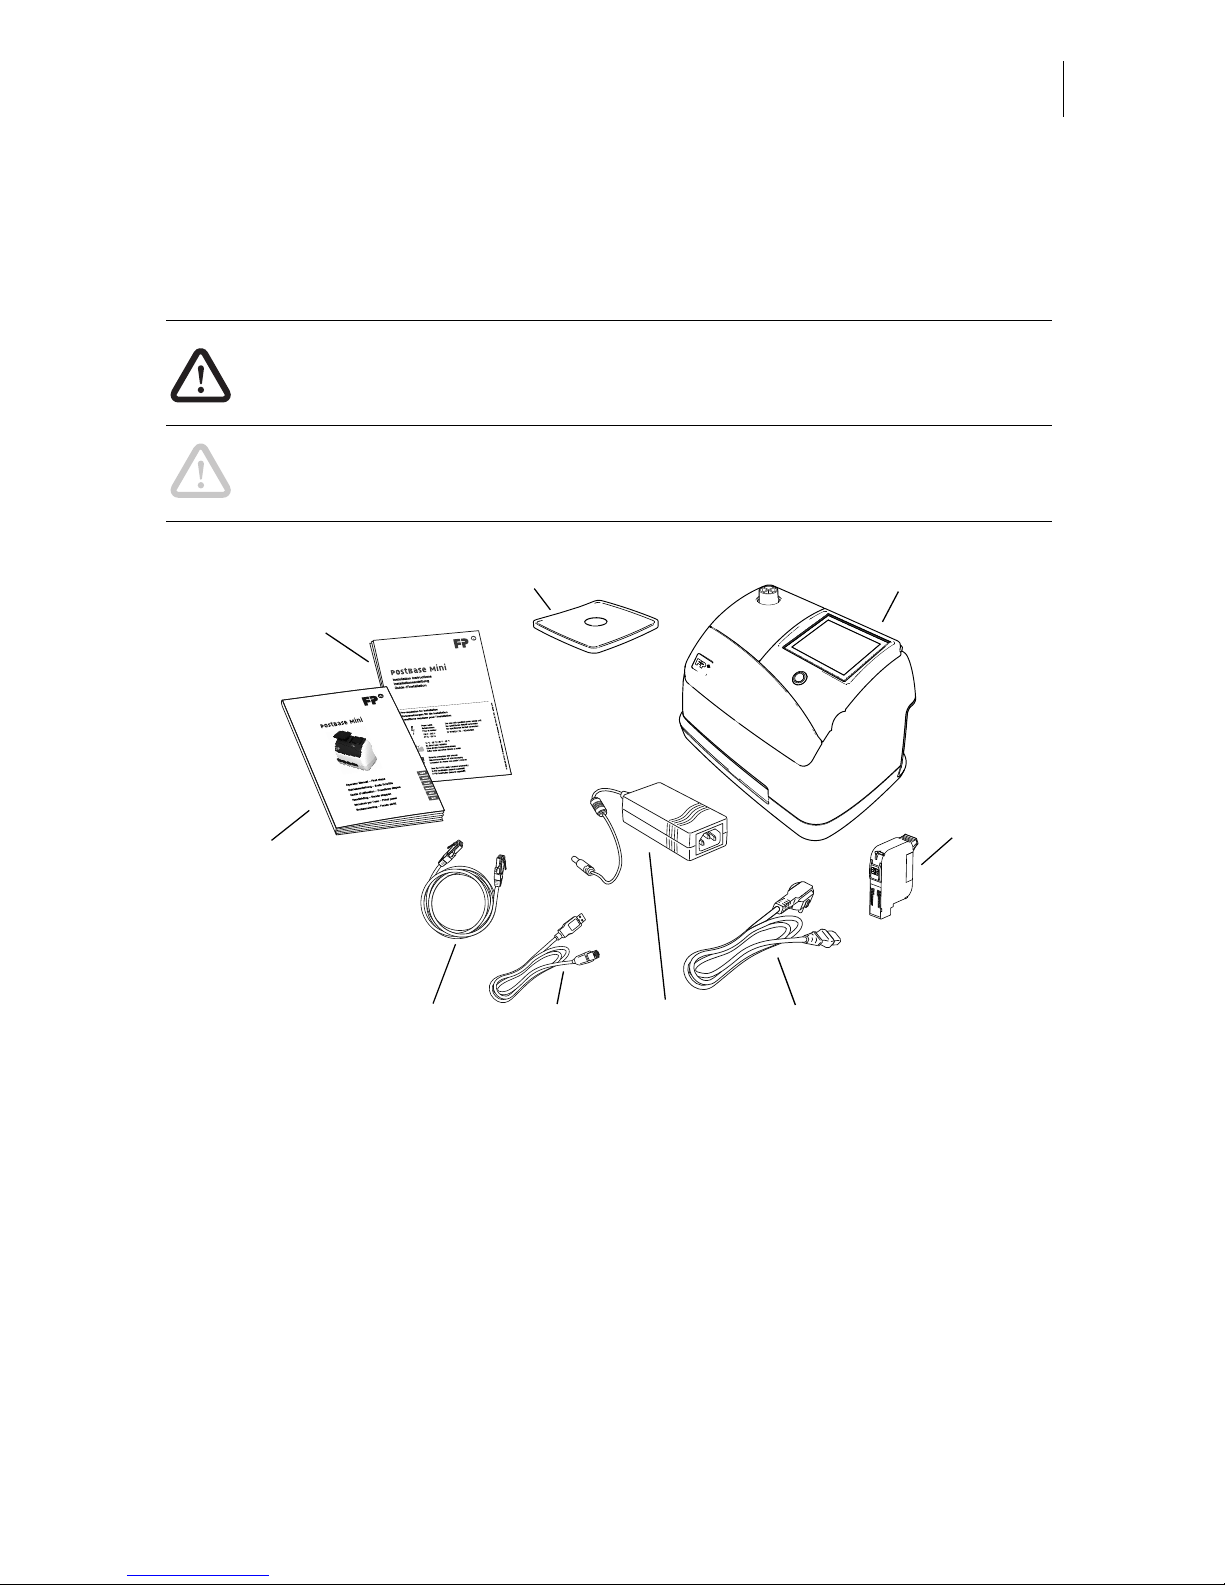
Step 1: Unpacking and checking the contents of the package
Warning! Do not start operating PostBase Mini if parts are damaged or missing. Please contact the Customer Support.
Caution! Carry out the steps exactly in the given order. Also, consult the
installation instructions (fold-out).
1
2
3456
7
9
8
1 PostBase Mini franking machine
2 Ink cartridge
3 Power cable
4 Power supply unit
5 USB cable
6 Ethernet cable
7 ‘First steps’ manual
8 Installation instructions (flyer)
9 Weighing platform (version as ordered)
Page 10
PostBase Mini
10
• Unpack the packages.
• Check that the contents of the packages
are complete and free from any damage.
Keep the packing and the transport fixture for
the print system. Use it again when you need
to transport PostBase Mini or send it in to
service.
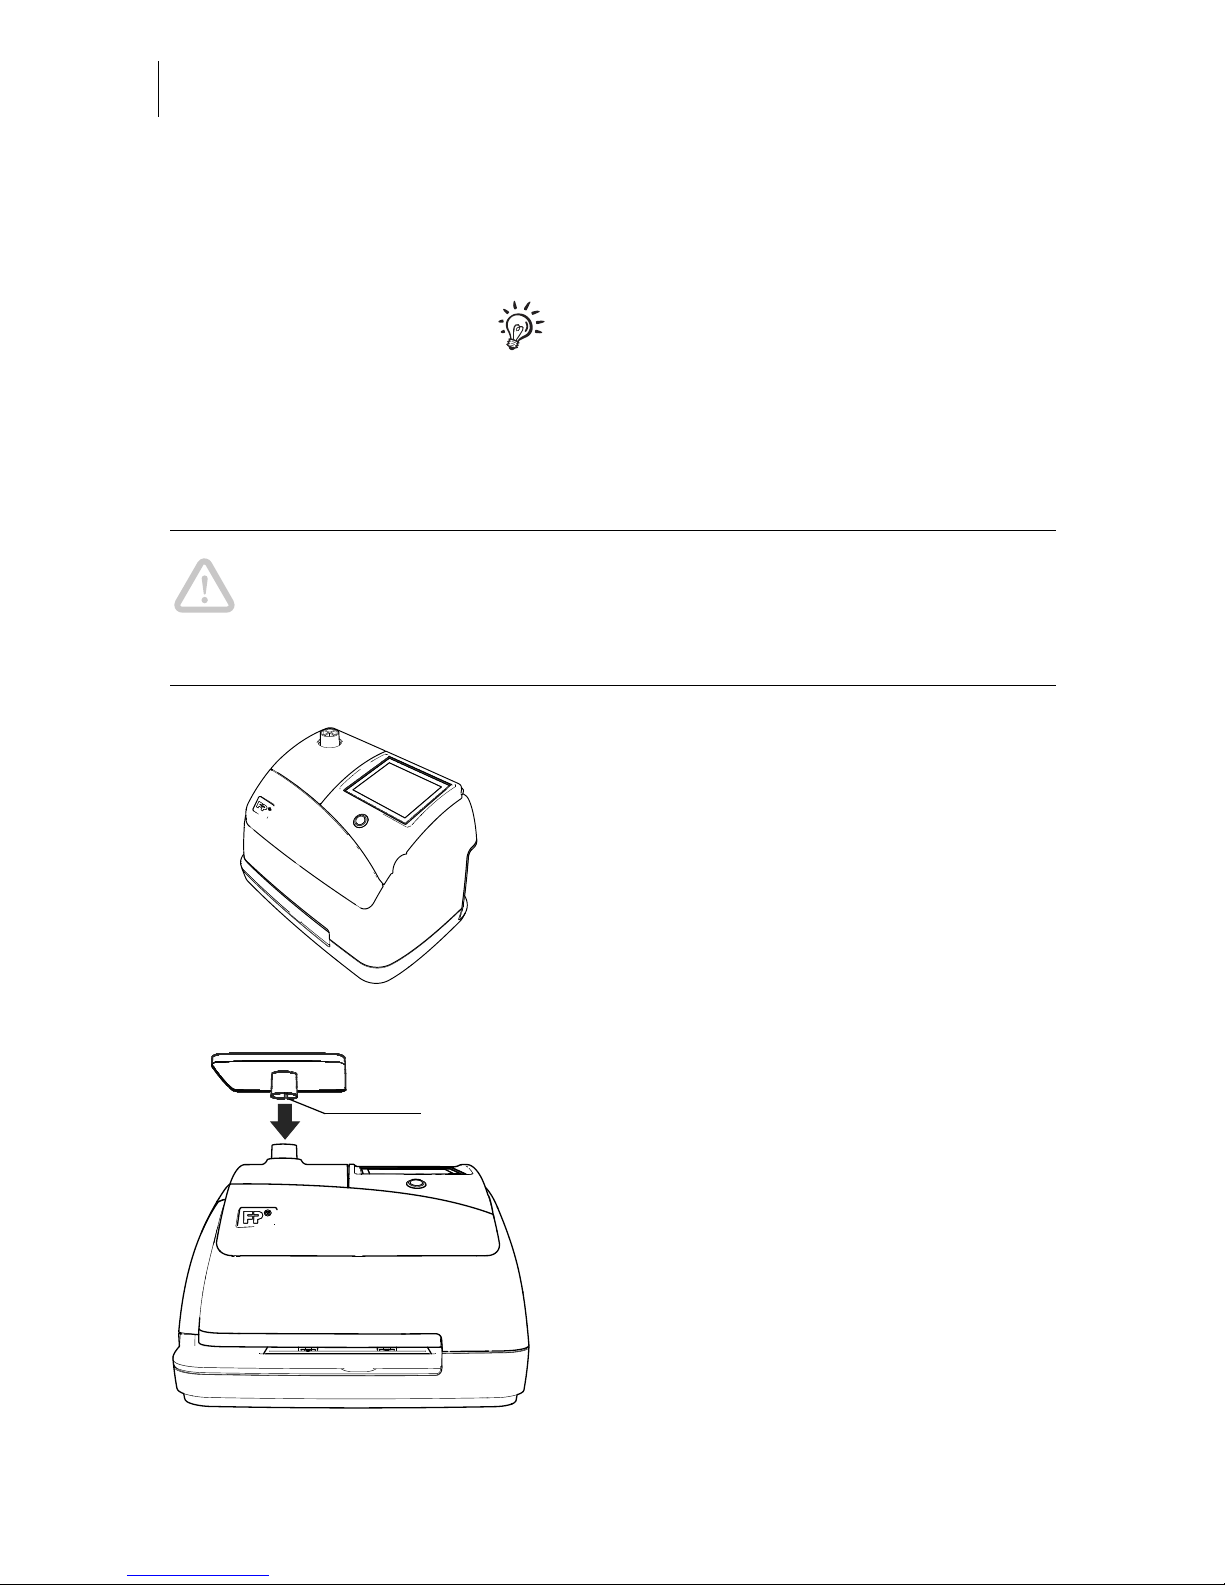
Step 2: Assembling PostBase Mini
Caution! When you move PostBase Mini from a cold environment (i.e. below
10 °C / 50 °F): Unpack the PostBase Mini and wait at least 2 hours before
connecting PostBase Mini. PostBase Mini requires this period to adapt to the
ambient conditions.
• Choose an installation site with the following ambient conditions:
– room temperature: 15 °C to 35 °C (59 °F
to 95 °F)
– no direct sunlight
– power socket in the immediate vicinity
– network connection with internet access.
• Place PostBase Mini on a firm, level, low
vibration and horizontal base.
• Remove the protective foil from the display.
Mounting the weighing platform
• Hold the weighing platform such that the
slot in the weighing platform foot points to
the back.
• Place the weighing platform onto the scale
receptacle from above. The slot of the
weighing platform must slide in the counterpart on the scale receptacle.
• Press down slightly on the weighing platform with your flat hand.
Slot
Page 11
Installation and commissioning
11
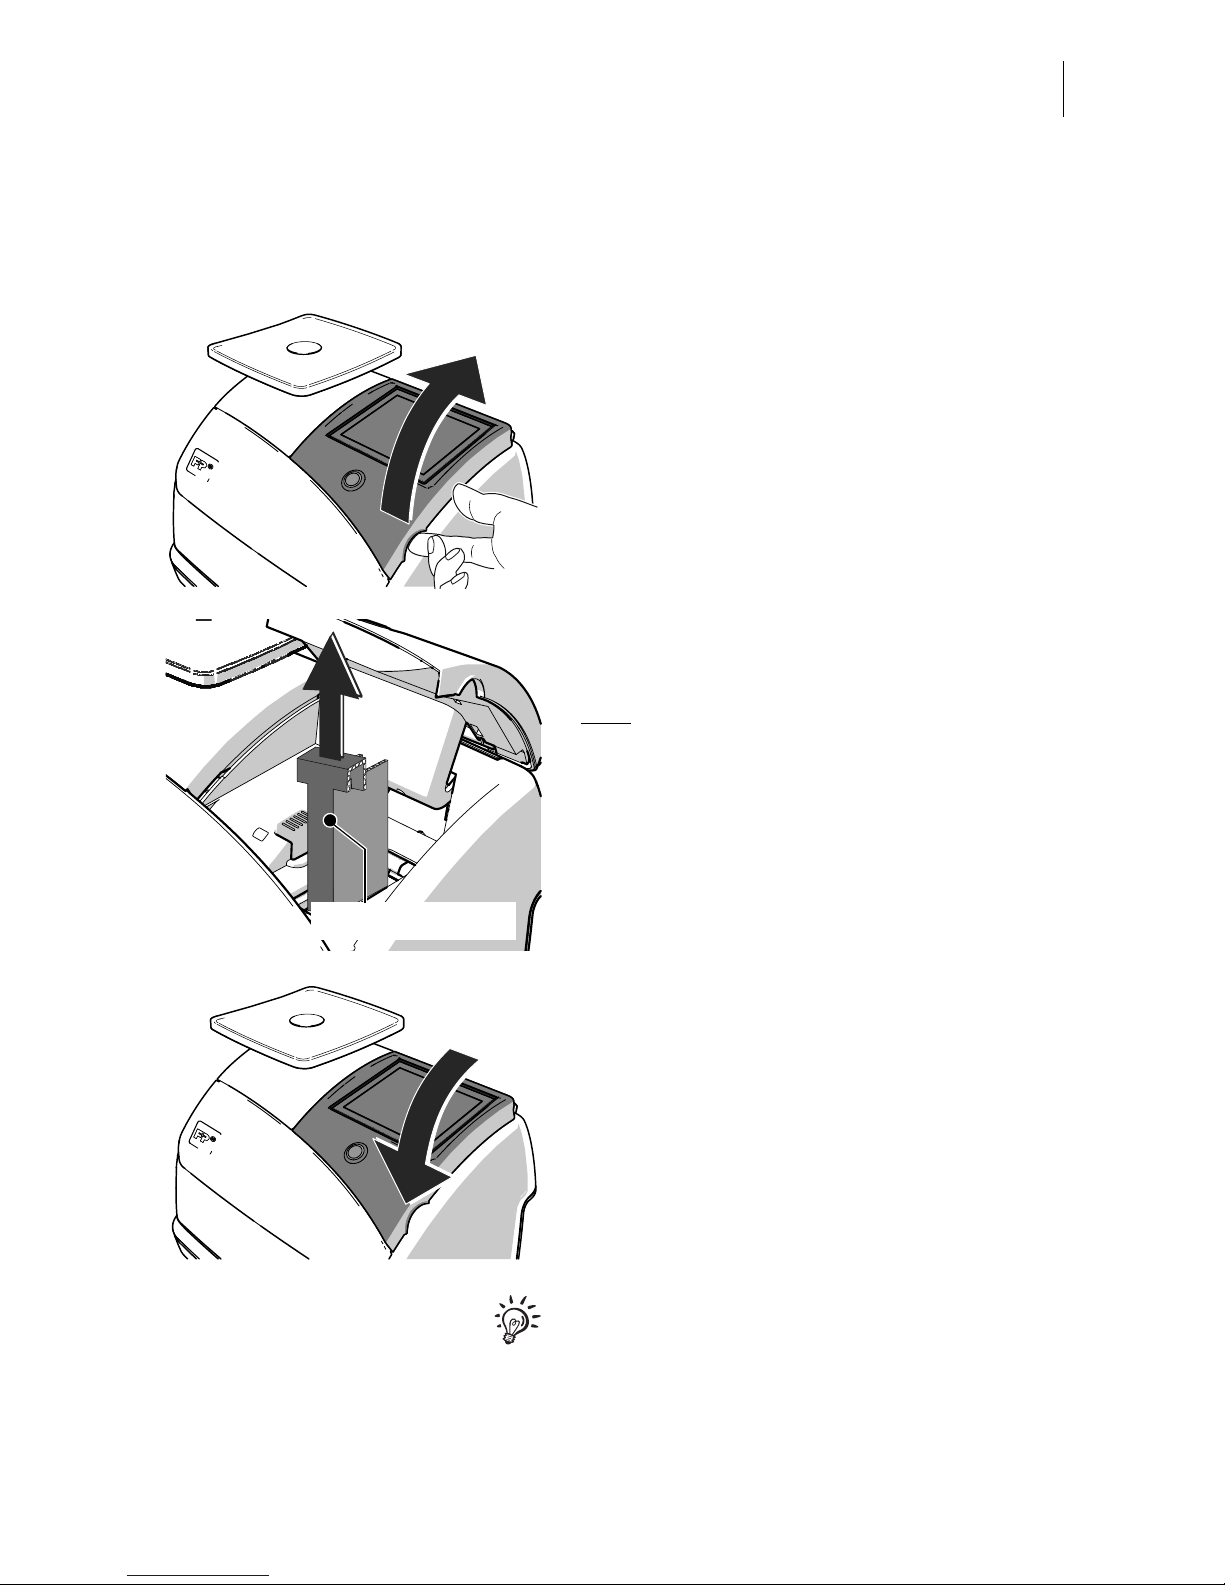
Step 3: Removing the transport fixture
A transport fixture (cardboard) is inserted in
the ink cartridge holder as a transport protection for the print system.
Remove the transport fixture:
• Lift up the operating panel as far as it goes.
It snaps in this position.
• Pull the cardboard (transport fixture) up out
of the cartridge holder.
Note
: Do not insert the ink cartridge until later
in the installation process (step 6)!
• Lower the operating panel back into
position.
Keep the transport fixture (cardboard). use it
again whenever you need to transport your
PostBase Mini, or when sending it to the customer support.
Transport fixture
Page 12
PostBase Mini
12
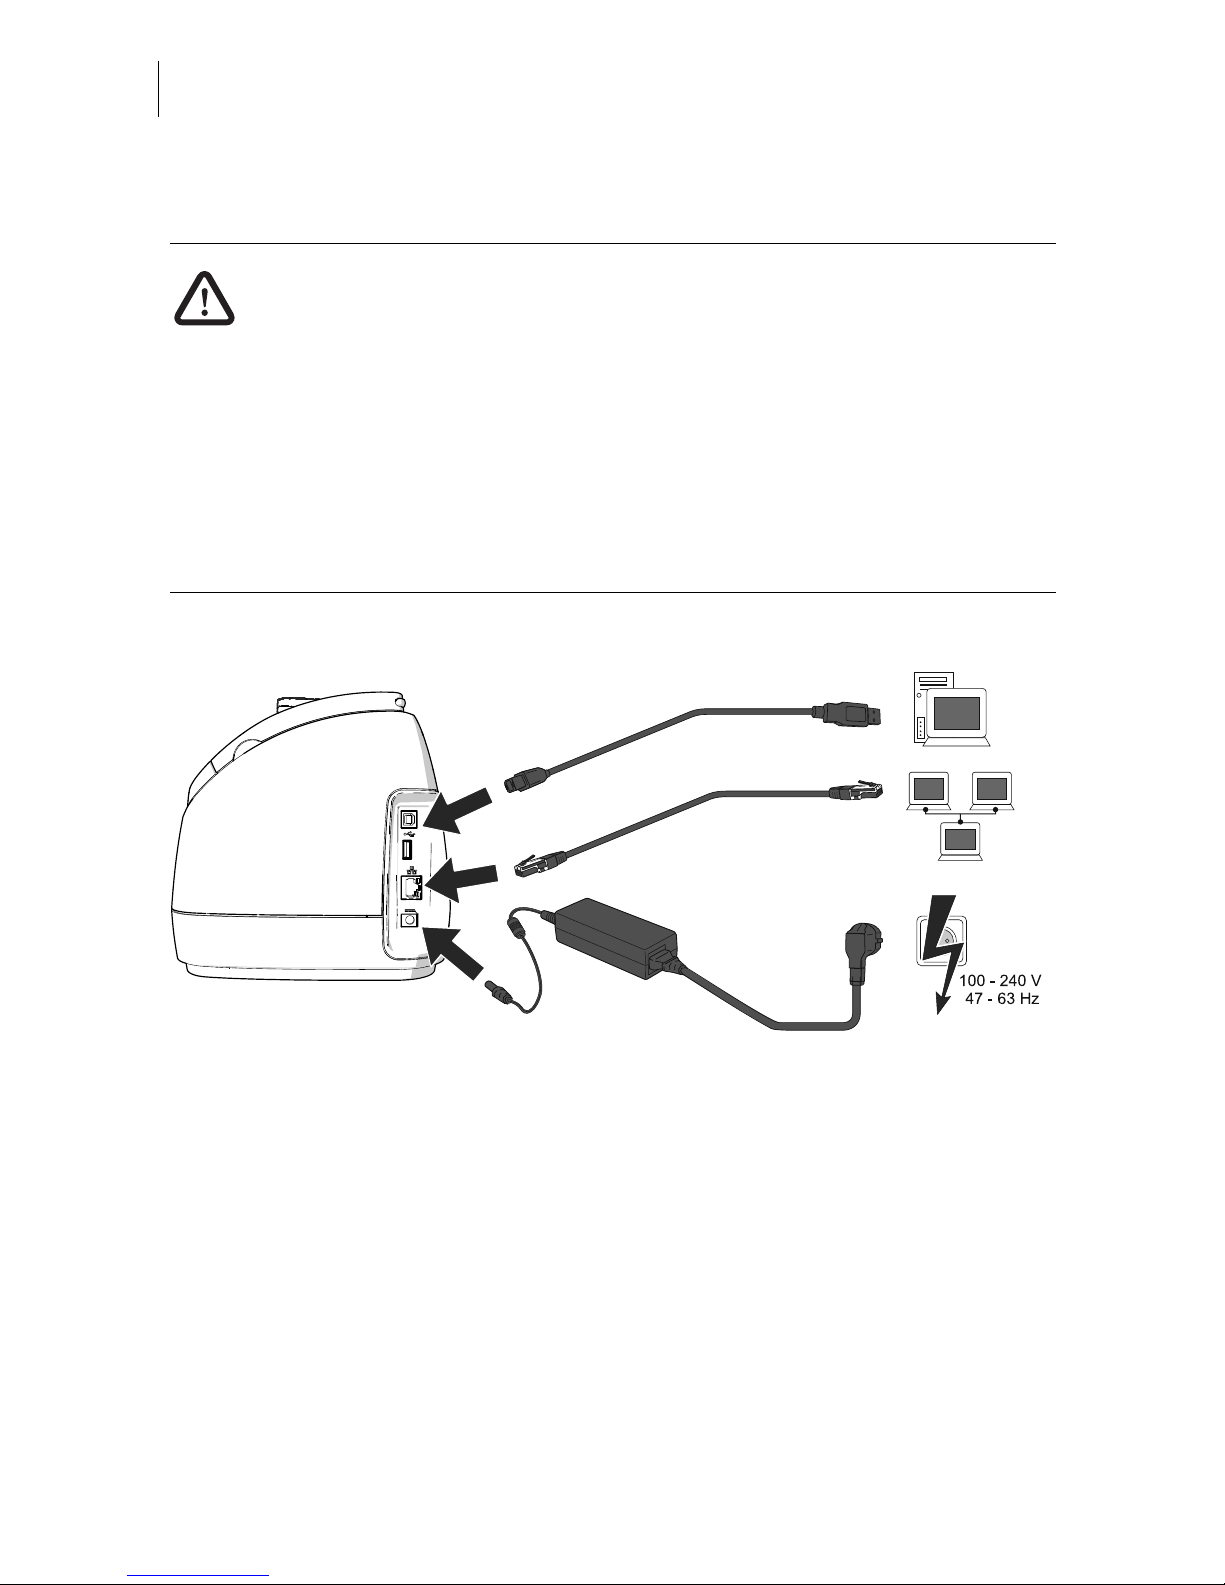
Step 4: Connecting PostBase Mini
Warning! Use only the power supply unit provided with the PostBase Mini or
approved by Francotyp-Postalia. Make sure that the power supply unit is not
damaged.
Use the cables provided with the PostBase Mini or approved by FrancotypPostalia. Make sure that cables are not damaged.
Connect PostBase Mini only to a grounded single-phase power socket. Make
sure your office power supply conforms to the power requirements indicated
on the power supply unit’s serial number plate.
Make sure the socket for connecting PostBase Mini is close by and easily
accessible at all times.
• Connect the franking machine to a local
area network (LAN).
• Connect the franking machine to a PC
(optional).
• Plug the mains plug of the power supply
unit into the power connection of the franking machine. Connect the power cable to
the power connection of the power supply
unit. Only then, plug the power cable into
the power socket.
Optional
Page 13
Installation and commissioning
13
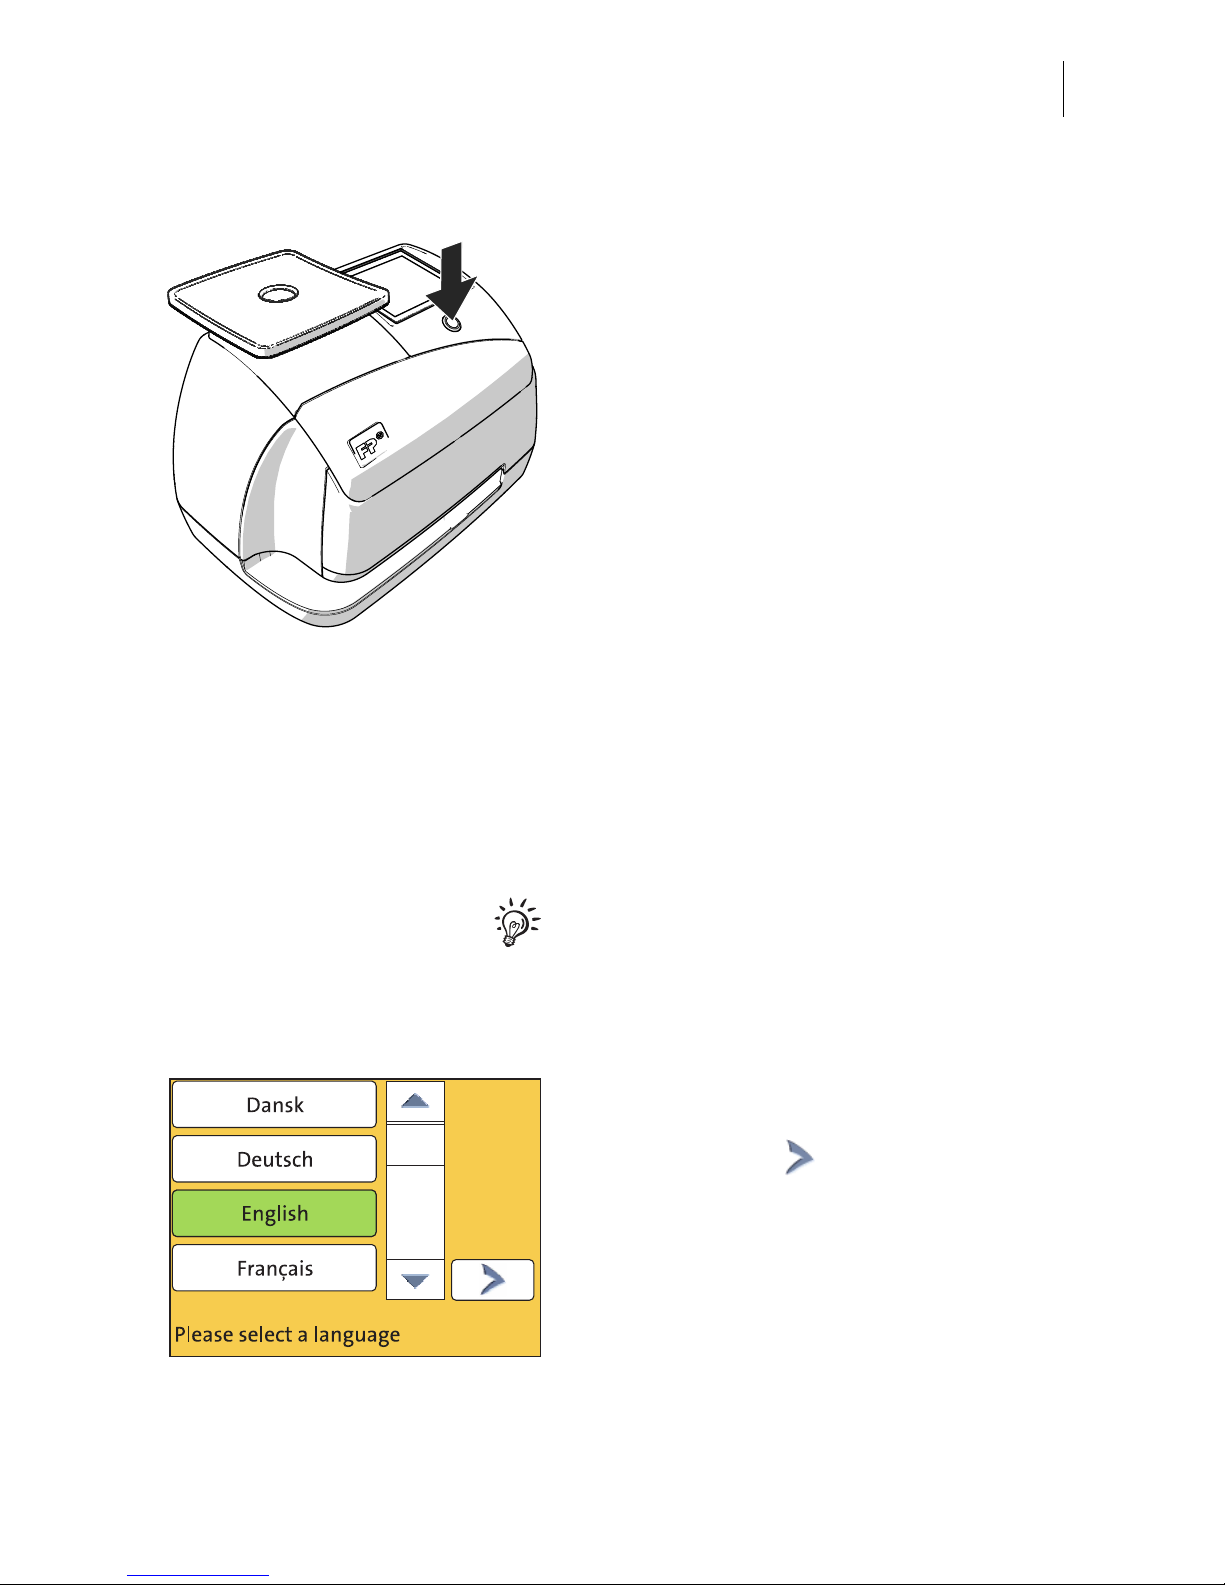
Step 5: Turning the PostBase Mini on
• Press the button on the operating panel.
The display lighting and button illumination
switch on. PostBase Mini performs a self test
and then starts the installation procedure.
Step 6: Installing PostBase Mini
PostBase Mini will guide you step by step
through the installation procedure. This
chapter covers a selection of the most important steps. Follow the instructions on the
display.
For information on handling the touch screen
and an overview of screen elements, please
read chapter 4.3.
• Have the R-PIN ready (received seperately).
• Touch the button with the desired
language.
• Confirm with the button and continue
the installation procedure.
Page 14
PostBase Mini
14
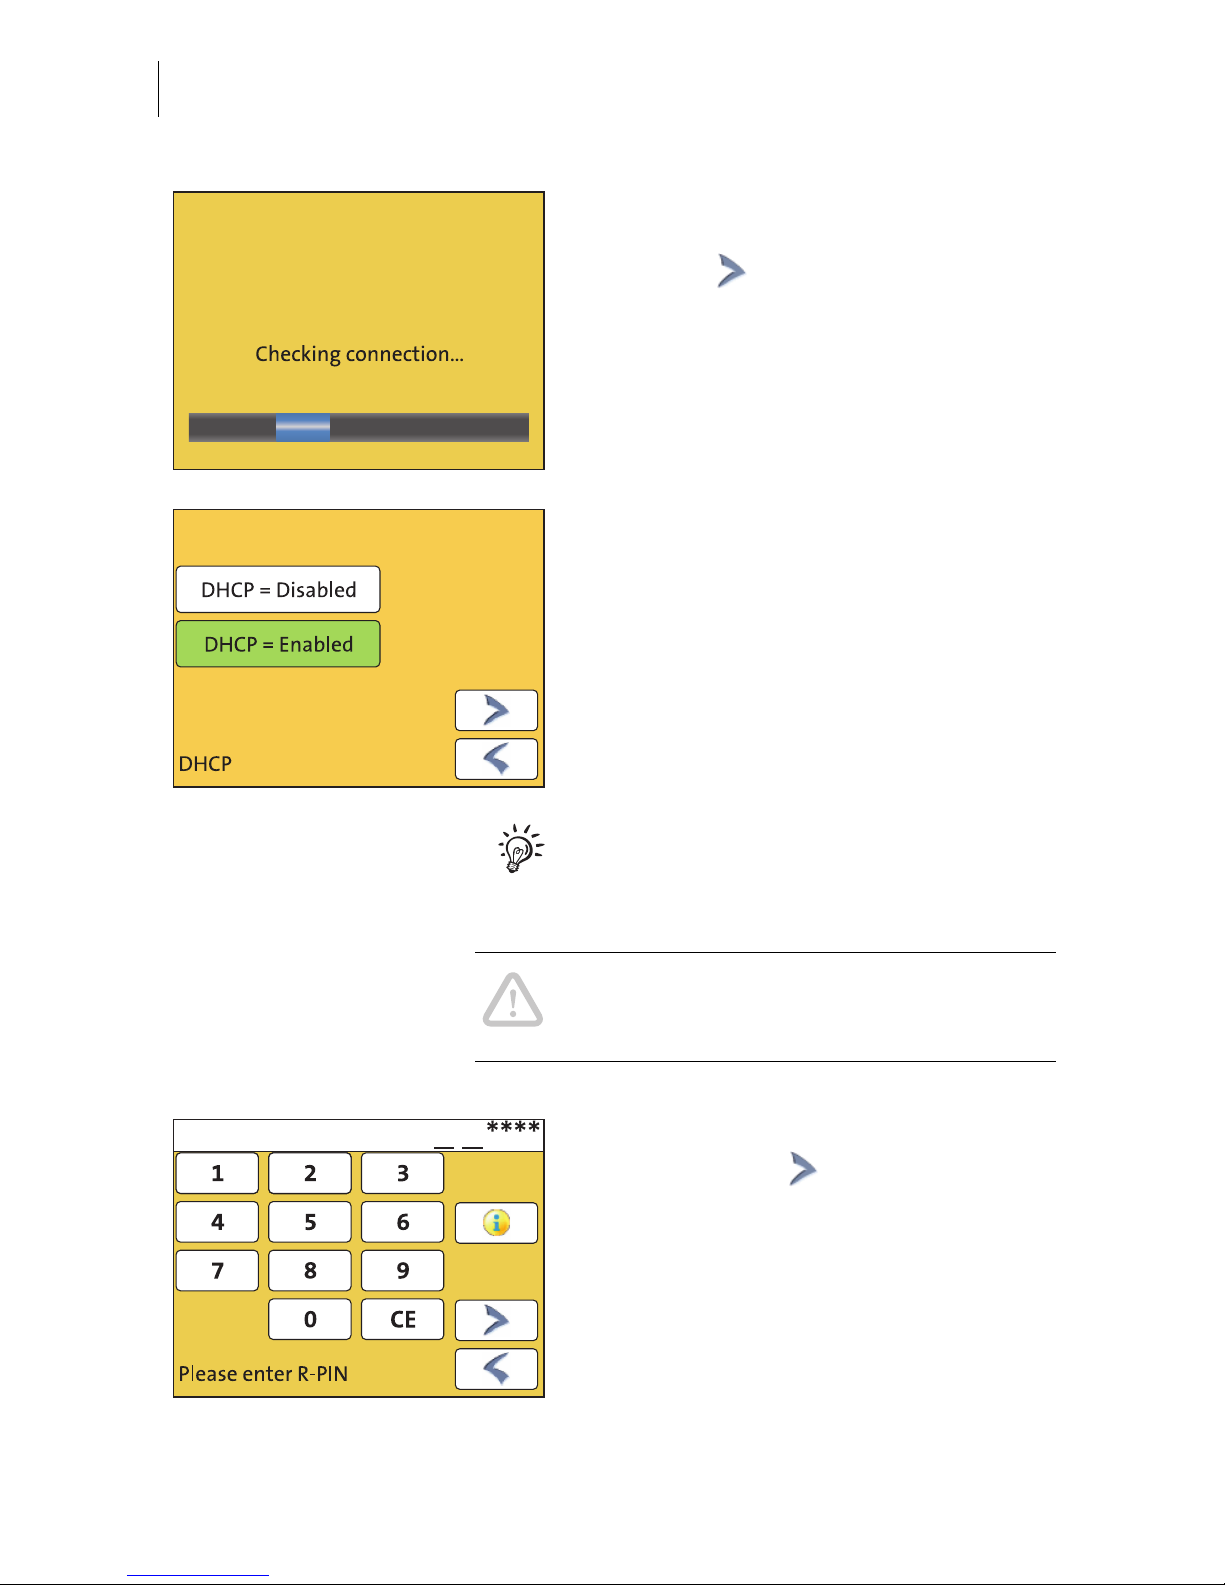
PostBase Mini comes with pre-set connection settings that should work in most cases.
• Press the button to use these settings.
PostBase Mini tests the connection to the FP
Infrastructure.
If no connection can be established, the wizard for entering connection parameters is
opened.
• If necessary: Enter the connection parameters. If need be, ask your network
administrator for details.
For details on possible settings, please read
the appendix “Connection settings (Overview)” in the “First steps” Operator Manual.
Caution! PostBase Mini may reboot several
times during installation. Do not unplug the
machine!
• Enter the Repository-PIN (R-PIN).
• Confirm with the button.
PostBase Mini now downloads the software
and data, then reboots.
• Follow the instructions on the display.
Page 15

Installation and commissioning
15
PostBase Mini then asks you to insert the
ink cartridge.
• Lift up the operating panel as far as it goes.
You can feel it engage.
• Remove the ink cartridge from the packing.
• Remove the nozzle protection.
For details, please refer to the instruction
leaflet that comes with every cartridge.
• Hold the ink cartridge so the contacts are
facing to the front of the franking machine.
• Insert the ink cartridge into the socket.
• Push the ink cartridge all the way down
until the little green latch locks it into place
with an audible click. While doing so, you
will have to overcome a slight spring pressure.
The illustration on the left shows the
correct position of the latch.
Page 16

PostBase Mini
16
• Lower the operating panel back into position.
PostBase Mini calibrates the cartridge …
… and prompts you to perform a test print.
• Place an empty envelope at the right hand
edge of the letter slot and push in as far as
it goes.
As soon as the sensor (in the back right hand
corner of the letter slot) detects the envelope,
the PostBase Mini grips the envelope tightly
and prints the test print.
Test print (example) • On the test print, determine the numbers
where
– the horizontal lines are as exactly next to
each other as possible and
– the vertical partial lines are as exactly
above each other as possible.
The ink cartridge is correctly aligned when
horizontal and vertical partial lines form one
line each at number 5
.
• Confirm with the button.
When horizontal and / or vertical partial lines
do not form one line each at number 5:
• Press to continue the procedure of ink
cartridge alignment.
Page 17

Installation and commissioning
17
Adjust cartridge: horizontal line
• Type the number where the horizontal partial lines are as exactly next to each other
as possible.
In the example, this is number ‘4’.
(If necessary: Press CE to clear the displayed number.)
• Confirm and continue with .
Adjust cartridge: vertical line
• Type the number where the vertical partial
lines are as exactly above each other as
possible.
In the example, this is number ‘7’.
(If necessary: Press CE to clear the displayed number.)
• Confirm and continue with .
• Place an empty envelope for another test
print.
• Assess the test print. If necessary, repeat
the alignment procedure until a correct
alignment has been obtained.
Page 18

PostBase Mini
18
• Contact to the data centre / load postage.
To be able to frank with your PostBase Mini,
the PostBase Mini must have the corresponding postage credit available. For this,
a connection to the data centre is necessary.
The exact process, permissible loading
amounts, as well as postage accounting
depend on postal regulations of the respective countries.
Home screen (example) PostBase Mini shows the Home screen.
Installation is complete.
In the M
ENU, you can configure the system
settings of your PostBase Mini to your liking
(display brightness, tone signals, standby
time, access control via PIN …). You also
have access to the account function of the
PostBase Mini in the M
ENU.
Page 19

The basics of operation
19
4 The basics of operation
In this chapter, you will learn about the basic functions of the PostBase Mini and how
to handle the touch screen.
4.1 Turning the PostBase Mini on / off
Turning on
• Press the button on the operating panel.
The display lighting and button illumination
switch on. The PostBase Mini performs a self
test and then displays the Home screen.
When access control is active, PostBase Mini
prompts you to enter the PIN during the start
routine.
Turning off
• Press the button for three seconds.
The PostBase Mini will complete any current
actions and then switches off. The display
light and button illumination go out and the
touch screen is deactivated.
3 seconds
Page 20

PostBase Mini
20
Disconnecting from mains
Caution! Make sure to always turn the
PostBase Mini off before disconnecting the
PostBase Mini from mains. Never pull the
mains plug or separate the power supply in
any other way before the printing system has
reached its sealed position. This is the only
way to prevent drying up and to ensure a
permanently high print quality
• Press the button ON/OFF for
three seconds to turn the franking
machine off.
The display light and button illumination go
out.
• Unplug the mains plug of the power supply
unit from the socket.
4.2 Standby
The PostBase Mini franking machine will go
to standby automatically if it is not used for
some time.
The display is dark and the button is illuminated in standby. The touch function is
inactive.
You can ‘wake up’ PostBase Mini by briefly
pressing the button.
Page 21

The basics of operation
21
4.3 Screen elements and operation philosophy
This chapter covers the user interface of the PostBase Mini franking machine. You
will learn how to operate the touch screen, the screen elements and the menus, window types and symbols.
4.3.1 The touch screen
The touch screen is active when the display is lit. To operate the PostBase Mini,
simply touch the screen elements with your finger.
General operation philosophy
You briefly touch the desired screen element
(in the example: the postage button) with
your finger. PostBase Mini performs the corresponding action.
You can operate scrollbars with the arrows or
by touching the slider and moving it. The setting is updated when you lift your finger off.
Stylus
You can also use the supplied stylus instead
of your finger. The stylus is located behind
the operating panel. You can pull it out to the
right.
Slider
Scrollbar
Stylus
Page 22

PostBase Mini
22
Buttons
You distinguish buttons from the screen
background by a frame. They can have various states, depending on the function:
Button can be pressed / is active.
Button is selected.
Button is being pressed.
Button cannot be pressed / is deactivated.
Standard buttons
The term ‘standard button’ refers to common
functions like:
OK / Save – confirm an entry, a message,
a security prompt.
Save the displayed setting.
Cancel – abort entry / function.
Back – to the previous window / higher-level
menu. Go back one step / level.
Continue – acknowledge a message,
accept the current setting and proceed to the
next step.
Page 23

The basics of operation
23
4.3.2 The Home screen
The Home screen appears after the machine was turned on and the start routine has
been successfully completed. It shows the current franking settings at a glance.
Functions In the Home screen
– you have access to all franking imprint
settings
– you frank your mail pieces
– you can weigh your mail pieces
– you can open the Menu
– current settings are displayed.
Operation philosophy A function can be edited or selected by
simply touching its button. Depending on the
respective function, the PostBase Mini opens
a list, an adjustment menu or a menu offering
further options. In the chapters to follow, you
will be introduced to each of the menu and
window types and their operation.
Advertising imprint:
Advert / SMS text (optional)
Postage (price of the product)
Weight
Mailing data
Current account
Shortcut
(selected)
Available
shortcuts
Further shortcuts
Open the Menu, access
– Special features
– Administration functions
– Basic settings
– Service function
Date
Page 24

PostBase Mini
24
4.3.3 The Product calculation menu
In the Product calculation menu, you set the product for franking.
Calling up the Product calculation menu
You open the Product calculation menu by
pressing the button showing the postage
value.
The left area of the display shows the available mailing data.
You can scroll the list with the scroll bar if
more than three options are available.
The set weight for product calculation
appears to the right in the display.
The postage and the button only appear
if all necessary mailing data were selected.
You can view the selected mailing data with
the button.
Postage
Weight
Available
mailing data
Scrollbar
Page 25

The basics of operation
25
Selecting mailing data
You select the mailing data for a product by
pressing the button with the desired setting.
PostBase Mini applies your selection and
shows the next available mailing data to the
left in the display. PostBase Mini guides you
through the postage calculation process step
by step.
Press the button to accept the current
setting and to return to the Home screen.
Deselecting mailing data
You can erase the mailing data step by step
with the button.
Display current mailing data
To view the selected mailing data, press the
button.
PostBase Mini displays the current mailing
data in a pop-up window.
Close the pop-up window with the button.
Returning to the Home screen
Set product for franking With the button, you set the selected
product for franking and return to the Home
screen.
Cancel Product calculation menu Deselect all mailing data and cancel the
Product calculation menu with the button.
The product set last remains set in the Home
screen.
Press the desired setting
Scroll the list
Accept current setting
and return to Home screen
Page 26

PostBase Mini
26
4.3.4 The Menu
Use the MENU button to open the Menu. From
this Menu, you can access the basic settings,
administration, and service functions.
Use the arrow buttons to scroll to the next
page and back in the Menu.
4.3.5 Lists
Lists (e.g. for adverts) offer all available settings. The current setting is shown with a
green background.
Use the arrow buttons to scroll forward or
backward.
Press the respective button to select one of
the provided settings.
Menu (example)
More functions
Current setting
Further
available options
Page 27

The basics of operation
27
4.3.6 Adjustment menus
A separate menu each opens for editing and selecting settings. There are different
types of adjustment menus, for example lists where you select a setting or menus
with a keypad for entering figures or letters.
Lists
The left area of the display shows the available settings. The current setting is shown with
a green background.
You can scroll the list with a scroll bar if more
than four options are available.
Press the button to save the current setting and to quit the adjustment menu.
Press the button to leave the adjustment
menu without saving any changes.
Input via keypad
Use the keypad to input values. The display
field indicates your input.
The keypad is always matched to the respective situation: The button labels change
accordingly, depending on whether you must
type figures or figures and letters.
The bottom left button is assigned a special
function matched to the current operation. In
the adjustment menu for setting the franking
date, for example, this is ‘reset to current
date’.
Press CE to clear input.
Press the button to save the current setting and to quit the adjustment menu.
Press the button to leave the adjustment
menu without saving any changes.
Current setting
Save
current setting
Button assigned according to function
(here: reset to current date)
Save
Display field
Page 28

PostBase Mini
28
Input using the counter principle
(not in all countries)
For some particular settings, PostBase Mini
may require you to enter values via a counter
principle.
Mode of operation: Use the arrow buttons to
increase or decrease the figure in each digit
until the desired amount is displayed in the
top of the display.
Press the button to save the displayed
amount.
Press the button to leave the adjustment
menu without saving any changes.
4.3.7 Pop-up windows
For some settings, a window covering parts
of the current window opens (pop-up
window). The pop-up prompts you for an
action. Messages and the ‘PC Mode’ (using
the PC control software for PostBase Mini)
also appear as a pop-up.
Some pop-up messages feature auto-confirmation, i.e. they automatically close after
some time.
Increase
Display field
Decrease
Yes / ConfirmNo / Cancel
Page 29

The basics of operation
29
4.3.8 Procedures (wizards)
For more complex settings, e.g. when setting
up connection data, PostBase Mini guides
you through all necessary actions step by
step. Different window types are used,
depending on requirements.
Press the button to accept the current
settings and to go to the next step.
You can press the button to return to
previous steps.
Pressing the button in the first screen of
the procedure will discard all settings and
close the procedure.
Page 30

PostBase Mini
30
5 Franking
5.1 Setting the franking imprint
Detailed information on the franking imprint of your postal service can be found in the
country-specific addendum.
For information on how to use the optional PC control software from FrancotypPostalia (e.g. Navigator, RemoteOne) to set the franking imprint, please refer
to the manual provided with the software.
Set advertising imprint Set postal product / postage
Product details
Shortcuts
(set postal product)
Open list wth further
shortcuts
Open the Menu:
– setting date
– changing account
Date
Page 31

Franking
31
5.2 Positioning and franking a letter
You can use the PostBase Mini to frank postcards and letters up to a thickness of
6 mm (0.23"). For thicker mail pieces, frank the empty envelope or use the special
franking labels of at least 140 mm (5.5") length. You can order suitable labels for the
PostBase Mini from Francotyp-Postalia.
You can feed mail pieces to frank when the
Home screen displays the desired settings
for franking.
• Insert the letter:
– side to be printed face up
– top edge first.
• Place the letter at the right hand edge of
the letter slot and push in as far as it goes.
As soon as the sensor (in the back right hand
corner of the letter slot) detects the letter, the
PostBase Mini grips the letter tightly and
prints (franks) it.
During franking, a message informs you
about the printing process.
Do not remove the letter until the Home
screen reappears and the PostBase Mini
releases the letter.
PostBase Mini is ready for franking
Page 32

PostBase Mini
32
Page 33

Appendix – Connection settings (Overview)
33
Connection settings (Overview)
The chart on the following pages gives an overview of the possible connection settings and parameters.
For further details, you may also refer to the Connectivity Guide for PostBase
on the FP homepage.
Connection Type
ETHERNET LAN connection. PostBase Mini connects to the
Francotyp-Postalia Infrastructure (FPI) via the
internet.
(default setting, not changeable)
DHCP Dynamic Host Configuration Protocol. Network-
ing protocol that allows automatic connection to
a network.
DHCP = E
NABLED Select this setting if your network supports
DHCP.
(default setting)
DHCP = D
ISABLED Select this setting if your network does not sup-
port DHCP.
During manual configuration, you will need to
enter the following parameters:
– Static IP address for your PostBase Mini
– Subnet mask
– Default gateway
– IP address of the DNS server.
Please contact you network administrator for
details.
Note
: When entering IP addresses, you have to
enter the dots, too.
Appendix
Page 34

PostBase Mini
34
In case your network only supports explicitly authorised devices, your network
administrator will require the MAC address of your PostBase Mini. You can find
it in the Connectivity Settings menu.
Proxy-Server Intermediary server that facilitates access to the
internet.
P
ROXY = DISABLED Select this setting if your network does not use a
proxy server.
(default setting)
P
ROXY = ENABLED Select this setting if your network uses a proxy
server.
You will need to enter the following parameters:
– IP address of the proxy or its alias
– Port number
Please contact you network administrator for
details.
Proxy-Authentication
(only when Proxy = Enabled)
Access control to the proxy server (user name
and password).
D
ISABLED Select this setting if your proxy server does not
require authentication (user name and password).
(default setting)
E
NABLED Select this setting if your proxy server does
require authentication.
You will need to enter the following parameters:
– User name for proxy access
– Password.
Please contact you network administrator for
details.
Page 35

Appendix – Connection settings (Overview)
35
Reference Information for Network Administrators
The PostBase Mini requires (preferably) an Ethernet connection, with a minimum of
10 Mbit/sec, in order to able to download postal funds from a Francotyp-Postalia
server. Ethernet cables of class CAT5E are recommended. For this it normally uses
TCP/IP (v4 only) through an https connection using TLS v1.2 over port 443. In certain
cases it may also use an http connection over port 80.
These two ports must therefore be enabled in any firewall. It will attempt to make a
connection to *.francotyp.com.
Page 36

PostBase Mini
36
Technical Data
Subject to short-term modification.
Dimensions
– Length 310 mm (12.2")
– Width / Depth 205 mm (8.1")
– Height 230 mm (9.1")
Weight 3,0 kg (6.6 lbs)
Power supply 24 VDC / 0.7 A (using an external power supply unit)
Protection class III
Power connection External Power Supply Unit:
XP POWER LTD. - VEH40US24
100 - 240 V / 0,93 A / 47 - 63 Hz
Power consumption 40 W, Energy Star
<1 W (switched off)
<7 W (standby)
Battery 3,6 V / 2 Ah / 20 mA (order no. 90.4701.8004.00)
Display TFT, 320 x 240 pixels, with touch panel, backlit
Print system
– Print technology Ink-jet, 1 ink cartridge
– Printing area 133 mm x 25 mm (5.2" x 1")
– Print resolution 300 dpi
Weighing area 3 g to 2.000 g / 0.1 oz to 5 lb
Performance Up to 15 letters/minute
Noise emission 54.5 dB(A)
Operating conditions +15 °C to +35 °C (59 °F to 95 °F)
Only use in closed rooms
Do not expose to direct sunlight
Rel. humidity 15 % to 80 %, non-condensing
Page 37

Appendix – Technical Data
37
Ink cartridge
Mail piece specifications
Subject to short-term modification.
Ink cartridge FP ink cartridge for PostBase Mini
(ink colour depending on country)
Operating and storage
conditions
+15°C to +35°C (59°F to 95°F)
Only use in closed rooms
Do not expose to direct sunlight
Rel. humidity 20 % to 70 %, non-condensing
Safety data sheet for users available at http://www.francotyp.com/en/
mail-management/material-safety-data-sheets-msds.html.
Format Postcard to ISO B4 envelope
Thickness Up to 6 mm (up to 0.23")
Material Ink-absorbent material (suitable for ink-jet printing)
No dark paper
No glossy coating on the surface to frank
No corrugated board
No extremely fibrous paper on which the franking imprint
could smear
Labels Self-adhesive labels for PostBase Mini,
minimum label size 140 mm x 85 mm (5.5" x 3.4")
Page 38

PostBase Mini
38
Declaration of conformity
Page 39

Appendix – License
39
License
This is a copy of the current LICENSE file inside the CVS repository.
LICENSE ISSUES
==============
The OpenSSL toolkit stays under a dual license, i.e. both the conditions of
the OpenSSL License and the original SSLeay license apply to the toolkit.
See below for the actual license texts. Actually both licenses are BSD-style
Open Source licenses. In case of any license issues related to OpenSSL
please contact openssl-core@openssl.org.
OpenSSL License
---------------
/* ====================================================================
* Copyright (c) 1998-2011 The OpenSSL Project. All rights reserved.
*
* Redistribution and use in source and binary forms, with or without
* modification, are permitted provided that the following conditions
* are met:
*
* 1. Redistributions of source code must retain the above copyright
* notice, this list of conditions and the following disclaimer.
*
* 2. Redistributions in binary form must reproduce the above copyright
* notice, this list of conditions and the following disclaimer in
* the documentation and/or other materials provided with the
* distribution.
*
* 3. All advertising materials mentioning features or use of this
* software must display the following acknowledgment:
* "This product includes software developed by the OpenSSL Project
* for use in the OpenSSL Toolkit. (http://www.openssl.org/)"
*
* 4. The names "OpenSSL Toolkit" and "OpenSSL Project" must not be used to
* endorse or promote products derived from this software without
* prior written permission. For written permission, please contact
* openssl-core@openssl.org.
*
* 5. Products derived from this software may not be called "OpenSSL"
* nor may "OpenSSL" appear in their names without prior written
* permission of the OpenSSL Project.
*
* 6. Redistributions of any form whatsoever must retain the following
* acknowledgment:
* "This product includes software developed by the OpenSSL Project
* for use in the OpenSSL Toolkit (http://www.openssl.org/)"
*
* THIS SOFTWARE IS PROVIDED BY THE OpenSSL PROJECT ``AS IS'' AND ANY
* EXPRESSED OR IMPLIED WARRANTIES, INCLUDING, BUT NOT LIMITED TO, THE
* IMPLIED WARRANTIES OF MERCHANTABILITY AND FITNESS FOR A PARTICULAR
* PURPOSE ARE DISCLAIMED. IN NO EVENT SHALL THE OpenSSL PROJECT OR
* ITS CONTRIBUTORS BE LIABLE FOR ANY DIRECT, INDIRECT, INCIDENTAL,
* SPECIAL, EXEMPLARY, OR CONSEQUENTIAL DAMAGES (INCLUDING, BUT
* NOT LIMITED TO, PROCUREMENT OF SUBSTITUTE GOODS OR SERVICES;
* LOSS OF USE, DATA, OR PROFITS; OR BUSINESS INTERRUPTION)
* HOWEVER CAUSED AND ON ANY THEORY OF LIABILITY, WHETHER IN CONTRACT,
* STRICT LIABILITY, OR TORT (INCLUDING NEGLIGENCE OR OTHERWISE)
* ARISING IN ANY WAY OUT OF THE USE OF THIS SOFTWARE, EVEN IF ADVISED
* OF THE POSSIBILITY OF SUCH DAMAGE.
* ====================================================================
*
Page 40

PostBase Mini
40
* This product includes cryptographic software written by Eric Young
* (eay@cryptsoft.com). This product includes software written by Tim
* Hudson (tjh@cryptsoft.com).
*
*/
Original SSLeay License
-----------------------
/* Copyright (C) 1995-1998 Eric Young (eay@cryptsoft.com)
* All rights reserved.
*
* This package is an SSL implementation written
* by Eric Young (eay@cryptsoft.com).
* The implementation was written so as to conform with Netscapes SSL.
*
* This library is free for commercial and non-commercial use as long as
* the following conditions are aheared to. The following conditions
* apply to all code found in this distribution, be it the RC4, RSA,
* lhash, DES, etc., code; not just the SSL code. The SSL documentation
* included with this distribution is covered by the same copyright terms
* except that the holder is Tim Hudson (tjh@cryptsoft.com).
*
* Copyright remains Eric Young's, and as such any Copyright notices in
* the code are not to be removed.
* If this package is used in a product, Eric Young should be given attribution
* as the author of the parts of the library used.
* This can be in the form of a textual message at program startup or
* in documentation (online or textual) provided with the package.
*
* Redistribution and use in source and binary forms, with or without
* modification, are permitted provided that the following conditions
* are met:
* 1. Redistributions of source code must retain the copyright
* notice, this list of conditions and the following disclaimer.
* 2. Redistributions in binary form must reproduce the above copyright
* notice, this list of conditions and the following disclaimer in the
* documentation and/or other materials provided with the distribution.
* 3. All advertising materials mentioning features or use of this software
* must display the following acknowledgement:
* "This product includes cryptographic software written by
* Eric Young (eay@cryptsoft.com)"
* The word 'cryptographic' can be left out if the rouines from the library
* being used are not cryptographic related :-).
* 4. If you include any Windows specific code (or a derivative thereof) from
* the apps directory (application code) you must include an acknowledgement:
* "This product includes software written by Tim Hudson (tjh@cryptsoft.com)"
*
* THIS SOFTWARE IS PROVIDED BY ERIC YOUNG ``AS IS'' AND
* ANY EXPRESS OR IMPLIED WARRANTIES, INCLUDING, BUT NOT LIMITED TO, THE
* IMPLIED WARRANTIES OF MERCHANTABILITY AND FITNESS FOR A PARTICULAR PURPOSE
* ARE DISCLAIMED. IN NO EVENT SHALL THE AUTHOR OR CONTRIBUTORS BE LIABLE
* FOR ANY DIRECT, INDIRECT, INCIDENTAL, SPECIAL, EXEMPLARY, OR CONSEQUENTIAL
* DAMAGES (INCLUDING, BUT NOT LIMITED TO, PROCUREMENT OF SUBSTITUTE GOODS
* OR SERVICES; LOSS OF USE, DATA, OR PROFITS; OR BUSINESS INTERRUPTION)
* HOWEVER CAUSED AND ON ANY THEORY OF LIABILITY, WHETHER IN CONTRACT, STRICT
* LIABILITY, OR TORT (INCLUDING NEGLIGENCE OR OTHERWISE) ARISING IN ANY WAY
* OUT OF THE USE OF THIS SOFTWARE, EVEN IF ADVISED OF THE POSSIBILITY OF
* SUCH DAMAGE.
*
* The licence and distribution terms for any publically available version or
* derivative of this code cannot be changed. i.e. this code cannot simply be
* copied and put under another distribution licence
* [including the GNU Public Licence.]
*/
Page 41

Appendix – Security Declaration for data usage
41
Security Declaration for data usage
Product Description: PostBase Mini franking machine
The PostBase Mini franking machine is connected to the user’s local network through
an Ethernet interface to share data with the Francotyp-Postalia Data Centre using
both the local network and a suitable available internet connection provided by the
user.
Francotyp-Postalia guarantees that the PostBase Mini franking machine does not
utilise, transmit, or sort any data from the user’s network which is not relevant for the
operation of this equipment.
United States Patents
US-Patent-Nr. 5.671.146, 6.579.019, 6.594.648, 6.615.196, 6.623.189, 6.692.166,
6.709.087, 6.771.179, 6.821.040, 7.043.631, 7.103.583, 7.322.764, 7.343.359,
7.606.264, 7.694.010, 7.724.905, 7.996.884, 8.131.959, 8.205.088
Page 42

PostBase Mini
42
Page 43

Customer Support / Warranty
43
Customer Support Every PostBase Mini is thoroughly checked before
leaving the factory. Should any faults occur with your
PostBase Mini in spite of our extensive quality control, please contact Francotyp-Postalia help line.
fp-francotyp.com
Warranty For warranty information, refer to the country-
specific addendum to the PostBase Mini Operator
Manual (if available in your country).
Customer Support / Warranty
Page 44

51.0053.3800.00 Rev. 03
2016-01 / xxx / helbig berlin
 Loading...