

Page 1

ostase 20
Set-Up and Installation Guide
metsy
s gni
l
ia
M
launaM rotarepO
sp
ets ts
r
i
F
1 - PostBase Mailing Machine
2 - Scale Platform
3 - Catch Tray with Bracket
4 - Ink Cartridge Set
5 - Power Cable
6 - Ethernet Cable
7 - First Steps Guide
8 - Hand Feed Tray
9 - FP Shipment Packing List
Checking the Contents of the Package
1
Before you Begin,
Activate your PostBase Machine
- Locate the Shipment
Packing List included
with your shipment.
Find your Customer #
and Meter Serial # as
shown to the right.
- Call FP toll-free at
866-750-7570, then
select Option 1 to look
up your PIN.
- Key in your Account #,
Zip Code, and Meter Serial # as
directed by the phone prompts.
Standard Contents*
10 - Envelope Moistener
Optional Accessories*
1
2
3
4
5
6
7
10
- Please allow 30 minutes for PostBase Installation
9
Attach Hand Feed Tray (or Envelope
Moistener) to the PostBase Machine
- Gently raise the le hand side of the PostBase as
indicated by the arrow
- Slide the Hand Feed Tray up to the le side of the
PostBase, as shown
- Gently lower the PostBase Machine over Hand Feed
Tray’s locking clips, as shown
2
(Note: Both the Hand Feed Tray and PostBase should be ush)
*List applies to new PostBase orders only. Exchange orders will
recieve the PostBase Mailing Machine Base (item #1 above) only.
- Insert Catch Tray Bracket into the Catch Tray as shown
- Gently raise the right hand side of the PostBase as
indicated by the arrow
- Slide the Catch Tray up to the right side of the
PostBase, as shown
- Gently lower the PostBase Machine over the Catch
Tray’s locking clips, as shown
3
Fasten Scale Platform
- Lower the Scale Platform onto the metal integrated
scale post on top of the PostBase, as shown
- Make sure one of the long grooves is facing the front
of the machine
4
Connect Catch Tray
(Note: Both the PostBase and Catch Tray should be ush)
8
Connect Power and Ethernet
5
Power Connection
- Connect one end of the Ethernet Cable to the back
of the PostBase Machine as shown; plug the other
end into an open Ethernet jack
- Attach the female end of the Power Cord to the
back of the PostBase Machine as shown; plug the
male end into a nearby power outlet
Ethernet Connection
6
Power On Your PostBase
- Push the Power Button on the front of the
PostBase Machine, as shown
- The LCD Touch Screen will illuminate and will
begin the installation process; as shown
- System startup takes up to 2 minutes, please
wait until instructions appear on the LCD Touch
Screen to continue with the installation.
Page 2
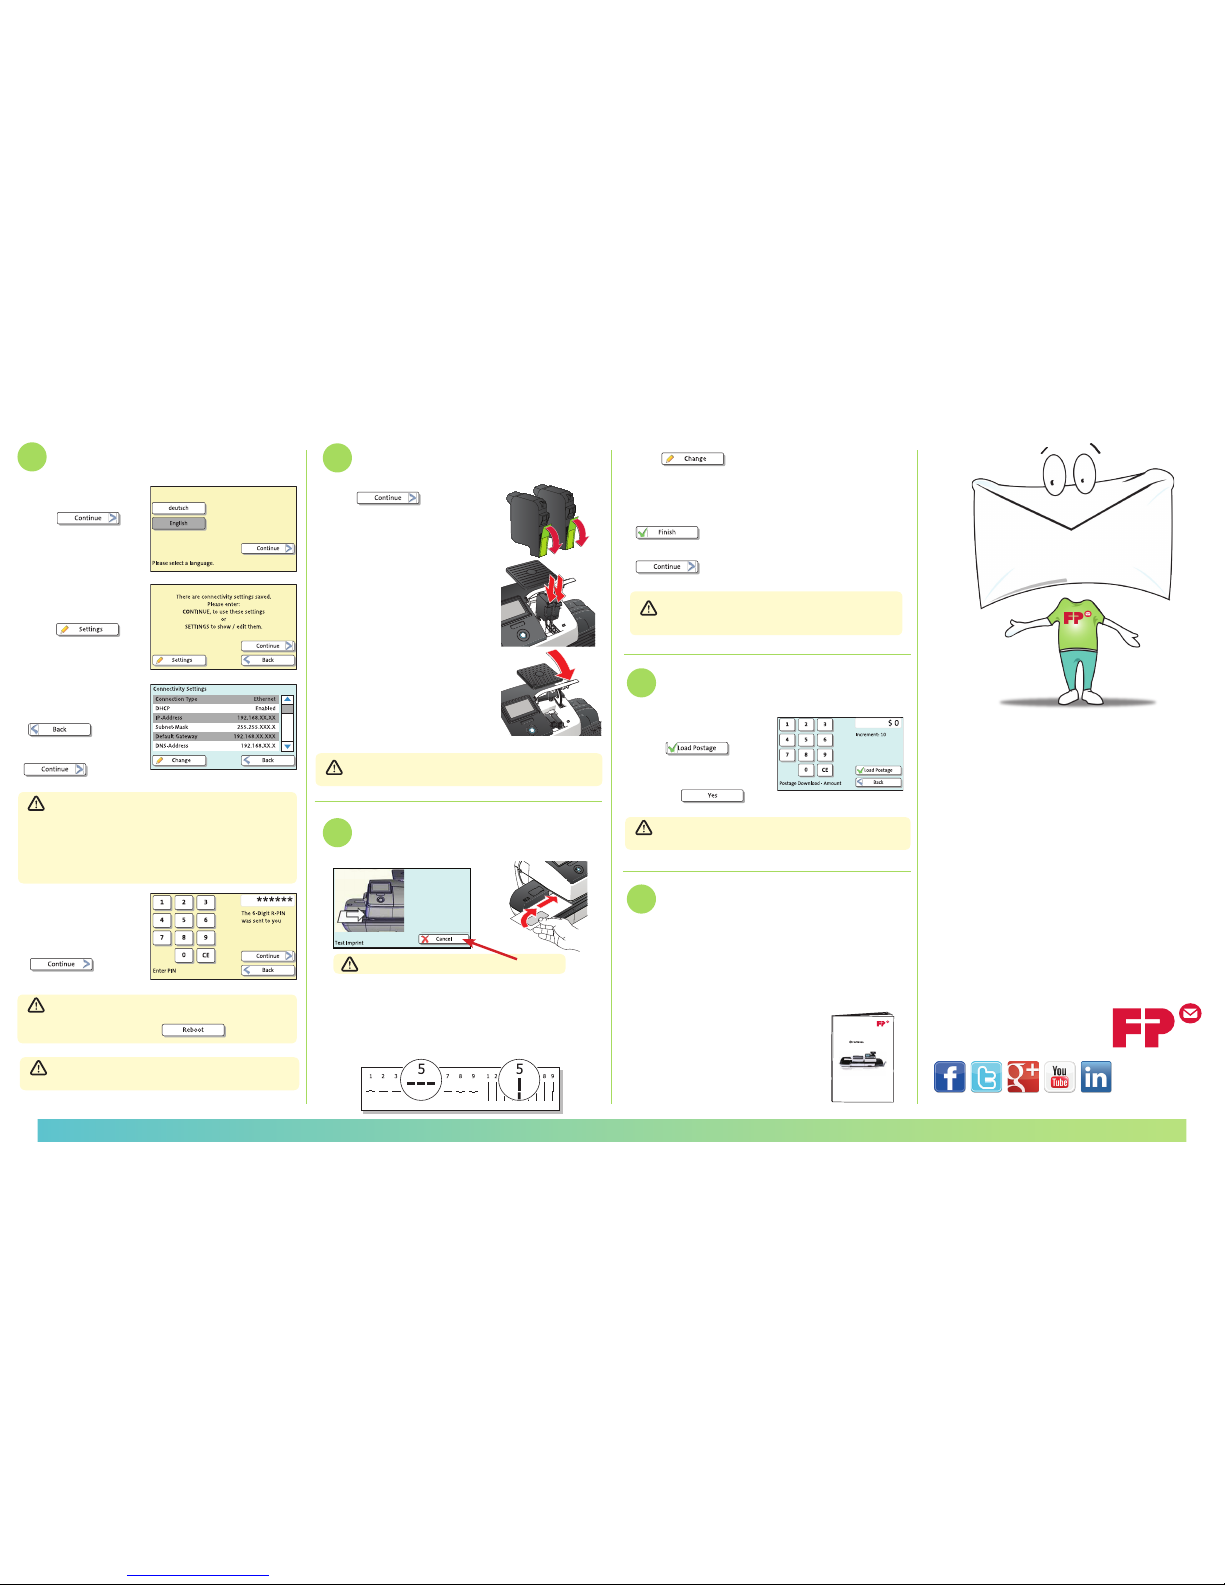
System Set-Up
- Choose your
appropriate language,
press
to continue.
- The screen will display
“There are connectivity
setting saved,”
press
to show current status.
- Conrm your IP
address has been
detected, then press
as shown, then press
7
- If no IP address is detected: Is your Ethernet cable
is plugged in? if not, plug in and restart your
machine by holding down the power button. Then
repeat the applicable System Setup steps above. If
no IP address is detected aer repeating this step,
please consult the Connectivity Guide at
fp-usa.com/support.
- If prompted, enter your
6-digit R-PIN
(this was
sent separately by mail
and email)
, press
- PostBase will begin updating and may take up to
10 minutes; Once the system is updated, it must be
restarted by pressing
- When the setup is complete, follow the prompt to
install ink cartridges.
- Ignore (do not press) the Cancel button.
8
Install Ink Cartridges
- Press to start
installation of print system.
- Please wait for front Ink Cartridge
Cover to open automatically.
- Prepare Ink Cartridges by
removing the protective lm as
shown.
- Insert Ink Cartridges into the ink
cartridge holder as shown, with
the print heads and contacts
toward the back of the PostBase.
- Press down rmly on both
cartridges to lock in place.
- Gently close the Ink Cartridge
Cover, as shown.
- Print heads will now be calibrated and cleaned;
this may take up to 2 minutes
9
Adjustment of PostBase Ink Cartridge
- Touch Screen will say Test Imprint as shown.
- To begin adjusting the ink cartridges, feed an
envelope or label through the system as shown, then
review the printed lines to conrm the straightest
horizontal and vertical line.
Manage your FP customer account at fp-usa.com/login.
If you have questions or problems, FP’s U.S. Customer
Service is here to help!
• Call 800.341.6052
• Go to fp-usa.com/support
- Press
and manually enter the straightest
vertical and horizontal lines as prompted
- Another test imprint will be required until the end
result for the straightest horizontal and vertical
lines is 5 and 5; when you achieve this result, press
- Your installation process is now beginning, press
to conrm your connectivity settings
- Your machine is now registering. Please do not
interrupt this process! This may take up to 5
minutes
10
Downloading Postage
What’s next...
- Enter in desired amount of
postage (minimum of $10),
press
to continue
- Conrm the amount by
pressing
Congratulations!
You Have Successfully Set Up your PostBase
- Refer to the Operator Manual to learn about the
features and functions of the system.
- To view the Operator Manual and other useful
documents & information on the PostBase system,
please visit: fp-usa.com/support.
11
- Postage will begin downloading immediately; this
process may take up to 2 minutes
metsy
s gni
l
ia
M
launaM rotarepO
sp
ets ts
r
i
F
FP Mailing Solutions
N. Mitchell Ct., Suite
Addison, IL -
..
www.fp-usa.com
INST20 01
 Loading...