

Page 1
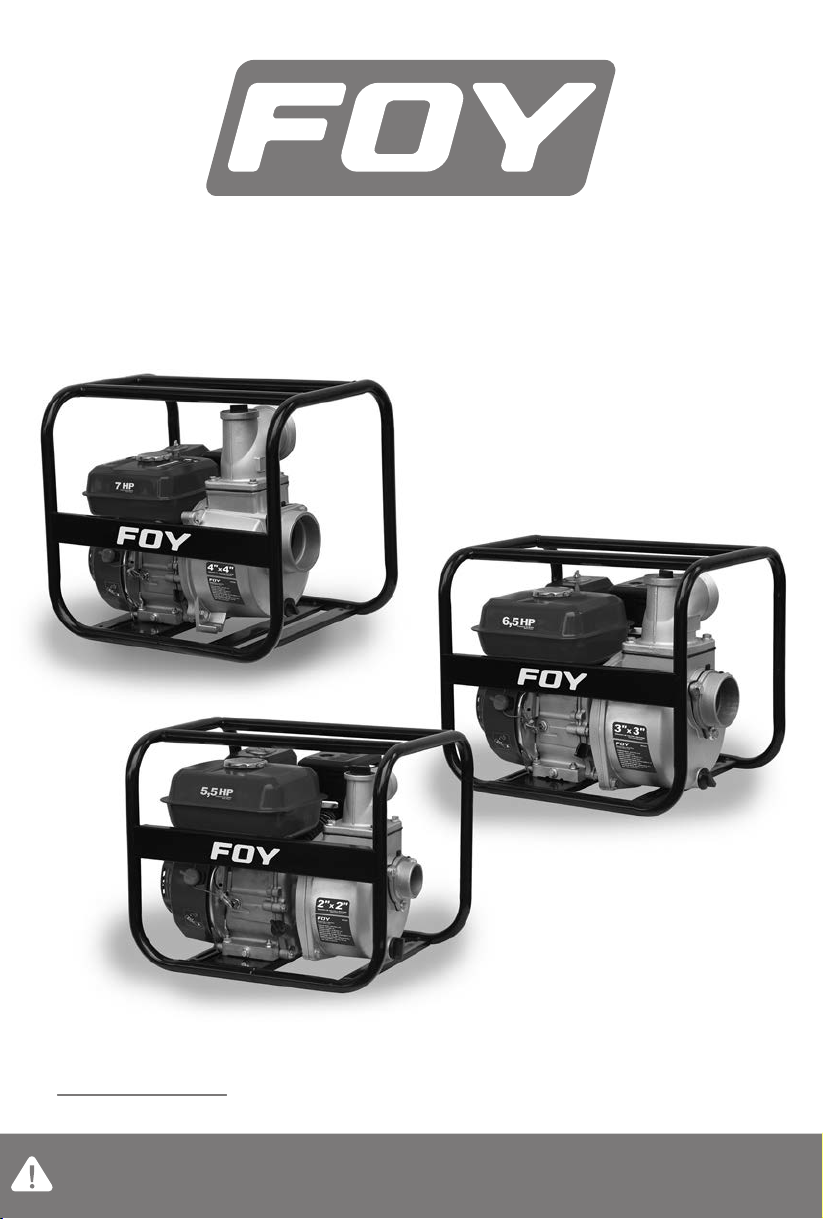
Motobomba a Gasolina
Gasoline Water Pump
MG322 • MG333
Manual de Usuario y Garantía.
User’s Manual and Warranty.
ATENCIÓN: Lea, entienda y siga las instrucciones de seguridad contenidas en este
manual antes de operar esta herramienta.
WARNING: Read, understand and follow the safety rules in this manual, before operating this tool.
MG344
Page 2

CONTENIDO CONTENT
ENGLISH ESPAÑOL
Normas generales de seguridad
Advertencias de seguridad para
motobombas a gasolina
Características
· Especificaciones técnicas
Instrucciones de operación
Mantenimiento
Solucionador de problemas
Garantía
3
3
4
4
5
6
7
12
General safety rules
Specific safety rules for gasoline
water pumps
Features
· Technical data
Operation instructions
Maintenance
Troubleshooting
Warranty policy
SÍMBOLOS SYMBOLS
PELIGRO, ADVERTENCIA, PRECAUCIÓN:
Indica un riesgo personal o la posibilidad
de un daño.
Lea el manual de usuario: Lea las instrucciones contenidas en este manual.
DANGER, CAUTION, WARNING: Indicates risk of
personal injury and/or the possibility of damage.
Read the user manual: Read all the instructions in
this manual.
8
8
9
9
9
11
11
12
2
Page 3

ESPAÑOL•Manual de usuario
NORMAS GENERALES DE SEGURIDAD
Esta MOTOBOMBA tiene características que harán su trabajo más rápido y fácil. Seguridad, comodidad y confiabilidad fueron previstos como
prioridad para el diseño del mismo, haciendo
más fácil su operación.
El propósito de este manual es servir de guía
para que el usuario pueda realizar una buena
operación y mantenimiento de esta motobomba. Este instructivo toma brevemente temas
tales como el funcionamiento, parámetros técnicos, operación, mantenimiento e información
de seguridad.
ADVERTENCIA: Lea todas las advertencias
de seguridad y todas las instrucciones. La omi-
sión de alguna de las advertencias e instrucciones que se enlistan a continuación puede dar
como resultado un choque eléctrico, fuego y/o
un daños serios. CONSERVE TODAS LAS ADVER-
TENCIAS Y TODAS LAS INSTRUCCIONES.
NOTA: La expresión “herramienta” en las adver-
tencias se refiere a la herramienta eléctrica que
se conecta a la fuente de alimentación (con cable) o a la herramienta que se acciona a batería
(sin cable).
SEGURIDAD EN EL ÁREA DE TRABAJO
Mantenga el área de trabajo limpia y bien iluminada. Las áreas desordenadas y oscuras pro-
vocan accidentes.
No maneje herramientas eléctricas en atmósferas explosivas, tales como en presencia de
líquidos inflamables, gases o polvo. Las herra-
mientas eléctricas crean chispas que pueden encender el polvo o los humos.
Mantenga alejados a los niños y curiosos mientras maneja una herramienta eléctrica. Las dis-
tracciones pueden causarle la pérdida del control.
Características y ventajas de los motores a 4
tiempos y válvulas a la cabeza (OHV):
• Los motores a 4 tiempos se destacan por la
potencia y durabilidad de la máquina y el ruido
ocasionado por la operación es más bajo.
Además el gas emitido es menos dañino, ya que
no se necesita previamente mezclar el aceite y
la gasolina.
• Las válvulas a la cabeza (OHV) hacen que el
motor consuma un 30% menos de gasolina y
50% menos de aceite que los motores convencionales así incrementa la eficiencia de la combustión, obteniendo mayor poder de salida.
Consigue un buen balance de temperatura, reduciendo la erosión del cilindro.
ADVERTENCIAS DE SEGURIDAD PARA
MOTOBOMBAS A GASOLINA
ADVERTENCIA: El no seguir estas instrucciones y advertencias puede ocasionar muerte, heridas personales o daños materiales.
• Por su seguridad nunca bombee líquidos flamables o corrosivos, tales como gasolina y ácidos.
• Para prevenir una corrosión prematura en su
motobomba evite bombear agua de mar, aguas
lodosas o residuales, soluciones químicas, líquidos
cáusticos tales como el aceite usado, el vino o
la leche.
• Asegúrese de colocar la motobomba en una
superficie plana y firme. Si se encuentra inclinada o volcada, el combustible se derramará.
• Para prevenir algún riesgo de incendio o procure tener una adecuada ventilación, mantenga
la motobomba al menos 1 metro de separación
de edificios u otros equipos durante su operación.
• Aprenda como detener la motobomba en alguna emergencia y tenga un total conocimiento
de los controles de operación.
• No permita que nadie opere esta unidad sin
previo conocimiento o instrucciones de su operación. No permita que los niños y mascotas estén cerca del área de operación.
IMPORTANTE: La gasolina es extremadamente flamable y explosiva bajo ciertas condiciones
y circunstancias.
• No fume o permita la presencia de flamas o
chispas cerca de donde este abasteciendo la
motobomba de gasolina o donde haya gasolina
almacenada. Cuando reabastezca de gasolina
hágalo cuando el motor esté completamente
detenido y en un área bien ventilada.
• No sobrepase la capacidad máxima de su tanque.
• Asegúrese de que el tapón del tanque de gasolina esté completamente cerrada.
NOTA: Los gases resultantes de la combustión
contienen monóxido de carbono.
• Evite inhalar los gases de la combustión.
• No ponga a funcionar la motobomba en cocheras o lugares cerrados.
• El escape se sobrecalienta durante la operación y permanece así aún después de estar apagado.
• Tenga cuidado de no tocar el escape cuando
esté caliente.
• Deje que la motobomba se enfríe antes de almacenarla.
3
Page 4
RIESGO DE MONÓXIDO DE CARBONO
Los gases del escape del motor contienen monóxido de carbono, un gas venenoso, inodoro e
invisible que, si se inhala en grandes proporciones, puede provocar la muerte o una lesión personal seria. Si comienza a sentir mareos o debilidad mientras utiliza la motobomba, apáguelo e
inmediatamente vaya a un lugar fresco; podría
padecer de envenenamiento por monóxido de
carbono.
b) Buena ventilación para el enfriamiento. La
circulación de aire y las temperaturas son importantes para las unidades enfriadas por aire. Las
temperaturas no deberán exceder 40°C (104° F)
de temperatura ambiente.
c) Rellene de combustible en un área bien iluminada. Evite el derrame de combustible y nunca
rellene con combustible mientras la motobomba este funcionando. Antes de rellenar combustible, espere que el motor se enfríe durante 2
minutos.
d) No reabastezca de combustible cerca de llamas, pilotos o equipos eléctricos que suelten
chispas, como herramientas mecánicas, soldadoras y rectificadoras.
e) El motor siempre deberá tener instalado el silenciador y el filtro de aire, los cuales deberán
de estar en buenas condiciones en todo momento ya que detienen el fuego en caso de una ignición en el motor.
f) No fume cerca de la maquina.
• Antes de transportar la motobomba en algún
vehículo, extraiga todo el combustible para evitar la posibilidad de fugas o derrames.
• Para evitar quemaduras, no toque el silenciador del motor u otras superficies que se hayan
calentado durante la operación.
• No modifique el deflector de calor.
• El servicio de la unidad debe ser realizado solamente por personal calificado en los centros de
servicio. Cuando realice mantenimiento, utilice
partes idénticas a la original. El uso de accesorios o partes no autorizadas podrían ocasionar
daños a la máquina o al usuario.
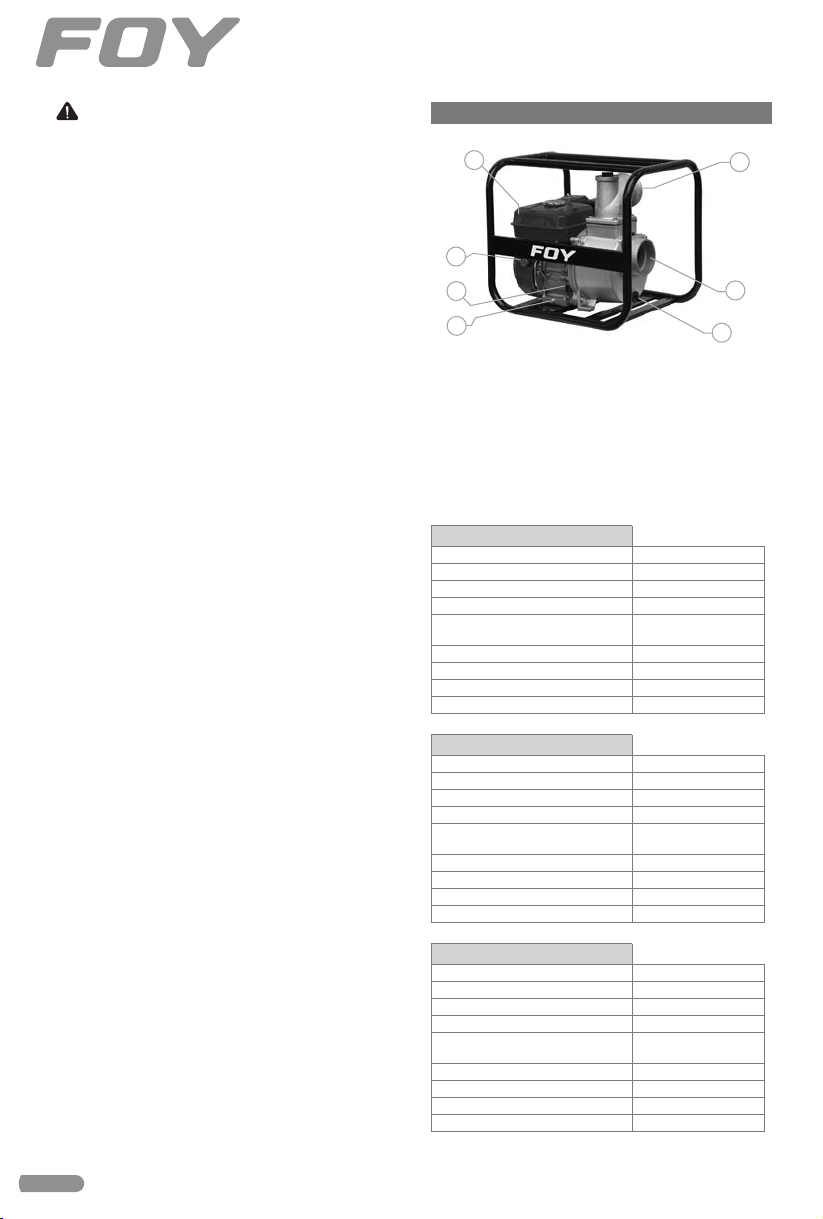
CARACTERÍSTICAS
CONOZCA SU HERRAMIENTA
1
7
5
6
1. TANQUE DE GASOLINA.
2. PUERTO DE DESCARGA.
3. PUERTO DE SUCCIÓN.
4. TAPÓN DE DRENADO.
5. TAPÓN DE TANQUE DE ACEITE.
6. TAPÓN DE DRENADO DE ACEITE.
7. INTERRUPTOR DE ENCENDIDO.
DATOS TÉCNICOS
MG344
POTENCIA
CILINDRADA
CAPACIDAD DE TANQUE
CAPACIDAD DE ACEITE
DIÁMETRO DE SUCCIÓN Y
DESCARGA
FLUJO MÁXIMO
DISTANCIA DE BOMBEO
VELOCIDAD DE MOTOR
PESO
MG333
POTENCIA
CILINDRADA
CAPACIDAD DE TANQUE
CAPACIDAD DE ACEITE
DIÁMETRO DE SUCCIÓN Y
DESCARGA
FLUJO MÁXIMO
DISTANCIA DE BOMBEO
VELOCIDAD DE MOTOR
PESO
MG322
POTENCIA
CILINDRADA
CAPACIDAD DE TANQUE
CAPACIDAD DE ACEITE
DIÁMETRO DE SUCCIÓN Y
DESCARGA
FLUJO MÁXIMO
DISTANCIA DE BOMBEO
VELOCIDAD DE MOTOR
PESO
7 HP
208 cc
3,6 L
0,6 L
4” x 4”
(10,1 cm x 10,1 cm)
900 L/min
20 m
3 600 r/min
27 kg (59,5 lb)
6,5 HP
196 cc
3,6 L
0,6 L
3” x 3”
(7,6 cm x 7,6 cm)
1 000 L/min
28 m
3 600 r/min
23 kg (50,7 lb)
5,5 HP
163 cc
3,6 L
0,6 L
2” x 2”
(5 cm x 5 cm)
500 L/min
26 m
3 600 r/min
21 kg (46,2 lb)
2
3
4
4
Page 5
ESPAÑOL•Manual de usuario
IMPORTANTE: El colador o filtro debe ser colocado e instalado en el extremo de la manguera de succión antes de su operación.
INSTRUCCIONES DE OPERACIÓN
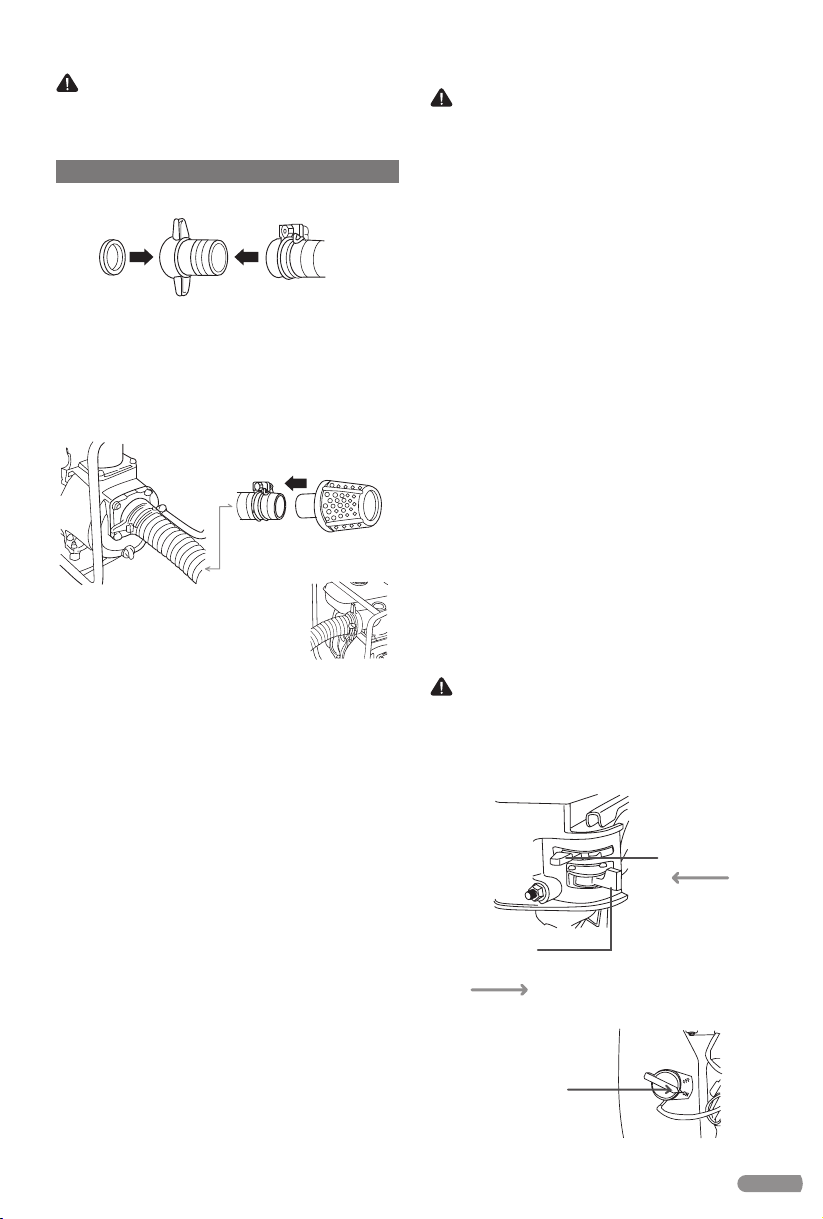
CONEXIÓN DE LAS MANGUERAS
• Conecte y asegure la manguera, enseguida
apriétela bien.
• Al final de la manguera de succión coloque el
colador o filtro antes de comenzar a succionar.
Grava o escombros que sean succionados por
la motobomba pueden causar daños severos al
mecanismo de succión.
Enseguida conecte la manguera
de descarga.
PARA UNA OPERACIÓN SEGURA
Opere en áreas bien ventiladas. Utilice la motobomba solamente en exteriores. Mantenga al
menos 1 m de distancia de sustancias flamables.
En el caso de alguna fuga de combustible detenga el motor. No fume cerca de la motobomba.
Antes de encender limpie cualquier resto o derrame de gasolina.
ACEITE DE MOTOR
Esta motobomba cuenta con un sensor protector que evita el arranque del motor si el nivel de
aceite no es el adecuado.
NOTA: El hacer funcionar esta motobomba con
un nivel bajo de aceite causará daños severos al
motor.
Para reemplazar el aceite de motor:
1. Coloque la motobomba en una superficie elevada.
2. Verifique el nivel de aceite; Inserte el medidor
de aceite en la abertura del depósito.
3. Si el nivel es muy bajo, agregue aceite para
motores de 4 tiempos.
COMBUSTIBLE
ADVERTENCIA: La gasolina es una sustancia
altamente flamable, el vapor de la gasolina puede explotar, tenga extrema precaución cuando
maneje gasolina.
· Reabastezca en un área bien ventilada y cuando
el motor se encuentre totalmente parado.
· Mantenga chispas y llamaradas alejadas de la
unidad.
· El vapor de la gasolina o algún derrame pueden encenderse, tenga cuidado.
· Evite sobrepasar la capacidad máxima del llenado de su tanque.
· Cuando llene el tanque de combustible asegúrese que el tapón quede totalmente cerrado.
NOTA: Si hubo algún derrame de gasolina en
este proceso, asegúrese de que el área se seque
antes de encender la unidad.
ANTES DE SU OPERACIÓN
La cámara del cebador de la motobomba debe
de estar completamente llena de agua antes de
operar.
Nunca intente encender la motobomba sin agua
en el cebador podría causar un sobrecalentamiento en la motobomba y así dañar el motor.
Una operación en seco puede causar que se dañen los empaques de la motobomba.
Si la unidad está siendo utilizada en seco, detenga el motor de inmediato y permita que se
enfríe antes de agregar el agua para el cebador.
IMPORTANTE: Llene de agua cuando el mo-
tor esté frío y no se encuentren en operación.
ENCENDIENDO EL MOTOR
1. Abra la válvula del combustible.
2. Cierre el cebador.
2
CIERRE EL
AHOGADOR
1
ABRA LA
VÁLVULA DE
GASOLINA
3. Encienda la unidad.
3
COLOQUE EL
INTERRUPTOR
DE ENCENDIDO
EN “ON“
5
Page 6
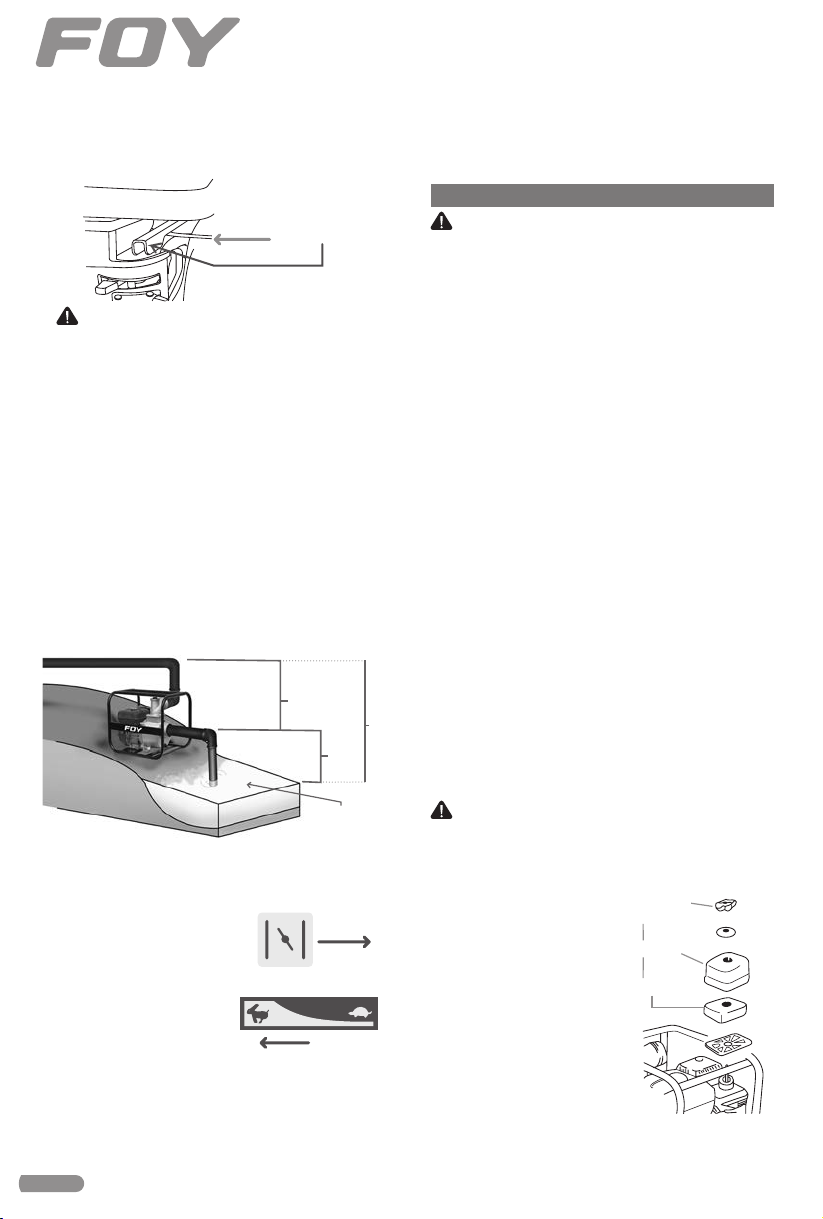
4. Acelere un poco.
5. Jale la piola un poco hasta sentir un poco de
resistencia y prosiga a jalar con fuerza hasta que
el motor se encienda.
4
“ACELERE”
UN POCO
2. Se recomienda que cierre la válvula del combustible cuando el motor se detenga, para evitar derrames.
MANTENIMIENTO
IMPORTANTE: Apague el motor antes de
realizar cualquier tipo de mantenimiento. Si el
motor tiene que estar funcionando, asegúrese
de estar en un área bien ventilada.
IMPORTANTE: No permita que la piola se regrese bruscamente contra el motor. Regrésela
suavemente a su posición original, evite daños
innecesarios al motor.
RECOMENDACIÓN PARA UN BUEN DESEMPEÑO
La siguiente imagen muestra la correcta instalación de la motobomba y la relación que existe
entre el nivel del agua con la acción de la succión y la descarga. La succión desde el espejo del
agua pasando por la moto bomba más la distancia máxima de expulsión es conocida como
“Descarga total”.
Para un óptimo rendimiento la motobomba
debe estar lo más cerca posible de la provisión
de agua (río, cisterna etc.) resultando en una
mayor rapidez de descarga a partir de un menor
tiempo de purgado.
descarga
Altura de
Altura Total
succión
Altura de
Espejo de agua
NOTA: La capacidad de descarga siempre es mayor que la capacidad de succión
PARA SU OPERACIÓN
1
1. Cuando el motor esté
encendido abra el ahogador por completo.
2. Acelere al máximo.
2
DETENIENDO EL MOTOR
1. Ponga el interruptor de encendido en la posición “OFF“ de apagado.
CAMBIANDO EL ACEITE
NOTA: Se recomienda cambiar el aceite después
del primer mes o después de las primeras 20 horas de uso (lo que suceda primero).
• Después del primer cambio se recomienda hacerlo cada 6 meses o después de 100 horas de
uso. Cuando drene el aceite, es recomendable
hacerlo cuando aún este tibio.
1. Quite la tapa del tanque de aceite y el tapón
para drenarlo.
2. Ponga de nuevo el tapón de drenado.
3. Llene el cárter con aceite para motor de 4
tiempos (600 ml de SAE 40W).
LIMPIEZA DEL FILTRO DE AIRE
Un filtro sucio impedirá un flujo constante de
aire en el carburador. Para evitar que el carburador se dañe, realice un mantenimiento constante al filtro.
De mantenimiento con más frecuencia si la motobomba es usada en condiciones de mucho
polvo.
Nunca utilice gasolina o solventes no especificados para la limpieza del filtro ya que podrían
desgastarlo o dañarlo.
IMPORTANTE: Nunca opere la unidad si el
filtro de aire esta roto o dañado.
COMO LIMPIAR EL FILTRO DE AIRE
1. Afloje el tornillo de mariposa y quite la cubierta
del filtro.
2. Lave el filtro con que-
Tornillo
mariposa
Cubierta
roseno, enjuáguelo bien.
Después deje que el filtro
Filtro
se seque por completo.
3. Remoje el filtro con
aceite de motor limpio,
exprímalo quitando el exceso de aceite.
4. Instale de nuevamente
el filtro y su cubierta.
6
Page 7
ESPAÑOL•Manual de usuario
LIMPIEZA DE LA BUJÍA
Para asegurar una buena operación del motor,
la bujía debe de estar limpia de desechos y depósitos.
1. Quite la bujía. Si el motor estaba en funcionamiento, entonces el escape estará muy caliente,
evite tocarlo.
2. Inspeccione la bujía. Cambiela si esta se encuentra dañada o astillada. Si aún es reusable
limpielo con un cepillo de alambre.
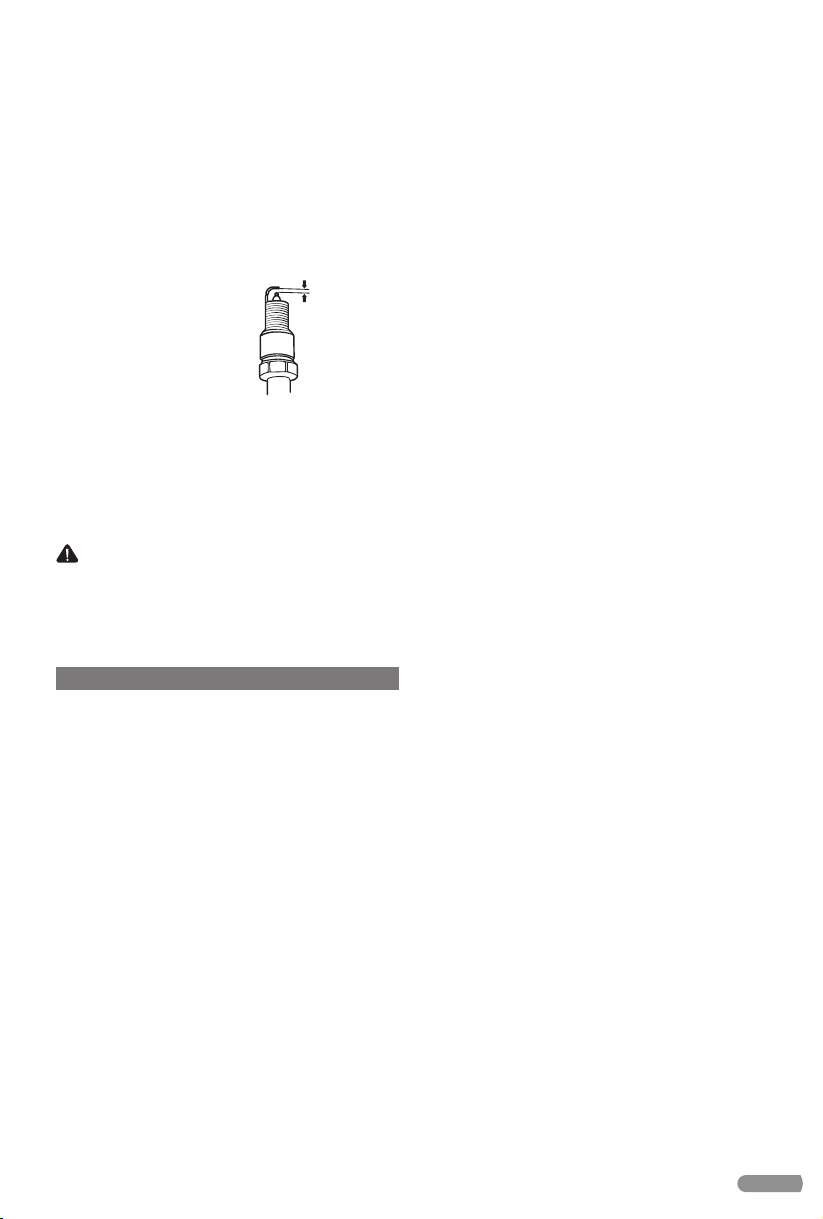
NOTA: Mida el hue-
0,7 - 0,8 mm
co de la bujía con un
calibrador. El espacio
debe de ser de 0,7 0,8
mm. De ser necesario,
ajuste.
3. Verifique que la arandela de la bujía este en
buenas condiciones y vuelva a colocar la bujía en
su lugar, enrósquele un poco con la mano.
4. Después de que la bujía se encuentre posicionada, enrósquelo con una llave para bujía y asegurar la arandela.
IMPORTANTE: La bujía debe estar bien apretada. Si no lo hace apropiadamente la bujía se
sobrecalentará y puede dañar el motor. Nunca
utilice una bujía con un rango de temperatura
diferente.
· Cheque que no este atascado el colador o filtro.
· Cheque que no estén sueltas las conexiones de
las mangueras.
· Cheque que las mangueras no estén dañadas.
· Verifique que la cabeza de succión no este muy
elevada.
Si aun no bombea lleve la motobomba a un centro de servicio autorizado más cercano.
SOLUCIONADOR DE PROBLEMAS
EN CASO DE QUE EL MOTOR NO ENCIENDA VERIFIQUE:
· Que el interruptor de encendido este en la posición de encendido “ON“
· Que haya suficiente combustible en el tanque.
· Que la válvula de paso de combustible este en
abierto: “ON“
· Que la gasolina llegue al carburador: Para esta
comprobación, llévela a un centro de ser vicio
autorizado.
Si no hay chispa en la bujía;
1. Verifique quitando la tapa de la bujía, quite
la bujía y limpie cualquier desecho o suciedad.
2. Vuelva a instalarla.
3. Encienda de nuevo la motobomba.
Si aun no enciende lleve la motobomba a su centro de servicio autorizado más cercano.
EN CASO DE QUE NO BOMBEE LA MÁQUINA
· Verifique que la motobomba tenga agua en
el cebador.
7
Page 8

GENERAL SAFETY RULES
Your GASOLINE WATERPUMP has many features
that will make your job faster and easier. Safety,
performance and reliability have been given
for top priority designing of this tool, qualities
to make easier its maintain and its operation.
This water pump has many good characteristics
such as maximum power, low noise, low fuel
consumption, low pollution, compact structure,
and small size. It’s used for project drain and
irrigation.
WARNING: Read and understand all instructions. Failure to follow all indications listed be-
low, may result in electric shock, fire and/or serious personal injury. SAVE THESE INSTRUCTIONS.
SAFETY IN WORKING AREA
Keep your work area clean and well lit. Cluttered
benches and dark areas may cause accidents.
Do not operate power tools in explosive atmospheres, such as in the presence of flammable
liquids, gases or dust. Some power tools create
sparks which may provoke fire.
Keep away observers, children and visitors
while operating a power tool. Distractions can
cause you to lose control.
OHV / FOUR-STROKE ENGINES FEATURES:
• Four-stroke engines exhibit outstanding pow-
er and durability, operational noise is exceptionally low. Also, exhaust is cleaner and there is less
smoke since there is no need to blend oil with
the gasoline.
• OHV engines consume approximately 30% less
fuel and 50% less oil than side valve engines.
SPECIFIC SAFETY RULES FOR
GASOLINE WATER PUMP
WARNING: Failure to follow these instructions and warnings may result in death, personal injury or property damage.
• For your safety, never pump flammable or corrosive liquids such as gasoline or acid.
• Avoid pump corrosion, never pump sea water,
muddy water, chemical solutions, or caustic liquids such as used oil, wine, or milk.
• Place the pump on a firm, level surface. If the
pump is tilted or overturned, fuel spillage may
be as result.
• To prevent fire hazards and to provide adequate ventilation, keep the pump at least 1
meter (3 feet) away from buildings and other
equipment during operation.
• Do not place flammable objects close to the
pump. Check local laws and regulations before
operating.
• Learn how to stop the pump quickly, and understand the full operation of the controls.
• Do not allow anyone to operate the pump
without proper instructions. Do not allow children to operate the pump. Keep children and
pets away from the area of operation.
IMPORTANT: Gasoline is extremely flammable and is explosive under certain conditions
and circumstances.
• Do not smoke or allow flames near or where the
pump is refueled or anywhere gasoline is stored.
Refuel in a well-ventilated area with the engine
stopped.
• Do not overfill the tank.
• Make sure that the filler cap is closed securely.
NOTE: Exhaust gas contains poisonous carbon monoxide.
• Avoid inhalation of exhaust gasses.
• Never run the pump in a closed garage or confined
area.
• The muffler becomes very hot during operation and remains hot for a while after stopping the engine.
• Be careful do not touch the muffler while it is hot.
• Let the engine cool before storing the pump indoors.
RISK OF CARBON MONOXIDE
Engine exhaust gases contain carbon monoxide, a poisonous, odorless, invisible gas that, if
inhaled in large proportions, can result in death
or serious personal injury. If you begin to feel
dizzy or weak while using the water pump, turn
it off and immediately go to a cool place; You
may suffer from carbon monoxide poisoning.
b) Good ventilation for cooling. Air circulation
and temperatures are important for air-cooled
units. Temperatures should not exceed 40 °C
(104 °F) of room temperature.
c) Fill the water pump with fuel in a well-lit area.
Avoid spilling fuel and never refill with fuel while
the water pump is running. Wait until the engine
cools for at least 2 minutes before refueling.
d) Do not refuel near flames, pilots or electrical
equipment that release sparks, such as power
tools, welders and grinders.
e) The engine must always have installed the
silencer and the air filter, which must be in good
condition at all times as they stop the fire in case
of an ignition in the engine.
f) Do not smoke near the water pump.
• Before transporting the water pump in any vehicle, remove all the fuel to avoid the possibility
of leaks or spills.
8
Page 9
ENGLISH•User's Manual
• To avoid burns, do not touch the engine muffler or other water pump surfaces that have
become heated during operation.
• Do not modify the heat deflector.
• Tool service must be performed only by qualified repair personnel. When maintaining a tool,
use only identical replacement parts. The use of
unauthorized parts or failure to follow the maintenance Instructions may create shock or injury.
FEATURES
KNOW YOUR TOOL
Before attempting to use this product, become
familiar with all of its operating features and
safety requirements.
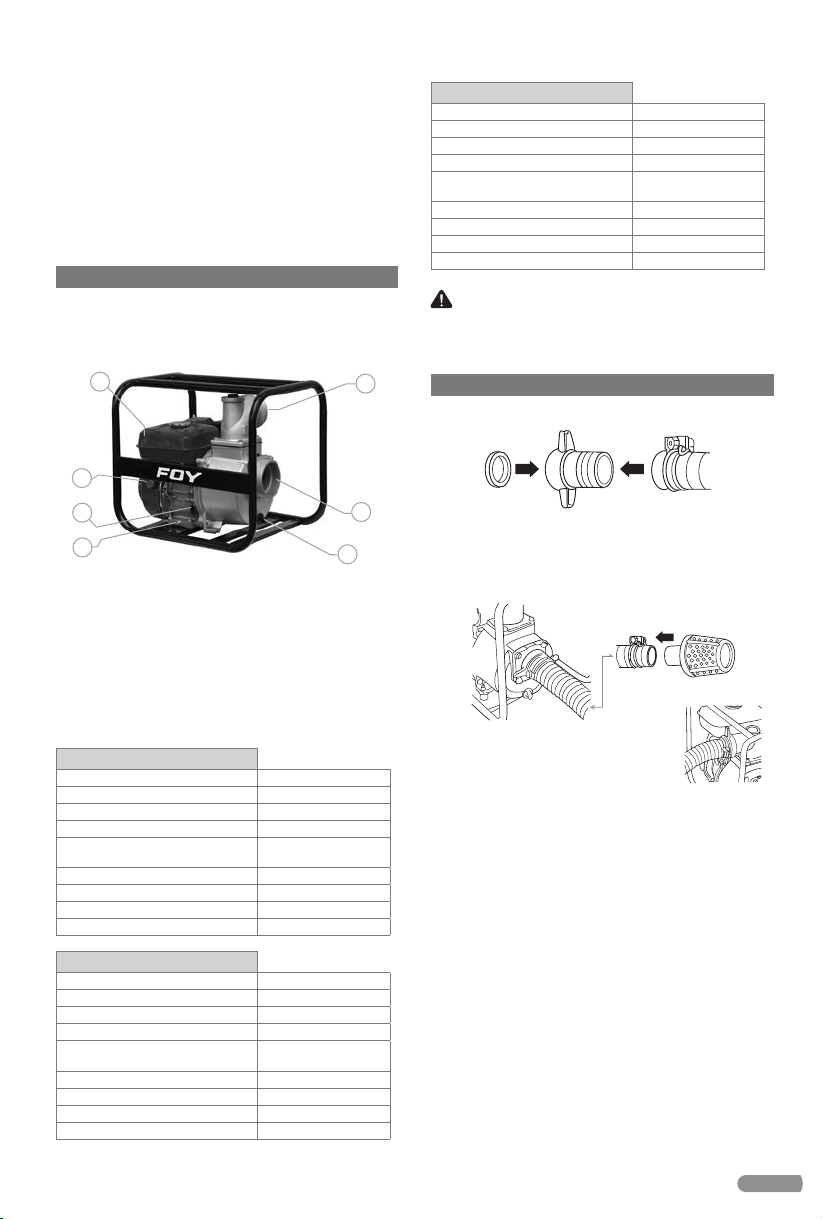
1
7
5
6
1. GAS TANK.
2. OUTLET PORT.
3. SUCTION PORT.
4. DRAINING PLUG.
5. OIL TANK PLUG.
6. OIL DRAIN PLUG.
7. IGNITION SWITCH.
2
3
4
MG322
POWER
DISPLACEMENT
TANK CAPACITY
OIL CAPACITY
SUCTION AND DISCHARGE
DIAMETER
PEAK FLOW
PUMPING DISTANCE
MOTOR SPEED
WEIGHT
5,5 HP
163 cc
3,6 L
1,1 L
2” x 2”
(5 cm x 5 cm)
500 L/min
26 m
3 600 r/min
21 kg (46,2 lb)
IMPORTANT: The strainer or filter should be
placed and installed on the end of the suction
hose before operation.
OPERATION INSTRUCTIONS
CONNECTING THE HOSES
• Properly secure the hose with the hose band.
• At the end of the suction hose install the filter
before pumping. Gravel or debris sucked into
the pump will cause serious damage to the engine.
TECHNICAL DATA
MG344
POWER
DISPLACEMENT
TANK CAPACITY
OIL CAPACITY
SUCTION AND DISCHARGE
DIAMETER
PEAK FLOW
PUMPING DISTANCE
MOTOR SPEED
WEIGHT
MG333
POWER
DISPLACEMENT
TANK CAPACITY
OIL CAPACITY
SUCTION AND DISCHARGE
DIAMETER
PEAK FLOW
PUMPING DISTANCE
MOTOR SPEED
WEIGHT
7 HP
208 cc
3,6 L
0,6 L
4” x 4”
(10,1 cm x 10,1 cm)
900 L/min
20 m
3 600 r/min
27 kg (59,5 lb)
6,5 HP
196 cc
3,6 L
0,6 L
3” x 3”
(7,6 cm x 7,6 cm)
1 000 L/min
28 m
3 600 r/min
23 kg (50,7 lb)
• Next connect the discharge hose.
FOR A SAFE OPERATION
Operate in well-ventilated areas. For outdoor
use. Keep at least 1 m (3 feet) distance from
flammable substances. In the case of fuel leakage stop engine. Do not smoke near the water
pump. Before starting clean any fuel spillage.
ENGINE OIL
This water pump has a sensor that prevents engine starting without an appropriate oil level.
NOTE: Running the engine with low oil level will
cause serious engine damage.
To replace the engine oil:
1. Place the water pump on a elevated surface.
2. Check the oil level by inserting the dipstick in
the filler neck without screwing it in.
3. If the level is low, fill to the top of the oil filler
neck with a 4-stroke engine oil.
9
Page 10
FUEL (GASOLINE)
WARNING: Gasoline is extremely flammable,
and gasoline vapor can explode. Use extreme
care when handling gasoline.
· Keep gasoline out of reach of children.
· Refuel in a well ventilated area with the engine stopped.
· Keep flames and sparks away, and do not
smoke in the area.
· Gasoline vapors or spilled gasoline may ignite.
· Refuel carefully to avoid spilling gasoline.
· Avoid overfilling the fuel tank.
· After refueling, tighten the fuel cap securely.
NOTE: If any gasoline was spilled, make sure the
area is dry before starting the engine.
BEFORE THE OPERATION
The pump chamber should be completely filled
before operating. Never attempt to operate the
pump without priming water or the pump will
overheat. Extended dry operation will destroy
the pump seal.
If the unit has been operated dry, stop the engine immediately and allow the pump to cool
before adding priming water.
IMPORTANT: Fill the pump chamber when
the engine it’s cooled and in no operation.
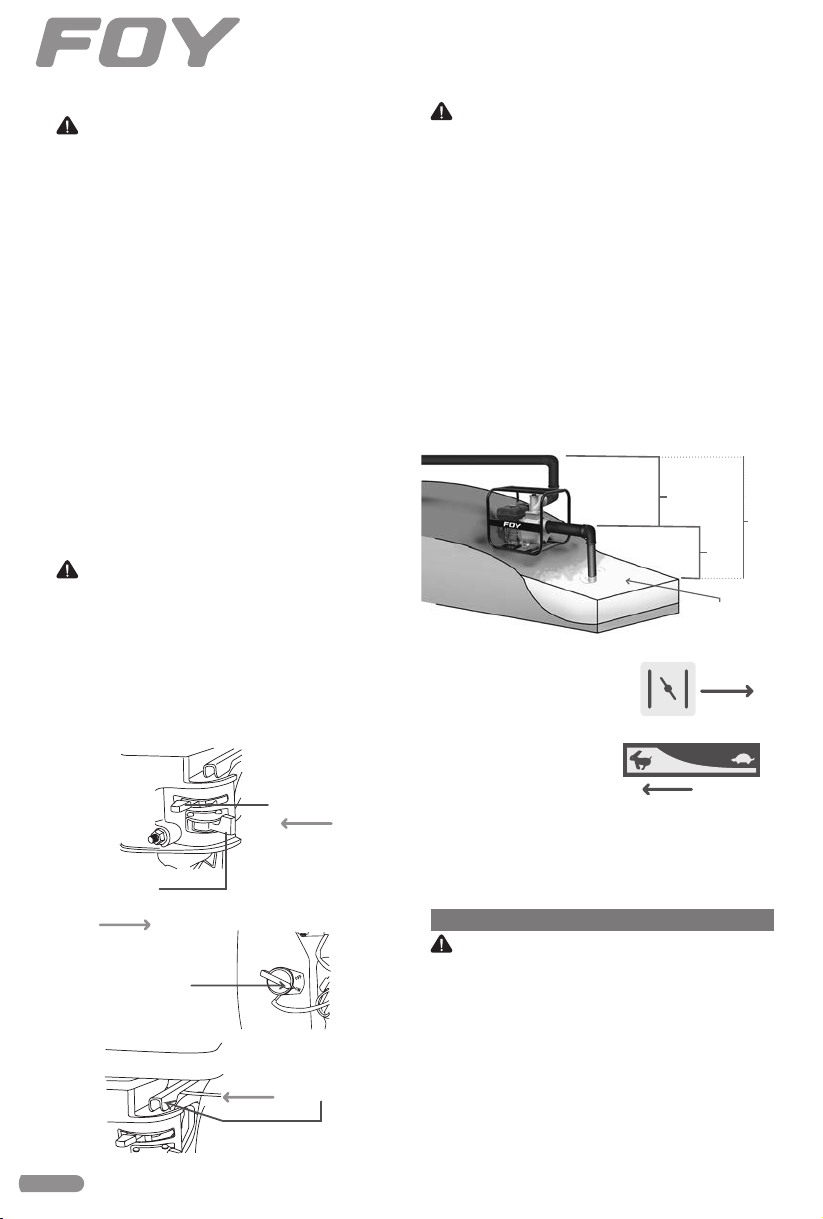
STARTING THE ENGINE
1. OPEN the fuel valve.
2. CLOSE the choke lever.
3. Turn the engine switch to the ON position.
4. Slightly accelerate the throttle lever.
5. Pull the starter grip lightly until resistance is
felt, then pull it briskly until starts.
2
CLOSE
CHOKE
1
OPEN THE
GASOLINE
VALVE
3
PLACE THE
IGNITION
SWITCH ON
“ON”
4
“ACCELERATE”
A LITTLE
IMPORTANT: Do not allow the starter grip to
snap back against the engine. Return it gently
to prevent damage to the starter.
WATER PUMP SET-UP
The following image shows the correct water
pump set up and relation between the water
level with the suction and discharge action.
The suction from the water surface through the
water pump and maximum pump lift is known
as “Total discharge”.
For an optimum performance place the water
pump as near as possible of the water source
(river, cistern etc.) this results in a faster discharge with less priming time.
NOTE: Discharge capacity is always larger than
suction capacity.
height
Discharge
height
Suction
Water surface
OPERATION
1
1. As the machine warms
up, open the choke.
2. Set the speed at full
throttle.
2
STOPPING THE ENGINE
1. Turn the engine switch to the OFF position.
2. As a recommendation CLOSE the fuel valve
when the engine stops.
MAINTENANCE
IMPORTANT: Shut off the engine before performing any maintenance. If the engine must be
run, make sure the area is well ventilated.
CHANGING THE OIL
NOTE: It’s recommended to change the oil after
the first month or after 20 hours of use. After
this, every 6 months or 100 h of use.
• Drain the oil while the engine is still warm to
assure rapid and complete draining.
Total Height
10
Page 11
ESPAÑOL•Manual de usuario
1. Remove the oil filler cap and the drain plug
to drain the oil.
2. Reinstall the drain plug and tighten securely.
3. Refill with the recommended oil (0,6 L of SAE
40W).
AIR CLEANER SERVICE
A dirty air cleaner will restrict air flow to the carburetor. To prevent carburetor malfunction, service the air cleaner regularly. Service more frequently when operating the pump in extremely
dusty areas.
Never use gasoline or low flash point solvents
for cleaning the air cleaner element. A fire or
explosion could result.
IMPORTANT: Never run the engine without
the air cleaner.
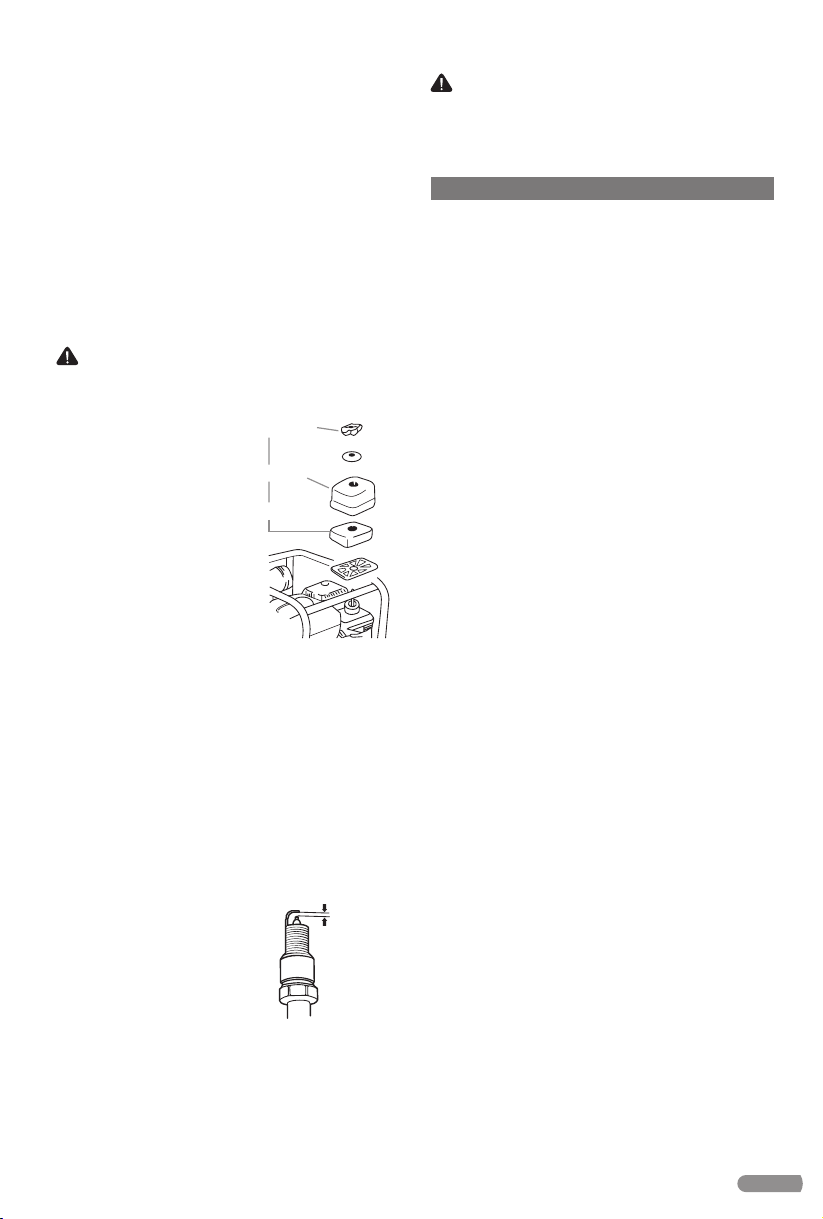
HOW TO CLEAN AIR FILTER
1. Loosen the wing nut,
Wing nut
remove the air cleaner
cover and remove the air
cleaner filter.
2. Wash the air cleaner filter in kerosene, then rinse
Cover
Filter
thoroughly. Allow the element to dry thoroughly.
3. Soak the element in
clean engine oil, and
squeeze out the excess
oil.
4. Reinstall the air cleaner element and the
cover.
SPARK PLUG SERVICE
To ensure proper engine operation, the spark
plug must be properly gapped and free of deposits.
1. Remove the spark plug.
If the engine has been running, the muffler will
be very hot. Be careful not to touch the muffler.
2. Visually inspect the spark plug. Discard it if
the insulator is cracked or chipped. Clean the
spark plug with a wire brush if it is to be reused.
IMPORTANT: The spark plug must be securely tightened. An improperly tightened plug can
become very hot and damage the engine. Never
use a spark plug with an improper heat range.
TROUBLESHOOTING
IN THE CASE OF THE ENGINE WONT START,
VERIFY:
· If the engine switch ON
· If it’s there enough fuel on the fuel tank
· If the fuel valve it’s at “ON”
IF GASOLINE IS REACHING THE CARBURETOR:
To check, loosen the drain screw with the fuel
valve ON. Fuel should flow out freely. If any fuel
is spilled, make sure the area is dry before testing the spark plug or starting the engine. Fuel
vapor or spilled fuel may ignite.
IF THERE IS NOT A SPARK AT THE SPARK PLUG:
1. Verify by removing the spark plug cap.
Clean any dirt from around the spark plug base,
then remove the spark plug.
2. Install the spark plug in the plug cap.
3. Turn the engine switch ON.
4. Ground the side electrode to any engine
ground, pull the recoil starter to see if sparks
jump across the gap.
5. If there is no sparks, replace the plug. Install
the new plug and try to start the engine according to the instructions.
6. If the engine still does not start, take the water pump to an authorized Service Center.
NOTE: Measure the plug gap
0,7 - 0,8 mm
with a feeler gauge. The gap
should be 0,7 - 0,8 mm
(0,027 - 0,031 in).
Correct as necessary by bending the side electrode.
3. Check that the spark plug washer is in good
condition, and thread the spark plug in by hand
to prevent cross-threading.
4. After the spark plug is seated, tighten with a
spark plug wrench to compress the washer.
11
Page 12

Notas / Notes
12
Page 13

Notas / Notes
Manual de usuario • User’s manual
13
Page 14
ESPAÑOL
PÓLIZA DE GARANTÍA
ENGLISH
WARRANT POLICY
Urrea Herramientas Profesionales S. A. de C. V. garantiza este producto por el termino de 1 año en sus
piezas, componentes y mano de obra contra cualquier
defecto de fabricación a partir de la fecha de entrega.
Fecha de venta: ____/____/____
Producto: ___________________
Marca: ______________________
Modelo: ____________________
______________________________
Sello y firma de distribuidor
Comercializado e Importado por:
Urrea Herramientas Profesionales S.A. de C.V.
km 11,5 Carretera A El Castillo, El Salto, Jalisco, México. C. P. 45680, Tel. (33) 3208 7900,
RFC UHP900402Q29
Condiciones:
Para hacer efectiva la garantía deberá presentar el
producto junto con la póliza de garantía debidamente firmada y sellada por el establecimiento
donde la adquirió, en cualquiera de los centros de
servicio autorizados.
Los gastos de transportación que se deriven del cumplimiento de la garantía seran cubiertos por:
Urrea Herramientas Profesionales S. A. de C. V.
Esta garantía no será valida en los siguientes
casos:
· Cuando el producto haya sido utilizado en condiciones distintas a las normales o al desgaste natural de sus partes.
· Cuando el producto no haya sido operado de acuerdo al instructivo de uso que lo acompaña.
· Cuando el producto haya sido alterado o reparado
por personas no autorizadas.
MG322
MG333
Urrea Herramientas Profesionales S. A. de C. V.
Warranties this product for a period of 1 year in its
parts, components and manual labour against any
manufacture defect from the purchasing date.
Purchase date: ____/____/____
Product:____________________
Brand:______________________
Model:______________________
______________________________
Distributor Seal and Signature
Sold and Imported by:
Urrea Herramientas Profesionales S.A. de C.V.
km 11,5 Carretera A El Castillo, El Salto, Jalisco, México. C. P. 45680, Tel. (33) 3208 7900, RFC
UHP900402Q29
Terms:
In order to make warranty effective you must present
the product along with the warranty properly filled
and signed to an authorized distributor or service
center.
Urrea Herramientas Profesionales S. A. de C. V.
will cover the transportation cost related to the
warranty.
This warranty is not applicable in the following
cases:
· When the product has not been used according to
normal conditions or natural wear of its parts.
· When the product has not been used according with
this user’s manual instructions.
· When the product has been fixed or modified by unauthorized or unqualified person.
14
MG344
Page 15
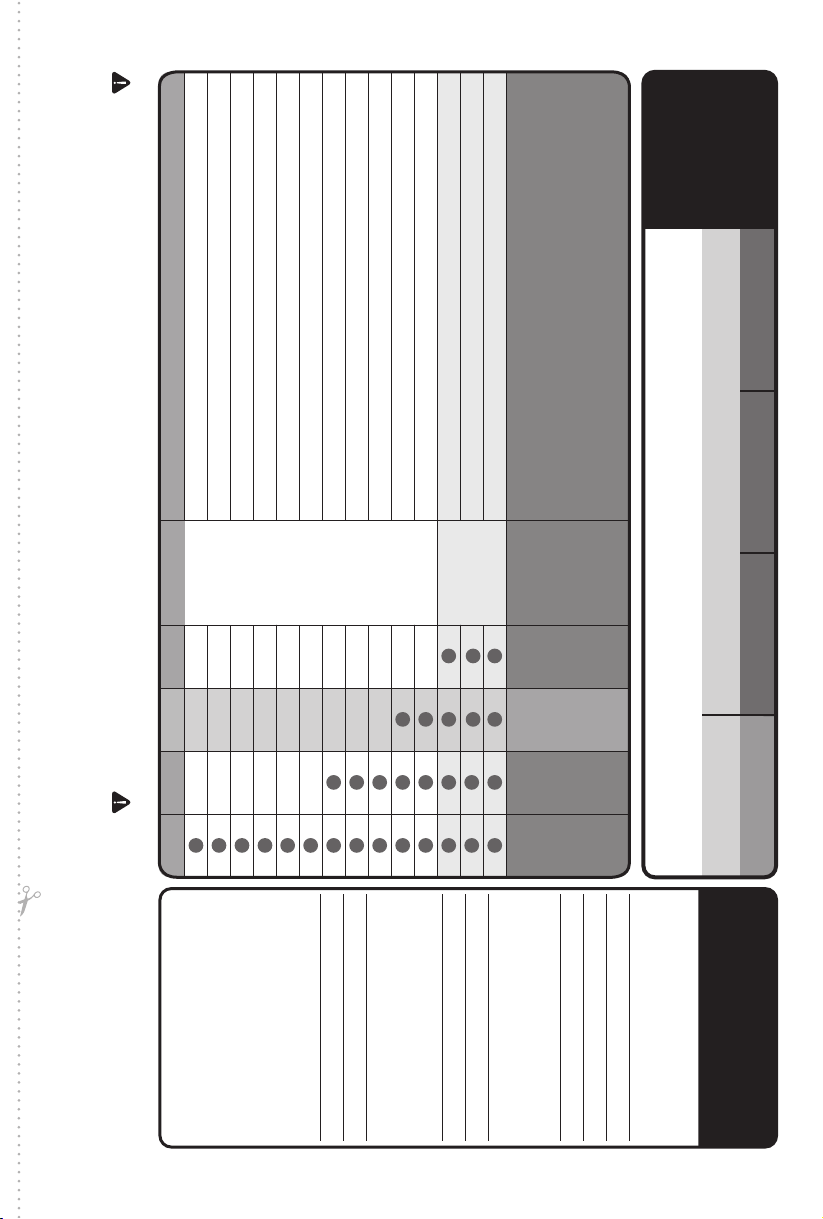
to se realizarán más frecuentemente si fuera necesario dependiendo de las condiciones y frecuencia de uso.
Important: The indicated maintenance periods serve as reference. The maintenance work will be performed more frequently if
necessary depending on the conditions and frequency of use.
Importante: Los periodos de mantenimiento indicados sirven como referencia. Las labores de mantenimien
Cambio de baleros de motor (de ser necesario) / Change engine bearings (only if is necessary)
Tipo de mantenimiento / Type of Maintenance.
Limpieza de tanque de combustible /
Remplazo de juntas y sellos / Replace seals.
Revisión de apriete de uniones /
Joint tightening review.
Clean the gas tank.
Limpieza del carburador /
Calibración de válvulas de motor / Adjust the engine valves.
Limpieza de motor /
Clean the engine.
Clean the carburetor.
Limpiar el filtro de aire con aire comprimido / Clean the Air Filter with air pressure.
Cambio de aceite (SAE30 o 10W-30) / Oil change (Use SAE30 or 10W-30.
Remplazo de filtro de aire / Replace air filter engine.
Remplazo de bujía / Change the spark plug.
Revisar filtro de aire / Check the air filter.
Limpieza general (no usar solventes) / General clean up (do not use solvents).
Revisar nivel de aceite (SAE30 o 10W-30) /
Check the oil level (SAE30 o 10W-30).
manual indicate.
La instalación del equipo debe de realizarse con-
forme al manual de usuario por un especialista.
The installation must be done by one specialist as the user
Working Cycle
Ciclos de
Trabajo /
MG322 MG333 MG344 MG544
Máximo 6 hrs diarias/
1 tanque de gasolina por 30 minutos de descanso /
1 Gasoline tank per 30 minutes of rest
Línea de corte / Cutting line
-
tenimiento ocasionará que se invalide la garantía.
Important: Failure to comply with this maintenance plan will
invalidate the entire warranty.
S1P1 S2
Importante: El no cumplir con los tiempos de man
compra.
NOTE: To get a better control, is necessary you
fill this chart with your personal data at the
purchasing.
service center.
autorizado /
Authorized
Centro de
servicio
Lugar de compra /
NOTA: Para llevar un mejor control,
es necesario que usted como usuario,
llene estos datos al momento de
Place of purchase:
Usuario /
User
Purchase date:
Responsible for
maintenance.
Cada 8 horas o
diariamente / Daily
or every 8 hours
Primeras 8 horas de
uso / First 8 hours
working
Cada 200 horas
o 3 meses / Every 3
months 200 hours
Cada 600 horas
o 6 meses / Every 6
months 600 hours
realiza la
¿Quién
tarea?
Fecha de compra /
Nombre de usuario /
User's name:
6 hr per day
Máximo 8 hrs diarias/
8 hr per day
Datos de usuario y compra /
User and purchase data.
-
Page 16
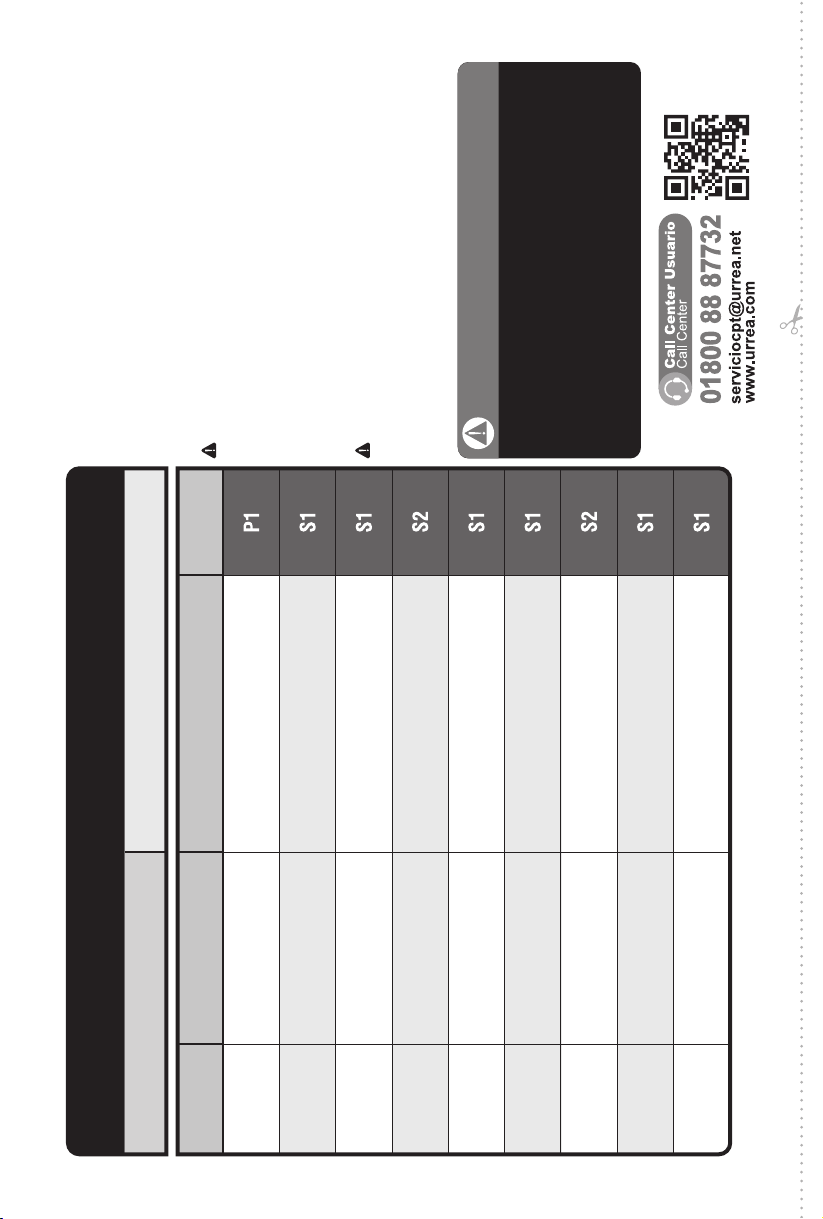
Garantía/ Warranty
Línea de corte / Cutting line
IMPORTANT
IMPORTANTE/
Urrea Herramientas profesionales S.A. de C.V. garantiza es-
tos productos por el termino de 1 año en sus piezas compo-
nentes y mano de obra contra cualquier defecto de fabrica-
Número de serie /Serial number:
IMPORTANTE: Los componentes de desgaste natural
ción en el motor a partir de la fecha de compra siempre y
cuando se cumpla con el plan de mantenimiento y servicios
aquí contenidos.
Tipo de
Maintenance
mantenimiento/
Firma de CSA y Fecha de servicio/
Signature of ACS and Date of Service
servicio autorizado Urrea.
como filtros, bujías, impulsor, retráctil y mantenimiento no
estarán cubiertos como garantía.
• Consulta los precios de mantenimiento en tu centro de
Urrea Herramientas profesionales S.A. de C.V. warranties this product for
IMPORTANT: The components of natural wear as air filters, spark
a period of 1 year in parts and handwork against manufacture defect in
the engine head since the purchasing date, provided that the mainte-
nance plan described here is complied with.
plug, impeller, recoil and maintenance service are not including as a war-
ranty.
• Check the maintenance prices in your local Service Center.
Tarjeta de Servicios/ Service Card
This maintenance must be done each 200 hour of service or 3 months
(whichever comes first). Verify the type of service in the chart behind in one
• El servicio se debe realizar cada 200 horas o 3 meses de uso
(lo que ocurra primero). Verifique el tipo de servicio como se
indica en la tabla de mantenimiento periódico (en la parte
posterior) en uno de los centros de servicio autorizado Urrea
of the Urrea Service Center to keep valid the warranty.
para mantener valida la garantía.
·
Modelo /Model:
Orden de trabajo/ Work order
#CSA
 Loading...