

Page 1

T12
12-Channel Radio Controller
User Manual
V1.0
2019.05
Page 2
Contents
T12 12-Channel Radio Controller User Manual
Overview
Product Characteristics
Main Use and Application Fields
Specication
Diagram
Using Environmental Conditions
Working Conditions
Security
Operation
Preparation and Checking Before Use
Connect to cellphone APP
Receiver / Camera / FC Connection and Setting
Connect to Cellphone to Display the Video
3
3
3
4
5
6
6
6
7
7
11
12
13
How to Upgrade the Firmware of T12
How to Switch Between Left and Right Hand
14
15
©
2019 FOXTECH All Rights Reserved
2
Page 3
T12 12-Channel Radio Controller User Manual
Overview
Product Characteristics
1. Dual-antenna dual-module redundancy design, combined with algorithm control, greatly increases
the signal communication capability.FHSS technology, omni gain antenna, complete operation and
configuration of aircraft and camera within communication distance.
2. Reserved TX, RX, return flight data to the ground remote control. Maximize the use of 2.4G wireless
Bandwidth, which solves the shortcomings of instability and non-interference in the 433 and 915 bands.
3. Internal integrated digital radio.
4. Use the mobile APP assistant software to set the parameters anytime, anywhere.
5. Bluetooth, USB two connection methods, support for S.BUS, PPM, PWM, I2C and serial port ,support for
device expansion.
6. Support mobile phone APP assistant software. Connect your phone app via Bluetooth or USB OTG, fast
switch hand type, adjust channel forward and reverse, rudder amount, channel binding, runaway protection
value, SBUS, PPM output and data transmission baud rate. Provide one-key parameter adjustment function,
you can call it at any time after saving the parameter.
7. Ground station APP has better interactive interface, larger map vision, can control the aircraft to achieve
intelligent waypoint planning, automatic execution of tasks, one-key back to home.
8. Built-in 4000MAH lithium-ion battery for more than 24 hours. 100MW ultra low power, And support to
charge your phone.
9. Integrated data,video and rc three-in-one link. Ultra-small size, with aluminum alloy embedded folding
bracket,sturdy and stable, the jaws rotate 360 ??degrees, and the two holders can be adjusted 180
degrees.
10. equipped with a mini camera.
Main Use and Application Fields
It is used to remote drones like plant protection drone, for video image transmission, data transmission and
radio control.
©
2019 FOXTECH All Rights Reserved
3
Page 4
Specication
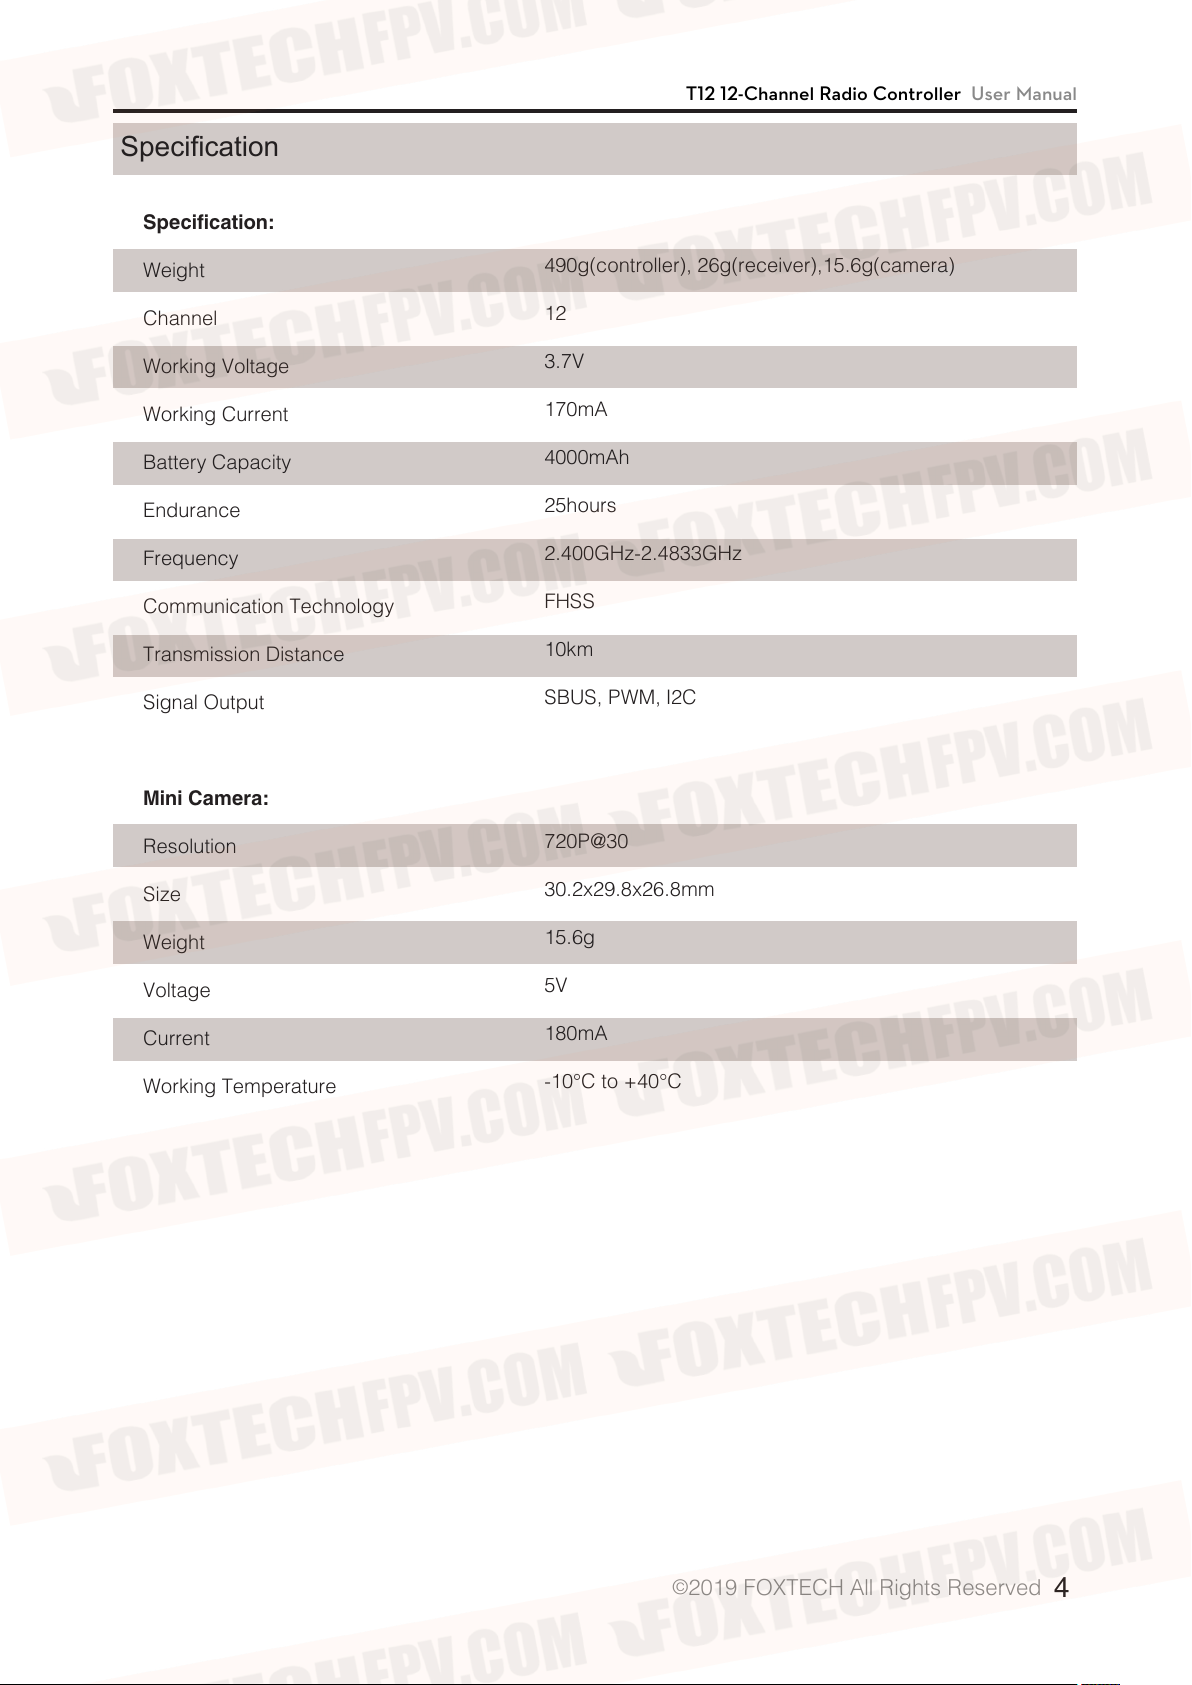
Specification:
T12 12-Channel Radio Controller User Manual
Weight
Channel
Working Voltage
Working Current
Battery Capacity
Endurance
Frequency
Communication Technology
Transmission Distance
Signal Output
Mini Camera:
Resolution
490g(controller), 26g(receiver),15.6g(camera)
12
3.7V
170mA
4000mAh
25hours
2.400GHz-2.4833GHz
FHSS
10km
SBUS, PWM, I2C
720P@30
Size
Weight
Voltage
Current
Working Temperature
30.2x29.8x26.8mm
15.6g
5V
180mA
-10°C to +40°C
©
2019 FOXTECH All Rights Reserved
4
Page 5
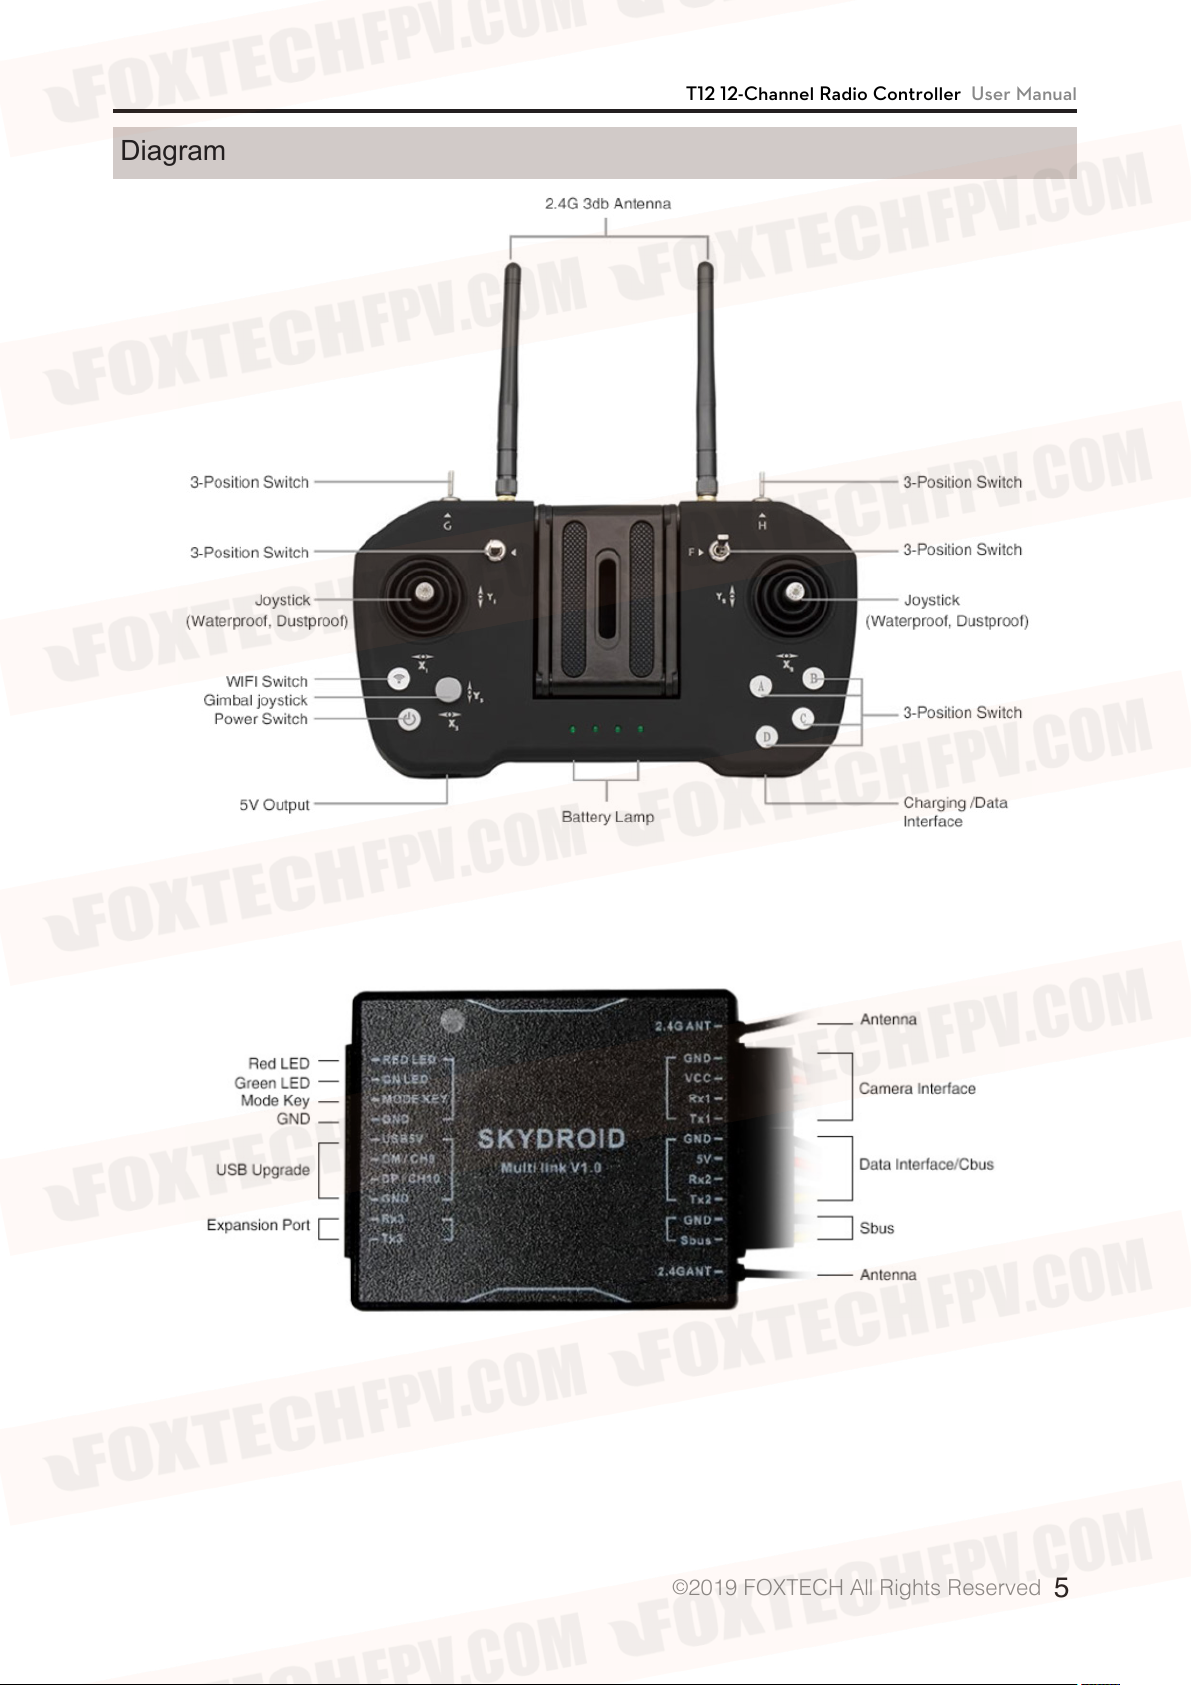
Diagram
T12 12-Channel Radio Controller User Manual
©
2019 FOXTECH All Rights Reserved
5
Page 6

T12 12-Channel Radio Controller User Manual
Using Environmental Conditions
1. Environment temperature: -10 °C ~ +55 °C.
2. Storage temperature: -25 ° C ~ +70 ° C.
3. Relative humidity: no more than 85%.
4. Atmospheric pressure: 86 kPa to 106 kPa.
5. The use of the site is not allowed to explode dangerous media, the surrounding media should not contain
corrosive metals and insulating gas and conductive media, not allowed to be filled with water vapor and
serious mold.
6. The place of use should have facilities to protect against rain, snow, wind, sand and ash.
Working Conditions
Power supply method and notes.
The T12 series ground unit has built-in integrated rechargeable lithium battery, which is compatible with the
market standard micro USB interface 5v/1.5A power adapter (such as mobile phone, camera and other
digital products USB charger) for charging.
If you encounter smoke, odor, or liquid leakage when charging on the ground unit, do not continue to
charge the ground unit. Please transfer it to our company for repair.
Do not charge the product in the baby's touch area to avoid the risk of electric shock.
Do not charge this product in an environment exceeding 60 ° C.
Security
Beginners should pay special attention to the following safety issues!
It is forbidden to fly when the body condition is not good, such as fatigue or drunkenness!
It is forbidden to fly in bad weather such as rain or strong wind!
It is forbidden to fly near high-voltage lines, communication base stations,or active places!
It is forbidden to fly at airports and other places where it is forbidden to fly!
It is forbidden to control the flight model in places where people are concentrated, in parking areas, or in
other areas where property damage or personal injury may occur.
Before the flight, check the equipment of the aircraft and check whether the transmit and receive system
and the aircraft are normal.
After the flight, turn off the power of the receiver and then turn off the power of the transmitter to prevent the
engine or motor from rotating and causing damage caused by the runaway protection function!
Please use a guaranteed professional charger to charge the battery.
This product antenna is a fragile component, please pay attention to avoid excessive damage.
©
2019 FOXTECH All Rights Reserved
6
Page 7

T12 12-Channel Radio Controller User Manual
Operation
Preparation and Checking Before Use
1. Always check that it the remote control is fully charged before use.
2. Please check if the antenna is placed as required before use.
3. For the first time, please ensure that the firmware has been upgraded to the latest version.
4. Users should ensure that they are not operating under the influence of drunkenness or drugs.
Proper Operation
Expand and vertically upward.
©
2019 FOXTECH All Rights Reserved
7
Page 8

Antennas can not cross.
T12 12-Channel Radio Controller User Manual
Faulty Operation
Cannot be parallel to the remote controller.
©
2019 FOXTECH All Rights Reserved
8
Page 9

Uav Operation Diagram
Proper Operation
Away from the center plate,vertically
upward, no shielding.
T12 12-Channel Radio Controller User Manual
Fixed under the arms.
©
2019 FOXTECH All Rights Reserved
9
Page 10

Faulty Operation
Can not place in the center of the plate.
T12 12-Channel Radio Controller User Manual
Antenna can not be close to the CF and metal.
Antennas can not cross, and can not be
placed in the middle of the tank.
©
2019 FOXTECH All Rights Reserved
10
Page 11

T12 12-Channel Radio Controller User Manual
Connect to cellphone APP
1. After installation, confirm that the receiver and the flight
controller are correctly installed and ensure that the receiver is
working properly.
2. APP currently only supports Android.
3.)Install the APP on your mobile phone.
4. Power on the remote controller (short press + long press),
enter the phone system settings interface to open Bluetooth,
search for Bluetooth: T12-XXX. The pairing code is 1234.
5. Open the device assistant APP, as shown below(Figure 1).
Adjust parameter of remote controller---- used to adjust the
channel forward and reverse, rudder amount, channel binding,
runaway protection value.
Hand Switching—Used to correct the maximum and minimum
offsets of the median point.
Usually do not need to move, otherwise it may cause
abnormal rudder.
Other options - used to select the receiver SBUS, PPM output,
and digital baud rate.
Device upgrade----for updating firmware online.
Connection method, please use Bluetooth for remote control,
USB for receiver.(Figure 1)
6. Remote control parameter adjustment, enter the controller
adjustment interface. The app will read the current values of the
remote controller and receiver (Figure 2).
For Example:
Channel 1
rudder is 1000, maximum rudder is 2000
Channel 2
rudder is 1000, maximum rudder is 2000
Channel 3
rudder is 1000, maximum rudder is 2000
Channel 4
rudder is 1000, maximum rudder is 2000
: Binding key is X2, no reverse, failsafe 1500, minimum
: Binding key is Y2, no reverse, failsafe 1500, minimum
: Binding key is Y1, no reverse, failsafe900, minimum
: Binding key is X1, no reverse, failsafe 1500, minimum
Figure 1
1. failsafe fill in "0"(default 1500)
2. Click on the upper right corner to write, otherwise you will
not be able to record the transmitter and receiver.
©
2019 FOXTECH All Rights Reserved
Figure 2
11
Page 12

T12 12-Channel Radio Controller User Manual
7. Parameter saving, parameter loading (Figure 3, 4, 5).
In order to change the drone model, or for batch configuration. We can save the parameters inside the APP.
Each time you load a parameter and write to the remote controller, you can quickly configure it.
As shown in the figure: adjust the parameters, click on the “three points” , and will popup menu in the upper
right corner and select Save.
Customize your own name and save it. Load the parameters in the same way.
The parameters are only saved in the APP. If you need to write to the remote controller, please click
“Write”.you will hear a "Di" when the remote communication is succeed.
Figure 3 Figure 4 Figure 5
Receiver / Camera / FC Connection and Setting
1. Receiver
Figure 6
©
2019 FOXTECH All Rights Reserved
12
Page 13

T12 12-Channel Radio Controller User Manual
2. Short-circuit MODE KEY and GND to enter the frequency pairing mode, the green light flashes quickly)
turn on the remore controller and will complete the frequency pairing,after the frequency pairing the green
light is always on.
3. The digital transmission pin is as shown in the figure. Please insert the corresponding cable to flight
control. The receiver TX corresponds to the flight control RX.
4. USB upgrade port is used to upgrade the receiver firmware, short-circuit the MODE KEY and GND
buttons, insert the 4 button wiring of the USB upgrade into the computer, the receiver light will automatically
turn red and flash slowly into the download mode.
5. Fault light:
The red light flashes quickly---the receiver does not pass the self-test, and it needs to be re-tested, if fails,
need to return to the factory.
The red light and green light is turned on and flashes on alternately, which belongs to the self-test.
The self-test passed, the green light is not on----the remote controller is not on, and not do frequency
pairing.
There is no reaction when the power is turned on----Check if the power supply is 5v, and whether the
positive and negative poles are reversed. If all is normal, please return to factory.
Connect to Cellphone to Display the Video
1. Properly solder the receiver to the camera and power up the unit.
2. Install the FUAV APP.
3. Connect the remote control to the phone with USB as shown in Figure 7.
4.Click OK in the pop-up USB window to display the image. (Figure 8)
Figure 7 Figure 8
©
2019 FOXTECH All Rights Reserved
13
Page 14

T12 12-Channel Radio Controller User Manual
How to Upgrade the Firmware of T12
1. Android upgrade
Download the device assistant and connect to the remote controller with Bluetooth. Select Bluetooth, refer
to the first part.
Turn off the remote control, press and hold the “A button”then turn it on, the remote control A light flashes
slowly into the download mode.
Open the device assistant, click "Check for updates", and if you have new firmware, click Upgrade Now.
Click "check the update", it will prompt whether upgrade the receiver etc. Please observe carefully,
because that most of the time you do not need to upgrade the receiver.
2. Computer upgrade, tool download site: https://www.foxtechfpv.com/t12-12-channel-radio-controller.html
3. Remote controller upgrade.
-The remote control is connected to the computer with a dual male data cable. Turn off the remote control,
press and hold the “A button” and then turn it on, remote control A light flashes slowly and enter the
download mode.
-Double-click [Firmware Upgrade Program] (Figure 9)
-Select the corresponding bin file and click Upgrade Now. When the progress is 100%, the upgrade is
completed. Please turn off the remote controller.
4. Receiver upgrade:
-Receiver upgrade (if needed), use USB cable, press the S1 button to insert the useb cable to the computer,
the receiver light will automatically turn red to enter the download mode.
-Select the corresponding bin file and click Upgrade Now. When the progress is 100%, the upgrade is
completed. Please unplug the receiver.
©
2019 FOXTECH All Rights Reserved
14
Page 15

How to Switch Between Left and Right Hand
There are 4 hand types in the device assistant.
T12 12-Channel Radio Controller User Manual
©
2019 FOXTECH All Rights Reserved
15
Page 16

T12 12-Channel Radio Controller User Manual
This content is subject to change.
Download the latest version from
https://www.foxtechfpv.com/t12-12-channel-radio-controller.html
For everyday updates, please follow
Foxtech Facebook page: https://www.facebook.com/foxtechhobby
YouTube Channel: https://www.youtube.com/user/foxtechonline/featured?view_as=subscriber
©
2019 FOXTECH All Rights Reserved
16
 Loading...