

Page 1
FOXTECH Nimbus VTOL
User Manual
V1.1
2018.01
Page 2

Contents
FOXTECH Nimbus VTOL User Manual
Specifications
Basic Theory
Introduction
Setup and Calibration
Assembly
Control Surface Calibration
Compass and Airspeed Calibration
Test Flight
Autopilot
Applications
2
3
3
4
4
4
6
7
9
10
2017 FOXTECH All Rights Reserved
©
1
Page 3

Specifications
Aircraft
Structure
FOXTECH Nimbus VTOL User Manual
Item Name
Version
Material
Shipping Dimension
Shipping Weight
Wingspan
Length
Max Flying Height
Max Flying Speed
Take-off Weight
Max Take-off Weight
Max Payload
Suggested Battery
Servo
Nimbus
Tilt VTOL PNP Combo
EPO
1150x330x450mm
30kg
1800mm
1300mm
3500m
25m/s
2.85kg(without battery)
4.8kg
500g
6S 10000mah Lipo Battery x1
6S 9500mah Li-ion Battery x2
5kg Servo
ESC
Motor
Propeller
Air Speedometer
UBEC
Transmitter
Flight Controller
Radio Telemetry
Optional
- CUAV SX Radio 900MHz Wireless Data Transmission Module(64km Transmission Distance)
- Rlink 433MHz Long Range UHF TX and 8CH SBUS RX Combo(Extend the Remote-controlling Distance)
40A ESC
4112 KV485 x2
4112 KV400 x1
1380 Wooden Propeller(1 pair)
1655 MARKII Matte Propeller(CW)
Px4 Air Speedometer
8A UBEC
X9D Plus Radio Controller
Pixhawk 2.1 Standard Set with Here GNSS
CUAV 3DR Radio Telemetry Bluetooth Box with TTL(915MHz)
2017 FOXTECH All Rights Reserved
©
2
Page 4
FOXTECH Nimbus VTOL User Manual
Basic Theory
Introduction
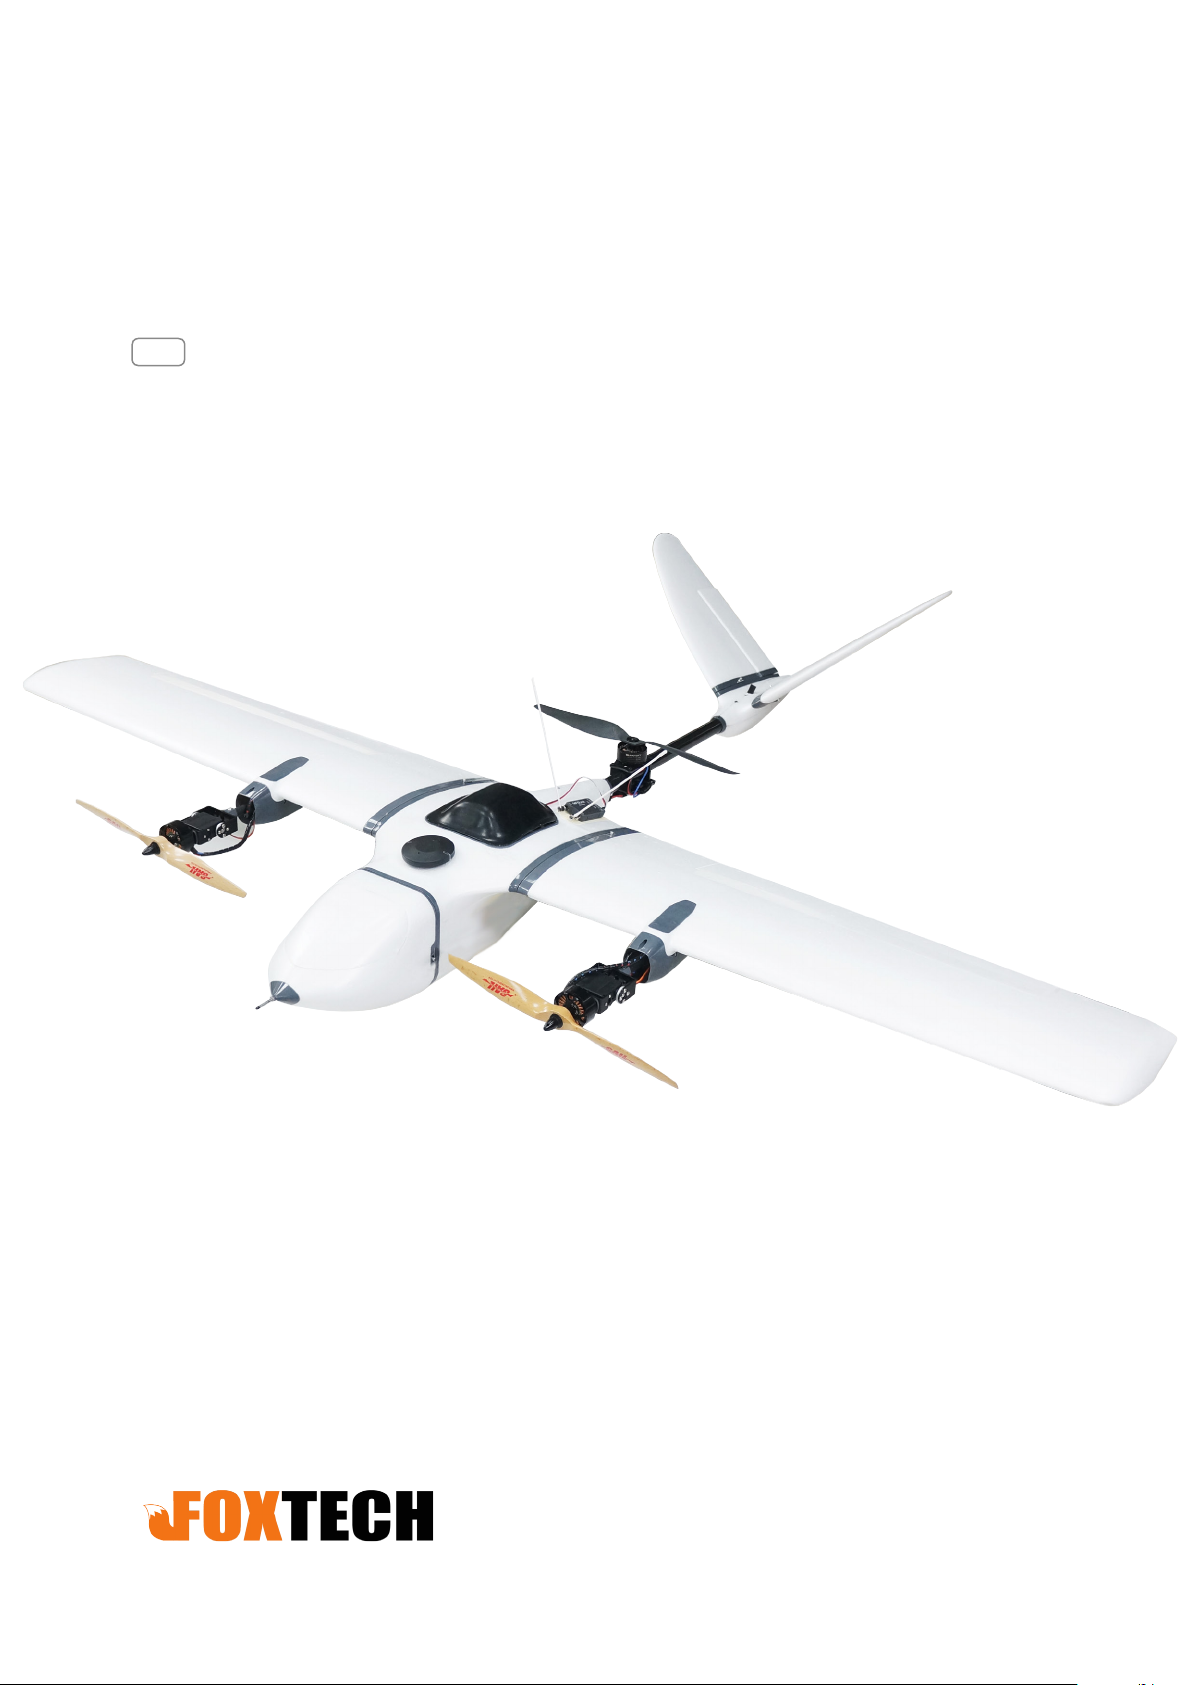
Nimbus VTOL is a modified version of Nimbus dual engine FPV plane, by keeping the advantages of the
original design, e.g, long flight time, stable flight, low stall speed, Foxtech gives it another great featureVertical taking off and landing.
With this great feature added, runway or parachute is no longer necessary, you can fly Nimbus VTOL even
in your backyard. Two robotic 180 degree high precision servos, one ESC and one rear motor are added to
the original design. In this case, Nimbus VTOL is then a tri-copter with vectored yaw and still a long range
FPV plane.
By using the very advanced flight controller Pixhawk 2.1, the plane can take off, fly waypoints and land all by
itself, in this case, doing long range FPV or survey can never been easier!
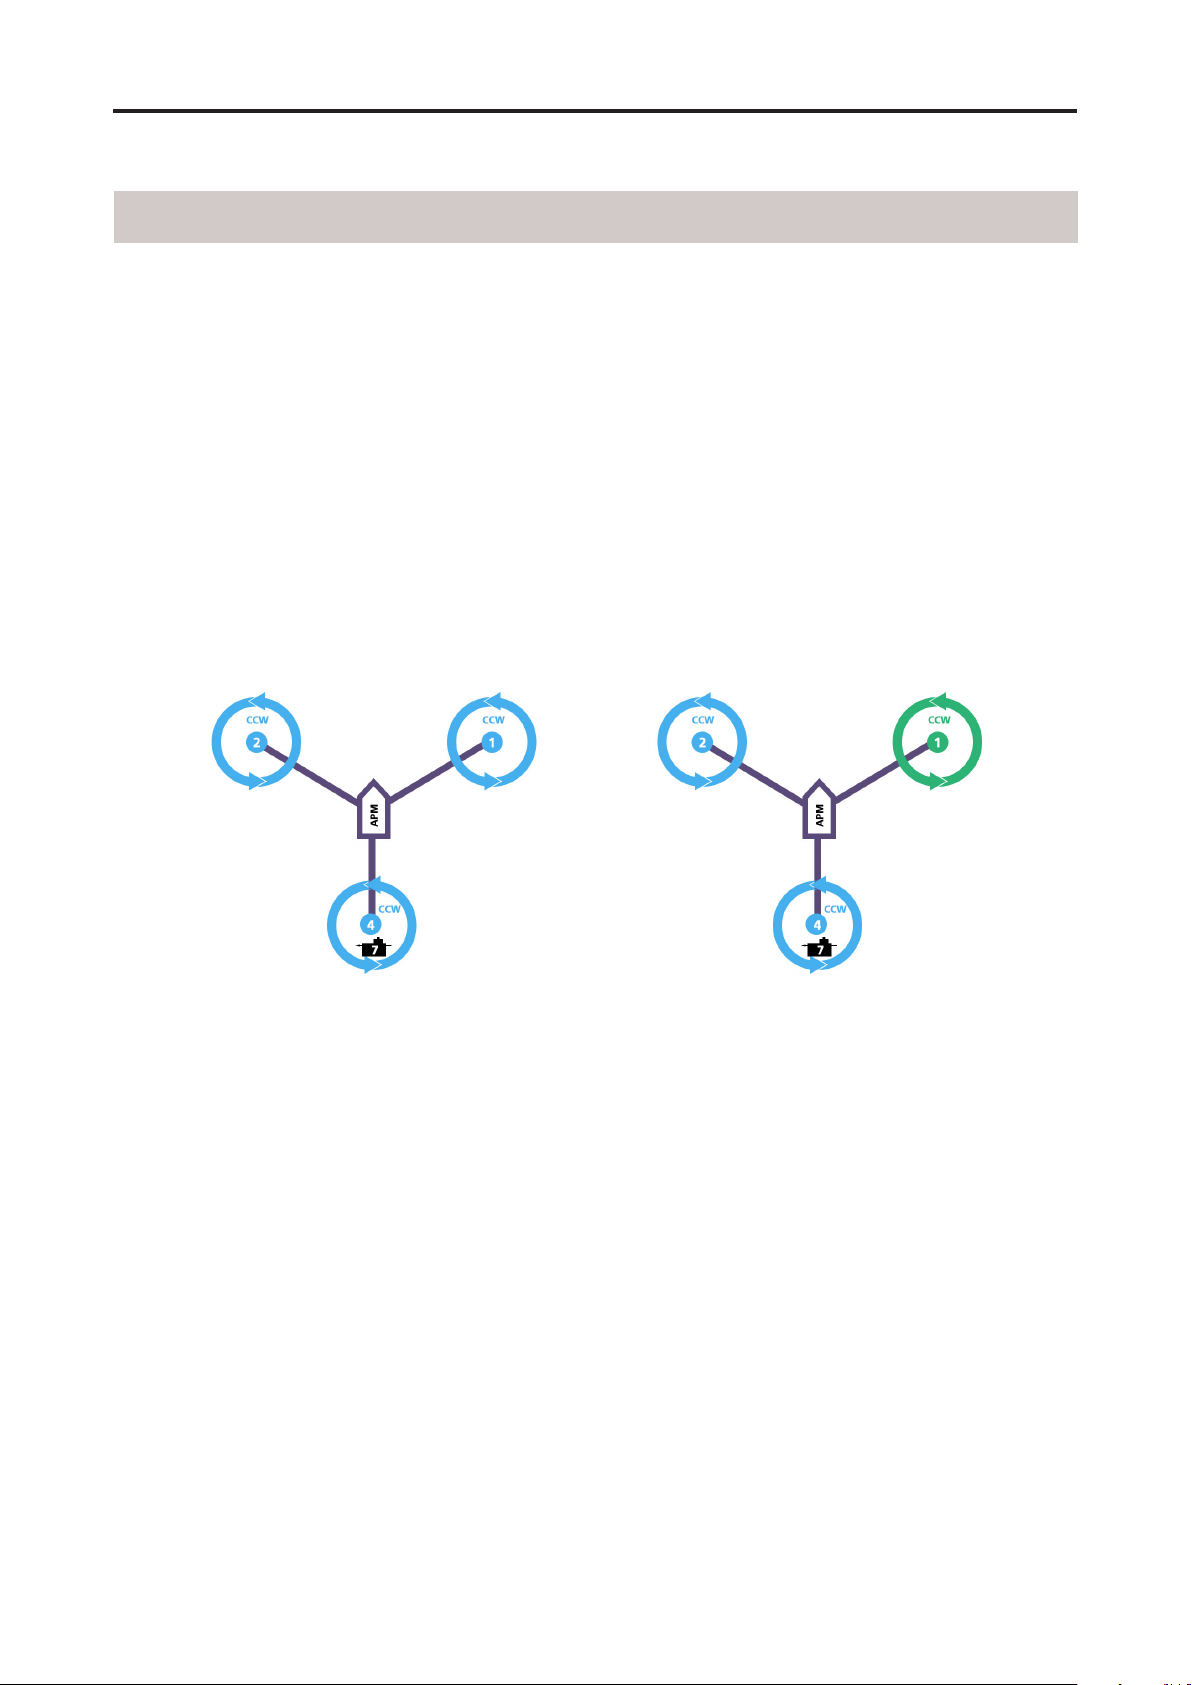
The image below shows two typical motor rotation directions.
2017 FOXTECH All Rights Reserved
©
3
Page 5

FOXTECH Nimbus VTOL User Manual
Setup and Calibration
Assembly
When you receive the Nimbus VTOL, almost all components are installed, but there are still a few
connections to be done.
- Connect the V tail.
- Connect the left and right wings.
- Connect the left and right tilting servo plugs.
- Connect the airspeed sensor before plug on the battery.
- Connect the nose.
Control Surface Calibration
- Link the Mission planner and Nimbus via data link.
- Set to manual mode.
- Check if all control surfaces are parallel to the surrounding surfaces. If not, trim the center value in the
parameter tree, you can trim them one by one by inputting SERVOX(1-14).
- In manual mode, the two front motors
should point straight forward with the
SAME angle, if not, calibrate the PWM
LOW value in SERVO 9 and SERVO10.
To achieve the vectored yaw function,
Servo 9 was set to Function 75 and Servo
10 was set to Function 76.
2017 FOXTECH All Rights Reserved
©
4
Page 6

FOXTECH Nimbus VTOL User Manual
Switch to Qstabilize mode, remove the propellers and check the tilting motors’ moving direction. E.g when
you push the rudder to the right, the left motor should tilt forwards and the right motor tilting backwards. If
you find the moving direction is the opposite, swap the plugs on AUX 1 and 2 on pixhawk, alternatively you
can also swap the function setting No. In Servo9 and Servo 10. (e.g. Set Servo 9 to 76 and set Servo 10 to
75, but the PWM high and low Value will be needed to reset.)
- Since all control surfaces are pre-connected, so no need to change any setting in the radio calibration in
Mission Planner.
- If you need faster yaw speed, you can try to change the value Q_TILT YAW ANGLE to higher value, default
value is from 10-15, and the max value is 30. warning: propellers would hit the wings if the input value is too
high.
- Transition speed from multicopter to plane can also be set in parameters, default is 8m/s.
2017 FOXTECH All Rights Reserved
©
5
Page 7

FOXTECH Nimbus VTOL User Manual
- Transition servo speed can be adjusted by Q_tilt_rate_up and Q_tilt_rate_dn, it’s suggested to set the Q_tilt
up with at least 100degree/s speed so the plane can be saved in case there is any malfunction caused by
setting or plane mechanism.
Compass and Airspeed Calibration
Nimbus VTOL uses high sensitivity compass and it has to be re-calibrated when fly in a new place.
- Enter the compass setting
page and click”start” ,hold the
plane and rotate it in order to
hit all directions on a sphere to
calibrate the compass, when
it’s done,a new offset would be
given to the flight controller, and
a reboot is necessary.
- A “pre-flight calibration” can
be found in the action menu of
the Mission Planner. Hold the
airspeed tube loosely and start
the calibration, the calibrated
airspeed should be from 1.0-2.0.
2017 FOXTECH All Rights Reserved
©
6
Page 8

FOXTECH Nimbus VTOL User Manual
Test Flight
Before the first flight, it’s suggest to check if every component is well connected, tilting servos working
properly, motors spinning to the correct direction and all control surfaces are moving to the desired
directions.
It’s suggested to use 3 modes, FBWA, Qstabilize and RTL as the initial modes on a three position switch. It’s
suggested to do the first flight in a very open area with no buildings or big trees around, and a flat taking off
area is necessary.
Aircraft Movement:
Right Turn
Elevon Reaction Elevon Reaction
Use the Qstabilize mode, start the motors by pushing the rudder all to the right with the throttle at the lowest
position, the motors should start to spin, gradually increase the throttle until the plane is ready to lift from the
ground, move aileron, elevator and rudder stick gently to check if the plane is moving as desired.
Aircraft Movement:
Left Turn
Continue to push the throttle until the plane is lifted from ground, it may swing a bit since there should be big
airflow hitting the wing, lift the plane to around 3 meters and try to fly it as a multicopter, it should not be a
problem for anyone who can play a multicopter.
When you are familiar with all controls, lift the plane to at least 30m from the ground and make sure there is
not obstacle in front of the plane.
2017 FOXTECH All Rights Reserved
©
7
Page 9

FOXTECH Nimbus VTOL User Manual
Switch it to FBWA mode, the Nimbus should tilt the two front motors together to gather speed, once the
speed is reaching 8m/s, the front motors will tilt straight and rear motor stops spinning, then the Nimbus is
now transferred to fixed wing.
It’s also suggested to active the short and long failsafe, the default action is respectively CIRCLE and RTH.
So in case the plane lose RC control, it will go back all by itself.
You can fly a while and see if the plane could go straight, if you find the plane is tilting left for example, don’t
try to trim the aileron with your radio, the trim to aileron(SERVO1) must be done in parameter setting. (If
the elevator trim is necessary, please trim the SERVO2 and SERVO4 at the same time with the same trim
amount.)
If everything goes well, you can try to land. First, reduce the altitude by pushing forward the elevator and
when the altitude is around 30m above the ground, switch to Qstabilize Mode, two front motors will tilt
upwards to 60degrees, the plane will glide a while until the speed is lower than 8m/s, then the front motors
will tilt straight up and the plane is then become a multicopter again, then you can land it just as a normal
multicopter.
2017 FOXTECH All Rights Reserved
©
8
Page 10

FOXTECH Nimbus VTOL User Manual
Autopilot
After the first flight, you can try to do autopilot.
You can choose to take off and land either by manual control or automatically.
Automatic taking off and landing and other VTOL features can only be found in Mission planner but no other
APP on ISO or Android devices like TOWER or QGCS, but you can still program the fixed wing fly waypoints
with the above mentioned APPs and you have to take off and land all by hand.
To use automatic taking off and landing, you can change the first waypoint to VTOL_TAKE OFF, and set an
altitude like 30 or 50m for this action, then set the next waypoint a bit far (like 100m ) from the first waypoint,
the Nimbus will take off as a multicopter, when it reaches the wanted altitude, it will switch to fixed wing and
fly waypoints or missions like a fixed wing.
The VTOL landing is also the similar, you can set the last waypoint to VTOL_LAND, but it’s suggested to set
one waypoint which is around 100m from this one, since the plane will try to turn to multicopter before the
last waypoint, if the waypoint before VTOL_LAND is too far, the Nimbus VTOL will finish the final distance all
in multicopter mode, the power consumption in mutlicopter mode is 3 times than in fixed wing mode.
2017 FOXTECH All Rights Reserved
©
9
Page 11

FOXTECH Nimbus VTOL User Manual
Applications
- Survey
- 3D Survey
- Patrol
- FPV
- Air pollution detection
More autopilot mode can be found in Mission planner manual, like circle survey, Grid, drop an object with
hook at desired waypoint.
This content is subject to change.
Download the latest version from
https://www.foxtechfpv.com/nimbus-1800-long-range-vtol.html
For everyday updates, please follow Foxtech facebook page"Foxtechhobby".
YouTube Channel: Foxtech
2017 FOXTECH All Rights Reserved
©
10
 Loading...