

Page 1
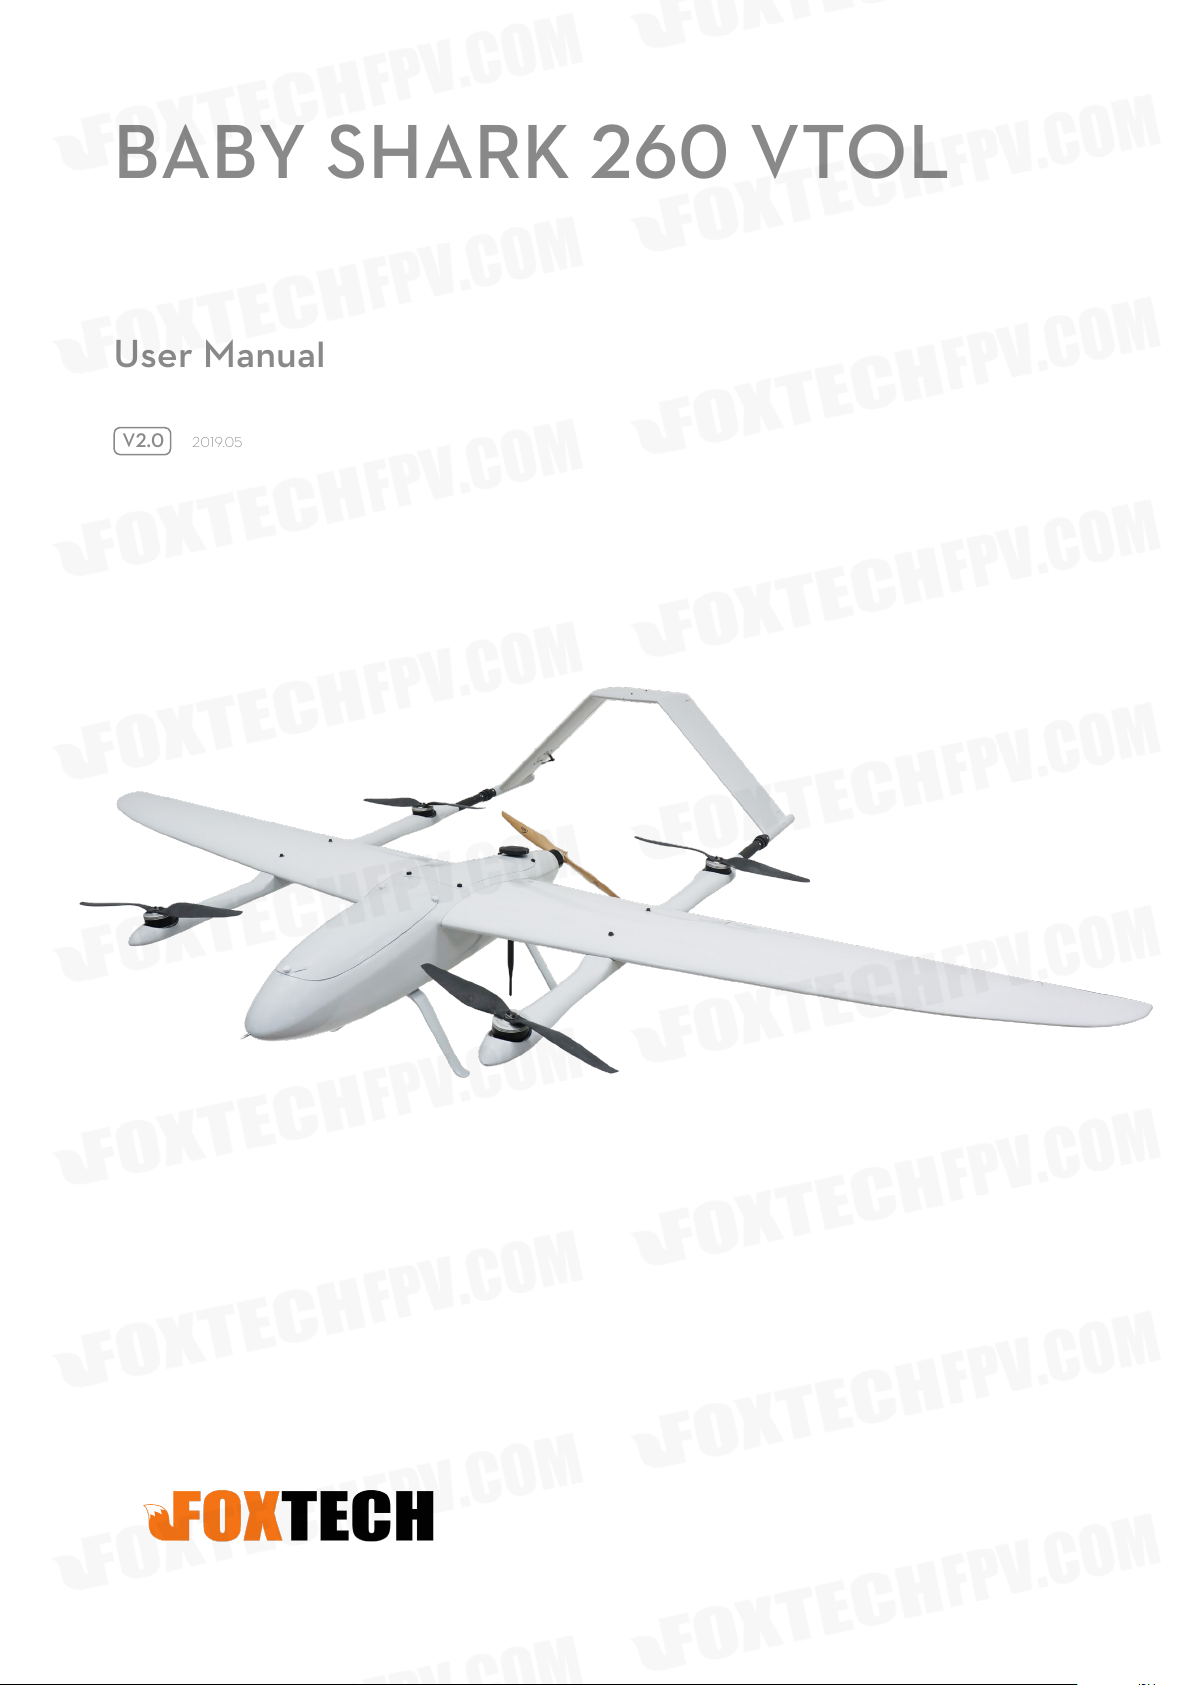
BABY SHARK 260 VTOL
User Manual
V2.0
2019.05
Page 2
Contents
FOXTECH BABY SHARK 260 VTOL User Manual
Specications
BasicTheory
SetupandCalibration
Assembly
Check Radio Control
Download Mission Planner
Connect Baby Shark to Computer
Connect the Datalink and Check Flight Controller
ChecklistbeforeEveryFlight
TestFlight
Autopilot
Applications
Appendix
2
3
4
4
5
5
5
8
13
14
16
17
18
ESC Calibration
Servo Checking and Required Mode Modication
Angle Deviation Compensation Checking
Default Setttings
Pixhawk Connections
18
20
23
24
26
©
2019 FOXTECH All Rights Reserved
1
Page 3
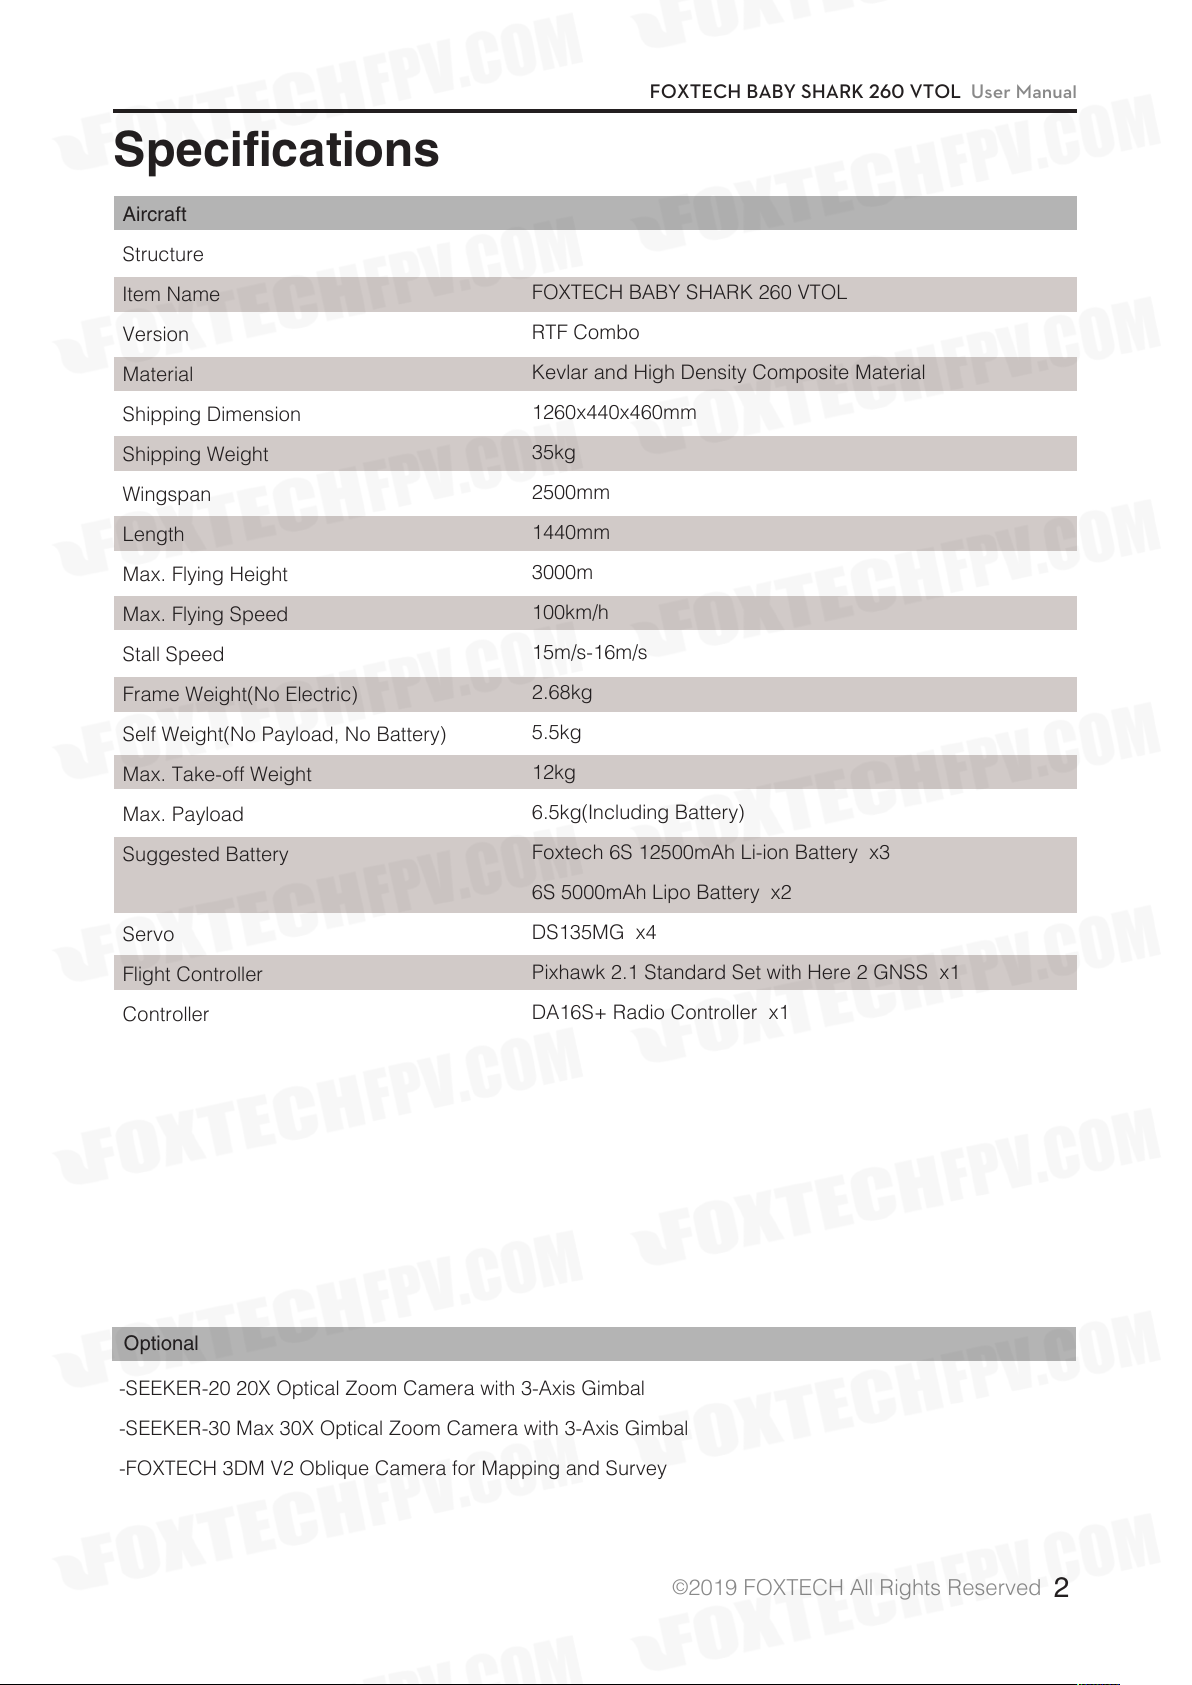
Specifications
Aircraft
Structure
FOXTECH BABY SHARK 260 VTOL User Manual
Item Name
Version
Material
Shipping Dimension
Shipping Weight
Wingspan
Length
Max. Flying Height
Max. Flying Speed
Stall Speed
Frame Weight(No Electric)
Self Weight(No Payload, No Battery)
Max. Take-off Weight
Max. Payload
Suggested Battery
FOXTECH BABY SHARK 260 VTOL
RTF Combo
Kevlar and High Density Composite Material
1260x440x460mm
35kg
2500mm
1440mm
3000m
100km/h
15m/s-16m/s
2.68kg
5.5kg
12kg
6.5kg(Including Battery)
Foxtech 6S 12500mAh Li-ion Battery x3
6S 5000mAh Lipo Battery x2
Servo
Flight Controller
Controller
Optional
-SEEKER-20 20X Optical Zoom Camera with 3-Axis Gimbal
-SEEKER-30 Max 30X Optical Zoom Camera with 3-Axis Gimbal
-FOXTECH 3DM V2 Oblique Camera for Mapping and Survey
DS135MG x4
Pixhawk 2.1 Standard Set with Here 2 GNSS x1
DA16S+ Radio Controller x1
©
2019 FOXTECH All Rights Reserved
2
Page 4
FOXTECH BABY SHARK 260 VTOL User Manual
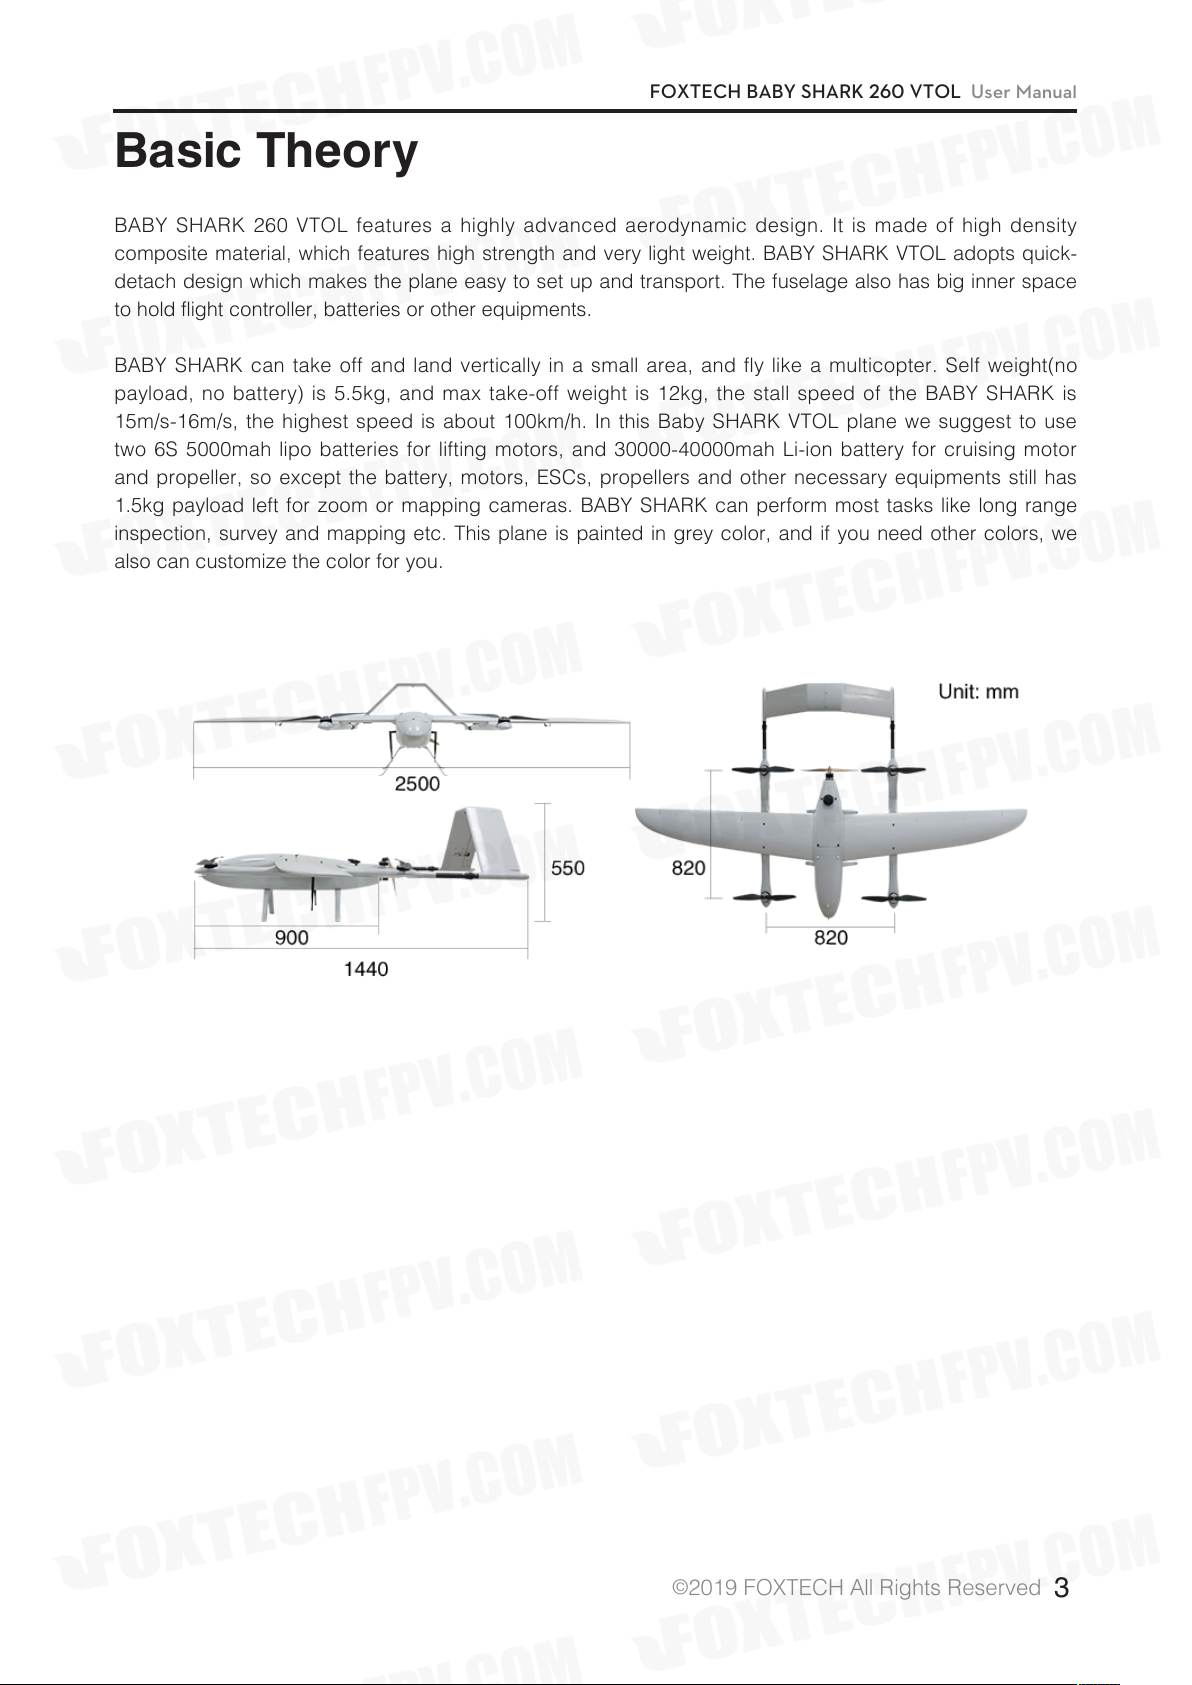
Basic Theory
BABY SHARK 260 VTOL features a highly advanced aerodynamic design. It is made of high density
composite material, which features high strength and very light weight. BABY SHARK VTOL adopts quick-
detach design which makes the plane easy to set up and transport. The fuselage also has big inner space
to hold flight controller, batteries or other equipments.
BABY SHARK can take off and land vertically in a small area, and fly like a multicopter. Self weight(no
payload, no battery) is 5.5kg, and max take-off weight is 12kg, the stall speed of the BABY SHARK is
15m/s-16m/s, the highest speed is about 100km/h. In this Baby SHARK VTOL plane we suggest to use
two 6S 5000mah lipo batteries for lifting motors, and 30000-40000mah Li-ion battery for cruising motor
and propeller, so except the battery, motors, ESCs, propellers and other necessary equipments still has
1.5kg payload left for zoom or mapping cameras. BABY SHARK can perform most tasks like long range
inspection, survey and mapping etc. This plane is painted in grey color, and if you need other colors, we
also can customize the color for you.
©
2019 FOXTECH All Rights Reserved
3
Page 5
Setup and Calibration
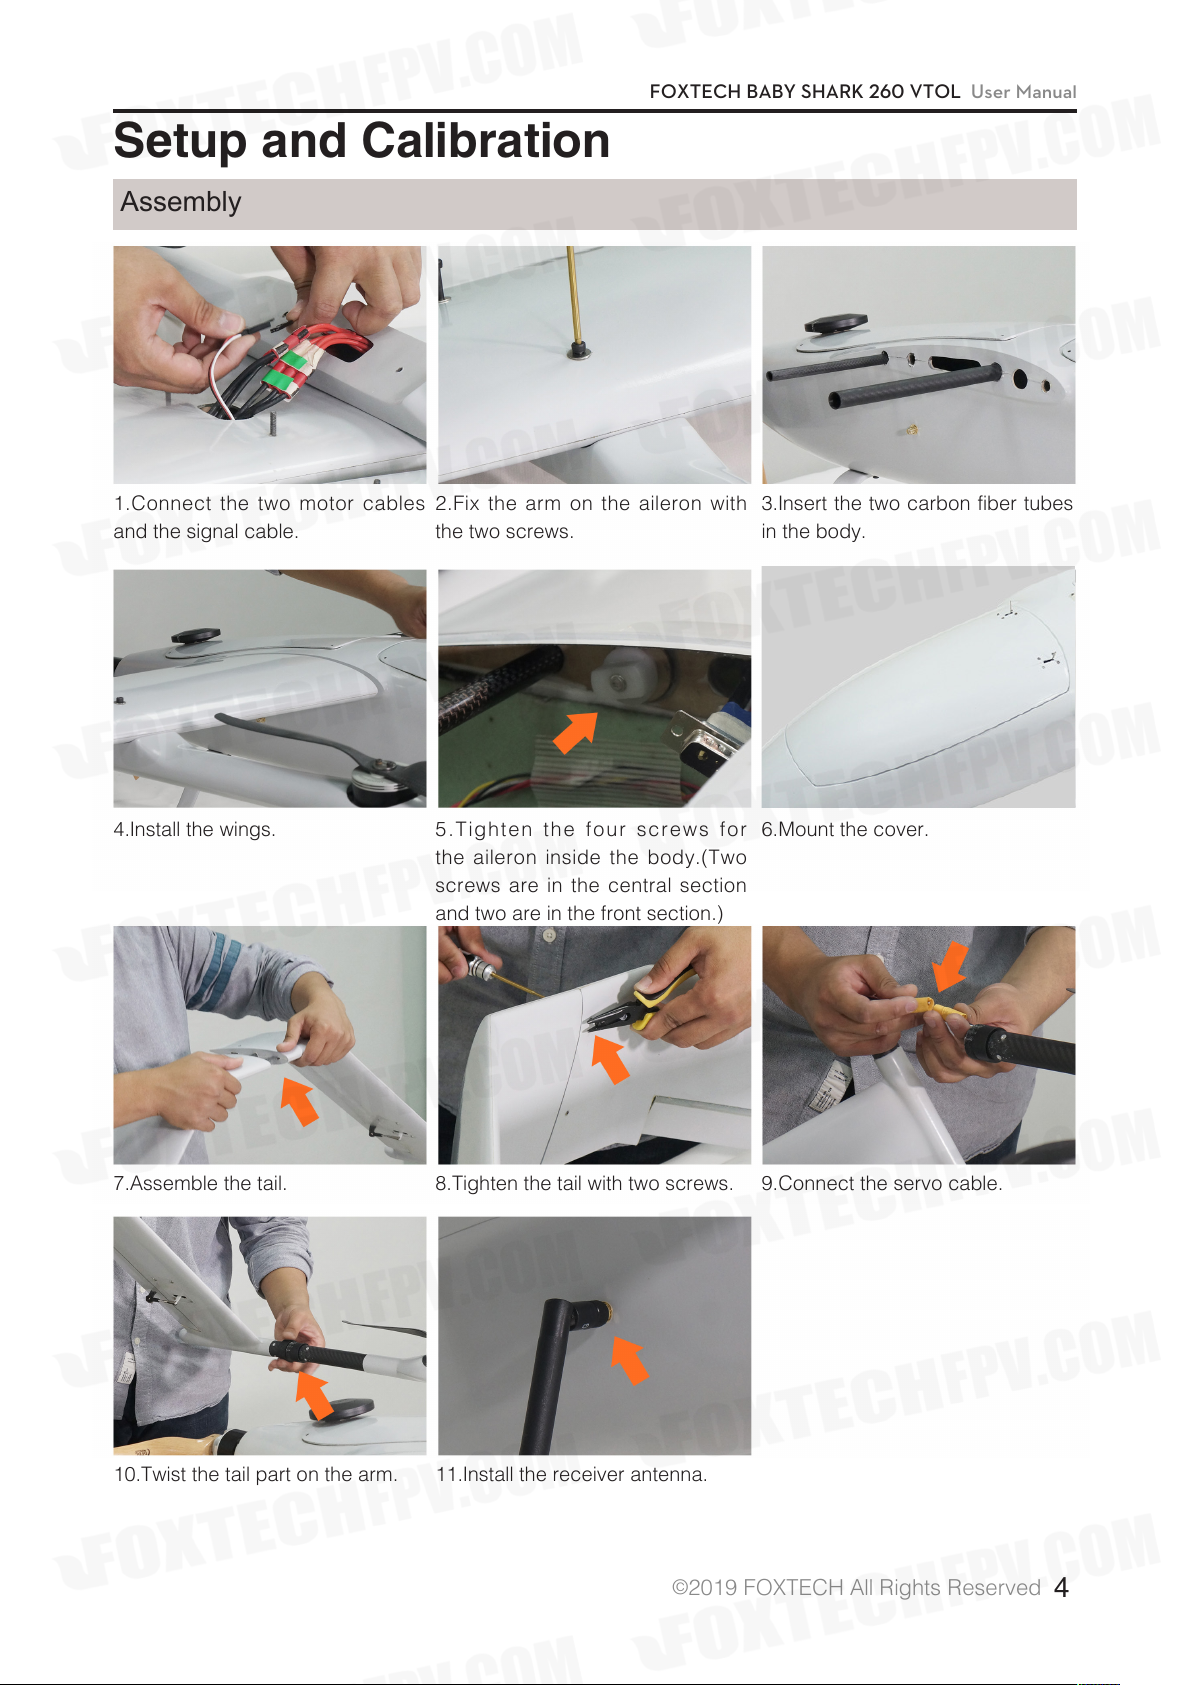
Assembly
FOXTECH BABY SHARK 260 VTOL User Manual
1.Connect the two motor cables
and the signal cable.
4.Install the wings.
2.Fix the arm on the aileron with
the two screws.
5.Tighten the four screws for
the aileron inside the body.(Two
screws are in the central section
and two are in the front section.)
3.Insert the two carbon fiber tubes
in the body.
6.Mount the cover.
7.Assemble the tail.
10.Twist the tail part on the arm.
8.Tighten the tail with two screws.
11.Install the receiver antenna.
©
2019 FOXTECH All Rights Reserved
9.Connect the servo cable.
4
Page 6
FOXTECH BABY SHARK 260 VTOL User Manual
Check Radio Control
1.Check transmitter mode(left hand throttle or right hand throttle).
2.Check channels on the transmitter.
Download Mission Planner
Download the latest Mission planner online or copy it from the SD card.
Download link: http://firmware.ardupilot.org/Tools/MissionPlanner/
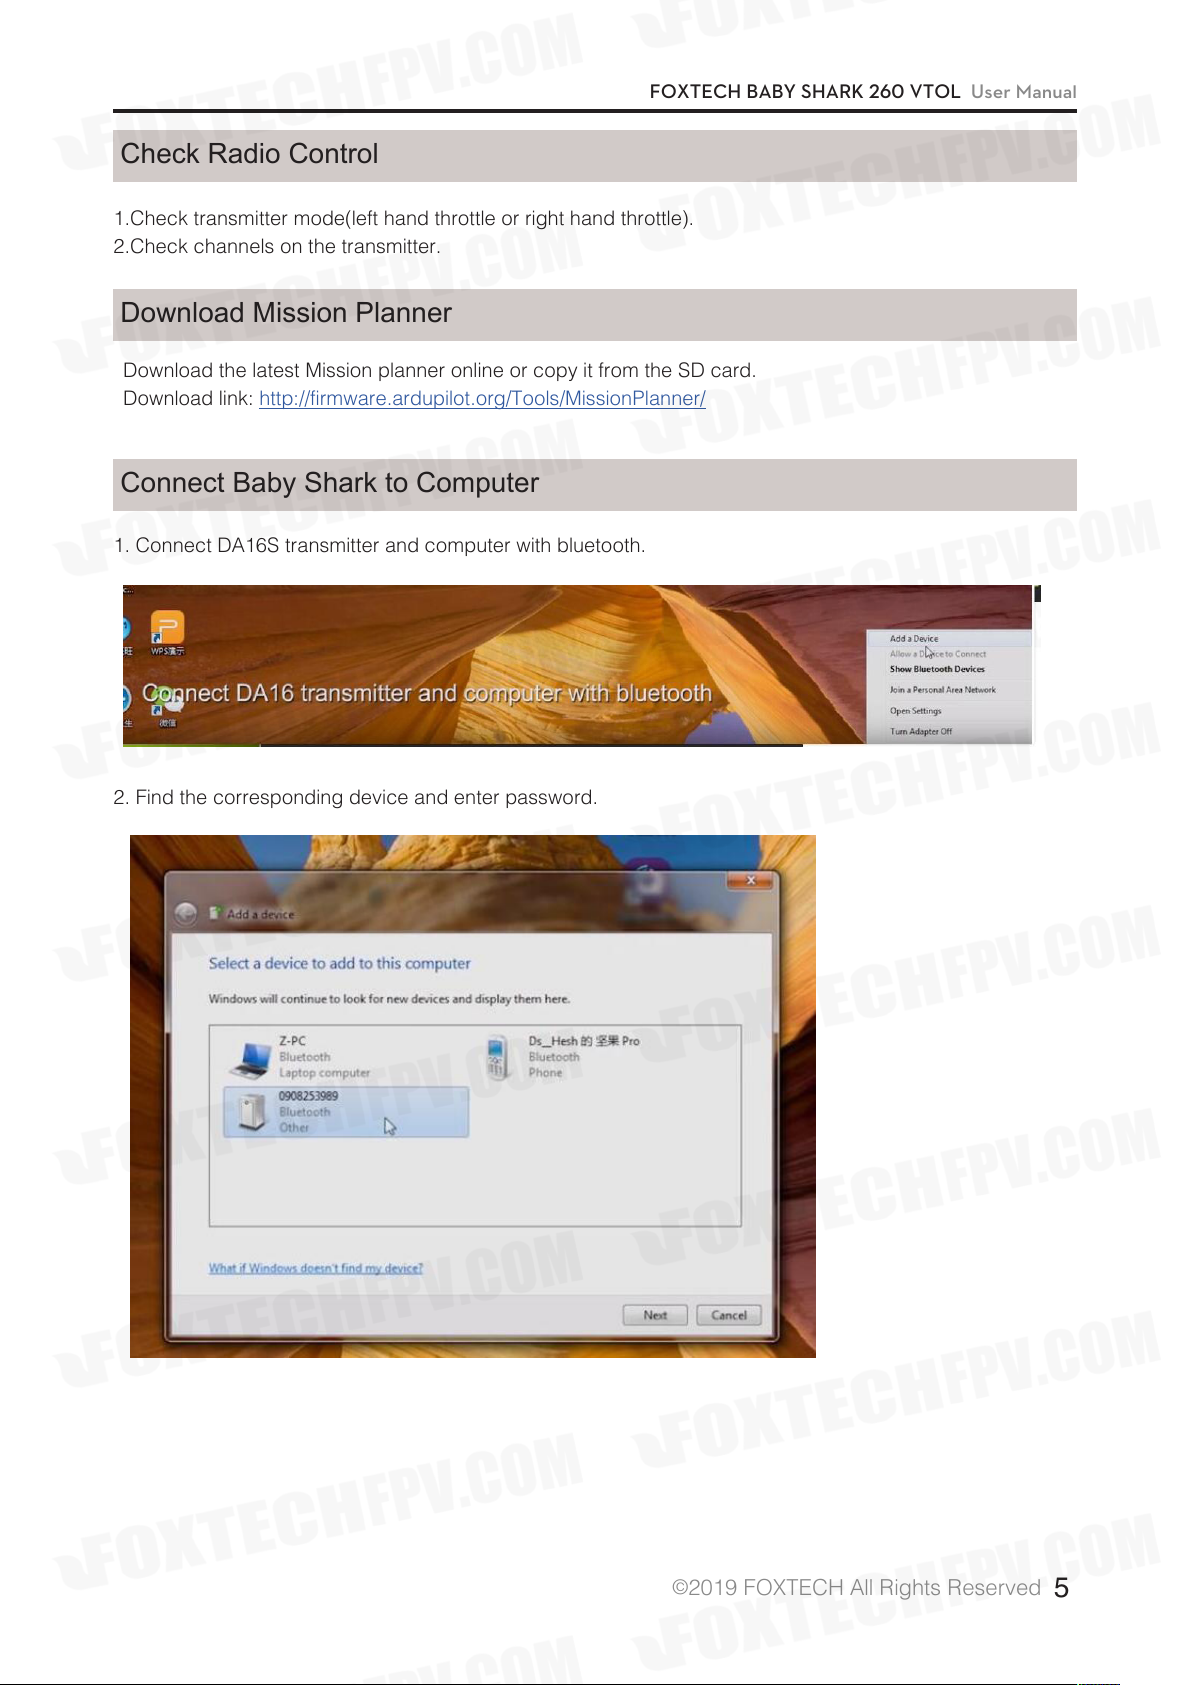
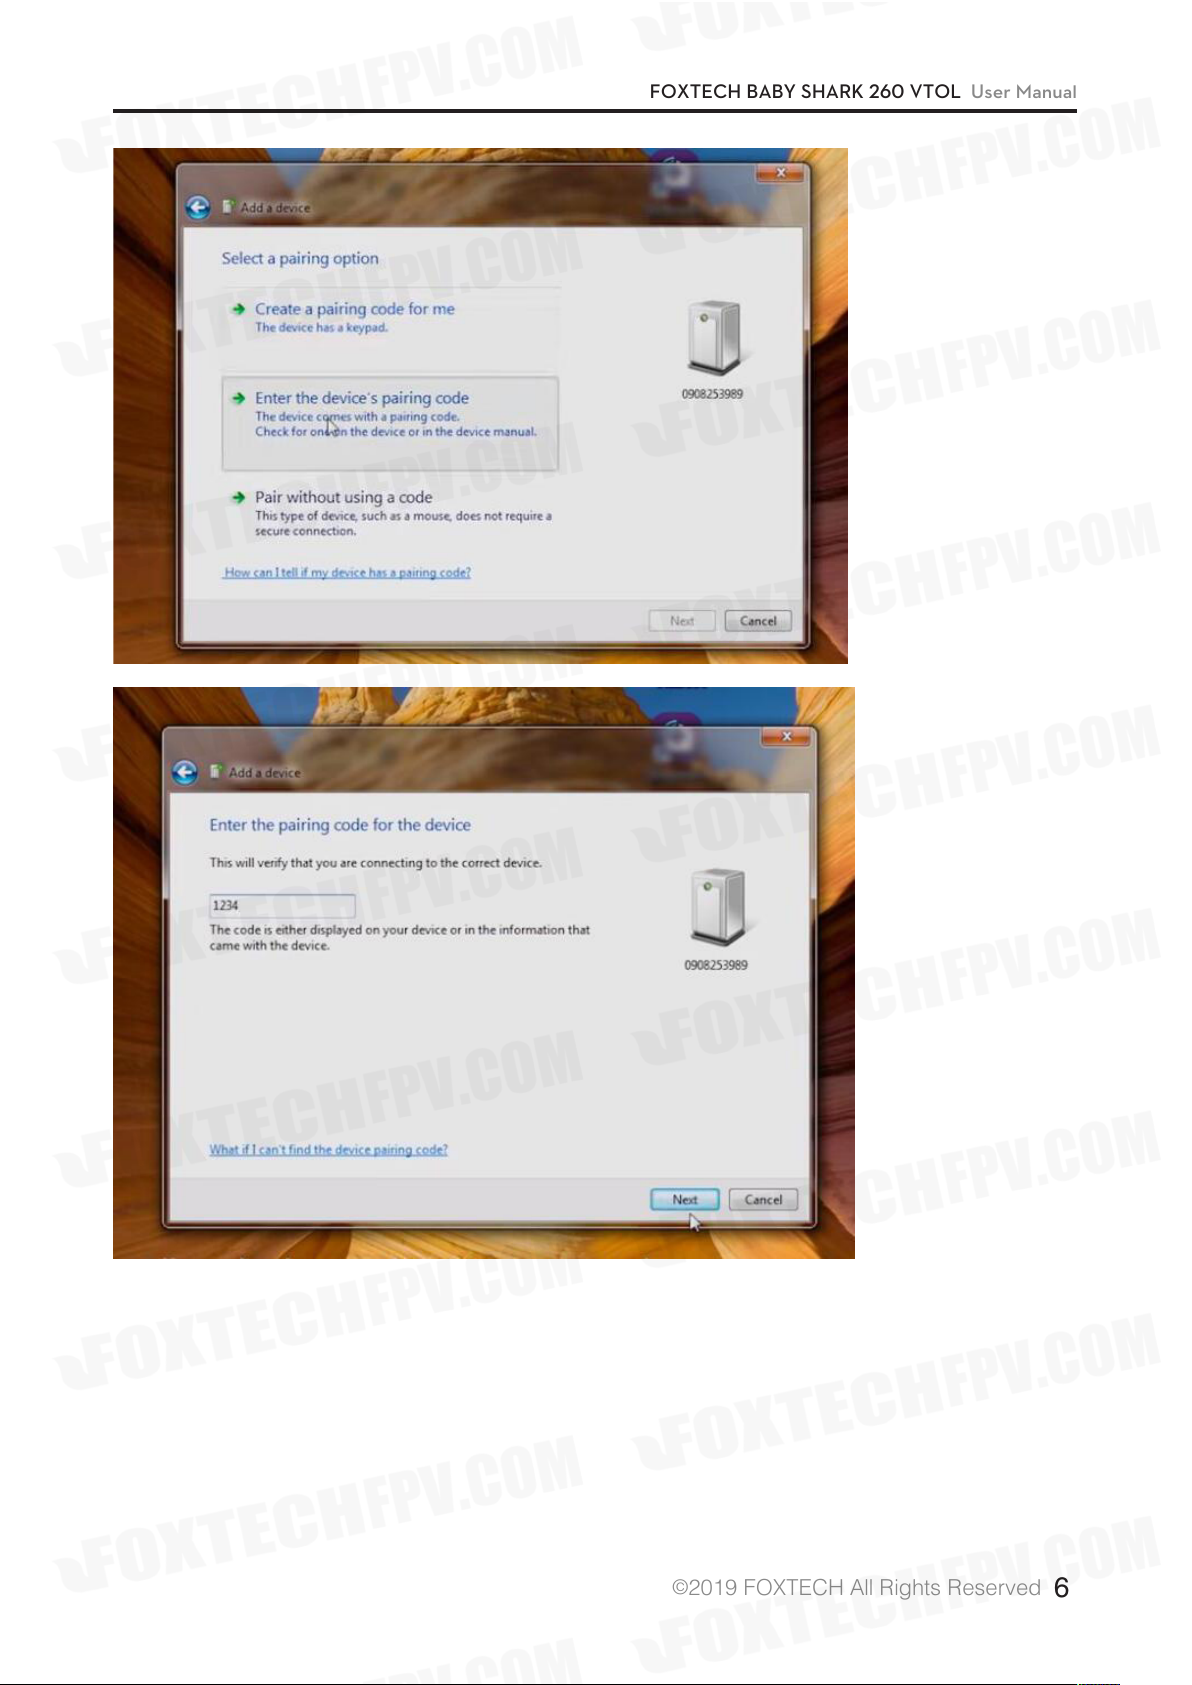
Connect Baby Shark to Computer
1. Connect DA16S transmitter and computer with bluetooth.
2. Find the corresponding device and enter password.
©
2019 FOXTECH All Rights Reserved
5
Page 7
FOXTECH BABY SHARK 260 VTOL User Manual
©
2019 FOXTECH All Rights Reserved
6
Page 8
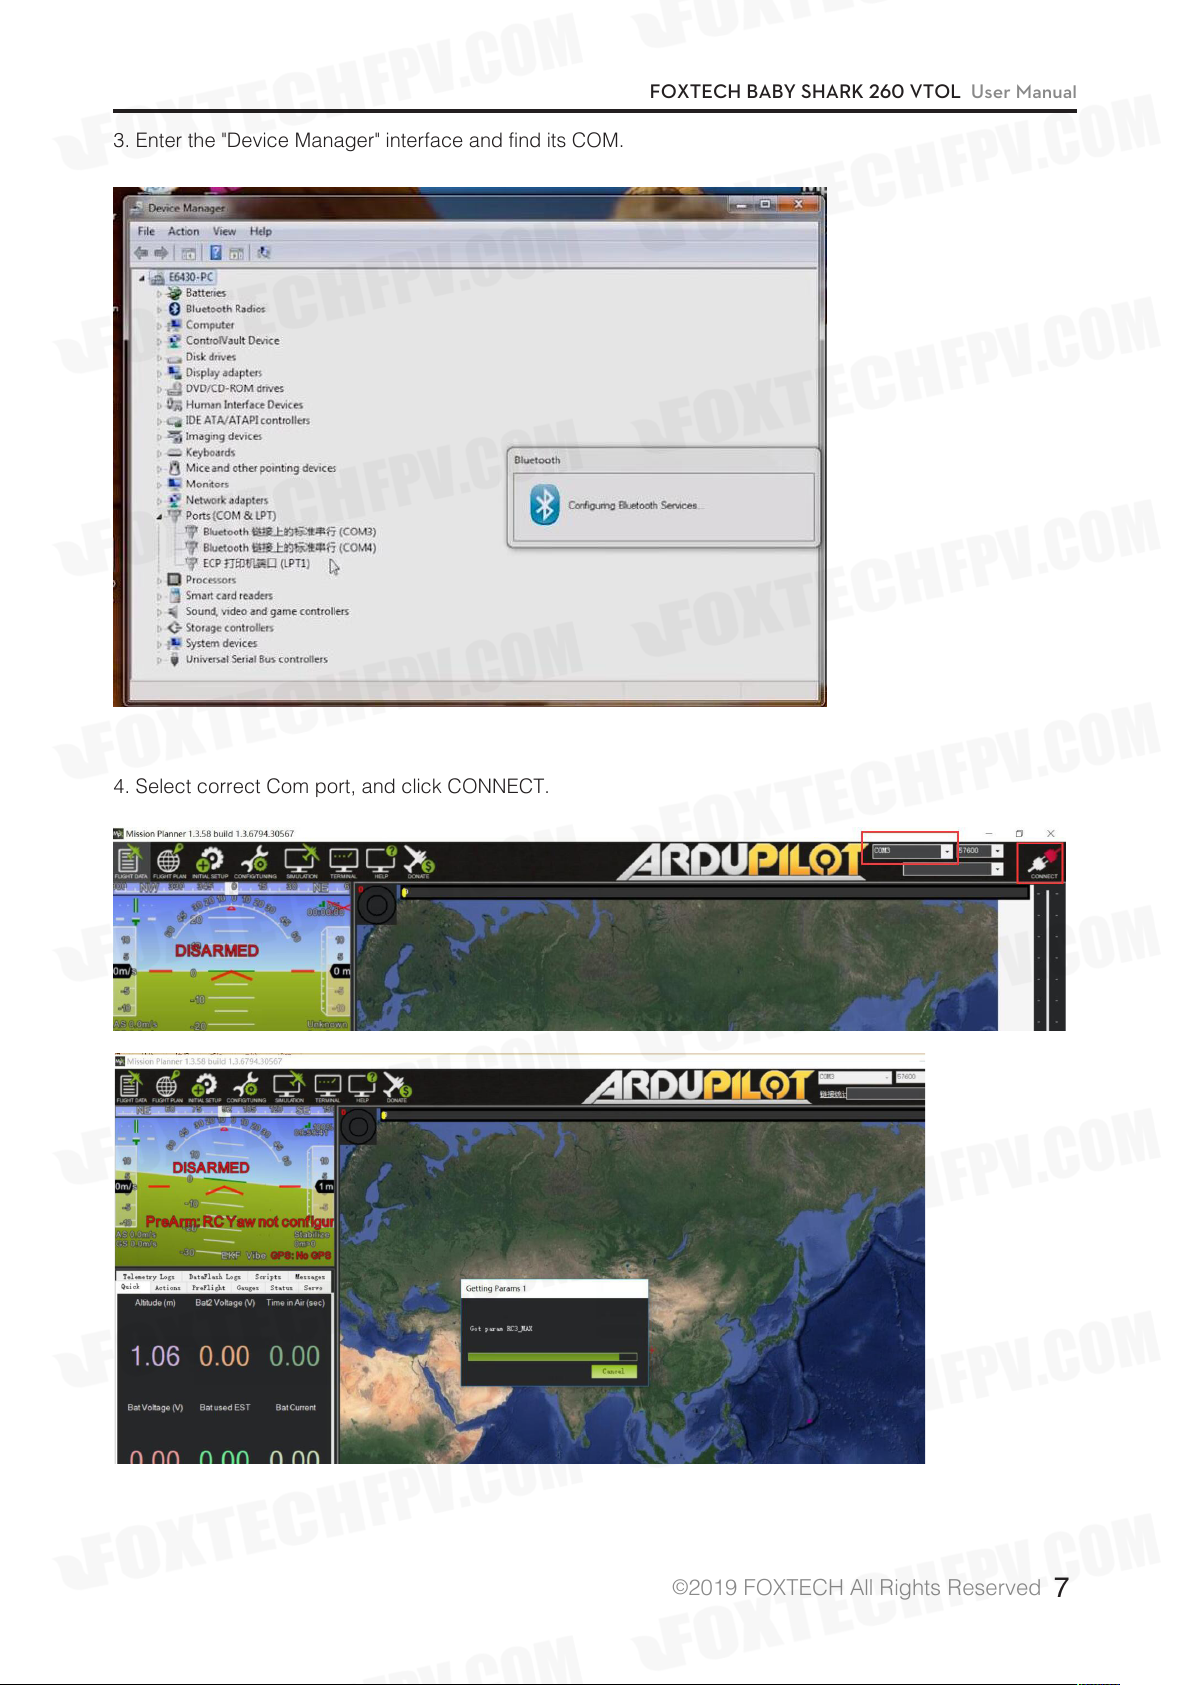
3. Enter the "Device Manager" interface and find its COM.
FOXTECH BABY SHARK 260 VTOL User Manual
4. Select correct Com port, and click CONNECT.
©
2019 FOXTECH All Rights Reserved
7
Page 9

5. Connection completed.
FOXTECH BABY SHARK 260 VTOL User Manual
Connect the Datalink and Check Flight Controller
1.Calibrate the Accelerometer
Although the accelerometer was calibrated already for the PNP version before shipping, please calibrate it
again since it might be affected in the transportation.
Under Initial Setup, select Accel Calibration from the left-side menu. Mission Planner will prompt you to
place the vehicle each calibration position. Press any key to indicate that the autopilot is in position and then
proceed to the next orientation.
The calibration positions are: level, on right side, left side, nose down, nose up and on its back.
Click this button to begin accelerometer
calibration.
This accelerometer trim can be used
to level the HUD horizon.
1.It is important that the vehicle is kept still immediately after pressing the key for each step.
2.The level position is the most important to get right as this will be the attitude that your controller
considers level while flying.
©
2019 FOXTECH All Rights Reserved
8
Page 10

FOXTECH BABY SHARK 260 VTOL User Manual
2. Compass Calibration
Baby Shark VTOL uses high sensitivity compass and it has to be re-calibrated when fly in a new place.
Enter the compass setting page and click”start” , hold the plane and rotate it in order to hit all directions on
a sphere to calibrate the compass, when it’s done, a new offset would be given to the flight controller, and a
reboot is necessary.
Onboard calibration produces better results.
3. Radio Control Calibration
Calibrating each of the transmitter controls/channels is a straightforward process - simply move each of the
enabled sticks/switches through their full range and record the maximum and minimum positions.
©
2019 FOXTECH All Rights Reserved
9
Page 11

FOXTECH BABY SHARK 260 VTOL User Manual
©
2019 FOXTECH All Rights Reserved
10
Page 12

FOXTECH BABY SHARK 260 VTOL User Manual
4. Check Flight Modes. (Cruise, QHover, QLoiter, Loiter, Auto, RTL)
©
2019 FOXTECH All Rights Reserved
11
Page 13

FOXTECH BABY SHARK 260 VTOL User Manual
5. Calibrate the Airspeed Sensor
It is critical that you calibrate airspeed meter to ensure that it is working correctly, and ensure that it is
correctly zeroed.
After you start up APM on your aircraft you should wait at least 1 minute for your electronics to warm up,
preferably longer, and then do a pre-flight calibration of your airspeed sensor. Your ground station software
should have a menu for doing this, usually called “Preflight Calibration”. You need to loosely cover your
airspeed sensor to stop wind from affecting the result, then press the button. The calibration will take a
couple of seconds.
Choosing that action will re-calibrate both your ground barometric pressure and your airspeed sensor.
Next you should check that your airspeed sensor is working correctly before takeoff. To do that you should
blow into the airspeed sensor and make sure that the "AS" airspeed sensor value in your HUD rises as you
blow into it.
6. Check the Two Batteries Voltages
If you find the voltages are not correct, Enter the voltages according to the hand-held volt meter in the
“Measured Battery Voltage” field, Press tab or click out of the field and the “Voltage Divider (Calced)” value
will update and the “Battery voltage (Calced)” should now equal the measured voltage.
7. Check Before Flight
(1) Connect the internet and
load the map.
(2) The plane direction should
be same with its direction in
mission planner, if not, please
calibrate again.
(3) Check plane status, altitude,
voltage airspeed meter working
fine.
©
2019 FOXTECH All Rights Reserved
12
Page 14

FOXTECH BABY SHARK 260 VTOL User Manual
Checklist before Every Flight
Make sure all items are checked before every flight.
1. The aircraft connection is stable and normal.
2. All screws and nuts are not loose.
3. The propeller is in the normal direction and is fastened.
4. All the Rudders' direction-correction are correct.
5. The airspeed meter reads correctly.
6. Aircraft voltage is normal.
7. The compass is toward the right direction.
8. More than 15 GPS satellites, or displays GPS FIX.
9. No warning words on the ground station.
10. Device SD card is normal.
11. Recording device is recording normally.
12. Aerial survey camera photo test is normal.
13. Exposure check is normal.
14. The remote controller power is normal.
15. Ground station power is normal.
16. Data connection strength is normal.
17. Aircraft H point positioning is normal.
18. Upload and download to check the routes.
19. The antenna is placed in the normal direction, the antenna of the aircraft is facing down or up, and the
two antennas of the receiver are not in contact.
20. Ground device recording is on.
21. Aircraft onboard camera is turned on.
22. Height setting of Return Home Point is normal.
23. Out of control return-to-lanuch setting is normal.
24. Try to vertically take off and land, make sure the direction-correction and direction control are normal
Start flying.
©
2019 FOXTECH All Rights Reserved
13
Page 15
FOXTECH BABY SHARK 260 VTOL User Manual
Test Flight
Before the first flight, it’s suggest to check if every component is well connected, Servos working properly,
motors spinning to the correct direction and all control surfaces are moving to the desired directions.
It’s suggested to use 3 modes, Cruise, Qhover and Qloiter as the labled modes on a three position switch.
It’s suggested to do the first flight in a very open area with no buildings or big trees around, and a flat taking
off area is necessary.
Use the Qhover(or Qloiter) mode, start the motors by pushing the rudder all to the right with the throttle at
the lowest position, the motors should start to spin, gradually increase the throttle until the plane is ready
to lift from the ground, move aileron, elevator and rudder stick gently to check if the plane is moving as
desired.
Continue to push the throttle until the plane is lifted from ground, it may swing a bit since there should be big
airflow hitting the wing, lift the plane to around 3 meters and try to fly it as a multicopter, it should not be a
problem for anyone who can play a multicopter.
When you are familiar with all controls, lift the plane to at least 50m from the ground and make sure there is
not obstacle in front of the plane.
Switch it to Cruise mode, the Baby Shark VTOL rear motor should work, once the speed is reaching at least
16m/s, the multicopter motors will stop spinning, then the Baby Shark is now transferred to fixed wing.
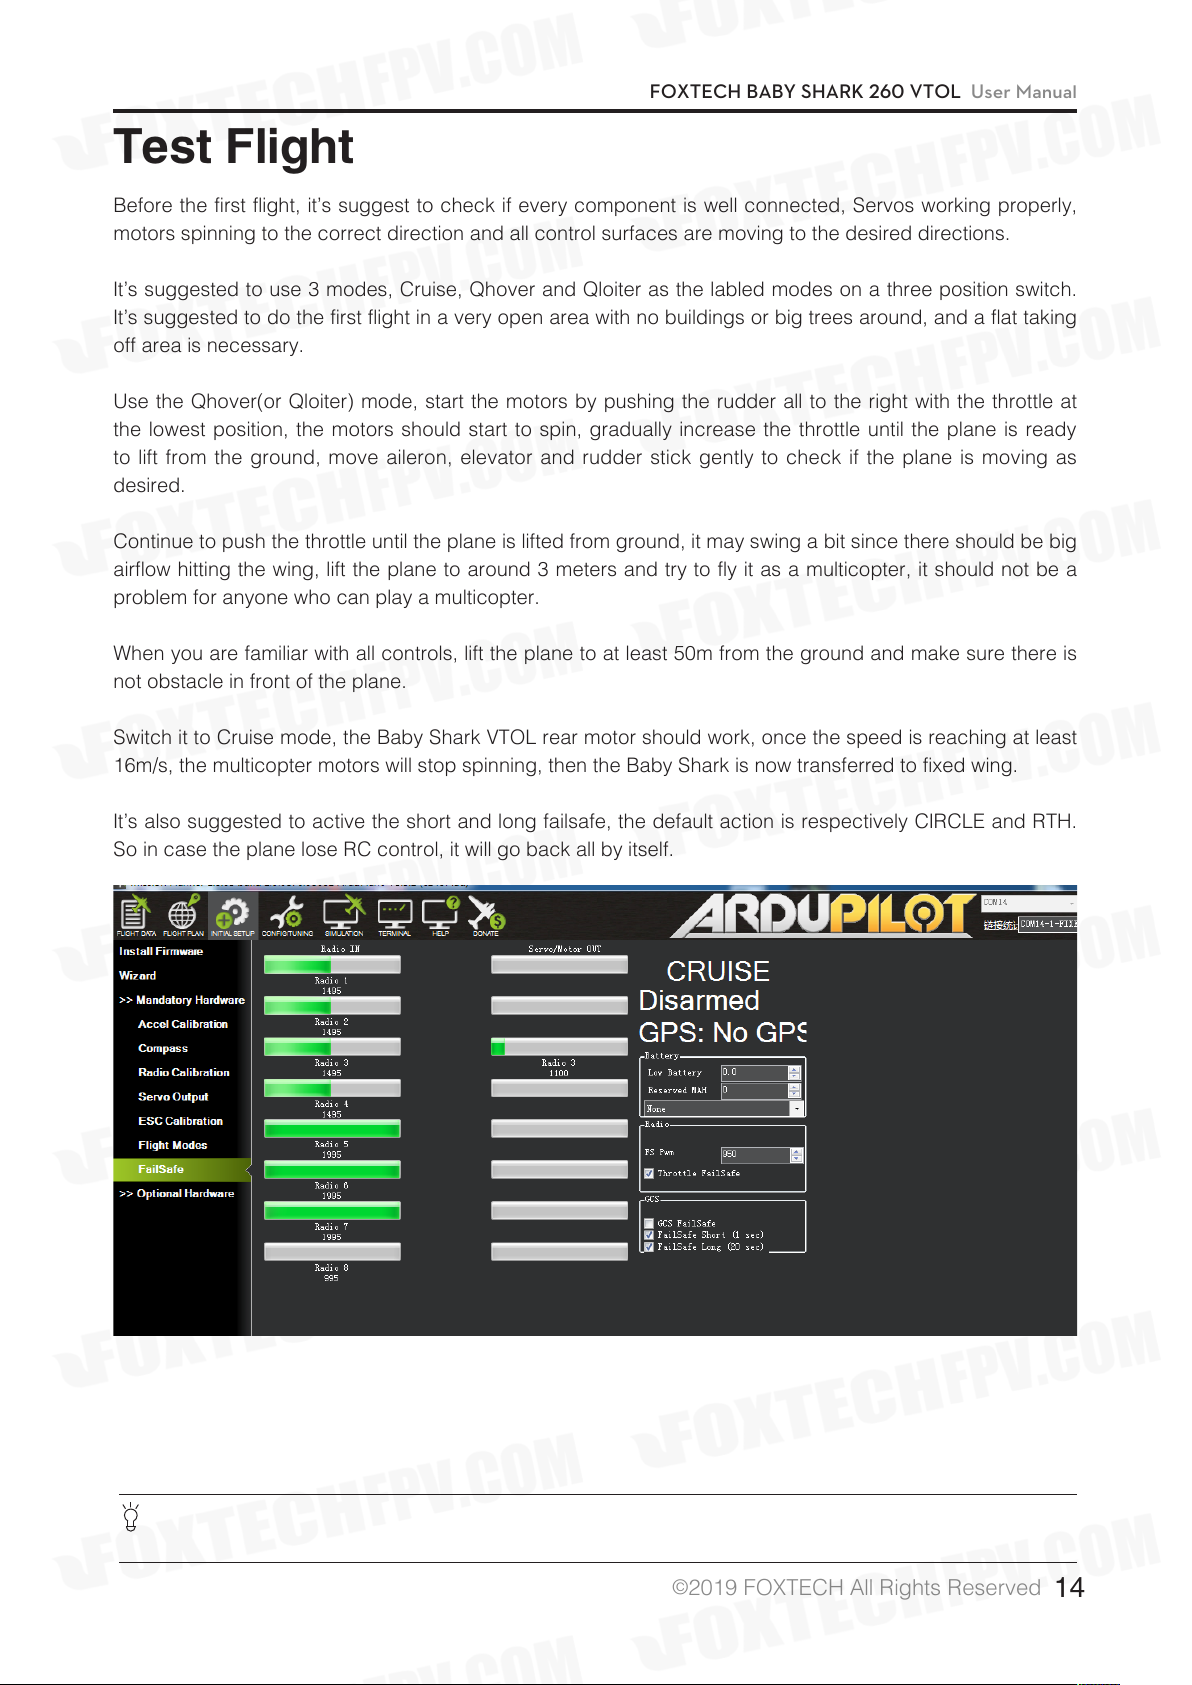
It’s also suggested to active the short and long failsafe, the default action is respectively CIRCLE and RTH.
So in case the plane lose RC control, it will go back all by itself.
You can fly a while and see if the plane could go straight, if you find the plane is tilting left for example, don’t
try to trim the aileron with your radio, the trim to aileron(SERVO1) must be done in parameter setting. (If
the elevator trim is necessary, please trim the SERVO2 and SERVO4 at the same time with the same trim
amount.)
GCS FAILSAFE disabled as default setting for DA16(S) radio or the control range will be greatly
affected.
©
2019 FOXTECH All Rights Reserved
14
Page 16

FOXTECH BABY SHARK 260 VTOL User Manual
If everything goes well, you can try to land. First, reduce the altitude by pushing forward the elevator and
when the altitude is around 50m above the ground, switch to Qhover(or Qloiter) Mode. Then become a
multicopter again, then you can land it just as a normal multicopter.
©
2019 FOXTECH All Rights Reserved
15
Page 17

FOXTECH BABY SHARK 260 VTOL User Manual
Autopilot
After the first flight, you can try to do autopilot.
You can choose to take off and land either by manual control or automatically.
To use automatic taking off and landing, you can change the first waypoint to VTOL_TAKE OFF, and set an
altitude like 50m for this action, then set the next waypoint a bit far (like 100m ) from the first waypoint, the
Baby Shark will take off as a multicopter, when it reaches the wanted altitude, it will switch to fixed wing and
fly waypoints or missions like a fixed wing.
The VTOL landing is also the similar, you can set the last waypoint to VTOL_LAND, but it’s suggested to set
one waypoint which is around 100m from this one, since the plane will try to turn to multicopter before the
last waypoint, if the waypoint before VTOL_LAND is too far, the Baby Shark will finish the final distance all in
multicopter mode, the power consumption in mutlicopter mode is 5 times more than in fixed wing mode.
Q_RTL is enabled as default,if the VTOL land command is not added, then the VTOL will go back to
HOME position and home altitude(default 50m)and performs automatical VTOL land.
©
2019 FOXTECH All Rights Reserved
16
Page 18

FOXTECH BABY SHARK 260 VTOL User Manual
Applications
- Survey
- 3D Survey
- Patrol
- FPV
- Air pollution detection
More autopilot mode can be found in Mission planner manual, like circle survey, Grid, drop an object with
hook at desired waypoint.
©
2019 FOXTECH All Rights Reserved
17
Page 19

FOXTECH BABY SHARK 260 VTOL User Manual
Appendix
The following calibrations are for Customers who bought Baby Shark VTOL Kit. For the customers who
bought Baby Shark PNP combo, the following calibrations are done before shipping. Please donot change
any settings. If the settings are changed by accident, please recover from the param. document in the SD
card.
ESC Calibration
1. Cut off Baby Shark power supply and take off all propellers. Connect Pixhawk flight controller with Mission
planner with USB cable. Change “Q_ESC_CAL” value to 1 and write params.
2. Long press
3. Click
Arm/Disarm
GPS safety switch
, There will be a sound “Du~”
until the red light keeps on.
Safety Switch
©
2019 FOXTECH All Rights Reserved
18
Page 20

FOXTECH BABY SHARK 260 VTOL User Manual
4. In the following demonstration, Take Left hand throttle as an example. Push throttle to Max.(Pic 4-1),
connect Baby Shark with power, when there is “di di ~ di” sound quickly push throttle to Min.(Pic 4-2) When
there is “di di di di ~di” sound, ESC calibration is successful. Then cut off power.
Pic 4-1
5. Connect Baby Shark with power again. Long press GPS safety switch. Radio throttle push to Min,
direction stick push to right(Pic 5-1), disarm Baby Shark, you can adjust “Q_M_SPIN_MIN”in mission
planner. The default value is 0.25. Write the value, it is complete.
Pic 5-1
Pic 4-2
©
2019 FOXTECH All Rights Reserved
19
Page 21

FOXTECH BABY SHARK 260 VTOL User Manual
Servo Checking and Required Mode Modification
Check the stick function of remote controller. (The follow example is demonstrated as transmitter Mode2
which means left hand is throttle.)
Please take off all propellers before the following calibrations in case any danger occurs.
Under Manual Mode :
1. Make sure the aircraft is in centre position.
2. Push the throttle-stick the motor speed will increase,and pull back the throttle-stick, the motor speed will
decrease.
3. Push the pitch-stick the two V-type tail will go down.
4. Pull back the pitch-stick the two V-type tail will go up.
5. Turn the aileron-stick to the left, the left aileron will go up, and the right one will go down.
6. Turn the aileron-stick to the right, the right aileron will go up, and the left one will go down.
©
2019 FOXTECH All Rights Reserved
20
Page 22

FOXTECH BABY SHARK 260 VTOL User Manual
7. Turn the direction-stick to the left,the left V-type tail will go up, and the right tail will go down.
8. Turn the direction-stick to the right,the right V-type tail will go up, and the left tail will go down.
Under the Q_STABLIZE Mode
1.Unlock the plane under the Q_STABLIZE mode. (Click safety switch, set the throttle at minimum speed
and turn the direction stick to the far right.)
Safety Switch
2. Check the throttle stick: when you push the throttle-stick, the motors speed will increase, and pull back
the throttle-stick, the motors speed will decrease.
3. Push the pitch-stick, the speed of the front motor will decrease and the back motor will increase, the two
V-type tails will go down.
©
2019 FOXTECH All Rights Reserved
21
Page 23

FOXTECH BABY SHARK 260 VTOL User Manual
4. Pull the pitch-stick, the speed of the front motor will increase and the back motor will decrease, the two
V-type tail will go up.
5. Turn the aileron-stick to the left, the left motor speed will decrease, and the right motor speed will increase
left aileron goes up, and the right aileron goes down at the same time.
6. Turn the aileron-stick to the right, the right motor speed will decrease, and the left motor speed will
increase left aileron goes down, and the right aileron goes up at the same time.
©
2019 FOXTECH All Rights Reserved
22
Page 24

FOXTECH BABY SHARK 260 VTOL User Manual
Angle Deviation Compensation Checking
Unlock the plane under the Q_STABLIZE mode:
1. Plane leans forward, the speed of the front motors will increase, the back motor-decrease,the two V-type
tails go up.
2. Plane leans back, the speed of front motors will decrease, the back motor-increase, the two V-type tails
go down.
3. Plane leans to the left, left aileron will go down, and the right aileron will go up, the speed of left motor
increases, and the right motor decreases.
4. Plane leans to the right,left aileron will go down, and the right aileron will go up,the speed of left motor
decreases, and the right motor increases;
©
2019 FOXTECH All Rights Reserved
23
Page 25

Default Setttings
Some default setttings in Pixhawk for Baby Shark.
1. Baby Shark Pixhawk Basic Settings for Reference.
FOXTECH BABY SHARK 260 VTOL User Manual
2. Suggested ”Q_VFWD” is: 0.05 , this setting will increase anti-wind performance in QLOITER mode and
Vtol-take off and landing.
3. Suggested “Q_WVANE_MINROLL” value is: 3
4. Suggested “ALT_HOLD_RTL” value is: 5000, default home altitude, 50m is a good number for Vtollanding.
5. Suggested “Q_RTL_MODE” value is: 1, if you prefer the plane go circles around the Home point instead
of go into Vtol-landing during RTL ,change it to 0.
6. Suggested “BRD_SAFETYENABLE” value is: 1, always important to have the safety switch on after power
on, you will need to press the safety switch on the GPS for 2 second to active the plane to fly.
©
2019 FOXTECH All Rights Reserved
24
Page 26
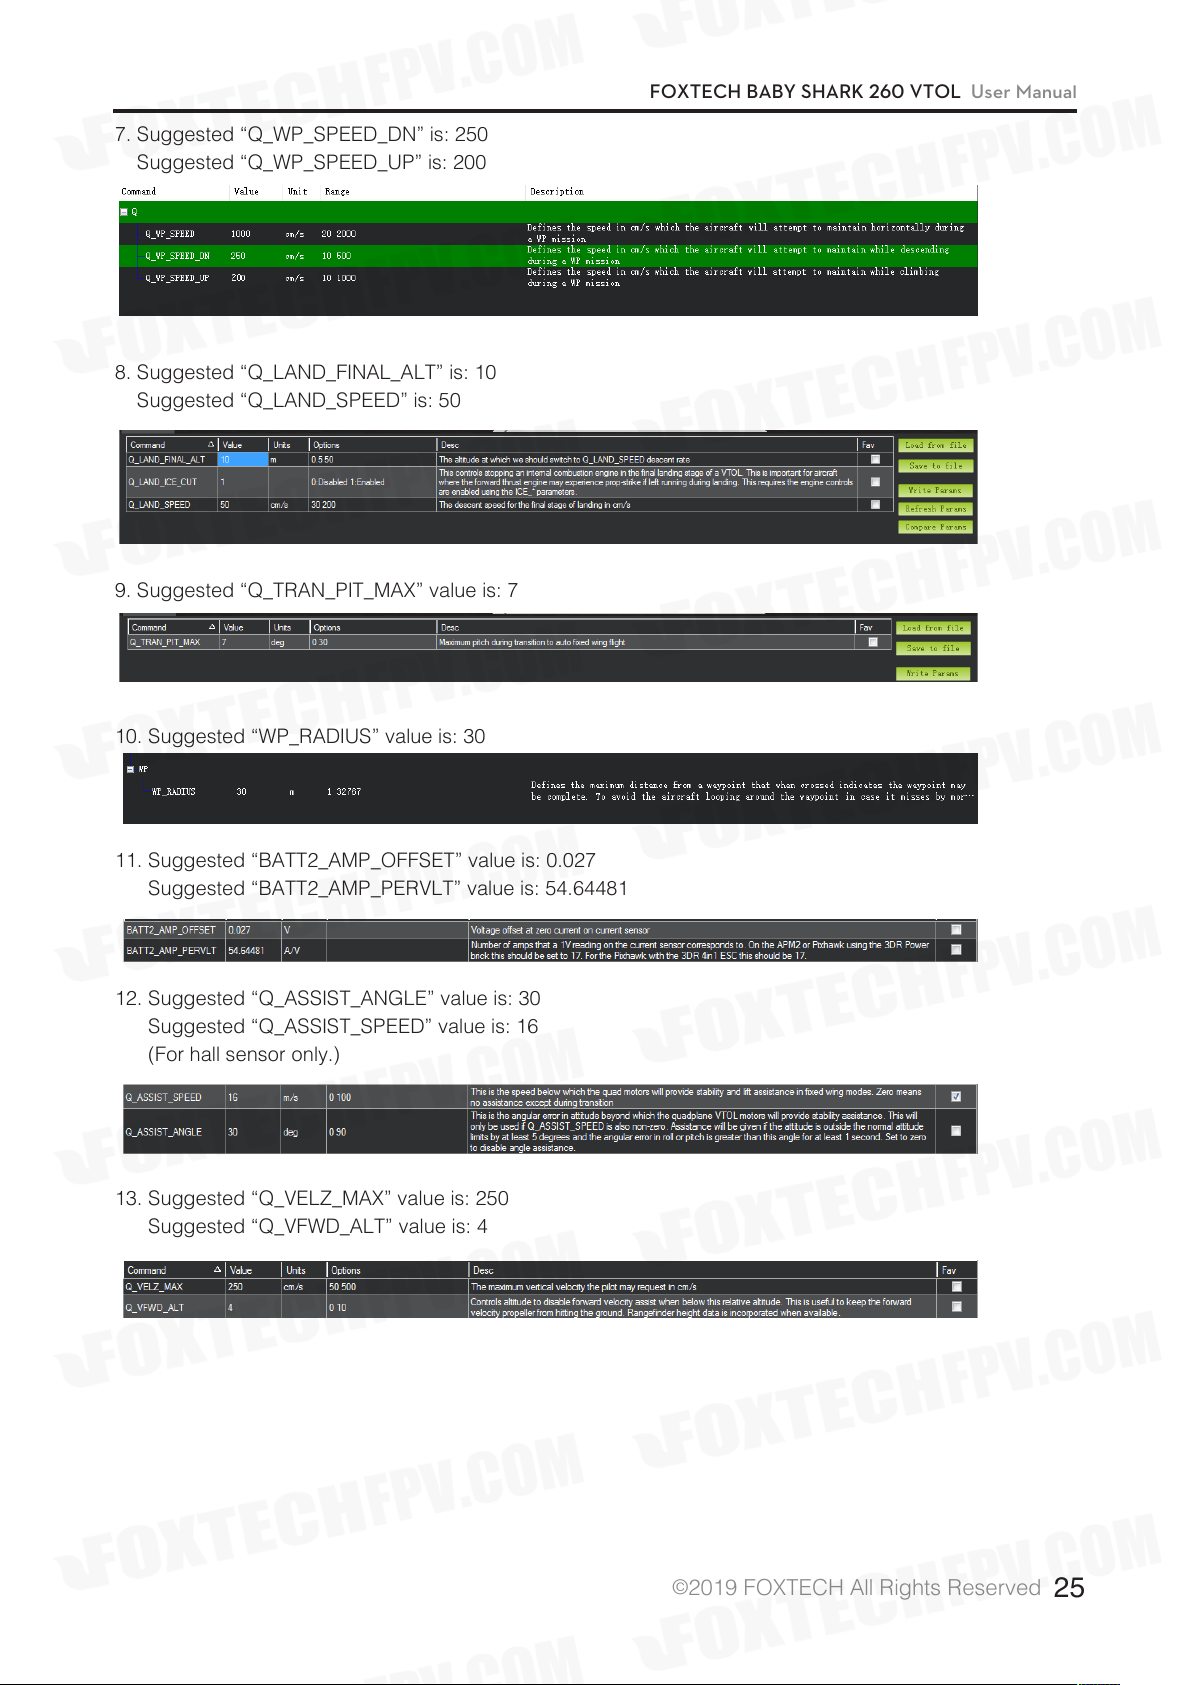
7. Suggested “Q_WP_SPEED_DN” is: 250
Suggested “Q_WP_SPEED_UP” is: 200
8. Suggested “Q_LAND_FINAL_ALT” is: 10
Suggested “Q_LAND_SPEED” is: 50
9. Suggested “Q_TRAN_PIT_MAX” value is: 7
FOXTECH BABY SHARK 260 VTOL User Manual
10. Suggested “WP_RADIUS” value is: 30
11. Suggested “BATT2_AMP_OFFSET” value is: 0.027
Suggested “BATT2_AMP_PERVLT” value is: 54.64481
12. Suggested “Q_ASSIST_ANGLE” value is: 30
Suggested “Q_ASSIST_SPEED” value is: 16
(For hall sensor only.)
13. Suggested “Q_VELZ_MAX” value is: 250
Suggested “Q_VFWD_ALT” value is: 4
©
2019 FOXTECH All Rights Reserved
25
Page 27
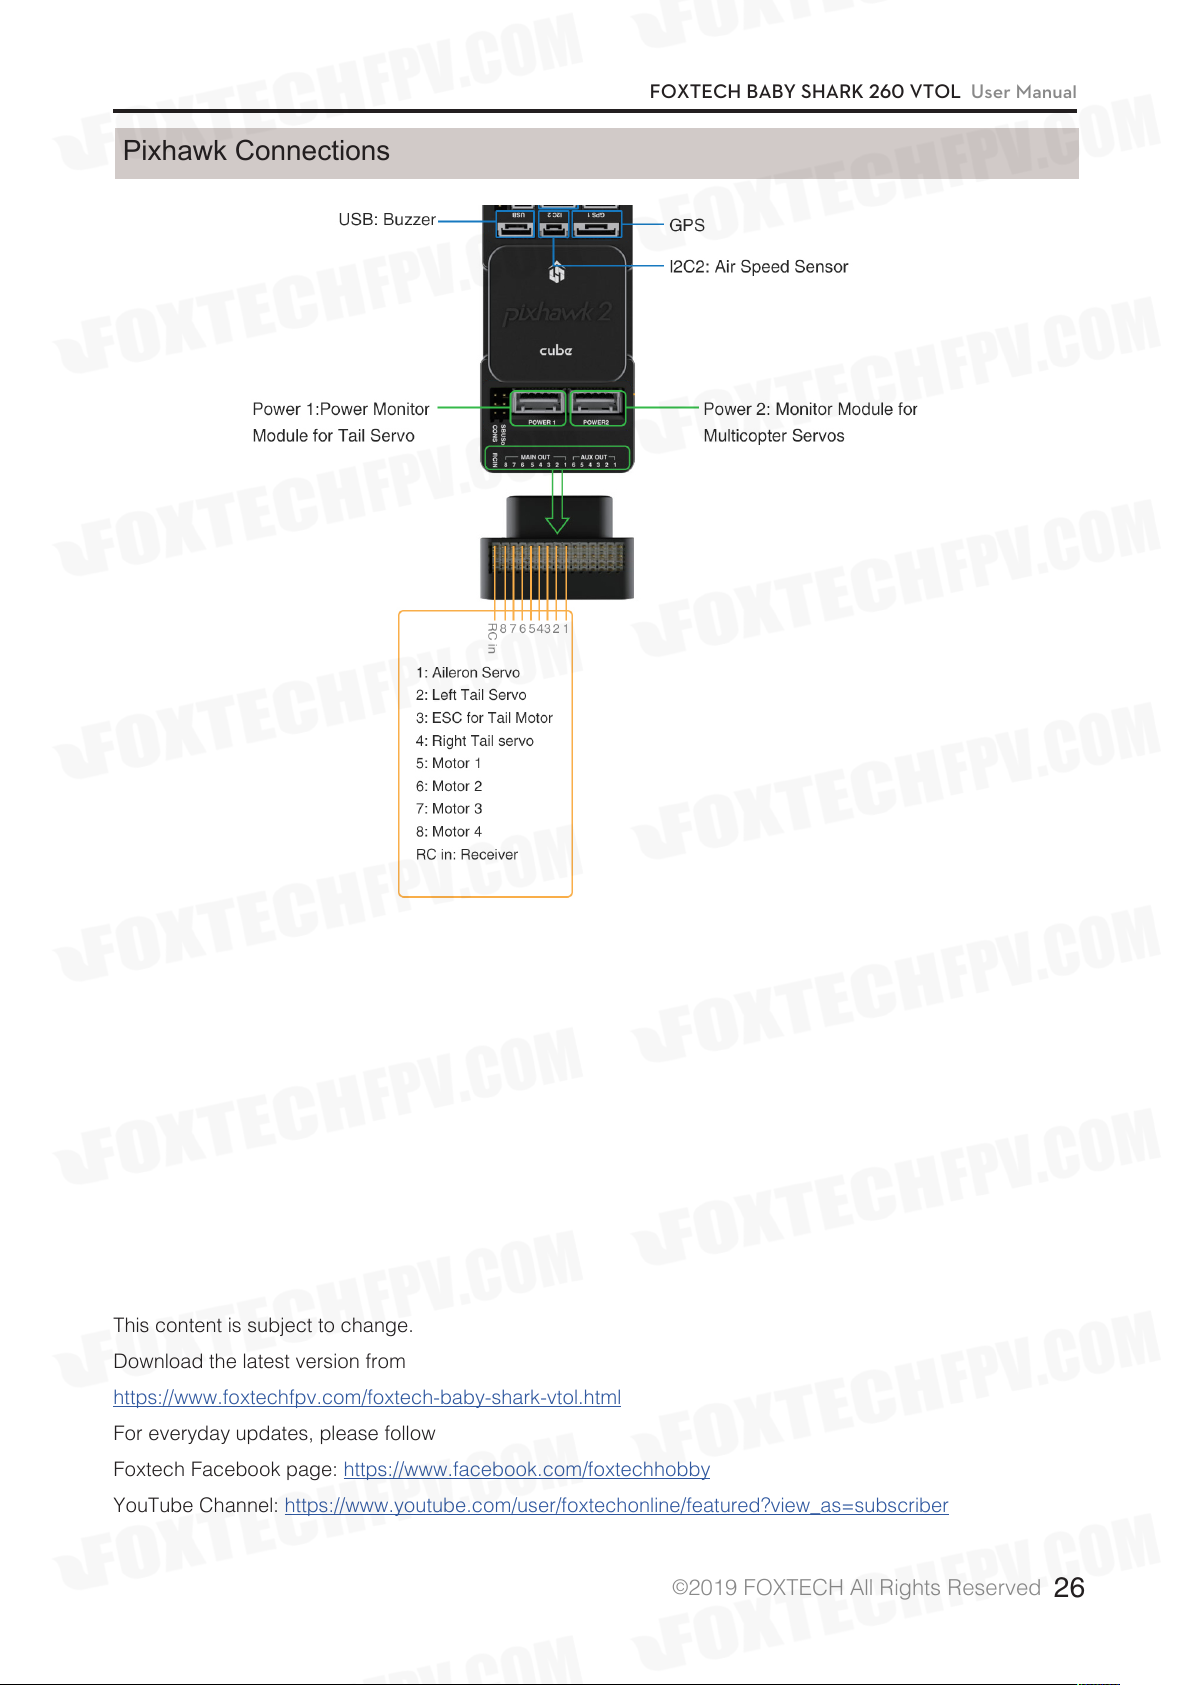
Pixhawk Connections
FOXTECH BABY SHARK 260 VTOL User Manual
This content is subject to change.
Download the latest version from
https://www.foxtechfpv.com/foxtech-baby-shark-vtol.html
For everyday updates, please follow
Foxtech Facebook page: https://www.facebook.com/foxtechhobby
YouTube Channel: https://www.youtube.com/user/foxtechonline/featured?view_as=subscriber
©
2019 FOXTECH All Rights Reserved
26
 Loading...