

Foxpro TRUCK PRO Instruction Manual

Important Information
FOXPRO®’s goal is to provide our customers with the highest quality products in the
industry. We take great pride in manufacturing our products in the USA. Please do not
hesitate to contact us for assistance, comments or questions.
FOXPRO® Inc.
14 Fox Hollow Drive
Lewistown, PA 17044
(717) 248-2507
Fax: (717) 247-3594
Hours of Operation
Monday – Friday
8AM – 5PM EST
Contact Us
Customer Service: (717) 248-2507
Toll Free Orders Only: 866-463-6977
General Inquiry E-mail: sales@gofoxpro.com
Stay up to date with the latest sounds by visiting our online sound library. Watch for
new products and upgrades from FOXPRO®. Visit us online:
www.gofoxpro.com
This manual, the animal sounds stored in your caller, and animal sounds purchased from
FOXPRO® Inc. for installation in your caller is protected by copyright.
Publication Date: June 13, 2014
Copyright ©℗ 2014 by FOXPRO® Inc.
REV8
2

Table of Contents
1. Getting Started ............................................................................................ 7
1-1 What’s in the Box? .................................................................................... 7
1-2 Truck Pro: First Glance .............................................................................. 7
1-3 Truck Pro: Power Requirements ............................................................... 9
1-4 Truck Pro Remote: First Glance................................................................. 9
1-5 Truck Pro Remote: Requirements ........................................................... 10
1-6 FOXGRIP II: First Glance .......................................................................... 10
1-7 FOXGRIP II: Requirements ....................................................................... 11
2. Quick Start Guide ...................................................................................... 12
2-1 Connecting the Speakers ........................................................................ 12
2-2 Powering On the Truck Pro ..................................................................... 13
2-3 Truck Pro Remote Setup ......................................................................... 13
2-4 Playing Sounds ........................................................................................ 14
2-5 Using Presets/Favorites .......................................................................... 15
2-6 Using the FOXGRIP II Remote ................................................................. 15
3. Truck Pro Detailed Overview .................................................................... 17
3-1 Power Information .................................................................................. 17
3-2 Speaker and Speaker Jack Information ................................................... 17
3-3 Auxiliary Device Jack ............................................................................... 18
3-4 USB Port .................................................................................................. 18
3-5 Setting the Channel of Operation ........................................................... 19
4. Truck Pro Remote Control Detailed Overview .......................................... 20
4-1 What are FOX FEATURES? ....................................................................... 20
4-2 Turning on the Truck Pro Remote ........................................................... 20
4-3 Navigating the Truck Pro Remote ........................................................... 20
3

4-4 Understanding the Truck Pro Remote Display ........................................ 21
4-5 Access the Truck Pro Remote Configuration Menu ................................ 22
4-6 Playing Sounds with the Truck Pro Remote ............................................ 25
4-7 Volume & Mute Control .......................................................................... 26
4-8 Presets / Favorites................................................................................... 26
5. FOX FEATURES ........................................................................................... 27
5-1 FOXFUSION .............................................................................................. 27
5-2 FOXMOTION ............................................................................................ 29
5-3 FOXBANG ................................................................................................ 29
5-4 FOXPITCH ................................................................................................ 30
5-5 AUTO VOLUME ........................................................................................ 30
5-6 User Button ............................................................................................. 31
5-7 FOXDATA ................................................................................................. 31
5-8 FOXGRIP .................................................................................................. 34
6. Sound Settings .......................................................................................... 34
6-1 Volume Step ............................................................................................ 34
6-2 Primary & Secondary (FOXFUSION) Mode .............................................. 34
6-3 Speaker Mode ......................................................................................... 35
6-4 Preset Mute Override ............................................................................. 35
7. Display / Power ......................................................................................... 35
7-1 Brightness ................................................................................................ 35
7-2 Keypad ..................................................................................................... 36
7-3 Theme ..................................................................................................... 36
7-4 Display Timeout ...................................................................................... 36
7-5 Auto Off ................................................................................................... 37
8. Date / Time(r) ............................................................................................ 37
4

8-1 Stand Timer & Timer Reset ..................................................................... 37
8-2 Alarm ....................................................................................................... 38
8-3 Time......................................................................................................... 38
8-4 Date & Date Format ................................................................................ 39
9. TX1000 Settings ......................................................................................... 39
9-1 Radio Channel ......................................................................................... 39
9-2 Download List .......................................................................................... 40
9-3 AUX .......................................................................................................... 40
9-4 View......................................................................................................... 41
9-5 Temperature Units .................................................................................. 41
9-6 Barometer Measurement Units .............................................................. 41
9-7 Elevation.................................................................................................. 41
9-8 About Info ............................................................................................... 42
9-9 Restore Defaults ...................................................................................... 42
10. Truck Pro Remote USB Operation ............................................................. 42
10-1 Editing the Presets File .......................................................................... 43
10-2 Viewing the FOXDATA File .................................................................... 44
11. Programming the Truck Pro ...................................................................... 44
11-1 Requirements .................................................................................... 45
11-2 Connecting to a Computer ................................................................ 45
11-3 Manual Programming Process .......................................................... 46
11-4 Indexing the Files............................................................................... 46
11-5 Using the FOXPRO Programming Utility ............................................ 47
11-6 Editing the Categories Manually ....................................................... 49
11-7 Editing the Categories with FOXPRO Utility ...................................... 50
11-8 Updating the Remote Playlist ............................................................ 50
5

11-9 Settings File ....................................................................................... 51
12. Creating FOXCAST Sequence Files ............................................................ 51
12-1 Creating FOXCAST Sequences Manually ............................................... 51
12-2 Enabling File Extensions in Windows .................................................... 53
12-3 Placing Sequences in the Truck Pro ...................................................... 53
12-4 Creating FOXCAST Sequences Online ................................................... 53
12-5 Synchronizing the Truck Pro Remote .................................................... 54
13. Firmware Updates ..................................................................................... 54
13-1 Truck Pro Digital Game Call ............................................................... 54
13-2 Truck Pro Remote .............................................................................. 54
14. Product Care & Maintenance.................................................................... 55
15. Troubleshooting ........................................................................................ 55
16. Maximizing Remote Range ....................................................................... 56
17. FCC & IC Information................................................................................. 57
18. Warranty Statement ................................................................................. 58
6

1. Getting Started
Congratulations on your purchase of the FOXPRO Truck Pro digital game call. To get the most of
your Truck Pro, please read and understand the operating instructions in full.
WARNING: To avoid personal injury and product damage, read all
operating instructions and safety precautions in this guide before using the
FOXPRO Truck Pro digital game call system. A digital copy of this file can be
downloaded from:
http://www.gofoxpro.com/resources/manuals/TRUCKPRO-MANUAL.pdf
1-1 What’s in the Box?
Included in the box you should find the following list of items:
1) Truck Pro digital game call
2) Truck Pro remote control
3) FOXGRIP II remote control
4) (2) Truck Pro speakers
5) (1) 12V power cable w/ fuse
6) (2) Camouflage speaker covers
7) Operators manual
8) Warranty registration
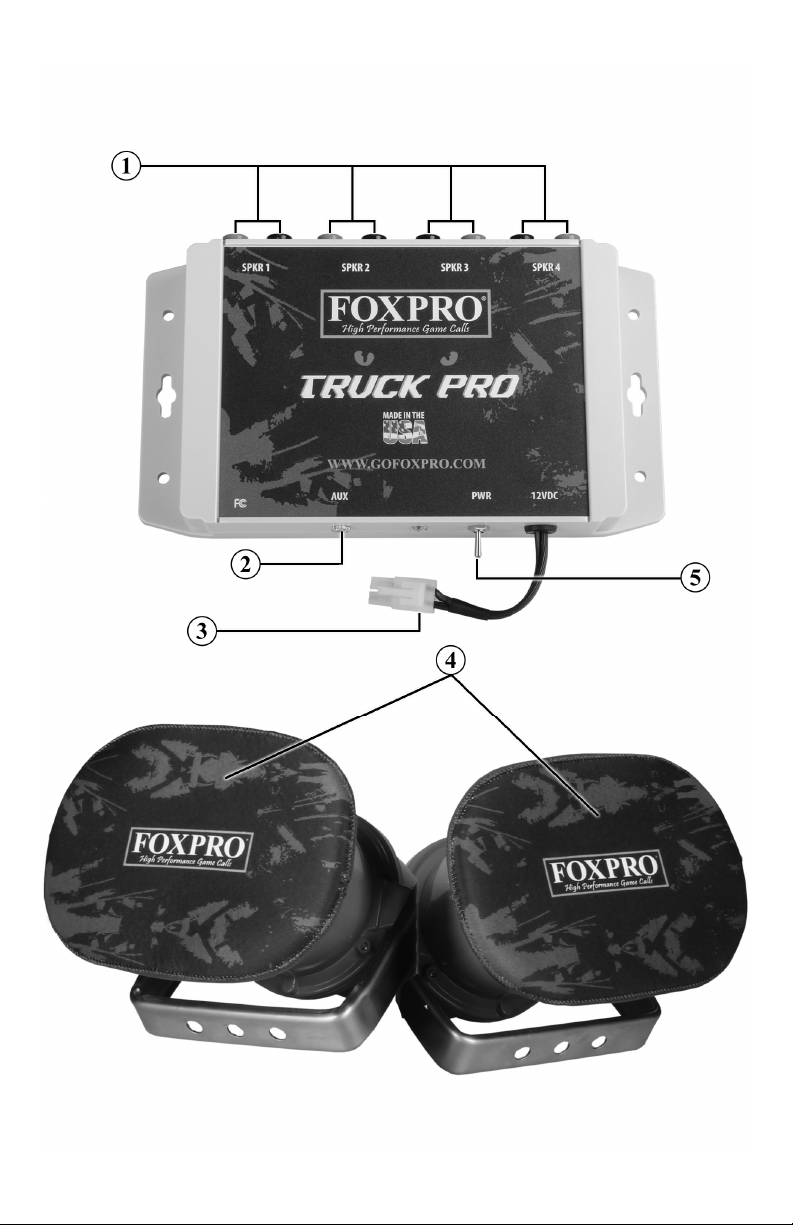
1-2 Truck Pro: First Glance
The graphic on the following page depicts the Truck Pro. Certain aspects are marked with a
number that corresponds to the chart below, defining that particular element.
Number Description
1 Speaker jacks
2 Auxiliary device jack
3 Power connector
4 Speakers
5 Power switch
7
8

1-3 Truck Pro: Power Requirements
IMPORTANT NOTE
The FOXPRO Truck Pro requires an external 12VDC power source, such as a car battery. It is
shipped from the factory with a power cable that connects to the cigarette lighter plugs found
in most motor vehicles. To power-up the Truck Pro, connect one end of the cable to an available
cigarette lighter plug in your vehicle and then connect the other end to the Truck Pro power
cable. Please note that the power plug features a 5A slow-blow glass inline fuse. If you are
using your own power cables rather than the supplied cables (for example: wiring directly to a
car battery), be sure that you use a 5A fuse on the positive side. FOXPRO has alternate power
cables available to connect directly to a battery rather than the cigarette lighter plug. Please
contact the FOXPRO Sales Team at 866-463-6977 for ordering information.
If you are powering the Truck Pro from your vehicles battery, make sure that the
battery is healthy and that your alternator is in good shape. If you frequently find
that your vehicle will not start without a jump, then we recommend that you do
not use the Truck Pro until your vehicle has been repaired by an automotive repair
specialist. The Truck Pro is designed to detect a low battery state before your
vehicle battery is rendered incapable of starting your vehicle. However, it is
impossible to account for the age and other factors associated with your particular
battery. The Truck Pro will start detecting a low battery state at 11.7V and will stop
operating at 11.5V. An extended run time threshold can be set to allow it to drop
to 10.5V before it stops operating. Please see section 11-9 for more information on
modifying this value.
1-4 Truck Pro Remote: First Glance
The chart below corresponds with a graphic that depicts the Truck Pro remote. Certain aspects
of the remote are marked with a number on the chart below.
Number Description Number Description
1 Quick access preset buttons 11 Recall button
2 FOXDATA button 12 Auxiliary button
3 Power on/off button 13 Mute button
4 Scroll up button 14 Volume up button
5 Volume down button 15 Back / menu button
6 Play / select button 16 FOXFUSION button
7 Scroll down button 17 Mini USB Port
8 FOXPITCH
9 USER button
10 Lanyard loop
9
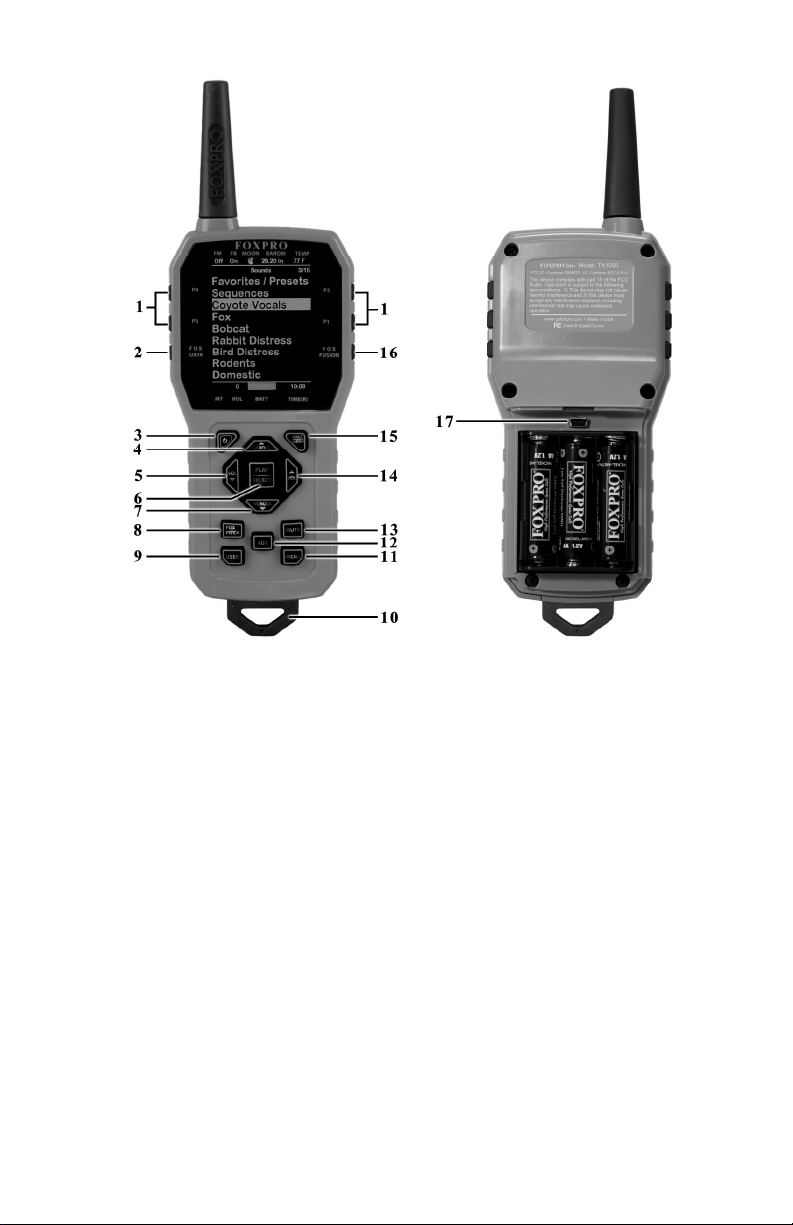
1-5 Truck Pro Remote: Requirements
The Truck Pro remote control operates on 3 ‘AA’ batteries. It is recommended that you use
high quality lithium or alkaline batteries for the best performance.
Installing Batteries in the Truck Pro Remote
1. Access the battery compartment by removing the door from the back of the remote.
The door slides down and off of the remote.
2. Place the batteries into each battery cavity while observing polarity as indicated.
3. Slide the battery compartment door back on the remote.
1-6 FOXGRIP II: First Glance
The Truck Pro comes standard with the FOXGRIP II. The FOXGRIP II is a radio transmitting device
featuring two buttons that transmit a signal to the Truck Pro to trigger preset 1 and preset 2.
FOXGRIP II features industrial-strength Velcro allowing you to secure it to many different
locations inside of your truck or hunting rig.
10

The image below depicts the FOXGRIP II. As you can see there are two individual buttons
labeled 1 and 2. Button 1 triggers preset 1 and button 2 triggers preset 2.
1-7 FOXGRIP II: Requirements
The FOXGRIP II contains a single lithium coin cell battery (CR2032). This battery typically lasts
approximately 3,000 button pushes (actual number of button pushes will vary depending upon
use). Replacement battery can be found at many local stores or through online sources. To
replace the battery, follow the instructions below:
1. Before attempting to replace the battery, it is crucial that you understand the risks
of electrostatic discharge potentially harming the electronic board during battery
replacement! Prior to replacing the battery, make sure that you are static free. You
can touch your hand to a refrigerator door, oven housing, door knob, etc. If you have
the ability to use a proper grounding wrist strap, please do so.
2. Carefully separate the FOXGRIP II into two halves. This can be accomplished with a
flathead screwdriver or other comparable tool.
3. Once apart, the circuit board will move freely. The battery is located on the back side
(see the following image).
11
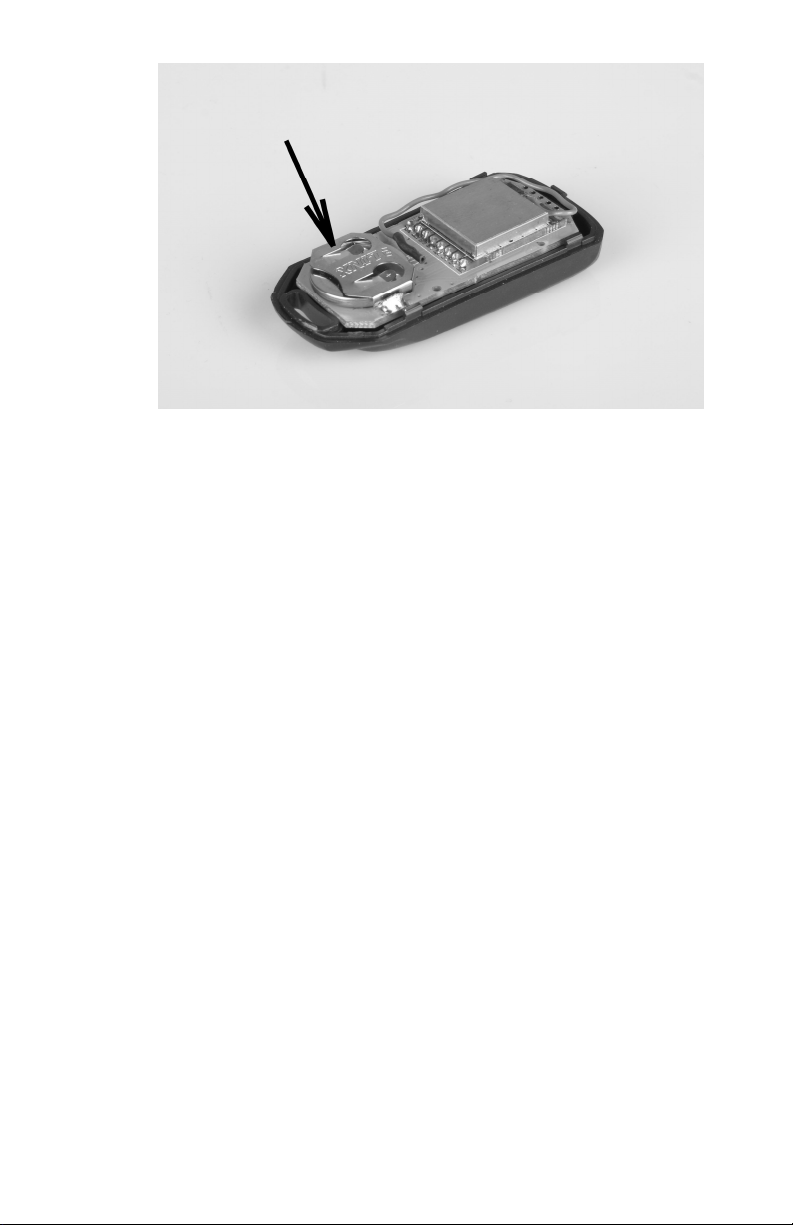
4. Locate the battery and carefully remove it from the board by sliding it out of the
holder. Note battery orientation as you remove it as the new battery must go back in
the same way (positive (+) side is up, negative (-) is down).
5. Carefully slide the new battery into the holder.
6. Place the circuit board back inside the appropriate case half.
7. Line the two halves up together and snap them shut to form a single device once
again.
2. Quick Start Guide
The following Quick Start Guide provides a very brief overview of basic operations such as
playing sounds, adjusting volume, and using presets. While this may be enough to get you
started, it is strongly recommended that you read the manual in its entirety to fully understand
all of the capabilities and get the most out of the product.
2-1 Connecting the Speakers
The Truck Pro comes standard with two external speakers. Prior to playing any sounds, you
must have at least one of the speakers connected. Each speaker has two colored ends: orange
and black. The back of the Truck Pro features 4 speaker jacks, each jack having an orange and
black plug. Be sure to keep the colors matched (orange to orange, black to black) when plugging
the speakers in.
The Truck Pro speakers feature a mounting bracket and 25’ of cable. This should provide you
with plenty of flexibility to mount the speakers just about anywhere on your truck. The speakers
also feature easy disconnect plugs that enable you to quickly disconnect the speakers from the
speaker wire and store inside. Each speaker has a protective neoprene cover that is provided to
help keep water from getting inside the speaker. Even with these covers in place, you should
12

not leave the speakers permanently mounted to your truck as they are not considered 100%
IMPORTANT NOTE
waterproof and water damage is not covered by warranty. When you are not using the Truck
Pro, it is recommend that you disconnect the speakers and store them inside your vehicle to
prevent excessive exposure to the elements.
2-2 Powering On the Truck Pro
The Truck Pro is powered-on by moving the power switch to the on position. When the device is
powered-on, the orange LED pilot lamp will blink one time and then illuminate, signaling that it
is ready to be operated from the remote control.
2-3 Truck Pro Remote Setup
After installing batteries or changing batteries in the Truck Pro remote, it is recommended that
you make it a routine to take a moment to setup the date and time settings. This section will
explain these setup configurations.
Setting the Clock:
1. Access the Back Menu by pushing the Back/Menu button.
2. Access the Date/Time(r) menu and select “Time”
3. Use the scroll buttons to set the current time.
4. Push “Play/Select” to lock it in.
The clock can be displayed in either the standard 12 hour format or 24 hour format (military
time).
Configuring Time Format:
1. Access the Back Menu by pushing the Back/Menu button.
2. Access the Date/Time(r) menu and select “Time Format”
3. Use the scroll buttons to select either 12 or 24 hour time format.
4. Push “Play/Select” to lock in the setting.
The bottom status line of the Truck Pro display can show either the current time or the stand
timer. The stand timer will only be displayed if it is turned on—otherwise, the clock will show
the current time.
The Truck Pro remote control features a moon phase indicator. In order to display
the correct moon phase, it is imperative that you enter the correct date.
Otherwise, the displayed information may not be correct.
Setting the Date:
1. Access the Back Menu by pushing the Back/Menu button.
13

2. Access the Date/Time(r) menu and select “Date”
3. By default, the first option is the month. Use the scroll buttons to select the current
month and then push the “Play/Select” button.
4. Next you set the day using the same method described above, and then push
“Play/Select”.
5. Finally, set the year and push “Play/Select” to lock it in.
There are three different date formats that you can choose from depending upon your personal
preference. They are month/day/year, year-month-day, and day.month.year.
Configuring Date Format:
1. Access the Back Menu by pushing the Back/Menu button.
2. Access the Date/Time(r) menu and select “Date Format”
3. Use the scroll buttons to cycle through the options.
4. When your desired date format is shown, push “Play/Select” to lock it in.
2-4 Playing Sounds
Before you can play sounds, make sure that the Truck Pro is connected to a 12V power source
and that power is applied to the connector the Truck Pro is plugged in to. Also check that you
have good batteries installed the remote control and that at least one speaker is connected to
the Truck Pro.
1. Turn on the Truck Pro by placing the power switch in the “on” position.
2. Turn on the Truck Pro Remote by pushing and holding down the power button for
approximately 1-2 seconds. The remote will default to Category View Mode, meaning
that the sounds are listed and grouped in categories.
3. Use the scroll buttons on the remote to highlight the category you wish to pick a
sound from and then push the “Play/Select” button. The sounds assigned to that
category will be displayed.
4. Use the scroll buttons on the remote to highlight the individual sound from that
category that you wish to play, and then push the “Play/Select” button to start
playback. Please note, the default play mode is set to single from the factory. This
means that the sound will play a single time and stop. This can be changed to repeat
mode and jukebox mode as well. See section 6.2.
5. Use the volume up button to raise the volume level to a point where you can hear it.
6. To mute (or pause) the sound, simply push the mute button. To resume playback,
push the mute button again.
7. To switch sounds, simply go through the sound list or switch categories to find a
different sound and then just push the “Play/Select” button. To go back to the
previous sound, push the “Recall” button.
14

2-5 Using Presets/Favorites
The Truck Pro remote is capable of storing up to 50 unique presets or favorites. A preset is a
shortcut to a particular sound which has a defined volume level. The Truck Pro remote has 4
quick access preset buttons located on the top left and right.
By default, your Truck Pro remote will have no presets established. The following instructions
will describe how to setup a preset:
To Create a Preset/Favorite:
1. From the main screen, select the “Favorites/Presets” menu item.
2. Select one of the 50 preset slots. Notice that the screen will indicate “Preset
Recording”. The first step is to select the sound.
3. Use the scroll buttons to highlight the sound you want to establish for this preset and
then push the “Play/Select” button.
4. The last step is setting the volume level. Use the volume buttons to dial-in the desired
volume level you wish to assign to this preset and then push “Play/Select” to lock it in.
5. Your preset is now setup.
You can assign the P1, P2, P3, and P4 buttons in the following manner:
1. Highlight the sound that you wish to have established in one of the four positions.
2. From the main sounds or category screen, press and hold the P1, P2, P3, or P4 button
for approximately 3-4 seconds.
3. Set the volume level and then push the “Play/Select” button to lock in that preset.
To initiate playback of a presets 1-4, make sure that both the Truck Pro and Truck Pro remote
are turned on, and then push the corresponding preset button (P1 – P4) on the top sides of the
remote. The Truck Pro will then instantly switch to that sound and volume level.
To initiate playback of any preset, simply select the “Favorites/Presets” menu on the main
screen, browse through the available presets, and then use the “Play/Select” button, just as if
you were picking a sound for normal playback.
Presets can also be managed by editing a specific file located within the Truck Pro remote. For
the advanced information on this process, please view Chapter 10.
2-6 Using the FOXGRIP II Remote
The FOXGRIP II relies upon having presets 1 and 2 setup in the Truck Pro remote. After setting
up presets 1 and 2 per the instructions in section 2-5, continue with the following.
15

Pairing the FOXGRIP II with the Truck Pro:
IMPORTANT NOTE
IMPORTANT NOTE
Make sure that you have fresh batteries in the Truck Pro remote and FOXGRIP II and that the
Truck Pro is turned on prior to trying the following steps. Before you can use the FOXGRIP II
with the Truck Pro, you must pair the two devices together.
1. Turn on the Truck Pro remote control.
2. Turn on the Truck Pro.
3. Enter the main menu on the Truck Pro remote control.
4. Select “FoxFeatures” menu.
5. Select the “FoxGrip” parameter. A confirmation message is displayed informing you to
verify that the Truck Pro is powered on. If you are sure the Truck Pro is turned on,
select “OK”.
6. A prompt will appear instructing you to activate FOXGRIP. At this time, push and
release button 1 on the FOXGRIP II. Upon pushing button 1, the synchronization
process begins. In this process, specific configurations are written to the Truck Pro so
that it learns how to react to the button pushes from the FOXGRIP II. Once
synchronization has started, it is important that you do not press a button on the
FOXGRIP II until the synchronization has completed.
7. After the synchronization is complete, the “FoxGrip” menu item will display the
appropriate ID for your FOXGRIP II.
If the synchronization fails, make sure you have a good battery in the FOXGRIP II. It
is also crucially important to make sure that the Truck Pro is powered on during
this process.
When using the FOXGRIP II, make sure that you have the FOXGRIP II located within
approximately 10 yards of the Truck Pro. Any distance greater than that may result in failure of
communication. With the Truck Pro turned on, push either button 1 or 2 on the FOXGRIP II to
trigger preset 1 or 2. A subsequent push of button 1 or 2 will result in the preset changing to a
muted state. Please note that if you mute the sound via the FOXGRIP II, the Truck Pro remote
control will not be aware of this state change. Because of this, if you wish to take over
operations from the Truck Pro remote you will need to push the mute button twice on the
Truck Pro to regain control from a FOXGRIP II induced mute state. If you press and hold either
button 1 or button 2 for ¾ of a second, this will result in the preset restarting.
If you change the presets on your Truck Pro remote, you must perform the
FOXGRIP II pairing steps in order for the Truck Pro to become aware of the preset
change. If you fail to perform this step, FOXGRIP II activation will result in the
previous presets playing rather than the new presets. Once paired, the Truck Pro
16

remote does not need to be powered on for the FOXGRIP II to control preset 1 and
2.
3. Truck Pro Detailed Overview
This chapter provides a more detailed oriented overview of the Truck Pro.
3-1 Power Information
The Truck Pro is designed to operate from a 12V power supply. The Truck Pro is shipped with a
power cable that enables you to connect to a cigarette lighter plug found in most vehicles. This
cable features a 5A slow-blow glass inline fuse. If you encounter a situation where the fuse must
be replaced, please use the image below for reference:
As you can see, there are 5 small pieces that must be accounted for during disassembly and
subsequent reassembly. The order they are shown in above is the order that you must use
when reassembling.
WARNING
If you are powering the Truck Pro from your vehicle battery, make sure that your
battery is healthy. If you frequently find that your vehicle will not start without a jump,
then we recommend that you do not use the Truck Pro until your vehicle has been
repaired by an automotive repair specialist.
3-2 Speaker and Speaker Jack Information
The Truck Pro ships with two 10W speakers. The Truck Pro has a total of four speaker jacks that
can accommodate up to 4 speakers. The speakers have two colored plugs: black and orange.
Always be sure to match colors when connecting the speakers. The Truck Pro can also work
with the FOXPRO SP-1130 30W speakers.
17

Each of the speakers has approximately 25’ (feet) of cable. This should provide plenty of cable
for most mounting situations. To order additional speakers, please visit our website at:
http://www.gofoxpro.com or contact the FOXPRO Sales Team toll free at 866-463-6977.
3-3 Auxiliary Device Jack
The Truck Pro is equipped with an auxiliary jack labeled “AUX”. This jack is located on the main
faceplate of the Truck Pro. The purpose of this jack is to allow for the connection of certain
external devices (such as Jack Predator Decoys) for triggering their action on and off by using
the Truck Pro remote control.
While you may be able to connect other devices to the auxiliary jack beyond Jack Predator
Decoys, there are strict electrical limits involved with this jack. If these limits are exceeded,
damage to your Truck Pro will result. That damage is not covered by warranty.
The electrically inclined will want to know that the jack is connected to the drain of an internal
FET with a maximum current rating of 10mA. The tip polarity of the 3.5mm jack is positive, the
sleeve is negative. If the external device is connected with reverse polarity, an internal
protection diode within the FET will conduct causing the device to stay on constantly. The
maximum voltage applied to this jack cannot exceed 15VDC.
Instructions for connecting various devices to the auxiliary jack are beyond the scope of this
manual. You are urged to seek help from a knowledgeable professional before connecting any
unapproved devices to the jack. Keep in mind that any damage to the Truck Pro as a result of
improper use of the auxiliary jack is not covered by the warranty, nor will FOXPRO be liable for
damage to any connected devices
3-4 USB Port
The Truck Pro is equipped with a standard USB 2.0 port which is located inside of the main
housing. This requires a USB 2.0 printer-style cable for connecting to your computer. To access
the USB port, remove the four screws located on the bottom of the Truck Pro. Remove the
bottom panel. The USB port is located close to the auxiliary jack (see the image on the next
page).
18
 Loading...