

Page 1

Page 2

2
Important Information
FOXPRO®’s goal is to provide our customers with the highest quality products in the
industry. We take great pride in manufacturing our products in the USA. Please do not
hesitate to contact us for assistance, comments or questions.
FOXPRO® Inc.
14 Fox Hollow Drive
Lewistown, PA 17044
(717) 248-2507
Fax: (717) 247-3594
Hours of Operation
Monday – Friday
8AM – 5PM EST
Contact Us
Customer Service: (717) 248-2507
Toll Free Orders Only: 866-463-6977
General Inquiry E-mail: sales@gofoxpro.com
Stay up to date with the latest sounds by visiting our online sound library. Watch for
new products and upgrades from FOXPRO®. Visit us online:
www.gofoxpro.com
This manual, the animal sounds stored in your caller, and animal sounds purchased from
FOXPRO® Inc. for installation in your caller is protected by copyright.
Publication Date: November 7, 2014
Copyright ©℗ 2014 by FOXPRO® Inc.
REV11
Page 3

3
Table of Contents
1. Getting Started ............................................................................................ 7
1-1 What’s in the Box? .............................................................................. 7
1-2 Krakatoa II: First Glance ...................................................................... 7
1-3 Krakatoa II: Requirements ................................................................... 8
1-4 Krakatoa II Remote: First Glance ......................................................... 9
1-5 Krakatoa II Remote: Requirements ................................................... 10
2. Quick Start Guide ...................................................................................... 10
2-1 Powering On the Krakatoa II ................................................................... 10
2-2 KRAKATOA II Remote Setup .................................................................... 10
2-3 Playing Sounds ........................................................................................ 11
2-4 Using Presets/Favorites .......................................................................... 12
3. KRAKATOA II Detailed Overview ............................................................... 13
3-1 External Speaker Jack Information.......................................................... 13
3-2 Auxiliary Device Jack ............................................................................... 13
3-3 Batteries and Charging ............................................................................ 14
3-4 USB Port .................................................................................................. 15
3-5 Setting the Channel of Operation ........................................................... 15
3-6 Setting the Battery Chemistry ................................................................. 16
4. KRAKATOA II Remote Control Detailed Overview .................................... 17
4-1 What are FOX FEATURES? ....................................................................... 17
4-2 Turning on the KRAKATOA II Remote ..................................................... 17
4-3 Navigating the KRAKATOA II Remote ...................................................... 18
4-4 Understanding the KRAKATOA II Remote Display .................................. 18
4-5 Access the KRAKATOA II Remote Configuration Menu ........................... 19
4-6 Playing Sounds with the KRAKATOA II Remote ....................................... 22
Page 4

4
4-7 Volume & Mute Control .......................................................................... 23
4-8 Presets / Favorites................................................................................... 23
5. FOX FEATURES ........................................................................................... 24
5-1 FOXMOTION ............................................................................................ 24
5-2 FOXBANG ................................................................................................ 24
5-3 AUTO VOLUME ........................................................................................ 25
5-4 User Button ............................................................................................. 26
5-5 FOXDATA ................................................................................................. 26
5-6 FOXGRIP .................................................................................................. 28
6. Sound Settings .......................................................................................... 29
6-1 Volume Step ............................................................................................ 29
6-2 Pri. Mode ................................................................................................ 29
6-3 Spk Mode (Speaker Mode) ..................................................................... 29
6-4 Main Speaker .......................................................................................... 30
6-5 Ext. Speaker ............................................................................................. 30
6-6 Preset Mute Override ............................................................................. 30
7. Display / Power ......................................................................................... 30
7-1 Brightness ................................................................................................ 30
7-2 Keypad ..................................................................................................... 30
7-3 Theme ..................................................................................................... 31
7-4 Display Timeout ...................................................................................... 31
7-5 Auto Off ................................................................................................... 32
8. Date / Time(r) ............................................................................................ 32
8-1 Stand Timer & Timer Reset ..................................................................... 32
8-2 Alarm ....................................................................................................... 33
8-3 Time......................................................................................................... 33
Page 5

5
8-4 Date & Date Format ................................................................................ 34
9. TX1000 Settings ......................................................................................... 34
9-1 Radio Channel ......................................................................................... 34
9-2 AUX .......................................................................................................... 35
9-3 View......................................................................................................... 35
9-4 Temperature Units .................................................................................. 35
9-5 Barometer Measurement Units .............................................................. 36
9-6 Elevation.................................................................................................. 36
9-7 About Info ............................................................................................... 36
9-8 Restore Defaults ...................................................................................... 36
10. KRAKATOA II Remote USB Operation ....................................................... 37
10-1 Editing the Presets File .......................................................................... 38
10-2 Viewing the FOXDATA File .................................................................... 38
11. Programming the KRAKATOA II ................................................................. 39
11-1 Requirements .................................................................................... 39
11-2 Connecting to a Computer ................................................................ 39
11-3 Manual Programming Process .......................................................... 40
11-4 Indexing the Files............................................................................... 40
11-5 Using the FOXPRO Programming Utility ............................................ 41
11-6 Editing the Categories Manually ....................................................... 42
11-7 Editing the Categories with FOXPRO Utility ...................................... 44
11-8 Updating the Remote Playlist ............................................................ 44
12. Creating FOXCAST Sequence Files ............................................................ 44
12-1 Creating FOXCAST Sequences Manually ............................................... 45
12-2 Enabling File Extensions in Windows .................................................... 46
12-3 Placing Sequences in the KRAKATOA II ................................................. 46
Page 6

6
12-4 Creating FOXCAST Sequences Online ................................................... 47
12-5 Synchronizing the KRAKATOA II Remote .............................................. 47
13. Firmware Updates ..................................................................................... 47
13-1 KRAKATOA II TX1000 Remote ........................................................... 47
14. Product Care & Maintenance.................................................................... 48
15. Troubleshooting ........................................................................................ 49
16. Maximizing Remote Range ....................................................................... 50
17. FCC & IC Information................................................................................. 51
18. Warranty Statement ................................................................................. 53
Page 7
7
1. Getting Started
Congratulations on your purchase of the FOXPRO Krakatoa II digital game call! To get the full
advantage of the Krakatoa II and its features, please read and understand the operating
instructions in full.
WARNING: To avoid personal injury and product damage, read all
operating instructions and safety precautions in this guide before using the
FOXPRO Krakatoa II digital game call system. A digital copy of this file can
be downloaded from:
http://www.gofoxpro.com/resources/manuals/Krakatoa_2.pdf
1-1 What’s in the Box?
Included with the box you should find the following items:
1) Krakatoa II digital game call
2) Krakatoa II remote control
3) Operators manual
4) Warranty registration card
5) USB cord
6) 2 rechargeable NiMH battery packs
7) Fast charger
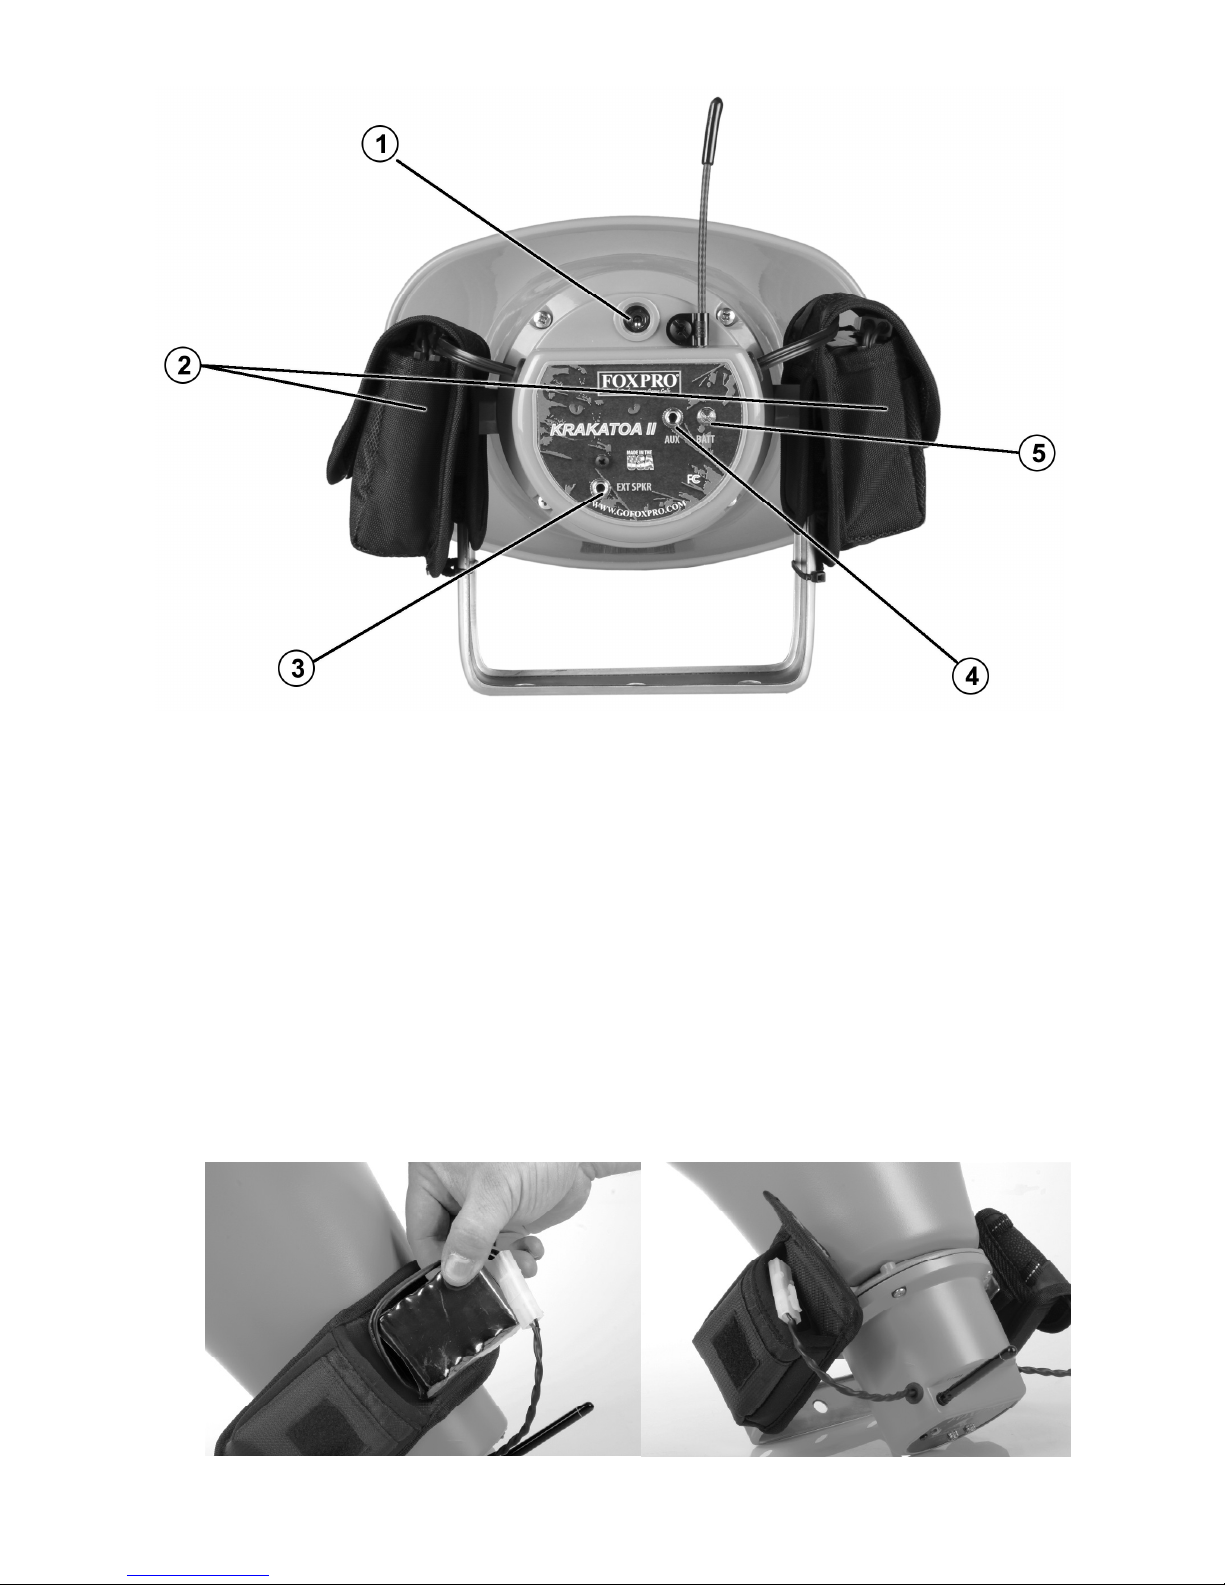
1-2 Krakatoa II: First Glance
The following chart corresponds to a graphic on the next page.
Number Description
1 Power on/off switch
2 Battery pouches
3 Auxiliary device jack
4 External speaker jack
5 Pilot lamp / low power LED
Page 8
8
1-3 Krakatoa II: Requirements
The Krakatoa II is shipped from the factory with two sealed rechargeable NiMH battery packs.
The packs may have some charge, but it is recommended to perform a charging cycle prior to
any field use. To install the battery packs:
1. Open the cover to one of the battery pouches (one located on either side).
2. Locate the power cable. The cable has a white connector on the end. That end
connects to the power cable found on the battery pack itself.
3. Connect the battery pack to the battery cable.
4. Place the battery into the pouch and secure the cover.
Page 9
9
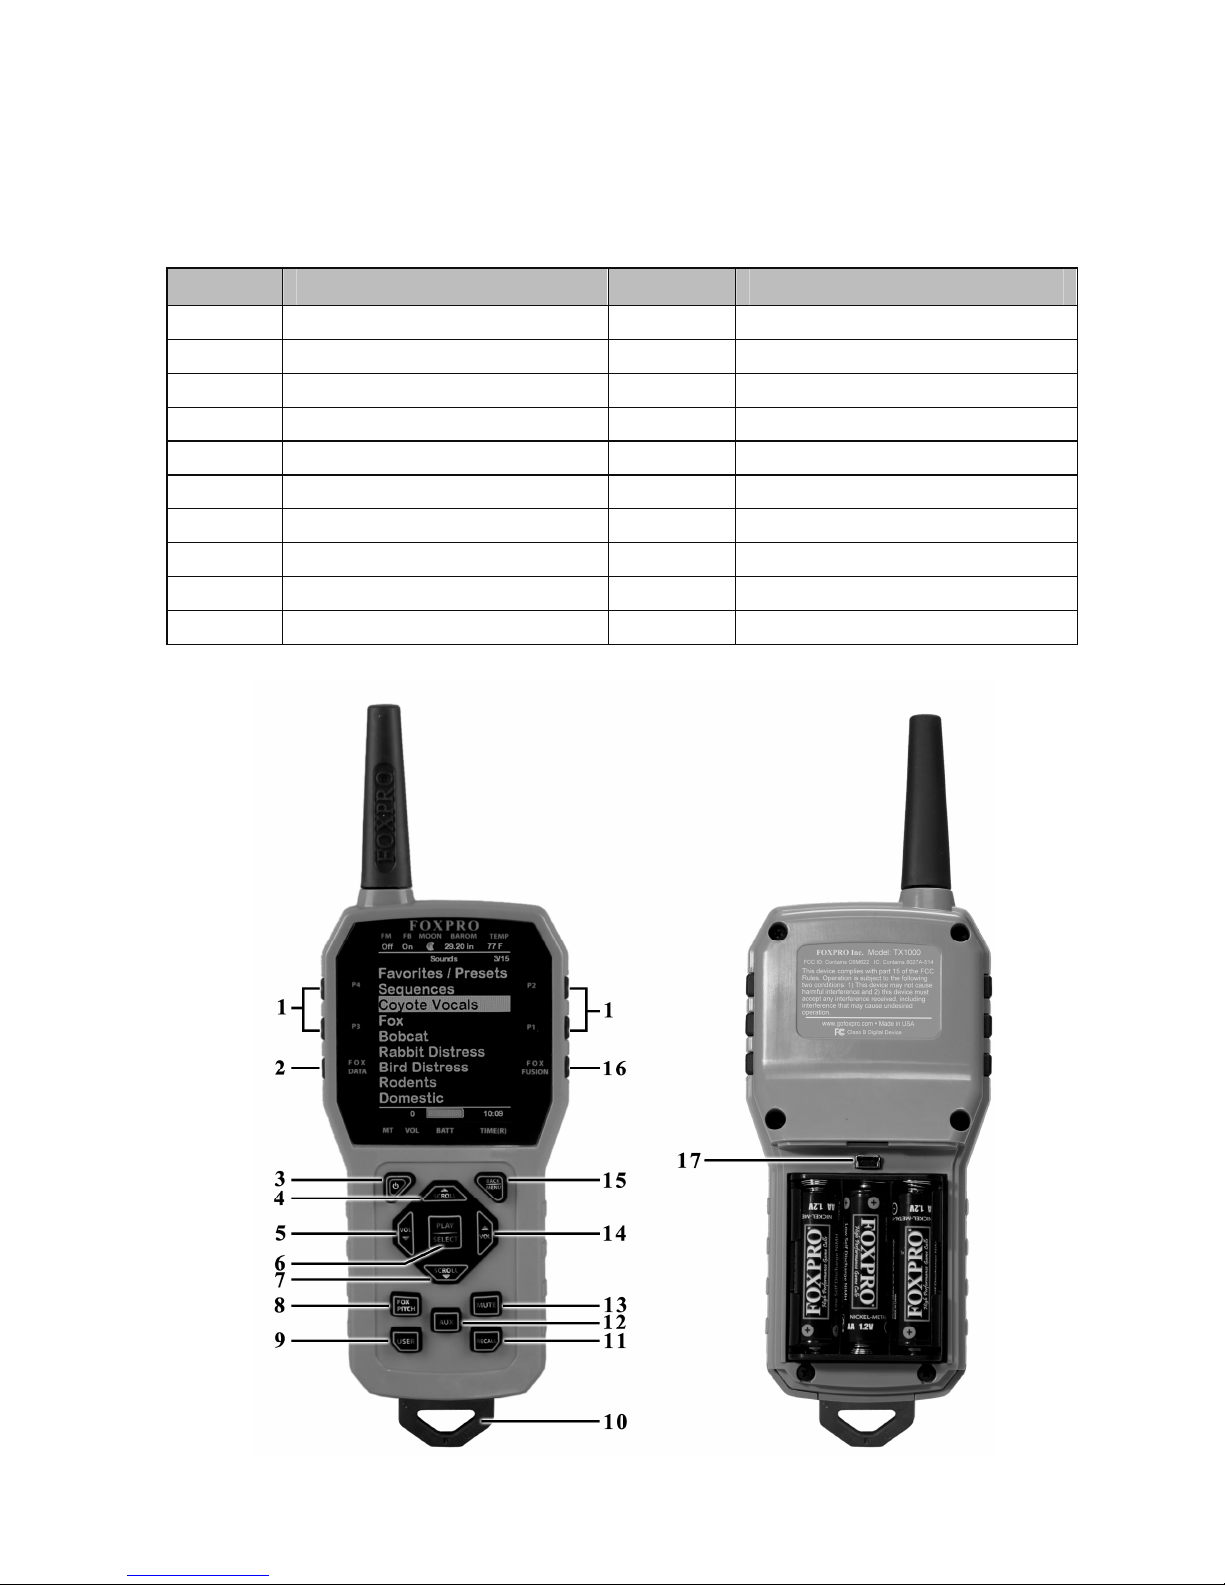
1-4 Krakatoa II Remote: First Glance
The following chart corresponds to a graphic below that depicts the Krakatoa II remote. Certain
aspects of the Krakatoa II remote will be marked with a number which corresponds to the chart
defining that particular element.
Number Description Number Description
1 Quick access preset buttons 11 Recall button
2 FOXDATA button 12 Auxiliary button
3 Power on/off button 13 Mute button
4 Scroll up button 14 Volume up button
5 Volume down button 15 Back / menu button
6 Play / select button 16 FOXFUSION button (unused)
7 Scroll down button 17 Mini USB Port
8 FOXPITCH (unused)
9 USER button
10 Lanyard loop
Page 10

10
1-5 Krakatoa II Remote: Requirements
The Krakatoa II remote control operates on 3 ‘AA’ batteries. It is recommended that you use
high quality lithium or alkaline batteries for the best performance.
Installing Batteries in the Krakatoa II Remote
1. Access the battery compartment by removing the door from the back of the remote.
The door slides down and off of the remote.
2. Place the batteries into each battery cavity while observing polarity as indicated.
3. Slide the battery compartment door back on the remote.
2. Quick Start Guide
The following Quick Start Guide provides a very brief overview of basic operations such as
playing sounds, adjusting volume, and using presets. While this may be enough to get you
started, it is strongly recommended that you read the manual in its entirety to fully understand
all of the capabilities and get the most out of the product.
2-1 Powering On the Krakatoa II
The Krakatoa II is powered-on by moving the power switch to the on position. When poweredon, the orange LED pilot lamp will blinks rapidly several times and then illuminates solidly,
signaling that it is ready to be operated from the remote control.
2-2 KRAKATOA II Remote Setup
After installing batteries or changing batteries in the KRAKATOA II remote, it is recommended
that you make it a routine to take a moment to setup the date and time settings. This section
will explain these setup configurations.
Setting the Clock:
1. Access the Date/Time(r) menu and select “Time”
2. Use the scroll buttons to set the current time.
3. Push “Play/Select” to lock it in.
The clock can be displayed in either the standard 12 hour format or 24 hour format (military
time).
Configuring Time Format:
1. Access the Date/Time(r) menu and select “Time Format”
2. Use the scroll buttons to select either 12 or 24 hour time format.
3. Push “Play/Select” to lock in the setting.
Page 11
11
The bottom status line of the KRAKATOA II display can show either the current time or the stand
timer. The stand timer will only be displayed if it is turned on—otherwise, the clock will show
the current time.
IMPORTANT NOTE
The KRAKATOA II remote control features a moon phase indicator. In order to
display the correct moon phase, it is imperative that you enter the correct date.
Otherwise, the displayed information may not be correct.
Setting the Date:
1. Access the Date/Time(r) menu and select “Date”
2. By default, the first option is the month. Use the scroll buttons to select the current
month and then push the “Play/Select” button.
3. Next you set the day using the same method described above, and then push
“Play/Select”.
4. Finally, set the year and push “Play/Select” to lock it in.
There are three different date formats that you can choose from depending upon your personal
preference. They are month/day/year, year-month-day, and day.month.year.
Configuring Date Format:
1. Access the Date/Time(r) menu and select “Date Format”
2. Use the scroll buttons to cycle through the options.
When your desired date format is shown, push “Play/Select” to lock it in.
2-3 Playing Sounds
Make sure that you have properly installed batteries in both the KRAKATOA II and KRAKATOA II
remote as described in Chapter 1.
IMPORTANT NOTE
The Krakatoa II remote control is not intended to operate the caller at distances
shorter than 1 meter (3 feet). If the remote is located too close to the caller,
proper operation cannot be ensured.
1. Turn on the KRAKATOA II by placing the power switch in the “on” position.
2. Turn on the KRAKATOA II Remote by pushing and holding down the power button for
approximately 2-3 seconds. The remote will default to Category View Mode, meaning
that the sounds are listed and grouped in categories. If no categories are defined, you
will see ‘Sound List’ instead.
Page 12

12
3. Use the scroll buttons on the remote to highlight the category you wish to pick a
sound from and then push the “Play/Select” button. The sounds assigned to that
category will be displayed.
4. Use the scroll buttons on the remote to highlight the individual sound from that
category that you wish to play, and then push the “Play/Select” button to start
playback.
5. Use the volume up button to raise the volume level to a point where you can hear it.
6. To mute (or pause) the sound, simply push the mute button. To resume playback,
push the mute button again.
7. To switch sounds, simply go through the sound list or switch categories to find a
different sound and then just push the “Play/Select” button. To go back to the
previous sound, push the “Recall” button.
2-4 Using Presets/Favorites
The KRAKATOA II remote is capable of storing up to 50 unique presets or favorites. A preset is a
shortcut to a particular sound which has a defined volume level. The KRAKATOA II remote has 4
quick access preset buttons located on the top left and right (see image on page 9).
By default, your KRAKATOA II remote will have no presets established. The following
instructions will describe how to setup a preset:
To Create a Preset/Favorite:
1. From the main screen, select the “Favorites/Presets” menu item.
2. Select one of the 50 preset slots. Notice that the screen will indicate “Preset
Recording”. The first step is to select the sound.
3. Use the scroll buttons to highlight the sound you want to establish for this preset and
then push the “Play/Select” button.
4. The last step is setting the volume level. Use the volume buttons to dial-in the desired
volume level you wish to assign to this preset and then push “Play/Select” to lock it in.
5. Your preset is now setup.
You can assign the P1, P2, P3, and P4 buttons in the following manner:
1. Highlight the sound that you wish to have established in one of the four positions.
2. From the main sounds or category screen, press and hold the P1, P2, P3, or P4 button
for approximately 3-4 seconds.
3. Set the volume level and then push the “Play/Select” button to lock in that preset.
To initiate playback of a presets 1-4, make sure that both the KRAKATOA II and KRAKATOA II
remote are turned on, and then push the corresponding preset button (P1 – P4) on the top
sides of the remote. The KRAKATOA II will then instantly switch to that sound and volume level.
Page 13

13
To initiate playback of any preset, simply select the “Favorites/Presets” menu on the main
screen, browse through the available presets, and then use the “Play/Select” button, just as if
you were picking a sound for normal playback.
Presets can also be managed by editing a specific file located within the KRAKATOA II remote.
For the advanced information on this process, please view Chapter 10.
3. KRAKATOA II Detailed Overview
This chapter provides a more detailed oriented overview of the KRAKATOA II.
3-1 External Speaker Jack Information
The Krakatoa II features an external speaker jack. This jack is a standard 3.5mm female jack
that can accept a 3.5mm male plug. When selecting an external speaker to use with the
Krakatoa II, note that FOXPRO recommends the use of a 25W speaker with 8Ω Impedance.
FOXPRO carries a variety of external speakers for purchase that can be used with the Krakatoa
II. You can view the line of speakers online by visiting www.gofoxpro.com
Connect an external speaker to Your Krakatoa II:
1. Make sure that the Krakatoa II is powered-off before connecting an external speaker.
2. Connect the plug from the external speaker to the external speaker jack.
3. Turn on the Krakatoa II and begin playing a sound to hear the external speaker in
action.
3-2 Auxiliary Device Jack
The KRAKATOA II is equipped with an auxiliary jack labeled “AUX”. This jack is located on the
back of the KRAKATOA II. The purpose of this jack is to allow for the connection of certain
external devices (such as Jack Predator Decoys) for triggering their action on and off by using
the KRAKATOA II remote control.
While you may be able to connect other devices to the auxiliary jack beyond Jack Predator
Decoys, there are strict electrical limits involved with this jack. If these limits are exceeded,
damage to your KRAKATOA II will result. That damage is not covered by warranty.
The electrically inclined will want to know that the jack is connected to the drain of an internal
FET with a maximum current rating of 10mA. The tip polarity of the 3.5mm jack is positive, the
sleeve is negative. If the external device is connected with reverse polarity, an internal
production diode within the FET will conduct causing the device to stay on constantly. The
maximum voltage applied to this jack cannot exceed 15VDC.
Page 14
14
Instructions for connecting various devices to the auxiliary jack are beyond the scope of this
manual. You are urged to seek help from a knowledgeable professional before connecting any
unapproved devices to the jack. Keep in mind that any damage to the KRAKATOA II as a result
of improper use of the auxiliary jack is not covered by the warranty, nor will FOXPRO be liable
for damage to any connected devices
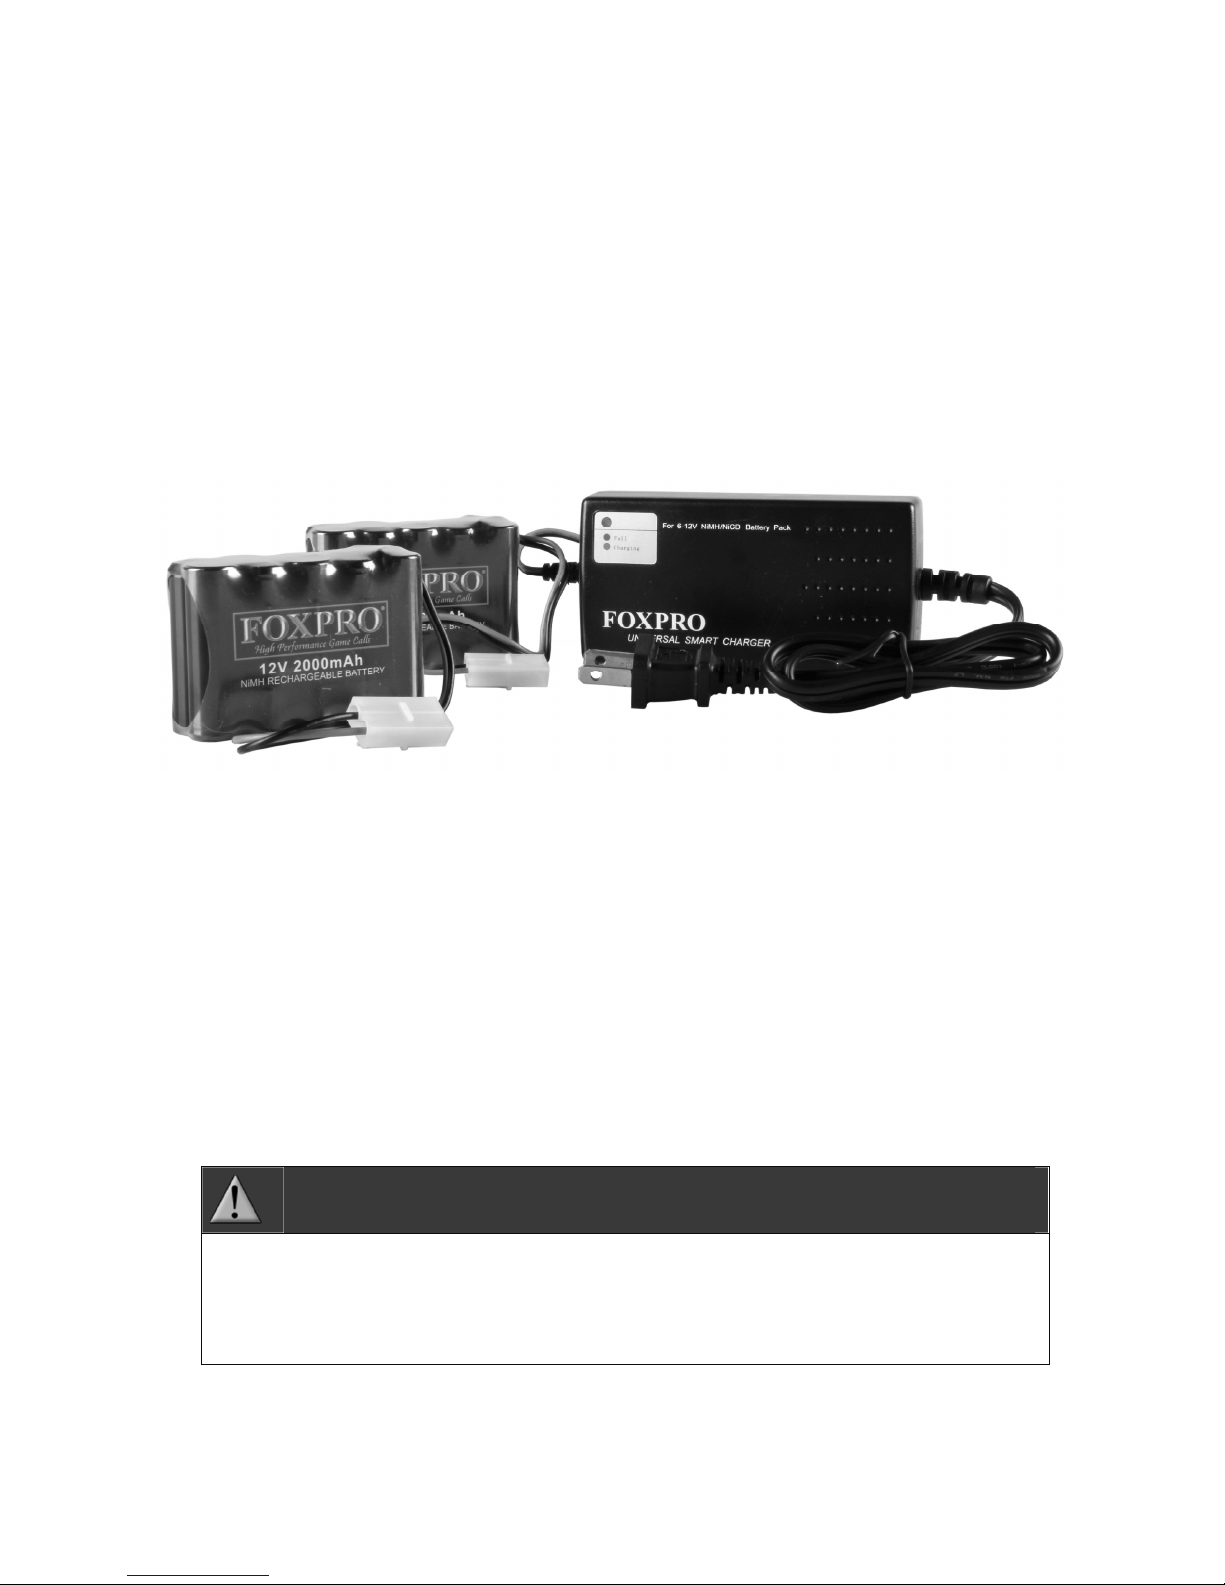
3-3 Batteries and Charging
The KRAKATOA II is equipped with dual rechargeable NiMH battery packs and a smart fast
charger (see image below). During operation, if the pilot lamp begins blinking, this is indicating
that the batteries are starting to get low and need recharged.
To Charge the Batteries
1. Disconnect one of the sealed battery packs from the Krakatoa II and remove it from
the battery pouch.
2. Connect the power cable from the sealed battery pack to the connector on the
charger.
3. Plug the wall adapter into a 110VAC wall outlet.
4. The charger has an LED which glows red while charging and switches to green when
the charge is complete.
5. When one pack is finished charging, place it back into its pouch and repeat these
steps for the second pack.
WARNING
Never attempt to charge batteries that are not intended to be recharged! The
resulting damage can be serious and will not be covered by the warranty. For
maximum charge efficiency, we recommend charging your KRAKATOA II in
temperatures ranging from 40°F to 85°F (5°C to 30°C).
Page 15
15
WARNING
Never connect your KRAKATOA II to an unregulated 12V system (i.e. automotive
systems, high current power supplies, etc.) Serious damage will occur which is not
covered by the warranty.
CHARGING RECOMMENDATIONS
• Do not leave charging batteries unattended.
• Remove batteries from the device when caller will not be used for prolonged
periods.
• Recharge your batteries periodically—even when not in use—to prevent
deep discharge.
3-4 USB Port
The KRAKATOA II is equipped with a standard USB 2.0 port which is located inside of the
speaker cap. In order to gain access to the USB port, you must remove the four screws that
secure the cap to the back of the speaker.
To Connect the KRAKATOA II to a Computer
1. Make sure that the KRAKATOA II is turned off.
2. Connect one end of your USB cable to the USB port in the KRAKATOA II.
3. Connect the other end of the USB cable to a USB port on your computer.
4. On most major operating systems, you will hear an alert as well as see visual
notification on the screen that a new device has been attached.
After connecting the KRAKATOA II to your computer, there are a number of things you can do.
To work on sound programming, please go to Chapter 11. To learn about changing the channel
of operation, please proceed to section 3-5.
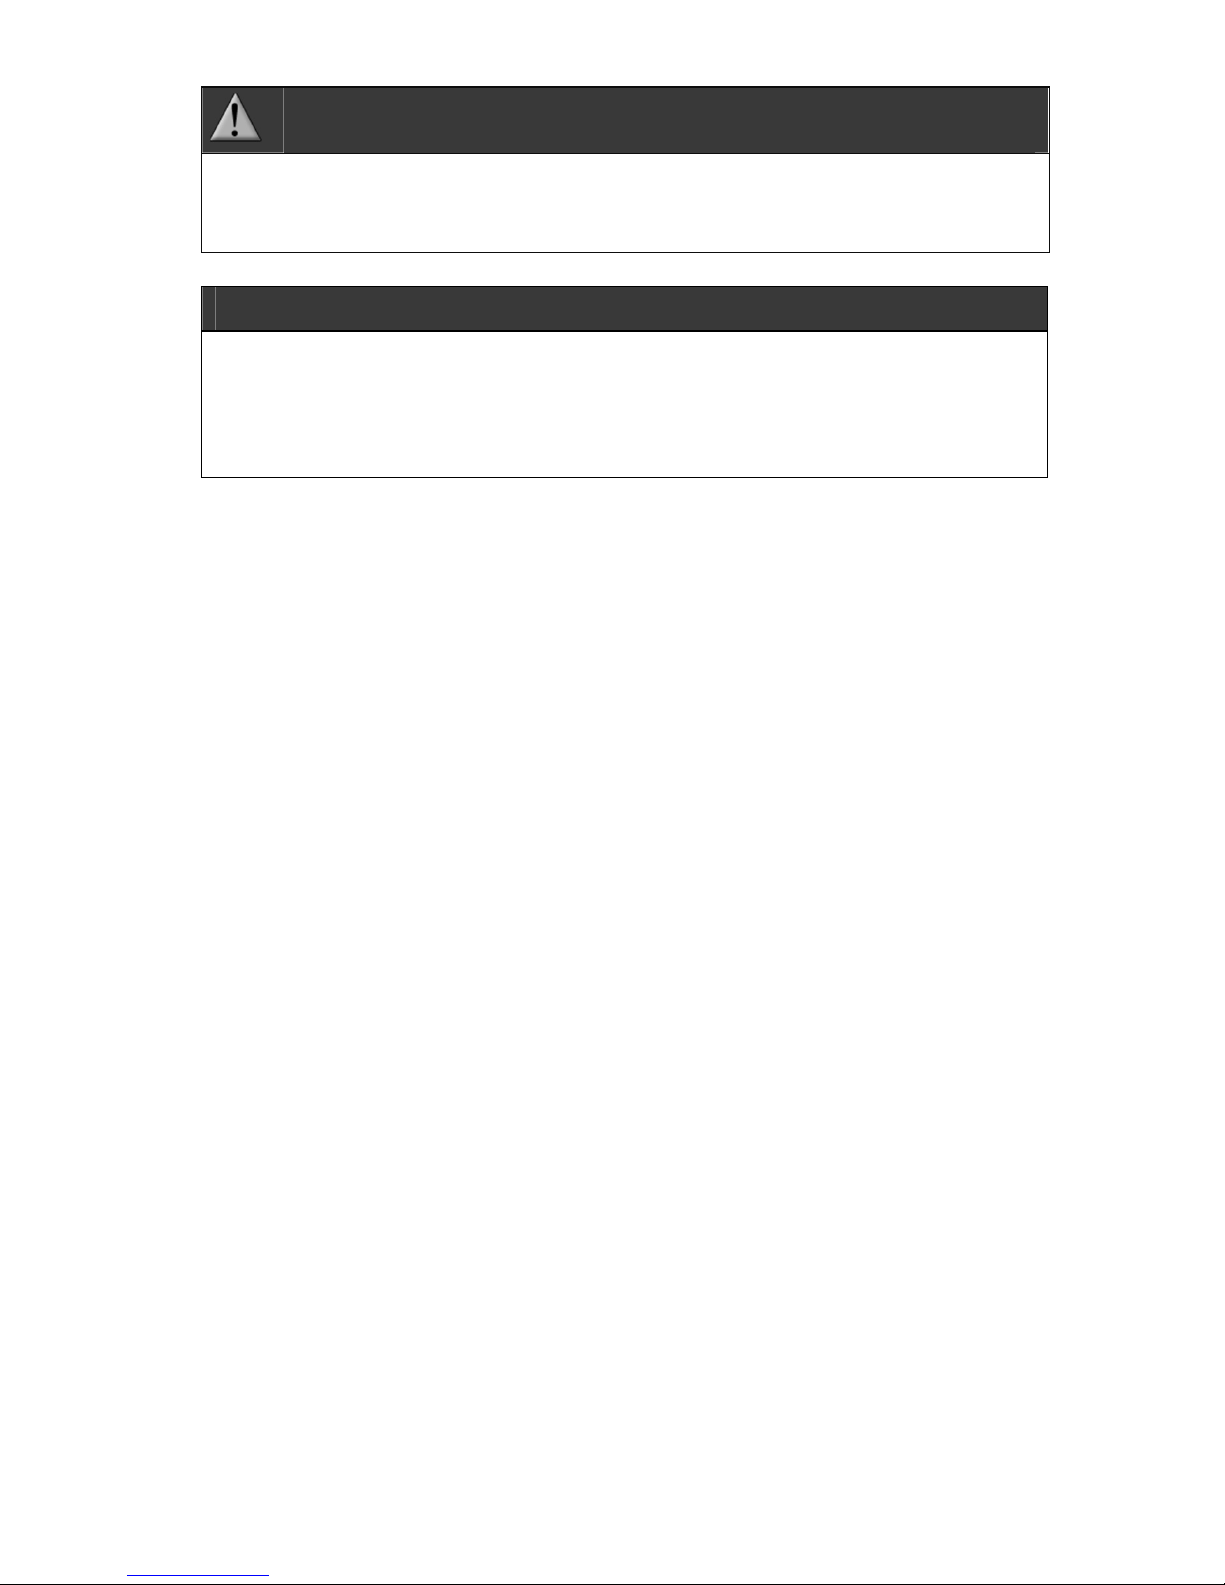
3-5 Setting the Channel of Operation
Changing the channel of operation requires that you remove the speaker cap from the back of
the KRKAKATOA II and modify the values of a DIP switch located inside. There are 8 channels of
operation available (0 – 7). The default channel of operation set at the factory is 6.
Changing the Channel of Operation
1. Locate and remove the 4 screws that connect the speaker cap to the main speaker
bell of the caller.
2. Turn the speaker cap around and look inside. Locate the DIP switch (see the following
image).
Page 16
16
3. The DIP switch has 4 individual slide switches. Each switch has two positions. For the
purposes of changing the channel, however, you will only modify switches 1 – 3. The
two positions are referred to as “on” and “off”. The “on” position is selected by
moving the switch to the right (towards the USB port). The “off” position is selected
by moving the switch to the left (away from the USB port). Use the tip of a pen or
pencil to change the position of the switches. The following chart shows the possible
switch positions for the various channels.
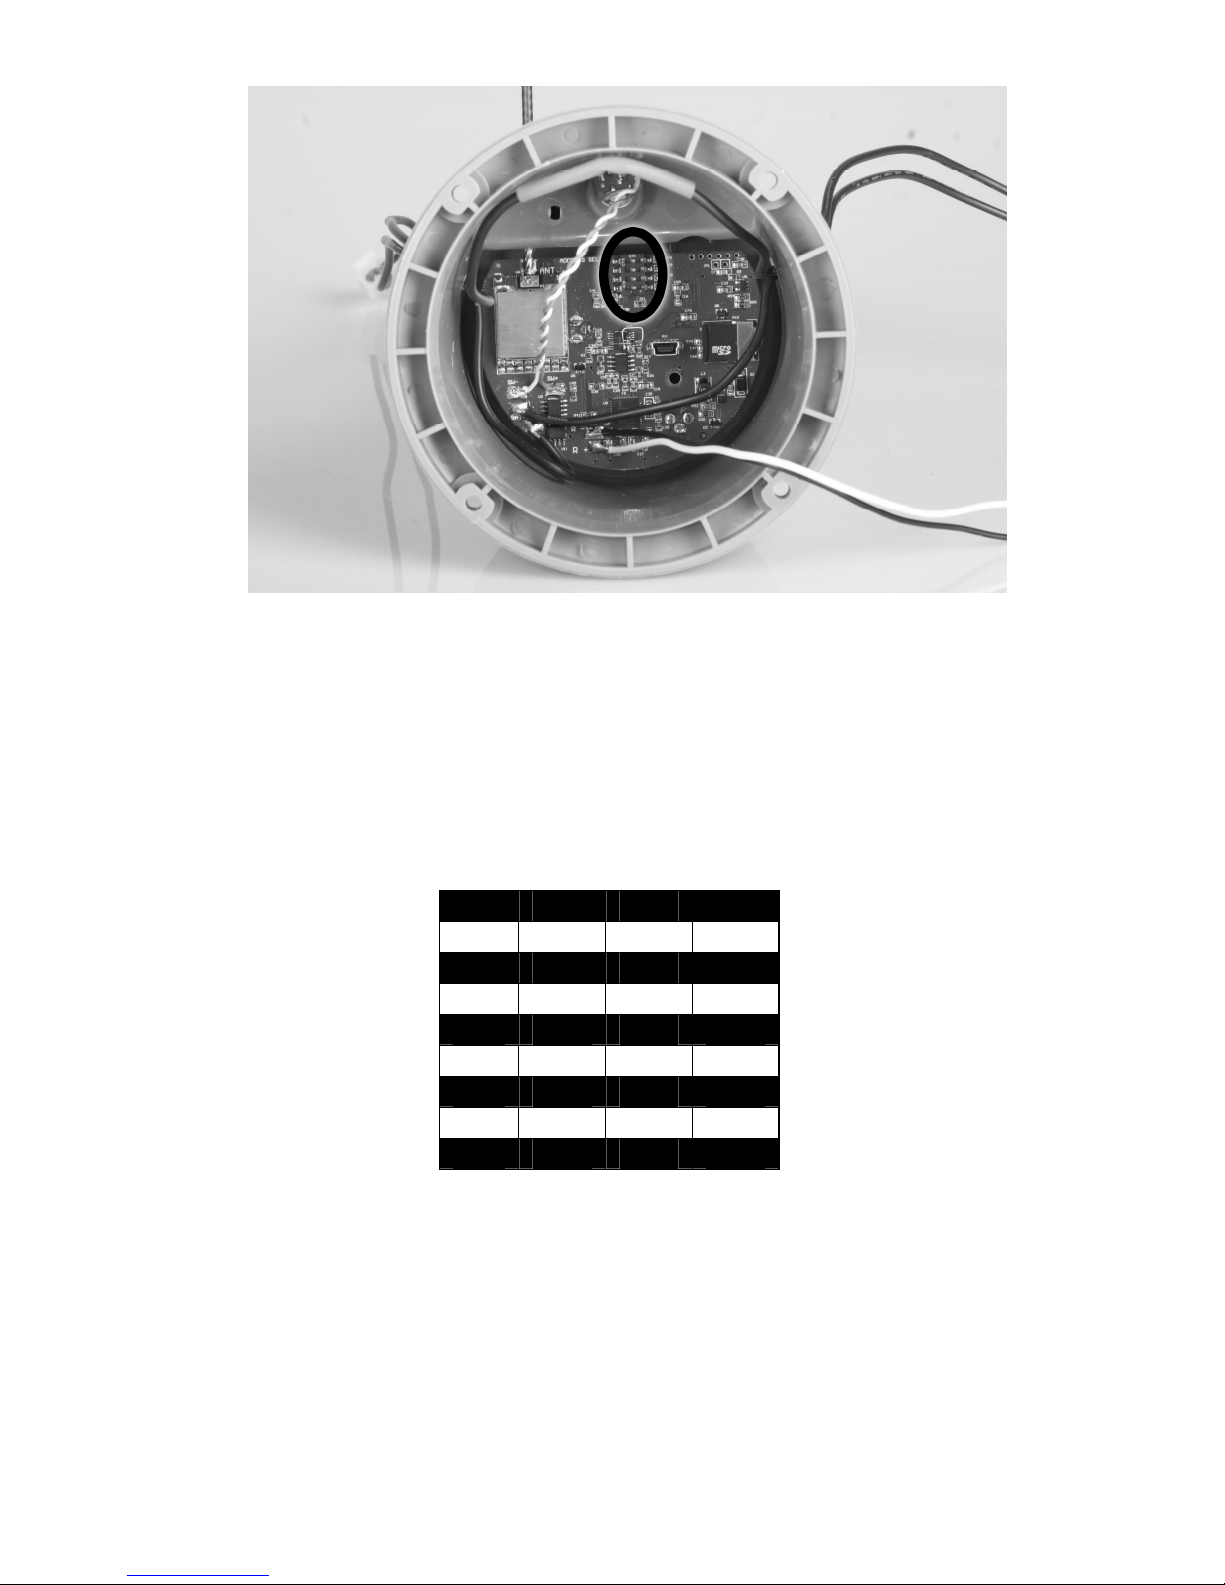
CH 1 2 3
0 OFF OFF OFF
1 ON OFF OFF
2 OFF ON OFF
3 ON ON OFF
4 OFF OFF ON
5 ON OFF ON
6 OFF ON ON
7 ON ON ON
4. Remember, if you change the channel of operation of the KRAKATOA II, you must also
change the channel of operation for the TX1000. See chapter 9, section 1 for more
information.
3-6 Setting the Battery Chemistry
For the best results, you must select the appropriate battery chemistry for the types of batteries
you are using in the device. To select the battery chemistry type, you have to remove the
Page 17

17
speaker cap from the back of the KRAKATOA II and modify the values of a DIP switch located
inside.
Changing Battery Chemistry
1. Locate and remove the 4 screws that connect the speaker cap to the main speaker
bell of the caller.
2. Turn the speaker cap around and look inside. Locate the DIP switch (see image in
section 3-5.
3. The last switch on the right acts to define what type of battery is being used. To select
NiMH batteries, place the switch in the “off” position. To select LiON batteries, place
the switch in the “on” position.
4. Reattach the cap to the speaker and secure it with the screws after selecting the
appropriate battery type.
4. KRAKATOA II Remote Control Detailed Overview
This chapter provides a more detailed oriented overview of the KRAKATOA II remote. The
model number for the KRAKATOA II Remote is “TX1000”. In this manual, we tend to refer to the
remote as “KRAKATOA II Remote”, but you will encounter “TX1000” later on as it referenced in
specific menu options.
IMPORTANT NOTE
The Krakatoa II remote control is not intended to operate the caller at distances
shorter than 1 meter (3 feet). If the remote is located too close to the caller,
proper operation cannot be ensured.
4-1 What are FOX FEATURES?
Throughout this section, you will encounter various features referred to as “Fox Features”. This
group of features includes: FOXBANG, FOXCAST, FOXMOTION, FOXGRIP, and FOXDATA. These
features are explained thoroughly in this section.
4-2 Turning on the KRAKATOA II Remote
After installing batteries as indicated in Chapter 1, you can turn on the KRAKATOA II remote by
pushing and holding the power button for approximately 1-2 seconds. An initial startup screen
will appear displaying the FOXPRO logo and remote version information. After the initial startup
sequence is complete, the main sound selections screen will appear.
Page 18

18
4-3 Navigating the KRAKATOA II Remote
The KRAKATOA II Remote has a scroll up and scroll down button for cycling through the onscreen display. A selected menu item is highlighted by a horizontal bar, and by pressing the
scroll up or down arrow button, the horizontal bar will move up or down through the menu list.
To select a menu item, push the “Play/Select” button. The “Back/Menu” button allows you to
access the KRAKATOA II Remote configuration options as well as navigate back one level in the
menu system.
4-4 Understanding the KRAKATOA II Remote Display
The KRAKATOA II Remote display can be viewed as three main segments: top status line,
primary display area, and bottom status line. The top and bottom status lines are static—
meaning, they will always be present. The primary display area is dynamic and will change upon
what operation you are performing.
Top Status Line Overview
Name Details
FM FOXMOTION status indicator. Displays either On or Off.
FB FOXBANG status indicator / FOXGRIP status indicator. Displays “FB”
if FOXBANG is activated. Displays “FG” if FOXGRIP is activated.
Displays “FB/FG” if both FOXBANG and FOXGRIP are activated.
MOON Moon phase indicator. Displays an icon depicting the current moon
phase. Correct moon phase display requires proper date and time
configuration.
BAROM Barometer. Displays the barometric pressure in either inches or
millimeters depending upon configuration. When enough
measurements have been taken, an arrow showing trend
(up/down) will appear. When elevation is set correctly, this value is
automatically corrected.
TEMP Thermometer. Displays the current temperature in either C or F
depending upon configuration.
Page 19

19
Primary Display Area Overview
Details
The image above shows the primary display area for the KRAKATOA II remote with default
settings using the day theme. Above the menu items you will see “Categories” which is the title
of this particular screen. When you enter other menu sections, the title will change accordingly.
The two main items on the screen “Favorites/Presets” and “FoxCast” options are always
available on this screen (in both Category and Sound List mode). Directly beneath “FoxCast”
begins the category listings. If using sound list mode, you will then see “Sound List” as the third
option.
Bottom
Status Line Overview
Name Details
MT Mute status indicator. When the sound is muted, a letter M will
appear. .
VOL Volume level indicator. Ranges 0 – 40.
BATT Battery level indicator.
TIME(R) Displays either stand timer or real-time clock. When an alarm is
indicated, the background will blink red.
4-5 Access the KRAKATOA II Remote Configuration Menu
From the main sounds screen, push the “Back/Menu” button a single time. This will allow you
to access the configurations screen. There are a total of five elements that appear on this menu:
Page 20

20
FOX FEATURES, Sound Settings, Display/Power, Date/Time(r), and TX1000 settings. Each of
these items and all possible values are displayed below.
FOX FEATURES Menu
This menu item provides access to turning FOX FEATURES on or off and their respective
configurations.
Menu Item Description Values
FoxBang Turns FOXBANG on or off. Off, Mute, Aux, Preset
5, Preset 4, Preset 3,
Preset 2, Preset 1,
FOXDATA
FoxBang Sen. Sets FOXBANG sensitivity. Low, Med, High
FOXMOTION Turns FOXMOTION on or off. Off, On
Rate Sets the desired rate for speed of
FOXMOTION.
1,2,3,4 and 5
Auto Volume Turns auto volume on or off Off, on
USER Allows for assigning a function to the USER
button.
Theme, FOXBANG,
Preset 5, FOXMOTION,
Auto Volume, Time(r)
Toggle, Timer Reset,
Backlight
FoxGrip Turn FoxGrip on or off. Off, On
Button 1 Assign FoxGrip button 1 Feature. Preset 1, Preset 2,
Preset 3, Preset 4,
Preset 5, Aux, Mute,
FOXDATA
Button 2 Assign FoxGrip button 2 Feature. Preset 1, Preset 2,
Preset 3, Preset 4,
Preset 5, Aux, Mute,
FOXDATA
FoxGrip Unit ID Displays the FoxGrip unit identification
number.
Erase FOXDATA Enables you to erase the FOXDATA file. N/A
Sound Settings Menu
This menu item provides access to various playback configurations, speaker configurations,
and more.
Menu Item Description Values
Volume Step Allows you to set the volume stepping value 1, 2, 3 and 5
Pri. Mode Set the play mode for the primary sound. Repeat, Juke, Single
Spkr Mode Sets the speaker mode. Stereo, Mono
Page 21

21
Main Speaker Turns main speaker on and off. Off, On
Ext. Speaker Turns external speaker on and off. Off, On
Preset Mt.
O/R
Preset mute override. If the sound is muted
and this is set to on, the remote will un-mute
the caller and start playing the preset.
Off, on
Display/Power Menu
This menu item provides access to on-screen display controls such as brightness, theme, and
automatic shut off settings.
Menu Item Description Values
Brightness Screen brightness control 5% - 100%
Keypad Brightness of keypad backlight Off – 100%
Theme Sets the remote display theme. FOXPRO, Day, Night
Disp Timeout Sets the screen timeout delay. 5 seconds, 15 seconds,
30 seconds, 1 minute, 2
minutes, 5 minutes
Auto Off Set the time delay before the remote shuts off 30 minutes, 45 minutes,
1 hour, 2 hours, 4 hours
Date / Time(r) Menu
This menu item provides access to date, time, alarm, and associated format configurations.
Menu Item Description Values
Stand Timer Turns the stand timer on or off. Off, on
Timer Reset Resets the stand timer to 0:00
Alarm (min) Set the duration for the alarm. 1 minute – 60 minutes
Time Set the current time Hours/Minutes
Date Set the current date Month/Day/Year
Time Format Set 12 or 24 hour time formats 12 Hr, 24 Hr
Date Format Set the desired date format m/d/y
d.m.y
y-m-d
TX1000 Settings Menu
This menu item provides access to other remote configurations, radio channel settings, and
sound display modes.
Menu Item Description Values
Radio
Channel
Sets the channel of radio operation. Must be
the same channel as the KRAKATOA II digital
0 – 7
Page 22

22
game call
Download
List
Invokes wireless transmission of sound list N/A
AUX Configure auxiliary function. FOXPRO’s Jack
Predator Decoys require Momentary.
Momentary, Latched
View Sets the sound view mode. Categories, Sound List
Temp. Units Configure the temperature units of
measurement
F, C
Barom. Units Configure the barometer units of
measurement
In, mm
Elevation Set your elevation above sea level. 0 – 19,717 ft.
About Info Displays system information N/A
Restore
Defaults
KRAKATOA II remote factory reset N/A
4-6 Playing Sounds with the KRAKATOA II Remote
The first operation that most users want to perform is playing sounds. There are multiple
methods in which you can initiate sound playback. Before attempting to play sounds, be sure
that the KRAKATOA II and KRAKATOA II remote both have fresh batteries installed and that both
devices are powered-on.
There are two sound view mode options within the KRAKATOA II remote; Sound List and
Categories. This is configured through the TX1000 Settings item in the main menu. The method
of playing a sound is identical for both modes; the way the sounds are displayed on the screen
is the only difference. By default, the KRAKATOA II remote is setup to display the sounds by
categories.
To change how the sounds are displayed, access the TX1000 Settings menu and locate the menu
item titled “View”. Highlight “View” and the push the “Play/Select” button a single time. Use
the scroll buttons to cycle through either “Sound List” or “Categories”. When you decide which
option you would prefer to use, push the “Play/Select” button to lock it in.
Default: Categories View
When the KRAKATOA II remote is turned on, the main screen will be displayed. The first item is
“Favorites/Presets” followed by “FOXCAST”. The next menu item marks the beginning of the
category listings. In category list mode, your sounds will not be displayed as one long list, but
rather as elements of defined categories. You can have up to 50 unique categories. Use the
Scroll Buttons to browse through the available categories. Highlight the category you wish to
browse and push the “Play/Select” button to enter the category. All sounds associated with
that category will be displayed. Find the sound you wish to play, and then push the
“Play/Select” button to begin playback of the sound. Unless you changed the volume prior to
pushing “Play/Select”, the volume will start off at level 0, so you will need to increase the
volume using the volume up button in order to hear it play.
Page 23

23
Optional: Sound List Mode
When selected, this option allows you to scroll through all available sounds in a single list. The
main screen will display “Favorites/Presets” and “FoxCast”, like normal, but a third option titled
“Sound List” will be present. To browse the sound list, select “Sound List” from the main screen.
You will then see a page that displays the first 9 sounds (000 – 008) loaded in the list. You can
use the Scroll Buttons to cycle through the sounds. Once you get to the end of the current
page, the proceeding lines will advance one-by-one. After highlighting the name of the sound
you wish to play, you can then push the “Play/Select” button a single time to start playback of
your primary sound. Unless you changed the volume prior to pushing “Play/Select”, the volume
will start off at level 0, so you will need to increase the volume using the volume up button in
order to hear it play.
4-7 Volume & Mute Control
The volume can be adjusted by using the “Volume Up” and “Volume Down” buttons on the
keypad mid-operation, prior to selecting a sound, or even while the caller is muted. Volume
ranges from 0 through 40 and the volume is increased in steps. These steps are configured
through the main menu under Sound Settings. The available stepping values are 1, 2, 3, and 5.
By default, the KRAKATOA II remote is set for a volume stepping value of 2. Volume can be
controlled automatically by a feature called Auto Volume.
4-8 Presets / Favorites
You can store up to 50 favorites or presets in your remote control. A favorite or preset is,
essentially, a shortcut to a specific sound number and volume level. These can be set through
the remote control itself or authored in a text file stored in your remote control. For more
information on setting up presets, see chapter 10.
From the main screen, select the Favorites/Presets option. This will display all presets available
in the remote. They are listed by preset identification number, name, and volume level.
Highlight the one you wish to play and then push the Play/Select button to activate. The
KRAKATOA II will immediately begin playing the established sound at the predetermined
volume level.
The remote also features 4 quick-access preset buttons providing one button access to a
particular sound/volume combination. These are located on the top left and right sides of your
remote control marked with “P1”, “P2”, “P3” and “P4”. If the KRAKATOA II is muted when
selecting a preset, it will remain muted. You can change this configuration with the Preset
Mute Override within the menu. Preset 5 can be assigned to the User button (please see
chapter 5 for setting up the User button).
Page 24

24
Favorites/Presets can be setup two different ways; through your PC or manually. To review the
instructions for creating presets via your home computer, see chapter 10. To review the
instructions for creating presets manually, just using the KRAKATOA II remote, see Chapter 2.
5. FOX FEATURES
This chapter explores all of the Fox Features in-depth to help you understand how to use them
and get the most out of your calling experience. While reading this section, keep in mind the
following point: some Fox Features are not compatible with other Fox Features, and some
remote operations will override Fox Features when called upon. There may be times when you
try to perform an operational change with KRAKATOA II Remote that results in a pop-up
message asking you if you wish to cancel the currently engaged Fox Feature to carry out the
desired operation.
IMPORTANT NOTE
No matter what FOX FEATURE you have engaged, if you change the primary sound
from one sound to another, it will automatically disengage the active FOX
FEATURE. FOX FEATURES will work with some other modes of operation such as
Jukebox Mode and FOXCAST, but as soon as it is switched to a different sound,
that feature will be turned off.
5-1 FOXMOTION
FOXMOTION is a unique feature that allows you to “move” the sound between the internal
speaker and an external speaker at varying rates to portray an effect of the sound (animal)
moving. There are 5 different rates or speeds at which you can have FOXMOTION operate. The
lower the setting, the more gradual the transition from one speaker to the other will be.
Activating FOXMOTION:
1. Turn on the KRAKATOA II and KRAKATOA II remote.
2. Begin sound playback like normal.
3. Access the KRAKATOA II remote main menu and select the FOX FEATURES item.
4. Select FOXMOTION and change it to on. Then select the Rate item directly beneath it
to adjust the speed that FOXMOTION operates at.
5-2 FOXBANG
When activated, FOXBANG reacts to the report of a firearm by automatically switching to an
assigned function established within the KRAKATOA II remote. There are 8 different settings for
FOXBANG. The available functions you can link to FOXBANG activation include: FOXDATA, mute
(toggles mute on/off), auxiliary (toggles auxiliary device on/off), preset 1, preset 2, preset 3,
preset 4, and preset 5. When FOXBANG is triggered, it will create a new record within your
FOXDATA in addition to performing the specified action.
Page 25

25
To Activate FOXBANG and Assign a Function:
1. Access the FOX FEATURES menu on the KRAKATOA II remote and locate FOXBANG.
2. Cycle through the available options from “Off” to the desired function you would like
FOXBANG to be linked to.
3. When the desired function is selected, push the “Play/Select” button to lock it in.
As the remote control has an internal sensor that senses when your firearm has been
discharged, it is important to make sure that you have the correct sensitivity level set for your
particular firearm. There are 3 sensitivity levels that you can choose from: Low, Medium, and
High. The lower sensitivity setting should be used with higher caliber firearms such as a .30 and
higher. High sensitivity should be used for smaller calibers such as .17 to .22. Everything else
should work fine with the medium setting.
Setting the Sensitivity:
1. Access the FOX FEATURES menu on the KRAKATOA II remote and locate FOXBANG.
2. Select FOXBANG Sen. and use the scroll buttons to cycle through the available
sensitivity options.
3. When the sensitivity level has been set, push “Play/Select” to lock it in.
Tip from FOXPRO
The FOXBANG sensor is located inside of the KRAKATOA II remote. In order for it to detect the
gunshot, the remote needs to be relatively close to the firearm. It is assumed that most hunters
will have the remote on a lanyard around their neck.
An unintended and unavoidable consequence of adjusting the FOXBANG sensitivity to the
highest level is that handling noises, such as the banging of the transmitter case on your firearm
stock, may cause unexpected activation of FOXBANG. For this reason, you should choose the
lowest sensitivity that affords reliable activation from the muzzle blast. FOXBANG is intended to
work when the transmitter is located within about 5 feet of the firearm muzzle.
Tip from FOXPRO
Before using FOXBANG in the field, head out to your local shooting range and test the different
sensitivity levels to find the one best suited to your firearm.
5-3 AUTO VOLUME
Different hunters like to deploy different tactics in the field. For example, some may get setup
and start playing their favorite sound at a specific volume level until an animal shows up.
Others prefer to have their volume level change frequently. While both methods have been
proven successful, Auto Volume takes care of your volume manipulation so that you can keep
focusing on the action in the field. When activated, auto volume begins playing your sound at
the lowest volume setting. Over the course of a few minutes, your volume level will slowly
Page 26

26
begin to rise. Once it reaches a certain point, the volume will then begin to modulate up and
down automatically.
Activating AUTO VOLUME:
1. Access the FOX FEATURES menu on the KRAKATOA II remote and locate AUTO
VOLUME.
2. Change the value from off to on.
3. After changing to on, push “Play/Select” to lock it in.
When you are operating with Auto Volume engaged, you can still adjust the volume, but the
adjustment that you make is relative only to the maximum volume that Auto Volume will climb
to during its operational cycle. If you change sounds while AUTO VOLUME is turned on, it will be
automatically turned off.
5-4 User Button
The User button is located on the bottom left side of your KRAKATOA II remote keypad. This
button can be assigned a function of your choice for quick one button access. You can choose
from preset 5, theme change, FOXBANG, FOXMOTION, Auto Volume, time(r) toggle, timer reset,
or backlight.
Programming the User Button:
1. Access the FOX FEATURES menu on the KRAKATOA II remote and locate USER.
2. Select USER and use the scroll buttons to cycle through the available options.
3. When the desired option has been set, push “Play/Select” to lock it in.
If you selected FOXMOTION as your USER button feature, please be aware that it will actually
toggle the state of FOXMOTION. For example, if FOXMOTION is turned off when you push the
USER button, it will automatically turn on FOXMOTION and take you straight to the
configuration screen. If you have FOXMOTION on already, it will turn it off. If you change
sounds, FOXMOTION will be turned off.
5-5 FOXDATA
If you enjoy keeping records of your hunts and studying the records frequently to detect trends
or patterns, then FOXDATA will become an important feature for you. FOXDATA is a digitaljournal, of sorts, that allows you to track details from any hunt with the intent of archiving
those details for future study. At the push of a button, FOXDATA creates a new log entry
documenting the current state of the remote control including: current playing sound, volume
level changes, usage, temperature, barometric pressure, date, time, moon phase, and timer.
The recorded data is stored in a CSV file within the remote control. You can access this file by
connecting the KRAKATOA II remote to a PC (see chapter 10). CSV files can be opened with
popular software titles such as Microsoft Excel.
Page 27

27
As an extension to FOXDATA, FOXPRO has developed an online extension that you can use to
store your data. This online application will track your information for you to plot out trends,
averages, and all other details. You can quickly import your FOXDATA file directly into your own
account to turn the data into useful onscreen information with charts and graphs. Determine
your hunt/harvest ratio, time spent in the field, and even download reports in PDF format. Visit
the website below for more information on the FOXDATA online extension:
http://www.gofoxpro.com/foxdata/
Tip fro
m FOXPRO
In order to make sure that your collected data is organized in a structured, per-stand basis, it
is important that you remember to start and end the FOXDATA tracking feature at the start
and end of each stand. Otherwise, the data set will not be closed and you may end up with
multiple stands featured as a single data set. FOXDATA will automatically record FOXBANG
and FOXGRIP activations only. All other records are generated by pushing the FOXDATA
button a single time.
Using FOXDATA:
1. At the beginning of a hunt, before you start calling, push and hold the FOXDATA
button for 1-2 seconds. This button is located on the side of the KRAKATOA II remote.
2. Select “Hunt Started”. After selecting this option, FOXDATA recording begins. To check
whether other not FOXDATA is actively recording, access the FOXDATA menu screen.
The title bar will display “(R) FoxData – Comment” where the (R) is the active
recording indicator.
3. Optionally, select the current weather conditions to further notate this hunt. The
options are listed in a chart below.
4. Proceed forward with your hunt and use the caller just like you normally would. Each
time you wish to create a log entry, push the FOXDATA button a single time and the
current state will be recorded.
5. After you have completed the hunt, push the FOXDATA button for 1-2 seconds and
select one of the shown options to close the session with a specific comment
reflecting the outcome of the hunt.
The options for ending a hunt are outlined in the table below:
Ending Name Description
Successful Call Successfully called in animal, no kill-shot provided
Successful Call/Kill Successfully called in and killed animal.
Shots Fired / Miss Successfully called in, took shot, missed.
Camera Shot Successfully called in, shot with camera
Nothing Seen Nothing called in
Hunt Ended Generic end.
Page 28

28
Premature Ending Interrupted (weather, human, other)
The options for weather conditions are outlined in the table below:
Weather Description
Weather Clear Clear skies or mostly clear
Weather Cloudy Cloudy skies or mostly cloudy
Weather Overcast Overcast conditions
Weather Rain Rainy conditions
Weather Snow Snowy conditions
Weather conditions may change while in the field. As a result, you can update the weather
notation throughout the hunt to best reflect your observations while in the field.
IMPORTANT NOTE
A quick press and release of the FOXDATA button results in a FOXDATA record
being created without prompting you for a comment. When FOXBANG and/or
FOXGRIP are active and triggered, a FOXDATA record is made.
IMPORTANT NOTE
Even though FOXDATA provides weather condition selections including rain and
snow, be aware that the KRAKATOA II and KRAKATOA II remote are not weather
proof or weather resistant. Proactive measures should be taken prior to using the
devices in adverse weather conditions. Placing the caller in a protective container
or case rather than leaving it out in the elements will help prevent damages that
are not covered under the warranty terms.
IMPORTANT NOTE
If you are performing a factory reset on the KRAKATOA II remote, be aware that it
will erase your FOXDATA file. In order to preserve the data for future use, make
sure that you back up the file prior to doing a factory reset.
5-6 FOXGRIP
This allows you to pair a FOXPRO Fox Grip or Fox Grip 2 with the KRAKATOA II Remote control.
Detailed instructions for using each Fox Grip model can be found on our website. The following
provides general instructions for basic setup.
Pairing the FOXGRIP to your KRAKATOA II Remote:
1. Make sure that your FOXGRIP has a fresh battery installed.
2. Access the FOX FEATURES menu and locate the FOXGRIP Unit ID menu option.
3. Push the “Play/Select” button a single time. A message will appear stating “Activate
FOXGRIP to pair now.”
Page 29

29
4. Push the button on your FOXGRIP. The KRAKATOA II remote will detect the signal and
then display the FOXGRIP Unit ID to the right of the menu item.
After the FOXGRIP device is paired with your KRAKATOA II remote, the next step is to determine
what particular feature you would like to assign to FOXGRIP. The following options are
available: FOXDATA, mute, auxiliary, preset 5, preset 4, preset 3, preset 2, and preset 1. To
disable FOXGRIP, set this to off.
Assigning a feature to FOXGRIP:
1. Access the FOX FEATURES menu and locate the FOXGRIP menu item.
2. Push the “Play/Select” button and then use the scroll buttons to cycle through the
available options. If using a Fox Grip 1, you will only adjust Button 1. If using a Fox Grip
2, you have the ability to adjust the setting for both buttons.
3. After locating the desired option, push the “Play/Select” button to lock it in.
6. Sound Settings
This chapter explores the sound settings menu and all associated options.
6-1 Volume Step
The KRAKATOA II remote has a range of volumes from 0 – 40. Increasing the volume in the field
by increments of 1 may be too slow for some and therefore this stepping value is configurable.
You can choose from 1, 2, 3, and 5. The factory default setting is 2.
Changing the Volume Step Value:
1. Access the Sound Settings menu and select “Volume Step”.
2. Use the scroll buttons to adjust the value up or down.
3. When the desired value is set, push the “Play/Select” button to lock it in.
6-2 Pri. Mode
Allows you to specify how the sounds are played back. The default value is repeat, where the
sound will play continuously when the end of the sound has been reached by starting over.
Single mode will result in each sound being played a single time. Juke represents ‘jukebox
mode’ where after a sound has played, it will automatically move on to the next sound in the
list.
6-3 Spk Mode (Speaker Mode)
There are three speaker modes available for you to select from. These modes affect how
sounds are played through the speakers. The modes are: Stereo, Reverse Stereo, and Mono.
By default, the device will be setup for stereo speaker mode. As the KRAKATOA II has a single
speaker setup a stereo audio file will be split so that the left channels play through the internal
Page 30

30
speaker while the right channel plays through the external speaker. Reverse stereo flip-flops the
left and right audio channels. Mono mode results in left/right channels being condensed so that
the same sounds play through all speakers at the same time.
6-4 Main Speaker
Provides you access to turn the internal speaker on and off.
6-5 Ext. Speaker
Provides you access to turn the external speaker on and off.
6-6 Preset Mute Override
During normal operation, if the KRAKATOA II is muted and you play a preset, the preset is
queued for playback, but it cannot be heard until the caller is un-muted. Preset mute override
will take care of this and eliminate the need for un-muting the call upon preset activation. It
works by initially checking to see if mute is active and, if it is, un-mute the unit while playing the
preset sound. This is especially important for FOXBANG operation. By having preset mute
override turned on, FOXBANG activation will result in the KRAKATOA II being un-muted if it is
muted when the activation occurs.
Turning on Preset Mute Override:
1. Access the Sound Settings menu and select “Preset Mt. O/R”.
2. Use the scroll buttons to cycle between on or off.
3. When set, push the “Play/Select” button to lock it in.
7. Display / Power
The Display/Power menu allows for control of on-screen display options such as backlight,
screen timeout, and operational theme.
7-1 Brightness
This controls the brightness of the display. You can adjust the screen brightness from 10%
(minimum) and 100% (maximum) brightness in increments of 10%.
Adjusting the Brightness:
1. Access the Display/Power menu and select “Brightness”
2. Use the scroll buttons to increase or decrease the value
3. When set to the desired brightness, push “Play/Select” to lock it in.
7-2 Keypad
This controls the intensity of the keypad back light. You can adjust the intensity from 0% - 100%.
Page 31

31
Adjusting the Keypad Intensity:
1. Access the Display/Power menu and select “Keypad”
2. Use the scroll buttons to increase or decrease the value.
3. When set to the desired intensity, push “Play/Select” to lock it in.
Tip from FOXPRO
Night hunters should select the lowest possible setting for screen and keypad brightness for the
best possible results. You may want to experiment with the various settings prior to a hunt to
familiarize yourself with it and what to expect.
7-3 Theme
The KRAKATOA II remote has three operational themes built in. These themes are designed to
help optimize the appearance of the on-screen display based upon factors such as time of day.
The two main themes to address this are: night and day. These themes provide the basic
framework for the visual look, but you are not limited to the themes default setting. You can
still adjust screen brightness to fine-tune it to your specific needs. Also included is the FOXPRO
theme which is built with FOXPRO company colors (orange/black). This theme is very good for
night hunting.
Changing Themes:
1. Access the Display/Power menu and select “Theme”
2. Use the scroll buttons to cycle through the available themes.
3. When set to the desired theme, push “Play/Select” to lock it in.
7-4 Display Timeout
After being idle for an established period of time, the on-screen display will go blank. The
KRAKATOA II remote will not power off completely during display timeout (see Auto Off) and is
still completely usable. When the screen completes a timeout cycle, the screen can be
reactivated by pushing any button on the keypad (please see important note below). There are
five different time settings that you can use for configuring the display timeout: 5 seconds, 15
seconds, 30 seconds, 1 minute, 2 minutes, and 5 minutes.
This feature is also useful in helping to preserve and maximize your battery life. By having the
screen shutoff when idle, the load on the batteries is reduced, which equates to improved run
times of your batteries.
Configuring Display Timeout:
1. Access the Display/Power menu and select “Disp Timeout”
2. Use the scroll buttons to cycle through the available time spans.
3. When set to the desired time, push “Play/Select” to lock it in.
Page 32

32
IMPORTANT NOTE
When your display times-out, you can push the power button a single time to
wake it back up to ensure that no functions are initiated. For example, if you were
to use a preset button or mute button in attempt to wake the remote up, you will
be performing the function of that button at the same time. A single press of the
power button will wake it up without causing any changes in operation.
7-5 Auto Off
After being idle for an established period of time, the KRAKATOA II remote control will
completely power down. When this happens, the remote must be powered back on like normal.
There are five different time settings that you can use for configuring the auto power off: 30
minutes, 45 minutes, 1 hour, 2 hours, and 4 hours.
Configuring Auto Off:
1. Access the Display/Power menu and select “Auto Off”
2. Use the scroll buttons to cycle through the available time spans.
3. When set to the desired time, push “Play/Select” to lock it in.
8. Date / Time(r)
The Date / Time(r) menu provides access to the date and time configuration, stand timer
configuration, and the stand alarm.
8-1 Stand Timer & Timer Reset
When activated, the far right indicator on the bottom status line will begin keeping time that
has elapsed since the KRAKATOA II remote has been powered on. The timer displays as:
“MMM:SS” (“M” stands for minutes and “S” for seconds). The stand timer begins tracking time
as soon as the KRAKATOA II remote is turned on.
Turning on the Stand Timer:
1. Access the Date/Time(r) menu and select “Stand Timer”
2. Use the scroll buttons to change between off and on.
3. When set to the desired position, push “Play/Select” to lock it in.
Resetting the Stand Timer:
1. Access the Date/Time(r) menu and select “Timer Reset”
2. Push “Play/Select” to reset the timer.
To get the clock back on the display, simply set the stand timer to off.
Page 33

33
8-2 Alarm
The KRAKATOA II remote features a visual alarm that can be set to go off after a span of time.
The available times are represented in minutes: 1 – 60. When the alarm is set and the
configured time span passes, the stand timer (or clock if set to display the clock) will begin to
flash alerting you.
IMPORTANT NOTE
The alarm is based upon the stand timer only, not the real time clock. Keep in
mind that the stand timer begins tracking time as soon as the KRAKATOA II remote
is turned on. Make sure that you select the Stand Timer Reset option (described
earlier on this page) when setting up the alarm. For example, if you turn on the
KRAKATOA II remote and 10 minutes have passed while getting setup, and then
you set the alarm for 30 minutes, it’s going to go off 20 minutes later unless you
use the Stand Timer Reset prior after setting the alarm. Also, if the screen timeout
occurs prior to the alarm going off, it will turn back on when the alarm goes off.
Setting the Alarm:
1. Access the Date/Time(r) menu and select “Alarm”
2. Use the scroll buttons to select the desired amount of time in minutes. To shut off the
alarm, simply change the value to off.
3. Push “Play/Select” to set the alarm.
8-3 Time
The KRAKATOA II remote has a real time clock. This clock must be set when you first install or
change batteries.
Setting the Clock:
1. Access the Date/Time(r) menu and select “Time”
2. Use the scroll buttons to set the current time.
3. Push “Play/Select” to lock it in.
The clock can be displayed in either the standard 12 hour format or 24 hour format (military
time).
Configuring Time Format:
1. Access the Date/Time(r) menu and select “Time Format”
2. Use the scroll buttons to select either 12 or 24 hour time format.
3. Push “Play/Select” to lock in the setting.
The bottom status line of the KRAKATOA II display can show either the current time or the stand
timer. The stand timer will only be displayed if it is turned on—otherwise, the clock will show
the current time.
Page 34

34
8-4 Date & Date Format
The KRAKATOA II remote will keep track of the current date in order to proper render moon
phases. This needs be setup when you first start using the KRAKATOA II remote.
IMPORTANT NOTE
The KRAKATOA II remote control features a moon phase indicator. In order to
display the correct moon phase, it is imperative that you enter the correct date.
Otherwise, the displayed information may not be correct.
Setting the Date:
1. Access the Date/Time(r) menu and select “Date”
2. By default, the first option is the month. Use the scroll buttons to select the current
month and then push the “Play/Select” button.
3. Next you set the day using the same method described above, and then push
“Play/Select”.
4. Finally, set the year and push “Play/Select” to lock it in.
There are three different date formats that you can choose from depending upon your personal
preference. They are month/day/year, year-month-day, and day.month.year.
Configuring Date Format:
1. Access the Date/Time(r) menu and select “Date Format”
2. Use the scroll buttons to cycle through the options.
3. When your desired date format is shown, push “Play/Select” to lock it in.
9. TX1000 Settings
The TX1000 Settings menu allows you to change the radio channel, download the sound list,
and configure other options.
9-1 Radio Channel
The KRAKATOA II remote can be configured to operate on one of 8 different radio channels (0-
7). If you change the radio channel for the KRAKATOA II remote, you must also change the radio
channel for the KRAKATOA II digital game call—otherwise the two devices will not be able to
communicate.
Changing the Radio Channel:
1. Access the TX1000 Settings menu and select “Radio Channel”
2. Cycle through the available channels using the scroll buttons.
3. When the proper channel is set, push the “Play/Select” button to lock it in.
Page 35

35
IMPORTANT NOTE
Do not change the radio channel on the remote control without also changing it on
the KRAKATOA II. Doing this will result in a loss of communication. To change the
channel on the KRAKATOA II, please see Chapter 3 Section 3-5.
9-2 AUX
The auxiliary jack operation specifications can be changed for either momentary or latched. All
FOXPRO Jack Predator Decoys require that the jack be setup for momentary.
Configuring the Auxiliary Setting:
1. Access the TX1000 Settings menu and select “AUX”.
2. Cycle through the two options using the scroll buttons.
3. When the appropriate setting is selected, push the “Play/Select” button to lock it in.
IMPORTANT NOTE
Some third party decoys may require latched operation as opposed to momentary.
A detailed list of other products and their specific requirements is not maintained
by FOXPRO. You will need to check with the equipment manufacturer to
determine if it is compatible and what the requirements are.
9-3 View
The KRAKATOA II remote control can display your sounds either by general listing or by category
listing. Sound categories are the best route to go if you have a large number of sounds.
Configuring Sounds View:
1. Access the TX1000 Settings menu and select “View”.
2. Cycle through the two options using the scroll buttons.
When the appropriate setting is selected, push the “Play/Select” button to lock it in.
9-4 Temperature Units
The integrated thermometer can display temperature in either Celsius or Fahrenheit based
upon your preference.
Configuring the Temperature Units:
1. Access the TX1000 Settings menu and select “Temp Units”.
2. Cycle through the two options using the scroll buttons.
3. When the appropriate setting is selected, push the “Play/Select” button to lock it in.
Page 36

36
9-5 Barometer Measurement Units
The KRAKATOA II remote can display barometric pressure readings in either inches or
millimeters depending upon your preference.
Configuring the Barometer Measurement Units:
1. Access the TX1000 Settings menu and select “Barom Units”.
2. Cycle through the two options using the scroll buttons.
3. When the appropriate setting is selected, push the “Play/Select” button to lock it in.
9-6 Elevation
Barometric pressure is the reading provided by a barometer in measuring atmospheric air
pressure. The pressure is not constant, but changes depending upon altitude and weather
conditions. In order to get the most accurate measurement with your KRAKATOA II remote, it is
recommended that you set the elevation value for your location. Atmospheric pressure is the
greatest at sea level as compared to higher altitudes. To get the best calculation, knowing your
approximate elevation will greatly increase the accuracy.
Setting the Elevation:
1. Access the TX1000 Settings menu and select “Elevation”.
2. Cycle through the options until you find the closest match for your location.
3. When the appropriate value is displayed, push the “Play/Select” button to lock it in.
There are many online resources that can assist you in determining your elevation above sea
level. Performing an online search will provide you with ample results featuring maps or other
tools to determine the elevation for your particular area.
9-7 About Info
The About Info screen displays a variety of information pertaining to version number, number
of sounds loaded, number of FOXCAST sequences loaded, number of categories loaded, and the
number of presets.
9-8 Restore Defaults
To reset your KRAKATOA II remote control back to factory defaults, use this option. Please be
aware that restoring factory defaults will result in loss of your presets/favorites, sound list,
categories, and all FOXDATA information.
Restoring Factory Defaults:
1. Access the TX1000 Settings menu and select “Restore Defaults”.
2. A confirmation screen is displayed asking you if you are sure. To proceed, select “Yes”,
otherwise, “No” will return you to the menu.
3. Once the reset is complete, the remote will be back to factory default conditions.
Page 37

37
10. KRAKATOA II Remote USB Operation
The KRAKATOA II remote control features a mini USB port located inside the speaker cap
compartment. In order to connect the remote to a computer, you will need to obtain a mini
USB type A/B cable (provided with the KRAKATOA II).
IMPORTANT NOTE
Before connecting the KRAKATOA II remote to a computer, be sure that the
remote has fresh batteries installed. The KRAKATOA II remote must be powered on
while connected to a computer. If the remote loses power while it is connected to
a computer during a write-mode, there is a possibility of corruption of the file
system. Make sure the batteries are fresh to prevent any damage from occurring.
Connecting the KRAKATOA II Remote to a Computer:
1. Connect the USB cable from the jack on the KRAKATOA II remote to a USB port in the
computer.
2. Power on the KRAKATOA II remote. The screen should activate and show “USB Active”
instead of the sound screen.
3. Your operating system will then detect the device and take the necessary steps to
make it accessible for you. Windows users will see a new drive letter appear named
“TX1000”. Mac users will see a new icon appear on their desktop called “TX1000”.
IMPORTANT NOTE
Depending upon your computer setup and operating system, the exact details of
what will happen when you connect the device may vary slightly. In general, the
operating system will detect that a piece of hardware has been detected. From
there, you should receive some sort of visual or audible notification that
something has been plugged in.
When the KRAKATOA II remote is connected to a computer, you can browse through the device
just as you would any other USB storage device. Inside of the file system, you should encounter
two files. These files are:
File Name Description
foxdata.csv Contains the harvested FOXDATA data.
presets.txt Contains the list of presets.
Each of these files can be viewed on most operating systems through the standard plaintext
editor such as notepad. With the exception of the FOXDATA file, the other files can be modified
for your specific configurations.
Page 38

38
10-1 Editing the Presets File
While you can create and edit your presets through this file, it is recommended that presets
be created through the KRAKATOA II remote as described in chapter 2. Open the file titled
‘presets.txt’ to view the contents. The file should look something similar to the following:
Example ‘presets.txt’ File
007,31
086,23
090,40
007,07
001,40
066,28
003,23
Each line in this file is referencing a specific sound number and a volume level separated by a
comma. The first line of the example shown above indicates sound number 007 established for
playback at volume level 31. You can add more presets to the file manually by editing it through
your computer. Once you have it edited to your liking, save the file and close it.
10-2 Viewing the FOXDATA File
The FOXDATA file is in what is called CSV format or comma separated values. In a CSV file, the
first row defines the variable (field) names each separated by a comma and subsequent rows
contain relative data for those defined fields. At first glance, the file may seem confusing and
not very useful. FOXPRO has developed an online FOXDATA extension that allows you to create
an account on our website, upload your ‘foxdata.csv’ file and have that file turned into easy-toread charts, graphs, and table.
Let’s say you have 3 months of hunts recorded in your KRAKATOA II remote through FOXDATA.
You can login to your account, upload the file, and then the system will take care of the rest.
You can then erase the current FOXDATA file from the KRAKATOA II remote to start recording
again. 3 months later you can upload another copy of the file to track the next batch.
The CSV file can be opened for viewing through a program such as Microsoft Excel. The field
titles will be displayed and the relative data will be displayed in rows beneath that. While Excel
can provide you with a quick glance at the information, turning it into something useful is where
the FOXDATA online extension comes into play.
Be sure to check out the FOXDATA online extension online at:
http://www.gofoxpro.com/foxdata
Page 39

39
11. Programming the KRAKATOA II
The FOXPRO KRAKATOA II digital game call can be completely programmed from home with the
use of a computer. It is possible to reprogram a KRAKATOA II from a Windows based PC as well
as a Mac. Both subjects will be covered in this section.
The KRAKATOA II can play a number of different audio file types. This includes FOXPRO’s
proprietary FXP and 24B files, MP3 files, uncompressed WAV files, and FLAC files. If you are
using your own audio files, make sure it is an MP3, uncompressed WAV, or FLAC file, otherwise
it will not work.
11-1 Requirements
The KRAKATOA II digital game call features a mini USB port located inside of the speaker cap.
You will need to obtain an appropriate mini USB type A/B cable. The same cable can be used to
connect your KRAKATOA II remote to your computer as well.
You will need a computer with an available USB port to connect to. It is not recommended
that you connect to a USB hub, but rather to a USB port directly on your computer.
You will need an online connection. FOXPRO sounds and software are distributed online from
the FOXPRO website. In order to access the sounds and software, an online connection is
required.
11-2 Connecting to a Computer
1. Make sure the KRAKATOA II is turned off.
2. Locate the USB port inside of the speaker cap of the KRAKATOA II and connect one
end of the USB cable to this jack.
3. Connect the other end of the USB cable to a jack on the computer.
4. Your computer may provide an audible or visual alert that a new device has been
connected.
Windows Users
After the KRAKATOA II has been connected to your computer, there are a number of things that
can happen. First, Windows users may see a “Found New Hardware” notification or even hear
an audible tone indicating a USB device has been connected. The first thing to determine is
what drive letter the KRAKATOA II is being assigned to. To do this, you can click on the Windows
start button and then click on ‘Computer’. The next screen will show all of the available drives
on this computer, locate the icon for the KRAKATOA II. Beneath this icon is a letter in
parenthesis—make a note of this letter as this is what drive letter the KRAKATOA II is on.
Double-click on this icon to view the files.
Page 40

40
Mac Users
After the KRAKATOA II has been connected to your computer, you may hear an audible tone or
even get a visual alert indicating that a device has been connected. Once detection is complete,
you should see a new icon appear on the desktop. Double-click on this icon to view the files.
11-3 Manual Programming Process
Manually programming the KRAKATOA II is a very simple process. You can perform the process
from a Windows PC or a Mac without any special software. The only requirements are that you
have the appropriate USB cable and a USB port on your computer.
To begin, connect the KRAKATOA II to your computer as described earlier in this chapter. Once
it is connected, browse to the KRAKATOA II and open it to view the contents. You should notice
a folder inside the KRAKATOA II titled “Sounds”. This folder is the location in which all of the
sounds, sequence files, and category files must be stored. If you wish to add new sounds, simply
place the sound files directly inside of the “Sounds” folder. Sounds can be removed by either
deleting them from the “Sounds” folder or moving them to a folder on your hard drive for later
use.
It is not required that you rename the sound files in any way to correlate with a specific position
within the sound list, but doing so can help make the task of creating sequences and category
files much simpler. The next section of the manual discusses file indexing. The files are sorted
based upon the individual names of the sound files. For example, a sound file labeled
“Aggressive Bobcat” would appear before a sound labeled “Bobcat in Heat”.
After placing the sound files into the KRAKATOA II “Sounds” folder, you must disconnect the
KRAKATOA II from your computer and then synchronize the KRAKATOA II remote control with
the KRAKATOA II to update the sound list. Instructions on updating the KRAKATOA II remote
sound list are featured later in this chapter.
11-4 Indexing the Files
Files stored in the KRAKATOA II and KRAKATOA II remote are sorted based upon the names of
the files. For example, a sound titled “000 My Sound” will appear in the list before a sound
titled “123 Lightning Jack”. While you can simply copy and paste sounds directly into the
KRAKATOA II’s sound folder, the ultimate order in which those sounds will appear in is based
upon the names of those files. This is important to understand when considering the
implications upon other features such as FOXCAST.
The KRAKATOA II can hold up to 1,000 sounds in total. Proper indexing values for all file names
range from 000 through 999. If you download a 4 sound pack from FOXPRO, you will see the
files in a format similar to:
Page 41

41
Example 4 Sound Pack File List
B00 Raspy Woodpecker
B51 Raven Duet
C26 Coyote Pair
N02 Raccoon Fight
Each one of those files contains the FOXPRO sound library identification number as the first part
of the file name. Obviously, the sound library identification number does not fall within the 000
through 999 indexing values. This means that if you wish to assign a specific position for any of
those files, those numbers must be replaced by a proper index value. Using your computer, you
can easily rename those files to become something similar to:
Example 4 Sound Pack File List
100 Raspy Woodpecker
101 Raven Duet
102 Coyote Pair
103 Raccoon Fight
By renaming the files, they will now have an index value to assign their individual positions
within the sound list. When building a FOXCAST sequence, for example, referencing sound
“100” will link to “Raspy Woodpecker”. While indexing is not required, it can certainly be useful
in many occasions.
11-5 Using the FOXPRO Programming Utility
The FOXPRO Sound Programming Utility for Windows based PC’s can be downloaded from our
website at the following link:
http://www.gofoxpro.com/programming/
Locate the “Software Links” heading and select the “FOXPRO Programming Utility” link. When
the page is loaded, locate the "Product Information" box. This box displays current version
number, publication date, and MD5 and SHA1 information for validating the installation file as
being genuine. The last item in the box contains the official download link. To begin the
download, click on the "Download" button.
If you are upgrading from a previous version of the FOXPRO Programming Utility, there is no
need to uninstall the original version before launching the new installer as it will automatically
upgrade for you. Your original sound library storage folder will remain unchanged.
Depending upon what internet browser you are using, you may be prompted to "Open", "Run",
or "Save" the file that is being requested. Some browsers may not prompt you for action and
just save the file to your default Download folder. If you are presented the option, we
recommend selecting either “Open” or “Run”—in doing this, the installer will automatically
launch when the file has been downloaded. Otherwise, you will need to browse your Download
folder for the install file which is titled: “foxpro-programming-utility-installer.exe”. You will then
Page 42

42
need to open the file to launch the installer. The installation is very brief and straightforward.
When the installation is complete, a message of success will display on the screen.
Launching the Utility
The installer creates a shortcut to launch the programming utility through your programs menu
under the Windows start button. The location is: Start Button -> All Programs -> FOXPRO ->
FOXPRO Programmer Click on the "FOXPRO Programmer" icon to launch the utility. Upon
successful launch, you will be presented with the main interface.
Connecting your KRAKATOA II to the PC
Connect the KRAKATOA II to your PC as outlined in section 11-2.
After connecting your FOXPRO game call to your PC, the utility should recognize the device as
being a valid product and display "Connected to..." followed by the device name. The "Caller
Sound Files" column should become active and display the sounds currently installed.
File Locations / Sound Library
If you had the previous version of the utility installed, your default sound library storage point is
located at "C:\FOXPRO\Sounds". By clicking on the "Browse Library" button you can browse the
sound files stored at that location.
If this is a fresh install with no previous versions, your default sound library storage point is
located under your Documents (or My Documents) folder\FOXPRO\Sounds. By clicking on the
"Browse Library" button, you can browse the sounds stored at that location.
Your sound library will probably be empty by default. You need to obtain sounds and place
them into your library folder in order to install them into your FOXPRO game call.
1. Connect your FOXPRO device to your PC
2. Launch the programming utility
3. If you do not see your new sounds under the "Source Sound Files" column, use the
"Browse Library" button to navigate to the correct location. When the appropriate
files are found, double-click on any of the sounds to automatically load all files from
that location.
4. Select one, multiple, or all sound files in the "Source Sound Files" column. Click on the
position you wish to load the sounds into and click "Insert". Or if you are replacing
existing sounds, use "Overwrite".
5. When complete, click on the "Update Caller" button to save your changes. Any sounds
being removed will automatically be backed-up.
6. Exit the utility and update the TX1000 as per the instructions in the next section.
11-6 Editing the Categories Manually
KRAKATOA II sound categories are maintained and defined through a text file that is located in
the KRAKATOA II. To begin working with the categories, open the file titled ‘categories.txt’
(located inside of the “Sounds” folder). The file should look something similar to the following:
Page 43

43
Example ‘categories.txt’ File
Coyote Vocals
000
001
002
003
004
Fox Vocals
023
024
025
026
Whitetail Sounds
078
079
The above example shows the category layout for three categories: Coyote Vocals, Fox Vocals,
and Whitetail Sounds. The sounds listed beneath each category name are the sounds that
comprise that category.
Through simple editing of this file, you can easily build your own category names and associated
sound lists. The best way to go about doing this is to have your KRAKATOA II remote control
next to you. Turn it on and access the sound list. Next to each one of the sounds is a three digit
number. This number is prefixed to the sound name by the KRAKATOA II remote. Let’s say you
want to create a raccoon category. Look through your sound list and find your raccoon sounds.
For this example, let’s say that you encounter 5 raccoon sounds in your sound list on sounds
090 – 094. Open the ‘categories.txt’ file and add the following:
Example ‘categories.txt’ File
Raccoon Sounds
090
091
092
093
094
Save the file and exit. You have now successfully created your very first sound category. As you
can see, the process is very simple to do. The first line is the name of the category which
appears in plaintext. Beneath that category name you list the sounds numerically based upon
their assignment within the KRAKATOA II remote control.
Any time you modify the category file in the KRAKATOA II, you must download the playlist to
the KRAKATOA II remote control.
Page 44

44
11-7 Editing the Categories with FOXPRO Utility
Make sure that you have installed the FOXPRO Sound Programming Utility as described in
section 11-5. When working with the KRAKATOA II and the utility, you will notice the “Edit
Categories” button above the “Caller Sound Files” column. Click on this button to launch the
category editor.
The screen provides a split-screen view. The left pane shows all of the sounds installed in your
KRAKATOA II. The right pane shows all of the categories (or no categories if none have been
defined). To create a new category, click on the “New Category” button, type in the desired
name, then click “OK”. The new category will appear on the right.
To move sounds into a specific category, click and drag the desired sound from the list on the
left into the category on the right. Note that when you are dragging the sound, the mouse
pointer will turn into a speaker. When you are finished assigning sounds into categories, click on
the “Save/Done” button to exit. Be sure to update the playlist on the remote control as
described in section 11-8.
11-8 Updating the Remote Playlist
The process of updating the playlist on the remote control requires using the FOXPRO Sound
Programming Utility. There are two versions of this utility available; the regular Windows
version and a Java version that is compatible with Windows and Mac. In order to update the
KRAKATOA II remote, you must use one of the two versions of the utility.
Any time you modify the sound list, sequences, or categories on the KRAKATOA II, the remote
control must be updated to reflect those changes. Before carrying out the steps listed below,
make sure that you have fresh batteries in your KRAKATOA II remote control. It is important to
note that these steps should not be followed until you have successfully reprogrammed the
KRAKATOA II.
1. Connect the KRAKATOA II remote to your computer as described in Chapter 10.
2. Open the FOXPRO Sound Programming Utility. The utility will automatically detect the
KRAKATOA II remote. If there is an update pending from recently reprogramming the
KRAKATOA II, a message will appear prompt you to apply the update.
3. After the update is installed, exit the utility and disconnect the KRAKATOA II remote
from your computer. After disconnecting the remote from your computer, it will
display the normal main screen and you can immediately observe the changes.
12. Creating FOXCAST Sequence Files
This section will provide you with detailed information on creating and installing FOXCAST
sequence files in your KRAKATOA II digital game caller.
Page 45

45
12-1 Creating FOXCAST Sequences Manually
This process requires some basic computer operations experience. If you are not very
experienced with computers, it is recommended that you seek help prior to performing any of
the following steps.
A FOXCAST sequence file is a simple text based file that contains unique instructions to guide
your KRAKATOA II through a stand. These instructions include commands to change the sound,
change the volume level, enter a passage of silence, and so forth. Here is a chart showing all of
the various command possibilities:
Instruction Value Description
S 0 – 999 Denotes numerical value of sound on unit
V 0 – 40 Denotes numerical value of volume level
P 1 - 99999 Denotes pause value in seconds (approx.)
M 0 – 4 FOXMOTION and speed parameter
D 1 or 0 1= activate decoy, 0= deactivate decoy
J n/a Denotes Jukebox Mode for this FOXCAST File
R n/a Denotes Repeat Mode for this FOXCAST File
Q n/a Denotes Single Play Mode for this FOXCAST File
A typical FOXCAST sequence file may look something similar to the following example:
Example FOXCAST Sequence File Layout
V 20
S 15 4
D 1
P 90
V 35
D 0
S 22
V 30
S 20 3
Q
The previous example is interpreted as follows:
Set volume to level 20. Play sound number 15 a total of 4 times. Activate the decoy. Pause for
90 seconds. Adjust volume to level 35. Deactivate the decoy. Play sound number 22. Adjust
volume to level 30. Play sound number 20 a total of 3 times. Quit.
Notice that you can specify how many times you wish a particular sound to be played. By
entering your instruction as “S 20 3”, you are thereby instructing the unit to play sound 20 a
total of three times.
A FOXCAST sequence must always begin with a volume or pause. Without defining a volume
level, the caller will default to volume level 0. A FOXCAST sequence file must always end with a
Page 46

46
specific ending statement. “J” represents jukebox mode. When you end a sequence with “J”,
once the sequence has played through a single time, it will automatically begin playing the next
FOXAST sequence. “Q” represents quit. Once the sequence has played entirely, the KRAKATOA
II will go silent. “R” represents repeat. Once the sequence has played entirely, the KRAKATOA II
will play that sequence again until it is interrupted by the operator.
The KRAKATOA II can accept up to 20 FOXCAST sequence files. These files will need to be in a
format such as:
Example FOXCAST Sequence File Names
S00 My Coyote Sequence 1.seq
S01 My Bobcat Sequence.seq
S02 Mountain Lion Calls.seq
Each file can be broken down into two parts. The first part, “My Coyote Sequence”, describes
the title or name of this particular sequence. The second part, “.seq”, is the file extension that
defines this file as a FOXCAST sequence file. Note that the .seq file extension is not native to
any operating system. This is a unique file extension for FOXPRO game calls with FOXCAST. A
FOXCAST sequence file may appear as an unknown file type and display on your computer as
“unknown” or “unassociated” icon.
On a Windows based PC, using a piece of integrated software such as Notepad is all that you
will need to successfully build a sequence file. Mac users would use something such as Textedit,
which is a standard application.
IMPORTANT NOTE
FOXCAST sequence files are expected to run for long durations. It may be
necessary to turn off the Auto Shutdown feature on the KRAKATOA II to prevent
any interruptions.
12-2 Enabling File Extensions in Windows
The Windows operating system may hide file extensions preventing you from making changes
to them. For example, instead of seeing “My Coyote Sequence1.seq”, the file may read as “My
Coyote Sequence1”. In order to change the file extension, you may need to configure your
operating system to display file extensions. Specific details on this process go beyond the scope
of this manual. You can perform an online search or consult a local computer technician for
assistance with this.
12-3 Placing Sequences in the KRAKATOA II
The KRAKATOA II expects to find FOXCAST sequence files inside of the “Sounds” folder in the
KRAKATOA II. If you are loading the sequence files manually, the first step is to connect the
KRAKATOA II to your computer. Browse to the KRAKATOA II and open it up. Locate the “Sounds”
folder. Copy your sequence files from wherever they are stored on your hard drive, into this
folder (drag and drop). If you are using the online FOXCAST file generator, you can save the file
directly from the website right into the “Sounds” folder in the KRAKATOA II.
Page 47

47
12-4 Creating FOXCAST Sequences Online
A second, simpler option for creating sequences can be found on the FOXPRO website. The
following address will direct you to the FOXPRO Online FOXCAST Sequence File Generator:
http://www.gofoxpro.com/foxcast
This easy to use site allows you to quickly assemble and download FOXCAST sequence files to
your computer or directly to your FOXPRO game call. The site has plenty of instructions to help
get you started. Just remember to save the sequence files into the “Sounds” folder in the
KRAKATOA II.
12-5 Synchronizing the KRAKATOA II Remote
Before you can access your FOXCAST sequence files on the KRAKATOA II remote, you must
download a new copy of the sound list. To perform this, please see chapter 11-8.
13. Firmware Updates
The KRAKATOA II remote features the ability to have firmware updates installed from home. It
is crucial to determine which version of game call and remote you have prior to performing any
of the update procedures.
13-1 KRAKATOA II TX1000 Remote
The Krakatoa II TX1000 remote features a mini USB port. Make sure you have the appropriate
mini USB type A/B cable for connecting the remote to your PC.
The update software is only compatible with PC’s running Microsoft Windows XP and newer.
You can download the installation program from the following link:
http://www.gofoxpro.com/fwupdate
Ample instructions are present on the website to aid you in the update process. You are
welcome to contact FOXPRO technical support for assistance in this matter.
Begin by verifying the batteries in your FOXPRO TX1000 remote are fresh or fully charged. It is
crucial that the batteries are fresh or fully charged prior to starting this process. If the batteries
are weak and cause the device to lose power during the update process, the device could be
damaged to an extent where it is no longer usable. Again, make sure your batteries are fresh or
fully charged and then follow the instructions below:
1. Turn off the TX1000.
2. Open the update utility software.
Page 48

48
3. Push and hold the user button on the bottom left of the remote. While holding in the
user button, turn the remote on. You will observe a screen displaying: “FOXPRO
TX1000 FIRMWARE UPGRADE CONNECT USB CABLE START UPGRADE UTILITY”.
4. Connect the USB cable from the TX1000 to the computer.
5. Push the ‘Connect’ button on the utility to start the update.
6. When complete, disconnect the TX1000 from the computer and turn it on. You should
now see the new firmware version number.
14. Product Care & Maintenance
In order to help get years of trouble free service with your FOXPRO game call, it is strongly
recommended that you read and understand the following points. Many of these are
considered proactive or preventative.
Avoid exposure to all precipitation and moisture. Whether you are storing your FOXPRO game
call or decoy away for the summer or just having some down time from calling, it is highly
recommended that you thoroughly inspect the unit for any signs of moisture. Moisture
(perhaps from rain, snow, condensation, or other) can potentially enter the unit or the battery
compartment and cause some serious problems. Proper care should be taken to mitigate the
introduction of (or potential for introduction of) moisture into the machine and make sure that
no moisture is present during storage. Moisture can quickly lead to corrosion, electrical shorts,
and even rust—all of which can possibly render the unit damaged and out of warranty. This
type of damage is preventable. For example, if you are operating in rainy, wet conditions, it is
recommended that you place the unit inside of a large plastic freezer storage bag or use a
water/weatherproof deployment bag to keep water from getting to it. When storing the unit
for prolonged periods, be sure that you keep it in a dry location not susceptible to drawing
moisture.
Remove batteries prior to storage or extended periods of inactivity! All batteries, whether
alkaline or rechargeable, should be removed from the game calls, decoys, and remote controls
prior to storage or periods of inactivity. Batteries that are left inside of electronic devices can
leak over time as the chemicals start to break down. Damages caused by this can be very severe
and potentially destroy the electrical components. To prevent this from happening, simply
remove all batteries from all devices before you put them away. Keep in mind; damage caused
by battery leakage is not a warranty issue.
Periodically charge your rechargeable batteries when not in use! Rechargeable batteries will
not last forever. To help maximize the overall life of your rechargeable batteries, we
recommend that you periodically charge them up, perhaps once a month or once every other
month, to keep them fresh. Batteries that are left uncharged can enter into a state of deep
discharge. Batteries in this state can, at times, no longer accept a charge and result in
unexpected operation or complete failure in the field. It is also recommended that you replace
rechargeable batteries about once a year just to keep them fresh.
Page 49

49
Keep it clean! Our products are designed to be used outdoors and as a result, they can get dirty
from time to time. While the dirt may add a bit of character and show that you use it frequently
and hard, it is recommended that you spend a few moments after each hunt or at the end of
the season prior to storage to clean it up a bit. Total disassembly won’t be required, just remove
any debris, sticks, leaves, dirt, or anything else that shouldn’t be there. If dirt or foreign objects
make their way into the machine, it can cause problems down the road.
Store in a dry location! If you are planning on storing the unit away for the summer, it is
recommended to keep the unit in a dry location that is not prone to drawing moisture. It is also
recommended to remove all batteries prior to removal.
Check it out before heading into the field! If you are getting your caller out for the first time
this season, take it out back and check it out before you head out on a hunt. Check your remote
range, fidelity, high volume, low volume, battery life, etc. Being prepared and ensuring proper
functionality before heading out on a trip can help you decide if you need new batteries, if it
needs service, or if everything is working well. This can help prevent cancellation of trips and
potential disappointment.
15. Troubleshooting
This section covers the troubleshooting aspects for the KRAKATOA II and KRAKATOA II remote
control. The most common problems are battery related. Before performing anything else, try
installing fresh batteries. When your batteries get low, in either the KRAKATOA II or the
KRAKATOA II remote, unexpected operation can occur. You can experience such things as loss
of audio quality, loss of remote control range, and other abnormal results.
Problem Solution
KRAKATOA II will Not Turn On Make sure the batteries are fully charged. Inspect the
battery connector wires and make sure they connected
and not corroded. Make sure the battery terminals show
no signs of corrosion.
KRAKATOA II does not
produce any sound
Check that the speakers are not turned off in the
KRAKATOA II remote control. Try connecting the
KRAKATOA II to a computer and inspecting the sound files
for missing files or signs of corruption.
KRAKATOA II remote not
controlling KRAKATOA II
Make sure that the remote and caller are set to the same
channel of operation. Then turn off the caller and remote,
wait a few moments, turn them back on and try operating
again.
KRAKATOA II remote does not
turn on
Try replacing the batteries.
KRAKATOA II remote stuck on
start-up screen
Try replacing the batteries.
Cannot control external If you are using a FOXPRO Jack Predator Decoy, make sure
Page 50

50
decoy that the AUX configuration is set to momentary and not
latched. If you are using a third party decoy, try using the
latched setting instead of momentary.
Having trouble with
programming new sounds
Check out FOXPRO’s website for detailed programming
information for your KRAKATOA II. Solutions for many
common issues can be found there.
Poor battery life in extreme
cold weather conditions
Cold weather operations can take a serious toll on alkaline
batteries. It is strongly recommended that you use lithium
or rechargeable NiMH batteries to get the best
performance in cold weather.
KRAKATOA II remote will not
turn on after firmware update
Contact FOXPRO technical support.
KRAKATOA II will not turn on
after firmware update
Contact FOXPRO technical support.
Cannot control volume on
KRAKATOA II
Check your KRAKATOA II remote configuration to see if
Auto Volume is activated. If it is, it would seem like you
have no volume control ability.
16. Maximizing Remote Range
Remote range can be affected by many factors. Some of these factors can be controlled while
others cannot. In order to achieve the best possible remote range with your KRAKATOA II digital
game call system, it is recommended that the following points be observed:
• Always use high quality alkaline or lithium cell batteries in the remote.
• Always maintain clear line of sight between the remote control and the KRAKATOA II.
Any obstructions—no matter how significant or insignificant—can adversely affect the
radio signal.
• Try to keep the remote control approximately six inches away from your body, gun
barrel, and metal shooting sticks as these things can detune the remote control.
• Hold the remote control vertically with the antenna pointing skyward.
• Avoid using the device remotely when you are near power lines, cellular phone
towers, and radar (such as near airports or military installations).
• Try to elevate the caller off of the ground by approximately three feet. This can
greatly maximize your overall remote control range.
• Try to avoid situations where the KRAKATOA II is placed at a lower elevation than the
remote control—the caller should always be higher.
• If you are using the KRAKATOA II remotely from a long distance, be sure to allow
enough time for device reaction before sending multiple signals. For example, if you
request a sound change, consider the amount of time from radio transmission from
the remote to the KRAKATOA II until that signal is turned into a change in operation
that you are able to perceive. It will not always be instantaneous and may take a
second or two before a change in operation is detected from your vantage point.
Page 51

51
Mashing down button after button can get the device into a state of confusion which
could result in undesirable results.
• If you are operating around another KRAKATOA II user, make sure that you are both
on different channels to prevent any interference.
17. FCC & IC Information
FCC Information
NOTE: This equipment has been tested and found to comply with the limits for a Class B digital
device, pursuant to Part 15 of the FCC Rules. These limits are designed to provide reasonable
protection against harmful interference in a residential installation. This equipment generates,
uses, and can radiate radio frequency energy and, if not installed and used in accordance with
the instructions, may cause harmful interference to radio communications. However, there is
no guarantee that the interference will not occur in a particular installation. If this equipment
does cause harmful interference to radio or television reception, which can be determined by
turning the equipment off and on, the user is encouraged to correct the interference by one or
more of the following measures:
• Reorient or relocate the receiving antenna.
• Increase the separation between the equipment and receiver.
• Connect the equipment into an outlet or circuit different that to which the receiver is
connected.
• Consult the dealer or an experienced radio/TV technician for help.
Operation is subject to the following two conditions: (1) this device may not cause harmful
interference, and (2) this device must accept any interference received, including interference
that may cause undesired operation of this device. Modifications not expressly approved by the
manufacturer could void the user’s authority to operate the equipment under FCC rules.
RF Exposure Safety Notice
The TX1000 transmitter is not intended to be operated closer than 20cm (about 8 inches) to
your body. The transmitter can produce a radiated RF field similar to that of a standard cell
telephone, although the duty cycle of this RF field is much lower than that of a cell telephone.
Using the transmitter closer than 8 inches to your body can increase your exposure to RF energy
levels thought by some to be harmful. Additionally, operation in close proximity to your body
can detune the antenna causing a decrease in operating performance.
The antenna(s) used for this transmitter must be installed to provide a separation distance of at
least 20 cm from all persons and must not be co-located or operating in conjunction with any
other antenna or transmitter. End-users and installers must be provided with antenna
installation instructions and transmitter operating conditions for satisfying RF exposure
compliance.
Note: Units exported beyond the boundaries of North America are not FCC certified. FOXPRO
Inc. makes every attempt at complying with regional regulations governing radio spectrum.
However, it is the user’s responsibility to ensure compliance with local laws and ordinances that
govern the use of radio controlled devices in the area of operation.
Page 52

52
Industry Canada Notice
This device complies with Industry Canada licence-exempt RSS standard(s). Operation is subject
to the following two conditions: (1) this device may not cause interference, and (2) this device
must accept any interference, including interference that may cause undesirable operation of
the device.
Le présent appareil est conforme aux CNR d’Industrie Canada applicable aux appareils
radio exempts de licence. L’exploitation est autorisée aux deux conditions suivantes :
(1) l’appareil ne doit pas produire de brouilage, et (2) l’utilisateur de l’appareil doit
accepter tout brouillage radioélectrique subi, même si le brouillage est susceptible d’en
compromettre le functionnement.
Page 53

53
18. Warranty Statement
Your FOXPRO® game call is warranted to be free from defects in materials and workmanship
that diminish its usefulness for a period of five years from the date of purchase if the item was
purchased from a FOXPRO Authorized Retailer. Return the unit prepaid and packaged securely
along with proof of purchase to the address shown below. Include a note describing the defect
or problem. This limited warranty is void if the unit is physically damaged, used in a manner
contrary to intended use, or otherwise abused, either intentionally or unintentionally. Also
specifically excluded are batteries and damage caused by attempts to charge batteries not
intended to be recharged, and water damage.
FOXPRO
14 Fox Hollow Drive
Lewistown, PA 17044
Online Warranty Registration
You can register your KRAKATOA II digital game call online at the following address):
http://www.gofoxpro.com/warranty
Make sure that you retain a hard copy of your proof of purchase (i.e. store receipt) for any
future warranty claims.
 Loading...