

Page 1

Page 2

TOPIC
PAGE
IMPORTANT
INFORMATION
3
USING THE FOXPRO® SNOW-CROW PRO 2
4
1.0 QUICK OPERATING GUIDE
5
5
5
5
6
6
7
3.0
BATTERIES AND CHARGING
7
4.0
AUX JACK FUNCTION
7
5.0 TX-
500 REMOTE CONTROL OPERATION
9
9
10
12
12
13
13
14
16
17
18
19
20
6.0 TX-
500 AND SNOW
-
CROW PRO CUSTOMIZATIONS
20
20
21
7.0
PROGRAM THE SNOW
-
CROW
-
PRO
24
24
24
25
27
FCC STATEMENT
29
LIMITED WARRANTY STATEMENT
32
1.1 Connecting the 12V Battery
1.2 Installing Batteries in the TX-500
1.3 Playing Sounds Manually
1.4 Operating the Snow-Crow Pro by TX-500 Remote
1.5 Powering Down
2.0 ABOUT THE FOXPRO® SCP SPEAKERS
5.1 Installing Batteries in the TX-500
5.2 Understanding the Menu System
5.3 Turning on the TX-500
5.4 Selecting Sounds
5.5 Setting the Volume
5.6 Mute
5.7 FOXCAST
5.8 Sound Presets
5.9 FOXFADE
5.10 AUTO-V
5.11 AUX
5.12 Recall
6.1 Control Menu
6.2 Config Menu
7.1 Purchasing New Sounds
7.2 Downloading the FOXPRO® Programming Utility
7.3 Programming with the Utility
7.4 Downloading new Playlist to the TX-500
Page | 2
Page 3

Important Information
FOXPRO®’s goal is to provide our customers with the highest quality products
in the industry. We take great pride in manufacturing our products in the USA.
Please do not hesitate to contact us for assistance, comments or questions.
FOXPRO® Inc.
14 Fox Hollow Drive
Lewistown, PA 17044
(717) 248-2507
Fax: (717) 247-3594
Hours of Operation
Monday – Friday
8AM – 5PM EST
Contact Us
Customer Service: (717) 248-2507
Toll Free Orders Only: 866-463-6977
General Inquiry E-mail: sales@gofoxpro.com
Stay up to date with the latest sounds by visiting our online sound library.
Watch for new products and upgrades from FOXPRO®. Visit us online:
www.gofoxpro.com
This manual, the animal sounds stored in your caller, and animal sounds
purchased from FOXPRO® Inc. for installation in your caller are protected
by copyright.
Copyright
©©©©
℗℗℗℗
2009 by FOXPRO® Inc.
Page | 3
Page 4
Using the FOXPRO® SNOW-CROW PRO2 Digital Game Call
Congratulations on the purchase of your FOXPRO® SNOW-CROW PRO 2
digital wildlife caller! You have chosen a highly advanced product with
reliability, ease-of-use, and features that are second to none. Please take this
time to read and understand the information in this instruction booklet. This will
ensure that you receive the maximum benefit from your new FOXPRO®
SNOW-CROW PRO 2.
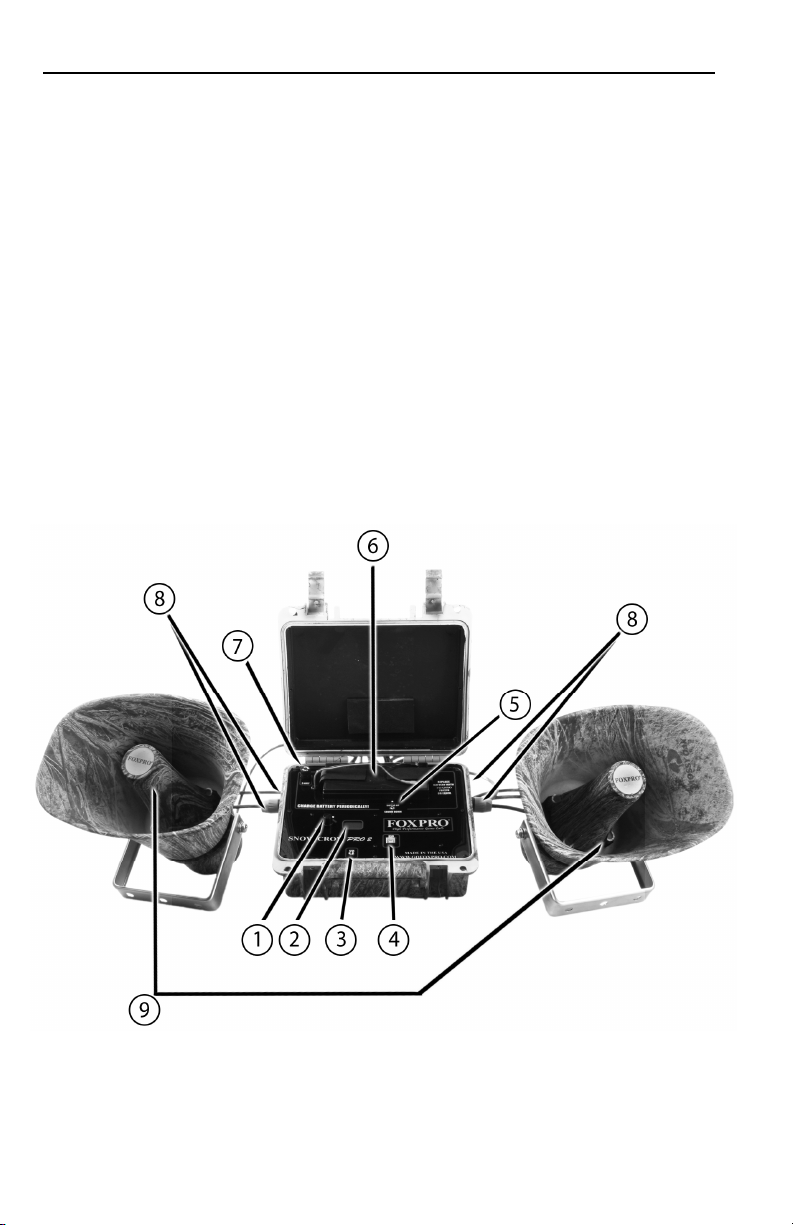
1. Power Switch/Volume Control Knob
2. LCD Panel
3. Auxiliary Jack
4. USB Port
5. Sound Up/Down Toggle Switch
6. High Capacity 12V Gel Cell Battery
7. Fuse
8. Four External Speaker Jacks
9. High Quality TOA Speakers
Page | 4
Page 5

CAUTION!
The FOXPRO SNOW
-
CROW PRO 2 can produce soun
d
pressure levels that can cause permanent hearing loss. Never operate
this device with speakers in close proximity to you at high volume levels
without hearing production.
1.0 QUICK OPERATING GUIDE
The SNOW-CROW PRO 2 is shipped from the factory with a high-capacity
rechargeable 12V SLA gel-cell battery preinstalled. Do not assume that the
state of charge on the battery is sufficient for operation right out of the box.
Make sure that you charge the battery prior to taking it into the field.
1.1 Connecting your 12V Battery
From the factory, your 12V battery will not be connected to the battery wires.
The first thing you need to do is remove the plastic covers from the terminals on
the battery itself. Connect the red lead to the positive terminal (also colored red)
and connect the black lead to the negative terminal (also colored black).
1.2 Installing Batteries in your TX-500
The TX-500 transmitter operates from 3 “AA” batteries. Please use high quality
alkaline or lithium batteries.
1. Remove the battery compartment cover located on the rear of the
transmitter.
2. Insert the “AA” batteries into the provided cavities. Note that the
battery polarity alternates.
3. Replace the battery compartment cover after the batteries are installed.
1.3 Playing Sounds Manually
Your SNOW-CROW PRO 2 can be operated with or without using the TX-500
transmitter.
1. Connect at least one of your external loudspeakers to the SNOWCROW PRO 2. The speakers are equipped with heavy duty plugs.
Insert the plug into one of the speaker jacks and turn it to the right to
lock it in place.
2. Turn the On/Off/Volume knob clockwise to the “ON” position – you
should hear a soft click. Please note that this switch is also the volume
control when the unit is operated manually. The further clockwise you
turn the knob, the louder the unit will play. At this point, the LCD
display on the SNOW-CROW PRO 2 will first display the channel of
operation, the software revision, and then display three horizontal bars.
3. Use the sound up/sound down toggle switch to select a sound number.
Once selected, release the button, and the sound will play. To select a
different sound, simply move the switch up or down again to select your
desired sound.
Page | 5
Page 6

1.4 Operating the SNOW-CROW PRO 2 by TX-500 Remote Control
1. Turn on the TX-500 transmitter by pressing down and holding the
sound selector knob for about 4 seconds. The screen will display
“FOXPRO® the caller of the wild” then show the remote version number
on the button line of the display. If you bump the button or do not hold it
for 4 seconds, the screen will briefly display “FOXPRO® the caller of
the wild” then turn back off. You may have to wait a few moments
before trying to turn it on again.
2. Select the sound you wish to play by turning the rotary selector knob on
the top of the transmitter either clockwise, which will scroll up, or
counter-clockwise which scrolls down.
3. When the sound desired appears in the displayed list, highlight the
sound, and press down on the rotary selector knob. You will notice that
the number associated with that sound will appear in the bottom text
line. This text line also displays the current channel setting, a mute
indicator, volume level indicator, battery monitor, and timer. The top
text line displays the front speaker, rear speaker, auto volume (AV) and
a play mode indicator. For more information on the text lines, see the
TX-500 features section of this instruction manual.
4. Now that you have selected the sound to be played, simply bring the
volume up to your desired level by depressing the volume up arrow. As
you depress the volume up arrow, note that the volume setting number
in the bottom text increases.
Muting the Sound
To mute the sound, simply press the mute button. The letter “M” will appear in
the bottom text line. The mute also serves as a pause feature, meaning that
when you un-mute the sound again, it will start playing where you muted the
sound instead of starting over again.
Changing the Sound
To change the sound, simply highlight your next sound preference and depress
the rotary selector knob. Your sound will instantly change. You can also use
the numeric keypad to enter the three digit number of the sound you wish to
play. When you begin entering a number on the keypad, the numbers you type
will appear in large text on the screen. You need to enter the three digit number
of the sound you wish to play. For example, type in a number in the range of
000 through 499 to play the corresponding sound.
Note: Make sure that you do not enter a number that is larger than the
total number of sounds programmed in the SNOW-CROW PRO 2. For
example, if you have 100 sounds and type in 234, nothing will happen.
1.5 POWERING DOWN
Be sure to power down both the SNOW-CROW PRO 2 and TX-500 after use to
Page | 6
Page 7

help prolong the battery life.
Powering Down the TX-500
Push and hold the selector knob until the selection menu appears (with TURN
OFF TX-500 already highlighted). By pressing the selection knob a second
time the transmitter will shut off. Should you forget to turn off the transmitter
when you are finished, it will automatically shut down after 2 hours of non-use.
Powering Down the SNOW-CROW PRO 2
Turn off the SNOW-CROW PRO 2 by rotating the On/Off switch to the off
position.
2.0 ABOUT THE FOXPRO® SNOW-CROW PRO SPEAKERS
Included with the SNOW-CROW PRO 2 are two large and loud horn
loudspeakers. These speakers connect directly to the central unit with very
rugged plugs. You may connect up to four of these speakers to the central unit.
3.0 BATTERIES AND CHARGING
Your SNOW-CROW PRO 2 operates on a rechargeable 12V SLA gel-cell
battery (FOXPRO part number FP1270). A smart charger is in included with the
SNOW-CROW PRO 2.
Note: Make sure that you disconnect the battery wires from the battery
prior to initiating a charge cycle to help prevent any damage to the main
unit.
The charger is automatic. When the battery is charging it will illuminate red and
when the charge is complete it will illuminate green.
4.0 “AUX” JACK FUNCTION
The SNOW-CROW PRO 2 is equipped with an auxiliary jack labeled “AUX”.
The purpose of this jack is to allow for the connection of certain external
devices, such as the FOXPRO® Jack-in-the-Box or Jack-Attack Decoy or other
approved devices, and to be able to turn these on and off with the TX-500
remote control transmitter. However, there are some strict electrical limits
involved with this jack. If these limits are exceeded, damage to your SNOWCROW PRO 2 will result. This damage is not covered by warranty.
The electrically inclined will want to know that the jack is connected to the drain
of an internal Field Effect Transistor with a maximum current rating of 100mA.
The “tip” polarity of the 3.5mm jack is positive, while the sleeve is negative. If
the external device is connected with the polarity reversed, an internal
protection diode within the FET will conduct, causing the device to stay on
constantly. The maximum voltage applied to this jack must never exceed 15
volts.
Page | 7
Page 8

Typical uses for this jack would be to control the FOXPRO® Jack-in-the-Box or
Jack-Attack Decoy or to start and stop a video recorder. Instructions on
connecting various devices to the “AUX” jack are beyond the scope of this
manual. You are urged to seek help from a knowledgeable professional before
connecting any unapproved device to this jack. Remember that damage to
your SNOW-CROW PRO 2 caused by improper use of the “AUX” jack is not
covered by the warranty, nor will FOXPRO® be liable for damage to any
devices connected to this jack.
The AUX jack is configurable for momentary or latched operation. Please see
section 6.11 for more information.
Page | 8
Page 9
5.0 TX-500 REMOTE CONTROL OPERATION
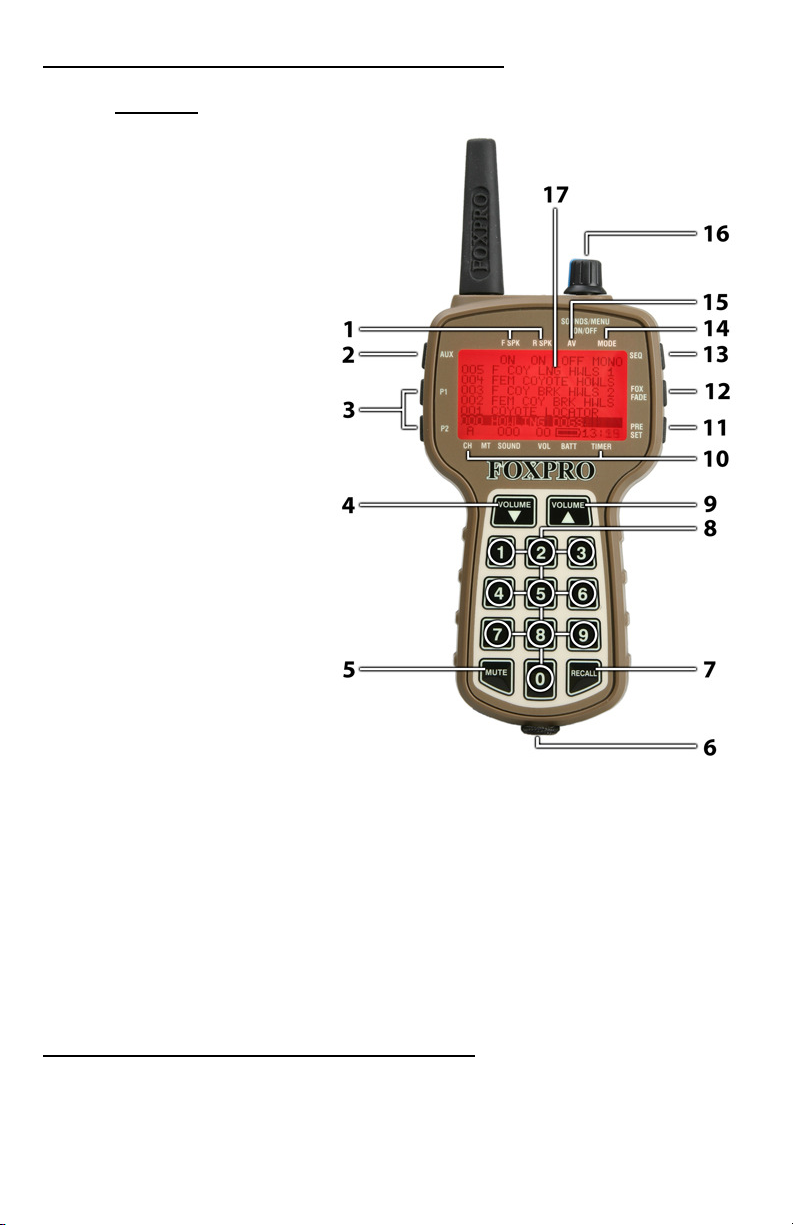
Features
1. Rear/Front Speaker On/Off
Indicator
2. Auxiliary Button
3. Quick Access for 2 Presets
4. Volume Down Button
5. Mute Button
6. Lanyard Loop
7. Recall Button
8. Numeric Keypad
9. Volume Up Button
10. Bottom Information Line
Indicating channel of
operation, mute status, sound
number, volume level, battery
level, and elapsed timer
11. Preset Mode Select Button
12. FOXFADE On/Off
13. Sequence Mode Select
Button
14. Mono/Stereo Indicator
15. Auto-Volume On/Off
Indicator
16. Rotary Selector Knob
17. Graphic LCD Panel
The SNOW-CROW PRO 2 features the TX-500 transmitter. The features of this
transmitter include a large graphic display (eliminating the need for printed
sound lists), 10 custom preset buttons that make your favorite sound and
volume levels available at the touch of a button, a volume and mute indicator, a
recall button, an elapsed timer, and a rotary sound selector knob for ease of
changing sounds.
The TX-500 transmitter operates on three standard AA batteries. Please use
high quality alkaline or lithium batteries.
5.1 INSTALLING BATTERIES IN YOUR TX-500
1. Remove the battery compartment cover located on the rear of the
transmitter.
Page | 9
Page 10

2. Insert the AA batteries into the provided cavities. Note that the battery
polarity alternates.
3. Replace the battery compartment cover after the batteries are installed.
5.2 UNDERSTANDING THE MENU SYSTEM
Your TX-500 transmitter has a menu-driven configuration system that provides
you with a navigable interface for making various operational changes to both
the SNOW-CROW PRO 2 and TX-500. Throughout the scope of this manual
you will find many references to the Main Menu. It is important that you are
familiar with and understand how the menu system works.
The Main Menu can be accessed at any time while operating the TX-500
transmitter. To bring up the Main Menu simply press and hold the rotary
selector knob for 2-3 seconds. The normal screen will change to reveal the
Main Menu.
By default, any time you enter the Main Menu, the “TURN OFF
TRANSMITTER” option will be highlighted. The line that is highlighted will be
referred to as the selected item throughout this manual. You can move the
highlight bar using the rotary selector knob to change the selected item by
rotating the knob clockwise or counter-clockwise. A selected item can be
activated by pressing down on the rotary selector knob. In this case, with
“TURN OFF TRANSMITTER” being the selected item, pressing the rotary scroll
knob down would result in the TX-500 turning off.
The Main Menu has sub-menus. These sub-menus will provide you with access
to making various system changes. The two main sub-menus are SNOWCROW PRO 2 CONTROL and TX500 CONFIG. Each one of these sub-menus
has other menu items inside.
The following chart will display the layout of the menu. The factory default value
of each setting will be noted in bold:
Page | 10
Page 11

SNOW-CROW PRO 2 CONTROL provides access to:
• MONO/STEREO
o MONO (.24b only)
o STEREO
o R STEREO (.24b only)
• PLAY MODES
o REPEAT MODE
o SINGLE PLAY MODE
o JUKEBOX MODE
• AUTO-V ON
• AUTO-V OFF
TX500 CONFIG provides access to:
• AUX
o MOMENTARY (JIB)
o LATCHED
• DISPLAY
o TEXT
NORMAL
LARGE ‘NUMBERS ONLY’
o GRAPHICS
NORMAL
REVERSE IMAGE
SET CONTRAST
o SCROLL
PAGED
SINGLE
o BACKLIGHT
ALWAYS OFF
LOW
MEDIUM
HIGH
ALWAYS ON
• CHANNEL
o 0 – 15
• VOLUME STEPS
o 2
o 4
o 5
o 8
o 10
• UPLOAD SOUND LIST
Page | 11
Page 12

5.3 TURNING ON THE TX-500
To turn on your TX-500 transmitter, simply push and hold the selector
knob for 4 seconds. This delay is to help prevent an accidental turn on. Be
sure to turn off the TX-500 transmitter after use so that unnecessary battery
drain is prevented. To do so, push and hold the selector knob until the
selection menu appears (with turn off transmitter already highlighted). By
pressing the selection knob a second time the transmitter will shut off. Should
you forget to off the transmitter when you are finished, it will automatically shut
down after 2 hours of non-use.
5.4 SELECTING SOUNDS
The TX-500 provides you with two methods of selecting and changing sounds
on your FOXPRO® SNOW-CROW PRO 2. You can use the rotary selector
knob to scroll through and send sound selections or you can directly enter the
sound number by using the numeric keypad.
Rotary Selector Method:
The rotary selector knob is located on the top right of the TX-500. This is a
dual-function knob that provides you with clockwise/counterclockwise action to
scroll through the sound list as well as a push button function to send sound
changes to the unit (it also works to confirm or lock-in various menu changes by
pushing down it.)
With the TX-500 turned on, you will see six sounds displayed on the screen.
Clockwise rotation of the knob scrolls the highlight bar up the page, while
counter-clockwise rotation moves it down. Once the bar reaches the top of the
6 displayed sounds, the next movement of the knob in the same direction will
cause the sounds to increment or decrement. Once the sound you wish to play
is highlighted in the display, push down on the selector knob to have it
transmitted to the SNOW-CROW PRO 2 for play.
You can scroll through sounds one at a time (up or down) very quickly by
turning the rotary sound selector knob or if preferred you can configure the
transmitter to scroll by six sounds at a time. The rotary sound selector knob is
used to highlight sounds on the display, change the page being viewed, and to
send the selected sound to the SNOW-CROW PRO 2.
Counterclockwise rotation decrements the sound lists. Clockwise rotation
increments the sound lists. If you wish to start your current sound playing from
the beginning, simply depress the knob again.
To switch sounds, simply select and highlight your desired sound and depress
the rotary selector knob. As you can see, even with hundreds of sounds
programmed, you can be set up to be never more than a few revolutions of the
rotary sound selector knob away from any sound.
Page | 12
Page 13

Numerical Entry Method:
You can also directly access any sound by direct numerical entry on the
keypad. For example, if you want to play sound 005, simply press the numbers
0, 0, and 5 sequentially on the keypad.
5.5 SETTING THE VOLUME
When the TX-500 is first turned on, the volume setting is preset to 00, as the
display will indicate. Once you have selected and transmitted your sound to the
SNOW-CROW PRO 2, simply depress the volume up button on the transmitter
to your desired level.
Depressing the volume buttons will cause the volume number to change in the
display from a low of “0” to a high of “40”. These changes are transmitted to
the SNOW-CROW PRO 2 in real time, causing the volume to ramp up or down.
The TX-500 allows you to change the volume step size to a specific level. By
default, the ramp speed will be set to 2. This means that every time you press
the volume up or down button, the volume level will increment or decrement by
2. You can change this value to 2, 4, 5, 8, or 10. To set this value:
NOTE: If you have volume steps 2 or 4 selected, you will notice that when
stepping the volume up or down using a continuous key-press, the
volume steps will gradually increase to 5.
1. Press and hold the rotary selector knob to access the main menu.
2. Highlight the “TX500 CONFIG” menu and depress the rotary selector
knob one time.
3. Use the selector knob highlight “VOLUME STEPS” and then depress
the selector knob one time.
4. Use the selector knob to highlight the desired volume stepping value
and then depress the selector knob to lock it in.
5. Exit the menus.
The volume numbers are important, as you will begin to identify your preferred
volume settings, and with the SNOW-CROW PRO 2 placed away from you, it
gives you the ability to know exactly at what volume the SNOW-CROW PRO 2
is playing. Without this, you may have a difficult time determining just how loud
or soft your unit is playing.
5.6 MUTE
To mute the current sound that is playing, simply depress the mute button on
the TX-500 transmitter. Mute mode is indicated by an “M” appearing in the
bottom status line. To un-mute, simply depress the mute button again.
The mute feature also serves as a pause function. When you mute the current
sound being played and un-mute again, the sound will begin playing at the
Page | 13
Page 14

point where you muted it.
While the SNOW-CROW PRO 2 is muted you can change to a different sound
and volume level. When you un-mute the unit, it will begin playing the new
sound and volume setting. You can also restart the current sound from the
beginning by depressing the rotary selector knob down one time while the unit
is muted.
5.7 SOUND SEQUENCES
The SNOW-CROW PRO 2 can operate from a special sequence file that
provides the unit with instructions on how to operate for the duration of the
hunt. Sound sequences can provide you with a completely hands-free
experience in the field. You can have up to ten unique sequences in your
SNOW-CROW PRO 2.
Creating a Sequence
There are two ways that you can create a custom calling sequence; manually
with a simple text editor or with the help of the graphical interface that runs on
Windows-based PC’s. Mac users will have to type their sequence file out by
hand.
Creating Sequence Files Manually
The SNOW-CROW PRO 2 will be looking for ten individual files pertaining to
the particular sequence. These files range from S00.seq through S09.seq.
NOTE: If you save a sequence file for later use, make sure you update it if
you make any programming changes to the unit. For example, if sound
number 005 used to be a rabbit and it is now a coyote, your sequence file will
now play the coyote.
The sequence file must be in plain text format. You cannot use MS Word or
other rich-text editing software to create the files. If you are manually creating
the file, use a program such as Notepad (or basic text editor) for authoring. The
following is an example of what the file should look like:
V 30
S 12
P 60
V 23
S 1
Q
The translation of the above example would equate to:
Page | 14
Page 15

Set volume to 30
Play sound 12 one time
Pause for 60 seconds
Set volume to 23
Play sound 1 one time
End
The above example uses the following syntax to denote instructions for the
SNOW-CROW PRO 2. All possible commands are shown below:
Instruction Value Description
S 0 – 499 Denotes numerical value of sound on unit
V 0 – 40 Denotes numerical value of volume level
P 1 - 99999 Denotes delay value in seconds (approx.)
J n/a Denotes Jukebox Mode
R n/a Denotes Repeat Mode
Q n/a Denotes Single Play Mode
Any time you author your own sequence file manually, make certain that each
instruction code is followed by a space and then the value.
Note: Each file must begin with a P or V value—if you start the sequence with a
sound, the SNOW-CROW PRO 2 will not know at what volume level to play the
sound.
Also make sure that you end the instructions with a capital J, R, or Q. If you end
the file with J, the SNOW-CROW PRO 2 will move on to the next available
sequence. If the file ends with R, the SNOW-CROW PRO 2 will repeat the
current sequence. Ending the file with a Q will result in the sequence playing
one time.
If you desire to have a sound play more than one loop, you will need to have
the sound listed as many times as you wish it to play. Example:
V 10
S 16
S 16
S 16
V 15
S 16
Q
This example shows that the volume is set to 10 for three loops playing sound
Page | 15
Page 16

number 16. The volume then switches to level 15 and plays sound 16 one last
time.
After creating your sequence file in Notepad (or basic text editor), be sure to
name the file in the format of S00.seq through S09.seq so that the SNOWCROW PRO 2 will recognize it as a valid sequence file. Notepad will try to
name the file .txt by default; this must be changed to .seq. You can add a
description to the file title as in the following examples:
S00 Stand 1.seq S02 Bobcat Special.seq
S01 Stand 2.seq S03 Coyote.seq
Loading a Sound Sequence to Your SNOW-CROW PRO 2 Manually
In order to get the sound sequence file from your computer into your SNOWCROW PRO 2, you will need a standard USB cable (type A/B) with the unit.
Remove the battery compartment door on the SNOW-CROW PRO 2 and
remove the battery pack. Locate the USB port in the bottom of the battery
compartment. Using the USB cable, connect the SNOW-CROW PRO 2 to your
computer. Take note to what drive letter is being assigned to your SNOWCROW PRO 2. Copy the sequence files from your hard drive directly into the
drive letter of the SNOW-CROW PRO 2.
Playing a Sequence
Sequences can be engaged at any time during operation.
1. Press the SEQUENCE button on the TX-500
2. Press a number button on the keypad to play the corresponding
sequence from 0 – 9 or highlight the desired sequence with the rotary
selector knob and depress it one time.
Play Modes and Sequences
If you have selected a different playback mode (i.e. jukebox or single)
sequence mode will ignore this selection.
5.8 SOUND PRESETS
The TX-500 provides you with quick access to your favorite sounds and
volumes with the push of a button. The TX-500 can hold a total of ten individual
sound presets, each one having their own unique volume level. You will also
find two quick-access buttons (P1 and P2) that provide you one-button access
to the sounds stored on presets one and two.
Creating Presets
1. Press the PRESET button and hold for approximately 3-4 seconds to
enter set preset mode. You should see SEL SND/ VOL on the top line
of the TX-500 display.
Page | 16
Page 17

2. Use volume up/down buttons to set the desired volume level
3. Select the desired sound by using the rotary selector knob to highlight it
on the screen and then press the selector knob down one time.
4. To lock the selected volume and sound in, press the desired number
(0-9) for that preset on the keypad. When pressing the number button,
this exits you from set preset mode and you are now in the preset
mode.
5. To add another preset, follow steps 1-5.
Playing a Preset
1. Briefly press the PRESET button one time to enter preset mode
2. Press the desired number of the preset you wish to play. Make sure
that you have preset in place prior to attempting to play it. The chosen
preset should play immediately.
5.9 FOXFADE
FOXFADE allows you to fade the volume level of the sound being played
between the front and rear speaker and allows you shut them off. There are
three ways in which FOXFADE can be used; mono, stereo, and reversed
stereo. FOXFADE will provide the best effect when using a stereo audio file
that contains two separate animal recordings; however, it can be used with
mono sounds that are being played in stereo mode.
Using FOXFADE
With the sound playing, press the FOXFADE button on the side of the TX-500
transmitter
1. Use the selector knob to move the cursor left or right on the screen.
Moving the knob clockwise will result in the bar moving towards the
left of the screen which corresponds with the front (horn) speaker and
the left audio channel. By moving the bar in this direction, the volume
level of the back speaker will go down. Moving the cursor to the far left
and depressing the rotary selector knob will result in the front speaker
being turned off.
Moving the knob counterclockwise will result in the bar moving
towards the right of the screen which corresponds with the back (cone)
speaker and right audio channel. By moving the bar in this direction,
the volume level of the front speaker will go down. Moving the cursor to
the far right and depressing the rotary selector knob will result in the
rear speaker being turned off.
Page | 17
Page 18

2. Once you have positioned the bar in your desired position, press down
the selector knob one time to lock the change in place.
FOXFADE in Stereo Mode
When you are operating the SNOW-CROW PRO 2 in stereo playback mode
and playing a stereo audio file, the left audio channel will play through the front
horn speaker and the right audio channel will play through the rear cone
speaker. Let’s say that the sound you are playing is a coyote and rabbit stereo
file; coyote on the left channel and rabbit on the right channel. When you enter
FOXFADE and move the vertical bar towards the left and lock the selection in,
the sound of the rabbit on the right channel will be reduced. If you move the bar
to the right and lock the selection in, the sound of the coyote will be reduced.
FOXFADE can help create many new scenarios in the field and help add
realism to your stand.
Using a Mono File in Stereo Mode
If you are playing a mono file while operating the unit in stereo mode, the
SNOW-CROW PRO 2 will play the same sound out of both speakers.
FOXFADE will act in the same manner as playing a stereo file with fading out
the volume of one of the channels depending upon which way you move the
bar.
5.10 AUTO-V
AUTO-V (auto-volume) provides you with a sort of “cruise control” for volume
adjustment and attenuation. When engaged, AUTO-V will start at the lowest
possible volume (0) and slowly climbs to 75% or volume level 30 which is the
default maximum volume level for AUTO-V, across a three minute period. Once
volume level 30 is reached, AUTO-V begins to reduce and increase the volume
level by 30% increments every ten seconds. For example, volume level 30 will
be reduced by 30% in a ten second period, and then increased back up 30%
across another ten second period. It will continue operating in this manner until
it is shut off.
Note: When using PRESETS while AUTO-V is enabled, the preset volume
control may not be recognized. For proper operation while using PRESETS,
turn AUTO-V off.
Turning AUTO-V On
It is not necessary that you have a sound playing prior to engaging AUTO-V as
it will begin its cycle after the sound begins playback.
1. Hold down the selector knob for 2-3 seconds to access the main menu.
2. Select SNOW-CROW PRO 2 CONTROL
3. Select AUTO-V ON to engage AUTO-V
Page | 18
Page 19

4. Exit the menu
AUTO-V will begin its volume adjustment cycle as soon as you begin playing a
sound. You will also see the AV indicator on the top line of the TX-500 screen
show ON.
Turning AUTO-V Off
AUTO-V can be turned off at any point during operation. When AUTO-V is
disengaged, the SNOW-CROW PRO 2 will continue playing the current sound
at 65% of the maximum volume to help prevent an erratic volume level change.
1. Hold down the selector knob for 2-3 seconds to access the main menu.
2. Select SNOW-CROW PRO 2 CONTROL
3. Select AUTO-V OFF to disengage AUTO-V
4. Exit the menu
Setting the Maximum Volume Level
AUTO-V will climb to volume level 30 as a maximum across a three minute
period by default. You can change the maximum volume level for the climb by
using the volume up/down buttons on the transmitter once you have engaged
AUTO-V.
Note: Making changes to the volume level after AUTO-V has been
engaged for a while can result in erratic volume level changes. Get
familiar with how AUTO-V works before using it on a stand.
Note: If the SNOW-CROW PRO 2 is turned off, be sure to reselect AUTO-V
function prior to operation.
5.11 AUX
This button is used to operate an external device that is connected to the
SNOW-CROW PRO 2—typically the FOXPRO® Jack-in-the-Box Decoy.
Depressing the AUX button will begin operation of the external device. A
second press of the AUX button will cease operation. For more information on
the AUX function, see the AUX Jack Function in the beginning of the manual.
The AUX can be configured to be momentary or a latched output. This can be
useful if you are using external devices that must see a latched connection as
opposed to the momentary connection required to activate/deactivate
FOXPRO®’s Jack-in-the-Box Decoy.
Adjusting AUX Jack Operation
1. Access the main menu by pressing and holding the rotary selector knob
for about 2-3 seconds.
2. Highlight the TX500 CONFIG menu item and press the rotary selector
Page | 19
Page 20

knob one time.
3. Highlight the AUX menu item and press the rotary selector knob one
time.
4. Highlight the desired operation, either MOMENTARY or LATCHED
menu item and press the rotary selector knob one time.
5. Exit the menu.
Note: For use with the FOXPRO® Jack-in-the-Box Decoy, make sure you
select MOMENTARY.
5.12 RECALL
The recall button will allow the last previous sound and volume setting to be
recalled and played. For example, let’s say you just switched your sound from
a rabbit distress at volume 18 to a coyote pup distress. Now, you bring the
volume up on that coyote pup distress to volume 29. By depressing the recall
button, your sound will switch from the coyote pup distress at volume 29, back
to the rabbit distress at volume 18. The recall button will also work with the
presets.
NOTE: If you press the recall button while playing a sequence, you will go
back to the last sound and volume level that was used prior to entering
sequence mode.
6.0 TX-500 and SNOW-CROW PRO 2 CUSTOMIZATIONS
The TX-500 and SNOW-CROW PRO 2 have many features—most of which
can be customized to work in a manner conducive to your needs. This section
will examine the menu system in detail and explain the available customizations
that you can perform.
6.1 SNOW-CROW PRO 2 CONTROL MENU
This menu allows you to select how the SNOW-CROW PRO 2 will operate.
From speaker selections, mono or stereo playback, and AUTO-V—use this
menu to get the SNOW-CROW PRO 2 working the way you want it.
MONO/STEREO
This menu allows you to specify the playback mode of the SNOW
CROWPRO2. To change the playback mode, use the selector to highlight the
desired option then press down on the selector knob one time:
MONO
STEREO
REVERSE STEREO
By default, the SNOW-CROW PRO 2 will be set to operate in stereo mode.
Reverse stereo mode allows you to flip the left and right audio channels. For
example, if you have a stereo sound (coyote on left channel, rabbit on right
Page | 20
Page 21

channel), but you would prefer that each sound come out of the opposite
speaker, simply select reverse stereo mode. This can be changed during sound
playback.
NOTE: Make sure you have read and understand the FOXFADE section as
making changes here will directly affect how FOXFADE will work.
PLAY MODES
This menu allows you to specify which play mode the SNOW-CROW PRO 2
will operate on. To change the play mode, use the selector to highlight the
desired option then press down on the selector knob one time:
REPEAT MODE (plays sounds/sequences continuously)
SINGLE PLAY MODE (plays sounds/sequences once)
JUKEBOX MODE (plays sounds/sequences incrementally)
NOTE: By default, REPEAT will be set as the play mode.
AUTO-V ON & AUTO-V OFF
You can turn AUTO-V on or off by highlighting the desired one and press down
on the selector knob one time. See section on AUTO-V for more details.
6.2 TX500 CONFIG MENU
This menu allows to you setup how the TX-500 will operate. Everything from
contrast to how the AUX button performs will be configurable through these
menus.
AUX
This option allows you to specify whether the AUX function will be momentary
or latched. To change the AUX settings, use the selector to highlight the
desired option then press down on the selector knob one time.
NOTE: FOXPRO®’s Jack-in-the-Box Decoy requires that the AUX function
be setup for momentary. Please check the specifications on the device you
are trying to operate prior to connecting it to your SNOW-CROW PRO 2.
DISPLAY
The display menu has many submenus that will customize the TX-500. Each
one will be discussed. To enter the submenu, simply highlight the desired one
and press down on the selector knob one time.
Text
There are two options for text; NORMAL and LARGE NUMBERS ONLY. The
vast majority of users will leave this setting on NORMAL, but for those who
have trouble reading the information on the screen, you are invited to use the
LARGE setting. To change the text settings, use the selector to highlight the
Page | 21
Page 22

desired option then press down on the selector knob one time.
Graphics
The graphics menu allows you to control whether the screen NORMAL or
REVERSE IMAGE. Reversing the image may be beneficial for users who are
hunting at night to help reduce the glow from the screen. You can also set the
contrast. To change the graphics settings, use the selector to highlight the
desired option then press down on the selector knob one time.
To set the contrast, highlight the SET CONTRAST option and press down on
the selector knob. You will see a cursor appear in the middle of the screen. The
middle position is the default position. To make adjustments, rotate the selector
knob clockwise or counterclockwise to set the bar. Moving the cursor to the left
will decrease the contrast and to the right will increase. Once you have a
desired setting picked, press down on the selector knob one time to lock it in.
Scroll
This menu allows you to adjust how the scrolling function will work. PAGED will
result in six sounds being displayed per page and six more sounds being
displayed upon incrementing to the next page. SINGLE will allow you to
increment up by one sound at a time rather than a page at a time.
NOTE: By default, the scroll option will be set to SINGLE.
Backlight
There are four options in the backlight menu; ALWYS OFF, LOW, MEDIUM,
HIGH, and ALWAYS ON. To change the backlight settings, use the selector to
highlight the desired option then press down on the selector knob one time.
NOTE: You should experiment with the different settings to find out which
ones work the best in varying conditions.
CHANNEL
Make sure that the channel in the TX-500 is set to 15 for operation. To change
the channel, use the selector to highlight the desired option then press down on
the selector knob one time.
VOLUME STEPS
This menu allows you to customize the speed at which the TX-500 will ramp the
volume. The options are 2, 4, 5, 8, and 10. To change the volume step settings
use the selector to highlight the desired option then press down on the selector
knob one time.
NOTE: Experiment with the volume steps to find out which one works the
best for you. By default, the volume step will be set to 2.
Page | 22
Page 23

UPLOAD SOUND LIST
After reprogramming your SNOW-CROW PRO 2, this menu item will allow you
to upload the new sound list from the SNOW-CROW PRO 2 to your TX-500.
For more information read the programming section of this manual.
TIMER
The TX-500 transmitter features a timer displayed on the bottom status line.
This makes it handy for determining length of stands, and to determine respond
times of incoming animals. When your TX-500 is turned on, the timer begins
counting. The timer displays minutes and seconds up to 99:59. Once this time
is reached, the timer rolls over to 00:00, and commences counting. The timer
can be reset at any time in the back menu by selecting the RESET TIMER
option. Once you turn your TX-500 transmitter off, the timer stops counting.
BATTERY MONITOR
The TX-500 transmitter also features a very effective battery monitor on the
bottom status line. The TX-500 transmitter operates on three standard AA
batteries. Please use high quality alkaline or lithium batteries. Battery life of
the TX-500 transmitter can approach two months with heavy use. Watch the
battery monitor and replace the battery before the batteries become completely
depleted.
Page | 23
Page 24

7.0 REPROGRAMMING SOUNDS ON YOUR SNOW-CROW PRO 2
You can locate an extensive guide to programming your SNOW-CROW PRO 2
on the FOXPRO® website at:
http://www.gofoxpro.com/program.php
Also featured is a video that guides you through the programming process. We
recommend visiting the website and viewing the information and video for
additional assistance in programming your SNOW-CROW PRO 2.
The SNOW-CROW PRO 2 comes standard with a USB 2.0 port built in (no
reader / writer is necessary), which makes reprogramming or adding sounds to
your SNOW-CROW PRO 2 easier than ever. A computer is required in order to
reprogram your sounds. The SNOW-CROW PRO 2 can be reprogrammed by
using personal computers equipped with Windows operating system version
2000 ME or later (98 SE or earlier not compatible), or a Macintosh computer
with an operating system of 9.X or later.
7.1 PURCHASING NEW SOUNDS
You can access the FOXPRO® website at any time to purchase new sounds to
program in your SNOW-CROW PRO 2. The website is located at:
http://www.gofoxpro.com
Once you are at the site, access the “Sounds” option from the main menu and
click on “Purchase Sounds.” You can purchase 4 sounds of your choice for
$8.00, 8 sounds of your choice for $15.00, and 16 sounds of your choice for
$25.00. Consult the programming link listed at the beginning of this section for
more details on purchasing, downloading, and installing new sounds from the
website.
NOTE: Prices mentioned in the proceeding section are accurate as of the
publication date found on the back of this manual. All prices are subject to
change without notification. No guarantees are made in product pricing.
Always consult the website before making a decision to purchase. If you do
not have access to a computer, sounds can be reprogrammed or added for a
fee by sending your SNOW-CROW PRO 2 to FOXPRO®
7.2 DOWNLOADING THE FOXPRO® PROGRAMMING UTILITY
We have developed a utility that simplifies the reprogramming of sounds on
your SNOW-CROW PRO 2. You can download the utility from our website.
To download and install the Programming Utility from the website
1. Using your web browser, navigate to: http://www.gofoxpro.com
2. Click on “Programs/Utilities” from the main menu
Page | 24
Page 25

3. Locate and click on “FOXPRO® Programming Utility”
4. Click on “Download Now”
5. Click on the Save button to save the executable file to your hard drive
for installation. If you choose to save the file to your hard drive, we
recommend saving it to your desktop.
NOTE: When saving the file, the name of the file on your Desktop (if you
choose your desktop as the location to save) will be labelutil.exe.
6. Double click the labelutil.exe icon, and select Run. The installation
process will now begin.
7. At the next screen, select OK.
8. Click on the button where prompted (the button is the one that
resembles a computer).
9. Click on the continue button. This should complete the setup of the
FOXPRO® Programming Utility
NOTE: The icon on your desktop is only an .exe file used to install the
programming utility to your computer. Once you have completed the
installation of the program, this icon can be deleted. The actual program will
be in your program files on your computer, and is called FOXPRO®
Programmer.
The Programming Utility is also stored on the SNOW-CROW PRO 2 memory
card.
To download and install the Utility from your SNOW-CROW PRO 2
1. Connect your SNOW-CROW PRO 2 to your PC with a standard USB
cable (type A/B). Once the SNOW-CROW PRO 2 is recognized by the
PC it will be assigned a drive letter.
2. Enter your “MY COMPUTER” icon and locate the SNOW-CROW PRO
2 from the list of available drive letters. Once you have located the drive
for the SNOW-CROW PRO 2, double-click on the icon to open it up.
3. After the drive is opened, locate the file named labelutil.exe and then
refer to steps 6 through 9 for installation of the Programming Utility.
7.3 PROGRAMMING WITH THE UTILITY
To gain access to the SNOW-CROW PRO 2’s USB port
1. Open the latches on the front of the SNOW-CROW PRO. The USB port
is accessible towards the middle of the main panel. It is clearly labeled
USB.
2. Connect a USB cable between this port, and the USB port on your
computer. Once the connection is made, your computer should
Page | 25
Page 26

recognize the SNOW-CROW PRO 2 as a removable drive.
Programming Process
1. Double click the folder on your desktop or go to your programs folder
and open the FOXPRO® Programmer. You will be prompted to make a
backup of your sounds.
2. Select OK, you will then be taken to the programming utility.
3. Select the proper USB drive for the SNOW-CROW PRO 2. This is
marked as Select Device, located in the upper right portion of the
programming utility.
NOTE: This drive varies on different computers. Once you have selected the
drive, the list of sounds currently on your SNOW-CROW PRO 2 appears in
the right vertical window. You will now notice that a new button appears
above the Select Device window that reads “Backup”. If you have not made
a backup of your sounds, simply click on this button. The programmer by
default will backup your sounds to a “FOXPRO®” folder, and a sub folder
“Backup”. This is also a good folder to use to add new sounds prior to
adding sounds, or reprogramming your SNOW-CROW PRO 2. You can also
create sub folders for different species, if you choose, rather than to have all
sounds located in one folder. Once your backup is complete, you are ready
to reprogram your SNOW-CROW PRO 2.
4. Select the “source” folder of your new sounds (Located on the left hand
side of the programmer screen). This is the folder where your sounds
are located.
5. Double click on the C:\ prompt, and locate the “FOXPRO®” folder. The
sounds sub folder should show up, assuming that you have used this
folder to store your sounds. If this is not the folder that your sounds are
located in, select the proper folder.
6. Once the proper folder is selected, double click the folder. The sounds
should now appear in the left side column, called “Source Sound Files”.
Now, determine the position that you would like to add new sounds to your
SNOW-CROW PRO 2. For example, if you would like to add the Jackrabbit
Distress to your SNOW-CROW PRO 2, highlight the sound in the left side
column.
NOTE: If this sound does not have a three digit number and a space located
at the beginning of it, you must check the Append Sound Number box
located below the left column. By selecting this box, the sound name will not
be shortened. If there is a three digit number and a space before the name
of the sound, there is no need to check this box. The first four characters will
be either truncated or ignored, by not selecting this box.
Page | 26
Page 27

7. Select the position in the right column where you would like to add the
sound. If you want to overwrite the sound in that position, then click on
the overwrite box, located between the two columns. This will replace
the current sound in that position.
NOTE: The sound that was located in that position will be deleted. If you
choose to insert the sound in that position and move all other sounds down
one, click the insert button. This will add the sound in that position and not
overwrite the current sound. If you would like to remove sounds from the
right side column before adding new ones, simply highlight the sound, and
click on the “Remove From List” button, located between the two columns.
If you would like to relocate a sound in the right sound column, you can
highlight the sound and then type the position number that you would like to
move it to in the “Move To” box (located below the right side column). This will
move the sound to your designated number. You can also highlight the sound
that you wish to move on the right column, and then click on the up or down
arrows below the right side column to move the sound one position at a time. If
you would like to reset your list at any time, click on the Clear/Reset List button
located on the right side of the screen. This will reset the list to its initial sounds.
8. Click on the “Copy to Caller” button located on the right side of the
screen. Your sounds will now be programmed to your SNOW-CROW
PRO 2.
IMPORTANT NOTE: Your SNOW-CROW PRO 2 will play .FXP, .24b .mp3
and .wav files. Other file types are not supported. Although you may store
.FXP and .24b sounds on your computer for later use, they can not be played
on your computer, or on any audio player other than a FOXPRO® caller.
7.4 DOWNLOADING NEW PLAYLIST TO TX-500
Program your sounds into the SNOW-CROW PRO 2 as outlined in the
instruction manual. Make certain that you do not use the same number for more
than one sound! Note that the transmitter can only display 21 characters per
line. The first 3 characters must be the sound number, from “000” through
“499”. Place a space between the sound number and the sound name. 17
characters remain for the sound name. Although the sound name can have
more characters, the TX-500 will only display the first 17 characters. Any
additional ones will not be displayed.
1. Disconnect all accessories from the SNOW-CROW PRO 2 (i.e.
charger, speakers, etc.)
2. Turn the power off on both the SNOW-CROW PRO 2 and the TX-500.
3. Turn on the TX-500 and SNOW-CROW PRO 2.
4. Access the Main Menu
5. Enter the TX500 CONFIG menu
Page | 27
Page 28

6. Highlight the UPLOAD SOUND LIST menu item and press down on the
selector knob one time
7. Make sure the SNOW-CROW PRO 2 is within 3 feet of the TX-500
8. A progress bar on the TX-500 display will indicate the playlist is being
transferred
NOTE: This process may take a few minutes. DO NOT
turn off the TX-500 or SNOW-CROW PRO 2 during
this process.
Page | 28
Page 29

FCC Information
NOTE: This equipment has been tested and found to comply with the limits for a Class B
digital device, pursuant to Part 15 of the FCC Rules. These limits are designed to
provide reasonable protection against harmful interference in a residential installation.
This equipment generates, uses, and can radiate radio frequency energy and, if not
installed and used in accordance with the instructions, may cause harmful interference
to radio communications. However, there is no guarantee that the interference will not
occur in a particular installation. If this equipment does cause harmful interference to
radio or television reception, which can be determined by turning the equipment off and
on, the user is encouraged to correct the interference by one or more of the following
measures:
• Reorient or relocate the receiving antenna.
• Increase the separation between the equipment and receiver.
• Connect the equipment into an outlet or circuit different that to which the
receiver is connected.
• Consult the dealer or an experienced radio/TV technician for help.
Operation is subject to the following two conditions: (1) this device may not cause
harmful interference, and (2) this device must accept any interference received,
including interference that may cause undesired operation of this device.
Modifications not expressly approved by the manufacturer could void the user’s authority
to operate the equipment under FCC rules.
RF Exposure Safety Notice
The TX-500 transmitter is not intended to be operated closer than 20cm (about 8 inches)
to your body. The transmitter can produce a radiated RF field similar to that of a
standard cell telephone, although the duty cycle of this RF field is much lower than that
of a cell telephone. Using the transmitter closer than 8 inches to your body can increase
your exposure to RF energy levels thought by some to be harmful. Additionally,
operation in close proximity to your body can detune the antenna causing a decrease in
operating performance.
The antenna(s) used for this transmitter must be installed to provide a separation
distance of at least 20 cm from all persons and must not be co-located or operating in
conjunction with any other antenna or transmitter. End-users and installers must be
provided with antenna installation instructions and transmitter operating conditions for
satisfying RF exposure compliance.
Industry Canada Notice
Operation is subject to the following two conditions:
This device may not cause harmful interference and
This device must accept any interference received, including interference that may
cause undesired operation.
Page | 29
Page 30

NOTES:
Page | 30
Page 31

NOTES:
Page | 31
Page 32

LIMITED WARRANTY STATEMENT
Please record t
he serial number for
your
SNOW
-
CROW PRO 2
Serial Number
Your FOXPRO® wildlife caller is warranted to be free from defects in materials
and workmanship that diminish its usefulness for a period of five years from the
date of purchase. Return the unit prepaid and packaged securely along with
proof of purchase to the address shown below. Include a note describing the
defect or problem. This limited warranty is void if the unit is physically
damaged, used in a manner contrary to intended use, or otherwise abused,
either intentionally or unintentionally. Also specifically excluded are batteries
and damage caused by attempts to charge batteries not intended to be
recharged, and water damage.
(Located on a sticker in the back of the battery compartment)
FOXPRO Inc.
14 Fox Hollow Drive
Lewistown, PA 17044
717-248-2507
Publication Date: April 26, 2010
Page | 32
 Loading...