

Foxfury Lighting Solutions RUGO Quick Start Manual
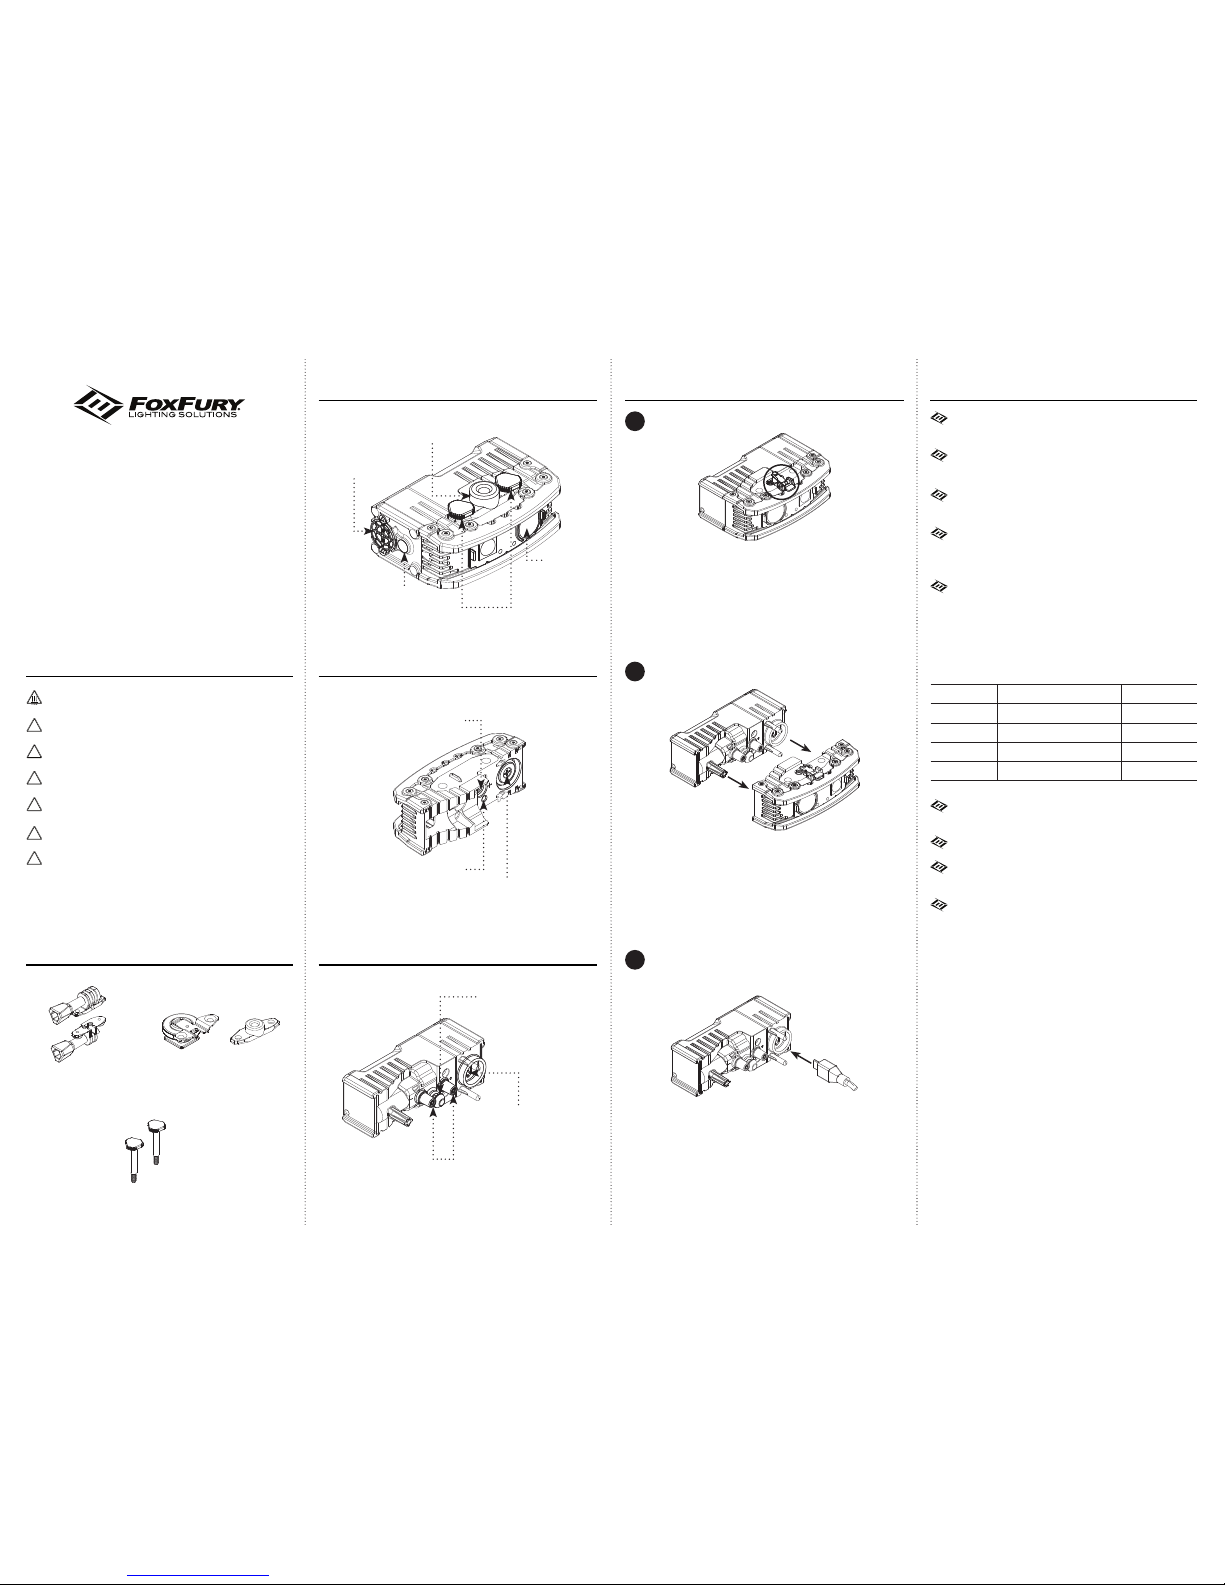
POWER PACK LIFE
MODE DURATION LUMENS
HIGH 1 hr 700
MEDIUM 1.5 hrs 400
LOW 3.5 hrs 200
DIM 6.75 hrs 70
*Power Pack life may vary according to age and ambient conditions.
The Charge Indicator will turn green
once fully charged.
Charging time is about 2.5 hours.
Do NOT leave Power Pack charging
for extended periods of time.
When disassembled, keep both ends
dry and away from water.
RUGO
™
QUICK START GUIDE
FULL ASSEMBLY CHARGING THE POWER PACK
DISASSEMBLED LIGHT HEAD
DISASSEMBLED POWER PACK
TRI-LENS
™
THUMBSCREWS
POWER/MODE
SWITCH
¼”-20 MOUNT
CHARGE
INDICATOR
LED CONTACT
CAVITY (2)
O-RING
ACCESS SCREW
LED MODULE
SCREW HOLE (4)
1
2
3
Press and hold the Power Pack Release
Lever located on the Light Head portion of
the Rugo™.
(Rugo™ in steps 1–3 shown with no mounts and is flipped to
show Power Pack Release Lever)
While maintaining pressure on the Power
Pack Release Lever, pull the Light Head
and Power Pack apart. If unable to pull
apart easily, try moving the Power Pack
back and forth while continuing to pull.
Insert the provided Micro USB Cable into
the Power Pack. Then, insert the opposite
end USB (Type A) into a USB compatible
power source or into the included AC/DC
Adaptor.
WARNINGS
When used for extended periods of time the
Rugo™ will become HOT to the touch.
Do not stare into the LEDs for long periods of
time or from a close range (less than 2ft).
This product is designed as an auxiliary lighting
tool to be used with photo, video, and film.
DO NOT use the Rugo™ as a primary light source
for activities.
While using any FoxFury product, please operate
at safe speeds.
Be sure to rinse the Rugo™ with fresh water
immediately after use in the ocean or a pool.
It is the responsibility of drone/UAV users to
follow the FAA laws and regulations and/or the
laws and regulations applicable to flight location.
IMPORTANT!
Please fully charge the Quick Swap™ Power Pack
before using the Rugo™ for the first time.
!
!
!
!
!
!
POWER CONTACTS
USB CHARGE PORT
LOCKING POST
MOUNTS INCLUDED
THUMBSCREWS (2)
FOR MORE INFO VISIT
FOXFURY.COM/RUGO
OPERATIONAL MODES
DIM mode: Press the Power/Mode
Switch once.
LOW mode: From DIM mode, press
the Power/Mode Switch once.
MEDIUM mode: From LOW mode,
press the Power/Mode Switch once.
HIGH mode: From MEDIUM mode,
press and hold the Power/Mode
Switch once.
OFF: From ANY mode, press and
hold the Power/Mode Switch for
2 sec.
6/2017
¼"–20 AND
COLD-SHOE MOUNT
STANDARD MOUNT
WITH (2) KNOBS
REMOVING/CHANGING THE
STANDARD MOUNT
REMOVING/CHANGING THE
¼”-20 & COLD-SHOE MOUNT
MOUNTING TO DEVICES
1 1
2 2
3 3
Start with the Rugo™ positioned so that the
Thumbscrews are on top.
Start with the Rugo™ positioned so that the
Thumbscrews are on top.
Twist each Thumbscrew counter-clockwise
until they become loose. They should then
be ready to pull out completely.
Twist each Thumbscrew counter-clockwise
until they become loose. They should then
be ready to pull out completely.
ACTION CAM
The Rugo™ can be mounted to an Action
Cam via the removable Standard Mount.
Line up the mounts on the Rugo™ with
the mounts on the Action Cam and then
tighten the Mount Knobs.
CAMERA
The Rugo™ can be mounted to a DSLR
camera via the removable Cold-shoe
Mount. Simply slide the mount onto the
camera flash attachment and twist the
Locking Ring until securely fastened.
TRIPOD OR PUCK ADAPTOR
The Rugo™ can be mounted to most
tripods or to the Puck Adaptor
(purchased separately) via the ¼"-20
Mount. Twist the threaded hole of the
Rugo™ ¼"-20 Mount onto the screw of
the tripod or Puck. Then, twist the Rugo™
and Puck until it is securely fastened.
USING THE TRI-LENS
™
18°
BEAM DISTANCE: 100ft (30m)
USED FOR: Distance
SPOT
FLOOD
120°
BEAM DISTANCE: 10 ft (3m)
USED FOR: Close-up
AREA
55°
BEAM DISTANCE: 30 ft (10m)
USED FOR: Mid-range
NOTE: Orientation of Mount Knobs
should match as shown above.
 Loading...