

FOXEER 700TVL, 600TVL Instruction Manual
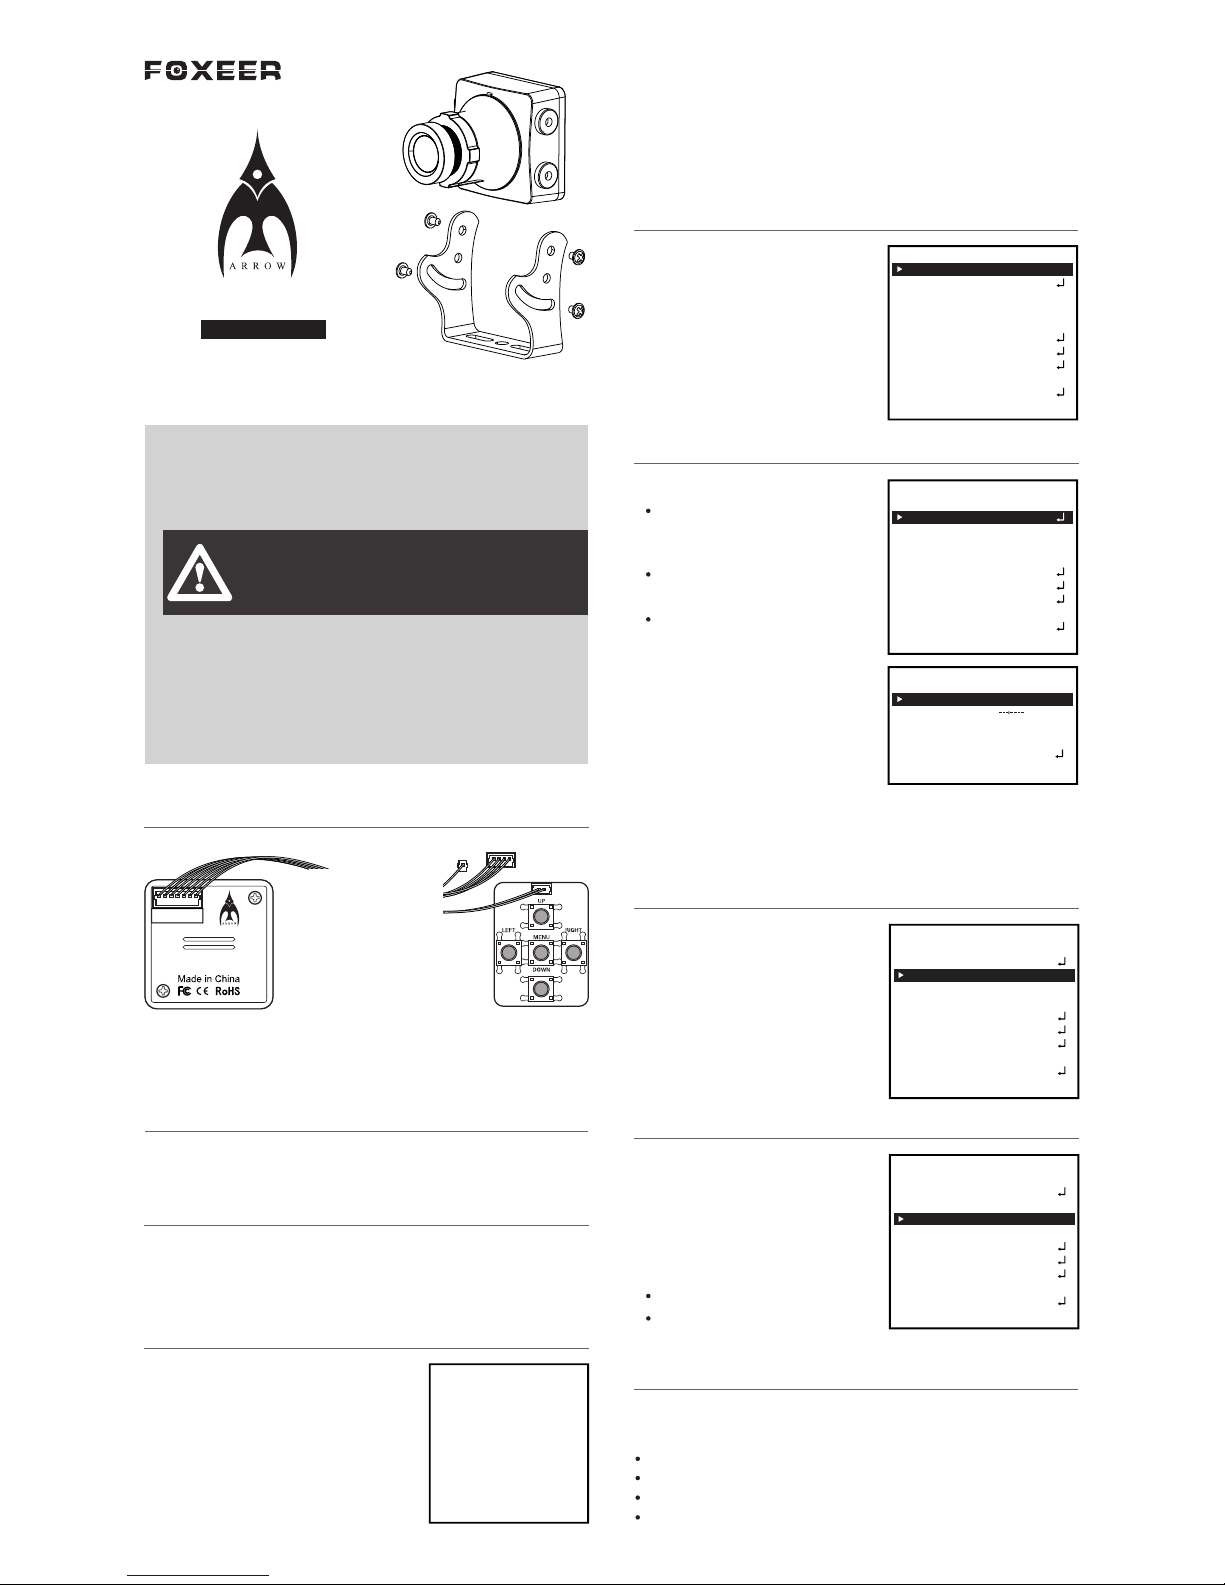
600TVL/700TVL CCD Mini FPV Camera
CAUTION: If you are using ESC’s with active braking, we recommend
powering the camera system through a BEC or voltage regulator.
Instruction Manual
WARNING: Read the ENTIRE instruction manual to become familiar
with the features of the product before operating. Failure to operate
the product correctly can result in damage to the product, personal
property and cause serious injury.
NOTICE: This product is only intended for use with unmanned, hobbygrade, remote-controlled vehicles and aircraft. FOXEER disclaims all
liability outside of the intended purpose and will not provide
warranty service related thereto.
SUPPORT: Visit www.foxeer.com/support to get more information.
CAMERA-OSD SWITCH CONNECTION
Age Recommendation:
Not for children under 14 years. This is
not a toy.
CAMERA-VIDEO TRANSMITTER CONNECTION
To connect the camera directly to the video transmitter, plug the 4 pin wiring
harness from the video transmitter into the camera leaving the OSD pin open.
OSD MENU
MENU: Push MENU (center button) to go to the main menu.
UP/DOWN: Move up and down through the menu.
Left/Right: Modify the menu parameters.
2. EXPOSURE
1.SHUTTER- Condition and speed control
Auto: Shutter speed is controlled
automatically according to the
brightness of the scene.
FIXED: Select shutter speeds from
1/50 to 1/100000.
FLK: Select when flickering occurs
due to imbalanc e between
ill uminatio n and frequency. PAL
Mode: 1/100, NTSC Mode: 1/120.
5.Day & Night
Camera Back OSD SwitchFront
EXPOSURE
BRIGHTENESS 050
AGC
DWDR OFF
RETURN RET
SHUTTER AUTO
----
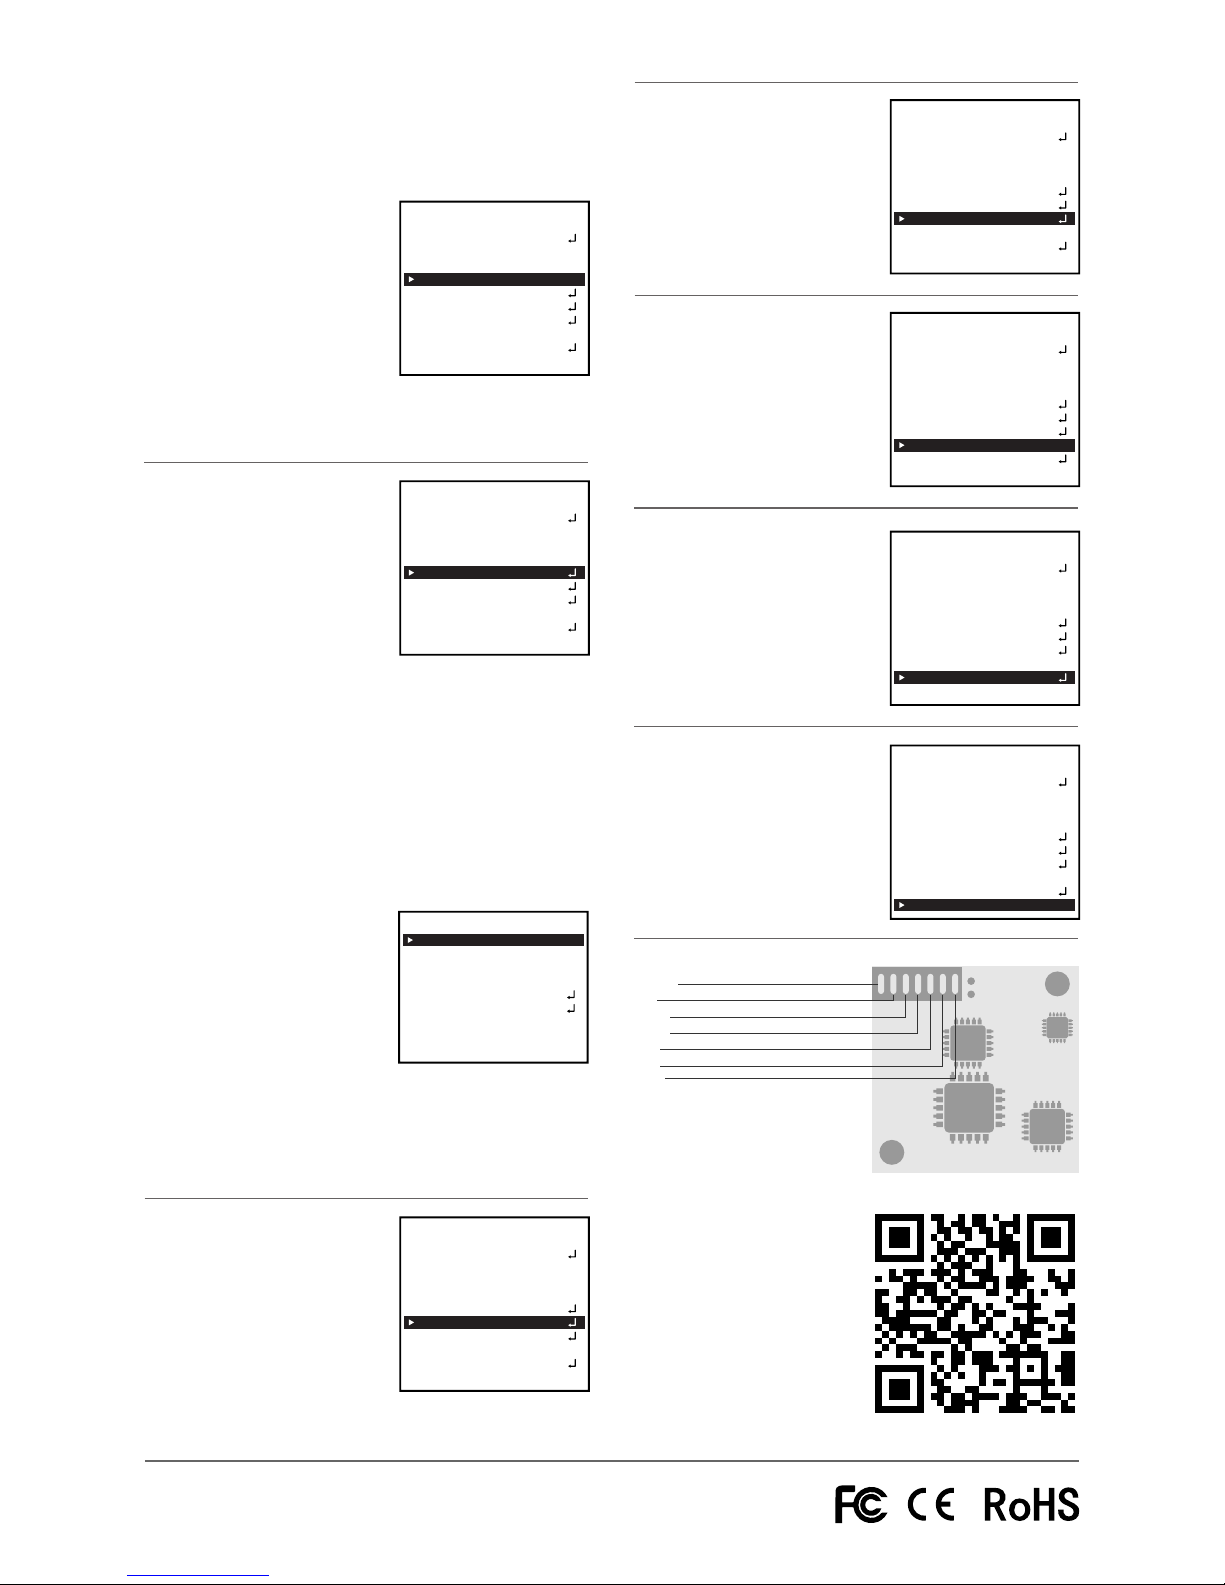
4 Pin To Video Transmitter
7 Pin Harness
VCC
VSEN
GND
VI D
AUD
OSD
2 Pin To OSD
Switch board
DC 5-35V in (Red)
Ground Wire(Black)
Video out(Yellow)
Audio out(Green)
OSD (White)
Ground Wire(Black)
Voltage Senser(Blue)
VCC
GND
VID
AUD
OSD
GND
VSEN
MINI FPV CAM
GND
Day & Night switch is specially designed for different occasions. There are
four kinds of modes.
• Auto mode
• Color mode
• B/W mode
• External switch
2. BRIGHTNESS- Adjust brightness from
0-255
3. AGC- Depending on lightness of
surroundings select HIGH, MID, LOW
or OFF.
4. DWDR- Depending on lightness of
surroundings turn OFF or ON (Adjust
brightness from 0-63).
4 WHITE BAL (WHITE BALANCE)
1. ATW (Auto Tracking White Balance)Ideal for color temps from
1800ºK~10500ºK ( fluorescent light,
outdoor, sodium vapor lamp, etc.)
2. MANUAL- Select ATW and change to
Manual mode.
Red 0~255
Blue 0~255
Select RETURN when finished.
1. Lens
This function is used to adjust the
brightness of the screen.
1. MANUAL: For use with a manual iris
lens.
2. DC: For use with a DC drive auto iris
lens.
3. VIDEO: For use with a video drive
auto iris lens.
ATW1
OFF
AUTO
SETUP
MANUAL
LENS
EXPOSURE
BACKLIGHT
WHITE BAL
DAY&NIGHT
SPECIAL
IMAGE ADJ
DPC
LANGUAGE ENGLIST
RESET
EXIT
FPV OSD Setup
1. Long press left button, user name info
will flicker, you can move user name
position now, after setup, press center
button to save, user name stop flicker
2. Long press right button, time flicker,
you can move time position, after setup,
press center button to save, time stop
flicker
3. Long press top button, you can setup user name, OSD info enable or
disable separately, besides, you can also setup font, S1/S2/S3, default is
S2, and you can reset to default setup, press EXIT to save.
4. Long press bottom button, voltage flicker, you can move voltage
position, after setup, press center button, you can adjust voltage if the
OSD voltage is not same as real power, after setup, press center button,
voltage stop flicker
ATW1
OFF
AUTO
SETUP
MANUAL
LENS
EXPOSURE
BACKLIGHT
WHITE BAL
DAY&NIGHT
SPECIAL
IMAGE ADJ
DPC
LANGUAGE ENGLIST
RESET
EXIT
ATW1
AUTO
SETUP
MANUAL
LENS
EXPOSURE
WHITE BAL
DAY&NIGHT
SPECIAL
IMAGE ADJ
DPC
LANGUAGE ENGLIST
RESET
EXIT
OFFBACKLIGHT
AUTO
SETUP
MANUAL
LENS
EXPOSURE
DAY&NIGHT
SPECIAL
IMAGE ADJ
DPC
LANGUAGE ENGLIST
RESET
EXIT
OFFBACKLIGHT
ATW1WHITE BAL
Voltage Senser
3. BACKLIGHT
1. BLC ( Backlight Compensation)
Use when there is a strong backlight
behind the object, clear images of the
background as well as the object can
still be obtained.
2. HLC
Adjust level from 0~255. There are
two options: night only, all day.
FOXEER
FONT :
NAME :
TIME :
POWER :
DEFAULT :
EXIT :
S2
ON
ON
ON
0 1 2 3 4 5 6 7 8 9
ABCD EFGHI JKLM OP
QRSTUVWXYZ():.<>/-
connect with battery directly
6. SPECIAL
1. CAM Title - Set the title background
2. MOITON - Motion detection
Choose the area and press ENTER to
confirm. The color of the chosen
area will change. Repeat to choose
other areas. After 1 second of
inactivity it will move to the next
menu item.
3. PRIVACY - Conceal the areas(OFF/ON)
Conceal the areas where you don’t wish to appear on the screen.
(1) AREA SEL: Set 4 privacy areas.
(2) AREA STATE: Select AREA STATE ON to conceal AREA selected. OFF
to disable Privacy.
(3) LEFT/RIGHT/TOP/BOTTOM: Set the dimension of each privacy area
by slider.
(4) COLOR: Select the color of each privacy area by slider.
(5) RETRUN: Return to previous menu.
4. PARK LINE - OFF/ON
(1) Lens sharp: OFF/ON, adjust from
0~255
(2) 2DNR: OFF/ON
(3) Mirror: OFF/ON
(4) FONT COLOR: Adjusted from 0 to 51
(5) CONTRASR: Adjusted from 0 to 255
(6) SHARPNESS: Adjusted from 0 to 255
(7) DISPLAY CRT/LCD
(8) NEG IMAGE: OFF/ON
CAM IN
GND
VIDEO
AUDIO
OSD
GND
TM and © 2016 FOXEER ALL rights reserved.
www.foxeer.com
VOLTAGE DISPLAY
VSEN
1. Color to B/W
When in External Control this can’t be adjusted. This is color to B/W
accumulated light intensity, when it reach “alternating light” state,
camera could be damaged by frequent switch. It might cause to not
correct judgment of image and reduction of span life of the device.
2. B/W TO COLOR
When in External Control this can’t be
adjusted. This is B/W to color
accumulated light intensity, when it
reach “alternating light” state, camera
could be damaged by frequent
switch. It might cause to not correct
judgment of image and reduction of
span life of the device.
3. DELAY TIME
Delay before color state begins to alternate.
SETUP
MANUAL
LENS
EXPOSURE
SPECIAL
IMAGE ADJ
DPC
LANGUAGE ENGLIST
RESET
EXIT
OFFBACKLIGHT
ATW1WHITE BAL
AUTODAY&NIGHT
8. DPC
Set the black point and white point as
auto-completion-point numbers.
SETUP
MANUAL
LENS
EXPOSURE
SPECIAL
IMAGE ADJ
DPC
LANGUAGE ENGLIST
RESET
EXIT
OFFBACKLIGHT
ATW1WHITE BAL
AUTODAY&NIGHT
SETUP
MANUAL
LENS
EXPOSURE
SPECIAL
IMAGE ADJ
DPC
LANGUAGE ENGLIST
RESET
EXIT
OFFBACKLIGHT
ATW1WHITE BAL
AUTODAY&NIGHT
7. IMAGE ADJ
SETUP
MANUAL
LENS
EXPOSURE
SPECIAL
IMAGE ADJ
DPC
LANGUAGE ENGLIST
RESET
EXIT
OFFBACKLIGHT
ATW1WHITE BAL
AUTODAY&NIGHT
5. COMM ADJ
(1) CAM ID: Set camera ID from
0~255
(2) BAUD RATE: Set camera
communication speed from 2400
to 38400
(3) PROTOCOL
(4) DISPLAY ID: OFF/ON
(5) ID POS
6. VERSION
10. RESET
1. FACTORY
Return to camera’s initial setting.
2. RETURN
SETUP
MANUAL
LENS
EXPOSURE
SPECIAL
IMAGE ADJ
DPC
LANGUAGE ENGLIST
RESET
EXIT
OFFBACKLIGHT
ATW1WHITE BAL
AUTODAY&NIGHT
11. EXIT
Save all settings and exit to Main Menu.
SETUP
MANUAL
LENS
EXPOSURE
SPECIAL
IMAGE ADJ
DPC
LANGUAGE ENGLIST
RESET
EXIT
OFFBACKLIGHT
ATW1WHITE BAL
AUTODAY&NIGHT
9. LANGUAGE
SETUP
MANUAL
LENS
EXPOSURE
SPECIAL
IMAGE ADJ
DPC
LANGUAGE ENGLIST
RESET
EXIT
OFFBACKLIGHT
ATW1WHITE BAL
AUTODAY&NIGHT
ENGLISH/CHINESE
COMM ADJ
PROTOCOL
BAUDRATE
DISPLAYID
RETURN
IDPOS
4800
CAMID 001
PELCO-D
OFF
RET
connect with battery directly
 Loading...