

Page 1
Page 2
UK
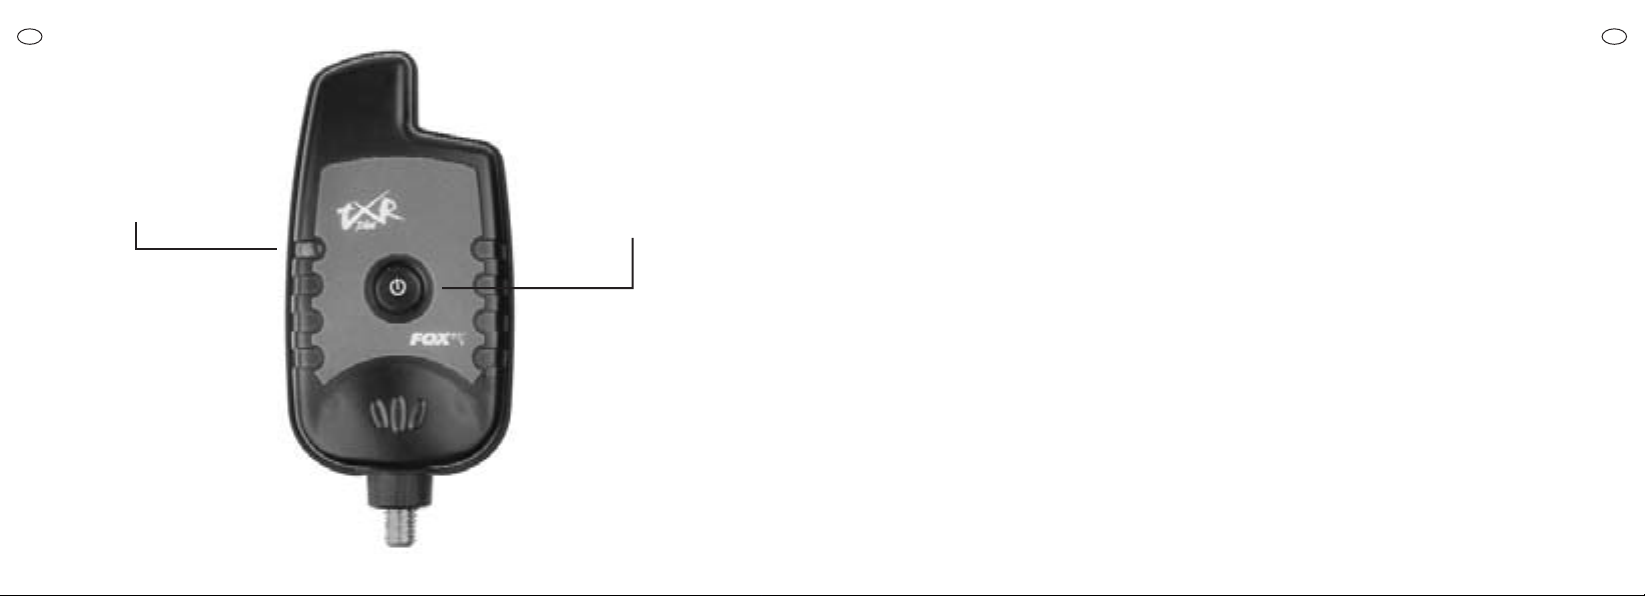
MICRON TXRPLUS
TRANSMITTER
TRANSMISSION LED
INDICATOR
ON/OFF
BUTTON
MICRON TXRPLUS
TRANSMITTER
TXR Plus Receiver and TXR Plus Transmitter units are
designed to add remote capability for up to 4 bite
alarm heads of any make, using 2.5mm or 3.5mm output sockets. Leads and plugs in both sizes are supplied.
FEATURES
• On/Off Button
• Four input sockets with waterproof cover
• Range test mode
• Four different output tones
• Red LED to indicate transmission
• FM transmitter with up to 500 metre range
(dependant on conditions)
• Operates from 1x ‘AAA’ battery
• Long battery life
• Low battery indication feature
• Sealed weatherproof case
• Protective coated electronics
• Digital circuitry
• Factory programmed unique ID code (no need for
code selection switches)
• Bracket for mounting unit to buzzer bar
UK
• Set of numbered leads with right angle plugs
• Compatible with Halo Elite remote bivvy light
OPERATION
NOTE: Before using your system for the first time, it is
necessary to “register” the transmitter with the TXR
Plus receiver. (See TXR Plus receiver “Registration
Mode” on page 10 for details).
The following instructions assume that the TXR Plus
receiver is already switched on and that the registration procedure has already been done.
TO SWITCH ON
Press and release (ON/OFF) button. A three note
sequence will be heard from the receiver and the red
LED on the transmitter will flash briefly.
TO SWITCH OFF
Press and release (ON/OFF) button again. A single low
note will be heard from the receiver and the red LED
on the transmitter will flash briefly.
2
3
Page 3

UK
TO CONNECT BITE ALARMS
Switch unit off. Unclip cover from rear of unit to reveal
input sockets. Plug in the required number of leads for
the number of alarms in use and push them into the
serrated grooves at the base of the compartment.
Refit cover, ensuring that no leads or plugs are
trapped between the cover and its rubber seal. Plug
the other ends of the leads into the extension box outputs of your bite alarms.
Note that the alarm plugged into input 1 will illuminate
the top LED on the receiver, the alarm plugged into
input 2 will illuminate the next LED down on the receiver, and so on.
When using the TXR Plus System in conjunction with
Delkim alarms it is important to set the tone on the
alarm head to the highest pitch. Lower tone settings
may result in sound distortion from your TXR Plus
Receiver & inaccurate reproduction of the number and
duration of triggers, Please note that this does not
apply to any other make of alarm.
RANGE TEST MODE
To activate the range test feature, press and hold
down the [ON/OFF] button on the TXR Plus
Transmitter until the red LED starts to flash (after
4
approx 2 seconds). Release the button. The Receiver
unit will then sound a sequence of four beeps, at medium pitch, repeating at intervals of approximately one
second. The user can then walk away, with the receiver, to their desired location. If the test signal can still
be heard from the receiver, then it is within reception
range.
The test signal will continue until one of the following
occurs –
(i) Test mode auto-cancels. This will occur approximately five minutes after selecting test mode. The
receiver will beep four times at high pitch, to indicate
that test mode has timed out.
(ii) One of the bite alarms is triggered. If this occurs,
then the unit will revert to normal operation mode.
(iii) The user switches the unit off. This also cancels
test mode and the unit will re-start in normal mode
when switched back on.
TONE DIFFERENTIATION
In order to help identify which bite alarm connected to
the TXR Plus has been triggered, the TXR Plus receiver will reproduce a different tone for each of the inputs
1-4. If your bite alarms incorporate a tone control, it
is advised that you set these up to approximate the
four different tones of the TXR Plus
receiver. (unless using Delkims as detailed previously)
BATTERY
To fit / replace battery:
To access the battery compartment, first unclip the
rear cover. Insert the special tool provided into the slot
on the battery cover. Push the back of the tool outwards, towards the left hand edge of the unit and the
cover will open.
Ensure battery is inserted the correct way round, as
shown in the battery compartment.
BATTERY REQUIREMENTS:
The TXR Plus model requires 1 x ‘AAA’ size (LR03)
1.5V alkaline battery
The use of a good quality alkaline battery is essential
for maximum battery life. The use of a rechargeable
battery is not recommended. As with any battery operated product, it is recommended that the battery be
removed, if the unit is not to be used for a long period
of time.
LOW BATTERY WARNING
UK
The TXR Plus constantly monitors its battery condition
and indicates a low battery as follows –
Normally, when a bite alarm connected to the TXR
Plus transmitter is triggered, the corresponding LED
on the TXR Plus receiver illuminates steadily and latches on for 20 seconds. However, if the battery in the
TXR Plus is low and a bite alarm is triggered, the corresponding LED on the TXR Plus receiver will flash and
remain flashing for the 20-second latching period.
When this occurs, it is recommended that the battery
in the TXR Plus should be replaced as soon as possible, to ensure continued operation.
5
Page 4
UK
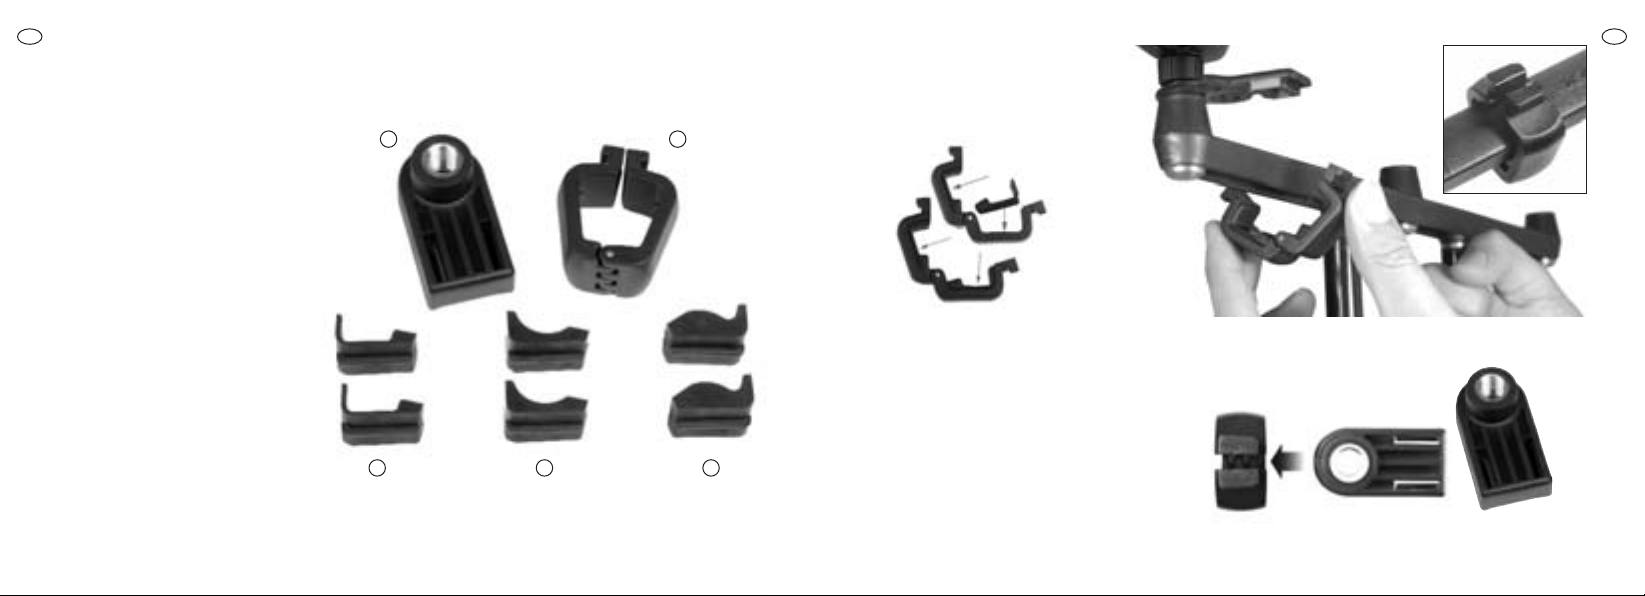
BRACKET COMPONENTS
1. LOCKING BRACKET
2. BUZZ BAR CLAMP
3. RUBBER CLAMP INSERT
To fit Stalker, Sky, Horizon and
A-Pods.
4. RUBBER CLAMP INSERT
To fit Quattro and X-Pods plus
Rod-Lok buzz bars and Euro
buzz bars.
1 2
TRANSMITTER BRACKET
UK
FITTING INSTRUCTIONS
1. Select the correct rubber inserts to fit
your buzz bar. Fit the clamp onto the bar.
5. RUBBER CLAMP INSERT
To fit 3 rod Goal Post buzz
bars.
6
2. Slide the locking bracket onto the clamp mak-
ing sure the tapered ends to the clamp are slotted into the bracket the correct way, as shown
below.
3 4 5
7
Page 5
UK
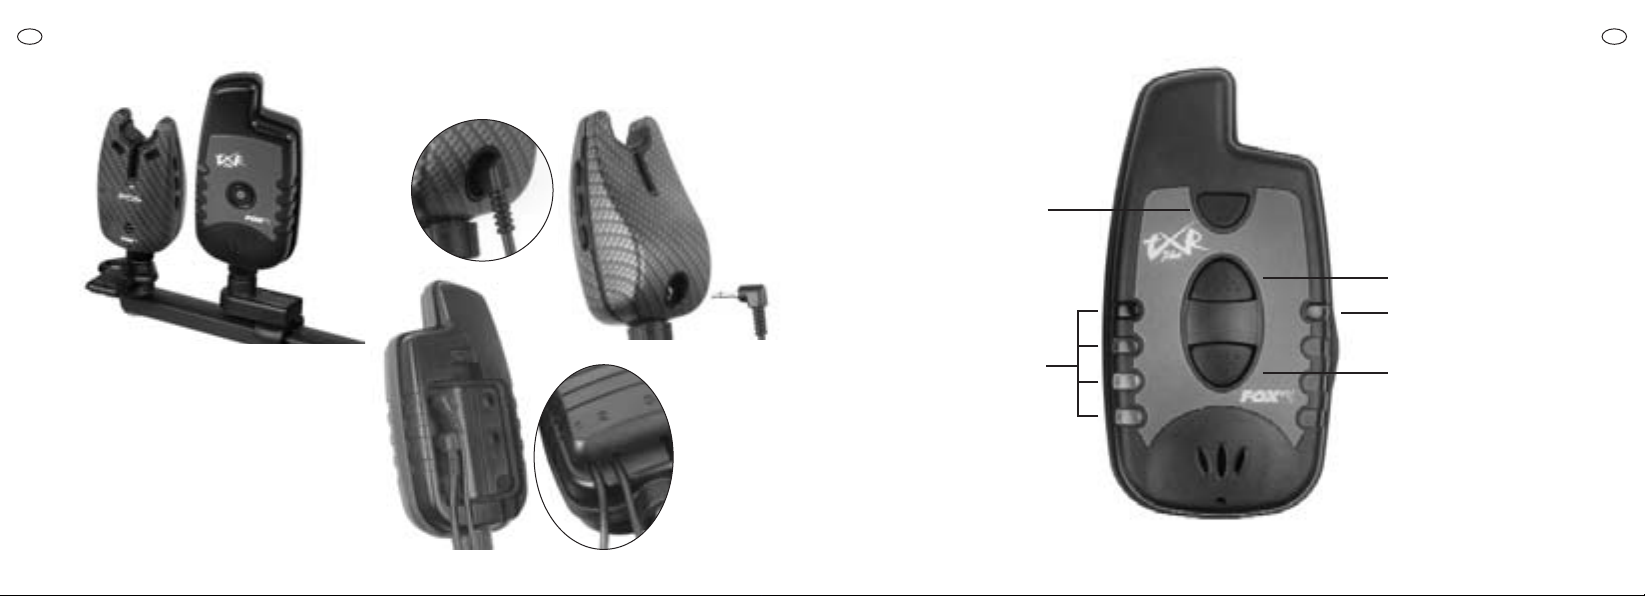
3. Attach the TXR Plus transmitter to the
secured bracket.
5. Fit the plug to the rear of the TXR Plus
transmitter and attach the protective cover.
There are 4 numbered sockets allowing use with
up to four alarm heads.
4. Fit the correct size jack plug (2.5mm or 3.5mm) to
the socket on your alarm head. Here we have fitted the
2.5mm plug to an EOS alarm.
ON/OFF BUTTON
INTERCHANGEABLE
INDICATION
LED LIGHTS
UK
MICRON TXRPLUS
RECEIVER
VOLUME +
BUTTON
CHARGING LED
VOLUME BUTTON
8
9
Page 6

UK
MICRON TXRPLUS
RECEIVER
TO SWITCH ON
Press and release [ON/OFF] button. Unit will sound a
three note sequence and the four LEDs will illuminate.
TO SWITCH OFF
Press and release [ON/OFF] button. Unit will sound a
single low note.
TO ADJUST VOLUME AND SELECT
VIBRATING ALERT
Use [VOLUME +] and [VOLUME -] buttons.
The unit will give a two-tone ascending or descending
beep at the new volume setting.
There are 8 different volume settings available.
Vibrating alert is selected by pressing [VOLUME -]
again, when the unit is already at its lowest volume
setting.
“REGISTRATION” MODE
When the TXR Plus system is used for the first time,
it is necessary to “register” the transmitter with the
receiver, so that the receiver can “learn” its unique
10
identification code. Before starting this procedure,
ensure that the TXR Plus transmitter is switched OFF,
then proceed as follows -
1. With the TXR Plus receiver already switched on,
press and hold down its [ON/OFF] button. After about
two seconds, the top LED will start to flicker rapidly.
Release the [ON/OFF] button.
2. Switch on the TXR Plus transmitter unit. The top
LED on the TXR Plus will stop flickering and illuminate
constantly for a brief period and the TXR Plus will emit
a single beep.
3. The second LED on the TXR Plus will then start
flickering for a moment and will then illuminate constantly for a brief period, followed by another single
beep.
4. This will be repeated for the third and fourth LEDs
down.
5. All four LEDs on the TXR Plus will then start to flicker. Switch the TXR Plus receiver OFF.
6. Switch the TXR Plus receiver on again and the system is now ready for use.
7. Note that if an error has been made, registration
mode can be cancelled at any time, by switching the
receiver off.
8. Registration data is held in non-volatile memory and
so is held indefinitely when batteries are removed. It is
not therefore necessary to repeat this procedure at
any time.
9. If registration mode is entered accidentally, then
simply switching the receiver off will terminate registration mode and prevent any corruption of the registration data.
OUT-OF-RANGE WARNING
The TXR Plus receiver incorporates an out-of-range
warning tone, which will sound when the receiver
recognises a transmission from a bite alarm, but the
transmission is “breaking up”. Depending on the conditions of use, signals from the bite alarm may also not
be received at all, at the extremes of range, which will
result in missing “beeps”.
Determining the limits of range is most conveniently
done with the bite alarm in range test mode (consult
the operating instructions of your bite alarms for
details of how to select range test mode). As the limit
of range is reached, the test signal will begin to break
up, with missing “beeps”, interspersed with the distinctive “crash” tone, indicating out-of-range.
Note that the out-of-range tone also operates when
the bite alarms are in normal operation mode.
USER CONFIGURABLE LEDs
UK
The receiver is equipped with four high-brightness
white LEDs. A set of interchangeable coloured lenses
are provided, so that the user may assign any colour
lens, to any LED, as desired. To fit a new lens, simply
lever the existing lens out by inserting a screwdriver
or similar in the slot underneath the lens, at the side
of the case, taking care not to scratch the surface.
BATTERIES
The TXR Plus model runs from 2 x ‘AAA’ NiMH
rechargeable batteries (supplied) or can also be used
with standard ‘AAA’ alkaline non-rechargeable cells, if
the recharging feature is NOT in use.
IMPORTANT SAFETY WARNINGS
WARNING: DO NOT UNDER ANY CIRCUMSTANCES
ATTEMPT TO USE ALKALINE OR OTHER NON-RECHARGEABLE BATTERIES WITH THE RECHARGING FEATURE. USE
ONLY THE NICKEL METAL HYDRIDE BATTERIES SUPPLIED.
FAILURE TO OBSERVE THIS MAY RESULT IN RISK OF FIRE,
EXPLOSION, BATTERY LEAKAGE OR PERSONAL INJURY
AND WILL INVALIDATE THE WARRANTY. FOX WILL NOT BE
HELD LIABLE FOR ANY DAMAGE OR INJURY SO CAUSED.
11
Page 7

UK
DO NOT MIX DIFFERENT BATTERY TYPES. DO NOT
MIX RECHARGEABLE AND NON-RECHARGEABLE BATTERIES.
USE ONLY FOX APPROVED NICKEL METAL HYDRIDE
BATTERIES. THE USE OF ANY OTHER TYPE OF
RECHARGEABLE BATTERY WILL INVALIDATE YOUR
WARRANTY.
USE ONLY THE AC/DC ADAPTER SUPPLIED. THE USE
OF ANY OTHER ADAPTER MAY DAMAGE THE UNIT
AND WILL INVALIDATE YOUR WARRANTY.
THE AC/DC ADAPTOR IS INTENDED FOR INDOOR USE
ONLY. DO NOT EXPOSE TO RAIN, DAMP OR MOISTURE.
FOR SAFETY REASONS, THE IN-CAR CHARGING
OPTION SHOULD NOT BE USED WHILST THE VEHICLE
IS IN MOTION.
THE CAR CHARGING LEAD MAY BE USED WITH 12
VOLT NEGATIVE EARTH VEHICLE ELECTRICAL SYSTEMS ONLY
FITTING RECHARGEABLE BATTERIES
Open the receiver battery compartment by unclipping
the cover at the rear of the unit. Take care removing
old batteries and ensure correct polarity and connection when fitting new batteries. Use only the Fox
approved Nickel Metal Hydride batteries. Re-fit cover.
NOTE: Before using your receiver for the first time,
the batteries will require a full charge.
LOW BATTERY WARNING
The TXR Plus receiver incorporates a low battery
warning system which continuously monitors the battery condition. When a low battery is detected, the
four LEDs will flash briefly in sequence, approximately
once every 10 seconds. This is most likely to occur
after a run, as this is when the demand on the battery
is at its highest. When a low battery warning has been
observed, it is essential to recharge the batteries (if
the rechargeable batteries are in use) or replace them
(if non-rechargeable alkaline batteries are in use), in
order to ensure continued operation.
BATTERY LIFE EXPECTANCY
All types of rechargeable battery have a lower capacity
than the equivalent sized alkaline (non-rechargeable)
battery.
Using Nickel Metal Hydride batteries, you should
expect to re-charge the batteries roughly twice as
often as you would have to replace alkaline batteries.
So, for example, if you normally expect 1,000 hours
use from alkaline batteries, then you should expect to
perform a re-charge every 500 hours of use.
To avoid this problem, simply re-charge the batteries
before each session of use.
REPLACEMENT OF RECHARGEABLE
BATTERIES
In normal use, it should be possible to recharge the
batteries many hundreds of times. If, however, you
notice that it is becoming necessary to recharge more
often, then the batteries may require replacement.
Replace only with Fox approved Nickel Metal Hydride
batteries. The use of any other type of battery may
invalidate your warranty.
OPERATION OF RECHARGING FEATURE
UK
1. Ensure that the rechargeable Nickel-Metal Hydride
rechargeable batteries supplied are fitted in the battery compartment.
2. Connect either the AC/DC adapter, or car charging
lead supplied, to the socket at the side of the unit.
3. Plug the AC/DC adapter into a wall socket, or insert
the car charging lead into a standard cigarette lighter
socket.
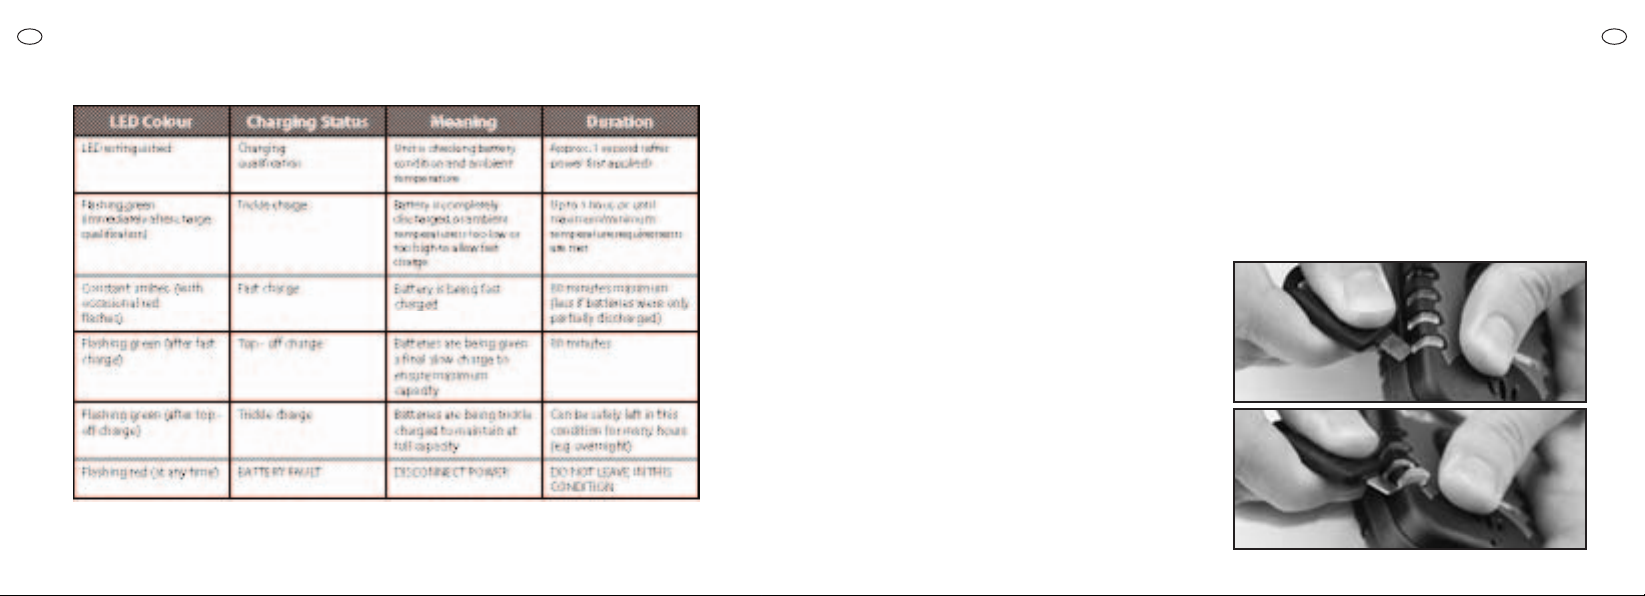
4. Observe the charging LED. The normal sequence is
as follows –
12
13
Page 8
UK
Notes –
- When fast charge is completed (80 minutes or less),
the unit is ready for use and will give almost full
battery life before recharging is necessary. For
optimum performance, however, it is recommended
INTERCHANGEABLE COLOURED LED
LENSES
The lenses on the TXR Plus receiver can be interchanged to match the LED colours shown on the alarm
head.
UK
that the top-off charge is allowed to complete, when
possible (a further 80 minutes)
- All types of rechargeable batteries will self-discharge
over a period of weeks or months, so it is
recommended that charging is carried out shortly
before use
To change the lens colour simply insert a blunt, flat
edge under the lens and lift upwards Here we have
used the corner of a Micron EOS battery compartment
key, but any similar item such as a small screwdriver
would be suitable.
- Unlike older types of rechargeable batteries, it is not
necessary to fully discharge Nickel Metal Hydride
batteries, so they can be re-charged periodically
without any detrimental effect on their life
expectancy.
- To avoid overheating the batteries, do not repeatedly
re-start the charging sequence (by interrupting the
power)
- The batteries will become slightly warm during fast
charge, this is normal
- The AC/DC adapter will become warm in use
14
15
Page 9

UK
STAND, BELT CLIP AND MAGNETIC
BIVVY HOLSTER
The TXR Plus is provided with a number of accessories
to hold the receiver, in different conditions of use.
Stand & belt clip
– the TXR Plus is provided with two
different battery covers, one of which incorporates a
fold-out stand and the other of which incorporates a
belt clip. Note that reception range will be reduced
when the unit is worn in close proximity to the body
(see later notes).
Magnetic bivvy holster
– this may be used to attach
the unit to the inside of a bivvy. Hold the holster up to
the inside wall of the bivvy and place the magnet on
the opposite side, so that the fabric is gripped
between the magnet and the rear of the holster. Place
the unit into the holster.
OBTAINING BEST PERFORMANCE FROM
THE TXRPLUS RECEIVER
The operating range of the TXR Plus receiver, like all
low power radio systems, is highly dependant on the
conditions of use and can be adversely affected by the
position of both transmitter and receiver, the terrain
16
over which it is being used, the prevailing atmospheric
conditions and the presence of any interfering signals.
To obtain best performance, it is recommended that
you –
(1) Ensure that your TXR Plus transmitter is set-up
as far as possible above ground level.
(2) Keep the TXR Plus as high above ground as
possible – if worn on the body, it should be worn
as high as possible (a shoulder pocket or
epaulette is ideal).
(3) Avoid wearing the unit close to the body – it
should be worn on the outside of your clothing.
(4) Try to keep a direct “line-of-sight” between the
receiver and transmitter – obstructions such as
trees, buildings, etc may cause loss of signal, or
reflections of the signal, resulting in “dead spots”.
(5) Do not keep the receiver in the same pocket as a
mobile phone, or other electronic device.
(6) If working at long range, always use the range
test facility on your transmitter, to ensure that
you are in range and will not miss a take.
(7) Ensure both your receiver and your transmitter
have good batteries.
If all the above points are adhered to, a working range
of up to 500 metres may be obtained. All the above
hints become progressively less important, as the
working range is reduced.
Remember to use the system responsibly – the TXR
Plus has been designed to give a long operating range
in order to maximise reliability at close range and
NOT
to encourage users to leave their rods in the water
unattended, whilst they are hundreds of metres away.
UK
17
Page 10

UK
NOTES NOTES
UK
18
19
Page 11

UK
Micron is a Registered Trade Mark
FOX is a Registered Trade Mark
European Registered Designs
We reserve the right to alter or
F
Micron est une Marque Deposee
L’enregistrement à la creations en
Europe. Nous nous reservons le droit
de modifier ou de changer sans
preavis les caracteristiques des
NL
Micron is een geregistreerd handelsmerk
FOX is een geregistreerd handelsmerk
Europees geregisteerd ontwerps.
We behouden ons het recht voor om
veranderingen of wijzigingen door te voeren
zonder voorafgaande kennisgeving.
D
Micron ist ein eingetragenes Warenzeichen
FOX ist ein eingetragenes Warenzeichen
Eintragung des Musters für Europa
Wir behalten uns das Recht vor, Spezifikationen
ohne vorherige Ankündigung zu ändern.
I
Micron è un marchio registrato
FOX è un marchio registrato
Registrazione Designs Europeo in
Ci riserviamo il diritto di cambiare
o modificare le specifiche senza
modify
FOX est une Marque Deposee
corso
56-58 Fowler Road, Hainault Business Park
Customer Services +44(0) 20 8501 1051
European Customer Services +32(0) 3660
2984 Email: customerserviceseurope@fox-
Fox International Group Limited
Hainault, Essex IG6 3UT
Email: [email protected]
int.co.uk
ISSUE (2)
 Loading...