

Page 1
Model:43DLE488
Android™OS
Page 2

Page 3
SAFETY INSTRUCTION
IMPORTANT SAFETY INSTRUCTIONS
WARNING
• TO PREVENT FIRE OR SHOCK HAZARD, DO NOT USE AN EXTENSION CORD,
RECEPTACLE OR OTHER OUTLET UNLESS THE BLADES CAN BE TO PREVENT
BLADE EXPOSURE.
• TO PREVENT FIRE OR SHOCK HAZARD, DO NOT EXPOSE THIS APPLIANCE TO
RAIN OR MOISTURE.
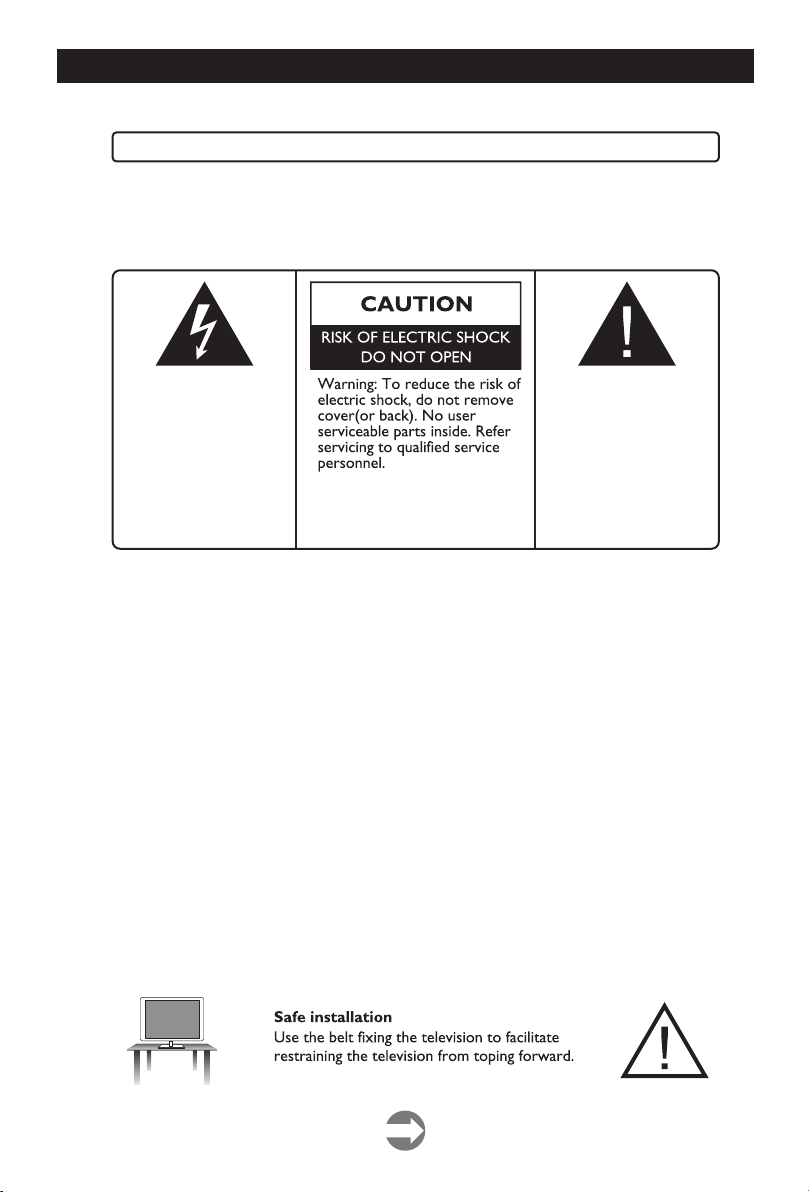
This lightning flash with
arrowhead symbol in an
equilateral triangle alerts
users to the presence of
uninsulated dangerous
voltage within the
products enclosure that
may be of sufficient
magnitude to constitute
a risk of electric shock.
This appliance should not be exposed to water and no object filled with liquid such as a vase should be
placed on the unit.
CAUTION
·Danger of explosion if incorrectly replaced.
·Replace with only equivalent type of battery.
·Do not expose battery to direct sunlight or any other source of heat.
·Ensure proper disposal of used batteries.
·Where the MAINS plug or an appliance coupler is used as the disconnect device, the disconnect
device shall remain readily operable.
·To reduce the risk of electric shock, do not perform any servicing other than what is mentioned in
the operating manual.
·There are no user-serviceable parts inside the TV; do not open the TV casing.
IMPORTANT INFORMATION
If a television is not positioned in a sufficiently stable location, it can be potentially hazardous due to
falling. Many injuries, particularly to children, can be avoided by taking simple precautions such as:
·Using cabinets or stands recommended by the manufacturer of the television.
·Only using furniture that can safely support the television.
·Ensuring the television is not overhanging the edge of the supporting furniture.
·Not placing the television on tall furniture (for example, cupboards or bookcases) without anchoring
both the furniture and the television to a suitable support.
·Not standing the televisions on cloth or other materials placed between the television and supporting
furniture.
·Educating children about the dangers of climbing on furniture to reach the television or its controls.
batteries are
The exclamation mark
within an equilateral
triangle alerts users
to the presence of
important operating
and maintenance
(servicing) instructions
in the literature
accompanying the
appliance.
1
Page 4

SAFETY INSTRUCTION
1. Read Instructions - All the safety and operating instructions should be read before the appliance is
operated.
2. Retain Instructions - The safety and operating instructions should be retained for future reference.
3. Heed Warnings - All warnings on the appliance and in the operating instructions should be adhered
to.
4. Follow Instructions - All operating instructions should be followed.
5. Water and Moisture - The appliance should not be used near water.
6. Cart and Stands - The appliance should only be used with a cart or stand that is recommended by
the manufacturer.
7. Wall or Ceiling Mounting - The appliance should be mounted to a wall or ceiling only as
recommended by the manufacturer.
8. Ventilation - The appliance should be well situated so that its location or position does not
interfere with its proper ventilation.
9. Heat - This appliance should be placed away from heat sources such as radiators, heat registers and
stoves.
10. Power Sources - The appliance should only be connected to a power supply as described in the
operating instructions or as marked on the appliance.
11. Grounding or Polarization - Precautions should be taken.
12. Power Cord Protection - Power supply cord should be routed so that it is not likely to be walked
on, pinched by items placed upon it against the cord and its end.
13. Cleaning - The appliance should be cleaned only as recommended by the manufacturer.
14. Power Line - An outdoor antenna should be located away from power lines.
15. Outdoor Antenna Grounding - If an outside antenna is connected to the receiver, the antenna
system must be grounded so as to provide against voltages and built-up static charges.
16. Non-use Periods - The power cord of the appliance should be unplugged from the outlet when left
unused for a long period of time.
17. Object and Liquid Entry - Care should be taken so that objects do not fall, and liquids are not
spilled into the enclosure through openings.
18. Conditions requiring Service - The appliance should be serviced by qualified service personnel
when:
·The power-supply cord or the plug has been damaged.
·Objects have fallen on or liquid has been spilled into the appliance.
·The appliance has been exposed to rain.
·The appliance does not appear to operate normally or exhibits a marked change in performance.
19. The ventilation should not be impeded by covering the ventilation opening with items,
such as newspapers, table-cloths, curtains, etc.
No naked flame sources, such as lighted candles, should be placed on the apparatus.
The apparatus shall be connected to mains socket outlet with a protective earthing connection.
The appliance coupler regarded as disconnection device, the disconnect device shall remain readily
operable.
20. The equipment may be used in tropical and moderate climates.
2
Page 5
SAFETY INSTRUCTION
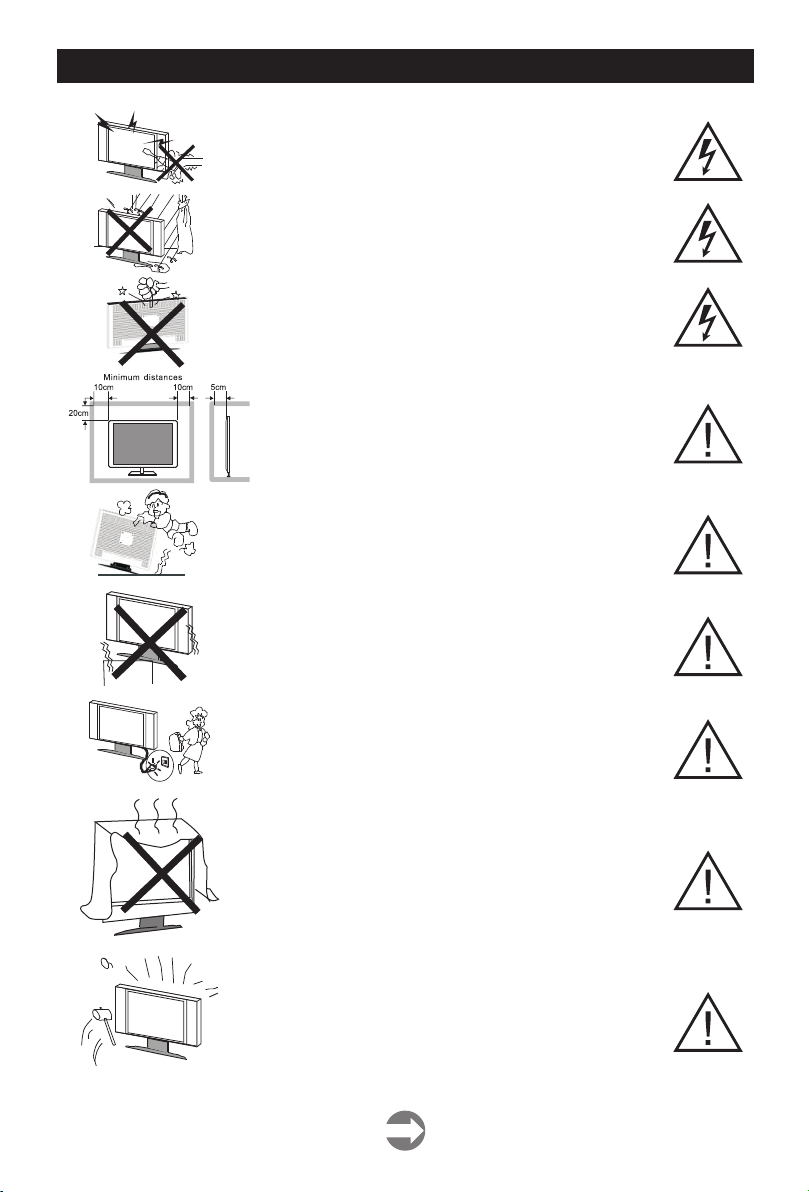
Warning
High voltages are used in the operating of this product.
Do not remove the back cover of the cabinet. Refer servicing
to qualified service personnel.
Warning
To prevent fire or electrical shock hazard, do not expose the
main unit to rain or moisture.
Warning
Do not drop or push objects into television cabinet slots or
openings. Never spill any kind of liquid on the television
receiver.
Caution
If the television is to be built into a compartment or
similarly enclosed, the minimum distances must be
maintained.
Heat built up can reduce the service life of your
television, and can also be dangerous.
Caution
Never stand on, lean on, push suddenly the product or its
stand.
You should pay special attention to children.
Caution
Do not place the main unit on an unstable cart stand, shelf
or table.
Serious injury to an individual, and damage to the television,
may result should it fall.
Caution
When the product is not used for an extended period of
time, it is advisable to disconnect the AC power cord from
the AC outlet.
Caution
Avoid exposing the main unit to direct sunlight and other
sources of heat. Do not position television receiver directly
on other products which give off heat. E.g. Video cassette
players, audio amplifiers. Do not block the ventilation holes
in the back cover. Ventilation is essential to prevent
electrical failure. Do not squash power supply cord under
the main unit.
Caution
The panel used in this product is made of glass. It can break
when the product is dropped or applied with force.
Individuals should execute caution when dealing with
broken glass should the panel break.
3
Page 6
CONTENTS
SAFETY INSTRUCTIONS
1 - 3
DESCRIPTION OF CONTROL KEYS & CONNECTORS
5 - 6
OPERATION OF REMOTE CONTROL
7 - 8
CONNECTIONS
9
OPERATION OF FUNCTION MENU
10 - 26
TROUBLE SHOOTING GUIDE
27
SPECIFICATIONS
27
4
Page 7
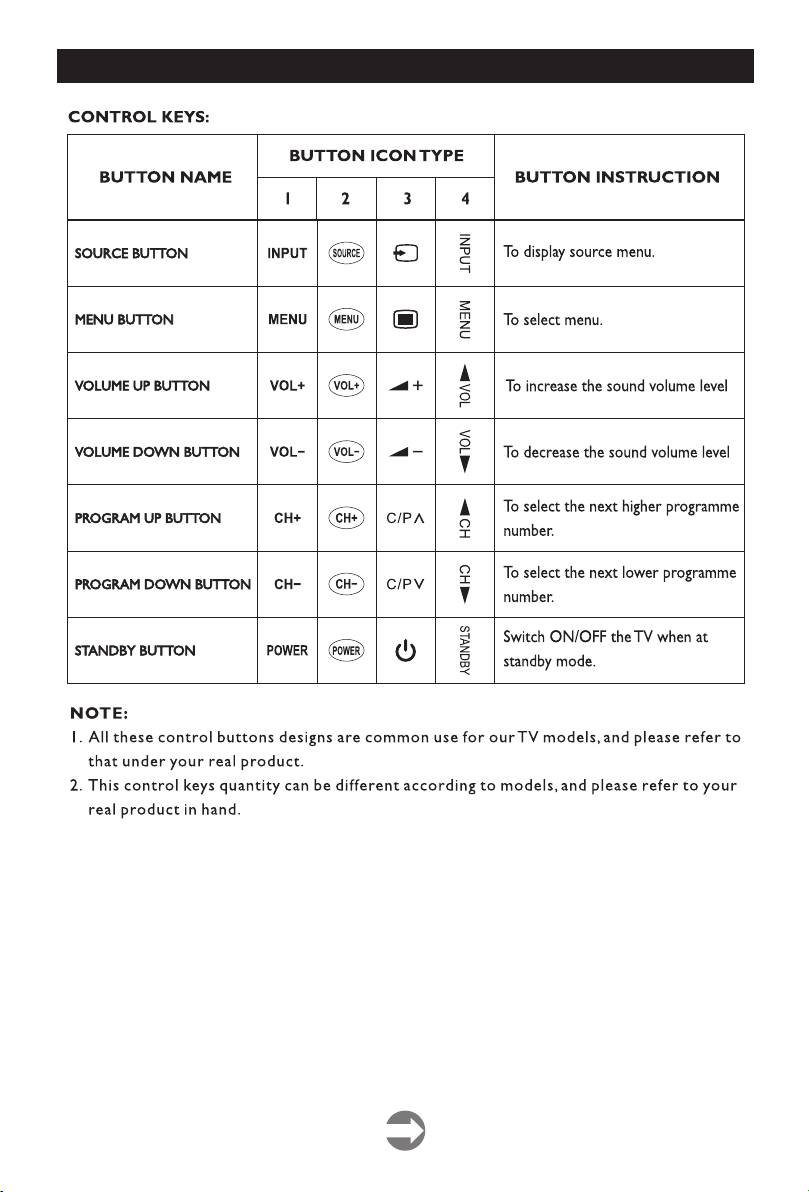
CONTROL BUTTON AND TERMINAL
5
Page 8
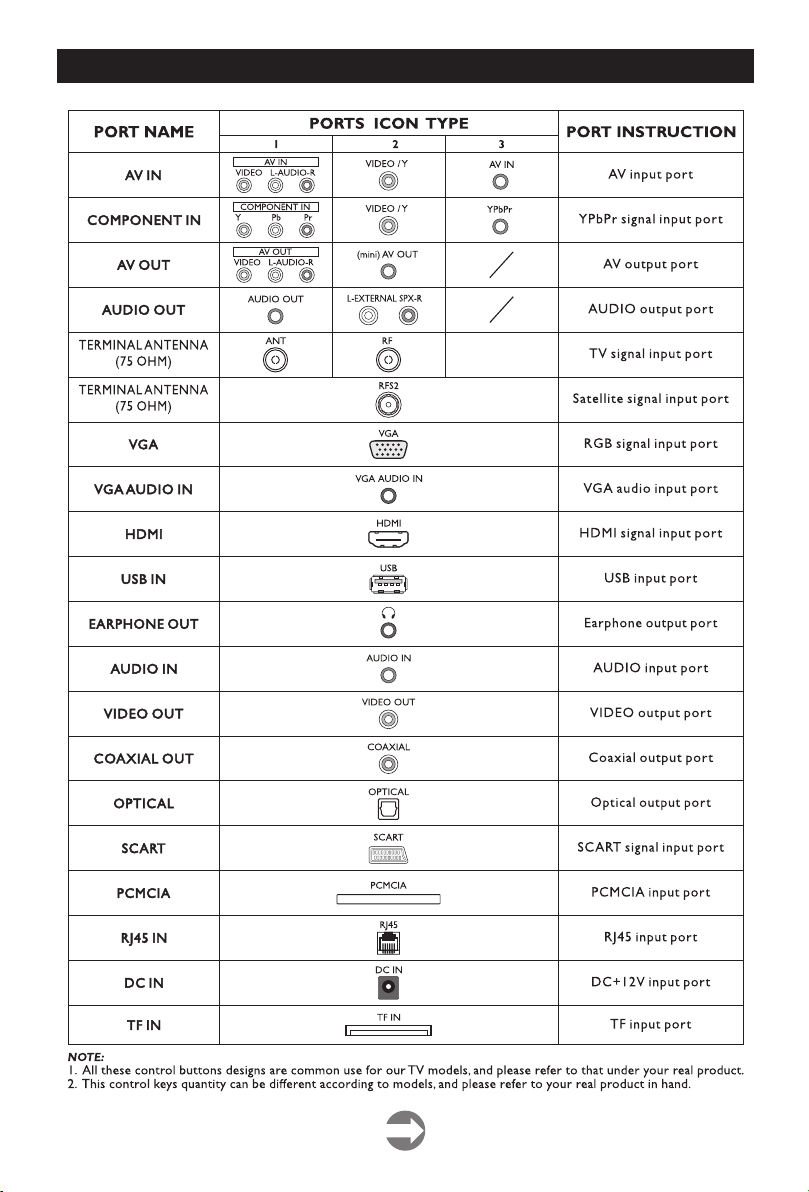
CONTROL BUTTON AND TERMINAL
6
Page 9
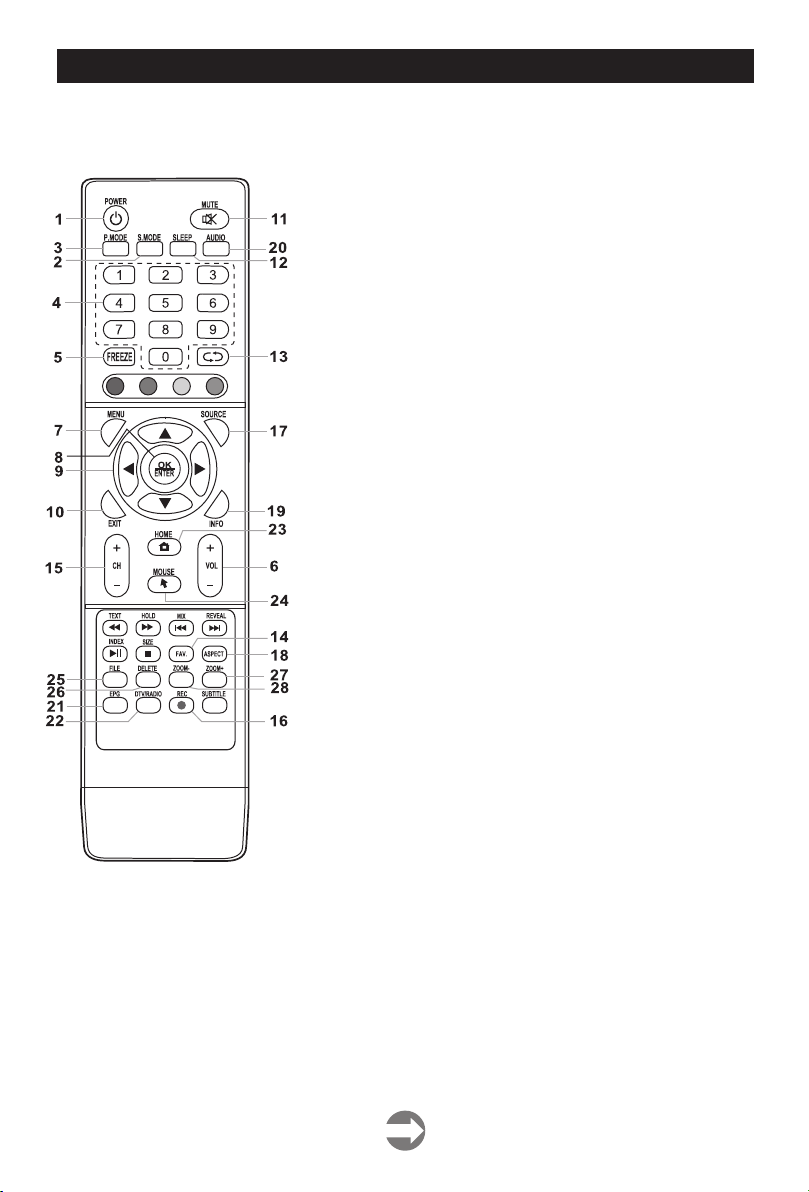
OPERATION OF REMOTE CONTROL
The remote controller cannot be used unless it is within the receivable range. Before you use the remote
control, please make sure there's no obstacle between the remote control and the receiver.
6. VOL+/VOL- BUTTON
Press two buttons to directly to turn up or turn down the
sound volume level.
7. MENU BUTTON
Press the button to open the main menu, press again or
use Exit to close.
8. OK / ENTER BUTTON
Press the button to confirm or enter sub menus.
9. UP, DOWN, LEFT, RIGHT ARROW BUTTONS
Press these buttons to select or adjust the desired item
on the TV menu.
10. EXIT BUTTON
Press the button to exit.
11. MUTE BUTTON
Press the button to turn off the volume. Press it again to
turn on the volume.
12. SLEEP BUTTON
Press the button to set up the TV auto turn off time.
13. RETURN BUTTON
Press the button to toggle between the current and the
previous program you were viewing.
14. FAV. BUTTON
Display favourite of program list.
15. CH+/CH- BUTTON
Press two buttons to directly to adjust the TV program.
16. REC BUTTON
Hotkey of PVR.
17. SOURCE BUTTON
Press the button display Source menu.
18. ASPECT BUTTON
Press the button to display and select available aspect
modes.
19. INFO BUTTON
Display the source and channel information.
20. AUDIO BUTTON (Optional)
Selects audio mode.
21. EPG BUTTON
Open/Close Electronic program guide.
22. DTV/RADIO BUTTON
Switch DTV program and radio program.
1. POWER BUTTON
Switch On/Off the TV when at standby
mode .
2. S.MODE BUTTON
Sound effect selection.
3. P.MODE BUTTON
Picture effect selection.
4. NUMBER BUTTONS
Press these buttons to select the TV
program you want to enter or input
password.
5. FREEZE BUTTON
Freeze picture.
23. HOME BUTTON
Back to home OSD.
24. MOUSE BUTTON
MOUSE On/Off.
25. FILE BUTTON
Android OSD operate guide .
26. DELETE BUTTON
User for delete the input.
27. ZOOM+ BUTTON
Directly to turn up the SMART TV sound volume level.
28. ZOOM- BUTTON
Directly to turn down the SMART TV sound volume level.
Note:
EPG, DTV/RADIO, REC are only effective in DTV mode.
7
Page 10
OPERATION OF REMOTE CONTROL
TELETEXT FUNCTION(optional)
1)TEXT BUTTON
Press the TEXT button to change the viewing from
TV to Teletext if TV stations in your local have
teletext broadcasting.
2) REVEAL BUTTON
This is a toggle function key to display hidden
characters.
3) MIX BUTTON
This is a toggle function button to display TV
Picture and teletext together or teletext only.
4) RED/GREEN/YELLOW/BLUE BUTTONS
These 4 Colour keys in teletext mode can quickly
enter the Pre-captured teletext pages.
5) ▲/▼ BUTTON
These keys can be used as a page up/down key in
teletext mode.
6) 0, 1, 2,..., 9 BUTTON
Using the 0,1 ,2, ..., 9 keys, the required Teletext
Pages are selected.
7) HOLD BUTTON
Some Teletext information is contained on more
than one page, the pages automatically changing
after a given reading time. Press the HOLD key to
stop the page changing. Press the HOLD key again
to allow the page to change.
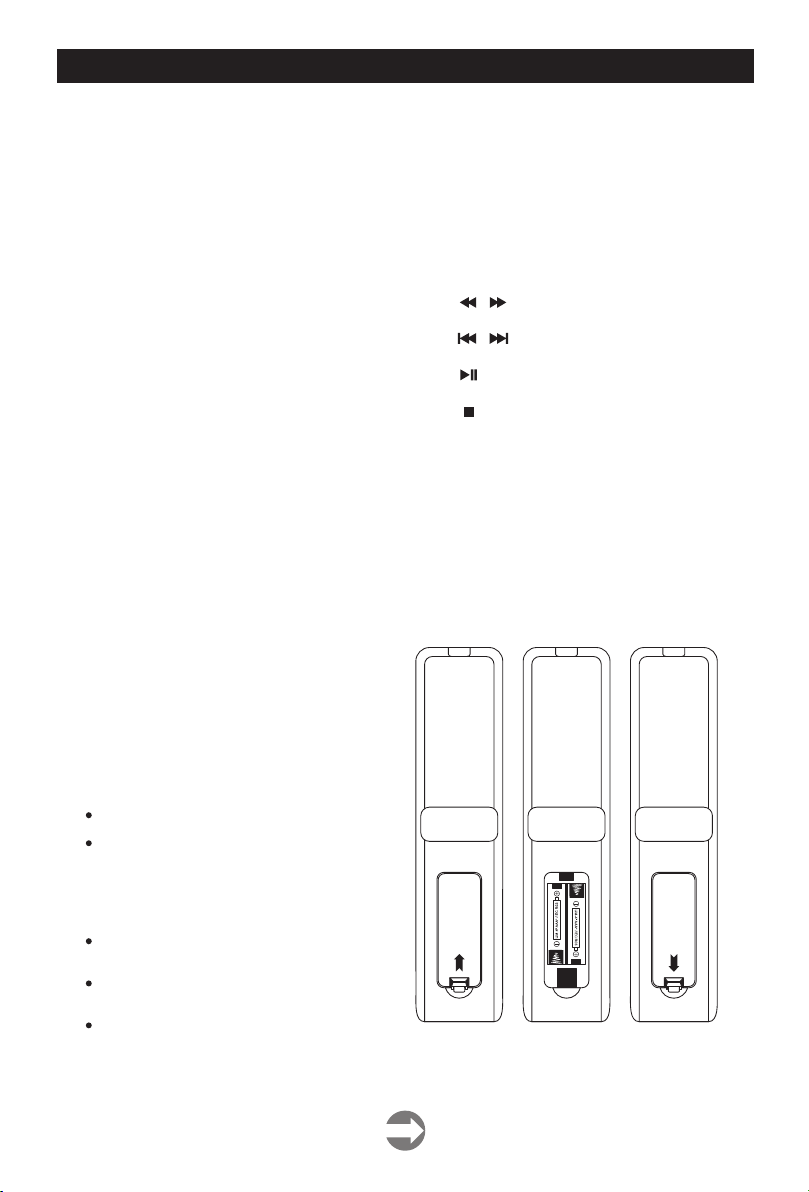
BATTERY INSTALLATION OF REMOTE CONTROL UNIT
1.Open the battery compartment cover.
2.Insert two AAA (pencil size) 1.5V
‘ ’
8)INIDEX BUTTON
Press the INDEX key to view Index page in
teletext mode.
9) SIZE BUTTON
This key is to expand character size and display
half teletext page,Each press will display upper....
tower ....Normal page.
USB FUNCTION (Optional)
1) / BUTTON
Skip a scene or music.
2) / BUTTON
Go back to the previous or skip to the next.
3) BUTTON
Play / Pause.
4) BUTTON
Stop playback.
5) SUBTITLE BUTTON
In the USB playback moives,open or closed
subtitle function(Need streaming support).
Note:
A USB device must already be connected.
batteries. Make sure the polarity (+ or -)
of the batteries matches the polarity
marks inside the unit.
3.Close the battery compartment cover.
Note:
Recommend use alkaline type batteries.
The life time of the batteries may last up
to one year, depending on how often the
remote control is used. For the best
performance, the batteries should be
replaced on a yearly basis, or when remote
operation becomes erratic.
Be sure to place the batteries in the correct
direction, as shown left.
Do not mix old and new batteries, or
different types.
Old batteries may leak chemical and damage
the remote control. Always remove batteries
as soon as they become weak.
8
Page 11
CONNECTIONS
INSTALLATION OF ANTENNA
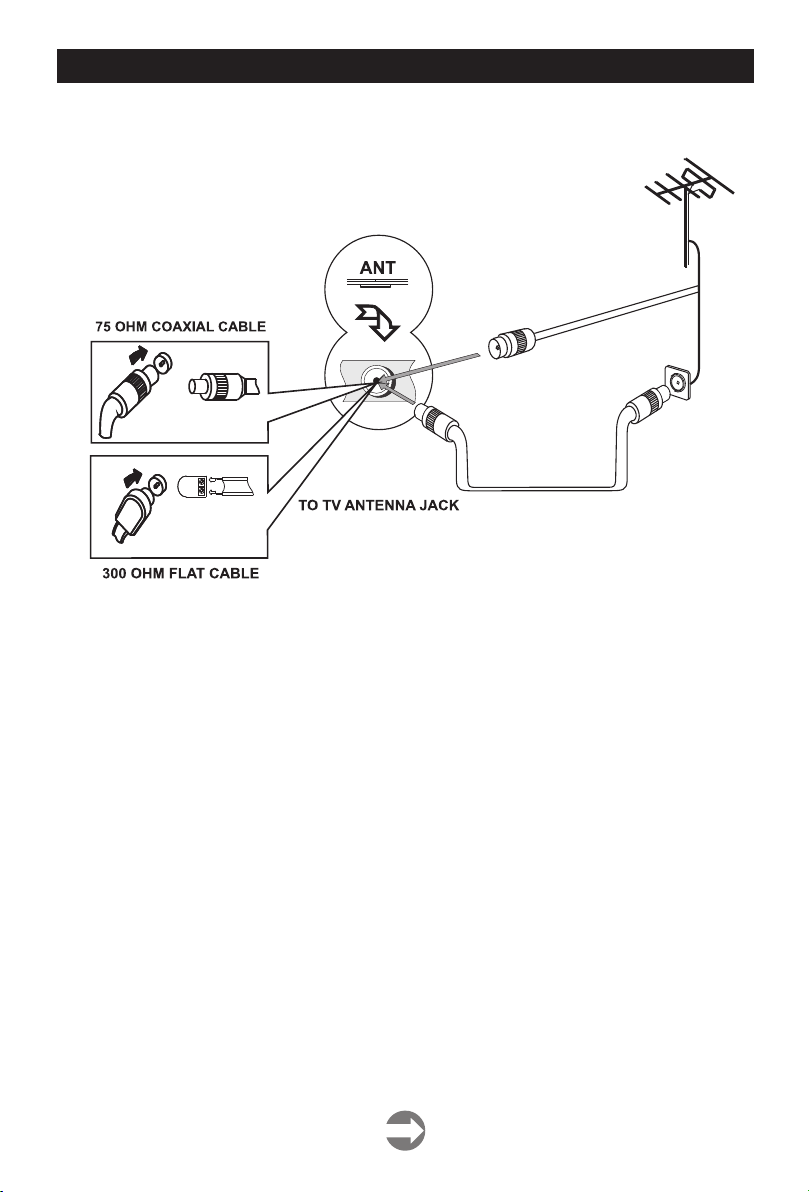
Connect the 75 OHM coaxial cable from the antenna to the antenna jack on the rear panel, as shown
above.
Note:
·
For better reception, especially in outlying area or where ghost or interference happens, an external
roof-mounted antenna is recommended.
·
For UHF TV reception, use the specified UHF antenna. Consult the local sale dealer.
·
When using 300 OHM flat cable, a 300 OHM - 75 OHM adapter should be adopted for a proper
connection to the antenna jack.
POWER CONNECTION
·
Plug the AC cord into an AC outlet.
·
Press the Power button on the remote control to turn on, press the Power button again to standby.
Note:
·
This unit should be operated from a household AC100-240V~ 50/60Hz.
·
When you disconnect the power supply cord, pull it out by the plug. Never pull the cord itself.
CAUTIONS:
During a power outage, the TV should be unplugged from the AC outlet. To conserve energy the TV
should be unplugged from the AC outlet if not being used for a prolonged period of time.
9
Page 12
OPERTION OF FUNCTION MENU
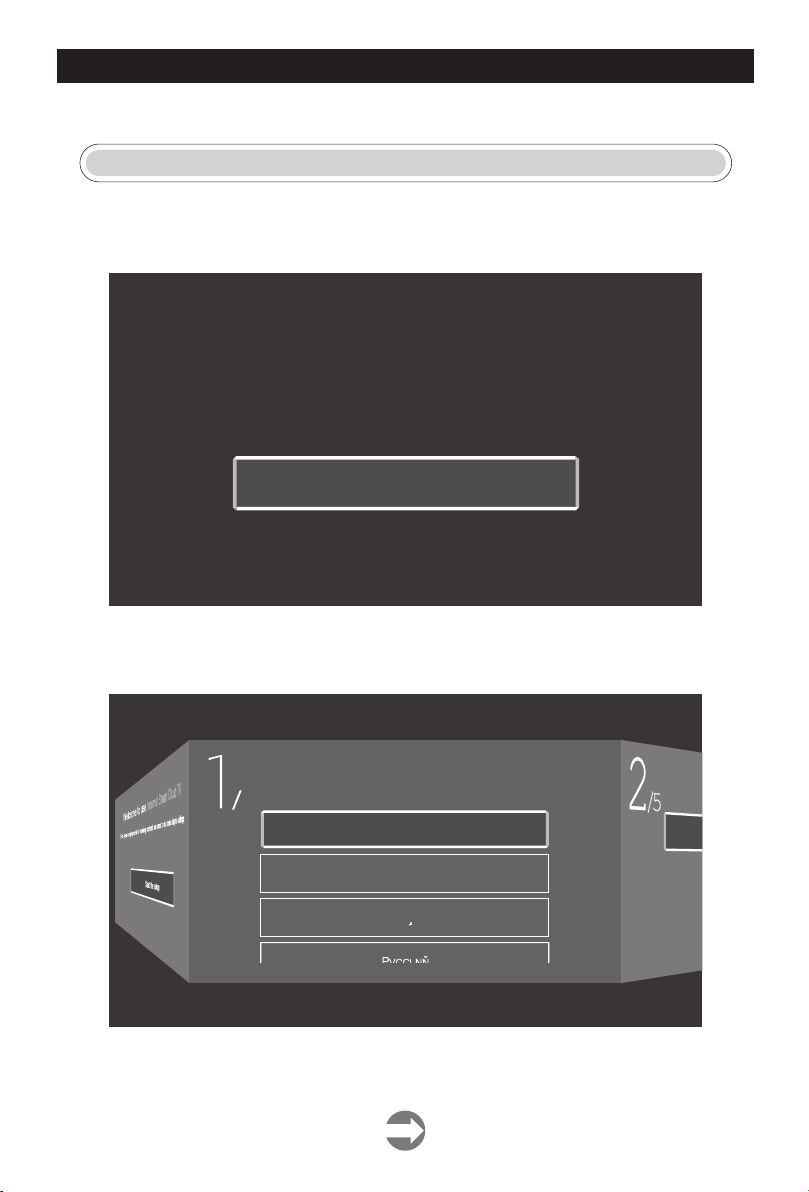
Note: The above pictures are for reference only, there may be differences in kind.
FTI
Connect an RF cable from the TV’s input called “RF-In” and to your TV Aerial socket.
Press OK button to select the Start the setup.
Welcome to use Internet Smart Cloud TV
For your enjoyment of viewing content, we need to do some simple settings
Start the setup
Press【▼】 【▲】button to select the lan gu ag e.
Press OK button to sure, and p ress【►】button to setup c ou nt ry.
/
Select the language you are using
5
English
Deutsch
Francais
10
Page 13
OPERTION OF FUNCTION MENU
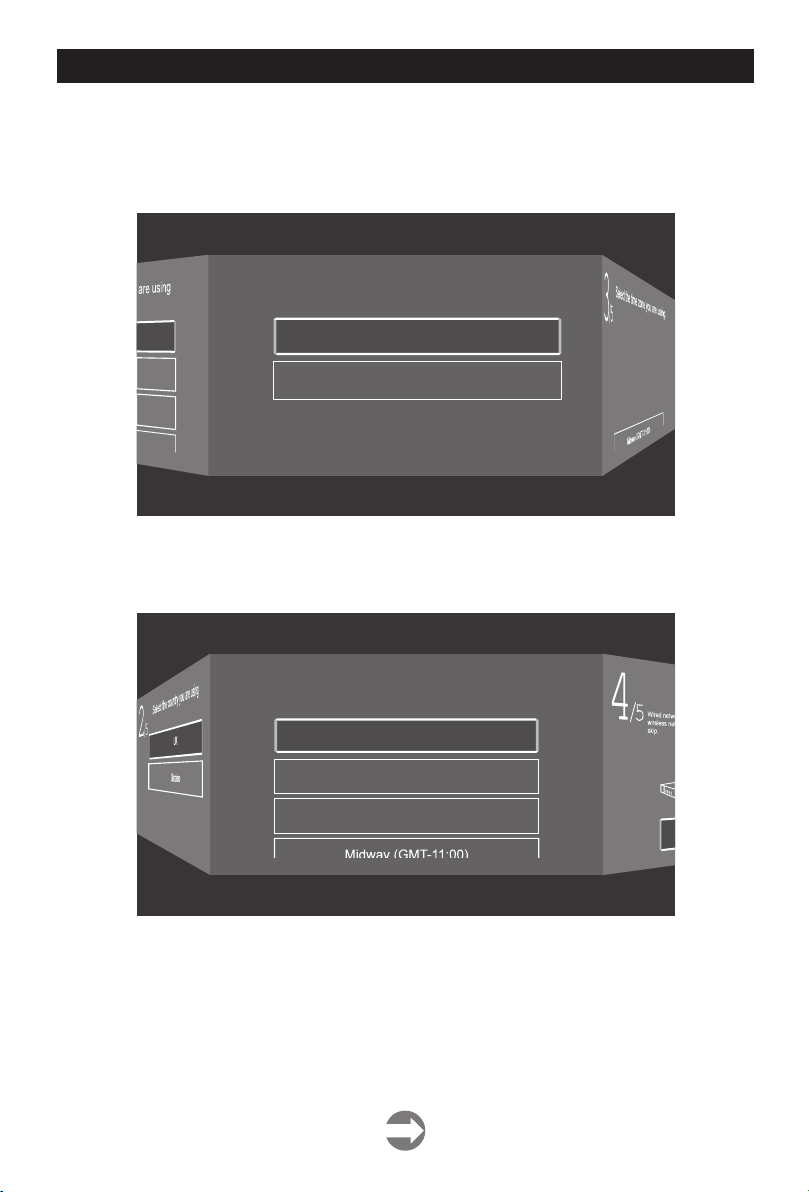
Press【▼】/【▲】button to select
Press OK button to sure, and press【 】button to select the time zone.
/
5
2
Press【▼】/【▲】button to select
►
Press【 】button to connect the WIFI/network.
Select the time zone you are using
/
5
3
the country.
►
Select the country you are using
UK
Ukraine
the time zone.
Kiev (GMT+2:00)
Pago_Pago (GMT-11:00)
Niue (GMT-11:00)
11
Page 14
OPERTION OF FUNCTION MENU
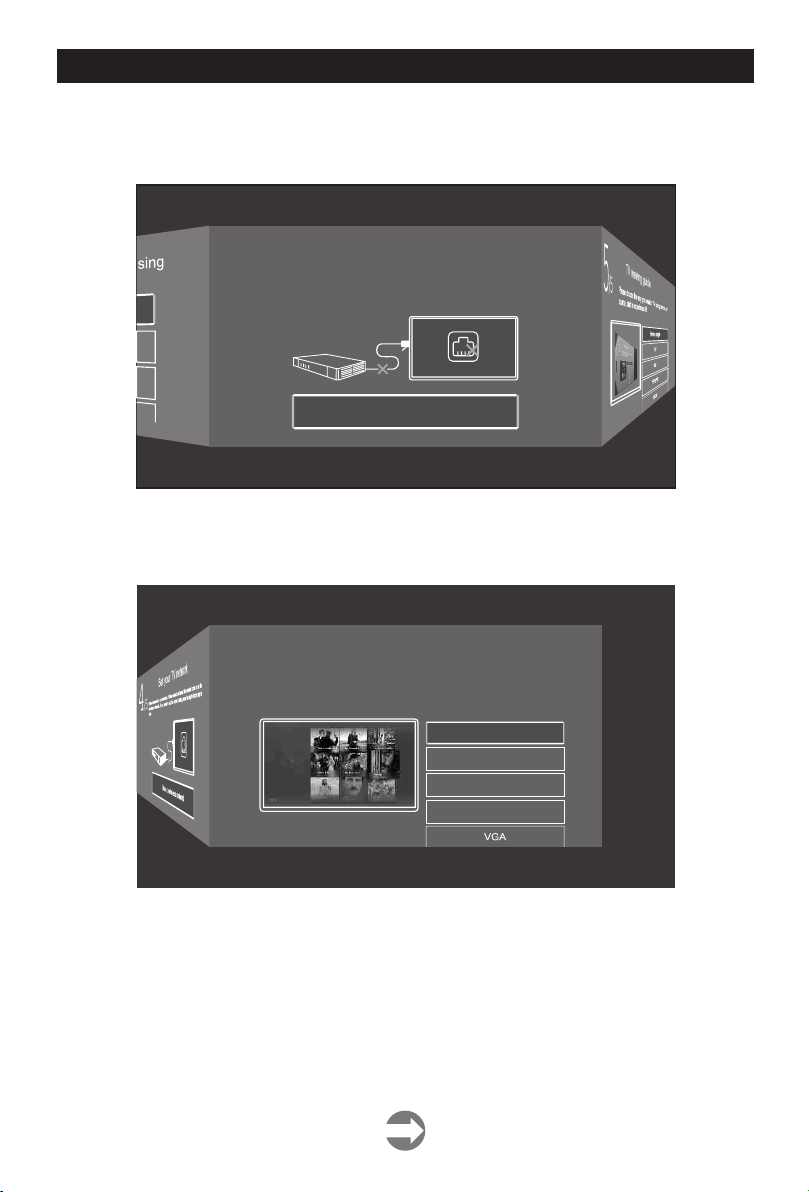
Press button to
OK connect the WIFI/network.
Press button to select the input source.
【►】
Set your TV network
Wired network is not detected. Please check and insert the network cable or use the
/
5
4
wireless network. If you want to set the network later, press the night direction key to
skip.
Use a wireless network
Press button to select the input source.【▼】/【▲】
/
5
TV viewing guide
Please choose the way you watch TV programs or
5
source, start to experience it!
12
Home page
TV
AV
YPBPR
Page 15
OPERTION OF FUNCTION MENUOPERTION OF FUNCTION MENU
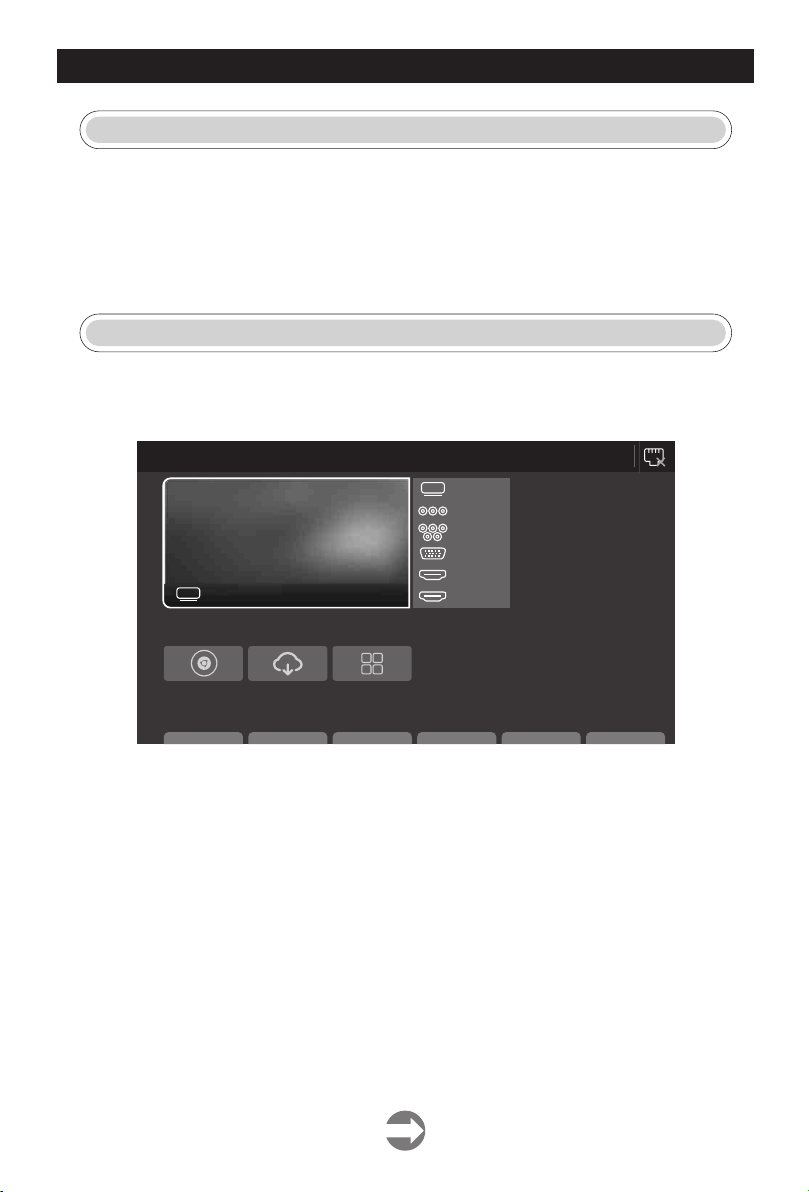
INPUT SOURCE
Press SOURCE button to enter Input Source menu.
Press【▼】/【▲】button to select.
Press ENTER to select source.
MAIN MENU
HOME
Press button to select HOME menu.
【◄】/【►】
Press【▼】/【▲】/【◄】/【►】button to select.
TV
TV No Si gnal
APP S
AM
02:09
2018/1/1 Monday
TV
TV
AV
YPBP R
VGA
HDMI 1
HDMI 2
Bro wser Dow nload App licat ions
LIK E A PPS
13
Page 16
OPERTION OF FUNCTION MENU
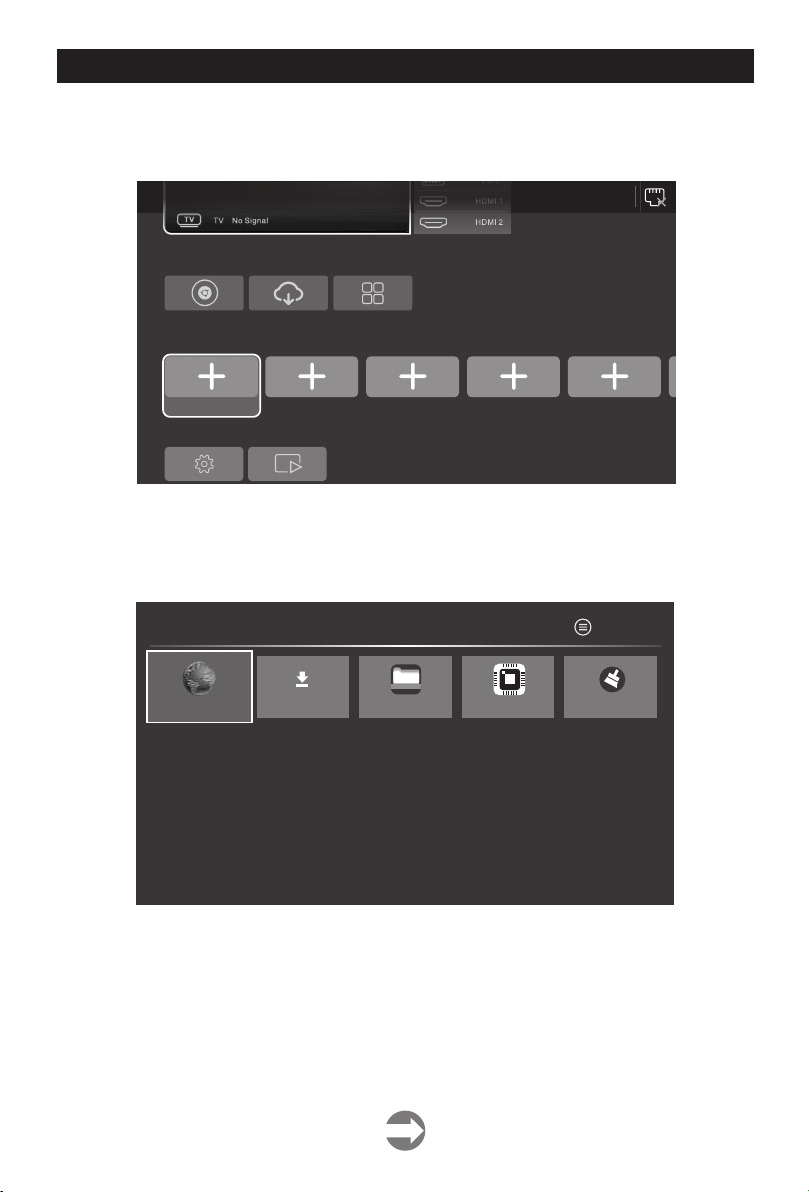
APPS/L IK E_ AP PS
Press button to select APPS/LIKE_APPS to add app.【▼】/【▲】
APP S
Bro wser Dow nload App licat ions
LIK E A PPS
Use r adds User ad ds Use r adds U ser add s User a dds
OTH ERS
Press to select App to install.【▼】/【▲】/【◄】/【►】
AM
02:09
2018/1/1 Monday
Bro wser
App List
File Browser
Downloads File Browser Smar TV Store TV Clean
Edit with MENU key
14
Page 17
OPERTION OF FUNCTION MENU
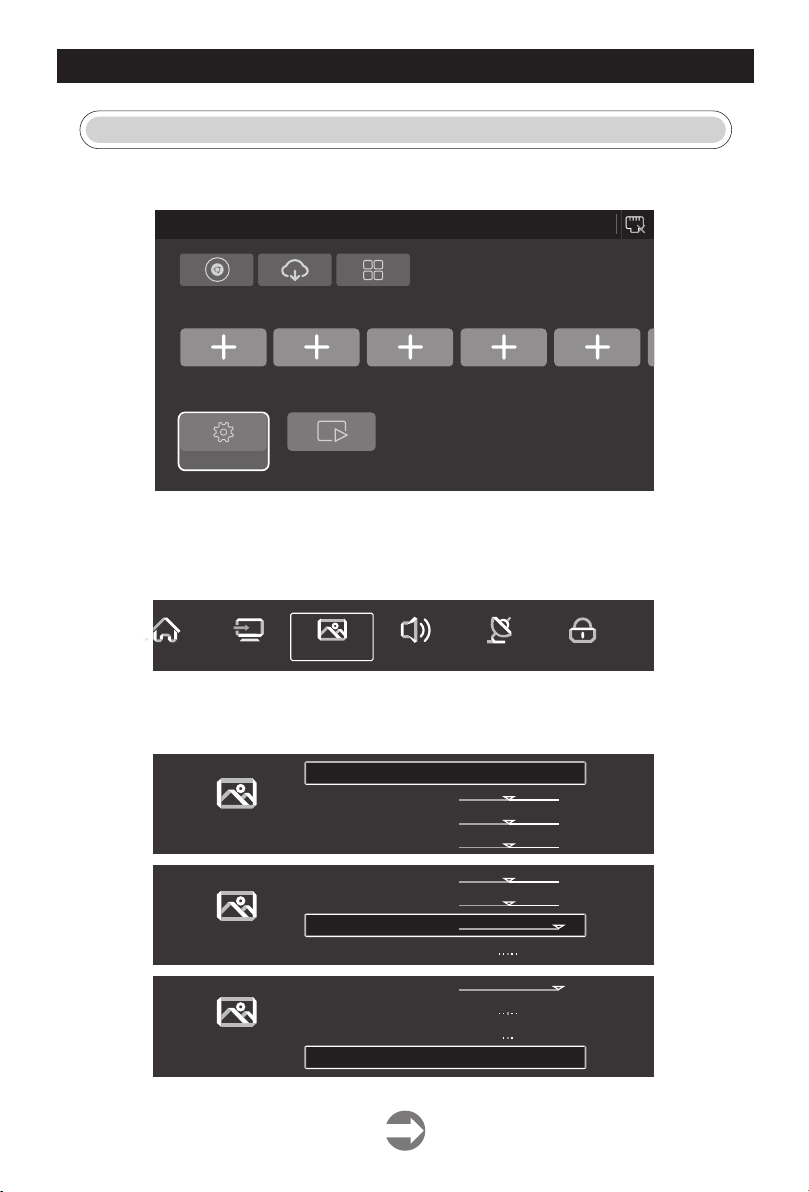
SETTINGS
Press【▼】/【▲】/【◄】/【►】button to enter Settings.
APP S
02:09
2018/1/1 Monday
AM
Brow ser Dow nload
LIK E A PPS
Use r adds U ser add s
OTH ERS
Set tings Fil e Explo rer
Appl icati ons
Use r adds Use r adds Use r adds
PICTURE
Press MENU button to enter main menu.
Press【◄】/【►】button to select Picture.
Press ENTER to enter setting.
Home
Home Source Picture Sound Channel System Lock Time
【▼】/【▲】
1. Press to select: Picture Mode/Contrast/Brightness/Color/Sharpness/Backlight/
Sou rce
Noise Reduction/Color Temp/More Settings.
2. Press【◄】/【►】to adjust or select.
Picture
Picture
Picture
Picture Mode
Contrast
Brightness
Color
Color
Sharpness
Backlight
Noise Reduction
Backlight
Noise Reduction
Color Temp
More Settings
>
>
>
50
50
50
50
50
Middle
Middle
Normal
>
100
>
100
>
>
>
15
Page 18

OPERTION OF FUNCTION MENU
Picture Mode
Press【▼】/【▲】button to select Picture Mode, then press【◄】/【►】button to select.
(Optional: Standard,Movie,Vivid,Soft,User).
Standard The default mode, to make users experience high-quality images under normal light.
Movie This mode is more suitable for watching movies.
Vivid Image colors more beautiful, more vivid picture.
Soft Produces s highly defined image in a soft lit room.
User User-defined picture settings.
Contrast / Brightness / Colour / Sharpness / Backlight
Press to select,and press to adjust.
【▼】/【▲】 【◄】/【►】
Contrast Adjust image contrast.
Brightness Adjust image brightness.
Color Adjust image color density.
Sharpness Adjust the image edge sharpness.
Backlight Adjust the screen backlight brightness.
Noise Reduction
Setting the option to eliminate image noise intensity.
Press to select Noise Reduction, and press to select.
【▼】/【▲】 【◄】/【►】
(Optional: Off,Low,Middle,High,Auto).
Color Temp
Adjust the overall color of the image.
Press【▼】/【▲】to select Colour Temperature. press【◄】/【►】to select.
(Optional:Cool, Normal, Warm).
Cool Produces a gentle blue-hued image.
Normal Produces a vivid image.
Warm Produces a red-hued image.
More Settings
Press to select【▼】/【▲】 More Settings
DLC
More Settings
DLC
Press to select , press to select Dark/Normal/Bright/Off.【▼】/【▲】 DLC 【◄】/【►】
16
Normal
>
>
Page 19
OPERTION OF FUNCTION MENU
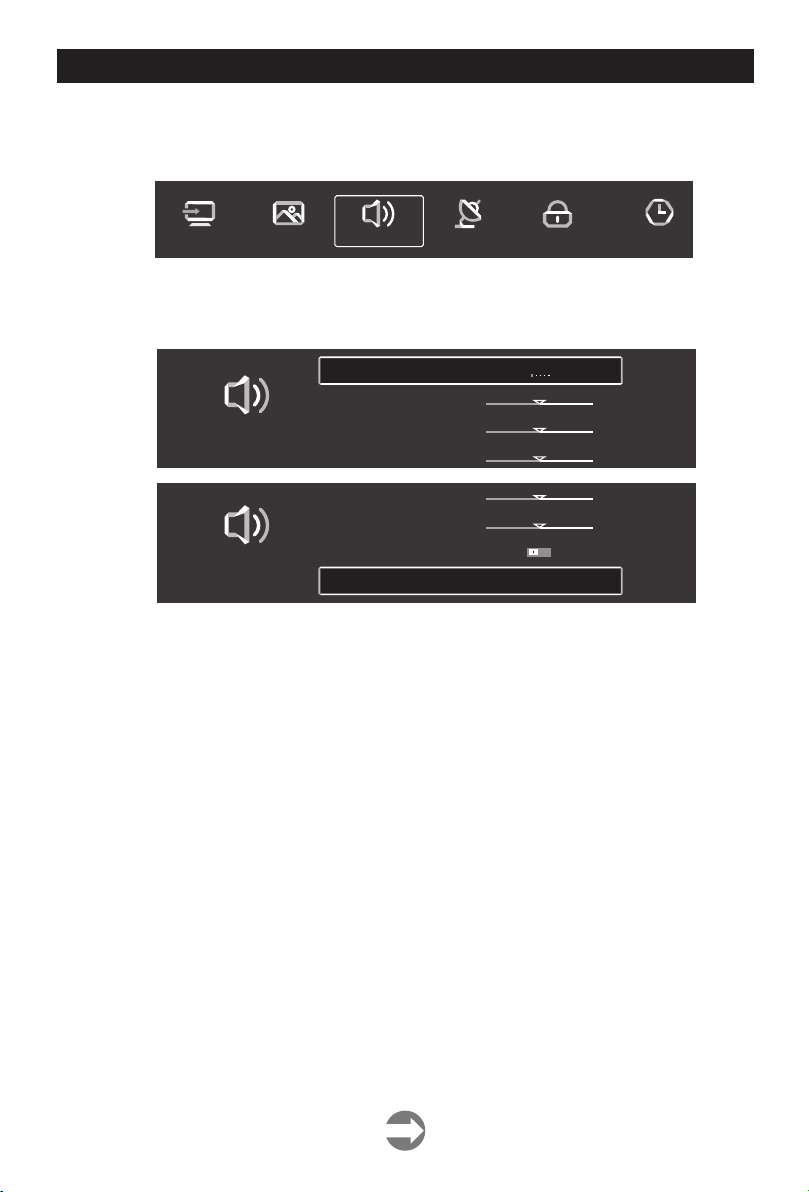
Sound
Press MENU button to display the main menu.
Press【◄】/【►】button to select Sound in the main menu.
Source Picture Sound Channel System Lock Time Settings
Press to select:Sound Mode/Bass/Treble/Balance/AVC/More settings.
【▼】/【▲】
Press ENTER /【◄】/【►】to select or adjust.
>
Standard
50
50
0
50
0
>
>
Sound
Sound
Sound Mode
Bass
Treble
Balance
Treble
Balance
AVC
More Settings
Sound Mode
【▼】/【▲】 【◄】/【►】
Press button to select Sound Mode, then press button to select.
(Optional: Standard, Music,Theater,News,User ).
Standard Produces a balanced sound in all environments.
Music Preserves the original sound.Good for musical programs.
Theater Enhances treble and bass for a rich sound experience.
News Enhanced voice.
User Select to customize picture settings.
Adjust the bass.
Bass
Treble Adjust the treble.
Balance Adjust the left and right channel output balance.
Press【▼】/【▲】button to select Balance, then press【◄】/【►】button to adjust.
AVC
Press【▼】/【▲】button to select AVC, then press【◄】/【►】button to choose ON/OFF.
After opening the AVC,Once the volume is set, regardless of any difference TV Version printed
on each channel, it can make the speaker volume remained stable.
17
Page 20
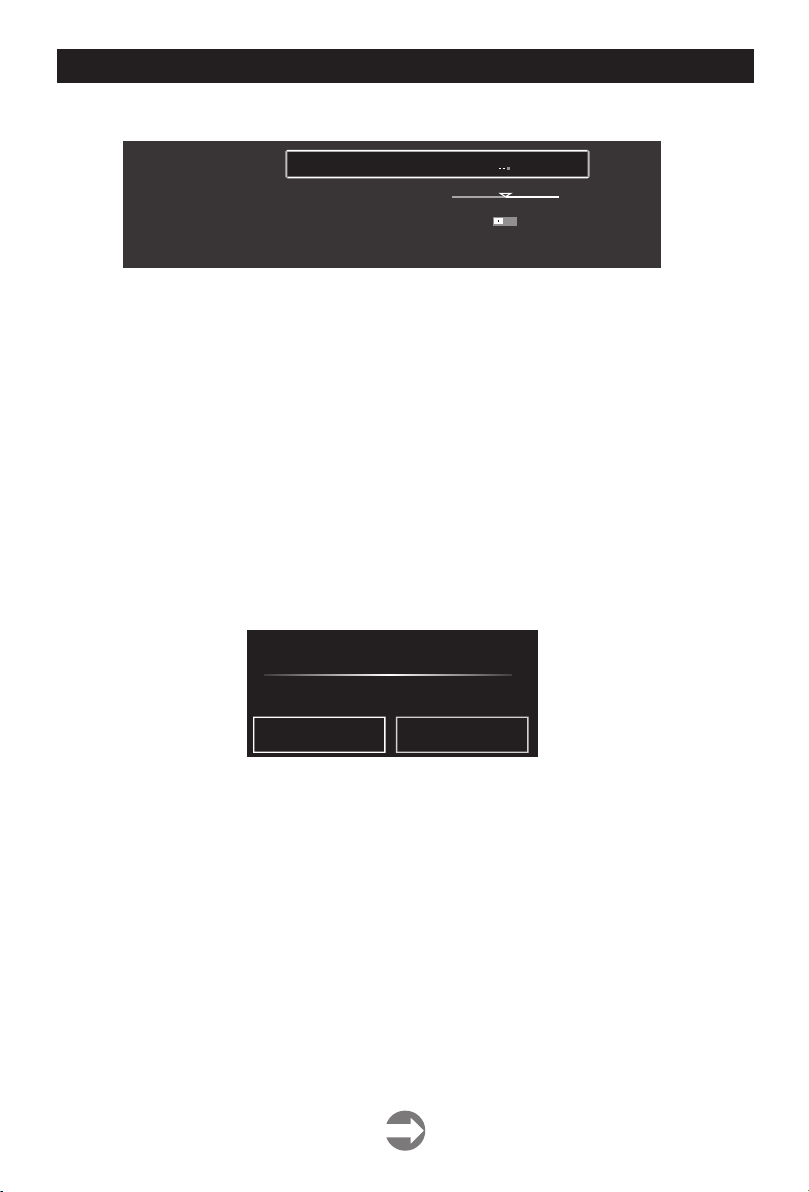
More Settings
OPERTION OF FUNCTION MENU
PCM
>
>
50
>
More Settings
SP DIF
SPDIF Delay
Surround
Asdio Only
SPDIF
Press【▼】/【▲】button to select SPDIF, then press【◄】/【►】button to choose
OFF / RAW / PCM.
SPDIF Delay
Press【▼】/【▲】button to select SPDIF Delay, then press【◄】/【►】button to adjust.
Surround
Achieve better surround sound effect.
Press【▼】/【▲】button to select Surround, then press【◄】/【►】button to choose ON/OFF.
Audio Only
After the opening screen is not displayed only plays sound
Press【▼】/【▲】button to select Audio Only, then press【►】button to choose ON/OFF.
Audio Only Notice
Are you sure to open Audio Only Mode?
Cancel
OK
18
Page 21
OPERTION OF FUNCTION MENU
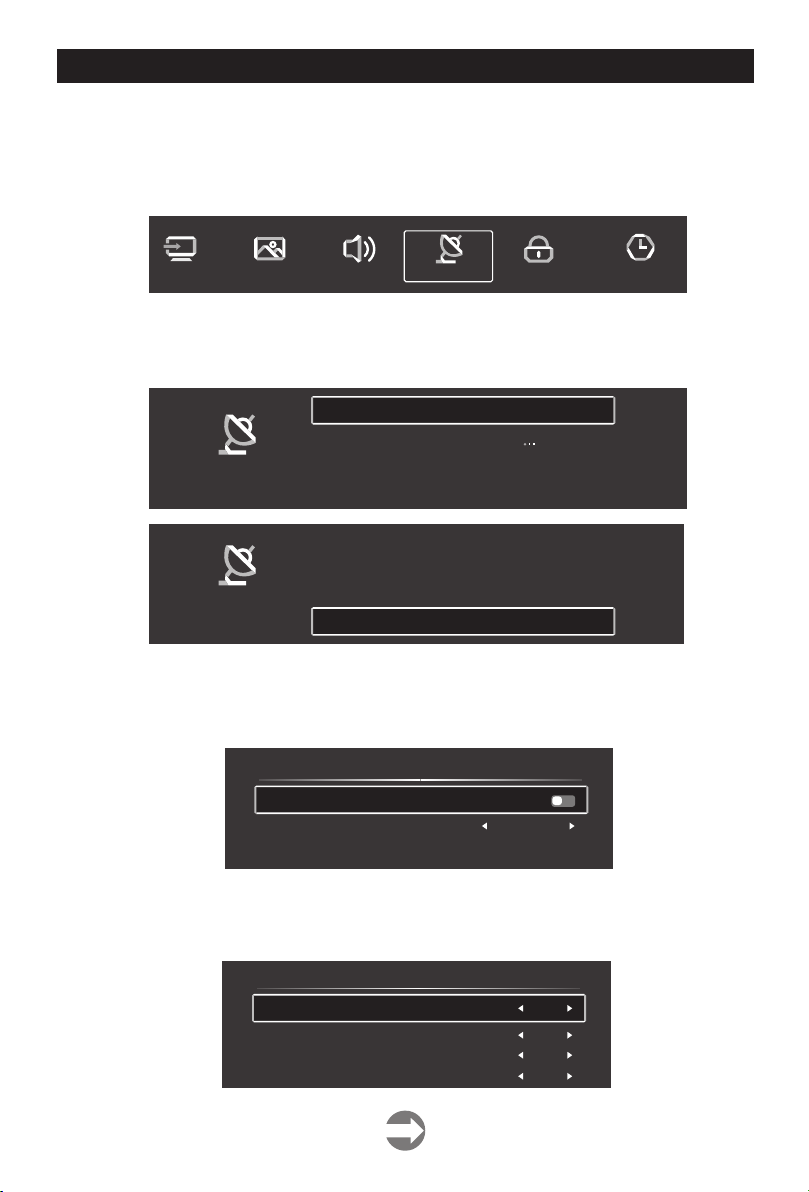
Channel
Press MENU button to display the main menu. Press【◄】/【►】button to select Channel
in the main menu.
Press【▼】/【▲】button to select. Press ENTER /【◄】/【►】to enter.
Source Picture Sound Channel System Lock Time Settings
Antenna Type-Air
Select the Air/Cable to tune.
Channel
Channel
Country
Antenna Type
Auto Scan
Analog Manual Scan
Auto Scan
Analog Manual Scan
Digital Manual Scan
Channel List
>
>
Air
>
>
>
>
>
>
>
Auto Scan
Press【▼】/【▲】button to select Auto Scan,press ENTER to start Auto Scan.
Auto Scan
LCN
Search Type
Start Scan
Analog Manual Scan
Press【▼】/【▲】button to select Analog Manual Scan press ENTER to start Scan.,
Anal og + Digi tal
Off
Analog Manual Scan
Start Scan
Color System
Sound System
Frequency(MHz)
Down
Auto
BG
-
42.0 0
+
19
Page 22
OPERTION OF FUNCTION MENU
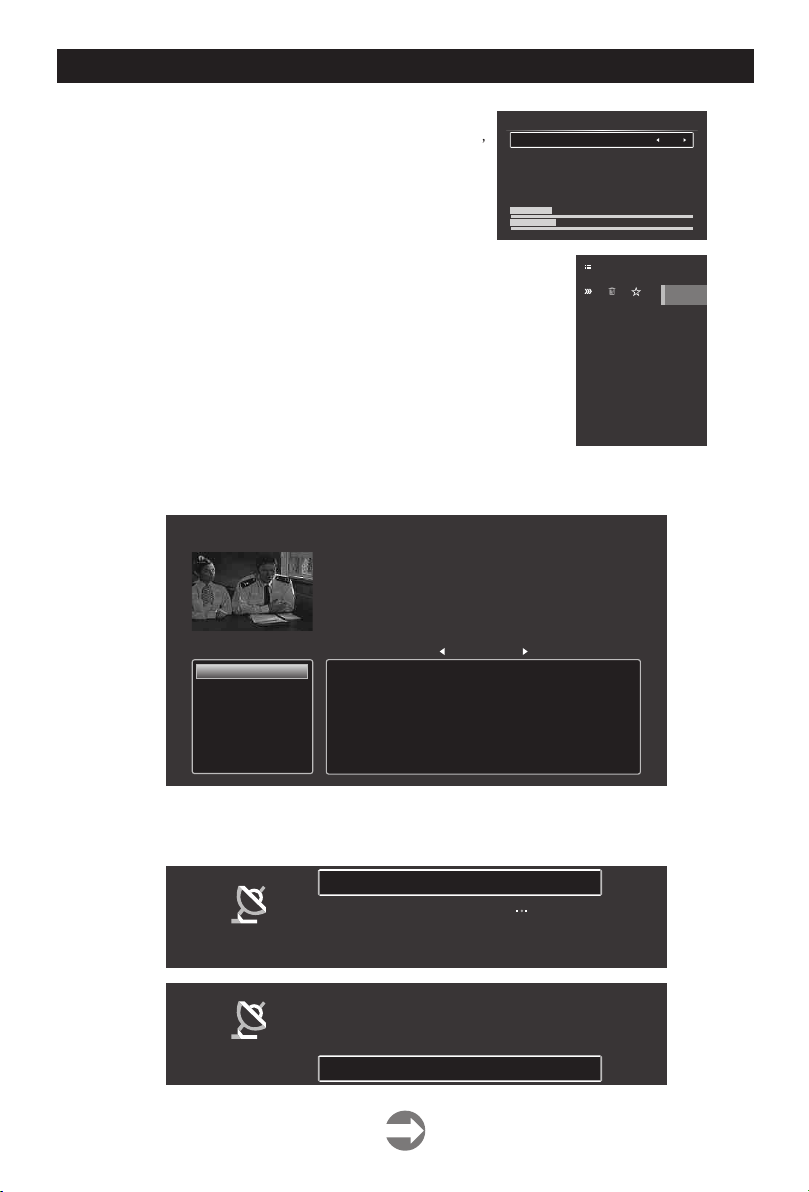
Digital Manual Scan
Press button to select Digital Manual Scan,
【▼】/【▲】
press ENTER to start Scan.
Digital Manual Scan
Frequency name
Start Scan
Frequency 602.00MHz
DTV
Radio
Data
Signal Lever:0%
Signal Quality:0%
37
Channel List
Press【▼】/【▲】button to select Channel List to list,
press MENU button edit the channel (Skip /Delete /Fav).
EPG
Press【▼】/【▲】button to select EPG.
EPG
Pie in the Sky
[Drama]
The Truth Will Out: The first series of the charming police drama. Henry is asked to search
for a missing policeman, but all he wants to do is get his restaurant ready! [S]
20 Drama
21 5 USA
26 ITVBe
27 ITV2+1
30 5STAR
37 QUEST
39 The Store
44 Channel 5+1
01:00AM - 02:00AM Pie in the Sky
02:00AM - 04:00AM Lovejoy Christmas Special
04:00AM - 07:00AM Home Shopping
07:00AM - 07:20AM Home Shopping
07:20AM - 07:50AM A Fine Romance
07:50AM - 08:50AM House of Cards
08:50AM - 09:50AM House of Cards
09:50AM - 10:50AM House of Cards
Antenna Type-Cable
Select the Air/Cable to tune.
2016/02/20 12:19:10AM
2016/02/20
Edit
Channel List
Skip Delete Fav
2016/02/20
01:00AM ~ 02:00AM
5-1
Channel
Channel
Country
Antenna Type
Auto Scan
Analog Manual Scan
Auto Scan
Analog Manual Scan
Digital Manual Scan
Channel List
20
>
Cabl e
>
>
>
>
>
>
>
>
Page 23
OPERTION OF FUNCTION MENU
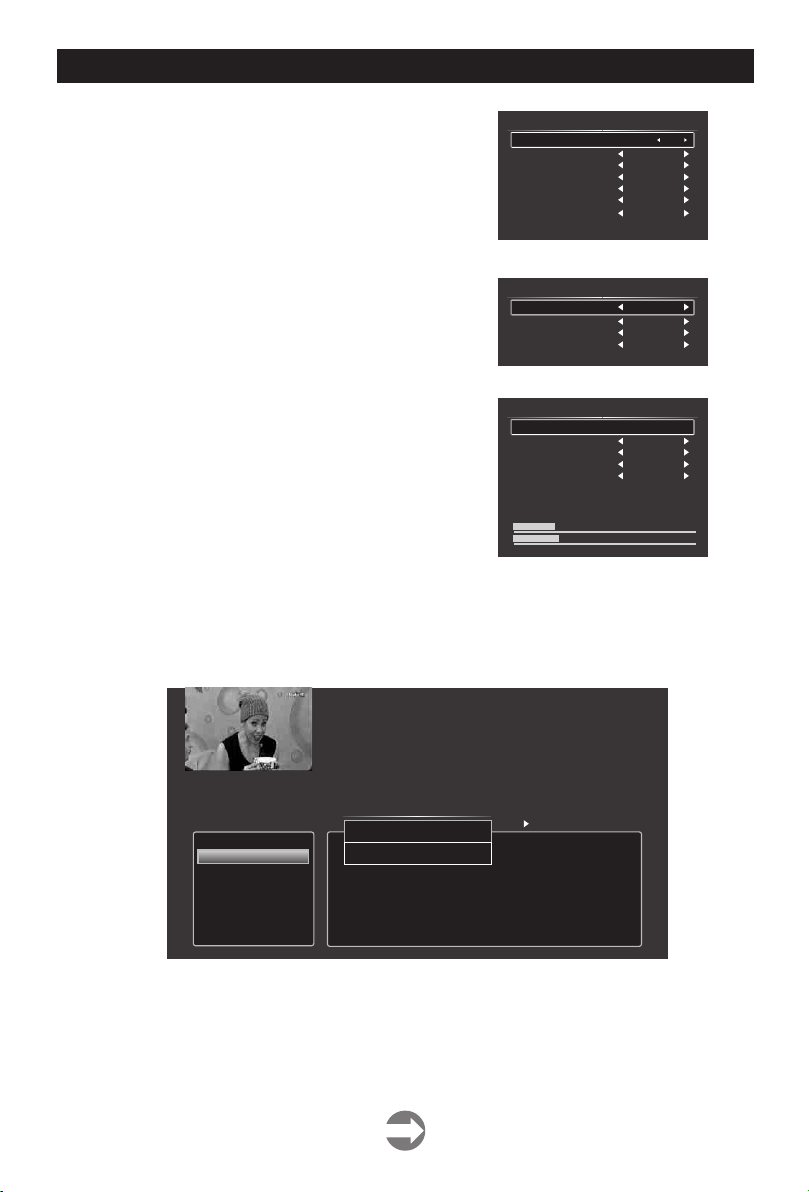
Auto Scan
Press【▼】/【▲】button to select Auto Scan,
press ENTER to start Auto Scan.
Analog Manual Scan
Press【▼】/【▲】button to select Analog
Manual Scan, press ENTER to start Scan.
Digital Manual Scan
Press【▼】/【▲】button to select Digital Manual
Scan, press ENTER to start Scan.
Channel List
Press【▼】/【▲】button to select Channel List to
list, press MENU button edit the channel
(Skip /Delete /Fav).
EPG
Press【▼】/【▲】button to select EPG.
LCN
Scarch Type
Scan Type
Network ID
Frequency
Symbol Rate
Moduation
Start Scan
Analog Manual Scan
Start Scan
Color System
Sound System
Frequency (MHz)
Digital Manual Scan
Start Scan
Frequency
Network ID
Symbol Rate
Modulation
DTV
Radio
Data
Signal Lever:0%
Signal Quality:0%
Auto Scan
Anal og + Digi tal
Netw ork
Auto
Auto
Auto
MODLI LATION Au to
Down
Auto
BG
4200
113000
Auto
Auto
MODL ILATION Au to
37
EPG
1 arte HD
2 Bibel TV HD
3 n-tv HD
4 N24 HD
5 Nickelodeon HD
6 Spare TS07
7 2M
8 3sat
2015/12/19 12:50:17PM
Alpha Jugend
[News and Factual]
Glaubenskurs. Jugendliche haben viele Fragen Uner Gott und die Welt. Auch uber
den christlichen Glauben. Eine 12-teilige Entdeckungsreise fur Sinnsucherinnen und
Sinnsucher.
Glaubenskuis. Jugendliche haben viele Fragen uber Gott und die Welt. Auch uber
den kungsreise fur Sinnsuchernnen und
01:00AM - 02:00AM Pie in the Sky
02:00AM - 04:00AM Lovejoy Christma
05:00PM - 05:30PM Live from Studio B
05:30PM - 06:00PM Tiefsehtauchen mit Jens Bottcher
06:00PM - 06:30PM Winterfest - Konzerte der Liberty University
06:30PM - 07:00PM Alpha Jugend
07:00PM - 07:15PM Bibel TV Emmaus
07:15PM - 08:55PM Die Bibel - Samson und Delila
EPG
Go To
Book
2016/02/19
2015/12/19
06:30PM ~ 07:00PM
21
Page 24
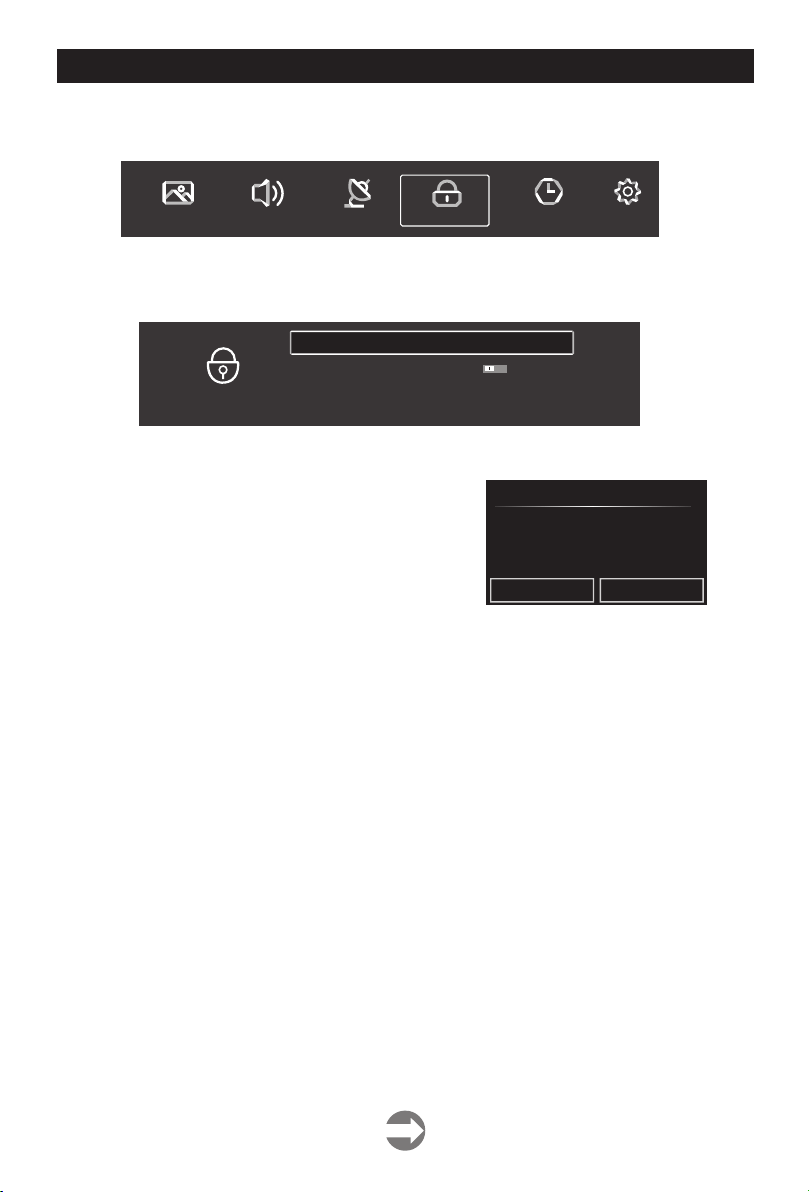
OPERTION OF FUNCTION MENU
System Lock
Press MENU button to display the main menu. Press【◄】/【►】button to select System Lock.
Picture Sound Channel
System Lock Time Settings
Press【▼ 】/【▲】button to select Change Password/System Lock.
Press ENTER /【◄】/【►】to enter.
Change PassWord
System Lock
System Lock
Change Password
Press【▼】/【▲】button to select Change Password.
System Lock
Old Password
New Password
Confirm Password
Press【▼】/【▲】button to select System Lock.
Common
>
Change Password
Cancel
OK
Audio Only Notice
22
Page 25
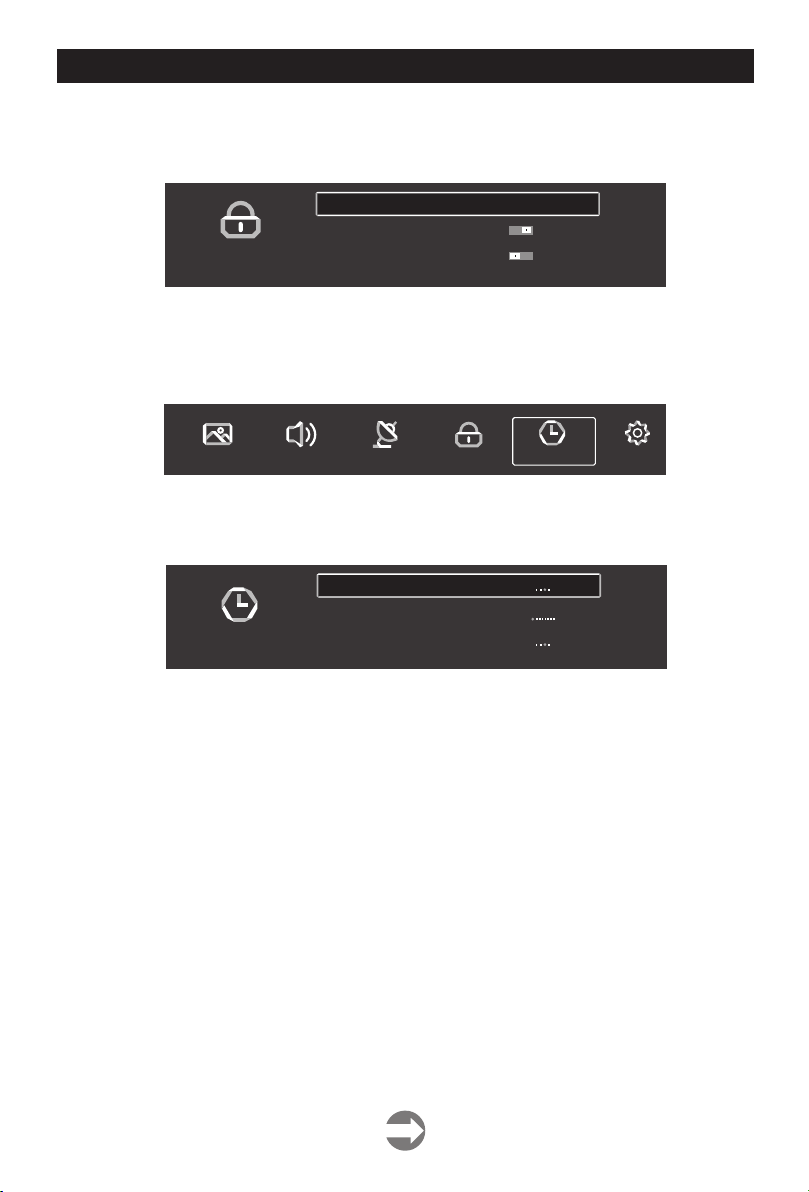
OPERTION OF FUNCTION MENU
Keypad Lock
Press【▼】/【▲】button to lock the keypad.
(NOTE: This fuction is avalable when the System Lock is on.)
System Lock
Change PassWord
System Lock
Keypad Lock
>
Time Setting
Press MENU button to display the main menu.
Press / button to select Time Setting in the main menu.
【◄】 【►】
Press【▼】/【▲】button to select:
Press【 】/【 】to enter.
◄ ►
Picture CommonSystem Lock Time SettingsSound Channel
OSD Timer/Sleep Timer/Autostandby Timer.
OSD Timer
Sleep Timer
Time Settings
Autostandby Timer
15s ec
Off
4ho ur
>
>
>
>
>
>
OSD Timer
【▼】/【▲】 OSD Timer, 【◄】/【►】
Press button to select Press to select.
(Optional: off,5sec,15sec,30sec).
Sleep Timer
Press【▼】/【▲】button to select Sleep Timer, Press【◄】/【►】to select.
(Optional: off,15min,30min,45min,60min,90min,120min,240min).
Autostandby Timer
Press【▼】/【▲】button to select Autostandby Timer, (Optional: off,3hour,4hour,5hour).
23
Page 26
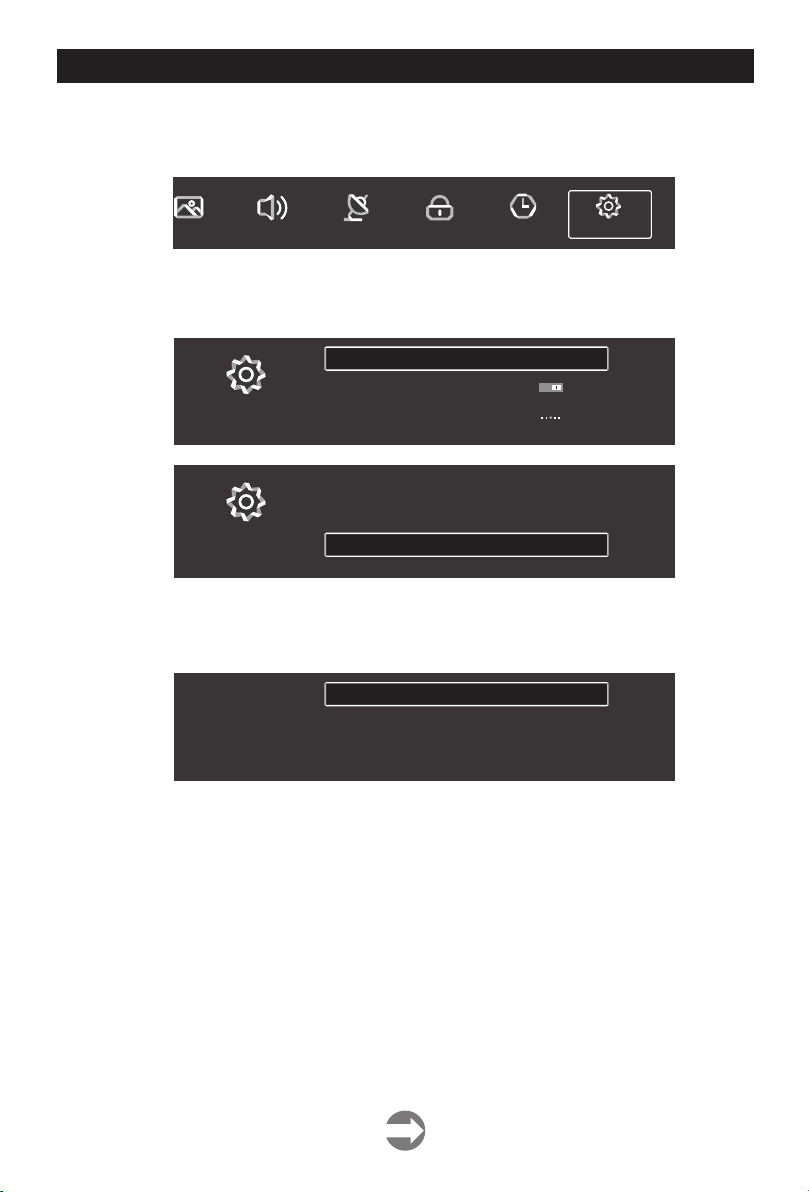
OPERTION OF FUNCTION MENU
Common
Press MENU button to display the main menu.
【◄】 【►】
Press / button to select Common in the main menu,
Picture Sound Channel CommonSystem Lock Time Settings
Press【▼】/【▲】button to select
Press ENTER /【 】/【 】to enter.
◄ ►
Common
Common
: Blue Screen / HDMI CEC / Menu Reset and so on.
PVR Setting
Blue Screen
Teletext
Audio language 1st
Audio Language 2nd
Subtitle Language 1st
Subtitle Language 2nd
HDMI CEC
Menu Reset
PVR Setting
Press【▼】/【▲】button to select PVR Setting.
Press【◄】/【►】to select Disk/Record List.
PVR USB Selector
Record List
PVR Setting
Blue Screen
Press【▼】/【▲】button to select Blue Screen.
Press【◄】/【►】to select ON/OFF.
>
West
>
>
>
>
>
>
>
>
>
>
>
HDMI CEC
Press【▼】/【▲】button to select HDMI CEC.
Press【◄】/【►】to select ON/OFF.
Menu Reset
Press【▼】/【▲】button to select Menu Reset.
Press【◄】/【►】to select Cancel/ok to reset the previous setting.
24
Page 27
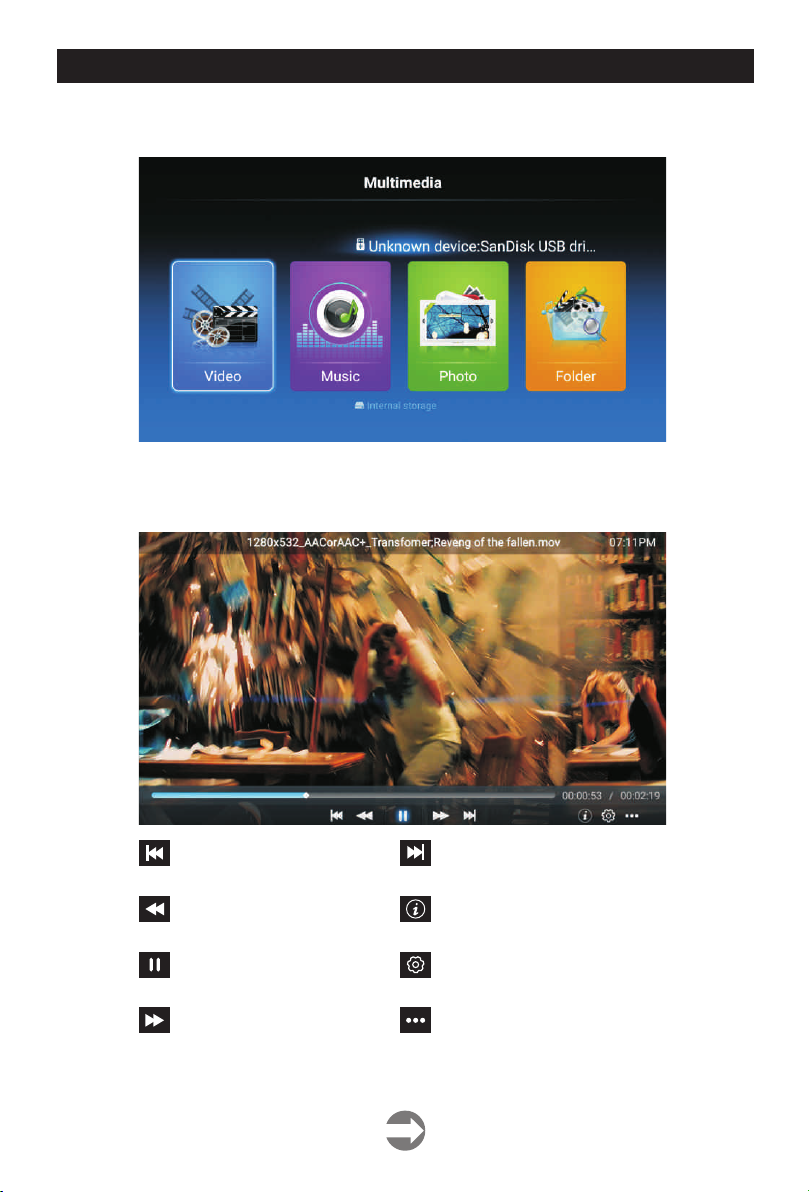
OPERTION OF FUNCTION MENU
Media
Press HOME button to enter Home Page, and press ▼ / ▲ button to select File Explorer.
Video
Press to select video. ◄ / ►
Press to play previous movie.
Press to play fast backward.
Press to stop/play the movie.
Press to play fast forward.
Press to play next movie.
Press to view the information of the movie.
(Resolution/Size/Deration/Bittrate)
Press to set the Audio Track/Select Subtitle/
Region Language/Play Mode/Aspect Ratio.
Press to select the movie to play.
25
Page 28
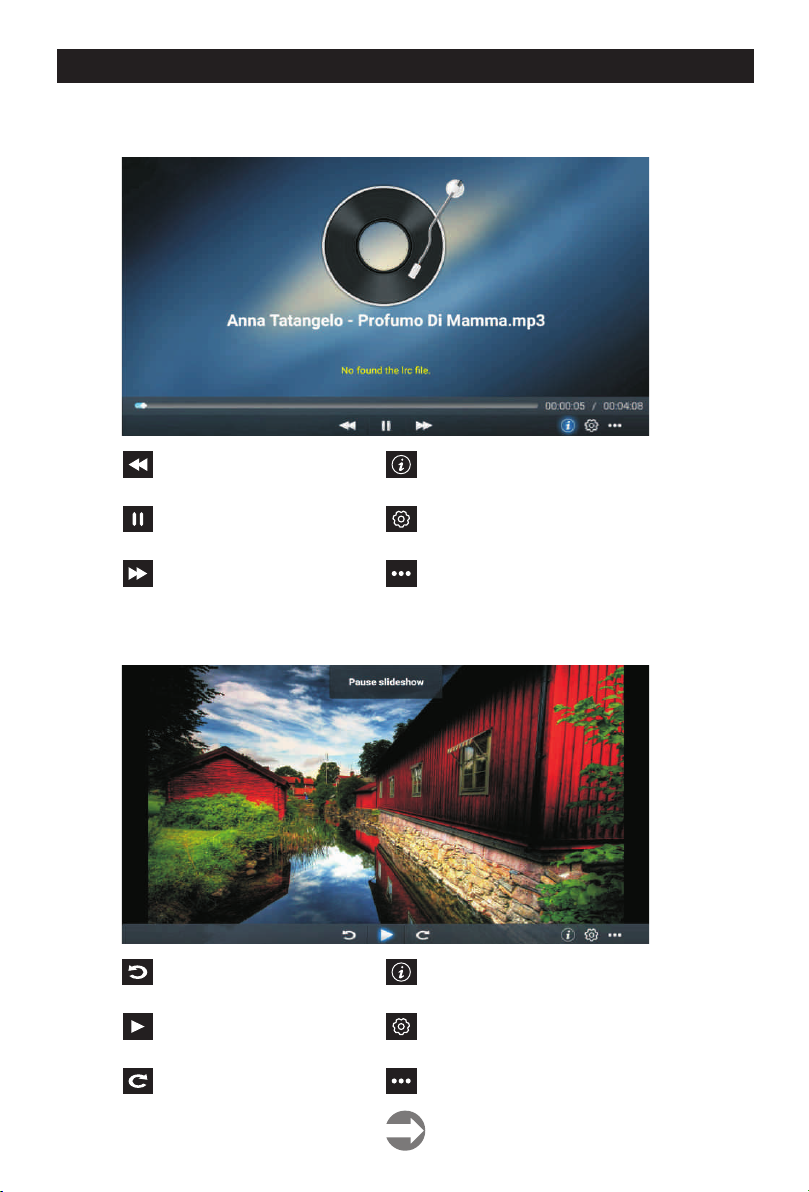
Music
◄ / ► Press to select music.
OPERTION OF FUNCTION MENU
Press to play fast backward.
Press to stop/play the music.
Press to play fast forward.
Photo
◄ / ► Press to select photo.
Press to rotate anticlockwise
the picture.
Press to stop/play the picture.
Press to rotate clockwise the
picture.
Press to view the information of themusic.
(Mine Type / Size / Bittrate)
Press to set the Play Mode(Repeat All /
Repeat One / Random / None).
Press to select the music to play.
Press to view the information of the picture.
(Size/Resolution)
Press to set the Play Mode(Aspect Ratio/
Playback duration/Play Mode).
Press to select the photo to play.
26
Page 29
TROUBLE SHOOTING GUIDE
Many apparent malfunctions are caused slight misadjustments of the regular controls of your unit or equally simple
causes. If any difficulty arises through normal use of your unit, check the list of common problems in the list below.
If the problem persists, unplug your unit and contact your dealer.
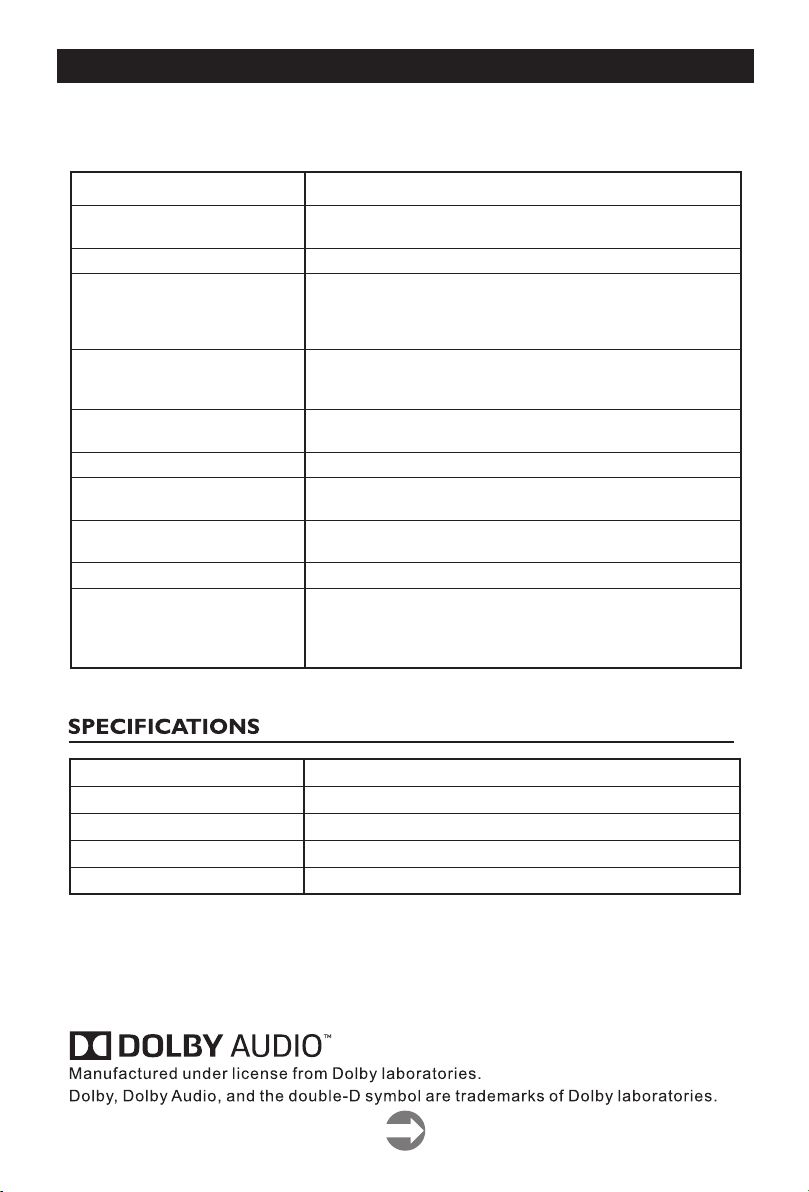
SYMPTOM METHODS OF CHECKING OR ADJUSTING
No picture or sound
Picture normal but no sound
Remote control not working
Cannot receive any TV signal
No program signals output from
external source
Contrast and brightness problems
Intermittent poor contrast and
colour fading on all channels
Dotted lines or stripes appear on
screen
Snow on screen
Double images or 'ghosting'
Check the AC plug is in the socket. Check house circuit breaker
is in the ON position.
Check that the volume is not at its minimum setting or on MUTE.
• Check that TV set power is ON.
• Check batteries are operational and inserted correctly.
• Make sure infrared receiving window on TV is not exposed to
strong lighting or blocked in any way.
• Ensure SOURCE switch is set to TV.
• Check aerial location and connection.
• Re-check your tuning method.
Check SOURCE button to make sure it is in the correct position
for reception.
Make necessary adjustments to relevant settings.
Check aerial positioning
There may be Interference from another electrical product.
Move appliance if it persists.
Check aerial for broken circuit, loose connection or any visible damage.
Check aerial location and direction - strong winds may cause it to
move. Also check whether mountains or tall buildings may be the
problem. Minor adjustment of the direction of your antenna
should keep the ghosting to a minimum.
Note: External rooftop/antenna adjustment should be left to a suitably qualified person.
Aspect Ra ti o
System
Base impe da nce
Receivi ng TV Band
AC Su pply Volta ge
16 : 9
PAL/SEC AM B G / DK / I , DVB -T /T 2
75 Ω ( Un b al a nc e )
Al l C ha n ne l s Re c ei vea b le
10 0 -2 4 0V ~ 5 0/ 6 0H z
Note: Part of the design and the specification may be changed without prior notice.
INFRA-RED REMOTE CO NTROL
Fea ture s: F ul l fu nc ti on r em ot e co nt rol
Effective Distance Powe r : 8 me tres
Power Supply: DC 3V ( Two bat te ri es , size AAA, recommend use alkaline type ba tt er ie s)
27
Page 30

Page 31
Model:43DLE488
Android™OS
Page 32

Page 33
BEZBEDNOSNE INFORMACIJE
VAŽNA BEZBEDNOSNA UPUTSTVA
KAKO BISTE SPREČILI POŽAR ILI ELEKTRIČNI UDAR NEMOJTE KORISTITI PRODUŽNI KABL,
DUPLI UTIKAČ ILI DRUGE DODATKE NA UTIČNICI OSIM ONIH KOJI BI MOGLI DA SPREČE
IZAZIVANJE STRUJNOG UDARA.KAKO BISTE SPREČILI POŽAR ILI ELEKTRIČNI UDAR NE
IZLAŽITE OVAJ UREĐAJ VLAZI ILI KIŠI.
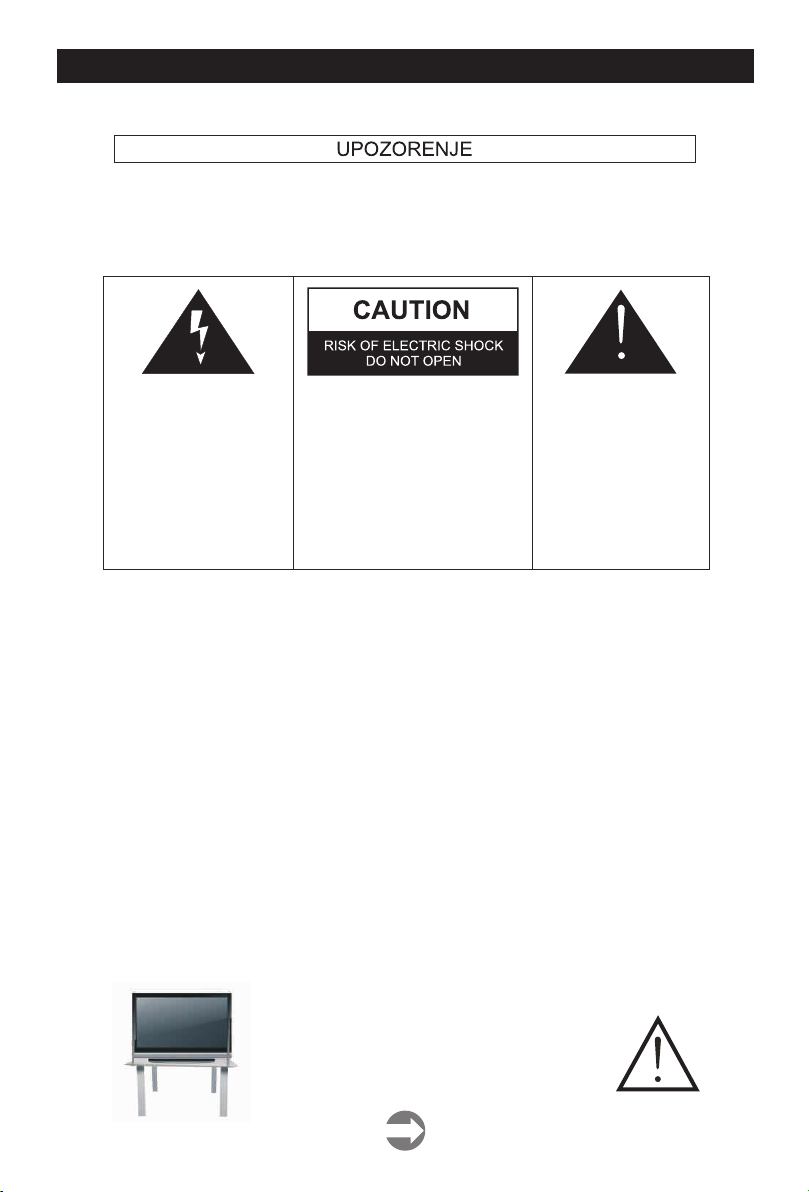
Ovaj simbol munje u
jednakostraničnom trouglu
upozorava korisnike na
prisustvo opasnog i ne
izolovanog napona unutar
kućišta proizvoda koji može
biti dovoljan da stvori rizik
STRUJNOG UDARA
Upozorenje: Da biste smanjili rizik
od strujnog udara nemojte skidati
pok- lopac (ili zadnju stranu).
Unutra nema delova koje korisnik
može sam da zameni. Za
obavljanje servisa zatražite pomoć
kvalifikovanog osoblja
Znak uzvika unutar jedna
- kostraničnog trougla u
ovom uputstvu upozorava
korisnika na prisustvo
važnih instruk- cija za rad
i održavanje (servisiranje )
uređaja.
Ovaj aparat ne treba izlagati vodi, a predmete ispunjene tečnošću poput vaza ne treba da budu
postavljeni na i oko uređaja.
OPREZ
• Postoji opasnost od eksplozije ako se baterija nepropisno zameni.
• Zamenite postojeću sa samo odgovarajućom vrstom baterije.
• Nemojte izlagati bateriju direktnoj sunčevoj svetlosti ili bilo kojem drugom izvoru toplote.
• Obezbedite pravilno odlaganje istrošenih baterija.
• Ostavite lako dostupnim mesto gde je utikač ili nastavak za prekid napajanja.
• Da biste smanjili rizik od strujnog udara, ne obavljajte bilo kakvo servisiranje osim onih koje se
pominju u ovom uputstvu.
VAŽNE INFORMACIJE
Ako televizor nije postavljen na dovoljno stabilnom mestu, može postojati potencijalna opasnost od
pada.
Mnoge povrede, posebno dečije, mogu se izbeći primenom jednostavnih mera opreza kao što su:
• Korišćenje elemenata ili stalaka koje je preporučio proizvođač televizora.
• Korišćenje samo onog nameštaja koji može sigurno izdržati uređaj.
• Obezbeđivanje uređaja tako da ne prelazi ivicu nameštaja.
• Nemojte postavljati TV-a na visok nameštaj (na primer, ormare ili police) bez predhodnog
pričvršćivanja kako nameštaja tako i uređaja na odgovarajuću površinu.
• Ne pokrivajte televizora krpom i ne stavljajte drugi materijal između televizora i nameštaja na
kom stoji.
Sigurna instalacija
Koristite pojas za fiksiranje televizora kako bi
sprečili uređaj od pada unapred.
1
Page 34

BEZBEDNOSNE INFORMACIJE
1. Pročitajte uputstva – Sve napomene o sigurnosti i načinu rada treba pročitati pre
uključivanjaaparata.
2. Sačuvajte uputstva – Uputstva za sigurnost i uputstvo za upotrebu treba da se sačuvaju za
buduće potrebe.
3. Imajte u vidu Upozorenja – Treba se pridržavati svih upozorenja na aparatu i svih uputstava
za upotrebu.
4. Pratite uputstva – Treba pratiti sva uputstva.
5. Voda i vlažnost – Aparat ne treba koristiti u blizini vode.
6. Nosač i postolje – Aparat treba koristiti samo sa nosačem ili postoljem koje preporuč
proizvođač.
7. Montaža na zid ili plafon – Aparat treba da se montira na zid ili plafon samo po preporuci
proizvođača
8. Ventilacija – Aparat treba da bude dobro postavljen, tako da lokacija ili pozicija aparata ne
ometaju njegovo provetravanje.
9. Toplota – Ovaj aparat treba postaviti dalje od izvora toplote kao što su radijatori i peći.
10. Napajanje – Aparat treba povezati samo na napajanje kao što je opisano u uputstvima
za upotrebu ili onako kako je naznačeno na uređaju.
11. Uzemljenje ili polarizacija – Treba preduzeti mere predostrožnosti.
12. Zaštita kabla za napajanje – Naponski kabl treba da bude usmeren tako da je malo
verovatno da se može gaziti, priklještiti stvarima na njemu i njegovom kraju.
13. Čišćenje – Aparat bi trebalo čistiti samo po preporuci proizvođača
14. Napajanje – spoljne antene treba da se nalazi daleko od dalekovoda.
15. Uzemljenje – spoljne antene – Ako je spoljna antena povezana na prijemnik, antenski
sistem mora biti uzemljen kako bi se obezbedila zaštita od naponskog i izvornog statičkog
elektriciteta.
16. Kada ga dugo ne koristite – napajanje uređaja trebalo bi da bude isključeno iz utičnice
kada se ne koristi duži vremenski period.
17. Upad predmeta i tečnosti – Treba paziti da predmeti ne upadnu, a tečnost ne prospe u
kućište kroz otvore.
18. Kada je potreban servis – Aparat treba da servisira kvalifikovano servisno osoblje kada
su:
• Kabal za struju ili utikač oštećeni.
• Kada predmeti upadnu ili kada se tečnost prolije po uređaju.
• Kada je aparat izložen kiši
• Kada aparat ne radi normalno ili pokazuje značajnu promenu u radu.
19. Ventilacioni otvori ne bi trebalo da budu pokriveni predmetima, kao sto su novine, tkanine,
zavese itd.
20. Izvore otvorenog plamena, kao sto su upaljene sveće, ne bi trebalo da stoje na aparatu.
21. Aparat će biti povezan sa mrežnom utičnicom sa zaštitnim uzemljenjem. Utičnica ili
nastavak za prekid napajanja trebaju da budu lako dostupni.
uje
2
Page 35
BEZBEDNOSNE INFORMACIJE
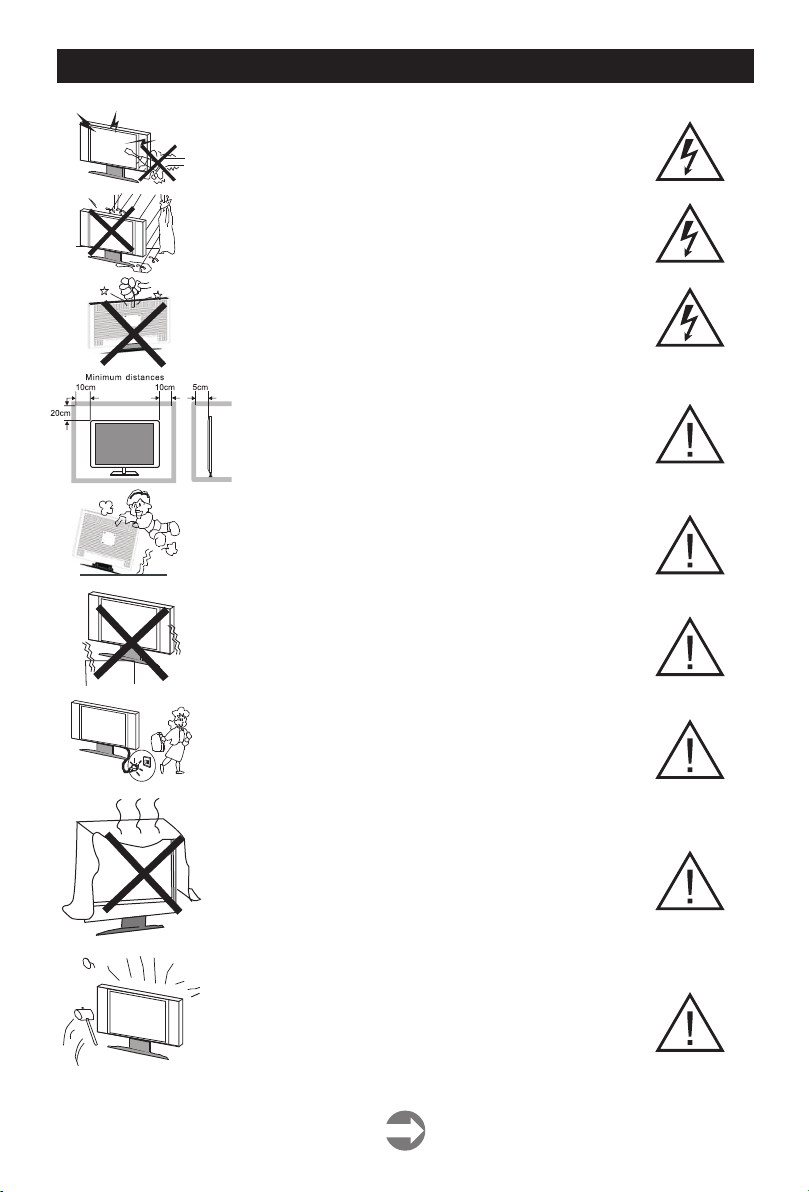
Upozorenje
Visok napon se koristi u napajanju ovog proizvoda. Ne uklanjajte
zadnjipoklopac. Obratite se kvalifikovanoj osobi za obavljanje
servisa.
Upozorenje
Da biste sprečili požar ili strujni udar, nemojte izlagati uređaj kiši
ili vlazi.
Upozorenje
Nemojte ispuštati i gurati predmete u kućište TV-a ili u otvore.
Nikadanemojte prosipati tečnost na TV prijemnik.
Oprez
Ako televizor treba da se ugradi u zatvoreni odeljak ili
na sličan način, morate se pridržavati dela uputstva o
minimalnim udaljenostima. Toplota može smanjiti životni
vek televizora, a takođe može biti povećan rizik od požara.
Oprez
Nikada nemojte da stanete ili se oslonite ili gurnete uređaj ili
stalak na kom se uređaj nalazi. Treba obratiti posebnu pažnju
na decu.
Oprez
Ne stavljajte glavnu jedinicu na nestabilno postolje, policu ili sto.
Usledpada može doći do ozbiljne povrede lica ili štete na
televizoru.
Oprez
Kada se proizvod ne koristi duži vremenski period, preporučljivo
je daisključite mrežni kabl iz utičnice.
Oprez
Izbegavajte izlaganje glavne jedinice direktnom suncu i drugim
izvorima toplote. Ne postavljajte televizor na druge proizvode
koji emituju toplotu. Na primer: Video uređaj, audio pojačala.
Ne blokiraj otvore za ventilaciju u zadnjem poklopcu. Ventilacija
je od suštinskog značaja za sprečavanje električnih kvarova.
Ne stavljajte kabl za napajanje ispod glavne jedinice.
Oprez
Panel (ekran) koji se koristi u ovom proizvodu napravljen je od
stakla. Može se slomiti padom uređaja ili nasilnim udarcem.
Pojedinci trebaoprezno da rade sa razbijenim staklom ekrana.
3
Page 36

SADRŽAJ
BEZBEDNOSNE INFORMACIJE..........................................................................................................1 - 3
OPIS KONTROLNIH TASTERA I KONEKTORA...................................................................................5 - 6
DALJINSKI UPRAVLJAČ...................................................................................................................... 7 - 8
KONEKCIJE................................................................................................................................................9
RAD MENIJA FUNKCIJA I GLAVNOG MENIJA...............................................................................10 - 26
VODIČ ZA REŠAVANJE PROBLEMA......................................................................................................27
SPECIFIKACIJA........................................................................................................................................27
4
Page 37
OPIS KONTROLNIH TASTERA I KONEKTORA
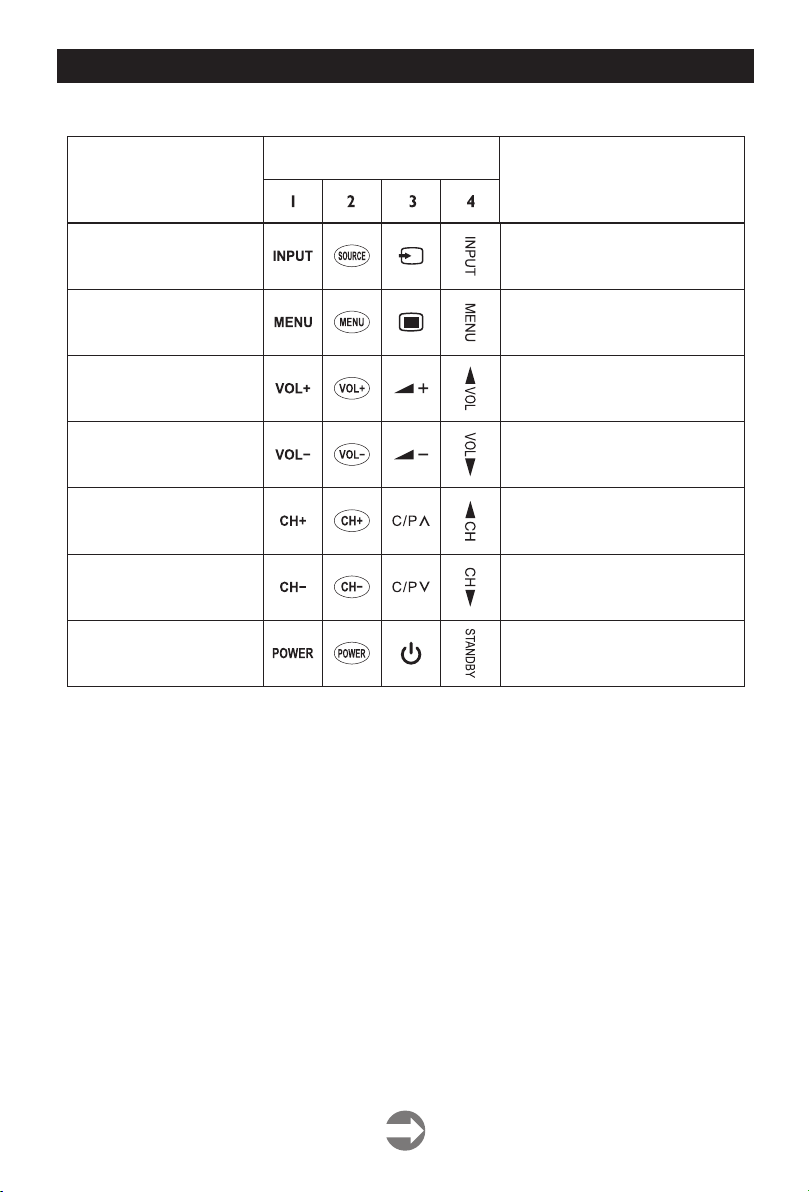
NAZIV TASTERA
NAZIV TASTERA
SOURCE BUTTON
MENU BUTTON
VRSTA TASTERA
INSTRUKCIJE ZA UPOTREBU
PRIKAZIVANJE GLAVNOG MENIJA
ZA IZBOR FUNKCIJA TV UREĐAJA
(DIGITALNI, ANTENSKI, SMART,
OPCIJA, MEDIA - USB, HDMI
PRIKAZIVANJE MENIJA TV
UREĐAJA
VOLUME UP BUTTON
VOLUME DOWN BUTTON
PROGRAM UP BUTTON
PROGRAM DOWN BUTTON
STANDBY BUTTON
POJAČAVANJE ZVUKA
UTIŠAVANJE ZVUKA
PREBACIVANJE NA VIŠI KANAL
PREBACIVANJE NA NIŽI KANAL
UKLJUČIVANJE/ISKLJUČIVANJE
TV UREĐAJA DOK JE U REŽIMU
MIROVANJA
NAPOMENA
1.Kontrolni tasteri su prilagođeni za upotrebu na našim TV modelima. Molimo da ih koristite u skladu
sa namenom.
2.Broj i raspored kontrolnih tastera može biti drugačiji u zavisnosti od modela. Molimo da ih koristite
u skladu sa Vašim uređajem i njihovom namenom.
5
Page 38
OPIS KONTROLNIH TASTERA I KONEKTORA
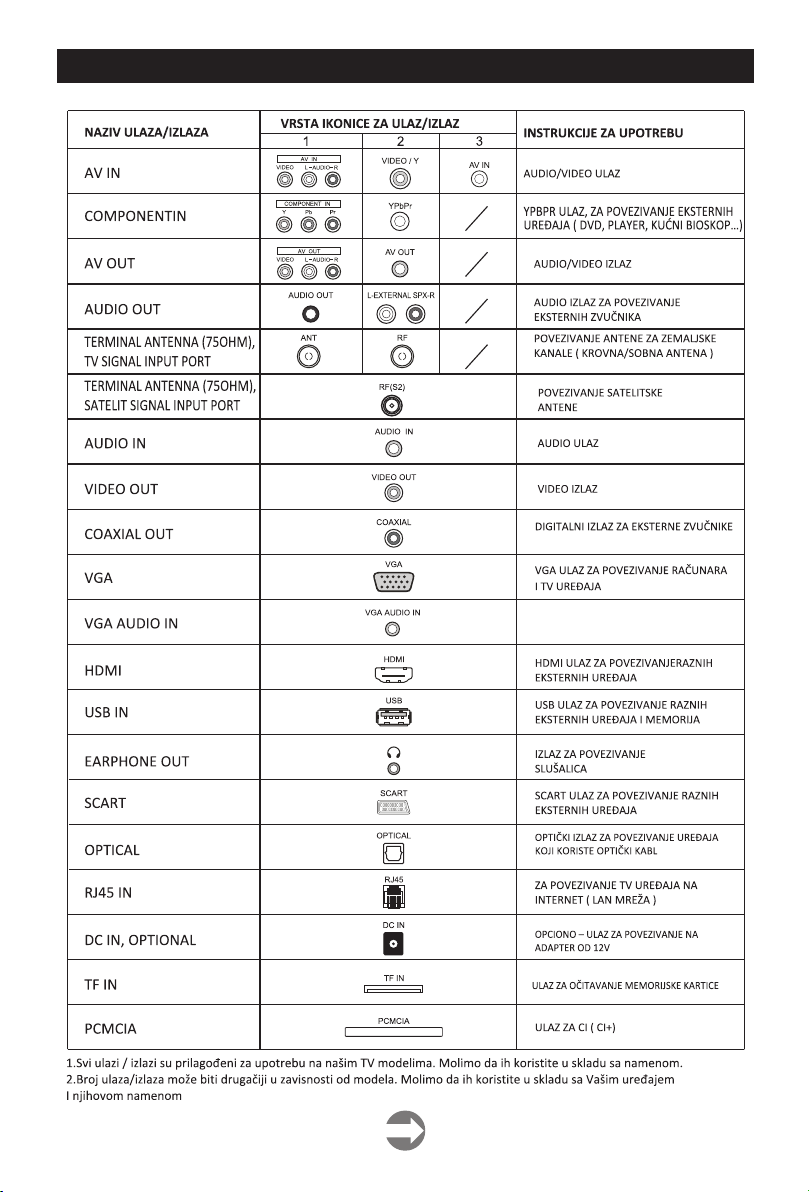
VGA ULAZ ZA AUDIO POVEZIVANJE
6
Page 39
DALJINSKI UPRAVLJAČ
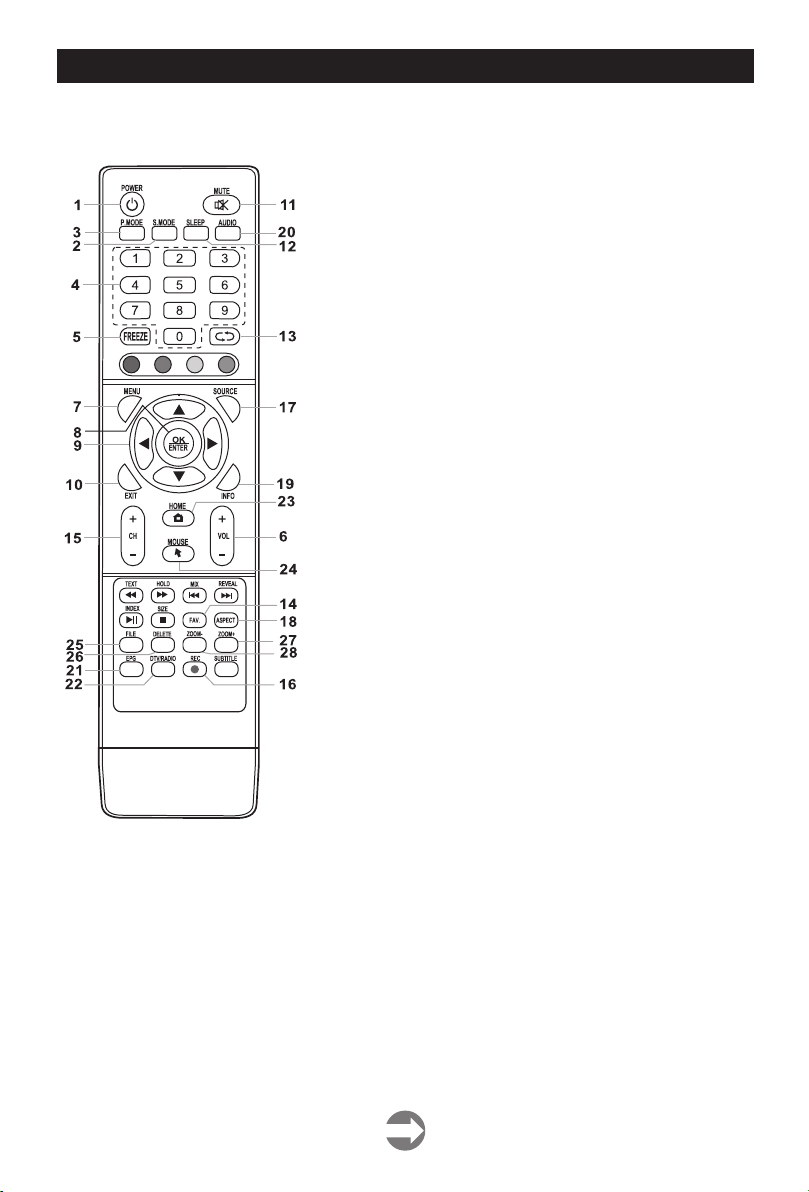
Prilikom upotrebe daljinskog upravljača, usmerite ga ka prijemniku signala daljinskog upravljača.
Predmeti koji se nađu između daljinskog upravljača i prijemnika signala mogu da onemoguće
normalno funkcionisanje.
1. POWER TASTER
uključivanje/isključivanje TV uređaja
2. S.MODE TASTER
taster za podešavanje zvučnih efekata
3. P.MODE TASTER
taster za odabir efekata slike
4. NUMBER (NUMERIČKI) TASTERI
direktno biranje kanala ili unošenje lozinke
5. FREEZE (ZAMRZAVANJE) TASTER
zamrzavanje trenutnog prikaza na ekranu
6. VOL+/VOL- TASTER
pojačavanje/utišavanje zvuka
7. MENU (MENI) TASTER
ulazak u glavni meni, za izlaz, pritisnite
ponovo ili koristite dugme “EXIT”
8. OK/ENTER TASTER
potvrđivanje izbora ili ulazak u podmeni
9. UP, DOWN, LEFT, RIGHT ARROW (STRELICE
GORE, DOLE,LEVO, DESNO)TASTER
kretanje kroz meni
10. EXIT (IZLAZ) TASTER
izlaz iz trenutnog menija
11. MUTE (ISKLJUČIVANJE ZVUKA) TASTER
pritisnite za isključenje zvuka. Ponovnim pritiskom
vraćate zvuk na predhodnu jačinu
12. SLEEP (AUTO-ISKLJUČIVANJE) TASTER
podešavanje automatskog isključivanja TV
uređaja u određeno vreme
13. RETURN (POVRATAK) TASTER
povratak na kanal koji ste predhodno gledali
14. FAV (OMILJENO) TASTER
prikazivanje omiljene programske liste
15. CH+/CH- (SLEDEĆI/PREDHODNI PROGRAM)
TASTER
promena TV kanala
16. REC (SNIMANJE) TASTER
snimanje trenutnog programa (radi samo u DTV
režimu rada)
17. SOURCE (IZVOR SIGNALA) TASTER
izbor funkcije TV uređaja (digitalni, antenski,
smart opcija, media-USB, HDMI)
18. ASPECT (FORMAT PRIKAZA) TASTER
izbor formata prikaza slike na ekranu
19. INFO (INFORMACIJA) TASTER
prikazivanje informacija o trenutnom statusu
signala, kvaliteta slike,programima ...
20. AUDIO TASTER
izbor zvuka sa različitih izvora (ako postoji)
21. EPG (ELEKTRONSKI PROGRAMSKI VODIČ)
TASTER
otvaranje/zatvaranje EPG-a (samo u DTV
režimu rada)
22.DTV/RADIO TASTER
prelazak sa DTV na radio program i obrnuto
23. HOME (POČETNI) TASTER
povratak na Smart - TV početnu stranu
24. MOUSE TASTER
prebacivanje kontrole na kursor vidljiv na ekranu.
25. FILE (USB) TASTER
direktan ulazak u USB režim rada.
26. DELETE (BRISANJE) TASTER
brisanje u USB režimu rada.
27. ZOOM + (UVEĆAJ) TASTER
uvećanje slike u Smart režimu rada.
28. ZOOM - (UMANJI) TASTER
umanji slike u Smart režimu rada.
Napomena:
EPG, DTV/RADIO, REC funkcije imaju efekta samo
u DTV modu
7
Page 40
DALJINSKI UPRAVLJAČ
TELETEXT FUNKCIJA (Opciono)
1) TEXT TASTER
pritisnite taster za prelazak sa TV
slike na Teletext, ukoliko TV stanica podržava isti.
2) REVEAL TASTER Za
prikazivanje skrivenih karaktera.
3) MIX TASTER
Taster za prikazivanje Teletexta I TV slike zajedno
ili samo Teletext slike. Ovaj taster omogućava
korisniku da unese 4 digitalne podstrane za
trenutnu stranu. Ukoliko sledeće digitalne strane
nisu unešene za 5 sekundi, predhodni broj strane
će biti ponovo pozvan i prikazan na ekranu.
4) RED/GREEN/YELOW/BLUE TASTER
Ova 4 tastera u Teletext modu služe za brzo
prebacivanje (zumiranje, prebacivanje na sledeću
stranu...)
5) UP/DOWN TASTER
Pomeranje stranice gore/dole uteletext modu
6) 0,1,2...9 TASTER
Izbor određene stranice uz pomoć numerisanih
tastera.
7) 7)HOLD TASTER
Neke teletext informacije se nalazena više
stranica koje se automatski menjaju nakon
određenog vremena. Pritisnite taster HOLD
da zaustavite promenu strana. Za nastavak
promene strane, pritisnite ponovo HOLD
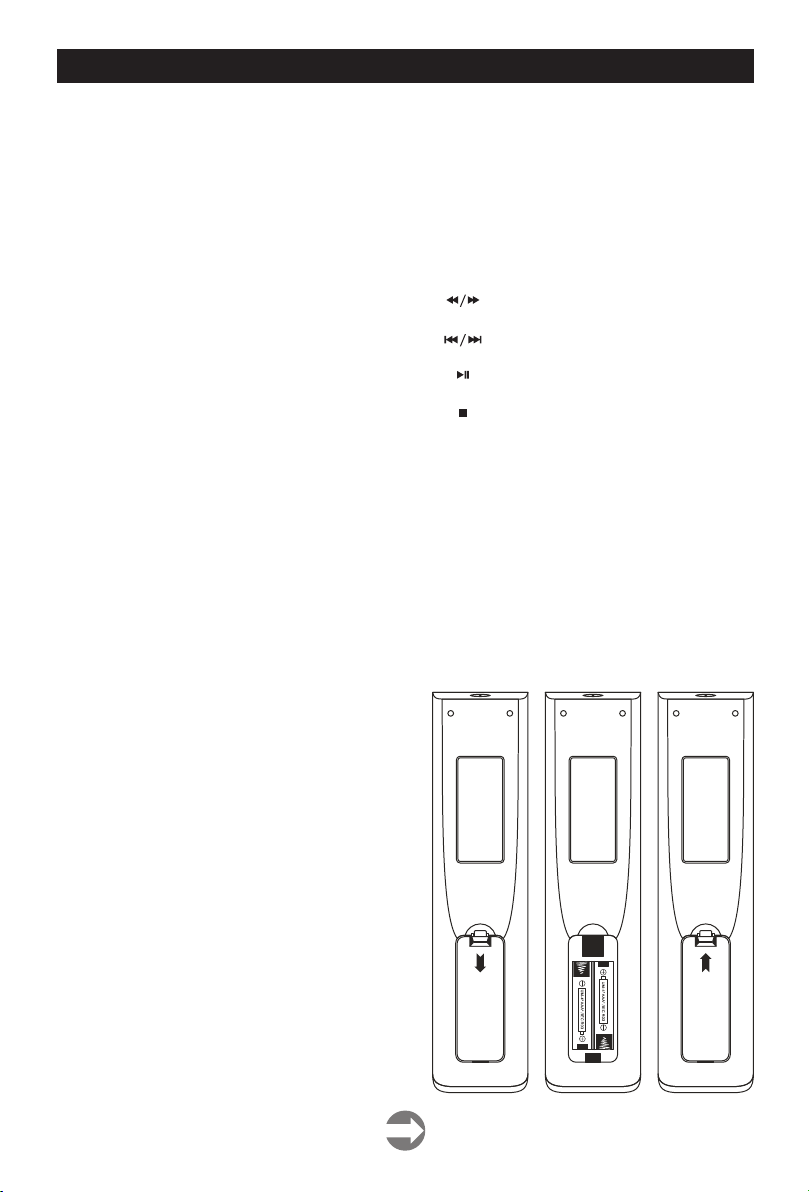
INSTALACIJA BATERIJA U DALJINSKI UPRAVLJAČ
8) SIZE TASTER
Taster za povećanje dimenzije karaktera i
prikazivanje pola teletext strane. Svaki pritisak
će prikazivati više i više do normalne strane
9) INDEX TASTER
Pritisnite ovaj taster kako biste videli index
stranu u teletext modu. Prikaz teletext
vremena.
USB FUNKCIJA (Opciono)
1) TASTER
Premotajte scenu ili muziku
2) TASTER
Vraćanje na predhodni ili prelazak na naredni fajl
3) TASTER
početak / pauza
4) TASTER
Zaustavljanje. Pritisnite da potvrdite akciju (Na
primer:kopiraj, nalepi itd.) Ponavljanje scene
ili muzike u reprodukciji filmova na USB-u.
5) SUBTITLE TASTER
Otvara ili zatvara funkciju titla ( titl mora biti
preuzet sa interneta i mora biti identičan kao
fajl, kao i kompatibilan sa fajlom koji podržava)
Napomena: USB uređaj već mora biti povezan.
1. Otvorite poklopac odeljka za baterije
2. Stavite dve AAA baterije ( uske ) od 1.5V. Budite
sigurni da se polaritet baterija ( + i - ) podudara sa
polaritetom unutar odeljka.
Napomena:
• Preporučujemo upotrebu alkalnih baterija
• Rok trajanja baterija može biti i duže od jedne
godine, u zavisnosti od toga koliko često se daljinski
upravljač koristi. Za najbolje performanse, baterij treba
menjati bar jednom godišnje ili onda kada počnu da
ometaju rad daljinskog upravljača.
• Budite sigurni da su baterije okrenute u dobrom
pravcu, kao na slici.
• Nemojte mešati stare i nove baterije ili različite vrste
baterija.
• Stare baterije mogu iscureti i oštetiti daljinski
upravljač. Uvek uklonite oslabljene baterije.
• Ne bacajte baterije u vatru, ne punite i ne rasklapajte
ih. Naročito nemojte puniti, sklapati i rasklapati,
zagrevati ili sagorevati upotrebljene baterije. poštujte
odgovarajuće propise o zaštiti okoline u vezi sa
upotrebljenim baterijama.
8
Page 41
KONEKCIJE
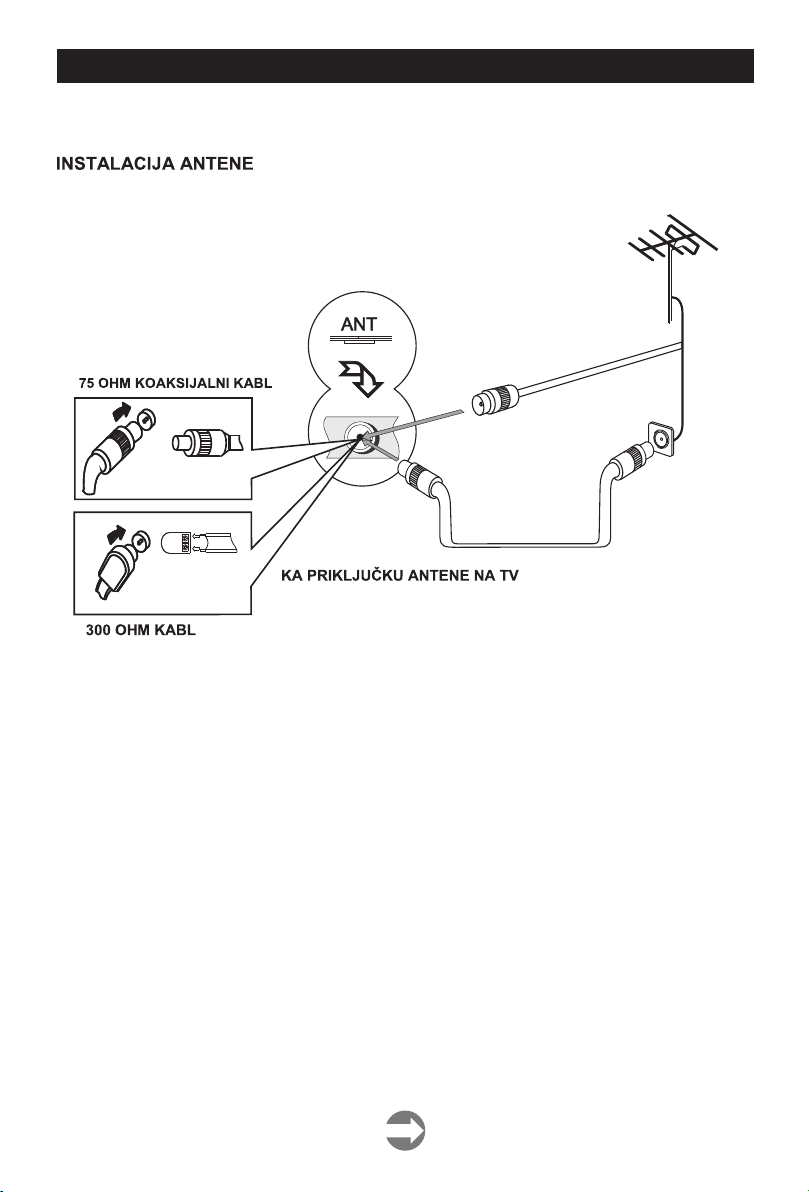
Povežite 75 OHM koaksijalni kabl od antene do antenskog priključka na zadnjem delu televizora
kao što je prikazano na slici.
Obaveštenje:
• Za bolji prijem, gde ima puno smetnji, preporučljivo je korišćenje spoljne antene na krovu.
• Za UHF TV prijem, koristite posebnu UHF antenu. Konsultujte se sa lokalnim prodavcem.
• Pri korišćenju 300 OHM kabla, koristite 300 OHM - 75 OHM adapter za pravilnu konekciju
sa antenskim priključkom televizora
PRIKLJUČAK ZA NAPAJANJE
• Priključite kabl za napajanje uređaja u odgovarajuću utičnicu.
• Pritisnite dugme POWER na daljinskom upravljaču da uključite/isključite TV.
Obaveštenje:
• Ovaj uređaj radi sa neizmeničnim napajanjem od 100-240V~ 50/60Hz.
• Kada isključujete kabl za napajanje uradite to držeći utikač, a ne kabl.
UPOZORENJE:
Prilikom nestanka struje isključite uređaj iz napajanja. Kako bi uštedeli struju isključite TV iz
napajanja ako ga ne koristite duži vremenski period.
9
Page 42
RAD MENIJA FUNKCIJA I GLAVNOG MENIJA
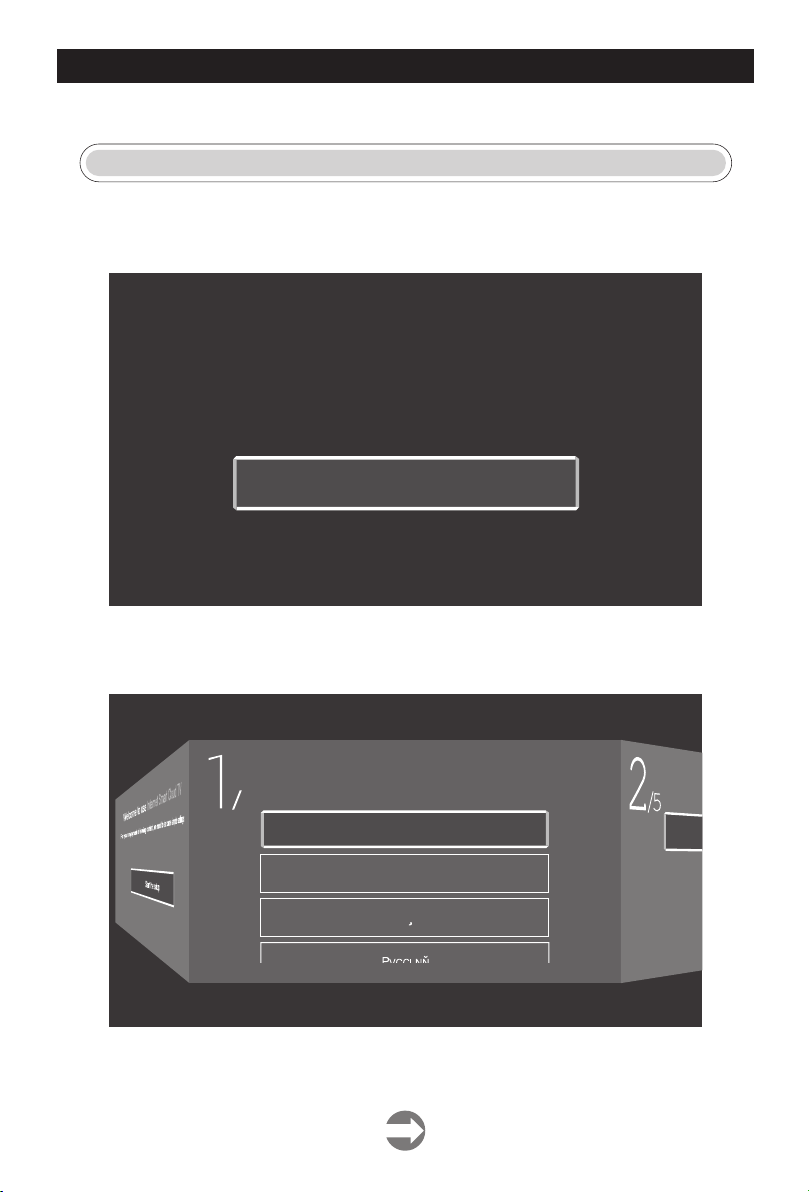
Napomena: Slike iznad su samo za referencu, u stvarnosti su moguće razlike.
FTI
Povezati RF kabl od TV ulaza po imenu "RF-In" do vaše TV Aerial utičnice
Pritsnite OK dugme kako biste izabrali Start za podešavanje.
Welcome to use Internet Smart Cloud TV
For your enjoyment of viewing content, we need to do some simple settings
Start the setup
Pritsnite 【▼】 【▲】taster kako biste izabrali jezik.
Pritisnite OK taster zatim pri tisnite 【►】taster kako biste izabrali zemlju.
/
Select the language you are using
5
English
Deutsch
Francais
10
Page 43
RAD MENIJA FUNKCIJA I GLAVNOG MENIJA
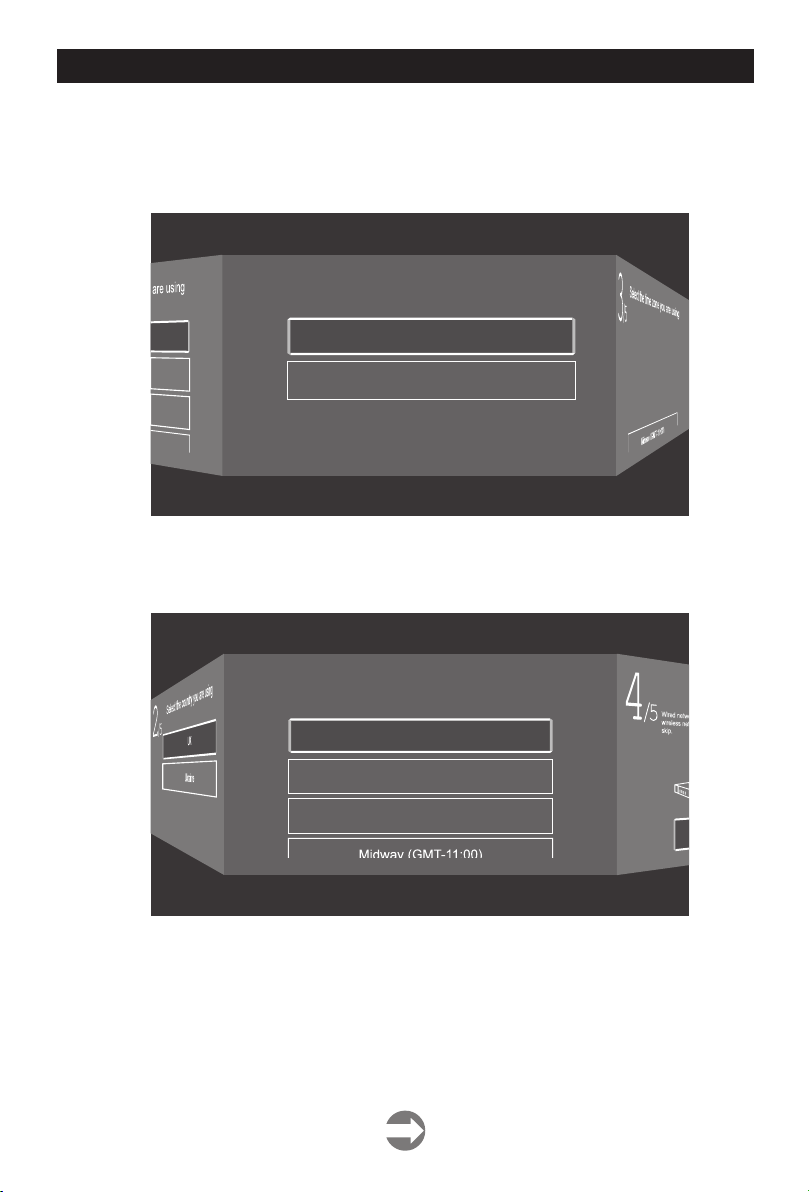
Pritisnite【▼】/【▲】taster kako biste izabrali zemlju.
Pritisnite OK taster i pritisnite 【►】taster kako biste izabrali vremensku zonu.
Select the country you are using
/
5
2
UK
Ukraine
Pritisnite【▼】/【▲】taster kako biste izabrali vremensku zonu.
Pritisnite【►】taster kako biste se povezali na WIFI/network.
/
3
Select the time zone you are using
5
Kiev (GMT+2:00)
Pago_Pago (GMT-11:00)
Niue (GMT-11:00)
11
Page 44
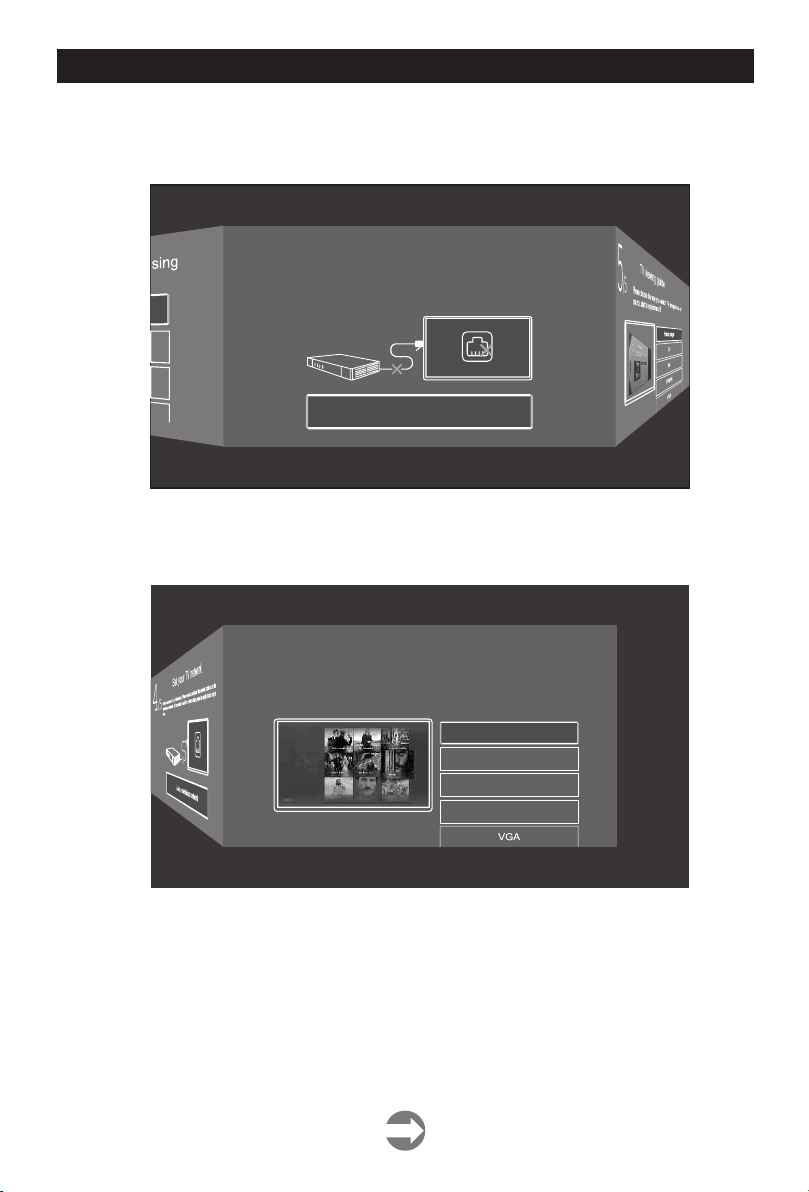
RAD MENIJA FUNKCIJA I GLAVNOG MENIJA
Pritisnite OK taster kako biste se povezali na WIFI/network.
Pritisnite ► taster da izaberete ulazni izvor.【 】
Set your TV network
Wired network is not detected. Please check and insert the network cable or use the
/
5
4
wireless network. If you want to set the network later, press the night direction key to
skip.
Use a wireless network
Pritisnite taster da izaberete ulazni izvor.【▼】/【▲】
/
5
TV viewing guide
Please choose the way you watch TV programs or
5
source, start to experience it!
12
Home page
TV
AV
YPBPR
Page 45
RAD MENIJA FUNKCIJA I GLAVNOG MENIJA
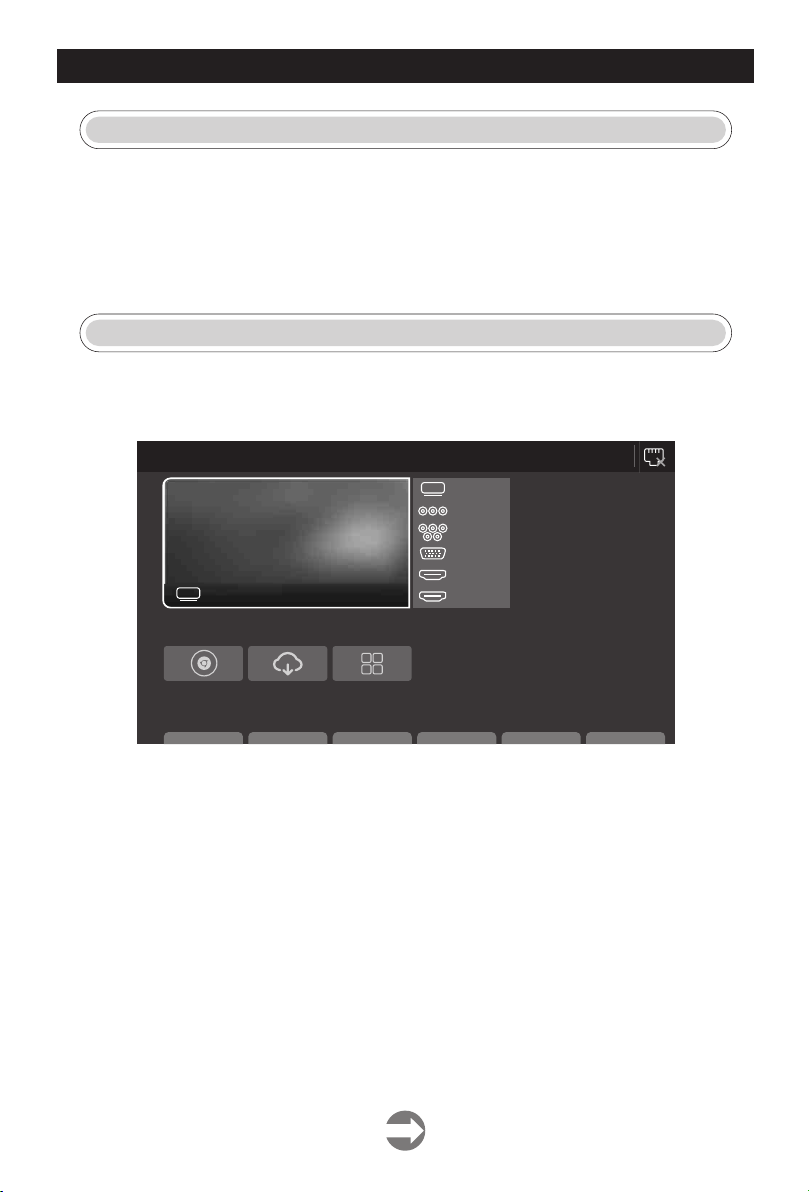
ULAZNI IZVOR
Pritisnite SOURCE taster kako biste izabrali Input Source meni.
Pritisnite【▼】/【▲】kako biste izabrali.
Pritisnite ENTER kako biste izabrali izvor.
GLAVNI MENI
HOME
Pritisnite taster kako biste izabrali HOME meni.
Pritisnite【▼】/【▲】/【◄】/【►】taster kako biste izvršili odabir.
【◄】/【►】
TV
TV No Si gnal
APP S
TV
TV
AV
YPBP R
VGA
HDMI 1
HDMI 2
AM
02:09
2018/1/1 Monday
Bro wser Dow nload App licat ions
LIK E A PPS
13
Page 46
RAD MENIJA FUNKCIJA I GLAVNOG MENIJA
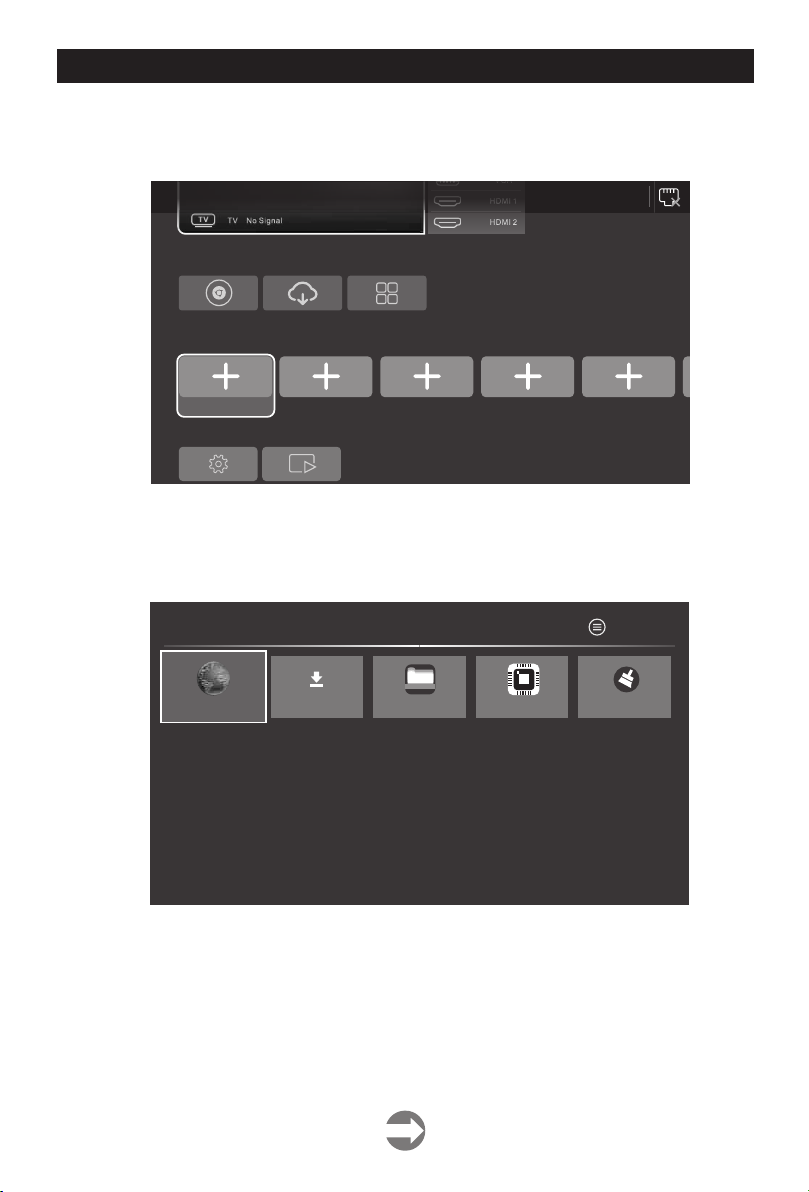
APPS/LIKE_APPS
Pritisnite taster kako biste izabrali APPS/LIKE_APPS da dodate aplikaciju.【▼】/【▲】
APP S
Bro wser Dow nload App licat ions
LIK E A PPS
Use r adds Us er adds Use r adds U ser add s User a dds
OTH ERS
Pritisnite kako biste izabrali App za instaliranje.【▼】/【▲】/【◄】/【►】
02:09
2018/1/1 Monday
AM
Bro wser
App List
File Browser
Downloads File Browser Smar TV Store TV Clean
Edit with MENU key
14
Page 47
RAD MENIJA FUNKCIJA I GLAVNOG MENIJA
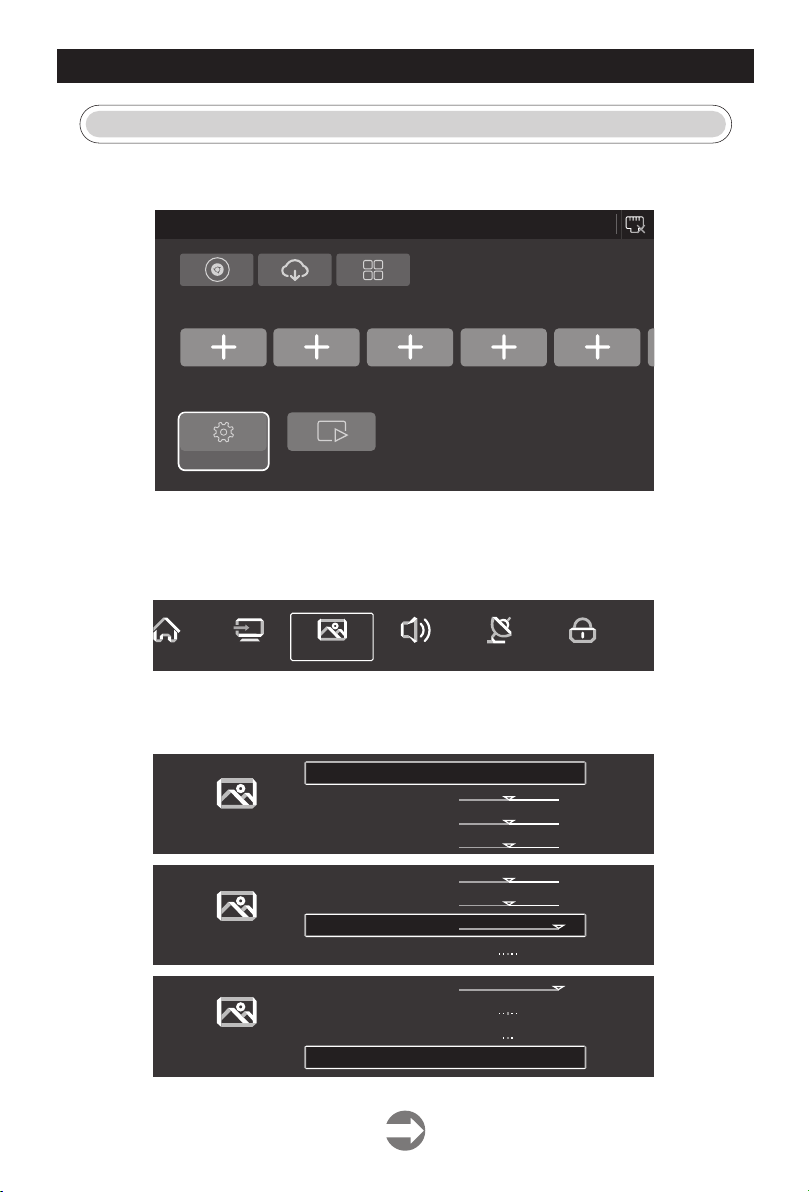
PODEŠAVANJA
Pritisnite【▼】/【▲】/【◄】/【►】taster kako biste ušli u Settings.
02:09
APP S
2018/1/1 Monday
AM
Brow ser Dow nload
LIK E A PPS
Use r adds U ser add s
OTH ERS
Set tings Fil e Explo rer
Appl icati ons
Use r adds Use r adds Use r adds
SLIKE
Pritisnite MENU taster kako biste izabrali glavni meni.
Pritisnite【◄】/【►】taster kako biste izabrali Picture.
Pritisnite ENTER kako biste ušli u podešavanja.
Home Source Picture Sound Channel System Lock Time
1. Pritisnite kako biste izabrali: Picture Mode/Contrast/ Brightness Color/
【▼】/【▲】
Sharpness/Backlight/Noise Reduction/Color Temp/More Settings.
2. Pritisnite【◄】/【►】da podesite ili izaberete.
Picture
Picture
Picture
Picture Mode
Contrast
Brightness
Color
Color
Sharpness
Backlight
Noise Reduction
Backlight
Noise Reduction
Color Temp
More Settings
>
>
>
50
50
50
50
50
Middle
Middle
Normal
>
100
>
100
>
>
>
15
Page 48

RAD MENIJA FUNKCIJA I GLAVNOG MENIJA
Picture Mode
Pritisnite【▼】/【▲】taster kako biste izabrali Picture Mode, potom pritisnite 【◄】/【►】
kako biste izabrali. (Opcionalno: Standard,Movie,Vivid,Soft,User).
Standard Glavni mod, kako bi korisnici imali jako kvalitetnu sliku pod normalnim svetlom.
Movie Ovaj mod je više prigodan za gledanje filmova.
ivid Slike boja su lepše, slike su živopisnije.
V
Soft Stvara visoko kvalitetne slike u slabo osvetljenoj sobi.
User Korisnik podešava sliku sam.
Kontrast/ Svetlost/Boja/Oštrina/Pozadinsko svetlo
Pritisnite da izaberete,I pritisnite da podesite.
Kontras Podesite kontrast na slici.
Svetlost Podesite oštrinu slike.
Boja Podesite gustinu slike.
Oštrina Podesite oštrinu slike.
Pozadinsko Svetlo Podesite pozadinsko svetlo na ekranu.
Smanjenje Buke
Podešavanje opcije za eliminisanje intenziteta buke.
Pritisnite kako biste izabrali Noise Reduction, i pritisnite kako
biste izabrali. (Opcije: Off,Low,Middle,High,Auto).
Color Temp
Podesite boju slike uopšteno.
Pritisnite【▼】/【▲】kako biste izabrali Colour Temperature.pritisnite【◄】/【►】kako
biste izabrali.(Opcije:Cool, Normal, Warm).
Cool pravi slike nežno plave boje.
Normal pravi živopisne slike.
Warm pravi slike crvene boje.
【▼】/【▲】 【◄】/【►】
【▼】/【▲】 【◄】/【►】
Još podešavanja
More settings Pritisnite kako biste izabrali【▼】/【▲】
DLC
More Settings
Normal
>
>
DLC
Pritisnite kako biste , kako biste izabrali Dark/
【▼】/【▲】 DLC Pritisnite【◄】/【►】
Normal/Bright/Off.
16
Page 49
RAD MENIJA FUNKCIJA I GLAVNOG MENIJA
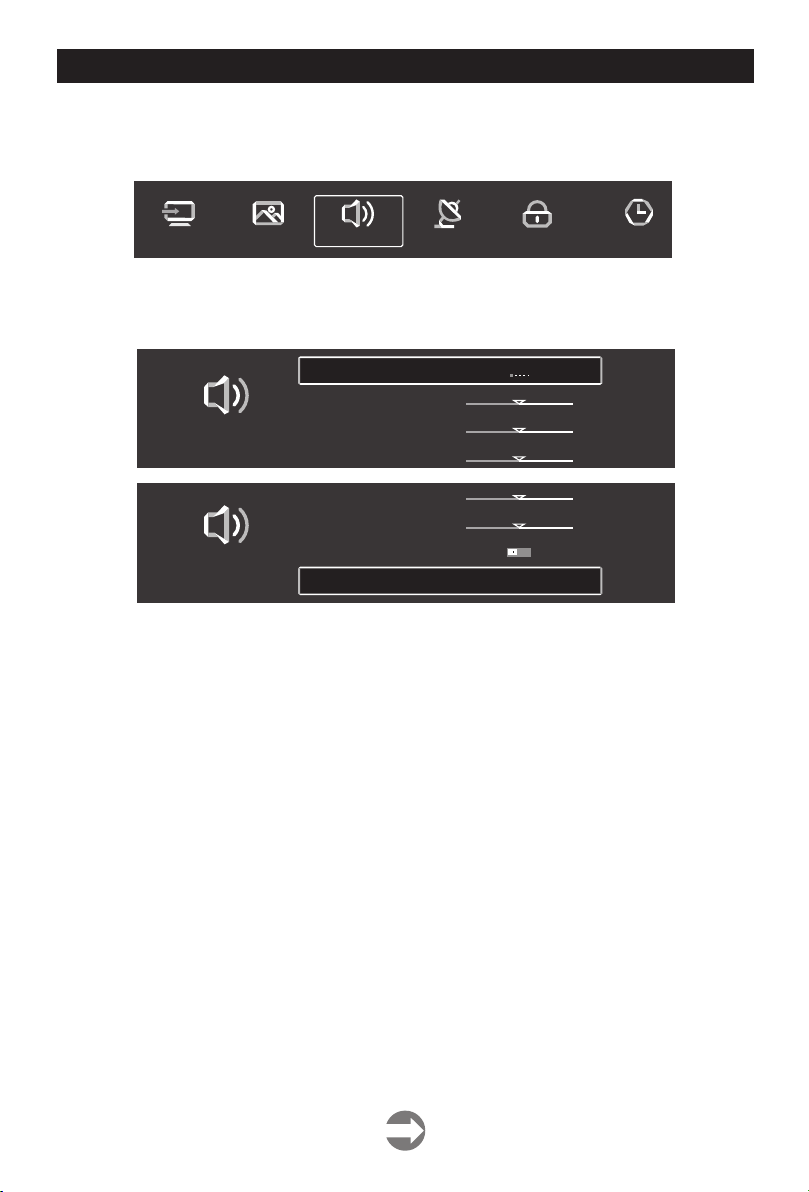
Zvuk
Pritisnite MENU taster kako biste izabrali glavni meni.
Pritisnite【◄】/【►】dugme kako biste izabrali Sound u glavnom meniju.
Source Picture Sound Channel System Lock Time Settings
Pritisnite kako biste izabrali: Sound Mode/Bass/Treble/Balance/AVC/More
【▼】/【▲】
settings.
Pritisnite ENTER / da izaberete ili izmenite
【◄】/【►】
Sound
Sound
Sound Mode
Bass
Treble
Balance
Treble
Balance
AVC
More Settings
>
Standard
50
50
0
50
0
>
>
Mod Zvuka
Pritisnite taster da izaberete Sound Mode, potom pritisnite
【▼】/【▲】 【◄】/【►】
dugme.da izaberete: (Opcije: Standard,Music,Theater,News,User ).
Standard Reprodukuje balansiran zvuk u svim uslovima.
Music Zadržava originalni zvuk pogodan za muzičke programe.
Theater Pojačava trebl i bas za bogato zvučno iskustvo.
News Pojačan glas za slušanje vesti.
User Izabereti kako biste sami prilagodili zvuk.
Podesite bas.
Bass
Treble Podesite treble.
Balance Prilagodite levi i desni balans.
Pritisnite【▼】/【▲】taster da izaberete Balance, potom pritisnite【◄】/【►】taster
radi podešavanja.
AVC
Pristisnite【▼】/【▲】taster kako biste izabrali AVC, potom pritisnite【◄】/【►】taster
kako biste izabrali ON/OFF.
Posle otvaranja AVC,Kada je jačina podešena, bez obzira na različite TV verzije štampane
na svakom kanalu, može da održava jačinu zvučnika stabilnom.
17
Page 50
RAD MENIJA FUNKCIJA I GLAVNOG MENIJA
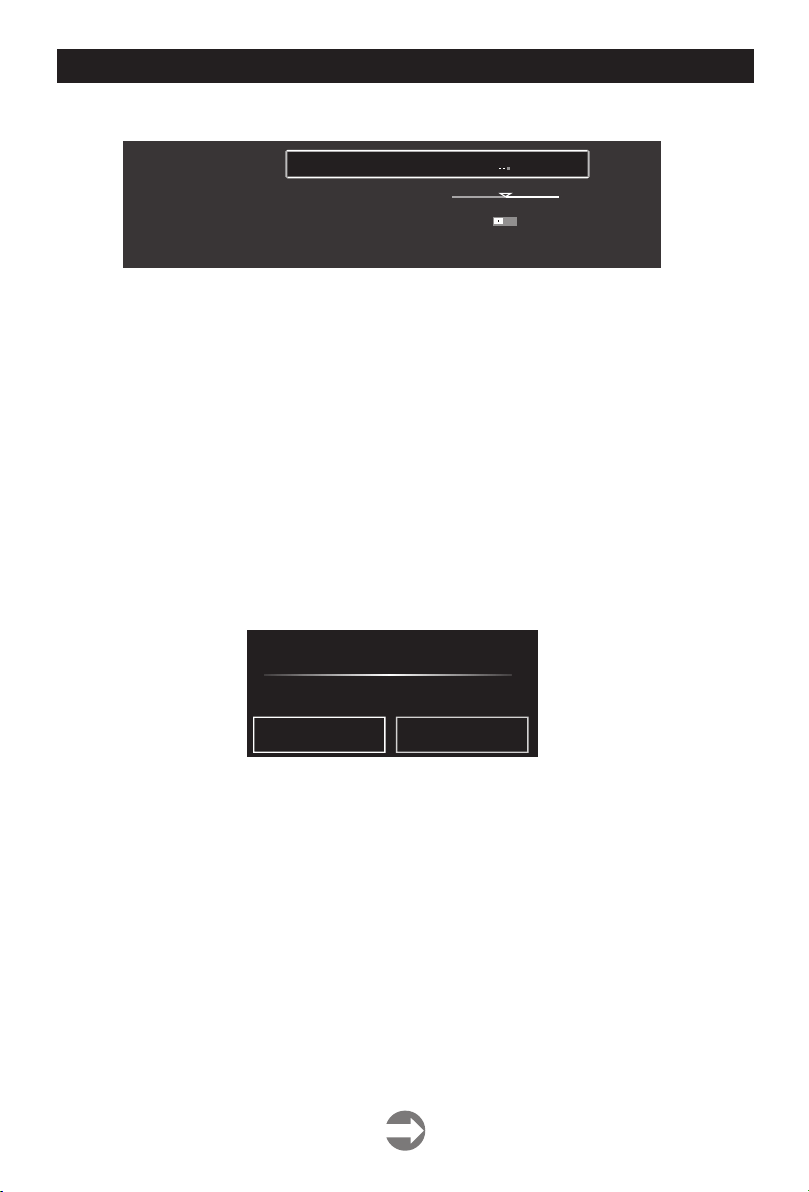
Još podešavanja
PCM
>
>
50
>
More Settings
SP DIF
SPDIF Delay
Surround
Asdio Only
SPDIF
Pritisnite【▼】/【▲】taster da izaberete SPDIF, potom pritisnite 【◄】/【►】taster kako
biste izabrali OFF/RAW/PCM
.
SPDIF Delay
Pritisnite【▼】/【▲】da izaberete SPDIF Delay, potom pritisnite【◄】/【►】taster kako
biste izvršili podešavanje.
Surround
Postiže bolji zvučni efekat u okruženju.
Pritisnite【▼】/【▲】dugme kako biste izabrali Surround,potom pritisnite【◄】/【►】taster
kako biste izabrali ON/OFF.
Audio Only (Samo Zvuk)
Posle otvaranja ekran nije prikazan i samo pušta zvuk
Pritisnite 【▼】/【▲】kako biste izabrali Audio Only,potom pritisnite【►】taster kako bi
izabrali ON/OFF.
Audio Only Notice
Are you sure to open Audio Only Mode?
Cancel
OK
18
Page 51
RAD MENIJA FUNKCIJA I GLAVNOG MENIJA
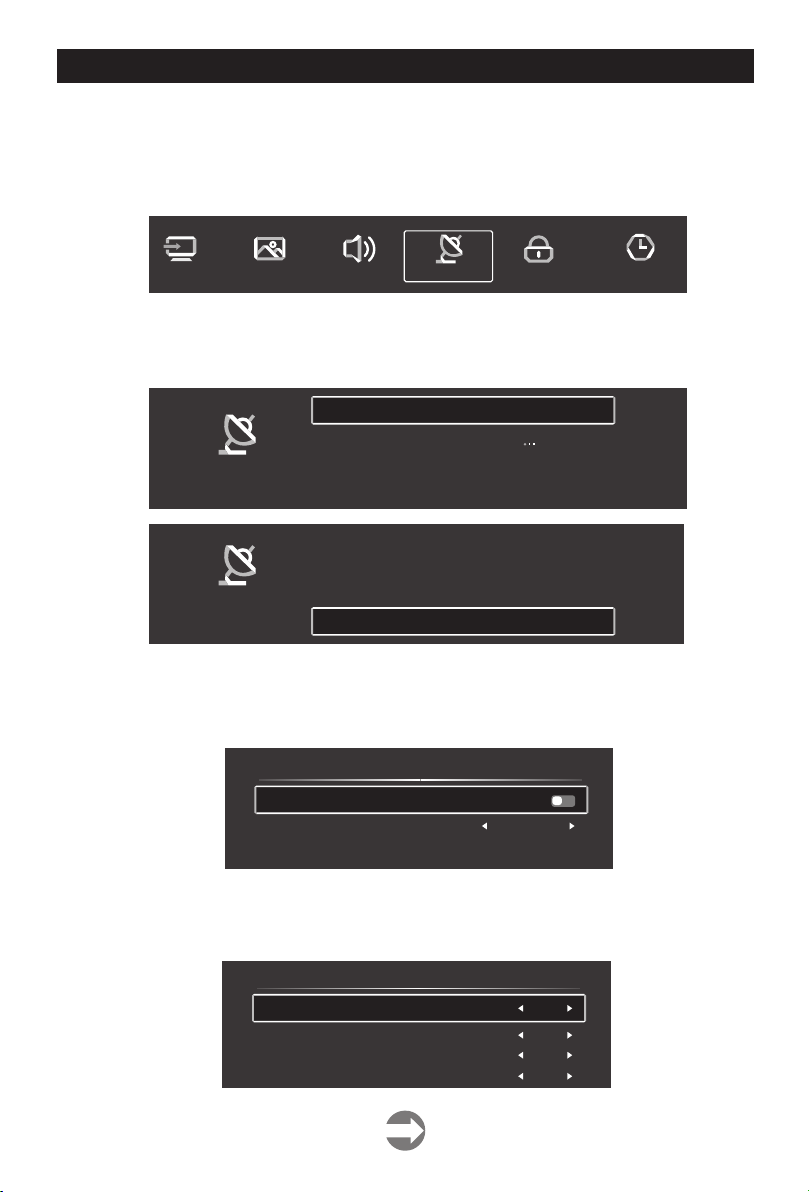
Channel
Pristisnite MENU dugme kako biste došli do glavnog menija.Pritisnite 【◄】/【►】
dugme kako biste izabrali Channel u glavnom meniju.
Pritisnite【▼】/【▲】izabrali.Pritisnite ENTER/ 【◄】/【►】kako biste izvršili
podešavanje.
Source Picture Sound Channel System Lock Time Settings
Antenna Type-Air
Izaberite Air/Cable kako biste izvršili podešavanje.
Channel
Channel
Country
Antenna Type
Auto Scan
Analog Manual Scan
Auto Scan
Analog Manual Scan
Digital Manual Scan
Channel List
>
>
Air
>
>
>
>
>
>
>
Auto Scan
Pritisnite【▼】/【▲】kako biste izabrali Auto Scan, pritisnite ENTER kako biste izabrali
Auto Scan.
Auto Scan
LCN
Search Type
Start Scan
Analog Manual Scan
Pritisnite【▼】/【▲】
taster kako biste izabrali Analog Manual Scan, pritisnite ENTER
da biste započeli skeniranje.
Anal og + Digi tal
Off
Analog Manual Scan
Start Scan
Color System
Sound System
Frequency(MHz)
Down
Auto
BG
-
42.0 0
+
19
Page 52
RAD MENIJA FUNKCIJA I GLAVNOG MENIJA
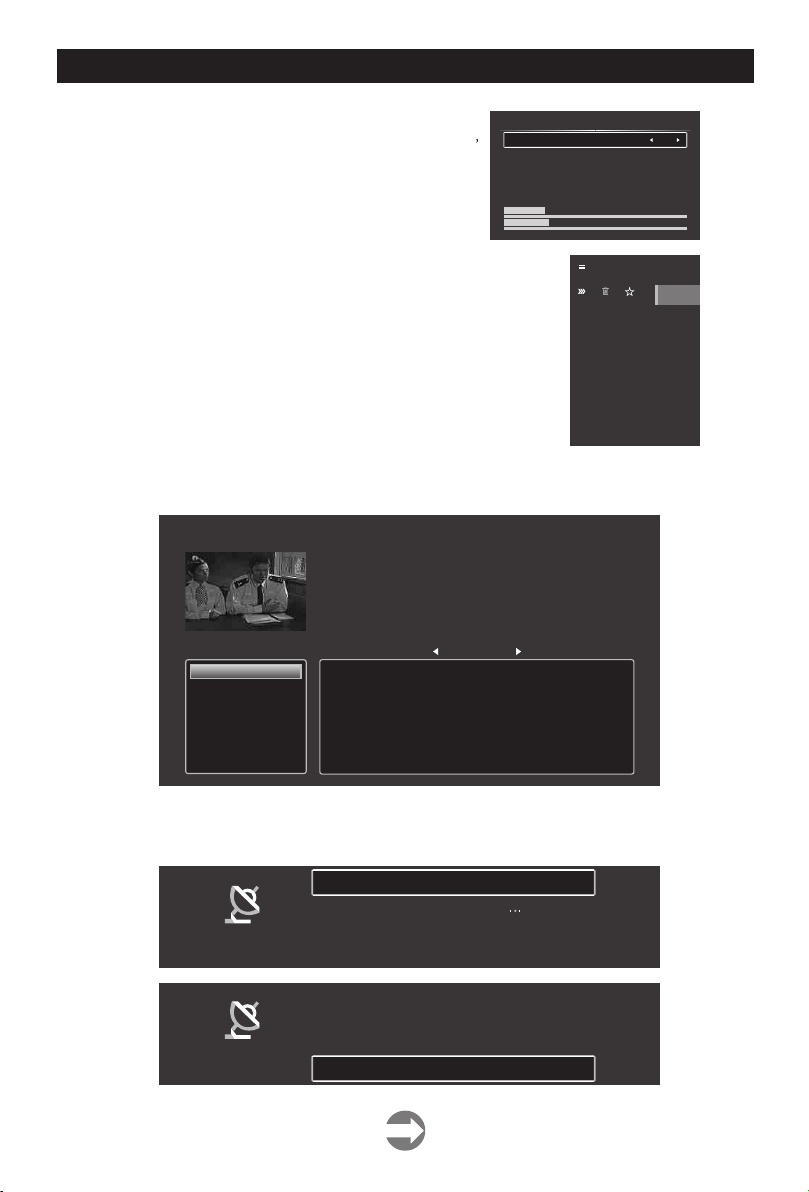
Digital Manual Scan
Pritisnite taster kako biste izabrali
【▼】/【▲】
Digital Manual Scan, pritisnite ENTER kako biste
započeli skeniranje.
Frequency name
Start Scan
Frequency 602.00MHz
DTV
Radio
Data
Signal Lever:0%
Signal Quality:0%
Channel List
Pritisnite【▼】/【▲】taster kako biste započeli Channel List,
kada izlista,pritisnite MENU dugme i uredite kanal (Skip /
Delete /Fav).
EPG
Pritisnite【▼】/【▲】taster da izaberete EPG.
EPG
20 Drama
21 5 USA
26 ITVBe
27 ITV2+1
30 5STAR
37 QUEST
39 The Store
44 Channel 5+1
Pie in the Sky
[Drama]
The Truth Will Out: The first series of the charming police drama. Henry is asked to search
for a missing policeman, but all he wants to do is get his restaurant ready! [S]
01:00AM - 02:00AM Pie in the Sky
02:00AM - 04:00AM Lovejoy Christmas Special
04:00AM - 07:00AM Home Shopping
07:00AM - 07:20AM Home Shopping
07:20AM - 07:50AM A Fine Romance
07:50AM - 08:50AM House of Cards
08:50AM - 09:50AM House of Cards
09:50AM - 10:50AM House of Cards
2016/02/20 12:19:10AM
2016/02/20
Digital Manual Scan
Edit
Channel List
Skip Delete Fav
2016/02/20
01:00AM ~ 02:00AM
37
5-1
Antenna Type-Cable
Izaberite Air/Cable kako biste izvršili podešavanje.
Country
Antenna Type
Channel
Channel
Auto Scan
Analog Manual Scan
Auto Scan
Analog Manual Scan
Digital Manual Scan
Channel List
20
>
Cabl e
>
>
>
>
>
>
>
>
Page 53
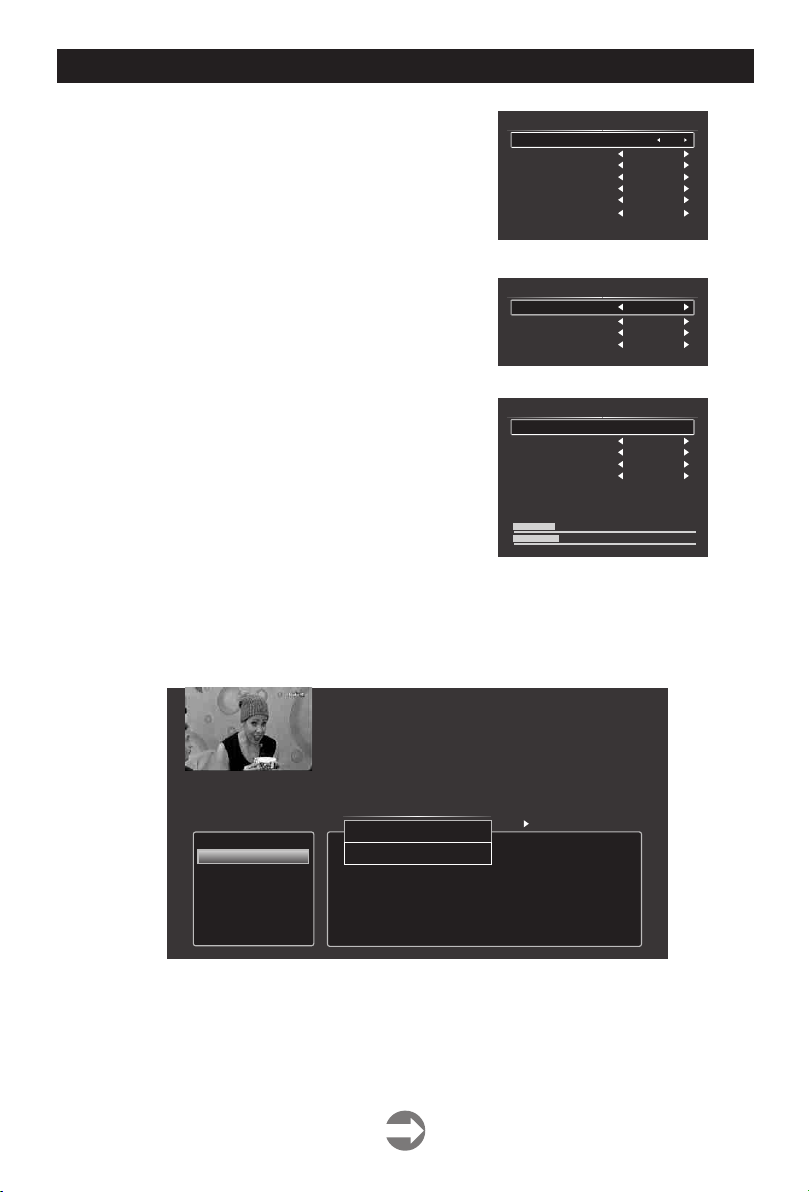
RAD MENIJA FUNKCIJA I GLAVNOG MENIJA
Auto Scan
Pritisnite 【▼】/【▲】taster kako biste izabrali
Auto Scan, pritisnite ENTER kako biste započeli
Auto Scan.
Analog Manual Scan
Pritisnite 【▼】/【▲】
taster kako biste izabrali
Analog Manual Scan, pritisnite ENTER kako biste
započeli skeniranje.
Digital Manual Scan
Pritisnite【▼】/【▲】taster kako biste izabrali
Digital Manual Scan, pritisnite ENTER kako biste
započeli skeniranje.
Channel List
Pritisnite【▼】/【▲】taster kako biste izabrali
Channel List da izlistate,pritisnite MENU taster
kako biste uredili kanal.(Skip /Delete /Fav).
EPG
Pritisnite【▼】/【▲】taster kako biste izabrali EPG.
LCN
Scarch Type
Scan Type
Network ID
Frequency
Symbol Rate
Moduation
Start Scan
Analog Manual Scan
Start Scan
Color System
Sound System
Frequency (MHz)
Digital Manual Scan
Start Scan
Frequency
Network ID
Symbol Rate
Modulation
DTV
Radio
Data
Signal Lever:0%
Signal Quality:0%
Auto Scan
Anal og + Digi tal
Netw ork
Auto
Auto
Auto
MODLI LATION Au to
Down
Auto
BG
4200
113000
Auto
Auto
MODL ILATION Au to
37
EPG
1 arte HD
2 Bibel TV HD
3 n-tv HD
4 N24 HD
5 Nickelodeon HD
6 Spare TS07
7 2M
8 3sat
2015/12/19 12:50:17PM
Alpha Jugend
[News and Factual]
Glaubenskurs. Jugendliche haben viele Fragen Uner Gott und die Welt. Auch uber
den christlichen Glauben. Eine 12-teilige Entdeckungsreise fur Sinnsucherinnen und
Sinnsucher.
Glaubenskuis. Jugendliche haben viele Fragen uber Gott und die Welt. Auch uber
den kungsreise fur Sinnsuchernnen und
01:00AM - 02:00AM Pie in the Sky
02:00AM - 04:00AM Lovejoy Christma
05:00PM - 05:30PM Live from Studio B
05:30PM - 06:00PM Tiefsehtauchen mit Jens Bottcher
06:00PM - 06:30PM Winterfest - Konzerte der Liberty University
06:30PM - 07:00PM Alpha Jugend
07:00PM - 07:15PM Bibel TV Emmaus
07:15PM - 08:55PM Die Bibel - Samson und Delila
EPG
Go To
Book
2016/02/19
2015/12/19
06:30PM ~ 07:00PM
21
Page 54
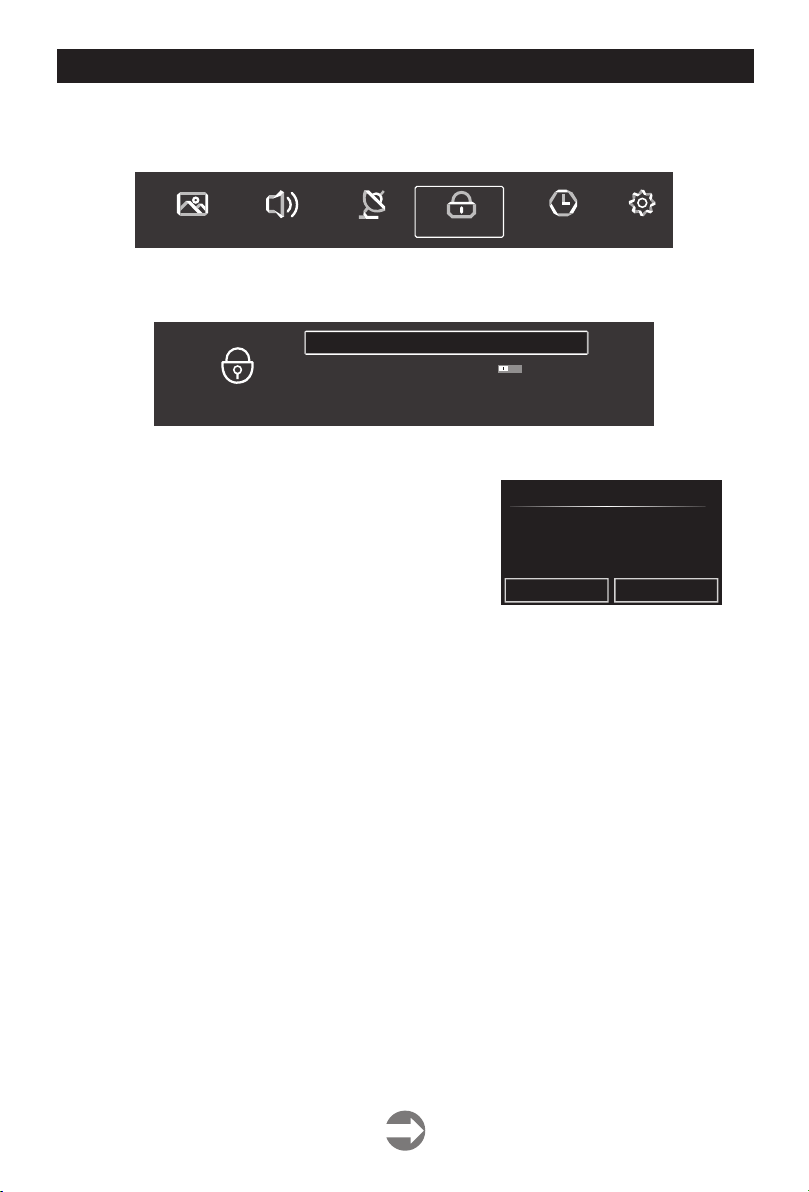
OPERTION OF FUNCTION MENU
System Lock
Pritisnite MENU taster da biste izlistali glavni meni.Pritisnite【◄】/【►】taster kako biste
izabrali System Lock.
Picture Sound Channel
System Lock Time Settings
Common
Pritisnite 【▼ 】/【▲】dtaster kako biste izabrali Change Password/System Lock.
Pritisnite ENTER /【◄】/【►】kako biste ušli.
Change PassWord
System Lock
System Lock
>
Change Password
Promena Lozinke
Pritisnite【▼】/【▲】taster kako biste izabrali
Change Password.
Zaključavanje Sistema
Old Password
New Password
Confirm Password
Cancel
Pritisnite【▼】/【▲】taster kako biste izabrali
System Lock.
OK
22
Page 55
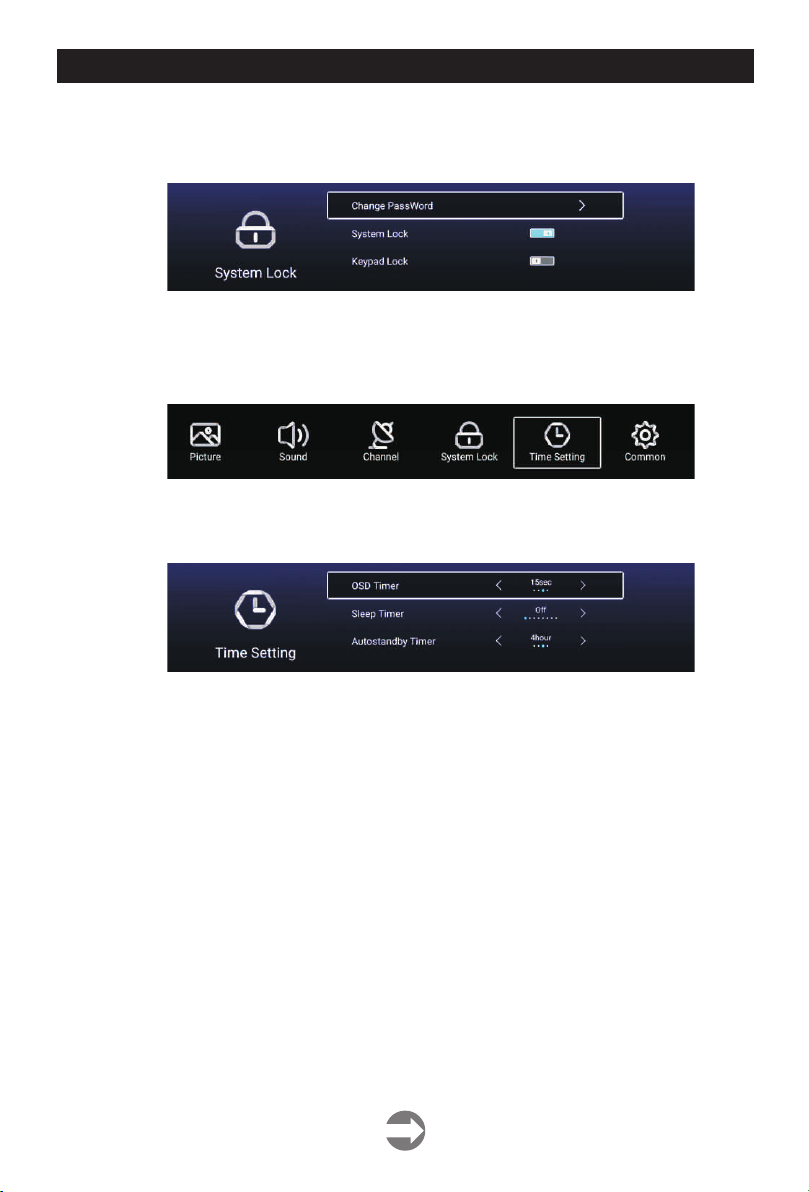
RAD MENIJA FUNKCIJA I GLAVNOG MENIJA
Zaključavanje Tastature
Pritisnite【▼】/【▲】
(Napomena: Ova funkcija je moguća kada je uključena System Lock .)
Podešavanje Vremena
Pritisnite MENU taster kako biste izabrali glavni meni.
Pritisnite ◄ / ► taster kako biste izabrali Time Setting u glavnom meniju.【 】 【 】
Pritisnite【▼】/【▲】taster kako biste izabrali: OSD Timer/Sleep, Timer/Autostandby
Timer .
Pritisnite【◄】/【►】kako biste ušli.
taster kako biste zaključali tastaturu.
OSD Tajmer
Pritisnite taster kako biste izabrali OSD Timer, Pritisnite
kako biste izabrali. (Opcionalno: off,5sec,15sec,30sec).
Tajmer za spavanje
Pritisnite【▼】/【▲】dugme kako biste izabrali Sleep Timer, pritisnite 【◄】/【►】
kako biste izabrali. (Opcionalno: off,15min,30min,45min,60min,90min,120min,240min).
Autostandby Tajmer
Pritisnite【▼】/【▲】taster kako biste izabrali Autostandby Timer, (Opcionalno: off,
3hour, 4hour, 5hour)
【▼】/【▲】 【◄】/【►】
23
Page 56
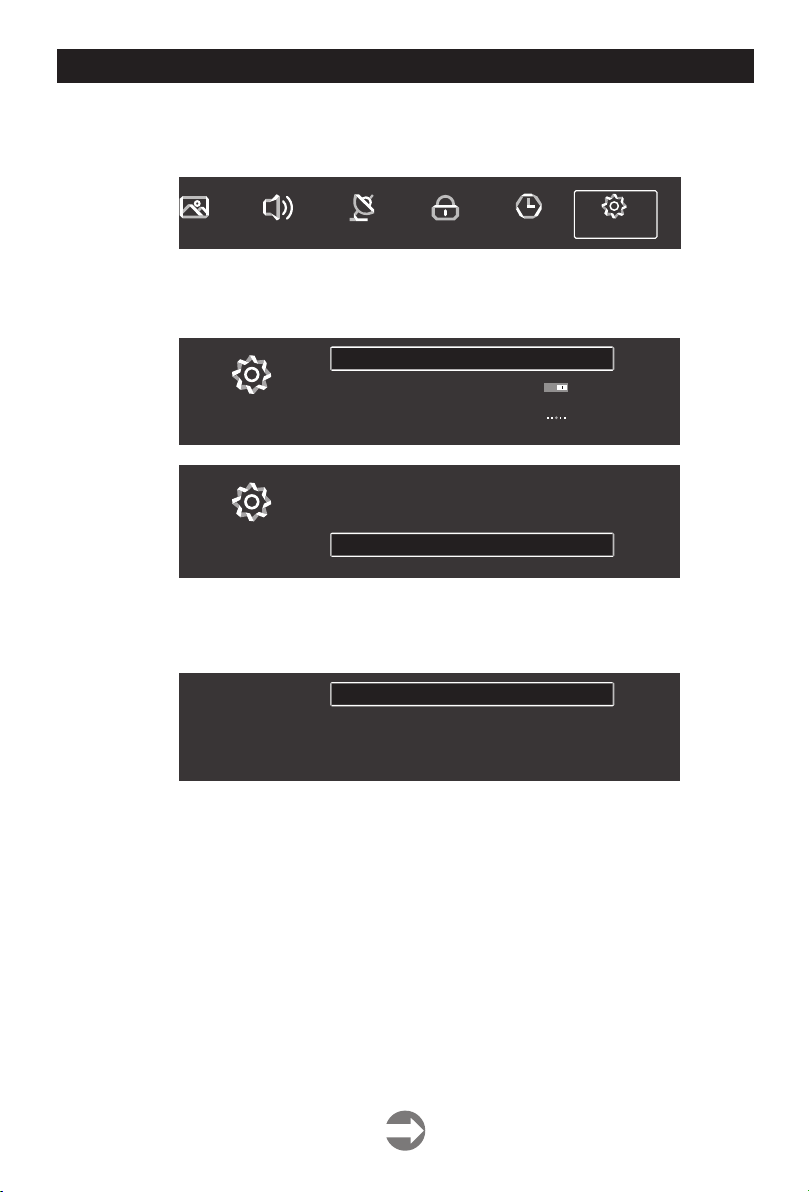
RAD MENIJA FUNKCIJA I GLAVNOG MENIJA
Common
Pritisnite MENU taster kako biste izabrali glavni meni.
Pritisnite ◄ / ► taster kako biste izabrali Common u glavnom meniju.
Pritisnite 【▼】/【▲】kako biste izabrali: Blue Screen/HDMI CEC/Menu Reset itd.
Pritisnite ENTER / 【◄】/【►】kako biste ušli.
【 】 【 】
Picture Sound Channel CommonSystem Lock Time Settings
PVR Setting
Blue Screen
Common
Common
Teletext
Audio language 1st
Audio Language 2nd
Subtitle Language 1st
Subtitle Language 2nd
HDMI CEC
Menu Reset
>
PVR Setting
Pritisnite【▼】/【▲】ttaster kako biste izabrali PVR Setting.
Pritisnite【◄】/【►】kako biste izabrali Disk/Record List.
PVR USB Selector
Record List
>
PVR Setting
Blue Screen
Pritisnite【▼】/【▲】taster kako biste izabrali Blue Screen.
Pritisnite【◄】/【►】kako biste izabrali ON/OFF.
HDMI CEC
Pritisnite【▼】/【▲】taster kako biste izabrali HDMI CEC.
Pritisnite【◄】/【►】kako biste izabrali ON/OFF.
West
>
>
>
>
>
>
>
>
>
>
Menu Reset
Pritisnite【▼】/【▲】taster kako biste izabrali Menu Reset.
Pritisnite【◄】/【►】kako biste izabrali Cancel/da resetujete pređašnje podešavanje.
24
Page 57
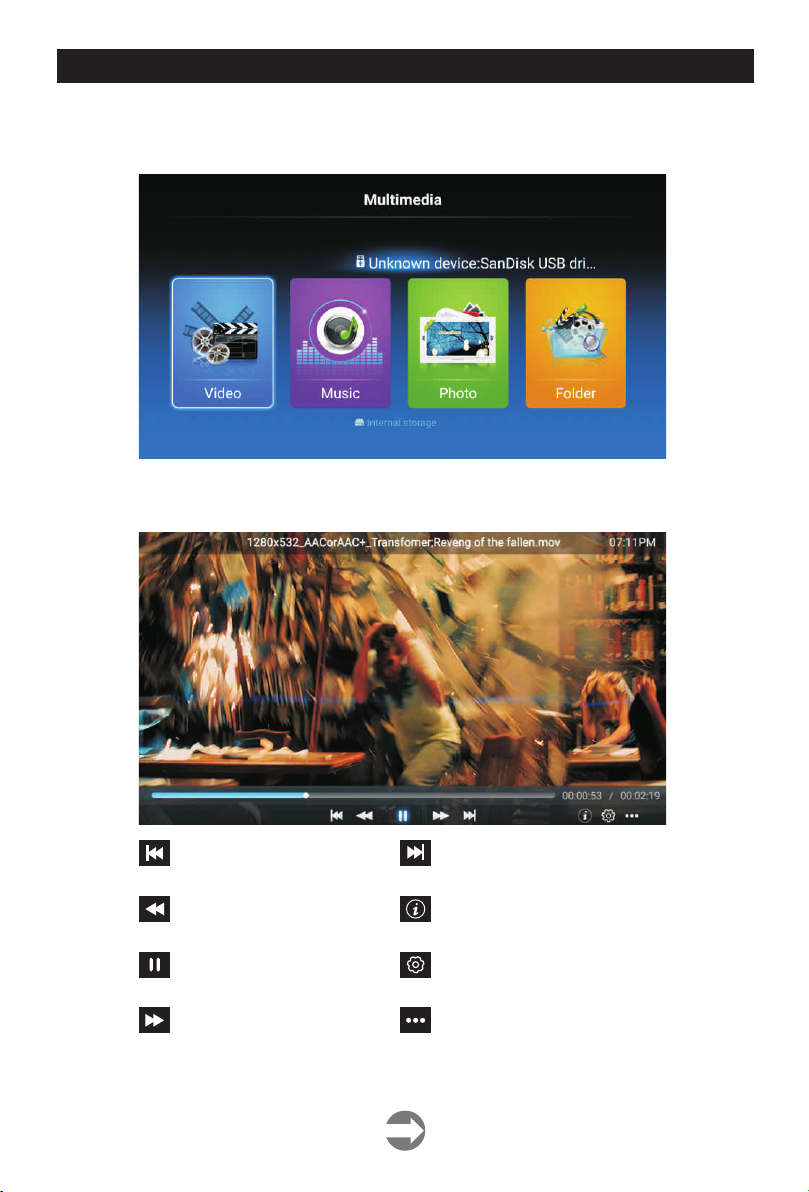
RAD MENIJA FUNKCIJA I GLAVNOG MENIJA
Media
Pritisnite HOME taster kako biste ušli u Home Page, pritisnite ▼ / ▲ taster kako biste
izabrali File Explorer.
Video
Pritisnite kako biste izabrali video. ◄ / ►
Pritisnite dugme kako biste
pustili prethodni film.
Pritisnite kako biste pustili brzo
premotavanje unazad.
Pritisnite kako biste stopirali/
pokrenuli film.
Pritisnite kako biste pustili sledeć
i film.
Pritisnite kako biste pustili sledeći film.
Pritisnite kako biste videli informacije o
filmu.(Resolution/Size/Deration/Bittrate
Pritisnite kako biste podesili Audio Track/
Select Subtitle/Region Language/Play Mode
/Aspect Ratio.
Pritisnite kako biste izabrali film koji želite
da pustite.
25
Page 58
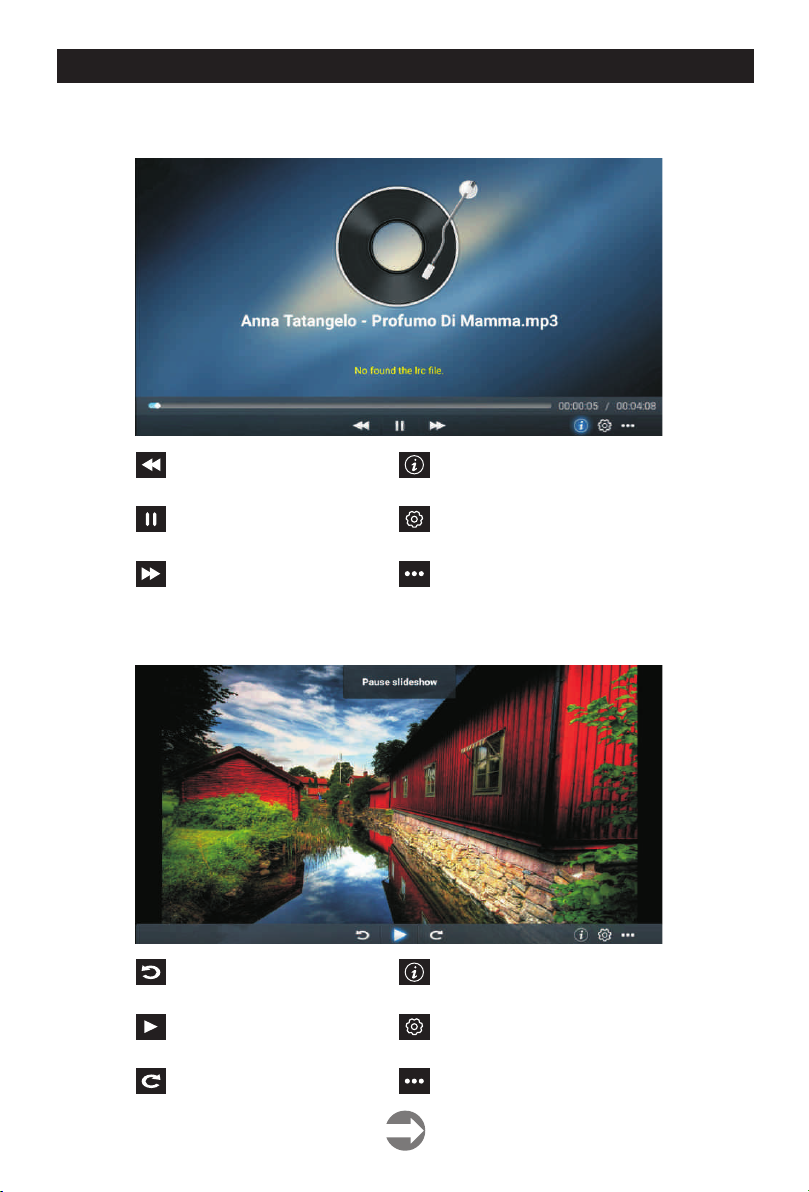
RAD MENIJA FUNKCIJA I GLAVNOG MENIJA
Muzika
Slika
◄ / ► Pritisnite kako biste izabrali muziku.
Pritisnite kako biste brzo
premotali unazad.
Pritisnite kako biste stopirali/
pustili muziku.
Pritisnite kako biste brzo
premotali unapred.
◄ / ► Pritisnite kako biste izabrali sliku.
Pritisnite kako biste videli informacije u
muzici.(Mine Type/Size/Bittrate)
Pritisnite kako biste podesili Play Mode
(Repeat All/Repeat One/Random/None).
Pritisnite kako biste izabrali muziku.
Pritisnite kako biste rotirali sliku
u pravcu suprotnom od kazaljke
na satu.
Pritisnite kako biste stopirali/
pokrenuli sliku.
Pritisnite kako biste rotirali sliku
u pravcu kazaljke na satu.
Pritisnite kako biste videli informacije vezane
za sliku.(Size/Resolution)
Pritisnite kako biste podesili Play Mode
(Aspect Ratio/Playback duration/Play Mode).
Pritisnite kako biste izabrali sliku koju ste
planirali da pustite.
26
Page 59
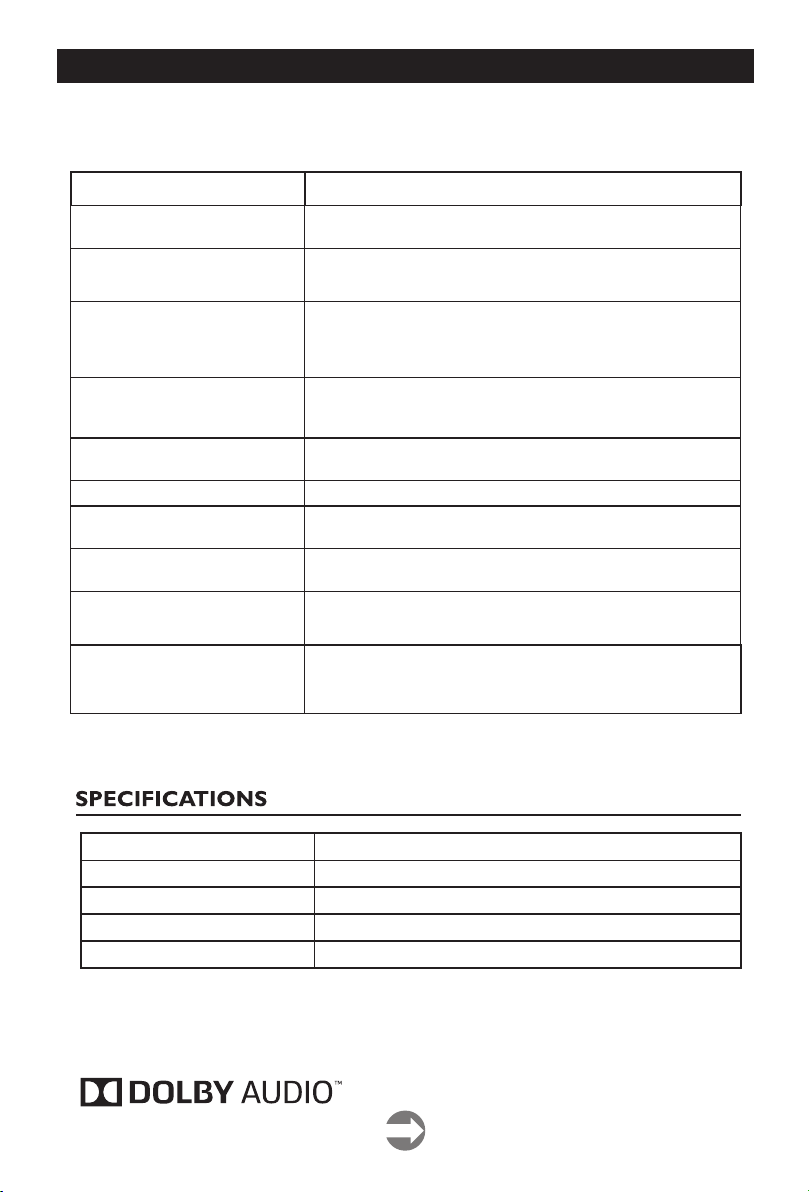
VODIČ ZA REŠAVANJE PROBLEMA
Mnogi kvarovi su prouzrokovani neodgovarajućim i nepravilnim podešavanjem i uglavnom su jednostavni
za otkloniti. Ukoliko imate poteškoća sa rukovanjem, prvo pogledajte sledeću listu uobičajnih grešaka i
njihovih rešenja.
SIMPTOMI
Nema slike ili zvuka
Slika je normalna ali bez zvuka
Daljinski upravlja ne radi.č
Ne primate nikakav TV signal
Bez signala programa sa spoljašnjeg
izvora
Problem sa kontrastom I osvetljenjem
Slab kontrast i blede boje na svim
kanalima
Linije ili tačke po celom ekranu
Sneg na ekranu
Dupla slika ili zamagljenost
METODA PROVERAVANJA I PODEŠAVANJA
Proverite da li je naponski kabl ispravno priklju en u uti nicu.č č
Proverite da nije slu ajno zvuk podešen na nečujno (MUTE).
Ukoliko jeste pojačajte zvuk.
Proverite da li je TV uklju en.
Proverite da li su baterije ispravno postavljene.
Uverite se da infracrveni odašiljač na daljinskom ili TV-u nije
izložen velikoj svetlosti ili da nije blokiran na bilo koji način.
Proverite da li je SOURCE prekida postavljen na TV-u.
Proverite i podešavanje za lokaciju i povezanost. Pokušajte da
ponovo pretražite kanale i proverite metod pretrage.
Proverite da li je taster SOURCE podešen na ispravnu poziciju
za prijem signala.
č
č
č
Napravite potrebne i željene izmene.
Proverite podešavanje za lokaciju prijema signala.
Drugi električni ure aji mogu da izazovu smetnje. Sklonite ih od
televizora.
Proverite lokacijska podešavanja,kratak spoj,prekinuta konekcija
ili bilo koja vidljiva oštećenja.
Proverite podešavanja za lokaciju i uopšte položaj antene ili
urečaja. Jak vetar može da izazove takve probleme. visoke
zgrade ili planine takoče. Malo podešavanje antene može u
mnogo čemu da popravi sliku.
č
NAPOMENA:
Spoljna ili krovna antena treba da bude postavljena od strane ovlašćenog osoblja.
Proporc ija ekrana
Sistem
Impenda nsa k oaksija lnog kabla
Prijem TV kanala
Napajan je, voltaža
16:9
PAL/SECAM BG / DK / I, DVB-T/T2,NTSC Playback
75Ω
Ceo opseg kanala
100-240V~ 50/60Hz
Napomena: Delovi i specifikacije mogu da budu promenjene bez predhodne najave.
Daljinski upravljač:
Karakteristike: Daljinski upravljač sa svim funkcijama ima radijus rada 8 metara
Napajanje: DC 3V (dve baterije, veličine AAA, preporuka da koristite alkalne)
20
Page 60

Nadamo se da ste pažljivo pročitali uputstva i da ćete ih se pridržavati.
33A S-551 0-FOX 21DE2
18
Za više informacija o FOX uređajima posetite našu internet stranicu:
 Loading...