

Page 1
Installing the DataSuite Software
1. DataSuite software is used to configure the MicroLogPRO II as well as download
and analyze the recorded data. Download the DataSuite software from the
www.fourtec.com homepage.
2. Run the setup file to install the Windows ® software on Windows XP, Vista or 7
(32 or 64-bit). Follow the instructions to complete the installation.
3. Double-click the DataSuite desktop shortcut to launch the software. After the
configuration screens are completed, connect the logger to the computer.
Detecting the MicroLogPRO II
1. Only once the DataSuite software has been installed, connect the data logger
via the mini-USB cable.
2. The logger will be automatically detected by the software and the logger icon
will appear in the main DataSuite window, indicating it is ready for use: .
Configuring the MicroLogPRO II using DataSuite Software
1. Right-click on the logger icon in the DataSuite window and select Setup.
2. In the Properties tab, configure the relevant parameters e.g. sampling rate,
temperature scale, operation mode, cyclic mode, unit comment, etc.
3. In the Sensors tab, select the relevant sensors and configure low and high
alarm levels, if necessary.
4. From any tab, click Setup and Run to start logging. The MicroLogPRO II icon will
appear as follows when in Run mode: .
5. To stop the logger when connected to the computer, right-click the
MicroLogPRO II icon and select Stop from the context menu.
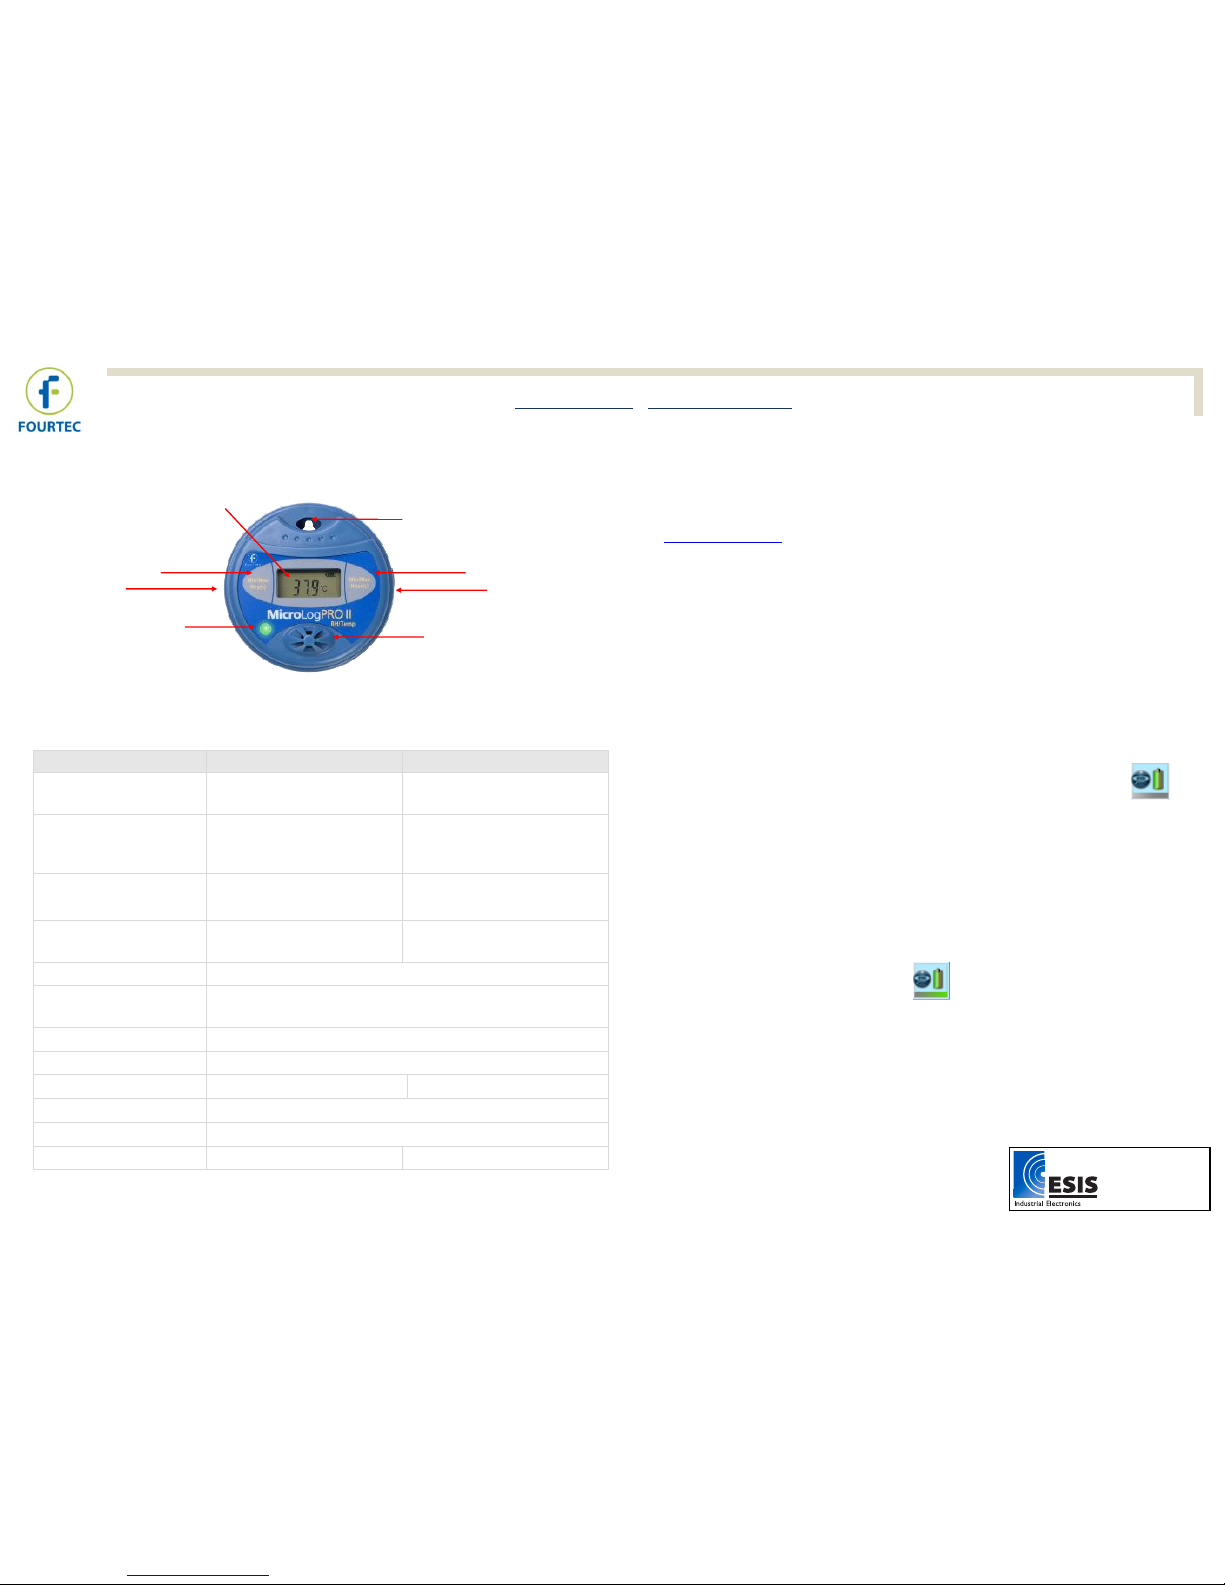
MicroLogPRO II Layout
* RH/Temp sensor for EC850 model only
General Specifications
EC800
EC850
Internal Sensor Range:
Temp:
-40 to 80 C
Temp: -40 to 80 C
RH: 5 to 95 %
Internal Temperature
Accuracy:
±0.3˚C @ 0 to 60 ˚C
±0.3 ˚C @ -40 to 0 ˚C and 60
to 80 ˚C after calibration only
± 0.3 °C
Temperature Resolution:
0.02 °C
or better
0.015 C
Internal Humidity
Accuracy & Resolution:
NA
± 2%, 0.05 %
External Sensor Accuracy:
NTC Temperature: 0.3 ˚C ; 4-20 mA: ±20 µA ; 0-10 V: ±5 mV
External Sensor
Resolution:
NTC Temperature: 0.03 ˚C ; 4-20 mA: 1 µA (display), 4.0 µA
(software) ; 0-10 V: 1 mV (display), 4.0 mV (software)
Memory Capacity:
52,000 samples (over 3 channels)
Sampling Rate:
Minimum - Once every second; Maximum - Once every 18 hours
Dew Point:
NA
LCD and Software indication
LED:
Bi-color Alarm
Power Supply:
2/3 AA 3.6V Lithium battery
Standards Compliance:
CE, IP65
CE, IP54
Bi-color LED
Min/Max Hours button
LCD screen
Min/Max Days button
Cradle for wall mounting
RH/Temp sensor
location
External sensor input
Mini-USB input
Page 1
MicroLogPRO II Quick Start Guide www.fourtec.com | support@fourtec.com Rev B, Jan-14, © Fourtec – Fourier Technologies
www.esis.com.au
Ph 02 9481 7420
Fax 02 9481 7267
esis.enq@esis.com.au
Page 2
6. Ensure that the destination computer, where the MicroLogPRO II will be
connected to download the data, has DataSuite installed with an Internet
connection. Go to Tools > Options > Email Settings and use the Test Email
function in the Email Profile Manager to verify the Email settings are working
correctly.
MicroLogPRO II Working Modes
STOP: MicroLogPRO II is idle and not recording. When stopping, the logger
immediately ceases to record data, displaying STOP on the LCD.
To stop the logger directly from the unit, select the Turn off on key press option
in the logger Setup window. Pressing both left and right buttons together for 15
seconds will stop the logger from sampling.
RUN: MicroLogPRO II is recording data. It will stop recording automatically
when its memory has reached full capacity (52,000 samples with one sensor
configured). When full the LCD displays FULL.
CYCLIC RUN: Similar to Run mode, but the logger will continuously sample data,
recording over old data when the memory reaches its capacity, beginning with
the earliest data recording. Cyclic Run mode must be selected from the logger
Setup window.
TIMER RUN: MicroLogPRO II can be configured to start recording at a
predetermined time. When set to Timer Run, the logger LCD displays tRUN.
PUSH TO RUN: MicroLogPRO II will only begin logging data when the user
presses both of the logger's buttons on the key pad for three seconds. Push to
Run mode must be selected from the logger Setup window.
MARKING A TIME STAMP: While the logger is running, pressing both logger
buttons for two seconds will record a new sample and time stamp to the logger
memory. Useful for marking specific events.
Downloading and Viewing the Logger Data
1. Connect the MicroLogPRO II to the computer. The logger is immediately
detected and data download begins automatically, as indicated by this icon:
2. To manually download data, right-click the MicroLogPRO II icon and select
Download Data.
3. View the downloaded data by double-clicking the MicroLogPRO II icon. The
online Graph window opens, from which you can also display data in Table or
Statistics views.
4. To open archived data, go to File > Open, select the relevant loggers from the
list, use the calendar to select the data set and click OK.
Using the Boomerang Feature
MicroLogPRO II units configured with Boomerang are able to automatically email a
PDF data report via email to predefined contacts when connected to a computer.
The report contains all recorded data in graph format. The destination computer
requires DataSuite and an Internet connection. A default fourtec email profile is
already defined within DataSuite.
To enable Boomerang:
1. Right-click on the MicroLogPRO II icon and select Setup.
2. Configure the logger using the Properties and Sensor tabs, and then click on
the Boomerang Report tab. Select the Include Boomerang Report checkbox to
enable this feature on the connected logger.
3. Select the temperature unit, C or F, and enter the Generated by and Comment
fields.
4. To add the Boomerang report recipients, click Add Contacts and select from the
contact list or click to manually add an email address.
5. When complete, click Setup and Run.
MicroLite Quick Start Guide www.fourtec.com | support@fourtec.com Rev A, Nov-12, PN: 50257, © fourtec – Fourier Technologies
For full instructions on using the MicroLogPRO II with
the DataSuite software, please download the DataSuite
User Guide from www.fourtec.com/downloadcenter.
Page 2
MicroLogPRO II Quick Start Guide www.fourtec.com | support@fourtec.com Rev B, Jan-14, © Fourtec – Fourier Technologies
www.esis.com.au
Ph 02 9481 7420
Fax 02 9481 7267
esis.enq@esis.com.au
 Loading...