


Sensing your
data logging needs
including
MultiLab™
ImagiProbe™
User Guide
TriLog
™
Triple-platform data logger: stand-alone, slot
on to Palm
™
, or even connected to the PC
and MAC

TriLog
User Guide
Fourier Systems
First Edition
First print
Printed in July 2003

III
Contents
Introduction ..............................................................................................8
Chapter 1 TriLog.....................................................................................9
1.1. General.........................................................................................9
1.1.1. TriLog: system contents......................................................................9
1.1.2. External connections......................................................................... 10
1.1.3. Battery ........................................................................................... 11
1.1.4. AC/DC Adaptor ................................................................................ 11
1.1.5. Automatic standby............................................................................ 11
1.1.6. Power saving mode........................................................................... 11
1.2. Stand-Alone Operation..................................................................12
1.2.1. Front Panel Layout............................................................................ 12
1.2.2. Working Modes ................................................................................ 12
1. Auto ID..............................................................................................................12
2. 8 sensors........................................................................................................... 13
1.2.3. Quick-Start...................................................................................... 13
1.2.4. Working with the TriLog keypad.......................................................... 14
1.2.5. The Display ..................................................................................... 15
1.2.6. Load the Last Setup.......................................................................... 15
1.2.7. Internal Clock and Calendar............................................................... 15
1.2.8. Clear the Memory............................................................................. 15
1.2.9. Choose the Right Setup..................................................................... 15
1.2.10. Programming Rules and Limitations .................................................... 17
1.3. Sensor Calibration........................................................................ 18
1.3.1. Hardware Offset Calibration ............................................................... 18
1.3.2. TriLog Automatic Zero Calibration....................................................... 18
1.3.3. pH Temperature Compensation .......................................................... 19
1.3.4. MultiLab Sensor Calibration................................................................ 19
1.3.5. Factory Calibration (No calibration required)......................................... 19
Chapter 2 Working with Palm Handheld and ImagiProbe............................. 20
2.1. Install the Software ...................................................................... 20
2.1.1. System Requirements....................................................................... 20
2.1.2. Installation...................................................................................... 20
2.2. Overview..................................................................................... 21
2.2.1. ImagiProbe Layout ........................................................................... 21
2.2.2. Palm Panel Layout............................................................................ 22
2.3. Connecting TriLog to a Palm Handheld............................................. 23
2.4. Getting Started ............................................................................ 24
2.4.1. Working with Investigations and Trials................................................. 24
1. Adding a New Investigation............................................................................... 24
2. Adding a New Trial............................................................................................ 24
3. Setting the Sampling Rate................................................................................. 25
4. Previewing Data................................................................................................25
5. Changing the Scale for the Y-Axis..................................................................... 26
6. Collecting Data.................................................................................................. 26
2.4.2. Selecting working mode .................................................................... 27
2.4.3. Manually Assigning Sensors and Their Calibrations................................ 27
2.4.4. Viewing Collected Data...................................................................... 28
1. Paging through Data ......................................................................................... 28
2. Viewing Specific Values in a Line Graph...........................................................28
3. Zooming In and Out of Data.............................................................................. 29
2.4.5. Adding and Editing Notes................................................................... 29
1. Adding Text Notes............................................................................................. 29

IV
2. Editing Text Notes............................................................................................. 30
2.4.6. Viewing an Existing Trial.................................................................... 31
2.4.7. Saving a Trial Setup ......................................................................... 31
2.4.8. Editing a Trial Setup ......................................................................... 31
2.4.9. Deleting Investigations and Trials....................................................... 31
1. Deleting Investigations......................................................................................31
2. Deleting Trials ................................................................................................... 32
2.5. Working with Sensors and Calibrations............................................ 33
2.5.1. Accessing the Sensor Module ............................................................. 33
2.5.2. Viewing Sensors and Sensor Notes...................................................... 33
2.5.3. Viewing and Editing Calibrations and Their Notes .................................. 34
2.5.4. Adding Sensors................................................................................ 34
1. Adding a Linear Sensor.....................................................................................34
2. Adding Linear Calibrations ................................................................................34
3. Adding Non-Linear Sensors .............................................................................. 36
4. Adding Non-Linear Calibrations......................................................................... 36
2.5.5. Deleting Sensors.............................................................................. 36
2.5.6. Deleting Calibrations......................................................................... 37
2.5.7. Installing Sensor Databases on Palm Powered Devices........................... 37
1. Installing Sensor Databases Using HotSync.....................................................37
2. Deleting Sensor Databases before Merging...................................................... 38
2.6. Adding Content to ImagiProbe 3.0 .................................................. 39
2.6.1. Creating and Saving a Content Database ............................................. 39
2.6.2. Installing Content Databases on Palm Powered Devices.......................... 39
1. Installing Content Databases by Beaming......................................................... 39
2. Installing Content Databases Using HotSync.................................................... 40
2.6.3. Merging Content Databases into ImagiProbe 3.0................................... 40
2.6.4. Deleting Content Databases before Merging ......................................... 41
2.7. Copying Data to a Desktop Computer.............................................. 41
2.7.1. Copying Data from a Handheld Computer to a Desktop Computer............ 41
2. HotSync for Macintosh ®...................................................................................42
3. HotSync for Windows ® ....................................................................................42
2.7.2. Working with ImagiProbe Data on a Desktop Computer.......................... 43
1. Navigating Investigations in a Browser on a Desktop Computer....................... 44
2. Importing Trial Data into MultiLab......................................................................46
3. Importing Trial Data into Other Desktop Applications........................................46
Chapter 3 Working with MultiLab.............................................................47
3.1. Install the Software ...................................................................... 47
3.1.1. System Requirements....................................................................... 47
3.1.2. Installation...................................................................................... 47
3.2. Overview..................................................................................... 49
3.2.1. MultiLab On-screen Layout................................................................. 49
3.2.2. MultiLab Window Layout.................................................................... 49
3.2.3. Working with Projects ....................................................................... 50
3.3. Getting Started ............................................................................ 51
3.3.1. Set up a Recording Session................................................................ 51
1. Prepare TriLog .................................................................................................. 51
2. Enable Video Recording.................................................................................... 51
3. Setup the TriLog................................................................................................ 51
4. Start Recording .................................................................................................51
3.3.2. Data recording options...................................................................... 51
1. Single measurement ......................................................................................... 52
2. Replace............................................................................................................. 52
3. Add.................................................................................................................... 52
3.3.3. Online Video.................................................................................... 52
1. Online video ......................................................................................................52

V
2. Recording..........................................................................................................52
3. Replaying an experiment................................................................................... 52
4. Video and audio Properties...............................................................................53
3.3.4. Download Data ................................................................................ 53
3.3.5. Save Data....................................................................................... 54
3.3.6. Open a File...................................................................................... 54
3.3.7. Create a New Project ........................................................................ 55
3.3.8. Import data..................................................................................... 55
3.3.9. Print............................................................................................... 56
1. Print a graph...................................................................................................... 56
2. Print a table....................................................................................................... 56
3.4. View the Data.............................................................................. 57
3.4.1. Display Options................................................................................ 57
3.4.2. Graph Display.................................................................................. 57
1. Split graph view................................................................................................. 58
2. The Cursor ........................................................................................................58
3. Zooming............................................................................................................59
4. Panning............................................................................................................. 60
5. Edit the Graph...................................................................................................60
6. Format the graph............................................................................................... 61
7. Change the graph’s units and its number format ............................................... 61
8. Add a graph to the project.................................................................................61
3.4.3. The Table Display............................................................................. 62
1. Editing data values............................................................................................ 62
2. Editing the table.................................................................................................62
3. Formatting the table .......................................................................................... 63
4. Add a table to the project .................................................................................. 63
3.4.4. Meters............................................................................................ 63
3.4.5. Data Map ........................................................................................ 64
1. Control the display with the Data Map...............................................................64
2. Understanding Data Map icons.........................................................................64
3.4.6. Export Data to Excel ......................................................................... 65
Export file settings................................................................................................. 65
3.4.7. Copy the Graph as a Picture............................................................... 65
3.5. Program TriLog ............................................................................ 66
3.5.1. Setup ............................................................................................. 66
1. Quick setup.......................................................................................................66
2. Define sensor properties...................................................................................67
3. Presetting the display........................................................................................ 68
4. Preset the graph’s X-axis ..................................................................................68
5. Power saving mode........................................................................................... 69
6. Triggering..........................................................................................................69
3.5.2. Start Recording................................................................................ 71
3.5.3. Stop Recording ................................................................................ 71
3.5.4. Clear TriLog’s Memory....................................................................... 71
3.5.5. Select TriLog’s operating mode........................................................... 71
3.5.6. Calibrating the sensors...................................................................... 71
3.5.7. Define a Custom Sensor.................................................................... 72
3.5.8. Communication Setup....................................................................... 73
3.6. Analyze the data .......................................................................... 74
3.6.1. Reading Data Point Coordinates.......................................................... 74
3.6.2. Reading the Difference Between two Coordinate Values ......................... 74
3.6.3. Working with the Analysis Tools.......................................................... 74
3.6.4. Smoothing ...................................................................................... 74
3.6.5. Statistics......................................................................................... 75
3.6.6. Most Common Analysis Functions ....................................................... 75
1. Linear fit ............................................................................................................ 75

VI
2. Derivative..........................................................................................................75
3. Integral..............................................................................................................75
3.6.7. The Analysis Wizard.......................................................................... 76
1. Using the Analysis Wizard................................................................................. 76
2. Curve fit.............................................................................................................76
3. Averaging..........................................................................................................77
4. Functions........................................................................................................... 78
3.6.8. Available Analysis Tools..................................................................... 78
1. Curve fit.............................................................................................................78
2. Averaging..........................................................................................................79
3. Functions........................................................................................................... 79
3.6.9. Online Analysis ................................................................................ 82
3.6.10. Manual Curve Fitting......................................................................... 84
3.7. Workbook.................................................................................... 86
3.7.1. Working with Workbook .................................................................... 86
3.7.2. Opening a Worksheet........................................................................ 86
3.7.3. Create Your Own Worksheet .............................................................. 87
1. Create an HTML document with Word..............................................................87
2. Create a configuration file..................................................................................87
3.8. Special Tools ............................................................................... 89
3.8.1. Predicting........................................................................................ 89
3.8.2. The Timing Wizard............................................................................ 89
1. Overview...........................................................................................................89
2. Working with the Timing Wizard........................................................................ 89
3. Measuring methods...........................................................................................90
4. Time schemes and calculations ........................................................................ 93
5. Tips on using the Timing Wizard.......................................................................96
3.8.3. Crop Tool ........................................................................................ 97
1. To trim all data up to a point.............................................................................. 97
2. To trim all data outside a selected range........................................................... 97
3.8.4. Capture Tool.................................................................................... 97
1. Preparing the capture table...............................................................................98
2. Capturing data................................................................................................... 99
3. Displaying the captured data on the graph........................................................ 99
3.9. Toolbar Buttons.......................................................................... 101
3.9.1. Main (upper) Toolbar .......................................................................101
3.9.2. Graph Toolbar................................................................................. 102
3.9.3. Table Toolbar..................................................................................103
Chapter 4 Troubleshooting Guide........................................................... 104
4.1.1. General..........................................................................................104
4.1.2. Troubleshooting the ImagiProbe Application ........................................105
4.1.3. Troubleshooting the ImagiProbe Conduit.............................................106
4.1.4. Troubleshooting MultiLab..................................................................107
Chapter 5 Specifications....................................................................... 109
1. The TriLog Data Logger ..................................................................................109
2. Sensors........................................................................................................... 110
3. Accessories..................................................................................................... 110
4. ImagiProbe Software (Palm™ Handheld)........................................................111
5. MultiLab Software (PC WINDOWS)............................................................. 111
Appendix A: Figures ............................................................................... 113
Appendix B: Adding a code resistor to a custom sensor ............................... 114

VII
Index .......................................................................................... 115

8 Introduction
Introduction
The TriLog™ is a triple platform data logger –- stand-alone, slot on to Palm™, or
connected to the PC & MAC. The TriLog is ideal for classroom mobility and outdoor
experimenting. Data can be turned into graph form, analyzed as well as exported to
spreadsheets - all in the palm of the hand. Based on the MultiLog technologies, the
TriLog carries all the same benefits plus more: 4 inputs with automatic sensor
recognition, 12 bit resolution and 256K sample memory. The TriLog also works with
nearly all of the MultiLog sensors, including leading sensors from other vendors.
TriLog can record data from up to 8 sensors simultaneously; it is capable of recording
at rates of up to 21,000 samples per second, and of collecting up to 100,000 samples
in its internal memory.
TriLog is very easy to use because all of its functions are broken down into only four
buttons. In addition, when a sensor is plugged in, the TriLog automatically recognizes
the type of sensor it is, and will record the data with the appropriate units.
A rechargeable battery powers the data logger, which automatically switches to
standby mode 5 minutes after the time of the last data recording, the last button was
pressed, or the last communication was made with the PC. While on standby, TriLog
switches to a low-power state whereby the electronic circuitry and the display are
turned off, using less power.
Combining a Palm handheld computer and the ImagiProbe™ software, TriLog
becomes a complete portable sensor based science laboratory that enables students
to collect and visually analyze data.
The TriLog system also comes with the powerful MultiLab software. When the TriLog
is connected to a PC, live displays can be viewed at rates of up to 100/s, and
automatic downloads can be carried out at higher rates. The WINDOWS™ based
software can display the data in graphs, tables or meters, can analyze data with
various mathematical tools, and can show live or recorded video movies of actual
experiments.
The large variety of sensors with which TriLog is compatible makes the unit a true
"digital lab", which can measure scientific phenomena from the fields of Physics,
Chemistry, Biology and Environmental Sciences.
This manual is divided into four sections:
• The first section is dedicated to the data logger itself. Topics include:
Connecting sensors, configuration through the data logger buttons, and
using the LCD display to take measurements when working offline.
• The second section explains how to operate the TriLog combined with Palm
and ImagiProbe software. Topics include: How to mount TriLog onto Palm,
how to use ImagiProbe software to program TriLog, collecting and viewing
data, and copying data from Palm to a desktop computer.
• The third section gives a comprehensive overview of the MultiLab software.
Topics include: Working online, how to download data from the data logger
to a PC, analyzing the data both graphically and mathematically, using the
MultiLab software to program the data logger when working online, and
working with the video tool.
• The fourth and last section contains hardware specifications and a
comprehensive troubleshooting guide that gives answers to common
questions.

Chapter 1 TriLog 9
Chapter 1
TriLog
This section will focus on the TriLog’s data collection device: The data logger. The
section includes:
• How to operate the TriLog’s keypad,
• How to set up TriLog
• How to connect TriLog to your PC.
1.1. General
1.1.1. TriLog: system contents
Figure 1: Contents of the TriLog system
1. The TriLog Data Logger.
2. Sensors (see your package list).
3. Four sensor cables.
4. Serial or USB communication cable (see your package list).
5. Web camera (optional).
6. MultiLab and ImagiProbe software installation CD.
7. An AC-DC adaptor.
1
2
2
3
4
5
6
7

10 Chapter 1 TriLog
1.1.2. External connections
Figure 2: TriLog external connections
1. Sensor input (In) sockets marked In-1/8 In-2/7 In-3/6 and In-4/5: These sockets
are used to connect the sensors. Normally, all four sockets can be used
simultaneously.
To connect a sensor to the TriLog use one of the sensor cables. Plug the
stereo plug into the data logger, and the mini-din plug into the sensor arrow facing down.
In order to connect more than 4 sensors at a time, use the splitter cables, which will
enable the connection of up to 8 sensors simultaneously. When a splitter cable is
connected, it must be connected to the socket in the correct numerical order (e.g. for
5 sensors, connect the splitter cable to In-4/5). One of the two splitter cables is
marked with P1 - that is the main input (the lower input number), the second line is
marked with P2 - indicating that it is the secondary input (the higher input number).
Connect up to four input splitters (DT225) to split the TriLog’s inputs starting with In-4
(the splitters must be connected in order):
In-4 splits into In-4 and In-5
In-3 splits into In-3 and In-6
In-2 splits into In-2 and In-7
In-1 splits into In-1 and In-8
2a. PC serial
connection
socket
3. Power input
(DC 6V)
1. Sensor
inputs
1st
input
2nd
input
3rd
input
4th
input
2b. PC USB
connection
socket

Chapter 1 TriLog 11
2. a) PC serial communication socket: Connect the stereo plug of the serial
communication cable to this socket and the 9-pin plug to the computer’s serial
port, usually located at the back of the computer.
Or:
b) PC USB communication socket: Connect the mini USB plug of the USB
communication cable to the TriLog and the USB Type A plug to the computer’s
USB port (see page 47 for USB driver installation).
3. External DC power supply socket: Plug in an AC/DC 9 - 12V adaptor whenever
you want to save battery power, or to charge the battery when necessary.
Connecting external power to the TriLog automatically charges the internal
battery. The adaptor should meet the required specifications (see section
1.1.4).
1.1.3. Battery
TriLog is equipped with a 2.4V/850mAh NiMH rechargeable battery. Before you start
working with TriLog for the first time, charge the unit for 10 to 12 hours while it is
turned off.
If the data logger’s main battery runs out, the internal 3V Lithium battery backs up
the memory, so no data will be lost.
Note: Battery shelf charge life is about 100 hours. To maximize battery
shelf charge life, always disconnect sensors when not in use.
Disconnect TriLog from the computer when not in use. You can
continue to operate TriLog by plugging it into the wall.
1.1.4. AC/DC Adaptor
• Output: Capacitor filtered 6 VDC, 500mA.
• 2.5mm stereo plug, tip positive.
1.1.5. Automatic standby
TriLog switches automatically to standby mode after 5 minutes have passed since
the time of the last data recording, the last button was pressed, or the last
communication was made with the PC.
While on standby, TriLog switches to a low-power state where the electronic circuitry
and the display are turned off and TriLog uses less power.
1.1.6. Power saving mode
When performing long experiments at low rates, of up to 1 per minute, TriLog
enables you to work in power saving mode. In this mode TriLog switches to standby
mode and ‘wakes up’ for brief periods of time only to execute data logging and then
returns to a standby.
This will enable TriLog to work continuously, without recharging the battery, for up to
100 hours instead of 5 hours in normal mode.
To learn how to operate in power saving mode please refer to section 3.5.1.5 on
page 69.

12 Chapter 1 TriLog
1.2. Stand-Alone Operation
One way to program the TriLog is to use the keypad and screen (The other way is to
use MultiLab – see page 66, or ImagiProbe – see page 24). The keypad allows us to
set all the parameters for data collection, while the LCD screen displays the setting
values.
1.2.1. Front Panel Layout
Figure 3: TriLog front panel
1.2.2. Working Modes
TriLog has two working modes. The default mode is Auto ID and the TriLog is in this
mode when turned on for the first time. When using more than 4 sensors (when using
VERNIER sensors, or if you’ve defined your own sensor), switch to the 8 sensors
mode. You can select the working mode either from MultiLab (see page 71) or from
ImagiProbe (see page 27).
TriLog saves the current mode selection and will automatically open in that mode the
next time you turn TriLog on.
1. Auto ID
Automatic sensor identification – just plug in the sensors and the TriLog prepares
itself to collect data from these sensors.
While in this mode you can work with up to 4 sensors simultaneously.
LCD Display
Rate
Button
On / Off
Button
Samples
Button
Run / Stop
Button

Chapter 1 TriLog 13
2. 8 sensors
This mode enables data logging from up to 8 sensors simultaneously. Connect up to
four input splitters (DT225) to multiply the TriLog’s inputs starting with In-4 (the
splitters must be connected in order):
In-4 splits into In-4 and In-5
In-3 splits into In-3 and In-6
In-2 splits into In-2 and In-7
In-1 splits into In-1 and In-8
In the splitter cable, one of the two wires is marked with P1 (port 1) - that is the main
input (the lower input number). The second wire is marked with P2 - indicating that it
is the secondary input (the higher input number).
In this mode there is no automatic sensor identification.
To learn how to switch TriLog to 8 sensors mode and to select the sensors manually
from MultiLab software please refer to section 3.5.5 on page 71. To learn how to do it
from ImagiProbe software please refer to section 2.4.2 on page 27.
Use this mode if you want to work with more than 4 sensors or if you are using
VERNIER sensors.
1.2.3. Quick-Start
Before you first use TriLog, charge the unit for 10 to 12 hours while it is turned off.
1. Turn on TriLog
Press the On button for one second. You will see the initialization screen. TriLog
performs a brief self-check, loads the last setup you used and momentarily displays
its version number and battery level, then the display will be changed to show the
current time and date.
2. Plug in the sensors
Start with the first input on the right (see on page 10). If TriLog is in Auto ID mode
(the default mode) it will identify the sensors you’ve plugged in and display the
sensor’s name.
Note: Sensors must be added successively, starting with input-1. If a
single sensor is used it must be connected to In-1. If two sensors
are used in an experiment, they must be connected to In-1 and In-2.
If the TriLog is in 8 Sensors mode you have to select the sensors manually from
MultiLab (see on page 66) or ImagiProbe (see page27).
3. Select Rate
Press the RATE button to display the current rate selection:
_ _ _ _ _ _ RATE_ _ _ _ _ _
R = 100/s
The cycle of sample rates is moved through by pressing the RATE button until the
appropriate rate is found.

14 Chapter 1 TriLog
4. Select total number of samples
Press the SAMPLES button to display the current total number of recording points:
_ _ _ _ SAMPLES_ _ _ _ _
S = 500
The cycle of sample points is moved through by pressing the SAMPLES button until
the appropriate number of points is found.
5. Start recording
Press the RUN button to start recording.
The LCD screen will display:
Logging
At rates of up to 10 samples per second TriLog displays the recorded data values,
the number of the last recorded data sample, and the total number of samples. Use
the RATE button to scroll through the different sensor’s data and the number of
samples.
You can stop recording any time by pressing the RUN button a second time.
Otherwise logging will stop after the selected number of samples where taken. The
LCD screen will display the number of the experiment in TriLog’s memory:
_ _ _ LOGGER – RUN _ _ _
Log 01 ended
1.2.4. Working with the TriLog keypad
On / Off
Press for one second to turn TriLog on. Press a second time to
turn it off
Note: Pressing OFF will not erase the sample memory. The data stored
in the memory will be kept for up to 10 years.
Rate
When programming TriLog press to scroll to the desired recording
rate.
When TriLog is running (in rates up to 10/s) use this button to
scroll through the different data displays
Samples
When programming TriLog press to scroll to the desired number of
recording samples.
When TriLog is running in manual mode press this button each
time you want to collect a sample
Run
Press to begin recording. Press a second time to stop

Chapter 1 TriLog 15
1.2.5. The Display
The Alfa numeric 2-lines LCD screen displays TriLog’s setup and status messages
and shows measured data in recording rates up to 10 per second.
To scroll through the various data displays press the Rate button.
In standby mode the display is turned off except for a brief period of time once a
minute to display status.
In power saving mode the display is turned off except for a brief period every time
TriLog records a new sample only to display the sample number.
If the user incidentally presses the on button in power saving mode TriLog displays
warning message:
To stop logging:
Press STOP
1.2.6. Load the Last Setup
When you turn TriLog on, once the self testing and selection of the input modes has
been completed, it will automatically load the last setup you’ve used.
1.2.7. Internal Clock and Calendar
The internal clock is set the first time you use the Setup command from the MultiLab
software to program the TriLog, and is automatically updated to the PC’s time and
date each time you connect your TriLog to a PC.
The internal clock and calendar is kept updated even when the TriLog is turned off,
but it will be erased if the 2.4V battery is dead. It will be updated the next time TriLog
will be connected to a computer or a Palm.
1.2.8. Clear the Memory
TriLog automatically checks the available memory before it begins the recording. If
there is not enough memory you will see this message on the display:
_ _ _ LOGGER-RUN _ _ _
Clear = (Run)
Press the Run button to clear the memory and begin recording.
1.2.9. Choose the Right Setup.
1.Sampling rate
The sampling rate should be determined by the frequency of the phenomenon being
sampled. If the phenomenon is periodic, sample at a rate of at least twice the
expected frequency. For example, sound recordings should be sampled at the
highest sampling rate – 20,800/sec, but changes in room temperature can be
measured at slower rates such as once per second or even slower, depending on the
speed of the expected changes. THERE IS NO SUCH THING AS OVERSAMPLING. For extremely smooth graphs, the sampling rate should be about 20
times the expected frequency.

16 Chapter 1 TriLog
Note: Sampling at a rate slower than the expected rate can cause
"frequency aliasing". In such a case, the graph will show a
frequency much lower than expected. In Figure 4 below, the higher
frequency sine wave was sampled at 1/3 of its frequency.
Connecting the sampled points yielded a graph with a lower,
incorrect frequency.
Figure 4: Frequency Aliasing
Manual sampling - use this mode for:
• Recordings or measurements that are not related to time.
• Situations in which you have to stop recording data after each
sample obtained, in order to change your location, or any other
logging parameter (Note: During the experiment NO CHANGES
can be made to the TriLog’s configuration).
To start an experiment using manual data logging, set the RATE to “manual” and
press the Run button once to start the data recording, then press the Samples
button each time you want to collect a sample.
2.Sampling Points
After you have chosen the sampling rate, choosing the number of points will
determine the logging period: Samples / Rate = Logging time. You can also choose
the duration of an experiment first, and then calculate the number of samples:
Samples = Logging time × Rate.
Continuous
In the Continuous mode, TriLog does not save data, and can continue logging
indefinitely.
If TriLog is connected to the PC and the MultiLab software is running, the data is
automatically transferred to the computer and displayed in a real time graph.
To operate in Continuous mode select RATE equal to or less than 100/s and
SAMPLES = Continuous.
You can also select Continuous mode directly from the MultiLab software.

Chapter 1 TriLog 17
1.2.10. Programming Rules and Limitations
The following are some rules and limitations you must take into account when
programming the TriLog, as TriLog integrates all programming limitations
automatically. TriLog will only allow the programming of settings that comply with the
rules below.
1.Sampling points:
• Increasing the number of active inputs limits the number of
sampling points one can choose. The following condition must
be always satisfied: Samples × Active Inputs < Memory.
• TriLog’s memory is sufficient for 170,000 samples.
• When sampling at rates faster than 100 samples per second the
memory can store only four experiments of 32,000 samples
each.
• When sampling at rates of 100 samples per second or less,
selecting Maximum sampling points will create up to four
successive files of 42,500 points each (a total of 170,000
points), depending on the available memory.
2. Sampling rate:
The number of sensors in use limits the maximum sampling rate:
Number of sensors Maximum sampling rate Resolution
1 sensor 20,800 samples per second 10 bit
1 sensor 11,200 samples per second 12 bit
2 sensors 3,400 samples per second 12 bit
3 sensors 2,500 samples per second 12 bit
4 sensors 1,900 samples per second 12 bit
5 sensors 1,600 samples per second 12 bit
6 sensors 1,400 samples per second 12 bit
7 sensors 1,200 samples per second 12 bit
8 sensors 1,050 samples per second 12 bit
3. Continuous sampling
• Continuous sampling is possible up to a maximum sampling rate of
100/s.

18 Chapter 1 TriLog
1.3. Sensor Calibration
In this chapter you will learn how to increase the TriLog system accuracy using
calibration. Most of the sensors are linear, i.e. the output level of each sensor
changes according to the equation:
baXY
+
=
Where:
Y – The sensor’s output (voltage level varying from 0 to 5V)
X – The sensor’s input
a – The sensor’s gain
b – The sensor’s offset
The calibration process allows us to control the offset, and in some cases even the
gain, of a sensor. The TriLog system offers 4 types of calibration:
1. Hardware offset calibration.
2. TriLog automatic zero calibration.
3. MultiLab “Sensor calibration”.
4. Factory calibration (no manual calibration required).
1.3.1. Hardware Offset Calibration
On some of the sensors there is a screw controlling the sensor offset. To calibrate
the sensor, rotate this screw until the sensor shows the correct measured value
(obtain the actual "correct value" from another source that is known to be accurate).
1.3.2. TriLog Automatic Zero Calibration
TriLog is able to automatically calibrate the sensor offset for all analog sensors
accurately, quickly, and for every new experiment conducted.
The calibration method is very simple. Whenever you plug in a sensor, the data
logger checks to see if the selected sensor measures a value within ±2% of its “zero
value”. If so, TriLog sets that value as zero.
1) To enable this feature, make sure that the sensors are at their “zero values”
when you plug them in. To ensure the most accurate “zero value”: Shorten the
Voltage sensor plugs.
2) Leave the Current sensor plugs open.
3) Cover the Light, Photo-Gate, and Microphone sensors.
4) Insert the pH sensor in a pH-7.0 solution.
5) Unload the Force Transducer.
6) Place the Accelerometer on a stationary surface.
7) Place the Temperature probes in ice water.
8) Place the Pressure sensor in a 1 ATM (1013 mb) Chamber.

Chapter 1 TriLog 19
1.3.3. pH Temperature Compensation
To compensate a pH sensor for temperature changes, plug the temperature sensor
into Input 1, and the pH sensor in Input 2. TriLog will then display the compensated
pH value.
1.3.4. MultiLab Sensor Calibration
The sensors can also be calibrated using the Calibrate Sensors option in MultiLab’s
Logger menu. Please refer to section 3.5.6 for more on this.
1.3.5. Factory Calibration (No calibration required)
All digital sensors that are essentially "timers" leave the factory fully calibrated, and
do not suffer from any accuracy degradation. An example of such a sensor is the
Sonic Ranger Distance sensor, which measures the time passed from the
transmission of a sound pulse to its echo reception.

20 Chapter 2 Working with Palm Handheld
Chapter 2
Working with Palm Handheld and
ImagiProbe
2.1. Install the Software
2.1.1. System Requirements
To work with ImagiProbe, your Palm handheld device should be equipped with the
following:
• Approximately 300k of memory
• Palm OS ® 3.5 or later
2.1.2. Installation
1. Follow the instructions in the Palm handheld manual to install the
Palm Desktop software onto your desktop computer.
2. Open the ImagiProbe 3.0 Installer located on the ImagiProbe CD.
3. Follow the on-screen instructions to install the ImagiProbe 3.0
application, manual and conduit onto your desktop computer.
4. Perform a HotSync operation to install the ImagiProbe application
onto your Palm Powered device.

Chapter 2 Working with Palm Handheld 21
2.2. Overview
2.2.1. ImagiProbe Layout
The ImagiProbe application is designed to support four major kinds of activities:
• Creating and viewing investigations
• Creating and viewing data collection trials
• Adding, viewing and editing sensors and their calibrations
• Creating, viewing and editing notes
The diagram below shows the ImagiProbe application's major modules and their
interrelationships:
Figure 5: schematic diagram of ImagiProbe modules
Investigations and Trials
The ImagiProbe application organizes data collection episodes into investigations
and trials. An investigation addresses the question you are trying to answer with
evidence derived from a series of independent data collection trials. The ImagiProbe
application enables you to add investigations and trials, limited in size and number
only by the available memory.
Sensors and Calibrations
When you install the ImagiProbe application you will also install calibrations for
commonly used sensors. You may wish to add calibrations for these sensors, or
define new sensors along with their calibrations. The ImagiProbe application provides
a sensors module that enables you to add new sensors and calibrations. In addition,
you can install sensors and calibrations using HotSync.
Phenomenon under investigation
Create Investigation
Create Trial
Setup Trial
Preview Data
Collect Data
Annotate
Annotate
View/Create Sensor
Annotate
Annotate
Calibrate by
Equation
Calibrate by
Reference
ImagiProbe

22 Chapter 2 Working with Palm Handheld
Note: You cannot recalibrate some sensors. Please see the
documentation included with each sensor for calibration
instructions.
Notes
The ImagiProbe application enables you to add text notes to each investigation, trial,
sensor or calibration. To enter text notes, you can use the gesture recognition
capability called Graffiti ® built into Palm OS, you can access an on-screen
keyboard, or you can attach on optional keyboard.
2.2.2. Palm Panel Layout
Future chapters will refer to components and controls on your Palm Powered device.
Refer to the diagram below to interpret those references.
Figure 6: Palm Panel Layout
Application Button
Menu Icon
Power Button
TriLog Connector
Scroll Buttons
Alpha Keyboard Target
Graffiti Write-in Areas
Numeric Keyboard Target

Chapter 2 Working with Palm Handheld 23
2.3. Connecting TriLog to a Palm Handheld
To connect TriLog to a Palm handheld:
1. Remove TriLog’s front panel – Simultaneously depress release
buttons on both sides of TriLog and lift the cover
2. While holding the back of the Palm handheld at an angle to the front
of the interface, slide the connector at the base of the Palm handheld
onto the matching connector at the bottom of TriLog.
3. Simultaneously depress release buttons on both sides of TriLog.
4. Lower the back of the Palm handheld onto the interface.
5. Release the buttons on the side of the interface to latch TriLog in
place.
Figure 7: Connecting Palm Handheld to TriLog
Release Button
Palm Connector
Universal Connector
Release Button
Reset Button

24 Chapter 2 Working with Palm Handheld
2.4. Getting Started
2.4.1. Working with Investigations and Trials
Before you can collect data with an ImagiProbe ™ system, you must add a new
investigation and within that investigation, a new data collection trial. After you have
added and named a trial, you must specify the trial’s data collection parameters: the
sensor(s) you have connected to TriLog and the sampling rate for the sensor(s). You
may also choose to add notes to an investigation or trial.
1.Adding a New Investigation
To add a new investigation, from the Investigations form:
1. Tap New Investigation
2. Enter a name for the investigation (e.g., Ohm’s Law).You can
change the investigation’s default name by tapping on the name and
changing it in the New Name dialog box. If you are not sure how to
enter text, refer to your Palm Powered computer’s manual
3. Tap OK to make the name change
Note: The ImagiProbe application always provides a default name for an
investigation (e.g., Investigation 1)
2.Adding a New Trial
To add a new trial, from the Trials form:
1. Plug in the sensor you need for this trial
2. Tap New Trial
ImagiProbe opens the Edit Trial Setup form. If Automatic Sensor Detection is on (the
default option), TriLog automatically detects the sensors and their calibration (see
page 12). To learn how to select working mode and how to assign sensors manually
see on page 27.
3. Enter a name for the trial (e.g. Bulb Characteristics). You can
change the trial’s default name by tapping on the name and
changing it in the New Name dialog

Chapter 2 Working with Palm Handheld 25
4. Tap OK to make the name change. If you are not sure how to enter
text, refer to your Palm Powered computer manual
3.Setting the Sampling Rate
The sampling rate specifies the number of samples per unit of time you wish to
collect (e.g.10 samples per second).
To set the sampling rate for the assigned sensor(s), from the Edit Trial Setup form:
1. Tap Set Rate
2. Pick the time unit (seconds, minutes or hours) from the Time unit
pick list in the Choose Sampling Rate dialog
3. Pick the number of samples per time unit from the Samples/time unit
pick list.
4. Tap OK
Note: The maximum sampling rate depends on the time unit and the
number of sensors connected. If you specify more than one
sensor, the same rate applies to both.
4.Previewing Data
When you complete your trial setup, you may wish to preview your data. In Preview
you can:
• Ensure that your handheld computer, TriLog and sensors are properly
connected
• Verify that a sensor is measuring what you intend it to measure
• Verify that a sensor has reached a stable value
• Adjust the y-axis scale to better suit your data
To preview data from one or more sensors, from the Trial Setup form:

26 Chapter 2 Working with Palm Handheld
1. Tap Preview
2. Examine data as they change in the meter or as they are plotted in
the Preview graph
3. You can toggle between sensors by tapping on the Input Selector
5.Changing the Scale for the Y-Axis
By default, the ImagiProbe application sets the y-axis scale to correspond to the
maximum and minimum values of a sensor’s range as specified in its calibration. You
can adjust the maximum and minimum values for the y-axis to better suit the range of
data expected in a trial. The ImagiProbe application determines the x-axis scale
based on your sampling rate.
1. Changing the Y-Axis Scale for One Sensor
To change the y-axis scale for one sensor, from the Preview Data or View Collected
Data forms:
1. Tap the Scale Picker and tap Scale Y to open the Rescale Y-Axis
entry form
2. Enter new values for From and To.
3. Tap OK to accept the changes
Note: Setting too narrow a range between y-max and y-min may
produce inaccurate plots.
2. Changing the Y-Axis Scale for More Than One Sensor
To change the y-axis scale for more than one sensor, from the Preview Data or View
Collected Data forms:
1. Tap the Input Selector to select the scale for sensor for which you
wish to make a scale change
2. Tap the Scale Picker and tap Scale Y marker for the selected scale
and enter new values
3. Tap OK to accept the changes
6.Collecting Data
From the Trial Setup, Edit Trial Setup or the Preview Data forms:
1. To start collecting data, tap Collect
2. To finish collecting data, tap Stop
Input selector

Chapter 2 Working with Palm Handheld 27
3. Tap Done to save your data
Note: When collecting data at sampling rates greater than 100 samples
per second, ImagiProbe 3.0 application will display data in real
time at 25 samples per second so you can visualize trends in the
data. At the end of the trial, the application will download the full
dataset for inspection.
Note: When collecting at rates greater than 10,000 samples per second:
• You cannot manually stop data collection. Data collection will
continue until the TriLog’s data buffer fills.
• Data will not be displayed until data collection is complete.
2.4.2. Selecting working mode
Before you can assign sensors for a trial you must first setup the application to
expect manual or automatic sensor assignment. For manual setup, ensure that the
Auto ID function is off. For automatic setup, ensure that the Auto ID function is on.
To activate the Auto ID function, from the Investigation or Trial form:
1. Tap the Menu icon to display the ImagiProbe 3.0 menus
2. Tap the Options menu
3. Select Auto ID Sensors…
4. To enable TriLog’s Auto ID mode (see on page 12) tap the On
button. To disable TriLog’s Auto ID mode tap on the Off button. The
Auto ID function will remain in effect until the next time you change it
2.4.3. Manually Assigning Sensors and Their Calibrations
To assign a sensor and its calibration to input, from the Edit Trial Setup form:
1. Tap on a Sensor Selector field.

28 Chapter 2 Working with Palm Handheld
2. Assign a sensor and its calibration to input 1 by tapping on the
sensor picker and selecting a sensor name from the installed sensor
list. The ImagiProbe 3.0 application will assign a default calibration
for the sensor. If you wish to change the default calibration to
another preinstalled calibration, tap the calibration picker
3. If necessary, follow the same steps to assign sensors to additional
inputs (maximum of 8 sensors). Assign sensors to additional inputs
only if you intend to collect data with multiple sensors
simultaneously.
2.4.4. Viewing Collected Data
When you have completed a data collection trial, the ImagiProbe application returns
you to the Data form. In the Data form, you can page through data; view specific
values in the line graph; zoom in and out of data.
1.Paging through Data
To move through your collected data, tap on the data navigation buttons to page
forward and backward. You can page forward or backward a page at a time or jump
directly to the beginning or end of the data.
2.Viewing Specific Values in a Line Graph
To view specific values:
1. Move to the graph page that contains the specific values you wish to
view.
2. Tap and hold inside the plotting area.
3. View specific values in the popup boxes.

Chapter 2 Working with Palm Handheld 29
Note: To view values for a different sensor you must toggle between the
sensors by tapping the Input Selector icon.
3.Zooming In and Out of Data
To zoom in or out of data:
1. Move to the graph page that contains the values you wish to view
more closely
2. Tap and drag on the x-axis to select the zoom-in section
3. Tap the Zoom Out icon to zoom out by a factor of two with each tap
4. To zoom all the way out tap the Scale picker, then select Zoom X.
2.4.5. Adding and Editing Notes
The ImagiProbe application provides Notes forms that enable you to add and edit
pages of notes to investigations, trials, sensors, and calibrations. You can return to a
Notes form to review, edit, or to add new notes.
1.Adding Text Notes
To add notes:
1. Tap the Notes icon to open a Notes form
2. Using the stylus, begin to enter notes in the Graffiti ® write-in area or
tap once on the Alpha Keyboard Target to open the on-screen
keyboard
3. As you enter your note in the Graffiti write-in area, it will appear in
the Note form. If you are using the on-screen keyboard, it will appear
in the text field above the keyboard
Notes icon

30 Chapter 2 Working with Palm Handheld
4. When you have finished adding text notes, tap Done to return to the
previous form. Your notes are automatically saved
2.Editing Text Notes
1. Editing a text note with Graffiti
To edit text in a note, from a Notes form:
1. Tap on the text you wish to edit to select it.
2. Use Graffiti to enter replacement text.
3. When you finish editing your note, tap Done to return to the previous
form. Your notes are automatically saved.
2. Editing a text note with the on-screen keyboard
To edit text in a note with the on-screen keyboard, from a Notes form:
1. Tap the Alpha Keyboard Target to display the on-screen keyboard
2. Working within the on-screen keyboard text entry area, use the
stylus to:
• Select the text you would like to erase or replace
• Position the input cursor where you would like to insert new
text
Use the on-screen keyboard to erase the selected text or to enter
new text
3. Tap Done to close the on-screen keyboard and return to the Edit
Text in Note dialog
4. Tap Done to place the edited text in the Notes form

Chapter 2 Working with Palm Handheld 31
3. Erasing Text Notes
To erase a text note, from the Notes form:
1. Tap the text to highlight the material you wish to erase.
2. Use the Graffiti backstroke to delete the text.
2.4.6. Viewing an Existing Trial
To view an existing trial, from the Investigations form:
1. Tap on an investigation name to enter the Trials form
2. Select a trial from the trial list by tapping on its name. Review data
collection parameters in the Trial Setup form
3. Tap View Data to view data collected in that trial
4. Tap Notes to view notes and sketches connected with that trial
2.4.7. Saving a Trial Setup
You can save a trial setup without previewing or collecting data. You can use it, for
example, to setup data collection parameters for trials in advance of your
investigation.
To save a trial setup, leave the Edit Trial Setup form by tapping the Save button
before tapping Collect. The ImagiProbe application will add the trial setup to the trial
list in the Investigation form.
2.4.8. Editing a Trial Setup
To edit trial setup, from the Investigation form:
1. Tap the trial name in the Trial list.
2. Tap the Edit button in the Trial form.
3. Make the necessary changes to parameters in the Edit Trial Setup
form.
4. Tap Save to save the edited trial setup. Or tap Preview or Collect to
begin viewing data
2.4.9. Deleting Investigations and Trials
1.Deleting Investigations
To delete an investigation, its trials and notes:
1. Tap the Investigation you wish to delete.
2. Tap the Menu icon on your handheld computer to display the
ImagiProbe application menus.
3. Select the Action menu.

32 Chapter 2 Working with Palm Handheld
4. Select Delete Investigation.
5. Tap OK when prompted
2.Deleting Trials
To delete a trial and its notes, from the Trial form:
1. Tap the Menu icon on your handheld computer to display the
ImagiProbe application menus
2. Select the Action menu
3. Select Delete Trial
4. Tap OK when prompted

Chapter 2 Working with Palm Handheld 33
2.5. Working with Sensors and Calibrations
The ImagiProbe installer includes calibrations for commonly used sensors (e.g. Light,
Temperature, Voltage, and pH).You can view the list of installed sensors and
calibrations from the Sensor module. Use the Sensor module to create new sensors
and calibrations. You can also add sensors and calibrations by downloading them
from the ImagiWorks.Inc. Website and installing them using the HotSync process.
2.5.1. Accessing the Sensor Module
To access the Sensor module, from the Investigations form:
1. Tap the Menu icon, or press the Menu key on your handheld
computer to display the ImagiProbe application menus
2. Choose the Go menu
3. Select Sensor List to display the Sensor list
2.5.2. Viewing Sensors and Sensor Notes
To view an installed sensor, from the Sensor list:
1. Scroll through the list of sensors
2. Tap on a sensor name (e.g. Light) to view its manufacturer and a list
of calibrations for that sensor (e.g. 0 – 600 lux)
3. Tap the Notes icon to view notes for that sensor
4. Tap Done to return to the Sensor form
5. Tap Back in the View Sensor form to return to the Sensor list.

34 Chapter 2 Working with Palm Handheld
2.5.3. Viewing and Editing Calibrations and Their Notes
To view calibrations, from the Sensor form:
1. Scroll through the list of calibrations
2. Tap on a calibration (e.g. 0 to 600 lux) in the calibration list
3. Tap the Notes icon to view and edit notes for that calibration
4. Tap Done to return to the Calibration form
5. Tap Edit to edit this calibration
6. Tap Save to save these changes
7. Tap Back in the Calibration form to return to the Sensor list
2.5.4. Adding Sensors
Though the vast majority of sensors are linear, the ImagiProbe 3.0 application also
supports non-linear sensors. You can add sensors and calibrations for both linear
and non-linear sensors.
1.Adding a Linear Sensor
To add a linear sensor, from the Sensor list:
1. Tap New Sensor
2. Select Linear from the Choose Sensor Type dialog and tap OK
3. Enter a name for the sensor
4. Enter a manufacturer for the sensor See Adding Calibrations to
calibrate this sensor
5. Tap Back to return to the Sensor list
2.Adding Linear Calibrations
The ImagiProbe application enables you to calibrate sensors in two ways:
• Equation — enter the calibration parameters provided in your sensor’s
documentation
• Reference — pair a voltage value from the sensor with a known value from a
reference source like a standard measuring instrument (e.g. thermometer,
light meter or voltmeter).
Note: Always consult the documentation provided with your sensor to
determine the proper calibration method for that sensor.
1. Calibrating a Linear Sensor with an Equation
To calibrate a sensor with an equation, from the Sensor form:
1. Tap New Calibration
2. Specify an operating range (Min to Max) for the sensor by entering
its minimum and maximum values

Chapter 2 Working with Palm Handheld 35
3. Specify units for the sensor (e.g. g)
4. Select Equation from the Calibrate by picker.
5. Referring to the documentation provided with the sensor, enter
values for the slope and the y-intercept of the calibration curve.
6. Tap Save
2. Calibrating a Linear Sensor by Reference
To calibrate a sensor by reference, from the View Sensor form:
1. Tap New Calibration
2. Specify an operating range (Min to Max) for the sensor by entering
its minimum and maximum values
3. Specify units for the sensor (e.g. g)
4. Select Reference from the Calibrate by picker
5. Tap in the Reference Point picker to set the value of the first
reference point
6. Follow the instructions in the Set Calibration Point form to add
values for the first reference pair
7. Tap OK to accept values for the first reference pair

36 Chapter 2 Working with Palm Handheld
8. Repeat steps 4 to 7 to add a second reference value pair
9. Tap Save
3.Adding Non-Linear Sensors
To add a non-linear sensor, from the Sensor List:
1. Tap New Sensor
2. Select one of the non-linear types from the Choose Sensor Type
dialog and tap OK
4.Adding Non-Linear Calibrations
The ImagiProbe application enables you to calibrate non-linear sensors by equation
only. Because this is an advanced feature, you will need a good understanding of the
functional characteristics of the non-linear sensor you wish to calibrate.
Note: Always consult the documentation provided with your sensor to
find the background information necessary to calculate the proper
calibration constants for your non-linear sensor.
1. Calibrating a Non-Linear Sensor with an Equation
To calibrate a non-linear sensor with an equation, from the Sensor Form:
1. Tap New Calibration
2. Specify an operating range (Min to Max) for the sensor by entering
its minimum and maximum values
3. Specify units for the sensor
4. Select Equation from the Calibrate by picker
5. Enter values you calculated using the sensor manufacturer’s
documentation for a, b, c to define the calibration curve
6. Tap Save
2.5.5. Deleting Sensors
To delete a sensor, from the Sensor list:
1. Tap the sensor you wish to delete
2. Select the Action menu
3. Select Delete Sensor

Chapter 2 Working with Palm Handheld 37
2.5.6. Deleting Calibrations
To delete a calibration, from the Sensor list:
1. Tap on a sensor name for which you wish to delete a calibration
2. Tap on the calibration you wish to delete
3. Tap the Menu icon, or press the Menu key on your handheld
computer to display the ImagiProbe application menus
4. Select the Action menu
5. Select Delete Calibration
6. Tap OK when prompted
7. When you finish deleting calibrations, tap Back
2.5.7. Installing Sensor Databases on Palm Powered Devices
1.Installing Sensor Databases Using HotSync
Installing sensor databases using the HotSync method requires three steps: a)
download the desired sensor database(s) from the ImagiWorks Website
(www.imagiworks.com
); b) place the database on the desktop computer; c) use
HotSync to copy the database from the computer to the Palm Powered device.
1. Using HotSync to Install Sensors from a Desktop Computer
To install one or more sensor databases stored on a desktop computer:
1. Download the sensor database(s) from the ImagiWorks Website
2. Locate the sensor database(s) you wish to install (e.g. Pressure
Sensor.pdb) on your desktop computer

38 Chapter 2 Working with Palm Handheld
3. Double-click on that file name to open the Install Handheld Files
Window of the HotSync Manager or open the Palm HotSync
Manager and select Install Handheld files from the HotSync menu
4. Drag all the sensor databases you wish to install into the Install
Handheld Files window
5. HotSync your Palm Powered device
The sensor database is now on your Palm and will be merged when you launch the
ImagiProbe application
2. Merging Sensor Databases into ImagiProbe 3.0
After you install the sensor database onto a Palm Powered device you will need to
merge that database into the ImagiProbe application. This will happen automatically
when you open the application.
After you merge a sensor database, the ImagiProbe application will automatically
delete the sensor database from the Palm Powered device. If you do not install the
sensor database, it will remain on the Palm device and the ImagiProbe application
will prompt you to merge the database each time you open it. Delete the sensor
database before you open the ImagiProbe application if you do not want it merged.
After installing a sensor database:
1. Open the ImagiProbe application
2. Tap OK
Note: The merging process adds the sensor(s) to the sensors you
already have in the ImagiProbe Sensor List. The merging process
will resolve naming conflicts by renaming sensors.
If you have multiple installable databases on your Palm Powered device, all are
integrated when you choose to accept the new information. If you wish to add only a
subset of the databases on the Palm device, delete unnecessary ones before
merging.
2.Deleting Sensor Databases before Merging
To delete a sensor database before merging with ImagiProbe:
1. Tap the Applications button
2. Tap the Menu icon, or press the Menu key
3. Tap the App menu
4. Tap Delete
5. Select the sensor database you wish to delete

Chapter 2 Working with Palm Handheld 39
2.6. Adding Content to ImagiProbe 3.0
You can create and save content databases of your favorite activities and install
these in advance on other Palm Powered computers. Content databases can include
investigations complete with notes and trial setups. Follow a three-step process to
add content to the ImagiProbe 3.0 application. First, create and save content
databases that include annotated investigations, trials and sensors. Second, install
saved content databases on your Palm Powered device. Third, merge the content of
these databases into investigations and trials already resident in the ImagiProbe
application. Install your sensor-based activities and merge them into the application
for student use. Delete content databases from the Palm Powered devices when you
no longer need them.
2.6.1. Creating and Saving a Content Database
Use the procedures outlined in earlier chapters to create investigations and trials
complete with notes. After you have created a collection of investigations and trials
that represent the content you wish to cover, save it as a database that you can
install on other Palm Powered devices.
After you have created your content, from the Investigation list:
1. Tap the Menu icon, or press the Menu key to open ImagiProbe
menus.
2. Select the Export menu.
3. Select Save Installable Database
4. Name the content database (e.g. Mixing Temp Investigations).
5. Tap OK to save the content database
2.6.2. Installing Content Databases on Palm Powered Devices
You can install content databases in two ways:
• Beaming – beam content databases to other Palm Powered devices.
• HotSync – save the content database as a .pdb file on a desktop computer for
later installation using the HotSync procedure.
1.Installing Content Databases by Beaming
After you have created and saved a content database, from the Investigation list:
1. Tap the Menu icon, or press the Menu key
2. Select the Export menu
3. Select Beam Installable Database
4. Position the Palm Powered devices to enable beaming
5. Choose a database to beam

40 Chapter 2 Working with Palm Handheld
6. Follow the on-screen instructions to complete the beaming
procedure
2.Installing Content Databases Using HotSync
The HotSync method requires two steps: a) placing the database on the desktop
computer; b) using HotSync to copy the database from the computer to other Palm
Powered devices.
1. Placing a Content Database on a Desktop Computer
Before you can distribute content using the HotSync method, you must place the
content database stored on your Palm Powered device on you desktop.
To place the content database on your desktop computer:
1. After you have created content database(s),performs a HotSync. The
HotSync procedure will copy content database(s) into your Backups
folder within the Palm folder (i.e. Palm folder >Users
>YourPalmUserName >Backups) on your desktop machine
2. Locate this fi le,(e.g.,database1.pdb) and copy it to an appropriate
location on your desktop computer (e.g. Content Databases folder)
for later use
2. Using HotSync to Install Content Databases
To install one or more content databases stored on a desktop computer:
1. Locate the content database you wish to install (e.g.,database1.pdb).
2. Double-click on that file name to open the Install Handheld Files
Window of the HotSync Manager, or launch the Palm HotSync
Manager and select Install Handheld files from the HotSync menu
3. Drag all the databases you wish to install into the Install Handheld
Files window
4. HotSync your Palm Powered device
The content database is now on your Palm and will be merged when you launch the
ImagiProbe application
2.6.3. Merging Content Databases into ImagiProbe 3.0
Before you can use a content database installed on a Palm powered device, you
must merge that database into the ImagiProbe application. This will happen
automatically when you open the application.
After you merge a content database, the ImagiProbe application will remove the
content database from the Palm Powered device. If you do not install the content
database, it will remain on the Palm device and the ImagiProbe application will
prompt you to merge the database each time you open it.
Delete the content database if you no longer need it.
After installing a content database by beaming or HotSync:
1. Open the ImagiProbe application
2. Choose Merge

Chapter 2 Working with Palm Handheld 41
Note: The merging process adds the content to any investigations and
trials you may have already saved in the ImagiProbe application.
The merging process will resolve naming conflicts automatically by
renaming investigations and trials.
2.6.4. Deleting Content Databases before Merging
You cannot select a particular database from among multiple installable databases
for merging. When you choose to accept new information in the ImagiProbe
application all installable databases in your handheld will be merged into the
ImagiProbe application. Delete unwanted databases from your handheld before you
open the ImagiProbe application.
To delete a database:
1. Tap the Apps button.
2. Tap the Menu icon, or press the Menu key
3. Tap Delete.
4. Select the content database you wish to delete.
5. Tap Delete to permanently remove this content database.
2.7. Copying Data to a Desktop Computer
After you have conducted investigations with the ImagiProbe ™ system, you may
wish to work with your data on a desktop computer. In this chapter you will learn to
copy ImagiProbe data and annotations from the handheld computer to a desktop
computer. After you copy data to your desktop computer, you can browse through it
using your favorite browser, you can import it into MultiLab or into any other
application that accepts tab delimited text data (e.g. AppleWorks ®, Excel ®).
Before you can copy data from your handheld computer onto your desktop computer,
you must install the Palm Desktop™ software provided with your handheld computer.
Please consult the handheld computer manual to install the Palm Desktop software.
Small pieces of software called conduits enable you to copy data from the handheld
computer to your desktop through a procedure known as HotSync ®.The instructions
in this guide assume that you have already installed the Palm Desktop software and
are familiar with HotSync.
2.7.1. Copying Data from a Handheld Computer to a Desktop
Computer
The ImagiProbe conduit employs a set of criteria for determining when to copy data
from the ImagiProbe application to the desktop computer:
When something has changed in the ImagiProbe application since the last HotSync
When the ImagiProbe application has been opened on the handheld computer since
the last HotSync, or when a conduit setting has changed since the last HotSync
When the ImagiProbe conduit decides that it needs to copy data, it creates a new
<username>Investigations folder within the selected destination folder. Each folder
contains only a copy of the data on the handheld computer at the time of that
HotSync.
To copy data from the handheld computer to a desktop computer:

42 Chapter 2 Working with Palm Handheld
1. Place your handheld computer in the cradle
2. Press the HotSync button on the cradle
2.HotSync for Macintosh ®
System requirements for the ImagiProbe conduit are those of Palm Desktop 4: Mac
OS X (version10.1.2 or higher) or Mac OS 9.x
See http://www.palm.com/software/desktop/mac.html.
Changing HotSync’s Default Settings for the ImagiProbe Conduit
By default, the ImagiProbe conduit is set up to copy data from the ImagiProbe
application on the handheld computer into an ImagiWorks HotSync Data folder on
your Macintosh computer.
Where this folder is located depends on which OS you are running:
• If you are running OS 9 and do not have Multiple Users turned on, the
ImagiWorks HotSync Data folder is in the <boot volume>:Documents folder.
• If you are running OS 9 and have Multiple Users turned on,the ImagiWorks
HotSync Data folder is in the <boot volume>:Users:<logged in user’s
name>:Documents folder.
• If you are running OS X,the ImagiWorks HotSync Data folder is in the logged
in user’s <home>:Documents folder.
Also the ImagiProbe conduit will, by default, report samples in elapsed time instead
of according to time of day.
You may wish to change these default settings.
To turn off HotSync for the ImagiProbe system, from the HotSync Manager:
1. Choose Conduit Settings from the HotSync menu
2. Double-click ImagiProbe to open the ImagiProbe Conduit Settings
window
3. .Choose Do nothing
4. If you wish to make this setting apply to multiple HotSyncs, then click
Make Default (otherwise the HotSync action setting change lasts
only for the next HotSync).
5. Click OK to save the change and close the ImagiProbe Conduit
Settings window.
Important: You will not be able to copy data from the handheld computer to the
desktop computer if you set the ImagiProbe Conduit to “Do nothing.”
3.HotSync for Windows ®
System requirements for the ImagiProbe conduit are those of Palm Desktop 4: PC
running Windows XP or 95/98/2000/ME or NT 4.0.
See http://www.palm.com/software/desktop.
Changing HotSync’s Default Settings for the ImagiProbe Conduit
By default, the ImagiProbe conduit is set up to copy data from the ImagiProbe
application on the handheld computer into an ImagiWorks HotSync Data folder in the
appropriate “My Documents” folder. The ImagiProbe conduit will also by default

Chapter 2 Working with Palm Handheld 43
report samples in elapsed time instead of time of day. You may wish to change these
default settings.
To copy data from the handheld computer to another folder on a Windows
computer, click on the HotSync Manager icon located on the task bar:
1. Choose Custom… from the HotSync menu
2. Double-click ImagiProbe to open the ImagiProbe Change HotSync
Action window
3. Click Change folder…
4. Select a new folder as the destination folder.
5. Click OK to save the change and close the ImagiProbe Change
HotSync Action window
To change the report format for time from elapsed time to time of day:
6. Choose Custom… from the HotSync menu
7. Double-click ImagiProbe to open the ImagiProbe Change HotSync
Action window
8. Choose Time of day
9. Click OK to save the change and close the ImagiProbe Change
HotSync Action window
Note: Consider using time of day for longer durations or slower sampling
rates.
To turn off HotSync from the ImagiProbe system, click on the Hot Sync manager
icon which is on the task bar in the lower-right corner of the screen:
1. Choose “Custom…”from the HotSync menu
2. Double-click ImagiProbe to open the ImagiProbe
Change HotSync Action window
3. Choose “Do nothing.”
4. If you wish to make this setting “stick” over multiple
HotSyncs, then check the Set as default checkbox
(otherwise the HotSync action setting change lasts
only for the next HotSync)
5. Click OK to save the change and close the
ImagiProbe Change HotSync Action window
Important: You will not be able to copy data from the handheld computer to the
desktop computer if you set the ImagiProbe Conduit to “Do nothing.”
2.7.2. Working with ImagiProbe Data on a Desktop Computer
The ImagiProbe system provides three ways to work with data on your desktop
computer:
• Browse data locally using your favorite browser;
• Import data into MultiLab for viewing in graphs and table and for further
analysis.
• Import data into any other application that accepts tab delimited text data (e.g.
AppleWorks, Excel).

44 Chapter 2 Working with Palm Handheld
When you copy files to a desktop computer with HotSync, the ImagiProbe conduit
creates a folder hierarchy ordered from the top by user/investigation/trial. The
ImagiProbe conduit names the top-level folder “<username> Investigations” (e.g.
Rhonda Investigations) where <username> represents the user name installed on
the handheld computer.
Inside this folder is an HTML file named “<username>_Investigations.html” (e.g.
Rhonda_Investigations.html) containing links to each investigation. This is the home
page. Open this file to browse the transferred data and annotations. Because the
ImagiProbe conduit places the data in an HTML file on your desktop computer, you
will not need to connect to the internet to browse your data.
In addition to the HTML file, the ImagiProbe conduit places a sub-folder inside the
top-level folder for each investigation. In turn, each investigation folder contains subfolders for each trial within that investigation. These trial sub-folders contain a tab
delimited text file named “trialname_Data.txt” for each trial's data. Open these text
files in MultiLab for further analysis.
1.Navigating Investigations in a Browser on a Desktop Computer
You can browse your investigations, trial data and annotations in your favorite
browser (e.g. Netscape Navigator, Internet Explorer, Safari).You may wish to browse
through your data to, for example, identify an investigation or particular trial that you
would like to work with further in a desktop application.
To browse ImagiProbe investigations and trials using Netscape Navigator, Internet
Explorer, or Safari:
1. Open the “<username> Investigations” folder
2. Open the “<username>Investigations.html” file. This will launch your
default browser and open a page that contains all your investigations
3. Click an investigation link to travel to an Investigation page. If you
added notes to an investigation, you will see them on the page
pertaining to that investigation
Figure 8: ImagiProbe Investigation Page

Chapter 2 Working with Palm Handheld 45
4. Click on a Trial link to open a specific trial. The HTML page for a trial
will display the trial setup for the trial. Also, if you added notes to a
trial, you will see them on the page pertaining to that trial
Figure 9: ImagiProbe Trial Page
5. Click on the top data link to review the data collected in the trial as
an HTML table. The first column of data in the table will display
either the time elapsed since you began collecting data, or the time
of day at which the sample was collected. The ImagiProbe Conduit
setting defaults to elapsed time
Figure 10: ImagiProbe data file
6. Click on the bottom data link to display your data as text inside the
browser

46 Chapter 2 Working with Palm Handheld
Note: The HTML table may not be available for larger trials. In this case,
you must view the data as text in the browser.
2.Importing Trial Data into MultiLab
When you copy files to a desktop computer with HotSync, the ImagiProbe conduit
creates text files containing the trial’s data. The data is stored in the
“ImagiProbe_HotSync data” folder. ImagiProbe creates separate folder for each
investigation. Each investigation folder contains sub-folders for each trial within that
investigation. These trial sub-folders contain a tab delimited text file named
“trialname_Data.txt” for each trial's data. Open these text files in MultiLab for further
analysis.
To import a trial data file:
1. Open MultiLab
2. Click File on the menu bar, then click Import Palm data file.
3. In the dialog that opens, next to Look in, navigate to the drive and
folder that contains the trial data file
4. Select the file.
5. Click Open.
3.Importing Trial Data into Other Desktop Applications
Besides browsing data on your desktop computer or analyzing data with MultiLab
you can import it into a broad range of applications. You can import the data into your
favorite analysis application (e.g. AppleWorks, Excel) by following the manufacturer’s
instructions for importing tab delimited text data into that application or yo can export
the data to excel from MultiLab.

Chapter 3 Working with MultiLab 47
Chapter 3
Working with MultiLab
3.1. Install the Software
3.1.1. System Requirements
To work with MultiLab, your system should be equipped with the following:
1.Software
! Windows 95 or later (Windows 95 and Windows NT will not support
video recording)
! Internet Explorer 5.0 or later (you can install Internet Explorer 5 when
you install MultiLab, since it ships with the product)
2.Hardware
! Pentium II 300MHz or higher (Pentium 200MHz or higher without
video recording)
! 32 MB RAM (64 MB recommended)
! 10 MB available disk space for the MultiLab application (50 MB to
install the supporting applications)
! To work with the video window your system should be equipped with a
video camera.
! To be able to record and play voice comments your system should be
equipped with a sound card, a microphone and a speaker.
3.1.2. Installation
Insert the CD into your CD drive.
Installation will begin automatically. Simply follow the on-screen instructions to
continue.
In case auto run is not working, open My Computer and click on the CD drive folder
(d: drive in most cases) and double-click on the setup icon, then follow the on-screen
instructions.
To uninstall the software: From the Start menu select Settings and click on Control
Panel, then use the Add/Remove programs function to remove the MultiLab
application.
To install the USB driver (optional):
1. Insert the CD into your CD drive. If Installation begins automatically
(and you have already installed MultiLab), click Cancel to stop
installation
2. Connect the TriLog to a USB port on your PC and turn the TriLog on.
Windows will automatically detect the new device and open the Add
New Hardware Wizard

48 Chapter 3 Working with MultiLab
3. Select Specify the location of the driver, then click Next
4. Select Search for the best driver for your device, then check the
Removable Media checkbox, and then click Next
Windows will automatically detect and install the necessary software.

Chapter 3 Working with MultiLab 49
3.2. Overview
3.2.1. MultiLab On-screen Layout
MultiLab is a comprehensive program that provides you with everything you need in
order to collect data from the TriLog, display the data in graphs, meters and tables,
analyze it with sophisticated analysis tools and view online or recorded video movies
of the actual experiment.
The program includes four windows: A graph window, table window, video window
and a navigation window called the Data Map. You can display all four windows
simultaneously or any combination of the four.
The most commonly used tools and commands are displayed on three toolbars.
Tools that relate to all aspects of the program and tools that control the TriLog are
located in the main (upper) toolbar. Tools specific to the graphs are located on the
graph toolbar and tools specific to the tables are located on the table toolbar.
Another useful feature is the Workbook. A Workbook is a Lab activity that gives the
student a step-by-step preview of the activity and then automatically configures the
MultiLab program as well as setting up the TriLog so that the student can begin
collecting the data. You can open an existing Workbook or create a new one from the
Workbook menu
3.2.2. MultiLab Window Layout
Figure 11: MultiLab window layout
Data map
Graph window
Information bar
Video window
Table window
Table toolba
r
Main toolbar
Graph toolbar

50 Chapter 3 Working with MultiLab
3.2.3. Working with Projects
Every time you start a new experiment, MultiLab automatically creates a new project
file. All the information you collect and process for a given experiment is stored in a
single project file. Each of these files contain all the data sets you collect with the
TriLog, the analysis functions you’ve processed, the video files you’ve recorded,
specific graphs and tables you’ve created, and the MultiLab settings for the
experiment.
Note: all data sets in a single project must be with the same sampling
rate.

Chapter 3 Working with MultiLab 51
3.3. Getting Started
3.3.1. Set up a Recording Session
1. Prepare TriLog
1. Connect TriLog to the PC (see page 10)
2. Turn on TriLog
3. Plug in any external sensors
4. Open the MultiLab software
2. Enable Video Recording
1. Connect the camera to the PC
2. Click Video
on the main toolbar to display the video window
3. Point the camera to the experiment setup
3. Setup the TriLog
1. Click Setup Wizard on the main toolbar
2. Follow the instructions in the Setup Wizard (see page 66)
4. Start Recording
Click Run
on the toolbar to start recording.
If the recording rate is 100 measurements per second or less, MultiLab automatically
opens a graph window displaying the data in real time, plotting it on the graph as it is
being recorded. If the recording rate is higher than 100/s, the data will be
downloaded and displayed automatically, once the data recording is finished.
If you are recording at a rate of 500/s or 1,000/s, MultiLab displays an online preview
at a rate of 25/s.
You can stop recording anytime by clicking Stop
on the toolbar.
3.3.2. Data recording options
To set the behavior of the data display when you start a new recording session, click
on the down arrow next to the Run button
, and select one of the following:

52 Chapter 3 Working with MultiLab
1. Single measurement
MultiLab will open a new project file every time you start a new recording session.
2. Replace
MultiLab will display the new data set in place of the old one. The project’s old data
sets will still be available in the same project file. They will be listed in the Data Map
and you can add them to the display at any time
3. Add
MultiLab will add the new data set to the graph in addition to the old ones.
Note: A maximum of 8 data sets can be displayed on the graph at the
same time.
3.3.3. Online Video
MultiLab enables you to view online video of your experiment along with the data
display, as well as to record video movies of the experiment and to replay them
simultaneously with the data graph. You can also add voice comments to the video
recordings.
To work with the video window your system should be equipped with a video camera.
To be able to record and play voice comments your system should be equipped with
a sound card, a microphone and a speaker.
1. Online video
The online video will start playing automatically when you open the Video window.
Click Video
on the main toolbar to display the video window.
2. Recording
1. From the Video menu select Enable video
2. Click Record
on the right-hand side of the toolbar to start video
recording
3. Click Run
to start data recording
4. Once the data logging has finished, click Stop Video Recording
5. Click Replay to replay both the data graphing process and the
video recording simultaneously
(Note: Saving the file will automatically save the video as well.)
3.Replaying an experiment
To simultaneously replay the video and the data graphing process of a saved file:

Chapter 3 Working with MultiLab 53
1. Open the file (see page 54)
2. Display the data on the graph (see page 64).
3. Click Replay
4.Video and audio Properties
To set the video properties click Video on the menu bar, then click Video properties
to open the video properties dialog box:
Figure 12: Video properties dialog box
1. Changing Video Quality
The video default quality is Normal, click another option to select either higher quality
(12KBps) or lower quality (3KBps).Changing the video quality not only affects the
image quality, but the recorded file space and the computer’s performance as well. A
higher video quality means more disk space is used, which can slow down the
computer’s performance.
2. Audio Visual Options
The default option is Audio_video. That means that both video and audio are
enabled and you can record voice comments along with the video. If you plan to
record video only, select the Video only option. If you plan to record voice comments
only select the Audio only option.
3.3.4. Download Data
Whenever data is received from the TriLog, it is accumulated and displayed
automatically by MultiLab. There are two modes of communication: Online and PostExperiment.
Online communication
When TriLog is connected to the PC and programmed to run at sampling rates of up
to 100/s, TriLog transmits each data sample immediately, as it is recorded, to the PC.
The software thus displays the data in real-time in both the graph window and the
table window.
When TriLog is connected to the PC and programmed to run at a sampling rate of
500/s or 1000/s, TriLog transmits every twentieth or fortieth data sample online. This
means MultiLab displays data at a rate of 25/s, while the full data is accumulated in
TriLog‘s internal memory. Once the recording has ended, the full data is
automatically downloaded to the PC and displayed.
When TriLog is connected to the PC and programmed to run at a sampling rate of
11,200/s or 20,800/s, data is accumulated in TriLog‘s internal memory. This data is
54 Chapter 3 Working with MultiLab
not transmitted to the PC until the recording period has ended, when the data is
automatically downloaded to the PC and displayed.
Off-line data logging
To download data that was recorded offline, or while TriLog was not connected to a
PC, connect TriLog to the computer, run the MultiLab program and click Download
on the toolbar. This will initiate the Post-Experiment Data Transfer
communication mode. Once the transfer is complete, the data will be displayed
automatically in the graph window and in the table window. If there are several
experiments stored in the TriLog, the first download will bring up the most recent
experiment; the second download will bring up the second most recent experiment,
and so on.
To download a particular experiment, choose Selective download from the Logger
menu, then select the experiment’s number in the Download dialog box.
Click Cancel in the Download progress window at any time to stop downloading the
data.
3.3.5. Save Data
Click Save on the main toolbar to save your project. This will save all the data
sets, graphs, tables and video movies under one project file.
Saving the project will also save any special formatting and scaling you did.
If you made any changes to a previously saved project, click Save to update the
saved file or select Save as… from the file menu to save it under another name.
Note:
To delete a specific data set, a graph or a table from the project, use the
Data Map (see page 64)
To remove unwanted data from a specific data set, apply the crop tool
(see page 89).
3.3.6. Open a File
1. Click Open on the main toolbar
2. Navigate to the folder in which the project is stored
3. Double click the file name to open the project
MultiLab opens the project and displays the first graph on the graph list. If the project
does not include saved graphs, the file opens with an empty graph window. Use the
Data Map (see page 64) to display the desired data set.

Chapter 3 Working with MultiLab 55
3.3.7. Create a New Project
There are three ways to create a new project:
1. Open the MultiLab program, which will open a new file each time
2. When working in Single Measurement mode, a new project is
opened every time you click on the Run button to start a new
recording
3. Any time you click New button
on the toolbar
3.3.8. Import data
Any file that is in comma separated values text format (CSV) can be imported into
MultiLab
To import a CSV file:
1. Click File on the menu bar, then click Import CSV file
2. In the dialog that opens, next to Look in, navigate to the drive and
folder that contains the CSV file
3. Select the file
4. Click Open
Tips:
To create a text file in a spreadsheet:
1. Open a new spreadsheet
2. Enter your data according to the following rules:
a) The first row should contain headers. Each header includes
the name of the data set and units in brackets, e.g.
Distance (m)
b) The first column should be the time. The time interval
between successive rows must match the time intervals
accepted by MultiLab. You can export MultiLab files to
Excel to learn about these time formats
See for example the table below:
3. On the File menu, click Save As
4. In the File name box, type a name for the workbook

56 Chapter 3 Working with MultiLab
5. In the Save as type list, click the CSV format
6. Click Save
To import files that were previously exported from MultiLab open MultiLab and import
the file as described above as they are already in CSV format.
3.3.9. Print
1.Print a graph
1. Click Print
on the main toolbar
2. Select the Graph 1 option (when in split graph mode you can choose
between Graph 1 and Graph 2)
3. Click Print to open the print dialog box
4. Click OK
MultiLab will print exactly what you see in the graph display.
2. Print a table
1. Click Print
on the main toolbar
2. Select the Table option
3. If you want to print only a specific range, uncheck the Print all data
check box and type the desired row numbers into the To and From
edit boxes
4. Click Print to open the print dialog box
5. Click OK

Chapter 3 Working with MultiLab 57
3.4. View the Data
3.4.1. Display Options
The MultiLab program’s screen consists of four parts: the graph window, table
window, video window and Data Map window. You can display all four parts
simultaneously (the default view) or any combination of the four.
The graph window is the main window by default and is and displayed in the center
of the application window. To specify other window as the main window:
1. Click View on the menu bar, then click View selection to open the
View selection dialog box:
Figure 13: View selection dialog box
2. Check the checkbox next to any window you’d like to include in the
view
3. Click the window display type you want
4. Click OK
In addition to these sections, you have the option to display an on-screen meter for
each of the sensors (see page 63).
3.4.2. Graph Display
Click Graph to display or hide the graph. The default graph display is the data
set or sets plotted vs. time, but you can change the X-axis to represent any of the
individual data sets (see page 60).
The graph usually displays all the data sets of a given recording, but you can use the
Data Map to remove one or more of the sets from the graph (see page 64).
In order to keep the graph clear and simple, only two Y-axes are shown on the graph
at once. If there are three curves in the graph, one of the Y-axes is hidden. To make
this axis visible, select the corresponding plot with the cursor (see section 2 below).
You can identify the Y-axis by its color, which matches the plot color.

58 Chapter 3 Working with MultiLab
1. Split graph view
MultiLab enables you to display your data in two separate graphs within the graph
window.
1. Click Split graph
on the graph toolbar to split the graph window
into two separate graphs
2. Click Edit graph
on the graph toolbar to open the Edit graph
dialog box
3. Choose which data sets to display on each of the graphs (or use the
Data Map to do so – see page 64)
4. To return to the single graph display, click Split graph
a second
time
2. The Cursor
You can display up to two cursors on the graph simultaneously.
Use the first cursor to display individual data recording values, to select a curve or to
reveal the hidden Y-axis.
Use two cursors to display the difference between two coordinate values or to select
a range of data points.
To display the first cursor:
Double click on an individual data point or click Cursor
on the graph toolbar.
You can drag the cursor with the mouse onto any other point on the plot, or onto a
different plot. For finer cursor movements use the forward and backward keys on the
keyboard.
The coordinate values of the selected point will appear in the information bar at the
bottom of the graph window.
To display the second cursor:
Double click again anywhere on the graph area or click 2
nd
Cursor .
The information bar will now display the difference between the two coordinate
values.
To remove the cursors:
Double click anywhere on the graph area, or click 1
st
Cursor a second time.
To remove the 2
nd
cursor:
Click 2
nd
Cursor a second time.
To display the cursors in split graph mode:
To display the cursors on the upper graph, use the same method as for single graph
mode.
To display the cursors on the lower graph, you must first remove them from the upper
graph and then double click anywhere on the lower graph to display the first cursor.
Double click a second time to display the second cursor, and double click a third time
to remove the cursors.

Chapter 3 Working with MultiLab 59
3. Zooming
1. To zoom in to the center of the graph
1. Click Zoom in
on the graph toolbar
2. To reverse the operation, click Zoom out
on the graph toolbar
2. To zoom in to a specific data point
1. Select the point with the cursor (see above)
2. Click Zoom in
on the graph toolbar
3. To reverse the operation click Zoom out
on the graph toolbar.
3. To zoom in to a range
1. Select the range with both cursors
2. Click Zoom in
on the graph toolbar
3. To reverse the operation click Zoom out
on the graph toolbar
4. To zoom in to a specific area
Click Zoom to selection
on the graph toolbar and drag the cursor diagonally to
select the area you want to magnify. Release the mouse button to zoom in to the
selected area.
Click Zoom to selection a second time to disable the zoom tool.
5. Autoscale
Click Autoscale
on the graph toolbar to view the full data display, or double click
on an axis to autoscale that axis alone.
6. Manual scaling
1. Click Graph properties
on the graph toolbar to open the Graph
properties dialog box
2. Select the Scale tab, and choose the axis you want to scale in the
Select axis drop list
3. Uncheck the Autoscale check box and enter the new values in the
edit box
4. Click OK
To manually scale a specific axis, right click on the axis to open its Properties dialog
box.

60 Chapter 3 Working with MultiLab
To restore auto scaling click Autoscale .
7. The stretch/compress axis tool
Move the cursor onto one of the graph axes. The cursor icon changes to the double
arrow symbol (
↔), indicating that you can stretch or compress the axis scale. Drag
the cursor to the desired location. Repeat the procedure for the other axis if
necessary.
Double click on the axis to restore auto scaling.
4. Panning
Use the pan tool after zooming in to see any part of the graph that is outside the
zoomed area.
To do this, click Pan
on the graph toolbar, then click anywhere on the graph and
drag the mouse to view another area.
Click Pan a second time to disable the Pan tool.
5. Edit the Graph
Use the Edit graph dialog box to select which data sets to display on the graph’s
Y-axis and to change the X-axis from time, to one of the data sets.
1. Click Edit graph
on the graph toolbar to open the Edit graph
dialog box:
Figure 14: Edit graph dialog box
2. To select a data set to display on the Y-axis, click on the data set’s
name in the Y-axis list. To display more than one curve, click on the
data sets you want
3. A list entry that begins with an Experiment (Exp.) number denotes a
recorded data set. A list entry that begins with an input number
denotes the next recording and will be displayed on the graph the
next time you start a recording
4. To deselect a data set, click on it a second time

Chapter 3 Working with MultiLab 61
5. To select a data set for display on the X-axis, click on the data set’s
name in the X-axis list. You can only select one data set at a time for
the X-axis
6. Type in the title of the graph in the Graph title edit box (optional)
7. Click OK
6.Format the graph
You can change the data line’s color, style and width. You can also add markers that
represent the data points on the graph and format their style and color.
The color of the Y-axis matches the corresponding plot’s color and will automatically
change with any change made to the color of the corresponding plot.
1. Click Graph properties
on the graph toolbar to open the Graph
properties dialog box
2. Select the Lines tab, and then select the plot or axis you want to
format in the Select plot drop list
3. From here you can format the line’s color, style and width, as well as
the markers’ color and style. To remove the line or the marker,
uncheck the corresponding Visible check box
4. Click OK
5. To restore the default formatting, click Restore default
7. Change the graph’s units and its number format
1. Click Graph properties
on the graph toolbar to open the graph
properties dialog box
2. Select the Units tab, and then select the plot or axis you want to
format in the select plot drop list
3. Choose the prefix option you want
4. Select the desired number of decimal places
5. To display numbers in scientific format, check the Scientific check
box
6. Click OK
8. Add a graph to the project
MultiLab displays new data in the graph window every time you start a new
recording. You can always display previous data using the Edit graph dialog box or
by double-clicking on the data’s icon in the Data Map. If you want to save a graph
that you created to your project, or to update a saved graph with changes you made,
use the Add to project tool:
Click Add to project
on the graph toolbar.

62 Chapter 3 Working with MultiLab
3.4.3. The Table Display
Click Table to display or to remove the table window.
When you start a new recording, MultiLab displays the new data on the table.
To add or remove columns from the table, use the Edit table tool (see below).
1. Editing data values
You can change the value of any data point. When any value is changed, MultiLab
automatically creates a copy of the data set and leaves the original data unchanged.
To do this:
1. Select a data cell by clicking on it
2. Type in the new value
3. Press Enter on the keyboard to accept (you can also press Tab or
the arrow keys to accept and move to the next cell)
2. Editing the table
To add or remove data sets from the table:
1. Click Edit table
on the table toolbar to open the Edit table dialog
box:
Figure 15: Edit table dialog box
To add columns to the table:
2. Select one or more of the data sets from the Available Columns list
3. Click Add
To remove columns from the table:
4. Select one or more of the data sets from the Current Columns list
5. Click Remove
6. Click OK

Chapter 3 Working with MultiLab 63
3. Formatting the table
1. Changing column width
Drag the boundary on the right side of the column heading until the column is the
desired width.
2. Changing row height
Drag the boundary below the row heading until the row is the desired height.
3. Formatting the fonts
1. Click Table properties
on the table toolbar
2. Select the Font tab
3. Format the font, as well as the font’s style and size
4. Click OK
4. Changing units and number format
1. Click Table properties
on the table toolbar
2. Select the Units tab, and then select the plot you want to format
from the select plot drop list
3. Choose the prefix option you want
4. Select the desired number of decimal places
5. To display numbers in scientific format, check the Scientific check
box
6. Click OK
4. Add a table to the project
MultiLab displays new data in the table window every time you start a new recording.
You can always display previously recorded data using the Edit table dialog. If you
want to save a table that you created to your project, or to update a saved table with
changes you made, use the Add to project tool:
Click Add to project
on the table toolbar.
3.4.4. Meters
MultiLab enables you to view data in meters format on the screen (one meter for
each sensor), with up to four meters showing at once. The meters can display live
data while MultiLab is recording, or saved data when a saved file is replayed.
When a cursor is displayed, the meter shows the measured values that correspond
to the time of the point at which the cursor is positioned.
There are three meter types: analog, bar and digital. The meter’s scaling
automatically matches the graph’s scaling.
To set up the meters:
1. Click Meter Setup
on the main toolbar

64 Chapter 3 Working with MultiLab
2. Select the meter type, and the data set to be displayed
3. A list entry that begins with a graph number denotes a displayed
data set. A list entry that begins with an input number denotes the
next recording, and will be displayed on the meter the next time you
start a recording
4. Repeat this procedure for up to four meters
5. To remove the meters click Meter Setup
, and click Remove all
3.4.5. Data Map
Click Data Map to display or remove the Data Map.
The data map is a separate window that displays the list of data sets that were
recorded or downloaded in the current session, as well as the lists of all the saved
graphs and tables. Use the Data Map to navigate through the available data sets and
to keep track of the data that is being displayed in the graph window.
1. Control the display with the Data Map
The items in the Data Map are sorted into three main categories:
• Data sets (including analysis functions)
• Saved graphs
• Saved tables
Double click on a category to bring up the full list. Double click a second time to
collapse the list. You can also use the plus (+) and minus (-) signs next to the icons
to expand or collapse the categories.
The Data sets list expands to sub-categories of experiments and functions. To
display the complete list of measurements, or the complete list of analysis functions
performed on the measurements for any individual experiment, double click the
experiment’s icon or click the plus sign (+) next to it.
To collapse a list under an individual experiment, double click the experiment’s icon
or click the minus sign (-) next to it.
To display a data set or a saved graph in the graph window, or to display a table in
the table window, double click its icon. Double click a second time to remove it.
You can also use a shortcut menu to display or remove a data set from the graph.
Simply right-click an icon, then click display on graph #1 or display on graph #2.
To delete an individual item from the Data Map and from the project, right-click on its
icon and click Delete. To permanently delete the item, click Save
on the main
toolbar.
To remove all data sets from the Data Map, right-click the Data sets icon
and click
Clear All Data.
2.Understanding Data Map icons
Data sets list
Functions – includes all the analysis functions of the project
Individual function – currently not on display

Chapter 3 Working with MultiLab 65
Individual function – currently displayed on graph 1
Individual function – currently displayed on graph 2
Individual function – currently displayed both on graphs 1 and 2
Function
Experiment – includes all recorded data of the experiment
Individual data set – currently not on display
Individual data set – currently displayed on graph 1
Individual data set – currently displayed on graph 2
Individual data set – currently displayed both on graphs 1 and 2
Data recorded without video
Data recorded with video
List of saved graphs
Saved graph – data sets vs. time
Saved graph – data sets vs. data set
Graph currently not on display
Graph currently displayed on graph 1
Graph currently displayed on graph 2
Graph currently displayed both on graphs 1 and 2
List of saved tables
Saved table
Table not currently displayed
Table currently displayed
3.4.6. Export Data to Excel
Click Export to Excel on the graph toolbar to export the displayed data to Excel.
MultiLab will then open a new Excel workbook displaying the data.
Export file settings
If MultiLab fails to export the data properly, try to change the export file settings:
1. Click File on the menu bar, then click Export file settings
2. Check the Ignore regional settings check box
3. Click OK
3.4.7. Copy the Graph as a Picture
You can copy the graph to the clipboard as a picture and then paste it to other
Windows programs such as Word or PowerPoint:
1. In the Graph menu, click Copy graph
2. Open the destination file
3. In the destination file, right click and select Paste

66 Chapter 3 Working with MultiLab
3.5. Program TriLog
3.5.1. Setup
1. Quick setup
Use the Setup wizard to guide you through the setup process.
1. Click Setup wizard
on the main toolbar to open the setup
wizard:
Figure 16: Setup wizard step 1 of 3
The first step is to assign sensors to each input. If you are working
with TriLog in Auto ID mode, the sensors are selected automatically
as you plug them in to the TriLog. Otherwise, you can manually select
the sensors you are using from the corresponding input drop lists.
2. Click Next to move to the second step:
Figure 17: Setup wizard step 2 of 3

Chapter 3 Working with MultiLab 67
3. Select the desired recording rate in the Select rate drop list
4. Select the Scroll option if you want the graph window to scroll as the
data recording progresses
5. Select the desired data recording mode in the Select recording
mode drop list
6. Click Next to move to the third step:
Figure 18: Setup wizard step 3 of 3
7. Select the desired length of the recording period in the Select
recording time drop list
The recording period is displayed as a unit of time by default. To
display the recording period as the number of recording samples,
select the By samples option. The number of samples is calculated
with the following formula:
Total recording samples
Recording periodRecording rate
=
×
8. To start the data recording only when a specific time or
measurement condition has been met click Triggering to open the
triggering dialog box (see page 69)
9. Click Finish to complete the setup and to send the setup command
to the TriLog
2. Define sensor properties
Some of the sensors can produce more than one measurement. For example, the
distance sensor measures distance, but MultiLab also calculates the velocity and
acceleration of the measured body in real time. MultiLab automatically displays the
basic measurement of distance, but enables you to display any combination of
distance, velocity and acceleration. Other sensors may only give one measurement,
but can display the data in different units. For example, the acceleration sensor can
display the acceleration in multiples of the gravity acceleration, or in the standard unit
2
s
m
.

68 Chapter 3 Working with MultiLab
You can define the properties of each sensor individually in the first step of the Setup
wizard, or by selecting Sensor properties from the Logger menu.
1. Click Setup wizard
on the main toolbar to open the Setup
wizard
2. Click Properties
next to the input you want to set
3. Click the check boxes next to the desired measurements
4. To change more properties, click the tab at the top of the dialog box
5. Click OK
3. Presetting the display
You may want to define the graph’s settings, such as formatting and scaling the
graph and selecting the axes, and to define the meters’ settings prior to beginning a
recording session. You can define the settings of each sensor input individually in the
first step of the Setup wizard:
1. Click Setup Wizard
on the main toolbar to open the setup
wizard
2. Click Properties
next to the input you want to set
3. Click the Display properties tab
4. Select a measurement from the Select measurement drop list
5. Select the graph or graphs in which you would like to display the
data, from the Display on graph drop list
6. Select a meter in the Meter type drop list if you want to display the
data in a meter as well as on the graph
7. Format the line and markers in the Plot section
8. If you want a specific scale, uncheck the Auto scale check box and
enter the desired minimum and maximum values of the axis
9. Click OK
4.Preset the graph’s X-axis
1. Click X-Axis display properties in the first step of the Setup wizard
to open the dialog box:

Chapter 3 Working with MultiLab 69
Figure 19: X-axis properties dialog box
2. Select the graph you wish to modify
3. Select the measurement you’d like to display on the X-axis
4. If you want a specific scale, uncheck the Auto scale check box and
enter the minimum and maximum values of the axis
5. Click OK
5.Power saving mode
To enable TriLog’s power saving mode (see on page 11) check the Power saving
mode check box in step 2 of the Setup wizard.
Note: the Power saving mode check box is enabled only after selecting
recording rate that is equal to or less then 1 sample every minute.
6.Triggering
To start the data recording only when a specific time or measurement condition has
been met, click Triggering in step 3 of the Setup wizard to open the triggering dialog
box:
Figure 20: Triggering dialog box

70 Chapter 3 Working with MultiLab
1. Select the triggering sensor in the Based on sensor drop list
2. Choose one of the following from the Type options:
• None - Trigger is disabled
• Above level - Start logging only once the measured value is
HIGHER than the trigger level.
• Below level - Start logging only once the measured value is
LOWER than the trigger level.
• Event Recording - This function enables you to record the
exact time and date at which a certain phenomenon occured:
The trigger level set for this option is actually a threshold setting.
Each time the threshold is crossed, TriLog will record the exact
time and date of the occurrence, and will continue to do so until
the desired number of samples has been obtained.
Note: The trigger acts on analog measurements only (not on the
distance sensor). The trigger condition must be fulfilled for at least
300µS.
• Control Level - The Control Level trigger allows you to create
an automatic sense and control system. This means that you
can connect a sensor measuring a certain phenomenon (for
example, Temperature) and connect a device that will start
operating when the recorded data from the sensor falls above or
below a pre-defined threshold (for example, a fan that will start
operating when the temperature measured by the sensor rises
above 30°C). This function requires the use of a splitter cable
and a control sensor. The cable divides each input into a sensor
cable and a controller cable. After setting the control level and
starting the data logging process, the sensor will sample and
record the data as usual, but when the measurement from the
sensor rises above the predetermined threshold value, the
controller cable will send a pulse of 5V to the control sensor, and
will continue to do so until the sensor measures a value below
the threshold level. When receiving the 5V pulse, the control
sensor will close/open a relay capable of switching 110/220V to
any load.
• Time delay - This trigger type enables you to set a timer that will
start the logging after a predetermined amount of time. After
setting the trigger to Timer Delay, click the down arrow on the
Level combo-box, and select from the 17 different time options.
The timer will start its countdown when you click RUN, and the
actual recording will start once the countdown has ended.
3.
Select the trigger level in the Level drop list
4. Click OK
Note: When you turn off TriLog, it will save the setup for the next
session.

Chapter 3 Working with MultiLab 71
3.5.2. Start Recording
Click Run on the main toolbar. Click the down arrow to change the
recording mode.
3.5.3. Stop Recording
Click Stop on the main toolbar
3.5.4. Clear TriLog’s Memory
To erase all experiment data currently stored in the TriLog, click Clear memory in
the Logger menu (TriLog must first be connected to the PC).
3.5.5. Select TriLog’s operating mode
To enable TriLog’s Auto ID mode (see on page 12):
1. Connect TriLog to the PC
2. Click Logger on the menu button, then click Auto ID
To switch to 8 sensors click Logger on the menu bar then click Auto ID a second
time to uncheck the Auto ID option.
3.5.6. Calibrating the sensors
MultiLab enables you to calibrate any of the sensors manually. This calibration is
much more accurate than the calibration performed by TriLog. With MultiLab, you
can calibrate the sensor using two points instead of the “one point automatic offset
calibration” used by TriLog:
1. Connect TriLog to the PC
2. Select the Calibrate sensors option from the Logger menu
3. Choose a sensor from the Select sensor drop list and click OK
4. Click on the Calibration tab
5. Enter a distinct real value in each of the Real Value edit boxes and
the corresponding measured values in each of the Measured Value
edit boxes (The measured values are the values displayed by
MultiLab when measuring the two real values
6. Click OK
The calibrated sensor parameters will be saved, so there is no need to calibrate
TriLog every time you run the MultiLab program.
To reset to the default calibration for any sensor, select the sensor and click Restore
defaults.

72 Chapter 3 Working with MultiLab
3.5.7. Define a Custom Sensor
Usually you will not need to use this option, however, MultiLab enables the user to
define additional custom sensors. This is a useful tool for when TriLog is
communicating with many sensors from different vendors.
Any additional sensor that you would like to connect to TriLog must comply with the
following restrictions:
1) The sensor’s output must be greater than or equal to 0V and less than or equal
to 5V. Remember that all sensors transform actual data into electrical data, so
the electrical output should remain between 0 and 5 volts.
2) The sensor Transfer Function (sensor output voltage changes vs. the sampled
phenomenon changes) must be a linear Transfer Function.
3) The sensor must have a code resistor in order to be automatically identified. If
the sensor does not have a code resistor, you will have to work in 8 sensors
mode and select the sensor manually.
To determine whether your sensor has a code resistor or not, simply plug it in to
TriLog (while in Auto ID mode) and see if TriLog displays the setup menu and the
sensor name.
Refer to the appendix to learn how to add a code resistor to your custom sensor.
To define a new sensor:
1. Connect TriLog to the PC
2. Select Define new sensor from the Logger menu to open the
Define new sensor dialog box:
Figure 21: Define new sensor dialog box
3. Click Add New Sensor
4. Type in a sensor name and a sensor unit
5. Type in two calibration values (two real values and the
corresponding output voltages of the sensor)
6. Click OK

Chapter 3 Working with MultiLab 73
3.5.8. Communication Setup
TriLog communicates with the MultiLab software via a serial communication port.
Some users may find it difficult to select the correct port, in which case MultiLab can
perform an automatic port selection, and can also report on the status of all available
ports.
Automatic COM Port recognition
The PC has 4 communication ports, COM-1 to COM-4. One of these ports is usually
available for external communication. It is not necessary to know which port is
available, since MultiLab can find it for you.
Connect the communication cable from TriLog to one of the PC COM Port
connectors. In most cases, the port connectors are is located near the mouse port.
Use the 9)25 adaptor if the PC connector is of the 25 pins variety.
Turn on TriLog and run the MultiLab software. MultiLab will automatically attempt to
communicate with the data logger. If communication is achieved, the selected port
becomes designated as TriLog’s communication port
If communication fails:
1. Select Comm Setup from the Logger menu. MultiLab will display a
dialog box reporting what COM Ports are already in use, and which
port is recommended for use with TriLog:
Figure 22: Communication setup dialog box
2. Click Try to connect and MultiLab will try to communicate with
TriLog. If communication is achieved, MultiLab will designate the
selected port as TriLog’s communication port
You can override the MultiLab recommendation and choose the COM Port yourself
by clicking the check box button to the left of the desired port, and clicking Try to
connect.
Note: In case of any communication malfunction, please refer to Chapter
4: trouble shooting guide.
3. You can click Work offline if you wish to work without TriLog. While
working offline, you can still open saved files to view and analyze
them

74 Chapter 3 Working with MultiLab
3.6. Analyze the data
3.6.1. Reading Data Point Coordinates
Position the cursor (see page 58) on a point to display its coordinates on the
information bar at the bottom of the graph window.
If more than one curve is displayed, and you want to read the Y- coordinates of all of
the curves simultaneously, bring up digital meters (see page 63) for each of the
curves. When you position a cursor on one curve, the meters will show the
corresponding Y-coordinates for the other curves.
3.6.2. Reading the Difference Between two Coordinate Values
Position one cursor on the first point and a second cursor on the second point to
display the difference between the two coordinate values on the information bar at
the bottom of the graph window
3.6.3. Working with the Analysis Tools
The analysis tools can only be applied to data sets that are displayed in the graph
window.
1. Use the cursors (see page 58) to select the graph and the data
range to which you want to apply the analysis.
2. Select the analysis function you wish to use.
The analysis function will be added onto the graph, with the exception of the
smoothing (averaging) function, which will replace the original data set.
To measure and analyze time events with photogates use the Timing Wizard (see
page 89).
3.6.4. Smoothing
The smoothing tool is very useful in reducing random "noises", especially if you want
to apply any analysis functions to the data. The smoothing process replaces every
data point with the average of its neighboring points.
1. Use the cursor to select the function on the graph that you want to
smooth
2. Click More smoothing
on the graph toolbar
3. You can repeat the procedure to further smooth the data
4. Click Less smoothing
to reduce the amount of smoothing

Chapter 3 Working with MultiLab 75
3.6.5. Statistics
Use the statistics tool to display statistics of a selected data set or a range of data.
The statistics include:
Average – The average of all the numbers in the range.
StDev. – The standard deviation
Minimum – The smallest value in the range.
Maximum – The largest value in the range.
Sum – Adds all the numbers in the range.
Area – The area between the graph and the x-axis in the range.
Samples – the number of data points in the range.
Rate – the recording rate.
To display statistics:
1. Use the cursors to select the graph and the data range to which you want to
apply the statistics
2. Click Analysis on the menu bar, then click Statistics
MultiLab will open a statistics window and will display the results in it.
3.6.6. Most Common Analysis Functions
1.Linear fit
Click Linear Fit
on the main toolbar to draw a line of linear least square fit
baxy
+
=
and to display the line’s equation.
Note: If you want the automatic curve fit equation to start at
0=t , apply
the crop tool before applying the linear fit (see page 89).
2.Derivative
Click Derivative
on the main toolbar to construct a graph in which each point is
the slope of the 3 consecutive points on the source graph.
3.Integral
Choose Integral from the Analysis menu to construct a graph in which each point is
the integral of all the preceding points on the source graph.
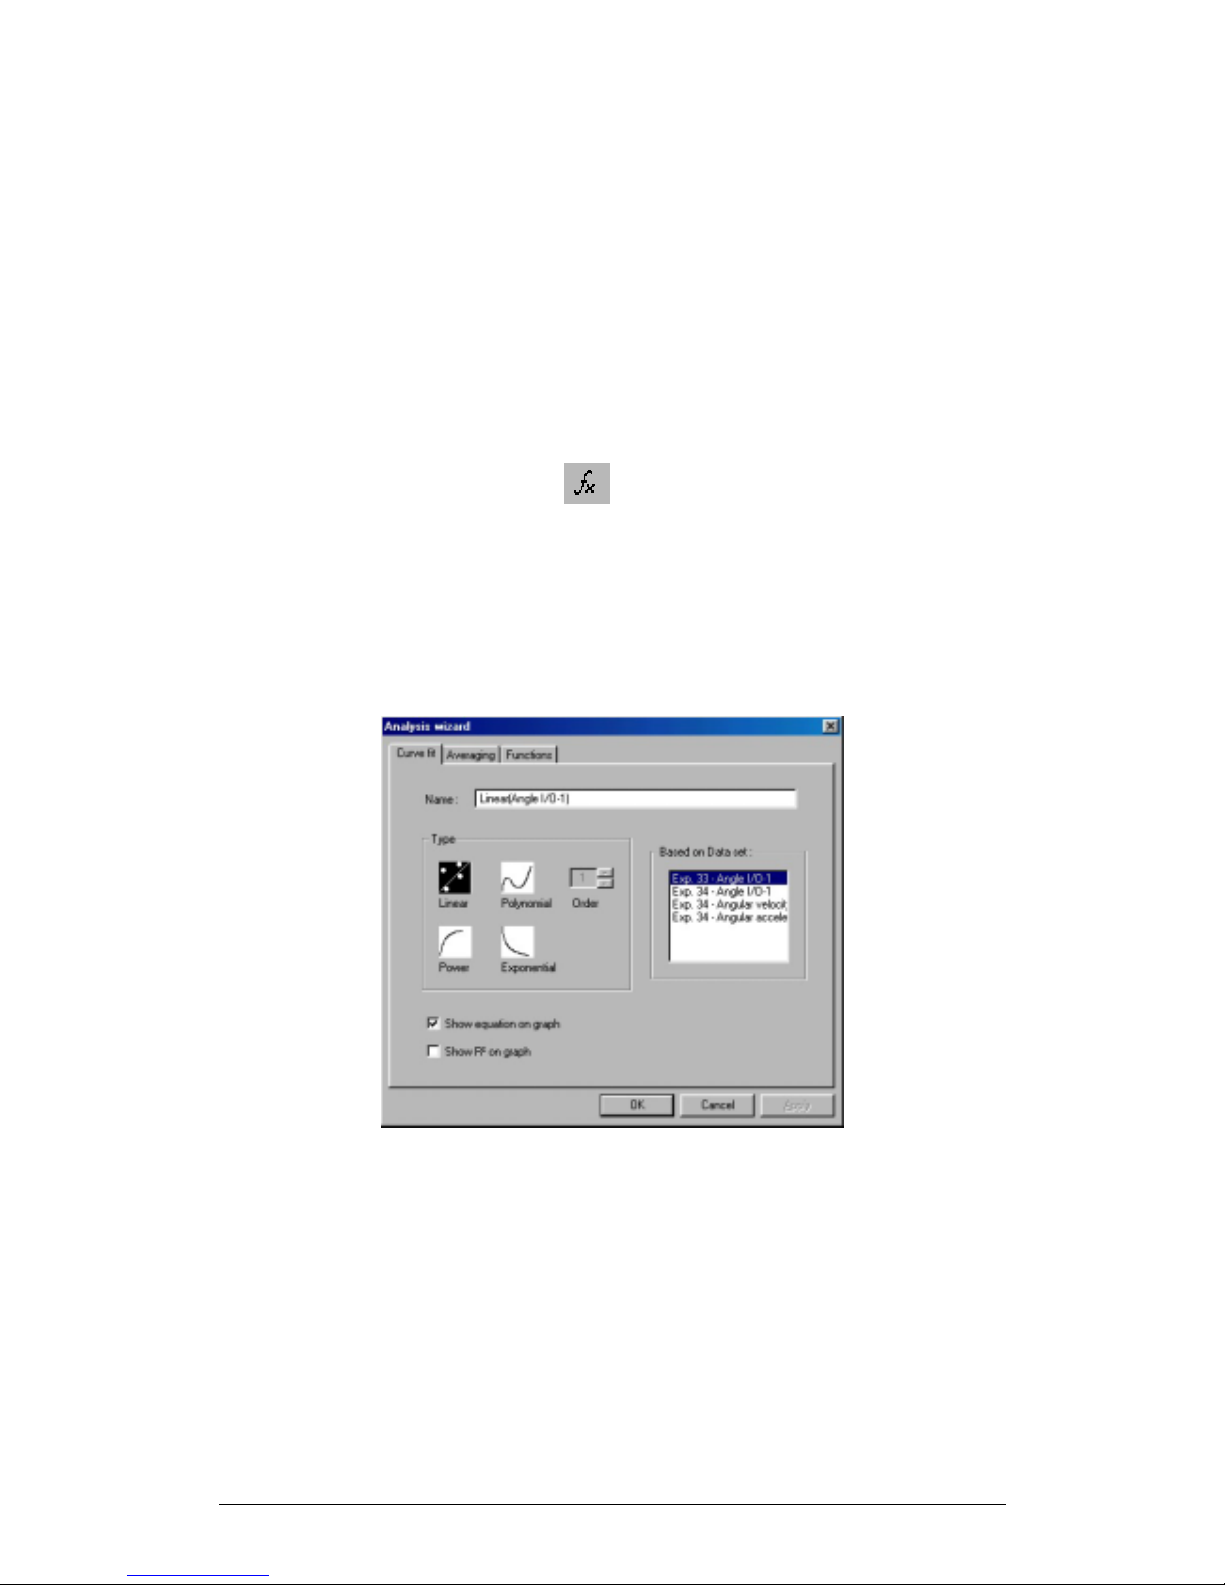
76 Chapter 3 Working with MultiLab
3.6.7. The Analysis Wizard
1.Using the Analysis Wizard
The analysis wizard will guide you through the various analysis functions available in
the MultiLab program. The analysis functions are grouped into three main categories:
curve fit (regression), averaging, and mathematical and trigonometric functions.
To apply an analysis function to a data set:
1. Use the cursors to select the graph or data range to which you would
like to apply the analysis
2. Click Analysis Wizard
on the main toolbar
3. Click a category tab:
a. Curve fit
b. Averaging
c. Functions
2.Curve fit
Figure 23: Analysis wizard – curve fit
1. Select a fit Type by clicking its icon (If you choose polynomial fit,
select the order you want)
2. If you use the cursor to select a data set, it will be highlighted in the
Based on data set list, but you have the option of selecting a
different data set
3. Type a name in the Name box (optional - the default name includes
both the function and the data set names).
4. Click the Show equation on graph check box to display the line’s
equation on the information bar

Chapter 3 Working with MultiLab 77
5. Click the Show R2 on graph check box to display the correlation
coefficient on the information bar
6. Click OK
Note: If you want the automatic curve fit equation to start at
0=t
, apply
the crop tool before any type of curve fitting (see page 89).
3.Averaging
Figure 24: Analysis wizard – averaging
1. If you use the cursor to select a data set, it will be highlighted in the
Based on data set list, but you have the option of selecting a
different data set
2. Select an averaging option (if you choose custom averaging, choose
the number of averaging points in the Points box)
3. Enter a name in the Name box (optional - the default name include
both the function and the data set names)
4. Select an Open option
5. Click OK

78 Chapter 3 Working with MultiLab
4.Functions
Figure 25: Analysis wizard – functions
1. Select a function from the Functions list. MultiLab displays the
function’s formula at the bottom of the dialog box
2. If you use the cursor to select a data set, it will be highlighted in the
G1 drop list, but you have the option of selecting a different data set
3. If the analysis function involves two data sets, select the second data
set from the G2 drop list
4. Enter a constant in each of the C1 and C2 boxes (optional)
5. Enter a name in the Name box (optional – the default name includes
both the function’s formula and the data set name)
6. Enter a unit (optional)
7. Select an Open option
8. Click OK
3.6.8. Available Analysis Tools
This section includes a brief description of each of MultiLab’s analysis functions.
For time, velocity and acceleration analysis see also the Timing Wizard on page 89
1.Curve fit
Linear
baxy +
=
Draws a line of linear least square fit.

Chapter 3 Working with MultiLab 79
Polynomial
n
nn
axaxay +++=
−L1
10
Draws a line of polynomial least square fit (you must select an order
between 1 and 6.)
Power
n
x
a
y =
Draws a line of power least square fit.
Exponential
bx
aey =
Draws a line of exponential least square fit.
MultiLab displays the curve fit equation and the correlation coefficient (R
2
) on the
information bar below the graph
2.Averaging
The average function replaces every point with the average of n neighboring points
from both sides of the point.
Low averaging:
5
=
n , Medium averaging: 11
=
n , High averaging: 41=n .
3.Functions
In the formulas below, G
1
and G2 represent selected data sets, and C1 and C2 are
constants that you can enter. The constant’s default value is 1.
Absolute
121
GCCy =
Draws a line of the absolute values of a data set.
Add
2211
GCGCy +
=
Draws a line of the addition of two data sets
Arccosine
)arccos(
121
GCCy
=
Draws a line of the arccosine values of a data set (in radians).
Arccosine is the angle whose cosine is
12
GC . The argument 12GC
must be between –1 and 1.
Arcsine
)arcsin(
121
GCCy
=
Draws a line of the arcsine values of a data set in radians. Arcsine is
the angle whose sine is
12
GC . The argument 12GC must be between
–1 and 1.
Average
C
1
·{average of C2 points around G1}

80 Chapter 3 Working with MultiLab
Replaces every point with the averaging of C
2
neighboring points.
Cosine
)cos(
121
GCCy
=
Draws a line of the cosine values of a data set. The argument
12
GC
must be expressed in radians.
Delta Y
)0(
11
=−
=
tGGy
Draws a line of the difference between the Y-coordinate of every
point and Y-coordinate of the first point. Use this function to move the
data set along the Y-axis so that the point will intersect the Y- axis at
the origin.
Derivative
ratesampling
t
t
yy
y
nn
n
1
,
2
11
=∆
∆
−
=
−+
Draws a line of the slopes of every three consecutive points of a data
set. For high recording rates and small ∆t, this line may be very noisy,
which is why smoothing the data set is recommended before applying
the derivative function.
Divide
22
11
GC
GC
y =
Draws a line of the division of two data sets
Envelope
(lower)
Lower envelope of G
1
with tolerance of C1 points
Draws a line that connects the minimum values of a data set. The
tolerance defines the minimum distance (in sampling points) between
two minima, so that the envelope function is able to ignore random
"noises".
Envelope
(upper)
Upper envelope of G
1
with tolerance of C1 points
Draws a line that connects the maximum values of a data set. The
tolerance defines the minimum distance (in sampling points) between
two maxima, so that the envelope function will be able to ignore
random "noises".

Chapter 3 Working with MultiLab 81
Exp.
12
1
GC
eCy =
Draws a line of
e raised to the power of a data set.
Fourier
transform
Discrete Fourier transform of G
1
.
Draws a line of the amplitudes of the harmonics of Fourier transform
vs. frequency.
Frequency
The frequency of G1 (minimum of C
1
points in one cycle).
Draws a line of the frequency of a periodic data set vs. time. The
constant C
1
defines the minimum data points in one cycle.
Integral
tGCCy
∆∑+=
121
Draws a line in which each point is the discrete integral of all the
preceding points in a data set.
Kinetic
energy
2
11
)(
2
1
GCy =
Draws a line of the kinetic energy of a data set. The argument
1
G
must be the velocity of the body, and the constant
1
C must be the
mass of the body.
Linear
121
GCCy +
=
Draws a line of a linear displacement of a data set. This function is
useful when you want to change the point of origin of a data set.
Ln
)ln(
121
GCCy
=
Draws a line of the natural logarithm of a data set. The argument
12
GC must be positive.
Log
)(log
12101
GCCy
=
Draws a line of the logarithm of a data set to base 10. The argument
12
GC
must be positive.
Multiply
2211
GCGCy ⋅
=
Draws a line of the multiplication of two data sets

82 Chapter 3 Working with MultiLab
Reciprocal
(1/X)
1
1
G
C
y =
Draws a line of the reciprocal values of a data set.
Sine
)sin(
121
GCCy
=
Draws a line of the sine values of a data set. The argument
12
GC
must be expressed in radians.
Square (X
2
)
2
121
)( GCCy =
Draws a line of the squares of a data set.
Square root
121
GCCy =
Draws a line of the square root values of a data set. : The argument
12
GC
must be greater than or equal to zero.
Subtract
2211
GCGCy −
=
Draws a line the subtraction of two data sets.
Tan
)tan(
121
GCCy
=
Draws a line of the tangent values of a data set. The argument
12
GC
must be expressed in radians.
3.6.9. Online Analysis
MultiLab enables you to analyze data from a live experiment and to display the
analysis function in the graph window, as the data is being recorded and processed.
To execute online analysis, you will first have to use the Analysis wizard to define the
function to be used (see page 76), and then edit the graph in order to display the
function (see page 60).
For example, here is how to set up an online envelope (amplitude) function of data,
recorded with a Rotary motion sensor connected to Input 1:
1. Click Analysis Wizard
on the main toolbar to open the
Analysis wizard dialog box:

Chapter 3 Working with MultiLab 83
Figure 26: Analysis wizard – online functions
2. Select Envelope (upper) from the Functions list
3. Select Input 1: Angle from the G1 drop list
4. Click OK
5. Click Edit graph
on the graph toolbar to open the Graph edit
dialog box:
Figure 27: Using graph edit dialog to display online functions
6. In the Y-Axis list click Input 1: Angle to select it and then click
Online function: Envelope (upper) to select it
7. If there are other highlighted data sets in the Y-Axis list, de-select
them by clicking on them
8. Click OK

84 Chapter 3 Working with MultiLab
9. Click Run on the main toolbar to start recording. MultiLab will
display the original data readings coming from Input 1, as well as the
data processed by the analysis function:
Figure 28: Online envelope function
The online analysis function will still be active in subsequent recordings.
To remove the online functions, click Analysis on the menu bar and then click Clear
online functions.
3.6.10. Manual Curve Fitting
The manual curve fit tool enables you to draw a mathematical curve, to change the
curve’s parameters until it fits into data set, and to display the resulting equation.
There are four types of mathematical curves you can draw:
Linear
BAty +
=
Draws a straight line.
Quadratic
CBtAy +−=
2
)(
Draws a parabola.
Exponential
CAey
Bt
+=
Draws an exponential line.

Chapter 3 Working with MultiLab 85
Power
CAty
B
+=
Draws a line of the time raised to the power of a number from –5 to 5.
Note: If you want the curve fit equation to start at
0
=
t , apply the crop
tool before any type of curve fitting (see page 89).
To apply manual curve fit:
1. Click on the Analysis menu, then click Manual curve fit to display
the Manual curve fit dialog box
2. To select a data set for display on the X-axis, click on the data set’s
name in the X-axis list
3. To select a data set to display on the Y-axis, click on the data set’s
name in the Y-axis list
4. Click OK. MultiLab will display the Manual curve fit toolbox at the
bottom of the graph window:
Figure 29: Manual curve fit toolbox
5. Choose one of the four curves by clicking the icon in the toolbox
6. Use the sliders to change the A, B and C parameters until the new
curve fits the sampled curve
7. The lower and upper limits of each sliding bar are located on the
sliding bar’s left and right ends, respectively. You can change the
limit values by clicking a limit box, and typing in your new value
MultiLab will display the resulting equation on the information bar at the bottom of the
toolbox.
8. Click Add to project
in the toolbox to add the curve to the
project
9. To close the manual curve fit toolbox click Exit
in the toolbox

86 Chapter 3 Working with MultiLab
3.7. Workbook
3.7.1. Working with Workbook
The Workbook is an online library of experiment manuals called “worksheets,” that
appear in Web-page format. Each worksheet includes an experiment template that
automatically configures both the MultiLab and TriLog at the push of a button. To
begin recording, all you need to do is click Run.
Every time you run an experiment from a worksheet, MultiLab opens a new project
file with the same predefined setup.
You can use Fourier-produced worksheets, or create your own. You can also modify
Fourier’s existing worksheets to your own specifications.
3.7.2. Opening a Worksheet
1. Click Workbook on the menu bar, and then click Open worksheet
2. Navigate to the folder in which the worksheet is stored
3. Double click the file name to open the worksheet
Figure 30: Worksheet
4. Follow the on-screen instructions and use the scroll bar, hyperlinks
and the Back and Forward buttons to navigate throughout the
document
5. Click Launch to configure MultiLab and TriLog
Note: TriLog should be operating in 8 sensors mode

Chapter 3 Working with MultiLab 87
6. Click Close to return to MultiLab
7. Click Run
on the main toolbar to begin recording
3.7.3. Create Your Own Worksheet
Creating a worksheet consist of two steps. First, create an HTML document using
your HTML editor (For example, Word or Front Page). This file should include the lab
manual and the experiment instructions (see below). The second step is to use the
MultiLab software to create a configuration file, which is a file that will store the
specific settings you wish to define for the experiment. These include the TriLog
setup, MultiLab’s layout, the recording mode, the graph format desired, special
preset graph scaling, sensors measurement etc.
1.Create an HTML document with Word
1. Create a new Web page
1. Open Word
2. In the File menu, click New
3. Do one of the following:
• On the General tab, click Web Page to
open a blank Web page
• On the Web Pages tab, click the
template that you would like to base
your Web page on
4. Enter your texts and pictures
5. Click Save on the toolbar
6. Navigate to C:\Program Files\Fourier Systems\MultiLab\Workbook
7. Click Save
2. Create a Web page from an existing Word document
1. Open the existing file with Word
2. In the File menu, click Save as Web Page
3. Navigate to C:\Program Files\Fourier Systems\MultiLab\Workbook
4. Click Save
2.Create a configuration file
1. Open the MultiLab program
2. Click Workbook on the menu bar, and then click create new
worksheet

88 Chapter 3 Working with MultiLab
3. Double click the file you want to configure to open it:
Figure 31: Creating a worksheet
4. Click Enter experiment settings to open the Setup wizard
5. Use the setup wizard to preset MultiLab and TriLog just as with the
normal setup process (see page 66)
6. When you’ve finished entering the settings, click Finish to update
the worksheet
7. Click OK
8. Click Close.

Chapter 3 Working with MultiLab 89
3.8. Special Tools
3.8.1. Predicting
The Predict tool enables you to draw predictions directly on the graph, prior to
displaying the real data:
1. Click Run
on the main toolbar to start recording
2. Click Pause/Continue
on the graph toolbar to freeze the graph
Data transmitted from the TriLog while the graph is frozen is stored onto the PC but
is not displayed.
3. Click on the end of the curve and move the mouse according to your
predictions. Click to draw a straight-line segment. Move the mouse
again and click where you want the second segment to end, and so
on
4. Click Add prediction
on the graph toolbar to create another
prediction
5. Click Pause/Continue
a second time to resume live data
display and to compare your predictions with the real data
3.8.2. The Timing Wizard
1.Overview
The Timing Wizard enables you to easily measure and calculate many types of time
events, including velocity and acceleration with one or two photogates.
Connect one photogate to input 1 or connect two photogates to input 1 and input 2 in
TriLog and perform the experiment. Then let the Timing Wizard guide you through
the analysis.
With the Timing wizard you can measure sequences of time events at gate one
and/or at gate two, or time events between the two gates. MultiLab can then
calculate the velocity and acceleration. Special options make it easy to measure
velocities in collisions and the time period of a pendulum or any other oscillating
body.
The Timing Wizard can handle multiple events. For example, if a body is crossing a
photogate several times, applying the Timing Wizard will result in a series of
measurements that match the number of crossings.
2.Working with the Timing Wizard
1. Display the data that you wish to analyze in the graph window

90 Chapter 3 Working with MultiLab
2. Click Analysis on the menu bar, then click Timing Wizard to open
step 1 of the Timing Wizard dialog:
Figure 32: Timing Wizard – Measurement
3. Click an option to select measurement: Time, Velocity or
Acceleration
4. Click Next to move to step 2:
Figure 33: Timing Wizard – Method
5. Click an option to select the measuring method
6. If required enter the body’s width, or the distance between the gates
in cm in the appropriate edit box (in velocity and acceleration
measurements only)
7. Click Finish to display the results
8. If you want to change the method or measurement, click Back to
return to the Timing Wizard. To exit the Timing Wizard click OK
3.Measuring methods
The Timing Wizard offers you various methods of analyzing the different
measurements. In some measurements you will be asked to enter the dimension of
the moving body, or the distance between the two photogates to allow for the
calculation of velocity and acceleration.

Chapter 3 Working with MultiLab 91
The methods depend on the selected measurement:
Time
• At one gate
Measures the time it takes the
body to cross the photogate
(between blocking and
unblocking the infrared beam)
• Between gates
Measures the time it takes the
body to move from one
photogate to the second
photogate (between blocking
the first and blocking the
second infrared beams)
• Pendulum
Measures the time period of an
oscillating body (the time
interval between the first and
the third blockings of the beam)
Velocity
• At one gate
Measures the time it takes the
body to cross the photogate
(between blocking and
unblocking the infrared beam)
and returns the velocity.
You should enter the body’s
width

92 Chapter 3 Working with MultiLab
• Between gates
Measures the time it takes the
body to move from one
photogate to the second
photogate (between blocking
the first and blocking the
second infrared beams) and
returns the average velocity.
You should enter the distance
between gates
• Collisions
Measures the crossing time
intervals at each gate and
returns the corresponding
velocities.
You should enter the bodies’
width (the width of the two
bodies must be identical)
Acceleration
• At one gate
A card with two flags must be
attached to the moving body
(see figure to the left). The
Timing Wizard measures the
crossing time intervals of the
two flags and returns the
acceleration.
You should enter the flags
width
• Between gates
Measures the crossing time at
the first gate, the time it takes
the body to move from one gate
to the second gate and the
crossing time at the second
gate and returns the average
acceleration.
You should enter the body’s
width

Chapter 3 Working with MultiLab 93
4.Time schemes and calculations
1. Time measurements
At one gate
Result:
12
ttt −=∆
Between gates
Result:
13
ttt −=∆
Pendulum (one gate)
Result:
15
ttt −=∆
t5
t3
t1
t2
t4
t2
t1
t1
t
2
t
3
t
4
Input 1
Input 2

94 Chapter 3 Working with MultiLab
2. Velocity
At one gate
Required parameters: w – the body’s width
Result:
12
; ttt
t
w
v −=∆
∆
=
Between gates
Required parameters: L – the distance between gates
Result:
13
; ttt
t
L
v −=∆
∆
=
Collision (two gates)
Required parameters: w – the bodies’ width (must be identical)
t1
t
3
t4
t1
t
2
t
3
t
4
Input 1
Input 2
t1
t2
t2

Chapter 3 Working with MultiLab 95
Result:
78
2
56
2
34
1
12
1
;
;
tt
w
v
tt
w
u
tt
w
v
tt
w
u
−
=
−
=
−
=
−
=
3. Acceleration
At
one gate
Required parameters: w – the flags’ width
Result:
t
vv
a
tttt
t
tt
w
v
tt
w
v
∆
−
=
−−+
=∆
−
=
−
=
12
1234
34
2
12
1
2
;
t5
t7
t8
t1
t
2
t
3
t
4
Input 1
t6

96 Chapter 3 Working with MultiLab
Between gates
Required parameters: w – the body’s width
Result:
t
vv
a
tttt
t
tt
w
v
tt
w
v
∆
−
=
−−+
=∆
−
=
−
=
12
1234
34
2
12
1
2
;
5.Tips on using the Timing Wizard
• Attach a flag to the moving body
When measuring the motion of a moving cart it is convenient to attach a vertical ‘flag’
to the cart (see picture below). You can mount a slotted wooden block on the cart
and insert the flag onto the slot, or use masking tape to attach the flag to one side of
the cart.
Use a double flag to measure acceleration at one gate. The width of the two flags
must be the same.
• Use the cursors
t
1
t
2
t
3
t
4
Input 1
Input 2

Chapter 3 Working with MultiLab 97
Use the cursors (see page 58) to select the graph and data range to which you want
to apply the Timing Wizard.
• Time resolution
The time resolution depends on the sampling rate. Use the table below to select a
rate that meats your needs.
Rate
(samples per
second)
Resolution
10 0.1s
25 0.04s
50 0.02s
100 0.01s
500 2ms
1000 1ms
2000 0.5ms
20800 0.05ms
• Use the Trigger
For fast events and high sampling rates use the Trigger tool (see page 69) to initiate
the data logging.
3.8.3. Crop Tool
The Crop tool enables you to trim the edges of a data set. Use it to remove unwanted
data or to apply manual curve fitting to a desired range of data points.
The time scale of the trimmed data is shifted so that it will start at
0
=
t .
If you want the automatic curve fit equation to start at
0
=
t , apply the crop tool
before any type of curve fitting
After applying the crop tool, the trimmed data set replaces the original set on the
graph display and a new icon is added to the Data Map under cropped data.
1. To trim all data up to a point
1. Position a cursor (see page 58) on the data point
2. Click on the Graph menu, then click Crop.
2. To trim all data outside a selected range
1. Use the cursors to select the range you want to keep
2. Click on the Graph menu, then click Crop.
3.8.4. Capture Tool
The Capture tool enables you to capture and record specific data points from the
TriLog stream of data, like taking snapshots of the dynamic process. For example,
you can design a light refraction experiment that will record the angle of the refracted

98 Chapter 3 Working with MultiLab
beam only when the light intensity is maximal, and then plot the angle of refraction
vs. the manually entered column of the angle of the incident beam.
In capture mode, when you start recording, the data in the graph window appears as
it normally does, but every time you click Capture, MultiLab enters the most recently
recorded value into a new entry in the capture table.
When you have finished capturing data, you can add manual columns to the table
and display the data in the graph window.
1. Preparing the capture table
1. Click Table on the menu toolbar, and then click Capture mode to
open the Capture dialog box:
Figure 34: Capture dialog box
2. In the Available Sensors list, select the sensors you want to capture
by clicking their name, and then click Add
3. If you want to insert a manual column into the table, click Insert
manual column to open the dialog box:
Figure 35: Manual Column dialog box
4. Enter the column’s name and unit, then click OK
The new column is added to the Current Columns list.
(Note: You can always add manual columns later by clicking Add manual column
on the Table menu.)
5. Click OK
MultiLab opens a new table with the columns you defined.
6. Enter values into the manual column by clicking a cell and typing the
number, then press Enter or the down arrow key to move to the next
cell:

Chapter 3 Working with MultiLab 99
Figure 36: Capture table
2. Capturing data
1. Click Run
on the main toolbar to start the data recording
process
2. Watch the online graph, and when the graph reaches a point you
wish to capture, click Capture
on the table toolbar. MultiLab
enters the momentary data to the capture table sequentially
3. If logging stops, simply click Run to continue the data recording and
capturing
4. After you’ve finished capturing the desired data, click Table on the
menu toolbar, and then click Capture mode to exit capture mode
3.Displaying the captured data on the graph
1. Click Edit graph
on the graph toolbar to open the Graph edit
dialog box:
Figure 37: Using Graph edit dialog box to display captured data

100 Chapter 3 Working with MultiLab
2. Choose the data set that you wish to display on the X–axis from the
X–Axis list by clicking its name
3. Choose the data set or sets you wish to display on the Y–axis from
the Y–Axis list by clicking its name (or names)
4. Click OK
 Loading...