

Fountainhead OMLB-2, OMLP-2, RMLB-2, RMLP-2 Owner's Manual
BARB
CONNECTION
SHU T-OFF
EXTENSION
BARB
CONNECTION
TANK
NOZZLE
PUMP HANDLE
SHU T-OFF
LOCK
ASSEMBLY INSTRUCTIONS
Owner’s Manual
The Fountainhead Group
Compressed Air Sprayer
1-800-3 11-9903
Owner’s Manual
OMLB-2, OMLP-2, RMLB-2, RMLP-2
WARNING! The sprayer is operated with liquid under pressure. Failure to observe CAUTION and to follow instructions for operating and cleaning
can cause tank, hose and other parts to be weakened and/or rupture under pressure. This can result in SERIOUS INJURY from high pressure discharge of liquids
or forcible ejection of parts. DO NOT USE FLAMMABLE MATERIALS IN THIS SPRAYER. Material could ignite or explode, causing serious injury. FOR SAFE USE
OF THIS PRODUCT - YOU MUST READ AND FOLLOW ALL INSTRUCTIONS BEFORE USE. TEST SPRAYER WITH WATER BEFORE USING ANY CHEMICALS .
SAFETY PRECAUTIONS:
1. Rea d ow ner ’s m anu al comp lete ly befo re
operating this sprayer.
2. This sprayer is designed for light duty lawn and
garden use only.
3. Always u se g og gles, gl oves a nd pro te ctive
clothing when using spraye r.
4. Read and follow all instructions and cautions on
label of products used in this sprayer.
5. Spray when air is calm to prevent drift of
chemical.
6. Do not leave sprayer in the sun when not in
use.
7. Never use flammable liquids, caustics, acids
or hot water in this tank.
8. Never store chemicals in this tank.
9. Always release pressure when sprayer is not in
use and before removing pump from tank.
10. Never stand with face or body over sprayer when
pressurizing tank or releasing pressure.
11. Clean and rinse sprayer thoroughly after each use.
12. Never attempt to alter sprayer from original
condition.
13. Always use replacement parts fr om original
manufacture r.
1-800-3 11-9903
If you have any problems with, or have any questions about your sprayer,
BEFORE YOU
RETURN IT TO THE STORE, CALL OUR TOLL FREE CUSTOMER SERVICE CENTER AT:
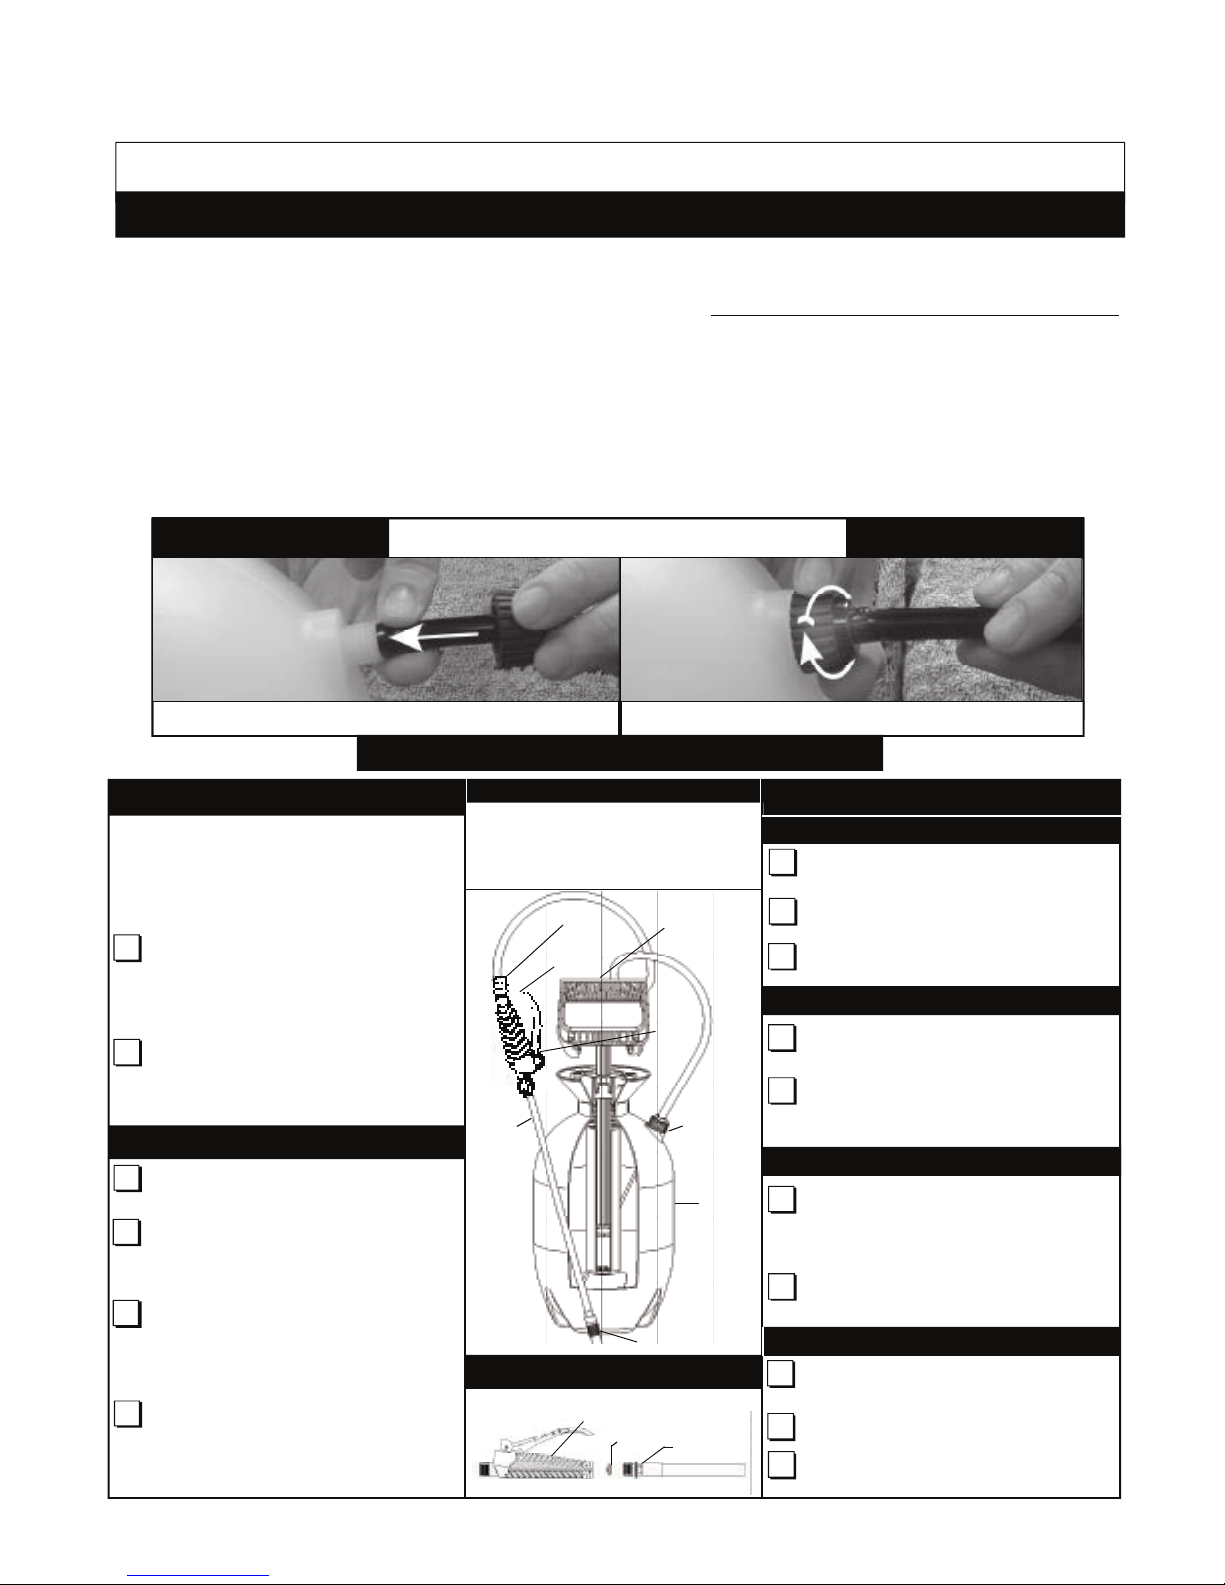
HOSE ASSEMB LY INSTRUCTIONS
11
22
11
1. PUSH HOSE COMPLETELY ON. 2. TIGHTEN NUT COMPLETEL Y.
! !
NEVER USE SPRAYER WITHOUT NU T.
1 .
2 .
1 .
2 .
3 .
HOS E A S S EMBL Y TO T A N K:
IM PORT A NT : A ho se nu t i s inc lud ed i n th e pa rts
ki t. The hose n ut i s re qu ired for pro per as se mbly
of t he spr aye r. Do n ot a tte mpt t o hea t, or a lte r
ho se , h ose nu t, or b arb prior t o a ssembly .
Sl ide h ose n ut ove r en d of ho se ( obs erv e
pr ope r ho se n ut o rie nta tio n in a bov e
di agr am) . P ush h ose c omp let ely o nto t ank
barb, as shown in step #1 of above dia gr am .
Sl ide hos e nu t al ong hos e an d ov er b arb
th rea ds. Turn ho se nu t c loc kwi se to
co mpl etel y t igh ten o ver hose , a s s how n i n
step #2 of ab ov e d ia gr am (d o not u se to ols) .
Re mov e pr ote cti ve c ap f rom end of s hut -of f
assem bl y.
Sc rew e xte nsio n on to e nd o f sh ut- off
as sem bly unt il f irm ly a tta che d.
Se lec t a noz zle , us ing NOZ ZLE SEL ECT ION
CH AR T. Scr ew se lec ted no zzl e ont o
ex ten sio n un til fir mly att ach ed, mak in g s ure
#1 710 92 ( o-r ing ) is in p la ce on end of
e x t en si on .
When using flat f an noz zl es, ma ke sure t abs
on nozz le ti ps ar e f it te d i nt o s lo ts on en d o f
extensi on . Tip can be in st al le d to produce a
ve rt ical o r h orizo nt al fla t f an.
4 .
EX T E NSION A S SEMBL Y TO SH U T - O F F
E- mail : Info@ TheF GI.co m • Web si te: w w w .TheF ounta inhea d Group .com • 1- 800-3 11-99 03
FI L T ER C LEAN I N G (
(S ee SPR AYE R
MA INT ENA NCE P AGE 2 )
OP E R ATI NG I NST R UCT IONS
F I LL I NG
1 .
2 .
Remove p ump by turni ng pump handle
counterclockwise.
Fill tank to desired level (always refer to
chemical manufacturer for proper mixture)
Place pump into tank opening and turn handle
clockwise to tighten.
3 .
Ma ke su re shu t- off lo ck is no t e nga ge d ( if
sh ut- off lo ck is eng age d w hile pr ess uri zing ,
th e un it w il l im med iat el y st art spr aying )
Pr ess uri ze spr aye r by pu mpi ng han dle i n a
sm oot h u p and d own m oti on. W hen d esi red
pres su re is a ch ieved, l oc k h andl e o nto pump .
P R ES S UR IZ I N G
Po int n ozz le aw ay fro m you. Pre ss shu t-o ff
bu tto n to be gin spr ayi ng. Re leas e b utt on to
st op s pra yi ng. Wh en u si ng a dju st able n ozzle ,
ad jus t sp ray p att ern b y tu rni ng n ozz le t ip.
(N ot e: Fla t fan no zzle i s not ad justabl e).
Fo r co nti nuo us spra yin g, s quee ze s hut -of f
handle and rot at e l oc k t ow ar d t he spra ye r t ip .
1 .
2 .
S P R A YI NG
1 .
2 .
Direc t nozzle away fro m you and press
han dle on shu t-off until unit stops spraying
(this will rel ease pr essure in tank).
Tu rn pum p ha ndl e cou nte rcl ock wis e to
re mov e p ump .
Empty any r em ai ni ng li qu id ac co rd ing to
produ ct dispo sal dire ctions. Clean sprayer as
dire ct ed und er CL EA NING SP RA YE R .
F I NI SH I N G
1 .
2 .
PN 180 568 20 03
3 .
ALWAY S ENSURE PRESSUR E IS RELEASE D
FROM TANK BEF ORE FIL LING OR SERV ICING .
Sq ue ez e sh ut-o ff h andl e and hold do wn u ntil
the unit stop s spr aying . Th en, a nd on ly th en, i t
is sa fe t o re move pump .
I M PO R TA N T!
Fi lt er
Hos e A ssem bly
Sh ut -O ff
As se mb ly
Lawn Insects
Insects on Roses
& Ornamental Plants
Insects on Fruit &
Vegetables
Insects and Diseases
on Roses & Ornamental
Plants
Insects and Disease
on Fruit Trees
Home-Invading Pests in
Lawn & Around
Perimeter of Home
Dormant Season
Spraying for Insect
Control on Fruit Trees &
Woody Ornamentals
14 178024 Extension-Curved-14”-Poly
180343 Extension-Straight-Brass 14”
180352 Extension-Curved-Brass 14”
15 178054 Nozzle Cap-Poly
180340 Nozzle Cap-Brass
16 178052 Nozzle Base
17 178055 Nozzle Assembly-Poly
180344 Nozzle Assembly-Brass
18 171092 O-Ring
19 180298 Pump Handle
20 180337 Parts Kit
21 180299 Pump Gasket
22 180320 Filter (If Equipped)
23 178083 Hose Adapter
1 180482 2 Gallon Tank-ML-2, Yellow
180507 2 Gallon Tank-ML-2, Natural
2 180292 Funnel
3 180294 Pump Barrel
4 180296 Pump Cap (2 required)
5 180449 Hose Assembly
6 180448 Shut-off Assembly
7 178085 Shut-off Body
8 178090 Shut-off Lever
9 178087 Plunger
10 178088 Shut-off Spring
11 178089 Retainer
12 178086 Diaphragm
13 180386 Hose 32”
KEY
NO.
PART #
DESRCRIPTION
KEY
NO.
PART # DESCRIPTION
KEY
NO.
PART #
DESCRIPTION
24 178084 O-Ring
25 180011 Lock
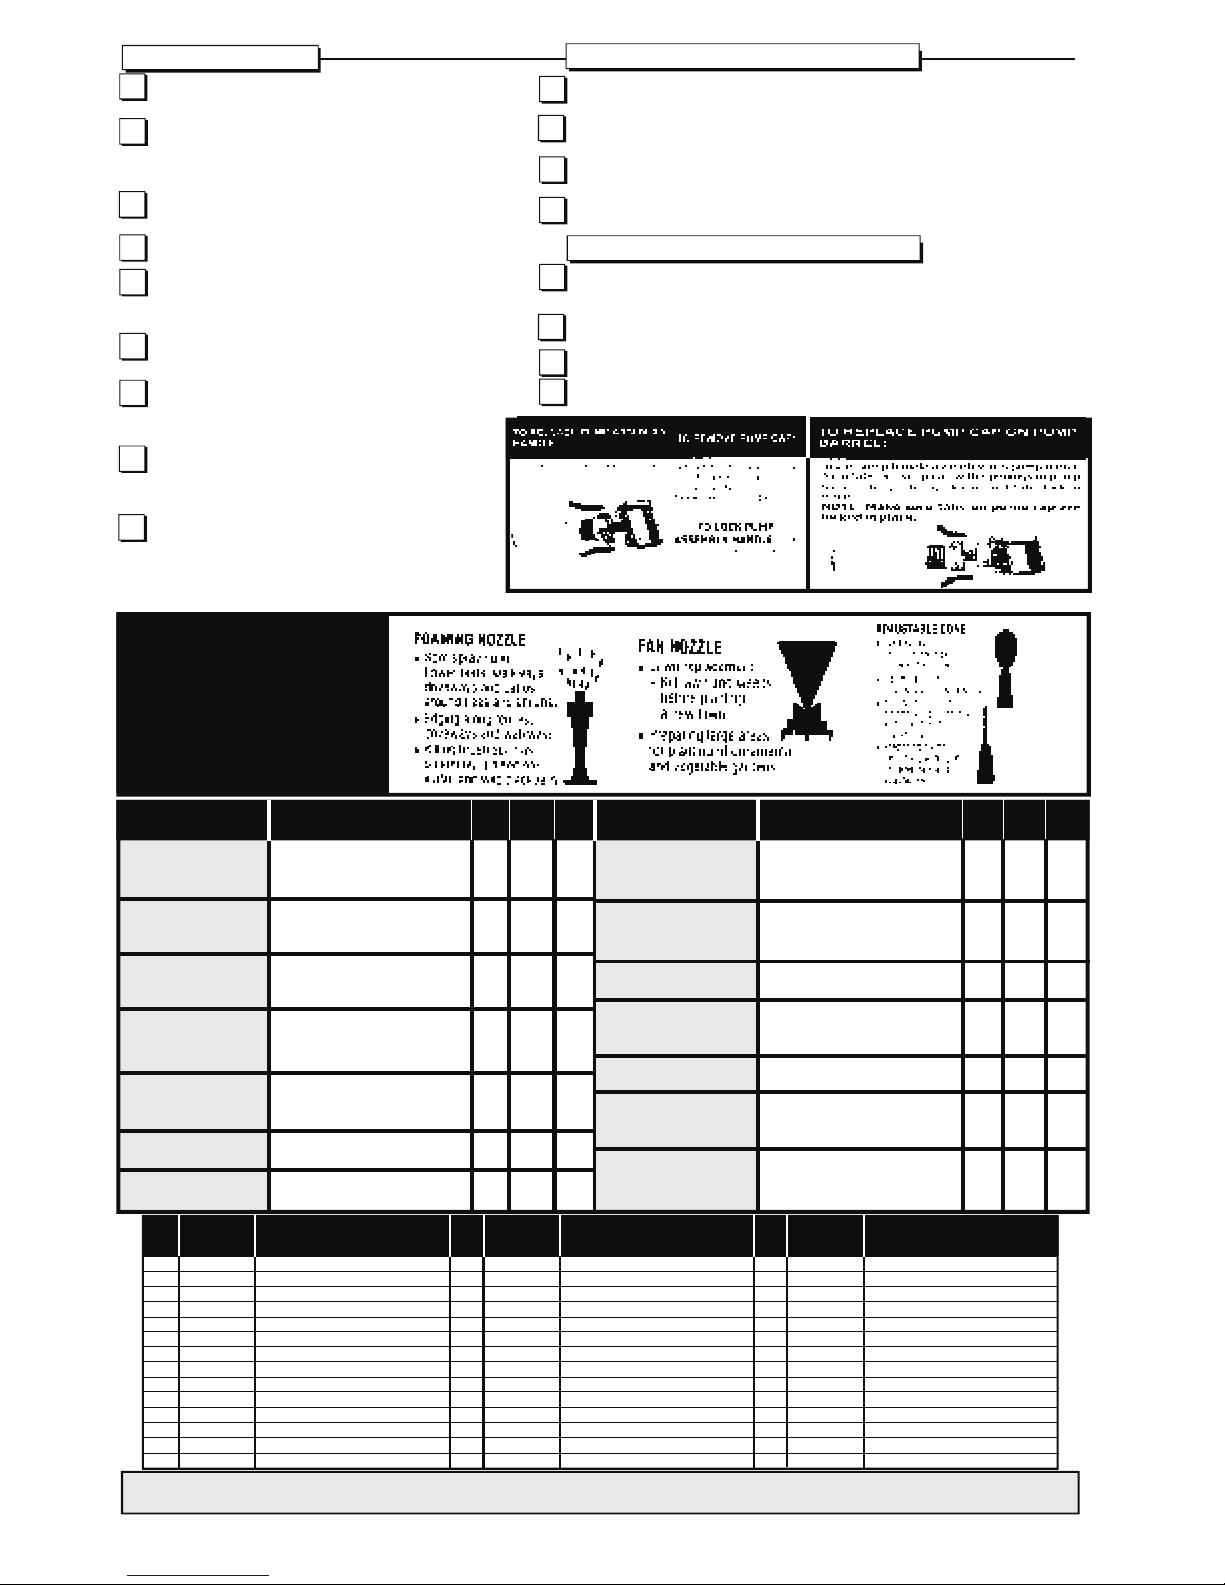
26 180007 Fan Tip Set
27 180097 High Volume Fan Tip (Red)
28 180168 Low Volume Fan Tip (Yellow)
29 178067 Cap Nut
30 180300 O-Ring, Pump
31 180305 Pump Assembly
32 180513 Outlet Tube
33 180364 Nut
34 171015 Check Valve
180568 Parts List / Instructions
35 180266 Foaming Nozzle
NOTE: MODELS OMLP-2 AND RMLP-2 ARE EQUIPPED WITH POLY EXTENSIONS AND NOZZLES.
MODELS OMLB-2 AND RMLB-2 ARE EQUIPPED WITH BRASS EXTENSIONS AND NOZZLES.
Remove pump as de scri bed in FINI SH
section.
Fill tank with tap water. Replace pump and
turn clockwise to tighten. Agitate tank to rinse
chemical off tank wall and pump.
Remove pump and empty contents into gravel
or bare soil.
Refill tank with tap water.
Check to be sure pump is free of debris and
place pump into tank. Turn handle clockwise
to tighten pump.
Pressurize tank. Follow all instructions in
PRESSURIZING section.
Point nozzle away from you and spray for
approximately 30 seconds to clean hose and
shut-off.
Release pressure as outlined in OPERA TING
and FINISH sections. Empty contents as in
step 3.
Repeat steps 4 thru 8 until thoroughly cleaned.
Note: It is best to keep 2 sprayers: One for
herbicides and one for other products, such
as fertilizers or insecticides.
CLEANING SPR AYER
SPRAYER MAINTENANCE
Pump should be periodically oiled by dropping 10 to 12 drops of light oil
down pump rod through opening in cover.
If nozzle clogs: remove nozzle assembl y, disassemble nozzle and clean
openings of any obstructions.
Never use any tool to remove pump if there is pressure in sprayer.
If filter clogs: remove and clean filter as shown on page 1 under FILTER
CLEANING .
Sprayer tank should be hung upside down, with pump removed,
in a warm, dry location.
Do not store or leave any solution in tank after use.
Store in a warm dry location out of direct sunlight.
KEEP SPRAYER OUT OF REACH OF CHILDREN.
NOZZLE
SELECTION
CHART
1.
2.
3.
4.
5.
6.
7.
8.
9.
E-mail: Info@TheFGI.com • Web site: www.TheFountainheadGroup.com • 1-800-3 11-9903
1.
2.
3.
4.
SPRAYER STORAGE
1.
2.
3.
4.
Broadleaf Weeds in Lawn
Grassy Weeds in Lawn
Brushy Weeds (Such as
Poison Oak, Poison Ivy,
Kudzu, Wild Blackberry)
Weeds in Non-Planted
Areas
(Mulch, Gravel, etc.)
Spot Control of Weeds in
Flowerbeds, around Trees
& Shrubs
Disease Control on
Vegetables
Disease Control on Fruit
Trees
Ortho® Weed-B-Gon® Weed Killer For
Lawns, Ortho® Weed-B-Gon
®
Chickweed, Clover & Oxalis Weed
Killer For Lawns
Ortho® Weed-B-Gon® Crabgrass
Killer For Lawns
Ortho® Brush-B-Gon® Poison Ivy,
Poison Oak & Brush Killer
Roundup® Weed & Grass Killer
Roundup® Weed & Grass Killer
Ortho® Garden Disease Control
Ortho® Garden Disease Control
PROBLEM
Ortho® Termite & Carpenter Ant
Killer, Ortho® Bug-B-Gon® MultiPurpose Insect Killer
Ortho® Bug-B-Gon® MultiPurpose Insect Killer, Ortho
®
Systemic Insect Control
Ortho® Bug-B-Gon® MultiPurpose Insect Killer
Ortho®Orthenex® Garden Insect
& Disease Control
Ortho® Orthenex® Garden Insect
& Disease Control
Ortho® Termite & Carpenter Ant
Killer, Ortho® Bug-B-Gon® MultiPurpose Insect Killer
Ortho® Volck® Oil Spray
SOLUTION
PROBLEM
SOLUTION
HIGH
VOLUME
FAN
(RED)
ADJUSTABLE
CONE
LOW
VOLUME
FAN
(YELLOW)
HIGH
VOLUME
FAN
(RED)
ADJUSTABLE
CONE
LOW
VOLUME
FAN
(YELLOW)
X
X
X
X
X
X
X
X
X
X
X
X
X
X
 Loading...