

Fountainhead Black Flag, Burgess User Manual
®
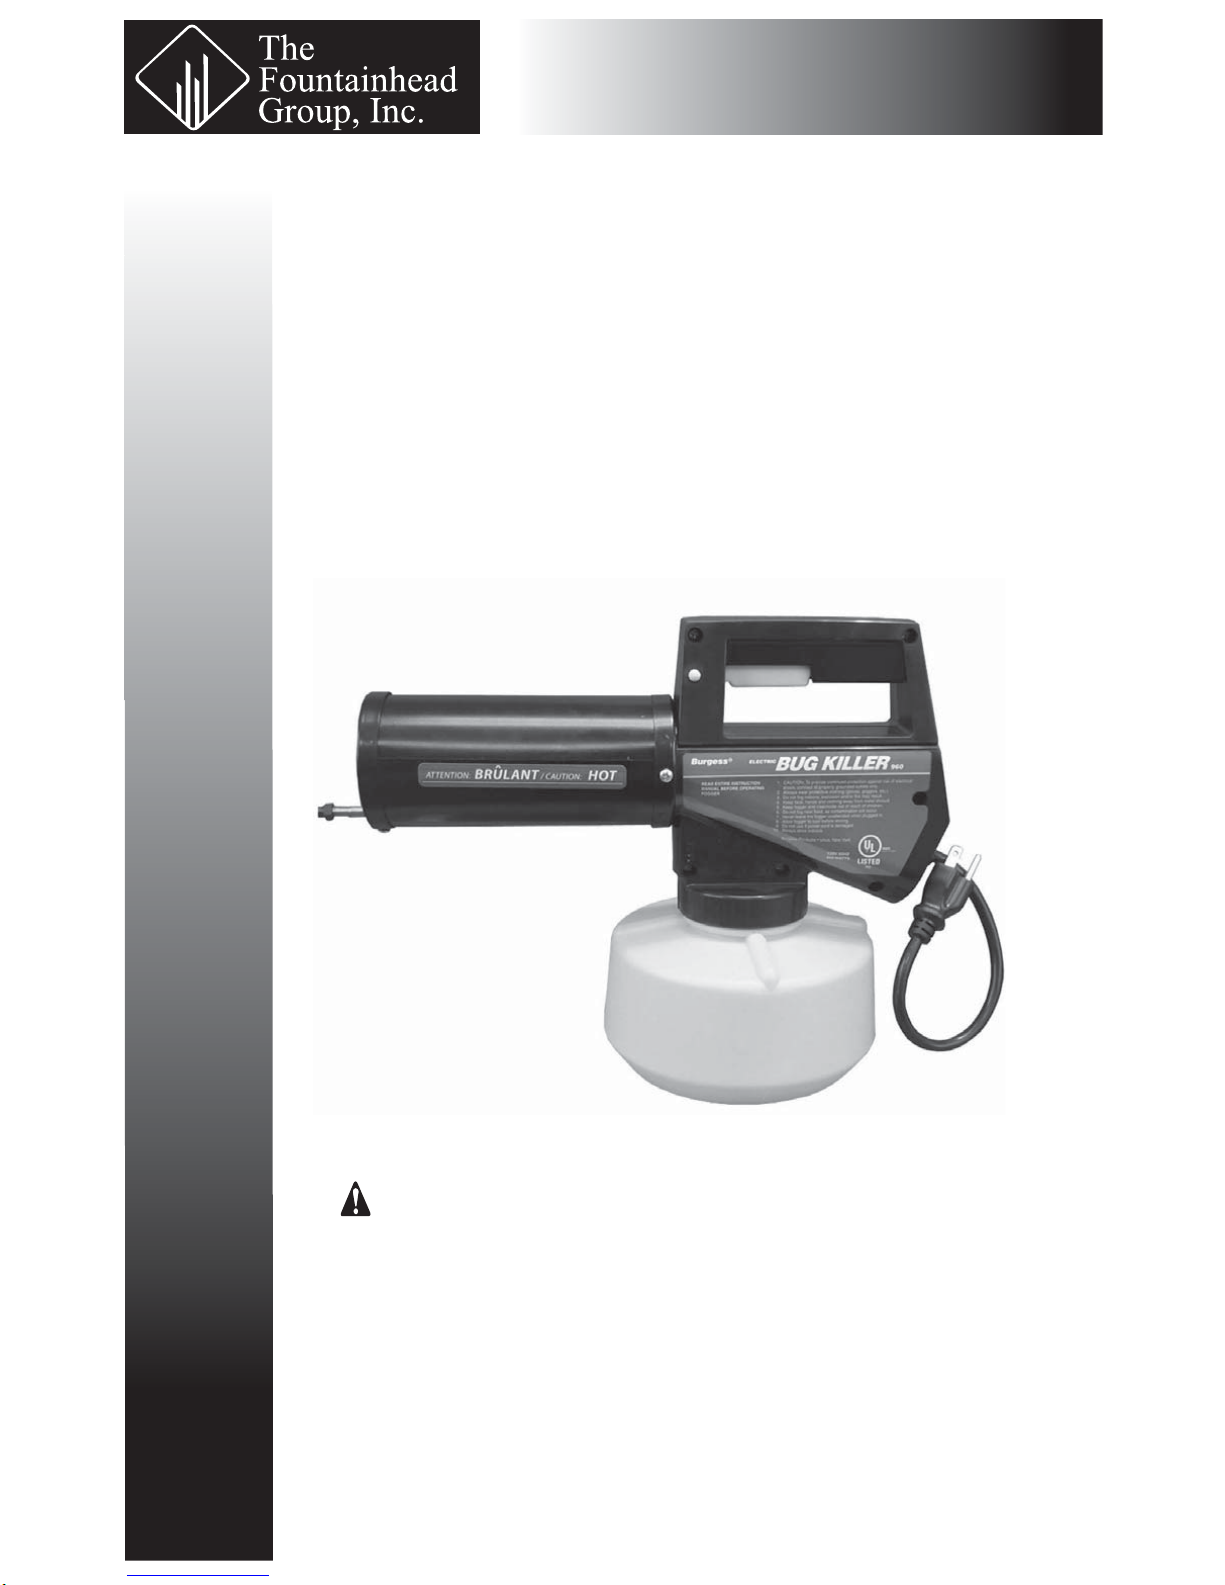
Black Flag /Burgess
Electric Insect
Fogger
Use and Care Manual
®
CAUTION: Read and follow all instructions
Do Not Return This Fogger To The Store
For Help, Information or Parts, Call: 1-800-311-9903
The Fountainhead Group, Inc.
23 Garden St., New York Mills, NY 13417
1-800-311-9903
www.TheFountainheadGroup.com
Manual No. 180557
Rev C. 06/06/2012
ECN12-084
5 1/2” x 8 1/2” Booklet

BEFORE YOU BEGIN
Principles of fogging
(Before Using, be sure to read and follow all instructions, including the
instructions on the chemical to be used.)
Fogging is one of the most e ective and economical means of applying insecticide.
The Black Flag®/Burgess® Fogger adds the convenience of total portability for today’s
mobile outdoor-oriented living.
The secret of fogging's success lies in its ability to reduce insecticide into microscopic
particles averaging 15 microns in diameter (a micron measures 1/25,000 of an inch).
By contrast mist droplets range from 50 to 125 microns; spray droplets more than 125
microns.
The tiny particle size allows the fog to spread through the air, penetrating shrubbery
and other insect havens. The result is more insecticide particles come in contact with
more insects for greater kill. Yet fogging uses far less insecticide than conventional
sprays.
LIMITED WARRANTY
We warrant that each product sold by us will be free from defects in material and
workmanship for a period of one year from the date of shipment by us. We make no
other express warranties, and all implied warranties, including tness and
merchantability, are limited to one year from date of shipment by us. Within the
warranty period, we will repair or replace any part found to be defective upon our
examination but will not pay shipping cost or other expenses. To obtain warranty
service, write us at The Fountainhead Group, Inc. 23 Garden Street, New York Mills, New
York 13417, or call prepaid, Area Code 315-736-0037. Merchandise may not be
returned without prior permission and must be returned to us with freight prepaid.
This warranty service is an exclusive remedy and we are not responsible for any
consequential or incidental damages or injury to person or properly. This warranty
shall not apply to any product which has been subject to misuse, negligence or
accident, or been damaged in shipment, or misapplied, or which has been modi ed
or repaired by unauthorized persons. This warranty only applies to products owned by
persons purchasing directly from us or from our approved distributors and
merchandisers. The right is reserved to incorporate subsequent design or parts
changes after publication and without re-issue of descriptive literature or catalogs.
NOTE: Limitations on duration of implied warranty and/or consequential damages may
not apply to you if your state does not permit them. This warranty gives you speci c
legal rights in addition to rights which you may have under state law.
Page 1

Outdoor
Use Outdoors
Only
Indoor
Do Not Use
Indoors
BEFORE YOU BEGIN CONTINUED
Where and when to fog
The Black Flag®/Burgess® Fogger is designed to provide fast control of
mosquitoes, ies and other ying pests in outdoor areas such as yards,
patios, picnic areas, campgrounds, and other places where insects can
spoil outdoor living.
The ideal time to fog is around dusk, when the wind has usually died
down and the temperature at ground level is somewhat higher than
that of the air a few feet o the ground. This temperature inversion will
tend to hold the fog in the treated area for a longer period of time. It
is not advisable to attempt fogging when the wind is blowing harder
than ve miles an hour, since the fog will be blown away before it has
the opportunity to be e ective.
Never use wet fog on plants, shrubs or outdoor carpeting, etc. Since
the oily residue could have damaging e ects. Keep the Fogger about
5 feet away from the objects being treated, and let the fog drift in the
desired direction. At this distance, any non-vaporized particles of
insecticide will have settled to the ground. Always keep the breeze at
your back when operating the Fogger.
DO NOT USE THE BLACK FLAG®/BURGESS® FOGGER INDOORS. Operating the fogger in an enclosed area where fog can become heavily
concentrated, may cause re or explosion.
Dry and wet fog
Dryness or wetness of the fog is controlled by the rate of pumping. Pumping at the
recommended rate of once every 3 to 4 seconds will produce the most e ective
fog. The dryness of the fog can be determined by passing a piece of dry cardboard
through the fog about 18 inches from the end of the nozzle. If the cardboard appears
wet you are pumping too fast. Fog should appear white in color. If fog appears brown
or yellow in color you are pumping too slow.
Dry fog is recommended. This increases the penetrating ability of the insecticide
and allows the fog to cover a larger area. Wet fog contains particles of insecticide that
may not have been completely vaporized. The oily residue left by wet fog may be
harmful to certain species of owers, growing plants, outdoor carpeting, etc.
Page 2

BEFORE YOU BEGIN CONTINUED
Use Only Black Flag® Fogging Insecticide Formula 2
1. The fogger is a dispenser of insecticides. Results obtained are directly related to the
insecticide used. In order to produce a fog, the insecticide must have the proper oil
base. Black Flag® Fogging Insecticide Formula 2 has the proper oil base. Do not use
emulsi able concentrate or other materials designed to be mixed with water.
2. USE ONLY BLACK FLAG® FOGGING INSECTICIDE FORMULA 2. Your Black
Flag®/Burgess® Insect Fogger is designed to be used with Black Flag® Fogging
Insecticide Formula 2. The use of other insecticides or chemicals may damage your
fogger and could result in unsafe conditions.
3. The use of other insecticides such as Dibrom or Vapona will clog the vapor coil of
your fogger, make it inoperable and void the warranty.
Safety Precautions
1. Important: Read entire owner’s manual before operating the fogger. ALWAYS WEAR
PROTECTIVE CLOTHING (GLOVES, GOGGLES).
2. Use only Black Flag® Fogging Insecticide Formula 2. Your Black Flag® / Burgess Insect
Fogger is designed to be used with this insecticide only. The use of other
insecticides or chemicals may damage your fogger and could result in unsafe
conditions thereby voiding the warranty. Always follow the insecticide label
instructions.
3. Keep your face, hands, and clothing away from the metal shroud cover at all times.
The metal shroud cover becomes very hot while in operation.
4. Do not breathe insecticide fog or vapors
.
5. Operate the fogger outdoors only. DO NOT USE INDOORS or within any enclosed
structure. Always keep the fogger away from ammable materials. Do not smoke
while lling and/or operating the unit. Remove or cover exposed food and drinking
water before application. Contamination, re, or explosion could occur.
6. Always pre-heat your fogger for at least 2 minutes while keeping the fogger level to
the ground. Failure to pre-heat may clog the nozzle causing damage to the unit.
Page 3

BEFORE YOU BEGIN CONTINUED
7. Do not allow adults, children, or pets to enter until vapors, mists, and aerosols
have dispersed. Do not apply this product in a way that will contact adults,
children or pets either directly or indirectly through drift. Do not remain in treated
area. Exit area immediately and remain outside the treated area until aerosols,
vapors and/or mists have dispersed. Keep fogger and insecticide out of the reach
of children.
8. Always operate your fogger in an upright position. Never turn the unit upside
down.
9. Do not over ll insecticide jar. Unplug and allow the unit to cool before re lling.
10. Never leave fogger plugged in when unattended or not in use, to prevent the risk
of re.
11. Always follow insecticide label instructions. Insecticide containers should be
disposed of properly when empty.
12. Always store fogger indoors. Always wait for the fogger to cool before storing.
13. Trigger lock should always be in lock position (push lock button to the right) when
not in use. This will prevent accidental pumping of insecticide into the coil. An
accumulation of insecticide in the coil may cause liquid discharge when starting
up the unit. Such a concentrated discharge may ignite or stain clothing, outdoor
carpeting, etc. and may be harmful to grass or foliage.
14. Use only 3 wire, 10, 12 or 14 gauge extension cords suitable for outdoor usage.
Never defeat grounding feature. Failure to comply may result in electrical shock
and/or re.
15. If a properly grounded receptacle is not present, have a quali ed electrician
install one.
Page 4
PREPARING FOGGER FOR OPERATION
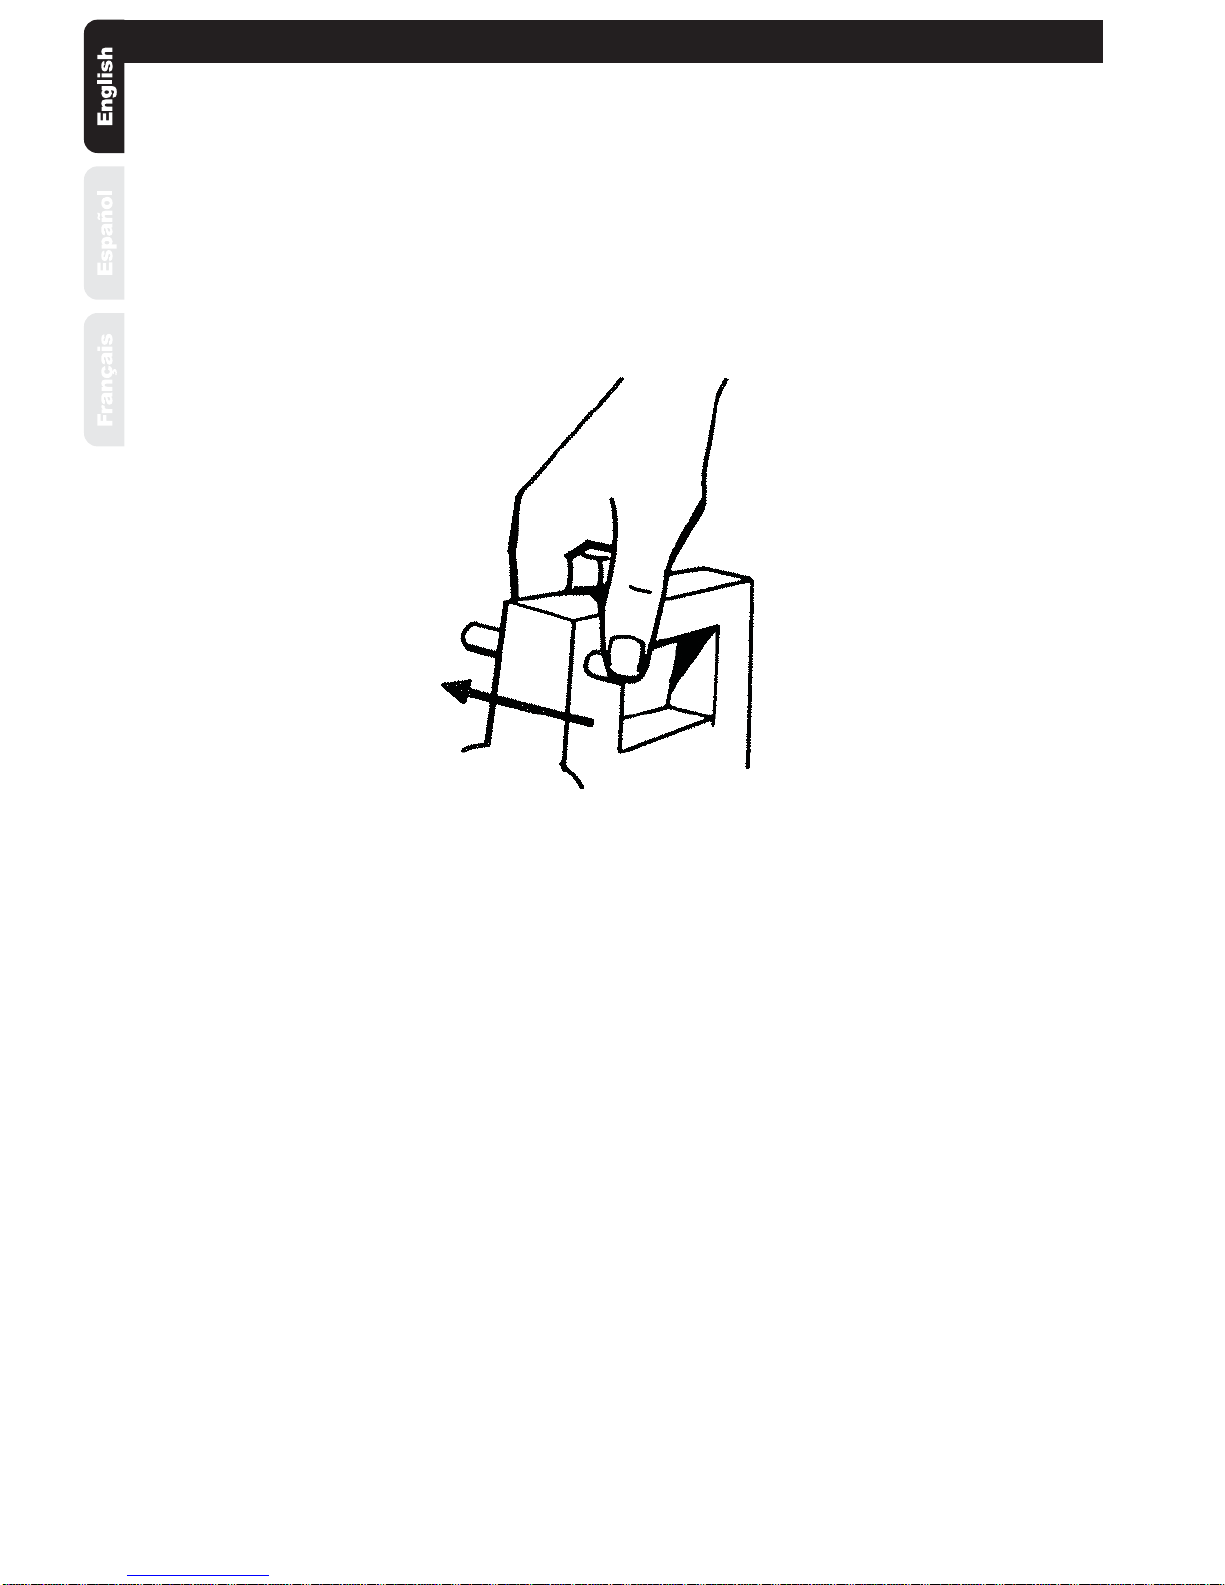
1. Make sure that the trigger is locked by pushing locking button in front of trigger to
the right (See Fig 2). This will prevent the accidental pumping of insecticide into
the coil.
To lock trigger
Fig 2
2. Unscrew the plastic insecticide container and ll with Black Flag® Fogging
Insecticide Formula 2. Do not over ll. The insecticide should be free of lint or
other foreign matter that may clog the pump mechanism. Straining the liquid
through a lint-free cloth before pouring it into the container will insure its
cleanliness. Make sure the container is screwed on securely so that it will not
come loose while the unit is in operation.
USE ONLY WITH BLACK FLAG® FOGGING INSECTICIDE FORMULA 2. Your Black
Flag®/ Burgess® Insect Fogger is designed to be used with Black Flag® Fogging
Insecticide Formula 2. The use of other insecticides or chemicals may damage your
fogger and could result in unsafe conditions.
Page 5

OPERATING INSTRUCTIONS
1. Make sure that the trigger is locked.
2. Place the fogger on a level surface when preheating.
3. Using a proper gauge extension cord, plug the fogger into a convenient outlet.
Allow the fogger to preheat for 2 or 3 minutes. While preheating some insecticide
or small clouds of smoke may come out of the nozzle. This is normal and should
not be cause for concern.
4. Release trigger by pushing trigger lock to the left and fogger is ready to operate.
5. Squeeze trigger every 3 to 4 seconds to achieve a steady cloud of whitish-grey
colored fog.
6. If unit becomes excessively hard to pump, you are pumping too fast. Too frequent
pumping results in wet fog.
7. If cloud becomes excessively blue/brown in color then you are pumping too slow.
This could degrade the insecticide and make it less e ective.
8. If a ame appears at the end of the nozzle, stop pumping immediately, and
unplug fogger. Place fogger on a stable, non combustible surface. Flame will stop
after excess insecticide is eliminated.
9. CAUTION: The shroud will become very hot while in operation. Do not let it come
into contact with skin, clothing or any combustible material. Always carry the
fogger at your side, pointed at a slightly downward angle.
10. Never leave fogger plugged in while not in use.
NOTE: Proper use of this fogger increases the penetrating ability of the insecticide and
allows the fog to cover a larger area. Improper use could result in oily residue left
behind which may be harmful to certain species of owers and growing plants.
Improper use will shorten the life of your new electric fogger.
Page 6

OPERATING INSTRUCTIONS CONTINUED
Turning o the Fogger
When you have nished fogging:
1. Push the trigger lock to the right to lock the trigger.
2. Allow the insecticide already in the coil to completely fog out. This will take 2 to 3
minutes.
3. When the fog being emitted becomes sporadic, unplug the unit.
4. Let the fogger cool o completely before storing.
Helpful Hints
If your extension cord is not long enough to reach the entire area you wish to fog
then:
1. Simply unplug the fogger and proceed to the area.
2. While fogging with unit unplugged, squeeze trigger every ve seconds and fog
the area necessary.
3. Fogger will stay hot enough to fog for approximately 2 minutes after being
unplugged.
4. If more time is needed to cover area, then plug fogger in and allow 3 to 4 minutes
to heat up again.
5. Repeat these steps as many times as necessary to fog desired area.
STORAGE /MAINTENANCE
Storage
1. Empty insecticide from the container before storing.
2. When storing the units for a long period of time, ush out the insecticide container
and the Fogger by pumping kerosene through the system. DO NOT PLUG IN UNIT.
This will safeguard against insecticide corrosion or clogging, and will insure top
performance.
3. Store Fogger and insecticide indoors, away from children.
Care and Maintenance
1. Insecticides provide lubrication for the Fogger's pump so no additional lubrication is
necessary.
2. If the nozzle or coil should become clogged, remove and clean nozzle with a small
diameter wire. With nozzle end pointed toward oor, insert wire in coil to check for
and remove carbon build up.
Page 7
2
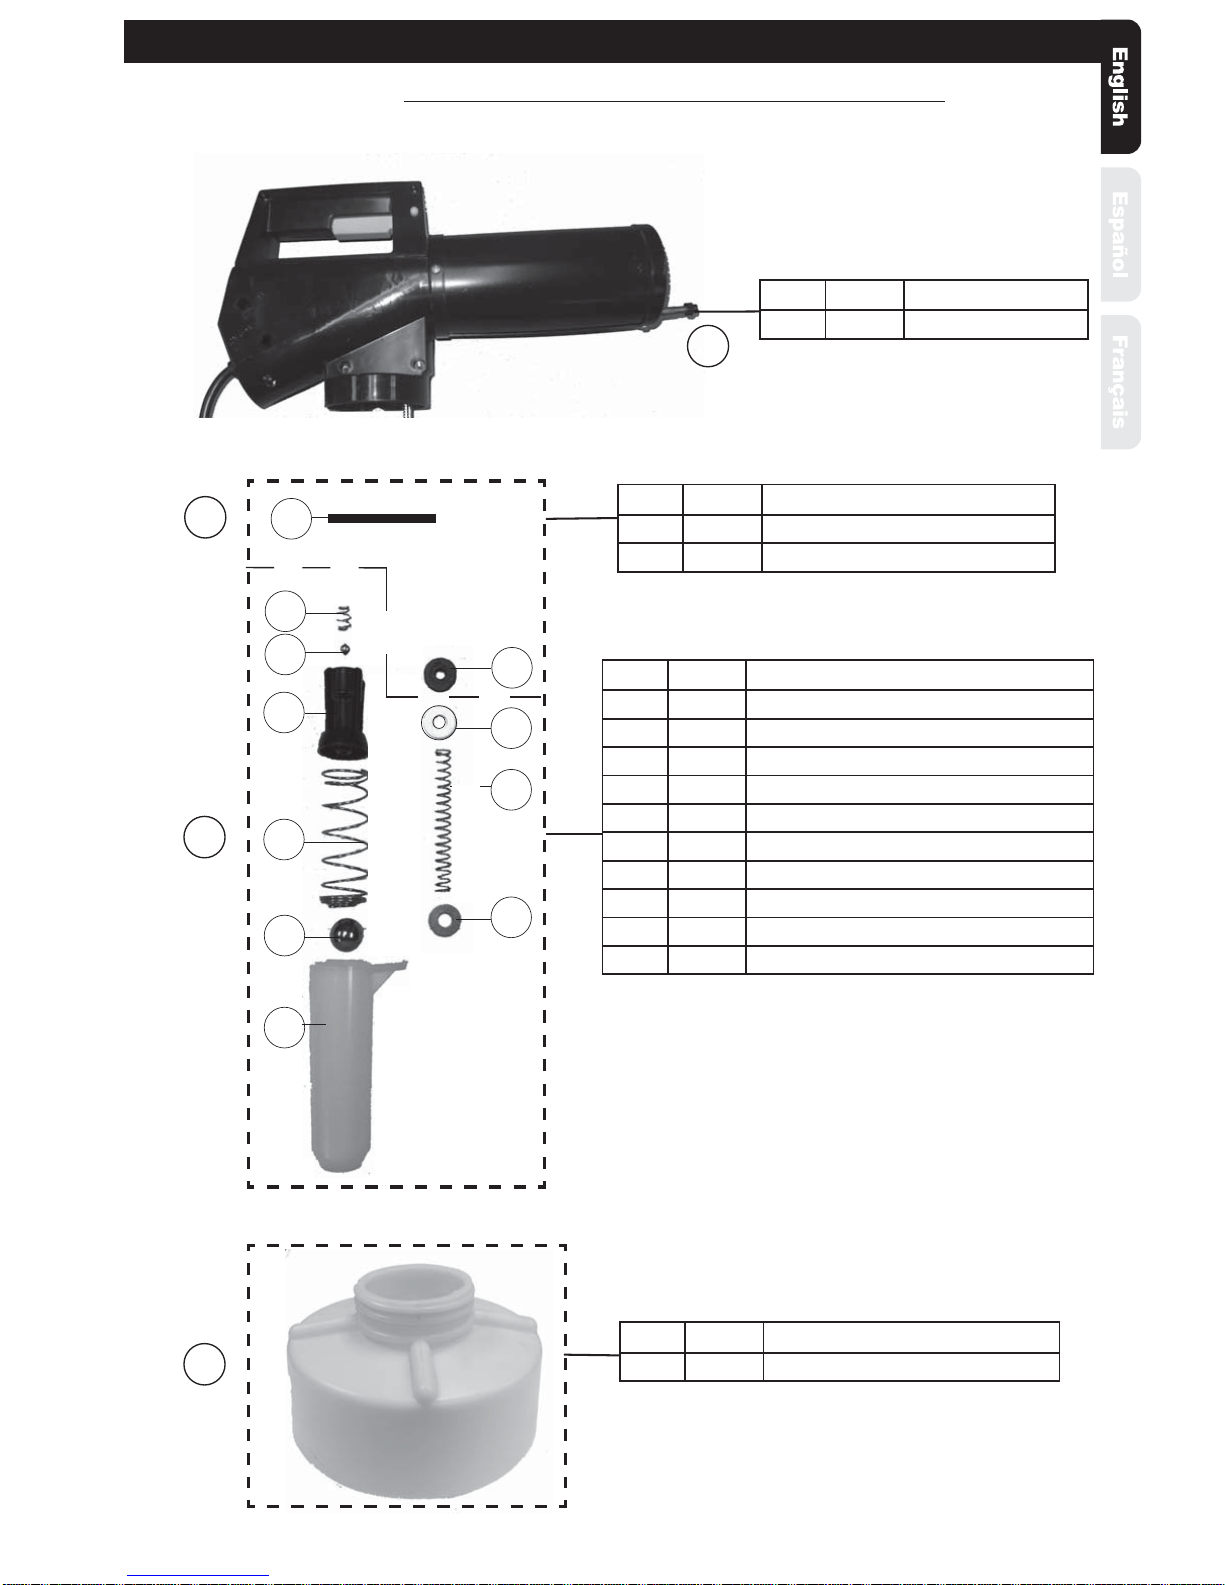
KITS AND PARTS
ATTN: Allow fogger to cool before servicing.
1. Nozzle
KEY# PART# DESCRIPTION
1 161015 VAPOR COIL NOZZLE
1
2. Gasket Parts Kit 161435
3B
3E
KEY# PART# DESCRIPTION
3B 161007 JAR GASKET
3G 161013 CYLINDER ROD GASKET
3
3C
3J
3F
3D
3A
3G
3K
3H
3K
3. Pump Parts Kit 161436
KEY# PART# DESCRIPTION
3A 161006 PUMP PISTON CYLINDER
3B 161007 JAR GASKET
3C 161008 PUMP PISTON BALL
3D 161009 PUMP PISTON CYLINDER BALL
3E 161010 PUMP PISTON SPRING
3F 161011 PUMP PISTON CYLINDER SPRING
3G 161013 PUMP PISTON CYLINDER ROD GASKET
3H 161014 PUMP PISTON CYLINDER ROD SPRING
3J 181131 PUMP PISTON
3K 161065 PUMP PISTON CYLINDER ROD WASHER (2)
4
4. Jar
KEY# PART# DESCRIPTION
4 161811 JAR
Page 8
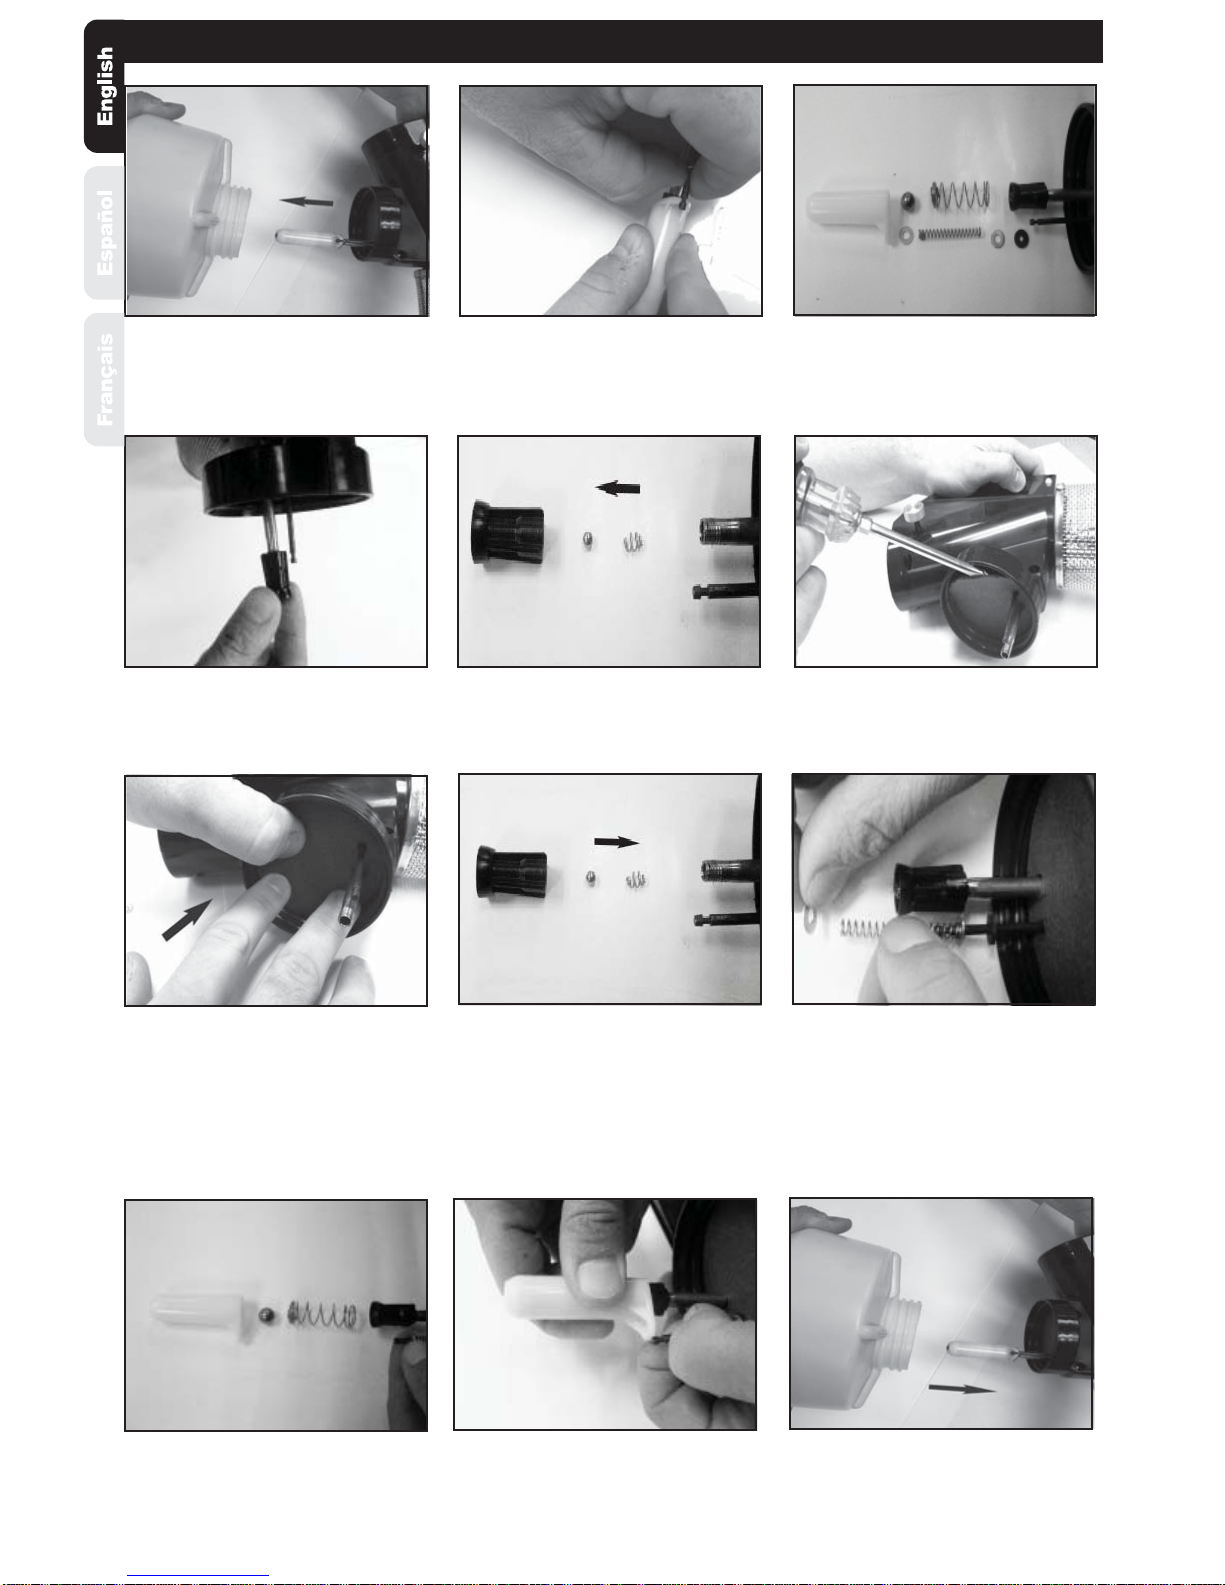
SERVICING INSTRUCTIONS
1. Unthread jar from fogger.
4. Unthread piston assembly.
2. Unhook pump piston
cylinder.
5. Remove and discard piston
and internal parts.
3. Remove and discard pump
piston cylinder and
associated parts.
6. Remove and discard
gasket from fogger.
7. Push new gasket (161007)
into place.
10. Install cylinder ball
(161009) and cylinder
spring (161011) into
cylinder (161006).
8. Install ball (161008) and
spring (161010) into piston
(181131). Thread piston
assembly back into place.
11. Slide cylinder onto piston
and attach to pump
piston rod.
9. Install new rod gasket
(161013), rst rod washer
(161065), rod spring
(161014), then second
rod washer (161065).
12. Thread jar back onto
fogger.
Page 9

TROUBLESHOOTING
Trouble Look For Remedy
(Symptom) (Probable Cause) (Corrective Action)
Poor fog quality. 1.) Low voltage. 1.) Change to another power source.
2.) Too light a gauge 2.) Use only 3 wire, 10 ,12 or 14 gauge
extension cord. extension cords suitable for outdoor
usage. Never defeat grounding
feature. Failure to comply may result
in electrical shock and / or re.
3.) Fogger is not at 3.) Wait 10-15 seconds before pumping.
operating temperature.
4.) If fog is wet and dripping the 4.) Decrease your pumping rate. See
pumping rate is too high or it Figure 6.
has not reached operating
temperature.
No fog 1.) Nozzle and/or end of 1.1.) Remove and clean nozzle ori ce.
Barrel heats up. coil obstructed or See Figure 1 & 2.
clogged.
1.2.) Remove carbon build-up from inside
the coil if necessary. See Figure 3.
2.) Pump plugged. 2.1) Insert a small diameter wire or tooth
toothpick into hole at bottom of
Piston Assembly to clear
obstruction. See Figure 4.
2.2) Replace pump assembly, (Kit #3).
3.) Piston is worn. 3.) Replace piston assembly, (Kit #3).
4.) Improper fogging 4.) Use only Black Flag ® Fogging
material. Insecticide Formula 2.
No fog-Barrel does 1.) No voltage. 1.) Change to another power source.
not heat up.
2.) Bad extension cord. 2.) Change to another extension cord.
3.) Heater assembly defective. 3.) Return you fogger for factory service.
Do not attempt to repair the heater
assembly. Not customer serviceable.
Dripping 1.) Nozzle loose. 1.) Tighten nozzle securely. See Figure 5.
2.) Excessive insecticide 2.) Pump with a lower rate. See Figure 6.
output.
Page 10
TROUBLESHOOTING CONTINUED
ATTN: Allow fogger to cool before servicing.
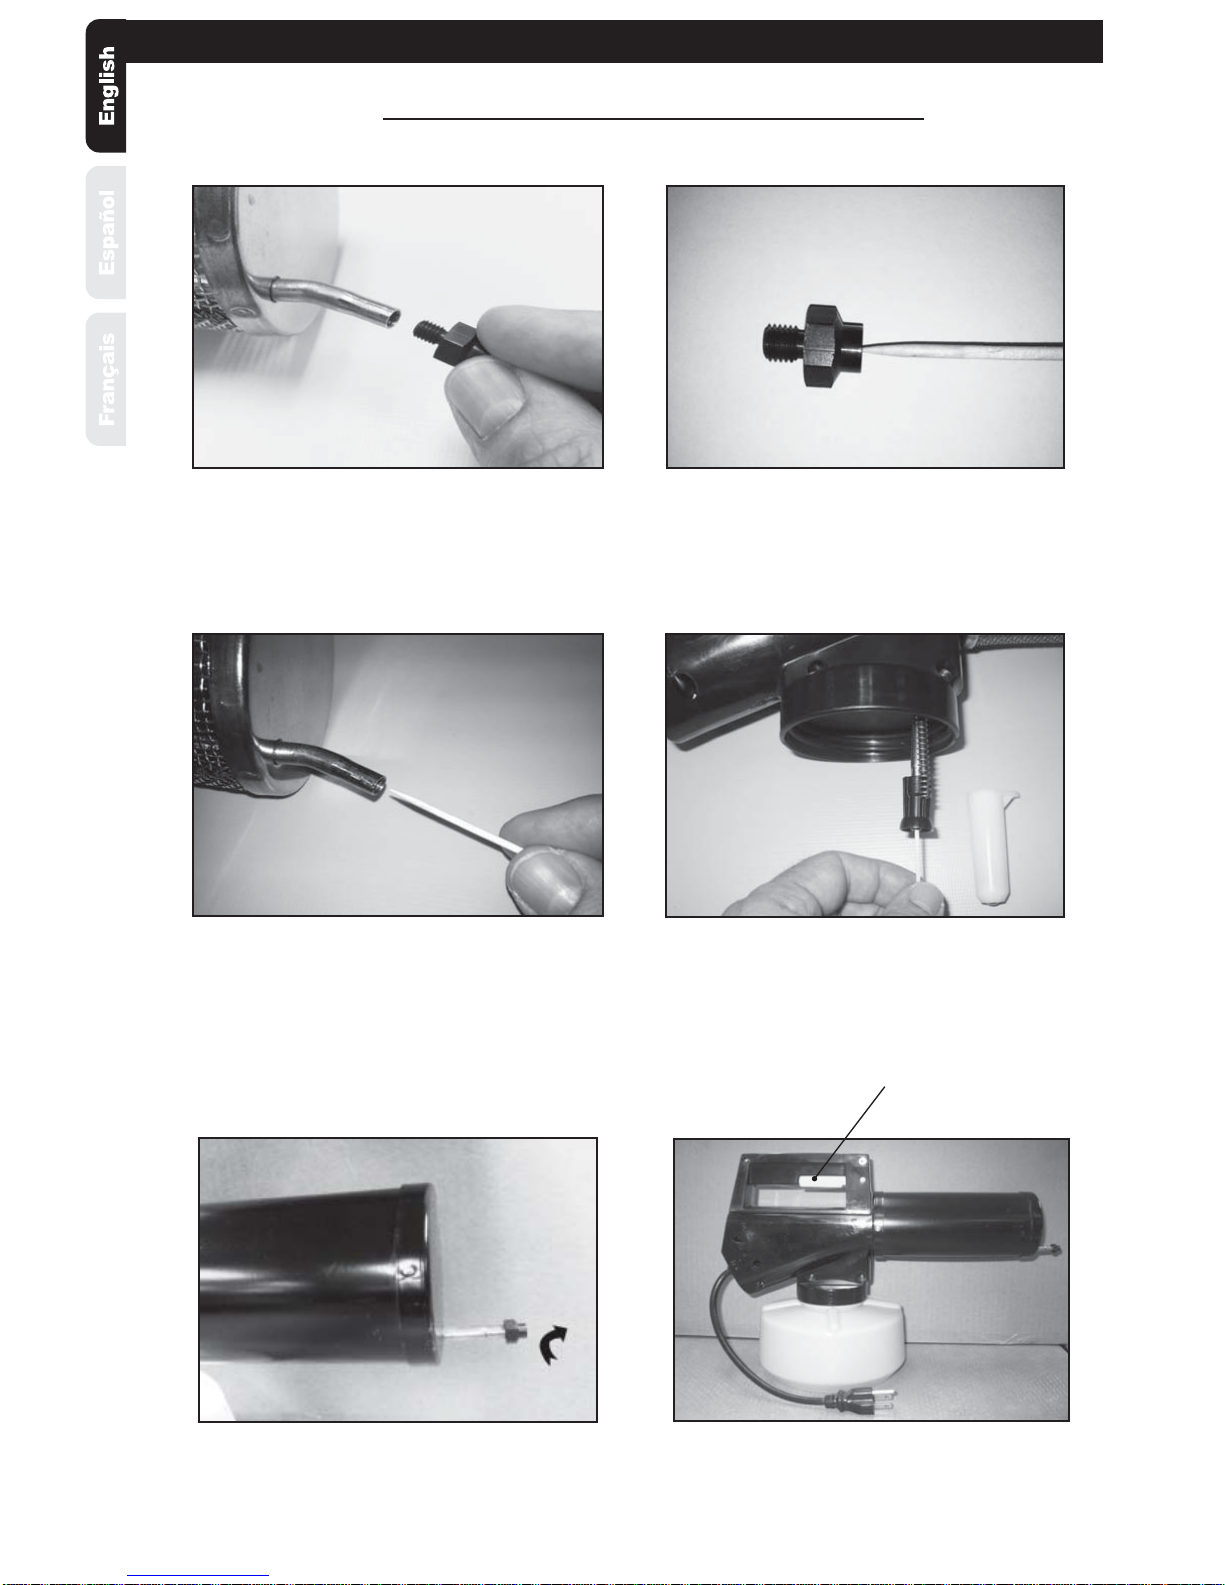
Figure 1
Figure 3
Figure 2
Enlarge View of nozzle ori ce
Figure 4
NOTE: Remove plastic barrel rst.
Figure 5 Figure 6
Trigger for pump.
Page 11
 Loading...