

Page 1
Product Name:
Instruction Manual
Sliding One Door Wood Cabinet
Thank you for purchasing this product.
This product has been manufactured with the highest standards of
safety and quality.
PLEASE READ ALL INSTRUCTIONS BEFORE ASSEMBLY.
Unpack all parts from Styrofoam and bubble wrap inside the carton to ensure there are no missing or damaged
parts. If any parts are missing or damaged, do not attem p t to assem b le or use the product.
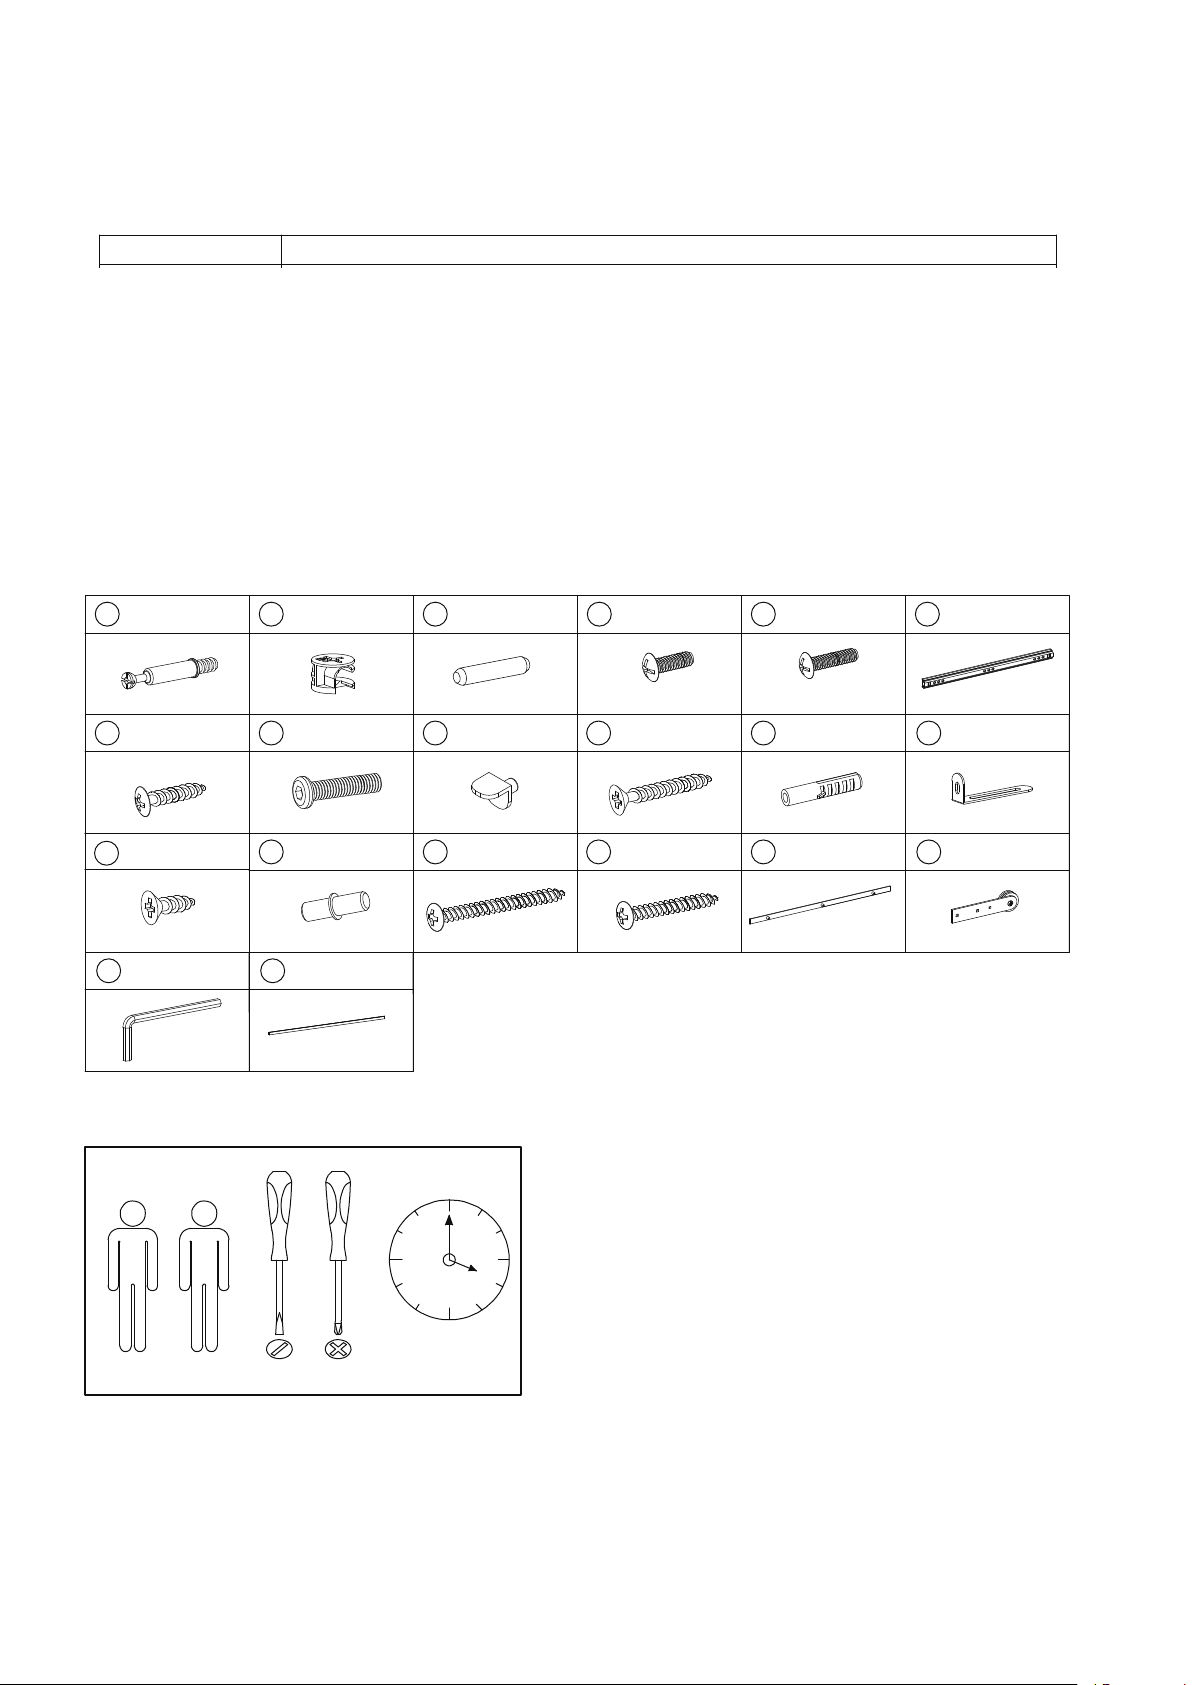
Hardware:
1 ×42 2 ×42
7 ×6 8 ×3
13 ×24
14 ×1 15 ×12 16 ×24 17 ×1 18 ×2
3 ×24 4 ×8 5 ×2 6 ×8
Ф4*10mm Ф3*12mm
9 ×8 10 ×2 11 ×2 12 ×2
19 ×1
20 ×1
1:00
Tools required for assembly: Philips screwdriver and Flathead Screwdriver (if using power tools, use with care)
Page 2
Product Name:
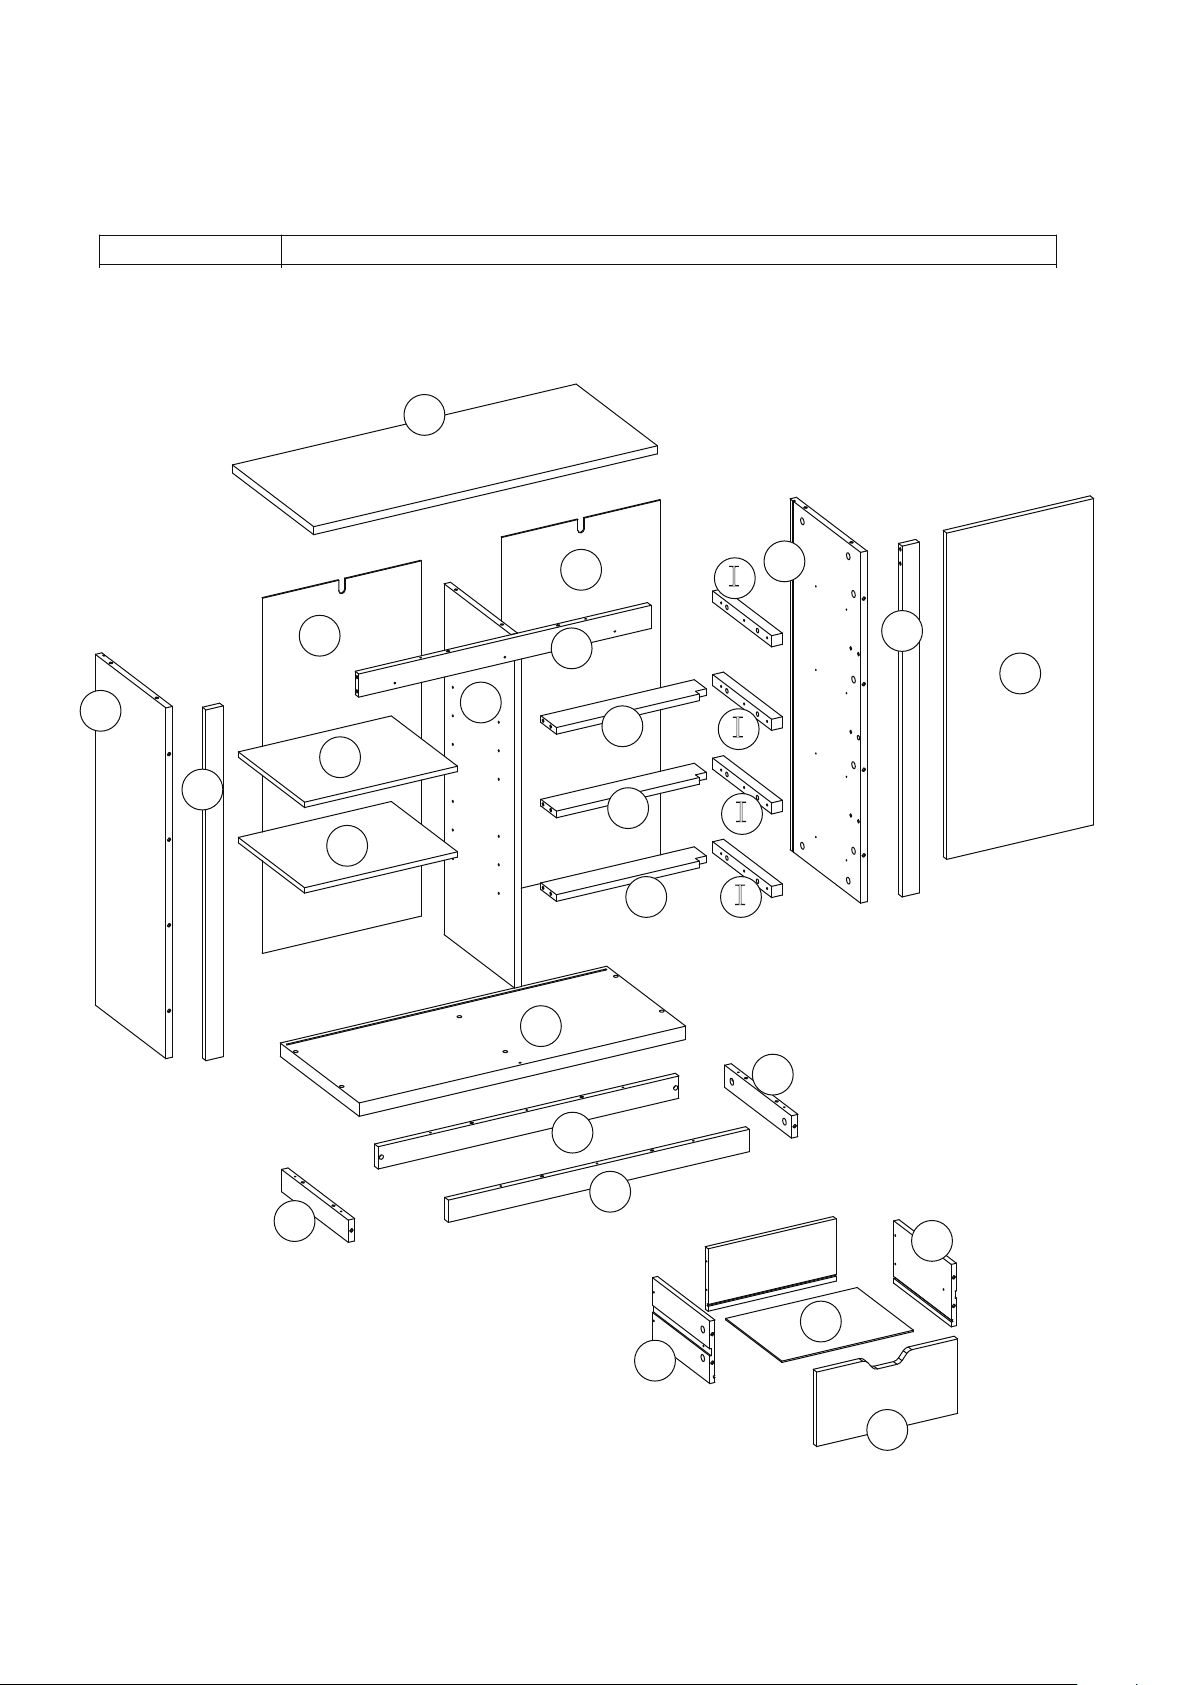
Panels:
Instruction Manual
Sliding One Door Wood Cabinet
A
B
F
L
M
M
D
H
E
N
L
J
K
C
I
G
P
I
I
IJ
O
O
N
R
S
U
×4
Q
Page 3
Product Name:
Instruction Manual
FIGURE A
Sliding One Door Wood Cabinet
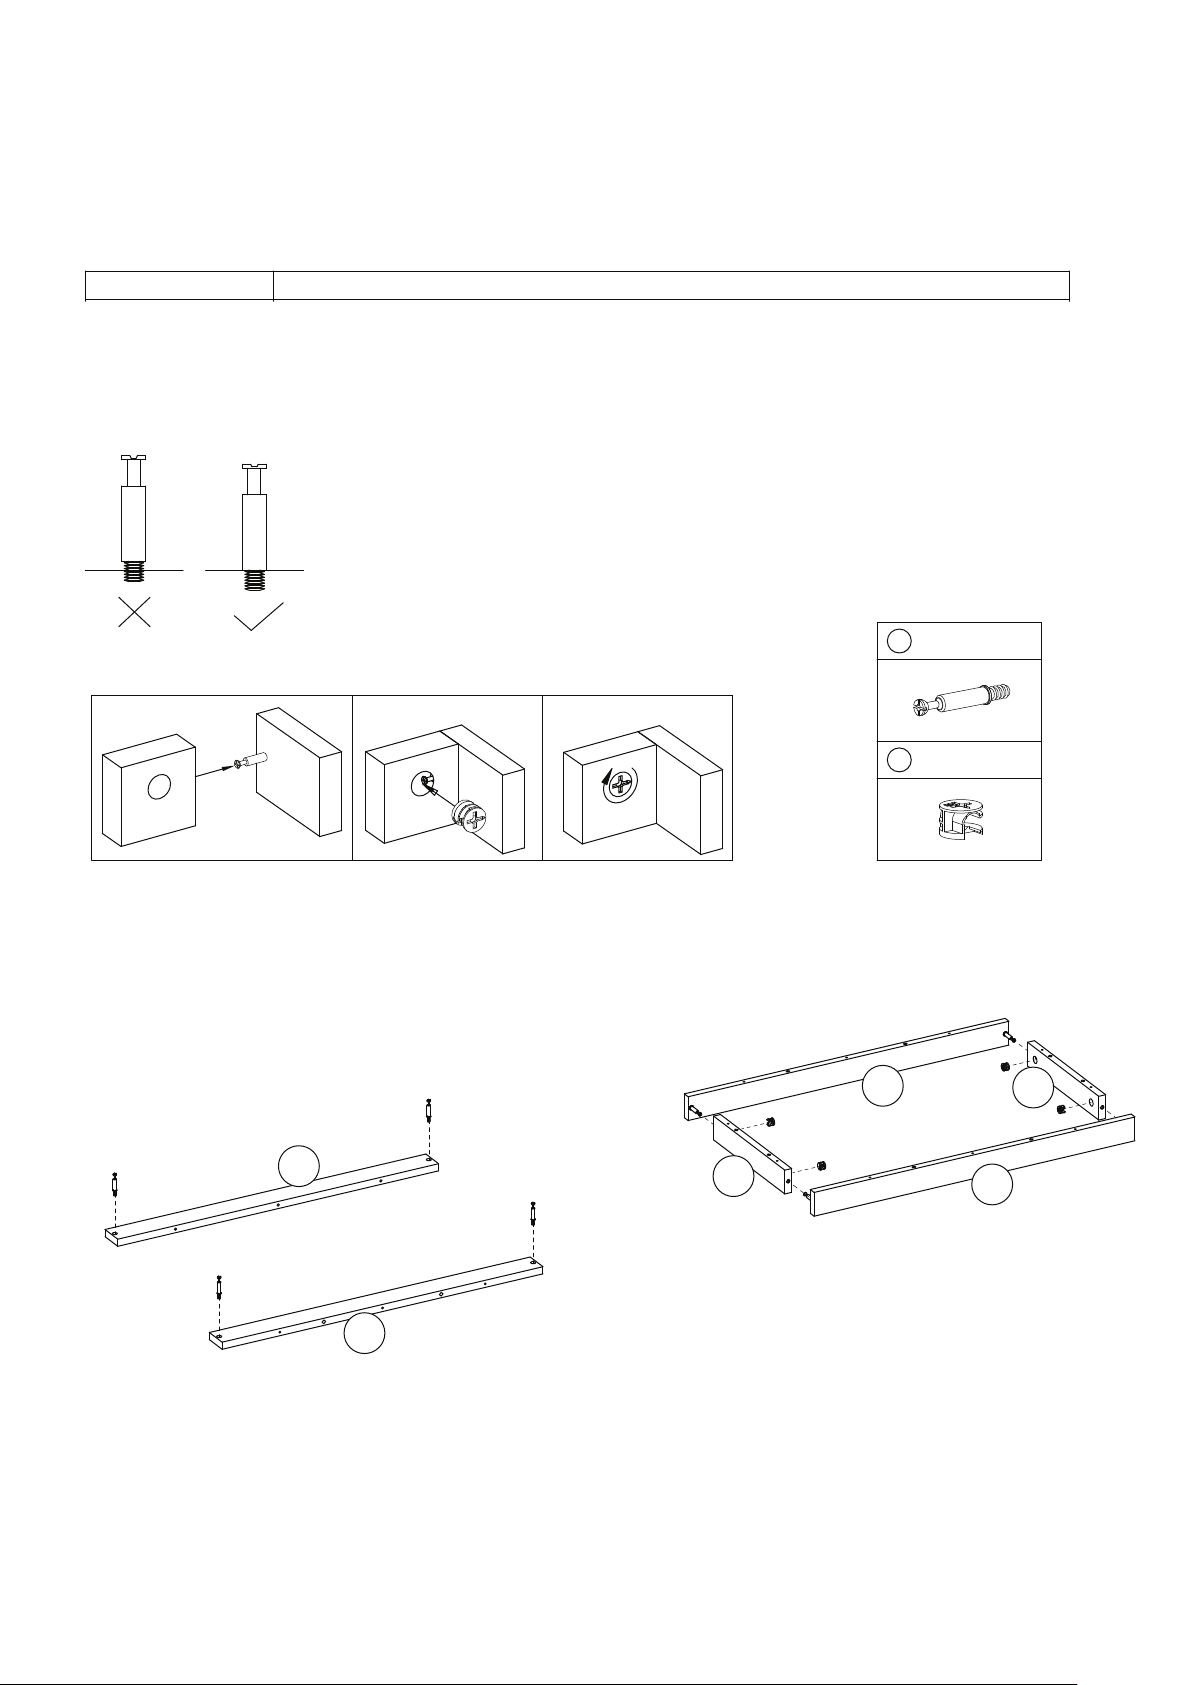
Step 1
Make sure the pins are installed correctly as shown with the “check mark” below:
Below shows how the pins are used to assemble t he panels together.
a b
c
N
O
N
1 ×4
2 ×4
O
N
N
Page 4
Product Name:
Instruction Manual
Sliding One Door Wood Cabinet
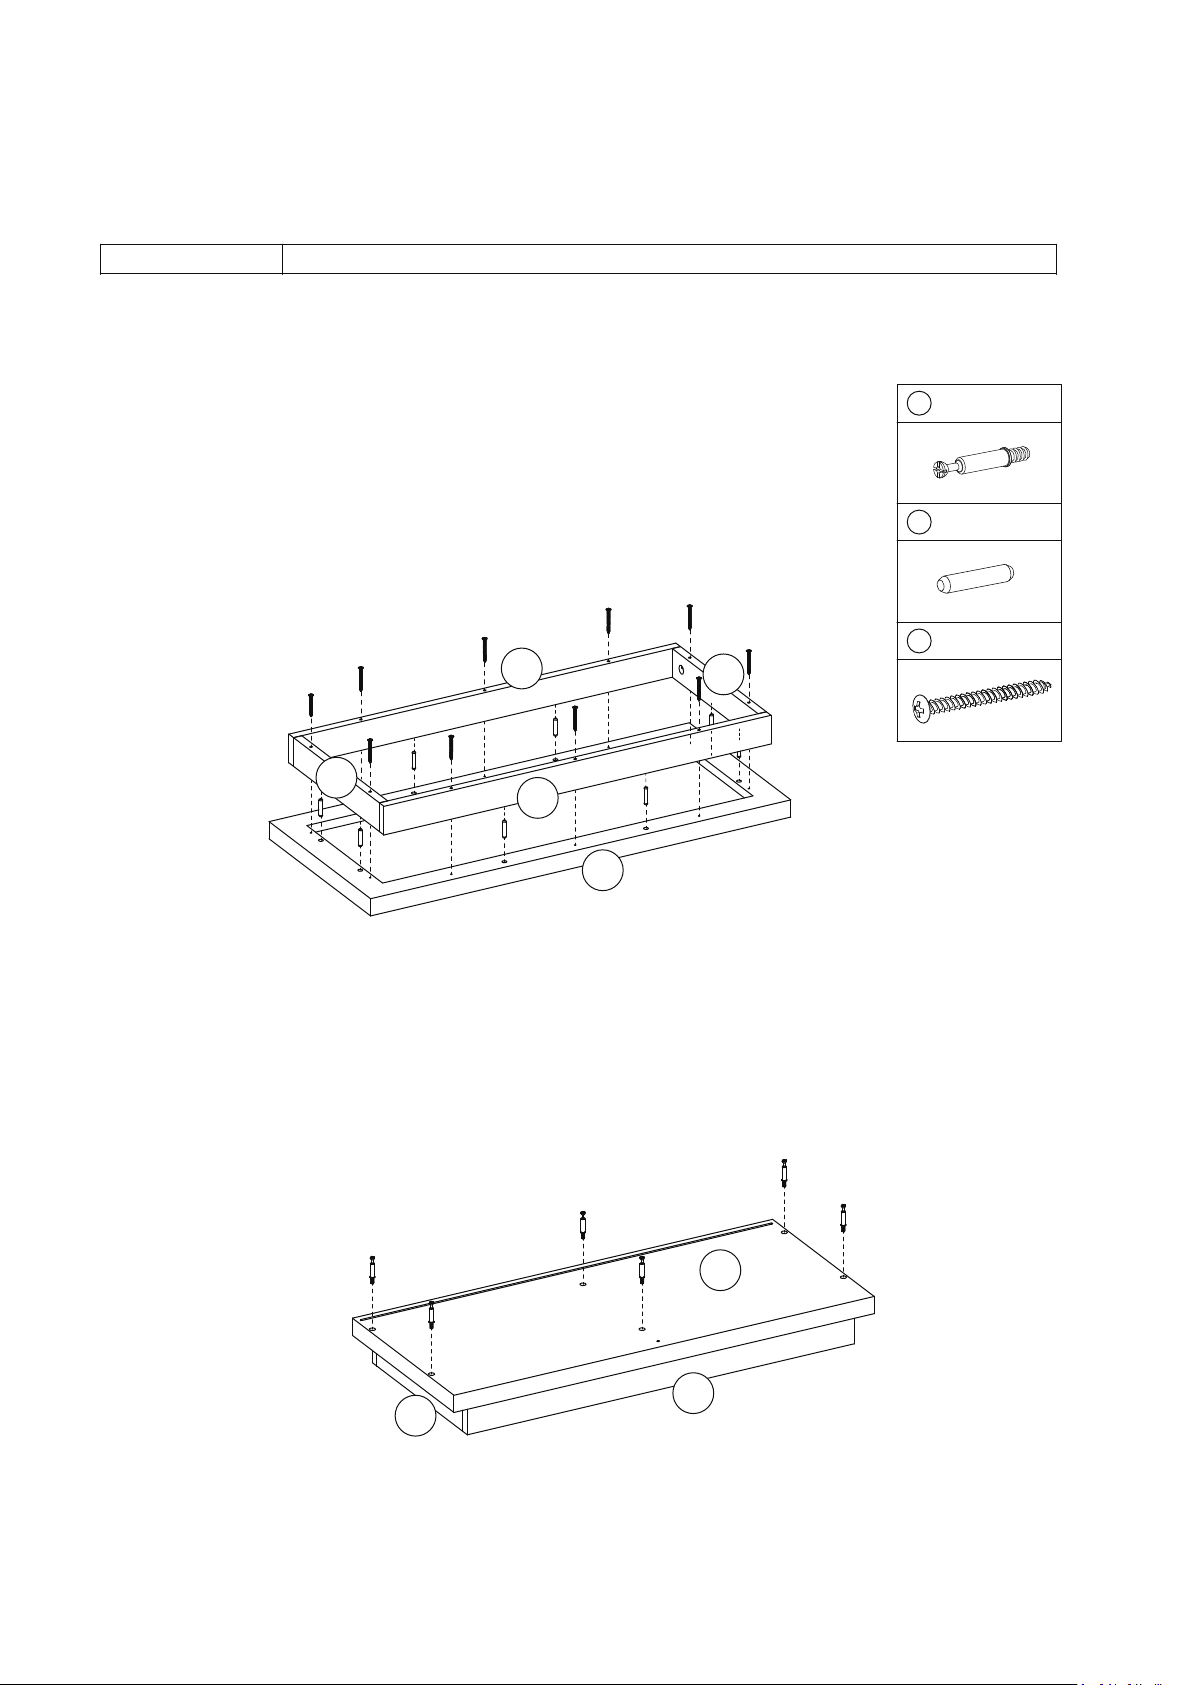
Step 2
Insert wooden dowels (3) onto (H ),Fix boom frame on to (H) as shown.
Screw cam bolt (1) onto (H)
N
O
1 ×6
3 ×8
15 ×10
O
N
H
H
N
O
Page 5
Product Name:
Instruction Manual
Sliding One Door Wood Cabinet
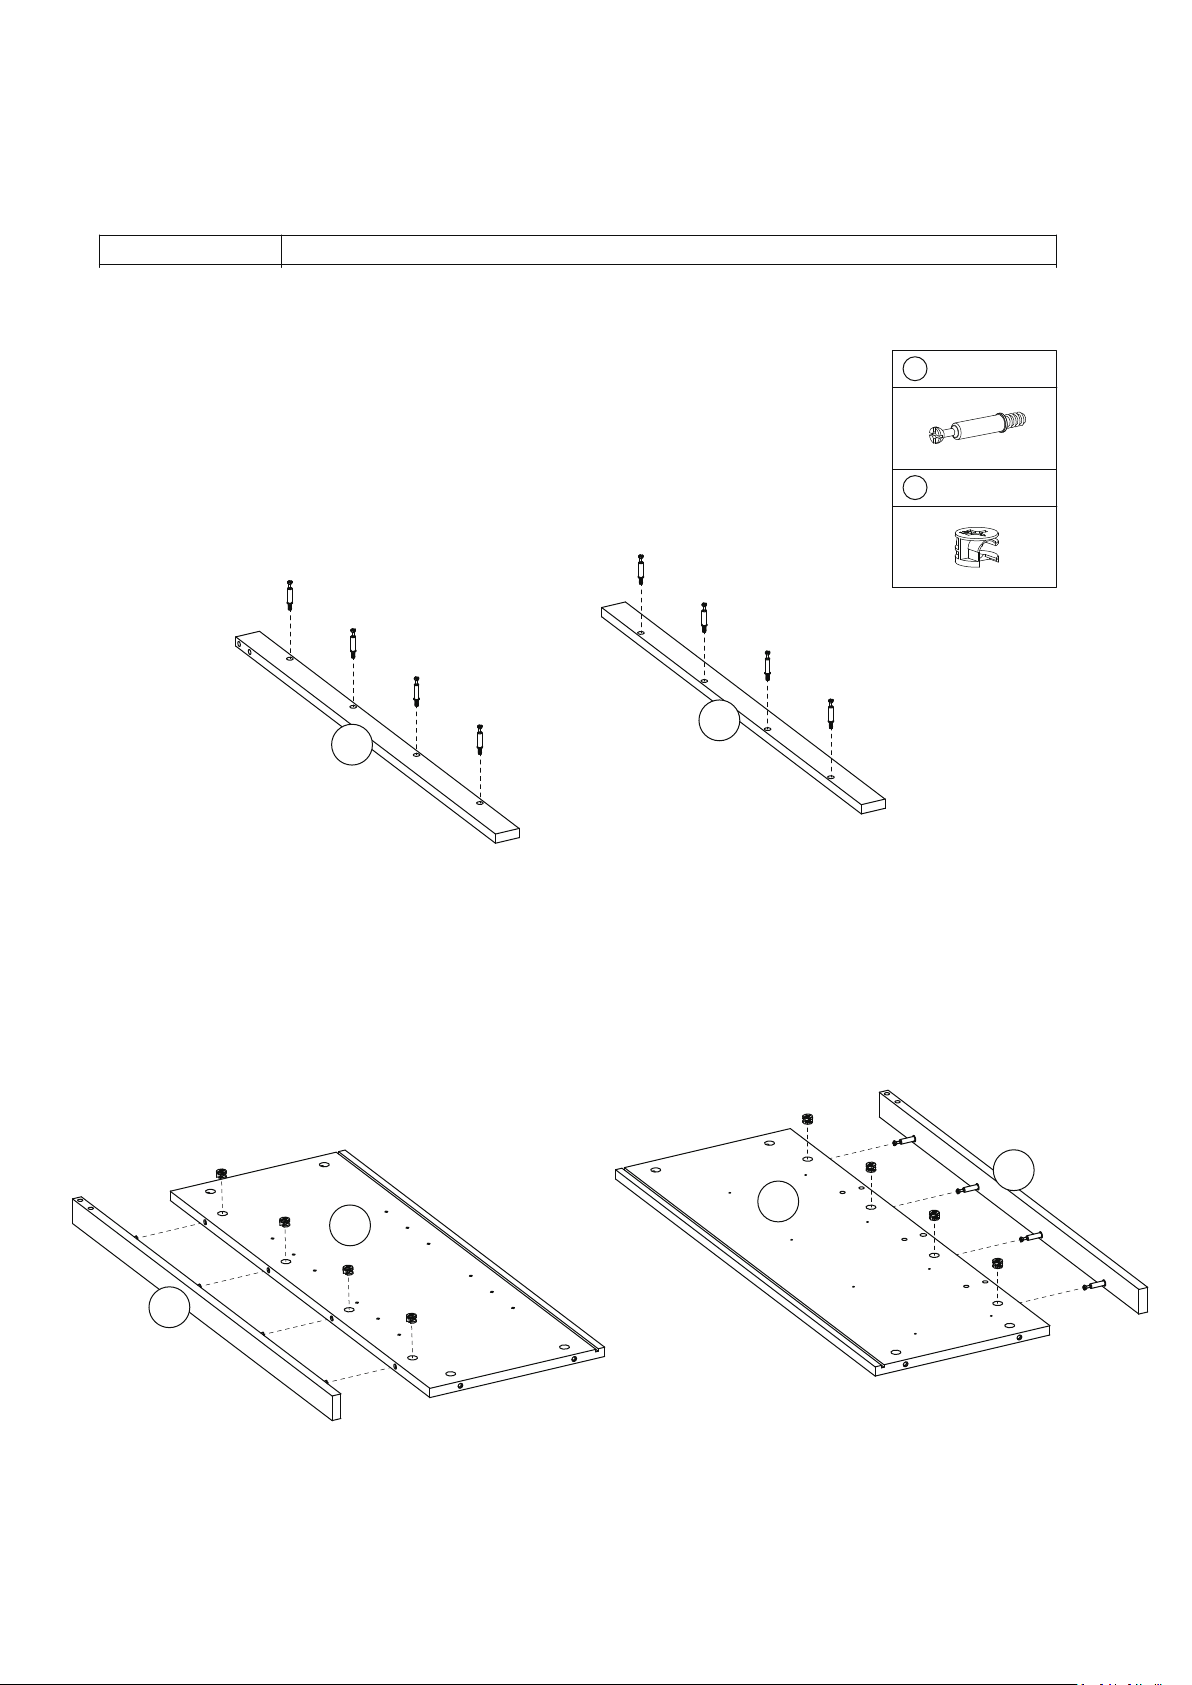
Step 3
Screw cam bolt (1) onto (F)&(G).
Aach (F) to (B) & (G) to (C), ghten the cam lock (2) clockwise to secure.
1 ×8
2 ×8
F
B
G
G
C
F
Page 6
Product Name:
Instruction Manual
Sliding One Door Wood Cabinet
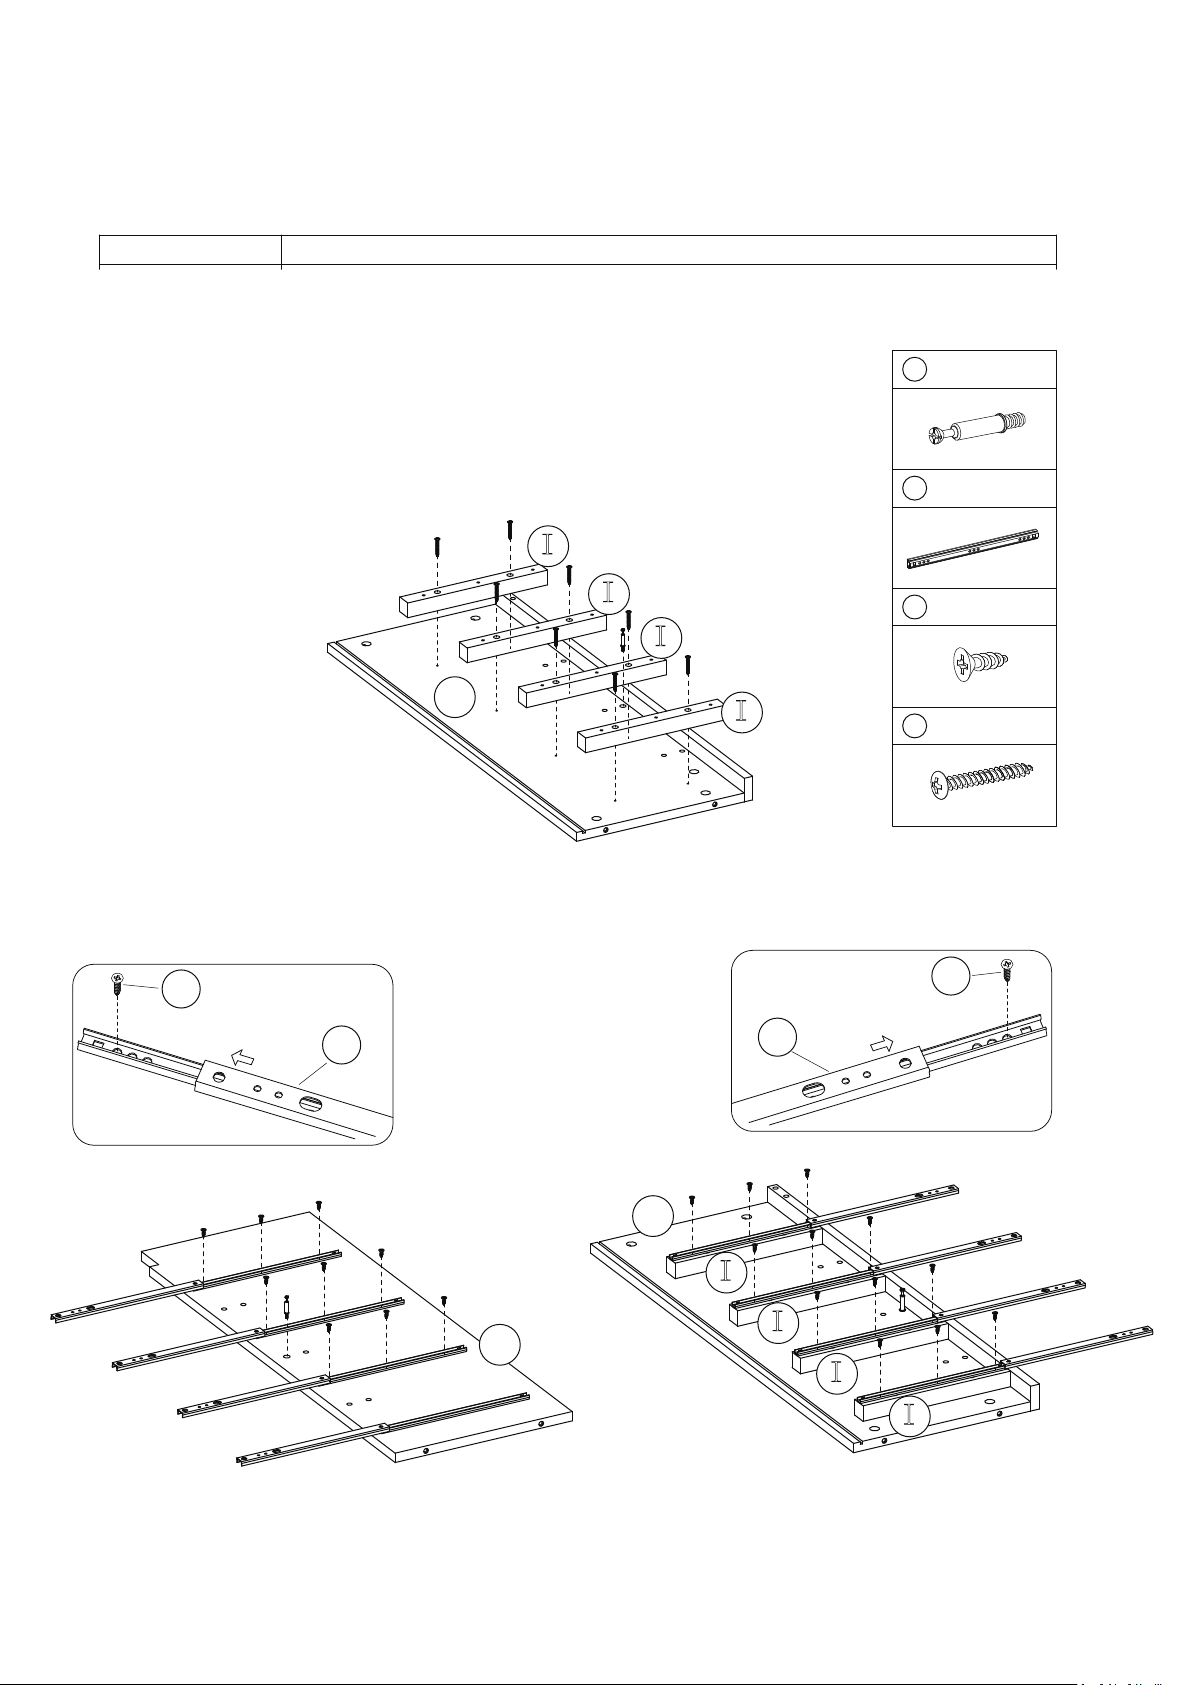
Step 4
Fix wood rail (I) to side panel (C) with screws (16).
Fix the sliders (6) to the side panel (A) & (B) with screws (13) as shown.
I
1 ×2
6 ×8
13
6
C
I
13 ×24
I
I
16
×8
13
6
C
I
I
D
I
I
Page 7
Product Name:
Instruction Manual
Sliding One Door Wood Cabinet
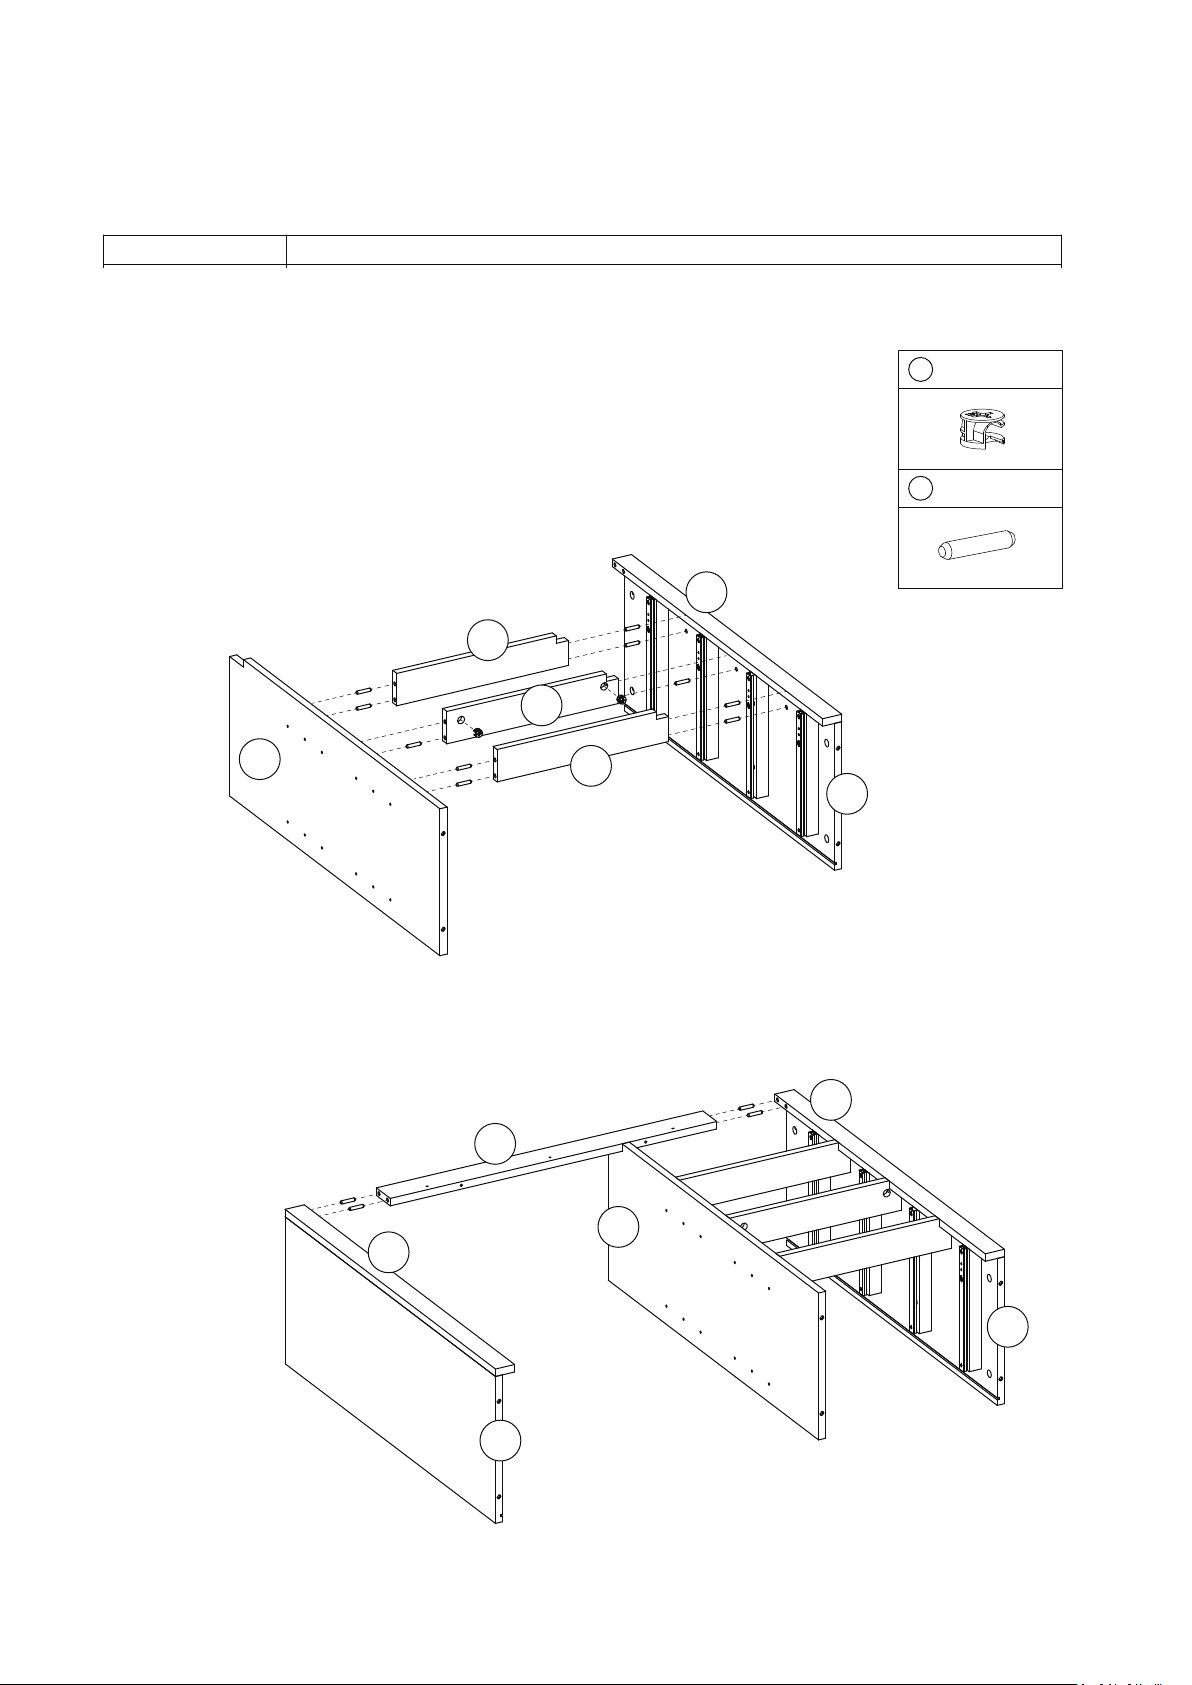
Step 5
Insert wooden dowel (3) onto(D)&(C), aach (J)&(K) as shown.
ghten the cam lock (2) clockwise to secure.
Insert wooden dowel (3) onto(E),aach (E) to (B) & unit (C) as shown.
G
J
2 ×2
3 ×14
D
K
J
C
G
E
D
F
C
B
Page 8
Product Name:
Instruction Manual
Sliding One Door Wood Cabinet
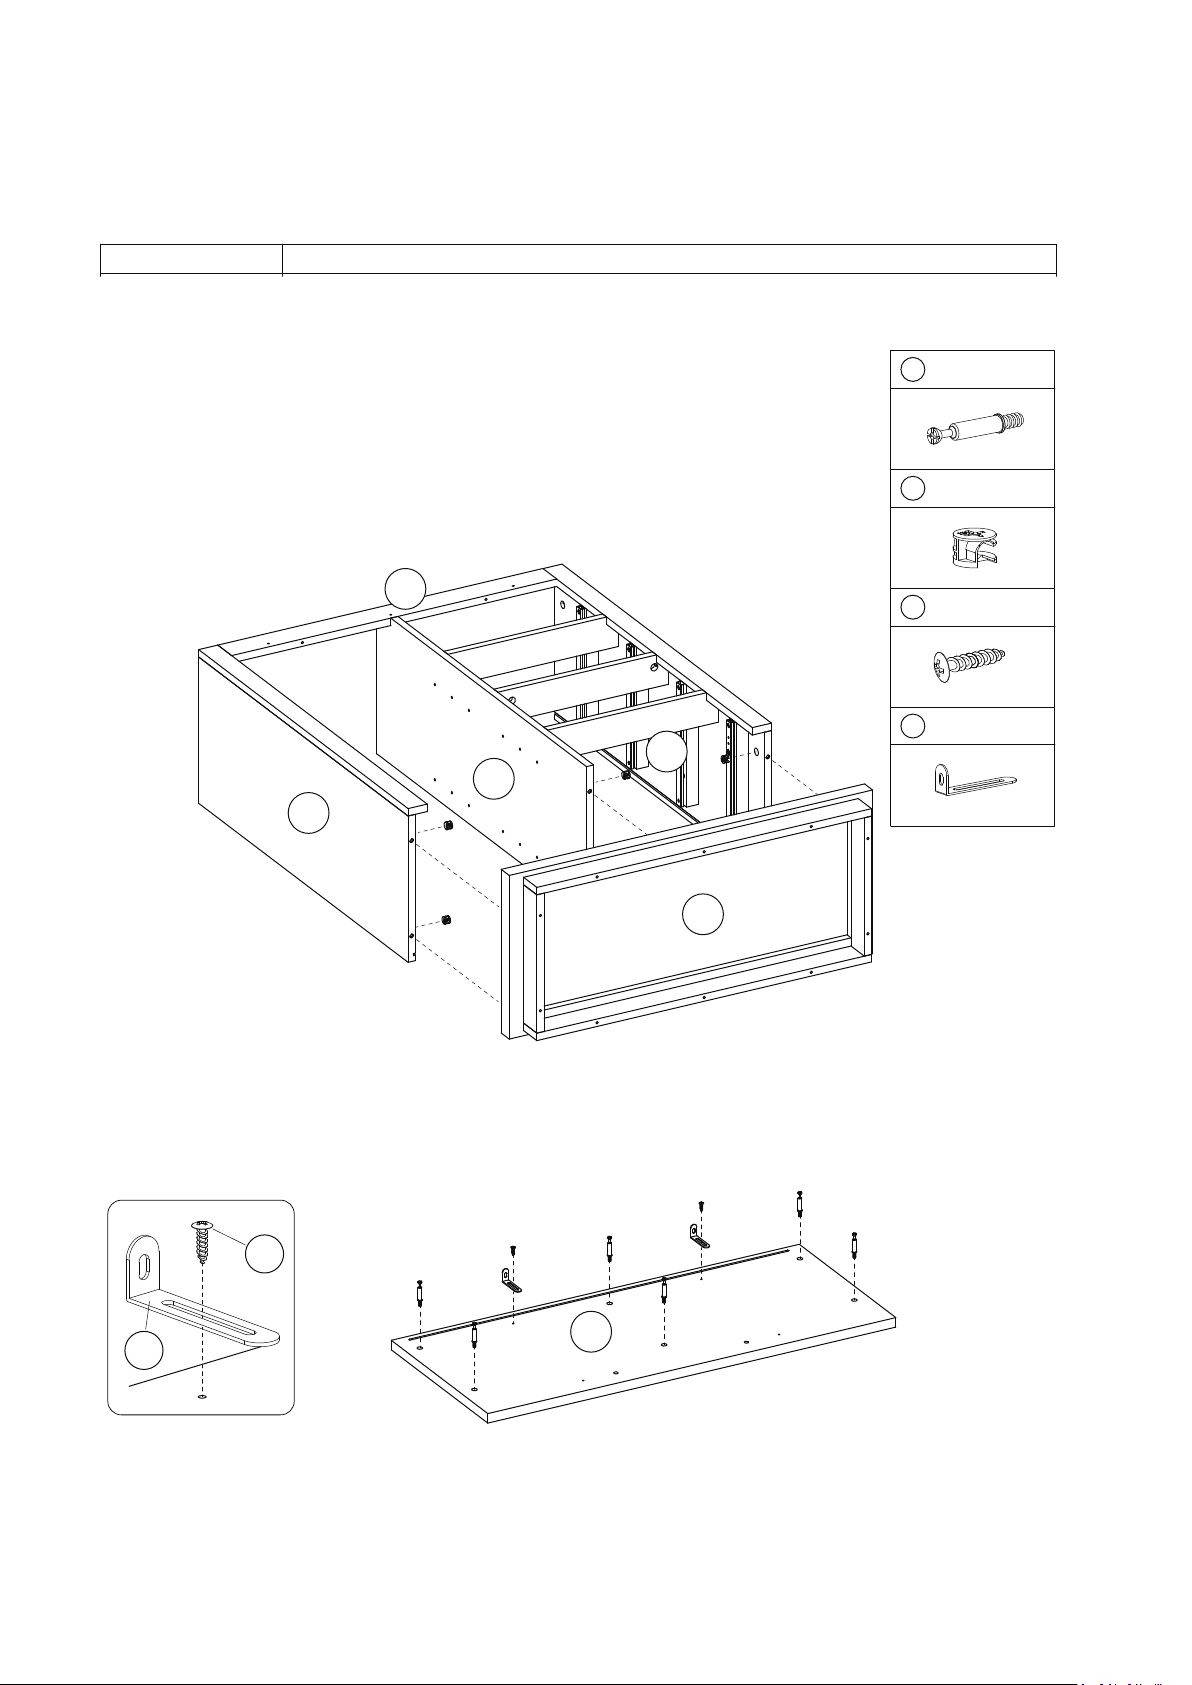
Step 6
Aach (H) to unit as shown, ghten the cam lock (2) clockwise to secure.
Fix (12) to top panel (A) with screw (7).
1 ×6
2 ×6
B
E
7 ×2
12 ×2
C
D
H
12
7
A
Page 9
Product Name:
Instruction Manual
Sliding One Door Wood Cabinet
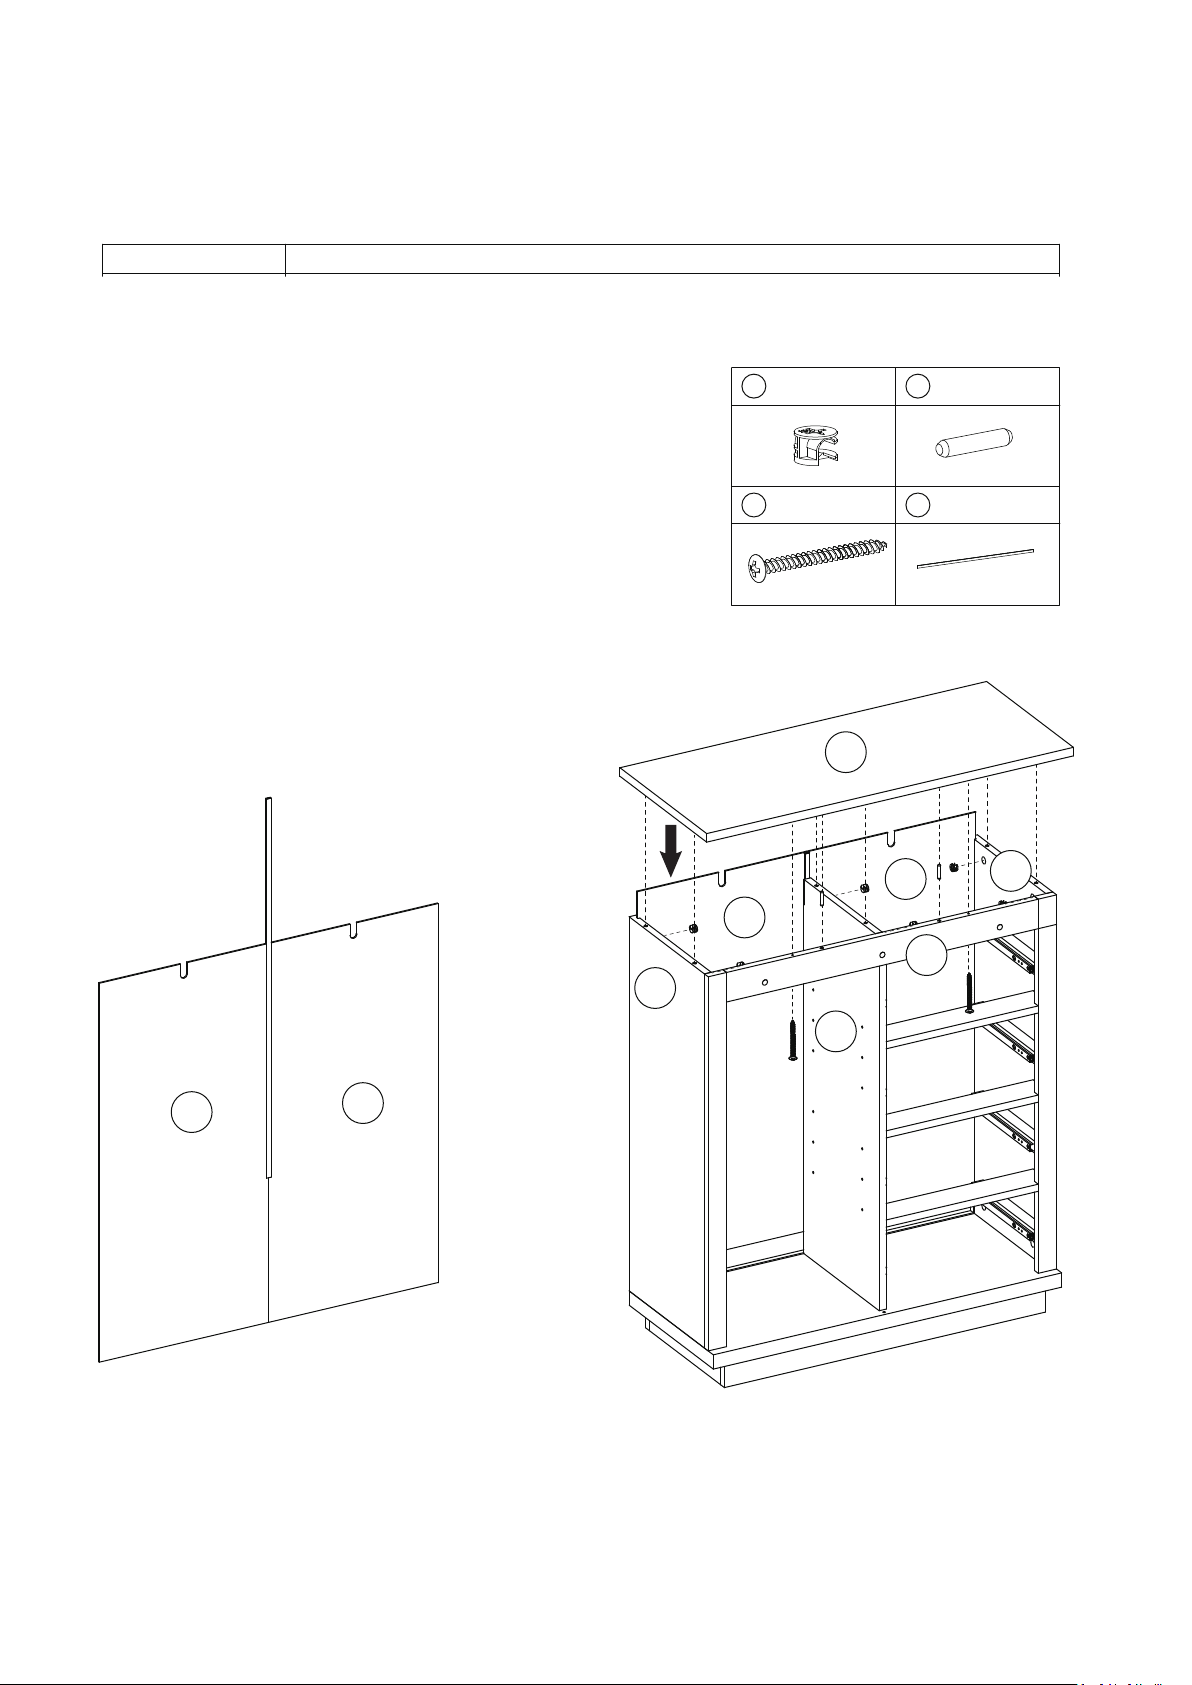
Step 7
Insert back panels (L) & (20) into unit as shown,
ghten the cam lock (2) clockwise to secure.
Fix (A) to unit with screw (15).
2 ×6
3 ×2
B
15 ×2
L
D
A
20 ×1
L
C
E
L
L
Page 10
Product Name:
Instruction Manual
Sliding One Door Wood Cabinet
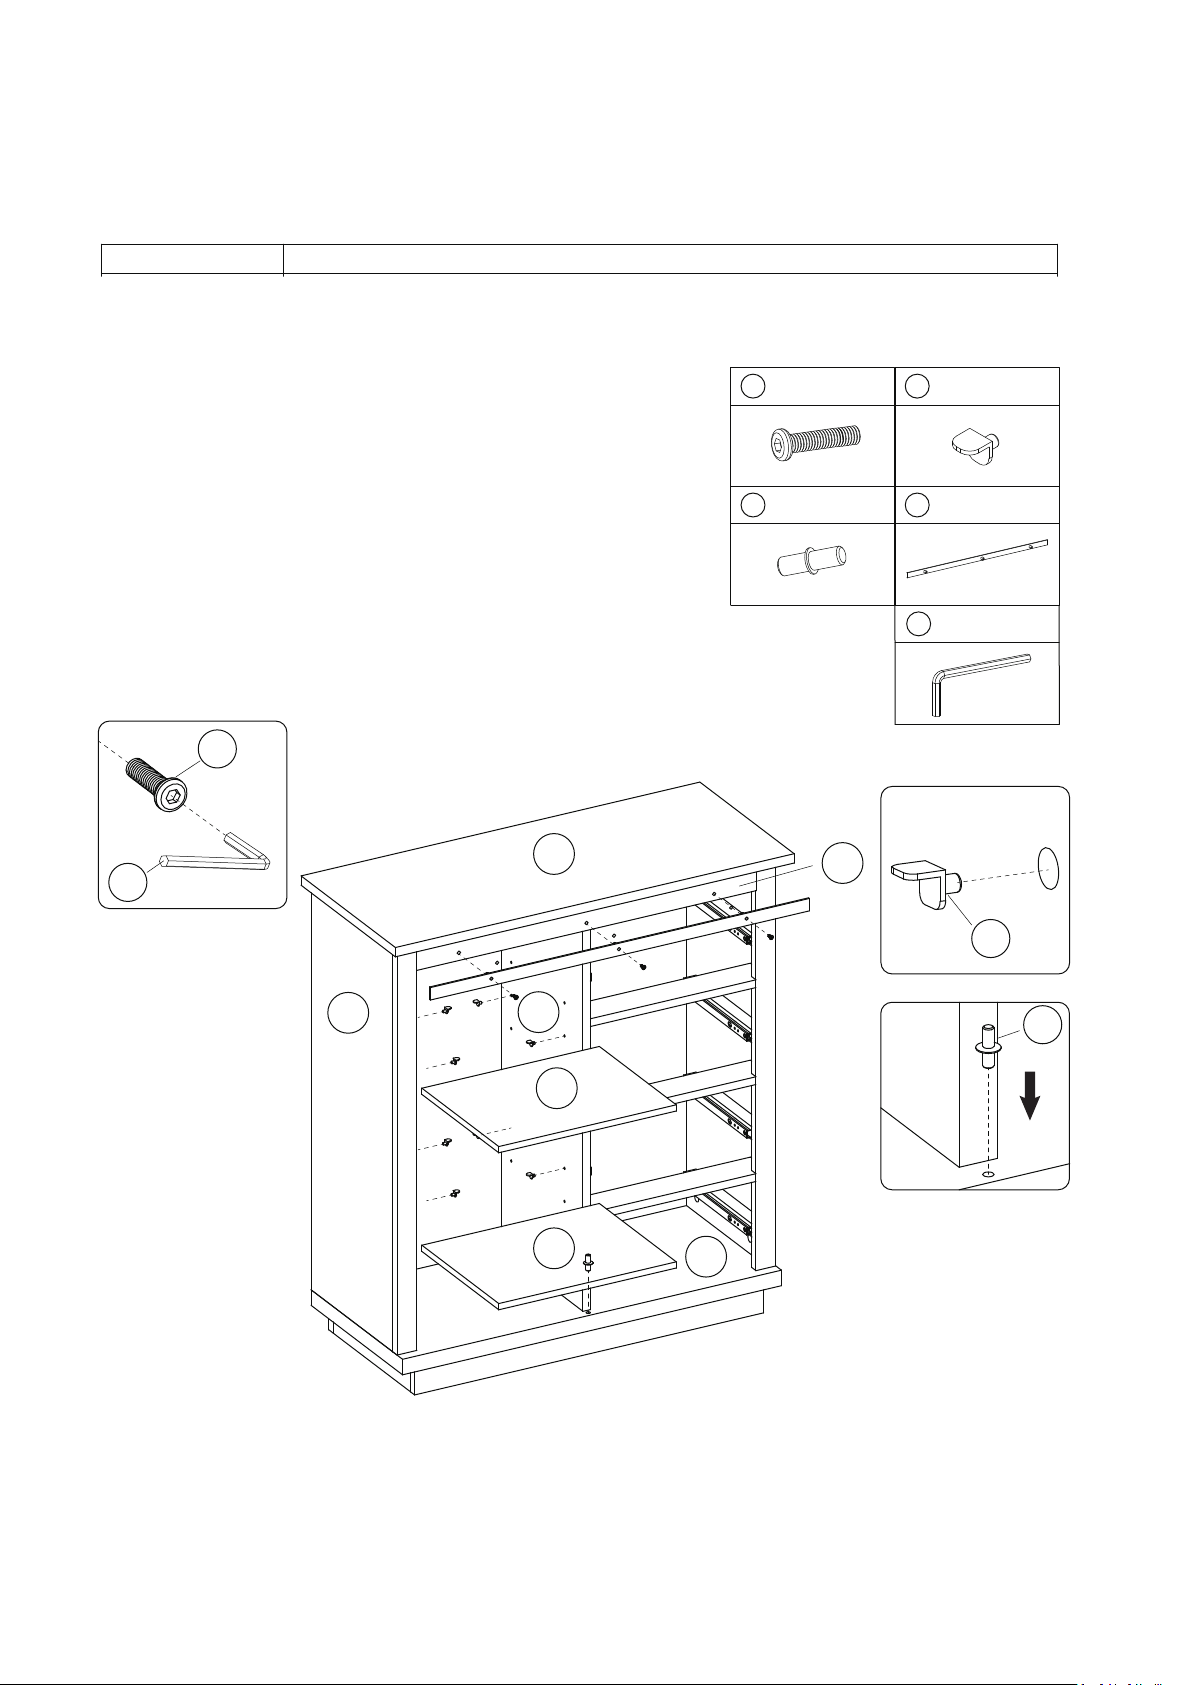
Step 8
Aach metal runner(17) onto unit with bolt (8)
as shown with tool (19).
Insert layer supports (9) into unit,
then put on the adjustable shelves.
Insert the bolt (14) onto panel (F) as shown.
8 ×3
14 ×1
9 ×8
17 ×1
19 ×1
19
8
B
D
A
M
M
E
9
14
H
Page 11
Product Name:
Instruction Manual
Sliding One Door Wood Cabinet
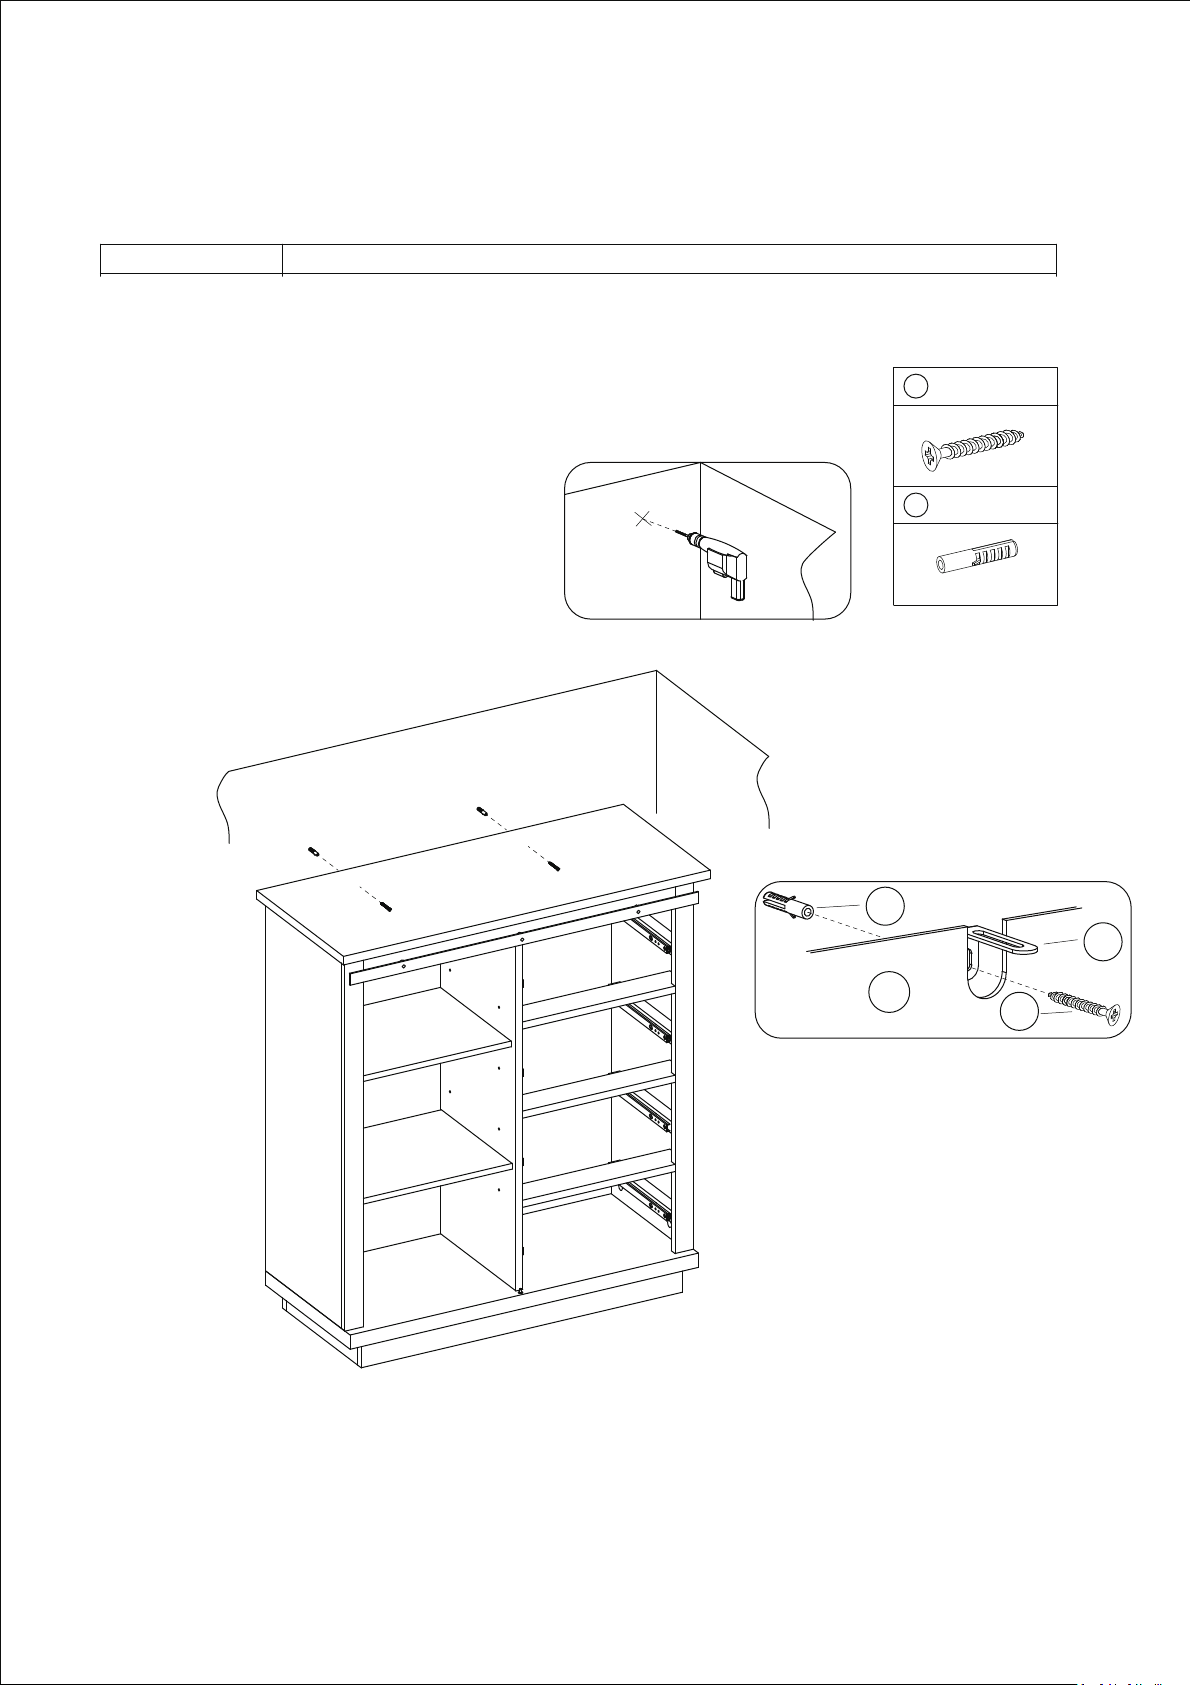
Step 9
Drill holes on the wall to input Wall plug (11).
Fix the unit to the wall with Screw (10) and through (12) as shown.
10 ×2
11 ×2
wall
11
12
L
10
Page 12
Product Name:
Instruction Manual
Sliding One Door Wood Cabinet
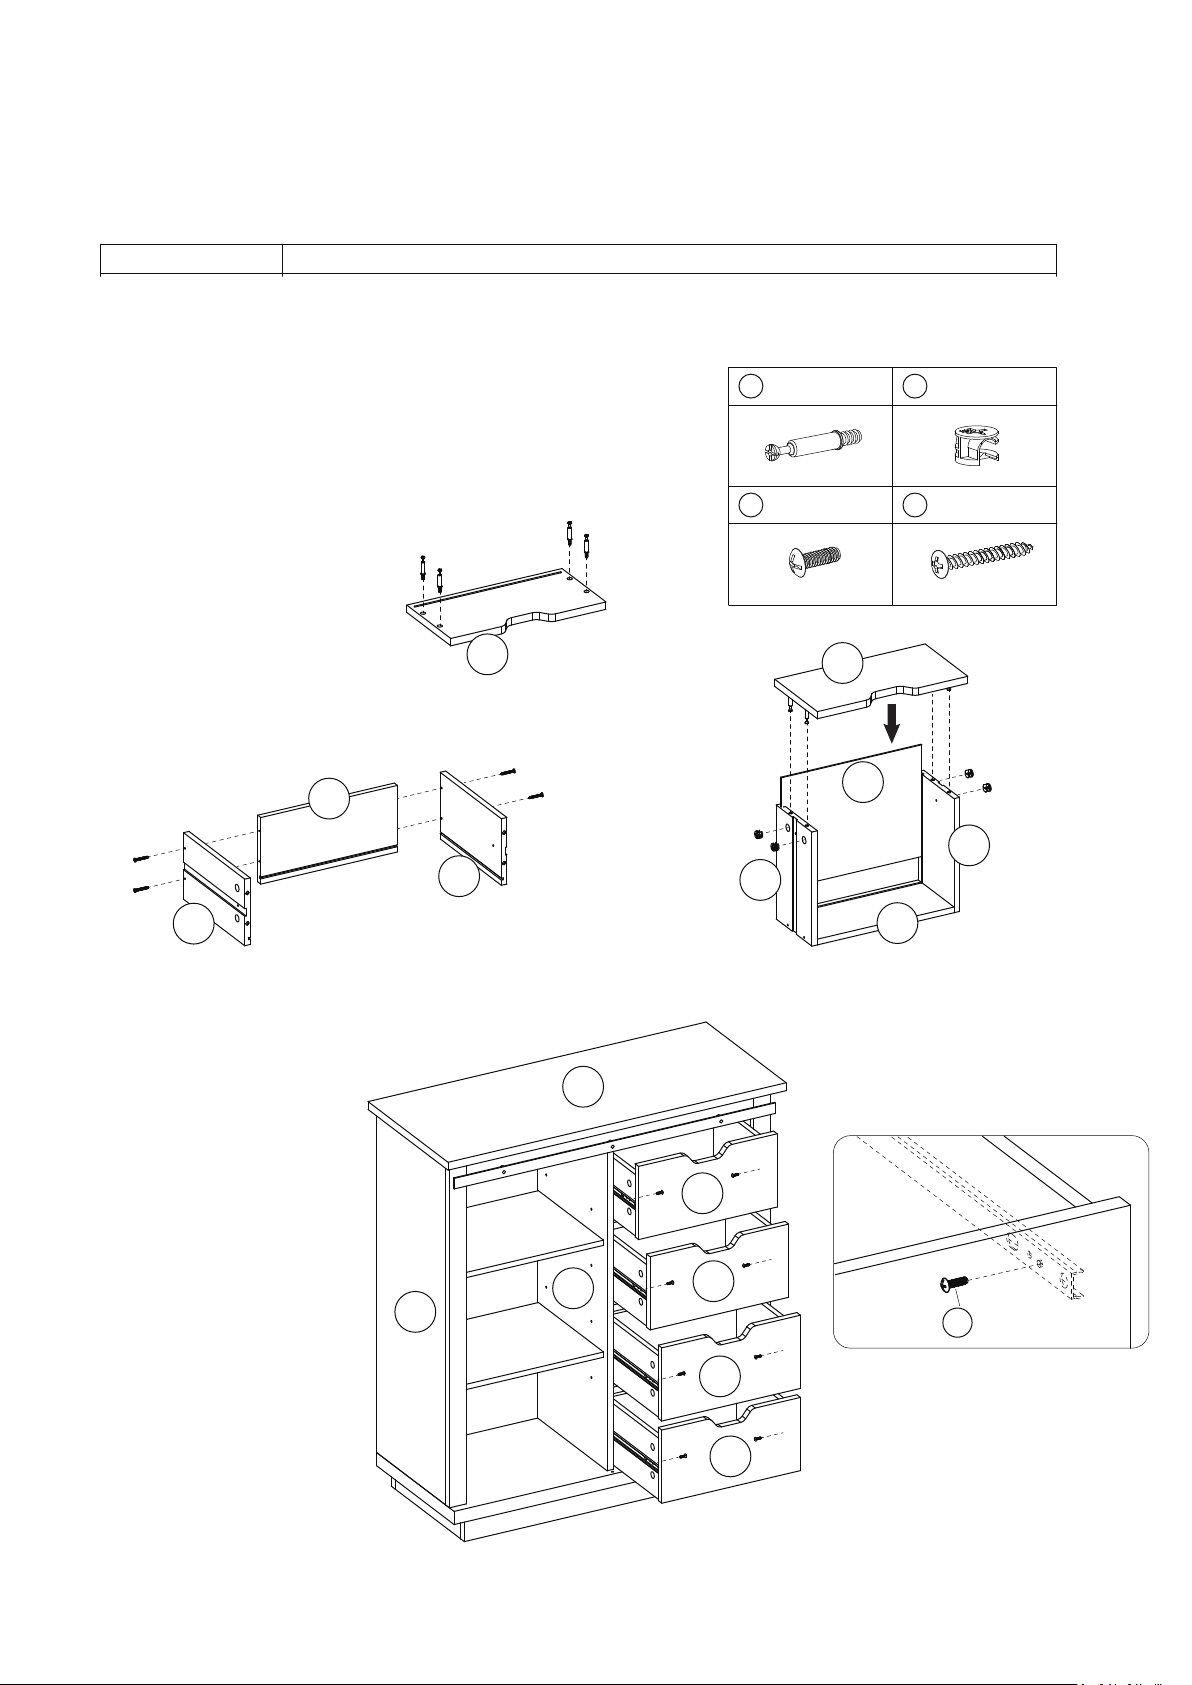
Step 10
Screw cam bolt (1) onto (Q),
Fix (R)&(S) to (T) with screw 16, insert boom panel (U),
aach (Q) to unit, ghten the cam lock (2) clockwise to secure
Insert the drawers into the unit with bolt (4) fixed.
×4
1 ×16
4 ×8
2 ×16
×16
16
R
T
S
Q
×4
A
Q
S
Q
U
T
R
×4
B
D
Q
4
Q
Q
Page 13
Product Name:
Instruction Manual
Sliding One Door Wood Cabinet
Step 11
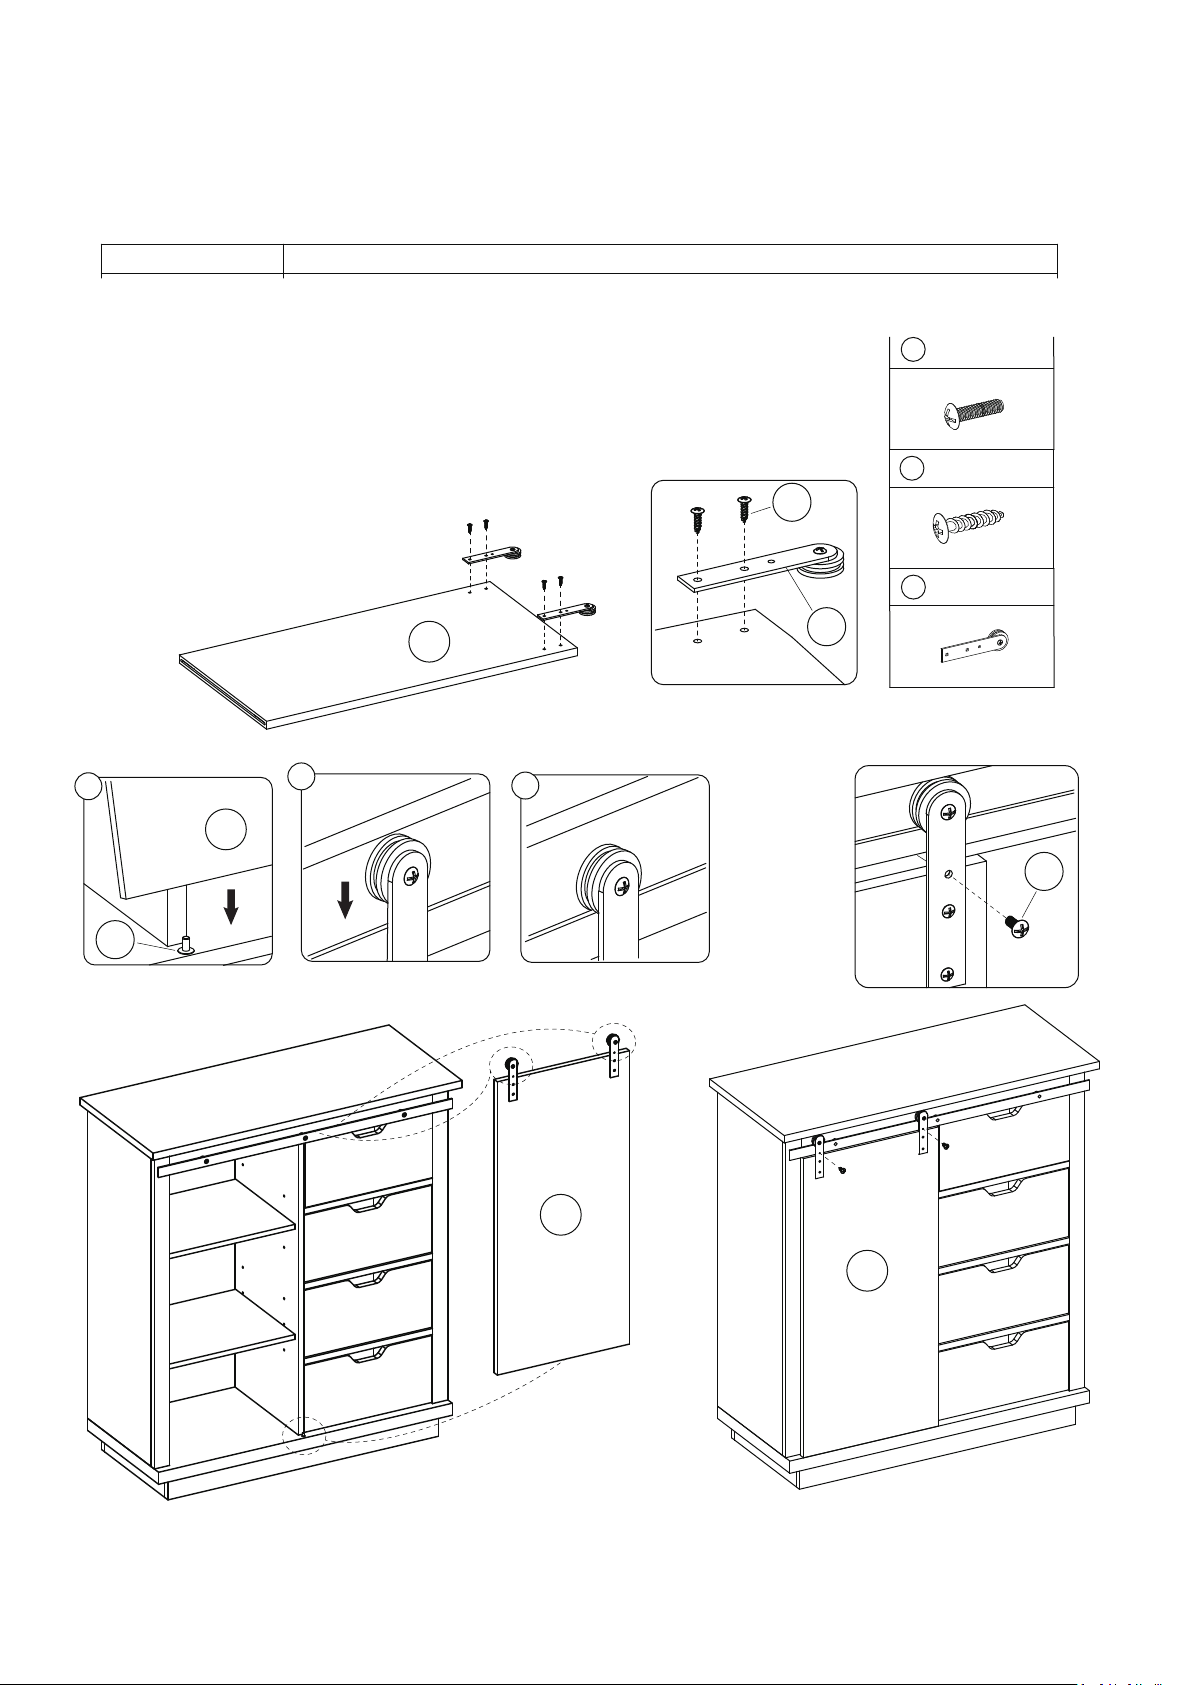
Fix the (18) on to door (P)
Insert the door (P) into the bolt (14), pull up the door a lile to hang the wheels (18)
onto the metal runner (17).
Screw bolts (5) into the hole as shown.
7
5 ×2
7 ×4
18 ×2
P
a
b
c
18
P
5
14
P
P
Page 14
Step 12
Product Name:
Instruction Manual
Sliding One Door Wood Cabinet
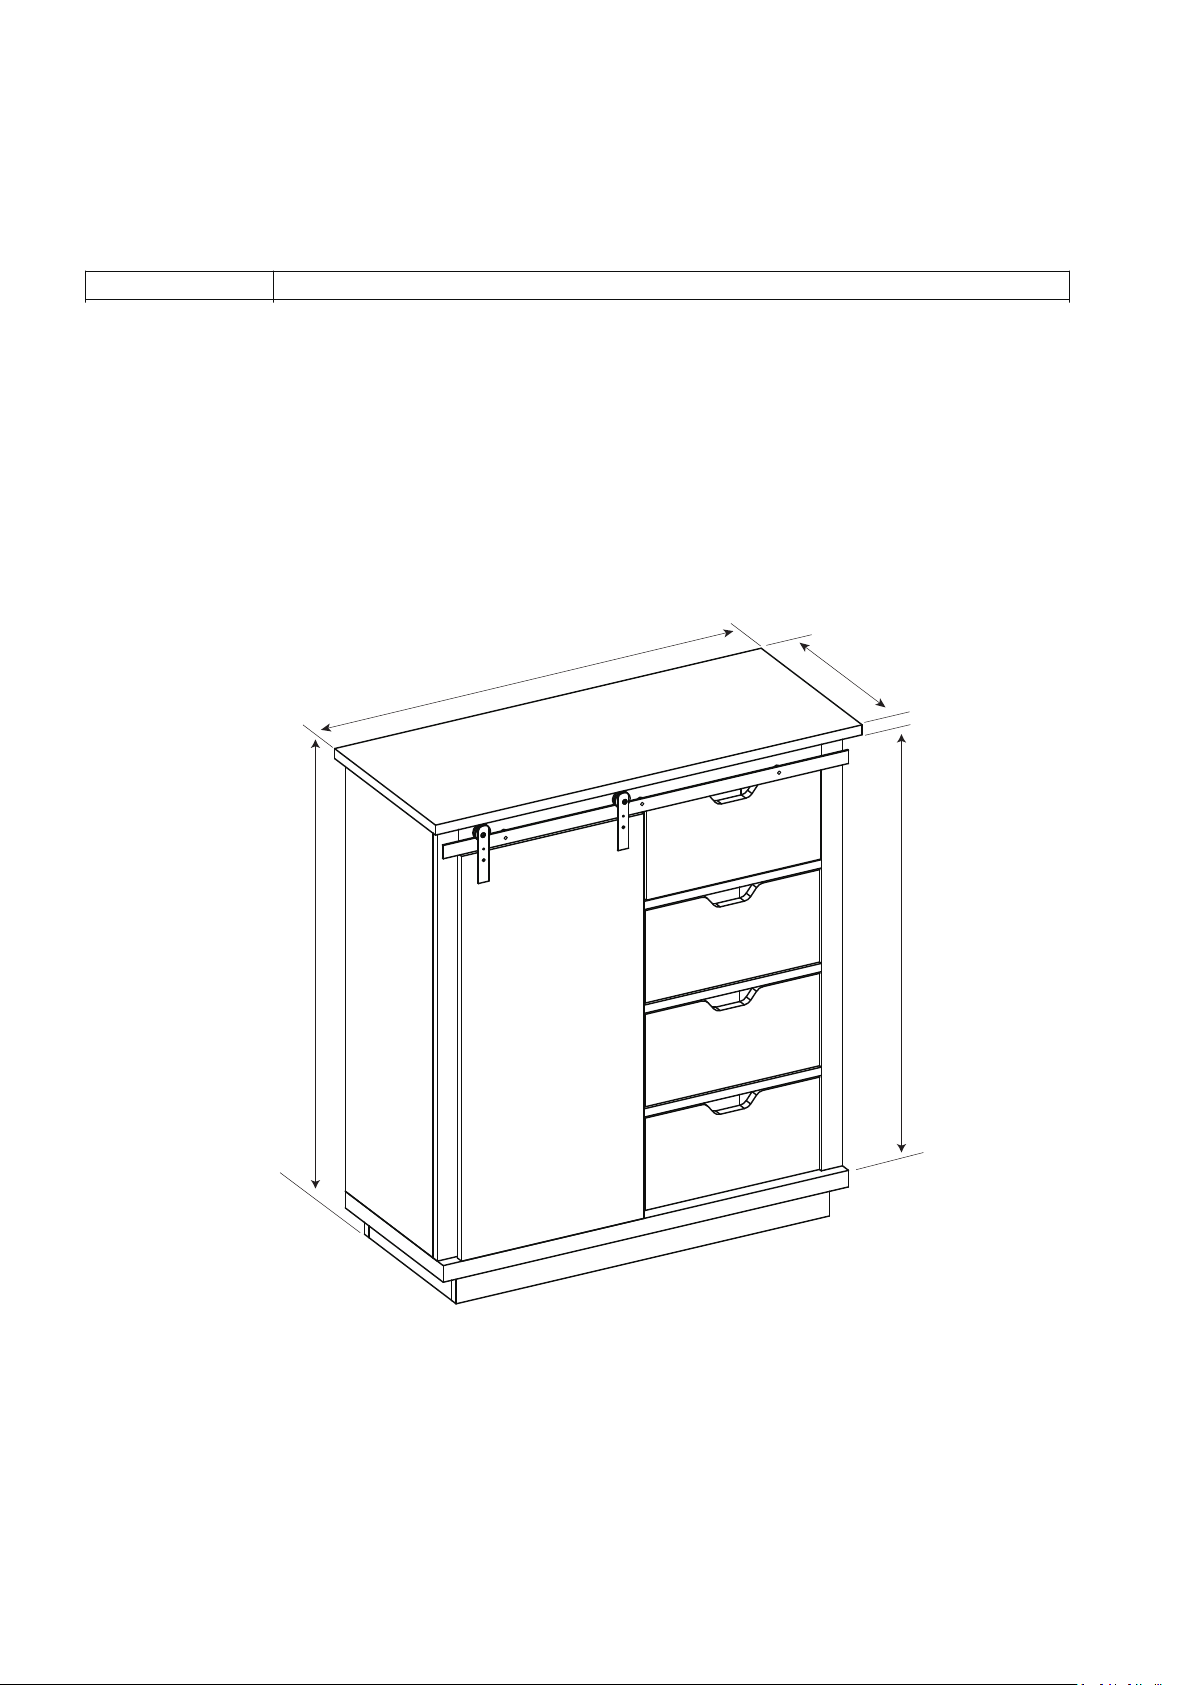
13.39"
31.15"
34.84"
30.63"
 Loading...