

Page 1
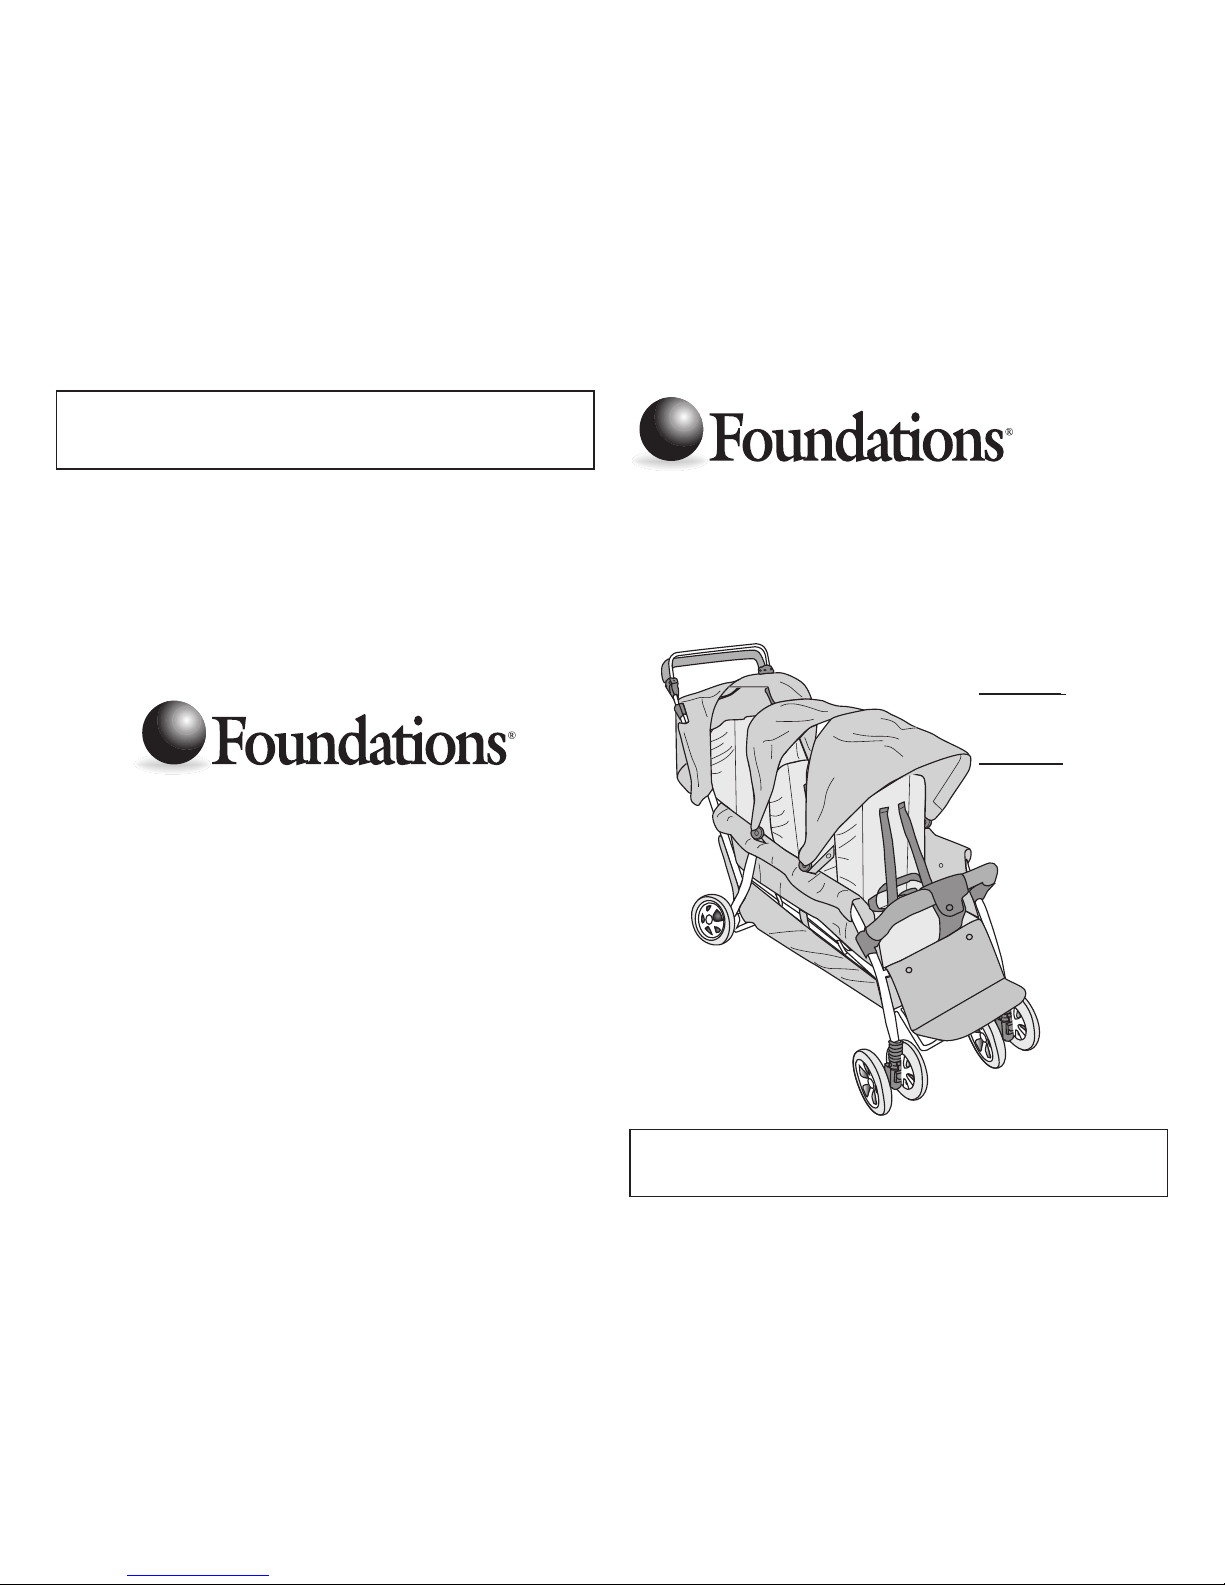
ASSEMBLY & USE INSTRUCTIONS
Triple Tandem Stroller
TrioTrio™™StrollerStroller
TrioTrio
™™
StrollerStroller
For use with children
whose:
Weight is:
40 lbs. (18.1 kg)
or less.
Height is:
40 inches (102 cm)
or less.
Read all instructions BEFORE assembly and USE of product
KEEP INSTRUCTIONS FOR FUTURE USE.
Keep this instruction manual for future use.
© 2006 Shamrock Industries, Inc. SI128A
Division of Shamrock Industries, Inc.
7001 Wooster Pike
Medina, OH 44256
1-877-716-2757 (U.S. Only)
or 1-330-722-5033
Page 2
1
WARNING
Failure to follow these warnings and assembly instructions
could result in serious injury or death.
Avoid Serious Injury To Children From Falling Or Sliding Out:
• ALWAYS use a harness to restrain each child.
• Snugly adjust harness around each child.
• NEVER leave children unattended, even when sleeping.
Always keep children in view.
• DO NOT allow children to climb on stroller or stand in seat.
Avoid Serious Injury To Children:
• DO NOT allow children to sit or stand in storage basket.
• DO NOT place any child weighing more than 40 lbs.
(18.1 kg) or taller than 40 inches (102 cm) in this stroller.
• Use caution when pushing stroller near traffic or in highly
congested areas.
• DO NOT use stroller on stairs or escalators with children in it.
• DO NOT lift stroller by arm bar.
Avoid Loss Of Control Of Stroller:
• ALWAYS use front wheel swivel locks when pushing
stroller on uneven terrain.
• Use caution when pushing stroller on uneven terrain or hills.
• ALWAYS set parking brake when the stroller is stopped.
• NEVER leave stroller unattended on a hill or incline even
when parking brake is set.
Avoid Injury From Stroller Tipping Over:
• DO NOT allow children to climb into stroller unassisted,
or to play or hang onto stroller.
• DO NOT overload stroller as it can become unstable.
• DO NOT carry more than 3 children, one per seat
or place extra parcels or goods in or on the stroller.
• DO NOT add package carrying accessories or hang items
from stroller.
• DO NOT place more than 15 lbs. (6.7kg) in storage basket.
• ALWAYS distribute weight as evenly as possible in each
seat of the stroller.
Avoid Pinch Injury:
• Keep fingers clear of hinged joints when folding and
unfolding stroller.
•
When making adjustments, always ensure all children’s
body parts are clear of any moving parts.
2
Assembly Assistance
Foundations®strives for the highest quality in our products but occasionally a missing
part or problem can occur during assembly.
If any parts are missing or broken or you need assistance with assembly, DO NOT
return the product to your dealer. Call
Foundations®for assistance at
1-877-716-2757 (U.S. Only) or 1-330-722-5033 (Monday through Friday,
9:00 a.m.– 4:00 p.m. Eastern Time). Please have the Stroller model number and
manufacture date located on the stroller frame under right, fabric arm rest cover
near rear seat back available when you call
or write us at:
Foundations®,
7001 Wooster Pike
, Medina, OH 44256.
Assembly Instructions
•
Adult assembly required. No tools required.
• Read all instructions before ASSEMBLY and USE of Stroller.
• Unpack carton, remove packing materials, including polybag. Identify and check
all parts. If parts are missing or damaged, call Foundations®Consumer Services
at 1-877-716-2757 (U.S. Only) or 1-330-722-5033.
• Plastic bags can cause suffocation. Keep plastic bag away
from children. Remove and discard plastic bag.
WARNING
Page 3
3
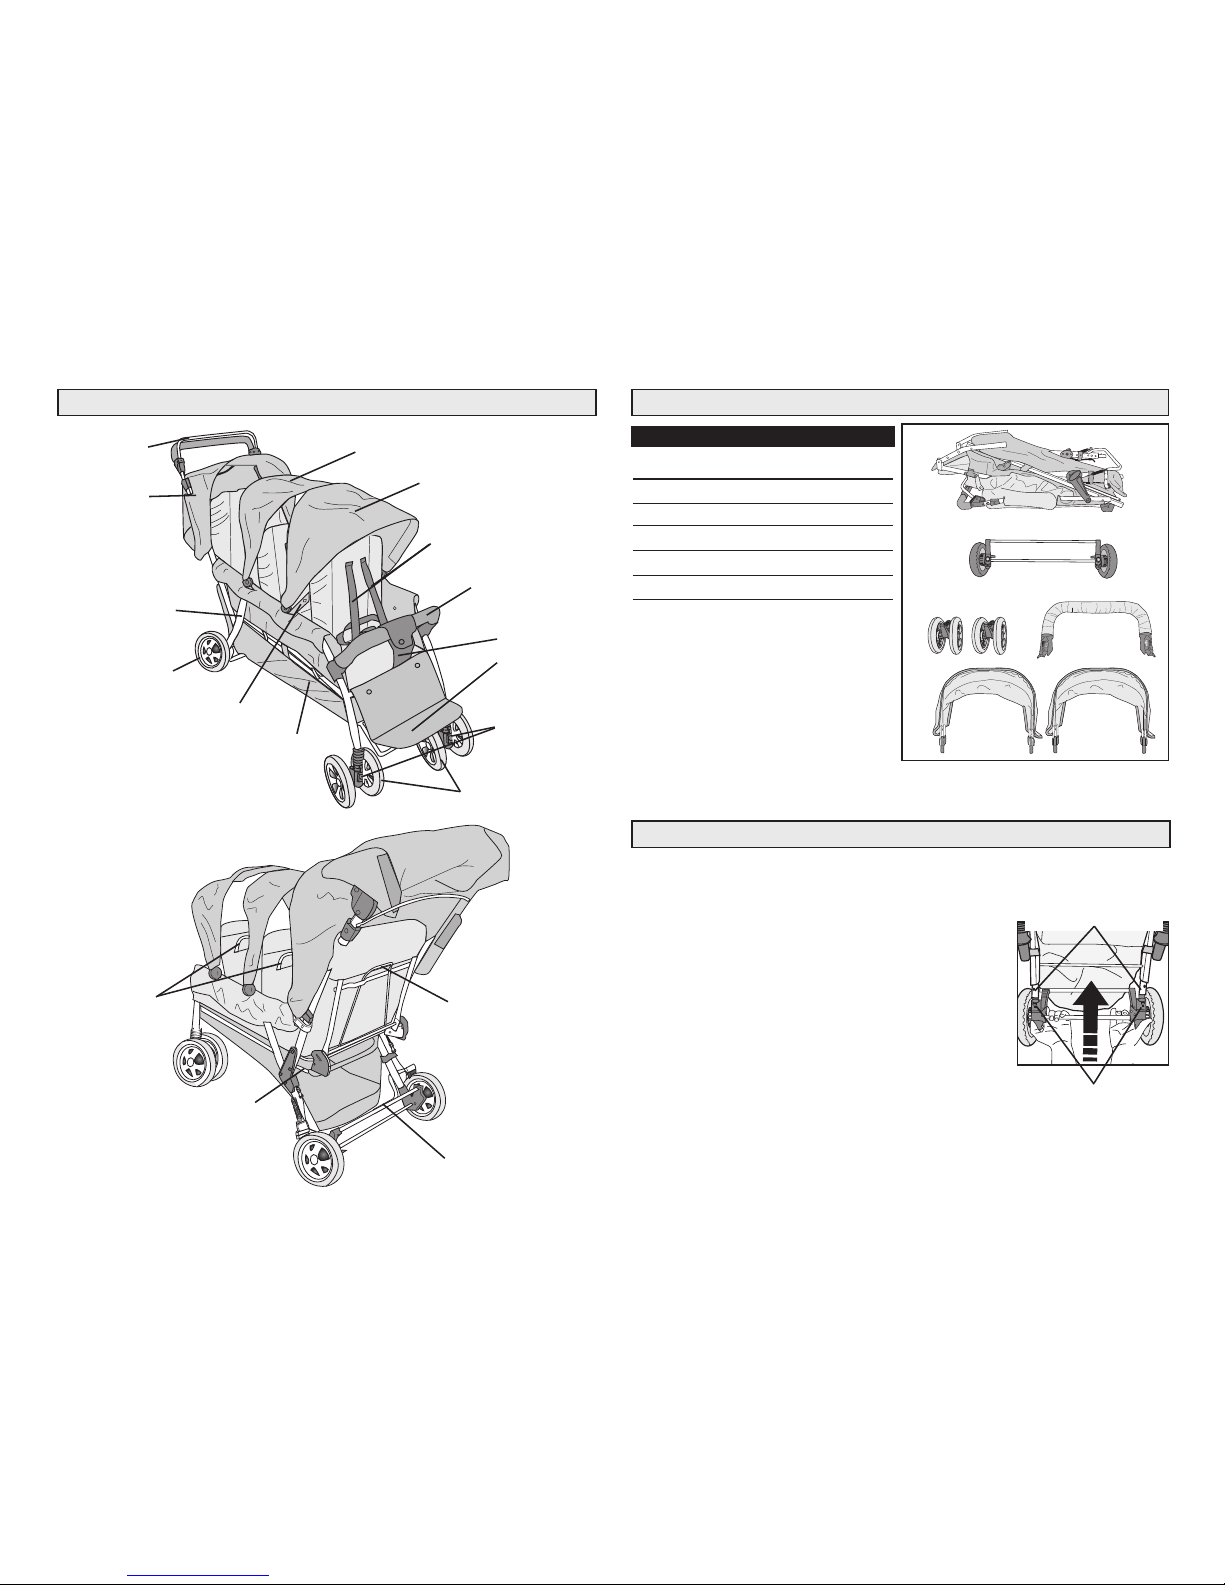
Trio™Stroller Parts
Stroller
Frame
Rear Wheel
Assembly
Front Wheel
Assemblies
Arm Bar
Runaway
Brake Bar
Storage
Basket
Footrest
Rear
Canopy
Harness
Passive Crotch
Straps
Front Wheel
Swivel Lock
Recline
Handle
Basket
Frame
Fold
Retention Strap
Parking Brake Lever
Middle
Canopy
Front
Canopy
Recline
Handles
4
1. Place stroller on its back so that the footrest is facing up.
2. With parking brake lever facing down and openings
in Rear Wheel Assembly Sleeves up, align and
slide Rear Wheel Assembly Sleeves onto
both rear leg tubes (Fig. 1).
3. After Rear Wheel Assembly Sleeves are started
onto the rear leg tubes, move parking brake lever
down into the locked position.
4. Slide Rear Wheel Assembly Sleeves up rear legs
until spring buttons snap into holes in both Rear
Wheel Assembly Sleeves.
Pull out on Rear Wheel Axle to be sure Rear Wheel
Assemblies are securely snapped to each rear leg.
Rear Wheel
Assembly
Fig. 1
Rear Wheel
Assembly Sleeves
STEP 1 - Rear Wheel Assembly
Parts List
Part Description Quantity
A. Stroller Frame 1
B. Rear Wheel Assembly 1
C. Front Wheel Assembly 2
D. Arm Bar 1
E. Front And Middle Canopy 2
PARTS LIST
A
B
C
D
E
Page 4
5
STEP 4 - Front And Middle Canopy Assembly
1. Position front canopy with taller tube toward front
of stroller.
2. Place end of Canopy Frame through opening in
fabric arm rest cover and push into plastic canopy
slot located on outside of metal stroller frame (Fig. 1).
3. Repeat for opposite side of Canopy Frame.
4. Repeat steps 1 through 3 for middle canopy.
Canopy
Frame
Fig. 1
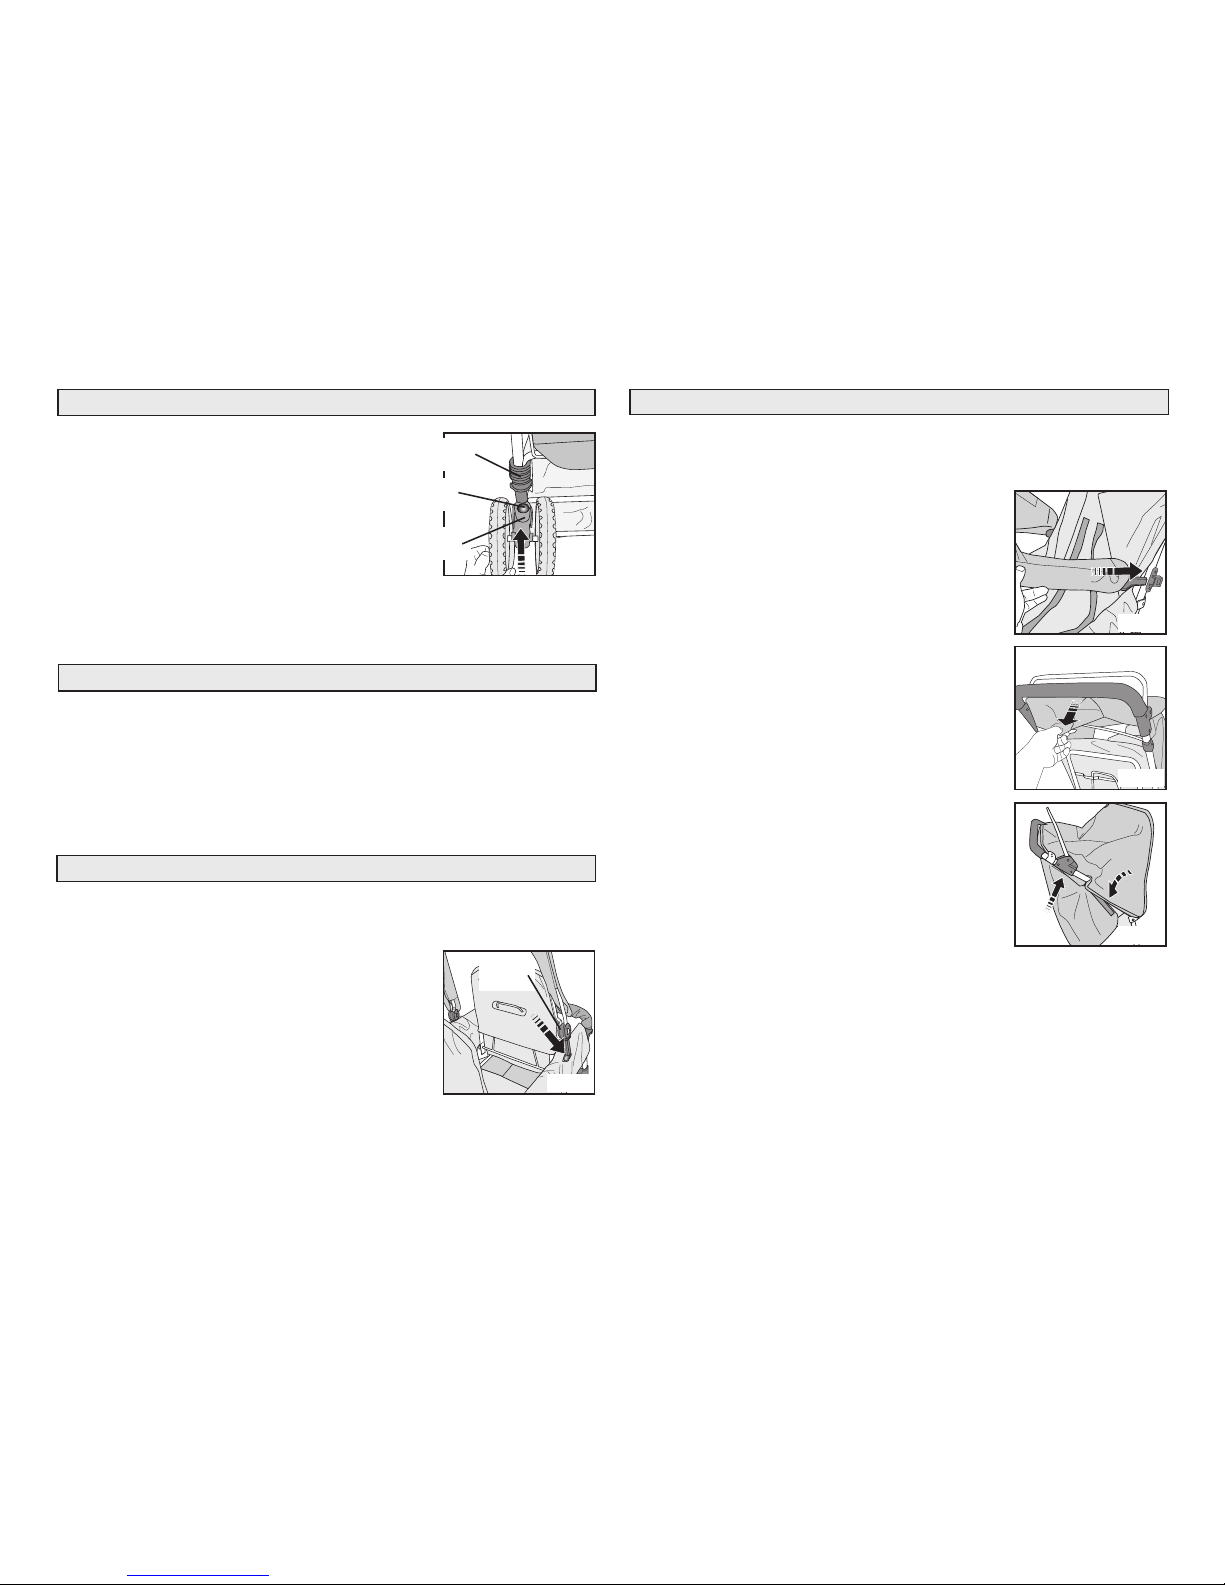
STEP 2 - Front Wheel Assembly
1. Position front wheel assembly with large opening
and swivel lock toward front leg sleeve.
2. Slide Front Wheel Assembly onto front leg
sleeve until it snaps in place (Fig. 1).
Pull out on Front Wheel Assembly to be sure
it is securely snapped to the front leg.
3. Repeat for other Front Wheel Assembly.
Front Wheel
Assembly
Fig. 1
Front Leg
Sleeve
Large
Opening
1. Unfold stroller (see Unfolding Stroller section).
2. Assemble Arm Bar (see Arm Bar Operation section).
STEP 3 - Arm Bar Assembly
6
STEP 5 - Rear Canopy Assembly
1. Position canopy with metal tube facing the front
of the stroller.
2. Push end of canopy frame into canopy slot
located on outside of stroller frame near the
rear seat back (Fig. 1).
Repeat steps 1 and 2 for other side of canopy.
3. Pull back of canopy through stroller handle over
canopy support wire (Fig. 2).
4. Attach small velcro flap behind stroller fold
lock (Fig. 3).
5. Attach large velcro flap around outside of
stroller frame, under stroller fold locks (Fig. 3).
Repeat steps 5 and 6 for other side of canopy.
Fig. 2
Fig. 3
Fig. 1
Page 5
7
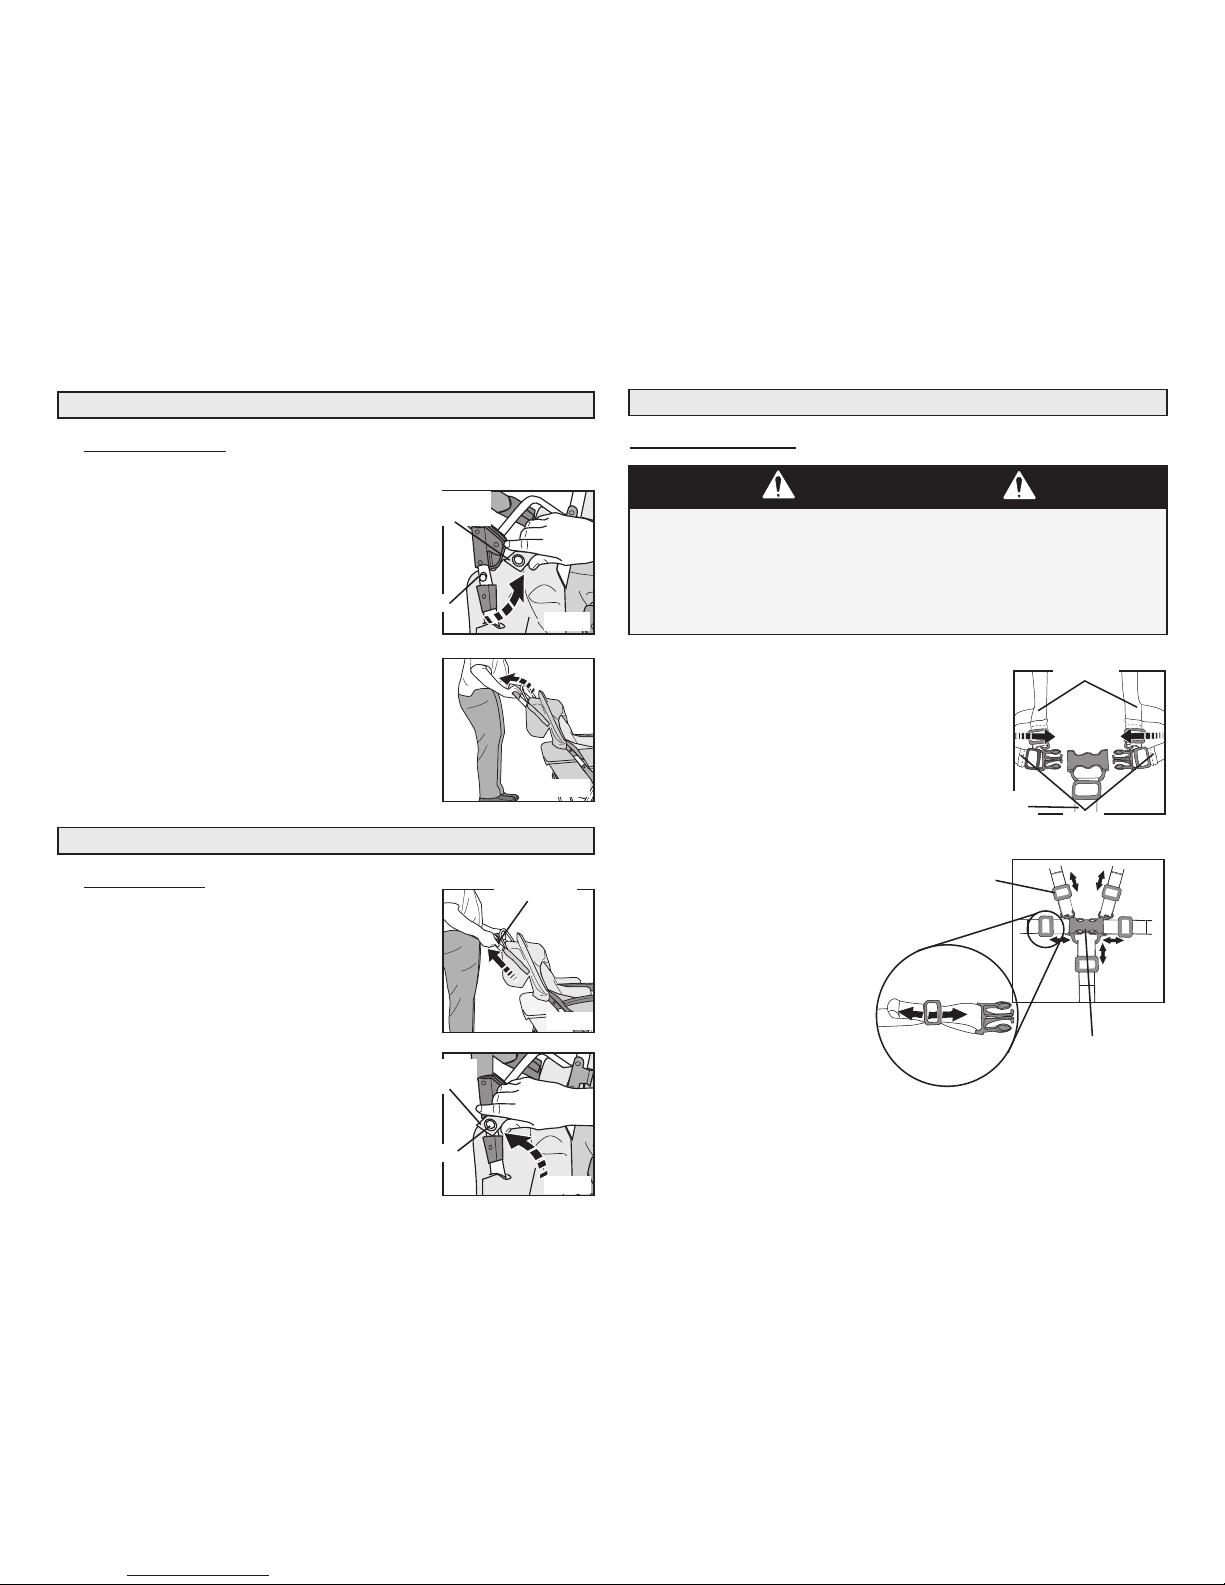
1. To fold stroller:
A. Push parking brake lever down to lock
brakes.
B. Place all seat backs in upright position.
C. Squeeze fold lock slide on right side
to unlock and slide red Fold Lock
Slides on both sides of stroller handle
toward handle grip (Fig. 1).
D. Push handle forward to fold stroller.
E. Press folded stroller together and
secure with Fold Retention Strap
by placing Fold Retention Strap
over Pin on stroller frame (Fig. 2).
Folding Stroller
Fold
Retention Strap
Pin
Fig. 6
Fold Lock
Slides
Fig. 1
1. To unfold stroller:
Check to be sure parking brake is in the
locked position before unfolding stroller.
A. With folded stroller laying down on
wheels, locate Fold Retention Strap.
Press stroller frame together and pull
Fold Retention Strap off Pin on stroller
frame (Fig. 1).
B. Standing at stroller handle, pull up and
back to unfold stroller being sure to
pull handle back until it locks into
position (Fig. 2).
C. Check that stroller is locked in the open
position.
- Lift up on handle.
- Handle should maintain it’s position
and be rigid, it should not flex upward
on either side.
Unfolding Stroller
Fold
Retention Strap
Pin
Fig. 2
Fig. 1
Stroller Operation & Use
1.
With harness unbuckled, place child in seat.
2. Secure child with harness by placing Shoulder
and Waist Belts over shoulders and over thighs.
Snap buckle tongues into crotch strap buckle
(Fig. 1).
3. Snugly adjust each strap by pulling on the
free end of the strap and moving slide
adjuster along strap (Fig. 2).
Securing Children:
Avoid Serious Injury To Children From Falling Or Sliding Out:
• ALWAYS use a harness to restrain each child.
• Snugly adjust harness around each child.
• NEVER leave children unattended, even when sleeping.
Always keep children in view.
• DO NOT allow children to climb on stroller or stand in seat.
WARNING
Fig. 1
Fig. 2
Shoulder
Belts
Waist
Strap
Crotch Strap
Buckle
Crotch
Strap
Slide
Adjuster
8
Page 6
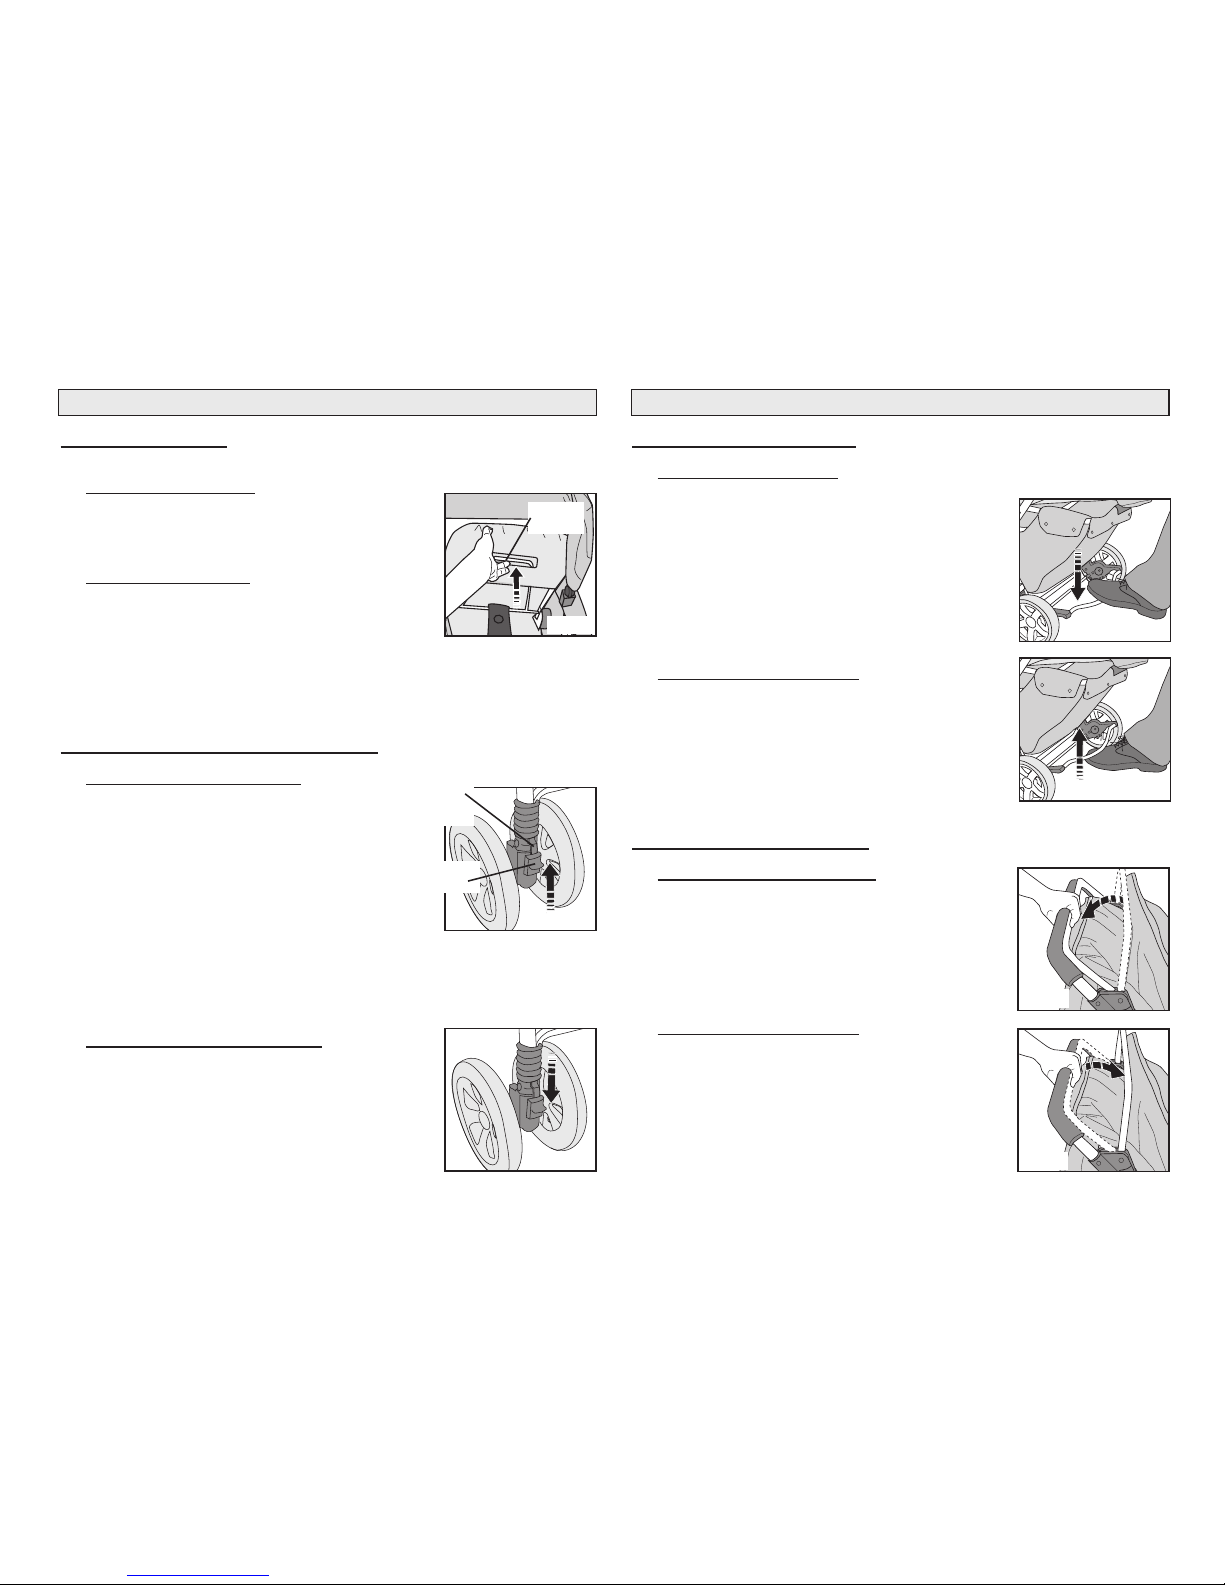
Seat Back Recline:
NOTE: All seat backs must be in the upright position when folding stroller.
To lower seat backs:
1. Pull seat back Recline Handle up (Fig. 1).
2. Lower seat back to recline position and release
seat back recline handle.
To raise seat backs:
1. Pull seat back recline handle up.
2. Push seat back up and forward to upright
position and release seat back recline handle.
3. Check that seat back is locked.
Front Wheel Swivel Lock Operation:
To lock front wheel swivel:
1. Rotate front wheel assembly until it is
straight back and swivel lock is aligned
with swivel lock track (Fig. 1).
2. Push swivel lock up over swivel lock track
until it snaps into place.
3. Check that front swivel is securely locked
by pushing side to side on front wheel
assembly.
4. Repeat steps 1 through 3 for the other
front wheel assembly.
To unlock front wheel swivel:
1. Push swivel lock down until it is free of the
swivel lock track (Fig. 2).
2. Repeat step 1 for the other front wheel
assembly.
Fig. 1
Fig. 2
Swivel
Lock
Track
Swivel
Lock
Stroller Operation & Use (continued)
Recline
Handle
Fig. 1
9
Stroller Operation & Use (continued)
Parking Brake Operation:
To lock parking brake:
1. Press down on parking brake lock bar
on the rear wheel assembly (Fig. 1).
2. Check that wheels are locked.
To unlock parking brake:
1. Lift parking brake lock bar up (Fig. 2).
Runaway Brake Operation:
To release runaway brake:
1. Pull runaway brake bar back and hold
runaway brake bar against stroller handle
while pushing stroller (Fig. 3).
To apply runaway brake:
1. Release runaway brake bar (Fig. 4).
Fig. 1
Fig. 2
Fig. 3
Fig. 4
10
Page 7
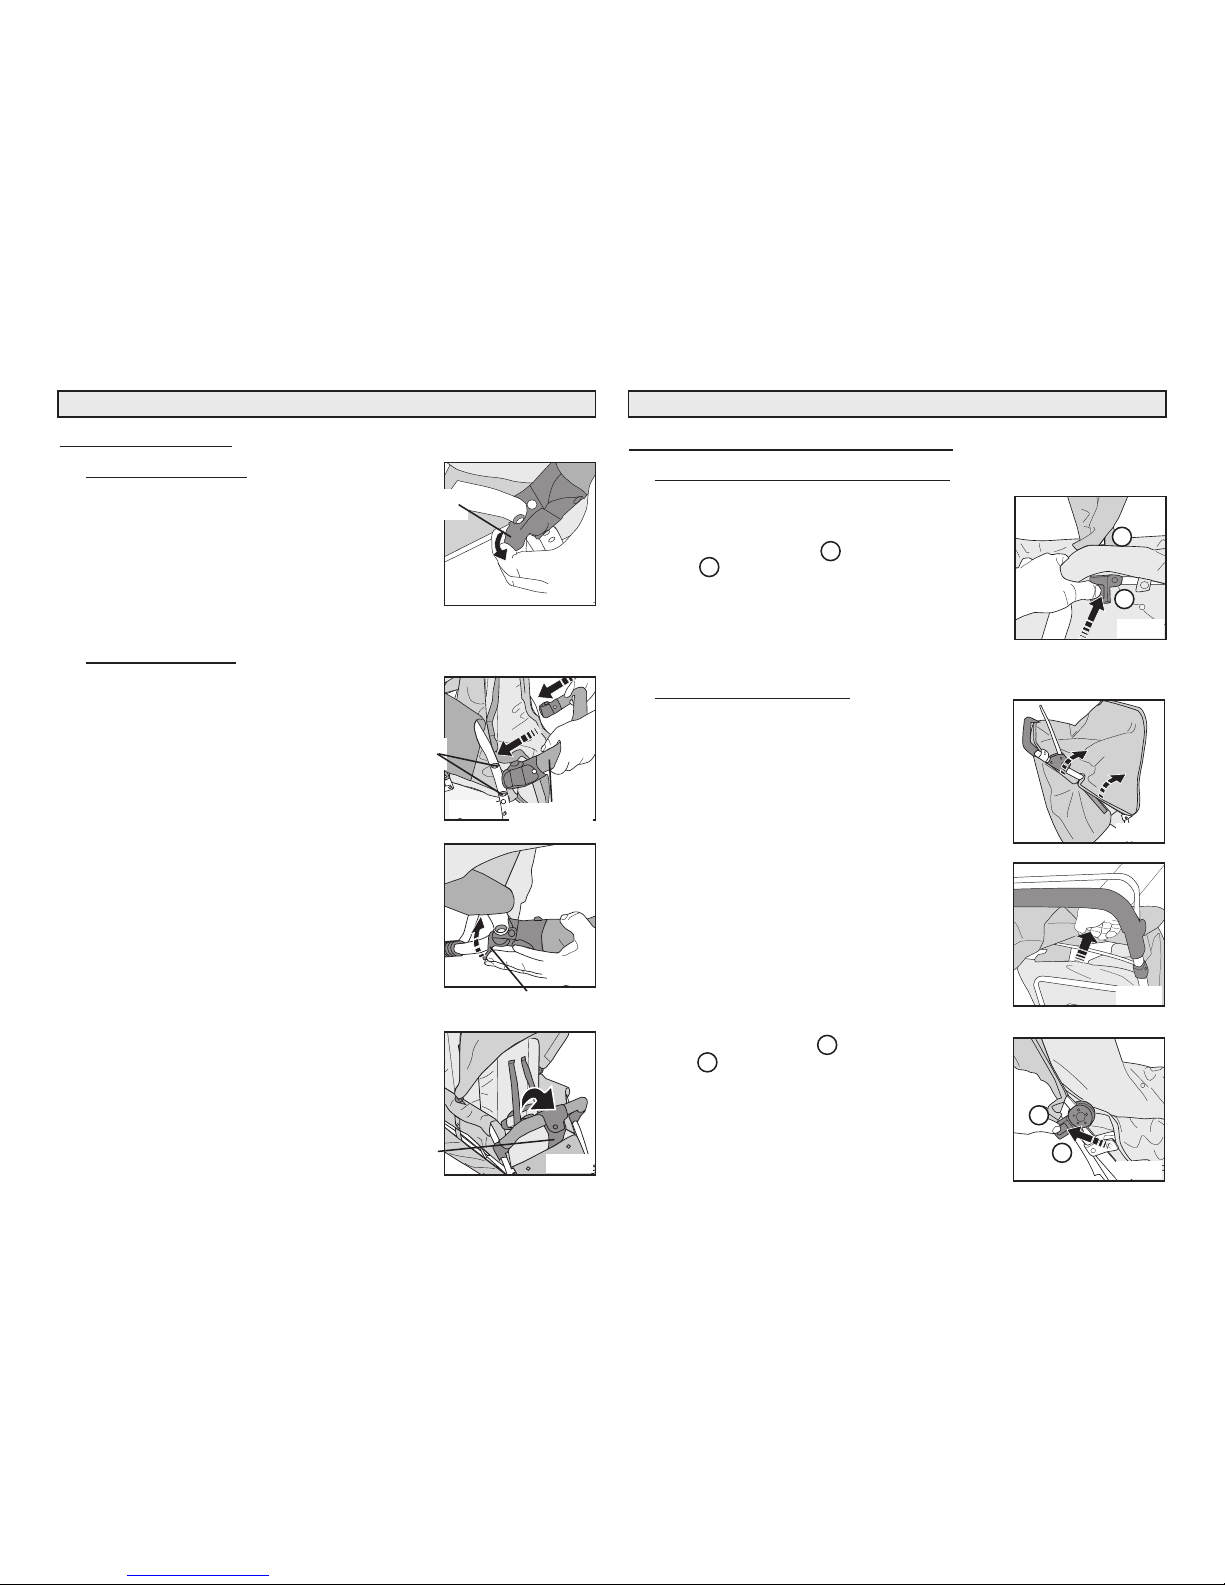
Arm Bar Operation:
To remove arm bar:
1. Unfasten snap on front passive crotch
strap.
2. Pull arm bar clamp out away from stroller to
unlock arm bar from stroller frame (Fig. 1).
3. Push down and pull out on arm bar to remove
it from stroller frame.
To attach arm bar:
1. Unfold stroller (see Folding and Unfolding
Stroller section).
2. With Foundations
®
logo up, position
Arm Bar Assembly onto front leg tubes
between arm bar stops and snap onto
front leg on both sides (Fig. 1).
3. Lock Arm Bar to stroller frame by pushing
Arm Bar Clamp in toward stroller (Fig. 2).
4. Repeat step 3 for opposite end of Arm Bar.
5. Place Passive Crotch Strap in center of
Arm Bar and secure snap (Fig. 3).
Stroller Operation & Use (continued)
Fig. 1
Arm Bar
Clamp
Fig. 2
Passive
Crotch
Strap
Fig. 3
Arm Bar
Clamp
Arm Bar
Assembly
Fig. 1
Arm Bar
Stop
11
Stroller Operation & Use (continued)
Front And Middle Canopy Operation:
To remove front and middle canopy:
1. Unsnap and lift fabric arm rest cover in the
area of the canopy to be removed.
2. Press retainer tab in and lift canopy frame
up on one side of stroller (Fig. 1).
3. Repeat steps 1 and 2 for other side of canopy.
See “Front and Middle Canopy Assembly”
section to attach front and middle canopy.
To remove rear canopy:
1. Disconnect 2 velcro flaps on each side of
the handle (Fig. 1).
2. Pull back of canopy out of stroller handle
(Fig. 2)
.
3.
Press retainer tab in and lift canopy frame
up on one side of stroller (Fig. 3).
4. Repeat step 3 for other side of stroller.
See “Rear Canopy Assembly” section to
attach rear canopy.
Fig. 1
1
2
1
2
1
2
Fig. 1
Fig. 2
Fig. 3
1
2
12
Page 8
Runaway Brake Operation And Adjustment
Runaway brake should be periodically checked for proper
operation.
To check for proper operation of hand brake:
NOTE: DO NOT check for proper operation
of runaway brake while any children are in stroller.
- Release the brake and push the stroller at a walking pace on a flat
level surface.
- While walking, release the stroller handle and hand brake bar.
- The stroller should stop almost immediately without turning, if it does
not the runaway brake MUST be adjusted. To adjust the runaway
brake follow the steps below:
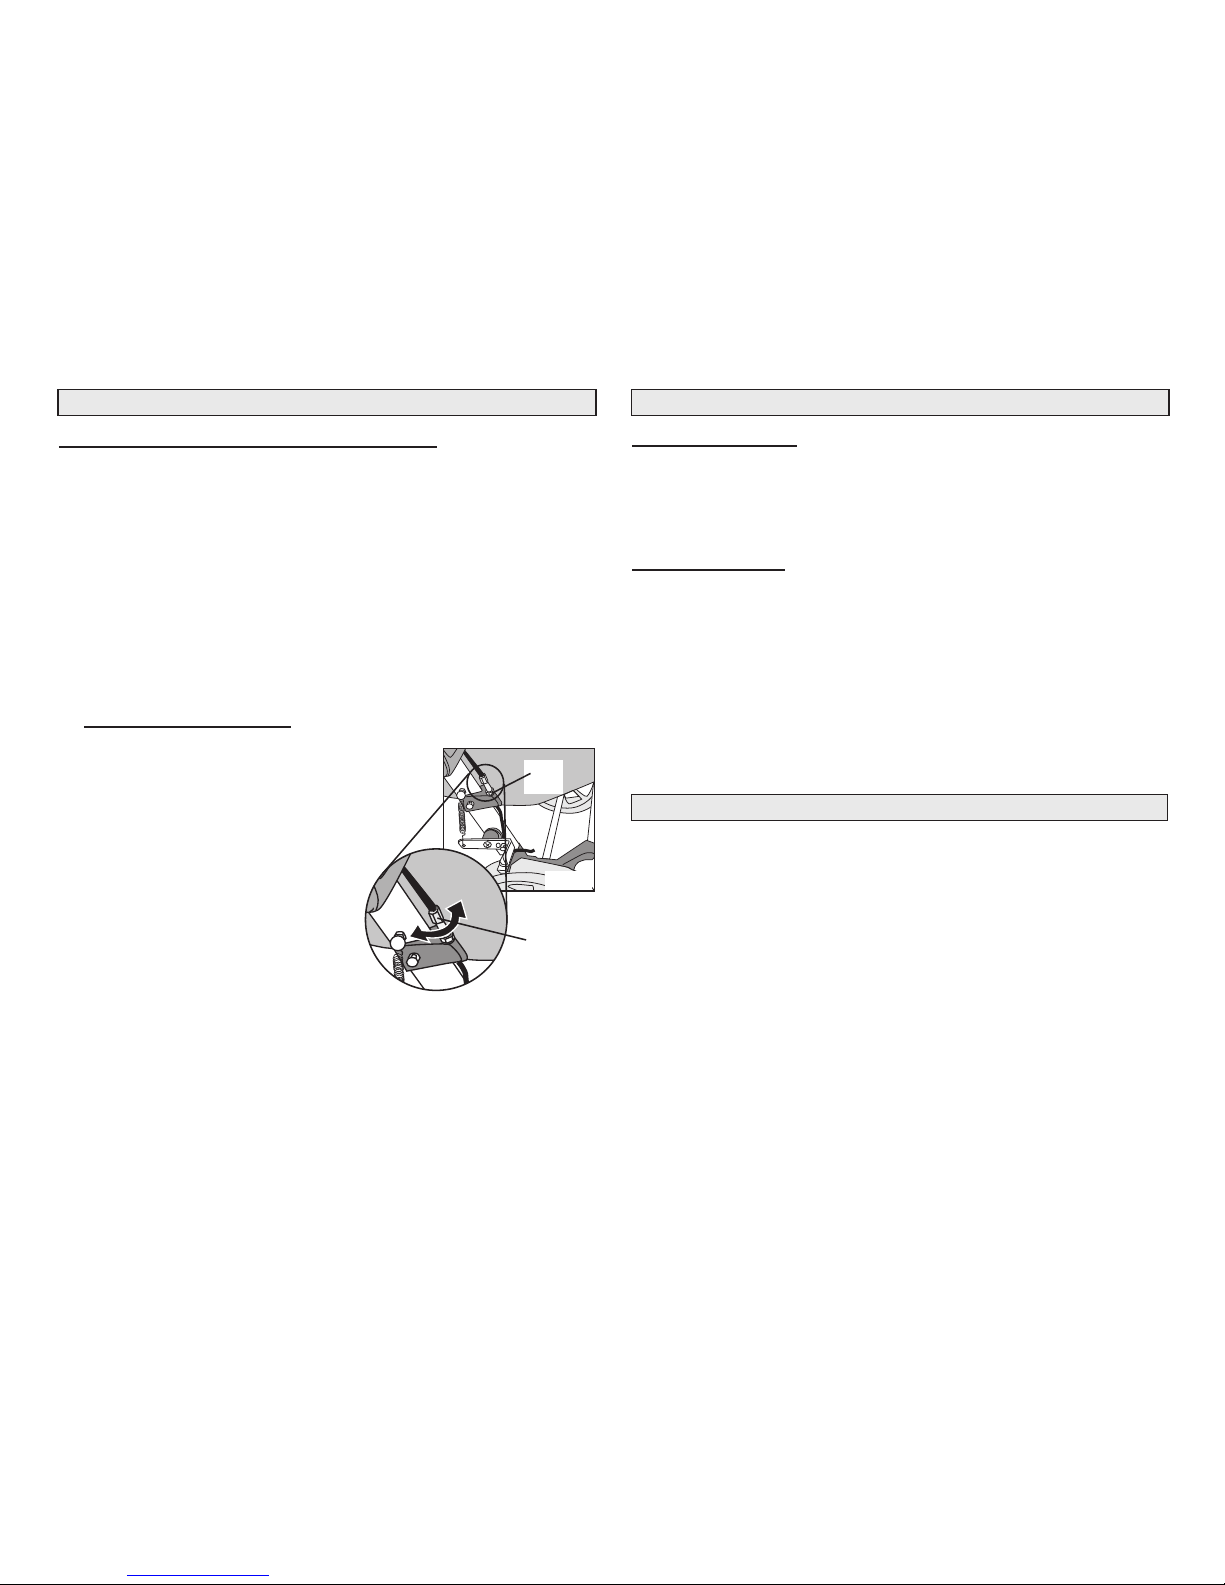
To adjust runaway brake:
1. Using an adjustable wrench, loosen the
Jam Nut on the runaway brake cable
adjustment bolt (Fig. 5).
2. Using an adjustable wrench, turn the runaway
brake Cable Adjustment Bolt clockwise to
tighten brake or counter-clockwise to
loosen brake on that side.
3. While holding runaway brake cable
adjustment bolt, use an adjustable
wrench to tighten jam nut.
4. Repeat steps 1 through 3 on
opposite side of stroller.
NOTE: It is important that both
sides are adjusted equally so that the
stroller will not turn when runaway brake is applied.
5. Recheck runaway brake for proper operation,
see “To Check For Proper Operation Of
Runaway Brake” section.
6. If the stroller still does not stop quickly
or turns when runaway brake is applied,
repeat steps 1 through 5.
NOTE: If problems persist call Foundations
®
for replacement parts or assistance.
Stroller Maintenance And Adjustments
Fig. 5
Jam
Nut
Cable
Adjustment
Bolt
13
One Year Limited Warranty
Foundations®warrants this product to be free from all defects in material and
workmanship when used according to the manufacturer’s instructions to the
original owner for a period of one year from date of purchase. The warranty does
not apply to damage caused by product alteration, normal wear and tear, misuse
or abuse of the product. Keep you sales receipt as a record of the date of
purchase. For replacement parts or warranty issues, please contact Foundations
®
as we are better able to serve you. DO NOT return the product to your retailer or
distributor.
If you need assistance, call or write:
Foundations®, 7001 Wooster Pike, Medina, OH 44256
Telephone: 1-877-716-2757(U.S. Only) or 1-330-722-5033
Fax: 1-330-722-5037
Stroller Maintenance And Adjustments (continued)
Cleaning seat pad:
- Surface wash small spots with mild solution of soap and water.
Do not use bleach.
- Rinse with water to remove soap solution.
Cleaning stroller:
1. Surface wash stroller frame, plastic parts and fabric with mild solution
of soap and water. Do not use bleach. Wipe surfaces with water to
remove soap solution.
2. Wipe or air dry.
14
 Loading...