

Page 1
User Manual
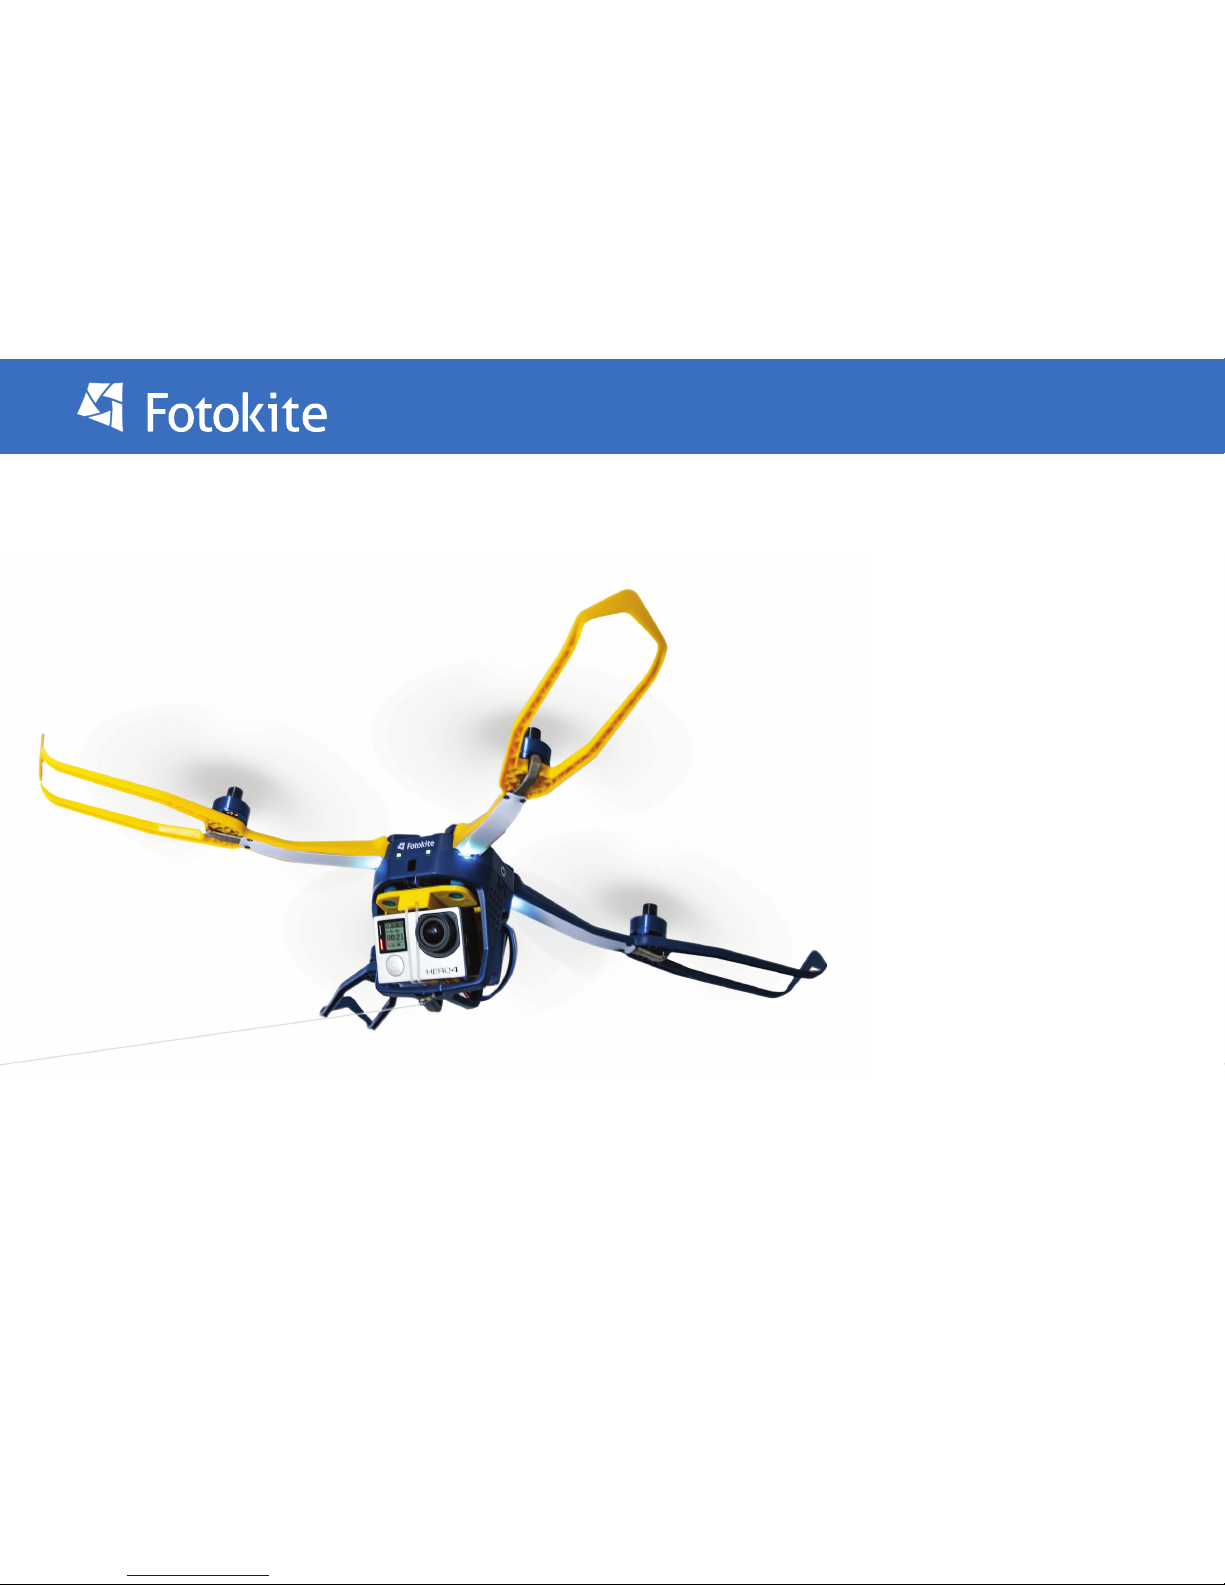
Fotokite Phi User Manual
Version 1.0
Page 2
2
Contents
What’s in the box?
System overview...Flight Frame
System overview...Leash
Installing the battery
Charging the Fotokite
Charging the Leash
Unfolding / Locking
How to y...takeo
How to y...controls
Thrust calibration
Thrust equalization
Fitting new propellers
Page 3
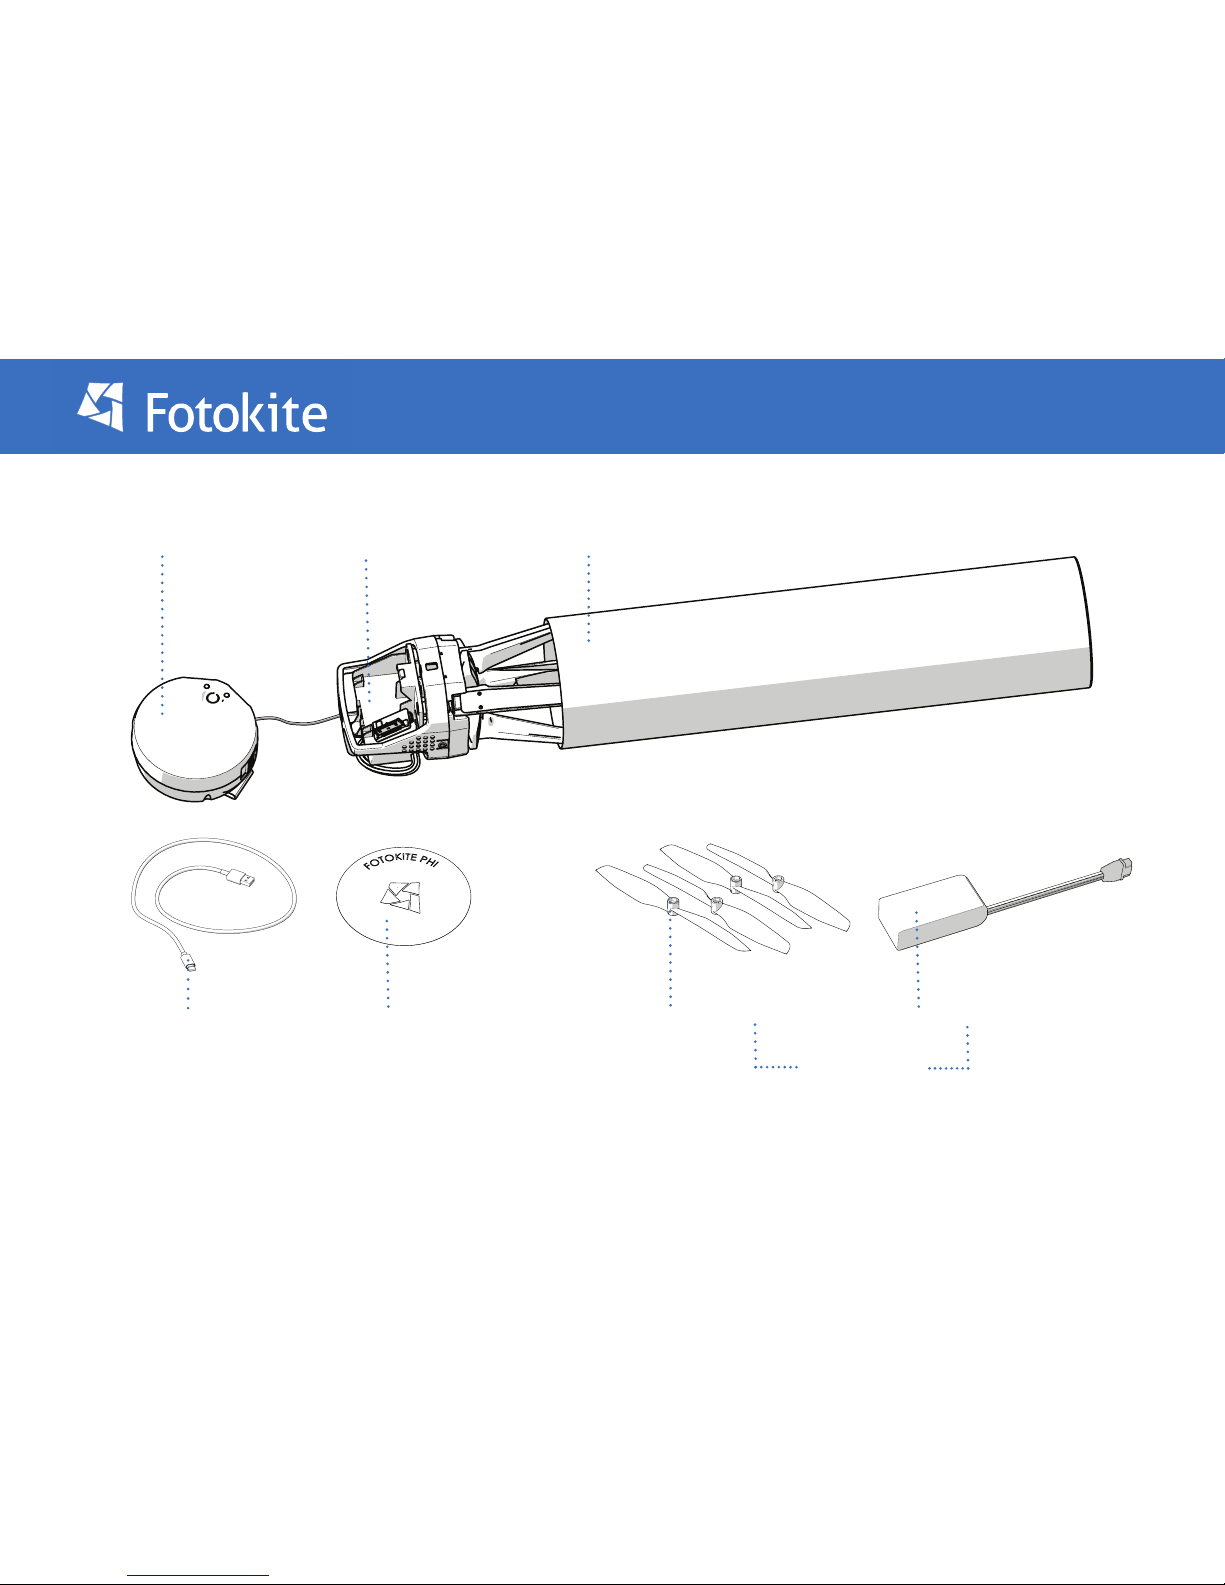
What’s in the box?
Flight Frame
Leash
Storage Tube
USB-C Cable
Quick-Start Guide
Spare propeller set
Extra battery
Optional Extras
Page 4
4
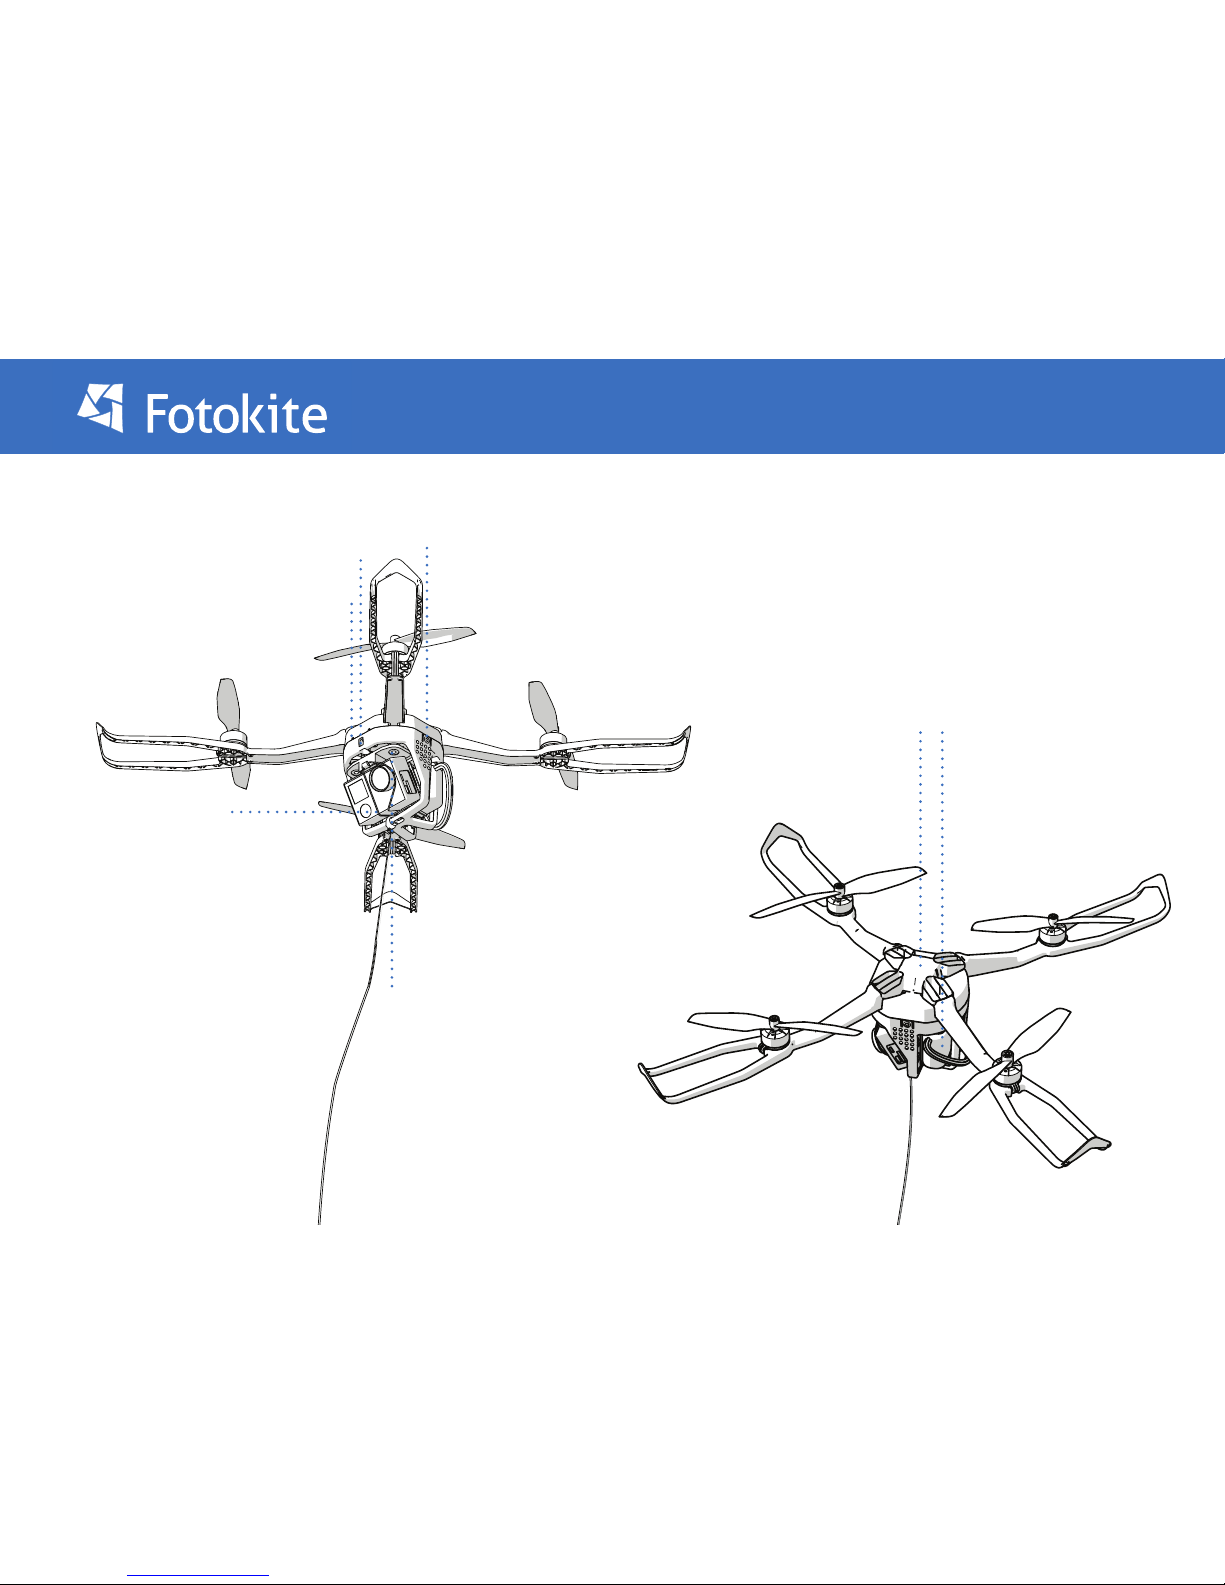
Power Button
Bottom clip-in
Camera band
Front clip-in
System overview...Flight Frame
Lock Flight Battery
Battery Status
Page 5
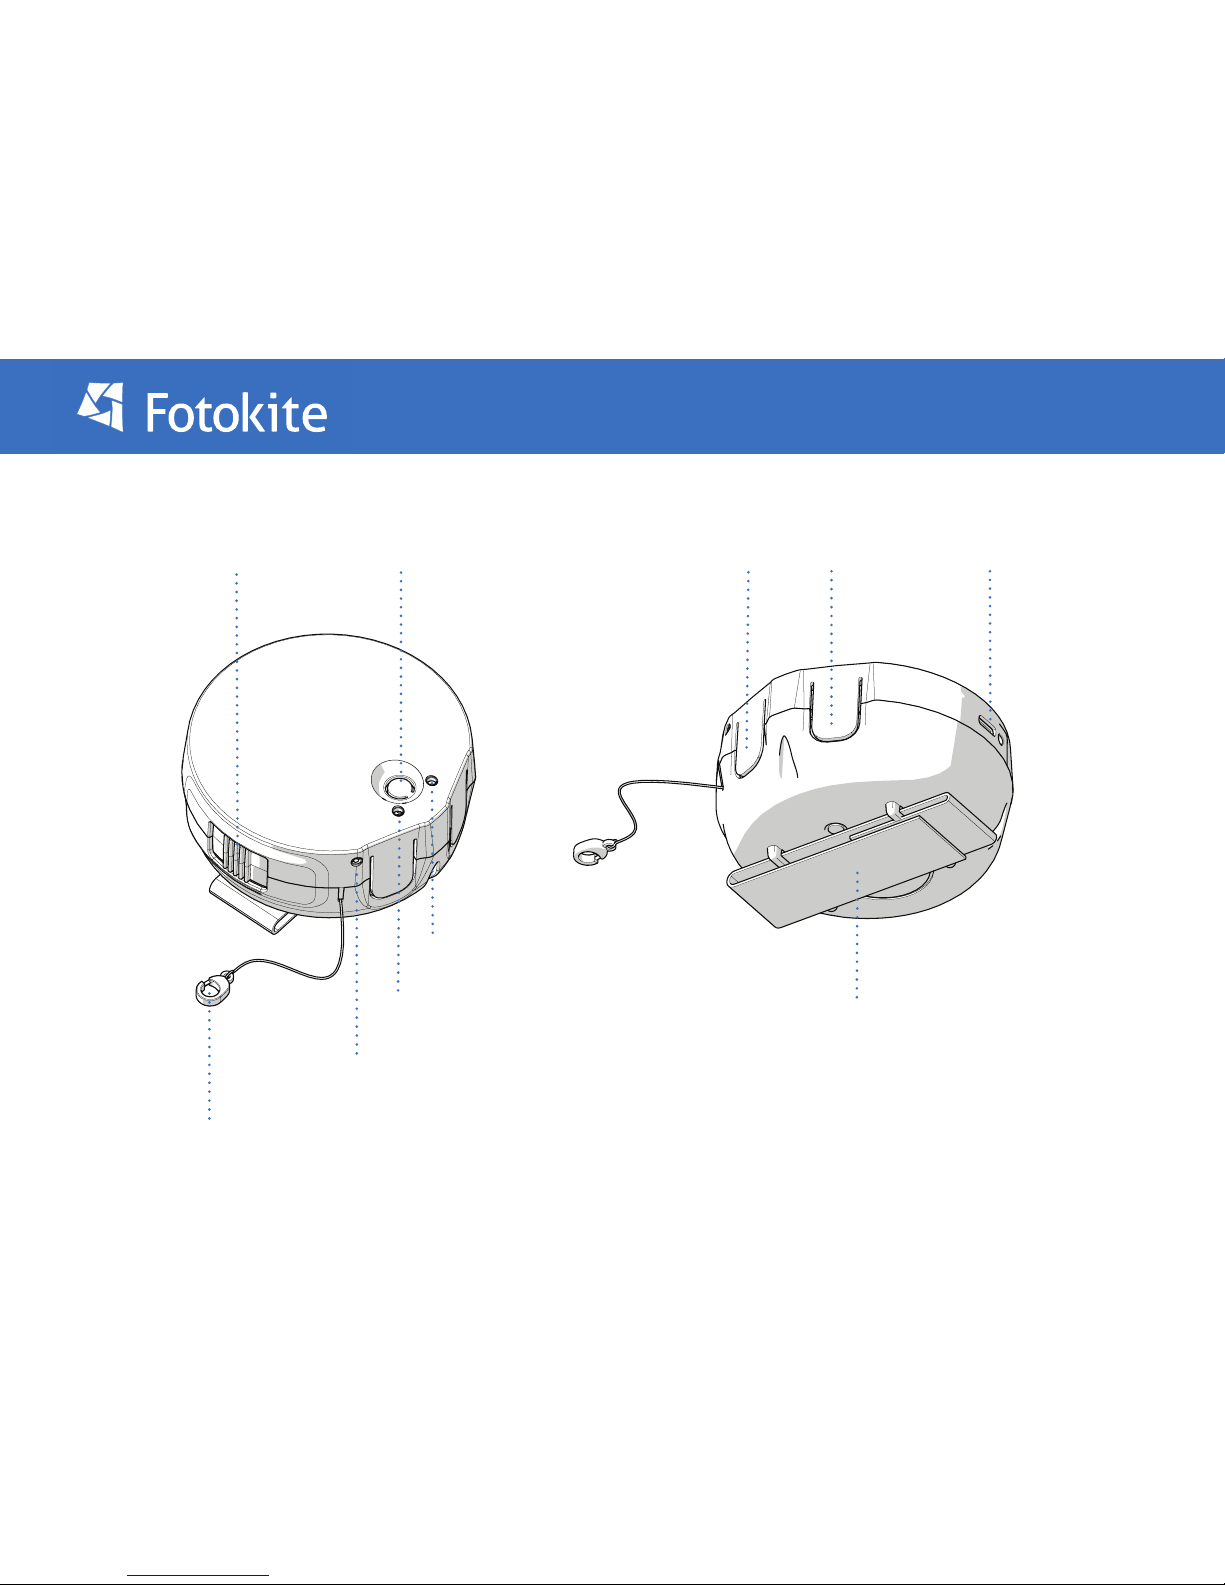
Hand strap
Tether attachment
Length control Power button USB-C Charging Port
Orbit button
Yaw button
System overview...Leash
Status Light
Orbit light
Yaw light
Page 6
6
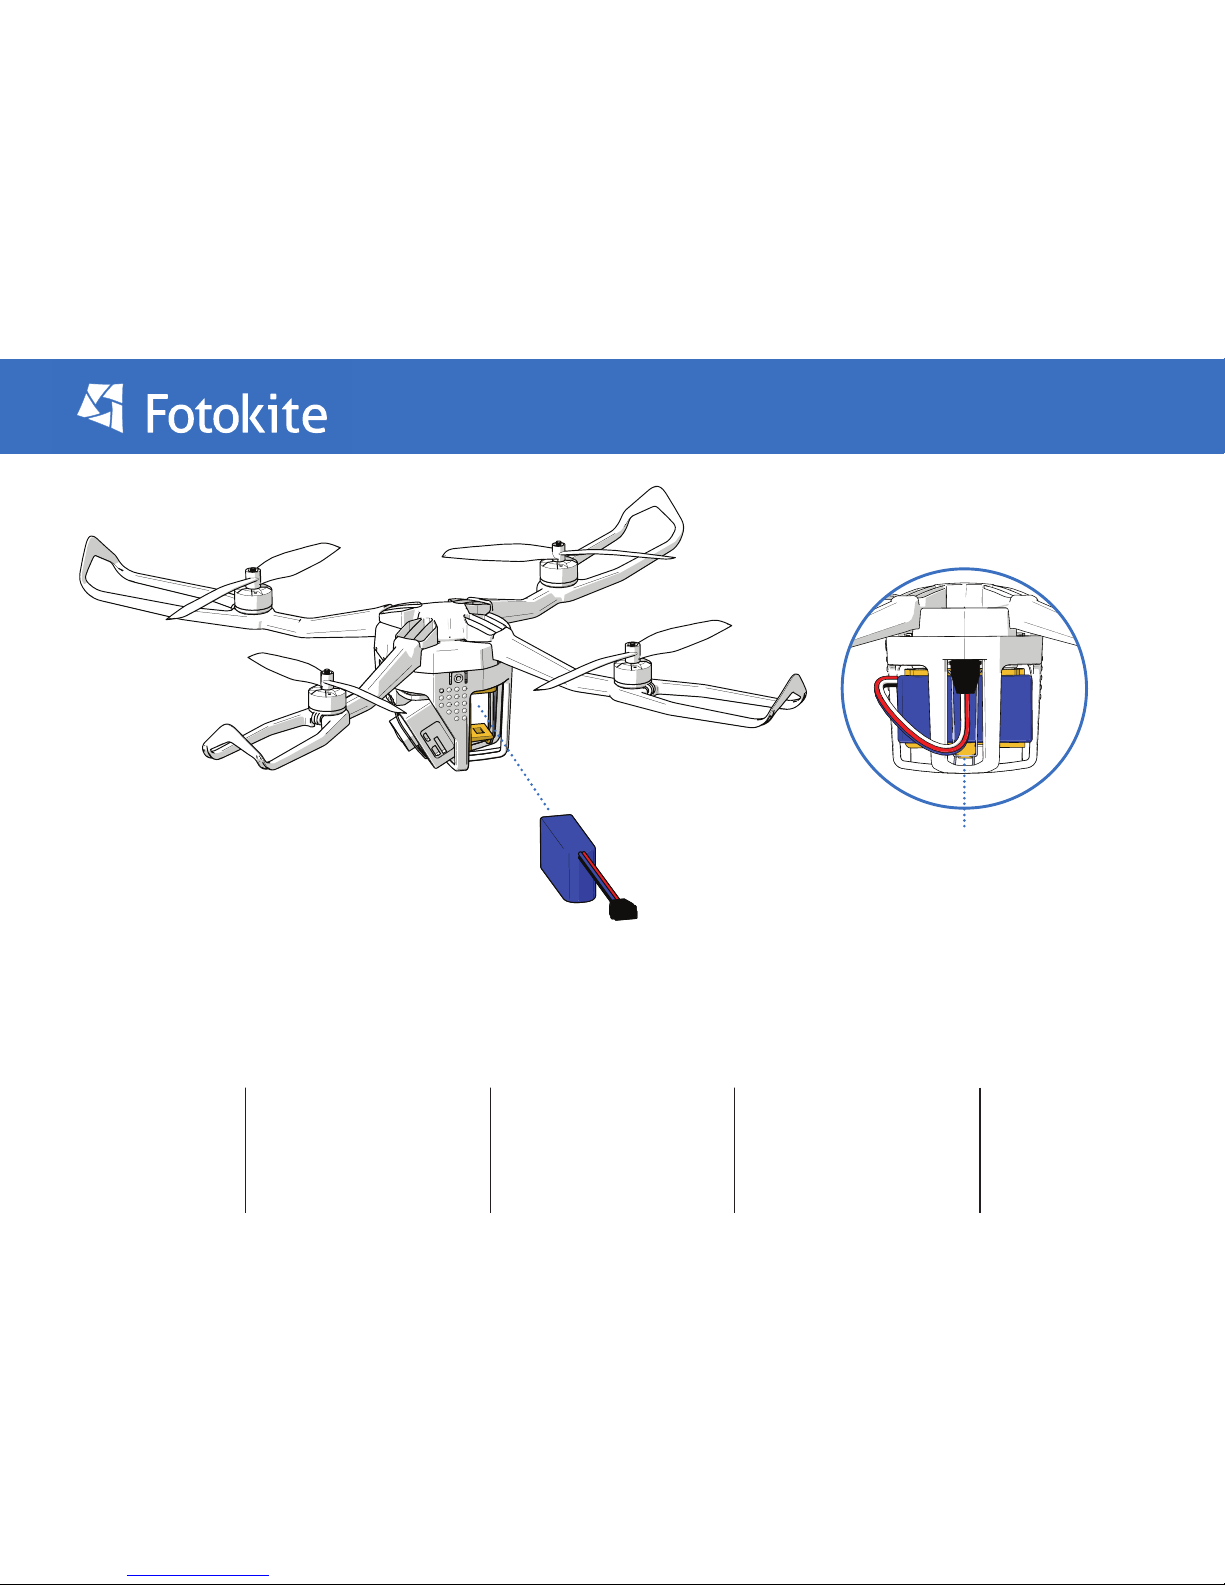
Installing the battery
1. Detach the battery band that
holds the battery in place.
2. Hold the battery band back to
keep it from going inside the
Fotokite’s main body.
3. Slide the battery in from the
side. Position it centrally
to ensure the ight frame is well
balanced.
4. Pull the battery band over the
battery, and secure it to the
yellow hook at the bottom of the
ight frame payload.
5. Plug in the battery connector
as shown above.
Battery band
Page 7
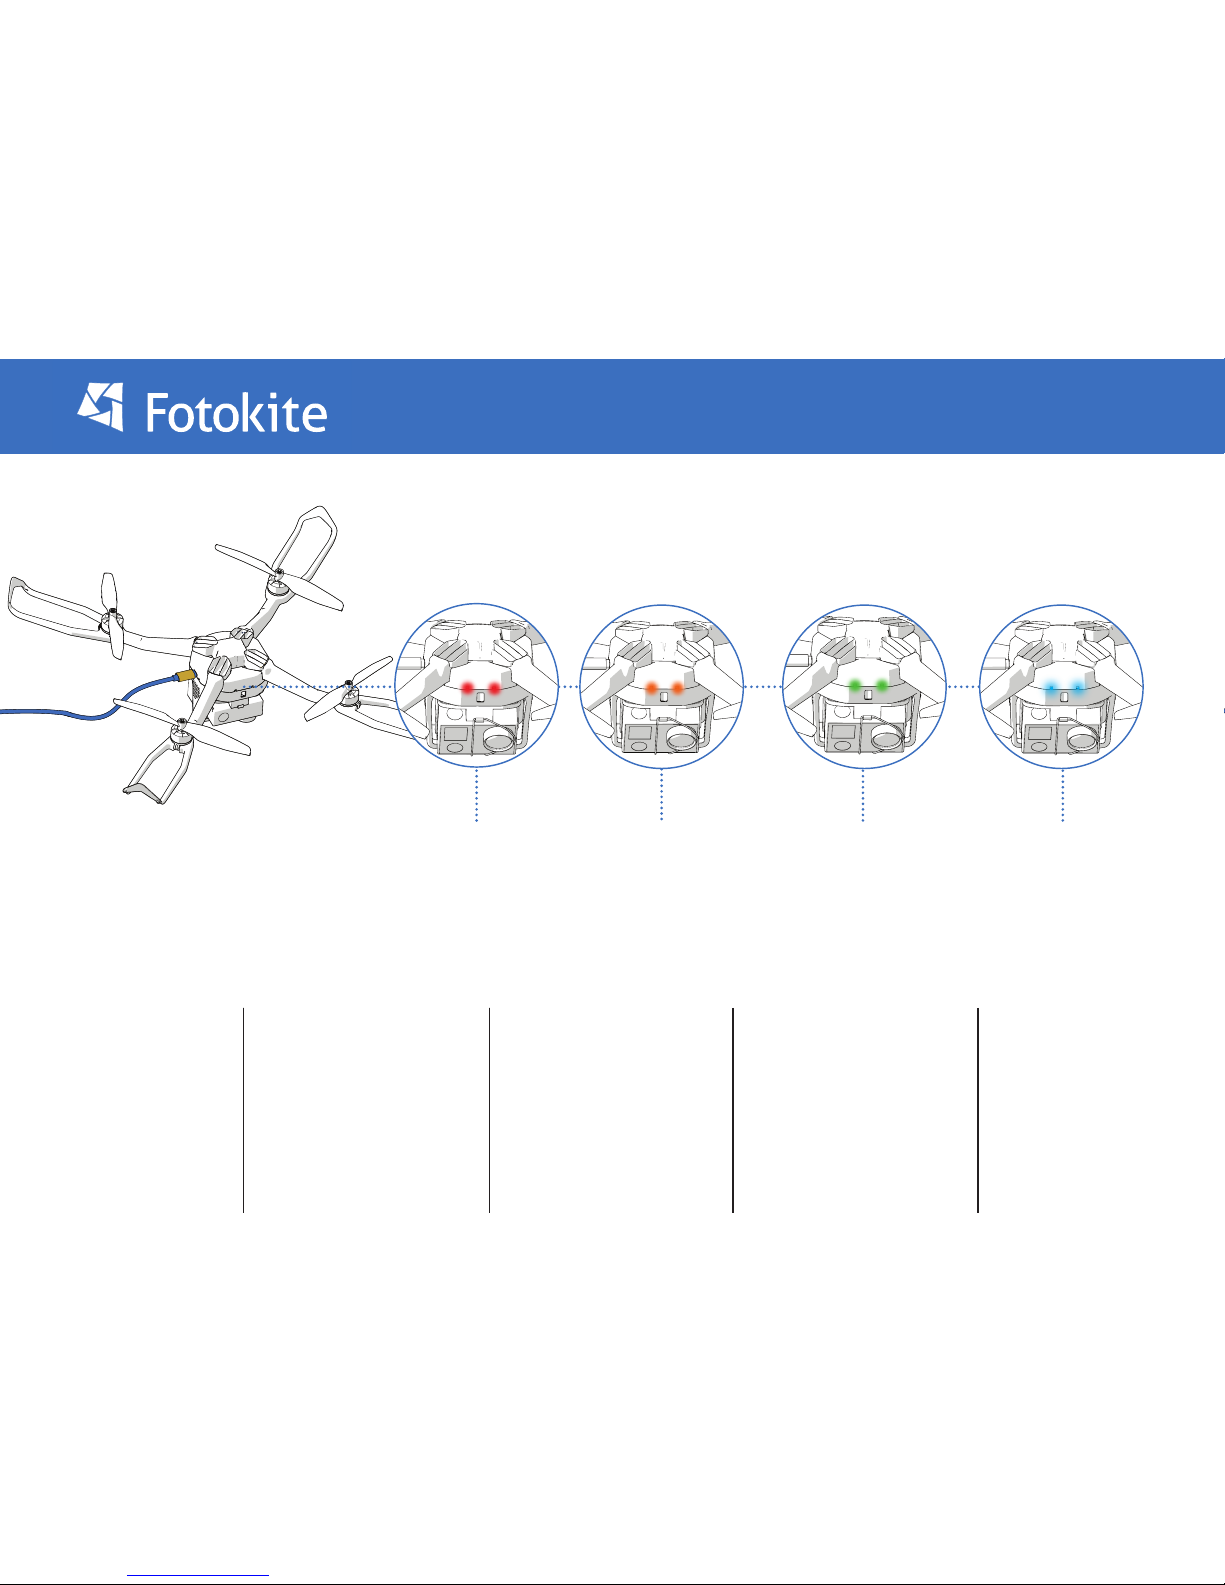
1. Ensurethat the battery is
connected to the Flight frame.
Charging the Fotokite
2. Plug the Fotokite charging
cable into a USB power supply or
into a computer.
3. Plug the Fotokite charging
cable into the Flight Frame.
4. The charging behaves as
follows:
a. Lights will blink regularly
during charging. Their color will
go from orange (when battery
almost empty) to green (when
battery almost full)
b. Once fully charged, the LEDs
will turn to a teal color.
5. Disconnect the charging
cable when charging
is complete.
Fully ChargedCharging
Charging Error Still charging...
Page 8
8
Charging the Leash
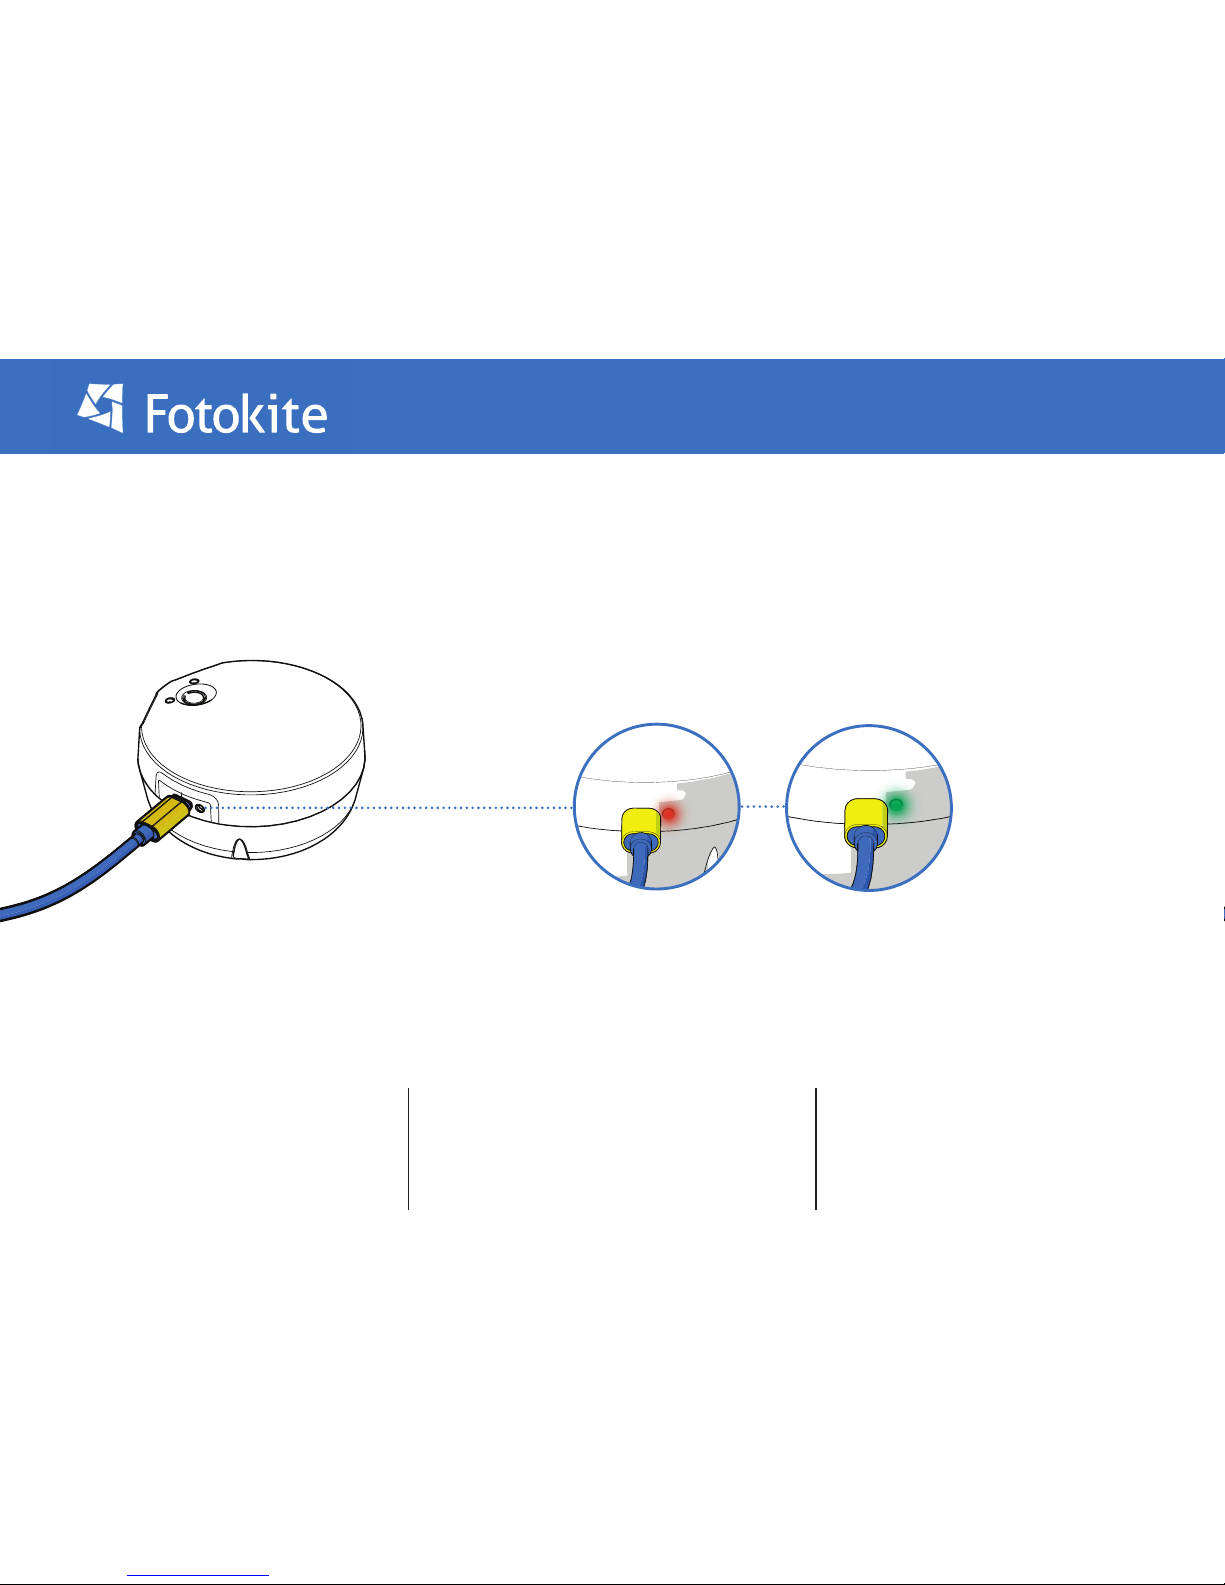
1. Plug the Fotokite charging cable into a USB power
supply or a computer.
3. The charging behaves as follows:
a. The LED will be red while the leash battery charges.
b. Once fully charged, the LED will turn green.
2. Plug the Fotokite charging cable into the leash.
Page 9
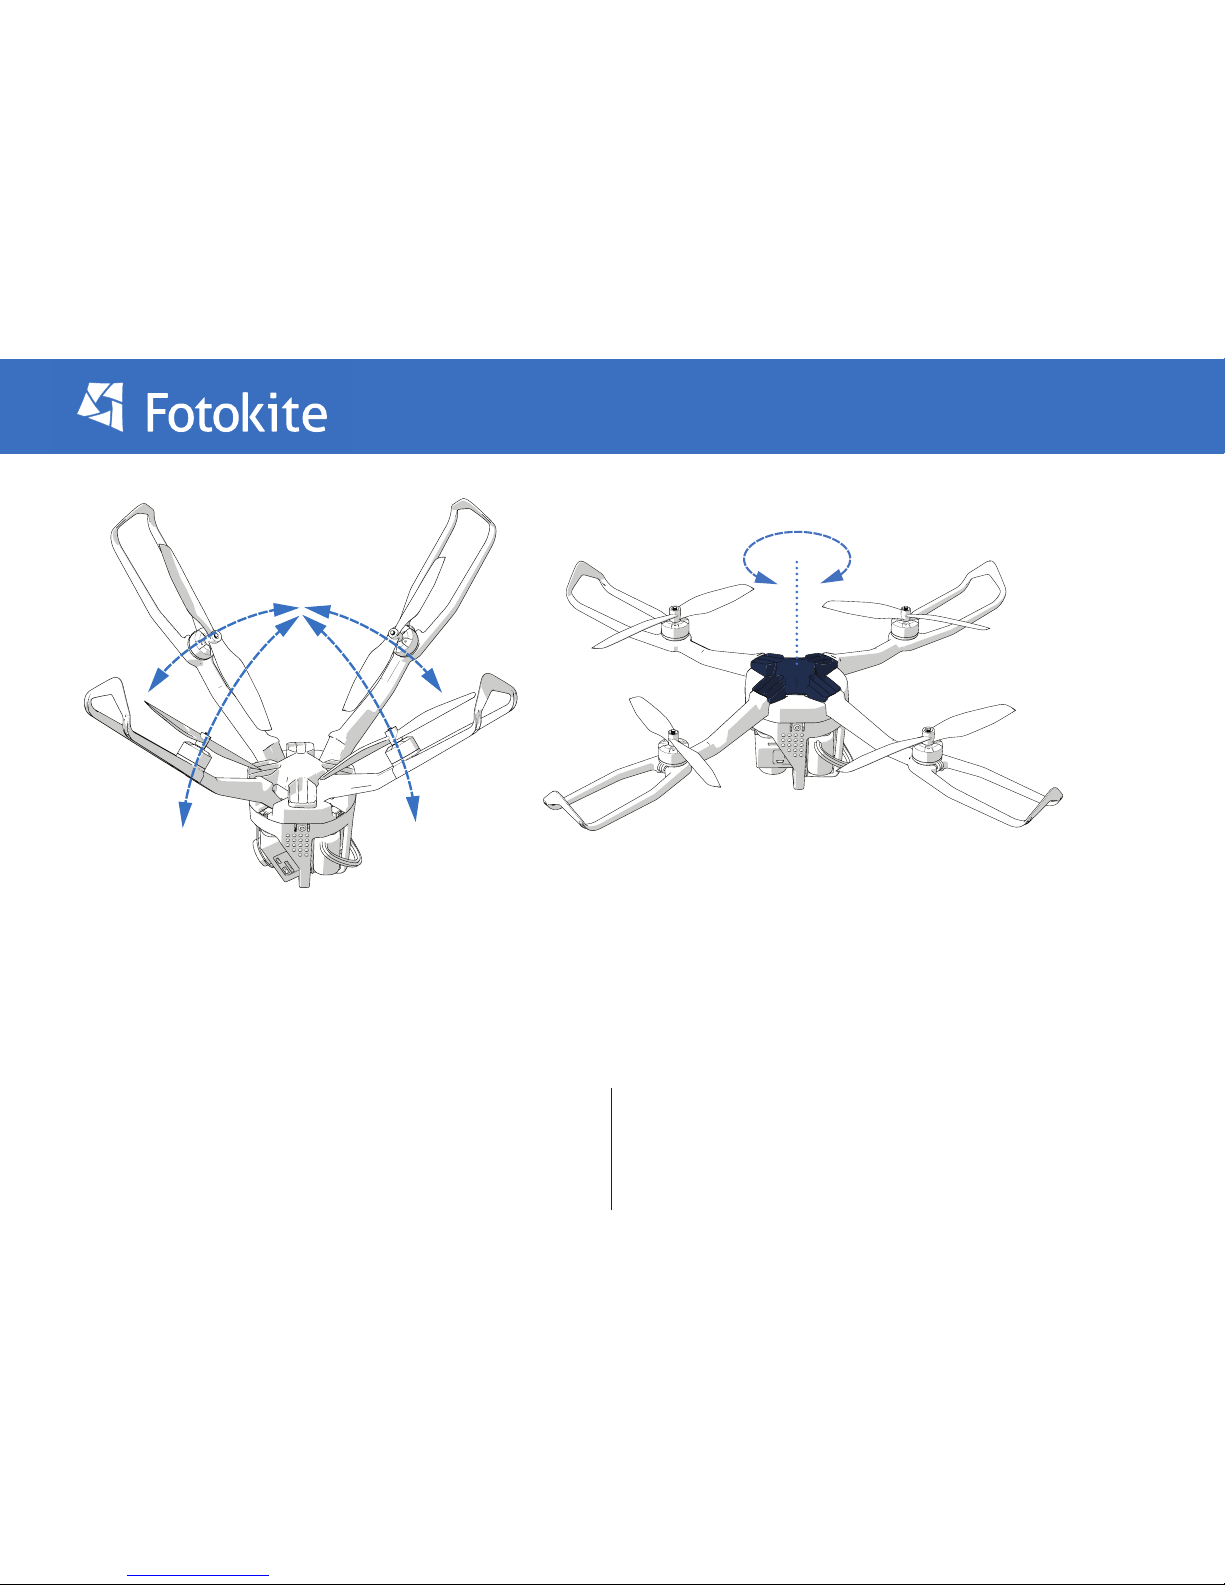
Unfolding / Locking
1. Fold the arms down, ensuring they are fully in the down position. 2. Twist the lock until it clicks into place, and ensure the arms
are securely locked.
Page 10
10
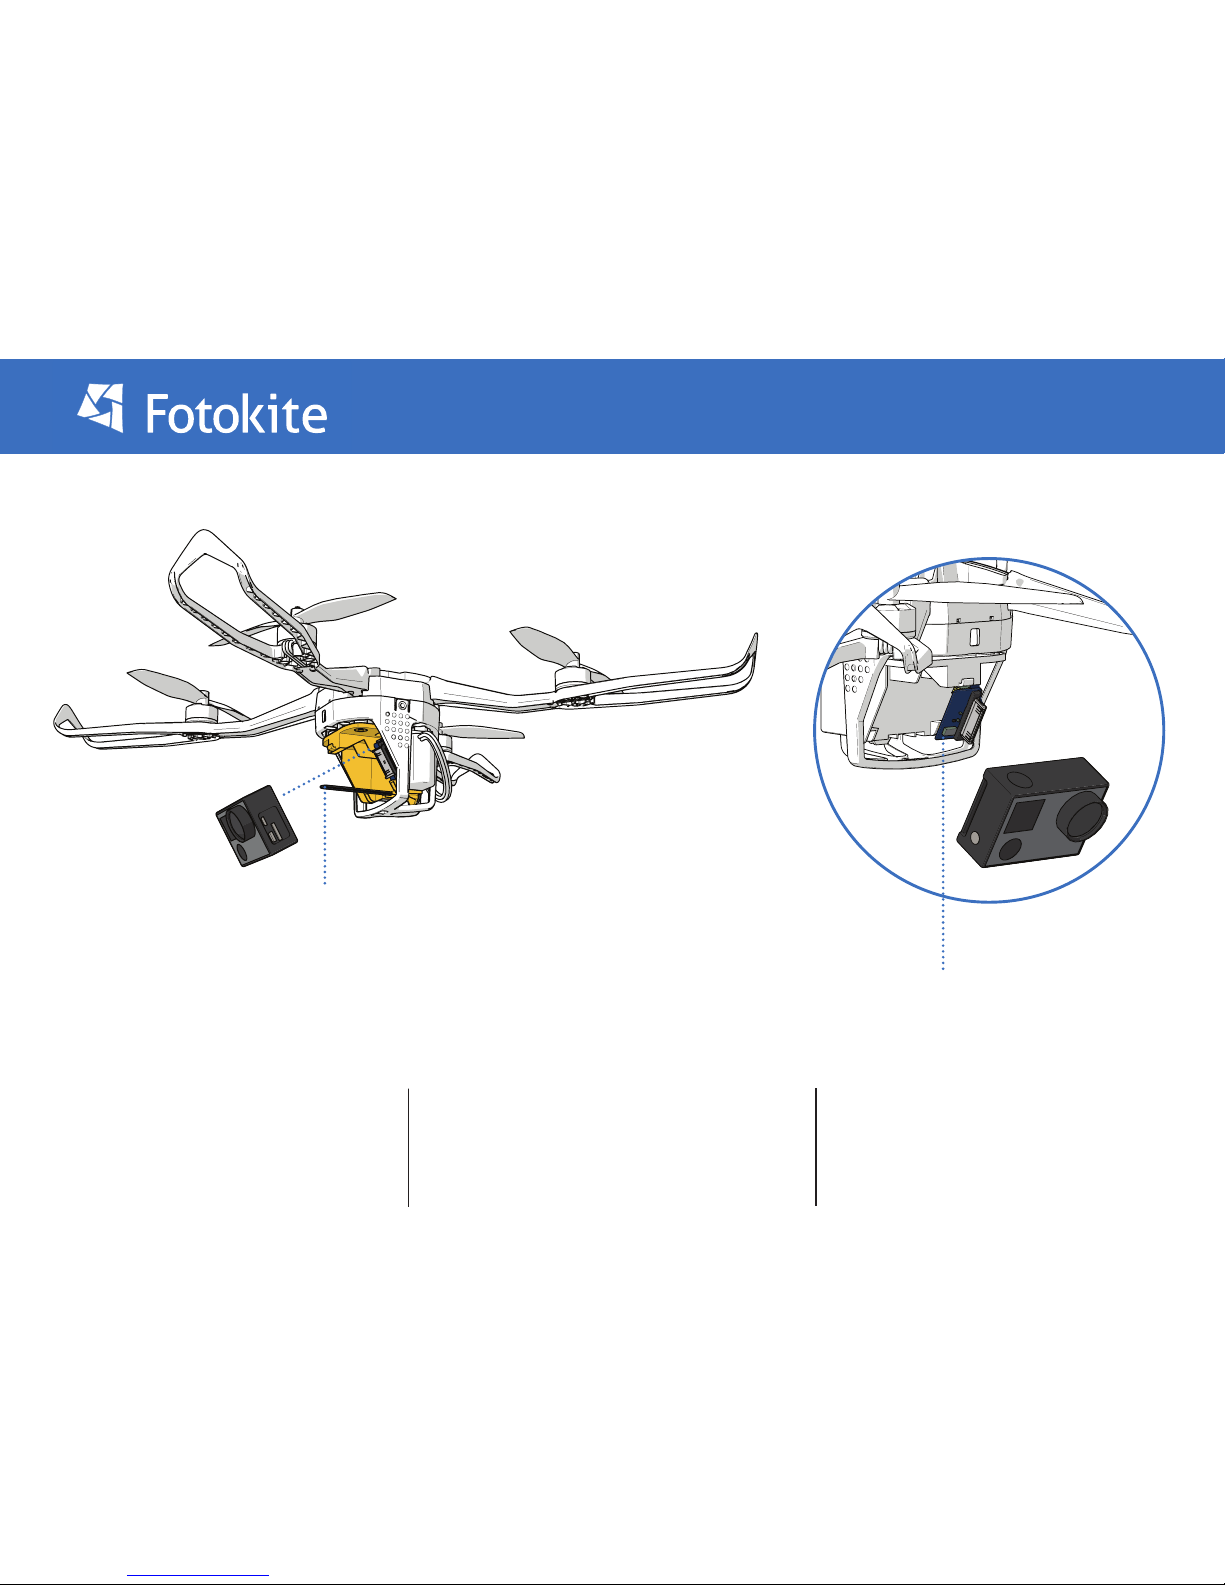
Attaching the camera (GoPro Hero 3, 3+ or 4)
The Fotokite works best with the GoPro Hero 3, 3+ and 4. The GoPro Hero 4 can even be controlled in ight using the leash.
1. Remove the battery from your GoPro. The camera
will be powered directly from the Flight Frame.
3. Verify that the GoPro is successfully connected by
turning on your Fotokite, and then turning
on the GoPro.
2. Plug in the GoPro connector of the Fotokite in the
back your GoPro.
GoPro Connector
Camera Band
Page 11
Attaching the camera...continued
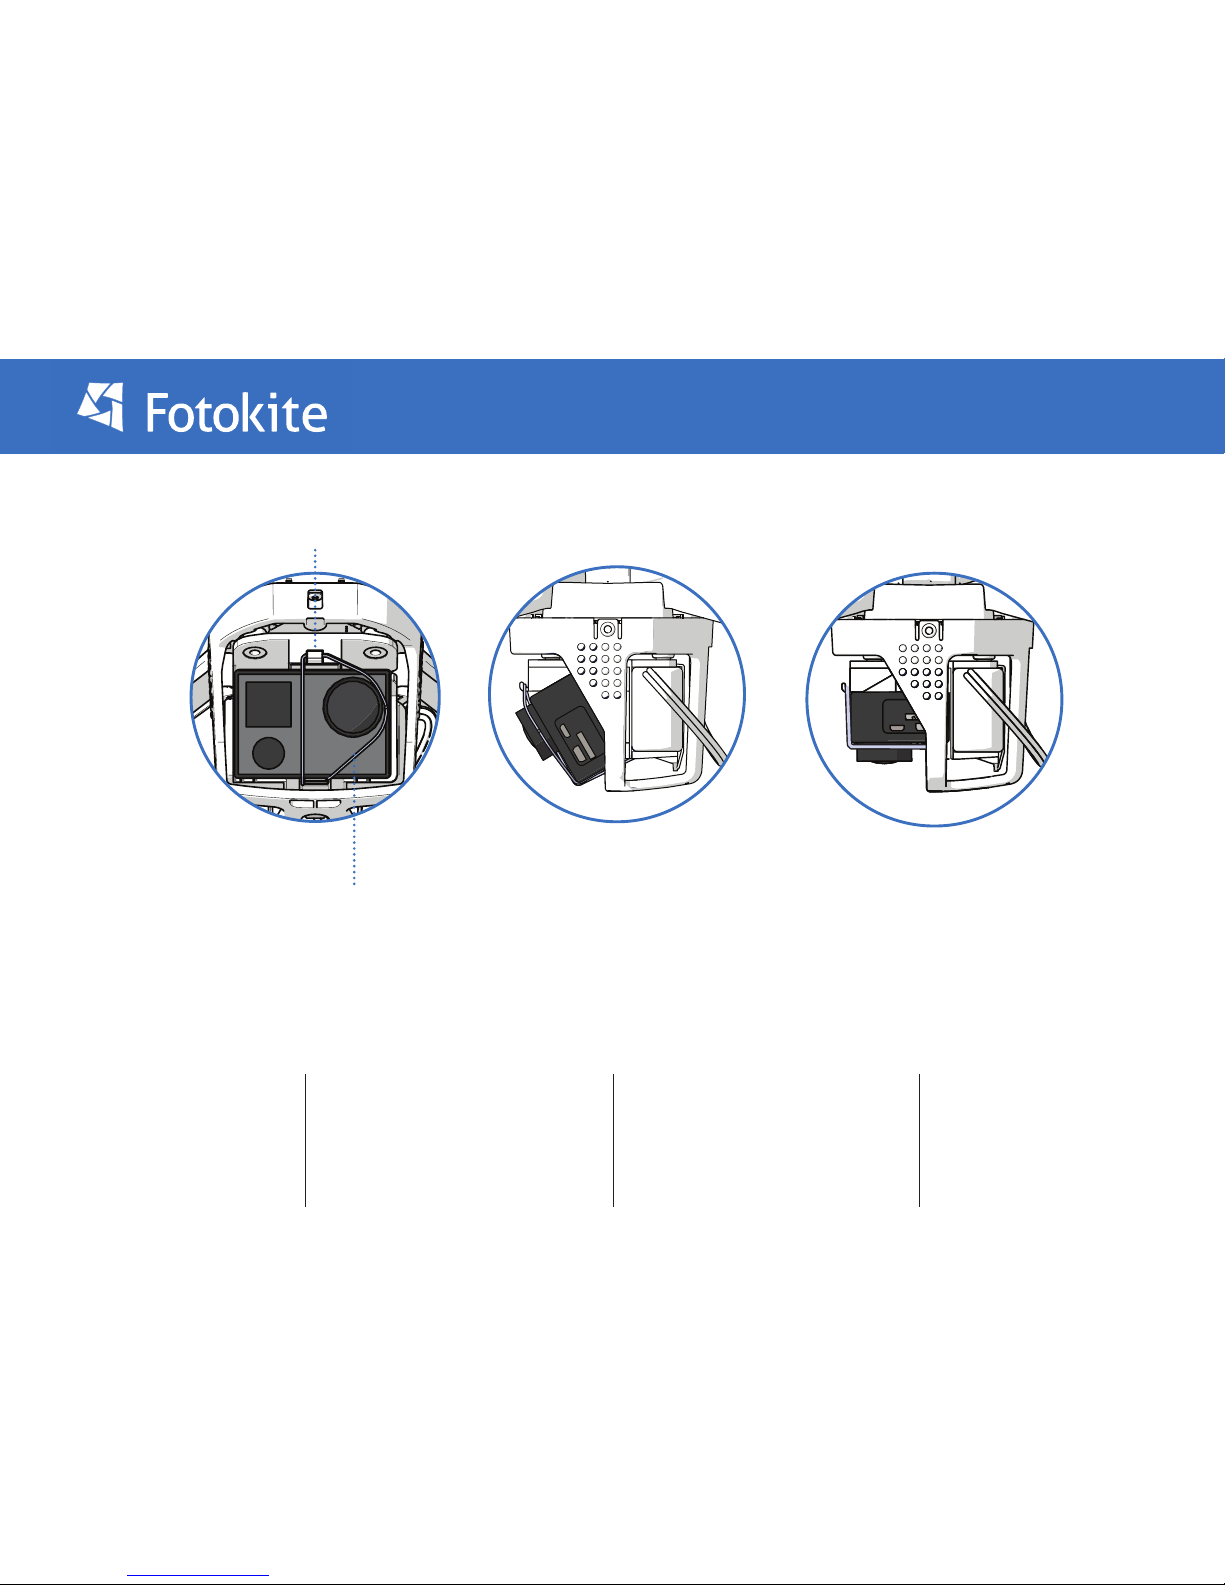
The camera can be positioned in two orientations; facing horizontally with a slight tilt or facing down. (Go Pro Hero 5 and other thicker models of cameras
will not t in the facing down position).
1. Pull the camera band holding the
camera back and hold it.
3. Place the camera band back over the
camera and attach it to the yellow hook
situated just above the camera.
4 For more stability and safety, the
elastic can be placed around the
objective of the camera.
2. Position the camera in the Flight
Frame. Ensure it sits rmly inside the
camera mount.
Camera band
Hook
Page 12
12
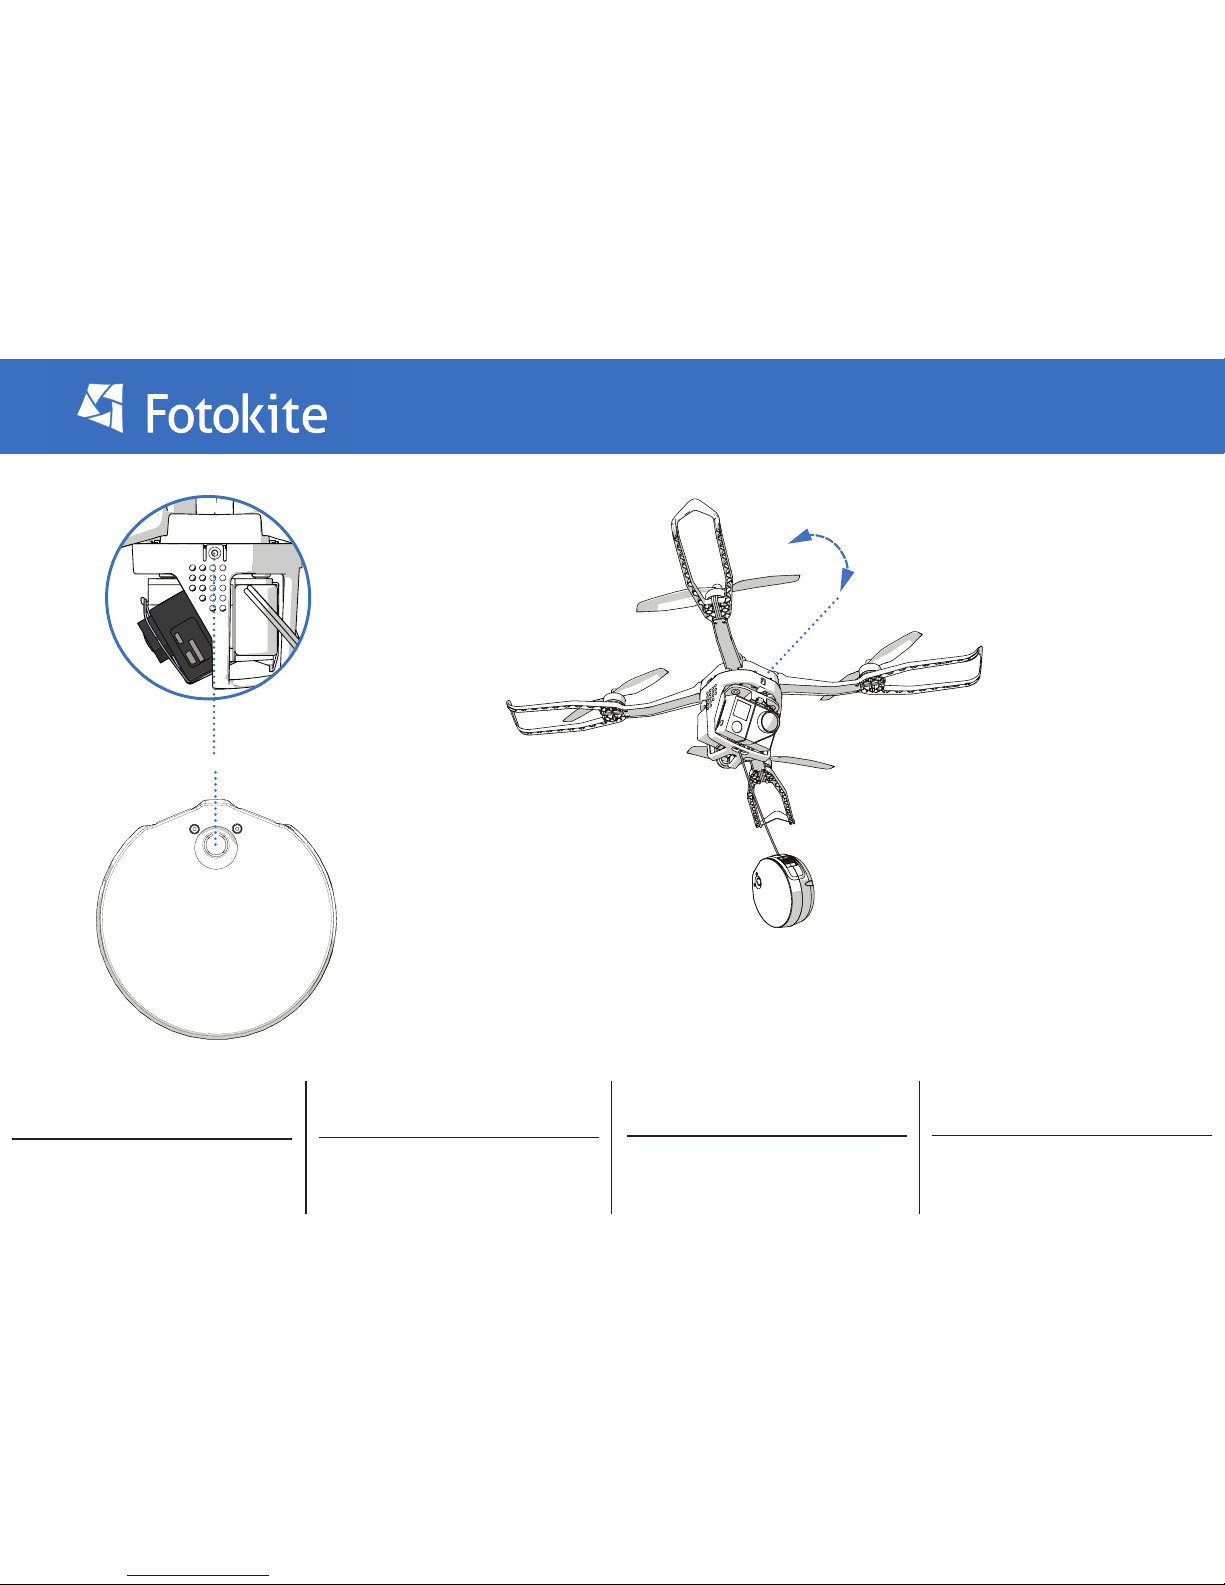
How to y...takeo
5. Don’t let go yet. The propellers will
start.
7. Gently release the Flight Frame!
*y*
8. To stop, grab the Flight Frame and
press the power button.
Long press turns o.
6. Hold the Flight Frame still as the
propellers spin up.
1. Press and hold the power buttons to
power on the Flight Frame and Leash.
3. Tilt the Flight Frame slightly away from
yourself.
4. Twist the Flight Frame 90° and back to
the right.
2. Hold the Flight Frame rmly at arms
length.
Power Button
90°
Page 13
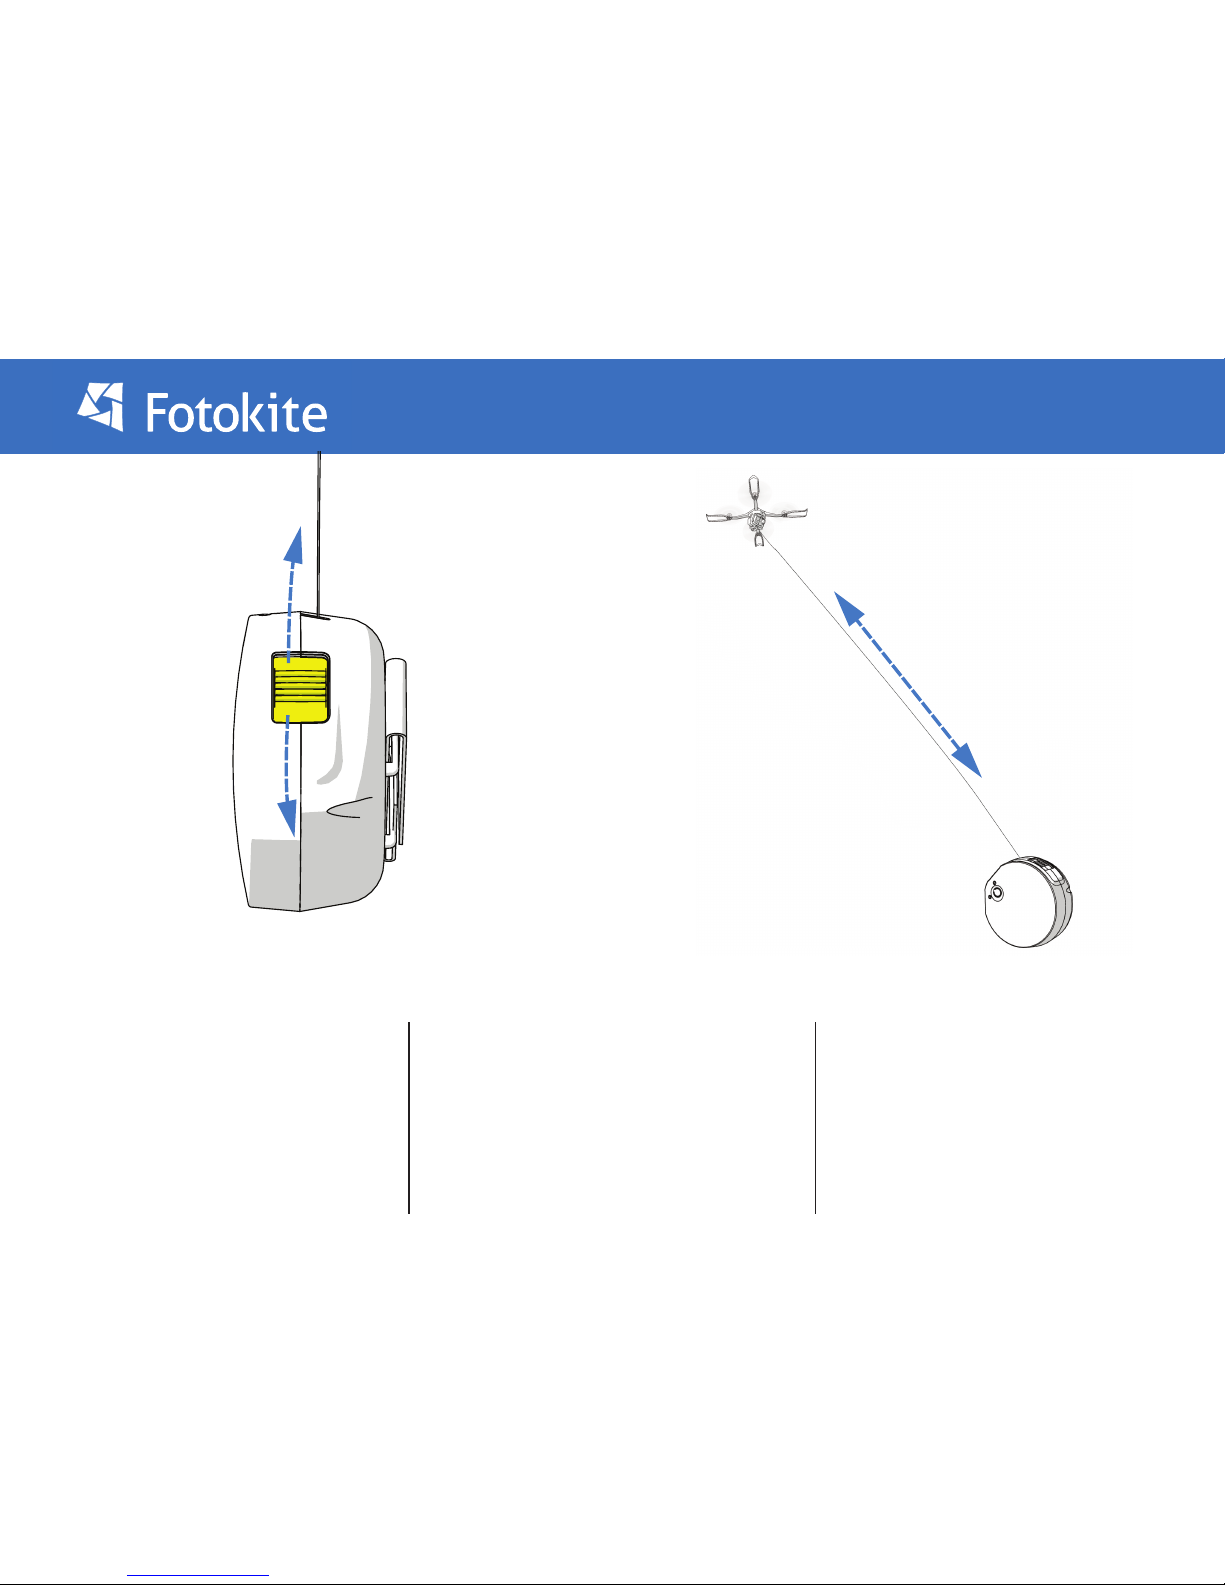
How to y...controls
1. To increase tether length push the length control
button forward. This will cause the Fotokite to y
away in the direction it is headed
3. To bring the Fotokite back down, pull the tether
length control button back.
Upon pulling the length control button back, the
Leash will communicate with the Fotokite and send a
signal to reduce thrust, this will cause it to
reduce altitude, however to increase speed you can
pull the Fotokite towards you.
2. When you want the Fotokite to stop, let go of
the length control button, and it will stop the
tether release.
Page 14
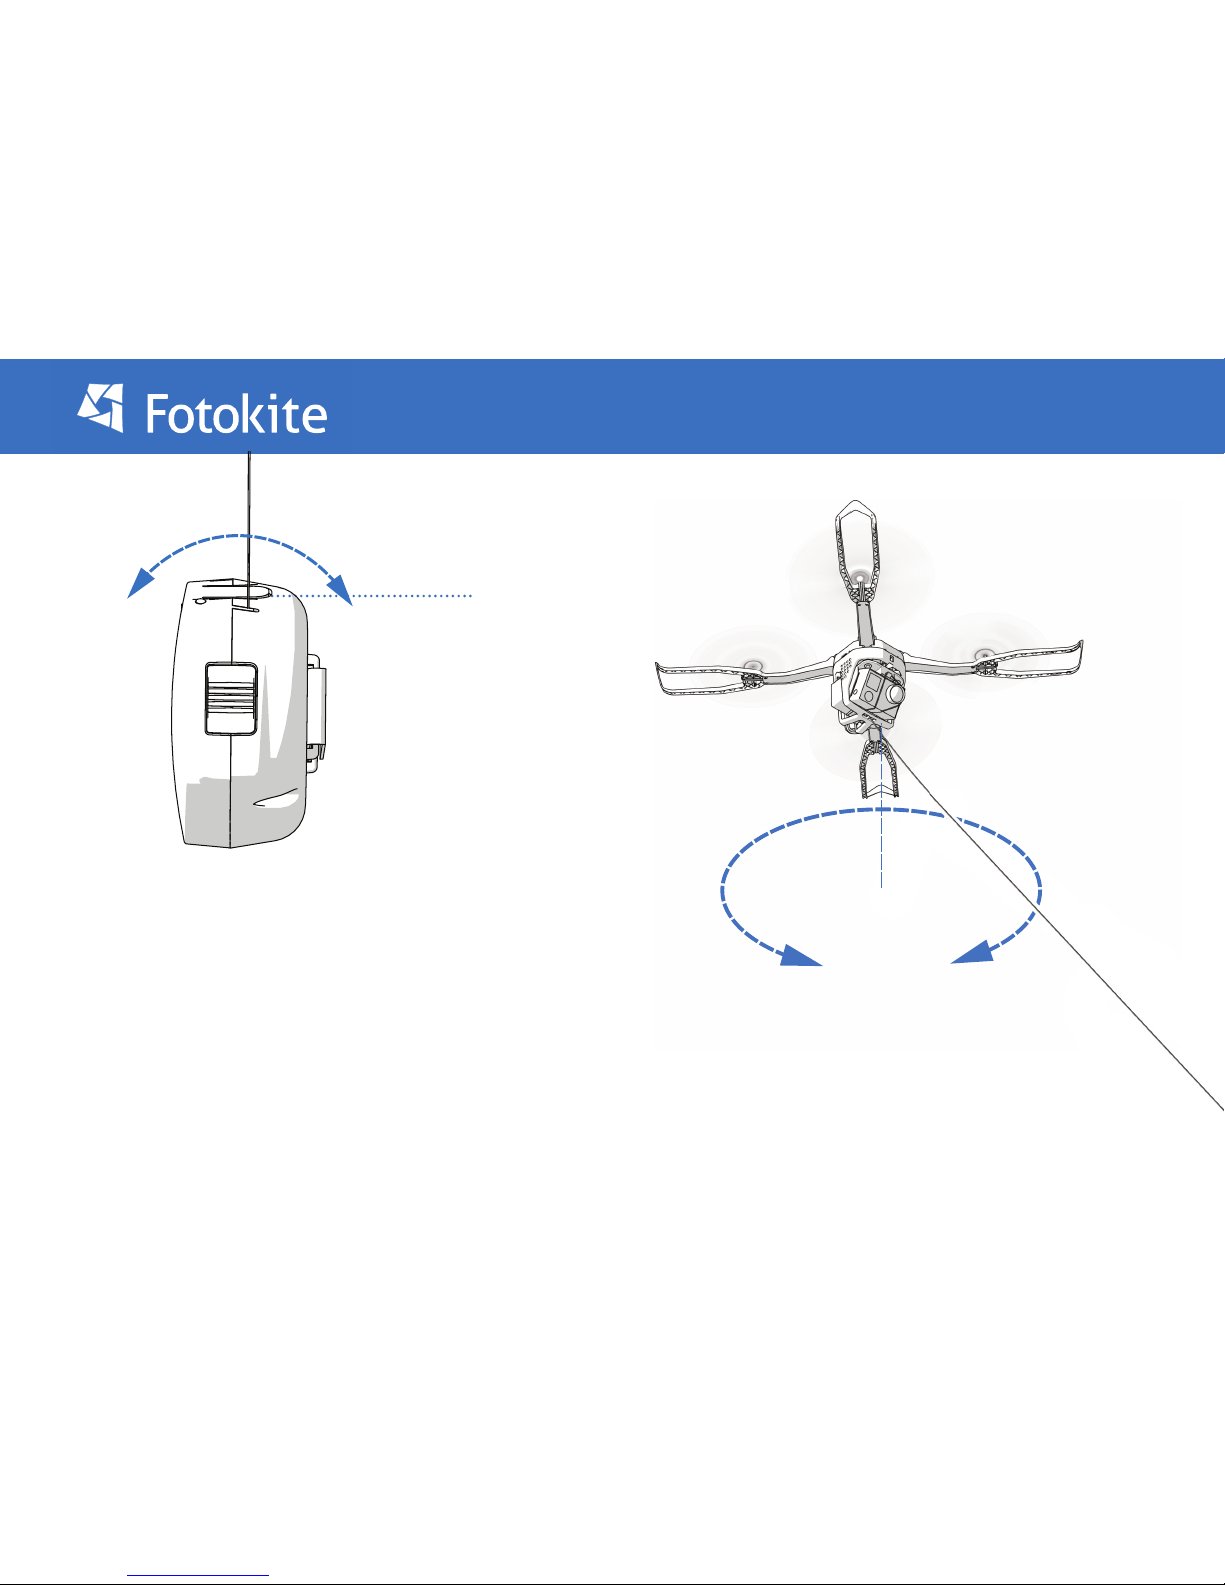
14
How to y...controls...continued
Yaw Button
To spin the Fotokite in place, press and hold the Yaw button, whilst using the
gesteure control of the Leash to choose which direction you want the Fotokite to spin.
Page 15
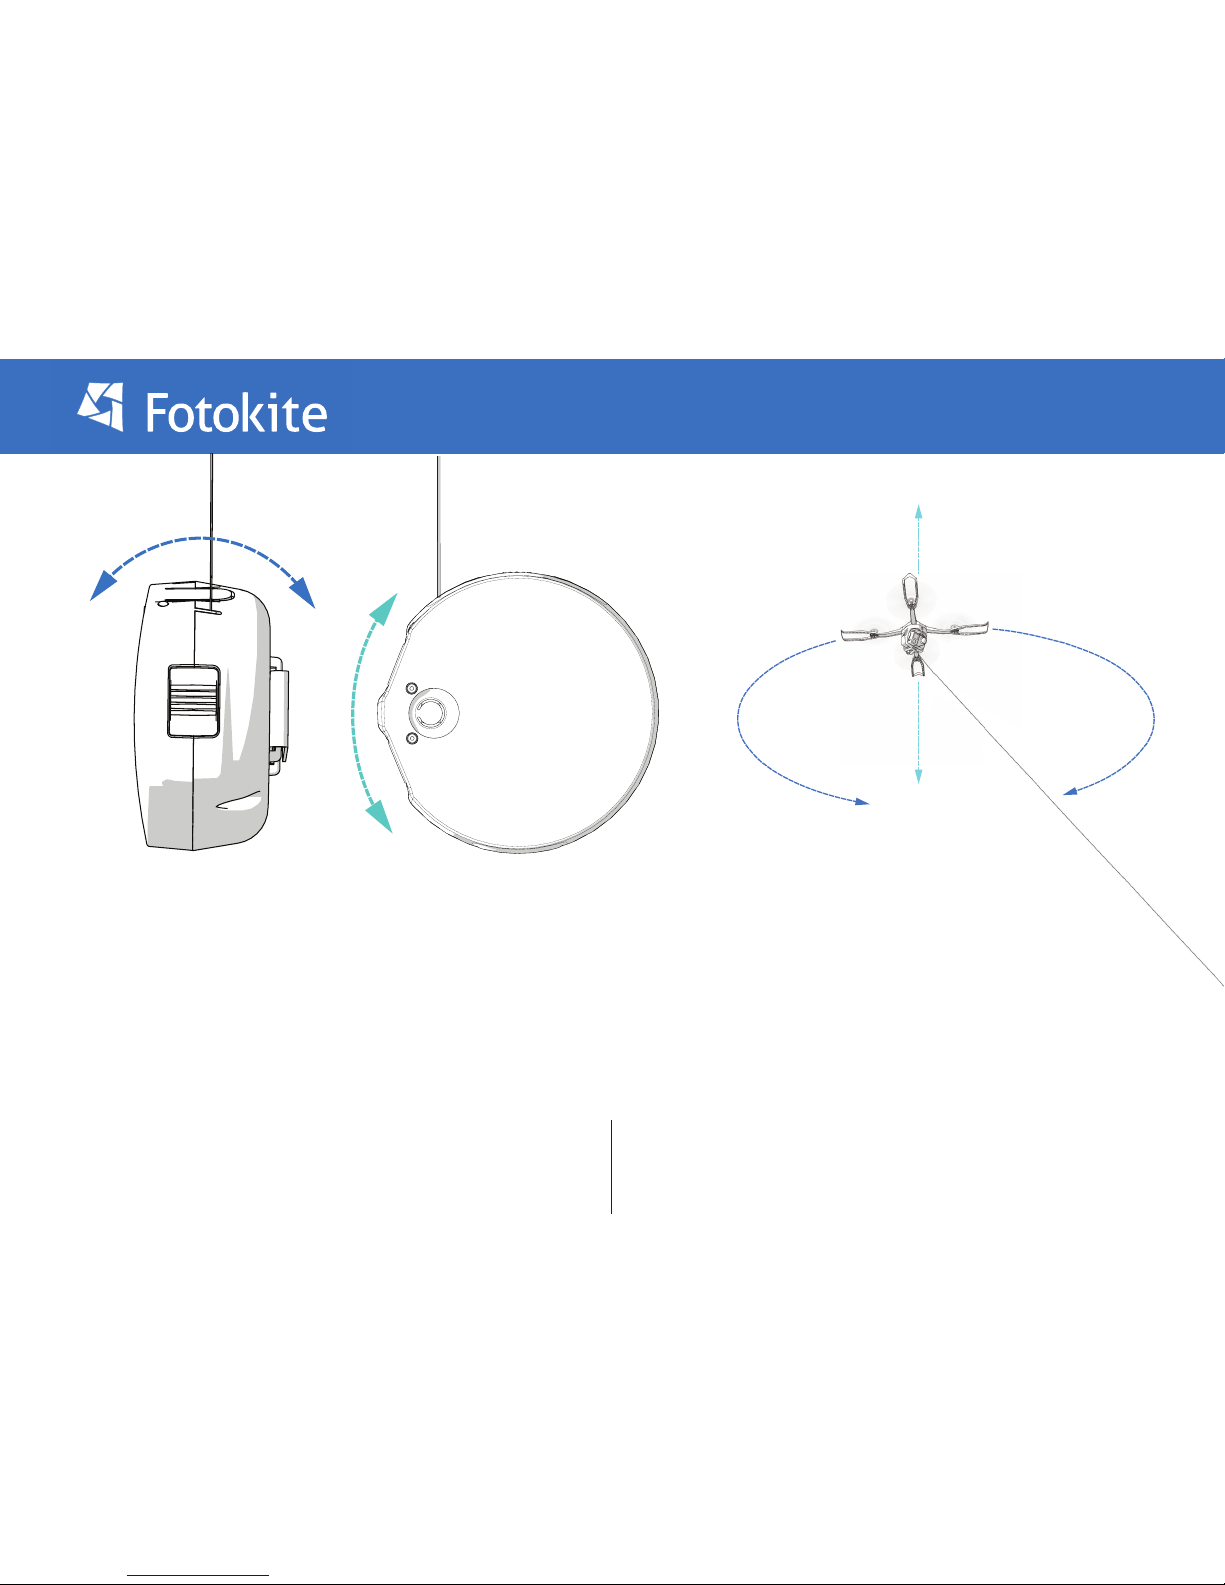
1. To orbit the Fotokite around you, press and hold the Orbit button and use the
gesture controls left or right to control the Flight Frame.
2. To change the the Flight Frames altitude relative to the user, press and hold the
Orbit button, and use the gesture controls up or down to control the Flight Frame.
How to y...controls...continued
Page 16
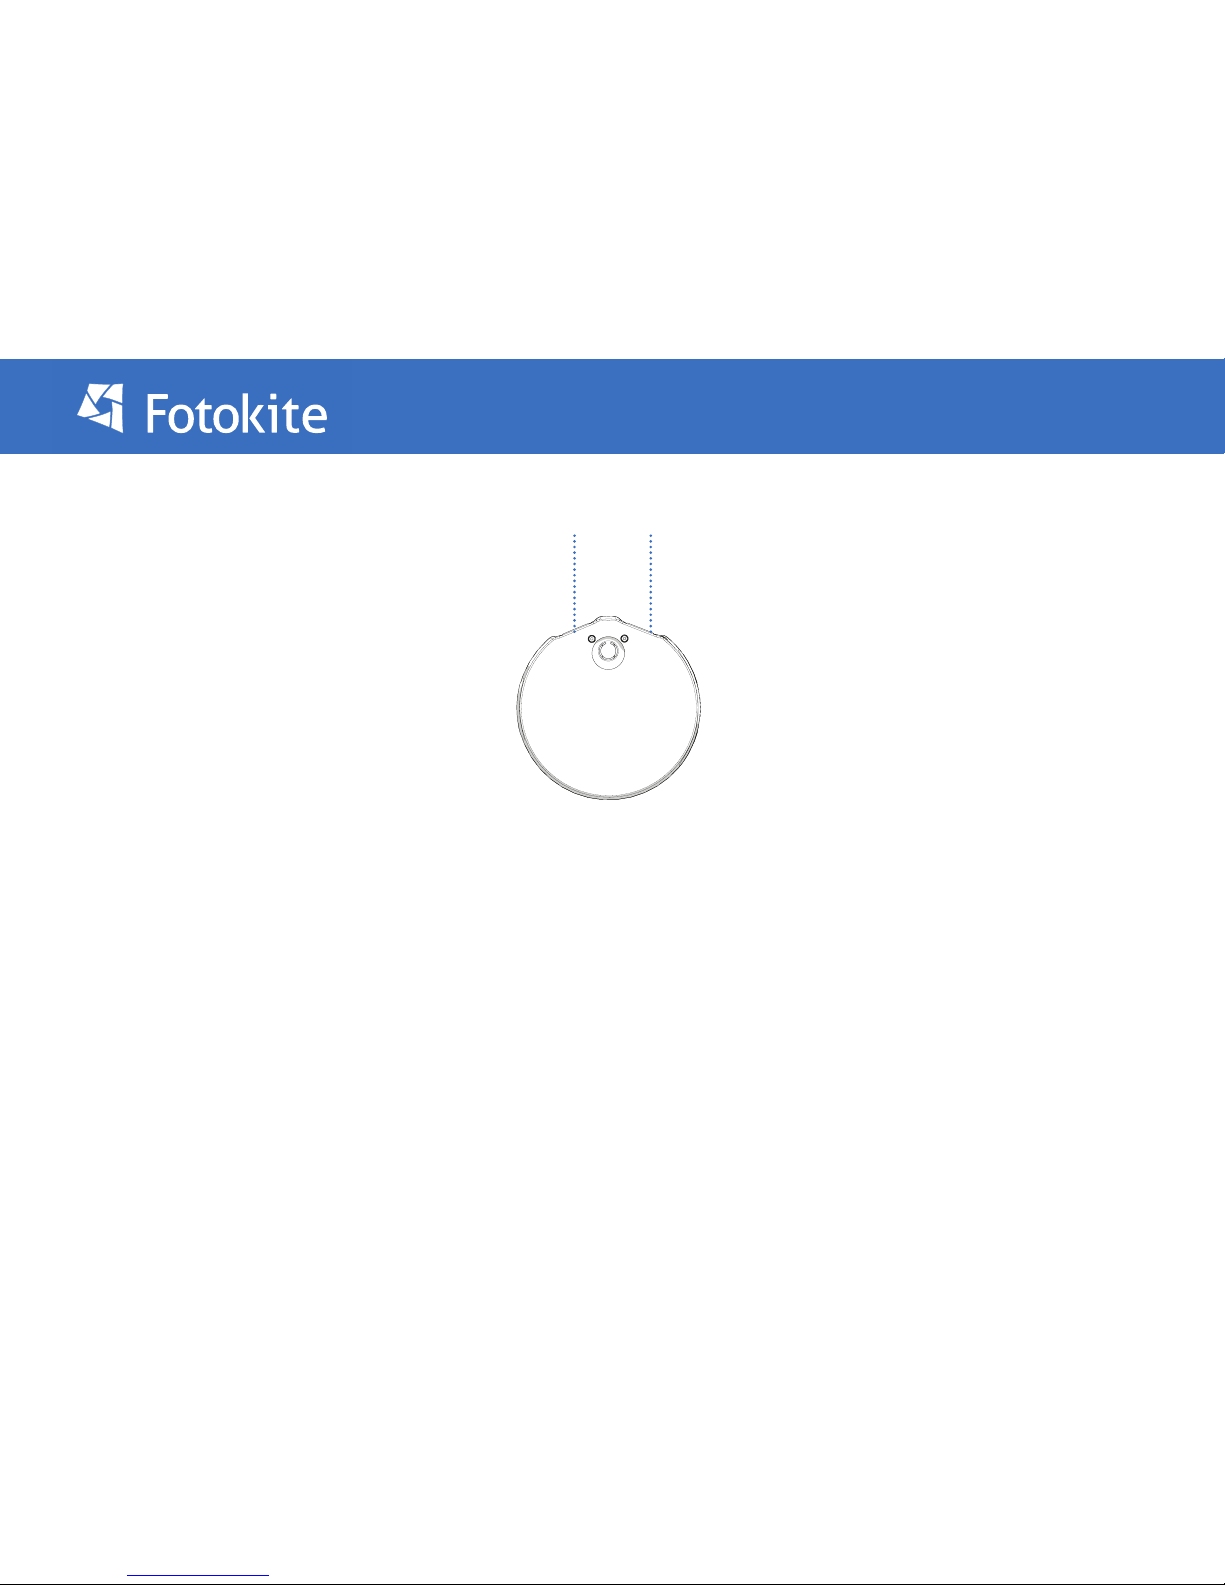
16
Orbit Button
Yaw Button
Press Yaw+Orbit buttons together to use.
Short press: start/stop video / take photo.
Long press: mode (photo<->video).
Controlling GoPro Hero 3, 3+ or 4
Page 17
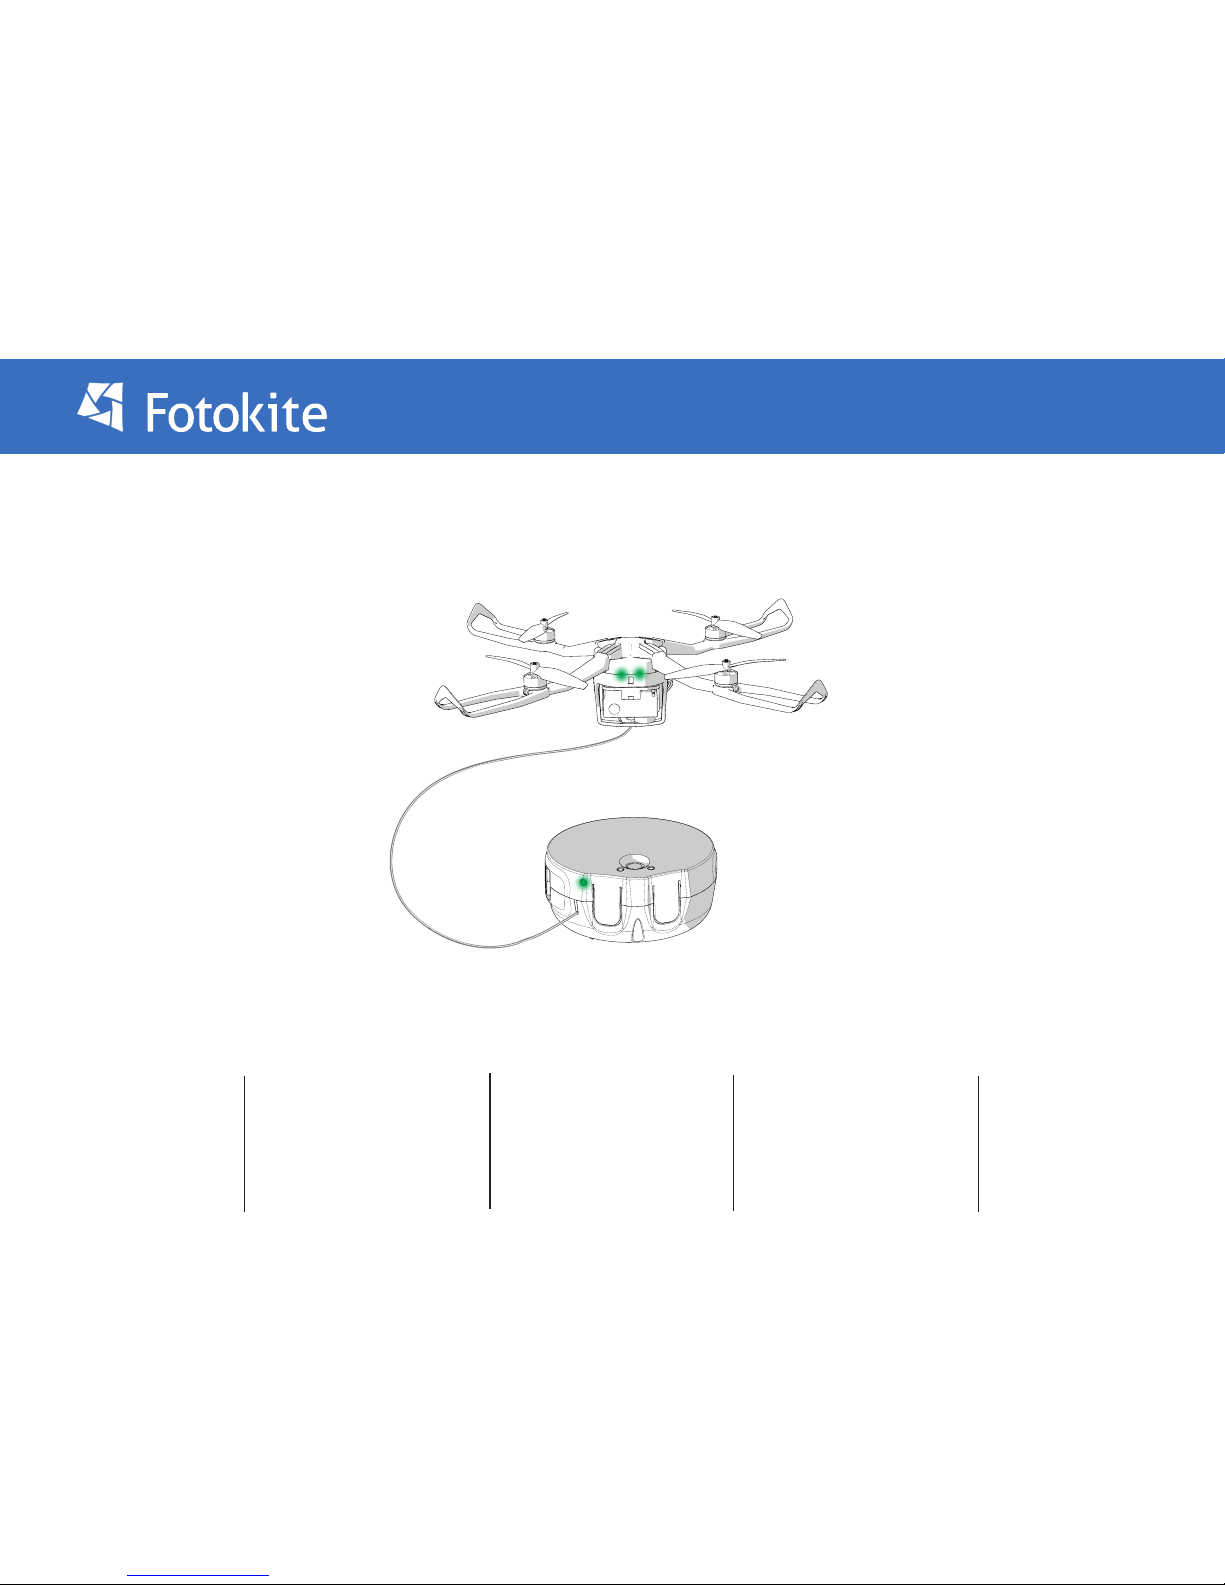
The Leash communicates with the Fotokite Flight Frame via a Bluetooth connection. Upon Powering both the Leash, and the Flight Frame ON the status
light on the Leash should turn solid green.
If the Leash status light ashes, and the leash vibrates, this is because the the two are not paired, follow the below instructions to Pair the Leash with the
Fotokite Flight Frame.
1. Start with both the leash and
the Fotokite turned OFF.
2. Press and hold the Yaw button
on the leash. While holding it,
turn on the leash with the Power
button.
3. The leash will turn on with
both the Orbit light and the
status light being blue.
4. Turn on the Fotokite
normally. As you do so, the status
light on the leash will turn green
(the Orbit light will remain blue)
5. Exit the pairing setup by
turning o the leash. Your
Flight Frame and Leash are now
paired.
Pairing the Flight Frame and Leash
Page 18
18
When operating the Fotokite at an altitude way above sea level:
The Fotokite is calibrated to y at an altitude slightly above sea level (0-1000m). If you go higher than this altitude, the air gets thinner and the thrust
provided by the Flight Frame needs to be increased.
When carrying a heavy payload:
The Fotokite is calibrated to function with a GoPro Hero4 from which the battery has been removed. If you operate the Fotokite with a dierent and
heavier device, you will need to increase the thrust provided by the Flight Frame.
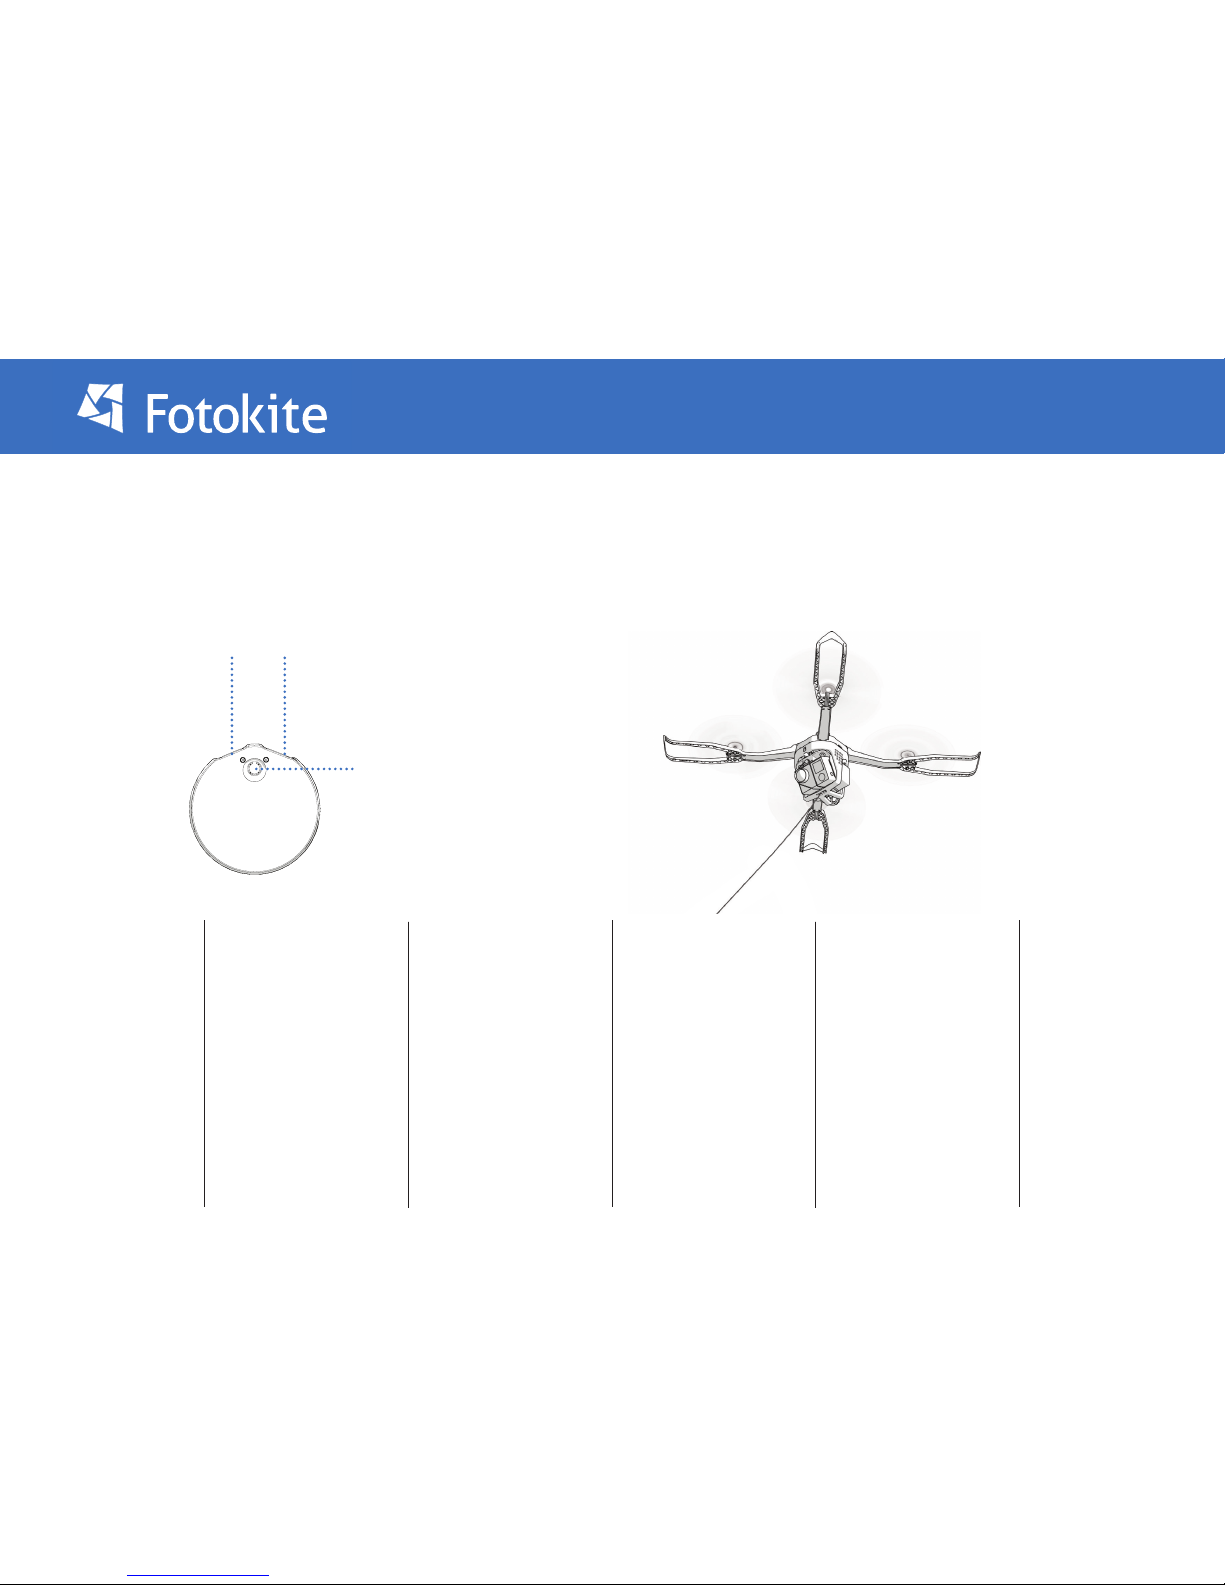
1. Turn on the Flight Frame
and the Leash, making sure
that they are paired.
2. Press and hold the Yaw
and Orbit buttons of the
leash. Then, press the
Leash power button to
enter the calibration menu.
The leash will buzz and
vibrate to conrm and the
Yaw and Orbit lights will
turn yellow.
3. Press the Yaw button
to navigate through the
calibration menu until the
Yaw and Orbit lights are
purple (normally reached
after one press).
4. Press the Orbit button
to start the calibration.
WARNING: THE MOTORS
WILL START SPINNING
5. The calibration is ideal
when the Fotokite hovers
in the air: it does not fall
to the oor nor does it y
to the up.
The calibration is done by
increasing or decreasing
the overall thrust:
Increase the thrust by
pressing the Yaw button
Decrease the thrust by
pressing the Orbit button
6. Once the Flight Framesuccessfully hovers
with minimal vertical
movement, press both
the Yaw and Orbit button
to validate the calibration.
Then, restart the Flight
Frame.
Thrust calibration
Orbit ButtonYaw Button
Power Button
Page 19
When carrying a heavy payload:
The Flight Frame is calibrated to function with a GoPro Hero4 from which the battery has been removed. If you operate the Fotokite with a dierent and
heavier device, your unit’s center of gravity shifts, which can cause it to y unbalanced.
When experiencing odd ight behaviour:
All Fotokites are calibrated during production. However, it can happen that the calibration is not done perfectly or needs to be done again for various
reasons.
Thrust equalization
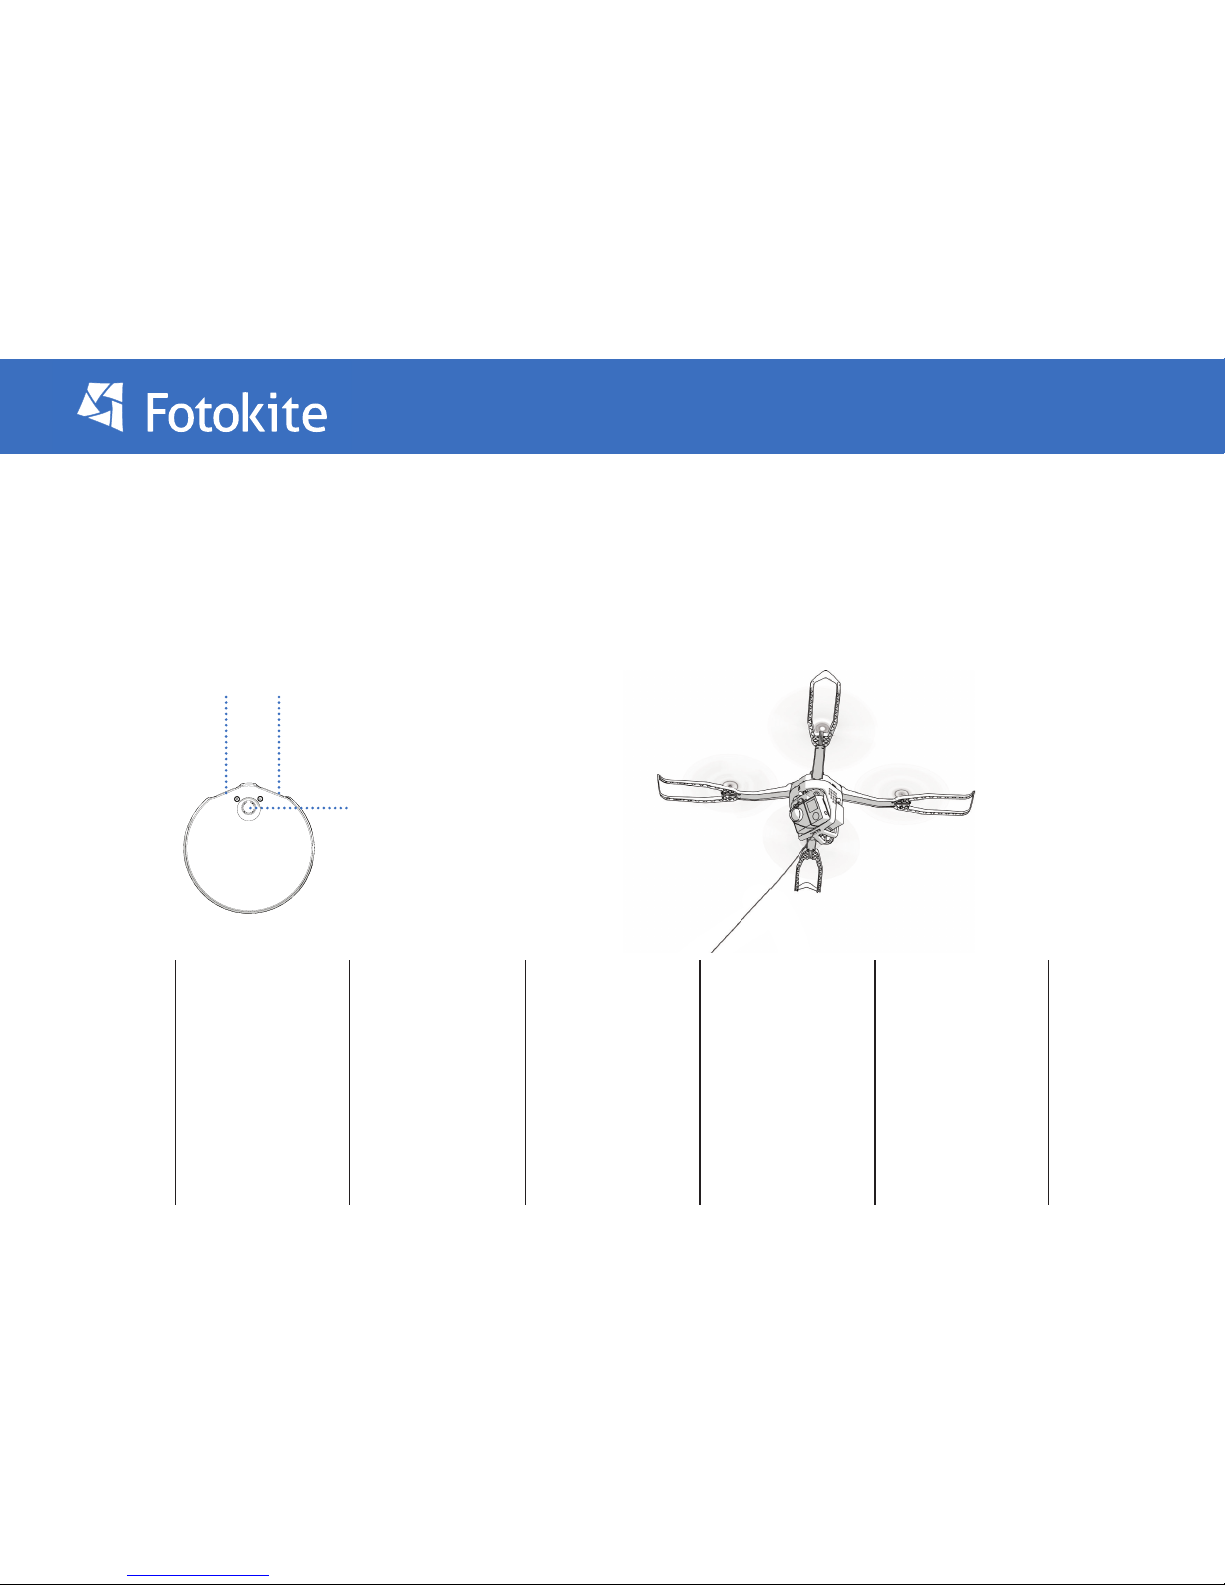
1. Turn on the Flight
Frame and the Leash,
making sure that they
are paired.
2. Press and hold the
Yaw and Orbit
buttons of the Leash.
Then, press the leash
Power button to enter
the calibration menu.
The leash will buzz and
vibrate to conrm and
the Yaw and Orbit lights
will turn yellow.
3. Press the Yaw
button to navigate
through the calibration
menu until the Yaw
and Orbit lights are
teal (normally reached
after two presses).
4. Press the Orbit
button to start the
calibration.
WARNING: THE
MOTORS WILL START
SPINNING
5. The Fotokite will
hover slightly.
Simply hold it by the
string at about 5-10
cm from the ight unit.
Move as little
as possible.
6. The 4 lights situated
under each arm of
the Fotokite will
turn red when the
calibration starts.
They will change color
gradually as the
calibration
progresses, going from
red, to orange, to
yellow, to green.
7. When the calibration
is complete, the
4 lights will turn blue.
Additionally, the leash
will buzz and vibrate.
Grab the Fotokite and
turn it o to complete
the procedure.
Orbit ButtonYaw Button
Power Button
Page 20
20
Fitting new propellers
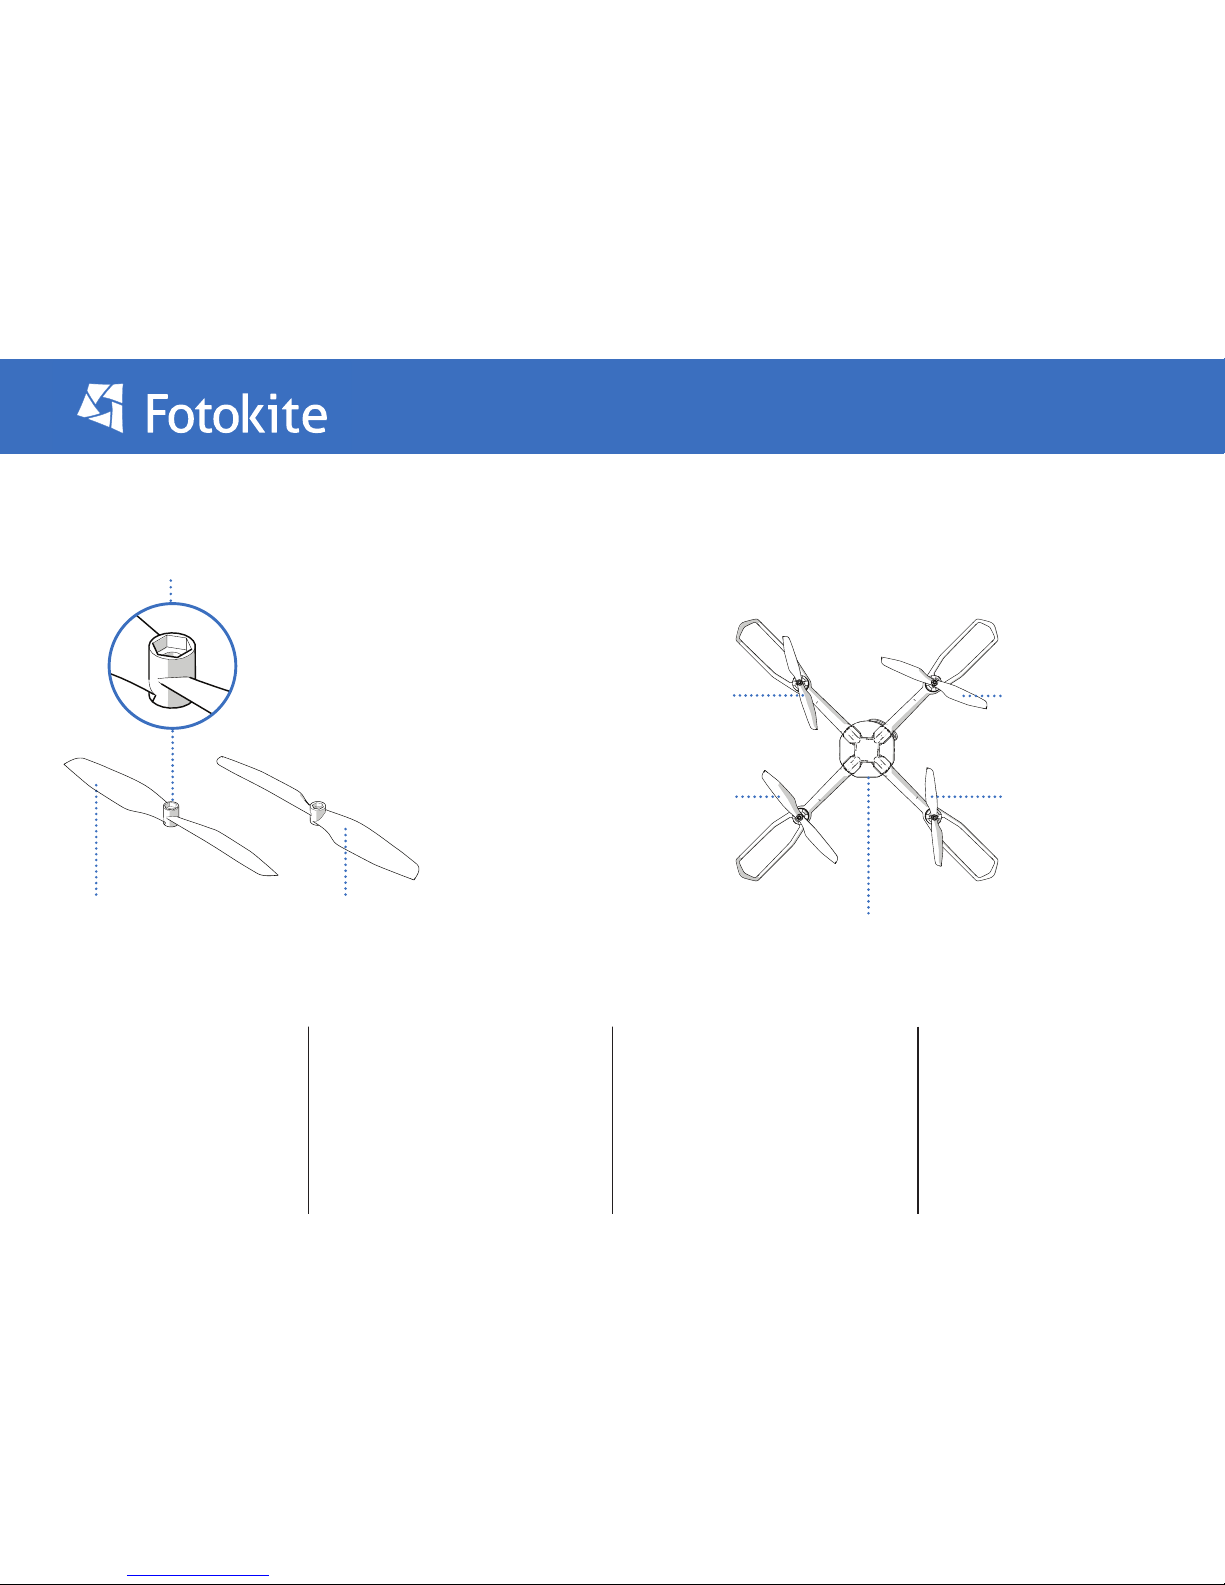
Top of propeller, recess for mounting nut
Left handed propeller
1. Identify the correct propeller (Left or
Right) that needs to be replaced.
2. Remove the damaged propeller,
by holding the motor in one hand to
prevent it from turning, and with the
other hand turn the propeller either
anti clockwise, or clockwise accordingly.
Front
3. Turn the propeller until the securing
nut become free.
4. Fit the new propeller onto the motor
ensuring it is in the correct orientation.
Fit the securing nut onto the motor
shaft by gently turning and into the nut
shaped recess on the top of the
propeller. Rotate the nut and propeller
until it is hand tight. The nut will self
tighten upon propeller start up.
The Fotokite uses two types of propller; left handed propeller, and right handed propeller. These must be tted to the correct motor for the Fotokite to
y. Each Propeller turns in a dierent direction, and as such has to be unmounted from the Flight Frame by turning in the opposite direction.
To remove a left handed propeller, turn it clockwise. To remove a right handed propeller turn it counter-clockwise.
Right handed propeller
Right handed propeller
Right handed propeller
Left handed propeller
Left handed propeller
 Loading...