

Page 1
Page 2
E-2
CAUTION
SAFETY INSTRUCTIONS
“WARNING”
RISK OF ELECTRIC SHOCK
DO NOT OPEN
CAUTION
TO REDUCE THE RISK OF ELECTRIC SHOCK,
DO NOT REMOVE COVER (OR BACK).
NO USER - SERVICEABLE PARTS INSIDE.
REFER SERVICING TO QUALIFIELD SERVICE PERSONNEL.
“TO REDUCE THE RISK OF FIRE OR ELECTRIC
SHOCK, DO NOT EXPOSE THIS APPLIANCE TO
RAIN OR MOISTURE”
The lightning flash with arrowhead symbol, within an equilateral triangle, is intended to alert the user to the presence of
uninsulated “dangerous voltage” within
the the product’ s enclosure that may be
of sufficient magnitude to constitute a risk
of electric shock to persons.
The exclamation point within an equilateral triangle is intended to alert the user to
the presence of important operating and
maintenance (servicing) instructions in the
literature accompanying the appliance.
1) Read these instructions.
2) Keep these instructions.
3) Heed all warnings.
4) Follow all instructions.
5) Do not use this apparatus near water.
6) Clean only with dry cloth.
7) Do not block any ventilation openings.
install in accordance with the manufacturer’s
instructions.
8) Do not install near any heat sources such as radiators, heat registers, stoves, or other apparatus
(including amplifiers) that produce heat.
9) Do not defeat the safety purpose of the polarized or
grounding-type plug. A polarized plug has two blades
with one wider than the other. A grounding type plug
has two blades and a third grounding prong.
The wide blade or the third prong are provided for
your safety. If the provided plug does not fit into your
outlet, consult an electrician for replacement of the
obsolete outlet.
10) Protect the power cord from being walked on or pin-
ched particularly at plugs, convenience receptacles,
and the point where they exit from the apparatus.
11) Only use attachments/accessories specified by the
manufacturer.
12) Use only with the cart, stand, tripod, bracket, or table
specified by the manufacturer, or sold with the appa-
ratus. When a cart is used, use caution when moving
the cart/apparatus combination to avoid injury from
tip-over.
FCC(U.S.A.) & ICES-003(Canada) INFORMATION
1. IMPORTANT NOTICE
This product, when installed as indicated in the instructions
contained in this manual, meets FCC and ICES-003 requirements. Changes or modifications not expressly approved by
Fostex Company for compliance could void the user’ s authority to operate the equipment. DO NOT MODIFY THIS
PRODUCT.
2.IMPORTANT
In order to comply with FCC and ICES-003 requirements,use
high quality shielded cables for connection to accessories
and / or another products. If any cables are supplied with this
product, they MUST be used. Follow all installation instructions. Failure to do so could void your FCC/ICES-003 authorization to use this product in the USA/Canada.
3.NOTE
This equipment has been tested and found to comply with
the limits for a Class B digital device, pursuant to Part 15 of
the FCC Rules.These limits are designed to provide reasonable protection against harmful interference in a residential
installation. This equipment generates, uses and can radiate
radio frequency energy and if not installed and used in accordance with instructions, may cause harmful interference to
radio communications. However, there is no guarantee that
interference will not occur in a particular installation. If this
equipment does cause harmful interference to radio or television reception, which can be determined by turning the equipment off and on, the user is encouraged to correct the interference by one or more of the following measures:
●
Reorient or relocate the receiving antenna.
●
Increase the separation between the equipment and
receiver.
●
Connect the equipment into an outlet on a circuit different
from that to which the receiver is connected.
●
Consult the dealer or an experienced radio/TV technician
for help.
4.Compliance with Part 15 of FCC Rules and Canadian
ICES-003.
This device complies with Part 15 of the FCC Rules. Operation is subject to the following two conditions: (1) This device
may not cause harmful interference, and (2) this device must
accept any interference received, including interference that
many cause undesired operation.
This Class B digital apparatus complies with Canadian
ICES-003.
Cet appareil numérique de la classe B est conforme à la
norme NMB-003 du Canada.
13) Unplug this apparatus during lightning storms or
when unused for long periods of time.
14) Refer all servicing to qualified service personal.
Servicing is required when the apparatus has been
damaged in any way,such as powersupply cord or
plug is damaged, liquid has been spilled or objects
have fallen into the apparatus, the apparatus has
been exposed to rain or moisture, does not operate
normally, or has been dropped.
15) Excessive sound pressure from earphones and headphones can cause hearing loss.
Page 3
E-3
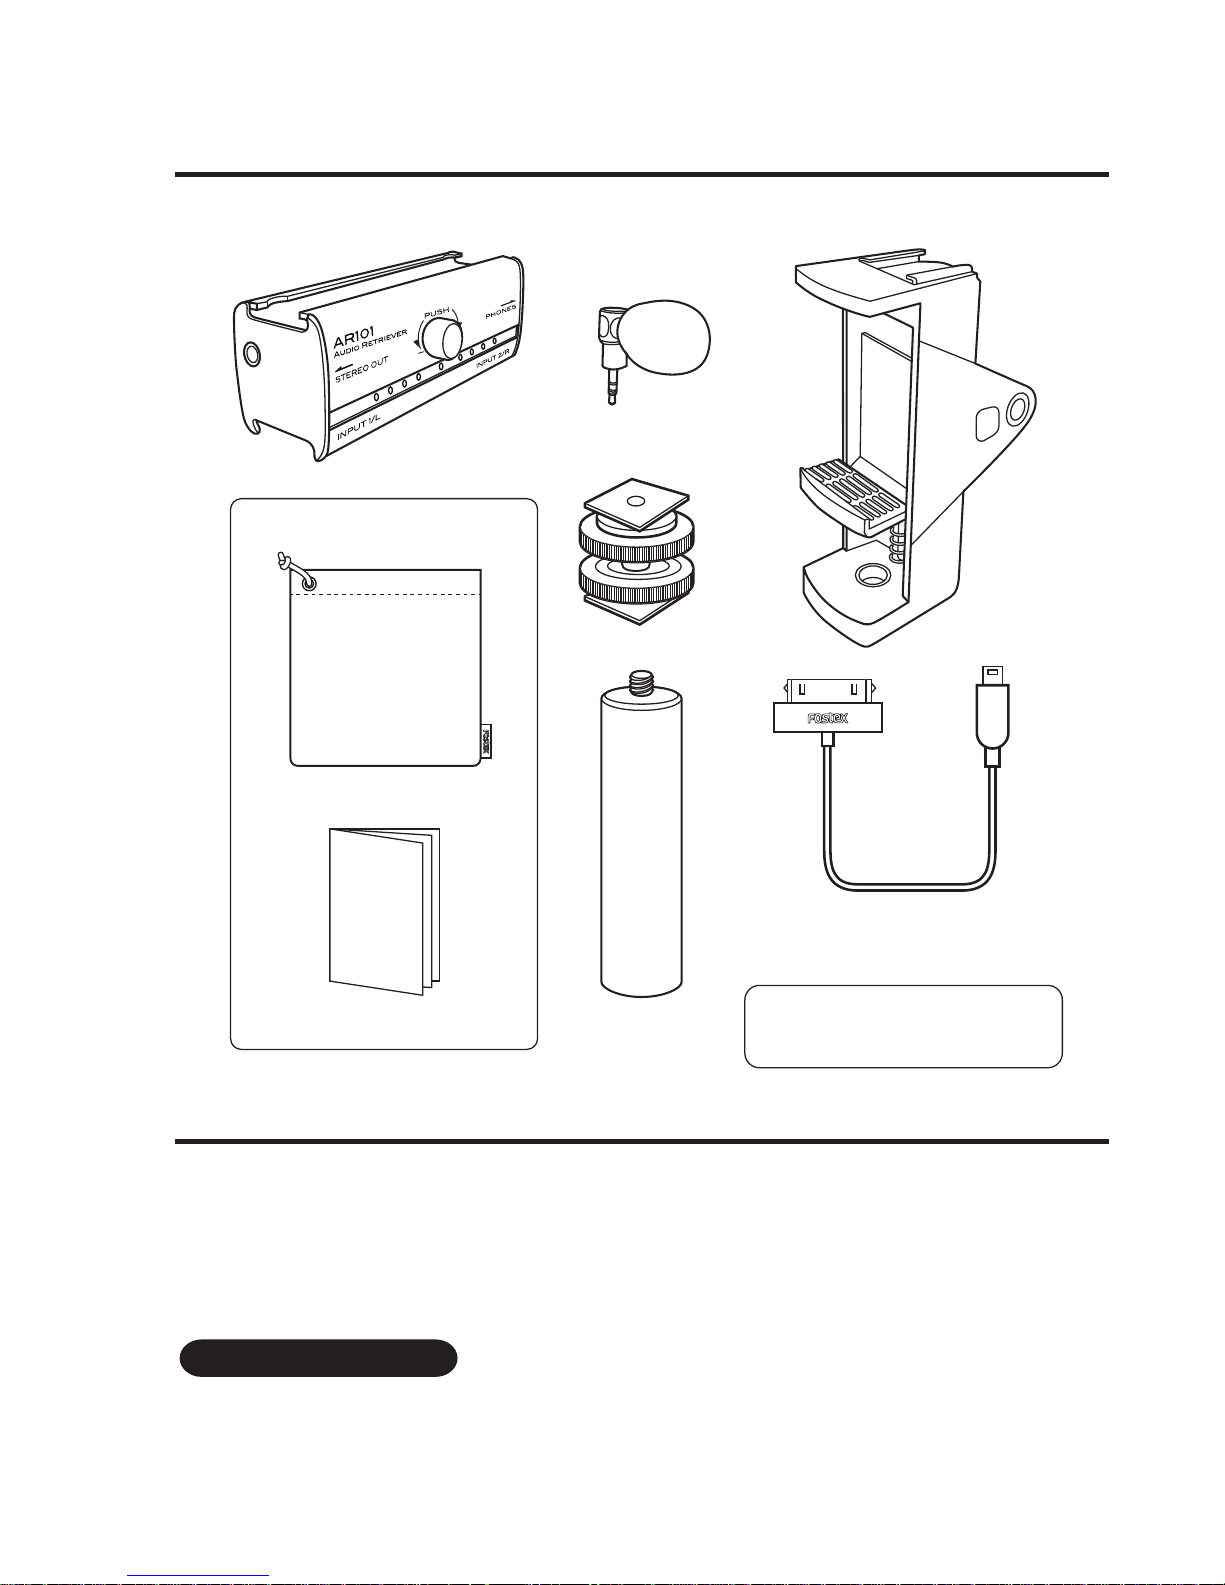
Supplied accessories
Specifications
1. Main Unit
2. Microphones2
4. Joint
3. Holder
5. Grip
Others
Pouch
Owner’s manual
6. 30pin Dock Cable
Connection Cable
If you are using an iPhone5 or iOS device equiped with Lightning connector, please use
a genuine “Lightning to 30pin Adaptor”.
Supplied power voltage for a plug in
microphone:2.5V
● ●
●
※
After purchasing the AR101, check
that all accessories are included in
the package.
USB power voltage:5V
●
Weight:60g
●
External dimensions:83
(W)
31
(H)
33
(D)mm
Specifications and appearance are subject to
change without notice for product improvement.
●
iPhone, Lightning-30 adaptor is a trademark of
Apple Inc., regiatered in the U.S. and other
countries.
Page 4
PRODUCT SUMMARY
E-4
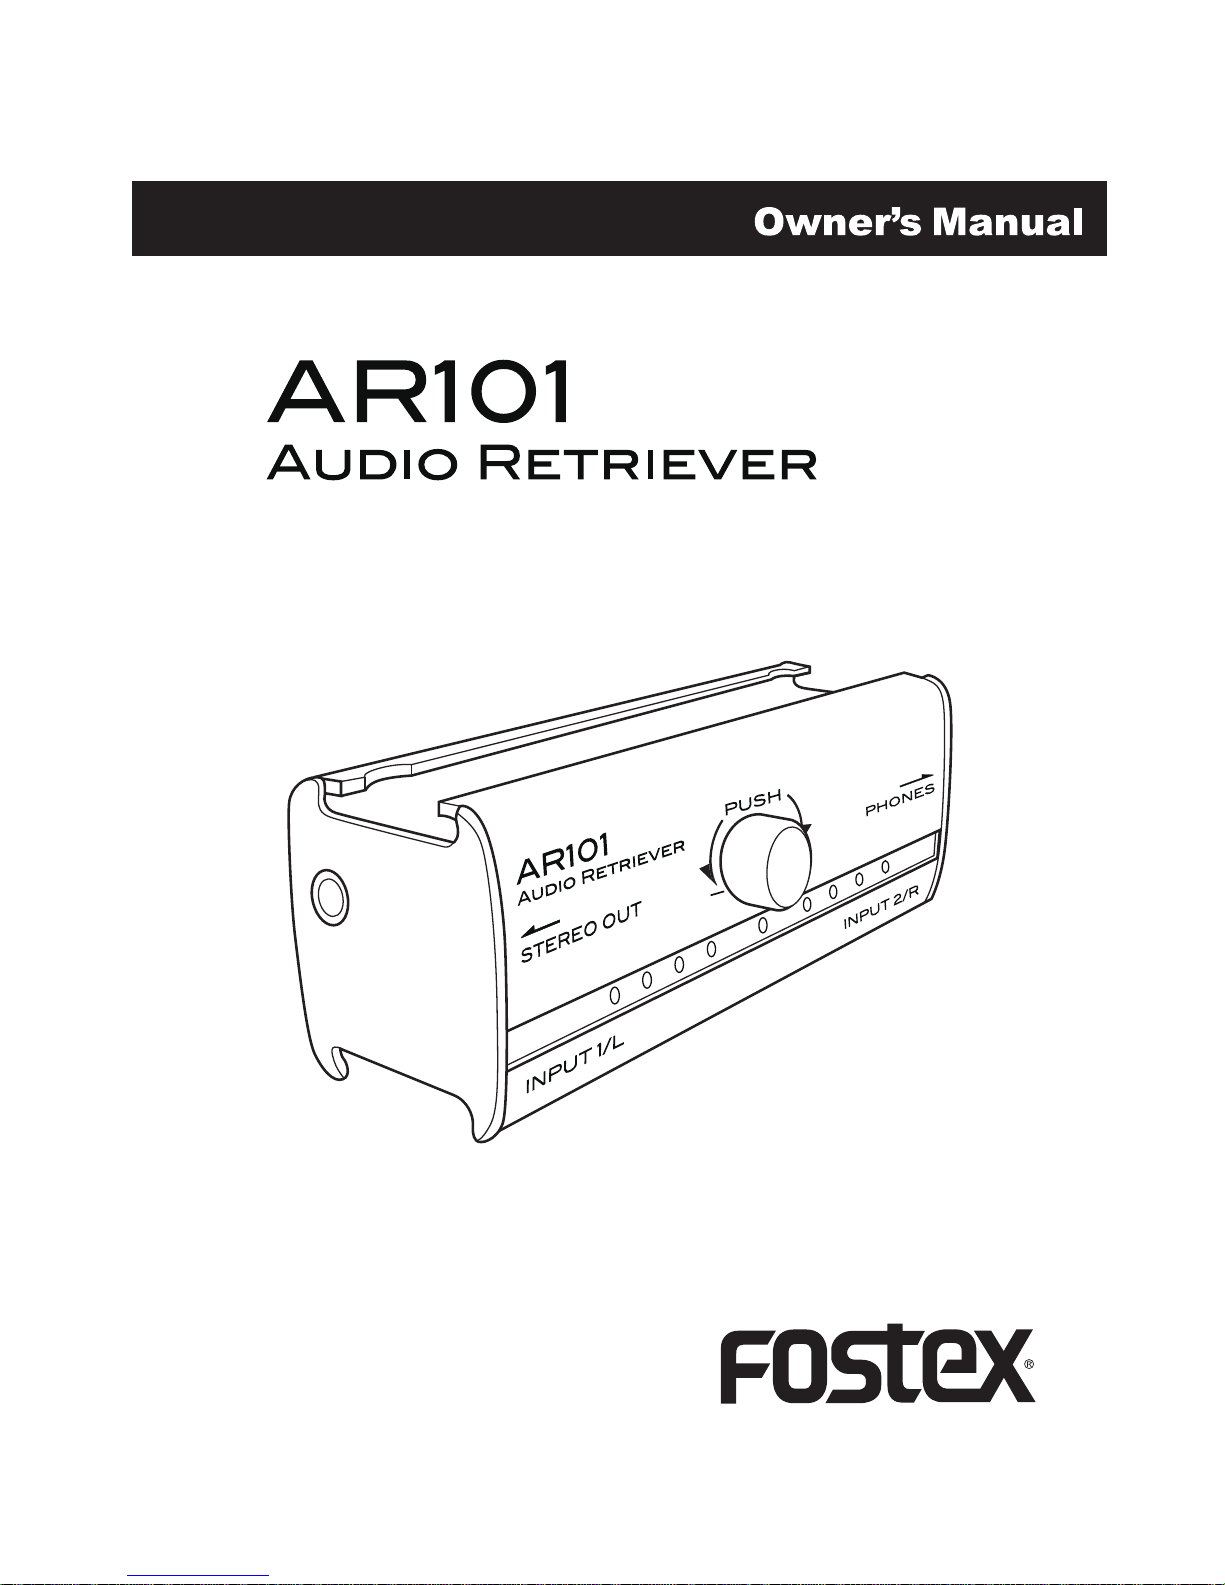
The AR101 is a device to collect sound, appropriately adjust the input level and PAN.
The AR101 is a USB device compatible with the iOS device, smartphone and PC
(referred to as “host device” below). Also it can be used with a device that has line or
mic levell analog input, such as digital camera (referred to as “analog device” below).
ABOUT AR101
•
Input and Output sound digitally transferred for a variety of host devices including iOS
devices.
•
Comes with two inputs for plug-in power microphones that adjust the level independently.
•
Equipped with a headphone output and stereo output, which can be used to send sounds to the host device.
•
LED indicator that makes it possible to display voice level of the left and right channels
independently.
•
Equipped with a cold shoe rail on the top and bottom of the unit for mounting external
accessories .
•
Possible to charge iOS devices using the external battery pack.
Main Characteristics
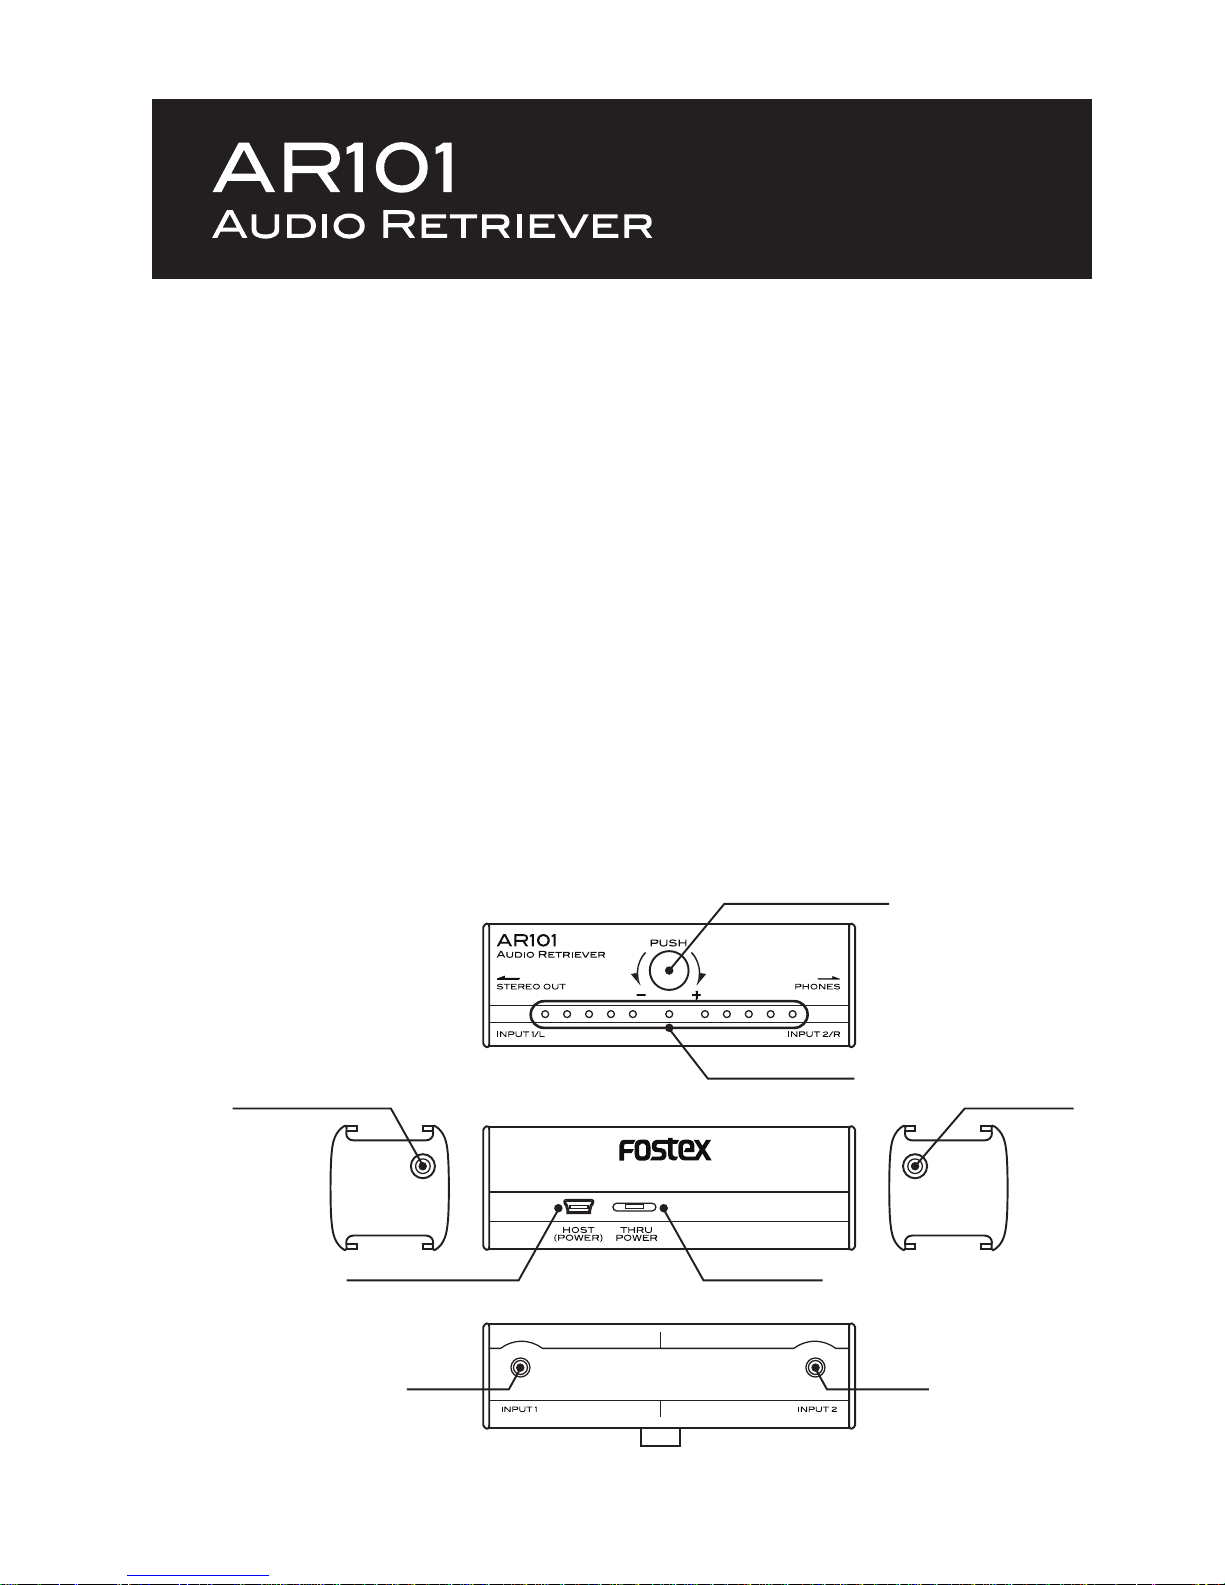
Features and controls
Rotary encoder
Phone outLine out (stereo)
Host connector
Input-1 Input-2
LED indicator
< Control side >
< Connect side >
Page 5
E-5
Recording with iPhone-1
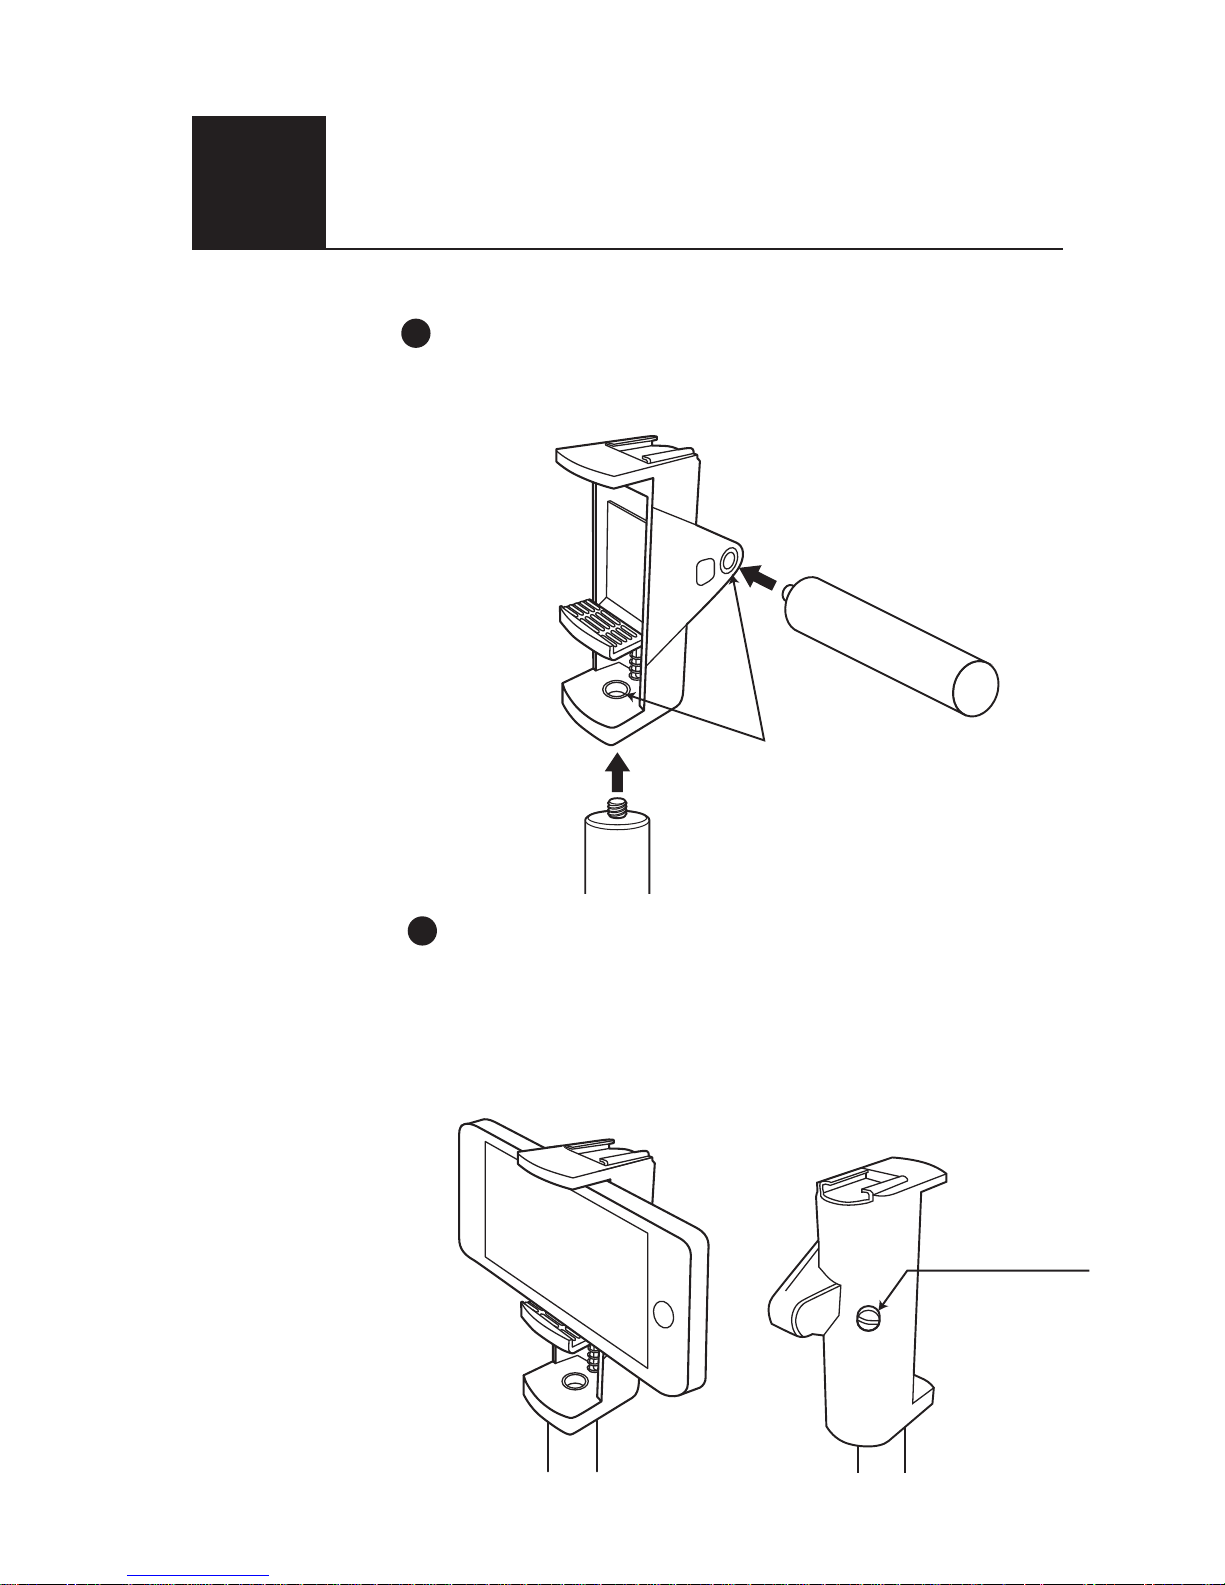
Thread to attach the grip are provided at the two locations in holder.
Please select the thread hole according to device.
Installing the iPhone in the holder
Tighten the screws to secure the iPhone in order to prevent it
from falling.
[Caution] Please be careful not to apply strong mechanical
shock to the holder as there is a possibility of iPhone falling.
CASE
1
Steps for recording using the iPhone:
1
2
How to assemble:
Attach the grip to the holder
Attaching to the iPhone
Holder
Thread Hole
Grip
Grip
Securing Screw
Page 6
E-6
CASE
1
4
Recording with iPhone-2
Steps for recording using the iPhone:
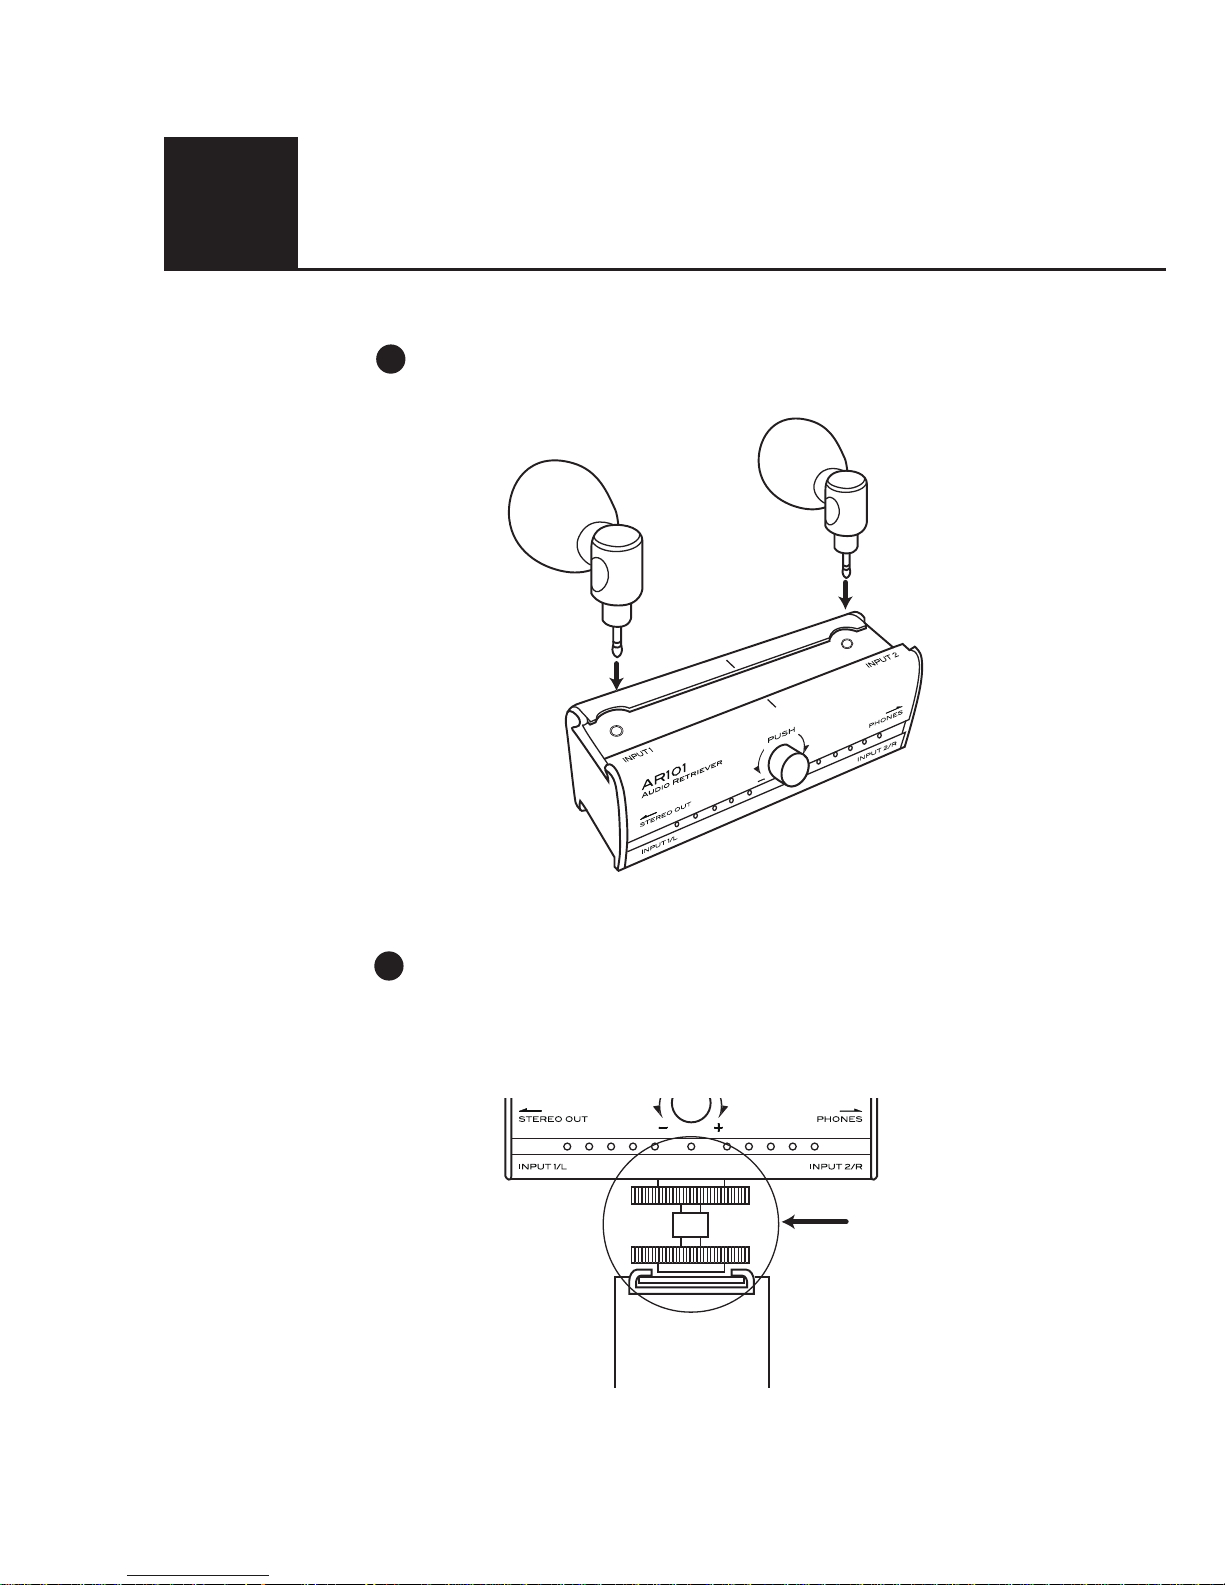
Attach the microphone to the main unit.
Install the main unit to the holder with the joint.
Insert the joint to each cold shoe rail. Ensure that it fits tightly.
3
Attaching the microphone
Body mounting
Attach the main unit to the holder
Main unit
Attaching the microphone
Holder
Joint
Page 7
E-7
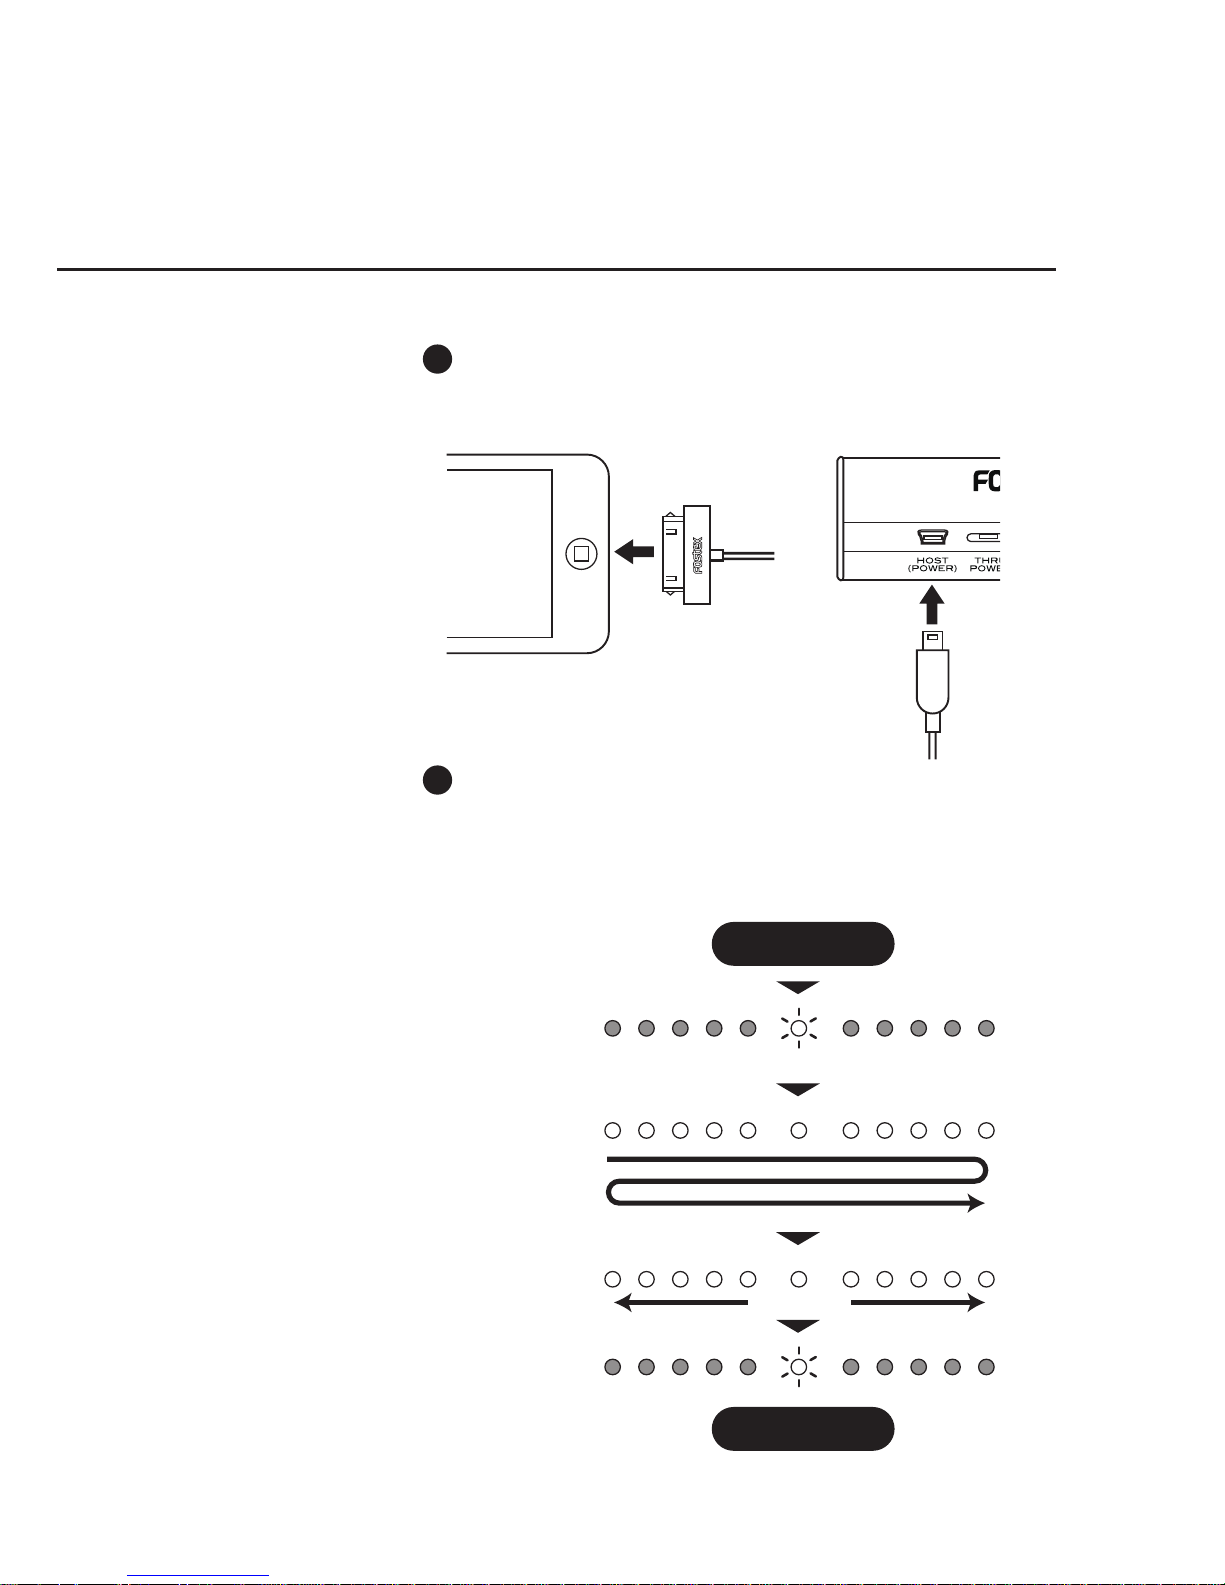
Middle LED will
become lit.
step-1
LED will flash
quickly from
side to side
several times.
Flashing
outwards from
the center.
Center of LED
will blink slowly.
step-2
step-3
step-4
Power Up
Standby
Main unit
iPhone
Connect 30pin Dock cable that cames with AR101.
5
Connecting cable
Connecting iPhone to main unit
When turning your iPhone on, power will be supplied to the main
unit. The LED indicator will display as shown below indicating
that main unit has become stand by mode.
Then, start the iPhone camera application.
6
Turn on the power
Turn on the iPhone
Page 8
E-8
CASE
1
<iPhone>
<LED indicator>
<LED indicator>
Brink
Brink
<Red>
INPUT-1/Lch Level INPUT-2/Rch Level
Volume Down Volume Up
Recording with iPhone-3
Steps for recording using the iPhone
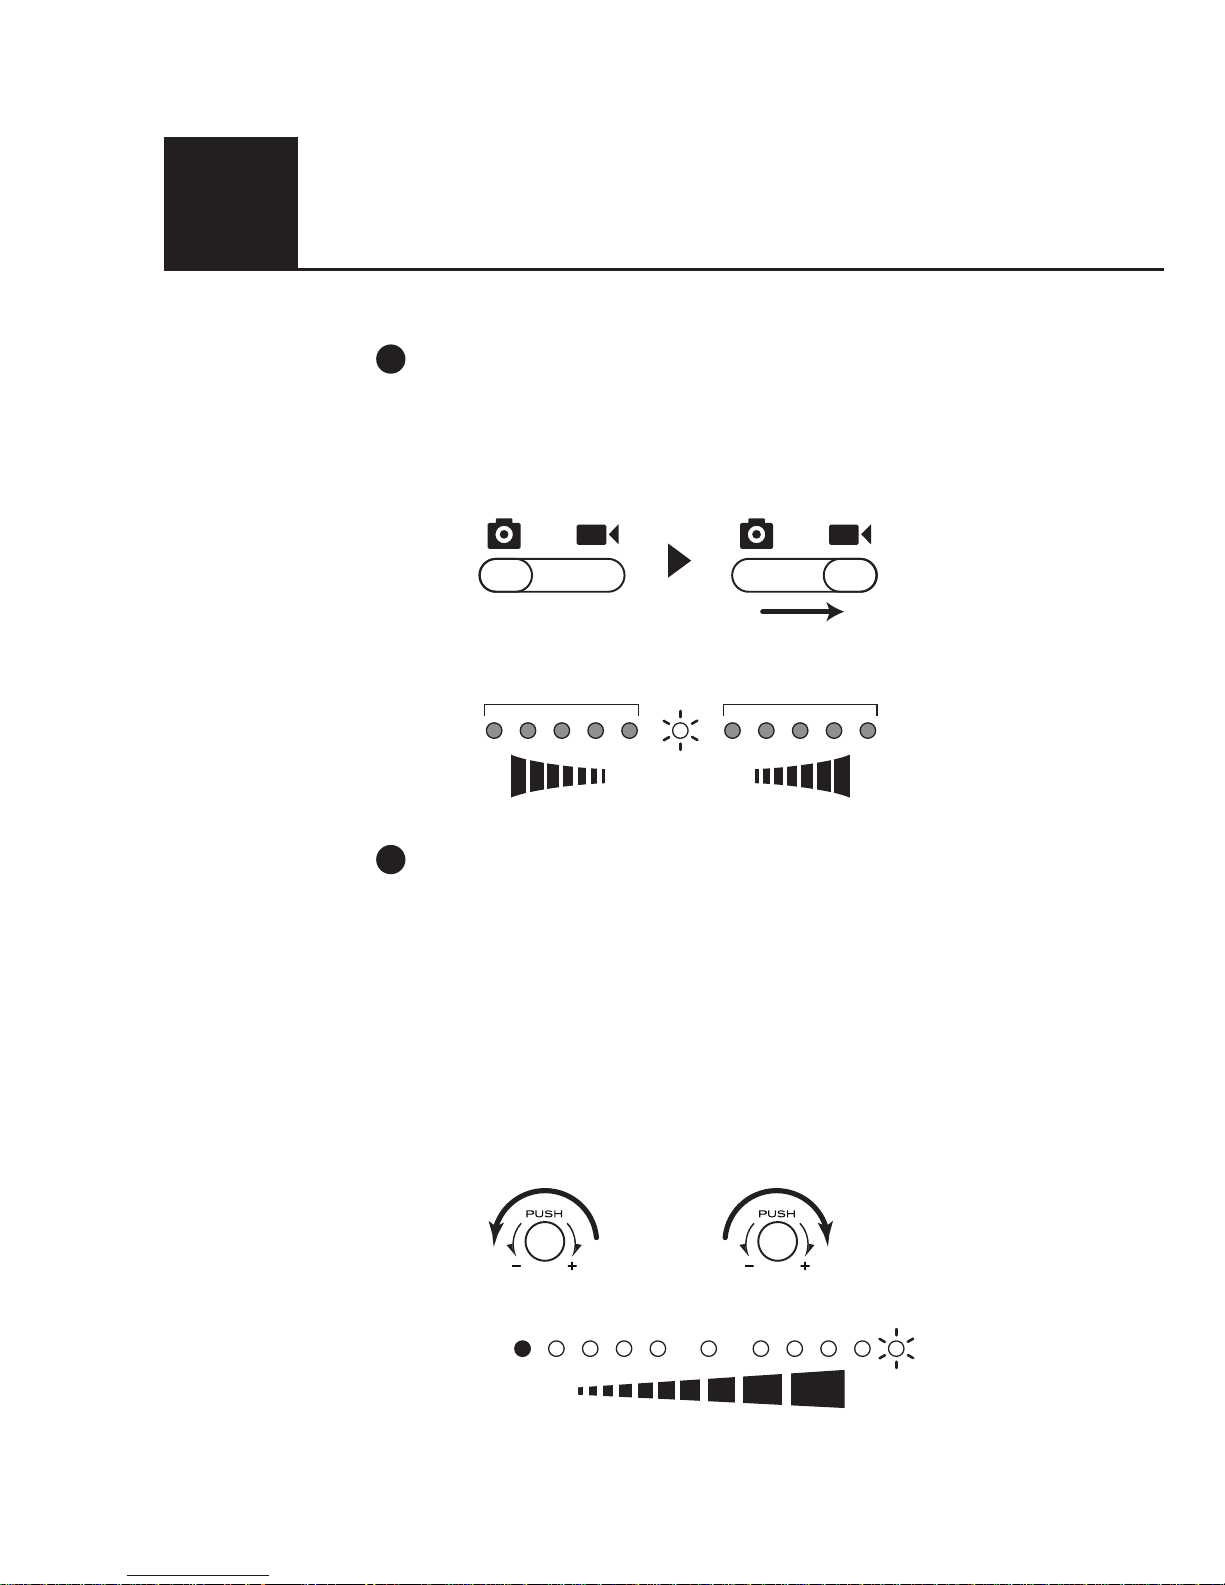
When switching to video mode, the AR101 will become recording
mode. Then, the LED indicator on the microphone input level will
be shown.
7
Recording mode
Switch to video mode on iPhone
You can adjust the overall volume using the rotary encoder, when
it is in recording mode. Turn clockwise, to increase the volume and
turn counter clockwise to decrease the volume.
Use headphones to monitor and adjust to the appropriate volume
level.
When in this adjusting mode, the LED indicator will blink red on
the furthest right.
As the volume is increased, the orange LED indicator will increase
from the left to match the volume.
8
Adjust the volume of the microphone.
Page 9
E-9
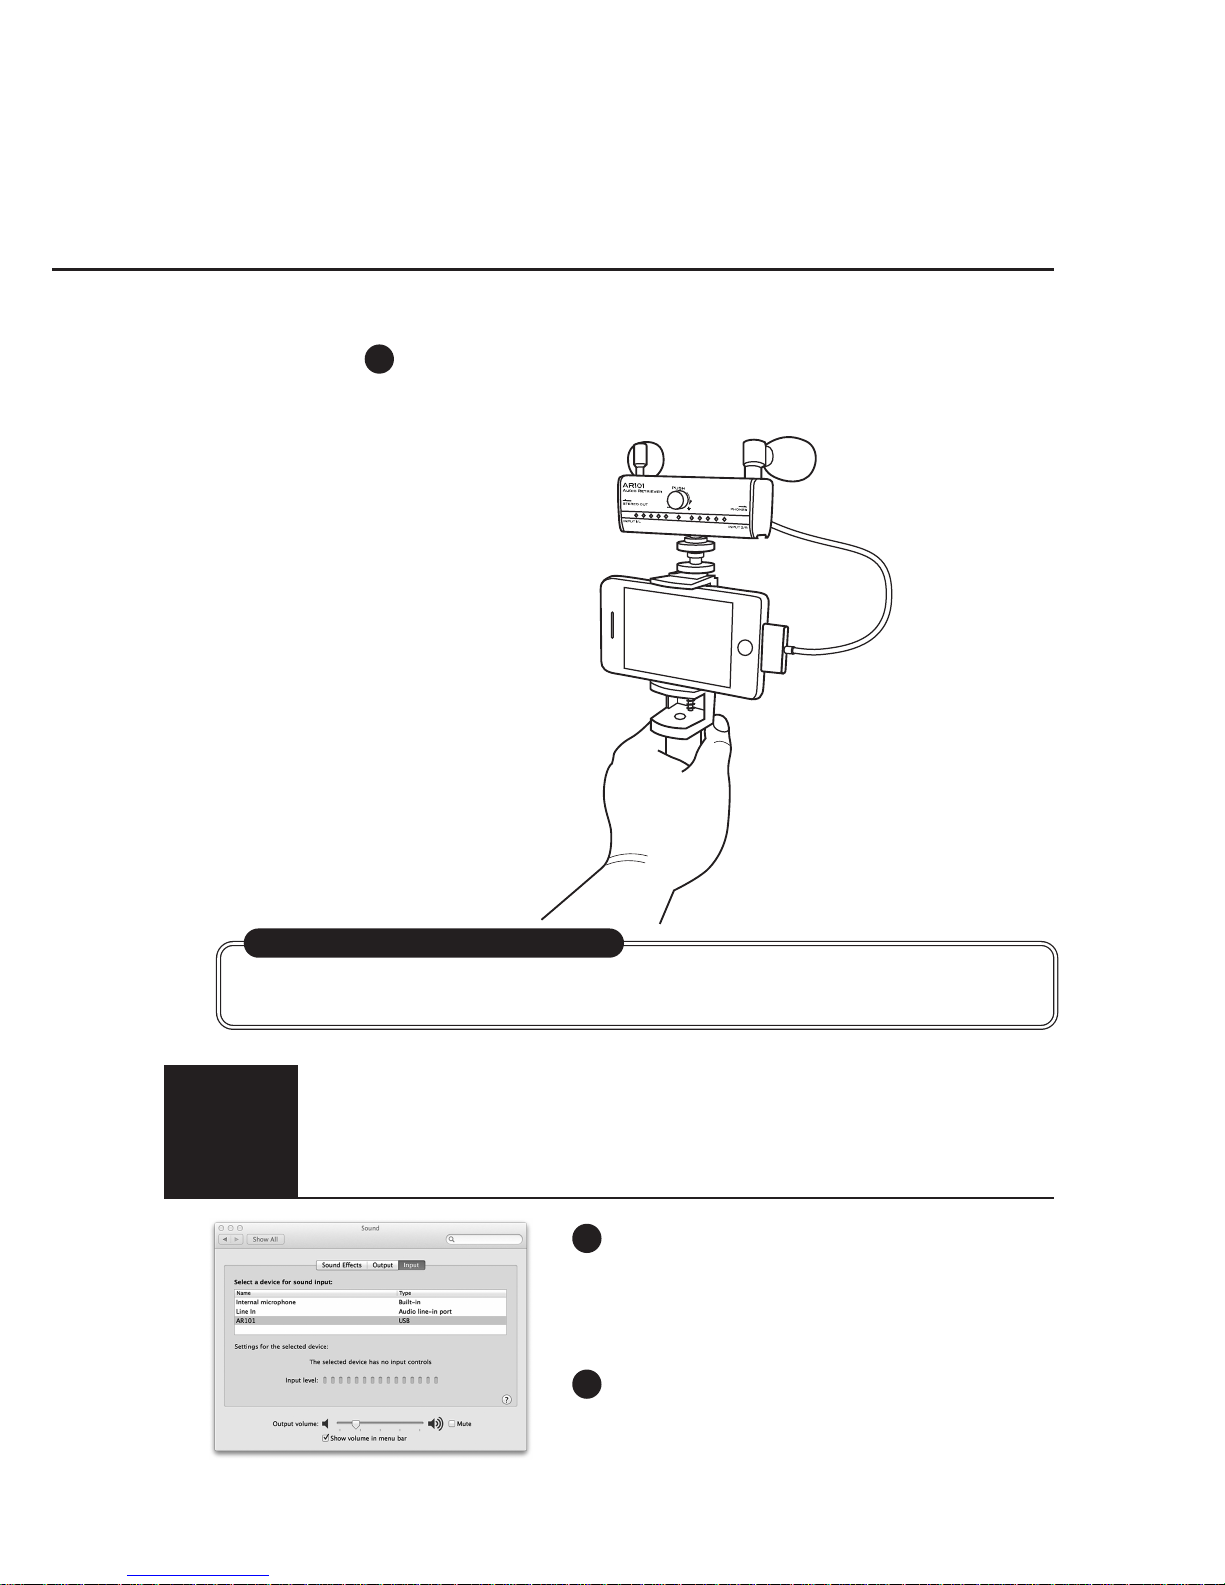
Prepare the cable, connect AR101 to
computer using USB cable.
Connect the AR101 to Mac
using USB cable.
1
Please select the AR101, clicking the tag “input”
on Apple menu → preference → sound.
Change input device
2
Recording by using Mac computer
CASE
2
How to record using computer audio interface
Easy setting with iOS apps!
Use of dedicated AR101 iOS application will make the setting easy.
For those using iOS devices, these applications are available at the App Store.
The iPhone can record excellent sound quality using the AR101
when you start filming video.
9
Record
To start recording video on the iPhone.
(The USB cable not included in the AR101)
Page 10
E-10
The AR101 can also be used with other host devices by using analog audio transfer as
far as the devices come with analog audio input. Please refer to the instruction manual of
devices to choose the proper type of connecting cable.
The dedicated AR101 application is only available on iOS devices. For the other host
devices, please use the rotary encoder to adjust the parameters. Please read the following guide for setting.
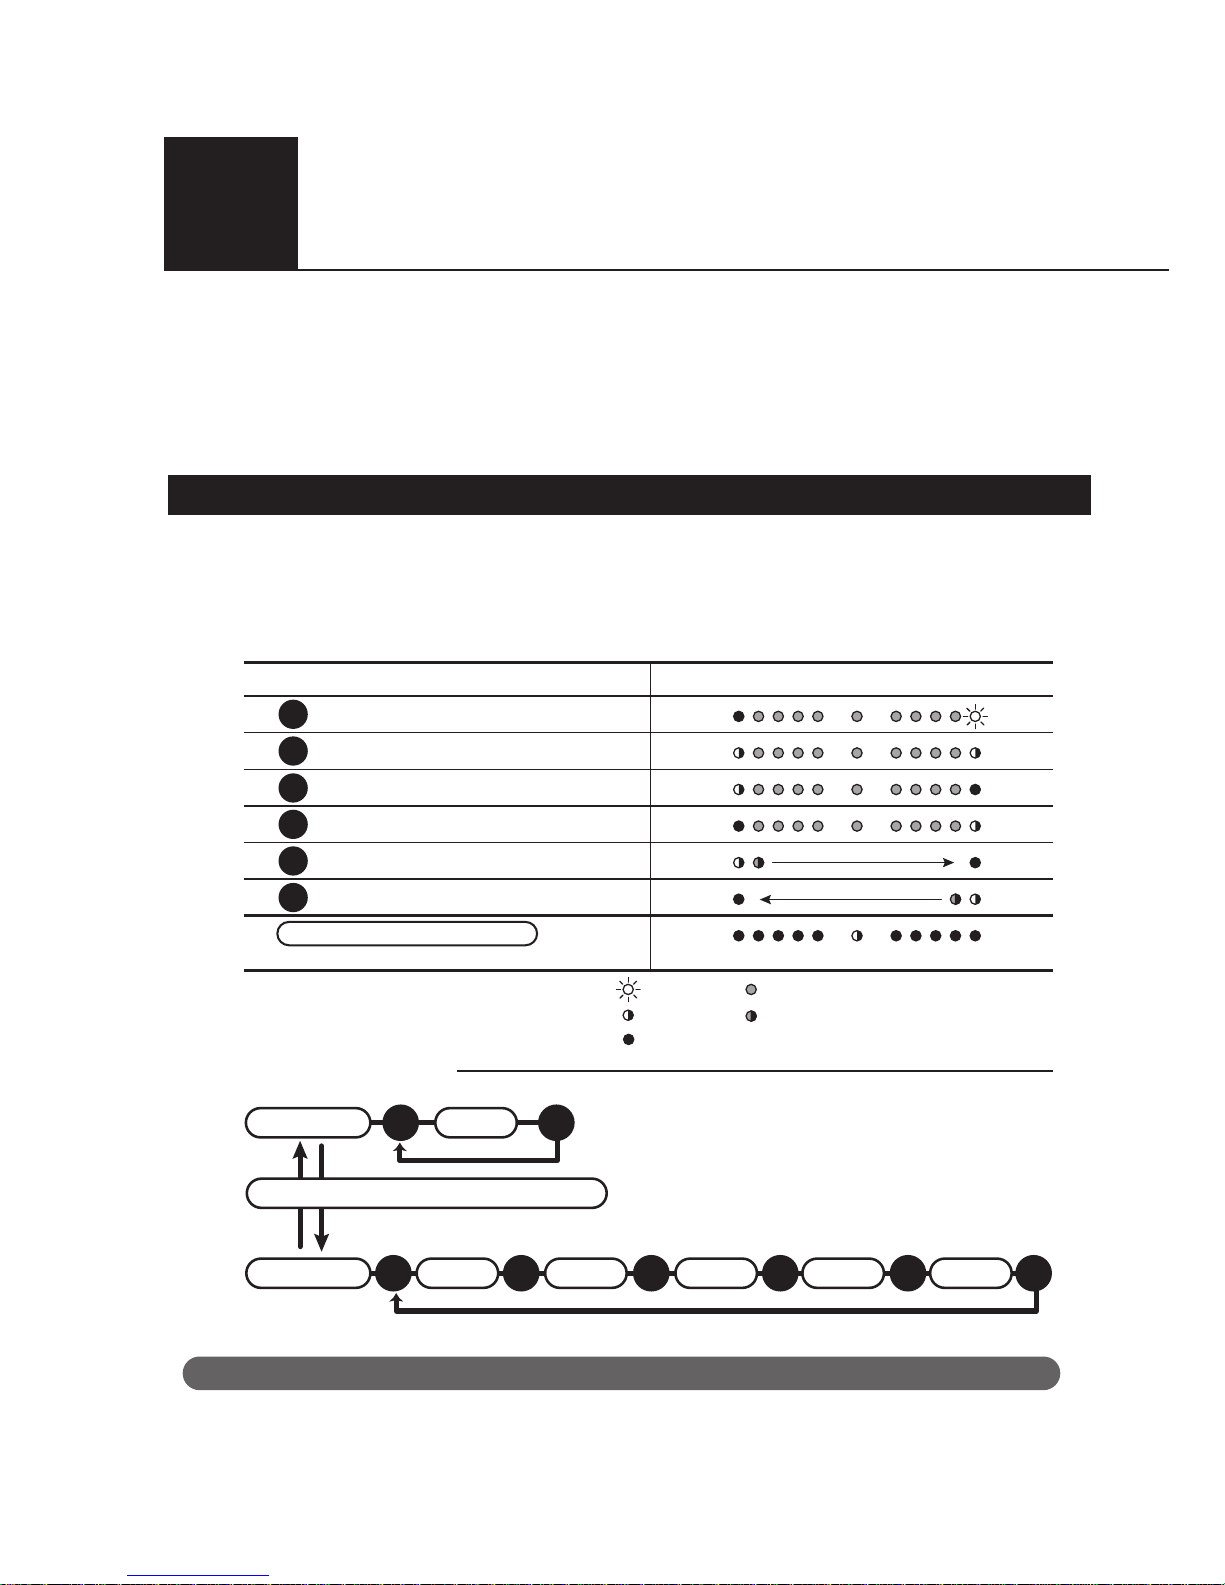
Using the rotary encorder, you can set the parameters in the chart below.
Please refer to the operation guide below to go to each setting mode.
How to determine which setting mode you are at; operating the rotary encoder will show
you by the LED indicator as described in the chart below.
Recording by analog device or other host device.
CASE
3
Operating guide for parameter setting by rotary encoder
Standby-1
Click
A
B
Click Click Click ClickClick
A
B C D E F
Standby-2
Press and hold for 15 seconds
*Press and hold for 15 seconds, LED will blink the same way as it does starting up.
■
Possible settings
Operation guide
LED indicator light pattern
A
B
C
D
E
F
Move while flashing by the operation.
Turn on by the operation.Turn on
Turn off
Blink
Press and hold for 3 seconds
*Operate in any mode.
How to record using a digital camera and/or smart phone
Fostex Company is not responsible for any defect, damages or loss of data from the use of this product.
Phone volume
Input level
Input-1 volume
Input-2 volume
Input-1 punning
Input-2 punning
Mute
Page 11
E-11
Declaration of EC Directive
The Affect of lmmunity on This Equipment
FOSTEX DISTRIBUTORS LIST IN EUROPE
<AUSTRIA>
This equipment is compatible with the EMC Directive (2004/108/EC) - Directive on approximation of member nation’ s ordinance concerning
the electromagnetic compatibility and with the Low Voltage Directive (73/23/EEC) - Directive on approximation of member nation’ s
ordinance concerning electric equipment designed to be used within the specified voltage range.
The affect of the European Specification EN61000-6-1 (coexistence of electromagnetic waves - common immunity specification) on this
equipment are as shown below.
In the electrical fast transient/burst requirements, surge, conducted disturbances by radio-frequency fields, power frequency magnetic
field, radiate electromagnetic field requirements and static electricity discharging environment, this could be affected by generation of
noise in some cases.
* Including non-EU countries (as of July 2011)
NAME: Mega Audio GmbH
ADD: Stromberger Str. 32, D-55411 Bingen, Germany
TEL: (+49) 6721-94330, FAX: (+49) 6721-32046
<BELGIUM>
NAME: General Audio
ADD:
Raymond Pelgrimslaan 101, B-1702 Groot-Bijgaaden, Belgium
TEL: (+32) 2-4630650, FAX: (+32) 2-4661500
<BULGARIA>
NAME: Shark Art
ADD: 15 Hristo Popovich Str., Varna 9000, Bulgaria
TEL: (+359) 52-600172, FAX: (+359) 52-250578
<CZECHO>
NAME: Praha Music Center spol s.r.o.
ADD: Ocelarska 937/39, Praha 9, 190 00, Czecho
TEL: (+420) 226-011-111, FAX: (+420) 226-011-112
<DENMARK>
NAME: Benum Nordic A/S
ADD: Meterbuen 18, Skovlunde, 2740 Denmark
TEL: (+45) 4451-8900, FAX: (+45) 4451-8911
<FINLAND>
NAME: Noretron Oy Audio
ADD: P. O. Box 22, FIN-02631 Espoo, Finland
TEL: (+358) 9-5259330, FAX: (+358) 9-52593352
<FRANCE>
NAME: Sennheiser France
ADD:
128 bis, avenue Jean-Jaures, 94851 Ivry-sur-Seine Cedex, France
TEL: (+33) 1 4987 0300, FAX: (+33) 1 4987 0324
<GERMANY>
NAME: Mega Audio GmbH
ADD: Stromberger Str. 32, D-55411 Bingen, Germany
TEL: (+49) 6721-94330, FAX: (+49) 6721-32046
<GREECE>
NAME: Bon Studio S. A.
ADD: 6 Zaimi Street, Exarchia, 106.83 Athens, Greece
TEL: (+30) 210-3809-605, 606, 607, 608
FAX: (+30) 210-3845-755, 210-3827-868
<HUNGARY>
NAME: ATEC Hungary Kft
ADD: H-110/ Budapest, Fogado u. 3, Hungary
TEL: (+36) 1-4319005, FAX: (+36) 1-4319006
<ICELAND>
NAME: I. D. elrf. electronic Ltd.
ADD: ARMULA 38 108 REYKJAVIK, ICELAND
TEL: (+354) 588 5010, FAX: (+354) 588 5011
<ITALY>
NAME: Proel S. p A.
ADD:
Zona Via Alla Ruenia, 37/43 64027 - Sant’ Omero (Teramo), Italy
TEL: (+39) 0861-81241, FAX: (+39) 0861-887862
<THE NETHERLANDS>
NAME: IEMKE ROOS AUDIO B.V.
ADD: Kuiperbergweg 20, 1101 AG Amsterdam, The Netherlands
TEL: (+31) 20-697-2121, FAX: (+31) 20-697-4201
<NORWAY>
NAME: Siv. Ing. Benum AS
ADD: P. O. Box 145, Vinderen, 0319 Oslo, Norway
TEL: (+47) 2213 9900, FAX: (+47) 2214 8259
<POLAND>
NAME: Mega Music Spolka z o. o
ADD: UI. Lesna 15, 81-876 Sopot, Poland
TEL: (+48) 58-551-18-82, FAX: (+48) 58-551-18-72
<SPAIN>
NAME: Letusa S. A.
ADD: C/Laguna 10, 28923 Alcorcon, Madrid, Spain
TEL: (+34) 91-4862800, 91-4470898, FAX: (+34) 91-6414597
<SWEDEN>
NAME: Benum Nordic A/S
ADD: Aldermansvagen 17, 171 48 Solna, Sweden
TEL: (+46) 8 207710
<SWITZERLAND>
NAME: Audio Bauer Pro AG
ADD: Bernerstrasse-Nord 182, CH-8064 Zurich, Switzerland
TEL: (+41) 1-4323230, FAX: (+41) 1-4326558
<UK>
NAME: SCV London
ADD: 40 Chigwell Lane, Oakwood Hill Industrial Estate, Loughton,
Essex IG10 3NY U.K.
TEL: (+44) 20-8418-0778, FAX: (+44) 20-8418-0624
Page 12

FOSTEX CO.
1-1-109, Tsutsujigaoka, Akishima-shi, Tokyo Japan, 196-8550
© PRINTED IN CHINA May 2013 8289688000
572037
 Loading...