

Page 1

Specifiche tecniche
Feature List
Feuille de Caractéristiques
Datenblatt
Hoja de Características
Характеристики
Gegevensblad
Folha de Caracteristicas
Φύλλο Προδιαγραφών
KS 60 MF 9
Page 2

Page 3
2
3
5
7
8
6
9
4
11
10
12
14
13
15
16
17
3
ITALIANO
KS 60 MF 9
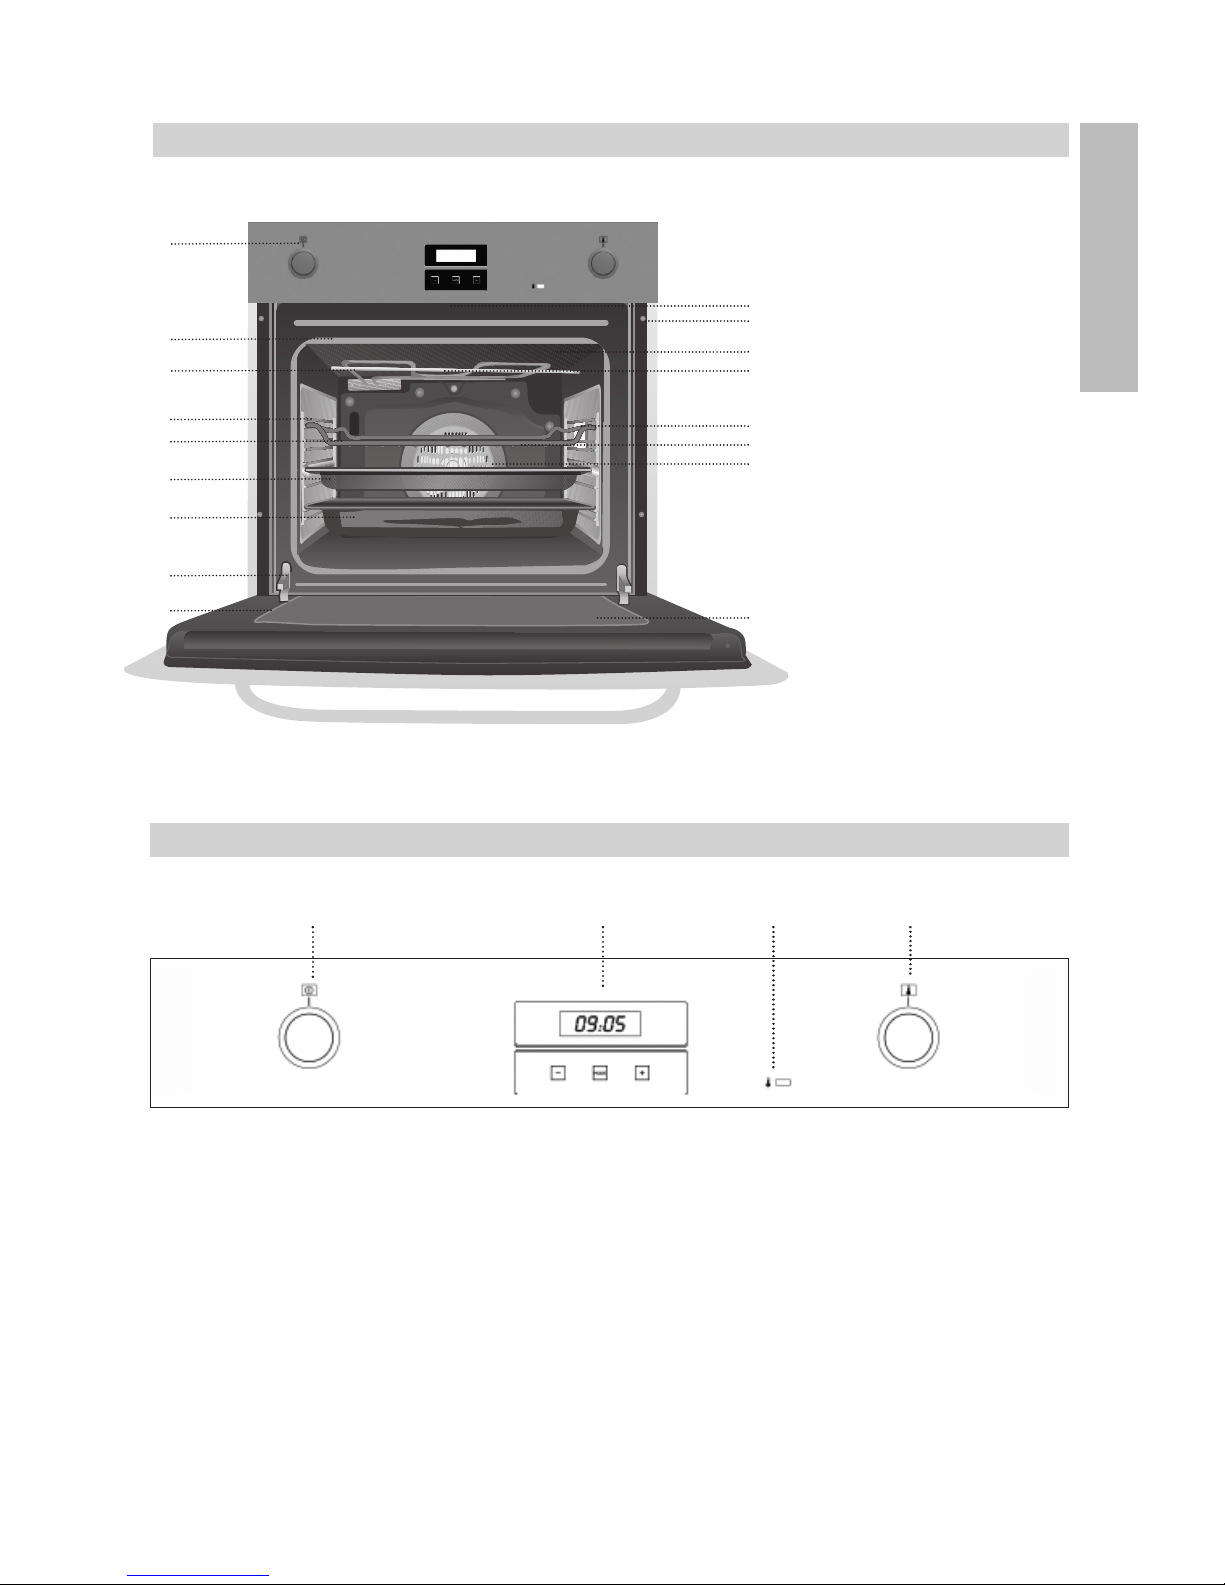
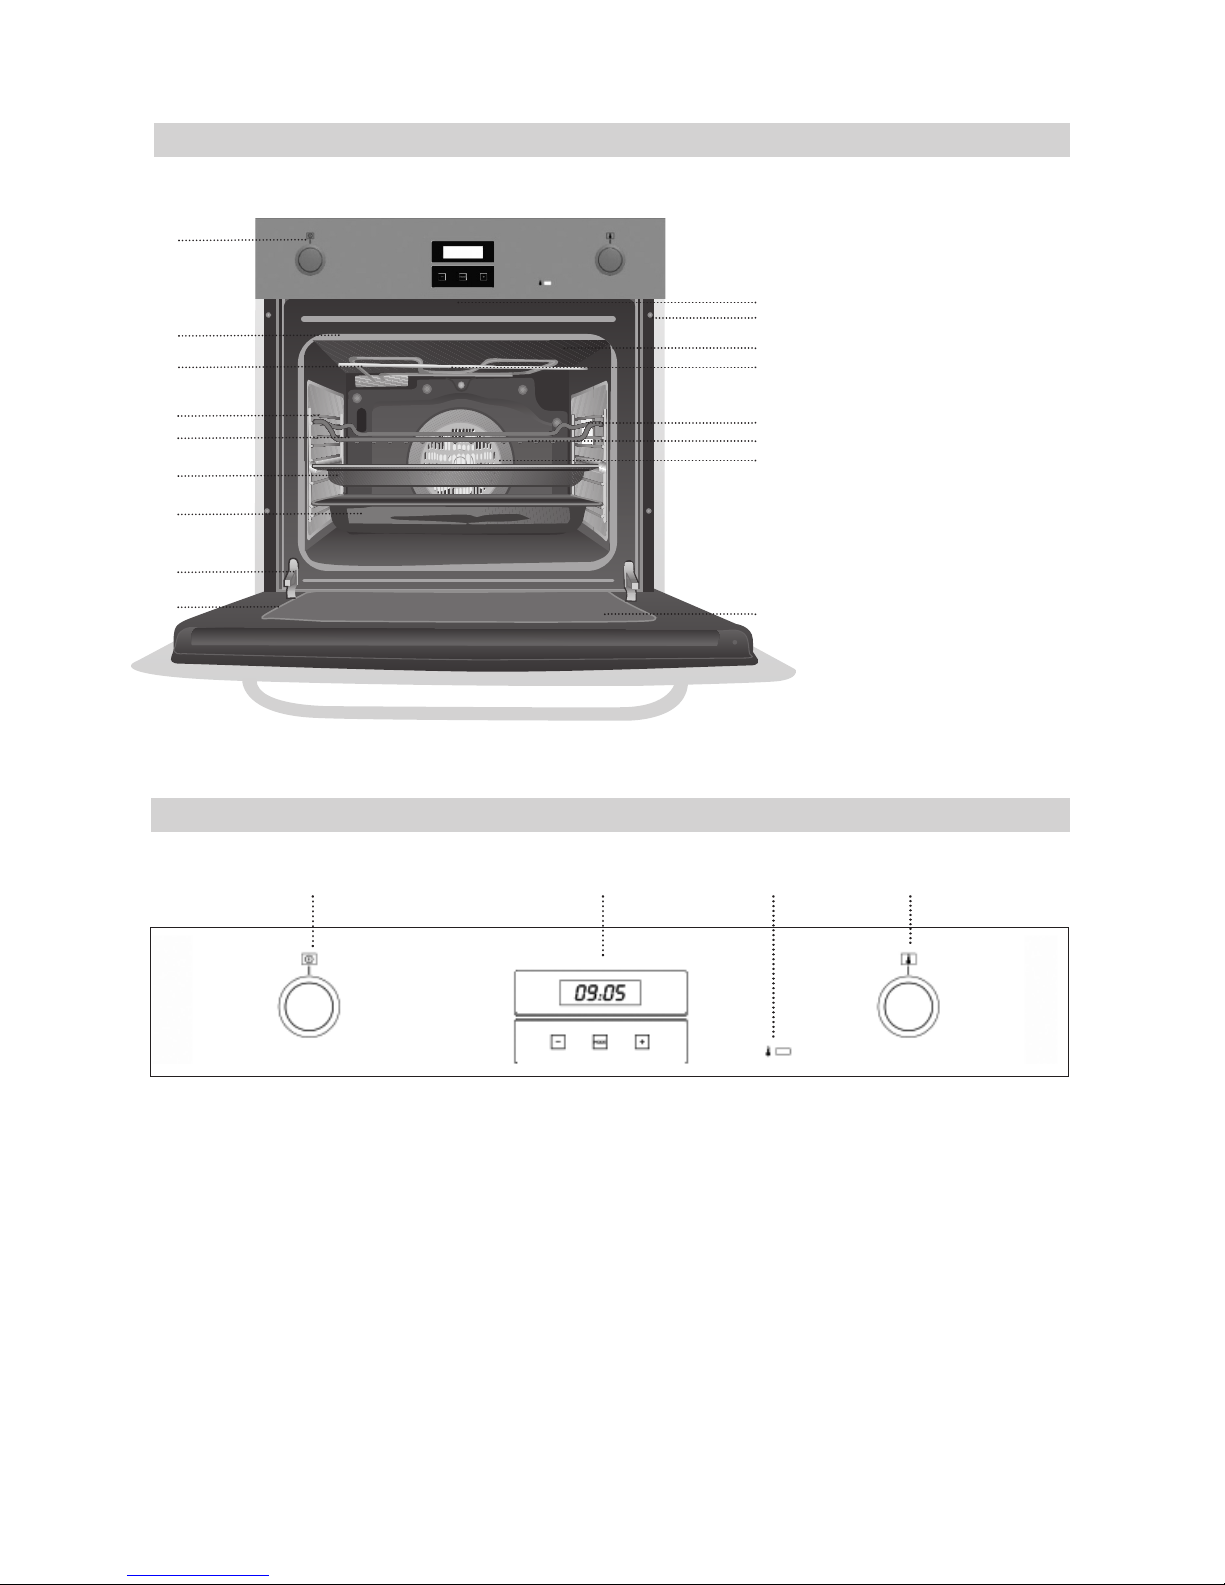
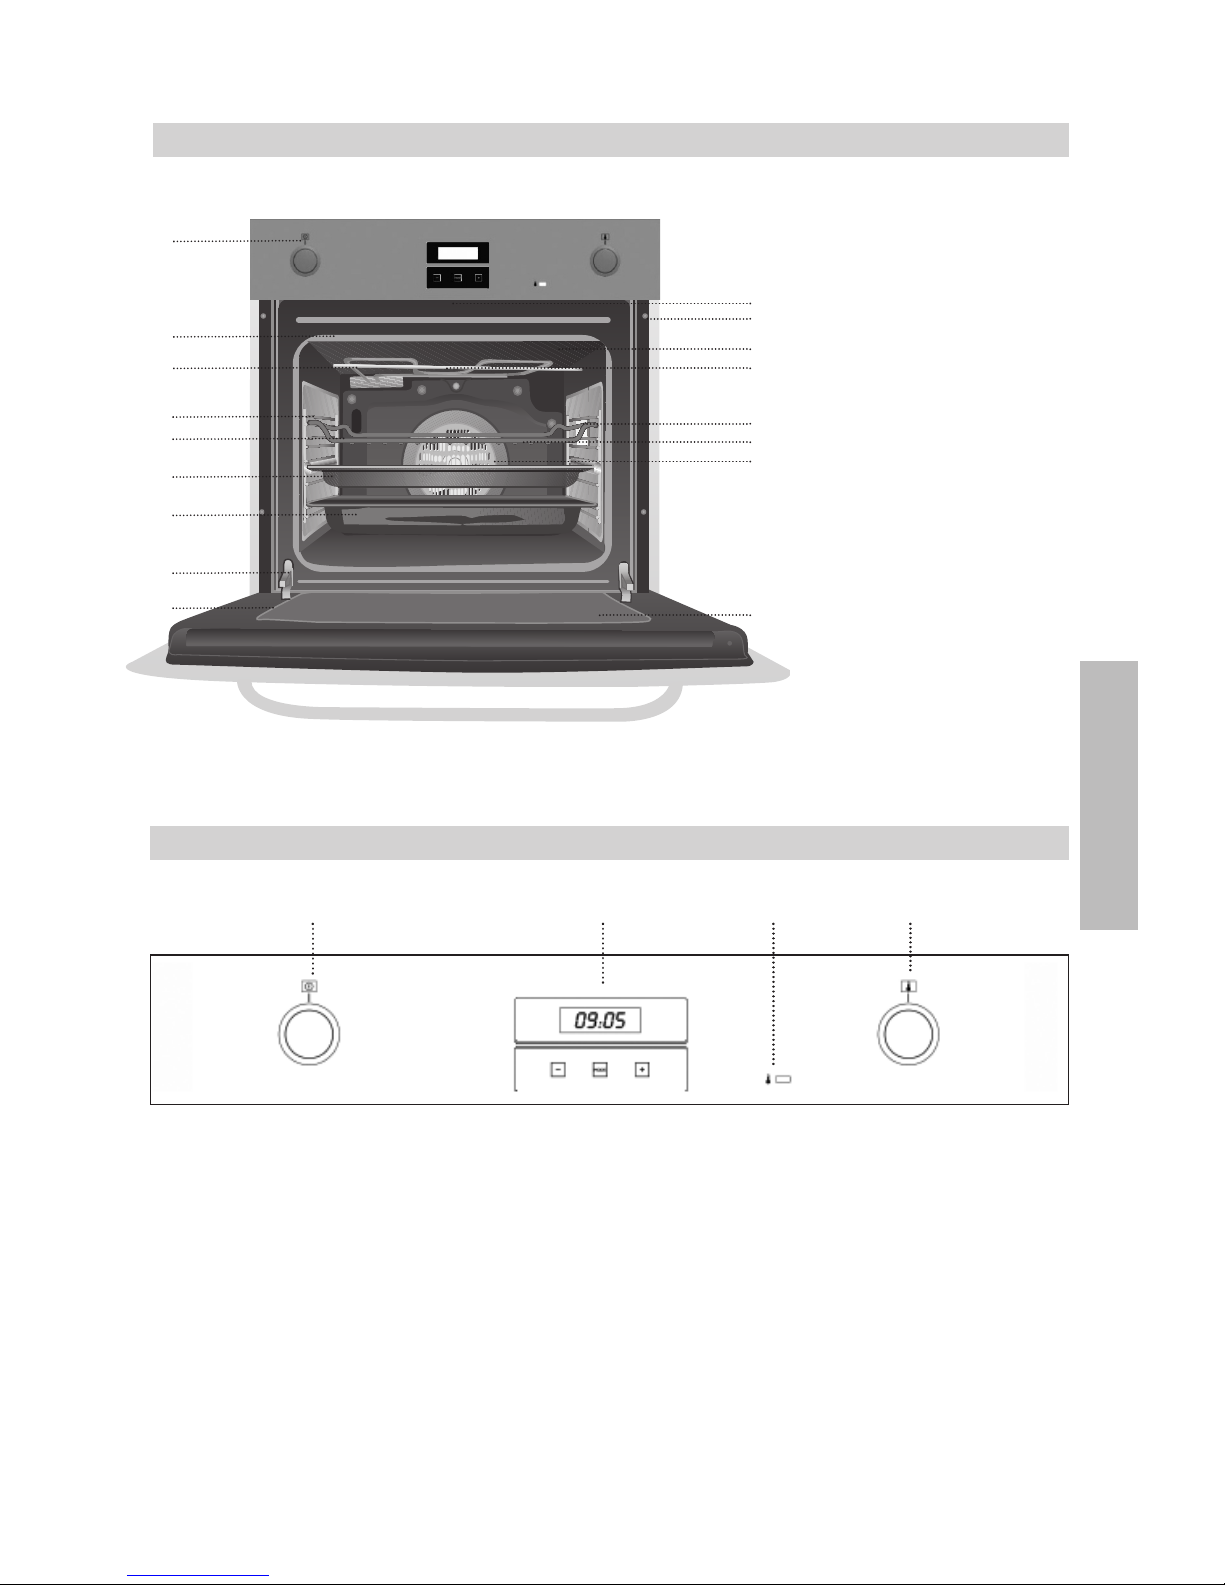
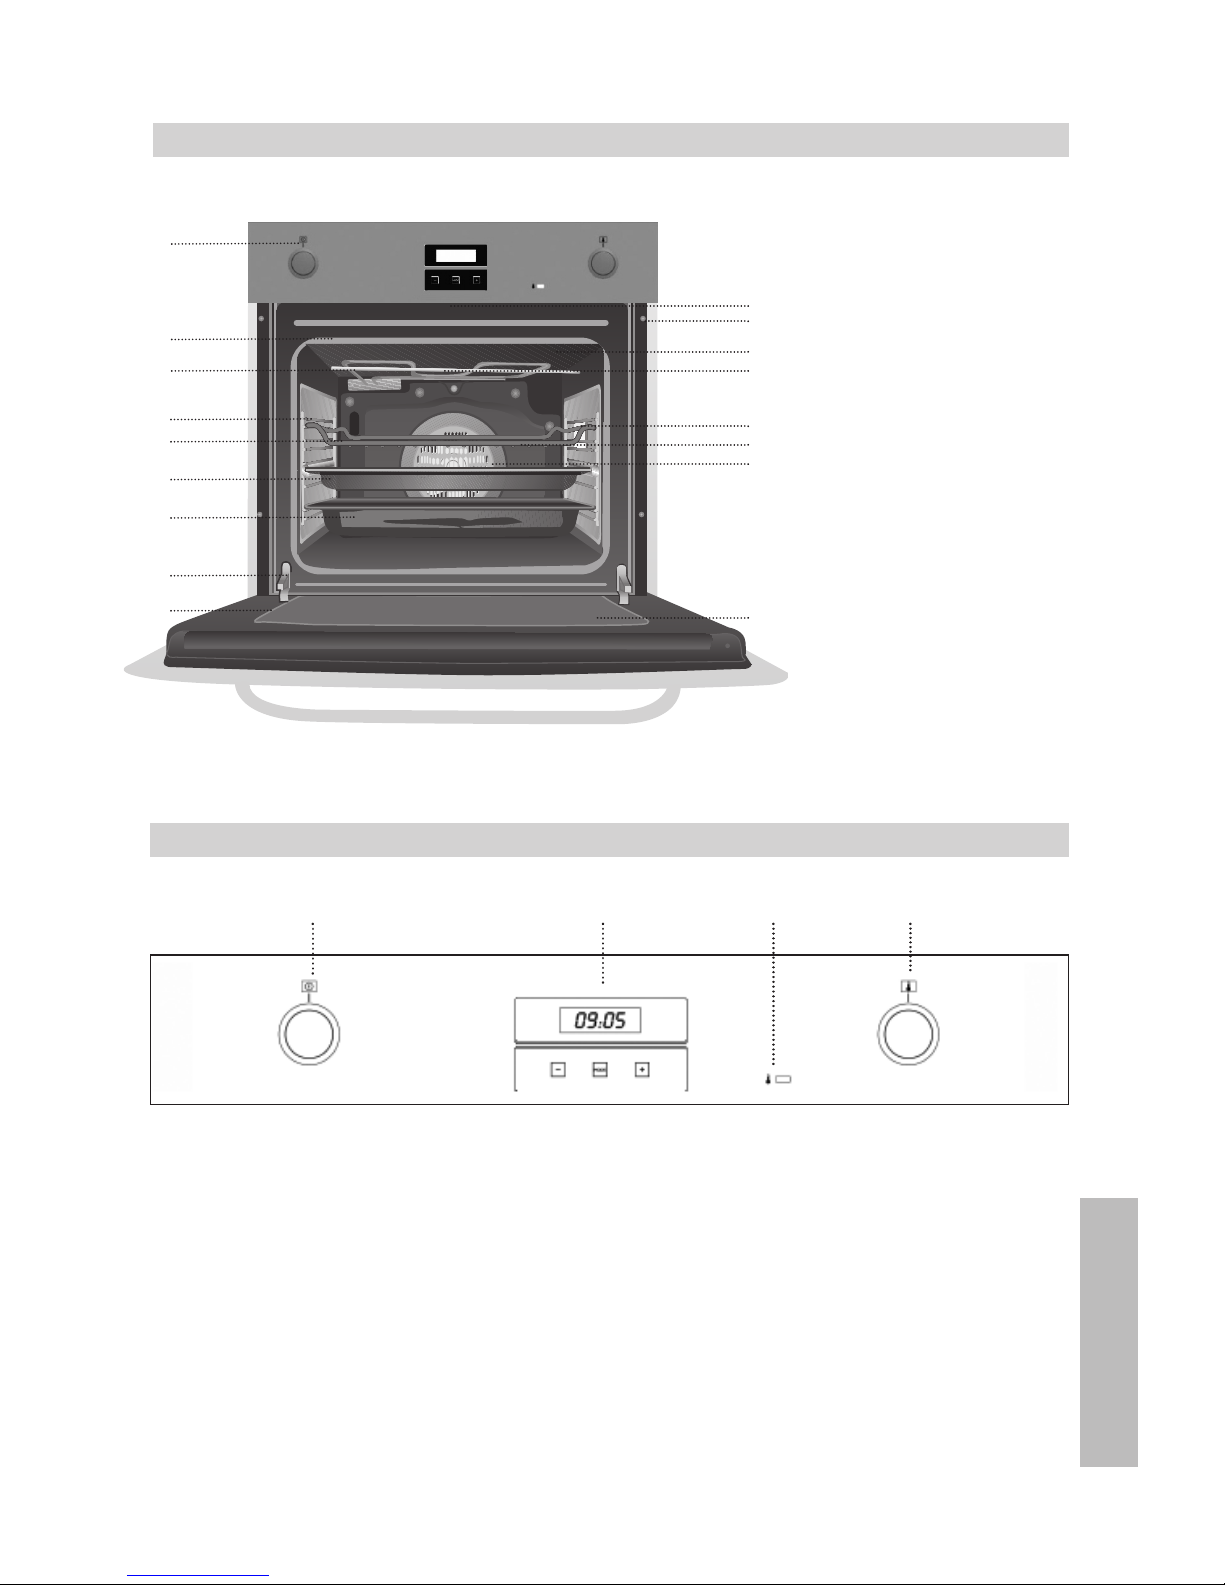
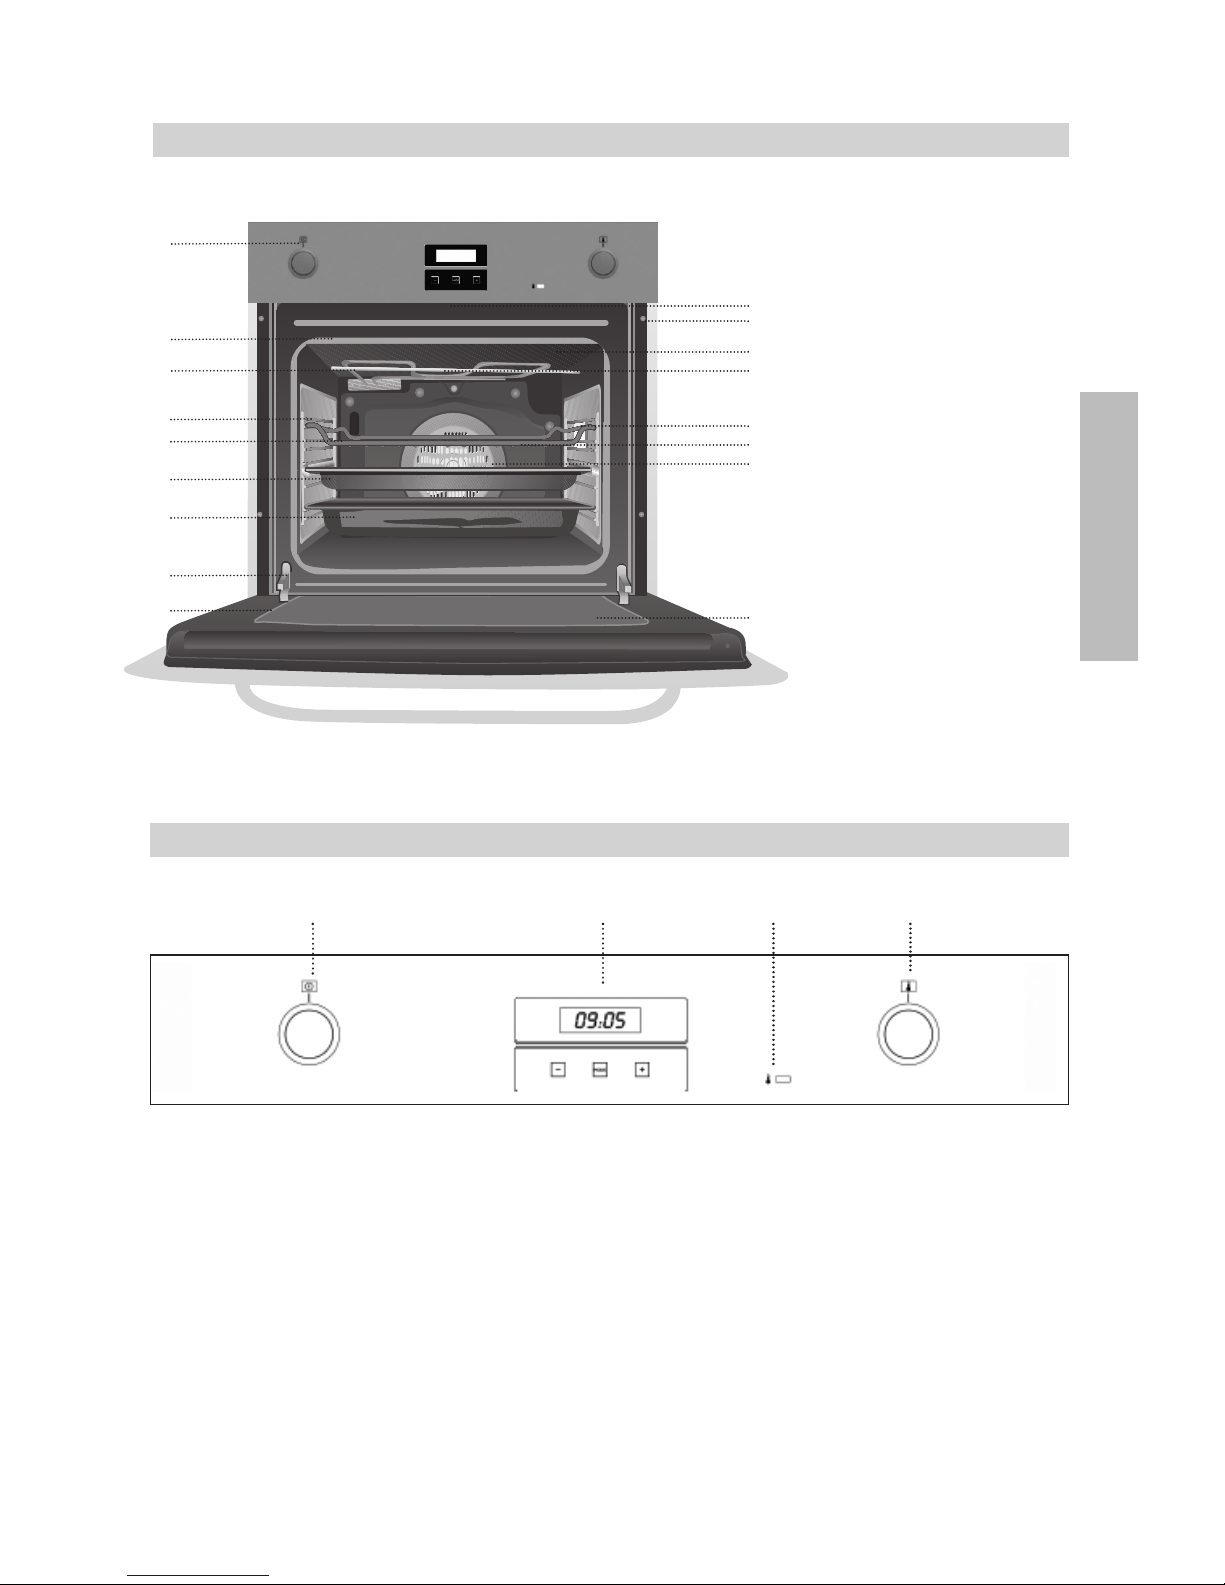
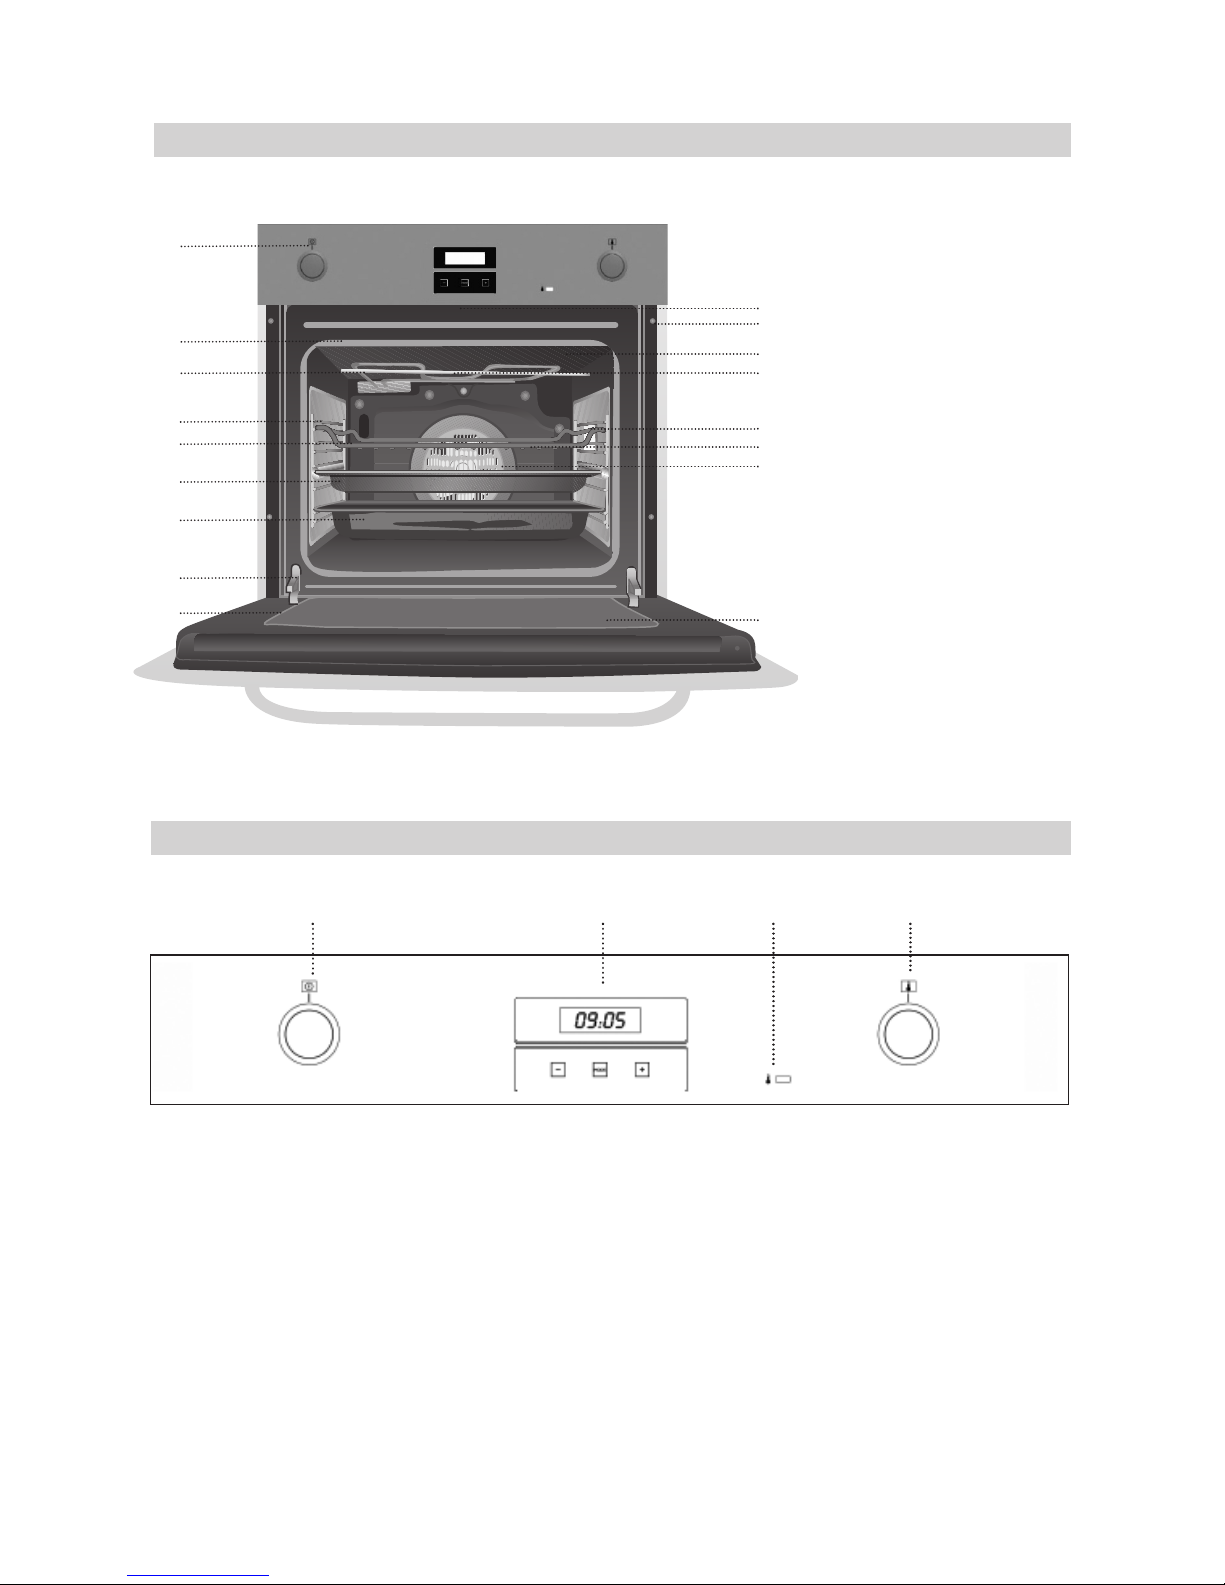
Pannello di comando
1 2 3 4
1 Pannello di comando
2 Guarnizione
3 Resistenza del grill
4 Supporto cromato
+ Guide di scorrimento
5 Griglia
6 Vassoio per pasticceria
7 Vassoio profondo
8 Cerniera
9 Sportello
10 Uscita dell’aria
di raffreddamento
11 Fissaggio al mobile
12 Schermo del grill
13 Uscita dei fumi
14 Lampada laterale
15 Pannello posteriore
16 Ventola
17 Vetro interno di grandi
dimensioni
1 Selettore di funzione.
2 Orologio elettronico.
3 Spia pilota di riscaldamento. Indica la
trasmissione del calore all’alimento e si
spegne quando viene raggiunta la temperatura
impostata.
4 Selettore di temperatura.
1
Page 4
4
Funzioni del forno
Spegnimento del forno
Illuminazione
Turbo
La ventola distribuisce il calore proveniente da
una resistenza situata nella parte posteriore del
forno. Grazie all'uniformità di temperatura
prodotta, consente di cucinare gli alimenti su
due altezze contemporaneamente.
Questa funzione consente anche di scongelare
gli alimenti portando il selettore di temperatura
in posizione
.
Standard
Si utilizza per dolci e torte in cui il calore ricevuto deve essere uniforme al fine di ottenere una
consistenza morbida e spugnosa.
Inferiore
Il calore proviene solo dalla parte inferiore del
forno. Adatto per riscaldare piatti o far lievitare
impasti.
Calore superiore
Per riscaldare i piatti.
Grill
Gratinatura e cottura arrosto superficiale.
Consente di dorare lo strato esterno degli
alimenti senza modificarne la parte interna.
Indicato per alimenti come bistecche, costine,
pesce, pane tostato.
MaxiGrill
Consente di gratinare superfici più estese rispetto al Grill, oltre a fornire una maggiore potenza di gratinatura, per ottenere una doratura più
rapida degli alimenti.
Attenzione
Durante l'uso della funzione Grill, MaxiGrill o
MaxiGrill ventilata, lo sportello deve essere
tenuto chiuso.
Aria calda ventilata intensa
Cottura di torte in teglia con fondo asciutto,
come ad esempio crostate, arrostitura intensa di
grandi arrosti e dipollame di grandi dimensioni
come ad esempio oche e tacchini.
Modo Pizza
Cottura di pane, pizza e torte morbide,
conservazione.
Nota
La lampadina resta accesa con qualsiasi funzione di cottrua.
Page 5

5
ITALIANO
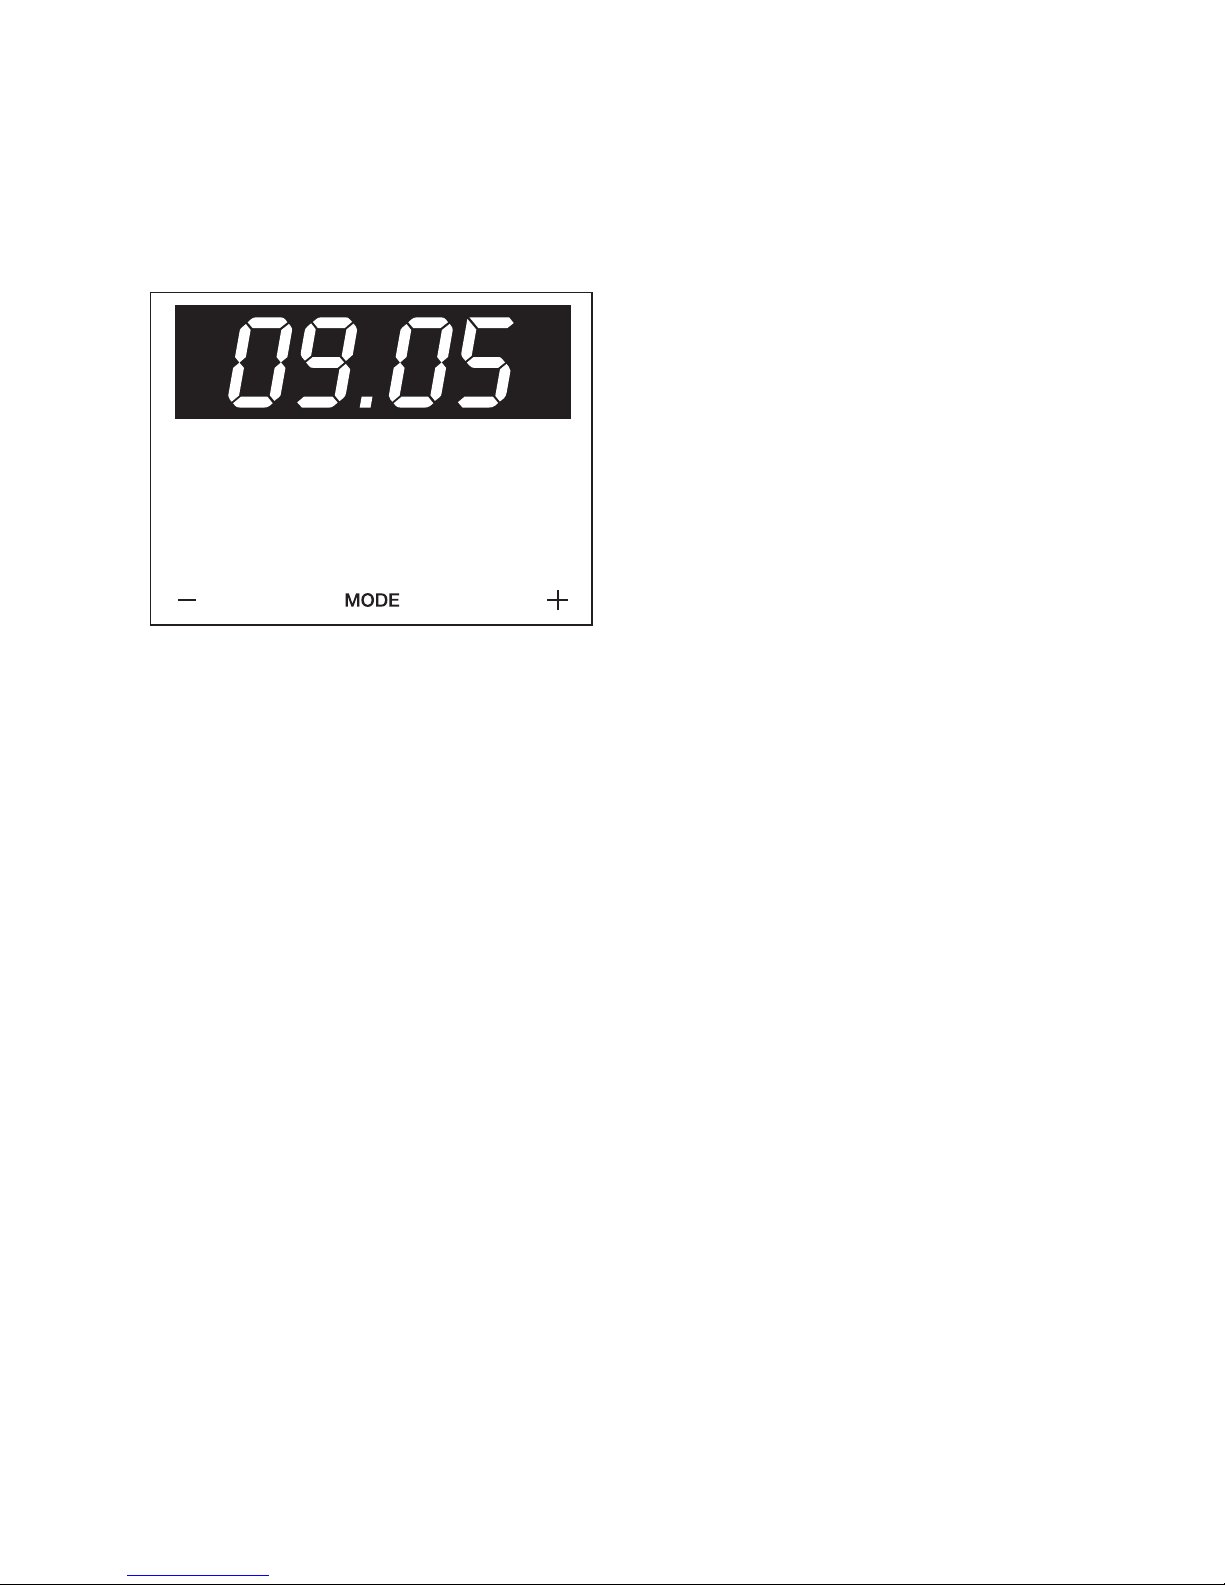
Regolazione dell’orologio elettronico
Al momento di collegare il forno, sul display
dell’orologio lampeggia la parola AUTO e l’indicazione 00:00. Mantenere premuti i simboli
+ e - contemporaneamente, fino a quando viene
emesso un segnale acustico e compare un
punto luminoso lampeggiante tra le cifre
dell’orologio. Dopodiché, toccando i simboli
+ o - si potrà impostare l’orologio. Infine viene
emesso un segnale acustico a conferma dell’impostazione dell’ora. Rimane acceso
il simbolo .
Per modificare l’ora in un secondo momento,
seguire le istruzioni di cui sopra.
Funzionamento manuale
Una volta regolato l’orologio, il forno è pronto
per essere utilizzato. Girando le manopole del
forno, selezionare una temperatura e una funzione di cottura.
Per spegnere il formo, girare le manopole in
posizione .
Funzioni dell’orologio elettronico
Allarme acustico: Emette un segnale acustico
allo scadere del tempo, per questa funzione non
è necessario che il forno sia acceso.
Durata della cottura: consente di cuocere per
il tempo impostato, trascorso il quale il forno si
spegnerà automaticamente.
Ora di fine cottura: consente di cuocere fino
a un orario definito, trascorso il quale il forno
si spegnerà automaticamente.
Durata della cottura e fine cottura: consente di
programmare il tempo e l’ora di fine cottura.
Con questa funzione il forno si accenderà automaticamente all’ora necessaria per cuocere per
il tempo impostato (Tempo di cottura) e terminare la cottura in modo automatico all’ora indicata (Fine cottura).
Modifica del tono del timer acustico
1 Toccare i simboli + e - insieme. Lampeggia un
punto luminoso tra le cifre sullo schermo dell’orologio.
2 Toccare il simbolo MODE per visualizzare l’in-
dicazione “ton1” sullo schermo dell’orologio.
3 Toccando più volte il simbolo -, è possibile
modificare il tono sonoro del timer.
Programmazione dell’allarme acustico
1 Mantenere premuto il simbolo MODE.
Successivamente lampeggia il simbolo
sullo schermo dell’orologio.
2 Selezionare il tempo dopo il quale si desidera
che l’orologio emetta l’allarme acustico toccando i simboli + oppure -.
3 A questo punto verrà emesso un segnale acu-
stico, appare l’ora attuale e il simbolo
rimane acceso, per indicare che il timer
è programmato.
4 Trascorso il tempo impostato, il forno emette-
rà un allarme acustico e il simbolo lampeggerà più rapidamente.
5 Toccare qualsiasi simbolo per silenziare
il segnale acustico. Il simbolo continua
a lampeggiare.
6 Mantenere premuto il simbolo MODE per dis-
attivare la funzione.
È possibile visualizzare in qualsiasi momento
il tempo rimanente, mantenendo premuto il simbolo MODE fino a quando lampeggia simbolo .
A questo punto è possibile modificare il tempo
impostato toccando i simboli + oppure -. Si sentirà un segnale acustico a conferma della modifica.
Programmazione del tempo di cottura
1 Mantenere premuto il simbolo MODE fino al
segnale acustico. Dopodiché, toccando nuovamente il simbolo MODE, appare la parola
“dur” sullo schermo dell’orologio.
2 Selezionare il tempo di cottura toccando
i simboli + oppure -.
Comandi del forno
Page 6

6
3 A questo punto verrà emesso un segnale acu-
stico, appare l’ora attuale e il simbolo “AUTO”
rimane acceso, per indicare che il forno si
spegne automaticamente.
4 Selezionare una funzione e una temperatura
di cottura.
5 Al termine della cottura, il forno si spegne ed
emette un segnale acustico.
6 Toccare qualsiasi simbolo per silenziare
il segnale acustico. Il forno rimane spento
e il simbolo “AUTO” continua a lampeggiare.
7 Mantenere premuto il simbolo MODE fino al
segnale acustico per disattivare la funzione;
infine girare le manopole in posizione per
spegnere il forno.
È possibile visualizzare e modificare in qualsiasi momento il tempo di cottura restante. A tal
fine, seguire le istruzioni di cui sopra.
Per annullare questa funzione, basta toccare
i simboli + e - insieme.
Programmazione dell’ora di fine cottura
1 Mantenere premuto il simbolo MODE fino al
segnale acustico. Successivamente, toccare il
simbolo MODE, fino a quando non compare la
parola “End” sullo schermo dell’orologio.
2 Selezionare l’ora di fine cottura toccando
i simboli + oppure -.
3 A questo punto verrà emesso un segnale acu-
stico, appare l’ora attuale e il simbolo “AUTO”
rimane acceso, per indicare che il forno si
spegne automaticamente.
4 Selezionare una funzione e una temperatura
di cottura.
5 Raggiunta l’ora di termine della cottura,
il forno si spegne ed emette un segnale acustico.
6 Toccare qualsiasi simbolo per silenziare
il segnale acustico. Il forno rimane spento e il
simbolo “AUTO” continua a lampeggiare.
7 Mantenere premuto il simbolo MODE fino al
segnale acustico per disattivare la funzione;
infine girare le manopole in posizione per
spegnere il forno.
Questa funzione può essere utilizzata anche se
il forno è già in funzione. A tal fine seguire le
istruzioni indicate, a eccezione della numero 4.
È possibile visualizzare in qualsiasi momento
l’ora di fine cottura seguendo l’istruzione Nº1.
Per modificare l’ora di fine cottura è necessario
annullare la funzione, toccando i simboli + e insieme, quindi riprogrammarla seguendo
le istruzioni di cui sopra.
Programmazione della durata di cottura
e dell’ora di fine cottura
11 Mantenere premuto il simbolo MODE fino al
segnale acustico. Dopodiché, toccando nuovamente il simbolo MODE, appare la parola
“dur” sullo schermo dell’orologio.
12 Selezionare il tempo di cottura toccando
i simboli + oppure -.
13 Sarà emesso un segnale acustico, sarà
visualizzata l’ora corrente e il simbolo
“AUTO”.
14 Mantenere premuto il simbolo MODE fino al
segnale acustico. Successivamente, toccare
il simbolo MODE, fino a quando non compare “End” sullo schermo dell’orologio.
15 Selezionare l’ora di fine cottura toccando
i simboli + oppure -.
16 Sarà emesso un segnale acustico, sarà
visualizzata l’ora corrente e il simbolo
“AUTO”.
17 Selezionare una funzione e una temperatu-
ra di cottura.
18 Il forno rimane spento, con il simbolo AUTO
sullo schermo dell’orologio. Il forno adesso è
programmato.
Page 7
7
ITALIANO
È possibile visualizzare in qualsiasi momento la
programmazione dell’orologio seguendo le
istruzioni nº 1 e 4.
Per modificare la programmazione è necessario
annullare la funzione, toccando i simboli + e insieme, quindi riprogrammarla seguendo le
istruzioni di cui sopra.
Attenzione
In caso di interruzione dell’alimentazione elettrica, la programmazione dell’orologio elettronico sarà cancellata e sull’orologio sarà visualizzata l’indicazione 00:00. Sarà quindi necessario procedere a una nuova regolazione
e programmazione.
19 Quando si raggiunge l’ora di inizio cottura,
il forno si accenderà e resterà in funzione
per il tempo impostato. Sullo schermo dell’orologio sono illuminati i simboli AUTO e .
10 Raggiunta l’ora programmata di termine
della cottura, il forno si spegne ed emette un
segnale acustico.
11 Premere qualsiasi tasto per silenziare
il segnale acustico. Il forno rimane spento
e il simbolo “AUTO” continua a lampeggiare.
12 Mantenere premuto il simbolo MODE fino al
segnale acustico per disattivare la funzione;
infine girare le manopole in posizione
per spegnere il forno.
Page 8
KS 60 MF 9
Control Panel
11 Control Panel
12 Oven Seal
13 Grill Element
14 Chrome Support
+ Telescopic Guides
15 Oven Grid
16 Cake Tray
17 Deep Tray
18 Hinge
19 Door
10 Air Outlet
for Cooling
11 Cabinet Mounting
12 Grill Screen
13 Smoke Outlet
14 Side light
15 Back Wall Panel
16 Fan
17 Large Inner
Glass Door
1 Function selector
2 Electronic clock
3 Heating indicator light. Indicates that the
heat is going to the food and it goes out
when the set temperature is reached.
4 Temperature selector
2
3
5
7
8
6
9
4
11
10
12
14
13
15
16
17
1
8
1 2 3 4
Page 9

9
ENGLISH
Oven Functions
Switch off oven
Lighting
Turbo
The fan distributes the heat produced by an
element located at the rear of the oven. Due to
the uniform heat distribution, it allows roasting
and baking to take place at two heights at the
same time.
This cooking mode allows defrosting of food. To
do this, set the temperature selector to
position.
Conventional
It is used for sponges and cakes where the heat
received must be uniform to achieve a spongy
texture.
Lower element
Heats only from beneath. Suitable for heating
dishes and raising pastry and similar.
Top Heat
To warm plates.
Grill
For preparing dishes with superficial roasting. It
allows the outer layer to be browned without
affecting the inside of the food. Ideal for flat
food, such as steaks, ribs, fish, toast.
MaxiGrill
Allows greater surfaces to be prepared, than
with the grill, together with higher power
reducing the time required for browning of the
food.
Caution
While using the Grill, MaxiGrill or MaxiGrill with
fan, the door must be kept closed.
Intensive hot air convection
Baking large flat cakes with a dry topping (such
as a crumble topping), intensive roasting of large
joints and large poultry such as goose or turkey.
Pizza mode
Baking bread, pizzas and moist cakes, making
preserves.
Note
The pilot light remains on in any cooking
function.
Page 10

10
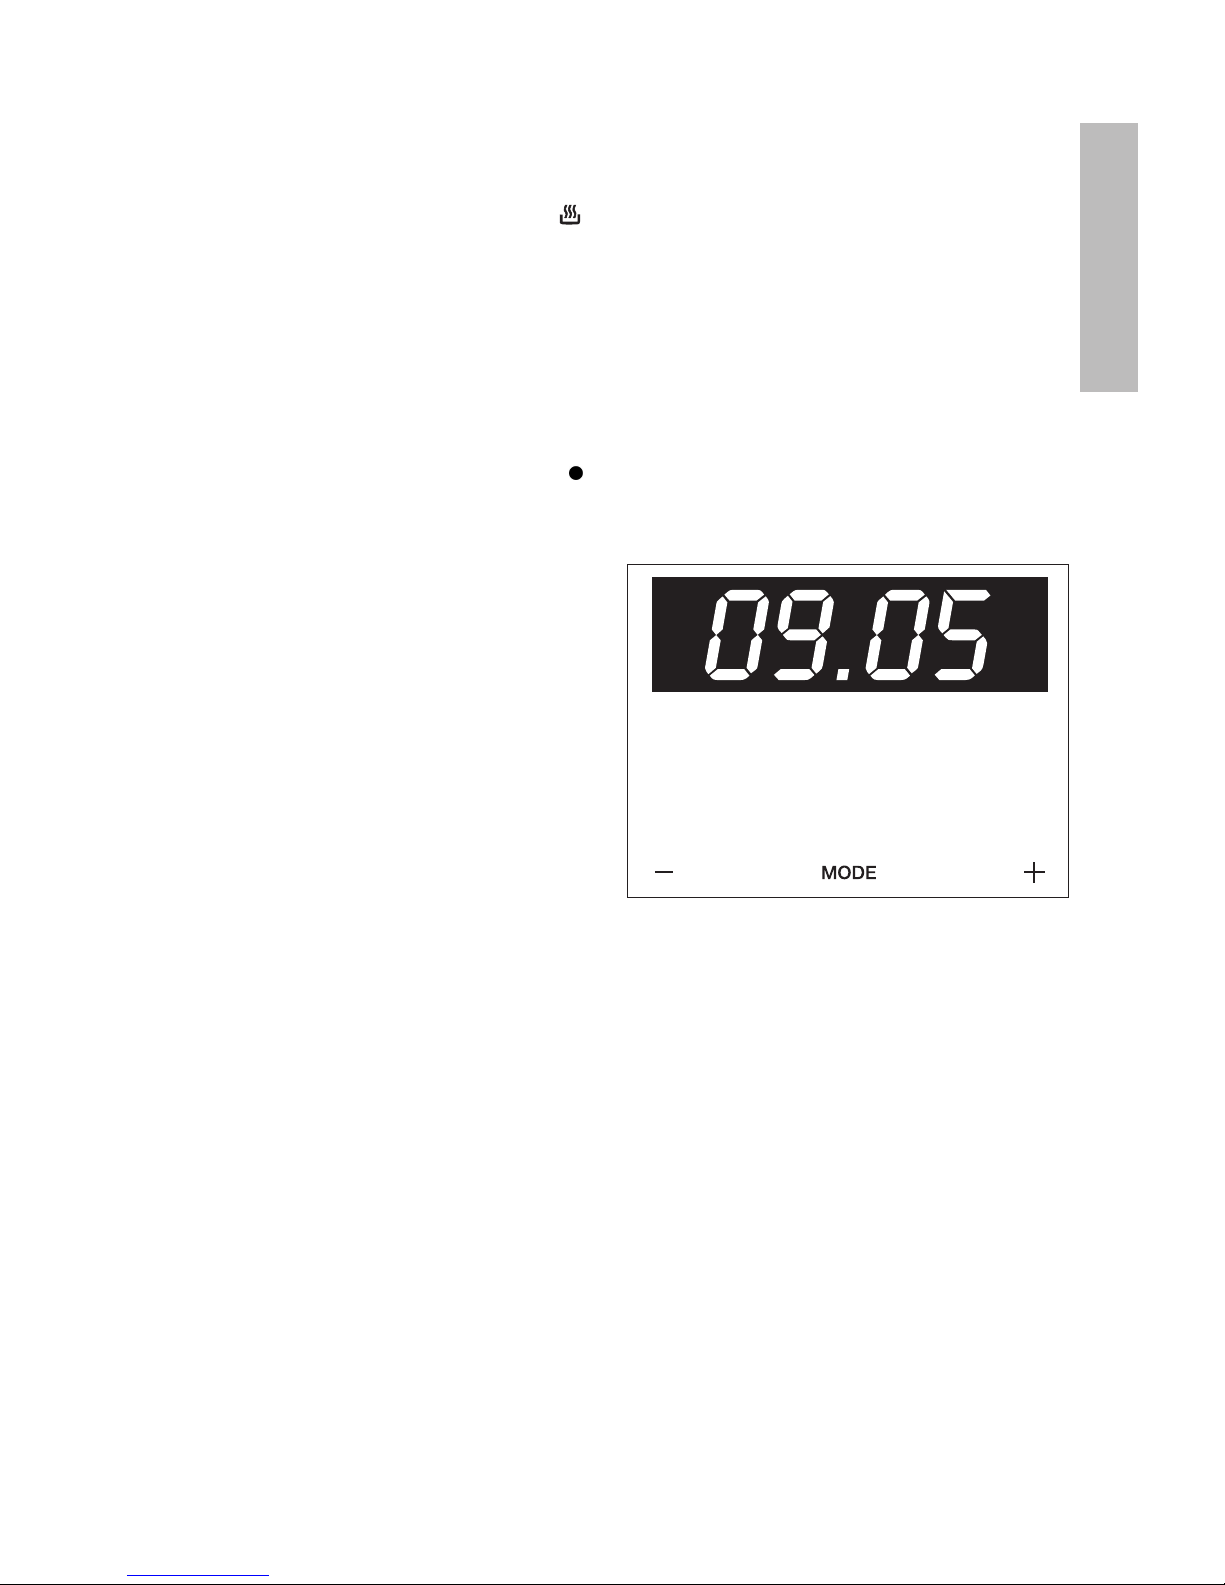
Setting the Electronic Clock
When you switch on the oven, you will notice
that the word AUTO will flash on the display
with 00:00. Press the + and – symbols until
you hear a beep and see a dot flashing
between the digits of the clock. Then set the
clock time by pressing on the + or – symbols.
You will hear a beep to confirm that the time
has been set. The symbol will remain lit.
Should you wish to change the time, follow
these instructions again.
Manual Operation
After setting the clock, the oven is ready for
use. Select a cooking temperature and function by pressing and turning the oven controls.
To turn off the oven, set the controls to .
Electronic Clock Functions
Timer Alarm: An audible signal is produced at
the programmed time, even if the oven is not
being used.
Cooking Time: This function allows you to programme cooking time length, after which the
oven will turn off automatically.
Cooking Stop Time: This function allows you to
programme the time for cooking to stop,
after which the oven will turn off automatically.
Cooking Time and Cooking Stop Time: This
function allows both cooking time length and
the stop time to be programmed. The oven
switches on automatically at the set time and
operates for the cooking time it has been programmed for. It switches itself off automatically at the entered stop time.
Changing the Clock Alarm Tone
1 Press + and - at the same time. You will noti-
ce a dot light up between the + and –
symbols on the clock display.
2 Press MODE and you will see “ton1” light up
on the clock display.
3 The alarm tone can be changed by repea-
tedly pressing on the - symbol.
Programming the Timer Alarm
1 Press on MODE. The symbol will flash on
the clock display.
2 Select the length of time after which you
want the alarm to sound by pressing on
+ or -.
3 The alarm will be confirmed by two conse-
cutive beeps and the display will show the
current time. The symbol will remain lit.
4 At the programmed time, the alarm will
sound and the symbol will begin to flash.
5 Press on any symbol to turn off the alarm.
The symbol will continue to flash.
6 Keep pressing MODE until the function is
switched off.
You can see how much time is left at any time
by pressing MODE until the symbol flashes. You can then change the selected time
by pressing + or -. The beep you hear will confirm the new time has been set.
Programming Cooking Time
1 Press MODE until you hear a beep. Press
MODE again and the word “dur” will appear
on the clock display.
2 Select the cooking time by pressing + or -.
3 You will then hear a beep and the present
time and the word “AUTO” will light up to
show that the oven will switch off automatically.
Oven Use
Page 11

11
4 Select a cooking function and temperature.
5 When the set cooking time is over, the oven
will turn off and an alarm will sound.
6 Press any symbol to turn off the alarm. The
oven will remain off and AUTO will continue
to flash.
7 Keep pressing on MODE until you hear a
beep to show the function is now off. Then
set the controls to to switch off the
oven.
You can see how much time is left and change the remaining cooking time. Follow the previous instructions.
To cancel this function, just press + and - at
the same time.
Programming the Cooking Stop Time
1 Press MODE until you hear a beep. Then
press MODE until the word “End” appears
on the clock display.
2 Select the cooking stop time by pressing
+ or -.
3 You will then hear a beep and the present
time and the word “AUTO” will light up to
show that the oven will switch off automatically.
4 Select a cooking function and temperature.
5 When it is the time for cooking to stop, the
oven will switch off and an alarm will sound.
6 Press any symbol to turn of the alarm. The
oven will remain off and AUTO will continue
to flash.
7 Keep pressing on MODE until you hear a
beep to show the function is now off. Then
set the controls to to switch off the
oven.
You can use this function even if you are cooking with the oven. If this is the case, follow
all of the above instructions except No. 4.
You can see the stop cooking time at any time
by following instruction No.1.
Programming Cooking Time and Cooking
Stop Time
11 Press MODE until you hear a beep. If you
press MODE again, the word “dur” will
appear on the clock display.
12 Select the cooking time by pressing + or -.
13 A beep will then sound and the present
time and AUTO will show.
14 Press MODE until you hear a beep. Then
press MODE until the word “End” appears
on the clock display.
15 Select the stop cooking time by pressing
+ or -.
16 A beep will then sound and the present time
and AUTO will show.
17 Select a cooking function and temperature.
18 The oven will remain off with AUTO on the
clock display. The oven is now programmed.
1
9 When it is the time for cooking to start, the
oven will switch on and cooking will continue for the selected time. The symbols
AUTO and will light up on the clock display.
10 When the programmed time is reach, the
oven will switch itself off and an alarm will
sound.
11 Press any symbol to stop the alarm. The
oven will remain off and AUTO will continue
to flash.
12 Press MODE until you hear a beep in order
to switch off the function. Then set the
controls to to switch off the oven.
You can see the state of the timer at any time
by following instructions 1 and 4.
If you wish to modify the timer setting, you
must cancel the function by pressing + and at the same time. Re-programme the oven by
following the instructions given.
ENGLISH
Page 12
12
Caution
In the event of power failure, your electronic
clock timer settings will be erased and 00:00
will flash on the display. Reset the clock and
programme again.
Page 13
13
KS 60 MF 9
Panneau frontal de commande
11 Panneau de commande
12 Joint de four
13 Résistance du grill
14 Support chromé
+ Guides télescopique
15 Grille
16 Plateau à Patisserie
17 Plateau pour Rôtis
18 Charnière
19 Porte
10 Sortie d’air
de réfrigération
11 Fixation au meuble
12 Écran du grill
13 Sortie des fumées
14 Ampoules latérales
15 Panneau du fond
16 Turbine
17 Vitre intérieure
de grande taille
1 Sélecteur de fonctions
2 Horloge électronique
3 Voyant lumineux de chauffage. Il indique que
la chaleur est transmise à l'aliment et s'éteint
quand la température choisie est atteinte.
4 Sélecteur de températures
2
3
5
7
8
6
9
4
11
10
12
14
13
15
16
17
1
FRANÇAIS
1 2 3 4
Page 14
14
Fonctions du four
Arrêt du four
Eclairage
Turbo
La turbine répartit la chaleur qui provient d’une
résistance située à la partie arrière du four.
Grâce à l’uniformité de la chaleur produite, on
peut cuisiner à 2 hauteurs en même temps.
Cette function permet de décongeler doucement
des mets. Pour l’utilisation, réglez le sélecteur
des temperatures sur la position .
Conventionnel
Utiliser pour les gâteaux et les tartes qui doivent
recevoir une chaleur uniforme et pour obtenir
une texture moelleuse.
Résistance inférieure
La chaleur provient seulement de la partie
inférieure. Approprié pour réchauffer des plats
ou faire lever des pâtes pour pâtisseries et
analogues.
Convenction de voûte
Pour chauffer les plats.
Grill
Pour gratiner et rôtir superficiellement. Permet
de dorer la couche extérieure sans affecter
l'intérieur de l'aliment. Indiqué pour les pièces
plates telles que les beefsteaks, les côtelettes,
les poissons, les toasts.
MaxiGrill
Permet de gratiner des surfaces plus grandes
qu'avec le Grill avec une puissance pour gratiner
supérieure, qui permet ainsi de dorer l'aliment
de façon plus rapide.
Attention
Quand on utilise la fonction Grill, MaxiGrill ou
MaxiGrill avec Turbine, la porte doit rester
fermée.
Chaleur tournante intensive
Cuire des biscuits à garnissage sec (recouverts
de pâte par exemple), griller intensément de
gros rôtis et pour les grosses volailles telles que
dindes et oies.
Fonction «Pizza»
Cuire du pain, des pizzas et des gâteaux
moelleux; stériliser.
Attention
La lampe reste allumée pendant toutes les
fonctions de cuisson.
Page 15
15
FRANÇAIS
Réglage de l’heure sur l’horloge électronique
Lors de la mise en marche du four, vous verrez
le mot AUTO et l’indication 00:00 clignoter sur
l’afficheur de l’horloge. Appuyez simultanément
et de façon prolongée sur les symboles + et -,
vous entendrez alors un bip et vous verrez un
point lumineux clignotant entre les chiffres de
l’horloge. Ensuite, réglez l’heure de l’horloge en
appuyant sur les symboles + ou -. Vous entendrez ensuite un bip pour confirmer l’heure sélectionnée. Le symbole restera allumé.
Si vous désirez modifier l'heure, veuillez suivre les instructions précédemment indiquées.
Fonctionnement manuel
Une fois l’horloge réglée, votre four est prêt à
fonctionner. Appuyez et tournez les commandes du four pour sélectionner une température et une fonction de cuisson.
Pour arrêter le four, placez les commandes
sur la position .
Fonctions de l’horloge électronique
Avertisseur : il génère un signal sonore lors-
que la durée sélectionnée est écoulée. Pour
l’utiliser, il n’est pas nécessaire que le four
soit en cours de cuisson.
Durée de cuisson : permet d’ajuster le temps
de cuisson. Lorsque la durée sélectionnée est
écoulée, le four s’éteint automatiquement.
Heure de fin de cuisson : permet d’ajuster le
temps de cuisson jusqu’à une certaine heure.
Lorsque l’heure sélectionnée est atteinte, le
four s’éteint automatiquement.
Durée et fin de cuisson : permet de programmer la durée et l’heure de fin de cuisson.
Cette fonction permet une mise en marche
automatique du four pour l’heure choisie, et la
durée de cuisson sélectionnée (Durée). Le
four s’éteint automatiquement à l’heure indiquée (fin de cuisson).
Changement de la tonalité de l’avertisseur
de l’horloge
1 Appuyez simultanément sur les symboles +
et -. Vous verrez un point lumineux clignoter
entre les chiffres de l'afficheur de l'horloge.
2 Appuyez sur le symbole MODE et vous
verrez l'indication « ton1 » sur l’afficheur de
l’horloge.
3 En appuyant de manière répétée sur le
symbole -, vous pourrez modifier la tonalité
de l’avertisseur sonore.
Programmation de l’avertisseur
1 Appuyez longtemps sur MODE. Ensuite,
vous verrez le symbole clignoter sur
l’afficheur de l’horloge.
2 Sélectionnez le temps après lequel vous dési-
rez que l’horloge sonne en appuyant + ou -.
3 Vous entendrez alors 1 bip puis l’heure
s’affichera et le symbole restera allumé,
indiquant que l’avertisseur est activé.
4 Une fois écoulé le délai programmé, un si-
gnal sonore se fera entendre et le symbole
se mettra à clignoter.
5 Appuyez sur n’importe quel symbole pour
arrêter le signal sonore. Le symbole continuera de clignoter.
6 Appuyez longtemps sur le symbole MODE
afin de terminer la fonction.
À tout moment vous pouvez visualiser le
temps restant en appuyant de façon prolongée sur le symbole MODE jusqu'à ce que le
symbole clignote. Vous pouvez alors modifier le temps sélectionné en appuyant sur les
symboles + ou -. Vous entendrez ensuite 1 bip
confirmant la modification .
Fonctionnement du four
Page 16

16
Programmation de la durée de cuisson
1 Appuyez longtemps sur le symbole MODE jus-
qu’à l’émission d’un bip. Ensuite, en appuyant de nouveau sur le symbole MODE, le mot
« dur » apparaît sur l’afficheur de l'horloge.
2 Sélectionnez la durée de cuisson en
appuyant sur + ou -.
3 Après quoi, un bip retentit, l’heure apparaît
et le symbole « AUTO » reste allumé, indiquant l’extinction automatique du four.
4 Sélectionnez une fonction et une tempéra-
ture de cuisson.
5 Une fois la durée de cuisson écoulée, le
four s'éteint et un signal sonore retentit.
6 Appuyez sur n’importe quel symbole pour
arrêter le signal sonore. Le four reste éteint
et le symbole « AUTO » continue de clignoter.
7 Appuyez longtemps sur le symbole MODE
jusqu’à l’émission d’un bip pour terminer la
fonction. Ensuite, mettez les commandes
en position pour éteindre le four.
À tout moment, vous pouvez visualiser et
modifier le temps de cuisson restant. Pour ce
faire, veuillez suivre les instructions précédemment indiquées.
Si vous désirez annuler cette fonction, il vous
suffit d’appuyer simultanément sur les
symbole + et -.
Programmation de l’heure de fin de cuisson
1 Appuyez longtemps sur le symbole MODE
jusqu’à l’émission d’un bip. Ensuite,
pressez le symbole MODE jusqu’à l’apparition du mot « End » sur l’afficheur de l’horloge.
2 Sélectionnez l’heure de fin de cuisson en
appuyant sur + ou -.
3 Après quoi, un bip retentit, l’heure apparaît
et le symbole « AUTO » reste allumé, indiquant l’extinction automatique du four.
4 Sélectionnez une fonction et une tempéra-
ture de cuisson.
5 Une fois arrivé à l’heure de fin de cuisson,
le four s'éteint et un signal sonore retentit.
6 Appuyez sur n’importe quel symbole pour
arrêter le signal sonore. Le four reste éteint
et le symbole « AUTO » continue de clignoter.
7 Appuyez longtemps sur le symbole MODE
jusqu’à l’émission d’un bip pour terminer la
fonction. Ensuite, mettez les commandes
en position pour éteindre le four.
Vous pouvez utiliser cette fonction même en
cours de cuisson. Il suffit alors de suivre ces
mêmes instructions, à l’exception de l’étape 4.
À tout moment, vous pouvez visualiser l’heure
de fin de cuisson en suivant l’instruction nº 1.
Si vous souhaitez modifier l’heure de fin de
cuisson, vous devrez annuler la fonction en
appuyant simultanément sur + et -, et la reprogrammer en suivant les instructions précédemment indiquées.
Programmation de la durée et de la fin de
cuisson
11 Appuyez longtemps sur le symbole MODE
jusqu’à l’émission d’un bip. Ensuite, en
appuyant de nouveau sur le symbole
MODE, le mot « dur » apparaît sur l’afficheur de l'horloge.
12 Sélectionnez la durée de cuisson en ap-
puyant sur + ou -.
13 Après quoi, un bip retentit, l’heure appa-
raît et le symbole « AUTO ».
14 Appuyez longtemps sur le symbole MODE
jusqu’à l’émission d’un bip. Ensuite, appuyez sur le symbole MODE jusqu’à apparition du mot « End » sur l’afficheur de
l’horloge.
15 Sélectionnez l’heure de fin de cuisson en
appuyant sur + ou -.
16 Après quoi, un bip retentit, l’heure appa-
raît et le symbole « AUTO ».
17 Sélectionnez une fonction et une tempéra-
ture de cuisson.
18 Le four reste éteint. Le symbole AUTO
reste affiché sur l’afficheur de l’horloge.
Votre four est programmé.
Page 17

17
FRANÇAIS
19 Lorsque vous atteindrez l’heure du début
de la cuisson, le four se mettra en marche
et la cuisson se fera durant le temps
sélectionné. Sur l’afficheur de l’horloge,
les symboles AUTO et sont allumés.
10 Une fois arrivé à l’heure de fin de cuisson
programmée, le four s’éteint et un signal
sonore se retentit.
11 Appuyez sur n’importe quel symbole pour
arrêter le signal sonore. Le four reste
éteint et le symbole « AUTO » continue de
clignoter.
12 Appuyez longtemps sur le symbole MODE
jusqu’à l’émission d’un bip pour arrêter la
fonction. Ensuite, mettez les commandes
en position pour éteindre le four.
À tout moment, vous pouvez visualiser la programmation de votre horloge et suivant les
instructions nº 1 et 4.
Si vous désirez modifier la programmation,
vous devrez annuler la fonction en appuyant
simultanément sur + et -, et la reprogrammer
en suivant les instructions précédemment
indiquées.
Attention
En cas de coupure de courant, toute la programmation de l’horloge électronique sera
annulée et l’indication 00:00 clignotera sur
l’afficheur de l’horloge. Il vous faudra alors
remettre l’horloge à l’heure et procéder à une
nouvelle programmation.
Page 18

KS 60 MF 9
Bedienfeld
11 Bedienfeld
12 Backofendichtung
13 Grillwiderstand
14 Verchromte Halterung
+ Teleskopführung
15 Rost
16 Backblech tief
17 Backblech
18 Scharnier
19 Tür
10 Kühlluftaustritt
11 Befestigung am
Einbauschrank
12 Grillblech
13 Abzug
14 Seitenlampen
15 Rückwand
16 Ventilator
17 Große Innenglasscheibe
1 Funktionswähler.
2 Elektronikuhr.
3 Kontrolleuchte Heizen zeigt die Einschaltung
der Heizelemente an und verlischt, wenn die
eingestellte Temperatur erreicht ist.
4 Temperaturwähler.
2
3
5
7
8
6
9
4
11
10
12
14
13
15
16
17
1
18
1 2 3 4
Page 19
19
DEUTSCH
Backofenfunktionen
Ausschalten des Herds
Beleuchtung
Turbo
Der Lufter verteilt die von einem an der
Ruckseite des Herds angeordneten
Heizwiderstand erzeugte Wärme. Auf Grund der
erzeugten gleichmäßigen Temperatur verteilung
ist ein Garen in 2 Etagen gleichzeitig möglich.
Wenn Sie den Temperaturregler auf null stellen,
können Sie mit dieser Funktion
die
Nahrungsmittel auftauen.
Normal
Verwendung fur Kuchen und Tortenböden, bei
denen die Wärmeeinwirkung gleichmäßig sein
muß, damit diese gut aufgehen.
Unterhitze
Es wird nur von der Unterseite Wärme zugefuhrt.
Geeignet zum Anwärmen von Tellern, zum
Aufgehen von Teigmassen oder fur ähnliche
Anwendungen.
Oberhitze
Tellerwärmen.
Grill
Gratinieren und Anbräunen. Gestattet das
Anbräunen der Außenschicht, ohne das Innere
der Nahrungsmittel zu beeinflussen. Geeignet
fur flache Stucke wie Beefsteak, Rippchen,
Fisch, Toastbrot.
MaxiGrill
Grillen auf größerer Oberfläche und mit größerer
Leistung als mit dem Grill, hierdurch erfolgt ein
schnelleres Bräunen der Speisen.
Achtung
Bei Benutzung der Funktionen Grill muß die
Herdtür geschlossen sein.
Intensiv-Heißluft
Backen von Blechkuchen mit trockenem Belag
(z. B. Streusel), Intensivbraten von großen
Braten und großem Geflügel wie z. B. Gänse und
Puten.
Pizza-Stufe
Backen von Brot, Pizza und feuchten Kuchen,
Einkochen.
Achtung
Die Beleuchtung ist bei allen Kochfunktionen
eingeschaltet.
Page 20

20
Einstellen der Uhrzeit der Elektronikuhr
Wenn Sie den Backofen an das Netz
anschließen, blinken auf der Uhr das Wort
AUTO und die Anzeige 00:00. Drücken Sie
gleichzeitig und länger die Symbole + und -,
dann hören Sie einen Piepton und sehen
einen blinkenden Leuchtpunkt zwischen den
Ziffern der Uhr; danach drücken Sie zur
Zeiteinstellung die Symbole + oder –.
Schließlich hören Sie einen Piepton zur
Bestätigung der gewählten Uhrzeit. Das
Symbol bleibt erleuchtet.
Wenn Sie irgendwann die Uhrzeit ändern
wollen, folgen Sie den vorstehend erwähnten
Anleitungen.
Manueller Betrieb
Nach Einstellung der Uhrzeit ist der Backofen
betriebsbereit. Durch Drücken und Drehen der
Bedienknöpfe können Sie Temperatur und
Garfunktionen wählen.
Um den Backofen auszuschalten, drehen Sie
den Knopf auf .
Funktionen der Elektronikuhr
Küchenwecker: Erzeugt ein Signal am Ende
der eingestellten Zeit, unabhängig davon, ob
der Backofen heizt oder nicht.
Garzeit-Dauer: Ermöglicht das Garen während
der gewählten Zeit, danach schaltet sich der
Backofen automatisch aus.
Garzeit-Ende: Ermöglicht die Garung bis zu
einer vorgewählten Zeit; danach schaltet sich
der Backofen automatisch ab.
Garzeit-Dauer und Garzeit-Ende: Ermöglicht
die Einstellung der Dauer und der Endzeit der
Garung. Mit dieser Funktion schaltet sich der
Backofen automatisch zu der passenden
Uhrzeit für die vorgewählte Garzeit (Dauer) ein
und schaltet sich automatisch beim Erreichen
der eingestellten Zeit (Garzeit-Ende) ab.
Ändern des Wecker-Tons
1 Berühren Sie gleichzeitig die Symbole +
und -. Sie sehen einen blinkenden
Leuchtpunkt zwischen den Ziffern der Uhr.
2 Berühren Sie das Symbol MODE und Sie
sehen die Anzeige “ton1” auf der Uhr.
3 Indem Sie das Symbol – wiederholt
berühren, können Sie den Ton des Weckers
ändern.
Programmierung des Weckers
1 Drücken Sie das Symbol MODE längere Zeit.
Danach blinkt das Symbol auf der Uhr.
2 Wählen Sie die Zeitdauer, nach deren Ablauf
der Wecker ertönen soll, indem Sie die
Symbole + oder – drücken.
3 Danach ertönt ein Piepton, die aktuelle
Uhrzeit wird angezeigt und das Symbol
bleibt erleuchtet, um anzuzeigen, dass
der Wecker programmiert ist.
4 Wenn die eingestellte Zeit abgelaufen ist,
ertönt ein Signal und das Symbol fängt
an zu blinken.
5 Berühren Sie irgendein Symbol, um das
Signal abzustellen. Das Symbol blinkt
weiterhin.
6 Drücken Sie längere Zeit das Symbol MODE,
um die Funktion auszuschalten.
Sie können jederzeit die Restzeit sehen,
indem Sie das Symbol MODE lange drücken,
bis das Symbol blinkt. So können Sie
auch die gewählte Zeit ändern, indem Sie
die Symbole + oder – berühren. Danach
hören Sie einen Piepton zur Bestätigung der
Änderung.
Programmierung der Gar-Dauer
1 Drücken Sie so lange das Symbol MODE, bis
ein Piep ertönt. Danach berühren Sie
nochmals das Symbol MODE und das Wort
"dur" erscheint auf der Uhr.
2 Wählen Sie die Gardauer, indem Sie die
Symbole + oder – drücken.
Bedienung des Backofens
Page 21

21
3 Danach ertönt ein Piep, die aktuelle Uhrzeit
wird angezeigt und das Symbol "AUTO"
leuchtet permanent und zeigt damit an,
dass der Backofen sich automatisch
abschalten wird.
4 Wählen Sie eine Funktion und eine Gar-
Temperatur.
5 Wenn die Garzeit abgelaufen ist, schaltet
sich der Backofen ab und es ertönt ein
Signal.
6 Berühren Sie irgendein Symbol, um das
Signal abzustellen. Der Backofen bleibt ausgeschaltet; das Symbol "AUTO" blinkt.
7 Drücken Sie so lange das Symbol MODE, bis
ein Piep ertönt, um die Funktion zu beenden.
Danach drehen Sie den Knopf auf Position
, um den Backofen abzuschalten.
Sie können jederzeit die verbleibende Garzeit
sehen und ändern. Dazu befolgen Sie bitte die
vorher erwähnten Anleitungen.
Wenn Sie diese Funktion beenden möchten,
drücken Sie gleichzeitig + und -.
Programmierung des Garzeit-Endes
1 Drücken Sie so lange das Symbol MODE,
bis ein Piep ertönt. Danach drücken Sie das
Symbol MODE, bis das Wort "End" auf der
Uhr erscheint.
2 Wählen Sie das Garzeit-Ende, indem Sie die
Symbole + oder – drücken.
3 Danach ertönt ein Piep, die aktuelle Uhrzeit
wird angezeigt und das Symbol "AUTO"
leuchtet permanent und zeigt damit an,
dass der Backofen sich automatisch
abschalten wird.
4 Wählen Sie eine Funktion und eine Gar-
Temperatur.
5 Wenn die eingestellte Uhrzeit erreicht ist,
schaltet sich der Backofen ab und es ertönt
ein Signal.
6 Berühren Sie irgendein Symbol, um das
Signal abzustellen. Der Backofen bleibt ausgeschaltet; das Symbol "AUTO" blinkt.
7 Drücken Sie so lange das Symbol MODE,
bis ein Piep ertönt, um die Funktion zu
beenden. Danach drehen Sie den Knopf auf
Position , um den Backofen abzuschalten.
Sie können diese Funktion einstellen, auch
wenn der Backofen schon in Betrieb ist. Dazu
folgen Sie den Anleitungen unter Punkt 4.
Sie können jederzeit das Garzeit-Ende sehen,
indem Sie den Anleitungen unter Nr. 1 folgen.
Wenn Sie das Garzeit-Ende ändern wollen,
müssen Sie die Funktion beenden, indem Sie
gleichzeitig die Symbole + und – drücken und
gemäß den vorher erwähnten Anleitungen neu
programmieren.
Programmierung der Gar-Dauer und des
Gar-Zeitendes
11 Drücken Sie so lange das Symbol MODE,
bis ein Piep ertönt. Danach berühren Sie
nochmals das Symbol MODE. Das Wort
"dur" erscheint auf der Uhr.
12 Wählen Sie die Gardauer, indem Sie die
Symbole + oder – drücken.
13 Danach ertönt ein Piep, die aktuelle
Uhrzeit und das Symbol "AUTO" werden
angezeigt.
14 Drücken Sie so lange das Symbol MODE,
bis ein Piep ertönt. Danach berühren Sie
das Symbol MODE, bis das Wort "End" auf
der Uhr erscheint.
15 Wählen Sie das Garzeit-Ende, indem Sie
die Symbole + oder – drücken.
16 Danach ertönt ein Piep, die aktuelle
Uhrzeit und das Symbol "AUTO" werden
angezeigt.
17 Wählen Sie eine Funktion und eine Gar-
Temperatur.
18 Der Backofen bleibt ausgeschaltet, doch
das Symbol "AUTO" leuchtet auf der Uhr.
Der Backofen ist nun programmiert.
19 Wenn die eingestellte Uhrzeit des Gar-
Beginns erreicht ist, schaltet sich der
Backofen ein und führt die Garung während der vorgewählten Zeit durch. Auf der
Uhr leuchten die Symbole AUTO und .
DEUTSCH
Page 22
22
10 Wird das eingestellte Garzeit-Ende
erreicht, schaltet sich der Backofen ab. Es
ertönt ein Signal.
11 Berühren Sie irgendein Symbol, um das
Signal abzustellen. Der Backofen bleibt
ausgeschaltet; das Symbol "AUTO" blinkt.
12 Drücken Sie so lange das Symbol MODE,
bis ein Piep ertönt, um die Funktion zu
beenden. Danach drehen Sie den Knopf
auf Position , um den Backofen
abzuschalten.
Sie können jederzeit die Programmierung Ihrer
Uhr sehen, indem Sie den Anleitungen unter
Nr. 1 und 4 folgen.
Wenn Sie die Programmierung ändern wollen,
müssen Sie die Funktion beenden, indem Sie
gleichzeitig die Symbole + und – drücken und
gemäß den vorher erwähnten Anleitungen neu
programmieren.
Achtung
Im Fall eines Stromausfalls wird die gesamte
Programmierung der Elektronikuhr gelöscht,
und es erscheint die blinkende Anzeige 00:00
auf der Uhr. Sie müssen die Uhr wieder
einstellen und erneut programmieren.
Page 23
2
3
5
7
8
6
9
4
11
10
12
14
13
15
16
17
23
KS 60 MF 9
Frontal de Mandos
1 Frente de Mandos
2 Junta de Horno
3 Resistencia de Grill
4 Soporte Cromado
+ Guías Telescópicas
5 Parrilla
6 Bandeja pastelera
7 Bandeja profunda
8 Bisagra
9 Puerta
10 Salida de Aire
de Refrigeración
11 Fijación al Mueble
12 Pantalla de Grill
13 Salida de Humos
14 Lámpara lateral
15 Panel Trasero
16 Turbina
17 Cristal Interior
de Gran Tamaño
1 Selector de funciones.
2 Reloj electrónico.
3 Piloto de calentamiento. Indica la transmisión
de calor al alimento y se apaga al alcanzar la
temperatura seleccionada.
4 Selector de temperaturas.
1
ESPAÑOL
1 2 3 4
Page 24

24
Funciones del Horno
Desconexión del horno
Illuminación
Turbo
La turbina reparte el calor que proviene de una
resistencia situada en la parte trasera del horno.
Por la uniformidad de la temperatura que se
produce, permite cocinar en 2 alturas al mismo
tiempo.
Esta función también permite descongelar alimentos, colocando el selector de temperaturas
en posición
.
Convencional
Se usa en bizcochos y tartas en los que el calor
recibido debe ser uniforme y para que consigan
una textura esponjosa.
Solera
Calor sólo desde la parte inferior. Apropiado
para calentar platos o levantar masas de repostería y afines.
Calor superior
Para calentar platos.
Grill
Gratinado y asado superficial. Permite el dorado de la capa exterior sin afectar al interior del
alimento. Indicado para piezas planas como
bistec, costillas, pescado, tostadas .
MaxiGrill
Permite el gratinado en mayores superficies que
en Grill, así como una mayor potencia de gratinado, obteniendo un dorado del alimento de
forma más rápida.
Atención
Durante el uso de la función Grill la puerta
debe mantenerse cerrada.
Aire caliente intensivo
Horneado de tartas con guarniciones secas p.
ej. azúcares; asado intensivo de asados grandes
y para grandes aves como p. ej. gansos y pavos.
Modo Pizza
Horneado de pan, pizza y pasteles húmedos,
confitar.
Nota
La lámpara permanece encendida en cualquier
función de cocinado.
Page 25
25
ESPAÑOL
Puesta en Hora del Reloj Electrónico
Al conectar su horno, observará que en la
pantalla del reloj aparece parpadeando la
palabra AUTO y la indicación 00:00. Toque a
la vez y de forma prolongada los símbolos
+ y -, entonces oirá un beep y verá un punto
luminoso parpadeando entre los dígitos del
reloj; a continuación tocando en los símbolos
+ ó – pondrá el reloj en hora. Finalmente
oirá un beep como confirmación de la
hora seleccionada. El símbolo quedará
iluminado.
Si en cualquier momento desea modificar
la hora, siga las instrucciones indicadas
anteriormente.
Funcionamiento Manual
Tras poner el reloj en hora, su horno está listo
para cocinar. Girando los mandos del horno,
seleccione una temperatura y una función de
cocinado.
Para apagar el horno, ponga los mandos en
posición .
Funciones del Reloj Electrónico
Avisador: Genera una señal acústica al cabo
del tiempo, para ello no es necesario que el
horno esté cocinando.
Duración del Cocinado: Permite cocinar durante un tiempo seleccionado, a continuación el
horno se apagará de forma automática.
Hora de Finalización del Cocinado: Permite
cocinar hasta una hora establecida, a continuación el horno se apagará de forma automática.
Duración y Fin del Cocinado: Permite programar la duración y la hora de finalización del
cocinado. Con esta función el horno se pondrá en marcha de forma automática a la hora
necesaria para cocinar durante el tiempo
seleccionado (Duración) y finalizando de
forma automática a la hora que le hayamos
indicado (Fin del Cocinado).
Cambio del tono de sonido del avisador
del reloj
1 Toque a la vez en los símbolos + y -. Verá
parpadeando un punto luminoso entre los
dígitos de la pantalla del reloj.
2 Toque en el símbolo MODE y verá la
indicación “ton1” en la pantalla del reloj.
3 Tocando repetidamente el símbolo -, podrá
modificar el tono sonoro del avisador.
Programación del Avisador
1 Toque de forma prolongada en el símbolo
MODE. A continuación verá el símbolo
parpadeando en la pantalla del reloj.
2 Seleccione el tiempo tras el cual desea que
el reloj avise, tocando en los símbolos + ó -.
3 Posteriormente sonará 1 beep, se mostrará
la hora actual y el símbolo permanecerá
iluminado, indicando que el avisador ya
está programado.
4 Transcurrido el tiempo programado, sonará
una señal acústica y el símbolo empezará a parpadear.
5 Toque en cualquier símbolo para detener la
señal acústica. El símbolo permanecerá
parpadeando.
6 Toque de forma prolongada el símbolo
MODE para finalizar la función.
En cualquier momento usted puede visualizar
el tiempo restante, tocando de forma
prolongada en el símbolo MODE hasta que el
símbolo parpadee. En ese momento usted
puede modificar el tiempo seleccionado
tocando en los símbolos + ó -. A continuación
escuchará 1 beep como confirmación del
cambio.
Manejo del Horno
Page 26

26
Programación de la Duración del Cocinado
1 Toque de forma prolongada el símbolo
MODE hasta que oiga un beep. A
continuación tocando de nuevo el símbolo
MODE, aparecerá la palabra “dur” en la
pantalla del reloj.
2 Seleccione la duración del cocinado,
tocando en los símbolos + ó - .
3 Posteriormente sonará 1 beep, se mostrará
la hora actual y el símbolo “AUTO”
permanecerá iluminado, indicando que su
horno se apagará de forma automática.
4 Seleccione una función y una temperatura
de cocinado.
5 Transcurrida la duración del cocinado, el
horno se desconectará y sonará una señal
acústica.
6 Toque en cualquier símbolo para detener
la señal acústica. El horno permanecerá
apagado y con el símbolo “AUTO”
parpadeando.
7 Toque de forma prolongada el símbolo MODE
hasta que oiga un beep para finalizar la función; a continuación ponga los
mandos en posición para apagar el horno.
En cualquier momento usted puede visualizar
y modificar el tiempo restante de cocinado.
Para hacerlo siga las instrucciones indicadas
anteriormente.
Si desea cancelar esta función basta con
tocar a la vez los símbolos + y -.
Programación de la Hora de Finalización del
Cocinado
1 Toque de forma prolongada el símbolo
MODE hasta que oiga un beep. A
continuación toque el símbolo MODE, hasta
que aparezca la palabra “End” en la
pantalla del reloj.
2 Seleccione la hora de finalización del
cocinado, tocando en los símbolos + ó - .
3 Posteriormente sonará 1 beep, se mostrará
la hora actual y el símbolo “AUTO”
permanecerá iluminado, indicando que su
horno se apagará de forma automática.
4 Seleccione una función y una temperatura de
cocinado.
5 Alcanzada la hora de finalización del
cocinado, el horno se desconectará y
sonará una señal acústica.
6 Toque en cualquier símbolo para detener
la señal acústica. El horno permanecerá
apagado y con el símbolo “AUTO”
parpadeando.
7 Toque de forma prolongada el símbolo
MODE hasta que oiga un beep para finalizar
la función; a continuación ponga los
mandos en posición para apagar el
horno.
Puede emplear esta función aunque usted
ya esté cocinando con su horno. Para ello
siga las instrucciones indicadas salvo la
número 4.
En cualquier momento usted puede visualizar
la hora de finalización del cocinado siguiendo
la instrucción Nº1. Si desea modificar la hora
de finalización deberá cancelar la función,
tocando a la vez los símbolos + y -, y programarla de nuevo siguiendo las instrucciones
indicadas anteriormente.
Programación de la Duración y Fin del
Cocinado
11 Toque de forma prolongada el símbolo
MODE hasta que oiga un beep. A
continuación tocando de nuevo el símbolo
MODE, aparecerá la palabra “dur” en la
pantalla del reloj.
12 Seleccione la duración del cocinado,
tocando en los símbolos + ó - .
13 Posteriormente sonará 1 beep, se
mostrará la hora actual y el símbolo
“AUTO”.
14 Toque de forma prolongada el símbolo
MODE hasta que oiga un beep. A
continuación toque el símbolo MODE
hasta que aparezca la palabra “End” en la
pantalla del reloj.
15 Seleccione la hora de finalización del
cocinado, tocando en los símbolos + ó - .
Page 27

27
ESPAÑOL
En cualquier momento usted puede visualizar
la programación de su reloj siguiendo las instrucciones n.º 1 y 4.
Si desea modificar la programación deberá
cancelar la función, tocando a la vez los símbolos + y –, y programarla de nuevo siguiendo
las instrucciones indicadas anteriormente.
Atención
En caso de un corte de suministro eléctrico,
se borrará toda la programación de su reloj
electrónico y aparecerá parpadeando la
indicación 00:00 en el reloj. Deberá ponerlo
en hora y programarlo de nuevo.
16 Posteriormente sonará 1 beep, se
mostrará la hora actual y el símbolo
“AUTO”.
17 Seleccione una función y una temperatura
de cocinado.
18 El horno permanecerá desconectado, con
el símbolo AUTO en la pantalla del reloj.
Su horno está programado.
19 Cuando se alcance la hora de comienzo
del cocinado, el horno se pondrá en
marcha y se realizará el cocinado durante
el tiempo seleccionado. En la pantalla del
reloj verá iluminado los símbolos AUTO
y.
10 Alcanzada la hora de finalización que
se había programado, el horno se
desconectará y sonará una señal acústica.
11 Pulse cualquier tecla para detener la señal
acústica. El horno permanecerá apagado y
con el símbolo “AUTO” parpadeando.
12 Toque de forma prolongada el símbolo
MODE hasta que oiga un beep para
finalizar la función; a continuación ponga los
mandos en posición para apagar el
horno.
Page 28

2
3
5
7
8
6
9
4
11
10
12
14
13
15
16
17
KS 60 MF 9
Панель управления
1 Панель управления
2 Прокладка духовки
3 Сопротивление гриля
4 Хромированные опоры
+ телескопические
направляющие
5 Решетка
6 Кондитерский противень
7 Глубокий противень
8 Петли
9 Дверца
10 Выход охлаждающего
воздуха
11 Закрепление в мебель
12 Экран гриля
13 Выход дыма
14 Боковая лампочка
15 Задняя панель
16 Турбина
17 Внутреннее стекло
большого размера
1 Выбор функций.
2 Электронные часы.
3 Индикатор нагрева. Указывает на нагревание
продукта, отключается при достижении
заданной температуры.
4 Выбор температур.
1
28
1 2 3 4
Page 29

29
РУССКИЙ
Функции духового шкафа
Отключение духового шкафа
Освещение
Tурбо
Турбина распространяет тепло, исходящее от
нагревательного элемента, расположенного
на задней панели духового шкафа. Благодаря
однородности температуры, эта функция
позволяет готовить на двух уровнях
одновременно.
Функция турбо также рекомендуется для
разморозки продуктов, для этого следует
установить ручку выбора температур в
положение
.
Обычный
Используется для бисквитов и тортов, где для
достижения мягкой и пористой стуртуры требуется однородная подача тепла.
Под
Тепло поступает с нижней части духового
шкафа. Функция пригодна для разогрева блюд
или подъема теста для кондитерских и
подобных им изделий.
Нагрев сверху
Для разогрева блюд.
Гриль
Гратен и поверхностное запекание. Позволяет
достичь золотистой корочки и не пересушить
внутреннюю часть продукта. Предназначается
для плоских порционных кусков, таких как,
например, бифштекс, ребрышки, рыба или
тосты.
МаксиГриль
Позволяет поверхностное запекание на
бóльших, чем при обычной функции гриля
поверхностях. Бóльшая мощность запекания
позволяет быстрее добиться золотистой
корочки.
Внимание!
Во время использования функций Гриль,
МаксиГриль или МаксиГриль с турбиной дверца духового шкафа должна быть закрыта!
Интенсивный горячий воздух
Выпечка тортов с сухими украшениями,
интенсивное запекание больших порций или
больших птиц, таких как, например, гусь или
индейка.
Режим пицца
Выпечка хлеба, пиццы и влажных пирожных.
Конфит.
Примечание
Лампочка внутри духовки остается
включенной при любой функции
приготовления.
Page 30

30
Установка текущего времени на электронных
часах
При подключении Вашего духового шкафа, на
экране часов появится мигающее слово AUTO
и значение 00:00. Дотрагивайтесь до
символов + и - до тех пор, пока не услышите
звуковой сигнал и не увидите мигающую точку
между цифрами часов. Затем дотроньтесь до
символа + или – и установите текущее время.
В заключение Вы услышите звуковой сигнал
означающий установку часа. Символ будет
светиться непрерывно.
Вы можете изменить показания часов в любое
время, для этого следуйте вышеприведенным
инструкциям.
Ручное управление
После установки текущего времени Ваша
духовка готова к началу работы. Поворачивая
ручки управления духовым шкафом, выберите
температуру и функцию приготовления.
Для отключения духового шкафа установите
ручки в положение .
Функции электронных часов
Таймер: По истечение заданного времени
таймер издает звуковой сигнал. Для работы
таймера необходимо чтобы духовой шкаф
находился в процессе работы.
Длительность приготовления: Позволяет
готовить в течение заданного времени, по
истечение которого духовой шкаф отключится
автоматически.
Время окончания приготовления: Позволяет
готовить до определенного часа, затем
духовой шкаф отключится автоматически.
Длительность и окончание приготовления:
Позволяет программировать длительность и
время окончания готовки. При помощи этой
функции духовой шкаф начнет работу
автоматически в заданый час и будет готовить в
течение выбранного времени (Длительность), в
заданное время произойдет автоматическое
отключение духового шкафа (Окончание
приготовления).
Изменение тональности звукового сигнала
таймера
1 Дотроньтесь один раз до символов + и -.
Появиться мигающая точка между цифрами
электронных часов.
2 Дотроньтесь до символа MODE и на экране
часов появится указание “ton1”.
3 Коротко дотрагиваясь до символа -, Вы
можете изменить звук таймера.
Программирование таймера
1 Дотрагивайтесь до символа MODE до тех
пор, пока символ на экране часов не
замигает.
2 Нажимая на символы + или - выберите
отрезок времени через который таймер
должен оповестить Вас
3 Вы услышите 1 звуковой сигнал, появится
текущее время и символ будет ровно
светиться. Ваш таймер запрограммирован.
4 По истечение заданного времени Вы
услышите звуковой сигнал и символ
замигает.
5 Для остановки звукового сигнала
дотроньтесь до любого. Символ будет
продолжать мигать.
6 Для окончания функции следует длительно
нажать на символ MODE.
В любой момент Вы можете увидеть время
оставшееся до окончания работы, для этого
следует длительно нажимать на символ MODE
до тех пор пока символ не начнет мигать.
В этот момент Вы можете изменить время
дотрагиваясь до символов + или -. Затем, Вы
услышите 1 звуковой сигнал означающий
внесение изменения.
Управление духовым шкафом
Page 31

31
Программирование времени приготовления
1 Длительно нажимайте на символ MODE до
тех пор, пока не услышите сигнал. Снова
дотронувшись до символа MODE, на экране
часов появиться слово “dur”.
2 Выберите время длительности
приготовления дотрагиваясь до символов
+ или - .
3 Затем Вы услышите 1 сигнал, появится
текущее время и символ “AUTO” будет
светиться указывая на то, что Ваш духовой
шкаф отключится автоматически.
4 Выберите функцию и температуру
приготовления
5 По истечение времени длительности
приготовления духовка отклчится и прозвучит
сигнал
6 Для остановки звукового сигнала нажмите
на любой символ. Духовой шкаф отключен и
символ “AUTO” будет мигать.
7 Длительно нажимайте на символ MODE до
тех пор пока не услышите сигнал,
означающий окончание функции. Затем
установите ручки в положение , духовка
выключена.
В любой момент Вы можете увидеть и
изменить время оставшееся до окончания
приготовления. Для этого следуйте
вышеприведенным инструкциям.
Если Вы желаете отменить эту функцию
следует одновременно нажать на символы
+ и -.
Программирование времени окончания
приготовления
1 Длительно нажимайте на символ MODE до
тех пор пока не услышите звуковой сигнал.
Затем нажимайте на символ MODE до тех
пор пока на экране часов не появится
слово “End”.
2 Выберите время окончания готовки
дотрагиваясь до символов + или - .
3 Затем Вы услышите 1 звуковой сигнал,
появится текущее время и символ “AUTO”
будет светиться указывая на то, что духовой
шкаф отключится автоматически.
4 Выберите функцию и температуру
приготовления.
5 По достижение заданного времени
окончания, духовой шкаф отключится
автоматически и прозвучит сигнал.
6 Для остановки сигнала достаточно
дотронуться до любого символа. Духовка
выключена и символ “AUTO” будет мигать.
7 Для завершения функции длительно
нажимайте на символ MODE до тех пор пока
не услышите звуковой сигнал. Затем
установите ручки в положение , духовка
отключится.
Можно использовать эту функцию когда
духовой шкаф уже находится в процессе
приготовления. Для этого следуйте указаным
инструкциям, пропустив пункт 4.
В любой момент Вы можете увидить время
окончания приготовления, для этого выполните
п. 1 инструкции. Если Вы желаете изменить час
окончания следует отменить функцию
одновременным нажатием на символы + и -, а
затем снова запрограммировать следую
вышеприведенным инструкциям.
Программирование длительности
и окончания приготовления
11 Длительно нажимайте на символ MODE до
тех пор пока не услышите сигнал. Затем
снова дотроньтесь до символа MODE, на
экране часов появится слово “dur”.
12 Выберите длительность приготовления
дотрагиваясь до символа + или - .
13 Вы услышите один сигнал, появится
текущее вермя и символ “AUTO”.
14 Длительно нажимайте на символ MODE до
тех пор пока не услышите сигнал. Затем
снова нажимайте на символ MODE пока
на экране часов не появится слово “End”.
15 Выберите время окончания
приготовления дотрагиваясь до символа
+ или -.
16 Затем Вы услышите 1 сигнал, появится
текущее время и символ “AUTO”.
17 Выберите функцию и температуру
приготовления.
РУССКИЙ
Page 32

Внимание!
В случае отключения электропитания вся
информация запрограммированная в
электронных часах будет утеряна. На часах
появится мигающее значение 00:00. Следует
вновь установить текущее время и
запрограммировать часы.
32
18 Духовой шкаф отключится, на экране
часов появится символ AUTO. Ваш духовой
шкаф запрограммирован.
19 По достижение времени начала
приготовления духовой шкаф начнет
работу автоматически и будет готовить в
течение выбранного времени. На экране
часов будет светиться символ AUTO и .
10 По достижение заданного времени
окончания духовой шкаф отключится
автоматически и прозвучит сигнал.
11 Для остановки сигнала достаточно
дотронуться до любой кнопки. Духовой
шкаф отключен, символ “AUTO” мигает.
12 Длительно нажимайте на символ MODE до
тех пор пока не услышите сигнал об
окончании функции. Для отключения
духовки установить ручки в положение .
В любой моент Вы можете увидеть как
запрограммированы часы, для этого следуйте
инструкциям 1 и 4.
Если Вы желаете изменить программу, следует
отменить функцию одновременным нажатием
на + и –, а затем заново запрограммировать
следуя вышеприведенным инструкциям.
Page 33
33
NEDERLANDS
2
3
5
7
8
6
9
4
11
10
12
14
13
15
16
17
KS 60 MF 9
Bedieningspaneel
1 Bedieningspaneel
2 Ovenpakking
3 Grillweerstand
4 Verchroomde steun
+ Telescopische geleiders
5 Rooster
6 Bakplaat voor taarten
7 Diepe bakplaat
8 Scharnier
9 Deur
10 Koelluchtuitlaat
11 Bevestiging aan meubel
12 Grillscherm
13 Rookuitlaat
14 Zijlamp
15 Achterpaneel
16 Turbine
17 Groot binnenglas
1 Keuzeschakelaar.
2 Elektronische klok.
3 Controlelampje voor verwarming. Geeft aan
dat er warmte naar het voedsel wordt
overgedragen. Het gaat uit als de
geselecteerde temperatuur bereikt is.
4 Temperatuurkeuzeschakelaar.
1
1 2 3 4
Page 34
34
Functies van de oven
Uitschakelen van de oven
Verlichting
Turbo
De turbine verdeelt de warmte die afkomstig is
van een weerstand aan de achterkant van de
oven. Door de gelijkmatige verdeling van de
temperatuur kan tegelijkertijd op twee
verschillende niveaus worden
gebakken/gebraden.
Met deze functie kunnen ook gerechten worden
ontdooid. Zet de temperatuurschakelaar
daarvoor in de stand
.
Conventioneel
Wordt gebruikt voor cakes en taarten waarbij de
warmte gelijkmatig verdeeld moet worden om
een luchtige textuur te verkrijgen.
Ovenvloer
Verwarmt alleen aan de onderkant. Geschikt om
gerechten op te warmen of gebak en dergelijke
te laten rijzen.
Bovenverwarming
Om gerechten op te warmen.
Grill
Gratineren en oppervlakkig braden. Hiermee
kan de buitenlaag goudbruin worden gebakken
zonder de binnenkant van het voedsel mee te
bakken. Geschikt voor platte gerechten zoals
biefstuk, kotelleten, vis en toast.
MaxiGrill
Hiermee kunnen grotere oppervlakken worden
gegratineerd dan met de grillfunctie. Er kan ook
een hoger gratineervermogen worden bereikt
zodat de etenswaren sneller worden
aangebraden.
Attentie
Tijdens het gebruik van de Grill-, MaxiGrill- of
MaxiGrill met turbinefunctie dient de ovendeur
gesloten te blijven.
Intensiefhetelucht
Bakken van plaatgebak met droog beleg (bijv.
kruimelkoek), intensief braden van groot
gebraad en groot gevogelte, zoals gans en
kalkoen.
Pizzastand
Bakken van brood, pizza en vochtig gebak,
wecken.
Opmerking
De lamp blijft in elke bakfunctie branden.
Page 35

35
NEDERLANDS
De elektronische klok gelijkzetten
Als u uw oven aanzet, zult u zien dat op het
scherm van de klok het woord AUTO en de indicatie 00:00 knipperen. Raak de symbolen
+ en - tegelijkertijd langdurig aan. Vervolgens
hoort u een pieptoon en ziet u een lichtpuntje
dat tussen de cijfers van de klok gaat knipperen. Door vervolgens de symbolen + of - aan te
raken kunt u de klok gelijkzetten. U hoort tenslotte een pieptoon ter bevestiging van het
geselecteerde tijdstip. Het symbool blijft
verlicht.
Als u op een willekeurig moment de tijd wilt wijzigen, volg dan bovenstaande instructies op.
Handmatige werking
Nadat de klok is gelijkgezet, is uw oven klaar
voor gebruik. Selecteer een temperatuur en een
bakfunctie door aan de bedieningsknoppen van
de oven te draaien.
Om de oven uit te schakelen dient u de bedieningsknoppen op de stand te zetten.
Functies van de elektronische klok
Kookwekker: Deze laat na het verstrijken van
de tijdsduur een geluidssignaal horen. Daarvoor
is het niet noodzakelijk dat de oven aan het
bakken is.
Baktijd: om gedurende de ingestelde tijd te
bakken. Daarna gaat de oven automatisch uit.
Eindtijd van het bakproces: om tot het ingestelde tijdstip te bakken. Daarna gaat de oven
automatisch uit.
Duur en eindtijd van het bakproces: om de
baktijd en de eindtijd van het bakproces te programmeren. Met deze functie wordt de oven
automatisch ingeschakeld op het nodige tijdstip
om tijdens de geselecteerde tijdsduur te bakken
(baktijd) en wordt hij automatisch uitgeschakeld
op het aangegeven tijdstip (eindtijd van het bakproces).
Wijzigen van de toonhoogte van de kookwekker
1 Raak de symbolen + en - tegelijkertijd aan.
U ziet een lichtpunt knipperen tussen de cijfers van het scherm van de klok.
2 Raak het symbool MODE aan. De indicatie
“ton1” verschijnt op het scherm van de klok.
3 Door het symbool - herhaaldelijk aan te raken
kunt u de toonhoogte van de kookwekker
wijzigen.
De kookwekker programmeren
1 Raak het symbool MODE langdurig aan.
Vervolgens ziet u dat het symbool knippert
op het scherm van de klok.
2 Selecteer de tijdsduur waarna u wilt dat de
kookwekker waarschuwt, door de symbolen
+ of - aan te raken.
3 Vervolgens klinkt er een pieptoon, de huidige
tijd verschijnt en het symbool blijft verlicht,
waarmee wordt aangegeven dat de kookwekker geprogrammeerd is.
4 Na het verstrijken van de geprogrammeerde
tijd klinkt er een geluidssignaal en het symbool begint te knipperen.
5 Raak een willekeurig symbool aan om het
geluidssignaal te stoppen. Het symbool
blijft knipperen.
6 Raak het symbool MODE langdurig aan om de
functie te beëindigen.
U kunt op ieder willekeurig moment de resterende baktijd bekijken door het symbool MODE
langdurig aan te raken totdat het symbool
gaat knipperen. Op dat moment kunt u de geselecteerde tijd wijzigen door de symbolen + of aan te raken. Vervolgens hoort u een pieptoon
ter bevestiging van de wijziging.
De baktijd programmeren
1 Raak het symbool MODE langdurig aan totdat
u een pieptoon hoort. Als u vervolgens
opnieuw het symbool MODE aanraakt, verschijnt het woord “dur” op het scherm van de
wekker.
Bediening van de oven
Page 36

36
2 Selecteer de duur van het bakproces door de
symbolen + of - aan te raken.
3 Vervolgens klinkt er een pieptoon, verschijnt
het huidige tijdstip en het symbool “AUTO” blijft
verlicht, waarmee wordt aangegeven dat uw
oven automatisch zal worden uitgeschakeld.
4 Selecteer een bakfunctie en -temperatuur.
5 Nadat de baktijd is verstreken, wordt de oven
uitgeschakeld en klinkt er een geluidssignaal.
6 Raak een willekeurig symbool aan om het
geluidssignaal te stoppen. De oven blijft uitgeschakeld en het symbool “AUTO” knippert.
7 Raak het symbool MODE langdurig aan totdat
u een pieptoon hoort om de functie te beëindigen; zet de bedieningsknoppen vervolgens
in de stand om de oven uit te schakelen.
U kunt op ieder willekeurig moment de resterende baktijd bekijken. Volg daartoe de bovenstaande instructies op.
Als u deze functie wilt annuleren hoeft u alleen
maar de symbolen + en - tegelijkertijd aan te
raken.
De eindtijd van het bakproces programmeren
1 Raak het symbool MODE langdurig aan totdat
u een pieptoon hoort. Raak vervolgens het
symbool MODE aan, totdat het woord “End”
op het scherm van de klok verschijnt.
2 Selecteer de eindtijd van het bakproces door
de symbolen + of - aan te raken.
3 Vervolgens klinkt er een pieptoon, verschijnt
het huidige tijdstip en het symbool “AUTO” blijft
verlicht, waarmee wordt aangegeven dat uw
oven automatisch zal worden uitgeschakeld.
4 Selecteer een bakfunctie en -temperatuur.
5 Als de eindtijd van het bakproces is bereikt,
wordt de oven uitgeschakeld en klinkt er een
geluidssignaal.
6 Raak een willekeurig symbool aan om het
geluidssignaal te stoppen. De oven blijft uitgeschakeld en het symbool “AUTO” knippert.
7 Raak het symbool MODE langdurig aan totdat
u een pieptoon hoort om de functie te beëindigen; zet de bedieningsknoppen vervolgens
in de stand om de oven uit te schakelen.
U kunt deze functie ook gebruiken als u al aan
het bakken bent met de oven. Volg daarvoor de
voorgaande instructies op, behalve nummer 4.
U kunt op ieder willekeurig moment de eindtijd
van het bakproces bekijken door de aanwijzing
nr. 1 op te volgen. Als u de eindtijd wilt wijzigen
dient u de functie te annuleren door tegelijkertijd de symbolen + en - aan te raken en deze
opnieuw te programmeren door de bovenstaande instructies op te volgen.
De baktijd en eindtijd programmeren
11 Raak het symbool MODE langdurig aan tot-
dat u een pieptoon hoort. Als u vervolgens
opnieuw het symbool MODE aanraakt verschijnt het woord “dur” op het scherm van
de klok.
12 Selecteer de duur van de baktijd door de
symbolen + of - aan te raken .
13 Vervolgens klinkt er een pieptoon en ver-
schijnt het huidige tijdstip en het symbool
“AUTO”.
14 Raak het symbool MODE langdurig aan tot-
dat u een pieptoon hoort. Raak vervolgens
het symbool MODE aan totdat het woord
“End” op het scherm van de klok verschijnt.
15 Selecteer het tijdstip waarop de baktijd afge-
lopen moet zijn, door de symbolen + of - aan
te raken .
16 Vervolgens klinkt er een pieptoon. Het huidi-
ge tijdstip en het symbool “AUTO” worden
getoond.
17 Selecteer een bakfunctie en -temperatuur.
18 De oven blijft uitgeschakeld, met het sym-
bool AUTO op het scherm van de klok. Uw
oven is geprogrammeerd.
19 Wanneer het bakproces moet beginnen, gaat
de oven aan en wordt er gebakken tijdens de
ingestelde tijd. Op het scherm van de klok zijn
de symbolen AUTO en verlicht.
Page 37
37
NEDERLANDS
Attentie
Bij een stroomonderbreking wordt de hele programmering van de elektronische klok gewist
en verschijnen de cijfers 00:00 op de klok.
U moet de klok dan opnieuw gelijkzetten en
programmeren.
10 Als de geprogrammeerde baktijd is verstre-
ken, gaat de oven uit en klinkt er een
geluidssignaal.
11 Druk op een willekeurige toets om het
geluidssignaal te laten stoppen. De oven
blijft uitgeschakeld en het symbool “AUTO”
knippert.
12 Raak het symbool MODE langdurig aan tot-
dat u een pieptoon hoort, om de functie te
beëindigen. Zet de bedieningsknoppen vervolgens in de stand om de oven uit te
zetten.
U kunt op ieder willekeurig moment de programmering van uw klok bekijken door de
instructies nr 1 en 4 op te volgen.
Indien u de programmering wilt wijzigen dient u
de functie te annuleren door tegelijkertijd de
symbolen + en - aan te raken en hem opnieuw
te programmeren volgens de bovenstaande
aanwijzingen.
Page 38
KS 60 MF 9
Painel de Comandos
11 Painel de Comandos
12 Junta de Forno
13 Resistência do Grill
14 Suporte Cromado
+ Guias Telescópicas
15 Grelhador
16 Tabuleiro de pastelaria
7 Tabuleiro profundo
18 Dobradiça
19 Porta
10 Saída de Ar
de Refrigeração
11 Fixação ao Móvel
12 Ecrã do Grill
13 Saída de Fumos
14 Lâmpada laterai
15 Painel Traseiro
16 Turbina
17 Vidro Interior
de Grande Tamanho
1 Selector de funções.
2 Relógio electrónico.
4 Selector de temperaturas.
3 Piloto de aquecimento. Indica a transmissão
de calor ao alimento e desliga-se quando o
forno atinge a temperatura seleccionada.
2
3
5
7
8
6
9
4
11
10
12
14
13
15
16
17
1
38
1 2 3 4
Page 39

39
PORTUGUÊS
Funções do Forno
Desconexão do forno
Iluminação
Turbo
A turbina reparte o calor que provém de uma
resistência situada na parte de atrás do forno.
Devido à uniformidade da temperatura
produzida permite cozinhar em 2 alturas ao
mesmo tempo.
Esta função permite a descongelação leve do
alimentos. Para sua utilização coloque o
selector de temperatura na posição
.
Convencional
Usado em bolos e tartes nos quais o calor
recebido deve ser uniforme para que adquiram
uma textura esponjosa.
Resistência Inferior
Calor somente na parte inferior. Apropriado para
aquecer pratos ou levantar massas de
confeitaria e semelhantes.
Aquecimento superior
Para aquecer pratos.
Grill
Gratina e assa superficialmente. Permite alourar
a camada exterior sem afectar o interior do
alimento. Indicado para pedaços planos como
filetes, costelas, peixe, tostas.
MaxiGrill
Permite gratinar superfícies maiores que com o
Grill, bem como gratinar com maior potência,
alourando assim o alimento de forma mais
rápida.
Atenção
Durante o uso da função Grill, MaxiGrill ou
MaxiGrill com Turbina deve-se manter a porta
fechada.
Ar quente intensivo
Assar bolos de tabuleiro com cobertura seca (p.
ex. «Streusel»); assar intensivamente pedaços
de carne grandes ou ave grande como, p. ex.,
gansos e perus.
Modo Pizza
Assar pão, pizza e bolos húmidos; fazer
conserva.
Nota
A lâmpada permanece acesa em qualquer
função de cozinhado.
Page 40

40
Colocar a Hora no Relógio Electrónico
Ao ligar o seu forno, observará que no ecrã do
relógio aparece a piscar a palavra AUTO e a
indicação 00:00. Toque ao mesmo tempo e
de forma prolongada nos símbolos + e –, ouvirá então um beep e observará um ponto luminoso a piscar entre os dígitos do relógio; em
seguida tocando nos símbolos + ou – colocará o relógio na hora certa. Finalmente ouvirá um
beep como confirmação da hora seleccionada. O símbolo permanecerá iluminado.
Caso deseje modificar a hora, siga as instruções indicadas anteriormente.
Funcionamento Manual
Após colocar o relógio na hora certa, o seu
forno está pronto para funcionar. Premindo e
girando os comandos do forno, seleccione
uma temperatura e uma função de cozinhado.
Para apagar o forno, coloque os comandos na
posição .
Funções do Relógio Electrónico
Avisador: Gera um sinal sonoro no final do
tempo, para isso não é necessário que o
forno esteja a trabalhar.
Duração do Cozinhado: Permite cozinhar
durante um tempo seleccionado, acabado
esse tempo o forno desligar-se-á automaticamente.
Hora de Finalização do Cozinhado: Permite
cozinhar até uma hora estabelecida, acabado
esse tempo o forno desligar-se-á automaticamente.
Duração e Final do Cozinhado: Permite programar a duração e a hora de finalização do
cozinhado. Com esta função o forno se porá
em marcha de forma automática na hora
necessária para cozinhar durante o tempo
seleccionado (Duração) e finalizando de forma
automática na hora que tenhamos indicado
(Fim do Cozinhado).
Alteração do tom sonoro do avisador do
relógio
1 Toque ao mesmo tempo nos símbolos +
e -. Observará um ponto luminoso a piscar
entre os dígitos do ecrã do relógio.
2 Toque no símbolo MODE e observará a indi-
cação “ton1” no ecrã do relógio.
3 Tocando repetidamente o símbolo -, poderá
modificar o tom sonoro do avisador.
Programação do Avisador
1 Toque de forma prolongada no símbolo
MODE. Em seguida observará o símbolo
a piscar no ecrã do relógio.
2 Seleccione o tempo que deseja que o reló-
gio avise, tocando nos símbolos + ou -.
3 Posteriormente soará 1 beep, aparecerá a
hora actual e o símbolo permanecerá iluminado, indicando que o avisador já está
programado.
4 Decorrido o tempo programado, soará um
sinal sonoro e o símbolo começará a piscar.
5 Toque em qualquer símbolo para parar o sinal
sonoro. O símbolo permanecerá a piscar.
6 Toque de forma prolongada no símbolo
MODE para finalizar a função.
Em qualquer momento pode visualizar o
tempo restante, tocando de forma prolongada
no símbolo MODE até que o símbolo pisque. Nesse momento pode modificar o tempo
seleccionado tocando nos símbolos + ou -.
Em seguida escutará 1 beep como confirmação da alteração.
Manuseamento do Forno
Page 41

41
Programação da Duração do Cozinhado
1 Toque de forma prolongada no símbolo
MODE até que oiça um beep. Em seguida
tocando de novo no símbolo MODE, aparecerá a palavra “dur” no ecrã do relógio.
2 Seleccione a duração do cozinhado,
tocando nos símbolos + ou –.
3 Posteriormente soa 1 beep, aparece a hora
actual e o símbolo “AUTO” permanece
iluminado, indicando que o seu forno se
desliga de forma automática.
4 Seleccione uma função e uma temperatura
de cozinhado.
5 Decorrida a duração do cozinhado, o forno
desligar-se-á e soará um sinal sonoro.
6 Toque em qualquer símbolo para parar o
sinal sonoro. O forno permanecerá apagado
e com o símbolo “AUTO” a piscar.
7 Toque de forma prolongada no símbolo
MODE até que oiça um beep para finalizar a
função; em seguida coloque os comandos
em posição para apagar o forno.
A qualquer momento pode visualizar e
modificar o tempo restante de cozinhado.
Para fazê-lo siga as instruções indicadas
anteriormente.
Se deseja cancelar esta função basta tocar
ao mesmo tempo nos símbolos + e –
Programação da Hora de Finalização do
Cozinhado
1 Toque de forma prolongada no símbolo
MODE até que oiça um beep. Em toque no
símbolo MODE, até que apareça a palavra
“End” no ecrã do relógio.
2 Seleccione a hora de finalização do cozin-
hado, tocando nos símbolos + ou –.
3 Posteriormente soará 1 beep, aparecerá
a hora actual e o símbolo “AUTO” permanecerá iluminado, indicando que o seu forno
se apagará de forma automática.
4 Seleccione uma função e uma temperatura
de cozinhado.
5 Alcançada a hora de finalização do cozinha-
do, o forno desligar-se-á e soará um sinal
sonoro.
6 Toque em qualquer símbolo para parar o
sinal sonoro. O forno permanecerá apagado
e com o símbolo “AUTO” a piscar.
7 Toque de forma prolongada no símbolo
MODE até que oiça um beep para finalizar a
função; em seguida coloque os comandos
em posição para apagar o forno.
Pode utilizar esta função ainda que já esteja a
cozinhar com o seu forno. Para tal siga as
instruções indicadas excepto a número 4.
A qualquer momento pode visualizar a hora de
finalização do cozinhado seguindo a instrução
Nº 1. Se deseja modificar a hora de finalização deverá cancelar a função, tocando ao
mesmo tempo nos símbolos + e –, e
programá-la de novo seguindo as instruções
indicadas anteriormente.
Programação da Duração e Final do
Cozinhado
11 Toque de forma prolongada no símbolo
MODE até que oiça um beep. Em seguida
tocando de novo no símbolo MODE,
aparecerá a palavra “dur” no ecrã do
relógio.
12 Seleccione a duração do cozinhado,
tocando nos símbolos + ou –.
13 Posteriormente soará 1 beep, aparecerá
a hora actual e o símbolo “AUTO”.
14 Toque de forma prolongada no símbolo
MODE até que oiça um beep.
Seguidamente toque no símbolo MODE
até que apareça a palavra “End” no
ecrã do relógio.
15 Seleccione a hora de finalização do
cozinhado, tocando nos símbolos + ou –.
16 Posteriormente soará 1 beep, aparecerá
a hora actual e o símbolo “AUTO”.
17 Seleccione uma função e uma temperatu-
ra de cozinhado.
18 O forno permanecerá desligado, com o
símbolo AUTO no ecrã do relógio. O seu
forno está programado.
PORTUGUÊS
Page 42

42
Atenção
Em caso de corte de fornecimento eléctrico,
apagar-se-á toda a programação do seu relógio electrónico e aparecerá a piscar a indicação 00:00 no relógio. Deverá colocá-lo na
hora certa e programá-lo novamente.
19 Quando estiver na hora de início do cozin-
hado, o forno ligar-se-á e realizará o cozinhado durante o tempo seleccionado. No
ecrã do relógio verá iluminado os símbolos
AUTO e .
10 Alcançada a hora de finalização que se
tinha programado, o forno desligar-se-á e
soará um sinal sonoro.
11 Prima qualquer tecla para parar o sinal
sonoro. O forno permanecerá apagado e
com o símbolo “AUTO” a piscar.
12 Toque de forma prolongada o símbolo
MODE até que oiça um beep para finalizar
a função; em seguida coloque os comandos na posição para apagar o forno.
A qualquer momento pode visualizar a programação do seu relógio seguindo as instruções
N.º 1 e 4.
Se deseja modificar a programação deverá
cancelar a função, tocando ao mesmo tempo
nos símbolos + e –, e programá-la de novo
seguindo as instruções indicadas anteriormente.
Page 43

43
ΕΛΛΗΝΙΚΑ
2
3
5
7
8
6
9
4
11
10
12
14
13
15
16
17
KS 60 MF 9
Πίνακας Χειρισμού
1 Πίνακας Χειρισμού
2 Λάστιχο φούρνου
3 Αντίσταση του γκριλ
4 Επιχρωμιωμένο στήριγμα
+ Τηλεσκοπικοί Οδηγοί
5 Σχάρα
6 Ταψί ζαχαροπλαστικής
7 Βαθύ ταψί
8 Μεντεσές
9 Πόρτα
10 Έξοδος αέρα ψύξης
11 Στήριξη στο έπιπλο
12 Προστατευτικό του γκριλ
13 Έξοδος καπνών
14 Πλαϊνός λαμπτήρας
15 Πίσω Πάνελ
16 Μοτέρ Παραγωγής Αέρα
17 Εσωτερικό γυαλί μεγάλου
μεγέθους
1 Διακόπτης επιλογής λειτουργιών.
2 Ηλεκτρονικό ρολόι.
3 Ενδεικτική λυχνία θερμοκρασίας. Αποτελεί
ένδειξη ότι μεταφέρεται θερμότητα στα
τρόφιμα και σβήνει όταν φθάσει στην
επιλεγμένη θερμοκρασία.
4 Διακόπτης επιλογής θερμοκρασίας.
1
1 2 3 4
Page 44

44
Λειτουργίες του Φούρνου
Σβήσιμο του φούρνου
Φωτισμός
Θερμος Αέρας
Ο ανεμιστήρας κατανέμει τη θερμότητα που προέρχεται από μια αντίσταση που βρίσκεται στο
πίσω μέρος του φούρνου. Χάρη στην ομοιόμορφη
θερμοκρασία που παράγεται, μπορείτε να μαγειρεύετε σε 2 επίπεδα ταυτόχρονα.
Αυτή η λειτουργία επιτρέπει επίσης την απόψυξη
τροφίμων τοποθετώντας τον διακόπτη
επιλογήςθερμοκρασίας στη θέση
.
Άνω/Κάτω Αντίσταση
Χρησιμοποιείται για κέικ και τάρτες όπου απαιτείται ομοιόμορφη παροχή θερμότητας ώστε να
αποκτήσουν αφράτη υφή.
Κάτω Αντίσταση
Θερμότητα μόνο στο κάτω μέρος. Κατάλληλη για
το ζέσταμα πιάτων ή για το φούσκωμα ζύμης και
παρόμοιων παρασκευών.
Άνω αντίσταση
Για το ζέσταμα πιάτων.
Γκριλ
Ρόδισμα και επιφανειακό ψήσιμο. Ψήσιμο της
εξωτερικής επιφάνειας χωρίς να επηρεάζεται το
εσωτερικό του τροφίμου. Κατάλληλη για επίπεδα
τρόφιμα όπως μπριζόλες, παϊδάκια, ψάρια, φρυγανισμένο ψωμί.
Μάξι Γκριλ
Ενδείκνυται για το επιφανειακό ψήσιμο μεγαλύτερων επιφανειών απ’ ότι με το γκριλ, και με μεγαλύτερη ισχύ, ώστε το φαγητό να αποκτά ροδισμένη όψη γρηγορότερα.
Προσοχή
Κατά τη λειτουργία Γκριλ, Μάξι Γκριλ ή Μάξι Γκριλ
με αέρα, η πόρτα πρέπει να παραμένει κλειστή.
Έντονος θερμός αέρας
5
Ψήσιμο γλυκών με στεγνά υλικά γαρνιρίσματος,
έντονο ψήσιμο μεγάλων κομματιών κρέατος και
μεγάλων πουλερικών, όπως για παράδειγμα
χήνες και γαλοπούλες.
Λειτουργία για ψήσιμο πίτσας
4
Ψήσιμο ψωμιού, πίτσας ή υγρών κέικ. Κονφί.
Σημείωση
Η λάμπα παραμένει αναμμένη σε όλες τις λειτουργίες ψησίματος.
Page 45

45
ΕΛΛΗΝΙΚΑ
Ρύθμιση της Ώρας στο Ηλεκτρονικό Ρολόι
Μόλις συνδέσετε το φούρνο σας στο ρεύμα, θα
παρατηρήσετε ότι στην οθόνη του ρολογιού αναβοσβήνει η λέξη AUTO και η ένδειξη 00:00. Αγγίξτε ταυτόχρονα και για παρατεταμένο χρονικό
διάστημα τα σύμβολα + και -. Θα ακούσετε ένα
χαρακτηριστικό ήχο και θα δείτε μία φωτεινή
κουκίδα να αναβοσβήνει ανάμεσα στα ψηφία
του ρολογιού. Στη συνέχεια, αγγίζοντας τα σύμβολα + ή – θα ρυθμίσετε την ώρα στο ρολόι.
Τέλος, θα ακούσετε ένα χαρακτηριστικό ήχο ως
επιβεβαίωση της ρύθμισης της ώρας. Το σύμβολο θα παραμείνει φωτισμένο.
Αν θελήσετε οποιαδήποτε στιγμή να αλλάξετε την
ώρα, ακολουθήστε τις προαναφερόμενες οδηγίες.
Χειροκίνητη λειτουργία
Μόλις ρυθμίσετε την ώρα στο ρολόι, ο φούρνος
είναι έτοιμος να λειτουργήσει. Επιλέξτε θερμοκρασία και λειτουργία μαγειρέματος γυρίζοντας
τους διακόπτες του φούρνου.
Για να σβήσετε τον φούρνο, γυρίστε τους διακόπτες στη θέση .
Λειτουργίες του Ηλεκτρονικού Ρολογιού
Σύστημα ειδοποίησης: Με την παρέλευση του
προγραμματισμένου χρόνου, εκπέμπει ένα ηχητικό σήμα, ανεξάρτητα από το εάν ο φούρνος βρίσκεται ή όχι σε λειτουργία.
Διάρκεια Μαγειρέματος: Το μαγείρεμα διαρκεί
για ένα προκαθορισμένο χρονικό διάστημα και
στη συνέχεια ο φούρνος σβήνει αυτόματα.
Ώρα Λήξης Μαγειρέματος: Το μαγείρεμα διαρκεί μέχρι μια προκαθορισμένη ώρα, και στη συνέχεια ο φούρνος σβήνει αυτόματα.
Διάρκεια και Λήξη Μαγειρέματος: Προγραμματισμός της διάρκειας και της ώρας τερματισμού του μαγειρέματος. Με αυτή τη λειτουργία ο
φούρνος θα τεθεί σε λειτουργία αυτόματα την
καθορισμένη ώρα για να μαγειρέψει κατά τη
διάρκεια του προκαθορισμένου χρόνου (Διάρκεια) και θα τελειώσει αυτόματα την προκαθορισμένη ώρα (Λήξη Μαγειρέματος).
Αλλαγή ήχου του συστήματος ειδοποίησης του
ρολογιού
1 Αγγίξτε ταυτόχρονα τα σύμβολα + και -. Θα
δείτε ότι αναβοσβήνει μία φωτεινή κουκίδα
ανάμεσα στα ψηφία της οθόνης του ρολογιού.
2 Αγγίξτε το σύμβολο MODE και θα δείτε την
ένδειξη “ton1” στην οθόνη του ρολογιού.
3 Αγγίξτε αρκετές φορές το σύμβολο - για να
αλλάξετε τον ήχο του συστήματος ειδοποίησης.
Προγραμματισμός του Συστήματος Ειδοποίησης
1 Αγγίξτε το σύμβολο MODE για παρατεταμένο
χρονικό διάστημα. Στη συνέχεια, το σύμβολο
θα αρχίσει να αναβοσβήνει στην οθόνη του
ρολογιού.
2 Επιλέξτε το χρονικό διάστημα μετά την παρέ-
λευση του οποίου θέλετε να ηχήσει η ειδοποίηση, αγγίζοντας τα σύμβολα + ή -.
3 Στη συνέχεια, θα ακούσετε 1 χαρακτηριστικό
ήχο,θα εμφανιστεί η τρέχουσα ώρα και το σύμβολο θα παραμείνει φωτισμένο, ως
ένδειξη ότι το σύστημα ειδοποίησης έχει
προγραμματιστεί.
4 Με την παρέλευση του προγραμματισμένου
χρόνου, θα ηχήσει ένα προειδοποιητικό σήμα
και το σύμβολο θα αρχίσει να αναβοσβήνει.
5 Αγγίξτε οποιοδήποτε σύμβολο για να σταματή-
σετε το ηχητικό προειδοποιητικό σήμα. Το σύμβολο θα συνεχίσει να αναβοσβήνει.
6 Αγγίξτε το σύμβολο MODE για παρατεταμένο
χρονικό διάστημα ώστε να τερματίσετε τη
λειτουργία.
Μπορείτε να δείτε οποιαδήποτε στιγμή τον υπολειπόμενο χρόνο, αγγίζοντας για παρατεταμένο
χρονικό διάστημα το σύμβολο MODE έως ότου το
σύμβολο αρχίσει να αναβοσβήνει. Τη στιγμή
αυτή μπορείτε να αλλάξετε τον επιλεγμένο χρόνο
αγγίζοντας τα σύμβολα + ή -. Στη συνέχεια, θα
ακούσετε 1 χαρακτηριστικό ήχο ως επιβεβαίωση
ότι η αλλαγή πραγματοποιήθηκε σωστά.
Χειρισμός του Φούρνου
Page 46

46
Προγραμματισμός της Διάρκειας Μαγειρέματος
1 Αγγίξτε το σύμβολο MODE για παρατεταμένο
χρονικό διάστημα έως ότου ακούσετε ένα
χαρακτηριστικό ήχο. Στη συνέχεια, αγγίζοντας
πάλι το σύμβολο MODE, θα εμφανιστεί η λέξη
“dur” στην οθόνη του ρολογιού.
2 Επιλέξτε την διάρκεια μαγειρέματος αγγίζο-
ντας τα σύμβολα + ή -.
3 Στη συνέχεια, θα ακουστεί ένας χαρακτηριστι-
κός ήχος, θα εμφανιστεί η τρέχουσα ώρα και
το σύμβολο “AUTO” θα παραμείνει φωτισμένο,
ως ένδειξη ότι ο φούρνος θα σβήσει αυτόματα.
4 Επιλέξτε λειτουργία και θερμοκρασία μαγειρέ-
ματος.
5 Με την παρέλευση της προγραμματισμένης
διάρκειας μαγειρέματος, ο φούρνος θα σβήσει
και θα ακουστεί ένα ηχητικό σήμα.
6 Αγγίξτε οποιοδήποτε σύμβολο για να σταματή-
σετε το ηχητικό σήμα. Ο φούρνος θα παραμείνει σβησμένος και το σύμβολο “AUTO” θα
αναβοσβήνει.
7 Αγγίξτε για παρατεταμένο χρονικό διάστημα
το σύμβολο MODE έως ότου ακούσετε ένα
χαρακτηριστικό ήχο, ως ένδειξη ότι η λειτουργία έληξε. Στη συνέχεια, γυρίστε τους διακόπτες στη θέση για να σβήσετε το φούρνο.
Μπορείτε να δείτε και να αλλάξετε τον υπολειπόμενο χρόνο μαγειρέματος οποιαδήποτε στιγμή.
Για να το κάνετε, ακολουθήστε τις προαναφερόμενες οδηγίες.
Αν θέλετε να ακυρώσετε τη λειτουργία αυτή, αρκεί
να αγγίξετε ταυτόχρονα τα σύμβολα + και -.
Προγραμματισμός της Ώρας Λήξης
Μαγειρέματος
1 Αγγίξτε το σύμβολο MODE για παρατεταμένο
χρονικό διάστημα έως ότου ακούσετε ένα
χαρακτηριστικό ήχο. Στη συνέχεια, αγγίξτε το
σύμβολο MODE, έως ότου εμφανιστεί η λέξη
“End” στην οθόνη του ρολογιού.
2 Επιλέξτε την ώρα λήξης μαγειρέματος αγγίζο-
ντας τα σύμβολα + ή -.
3 Στη συνέχεια, θα ακουστεί ένας χαρακτηριστι-
κός ήχος , θα εμφανιστεί η τρέχουσα ώρα και
το σύμβολο “AUTO” θα παραμείνει φωτισμένο,
ως ένδειξη ότι ο φούρνος θα σβήσει αυτόματα.
4 Επιλέξτε λειτουργία και θερμοκρασία
μαγειρέματος.
5 Με την έλευση της ώρας λήξης μαγειρέματος,
ο φούρνος θα σβήσει και θα ακουστεί ένα ηχητικό σήμα.
6 Αγγίξτε οποιοδήποτε σύμβολο για να σταμα-
τήσετε το ηχητικό σήμα. Ο φούρνος θα παραμείνει σβησμένος και το σύμβολο “AUTO” θα
αναβοσβήνει.
7 Αγγίξτε για παρατεταμένο χρονικό διάστημα
το σύμβολο MODE έως ότου ακούσετε ένα
χαρακτηριστικό ήχο, ως ένδειξη ότι η λειτουργία έληξε. Στη συνέχεια, γυρίστε τους διακόπτες στη θέση για να σβήσετε το φούρνο.
Μπορείτε να χρησιμοποιήσετε αυτή τη λειτουργία ακόμη και αν εκείνη τη στιγμή μαγειρεύετε
στο φούρνο σας. Στην περίπτωση αυτή, ακολουθήστε τις προαναφερόμενες οδηγίες παραβλέποντας το 4ο βήμα.
Μπορείτε να δείτε την ώρα λήξης μαγειρέματος
οποιαδήποτε στιγμή ακολουθώντας την οδηγία
Nº1. Αν θέλετε να τροποποιήσετε την ώρα λήξης,
θα πρέπει να ακυρώσετε την λειτουργία αγγίζοντας ταυτόχρονα τα σύμβολα + και - και να την
προγραμματίσετε εκ νέου ακολουθώντας τις
προαναφερόμενες οδηγίες.
Προγραμματισμός της Διάρκειας και της
Λήξης Μαγειρέματος
11 Αγγίξτε το σύμβολο MODE για παρατεταμένο
χρονικό διάστημα έως ότου ακούσετε ένα
χαρακτηριστικό ήχο. Στη συνέχεια, αγγίζοντας πάλι το σύμβολο MODE, θα εμφανιστεί
η λέξη “dur” στην οθόνη του ρολογιού.
12 Επιλέξτε την διάρκεια μαγειρέματος αγγίζο-
ντας τα σύμβολα + ή -.
13 Στη συνέχεια, θα ακουστεί ένας χαρακτηρι-
στικός ήχος , θα εμφανιστεί η τρέχουσα ώρα
και το σύμβολο “AUTO”.
14 Αγγίξτε το σύμβολο MODE για παρατεταμένο
χρονικό διάστημα έως ότου ακούσετε ένα
χαρακτηριστικό ήχο. Στη συνέχεια, αγγίξτε το
σύμβολο MODE, έως ότου εμφανιστεί η λέξη
“End” στην οθόνη του ρολογιού.
15 Επιλέξτε την ώρα λήξης μαγειρέματος αγγίζο-
ντας τα σύμβολα + ή -.
Page 47

47
ΕΛΛΗΝΙΚΑ
Αν θέλετε να τροποποιήσετε τον προγραμματισμό, θα πρέπει να ακυρώσετε την λειτουργία
αγγίζοντας ταυτόχρονα τα σύμβολα + και - και
να την προγραμματίσετε εκ νέου ακολουθώντας
τις προαναφερόμενες οδηγίες.
Προσοχή
Σε περίπτωση διακοπής ρεύματος, θα διαγραφεί
ο προγραμματισμός του ηλεκτρονικού σας ρολογιού και θα αναβοσβήνει στο ρολόι η ένδειξη
00:00. Θα πρέπει να ρυθμίσετε την ώρα και να
το προγραμματίσετε από την αρχή.
16 Στη συνέχεια, θα ακουστεί ένας χαρακτηρι-
στικός ήχος και θα εμφανιστεί η τρέχουσα
ώρα και το σύμβολο “AUTO”.
17 Επιλέξτε λειτουργία και θερμοκρασία
μαγειρέματος.
18 Ο φούρνος θα βρίσκεται εκτός λειτουργίας,
με το σύμβολο AUTO στην οθόνη του ρολογιού. Ο φούρνος σας έχει προγραμματιστεί.
19 Όταν φθάσει η ώρα έναρξης του μαγειρέμα-
τος, ο φούρνος θα τεθεί σε λειτουργία και θα
μαγειρέψει κατά τη διάρκεια του επιλεγμένου
χρονικού διαστήματος. Στην οθόνη του ρολογιού θα δείτε φωτισμένα τα σύμβολα AUTO
και .
10 Με την έλευση της προγραμματισμένης ώρας
λήξης, ο φούρνος θα σβήσει και θα ακουστεί
ένα ηχητικό σήμα.
11 Αγγίξτε οποιοδήποτε πλήκτρο για να σταμα-
τήσετε το ηχητικό σήμα. Ο φούρνος θα παραμείνει σβησμένος και το σύμβολο “AUTO” θα
αναβοσβήνει.
12 Αγγίξτε για παρατεταμένο χρονικό διάστημα
το σύμβολο MODE έως ότου ακούσετε ένα
χαρακτηριστικό ήχο, ως ένδειξη ότι η λειτουργία έληξε. Στη συνέχεια, γυρίστε τους
διακόπτες στη θέση για να σβήσετε το
φούρνο.
Μπορείτε να δείτε τον προγραμματισμό του
ρολογιού σας οποιαδήποτε στιγμή ακολουθώντας τις οδηγίες Νº 1 και 4.
Page 48

Desideriamo anche noi dare il nostro contributo all'ambiente; per questo la carta che utilizziamo è riciclata.
Our contribution to protecting the environment - we use recycled paper.
Notre participation à la protection de l’environnement : nous utilisons du papier recyclé.
Unser Beitrag zum Umweltschutz: Wir verwenden wiederverwertetes Papier.
Nuestra aportación a la protección del medio-ambiente: utilizamos papel reciclado.
Наш вклад в защиту окружающей среды: мы используем переработанную бумагу.
Onze bijdrage aan de bescherming van het milieu: wij gebruiken kringlooppapier.
O nosso contributo para a protecção do meio ambiente: utilizamos papel reciclado.
Η συμβολή μας στην προστασία του περιβάλλοντος: χρησιμοποιούμε ανακυκλωμένο χαρτί.
Cod.: 3172675-002
kWh/cycle*
kWh/cycle*
L
*
*
0.84
0.89
57
106,3
1
36 kg
ෆ<^ϲϬD&ϵ
 Loading...