


LASER SHOW SYSTEM
PROFESSIONAL ANIMATION SERIES
MODEL A10-FB4
User Guide

Safety Notes
Key /Remote:
The projector has "Key/Remote Interlock" fuction for Safty. If the function is on, there is
no laser emitted.
Page12
Page 1
CH2
Comment
Laser ON / OFF
Change Page
Change Pattern
Channel NO.
DMX
mode
CH1
CH3
CH4
ANIMATION
LASER SHOW SYSTEM
SAFETY NOTES
Thank you very much for choosing our product, for your safety, please read the
laser safety instruction and this manual carefully before your operation.
This manual includes installation and user information.
Please install and operate the laser according to the requirements of this manual
and safety guidelines.
DO NOT OVER DRIVE THE SCANNERS. WHEN USING MAX SPEED
KEEP THE ANGLE SMALL. FOR MAX ANGLE DO NOT EXCEED
40000PPS ON THE ILDA SOFTWARE SETTING.
Class 3b and 4 Laser Lighting Effect User Safety Guide
Important Warnings
Class 4 Lasers have the potential to harm eyesight if viewed directly in the face, and in
many instances this may be the case even if viewed over longer distances of several tens
of metres. Therefore before using the laser product you should familiarise yourself with its
operation, and also the safety aspects that need to be considered.
Laser lighting effects are quite safe to watch if installed and used correctly, and being
aware of a few basic factors will help you to achieve this. This guide has been prepared
to help provide a basic backgrounder to the key safety aspects, and is based on current UK
health and safety guidance on the use of lasers for public displays.
Installation and Operation Notes
1. The laser should only be installed and operated by those that are aware of how to
operate laser, and what the various controls perform.
2. The laser should be mounted in a suitable and secure position in the venue, so that once
in position it is unlikely to be affected by unintended movement.
speed of Pattern (0 slowest 255 fastest)
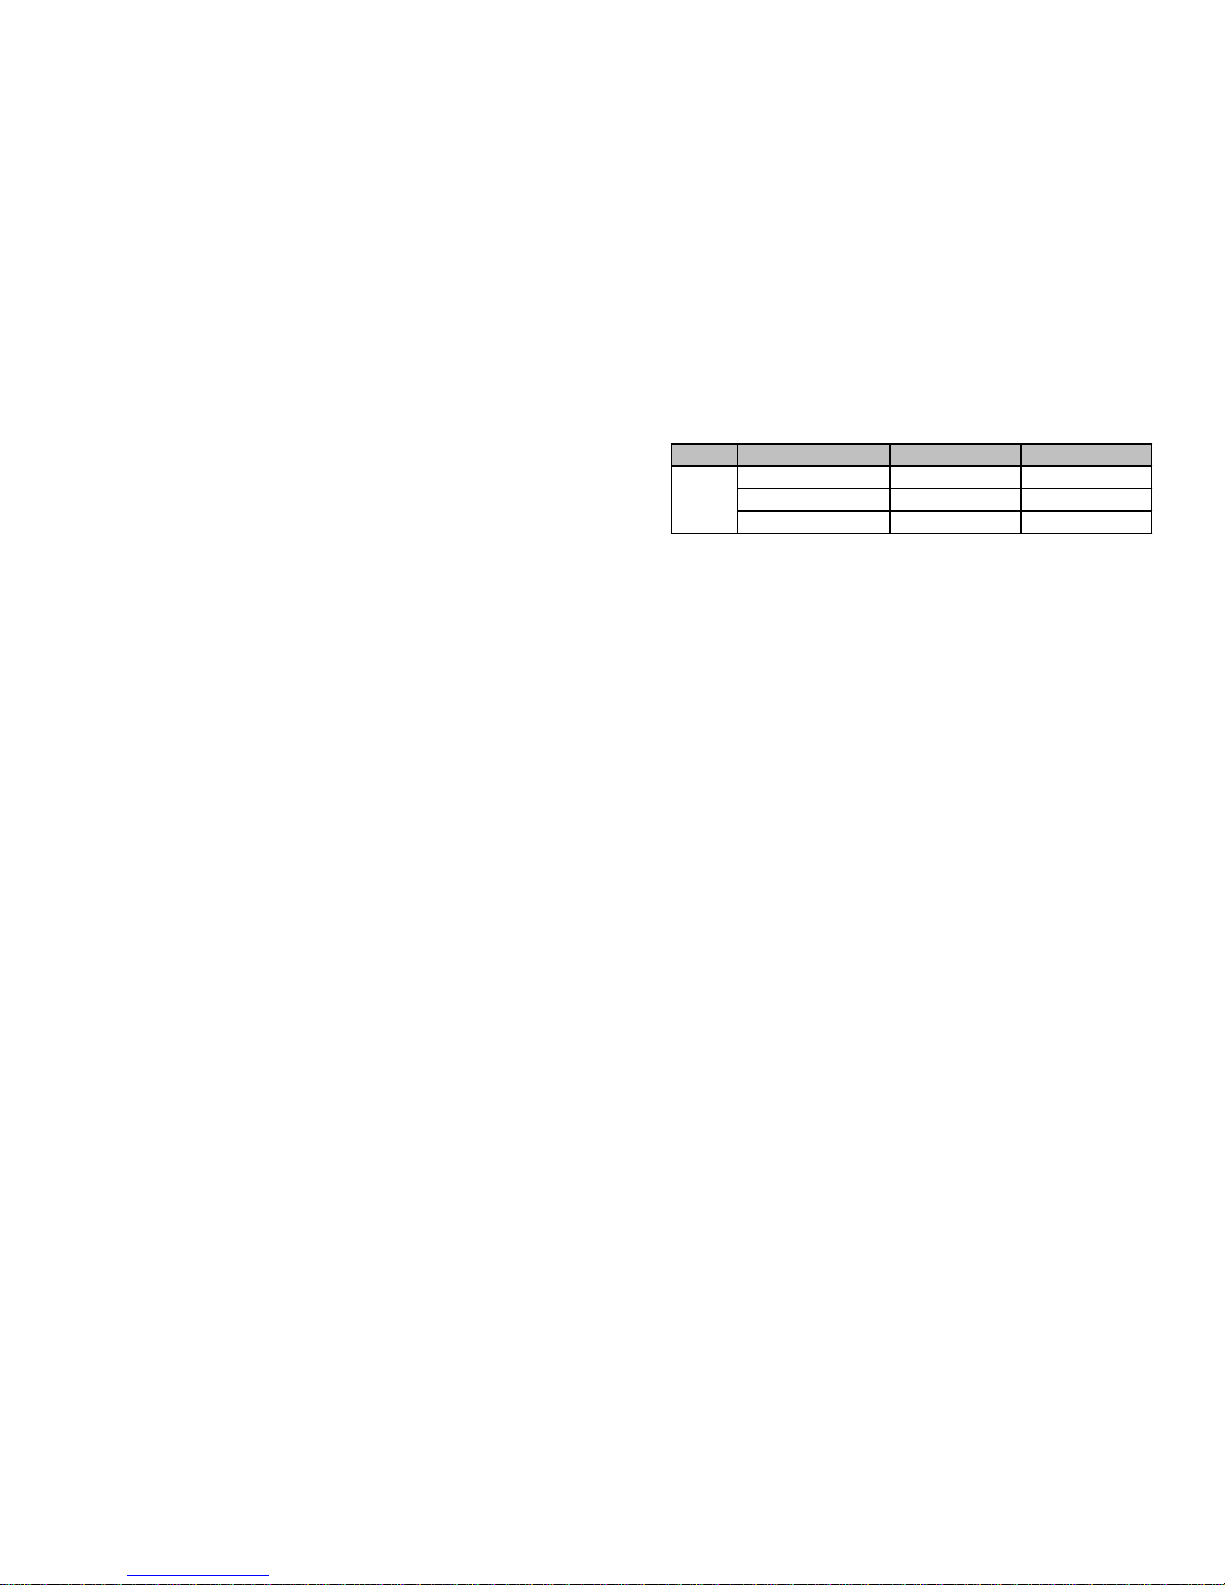
Table 7: FB4 Device Infor
change with hardware
change with hardware
change with hardware
Key point for Common Mode
BEYONG/QS, ILDA, Auto Start, Test Mode is often be used. The key point is shown as
below:
BEYONG/WS Mode:
FB4 has one standard CAT5 or CAT6 Ethernet port, so you would only use a RJ45 cable
to connect the FB4 which the Projector has. But you must should have the FB3 hardware
and also FB3 has the License from Pangolin.
ILDA Input Mode:
ILDA input is nomorlly used, the DB25 cable should be connected to the Projector and
mode is "ILDA Input"
Auto Start Mode:
1. Use BEYONG or QS to update Firmware of FB4;
2. FB4 is "Auto Start Mode";
3. Tigger or Animation or play mode of "Auto Start Setup" is set according needed.(See
Table 2)
4. All finished, must to press to Exit Menu and Restart the Projector(need power OFF).
Test Mode:
1. Use BEYONG or QS to update Firmware of FB4;
2. FB4 is "Test Mode";
3. Test Pattern and Maste Size of "Test Mode" is set according needed.(See Table 2)
4. All finished, select the "Enable" is "√", the Projector is working.
DMX Mode:
According the numbers of the projectors, setting the DMX address.
FB4 has 4 DMX channels, the detail informaton as bellow:
Page 2
Page11
3. Prior to installation and operation of the laser, the paths of the beams and effects should
be considered, particularly with respect to how they will touch the audience. If direct
audience scanning is desired then the laser energy in the effects needs to be considered to
decide if the effects are safe for direct viewing.
Introduction
Laser lighting products are used to create some of the most vivid and striking visual
effects, and are often noted for how they seem to produce solid shapes that cut through the
air, and pick up highly defined swirling smoke patterns. The light that is used to create
these stunning effects is different from normal light and therefore several precautions need
to taken when using lasers to ensure that the lighting effects are safe and enjoyable to
view. The optical power output from the kind of lasers used for lighting displays can be
harmful if not properly setup or is misused. But when used following the recommended
health and safety guidelines, laser lighting effects no more harmful than looking at any
conventional lighting effect.
Although this guide covers the main points to consider when using laser effects, users are
advised to familiarise themselves with other guidance, particularly that issued by the
Health and Safety Executive, HS(G)95 The Radiation Safety Of Lasers Used For Display
Purposes.
A laser product that emits more than 5mW of light and less than 500mW can be classified
as a Class 3B laser product
A laser product that emits more than 500mW of light and can be classified as a Class 4
laser product
FB4
Device
Infor
Comment
Class 3B and 4 are safe if used responsibly, and in accordance with the relevant the
guidance issued by the Health and Safety Executive.
Class 4 laser devices may cause fires and burn the skin if exposed directly.
In the simplest terms, generally keeping the beams and effects above the audience will not
present a hazard to those viewing the show or effects. When you start to aim the laser
effects down into the audience area is when it becomes harder to tell if the effects could
cause harm. With a Class 3B and 4 laser lighting effect, the problem can arise if the beams
or effects actually hit someone’s face. If in doubt, keep the effects above the audience.
Class 3B and 4 laser devices can be harmful to eyesight if viewed directly. i.e. that is, the
beam or effect strikes the face of a person directly. The actual injury that a Class 3B and 4
laser can cause depends upon a number of factors, including how long the laser beam
enters the eye for, the intensity of light, and what part of the eye it actually gets focused
onto. The most susceptible part of the eye to receive damage from a laser is the internal
back wall of the eyeball, known as the retina. It is this part of the eye that receives the
light signals that are sent to brain. All light entering the eye gets focused onto the retina.
Firm Ware
x.xx
Build NO.
xxxx
Function
Value
Serial NO.
xxxxx

Table 4: Geo Correction
Table 5: Color Settings
Table 6: Scan Guard
Page 10 Page 3
Master
Settings
X Shear
-100-+100
Invert Y
x /√
0
Y Shear
-100-+100
0
Knowing what the MPE and exposure level is for a given laser effect is quite a complex
and involved process to establish. For it is dependant on a whole number of conditions
and variables that need to be taken into account. The laser safety standard BS/EN 60825-1
contains the data required to calculate the safe levels, but it is not straightforward to
interpret. Laser Safety Calculation Software has been developed to help ease the task of
establishing laser effects exposure.
The BS/EN60825-1 Laser Safety Standard recommends that all establishments that use, or
businesses that work with Class 3B laser products, should appoint a Laser Safety Officer
(LSO). The Laser Safety Officer should be aware of the safety issues when using lasers,
and is responsible for overseeing how the laser is used. In smaller businesses, the LSO
will probably also be the installer, operator, owner etc.
The worst case effect to look at directly is a static single beam, because all the light energy
is concentrated into one point.
Y Postion
-100-+100
100
Z Postion
0-359
0
There are no specific “laser laws” or any “laser licences” that anybody needs in order to
own or operate a laser for lightshow use. However, there is specific guidance issued by the
Health and Safety Executive in the form of a document called HS(G)95 The Radiation
Safety of Lasers Used for Display Purposes. HS(G)95 outlines a number of detailed points
to consider when using lasers for lightshow purposes.
Class 3B and 4 laser products are required to have several specific safety features as part
of their design. These features are laid out in the British Standard on Laser Product Safety
BS/EN 60825-1 and are a requirement of the product meeting CE approvals. The
important ones are listed below:
Geo
Correction
-100-+100
100
X Postion
1) Laser Safety Warning Labels
2) Emissions Indicator
3) Remote Interlock Connector
Audience Scanning
Audience Scanning is the term commonly used to describe when laser effects are being
directly aimed at the viewing audience. This creates a very dramatic looking effect, as
people can touch the light, and look down smoky tunnels. But because the laser light can
touch or scan past people’s faces, it also carries a risk that it could cause damage to people
’s eyesight, if they are overexposed to the laser light.
The amount of laser light that a person can be exposed to without it causing harm to
eyesight is known as the Maximum Permissible Exposure or MPE. These levels are
defined the in the British Laser Safety Standard BS/EN 60826-1. When people are
exposed to laser light which is above the MPE, it poses a risk of causing eye damage. This
could be of concern when the laser effects are viewed directly in the face or there is a
chance that they could be.
X Scale
-100-+100
100
X Scale
-100-+100
100
Swap XY
√/x
x
Function
Range
Default Value
x
Rescan Time
0-999
500
Min Velocity
0-300
30
Dwell Time
1-300
45
Scan
Guard
Enable Gurad
x /√
x
Horizon Level
0-100
49
Horrizon Angle
1-(-45)
-45
Cyan
0-100
100
Function
Range
Default Value
Deep Blue
0-100
100
Yellow
0-100
100
100
Green
0-100
100
Blue
0-100
100
Function
Range
Default Value
Color Shift
0-7
100
Color
Settings
Red
0-100

General instructions
Table 1: Operation Mode
Unpacking:
Thank you for purchasing this product. Please read user guide for safety and operations inf-
ormation before using the product. Keep this manual for future reference. This product can
create perfect laser programs and effects since it has passed a series of strictly tests before
delivery. Please check the attachments listed on the page after opening the carton. In the
event of carton damage or attachment missing in transit, please contact your dealer or our
after sales service department.
Table 2: xxx Mode
Attachments:
1. Laser Light: 1PC
2. Power Cable: 1PC
3. User Guide: 1PC
4. CAT5 Ethernet Cable: 1PC
5. SD Card Adapter: 1PC
Notice:
1. Do not exposure the human eye direct to laser beam.
2. Do not turn on and off the unit frequently.
3. Before using this unit make sure the power supply is ground.
4. This unit is intended for indoor use only and should be prevented from water, moisture
and shake. The working temperature of this unit is 18~30℃, do not use this continuously
over 4 hours, otherwise it shortens the lifetime of the unit.
5. Use cleaning tissue to remove the dust absorbed on the external lenses periodically to
optimize light output.
6. Do not remove or break the warranty label, otherwise it void the warranty.
7. Always replace with the exact same type fuse, replacement with anything other than the Table 3: Master Settings
specified fuse can cause fire or electric shock and damage your unit, and will void your
manufactures warranty.
DANGER
LASER RADIATION AVOID EXPOSURE
TO BEAM CLASS 3B LASER PRODUCT
Page 4 Page 9
Master
Settings
Maste Size
1-100
Enable Laser
x /√
Projector input from the patterns in SD card build-in
100
Artnet
Setting
RDM
x /√
x
Preamble
x /√
x
Universe
0-999
x
Test Pattern
1-999
1
Anination
001-999
001
Play Mode
loop/once
loop
Range
Trigger
pwr
AutoStart
Setup
Default Value
Preamble
Function
pwr/time/aux/click/none
0
Start Address
Projector input from the patterns in SD card build-in
Test Mode
1-512
1
!
DMX -512
Projector input from DMX signals
Art NET
20-100
100
Invert X
√/x
√
Invert Y
√/x
√
100
Master Size
20-100
100
X Scale
20-100
100
Test
Mode
Function
Auto/ON/OFF
Auto
DMX
Setting
Range
1
RDM
x /√
x
Termination
Default Value
x /√
x
Start Address
1-512
Brightness
0-100
Y Scale
Mode
Description
Operation
Mode
BEYONG/QS
Projector input from BEYONG/QS
ILDA Input
Projector input from ILDA signals
Projector input from Art NET signals
Auto Start

Menu Setting
Technical Specification
Rotate the Funciton key to select the mode and parameter, the LCD will change.
Press the Function key to enter the menu, the LCD will change. 1. Voltage: AC200~250V, 50HZ/60HZ, Fuse 3A/250V
2. Rated Power: 150W
3. Scanner: 50K High-speed optical scanner, ±30° big angle scanning
4. Laser: RGB analog modulate, 10KHZ frequency
3000mW 638nm wavelength red laser, TE-cooled
3000mW 520nm wavelength green laser, TE-cooled
4000mW 450nm wavelength blue laser, TE-cooled
5. Working Modes: BEYONG/QS, ILDA Input, DMX-512, Art NET, Auto Start
6. Graphics & Effects: Beam show and animated graphics show patterns
7. SD card: 8GB, build in program, and downloading program
8. Play Program Format: .FB4 laser show document downloading for BEYOND/QSS
9. Safety Configure: Laser key switch, laser remote interlock, safety shutter,
SFS Control(scanner fail safety control ON/OFF), flying rings bolt
10. Interface: 5 pins XLR jack for DMX, DB25/M interface for PC control
DB25/M interface for PC control
RJ45 Ethernet interface for BEYONG/QS
11. Machine Size: 410*300*235(H)mm
12. Machine Weight: 22.6Kg
Front/Rear Panel
Front/Rear Panel
Note: xxx Mode is Test Mode or Auto Start
Front Panel
1. Laser indicator: White 2. Laser aperture
3. Fan air outlet
Page 8 Page 5
Operation Mode
xxx Mode
Geo Correction
Master Settings
Color Settings
Scan Guard
FB4 Device Infor
Exit Menu
Submenu See
Table 1
Submenu See
Table 2
Submenu See
Table 3
Submenu See
Table 4
Submenu See
Table 5
Submenu See
Table 6
Submenu See
Table 7
1
2
3

SD card is inserted to the SD card jack, in different mode will run the program in the
SD card. Computer will be connected by the Ethernet jack using the a Ethernet cable.
For firmware be updated use following sequence of operations:
1. Take SD card, make folder Firmware, put into this folder the firmware file-firmware.fb4
2. Insert the card into FB4. You will see four LEDs in ON state. After update FB4 will
restart automatically.
3. After that, check menu of FB4, there are new and important items.
3.1. Turn off the Safe Guard located in main menu of FB4.
3.2. Operational mode has BEYOND/QS Streaming, DMX, Test, Autostart and a
few other. It is important to set mode correctly.
For export the content to file use main menu Tools – FB4 workspace export. The SD
Rear Panel
Project window is a bit complex now and require some fine tuning. But it works.Click
1. SFS Control: Scanner fail safety control ON/OFF 2. Laser key switch on Export button will start export of all cues in the SD Project as .FB4Animation files.
3. Laser remote interlock 4. DMX jack 5. SD card slot Output files located in: BEYOND folder / Project / name of Project / Serial of FB4 /....
6. Ethernet jack for BEYONG/QS 7. FB4 Panel 8. Function setting with key
Before down load, SD card has only three empty folders ,
as follow:
9. ILDA interface with DB25 jack 10. Power switch 11. Power jack input
12. Power jack output 13. Fun (4 PCS)
Function & Setting
FB4 Operation:
After export files and then down load to SD card, the program as follw:
FB4 Panel
1. SD card jack
2. LCD
3. Ethernet jack for BEYONG/QS
4. Function setting with key 5. Status indicator lights
Function setting key
1. Rotate the Funciton key to select the mode and parameter, the information on LCD will
be changed.
2. Press the Function key to enter the sub-menu, enter the sub-menu.
Page 6 Page 7
4
3
1
1
7
9 2 11
10 8 12
3
4
5
13
6
2
5
 Loading...