

Page 1

USER GUIDE
Page 2

Copyright
Copyright © 2003 Fossil, Inc. Al l rights reserved. Wrist PDA is a tradema rk of Fossil, Inc. All other t rademarks are the property of their respective
owners.
Disclaimer and limitation of liability
Fossil, Inc., and it s su ppliers assu me n o re sponsi bility fo r any dama ge o r los s resu lting from t he u se of this guide . Fos sil, I n c., and its suppl iers
assume no responsibility for any loss or claims by third parties which may arise through the use of this device; nor do they assume any re sponsibilit y
for any damage or loss caused by dele tion of data as a result of malfunction, dead battery, or repai rs. Be sure to make backup copies of all im port ant
data to protect against data loss.
Page 3

About Thi s Guide 9
1 Introduction to the Wrist PDA Watch 11
Wrist PDA components . . . . . . . . . . . . . . . . . . 12
Main components . . . . . . . . . . . . . . . . . . . 12
Control buttons . . . . . . . . . . . . . . . . . . . . 13
Back of the watch . . . . . . . . . . . . . . . . . . . 14
Displaying the time . . . . . . . . . . . . . . . . . . . . 15
Switching to PDA mode . . . . . . . . . . . . . . . . . . 15
Using the stylus . . . . . . . . . . . . . . . . . . . . . 16
Working with applications . . . . . . . . . . . . . . . . . 17
Understanding application interface elements . . . . . . . . 19
Using menus and menu commands. . . . . . . . . . . . 20
How to display tips. . . . . . . . . . . . . . . . . . . 21
Writing on the screen . . . . . . . . . . . . . . . . . . . 21
Customizing the watch . . . . . . . . . . . . . . . . . . 22
Using Palm Desktop software . . . . . . . . . . . . . . . 22
Beaming data . . . . . . . . . . . . . . . . . . . . . . 23
Recharging the watch . . . . . . . . . . . . . . . . . . . 24
2 Writin g on th e Scr een 25
Using the onscreen keyboard . . . . . . . . . . . . . . . . 25
Using the handwriting software . . . . . . . . . . . . . . 26
Learning to write characters . . . . . . . . . . . . . . . 27
General Guidelines for Jot Writing . . . . . . . . . . . . 27
Jot tips . . . . . . . . . . . . . . . . . . . . . . . . 29
The Jot alphabet . . . . . . . . . . . . . . . . . . . . 30
Writing numbers . . . . . . . . . . . . . . . . . . . . 30
Writing accent marks . . . . . . . . . . . . . . . . . . 30
Using the Jot tuner . . . . . . . . . . . . . . . . . . . 31
Using ShortCuts . . . . . . . . . . . . . . . . . . . . . 31
Wrist PDA User Guide 3
Page 4

3 Managing Applications 33
Using the Applications Launcher . . . . . . . . . . . . . . 33
Selecting applications. . . . . . . . . . . . . . . . . . 33
Categorizing applications . . . . . . . . . . . . . . . . 34
Changing the Applications Launcher display . . . . . . . 35
Setting preferences for applications . . . . . . . . . . . . . 36
Installing add-on applications . . . . . . . . . . . . . . . 37
Removing applications . . . . . . . . . . . . . . . . . . 40
4 Wo r kin g with App lic ati ons 41
Overview of basic applications . . . . . . . . . . . . . . . 41
Using the Date Book . . . . . . . . . . . . . . . . . . . 42
Scheduling events . . . . . . . . . . . . . . . . . . . 42
Adding Address Book information to an event . . . . . . . 49
Using the alarm . . . . . . . . . . . . . . . . . . . . 49
Changing the Date Book view . . . . . . . . . . . . . . 54
Changing the Date Book display . . . . . . . . . . . . . 60
Using the To Do List . . . . . . . . . . . . . . . . . . . 62
Creating To Do List items . . . . . . . . . . . . . . . . 62
Changing priorities and due dates . . . . . . . . . . . . 65
Displaying completed and due items . . . . . . . . . . . 66
Using the Address Book . . . . . . . . . . . . . . . . . . 68
Adding and using Address Book entries. . . . . . . . . . 68
Changing the Address Book display . . . . . . . . . . . 72
Using the Memo Pad . . . . . . . . . . . . . . . . . . . 74
Creating memos . . . . . . . . . . . . . . . . . . . . 74
Reviewing memos . . . . . . . . . . . . . . . . . . . 75
Using the Calculator . . . . . . . . . . . . . . . . . . . 77
Using the Calculator buttons. . . . . . . . . . . . . . . 77
4 Wrist PDA User Guide
Page 5

5 Performing Common Tasks 79
Creating records . . . . . . . . . . . . . . . . . . . . . 79
Editing records . . . . . . . . . . . . . . . . . . . . . . 80
Selecting Text . . . . . . . . . . . . . . . . . . . . . 80
Using the Edit menu . . . . . . . . . . . . . . . . . . 81
Deleting records . . . . . . . . . . . . . . . . . . . . 82
Purging records . . . . . . . . . . . . . . . . . . . . 83
Categorizing records . . . . . . . . . . . . . . . . . . . 84
Finding records. . . . . . . . . . . . . . . . . . . . . . 87
Finding Address Book records . . . . . . . . . . . . . . 87
Using Phone Lookup . . . . . . . . . . . . . . . . . . 88
Sorting records . . . . . . . . . . . . . . . . . . . . . . 88
Making records private . . . . . . . . . . . . . . . . . . 89
Attaching notes . . . . . . . . . . . . . . . . . . . . . 91
Choosing fonts . . . . . . . . . . . . . . . . . . . . . . 92
Getting information about an application . . . . . . . . . . 93
6 Customi zing Your Watch 95
Customizing your watch . . . . . . . . . . . . . . . . . 95
Setting the date, time, and time zone . . . . . . . . . . . 96
Selecting Wrist PDA preferences . . . . . . . . . . . . . 98
Setting the auto-off delay time . . . . . . . . . . . . . . 99
Choosing a watch face . . . . . . . . . . . . . . . . . 99
Formatting the date, time, and numbers. . . . . . . . . . 100
Selecting sound settings. . . . . . . . . . . . . . . . . 101
Turning Beam Receive on and off. . . . . . . . . . . . . 101
Assigning security options. . . . . . . . . . . . . . . . . 102
Masking and hiding records . . . . . . . . . . . . . . . 102
Assigning and editing passwords . . . . . . . . . . . . 103
Locking your watch . . . . . . . . . . . . . . . . . . 104
Displaying owner information . . . . . . . . . . . . . . 105
Wrist PDA User Guide 5
Page 6

7 Beaming Information 107
Beaming a business card. . . . . . . . . . . . . . . . . . 107
Creating a business card for beaming:. . . . . . . . . . . 107
Beaming a record . . . . . . . . . . . . . . . . . . . . . 108
Beaming an application . . . . . . . . . . . . . . . . . . 109
Receiving beamed information . . . . . . . . . . . . . . . 109
Turning off beaming . . . . . . . . . . . . . . . . . . . 110
8 Exchanging and Updati ng Data using HotSync Operations 111
Performing a HotSync operation for the first time. . . . . . . 111
Performing the first local HotSync operation. . . . . . . . 112
Selecting HotSync setup options . . . . . . . . . . . . . . 113
Customizing HotSync application settings . . . . . . . . . . 114
IR HotSync operations . . . . . . . . . . . . . . . . . . 116
Preparing your computer for infrared communication. . . . 116
Configuring HotSync Manager for infrared communication . 1 17
Performing an IR HotSync operation . . . . . . . . . . . 118
Using the Wrist PDA COM Port Manager . . . . . . . . . . 118
Accessing the COM Port Manager . . . . . . . . . . . . 119
Importing data . . . . . . . . . . . . . . . . . . . . . . 119
Using File Link. . . . . . . . . . . . . . . . . . . . . 121
9 Instal lin g Palm Deskt op So ft war e 123
Importing Data From an Existing Palm OS Device . . . . . . 123
Installing the Wrist PDA Software. . . . . . . . . . . . . . 124
10 Maintaining Your Wrist PDA 131
Resetting your watch . . . . . . . . . . . . . . . . . . . 131
Performing a Soft Reset . . . . . . . . . . . . . . . . . 131
Performing a Hard Reset . . . . . . . . . . . . . . . . 131
Calibrating the screen . . . . . . . . . . . . . . . . . . . 132
Removing Palm Desktop software . . . . . . . . . . . . . 132
6 Wrist PDA User Guide
Page 7

11 Fre qu en tly A sked Questions 133
General Questions . . . . . . . . . . . . . . . . . . . . 133
Where can I find my Wrist PDA’s warranty? . . . . . . . . 133
Is my Wrist PDA waterproof or water-resistant? . . . . . . 133
Where is the stylus? . . . . . . . . . . . . . . . . . . 133
Where do I write Jot text on my Wrist PDA? . . . . . . . . 133
Can my Wrist PDA use infrared for “beaming” with another
Palm device? . . . . . . . . . . . . . . . . . . . . . 134
Battery Questions. . . . . . . . . . . . . . . . . . . . . 134
How long does the battery last on my Wrist PDA? . . . . . 134
Can I lose my data if the screen goes blank from not charging the
battery? . . . . . . . . . . . . . . . . . . . . . . . 134
How can I maximize the battery life? . . . . . . . . . . . 134
Operating Problems. . . . . . . . . . . . . . . . . . . . 135
I do not see anything on the Wrist PDA screen. . . . . . . . 135
How do I reset the watch? . . . . . . . . . . . . . . . . 135
How do I open the software keyboard? . . . . . . . . . . 135
The software keyboard beeps, but does not display. . . . . . 135
I cannot get beaming to work with another PalmTM device. . 136
I tried to perf or m a HotSync opera tion, but nothing happens. 136
Wrist PDA User Guide 7
Page 8

8 Wrist PDA User Guide
Page 9

About This Guide
Welcome! This guide des cr ib e s al l y ou need to know about using
your Wrist PDATM watch and the applications that come with it.
Before using your watch as a personal digital assistant (PDA), you
may want to look at the first two chapters of this guide to learn
about its basic features and how to write on the screen using the
built-in handwriting software. Then see chapt er 4 for deta ils on
using the main applications: Date Book, Address Book, To Do List,
and Memo Pad.
After you become familiar with your watch’s basic features, you can
use this guide as a reference for less common tasks, and also as a
source of information if you have problems operating the watch.
NOTE: To set up your Wrist PDA, follow the instructions in the
Getting Started booklet.
Wrist PDA User Guide 9
Page 10

About This Guide
10 Wrist PDA User Guide
Page 11

1
Introduction to the Wrist PDA Watch
To start using with your W rist PDA, you should familiarize yourself
with the basic features described in this chapter. You’ll learn how to:
• identify the watch’s main components
• switch to PDA mode when the time is displayed
• open and use applications
• write on the screen to enter data
• customize Wrist PDA features
• use the PalmTM Desktop software
• beam data between your watch and another PDA device
• recharge your Wrist PDA when its power starts getting low
Wrist PDA User Guide 11
Page 12
Introduction to the Wrist PDA Watch
Wrist PDA components
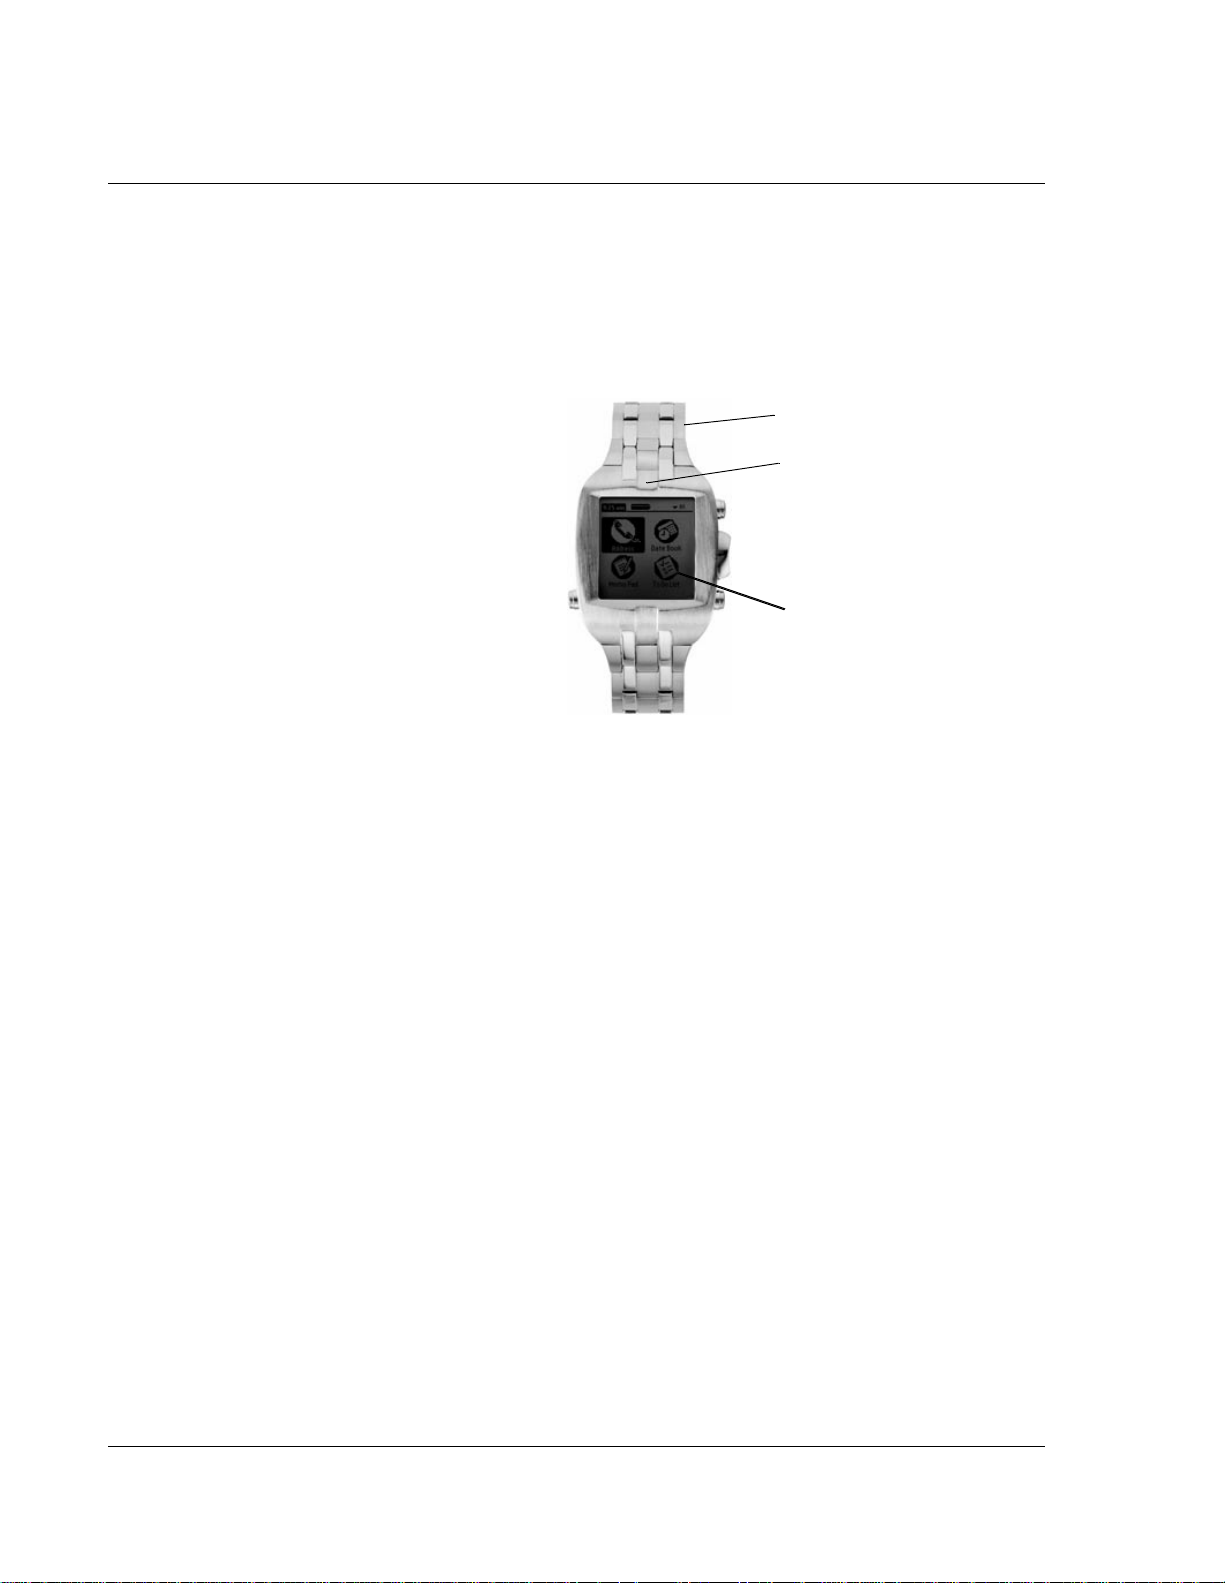
Wrist PDA components
Main components
Stylus (bui lt int o wr i stb and)
Infrar ed ( IR) port
Screen
Screen. Displays the applications and data stored in your watch. It
is touch-sensitive and responds to the stylus.
• Write letters and numbers on the screen using the built-in
Jot® handwriting software (see page 21).
• Activate the electroluminescent (EL) backlight by pressing
and holding the Back button (see the next page).
Stylus. Remove the stylus from the wristband and use it as a
selection tool (like a mouse) or to write text and numbers on the
screen
(see page 16).
IR port. Uses infra re d tech no lo gy to exc ha nge data w ith oth er Wris t
PDA watches and Palm devices. See "Beaming Information" on page
107 for more information.
12 Wrist PDA User Guide
Page 13

Intr oduction to the W rist PDA Watch
Wrist PDA components
Cont ro l butto ns
Page U p
Scrolls up one screen
at a time
Rocker switch
• Pivot to di s play next item or line on
the screen
• Push in on t h e button to use as Enter
key. Selects the highlighted item.
• When time is displayed, press to
activate PDA mode
Back button
• Press to go back to previou s
screen or to vi ew ap pl ications
• Press and hold to turn on EL
(electroluminescent) backlight
Rocker switch. Pivoting th e switch up or down displays the next
item or line on the screen.
Page Down
Scrolls down one screen
at a time
Press inward on the switch (toward the watch) to use it as an Enter
button. This le ts you select the currently highlighted applicati on or
menu item.
When the Wrist PDA watch is displaying the time, press the switch
to return to PDA mode.
Page Up and Page Down buttons. Displays t ext an d graphic s tha t
extend beyond the area of the watch s creen. Lets you scroll up or
down by moving one screen at a time.
Back button . Lets you return to the previous scree n , or exit the
current application and return to the Application Launcher. (Press
the Back button repeatedly to display the Application Launcher
categories Al l, Main, a nd System.)
Press and hold the Back butt on t o turn on the EL
(electroluminescent) backlight .
Wrist PDA User Guide 13
Page 14
Introduction to the Wrist PDA Watch
Wrist PDA components
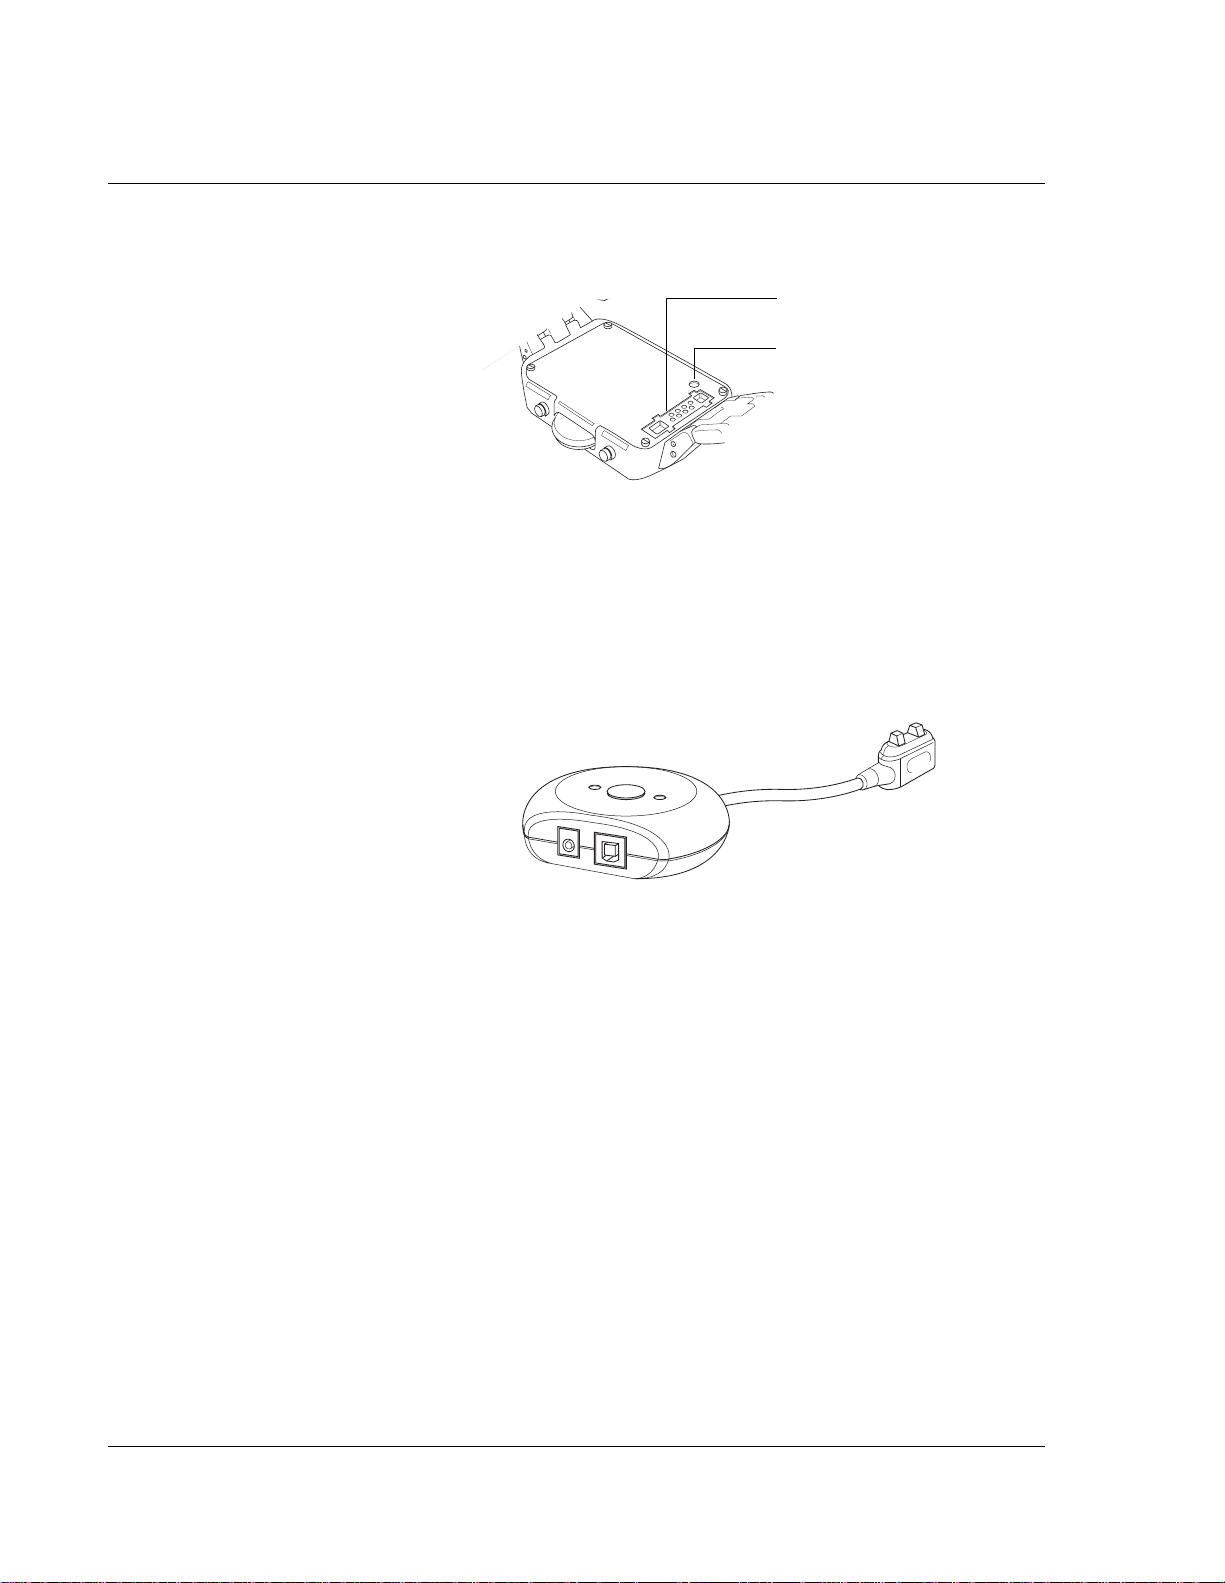
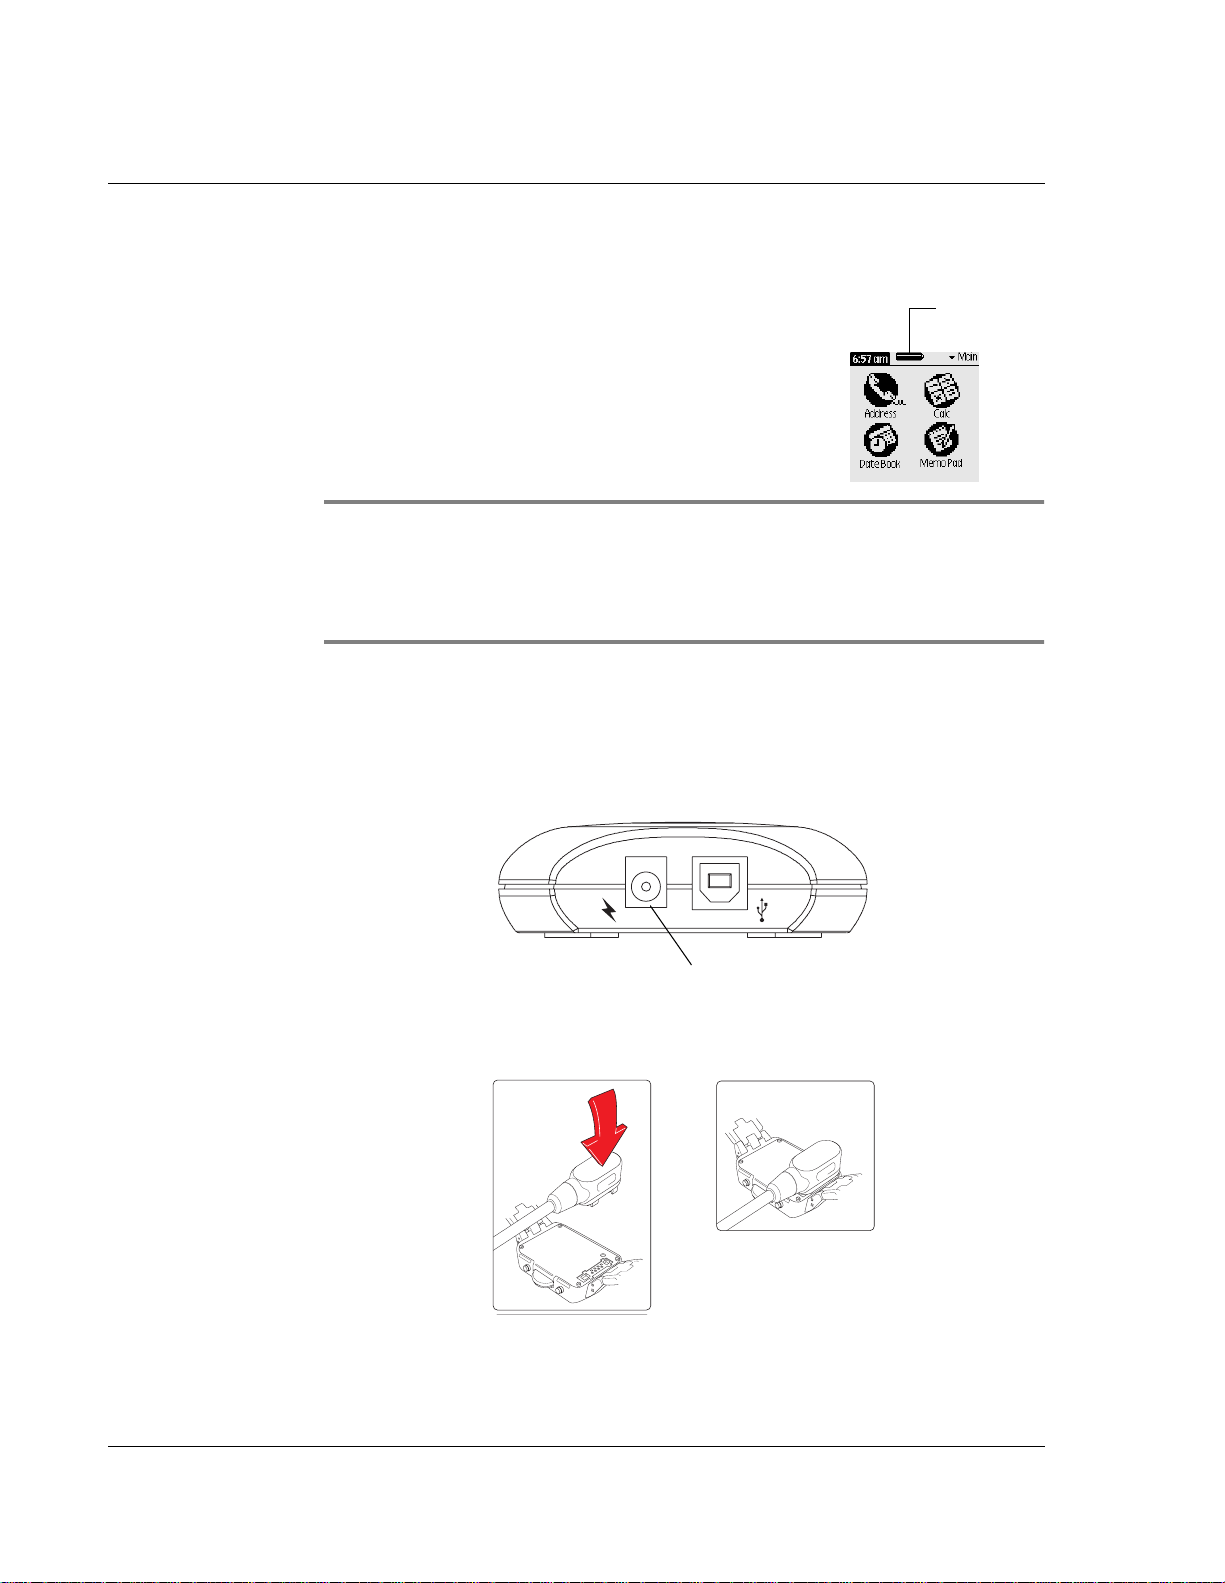
Back of the watch
HotSync Pod connector port. Lets you connect the cable from the
HotSync Pod to recharge the watch and perform HotSync®
operations.
Reset button. Under normal circumstances, you should not have to
reset the watch. See page 131 for more information.
HotSync Pod
Connector port (for HotSync Pod)
Reset button
The HotSync Pod lets you recharge the watch or synchronize
information between your Wrist PDA watch and the Palm Desktop
software using HotSync technolog y. Connect the cable from the
HotSync Pod to the port on the back of the watch when recharging
(page 24) or to perform a HotSync operation (page 111).
14 Wrist PDA User Guide
Page 15
Displaying the time
Your Wrist PDA watch automatically displays the time after a brief
period of inactivity (when you have not used the s tylus or pressed
any of the buttons). You can select the specific period of time after
which the watch face will appear, ranging from 30 seconds to two
minutes. See page 99 for instructions on setting the time delay.
NOTE: For ease of viewing in dark conditions, turn on the
electroluminescen t (EL) backlight. Press and hold the Back button
on the left side of the watch until the light activates.
See these sections for more information:
• To set the date and time, see page 96
• To select a different watch face style from various built-in
options, see page 99
Intr oduction to the W rist PDA Watch
Displaying the time
You can al s o install third-party applica t io n s for displ a yin g th e ti m e ,
but they will not automa ti ca ll y run like the buil t- in watch feature.
See page 37 for instructions on installing add-on applications.
Switching to PDA mode
When the watch face is displayed, you can switch to PDA mode by
pressing and holding th e Ro ck e r switch on the right side of the
watch.
NOTE: You can set how long you have to hold the button to
switch to PDA mode. See page 98.
Press to activate PDA mode
Wrist PDA User Guide 15
Page 16
Introduction to the Wrist PDA Watch
Using the stylus
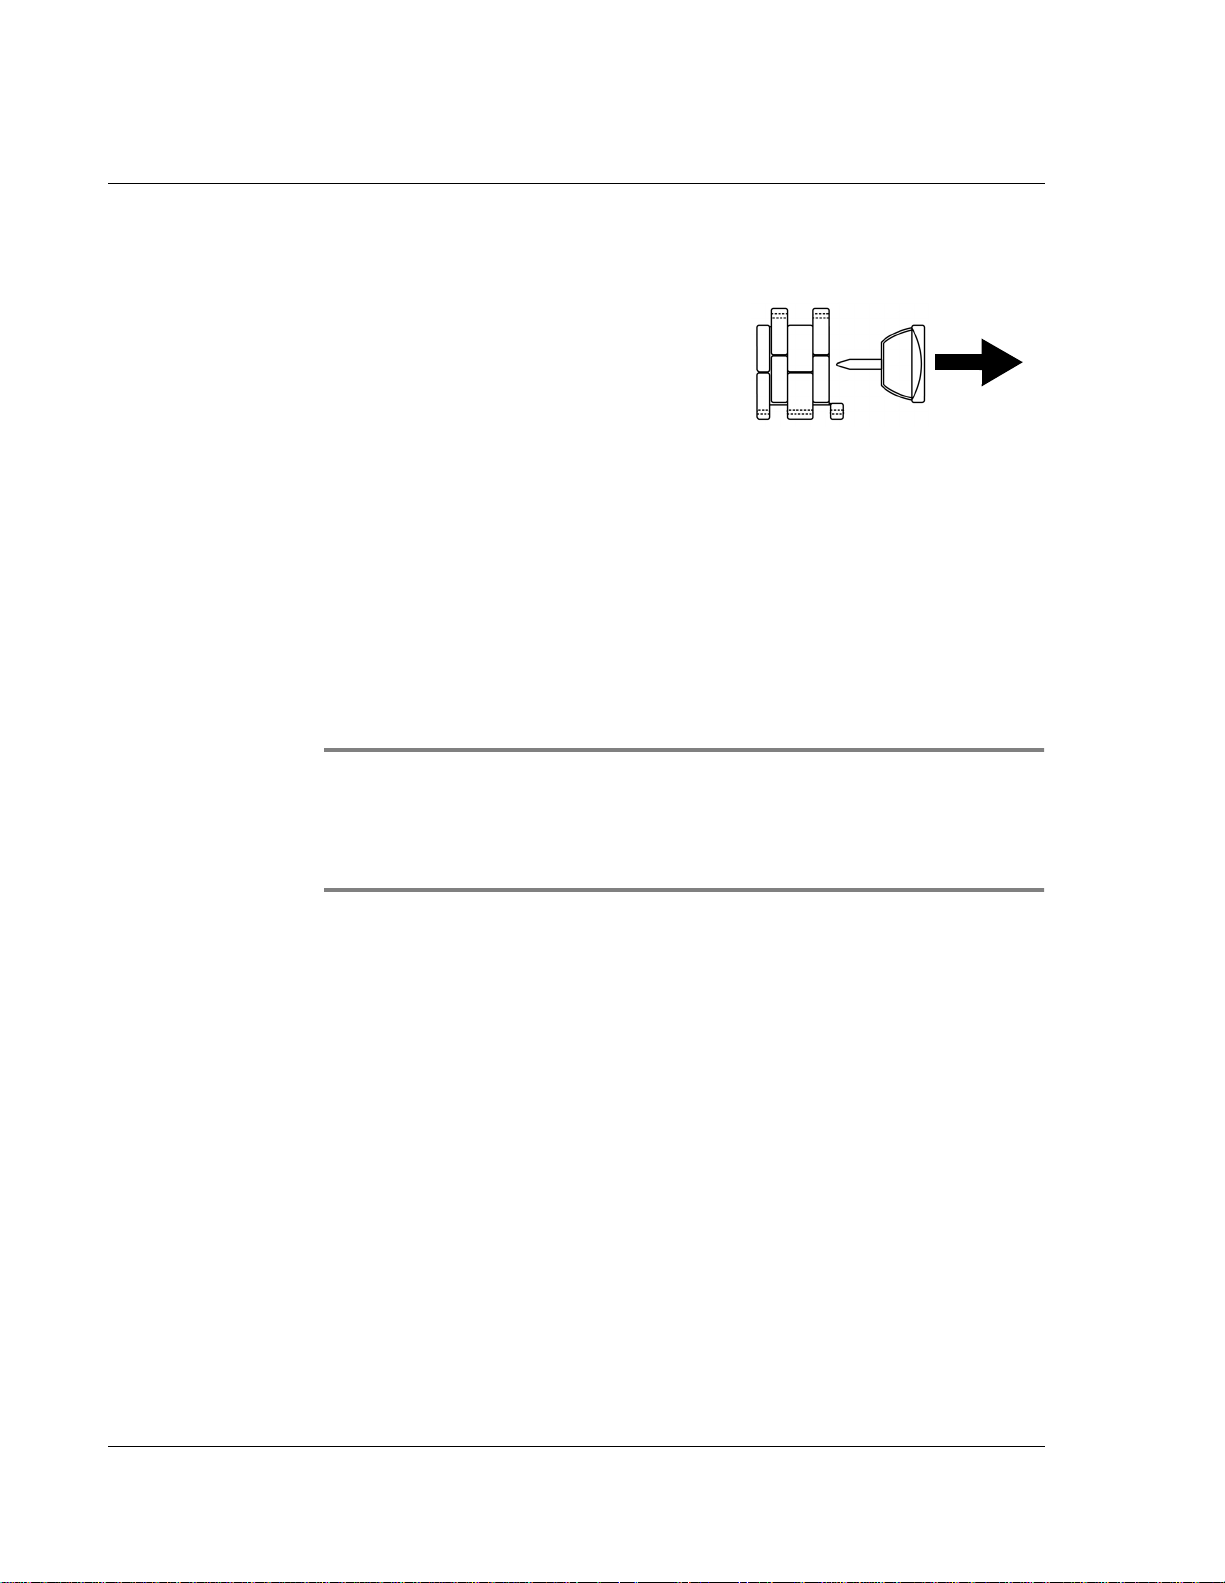
Using the stylus
The stylus is integrated into the
wristband ( fo r meta l bands) or into a
holder on leather or plastic bands. To
use the stylus, slide it straight out as
shown.
Tapping. Tap with the stylus to select items on the screen, or to
position the cursor in text.
If you are having trouble selecting an object, such as a button, slider,
or checkbox, try tapping and holding the stylus on the object.
Selecting. To select a section of text, press and hold the stylus in
place until the watch “chirps.” Then drag the stylus to the right
along the section of text you want to select. This highlights or selects
the text.
IMPORTANT: Do not use a pen, pencil, or any other sharp
object to write on the screen. A spare stylus is included with the
watch. If you misplace your stylus, visit www.fossil.com for
information on getting a replacement.
If you have difficulty accur ately selecting items on the screen, you
may need to calibrate the screen. See page 132.
16 Wrist PDA User Guide
Page 17
Intr oduction to the W rist PDA Watch
Working with applications
Your W rist PDA watch comes with several built-in applications. The
main ones are:
• Date Book
• Address Book
•To Do List
•Memo Pad
• Calculator
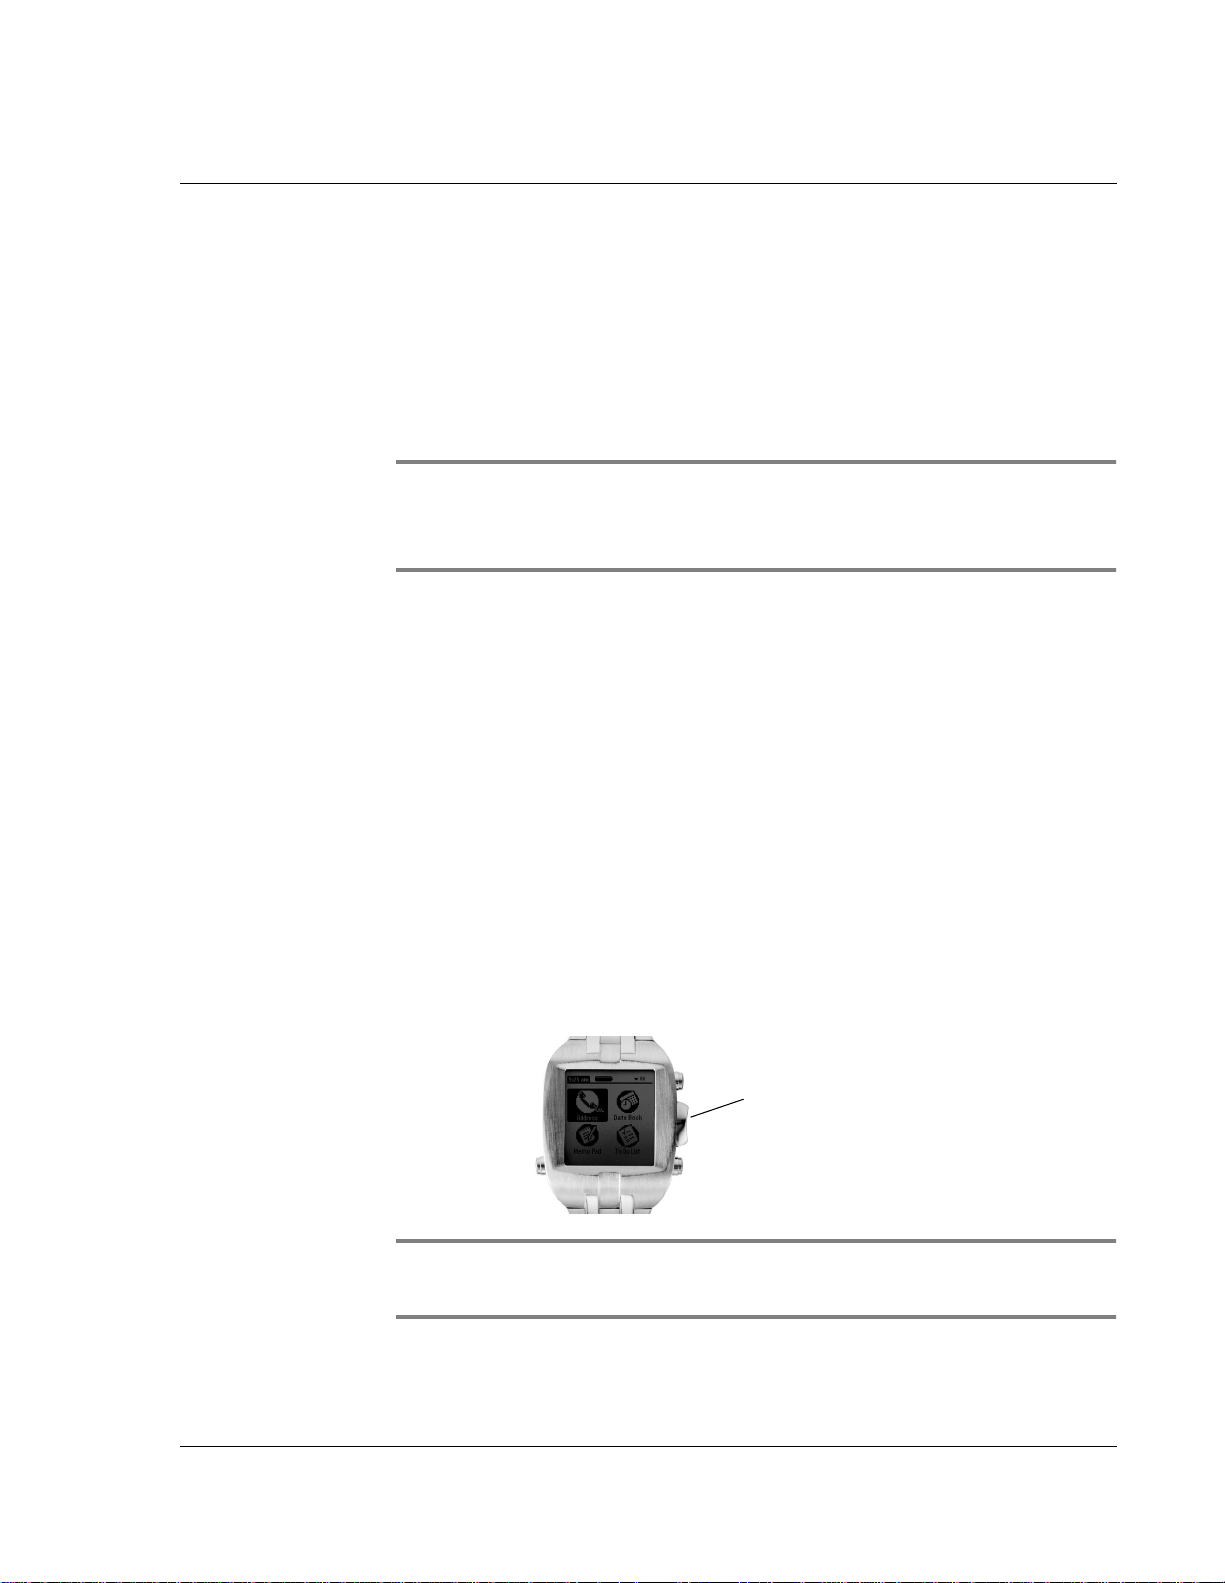
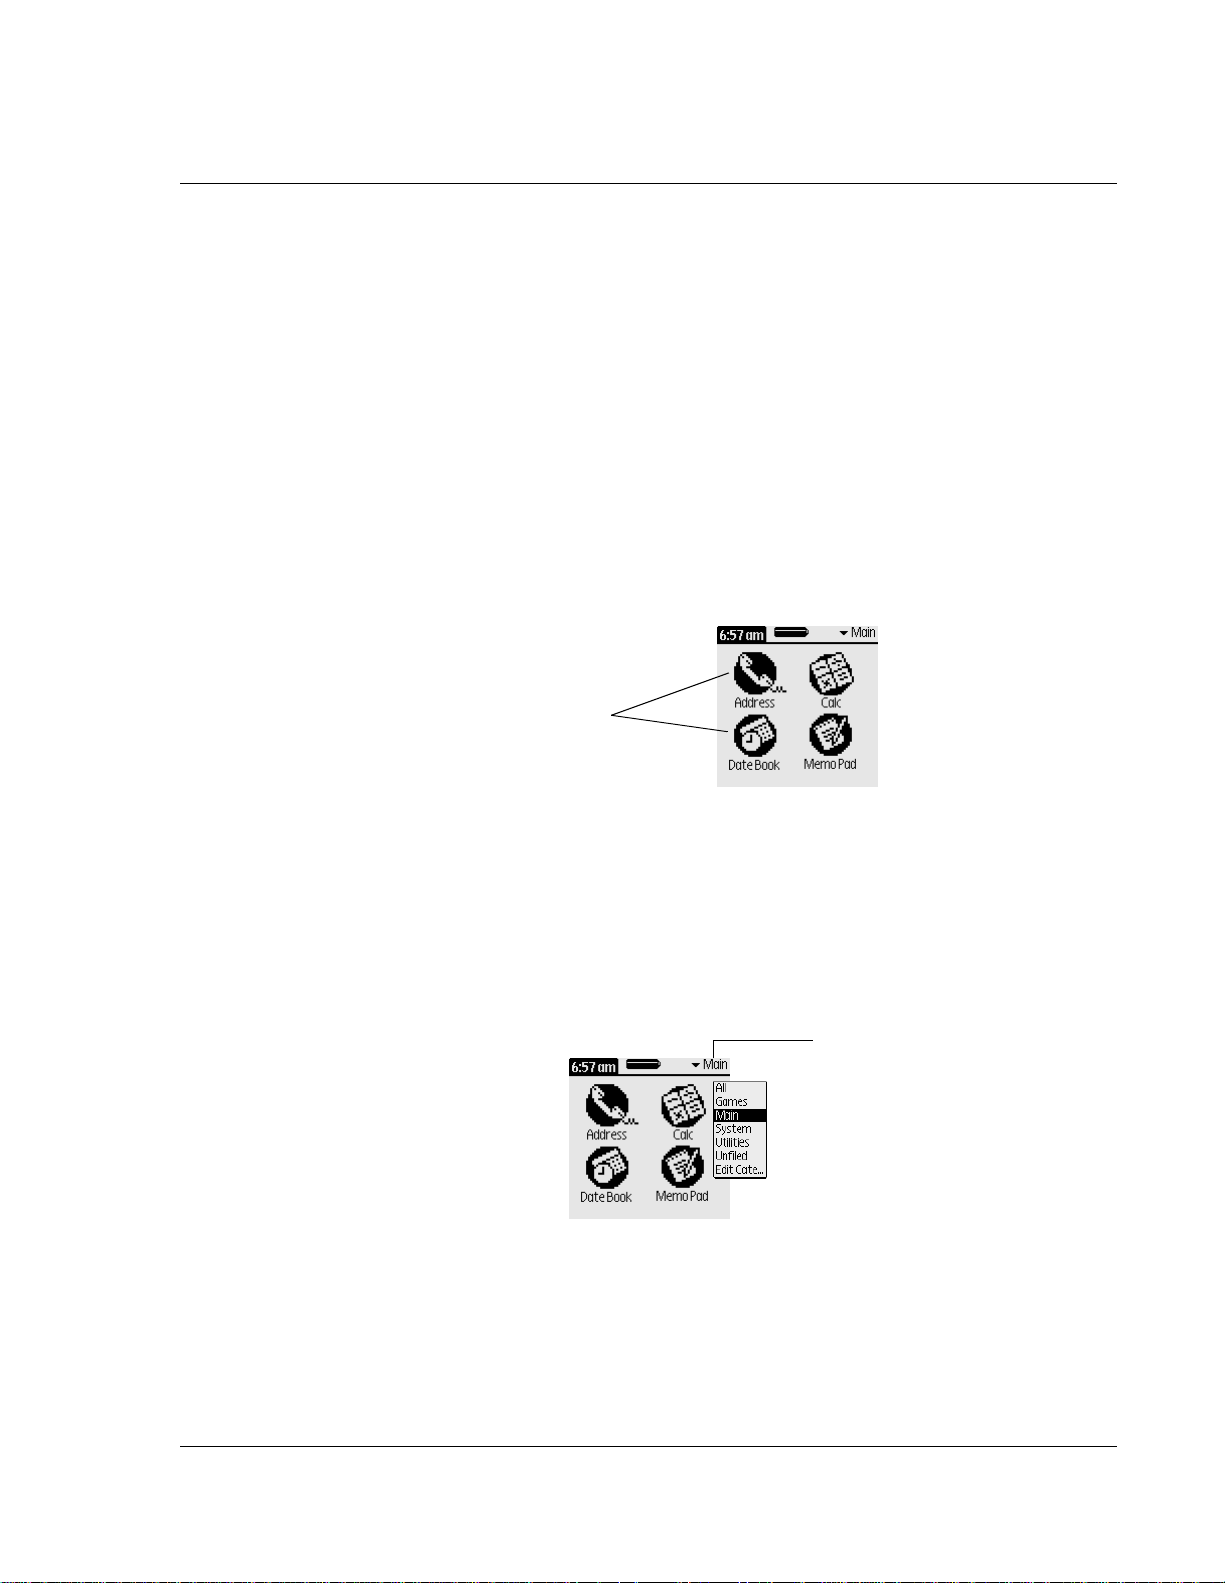
The applications are displayed as icons on the Applications
Launcher screen, as shown:
Applic ation icons
Working with applications
Applications can be sorted into categories to help you find them.
The watch comes with several built-in categories, such as Main,
System, Games, and Utilities. You can also create your own
categories (see "Managing Applications" on page 33).
The watch’s main applications (Date Book, Address Book, etc.) are
stored in the Main category. You can select a category by tapping the
pick list in the upper-right corner of the screen:
Tap he re to choose
appli cation category
In addition to letting you see your applications, the Applications
Launcher screen also displays the current ti me and battery level. See
page 24 for information on reading battery levels and recharging
your watch.
Wrist PDA User Guide 17
Page 18

Introduction to the Wrist PDA Watch
Working with applications
To open an application:
1. If your Wrist PDA is not in PDA mode (for example, if it’s
showing the time), switch it to PDA mode by pressing the Rocker
switch on the right side of the watch (see page 15).
2. Once you’re in PDA mode, if an a pplication is current l y running,
press the Back button to exit the application and display the
Applic ations Launcher screen.
3. Select the category containing the application you want to open.
You can select the category from the pick list in the upper-right
corner
(see page 17) or by pressing the Back button repeatedly to cycle
through categories (only categories with applications in them will
be displayed).
TIP: If you are unsure which category an application is in, select
the All category to display all the applications on your watch. See
page page34 to find out which category an application is in and
how to change it.
4. If there are more applications than fit on the screen, do one of the
following:
• Press the Page Up or Page Down button until the desired
application is visib le.
• Use Rocker Up or Rocker Down to move the highlight to the
desired appli ca t ion.
• Use the stylus to write the first letter of the application on the
screen; this highlights the first application that starts with
that letter.
5. To open the application, use the stylus to tap its icon. Or if the
icon is already highlighted, just press Rocker Enter.
To switch to another application, press the Back button on the watch
to display the Applications Launcher screen, then select the
applica tion you want t o o pe n .
NOTE: To install additional new applicatio ns, see page 37.
18 Wrist PDA User Guide
Page 19
Intr oduction to the W rist PDA Watch
Understanding application interface elements
Understanding application interface elements
Wrist PDA applications include the following
interface elements:
• Pick l ists that display a list of choices. Tap
the black triangle next to the pick list to
display a list of choices, and then ta p an
item in the list to sele c t it.
• Text areas and screens in which you can
enter information.
• Scroll bars to move through multi-page
screens. Tap and hold do wn the scr oll bar
slider to scroll through pages; tap the slider
arrow at the top or botto m t o move o n e
line at a time. To scroll to the previous
page, tap the scroll bar just above the
slider; to scroll to the next page, tap the
scroll bar just below the slider. Y ou can
also scroll to the previous and next pages
by pressing the Page Up and Page Down
buttons on the right side of the watch.
• Menu bars containing drop- down
menus specific to an application. Tap
the application’s tab at the top-left
corner of the screen to access the menu
bar (not all applications have a menu
bar).
Pick lis t
Text area
Tap here to
display menu bar
• Check boxes that indicate the state of
the corresponding option. A check
Check
box
mark in a check box indicates that the
option is active. If a check box is
empty, tapping it inserts a check mark.
If a chec k box is checked, tapping it
removes the check mark.
• Command buttons that initiate a
command when tapped. Command
buttons appear in dialog boxes and at the bottom o f
application screens.
Wrist PDA User Guide 19
Command button
Page 20
Introduction to the Wrist PDA Watch
Understanding application interface elements
Using menus and menu commands
Menus on your watch are easy to use, and work the same way in all
applications. Menu bars and manual commands differ based on the
application and the area of the application in which you’r e working.
For example, in the Memo Pad, the Memo List screen and the Memo
screen display different menus.
Menu commands for each application are described in the
corresponding application’s chapter, with the exception of the Edit
menu. For information on Edit menu commands, see "Using the
Edit menu" on page 81
Most menu commands have an equivalent command stroke, which
is similar to keyboard shortcuts used to execute commands on
computers. To use menu commands, menus must be closed.
To displ ay a menu bar and choose a command:
1. Do one of the following:
• Open an application (such as the Date Book); tap the tab at
the upper-left corner of the screen (the Calculator does not
have a tab); then tap the desired command.
• In the text input area of the screen, drag a diagonal line from
the lower left to upper right (called the Command stroke) to
displa y th e Command too lbar. The Comma n d toolbar is
displayed for approximately 4 seconds.
Tap an icon that represents the command you want, or write the
ShortCut character for the command you want to use. For example,
to choose Select All in the Edit menu, draw the command stroke in
the text area to display the Command toolbar; then draw the letter S.
ShortCut characters are listed beside the menu options they
correspond to. Note that if you wait more than three seconds to
draw the ShortCut letter, you’ll have to redraw the Command stroke
to redisplay the Command toolbar.
20 Wrist PDA User Guide
Page 21
Intr oduction to the W rist PDA Watch
Writing on the screen
How to display tips
Many of the dialog boxes that appear on your watch contain a Tip
icon in the upper right corner. Tips anticipate questions you may
have and provide s h ortcuts for using the dialog box or other useful
information.
To display a tip:
1. Tap the Tips icon (the lowercase “i” in the upper right corner of
the dialog box).
Tip icon
2. Tap Done after reading the tip.
Writing on the screen
You can write text and numbers on your Wrist PDA in two ways:
• Using the onscreen keyboard (see page 25)
• Using the built-in handwriting software (see page 26)
You can also enter data stored on your computer by importing it
into your Palm Desktop softw a re, and then synchronizing w i th
your watch (see page 119).
Wrist PDA User Guide 21
Page 22

Introduction to the Wrist PDA Watch
Customizing the watch
Customizing the watch
You can customize your watch in a variety of ways. For example,
you can:
• Change the time zone when you travel
• Choose the delay period before the watch automatically
displays the time
• Select a watch face style
• Change how long you have to press and hold a button to
activate the EL backlight or cause the watch to enter PDA
mode
• Displa y the date , time, a nd numb ers in var ious intern a tional
formats
• Control the sound v ol ume
• Set up security options
• Display owner information
See page 95 for instructions on making these settings.
Using Palm Desktop software
Palm Desktop software includes the same main applications as your
Wrist PDA watch: Address Book, Date Book, To Do List, and Memo
Pad. You can use the HotSync feature of this software to back up
and exchange data between your watch and your computer (see
page 111).
It’s a good idea to back up your data in case something happen s to
the data on your Wrist PDA watch. Changes you make on your
Wrist PDA watch or Palm Desktop software appear in both places
after you synchronize.
With Palm Desktop software, you can do the following:
• Work with your Wrist PDA watch applications on your
computer. Palm Desktop software duplicates the Date Book,
Address Book, To Do List, and Memo Pad applications on
your watch, so that you can view, enter, and modify any data
stored on your watch.
22 Wrist PDA User Guide
Page 23

Intr oduction to the W rist PDA Watch
Beaming data
• Back up the data stored on your watch with HotSync
technology and synchronize the data on your Palm Desktop
software. S yn chr oniz ation is a one-step procedure that
ensures your data is always safe and up to date. See
"Exchanging and Updating Data using HotSync Operations"
on page 111 for more information.
• Import and export data, so you can easily transfer data from
other desktop applications in to any of your mai n
applications. See "Importing data" on page 119 for more
information.
• Print your Date Book, Address Book, To Do List, and Memo
Pad information on any printer.
Instructions for installing the Palm Desktop software are provided
in the Wrist PDA Getting Started booklet. Refer to the online Help in
Palm Desktop software for information on using the software.
NOTE: The Palm Desktop software for your Wrist PDA watch
does not run on Macintosh systems.
Beaming data
Your Wrist PDA watch is equipped with an IR (infrared) port that
you can use to beam information to another Palm-style device that’s
close by and also has an IR port.
You can send or receive the following information:
• The record currently displayed in Date Book, Address Book,
• All records of the category currently displaye d in the
• A special Address Book record that you designate as your
• An application installed in RAM memory.
See page 107 for details.
To Do List, or Memo Pad.
Addre ss Bo ok, To Do Lis t, or Memo Pad applic a tions.
business card, containing information you want to exchange
with business contacts.
Wrist PDA User Guide 23
Page 24
Introduction to the Wrist PDA Watch
Recharging the watch
Recharging the watch
A battery l evel indicator appears on the same
screen as your applications:
Batter y level
indicator
To avoid losing data, always recharge your
watch before the power runs out completely.
NOTE: If the watch ever fully discharges and you lose data, you
can always get back your most recent data by performing a
HotSync operation between the watch and the Palm Desktop
software (see page 111).
To recharge th e watch:
1. Make sure the power supply for the HotSync Pod is plugged into
a power outlet and connected to the port on the back of the
HotSync Pod as shown below:
2. Turn the watch over and connect the cable from the HotSync Pod
to the port on the back of the watch.
3. Let the watch charge for several hours or overnight to recharge the
battery fully.
24 Wrist PDA User Guide
Connect power supply here
Page 25

Writing on the Screen
You can enter data into your Wrist PDA watch by using the
onscreen keyboard or by writing with the stylus in the text input
area. You can also import data from another application (see page
119).
Using the onscreen keyboard
Some applications let you open the onscreen keyboard anytime you
need to enter text or numbe rs on your watch.
To use the onscreen keyboard:
2
1. Open an application that supports using the keyboard (such as
the Address Book, Date Book, or To Do list).
2. Tap any record, or tap New.
3. Tap in the area where you wish to enter text. Make sure the
blinking text entry cursor is visible.
4. To display the keyboard, open the application menu by tapping
the tab in the upper-left corner of the screen. Select Edit, then
select Keyboard.
You can also open the keyboard by drawing the Command stroke
and tapping the ABC keyboard icon on the Co mmand toolbar ( se e
page 20).
Wrist PDA User Guide 25
Page 26
Writing on th e Screen
Using the handwriting software
NOTE: To display the keyboard, a blinking text entry cursor
must be visible in the text entry area.
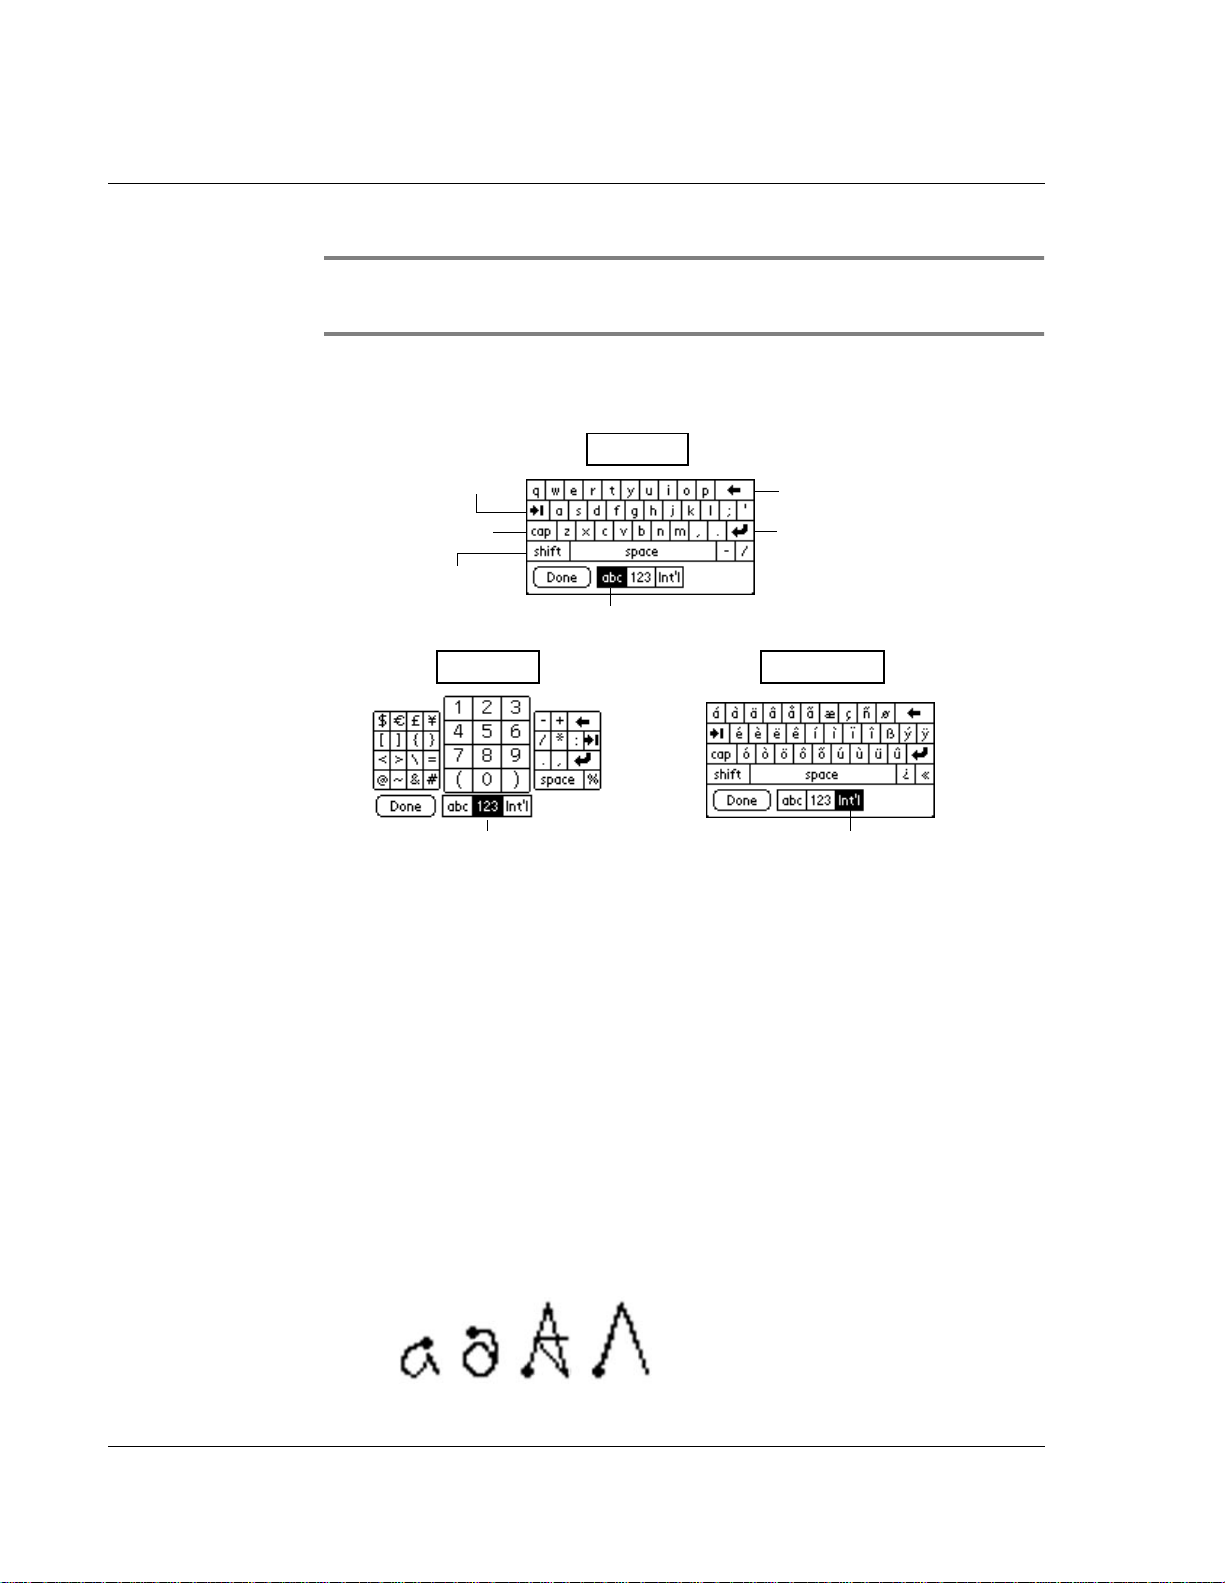
5. To display the number keyboard, tap 123 at the bottom of the
keyboard display. To use international characters, tap Int’l.
Alpha
Tab
Caps Lock
Caps Shift
Tap here t o di sp lay alphabetic keyboard
Numeric
Tap here to display
numer ic keyboard.
6. Tap the desired characters or numbers; then tap Done to enter the
text or numbers.
Using the handwriting software
Backspace
Carriage return
International
Tap he r e t o displa y
international keyboard.
Your watch lets you write on the screen using Jot®handwriting
software. This lets you create letters, numbers, punctuation, and
symbols, including all of the characters found on a standard
keyboard.
The strokes are different from those used on other Palm Powered
handhelds. Jot lets you write more naturally, using standard upperand lowercase printed letters in most cases . Jot recognizes various
strokes as well as most Graffiti®-based characters.
26 Wrist PDA User Guide
Variou s way s of w riting the le tte r A.
Use the meth od m os t natural for you.
Page 27

Writing on the Screen
Using the handwriting software
NOTE: Uppercase letters are formed by drawing a character
stroke across the middl e of the scr een, not by drawing a character
stroke that looks like an uppercase letter. See page 28.
Learning to write characters
Wi th onl y a f ew minutes of p ract ice, you’ll f ind it eas y to enter
accurate text and numbers using Jot.
The Jot tutorial show s you how to use the handwritin g softw a re. To
practice using Jot, tap the Jot application icon, then tap Tutorial.
Tap a letter to see how it’s written, then try writing it you rself.
General Guidelines for Jot Writing
Follow these guidelines to learn and use Jot writing strokes
successfully:
• To achieve 100% accuracy, practice drawing characters
exactly as they appear in the tables later in this ch apter.
• The heavy dot on each shape indicates
where to start the stroke. Some characters
have similar shapes, but different starting
and endi n g points. Alway s start th e stroke
at the heavy dot. (Do not draw the heavy
dot; it is there only as a guideline.)
• The Jot writing strokes for letters closely resem ble letters of
the standard English alphabet, both uppercase and
lowercase. Most characters require only a single stroke.
When you lift the stylus from the text input area, your watch
recognizes and displays the text character immediately.
For multi-stroke characters, a temporary character is
displayed a fter the first stroke, to show that the st roke was
recognized. For example, after the first vertical stroke of “t”,
a temporary “l” is shown. There is a short time delay, during
which the second stroke must be drawn. Otherwise the
temporary stroke is recorded.
Begin stroke here
Wrist PDA User Guide 27
Page 28
Writing on th e Screen
Using the handwriting software
• The screen is divided into two parts, one for writing
lowercase letters and one for writing numbers. To have your
watch recognize letters and numbers, you must begin letter
strokes on the left side, and number strokes on the right.
NOTE: To turn on the screen-dividing mark (shown below),
open the Jot application and select Show mo de mar k.
Dividing mark
Write lowercase
letters on this side
Write numbers
on this side
• Jot writing automa tically capi talizes the first lette r of a new
record or sentence. To write additional capital letters, use the
same character stroke as for a lowercase letter, but start the
stroke on the left side of the screen and write across the
middle, indicated by the di viding mark shown above .
To write Jot letters:
1. Tap the screen where you want to write text, for example, on a line
next to a time in the Date Book.
NOTE: A blinking cursor must appear onscreen in the writing
area before you can begin writing text.
2. Use the tables on the following pages to find the stroke shape for
the letter you want to write. For example, the stroke shown below
creates the letter n.
28 Wrist PDA User Guide
Page 29

Writing on the Screen
Using the handwriting software
Lift st ylus here.
Start stroke at
heavy dot.
You use the same shape to create both the lowercase letter in the left
hand side of the text input area, and the uppercase letter across the
division line.
3. Position the stylus in the left hand side of the text input area.
4. Start your stroke at the heavy dot, and draw the stroke shape as it
appears in the tables.
5. Lift the stylus from the screen at the end of the stroke shape.
6. Your watch recognizes your stroke immediately and displays the
letter a t the in serti on p oint on scr een. As soon as yo u lift the stylus
from the screen, you can begin the stroke for the next character
you w a nt to wr ite.
Jot tips
When us ing Jot writ in g , ke e p the following tips i n min d :
• For greater accu racy, draw letters with large strokes; strokes
that nearly fill the text input area are easily interpreted.
• To delete characters, set the insertion point to the right of the
character you want to delete, and draw the Backspace stroke
(a line from right to left) in the text input area.
• Write at natural speed. Writing too slowly can produce
errors.
• Do not write at a slant (like italics). Keep vertical strokes
parallel to the sides of the text input area.
• When letters and numbers can be written using two different
strokes, use the one that’s easier for you.
• Press firmly.
Wrist PDA User Guide 29
Page 30
Writing on th e Screen
Using the handwriting software
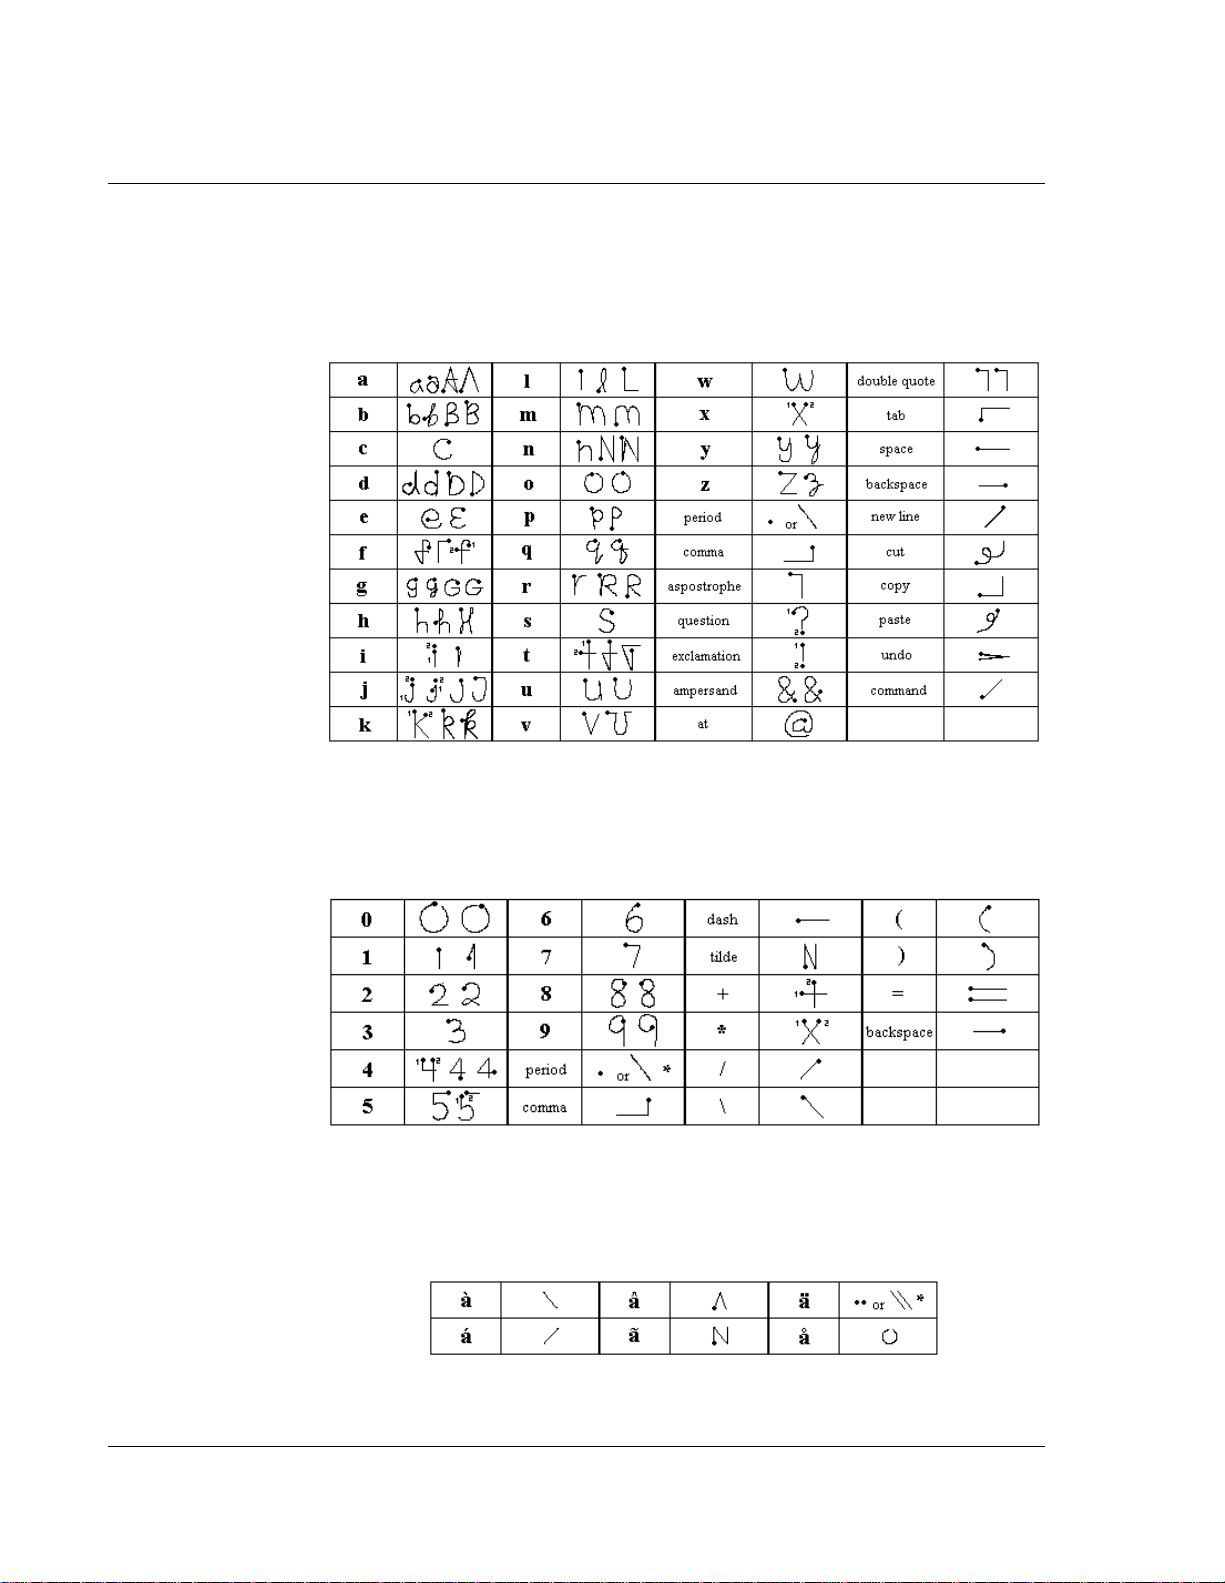
The Jot alphabet
Draw the following letters, symbols, and gestures on the left side of
the screen.
Writing numbers
Draw the following numbers and synbols on the right side of the
screen.
Writing accent marks
Write accent marks on the right side of the screen after writing an
upper- or lowercase character.
30 Wrist PDA User Guide
Page 31

Using the Jot tuner
The Jot tuner provides alternative strokes for making the I, K, P, T, Y,
and $ characters. For example, you may want to form the letter “T”
by using strokes similar to a space and an “L”. But if this technique
is difficult to control, you can turn off this option.
To use the tuner:
1. In the pick list in the upper right corner of the screen, tap All.
2. Tap on the Jot icon.
3. Tap Tuner.
4. Tap on one of the letters available for you to tune.
Using ShortCuts
Writing on the Screen
Using ShortCuts
ShortCuts let you quickly and easily enter commonly used words or
phrases. ShortCuts are similar to the Glossary or Autotext features
of some word processors. Jot writing comes with several predefined
ShortCuts. You can also create your own, for any words, letters, or
numbers.
You can create ShortCuts, with up to 45 characters, using the
ShortCut preferences. Fo r example, you could create a ShortCut for
your name or for the header of a memo. All ShortCuts you create
appear on the list in the ShortCut Preferences screen, ar e available in
any of your watch applications, and are backed up on your
com puter wh en you perf orm a HotSync operation.
Your watch includes the following predefined ShortCuts for
common entries:
• ds—Date stamp
• ts—Time stamp
• dts—Date/time
To use a ShortCut:
Draw the ShortCut st roke, followed by the
ShortCut character or characters. When you draw
the ShortCut stroke, the ShortCut symbol appears
at the insertion point.
• br—Breakfast
•lu—Lunch
• di—Dinner
• me—Meeting
ShortCut
stroke
Wrist PDA User Guide 31
Page 32

Writing on th e Screen
Using ShortCuts
To create a ShortCut:
1. Select All or Sys te m from the pick list in the upper right corner.
2. Select Prefs from the menu.
3. Tap ShortCuts in the pick list in the upper right corner.
4. Tap New.
5. In the ShortCut Name line of the ShortCut Entry screen, enter the
letters you want to use to activate the ShortCut.
Tap New.
6. Tap the ShortCut Text area, then enter the text that will appear
when you write the ShortCut characters.
7. You can add a space character after the last word in your ShortCut
text, so that a space automatically follows the ShortCut text.
8. Tap OK.
To edit a ShortCut:
1. In the ShortCut Preferences screen, tap the ShortCut you want to
edit.
2. Tap Edit.
3. Make the changes you want; then tap OK.
To delete a ShortCut:
1. In the ShortCut Preferences screen, tap the ShortCut you want to
delete.
2. Tap Delete; then tap Yes.
32 Wrist PDA User Guide
Page 33

Managing Applications
This chapter explains how to switch between applications on your
Wrist PDA, how to personalize applicati on setti ng s, and how to
categorize applica tions into related groups.
Using the Applications Launcher
The Ap plicat ions La unch er dis plays al l the availab le app lica tions on
your watch. You can also display only selected applications by
arranging applications into categories.
To open the Applications Launcher:
3
If the watch face is currently displayed, press Rocker Enter to
display the Applications Launcher.
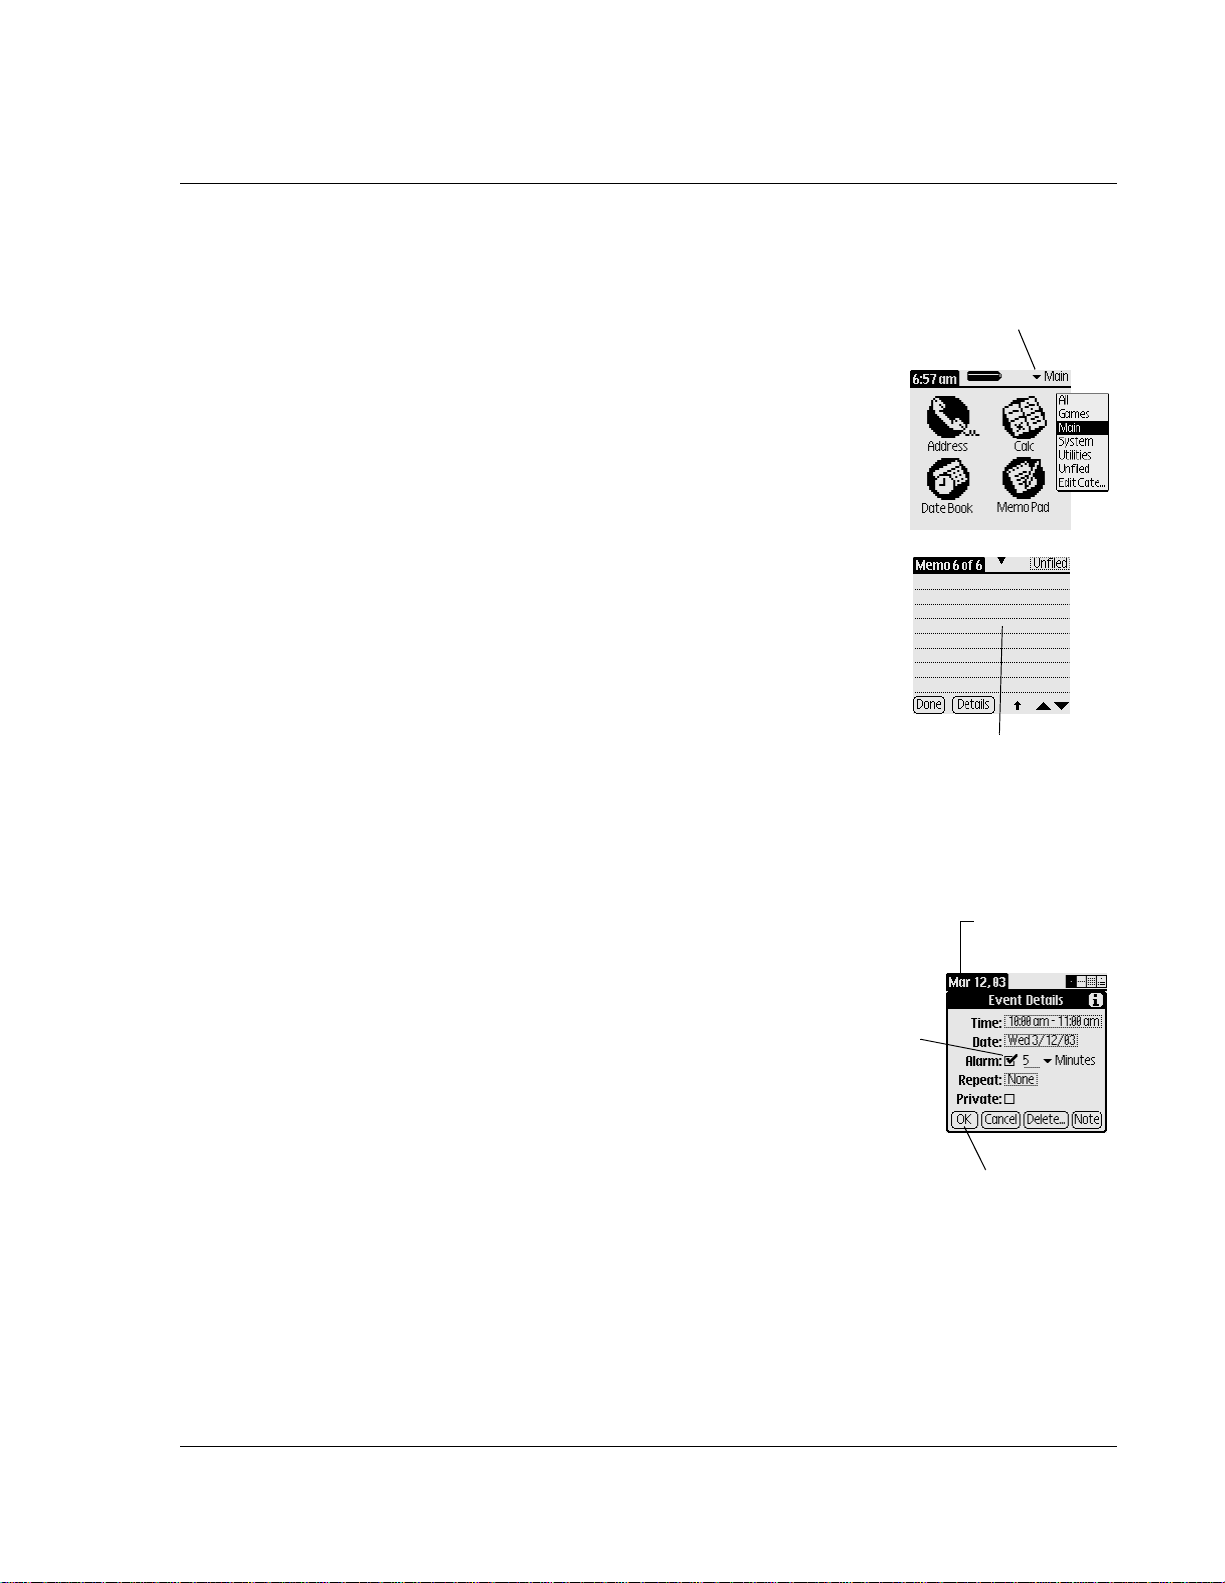
Selecting applications
Your Wrist PDA watch is equipped with a variety of applications.
All the applications installed on your watch appear in the
Applications Launch er.
Application category
Applic ation icons
Wrist PDA User Guide 33
Page 34

Managing Applications
Using the Applications L aunch er
In addition to providing a way for you to open applications, the
Applications Launcher displays the current time, battery level, and
application category.
To open an application:
Choose from the following options:
• Tap the icon of the application you want to open. If you have
many applications installed on your watch, you may need to
select the category containing that application (see below).
• If there are more applications than f it on the screen, you may
need to scroll up or dow n usi ng the Page buttons or Rocke r
switch until you see the desired application. You can also use
the stylus to write letter with which the application’s name
begins; this highlights the first application starting with that
letter.
• To switch between applications, press the Back button on
your watch and select another application in the
Applications Launcher.
See page 18 for more information on selectin g and opening
applications.
Categoriz ing applications
The category feature enables you to manage the number of
application icons that appear onscreen in the Applications
Launcher. You can assign an application to a category and then
display a single category or all your applications.
To categorize an applica tion:
1. If necessary, press the Rocker switch to display the Applications
Launcher.
2. Tap the tab in the upper-left corner to display the menu bar.
3. From the App menu, tap Category.
34 Wrist PDA User Guide
Page 35

Managing Applications
Using the Applications Launcher
4. Choose from the following options:
• To choose a category for an application, tap the pick list next
to each appl ication.
• To create a new category for an application, tap Edit
Categories from the application’s pick list. Tap New, enter
the category name, and then tap OK to add the category. Tap
OK.
5. Tap Done.
To display applications by category:
1. Tap the pick list in the upper right corner of the screen.
2. Tap the category you want to display.
To view all the applications installed on your watch, select the All
category.
Changing the Applications Launcher display
By default, the Applications Launcher displays applications as large
icons. As an alternative, you can display applications as smaller
icons or in a list format.
To change the view of applications:
1. Tap the tab in the upper-left corner to display the menu bar.
2. From the Options menu, tap Preferences.
3. From the View By option, select Small List, Small Icon, Large List,
or Large Icon.
4. Tap OK to see your applications in the new format.
In addition to displaying applications by icon or list, you can set an
option to display the last-selected application and/or category of
applications each time you open the Applications Launcher.
Wrist PDA User Guide 35
Page 36

Managing Applications
Setting preferences for applications
To display the last-selected application or category:
1. Tap the tab in the upper-left corner to display the menu bar.
2. From the Options menu, tap Preferences.
3. In the Preferences dialog box, tap Remember Last Application or
Remember Last Category.
4. Tap OK. Each time you return to the Applications Launcher, the
last application or category of applications you selected is
displayed.
NOTE: If you do not select the Remember Last Category option,
all applications are displayed when you select the Applications
Launcher.
Setting preferences for applications
You can set preferences for individual applications in the
Preferences dialog box. Not all applications have preference
settings.
To set preferences for an application:
1. Open an application.
2. Tap the Menu icon.
3. From the Options menu, select Preferences.
4. Enter the desired preference settings; then tap OK.
36 Wrist PDA User Guide
Page 37

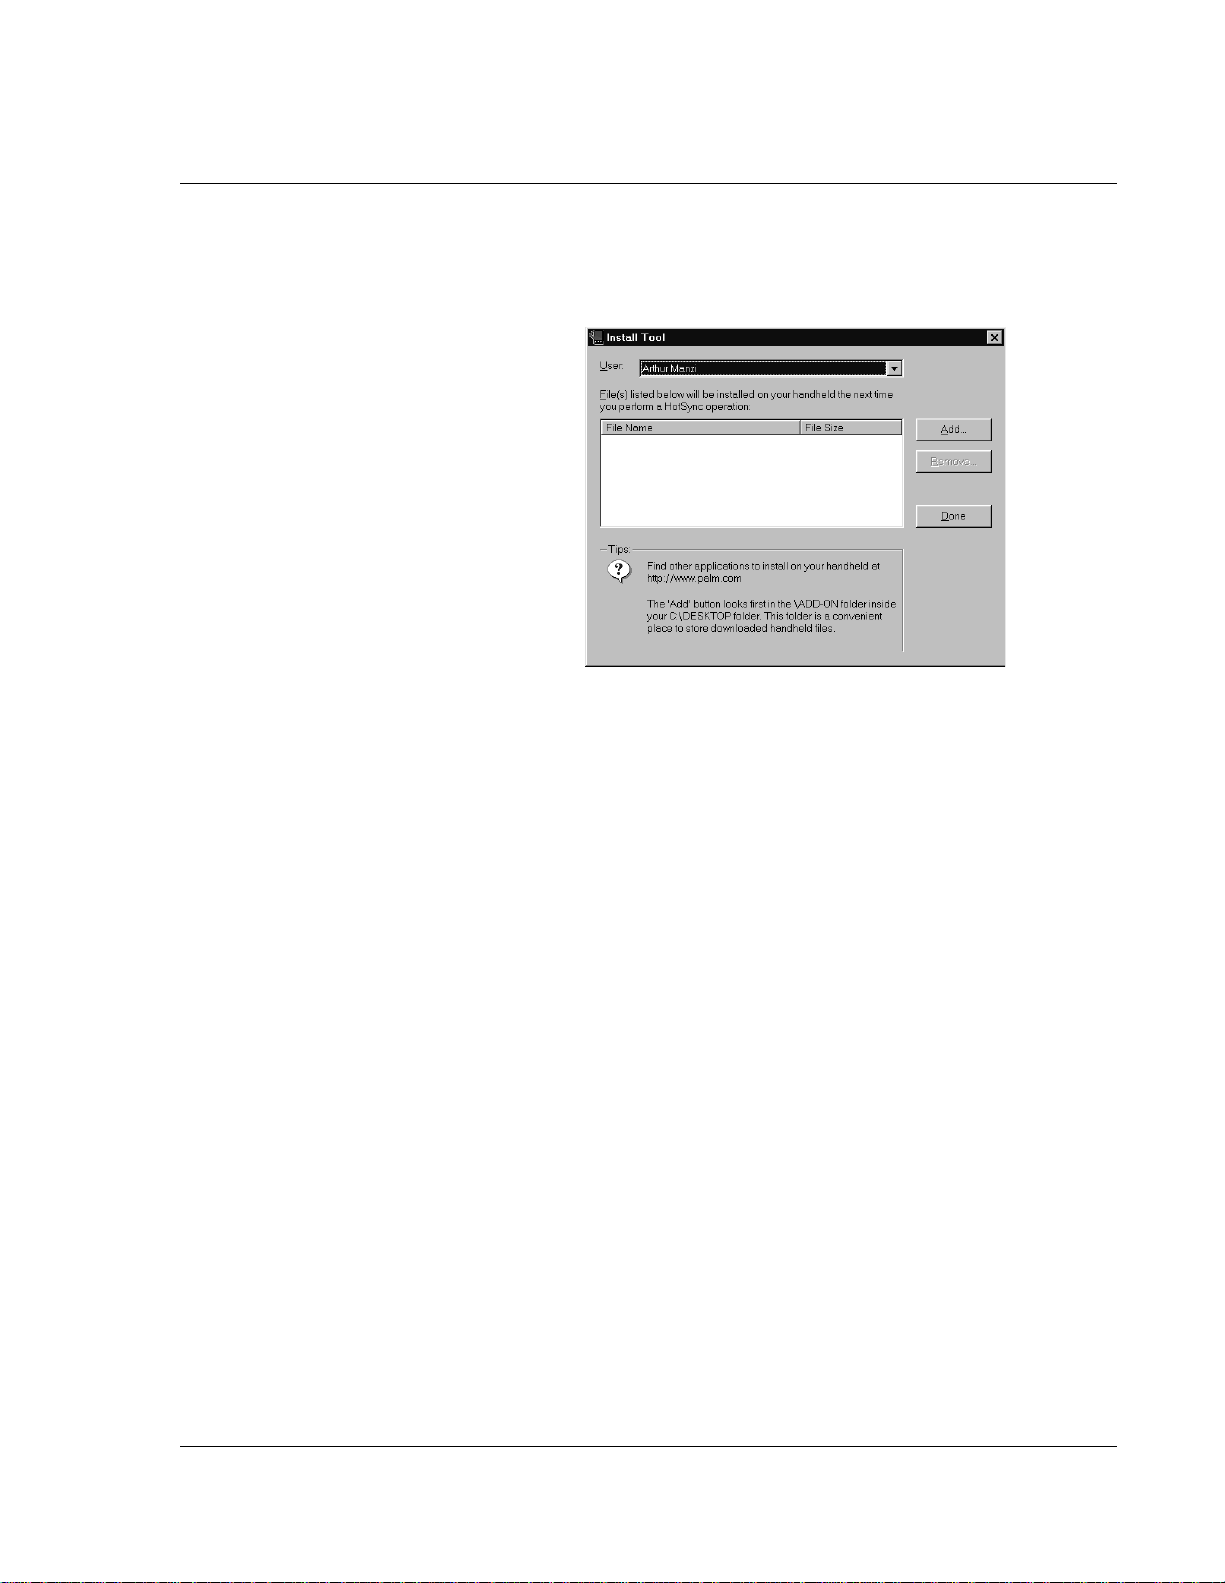
Installing add-on applications
In addition to the applications that came with your watch, you can
install applications (called add-on or third-party applications) using
the In sta ll Tool during a HotS ync ope ra tio n. A va riet y o f t hir d -pa rty
applications are available for your device, such as games and other
software.
Add-on app lic ati ons r es i de in R AM me mo ry and c an be r emo ve d at
any time; for information, see “Removing applications” later in this
chapter.
Installing games
In addition, you can install games included with your Palm Desktop
software. These games (located in your Palm\Add-on folder)
include:
• Giraffe (a fun, simple way to practice Jot writing)
Managing Applications
Installing add-on applications
• HardBall
•MineHunt
• Puzzle
•SubHunt
After you install and start a game, its instructions appear in the
Game menu. Depending on the game, the Game menu may also
contain commands to show high scores, start a new game, or set
preferences for the game.
Wrist PDA User Guide 37
Page 38

Managing Applications
Installing add-on applications
To install add-on applications on your watch:
NOTE: Some software publishers use an installer program to
automate the installation of the application. In these cases, you
may not need to follow these steps. Always follow the installation
instructions that come with the software program.
1. Copy or download to your computer the application you want to
install . If the a pplicat ion is compres s ed (for example, in a .zip
file), e x t ra ct it from the comp resse d file. (See the software
publisher’s instructions for details.)
2. Doub le-cl ick th e Palm Desk top icon on you r comp ute r desk top to
open the application; then click Install.
TIP: You can also open the Install Tool dialog box by doubleclicking any file with a PRC file extension.
38 Wrist PDA User Guide
Page 39
Managing Applications
Installing add-on applications
3. In t he U s e r dr o p-down li s t, select the user name that corresponds
to you r Wrist PDA watch; then click Add.
4. Browse to the folder on your computer where you saved or
extracted the application. Select the application, then click Open.
The file appears in the Palm Install Tool dialog b ox.
5. If you decide not to install an application, select it in the list of
files in the Palm Install Tool dialog box and click Remove. The
applic atio n is remo ved from the dial og box list , but not from your
computer.
6. Click Done. A message appears to indicate that the application or
applications will be installed the next time you perform a
HotSync operation.
7. Perform a HotSync operation to install the applications. See
"Exchanging and Updating Data using HotSync Operations" on
page 111 for more information.
Wrist PDA User Guide 39
Page 40

Managing Applications
Removing applications
Removing applications
You can remove add-on applications, patches, and extensions from
your watch if you run out of memory or no longer need them.
You cannot remove the built-in applications that reside in the ROM
portion of your device, including the Date Book, Address Book, To
Do List, Memo Pad, and Calculator applications.
To remove an add-on application:
1. Tap the tab in the upper-left corner of the screen to display the
menu bar .
2. From the App menu, tap Delete.
3. In the Dele te dialog box, tap the application you want to remove.
1.7M of 1.8M
4. Tap Delete.
5. Tap Yes.
6. Tap Done.
40 Wrist PDA User Guide
Page 41

Working with Applications
Your Wr ist PDA watch includes the following basic applications:
• Date Book
•To Do List
• Address Book
•Memo Pad
• Calculator
Overview of b asic applicatio n s
4
The Wrist PDA includes the following basi c applic atio ns: the Date
Book, for scheduling; the T o Do List, for reminding you of tasks you
need to complete; the Address Book, for ente ring names and
addresses; the Memo Pad, for jotting notes; and the Calculator, for
performing mathematical calculations.
Wrist PDA User Guide 41
Page 42

Using the Date Book
Using the Date Book
The Date Book lets you quickly and easily schedule appointments
or any activity associated with a date or date and time. When you
open the Date Book, the current date and a list of times for a
standard business day are displayed.
Use the Date Book to:
• Schedule events: timed events, which have both times and
dates; untimed events, for example, birthdays or
anniversaries; repeating events, such as a weekly meeting
held on the same day at the same time; continuous events,
such as a vacation or three-day conference; and all day
events, which reflect the default hours of a day as set by the
user.
• Display your schedule in different ways: by Day, Week,
Month, or Agenda view.
• Set an alarm to sound minutes, hours, or days before a
scheduled appointment.
• Attach notes to events to describe or clarify Date Book
entries.
• Rearrange or delete events from your schedule.
To ope n the Date B ook:
1. Make sure you’re in PDA mode (see page 15). Then, if necessary,
press the Back bu tton to dis play the Applicatio ns Launche r.
2. Tap the Date Book icon.
Scheduling events
An entry in the Date Book is called an event. When you schedule an
event , its de scri ptio n a ppe ars on t he ti me lin e, an d its du rat ion is se t
to 1 hour by default. You can easily change the star t t ime and
duration for any event. You can schedule the following types of
events in the Date Book:
• Timed events, such as meetings, that have a specific date and
a specific start and end time.
• Untimed events, such as birthdays, holidays, and
anniversaries. These events occur on a particular date but
42 Wrist PDA User Guide
Page 43
Using the Date Book
have no specif ic start or end ti m es; they ap pear a t the top of
the list of times marked with a diamond. You can schedule
more than one untimed event on the same date.
• Repeating events, such as a weekly meeting that is held on the
same day at the same time each week.
• Continuous events, such as a vacation or three-day
conference.
• All day events, which reflect the default length of the day as
set by the user.
Scheduling timed events
You can schedule t imed events for the current date or for future
dates.
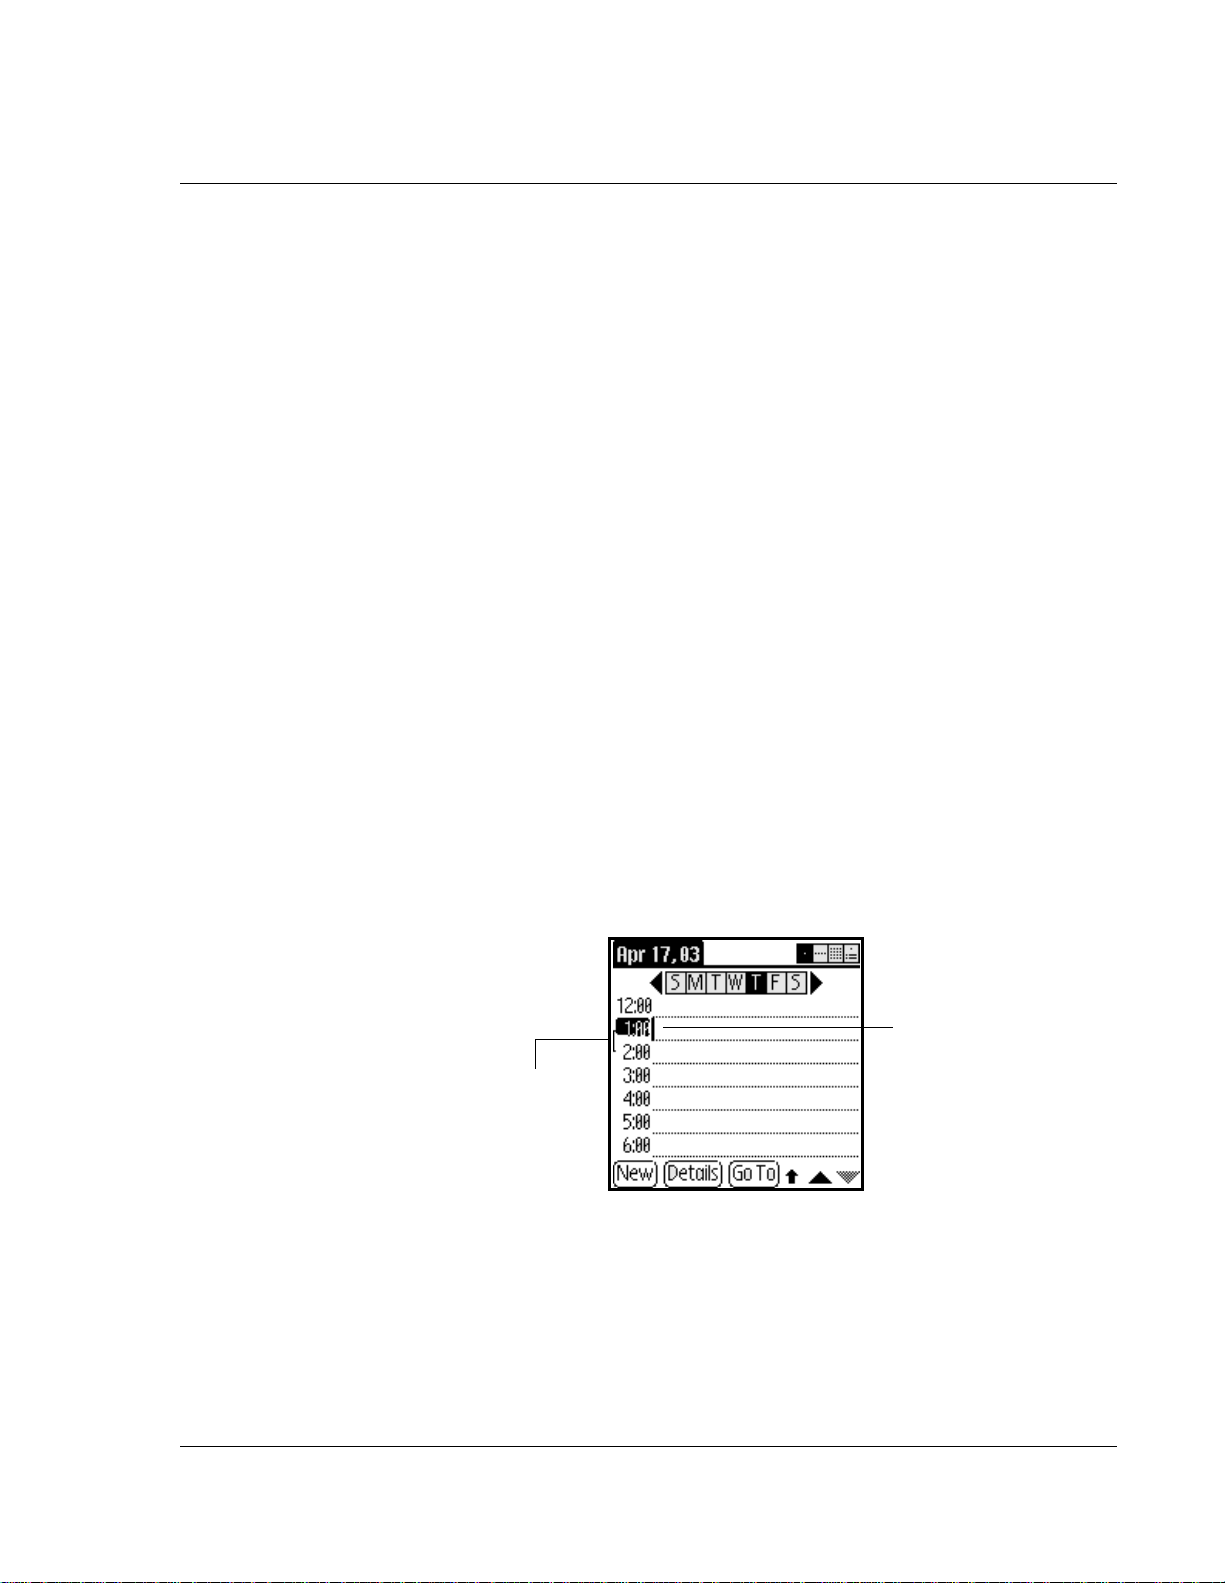
To schedule a timed event for the current date:
1. Press the Date Book button on your watch to open the Date Book
to today’s schedule. The current date and a list of times for a
normal business day are displayed in Day view.
2. With the current day selected, tap the line next to the time that
corresponds to the start of the event.
Use the Page Up and Page Down buttons to view t imes that do not
fit on the screen.
Tap a line next to
desired time;
then ent e r text.
Time bar
shows defa ult
duration.
3. Enter a description of the event, up to 255 characters in length.
Wrist PDA User Guide 43
Page 44

Using the Date Book
4. Set the event’s duration:
• If the event is 1-hour long, skip to the end of this procedure.
• If th e e v e nt is longer or shorter than an hour, tap directly on
the time to open the Set Time dialog box.
Tap the time to
display the Se t
Time di alog
box.
TIP: You can open the Set Time dialog box by making sure no
event is selected, and then writing a number (to select a start
time) on the number input side of the screen.
5. Set the duration of the event in either of the following ways:
• Tap the Start Time box and set the time by selecting the hours
and minutes in the time columns; Tap End Time, then tap the
time columns to set the End Time.
You can also select the time using the watch buttons: press
Rocker Up and Down to change the hours and Page Up and
Down to change the mi nutes. Pressing and holding the buttons
makes the time change f aster. Once the desired time is selected,
press Rocker Enter to accept the changes.
• Tap All Day if the event lasts all day. The default hours of a
standard business day are set b y the user, and may be
changed using the Preferences command in the Date Book
application. See the section “Changing the displayed Start
and End Times” later in this chapter.
• Tap No Time if the appointment does not have a specific
starting and ending time. This can b e used to remind you of
important events and holidays without creating a timed
appointment (see page 45).
44 Wrist PDA User Guide
Page 45

Using the Date Book
Tap to sc rol l to
earlier hours.
Start Time
highlighted
Tap to chan ge
hours.
Tap to chan ge
minutes.
Tap to scro ll to late r
hours.
6. Tap OK.
To schedule a ti med event for anoth er date:
1. Select the date you want in one of the following ways:
• Tap the de sired da y of the week in the d a t e ba r at the top of
the screen. If necessary, tap the Previous week or Next week
scroll arrows to move to another week.
You can also use the Rocker switch to change the day of the
week. You can change weeks by scrolling to before Sunday or
after Saturday.
• Tap Go To at the bottom of the screen to open the Go To Date
dialog box. Select a date by tapping a year, month, and day in
the calendar.(You can also use the Rocker switch and Page
buttons to change the month.) Tapping the day you want to
make the appointment for automatically returns you to Day
View.
2. After locating the desired date, follow the steps for scheduling an
event for the current day.
Scheduling untimed events
You can schedul e untimed eve nts for any d ate . Untime d e ven ts
appear at the top of the list of times marked with a diamond.
To schedule an untimed event:
1. Select the event date you want, as described in the previous
procedure, “To schedule a timed event for another date.”
Wrist PDA User Guide 45
Page 46

Using the Date Book
2. Tap New.
3. In the Set Time dialog box, tap No Time.
4. Enter a description of the event.
New
untimed
event
5. Tap a blank area on the scre en to deselect the unt imed event.
NOTE: If you create a timed event and later want to make it an
untimed event, tap directly on the event time on the Date Book
screen; then tap No Time.
Scheduling repeating or continuous events
The Repeat function lets you schedule events that recur at regular
intervals or exte nd over a pe ri od of consecutive days. Repeati n g
events include a birthday and a weekly guitar lesson that falls on
the same day of the week and the same time of day. Continuous
events might include a business trip or a vacation.
46 Wrist PDA User Guide
Page 47

Using the Date Book
To schedule a repeating or continuous event:
1. Tap the event (be sure t o tap t he event and not the time next to the
event).
Typically, a continuous event is an untimed event.
2. Tap Details.
3. Tap the Repeat box to open the Change Repeat dialog box.
Tap the
Repeat
box.
4. Tap Day, Week, Month, or Year to set how often the event repeats
(or use the Rocker switch to sel ect the desired option). Choose
Day for a continuous event.
5. Enter a number that corresponds to how often you want the event
to repeat on the Every line.
For example, if you select Month and enter the number 2, the
event repeats every other month.
6. To set an end date for the repeating or continuous event, tap the
End On pick list and tap Choose Date. Use th e da te picker to
select an end date.
7. Tap OK. An icon that represents a repeating event appears to the
far right on the event line.
Making changes to repeating or continuous events
When changes are made to a repeating or continuous event you
have the option of applying the change to just the current event, the
current event and all future occurrences of this event, or all
occurrences of this event - past, present, and future.
To delete repeating events:
1. Select the event you want to delete.
Wrist PDA User Guide 47
Page 48
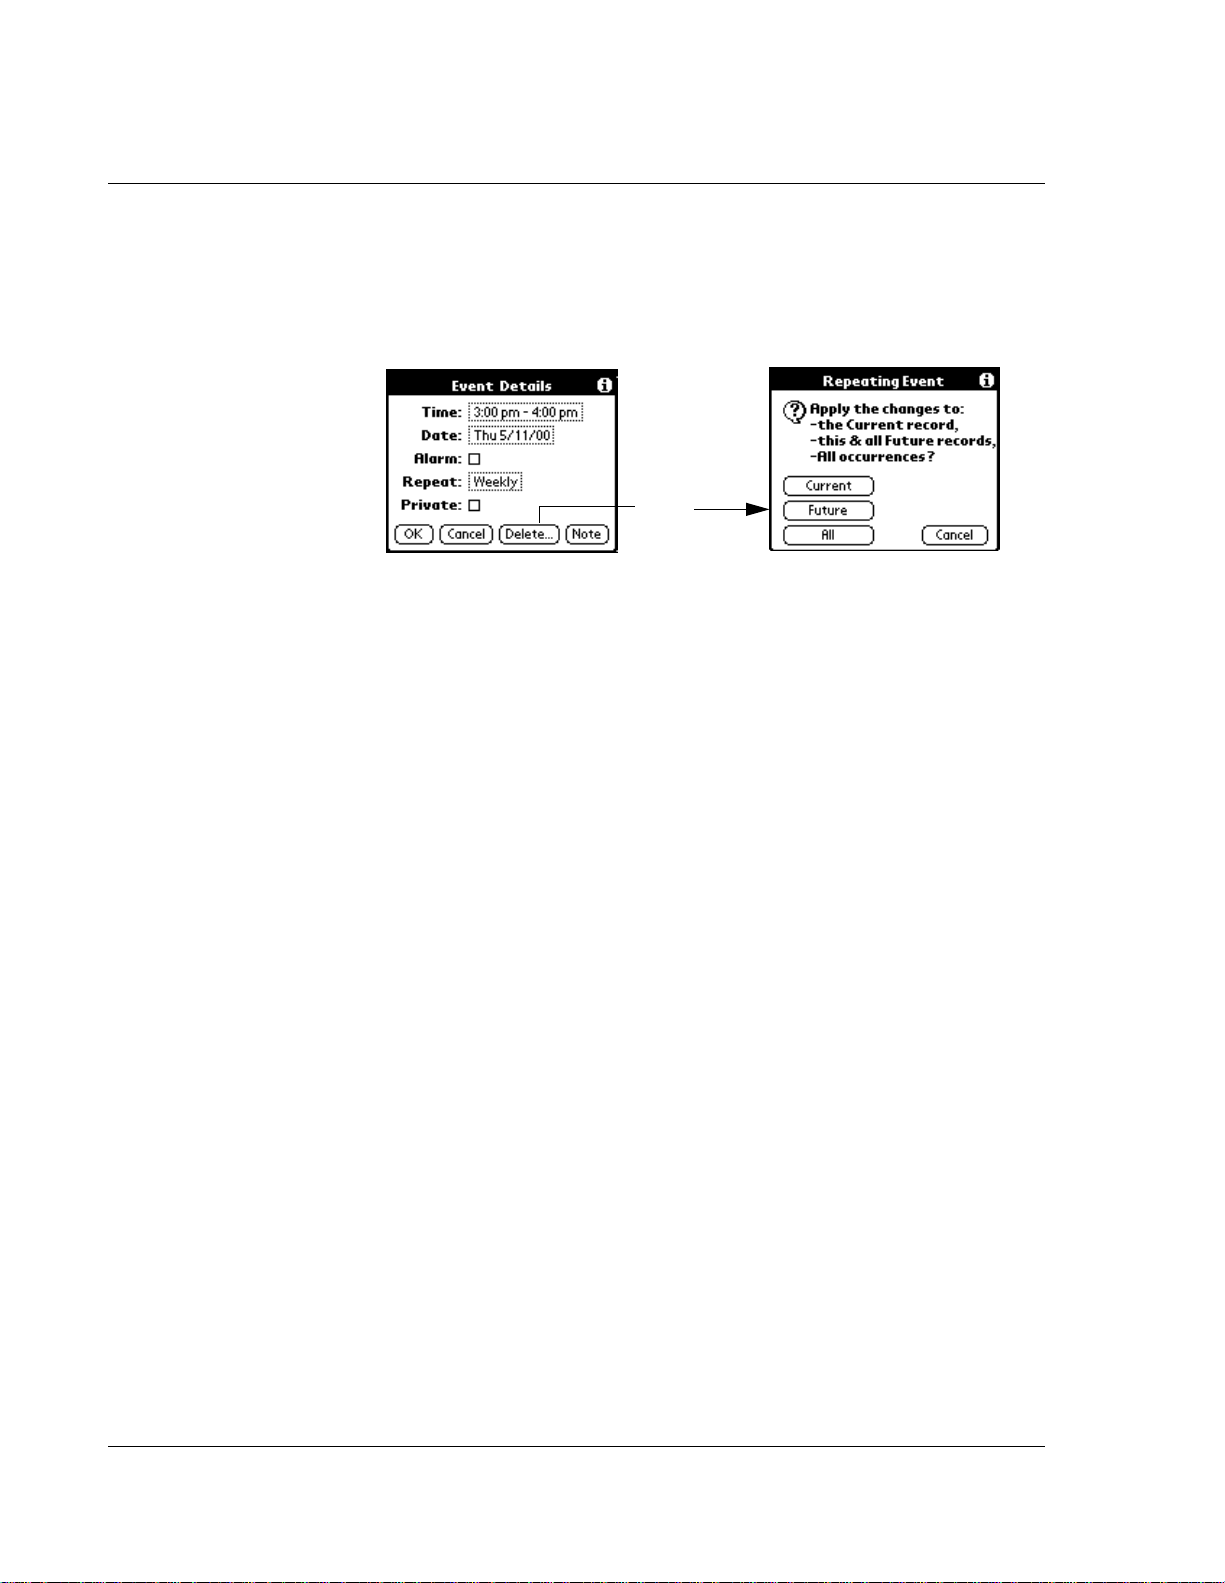
Using the Date Book
2. Tap Details. The Event Details screen opens.
3. Tap Delete. The Repeating Event screen opens asking for
4. Select one of the following options:
confirmation of the delete.
Tap
Delete
• Current deletes a single occurrence of this event
• Future deletes the current event and all future occurrences of
this event
• All deletes all past, current, and future occurrences of this
event.
The event is removed from your datebook and you are returned to
the day view where you started. These steps apply to all changes
you make to repeating or continuous events.
About scheduling repeating or continuous events
Keep the following in mind when scheduling rep eating or
continuous events:
• If you change the start date of a repeating event, your watch
automatically changes the end date to maintain the duration
of the repeating event.
• If you change the repeat interval (e.g., daily to weekly) of a
repeating event, past occurrenc e s (p r ior to the day on which
you change the setting) are not changed, and your watch
creates a new repeating event.
• If you change the date of an occurrence of a repeating event
(e.g., from January 14 to January 15) and apply the change to
all occurrences, the new date becomes the start date of the
repeating event. Your watch adjusts the end date to maintain
the duration of the event.
48 Wrist PDA User Guide
Page 49

Using the Date Book
• If you change other repeat settings (for example, time, alarm,
private) of a repeating event and apply the change to all
occurrences, your watch creates a new event. The start date
of this new event is the day on which the setting is changed.
Past occurrences (prior to the day of the change) are not
changed.
• If you apply a change to a single occurrence of a repeating
event (e.g., time), that occurrence no longer shows the Repeat
icon.
Rescheduling events
You reschedule events using the Details option in the Date Book.
You can also use the Details option to convert untimed events into
timed events.
To reschedule an event:
1. Tap the event you want to reschedule.
2. Tap Details.
3. To change the time, tap the Time box, then select a new time.
Press the Enter button on the right side of the watch, or press the
Back button to cancel.
4. To change the date, tap the Date box, select a new date, and then
tap OK.
Adding Address Book information to an event
You can add a name and telephone number to an event using the
Phone Lookup option.
1. Tap the tab in the upper-left corner of the screen to open the menu
bar.
2. From t he Options menu, select Phone Lookup.
3. Choose the phone number you want to include and tap Add.
Using the alarm
The Alarm setting lets you set an audible alarm for events in your
Date Book, and display a reminder message onscreen. For untimed
events, you can set a silent alarm that displays a blinking indicator
Wrist PDA User Guide 49
Page 50

Using the Date Book
(you can tap the indicator to view the reminder message). If you do
not set an alarm, no visual or audible indicator will occur.
Setting an alar m for an event
You can set an alarm for minutes, hours, or days before an event.
When you set an alarm, an Alarm icon appears to the far right of the
event with the alarm. You set silent alarms for untimed events in the
same way, but instead of an sounding an audible alarm, the watch
displays a blinking indicator in the upper-left corner of the screen
(see “Understanding the blinking alarm indicator” below).
The alarm triggers at the specified period of minutes, hours, or days
before the event begins. For untimed events, the indicator appears
before midnight of the day on which the untimed event occurs. For
example, if you set a 5-minute alarm for an untimed event that
occurs on January 17, the blinking indicator will appear at 11:55
p.m. on the night of January 16.
To set an alarm fo r an eve nt:
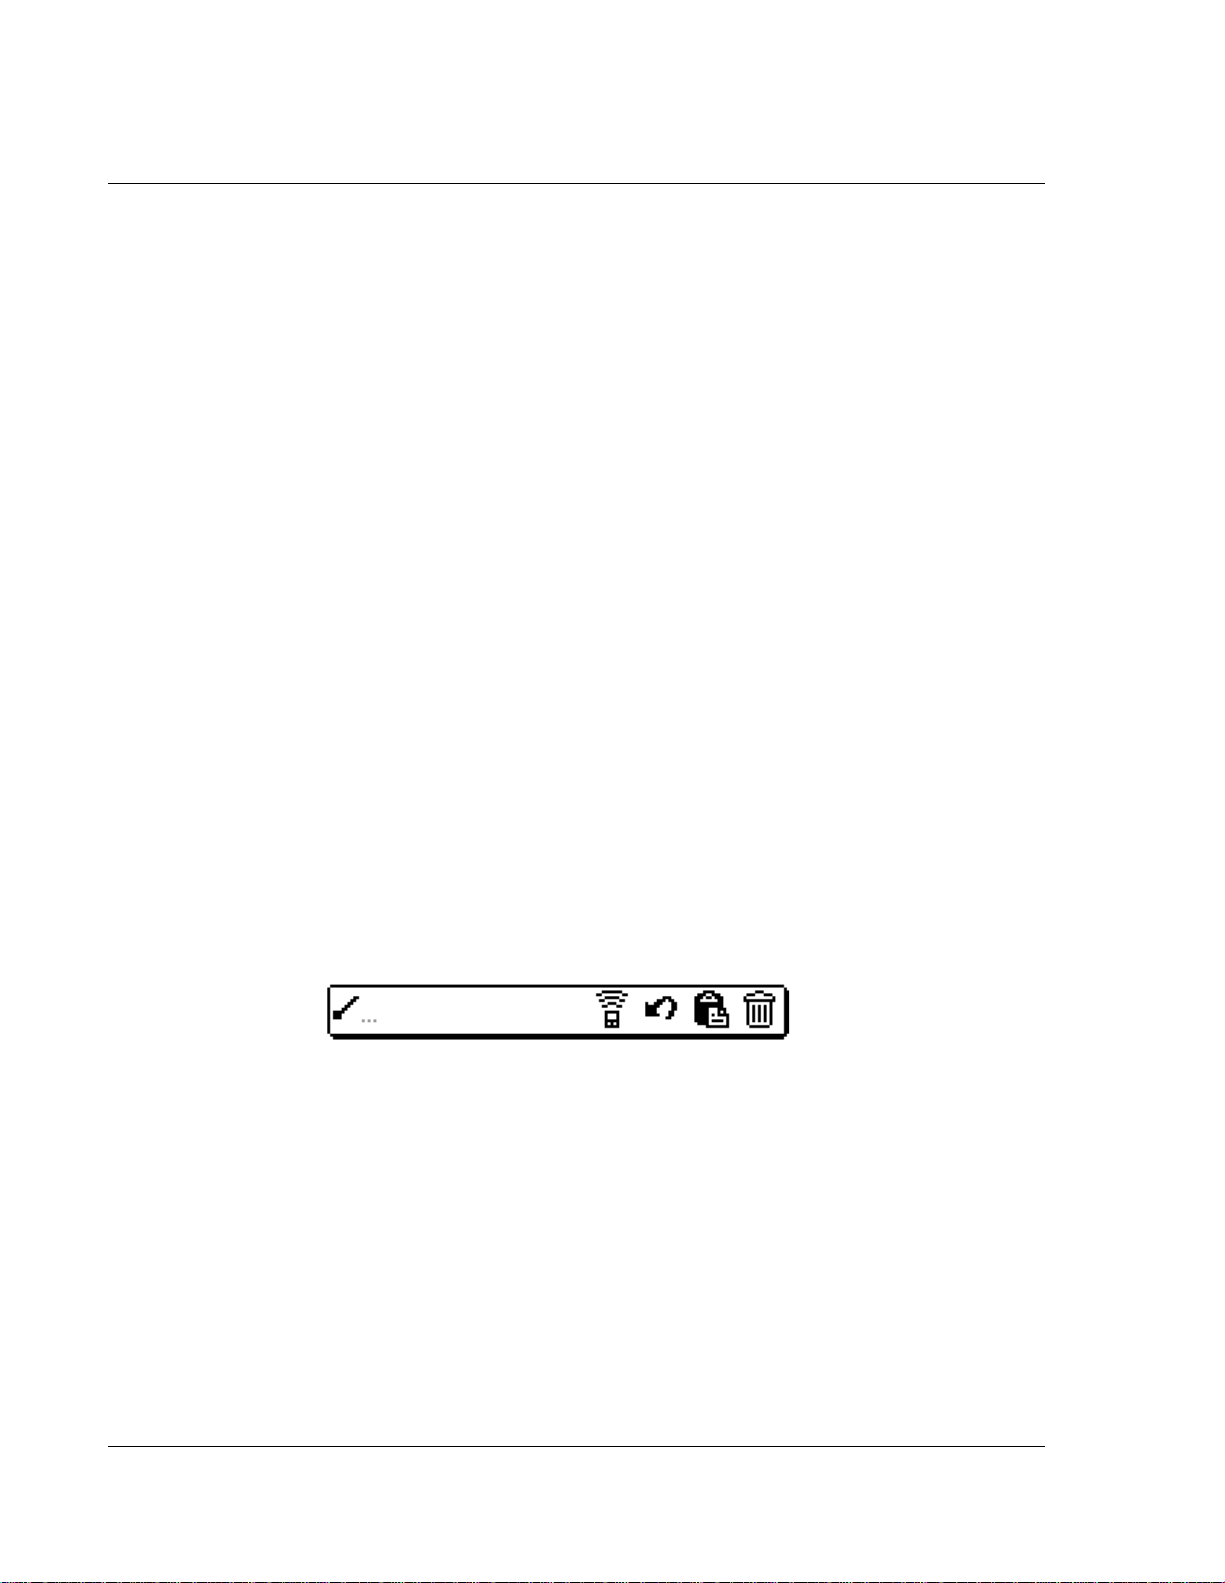
1. Tap the event to which you want to assign an alarm.
2. Tap Details.
3. Tap the Alarm check box to select it.
4. The default setting, 5 Minutes, appears (the alarm will sound 5
minutes before the event).
To change this setting:
• Select the 5 next to the Alarm check box and write in any
number from 0 to 99.
• Tap the pick list to change the time unit; select Minutes,
Hours, or Days.
Enter number of
time un i t s he re.
Tap here to
select unit of time.
5. Tap OK.
50 Wrist PDA User Guide
Page 51

Using the Date Book
Using alarm options
You can automatically cause the alarm to be set for each new event
using preferences. You can also select a tone for the alarm and the
number of times the alarm sounds.
To set alarm options:
1. To open the Preferences dialog box, do one of the following:
• Tap the inverted tab at the top of the Date Book screen to
display the menu bar.
• In the text input area, drag a diagonal line from the lower left
to upper right to display the Command toolbar. Type an R,
the ShortCut for the Preferences command.
2. In the Options menu, tap Preferences.
3. Select from the following options:
• Tap Alarm Preset to set an alarm for each new event
automatically. The silent alarm for untimed events is defined
by minutes, days, or hours before midnight of the date of the
event.
• Tap the Alarm Sound pick list, and then tap an option to set
the tone of the alarm. Options include Alarm, Alert, Bird,
Concert, Phone, Sci-fi, and Wake Up.
• Tap Remind Me to define how many times the alarm
sounds—one, two, three, five, or ten times.
• Tap Play Every to set how often the alarm sounds—every
minute; or every 5, 10, or 30 minutes.
4. Tap OK.
Wrist PDA User Guide 51
Page 52

Using the Date Book
Using the alar m in watc h mo de
When your Wrist PDA is in watch mode, the
Alarm icon
alarm will still run. An alarm icon will
appear on the watch face in the upper-left
corner of the screen to let you know that the
alarm is active. When the alarm sounds, the
watch will beep if you have the Alarm sound
turned on.
To answer the alarm while in watch mode,
wake your Wrist PDA by pressing Rocker
Enter. This switches the watch to PDA mode
and lets you dismiss the alarm or use the
Reminders list screen, as described below.
Dismissing the alarm
Audible alarms sound for about two seconds, but you can interrupt
the sound by tapping anywhere on the screen or by pushing any
button.
For a silent alarm (for untimed events), the blinki ng indicator
remains onscreen until you tap it to view the Reminders list screen,
then clear any events on the screen (see “Using the Reminders list
screen” below).
When an audible alarm sounds, you see the Reminder screen:
This screen has three buttons for responding to an alarm:
OK: Ma kes the remind e r g o awa y, w ith no further no tification.
Snooze: Switches to the application that was running when the
alarm went off, and returns to the Reminder screen after five
minutes. You cannot change this time interval, but you can go back
to the Reminder screen right away by tapping the blinking indicator
52 Wrist PDA User Guide
Page 53
Using the Date Book
in the upper-left corner of the screen (see “Understanding the
blinking alarm indicator” below).
Go To: Lets you see details of the event in the Date Book. This
cancels the alarm, and there is no further notification.
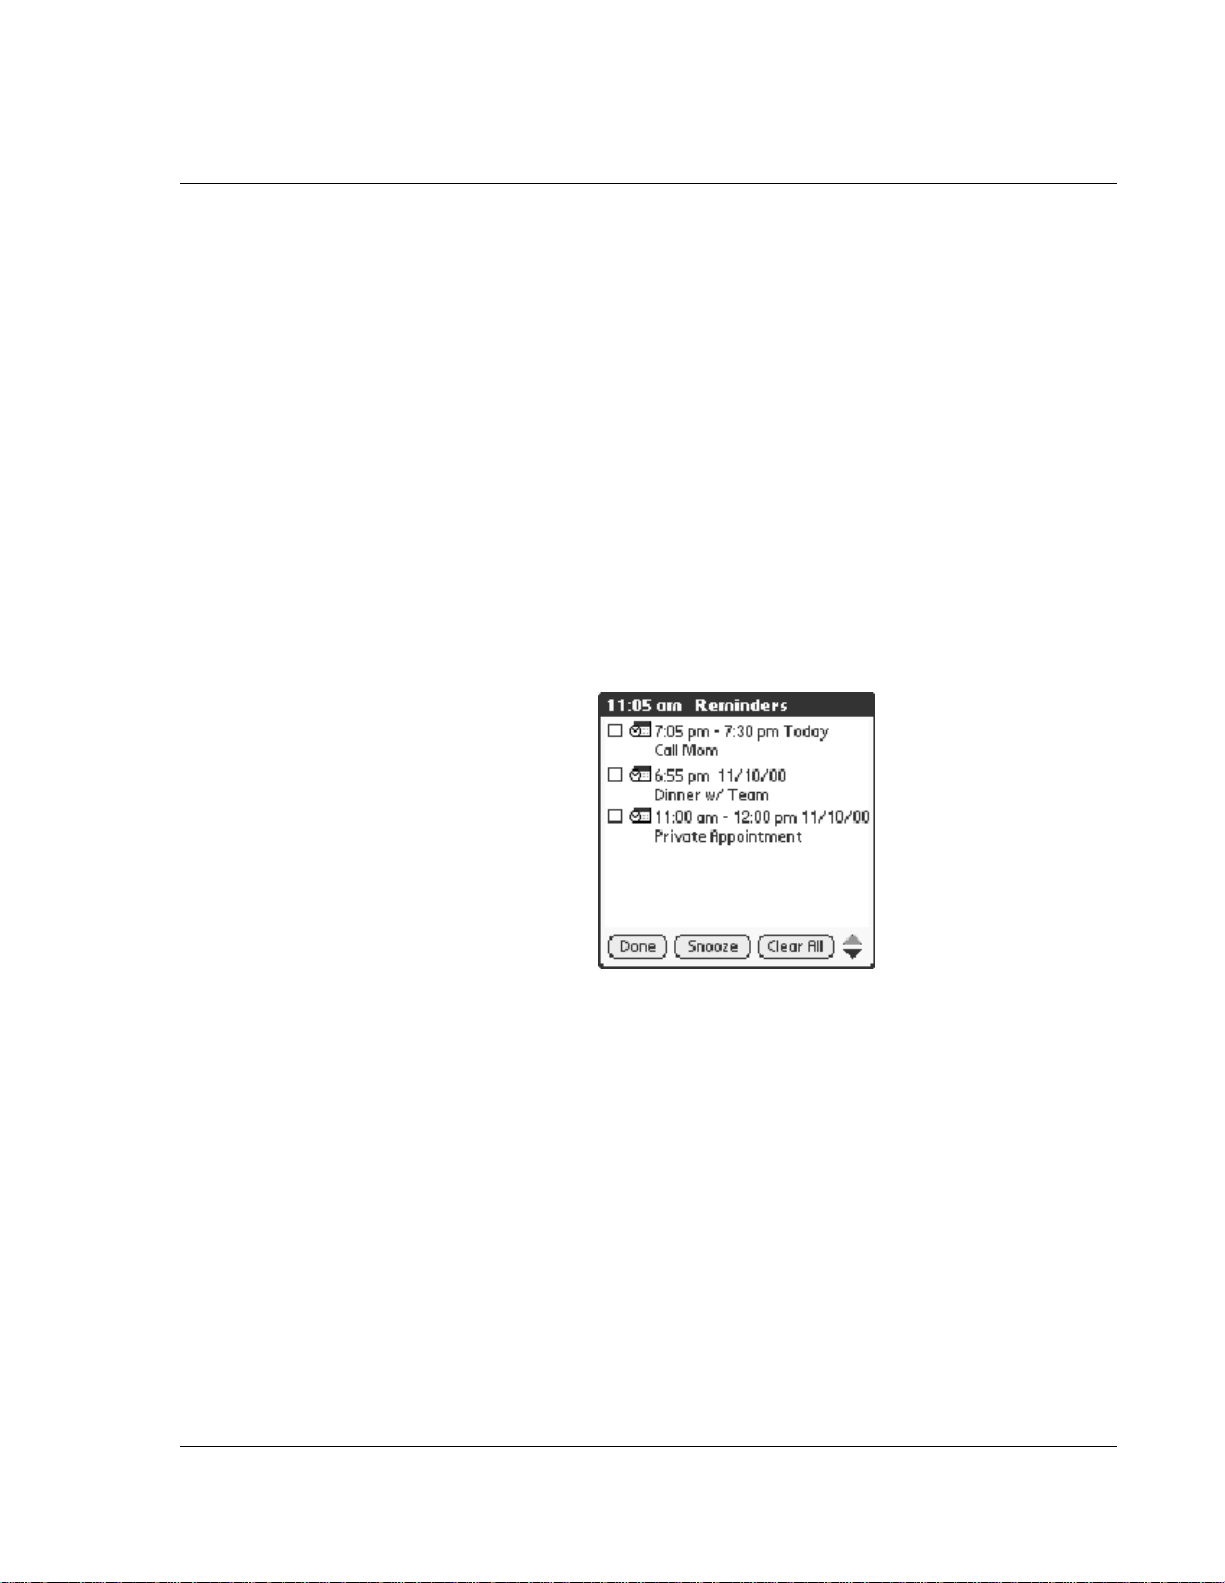
Using the Remind ers list screen
The Reminder screen changes to a Reminders list of items that
require your attenti on if you did not di s miss or snooze an alarm for
one event, and another alarm sounds for a second event. If there is a
blinking indicato r in the upper-left corner of the screen, tapping it
also displays the Reminders list (see “Understanding the blinking
alarm indicator” below).
Each listed reminder contains the date and time of the event, with a
description beneath it.
Tapping on the text or icon goes to that item in the Date Book and
deletes the event from the Reminders list screen.
Tapping the check box clears that item, similar to a To Do list item.
The watch will draw a line through the text, pause for a moment,
and them remove the item from the list, although the original data
remains in the Date Book.
The Reminders list screen has three buttons:
Snooze: Puts the Reminders list screen to sl eep for fiv e minu tes.
After this time in terv al, the R em inde rs lis t screen is displ ay ed again .
You can go directly to the Reminders list screen without waiting, by
tapping on the blinki ng alarm indica tor. See “Understanding the
blinking alarm indicator” below.
Wrist PDA User Guide 53
Page 54

Using the Date Book
Done: If the Reminders list appeared because of more than one
alarm, tapping Done closes the Reminders list screen, although the
events will remain in the Date Book. The Reminders list screen will
not appear again, unless you tap the blinking alarm indicator in the
menu bar.
If you tapped the Snooze button and then tapped the blinking alarm
indicator to make the Reminders list reappear, then tapping Done
makes the Re mi n ders list continue to snoo z e, and it will r e ap p ear
after five minutes.
Clear All: removes all of the items from the list, but does not close
the Reminders screen. Tap this button to erase a list of events that
have passed.
Understanding the blinking alarm indicator
A blinking alarm indicator appears in the upper left corner of the
screen in the menu bar if:
• You tap the Snooze button
• You tap Done in the Reminders list screen
• A silent alarm has occurred
The in dicator appears in two different states:
• Blinking star: When there is at least one item in the list,
the star indicator blinks on and off until the list has been
emptied.
• Blink ing sta rburst: When a silent alarm occurs, a
starburst pattern appears, alternately flashing solid,
exploded, then off, until you view the new event.
Tapping on the indicator opens the Reminders list, even if there is
only one item in the list.
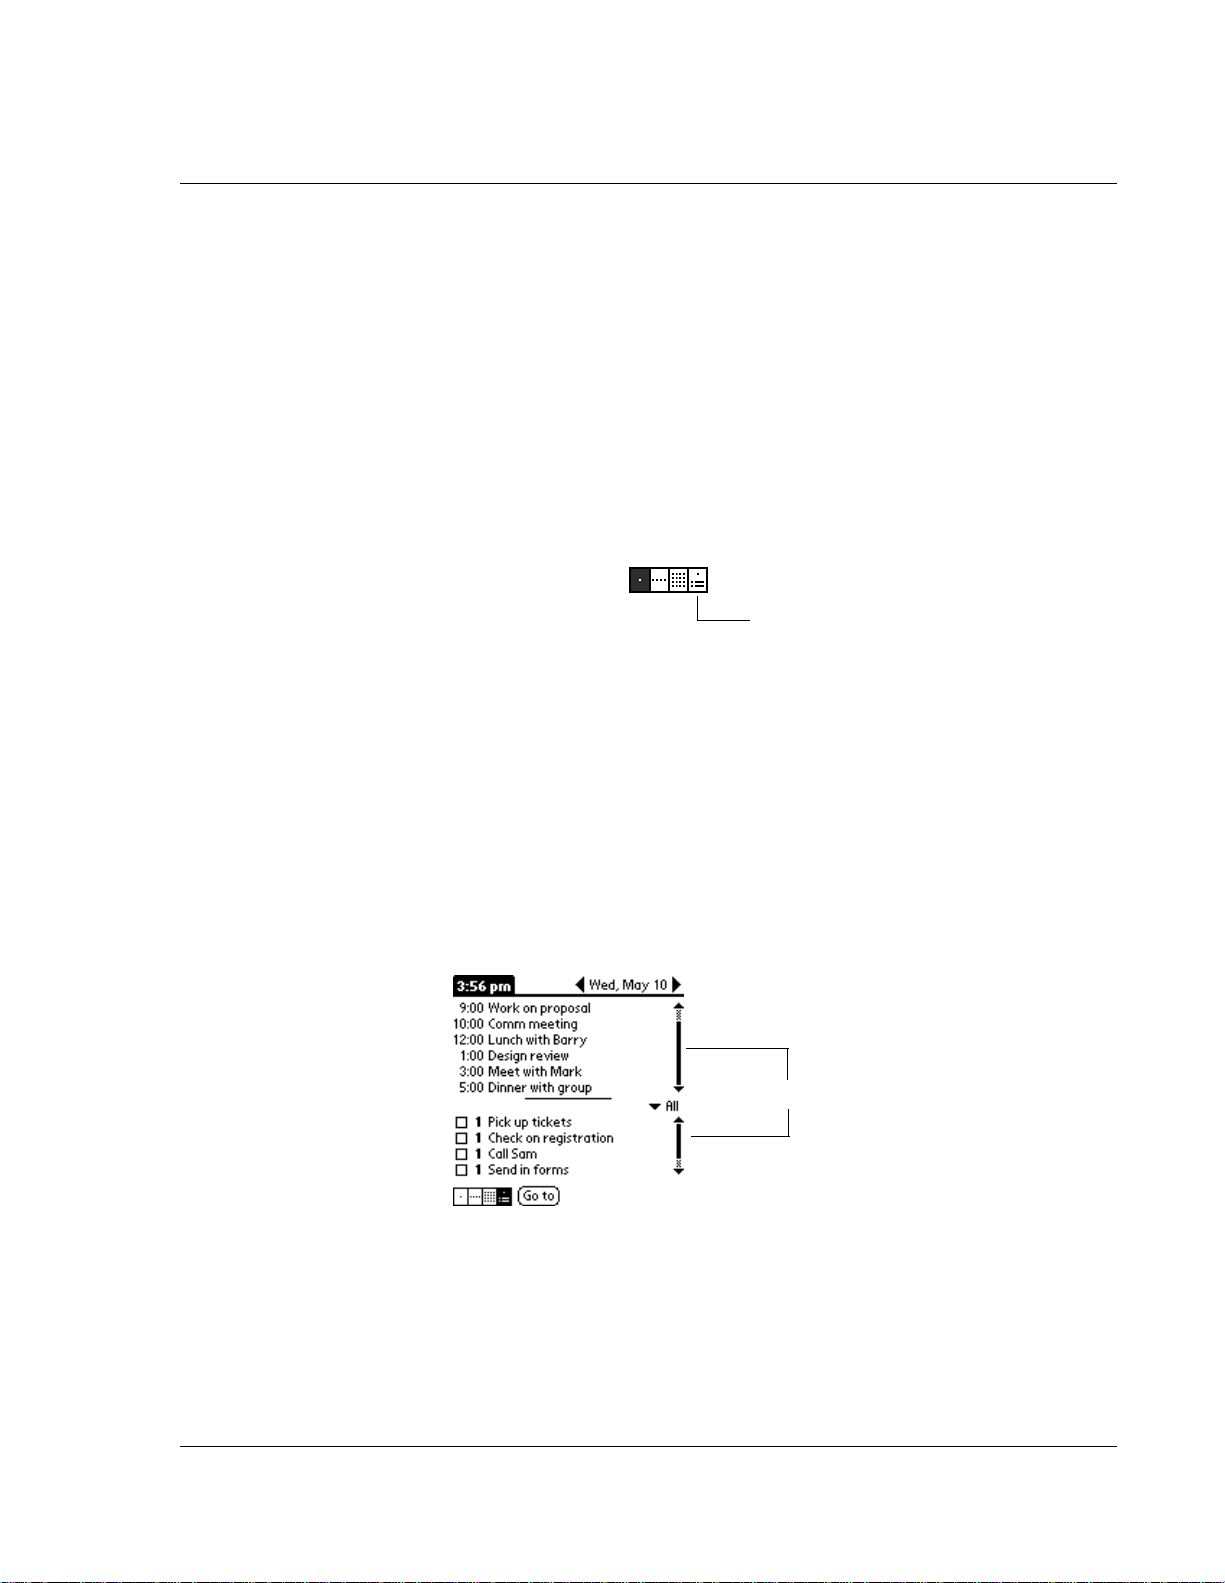
Changing the Date Book view
The Date Book includes four views for displaying your
appointments: day view, week view, month view, and agenda view.
To display the Date Book views:
1. Tap a view icon in the upper-right area of the Date Book screen:
54 Wrist PDA User Guide
Page 55

Using the Date Book
Date Book view icons
You can also press Rocker Enter to cycle through the different Date
Book vi ews.
To display the current time:
To display the current time in Date Book, tap and hold for one
second on the date displayed in the upper-left corner of the screen.
Then, without taking the styl us off the screen, make a small stroke
in any direction away from the date display. The current time
displays instead of the date until you release the stylus from the
screen.
Working in Week view
Week view displays a c alendar of your events for an entire week.
This view lets you quickly review your appointments and available
time slots. In addition, the graphical display helps you spot
overlaps and conflicts in your schedule.
To display the Week view:
1. Tap the Week view icon—or press Rocker Enter until the Week
view icon is highlighte d.
Week view
2. Tap the left and right navigation controls to move forward or
backward a week at a time, or tap on a specific day to display the
details of an event. You can also use Rocker Up and Down to
change th e displayed week, and the Page bu ttons to s croll throu gh
the hours.
NOTE: The Week View also shows untimed events and events
before and after the range of times displayed.
Wrist PDA User Guide 55
Page 56

Using the Date Book
Previous
week
Next
week
Bar indicates earlier event.
Dot indicates untimed event.
Scroll to view earlier or later events
Bar indicates later event.
3. Tap an event to display a description of the event at the top of the
screen.
Event details
Tap to show event details.
Tips for using Week view
Keep the following points in mind when using Week view:
• To reschedule an event while in Week view, tap and drag the
event to a different time or day.
• Tap a blank time on any day to move to that day and have
the time selected for a new event.
• Tap any day or date that appears at the top of the Week view
to move directly to that day w ithout selectin g an event.
• The Week view displays the hours of the day defined by the
Start Time and End Time in the Date Book Preferences
settings. If you have an event before or after this time span, a
bar appears at the top or bottom of that day's column. Use
the onscreen scroll arrows to scroll to the event.
56 Wrist PDA User Guide
Page 57

Using the Date Book
Spotting event conflicts
It is possible to schedule events that overlap (an event that starts
before a previous one finishes).
An event conflict (time overlap) appears in the Week view as
overlapping time bars and in the Day view as overlapping brackets
to the left of the conflicting times.
Event
conflicts
Wrist PDA User Guide 57
Page 58

Using the Date Book
Working in Month view
The Month View screen shows which days have events scheduled.
Dots and lines in the Month view indi ca te eve n ts, repe ating events,
and untimed events.
Dashed line indicates continuous event
Dots on right side indicate events
Dots bel ow dat e in di ca t e un tim e d ev ents
You can control the dots and lines that appear in the Month View.
See "Changing the Date Book display" on page 60 for more
information.
Tips for using Month view
Keep the following points in mind when using the Month view:
• Tap a day i n the Month view to display that day in the Day
view, or tap the scroll arrows in the lower-right corner to
move forward or backward a month. Or tap Go To to open
the date selector and select a different month.
• You can also use the Page buttons to change the displayed
month, and Rocker Up and Down to highlight a different
day. Pressing Rocker Enter changes to the Day view for the
selec te d day.
58 Wrist PDA User Guide
Page 59
Using the Date Book
Working in Agenda view
The Agenda view lets you view appointments, unt imed event s, and
To Do List items in a single screen. Although it is primarily a
viewing option, you can also use the Agenda view to check off
completed To Do List items. To go to a Day V iew of any event on the
Agenda view screen, simply tap the desired event.
To display the Agenda View:
1. Tap the Agenda view icon—or press Rocker Enter until the
Agenda view icon is highlighted.
Agenda view
2. Use the navigation bars to move forward or backward a day at a
time or to display more To Do items.
Or use Rocker Down to scroll through the list of appointme nts for
the day. When you reach the last appointment, your selection will
move to the first To Do item for the day. You can highlight a To Do
item and then press and hold Rocker Enter to check or uncheck i t
without leaving Agenda view .
Use Rocker Up to scroll back up to the top of the T o Do list and then
to the Appointments list.
Scroll each list
Wrist PDA User Guide 59
Page 60

Using the Date Book
Tips for using Agenda view
• Tap any appointment while in Agenda view to display the
Day View of the appointment.
• Check off completed To Do List items in the Agenda view, or
click a description of an item to go directly to the To Do List
application. Pressing the Back button returns you to the
Agenda view.
• You can change the category of To Do items shown. Tap on
the pick list and select t he new category. See the chapter on
“Using the To Do List” for more information on To Do items.
Changing the Date Book display
In Day or Month view, you can change which events appear in the
Date Bo ok. In Day view, you can display time bars that highlight
event conflicts.
To change the Date Book display of events:
1. In Day view or Month view, tap the date in the top-left corner to
display the menu ba r.
2. Tap Options, and then tap Display Options.
3. For Day view, select from the following options:
• Tap Show Time Bars to display time bars showing the
duration of an event and any event conflicts.
• Tap Compress Day View to display start and end times for
each event, but no blank time slots at the bottom of the
screen, to minimize scrolling. Clear the option to display all
time slots.
60 Wrist PDA User Guide
Page 61

Using the Date Book
4. For Month view, select whether to display Timed, Untimed, or
Daily Repeating events.
5. Tap OK.
Changing th e di splayed Start and End Times
You can change the preferences used for new entries. Preferences
includ e disp lay starting tim e, display e nding time, a n d alarm
characteristics. See the section “Using alarm options” earlier in this
chapter for more information on alarm preferences.
To change the start and end time in the Date Book:
1. Tap the date in the top-left corner to display the menu bar.
2. Tap Option, and then tap Preferences.
The Start and End Time are used by the various Date Book screens.
The Day view schedules events to start and end at these times when
the All Day option is selected. The Week view displays the time
span defined by the Start Time and End Time.
3. Press Rocker Up and Down to change the start time, then press
Page Up and Down to change the end time. You can also tap Start
Time and use the scroll arrows to select a new start time for the
Date Book screens, and do the same to set a new end time. If the
time slots you select do not fit on one screen, you can tap the scroll
arrows to scr oll up and down.
4. Tap OK or press Rock e r Enter when done .
Wrist PDA User Guide 61
Page 62

Using the To Do List
Using the To Do List
The To Do List is a convenient place to create reminders and
prioritize the things that you have to do.
Use the To Do List to:
• Make a quick and convenient list of things to do.
• Assign a priority level to each task.
• Assign a due date for any or all of your To Do List items.
• Assign To Do List items to categories so that you can
organize and view the m in lo gical g roups. F or more
information, see "Categorizing records" on page 84.
• Sort your To Do List items either by due date, priority level,
or category.
• Atta ch notes to individ ual To Do List items for a description
or clarificat ion of the task. For more information, see
"Attaching notes" on page 91.
To open the To Do List:
1. Make sure you’re in PDA mode (see page 15). Then, if necessary,
press the Back bu tton to dis play the Applicatio ns Launche r.
2. Tap the To Do List icon.
To Do List opens to display the category of items you last viewed.
Creating To Do List items
A To Do List item is a reminder of some task that you have to
complete. A record in the To Do List is called an item.
To create a To Do List item:
1. Tap the To Do List icon to display the To Do List.
62 Wrist PDA User Guide
Page 63

Using the To Do List
2. Tap New.
New To
Do item
Tap New
3. Enter the text of the To Do List item. The text can be longer than
one line.
TIP: You can add a name, address, and phone number to a To
Do List item using the Phone Lookup option. For more
information, see "Using Phone Lookup" on page 88.
4. Tap anywhere onscreen to deselect the To Do List item.
TIP: If no To Do List item is currently selected, writing in the text
input area automatically creates a new item.
Setting To Do List priorities
You can set priorities for tasks in your To Do List according to their
importance or urgency. Items appear by priority and due date at the
top of the To Do List by default, with 1 the highest priority.
Changing an item’s pri ority may move its position in the list.
New To Do List items automatically have a priority of 1. If you
select another item first, before creating a new item, th e item you
create appears beneath the selected item with the same priority as
the selected item.
Wrist PDA User Guide 63
Page 64
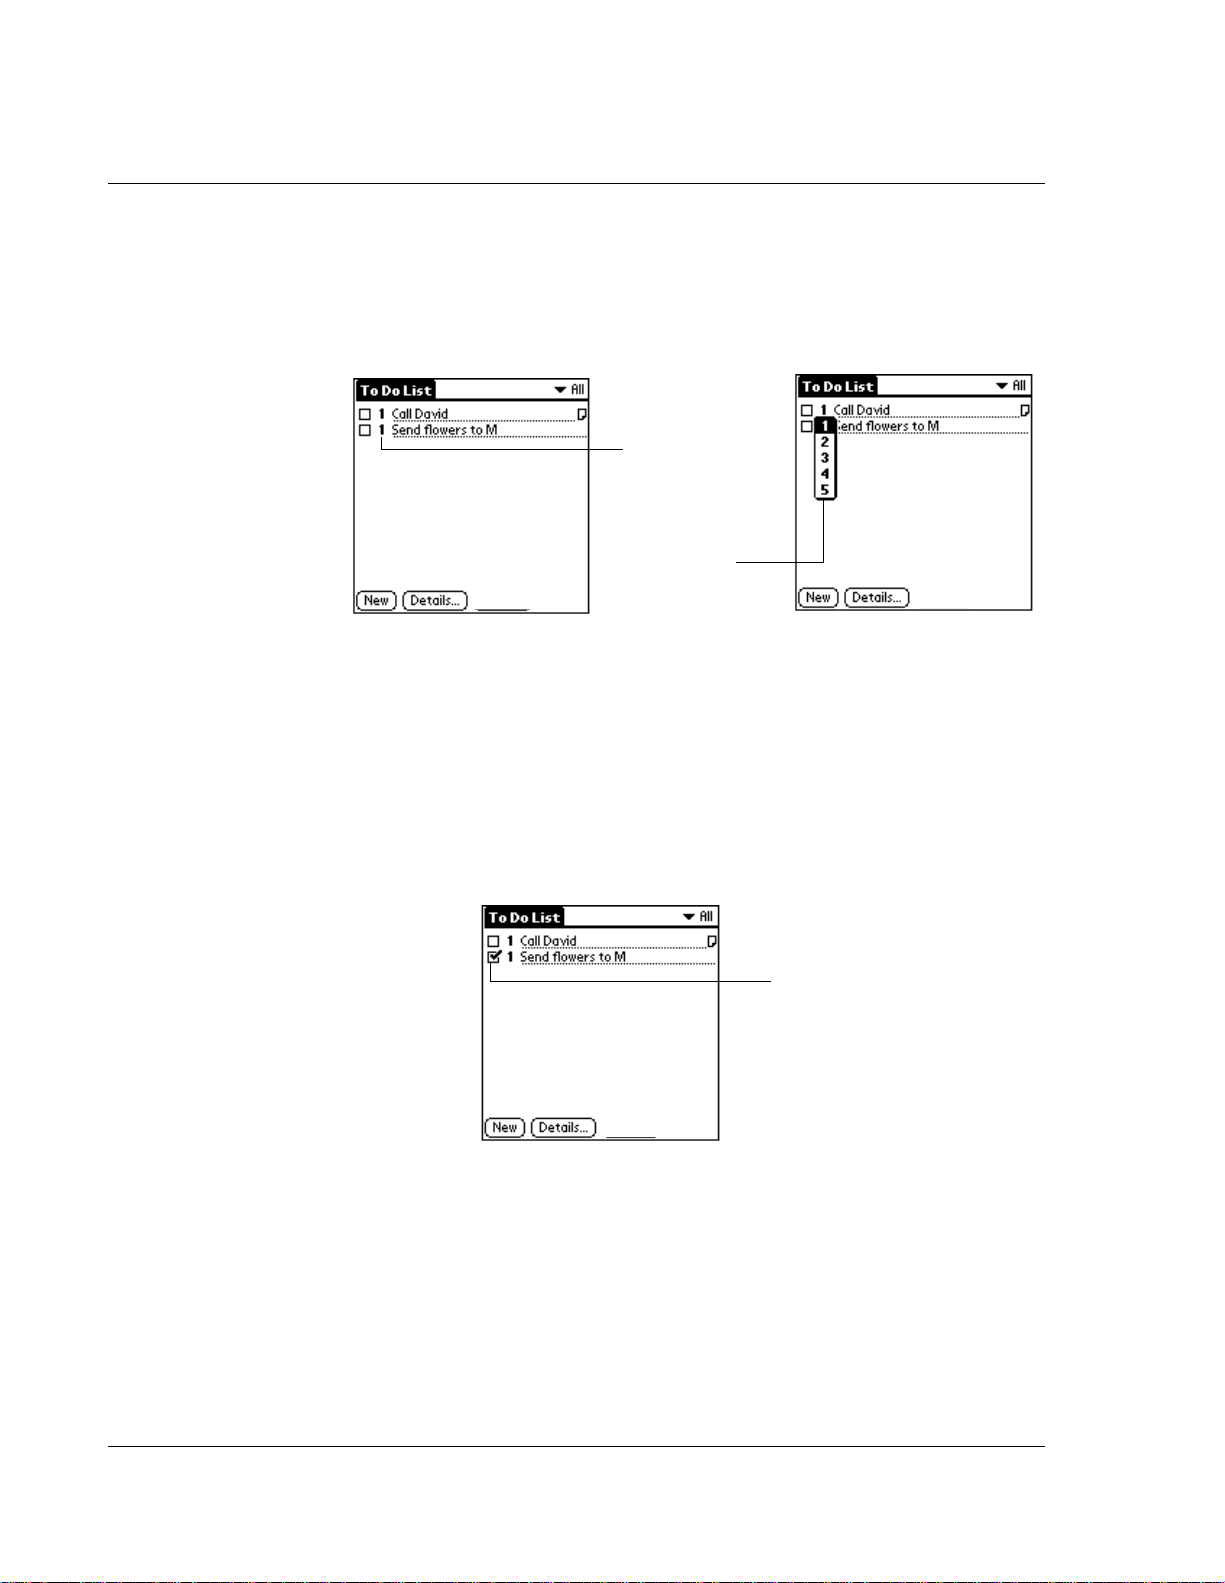
Using the To Do List
1. Tap the Priority number on the left side of the To Do List item.
2. Tap the Priority number that you want to set, with 1 the most
To set the priority of a To Do List item:
Show To Do List screen and priority numbers.
Tap here
Tap to
select
priority
important and 5 the least important.
Checking off To Do List items
You can check off a To Do List item to indicate that you’ve
completed it . Tap the box nex t to the item to check it off the li st. You
can also use Rocker Up and Down to highlight a To Do list item,
then press Rocker Enter to check or uncheck it.
Completed To
Do List item
To make checked-off items disappear:
You can have completed items remain onscreen, or clear them from
view.
1. In the To Do List, tap the ta b in the upper- left corner to display the
menu bar.
64 Wrist PDA User Guide
Page 65

Using the To Do List
2. Tap the Options menu, then tap Show.
3. Check or uncheck Show Completed Items. I f you clear this
settin g, your To Do items disappear from the list wh en you
complete (check) them.
NOTE: Items that no longer appear on the list because Show
Completed Items is turned off have not been deleted. They are
still in the memory of your watch. You must purge completed
items to remove them from memory.
Changing priorities and due dates
You can change the To Do List to display the due date assigned to an
item, change its priority, and assign a category to the task with the
To Do Item Details dialog box.
You can then sort To Do List items by priority, due date, or category.
To change the priority and due date of a To Do List item:
1. In the To Do List, tap the item that you want to change.
2. Tap Details.
3. In the Details dialog box, tap No Date to open the Due Date pick
list.
Tap here.
4. Tap the date that you want to assign the item. Options are Today,
Tomorrow, One Week from the current date, No Date to remove
the due date from the item, or Choose Date to display the date
selector and select a date.
5. Tap Private to hide this item when Security is turn ed on.
For more information, see "Making records private" on page 89.
6. Tap OK.
Wrist PDA User Guide 65
Page 66
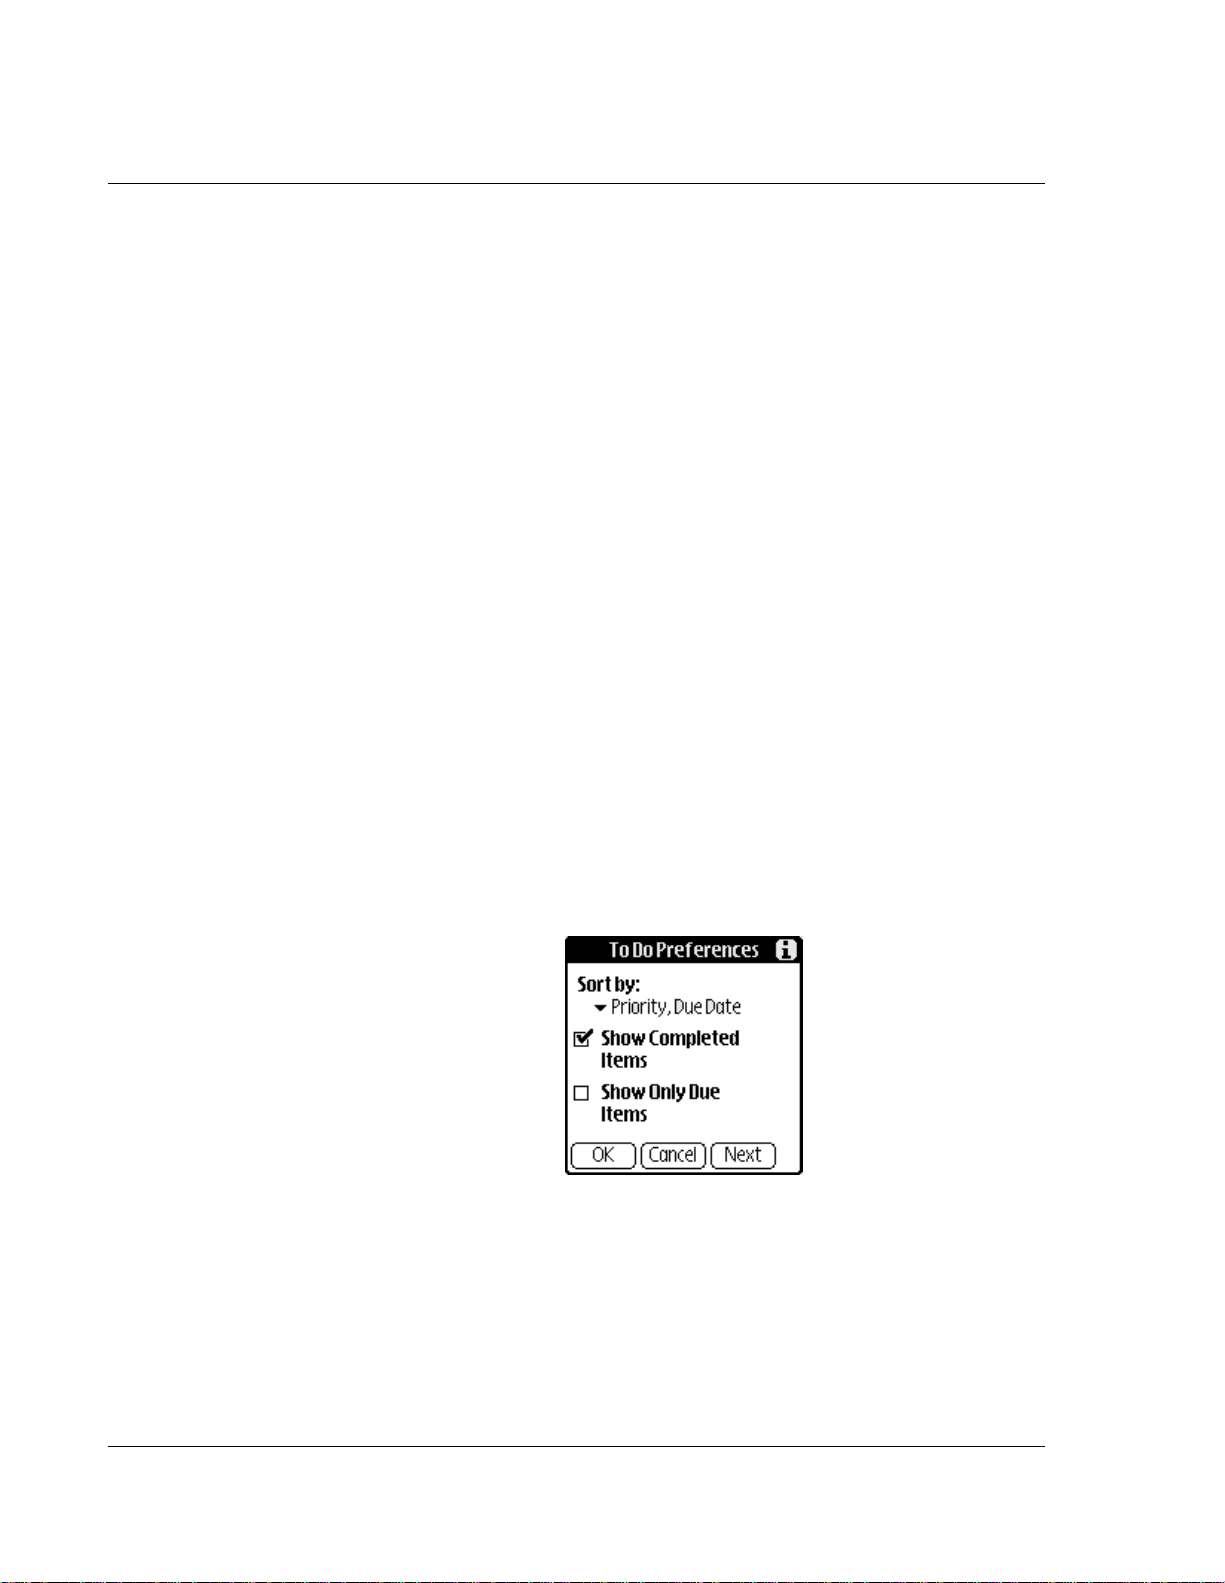
Using the To Do List
1. In the To Do List, tap the ta b in the upper- left corner to display the
2. Tap the Options menu, then tap Show.
3. In the To Do Preferences screen, tap Sort By, and then select an
4. Tap OK.
To sort To Do items:
menu bar.
option from the pick list:
Tap Prio rity , Due Da te to sort ite ms by pr iorit y firs t, and th en du e
date. Tap Due Date, Priority to reverse that order.
Tap Category, Priorit y to sort items by category first, and then
priority. Tap Priority, Category t o reverse that order.
Displaying completed and due items
You can have the T o Do List display completed items and their
completion dates, as well as due items and their due dates.
To displ ay completed and due items in the To Do List:
1. In the To Do List, tap the ta b in the upper- left corner to display the
menu bar.
2. Tap the Options menu, then tap Show.
3. In the To Do Preferences dialog box, choose from the following
settings:
• Tap Show Completed Items to display your completed items
in the To Do List. If this setting is turned off, completed To
Do items disappear from the li st , but are kept in the m emory
66 Wrist PDA User Guide
Page 67

of your watch. You must purge completed items to remove
them from memory.
• Tap Show Only Due Items to show only the items that are
currently due, past due, or have no due date specified. When
this setting is active, items that are not yet due do not appear
in the list until their due da te .
4. Tap Next t o di s play these add itional options:
• Tap Record Completion Date to replace the due date with the
actual date when you complete (check) the item. If you do
not assign a due date to an item, the completion date still
records when you complete the item.
• Tap Show Due Dates to display the due dates for items in the
To Do List and to display an exclamation mark next to items
that remain incomplete after the due date passes.
5. Tap OK.
Using the To Do List
Wrist PDA User Guide 67
Page 68

Using the Address Book
Using the Address Book
The Address Book lets you keep names, addresses, telephone
numbers, and other information about your personal or business
contacts.
Use the Address Book to:
• Quickly enter, look up, or duplicate names, addresses, phone
numbers, and other information.
• Enter up to five phone numbers (home, work, fax, car, and so
on) or e-mail addresses for each name.
• Define which phone number appears in the Address List for
each Address Book entry.
• Attach a note to each Address Book entry, in which you can
enter additional infor m ation about the entry.
• Assign Address Book entries to categories so that you can
organize and view them in logical groups.
To open the Address Book:
1. Make sure you’re in PDA mode (see page 15). Then, if necessary,
press the Back bu tton to dis play the Applicatio ns Launche r.
2. Tap the Address icon.
The Address Book opens and displays the list of your records.
Adding and us ing Address Book entries
The Addr e ss Book appl ic atio n s tor es nam e a nd ad dr ess inf or mati on
about people or businesses.
Creating an Addr ess Book entry
A record in Address Book is called an entry. You can create entries
on your watch, or you can use Palm Deskto p so ftware to create
entries on your computer and then download them to your watch
with your next HotSync operation.
Palm Desktop software also has data import capabilities that let you
load database files into the Address Book o n you r wa tc h.
See "Imp ort ing data " on page 119 and Palm Des kt op onli ne He lp fo r
more information.
68 Wrist PDA User Guide
Page 69

Using the Address Book
To create a new Address Book entry:
1. Tap the Address icon to display the Address Book.
2. Tap New.
Cursor
at Las t nam e
Tap New.
3. Enter the last name of the person you want to add to your Address
Book.
4. Tap the First Name field to move to it.
5. You can move to any field by tapping it directly.
6. Enter the individual’s first name in the First Name field.
7. If you want to be able to sort the Address Book by company name,
enter the information you want in the Company field.
8. Ente r any oth er i nfo r mation that you want to include in the entry.
9. Tap the scroll arrows (or use the watch buttons) to move to the
next page of information.
10. To attach a note to an entry, tap Note. Enter the information you
want in the text input area, and then tap Done.
Wrist PDA User Guide 69
Page 70

Using the Address Book
11. When you have finished entering information, tap Done.
TIP: To create an entry that always appears at the top of the
Address List, begin the Last name or Company field with a
symbol, as in *If Found Call.* This entry can contain contact
information in case you lose your watch.
Tap Done
To view details of an address entry:
1. Tap the address entry.
The entry appears in Address view.
2. Tap Done when you have finished viewin g the entry.
Duplicating an entry
You can duplicate existing entries, which can be helpful when you
want to enter multiple people from a single organization. When you
duplicate an entry, the word Copy appears next to the name in the
First Name field.
To duplicate an entry:
1. From the Address Book, tap a name you want to duplicate.
2. Tap the tab at the top-left corner of the screen to display the menu
bar.
Make sure Reco rd is selected, then tap Duplicate Addre ss.
3. Edit the record as necessary.
70 Wrist PDA User Guide
Page 71

Using the Address Book
Selecting specific address details
You can select the specific information that an Address Book entry
displays. Any changes you make apply only to the current entry.
To select a different address detail:
1. Tap the entry that you want to change in the Address list.
2. Tap Edit.
3. Tap the pick list next to the label you want to change.
Tap
triangle
4. Select a new label.
Editing Address Book entries
You can change the type of information that appears in the Address
List screen, categorize an entry, and hide an entry for security
reasons. You c an al so dele te en tr ies.
To edit an Address Book entry:
1. Tap the entry that you want to change in the Address list.
2. Tap Edit.
3. Tap Details.
4. In the Address Entry Details dialog box, select any of the
following settings:
Wrist PDA User Guide 71
Page 72

Using the Address Book
5. To attach a note to an entry, tap Note, enter information in the text
input area, and tap OK.
6. To delete an entry, tap Delete.
7. Tap OK.
Changing the Address Book display
You can change how Address Book lists are s orted and you can add
custom fields for entering additional information, using
preferences. You can also have the Address Book display the last
category you selected each time you return to the application.
• Tap Show in List, and in the pick list tap which type of phone
or other informatio n you want to appear in the Address List
screen. Options are Work, Home, Fax, Other, and E-mail.
• Tap Category, a nd then tap a cate g or y in the pick li st tha t
you want to assign to the entry.
• Tap Private to hide the entry when Security is turned on.
To change how lists are sorted:
1. Tap the tab in the upper-left corner of the screen to display the
menu bar .
2. Tap Options, and then tap Preferences.
3. Choose an op ti on to sort Address Book lists from the List By pick
list:
• Tap Last Name, First Name to sort alphabetically by an
individual’s last nam e an d the n first name .
• Tap Company, Last Name to sort alphabetically by the
company name, and then an individual’s last name.
4. Tap OK.
72 Wrist PDA User Guide
Page 73

Using the Address Book
To add custom fields at the end of Address Edit screens:
1. Tap the tab in the top-left corner of the screen to display the menu
bar.
2. Tap Options, and then tap Rename Custom
Fields.
3. In the text input area, rename the fields to
identify the information you’ll enter in
them. The names you give the custom fields
appear in all entries, at the end of the
Address Edit screen.
4. Tap OK in the Rename Custom Fields
dialog box.
5. Tap Done.
To control the Address Book display on returning to the
application:
1. Tap the tab in the upper-left corner of the screen to display the
menu bar .
2. Tap Options, and then tap Preferences.
3. In the Address Book Preferences dialog box, select an option:
• To have the Address Book redisplay the last category you
selected on returning to the application, tap the Remember
Last Category check bo x to select it.
• To have the Addres s Book display the All category on
returning to the application, clear the Remember Last
Category check box.
4. Tap OK.
Wrist PDA User Guide 73
Page 74

Using the Memo Pad
Using the Memo Pad
The Memo Pad provides a place to take notes that are not associated
with records in the Date Book, Address Book, or T o Do List. You can
also:
• Assign memos to categories so that you can organize and
view them in lo gical g roups.
• Write down phone numbers and other types of information.
Later, you can cop y and past e this informatio n i n to o t h er
applications.
To open the Memo Pad:
1. Make sure you’re in PDA mode (see page 15). Then, if necessary,
press the Back bu tton to dis play the Applicatio ns Launche r.
2. Tap the Memo Pad icon.
The Memo Pad opens to display the last Memo Pad screen that you
viewed.
Creating memos
A record in the Memo Pad is called a memo. A memo can contain up
to 4,000 characters. The number of memos you can store is limited
only by the memory availab l e on your w a tch.
When you create a new memo, you can add information to it from
the Address Book application, such as a phone number or address,
using the Phone Lookup option. See "Using Phone Lookup" on page
88.
To create a new memo:
1. Tap the Memo Pad icon to display the Memo List.
2. Tap New.
74 Wrist PDA User Guide
Page 75
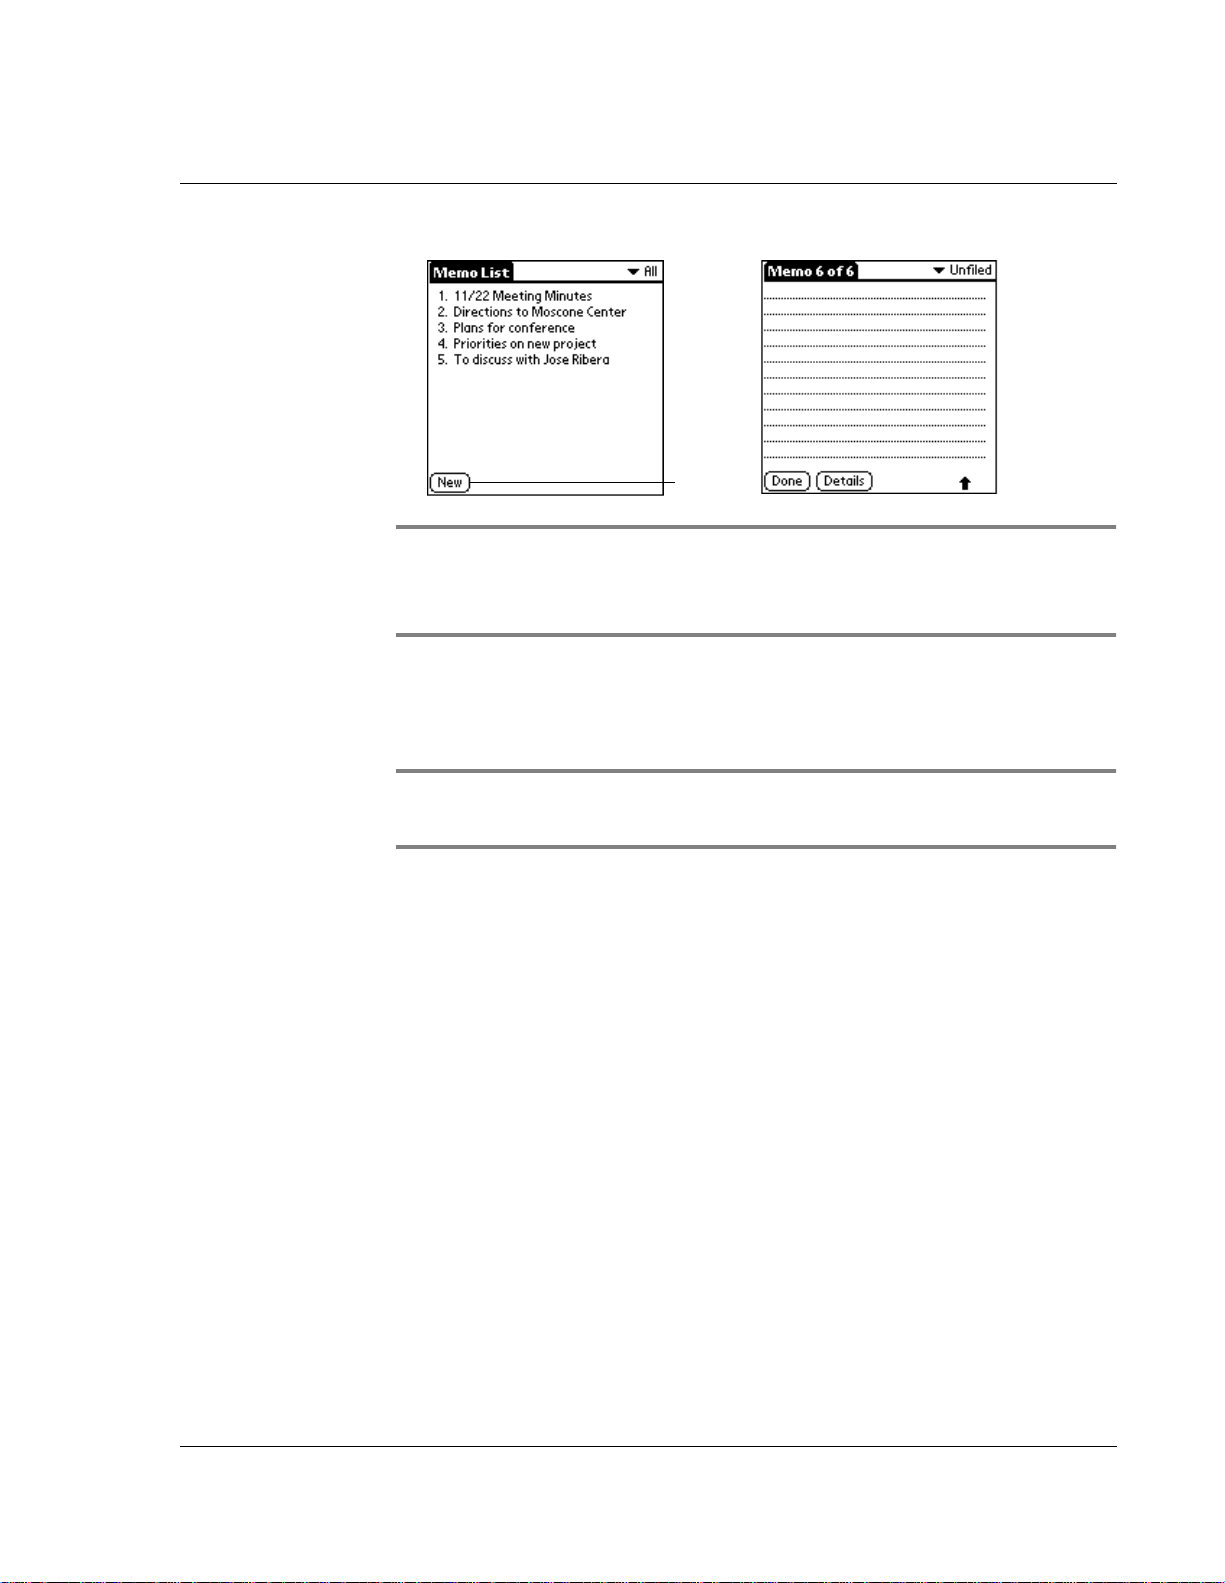
Using the Memo Pad
Tap New.
TIP: You can also create a new memo by beginning to write in
the text input area in the Memo List screen. The first letter is
automatically capitalized and begins your new memo.
3. Enter the text you want to appear in the memo. Use the carriage
return stroke (new line st roke) to move down to new lines in the
memo.
TIP: You form the carriage return stroke by drawing a diagonal
line toward the lower-left corner of the screen.
4. Tap Done.
You can categorize memos and sort them by categories. See
"Categorizing records" on page 84 and "Sorting records" on page 88
for more informati o n .
Reviewing memos
The Memo List displays the first line of a memo. This makes it easy
to locate and review your memos. You can easily sort memos in the
Memo List or move through memos using Memo options.
To review a memo:
1. In the Memo List, use Rocker Up and Down to change the
selection highlight, then press Rocker Enter to open the selected
item. You can also tap the memo if you are using the stylus. If
there are more memos than fit on the screen, use Page Up and
Down to view additional screens.
Wrist PDA User Guide 75
Page 76

Using the Memo Pad
2. Review or edit the text in the memo.
3. Tap Done.
Tap a memo
to review its
contents
TIP: When you’re looking at the text of a memo, you can easily
jump to other memos for review. Use the Up and Down buttons
on the watch to skip to other memos.
To change the order in which memos appear in the Memo List:
1. Tap the tab in the upper-left corner of the screen to display the
menu bar .
2. Tap Options.
3. Tap Preferences, and choose one of the following options:
• Tap Manual to sort new memos in the sequence in which you
create them.
• Tap Alphabetic a l to sort new and existing me m os in
numerical and then alphabetical sequence.
4. Tap OK.
76 Wrist PDA User Guide
Page 77

Using the Calculator
The Calculator lets you perform basic arithmetic, such as addition,
subtrac tion, multiplic a tion, an d division .
To open the Calculator:
1. Make sure you’re in PDA mode (see page 15). Then, if necessary,
press the Back bu tton to dis play the Applicatio ns Launche r.
2. Tap the Calc icon.
The calculator displays on the sc reen.
Using the Calculator
Using the Calcula t or butt ons
The Calculator includes several buttons to help you perform
calculations.
• The CE button clears the last number you entered.
Use this button if you make a mistake while entering a
number in the middle of a calculation. This button enables
you to re-enter the number without starting the calculation
over.
• The C button clears the entire calculation and enables
you to begin a fresh calculation.
• The Plus/Minus button toggles the current number
between a negative and positive value. If you want to enter a
Wrist PDA User Guide 77
Page 78

Using the Calculator
negative number, enter the number first and then press the
+/- button.
• The M+ button places the current number in memory.
Each new number you enter with the M+ button is added to
the total store d in memory. The num ber that you add can be
either a calculated value or any number you enter by
pressing the number buttons. Pressin g this button has no
effect on the current calculation (or series of calculations); it
merely places the value into memory until it is recalled.
• The MR button recalls the stored value from memory
and inserts it in the current calculation.
• The MC button clears any value that is stored in the
Calculator memory.
78 Wrist PDA User Guide
Page 79

Performing Common Tasks
Creating records
5
Performing Common
Tasks
The tasks described in this section use the term records to refer to an
individual item in any of the basic applications, for example, a
single Date Book event, Address Book entry, To Do List item, or
Memo Pad memo.
Creating records
You can use the following procedure to create a new record in the
Date Book, A dd ress Book, To Do List, or Me mo Pad .
To create a record:
1. Select the application in which you want to create a record.
2. Tap New. (For the Date Book only, select start and end times for
your appointment and tap OK.)
3. Enter text for the record.
NOTE: The Wrist PDA automatically capitalizes the first letter of
each field.
4. As an option, tap Details to select attributes for the record.
5. In the Address Book and Memo Pad only, tap Done.
Your watch saves the new record automatic all y.
Wrist PDA User Guide 79
Page 80

Performing Common Tasks
Editing records
Editing records
Afte r you create a record, you ca n ch a n ge, delete , or a dd new
information at any time. When the screen is in edit mode, a blinking
cursor appears within the information, and the information appears
on a dotted gray line called an edit line.
You can enter text in any of the ways described in Chapter 2,
“Entering Data in your Wrist PDA™ Watch.”
Cursor
Edit line
Selecting Text
Select the text you want to e d it using one of the following
techniques:
• Double-tap on a word in a field to select the word.
• Triple-tap on any word on a line to select the ent i r e lin e .
• To select several characters, words, or lines, tap and hold
with the stylus until you hear a beep. Then drag the stylus
left or right across the text you want to highlight, or drag up
or down t o select multiple lines.
80 Wrist PDA User Guide
Page 81
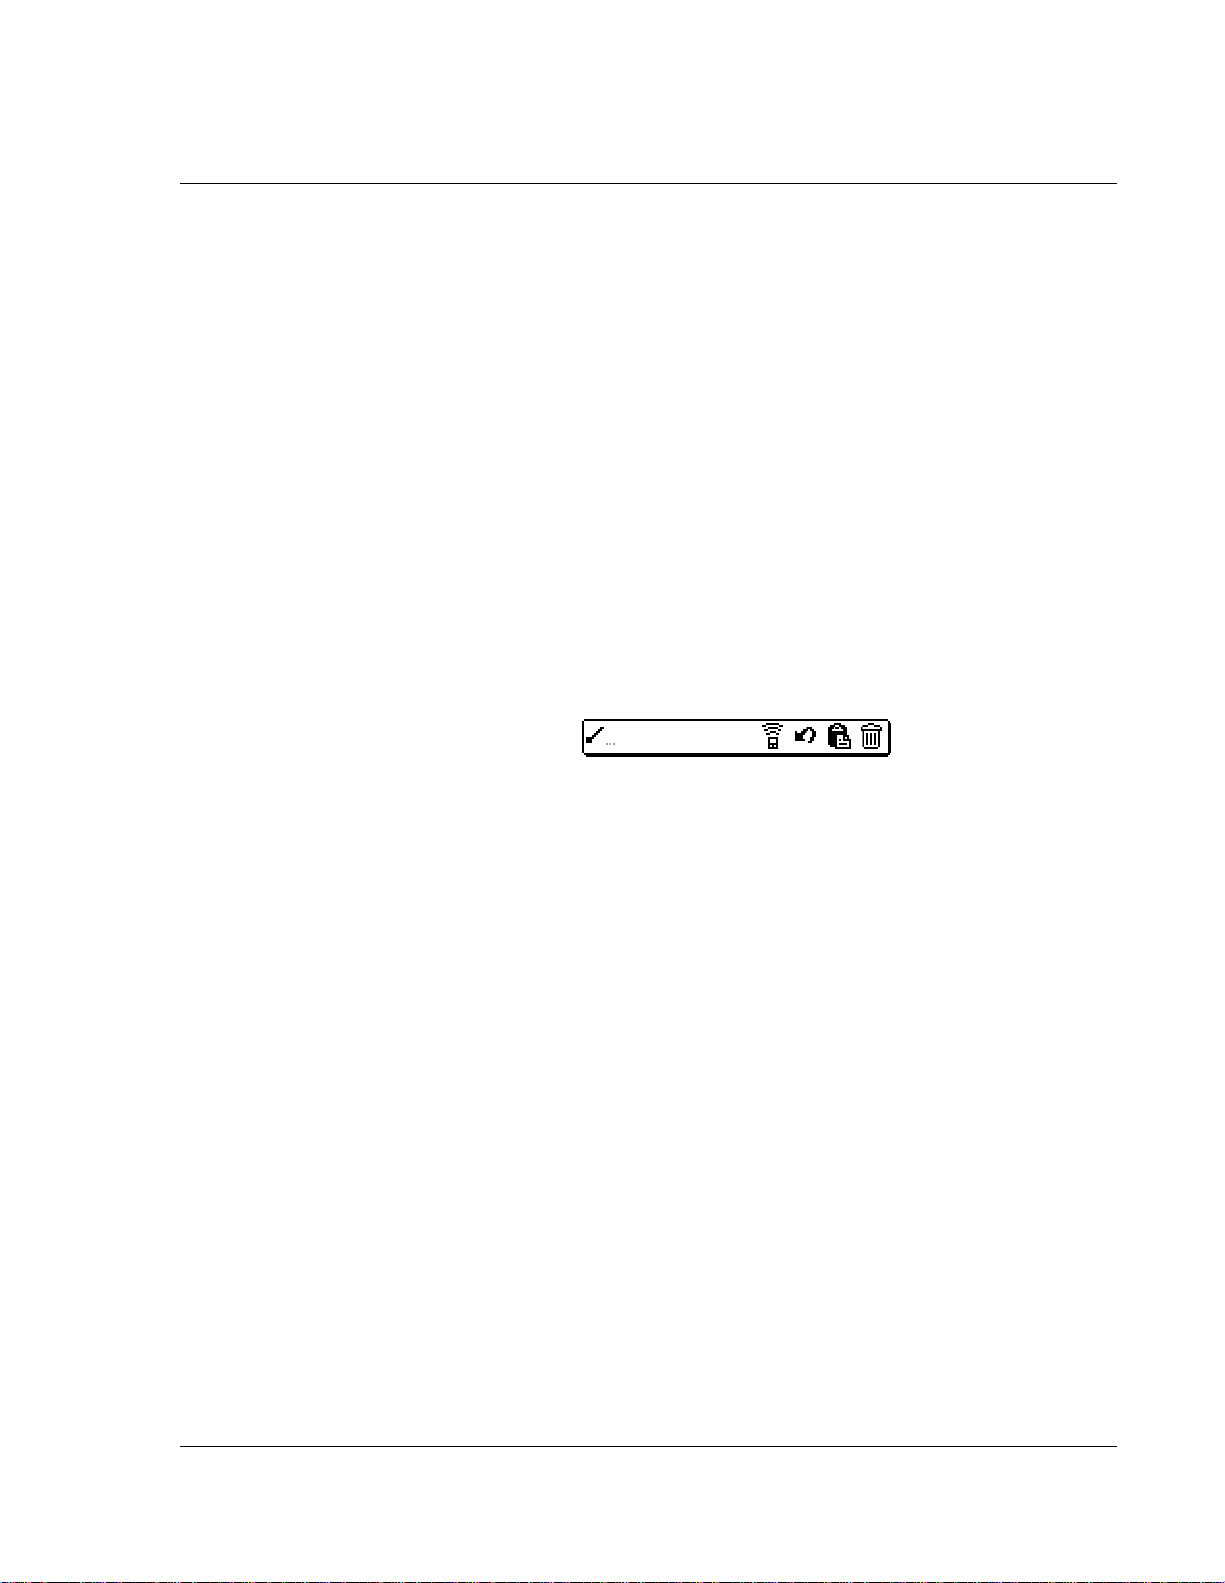
Performing Common Tasks
Editing records
Using the Edit menu
The Edit menu is available from any screen where you enter or edit
text. As a general rule, the Edit menu commands affect selected text.
You can display the Edit menu by tapping the tab at the upper-left
corner of the screen, or by writing a ShortC ut.
To use the Edit menu:
1. Do one of the following to display the Edit menu:
• Tap the tab at the upper-left corner of the screen; then tap the
Edit menu to display the commands in the menu.
• In the text input area, drag a diagonal line from the lower left
to upper right to display the Command toolbar. To select a
command, either tap the icon representing a command on the
Command too lbar, or draw the ShortCut in the text area of
your screen.
2. Choose from the following commands, depending on the
application you’re using:
• Undo reverses the last action taken.
• Cut removes a selection from its current location to memory.
You can then paste the text into another area of the current
application or into a different application.
• Copy copies a selection and moves it to memory. You can
paste the selection into another area of the current
application or into a different application.
• Paste inserts a selection from memory into an area you select.
Paste produces no result if you have not used the Cut or
Copy commands.
• Select All selects all the text in the current record or screen.
• Keyboard opens the onscreen keyboard. Tap Done to close
the keyboard.
• Graffiti2 Help opens the Jot character stroke screen.
Wrist PDA User Guide 81
Page 82

Performing Common Tasks
Editing records
Deleting records
You can delete records in any of the basic applications.
To delete a record in any of the basic applications:
1. Select the record you want to affect.
2. Do one of the following:
• Tap the tab at the upper-left corner of the screen, open the
Record menu, and then select the desired Delete command.
The Dele te comm a nd diffe rs depen ding on the applica tion
you’re using, for example, Delete Event appears in the
Record menu wh ile you’ re in the Dat e Book, an d Delete Item
appears when you’re using the To Do List.
• In the Details dialog box of the application, tap Delete, and
then tap OK.
• Delete the text of the record.
NOTE: In the Date Book, deleting the text of a repeating event
deletes all instances of the event.
• In the text input area, drag a diagonal line from the lower left
to upper right to display the Command toolbar; then tap the
Delete icon or draw a ‘D’ in the text area.
Delete icon
A confirmation dialog box appears.
3. To archive a copy of the deleted file on your PC, select the Save
Archive option. If you choose the archive option, the record is
transferred to the archive file on your PC the next time you
perform a HotS ync operation.
4. Tap OK to delete the record.
82 Wrist PDA User Guide
Page 83

Performing Common Tasks
Editing records
Purging records
Over time, as you use Date Book and To Do List, you may
accumulate records that are no longer useful. For example, events
that occurred months ago remain in the Date Book, and completed
To Do List items remain in the lis t .
Outdated records take up memory on your watch, so it’s a good
idea to remove them by using Purge. If you think Date Book or To
Do List records might prove useful later, you can purge them from
your watch and save them in an archive file.
Purging is not available in Address Book or Memo Pad; delete
records from these applications manually.
To purg e record s :
1. Open the application from which you want to purge records.
2. Tap the tab at the upper-left corner of the screen, open the Record
menu, and select Purge.
3. Choose from the following options:
• For the Date Book, select the Delete Events Older Than pick
list and select an option—1 week, 2 weeks, 3 weeks or 1
month.
• For the Date Book or To Do list, select Save Archive Copy on
PC to save a copy of purged records in an archive file on your
desktop. Selecting this option transfers purged records to an
archive file the next time you perform a HotSync operation.
Tap OK.
Wrist PDA User Guide 83
Page 84

Performing Common Tasks
Categorizing records
Categorizing records
You can categorize records in the Address Book, To Do List, and
Memo Pad applications for easy retrieval. (The Date Book does not
have categories.) When you create a record, it is automatically
assigned to the currently displayed category. For example, if the All
category is displayed, the record is assigned to the Unfiled category.
A record can remai n u nfiled or it can be assigned to a category at
any time.
In addition to the All and Unfiled categories, each application has a
defa ult set of categories:
• The Address Book includes a Business, Personal, and
QuickList category.
• The Memo Pad and To Do List include a Business and
Personal category.
You can rename or delete the default categories, and you can create
new categories. Each application can have up to 15 categories.
To move a record into a category:
1. Select the record you want to categorize.
2. Tap Details. (From the Address View screen, tap Edit first.)
3. In the Details dialog box, tap the Category pick list, select the
desir e d c a te gory, and th e n tap OK.
To display a category of records:
1. Open an application: the Address Book, the To Do List, or the
Memo Pad.
2. Tap the pick list in the upper right corner of the screen; then tap
the category you want to display.
84 Wrist PDA User Guide
Page 85

Performing Common Tasks
Categorizing records
Tap pick list
Select a category
To add or edit application categories:
1. In the Address Book, To Do List, or Memo Pad application,
choose fr om the following options:
• Tap the pick list in the upper right corner of the screen, and
tap Edit Categories.
Edit Categories
• In the Address Book, select a record and tap Edit; th en tap
Details. In the Ca te g or y pic k l ist, tap Edit Categories.
• In the Memo Pad and To Do List, select a record from the list,
and tap Details . In the Category pick list, tap Edit Categ ories.
2. Select any of the following options:
• To create a new category, tap New, and enter a new name in
the text input area. Tap OK.
Wrist PDA User Guide 85
Page 86

Performing Common Tasks
Categorizing records
• To rename a category, tap it in the list to select it. Tap
Rename, enter a new name in the text input area, and Tap
OK.
• To delete a category, tap it in the list to select it. Tap Delete.
3. Tap OK.
To rename a category:
1. Tap the pick list in the upper right corner of the screen; then tap
Edit Categories.
2. Select the category you want to rename; then tap Rename.
3. Enter the new name for the category, and tap OK.
4. Tap OK to exit the Edit Categories dialog box.
TIP: You can move records from multiple categories into a
single category by individually renaming all categories with a
single category name.
86 Wrist PDA User Guide
Page 87

Finding records
Your watch lets you find information in several ways:
• In the Applications Launcher, you can enter the first letter of
the application you are searching for. Th is highlight s the first
application that starts with that letter.
• In the Address Book, you can use the Look Up option to
enter the fir st let ter s o f a name to scroll immedi ate ly to that
name.
• In the Date Book, the To Do List, and the Memo Pad, you can
use Phone Lookup to display the Address List screen and
add the information from this list to a record.
Finding Address Book records
You can look up Address Book records using the Scroll/Enter
button on the left side of the watch or by typing the first few letters
of a name in the Look Up option at the bottom of the address screen.
Performing Common Tasks
Finding records
To look up an Address Book record:
1. Do one of the following:
• From the Address screen, enter the first few letters of the
name you want to locate.
Look Up option
• Use the Scroll/Enter button on the left side of the watch to
scroll one record at a time. Holding down the scroll button
accelerates scrolling. You can also use the Up and Down
buttons to move one screen at a time.
Wrist PDA User Guide 87
Page 88

Performing Common Tasks
Sorting records
Using Phone L ook up
The Phone Lookup option lets you add a telephone number from
the Address list to an entry in another application. For example, you
can add your dentist’s tel e phone number to your dental
appointment date in the Date Book.
To use Phone Lookup:
1. Display the record in which you want to inse rt a phone number.
The record can be in the Date Book, To Do List, or Memo Pad.
2. Do one of the following:
• Tap the tab at the upper-left corner of the screen; then tap
Options and tap Phone Lookup.
• In the text input area, drag a diagonal line from the lower left
to upper right to display the Command toolbar. In the text
area, write an L, the Sho rt Cut for the Phone Lookup
command.
3. Select a record or write the first few letters of the name you want
to add. Tap Add to add the information to the record.
NOTE: You can also search based on selected text. Drag to
highlight the text, then follow step 2 above. When the search is
complete, the name and phone number of the candidate will
replace the selected text.
Sorting records
You can sort lists of records in various ways, depending on the
applic atio n. S ort ing i s avai lab le i n a pplic at ions that d ispla y list s— in
the Address Book, T o D o List, and Memo Pad.
To sort records in the To Do List:
1. Open the application to display the list screen.
2. Tap Show.
3. Tap the Sort By pick list, and select an option.
4. Tap OK.
88 Wrist PDA User Guide
Page 89

Performing Common Tasks
Making records private
To sort records in the Address Book and Memo Pad:
1. Open the application to display the list screen.
2. Do one of the following:
• Tap the tab at the upper-left corner of the screen; then tap
Preferences in the Options menu.
• In the text input area, drag a diagonal line from the lower left
to upper right to display the Command toolbar. In the text
area, write an R, the ShortCut for the Preferences command.
3. In the Preferences dialog box, tap the option you want; then tap
OK to sort the list.
To sort the Memo List manually:
Tap and drag a memo to a new location in the list.
NOTE: To display the list of your memos on your computer as
you arranged them manually on your watch, open Memo Pad in
the Palm Desktop software, click List By, and select Order on
Handheld.
Making records private
In all the basic applications, you can make individual records
private. Private records can be e ither masked or hidden. Private
records remain visible and accessible until you select a security
setting to Hide records. Private record names are covered with a
gray bar when the security setting is set to Mask records.
If you have assigned a password to your device, you must enter it
before private records are displayed. See "Assigning security
options" on page 102 for more information.
To make a record private:
1. In your application, do one of the following:
• Create a new record and tap Edit, and then tap Details.
• Select an existing record, and tap Details.
2. Tap the Private check box. Tap OK.
Wrist PDA User Guide 89
Page 90

Performing Common Tasks
Making records private
3. At the alert in the Private Records dialog box, tap OK.
To hide private records:
1. Do one of the following:
• From the Applications Launcher, tap the Security icon.
• From within an application, tap the tab at the upper-left
corner of the screen; then tap Security in the Options menu.
2. In the Change Security dialog box, in the Current Privacy pick
list, tap Hide Records; then tap OK.
To display private records:
1. Do one of the following:
• From the Applications Launcher, tap the Security icon.
• From within an application, tap the tab at the upper-left
corner of the screen; then tap Security in the Options menu.
2. From the Current Privacy pick list, tap Show Records; then tap
OK.
3. If you have assigned a password, you must enter the password
before the hidden records are displayed.
4. Enter your password, and then tap Show.
90 Wrist PDA User Guide
Page 91
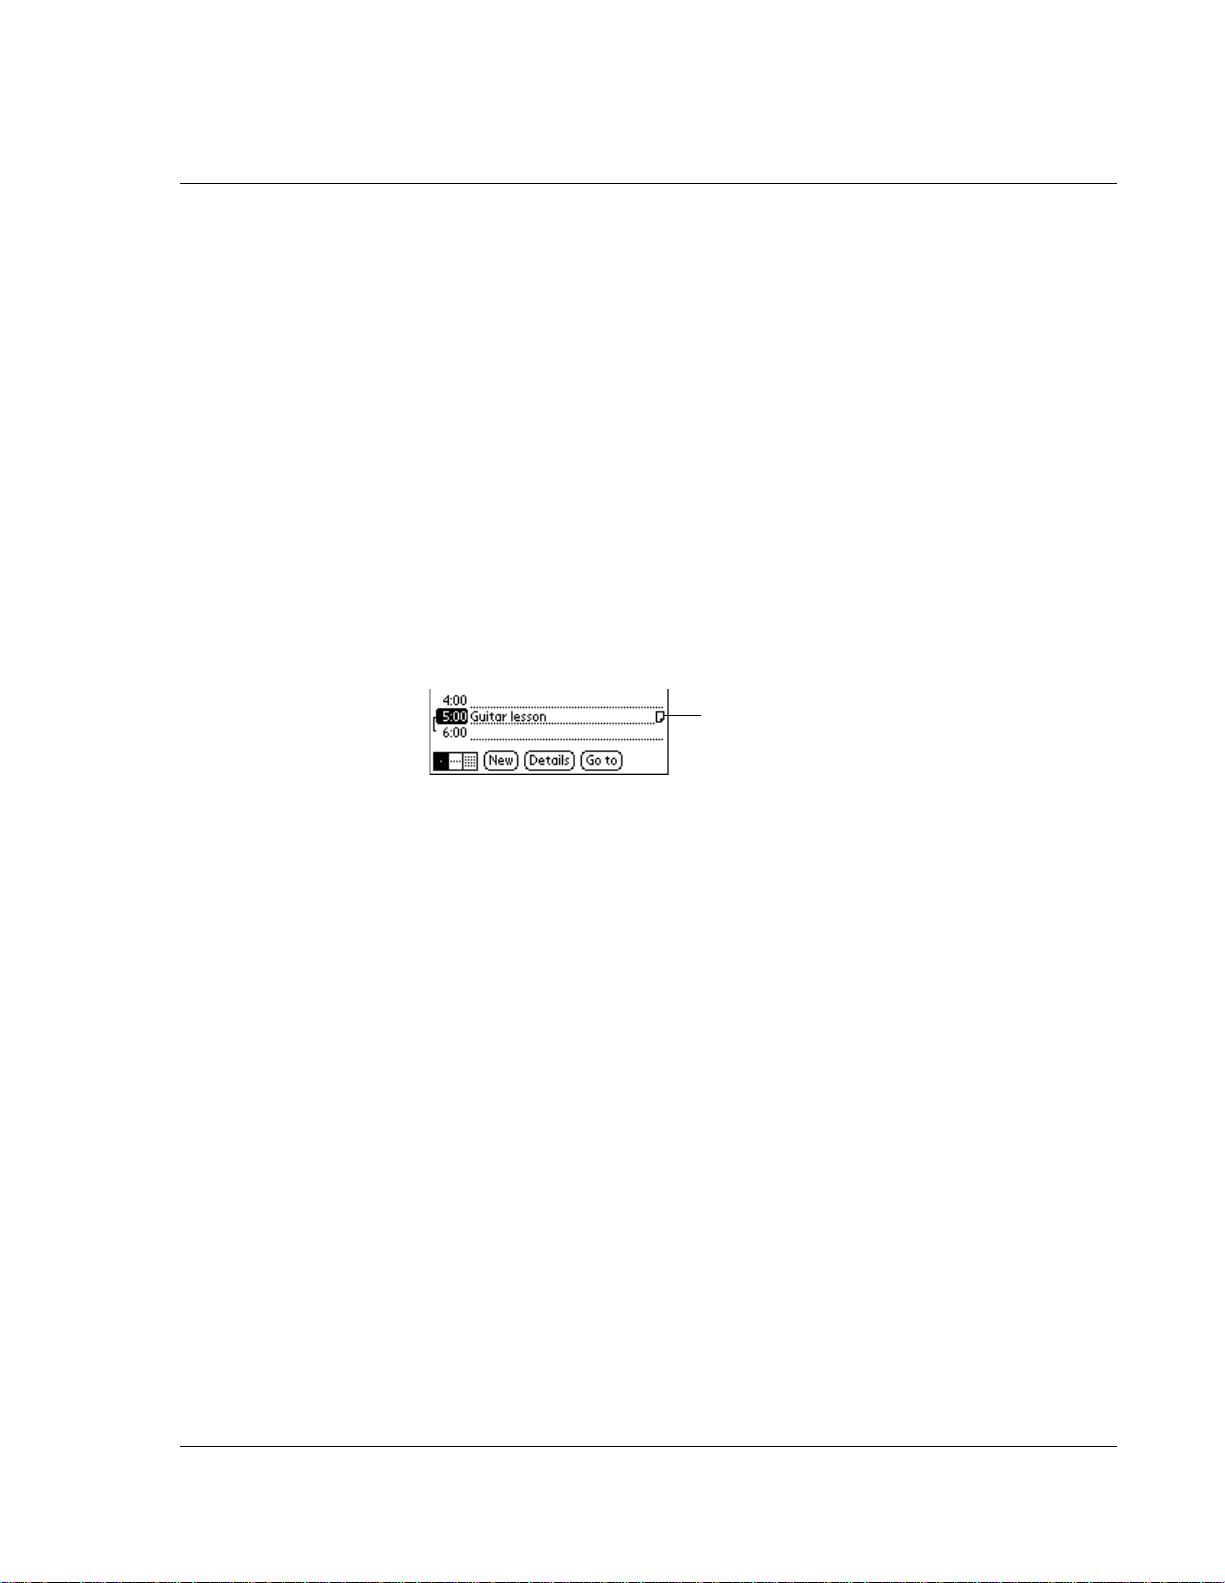
Attaching note s
You can attach notes to records in all the basic applications except
the Memo Pad. A note can be up to several thousand characters
long.
To attach a note to a record:
1. Display th e entry to which you w ant to add a note.
2. In A ddress B ook on ly, ta p Edit.
3. Tap Details.
4. Tap Note; then enter the desired note.
5. Tap Done.
A note icon appears to the right of any item containing a note.
Performing Common Tasks
Attaching notes
Note icon
To review or edit a note:
Tap the note icon.
To delete a note:
1. Tap the note icon.
2. Tap Delete; then tap Yes to delete the note.
Wrist PDA User Guide 91
Page 92

Performing Common Tasks
Choosing fonts
Choosing fonts
You can change the font style in all basic applications. You can
choose a different font style for each application.
Small font
Bold font
Large font
To change the font style:
1. Open an application.
2. Do one of the following:
• Tap the tab at the upper-left corner of the screen; then tap
Font in the Options menu.
• In the text input area, drag a diagonal line from the lower left
to upper right to display the Command toolbar. In the text
area, write an F, the ShortCut for the Font command.
3. Use Rocker Up and Down to highlight the desired font and then
press Rocker Ent e r to se le ct it. Or use the sty lus to tap the font,
then tap OK.
92 Wrist PDA User Guide
Select font
Page 93

Performing Common Tasks
Getting information about an application
Getting information about an application
You can get information about any application by displaying its
About box. The About box displays the name and version number
of the appl ication.
To display the About box:
1. Tap the tab in the upper-left corner of the application.
2. In the Options menu, tap About.
The text following the Ab out command differs based on your
location. For example, if you’re in the Date Book, the command is
About Date Book; if you are in the Address Book, the command is
About Address Book.
Wrist PDA User Guide 93
Page 94

Performing Common Tasks
Getting information about an application
94 Wrist PDA User Guide
Page 95

Customizing Your Watch
Customizing your watch
You can customize your watch in the following ways:
• Input the current date and time
• Choose the delay period before the watch automatically
displays the time
• Select a watch application and watch face
• Change how long you have to press and hold a button to
activate the EL backligh t or cause the watch to enter PDA
mode
6
• Display date, time, and numbers in various international
formats
• Allow your watch to automatically receive any data beamed
to it
• Set up security options
• Display owner information
Wrist PDA User Guide 95
Page 96

Customizing Your Watch
Customizing your watch
Setting the date, time, and time zone
The Preferences screen lets you set the
date, time, and time zone for your watch.
To set the date:
1. Tap the Prefs icon.
2. Fro m th e pick lis t in the uppe r right corner, tap Date & Time.
3. On the Date & Time screen, tap the Set Date box.
4. Use Page Up and Down to select the month, then use Rocker Up
and Down to select the day.
5. When the current day is selected, press Rocker Enter.
The screen closes and the dates you selected are displayed in the Set
Date box.
To set the tim e:
1. Tap the Prefs icon.
2. Fro m th e pick lis t in the uppe r right corner, tap Date & Time.
3. On the Date & Time screen, tap the Set Time box
4. Use Rocker Up and Down to adjust the hour. When the hour
passes 12 o’clock, AM and PM will switch automatically. Use Page
Up and Down to adjust the minutes.
5. When the correct time is displayed, press Rocker Enter to return to
the Date & Time screen.
NOTE: To display time based on a 24-hour clock, change the
time format. See "Formatting the date, time, and numbers" on
page 100.
96 Wrist PDA User Guide
Page 97

Customizing Your Watch
Customizing your watch
To set the time zone:
1. Tap the Prefs icon.
2. Fro m th e pick lis t in the uppe r right corner, tap Date & Time.
3. On the Preferences screen, tap the Set Time Zone box.
4. Use Rocker Up and Down to change the highlighted time zone.
Use the Page buttons to move by screen. Highlight the time zone
you want to use and press Rocker Enter to select it.
TIP: Choose the time zone from the list that corresponds to
where you are. When you travel, use this dialog to change time
zones. If you’re not sure what time zone you are in, find out what
time it is, and select the time zone which shows the current new
time.
Do not use the time zone dialog box to switch between daylight
savings time and standard time. Use the Daylight Savings pick
list.
The screen closes and the dates you selected are displayed in the
Date & Time screen.
To set daylight savings time:
1. Tap the Prefs icon, then select Date & Time from the pick list in
the upper right corner of the screen.
2. Tap on the Daylight Saving pick list to toggle this feature on or
off.
Wrist PDA User Guide 97
Page 98

Customizing Your Watch
Customizing your watch
Selecting Wrist PDA preferences
The Wrist PDA Preferences screen lets you choose the behavior of
the watch when it goes into sleep mode (auto-off), select the watch
applic a t ion used to display the time, and lock the watch face. I t also
lets you select how long you have to press the Rocker switch to exit
sleep mode and return to PDA mode, and how long to press the
Back button to turn on the EL backlight.
To access the W rist PDA Prefe ren ces screen:
1. Tap the Prefs icon.
2. Selec t WristPD A from the pic k list in the upper-r ight corne r of the
screen.
You see this screen displayed:
Choosing th e auto-off display and wat c h a p plication
preferences:
• To control the behavior of the watch when it goes into sleep
mode (auto-off), select one of the Mode options: Current
leaves the current PDA application on the screen, Watch
displays the time using the selected watch application, and
Off displays a blank screen.
• If Mode is set to Watch, you can select which watch
application you want to use to display the time. Tap Watch
App to display a list of the currently installed Watch
applications, then select one of the available options.
• To prevent the currently selected watch face from being
accidentally changed by pressing Rocker Up or Down, tap
the Lock Face checkbox.
98 Wrist PDA User Guide
Page 99

Customizing Your Watch
Customizing your watch
Changing the key timeouts:
•Tap the Enter PDA pick list to choose how long you have to
press the Rocker switch to exit sleep mode and return to PDA
mode.
•Tap the Back Backlight pick list to choose how long you
have to press the Back button to turn on the EL backlight.
Setting the auto-off delay time
Your Wrist PDA watch goes into sleep mode (auto-off) after a brief
period of inactivity (when you don’t use the stylus or press any
buttons). If you’ve selected Watch as the auto-off display mode (see
page 98), the time automatically displays when the watch goes into
sleep mode. If you find that this happens before you finish
reviewing the information on the screen, you can increase the time
delay.
To set the auto-off interval:
1. Tap the Prefs icon.
2. In the pick list in the upper right corner, ta p General.
3. In the General Pr eferences screen, change the timing by tapping
the Auto-Off After pick list. Tap an option—30 seconds, 1 minute,
90 seconds, or 2 minutes.
Choosing a watch face
You can choose a new w atch face by using the Watch applic ation.
1. Press the Back button to display the Applications Launcher. Press
the button se veral times until you s ee the All category displayed
in the upper-right corner.
2. Tap the Watch application icon.
3. Press Rocker Up or Down to select your favorite watch face, then
press Rocker Enter to select it and retu rn to the Appli c ation s
Launcher.
When the watch goes into sleep mode, the watch face you selected
will dis p la y the time .
Wrist PDA User Guide 99
Page 100
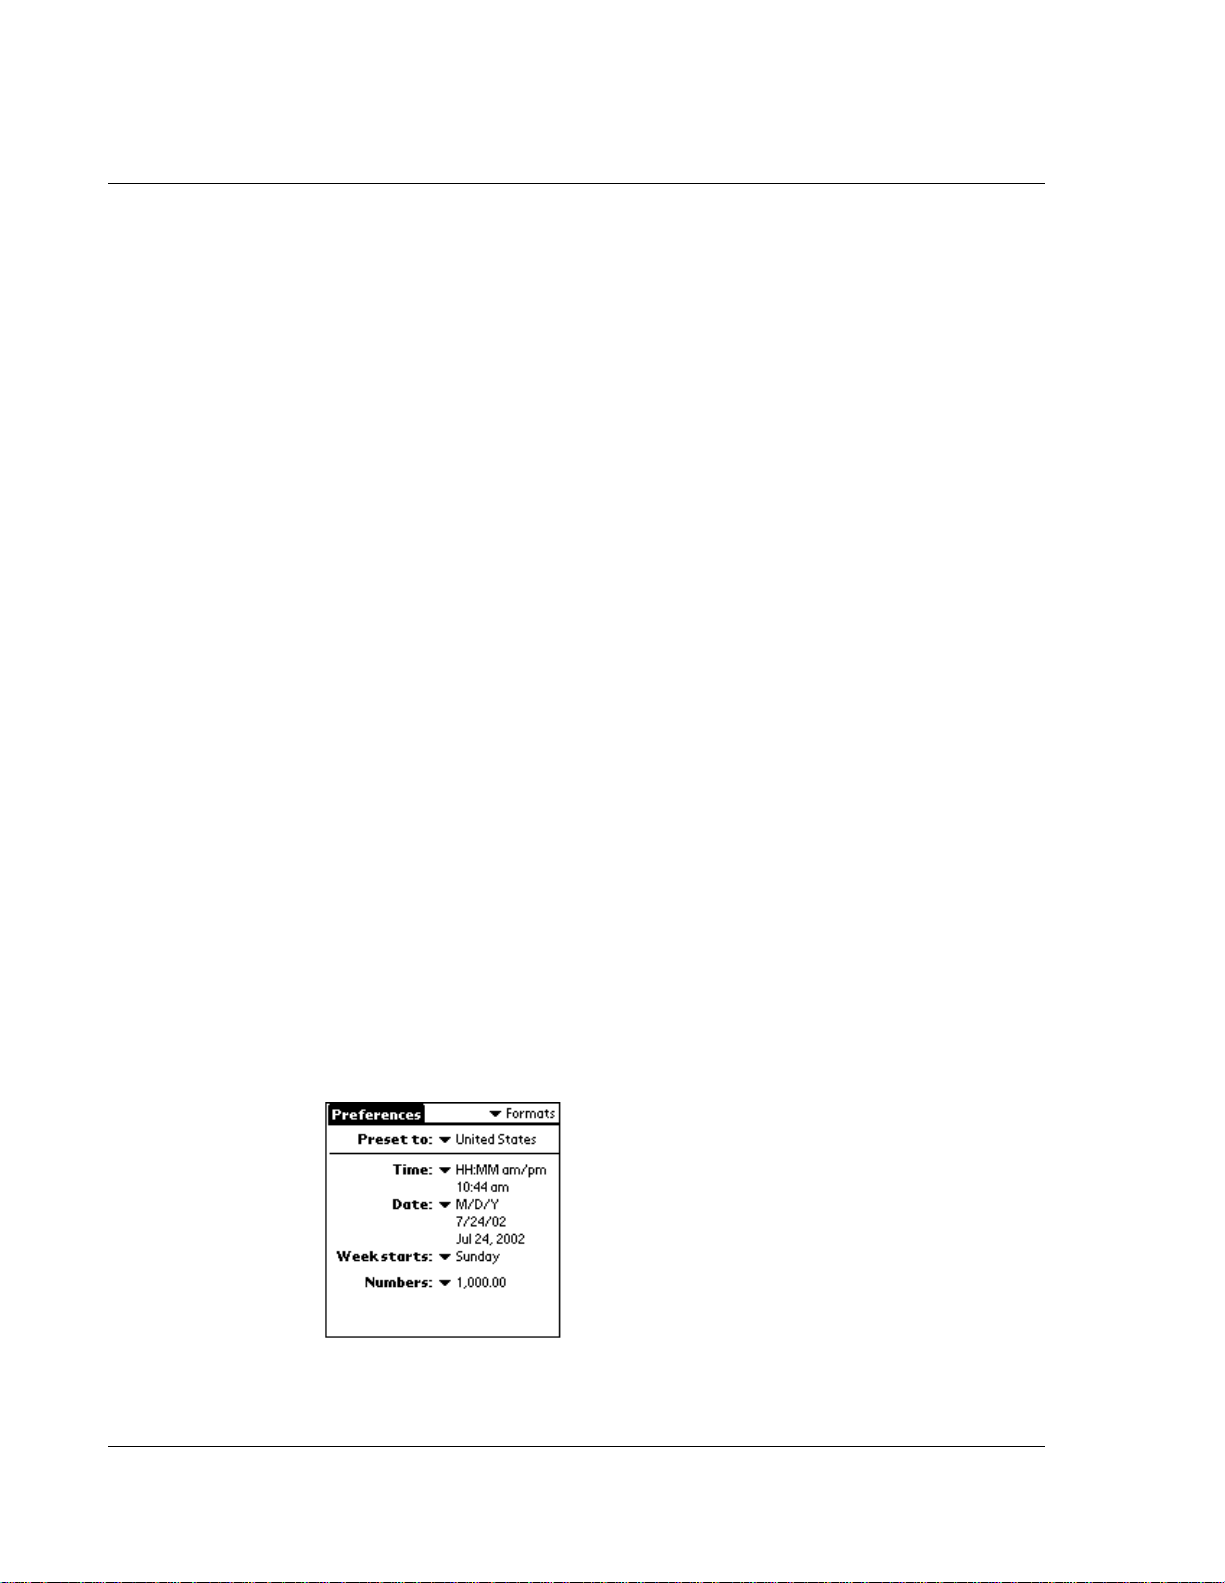
Customizing Your Watch
Customizing your watch
You can also change the watch face while the time is displayed in
sleep mode (but the Lock Face option must be unchecked; see page
98). Use Rocker Up or Down to view the available watch faces.
When the one you want to use is displayed, simply stop using the
Rocker switch. This will be the watch face that displays when the
watch goes into sleep mode.
Formatting the date, time, and numbers
The Formats Preferences screen lets you choose a default country for
your device and also lets you set defaults for times, dates, and
number formats. When selecting a country and time, date, and
number formats, keep the following in mind:
• When you select a country, the time, date, and number
formats are adjusted, as well as the week’s starting day. For
example, in Germany, time often is expressed using a 24hour clock and the starting day of the week is Monday; in the
United States, however, time is expressed using a 12-hour
clock with an AM or PM suffix and the starting day of the
week is Sunday. You can customize the settings.
• The Time setting defines the format for the time of day,
which appears in all applications on your watch.
To choose a country default:
1. Tap the Prefs icon.
2. In the pick list in the upper right corner, tap Formats.
3. Tap the Preset To pick list to view the available country preset
options. Press Rocker Up or Down to highlight the desired option,
then press Rocker Enter to select it.
100 Wrist PDA User Guide
 Loading...