

Page 1
User
User
Manual
Manual
C2E
V1.0
Page 2

I
Contents
Security Warning
1. Overview
1.1. Key Features..................................................................................................................... 1
1.2. Read Before Use.............................................................................................................. 2
1.3. Package Contents............................................................................................................2
1.4. Download Foscam App....................................................................................................2
1.5. Get a New Free Foscam Account..................................................................................2
1.6. Add the Camera to an Existing Foscam Account........................................................3
1.7. View Your Video Footage................................................................................................4
2. View Your Content
2.1. View the Devices Page....................................................................................................5
2.2. Watch Live......................................................................................................................... 6
2.3. Take a Snapshot From Live Video.................................................................................7
2.4. Talk and Listen.................................................................................................................. 9
2.5. Record Clips From Live Video..................................................................................... 10
2.6. View Alerts.......................................................................................................................12
2.7. Cloud Recording.............................................................................................................12
2.8. View Recordings in Foscam Cloud............................................................................. 13
2.9. More Function.................................................................................................................14
3. Device Settings
3.1. Active / Deactivate 8-hour Video History....................................................................16
3.2. Alarm Setting...................................................................................................................17
3.2.1. Motion Detection
3.2.2. Sound Detection
3.3. SD Card Video Playback.............................................................................................. 21
3.4. Upgrade Camera Firmware..........................................................................................23
3.5. Share Your Camera....................................................................................................... 24
3.6. View / Rename Your Camera.......................................................................................26
3.7. Network............................................................................................................................27
3.8. Change Speaker Volume..............................................................................................28
3.9. Video Settings.................................................................................................................29
3.10. Security Settings.......................................................................................................... 31
3.11. Sync Time......................................................................................................................33
3.12. IR LED Schedule..........................................................................................................34
3.13. Turn On / Off the Status LED.....................................................................................35
3.14. Turn On / Off the Voice Prompt................................................................................. 37
3.15. Reboot Camera............................................................................................................38
..............................................................................................................................
.....................................................................................................................................
........................................................................................................................
...........................................................................................................................
.................................................................................................
..................................................................................................
III
1
5
16
17
19
Page 3

II
3.16. Delete Camera............................................................................................................. 39
3.17. Forgotten Camera User Name & Password?......................................................... 40
4. App Settings
4.1. Foscam Account.............................................................................................................42
4.2. Sign in with Gesture.......................................................................................................43
4.3. View the Live Video Only in WiFi Environment.........................................................44
4.4. Push Messages..............................................................................................................45
4.5. Devices List Settings..................................................................................................... 46
5. Sign Out
6. Appendix
6.1. CE & FCC........................................................................................................................49
6.2. WARRANTY....................................................................................................................50
6.3. Statement........................................................................................................................ 53
7. Obtaining Technical Support
................................................................................................................................
.......................................................................................................................................
......................................................................................................................................
....................................................................................................
42
48
49
55
Page 4

III
Security Warning
Please change the password of your camera regularly, using a combination of
We recommend that you regularly update your camera to the latest available
numbers, letters and special characters.
software and firmware versions to help ensure the best experience for your camera.
Page 5

1
1. Overview
Foscam Indoor HD IP Camera is designed for indoor surveillance with wide applications
1.1. Key Features
Standard H.264 video compression algorithm to satisfy the transmission of high
P2P feature for easy access
Megapixel HD video
Support WEP, WPA and WPA2 encryption
Wireless connection is compliant with IEEE 802.11b/g/n WI-FI
IR Range up to 8m (26ft)
Support image snapshot
Support sigle-stream
Support SD Card storage up to 32GB
Support IR-Cut auto switch
Support two-way audio
Provide free Android and iPhone App for viewing live video
Supports push messages
such as at home, in retail store and in office.
The camera is an integrated wireless IP Camera with a color CMOS sensor which enable
to view in High Definition resolution. It combines a high quality digital video camera, and
bring clear video to mobile devices over the Internet.
These cameras support P2P function. Thanks to the P2P easy access technology, you
don’t need to do complicated Port Forwarding and DDNS settings, you just need to scan
the QR code at the bottom of the camera to connect it to smart phone.
With flexible move of 350-degree horizontally and 180-degree vertically, Foscam IP
Camera provides users with more comprehensive controls over a monitored site. The
camera supports H.264 video compression technology, dramatically reduces file size and
saves network bandwidth.
Foscam provides Smart Phone App for Android and iPhone users, please search and
install Foscam App named Foscam on App Store and Google Play for iOS and Android
devices, then you can view your camera anywhere, anytime on your smart mobile
devices.
definition video in narrow bandwidth network
Page 6
2
1.2. Read Before Use
Please first verify that all contents received are complete according to the Package
1.3. Package Contents
IP Camera × 1
DC Power Adapter × 1
Quick Setup Guide × 1
USB Power Cable× 1
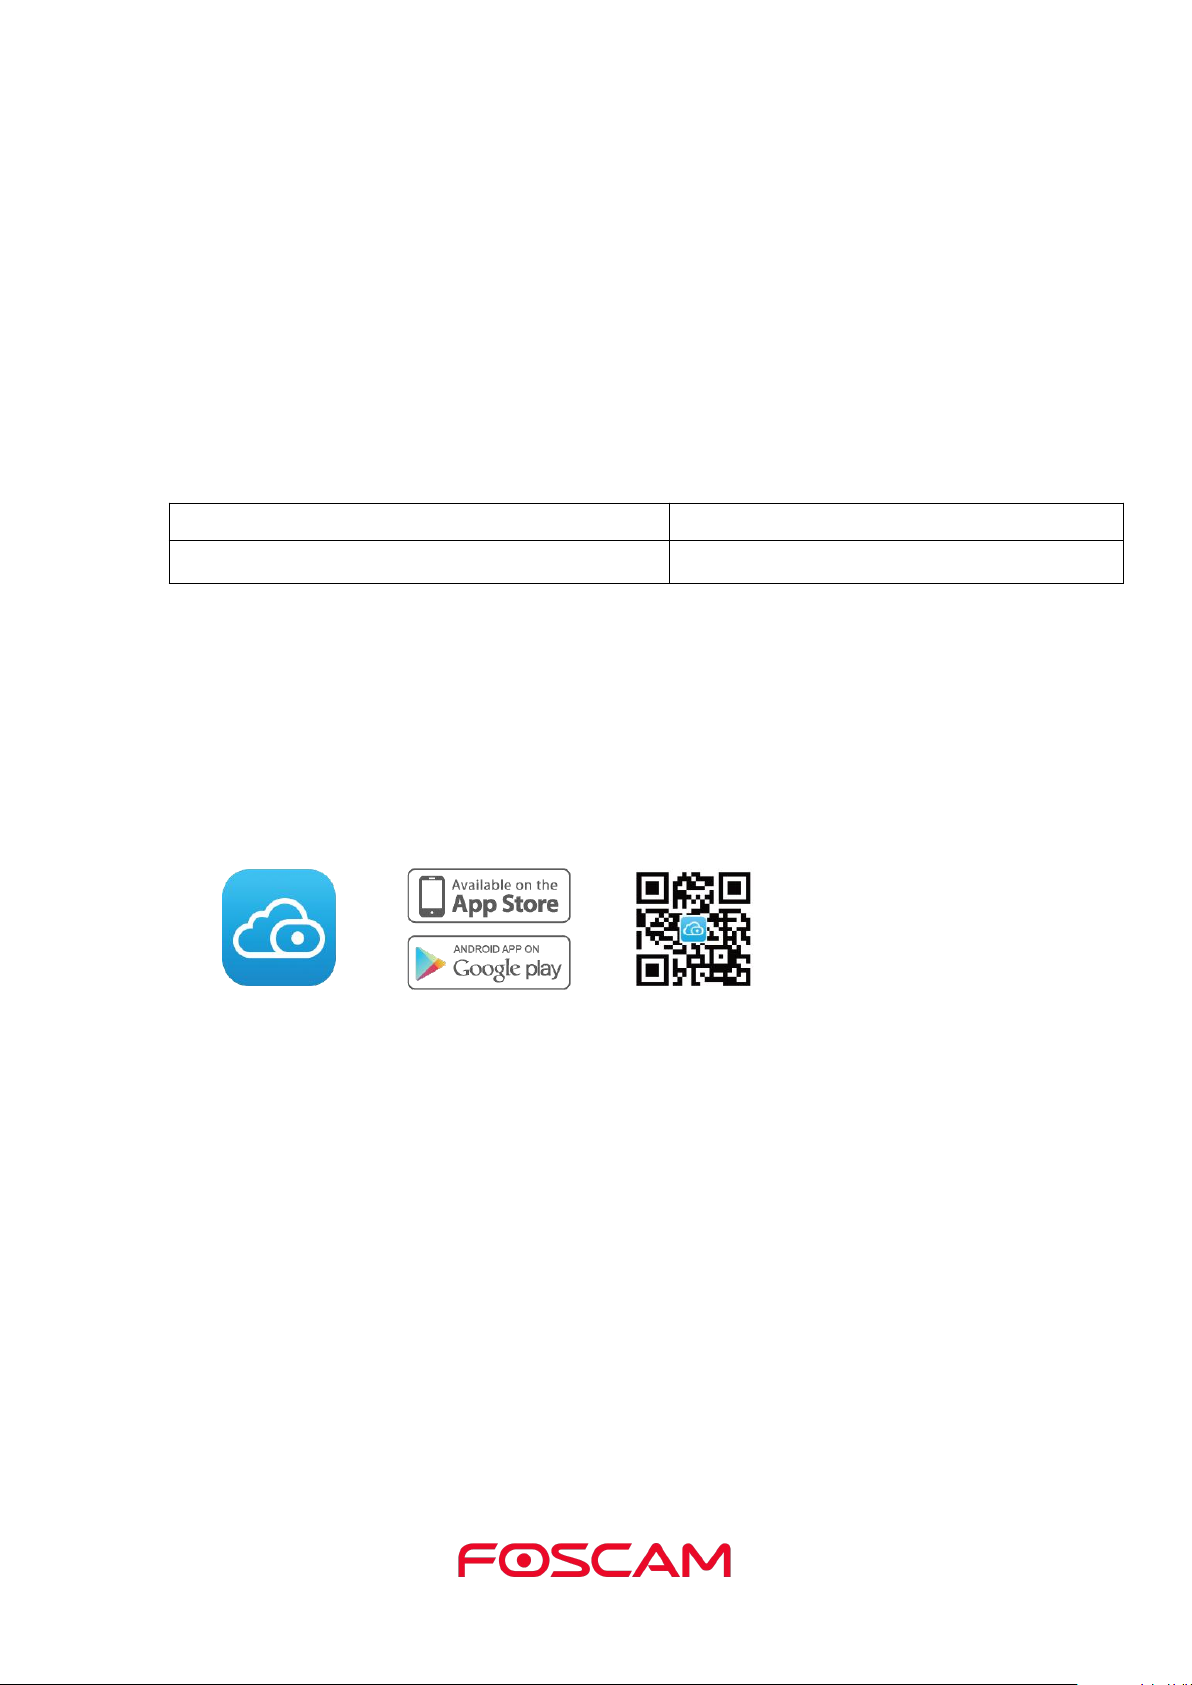
1.4. Download Foscam App
To download the free Foscam App, simply scan the QR Code below.
You can also search for "Foscam" in the App Store or Google Play store to download
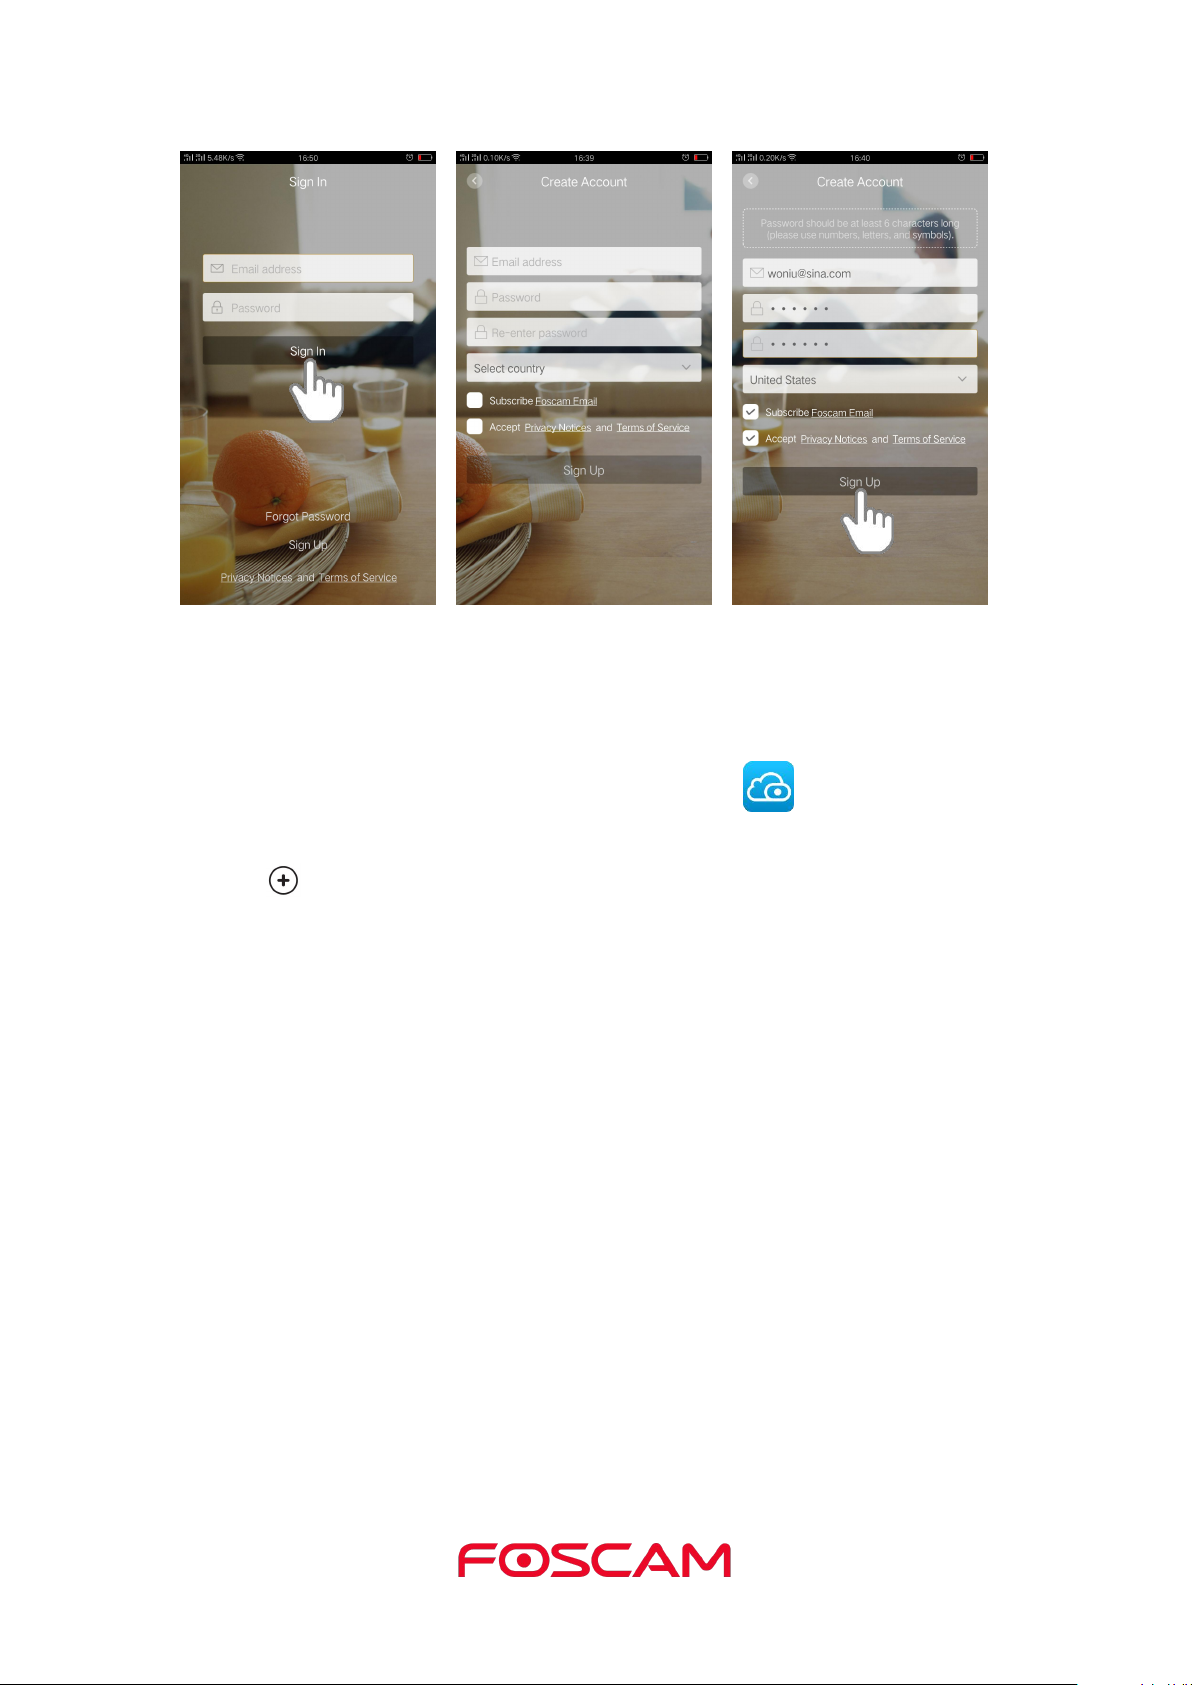
1.5. Get a New Free Foscam Account
To create a new Foscam account
Contents listed below. Before the IP Camera is installed, please carefully read and follow
the instructions in the Quick Setup Guide to avoid damage due to faulty assembly and
installation. It also ensures the product is used properly as intended.
and install Foscam App as well.
With the Foscam App, you can turn your iOS or Android smartphone into a monitoring
center for your security system.
launch the Foscam App from your smartphone, tap the Sign Up button, and follow the
onscreen instructions.
Page 7
3
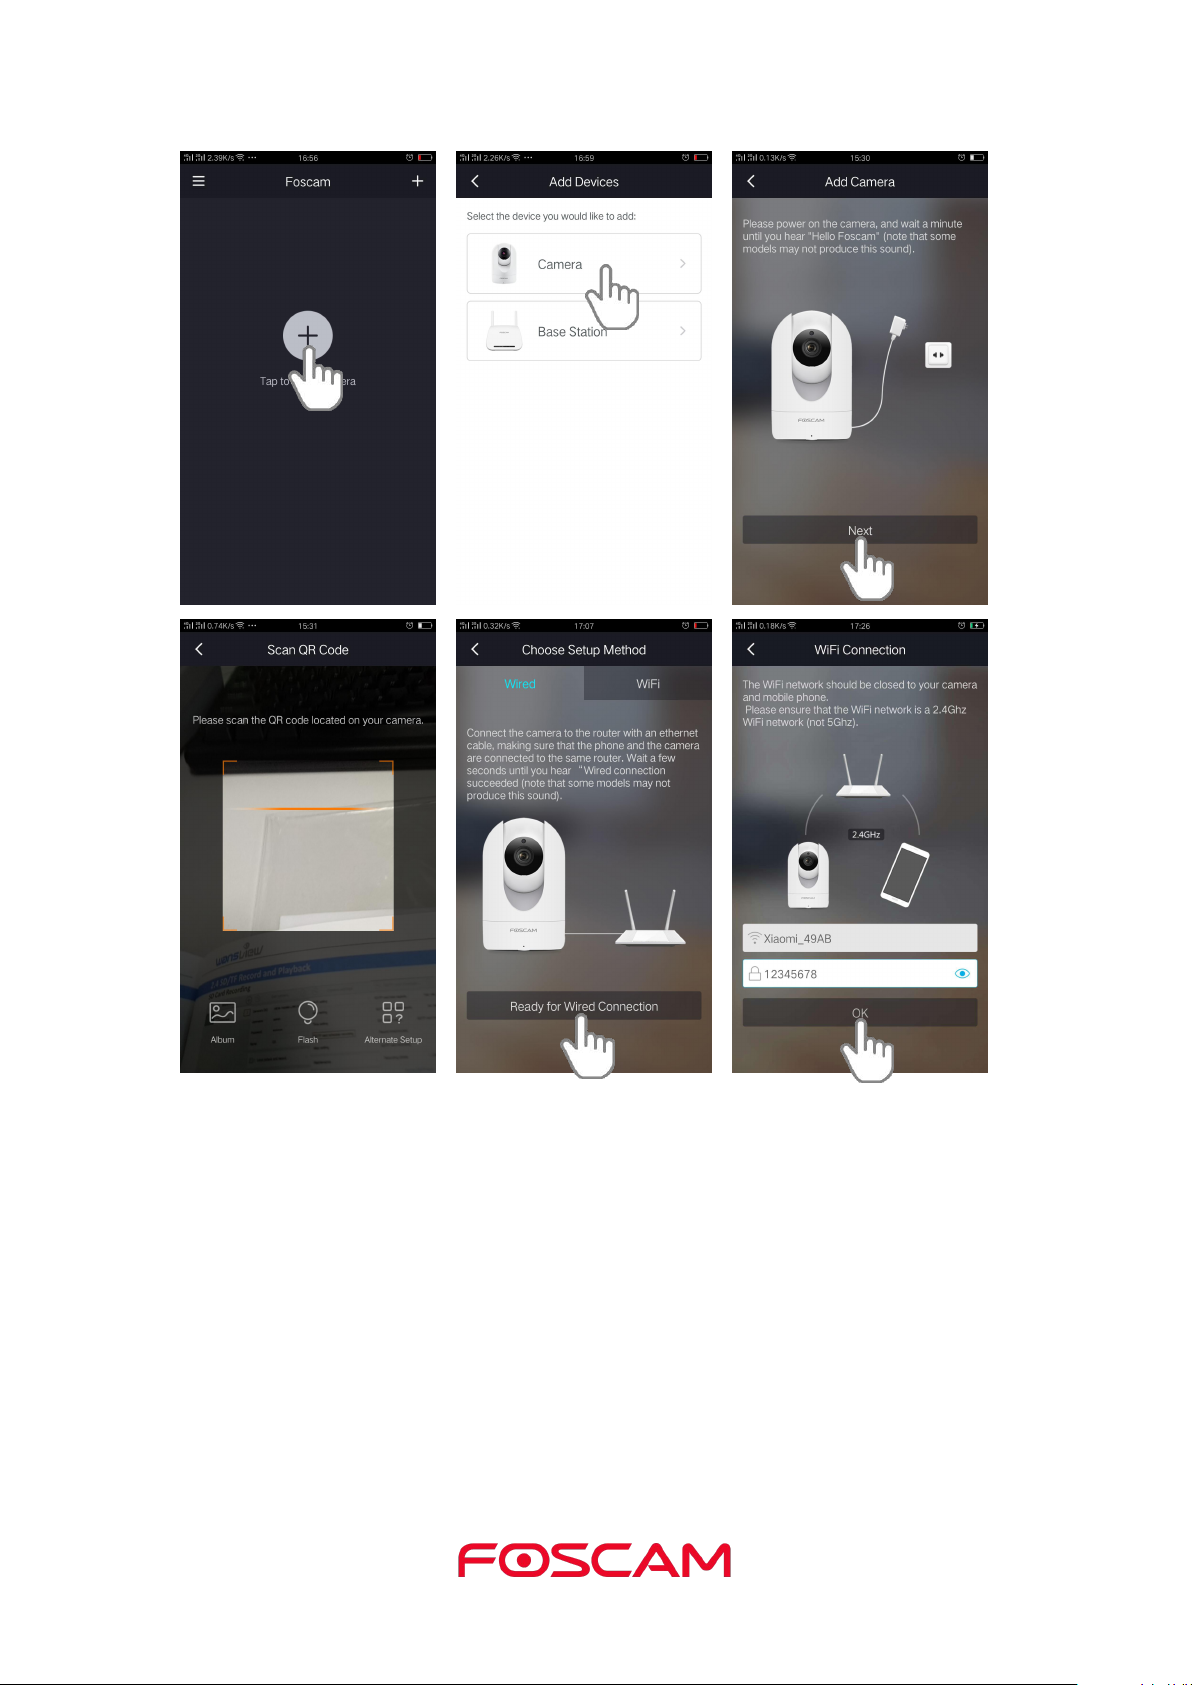
1.6. Add the Camera to an Existing Foscam Account
If you already have a Foscam Account, tap the Foscam icon on your mobile phone,
1. Tap .
2. Select camera.
3. Tap Next to scan the QR code of the camera.
4. Scan the QR code.
5. Click Ready for Wired Connection to input the WiFi password.
6. Input the password and click OK.
then sign in your Foscam Account.
Wait for a moment, the camera will be connected.
Page 8
4
1.7. View Your Video Footage
When you launch the Foscam App, the devices page will display.
To view and listen in on a live feed, tap or click Live on the camera feed image.
View your camera's alert video recordings in the Foscam Cloud by
tapping the timebar in the live page.
Your system is now set up and ready to go.
Page 9
5
2. View Your Content
To view and listen to a live feed, tap Live on the camera feed image.
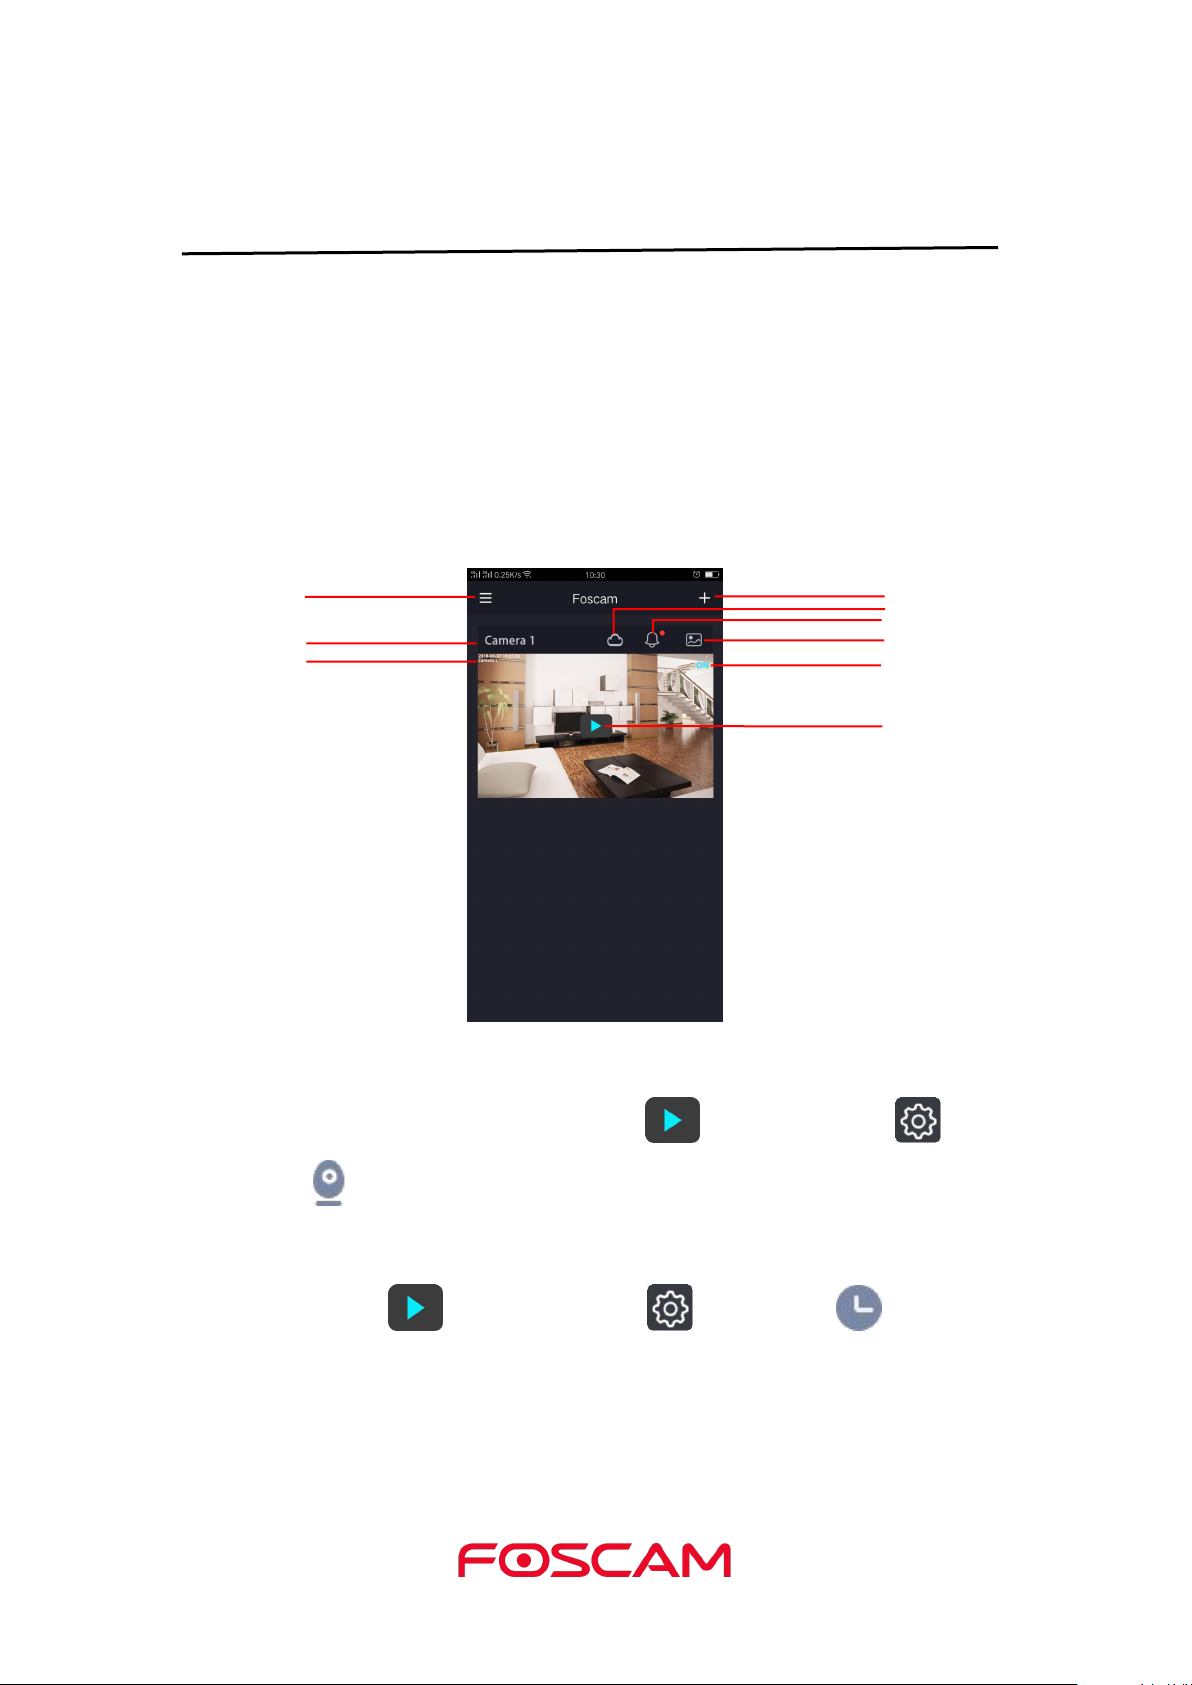
2.1. View the Devices Page
Watch Live
Menu
Camera Name
Camera Date&Time
Add Device
Alerts
Album
Camera Status
Cloud Service
To view your camera's alert video recordings in cloud by tapping the timebar in the live
page.
When you launch the Foscam App, the devices page displays.
Camera Name: A camera name which is displayed in the Foscam Cloud Service.
You can rename your camera’s name by tap Live > Camera Settings >
Camera Info .
OSD: Including camera name and camera time, camera name can not be renamed but
camera time can be in synchronized with the phone.
Sync Time: Tap Live > Camera Settings > Sync Time .
Page 10
6
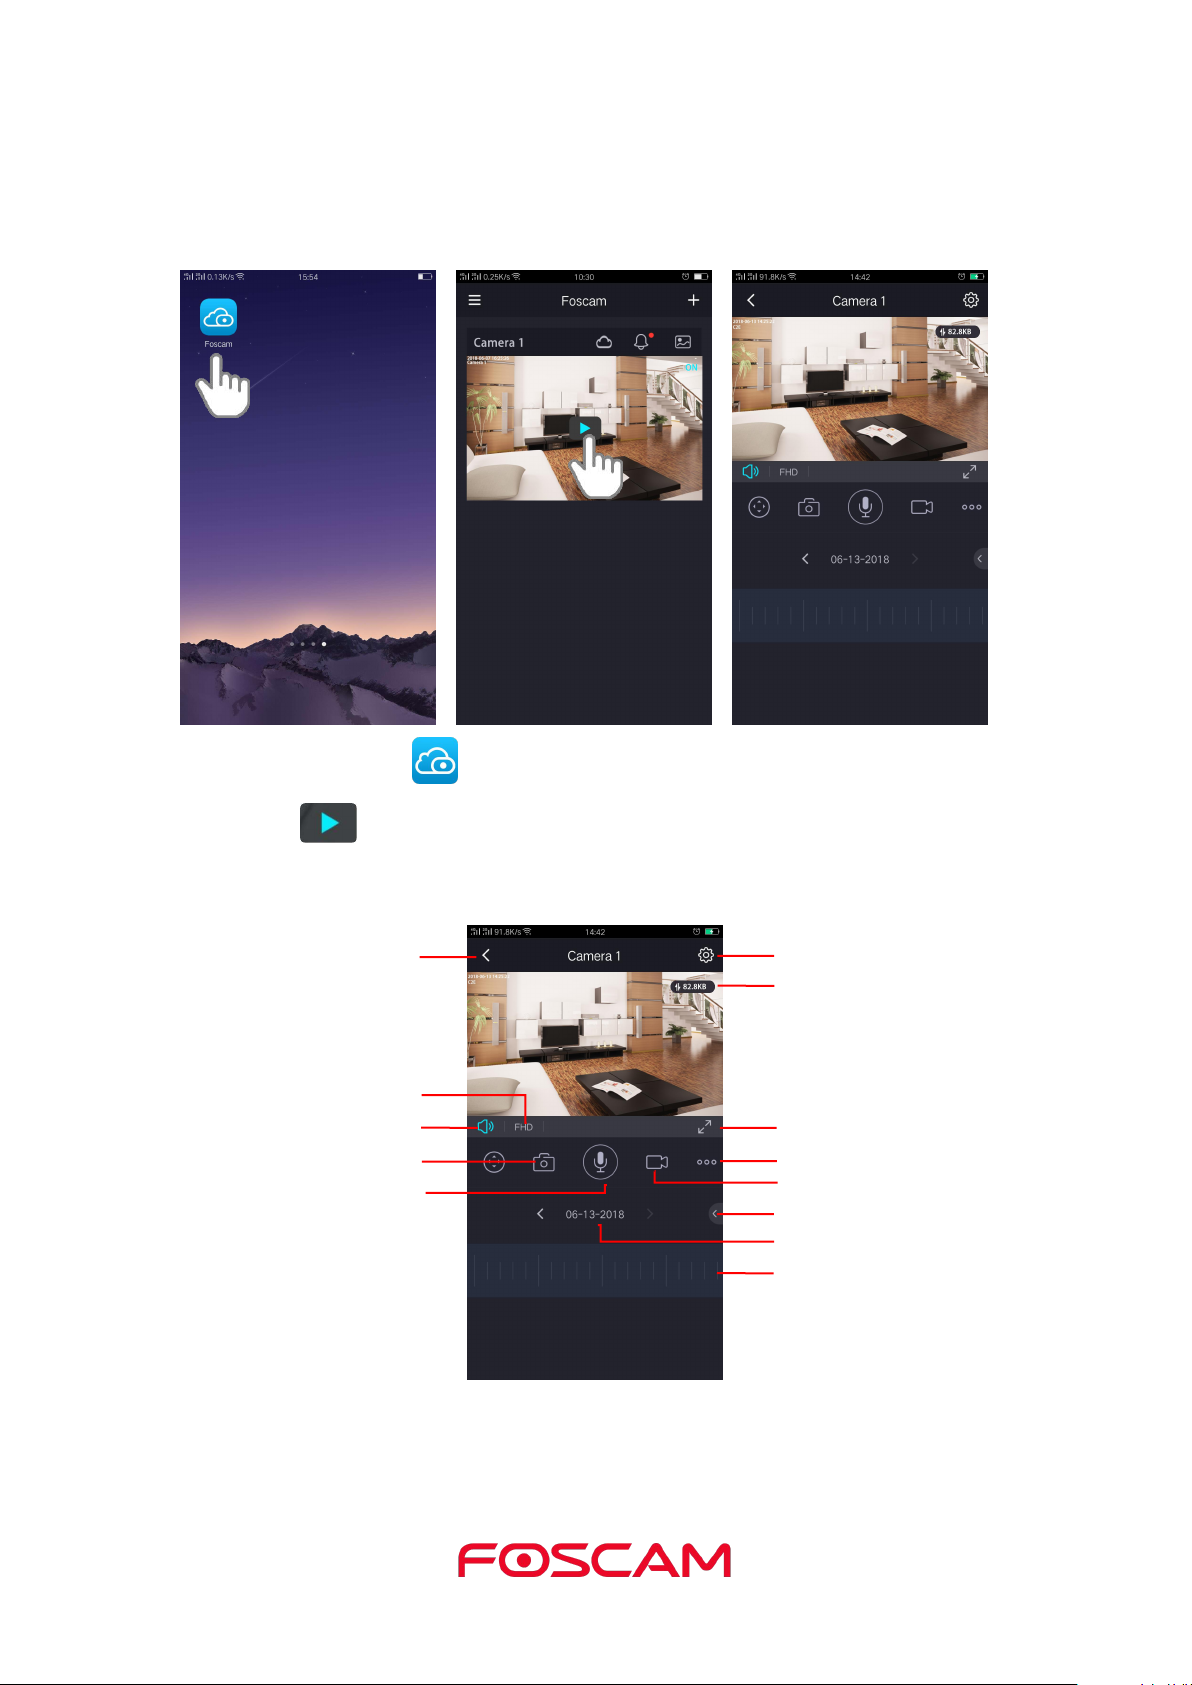
2.2. Watch Live
You can view a live stream of your camera at any time.
1. Tap the Foscam icon on your mobile device, the devices page displays.
2. Tap Live to view and listen to a live video.
3. A row of live feed icons displays below the live stream image for the camera.
Back
Speaker / Mute the audio
Resolution
Snapshot
Bit Rate
Camera Setting
Full screen
More Function
Record video manually
Two-way audio
Cloud Service Subscription
Date
Timeline
Stream Type: There are three types to identify different streams you have set. If select the
FHD Mode, the clearer video will become, and it will take up more bandwidth; If select the
Page 11

7
SD Mode, the bandwidth is very narrow, and bit rate is large, that will lead to video can not
4. To stop viewing and listening to the live feed, tap the Back icon.
2.3. Take a Snapshot From Live Video
1. Tap the Foscam icon on your mobile device.
2. Tap Live to view and listen to a live video.
play well. The HD Model is a value between FHD Mode and SD Mode.
Bit Rate: Generally speaking, the larger the bit rate is, the clearer video will become. But
the bit rate configuration should combine well with the network bandwidth. When the
bandwidth is very narrow, and bit rate is large, that will lead to video can not play well.
On this screen, you can listen to a live stream, record clips, take a snapshot, activate
two-way talk or full screen.
If you want to catch the smaller details, pinch and drag any image as you do with photos
on your smartphone.
A row of live video icons displays below the live stream image for the camera.
Page 12

8
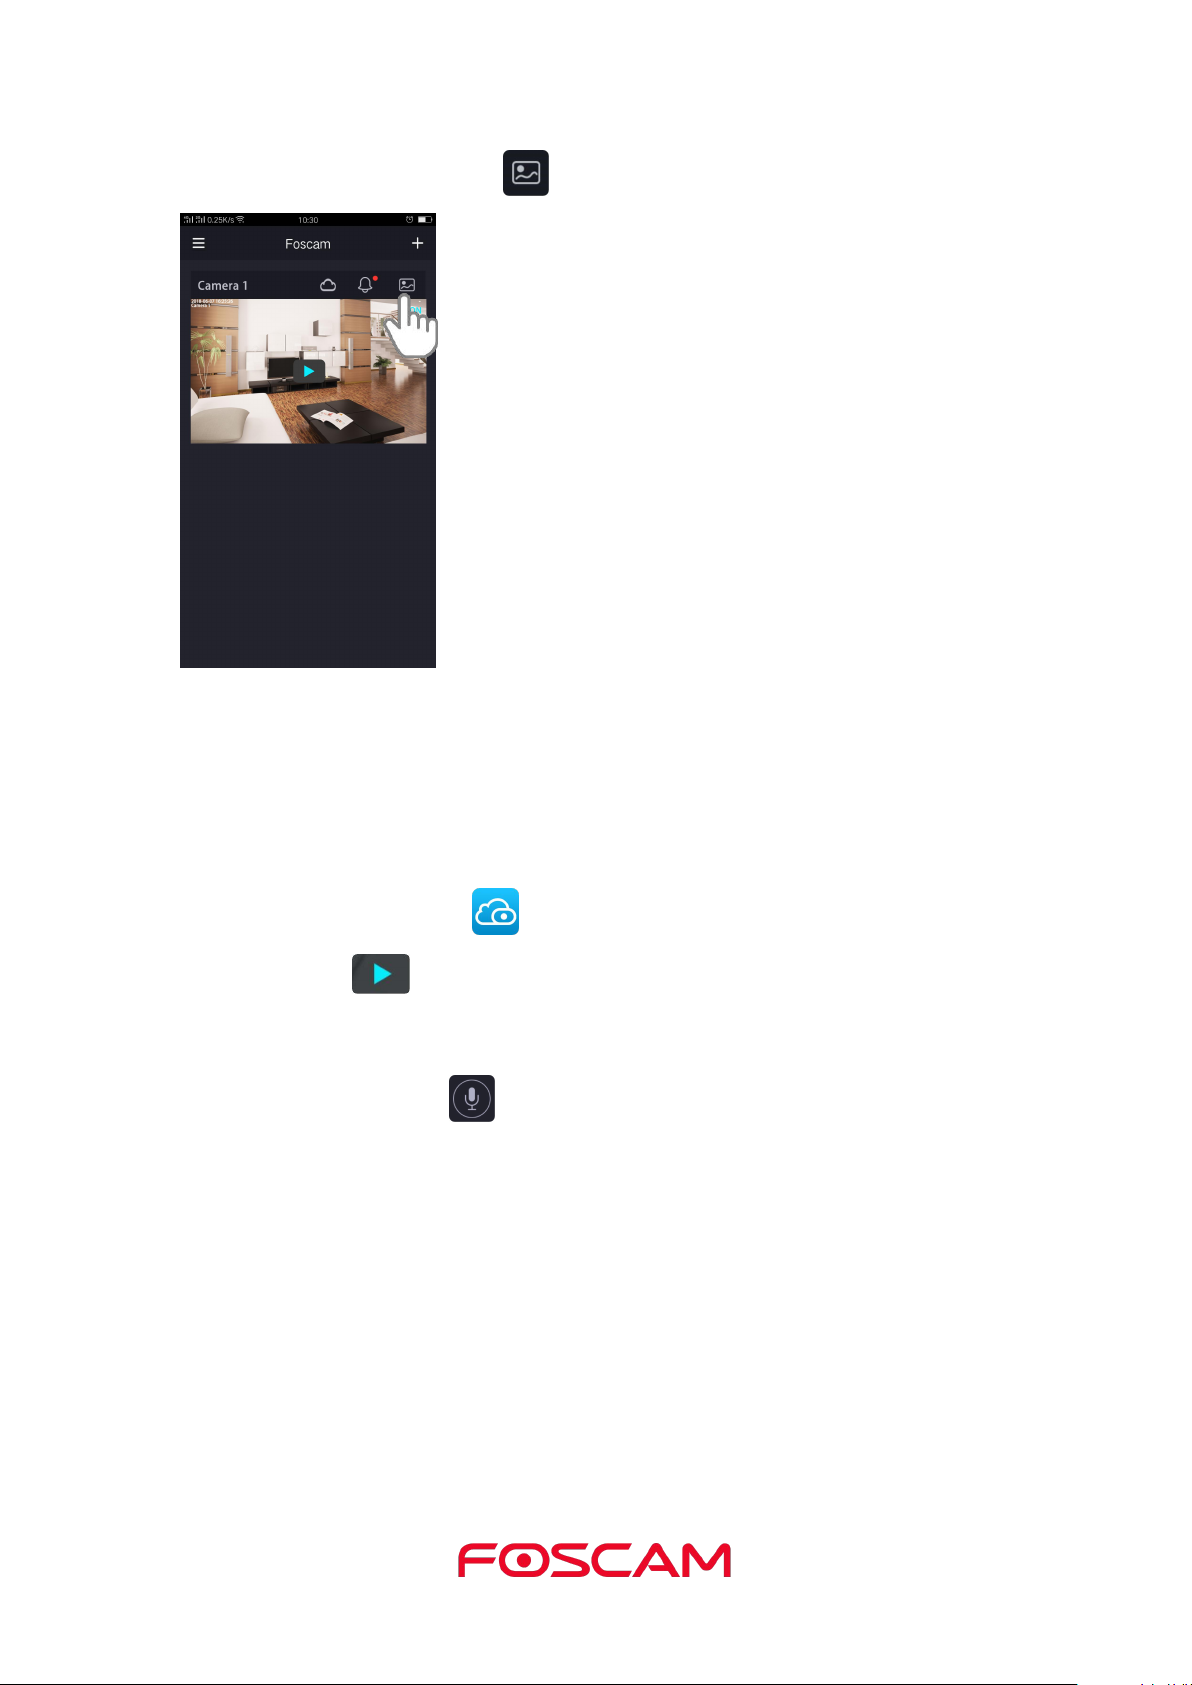
3. Tap Snapshot .
The snapshot is saved in Album.
You can view it in Sidebar > Album .
Page 13
9
Or you can view it by click Album .
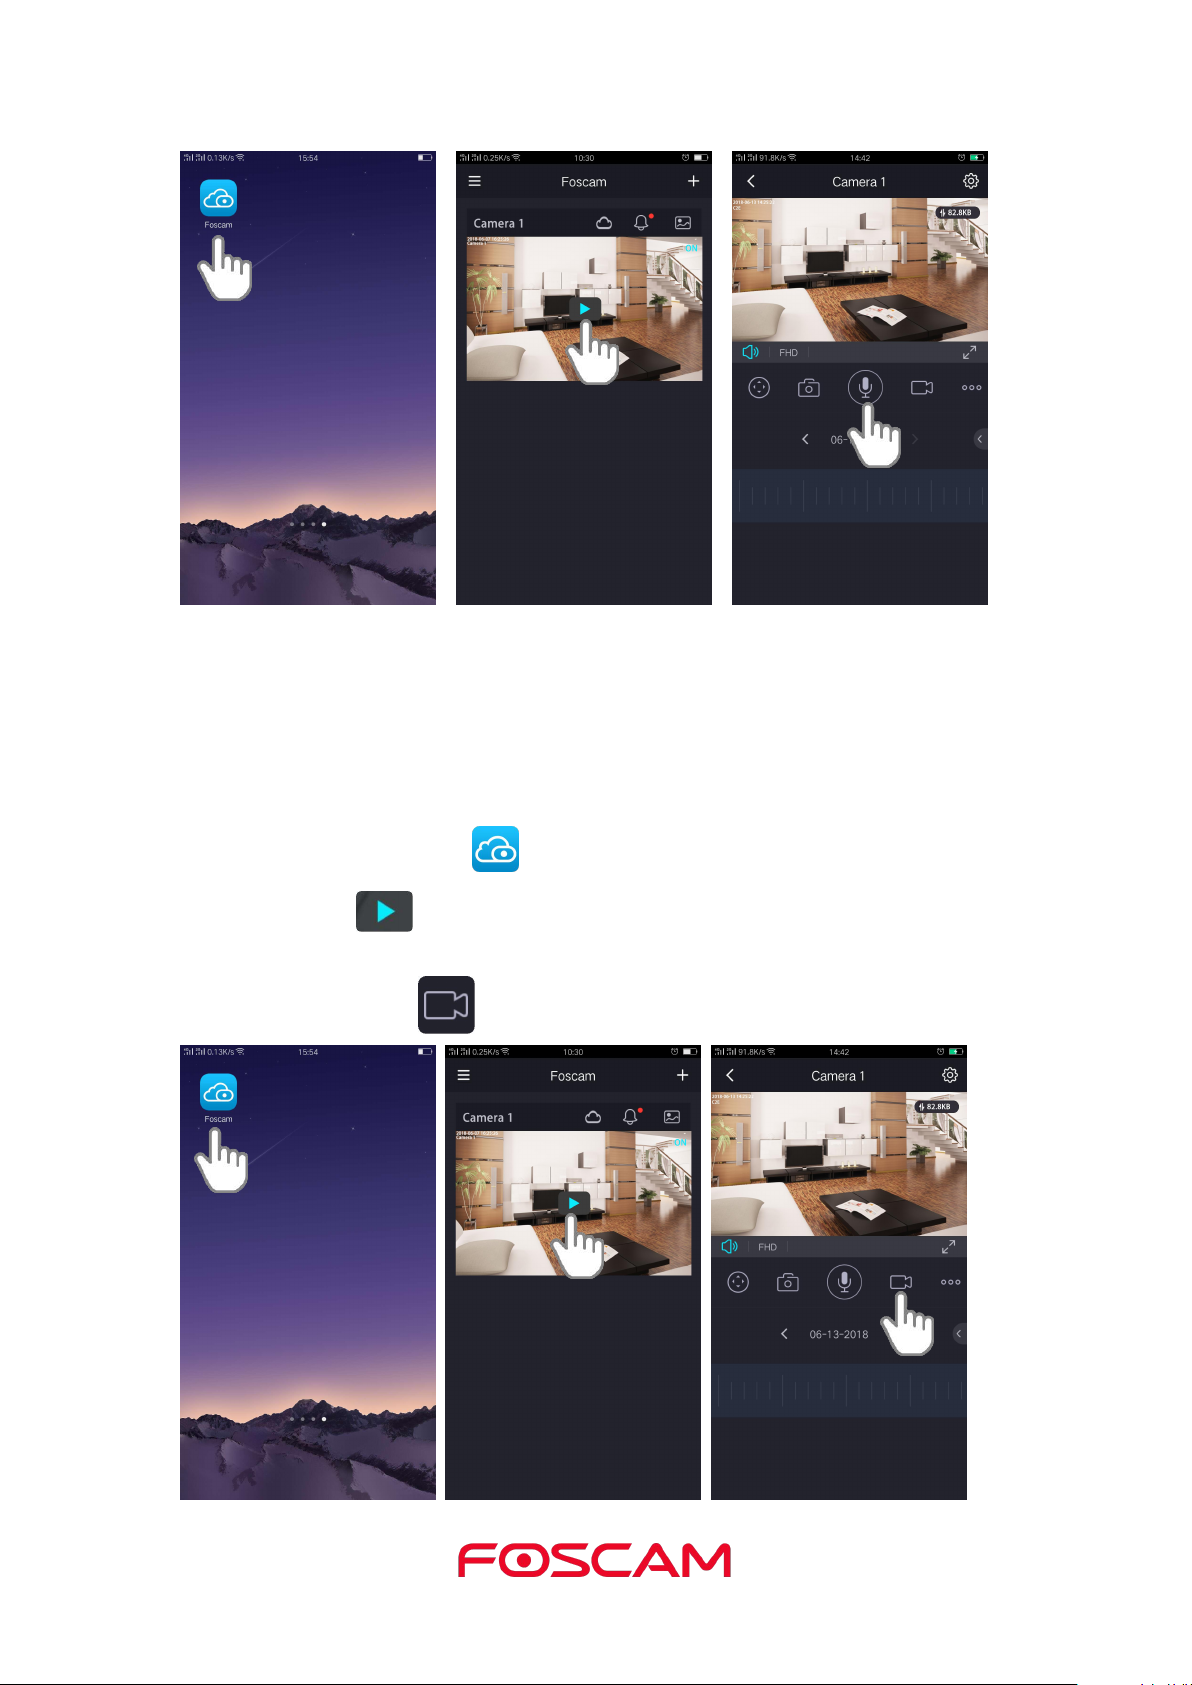
2.4. Talk and Listen
1. Tap the Foscam icon on your mobile device.
2. Tap Live to view and listen to a live video.
3. Press and hold the button and speak.
This camera supports two-way audio. Everything you say or hear will come through
clearly and instantly so that you can be part of every story, every time.
A row of live video icons displays below the live stream image for the camera.
Page 14
10
When the button is bright blue, two-way audio is ready.
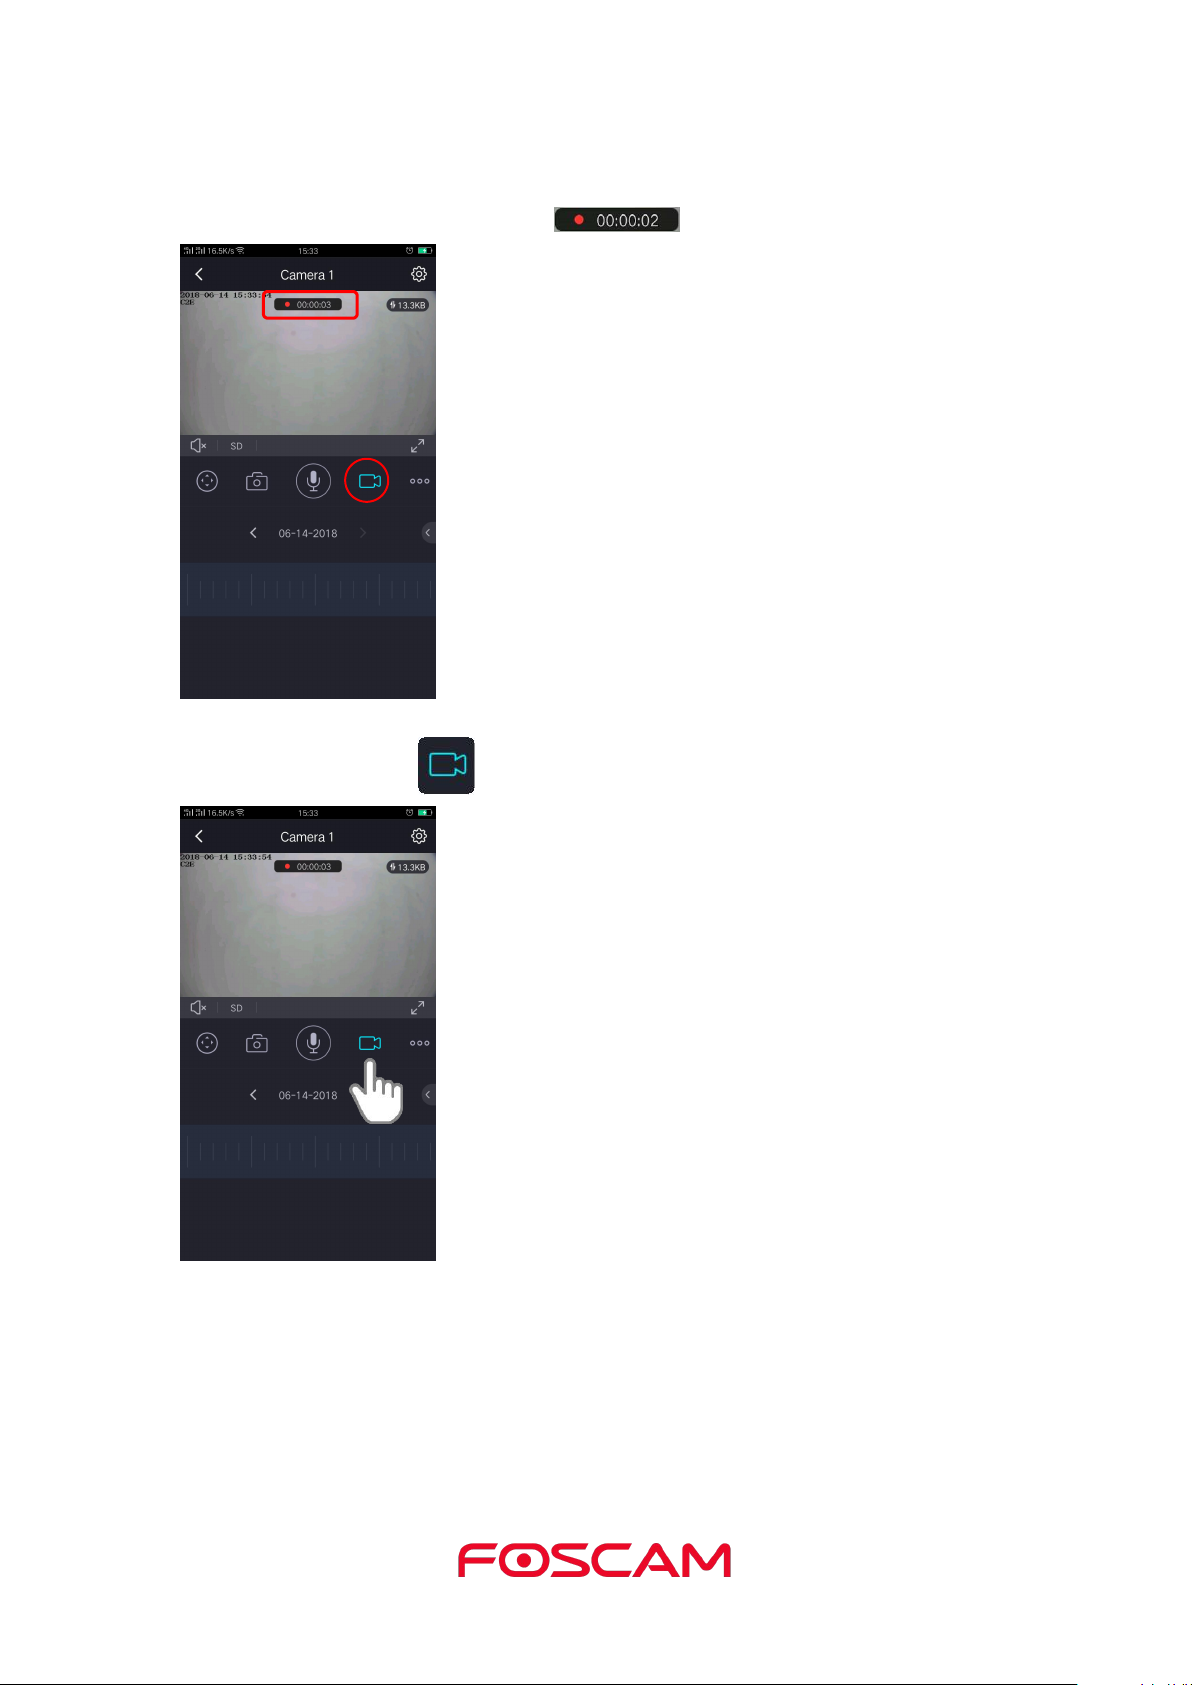
2.5. Record Clips From Live Video
1. Tap the Foscam icon on your mobile device.
2. Tap Live to view and listen to a live video.
3. Tap Recording to start recording.
To record a short clip of the event to the cloud.
A row of live video icons displays below the live stream image for the camera.
Page 15
11
This icon turns blue to indicate that you are recording the live feed, and the recording item
4. Tap Recording to stop recording.
will be showed on the middle of the live .
The recording is saved in your Foscam cloud.
Page 16
12
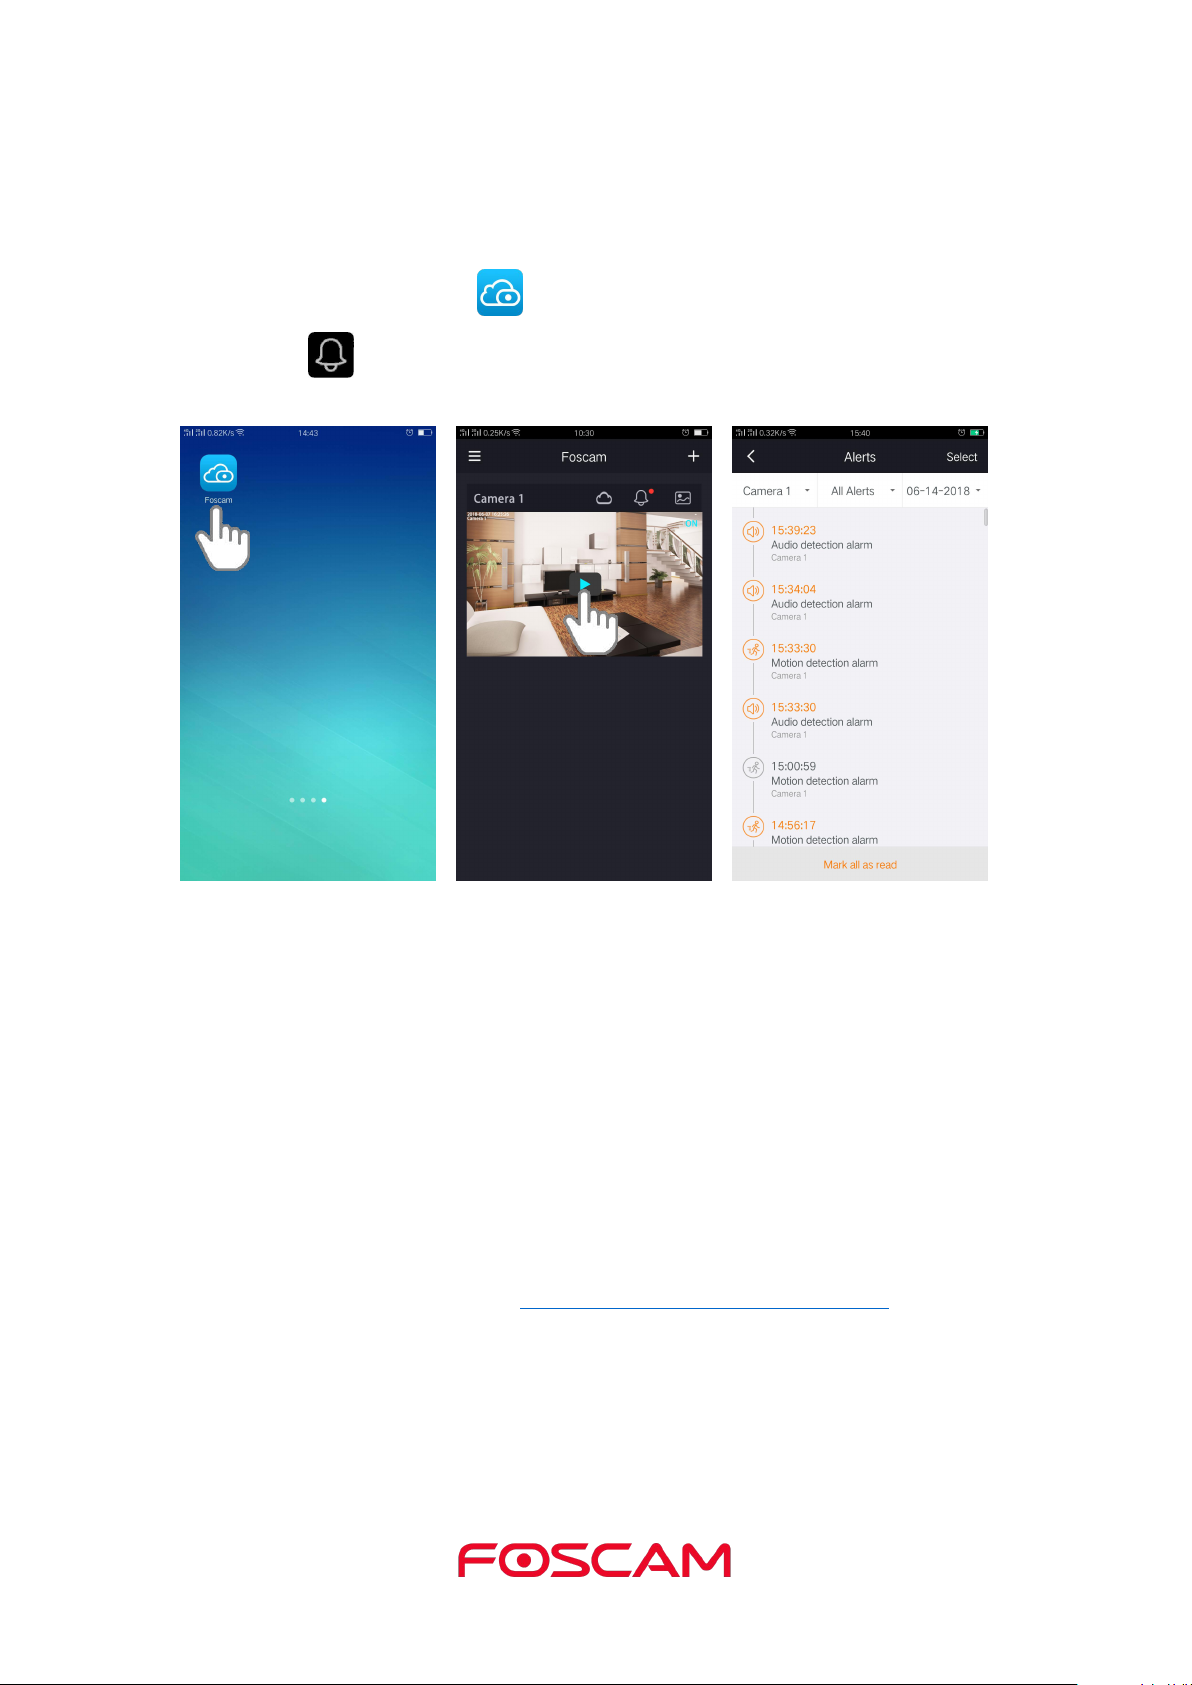
2.6. View Alerts
You can view all alerts of the system, including motion detection and sound detection.
1. Tap the Foscam icon on your mobile device.
2. Tap on the live video to view alerts.
2.7. Cloud Recording
With cloud recording, camera's alarm video recordings are sent to the cloud for secure
storage.
You can access these recordings from anywhere you are using a mobile phone. All
recordings are encrypted with the user name and password which you have created, no
one else can access.
We provide 1 year free cloud storage for the camera. We store a rolling 8 hours of
recordings that are created when the camera detects motion or sound. For how to active
8-hour Video History, please refer to Active / Deactivate 8-hour Video History.
You can download recordings and save them to the SD card for long-term storage.
Page 17
13
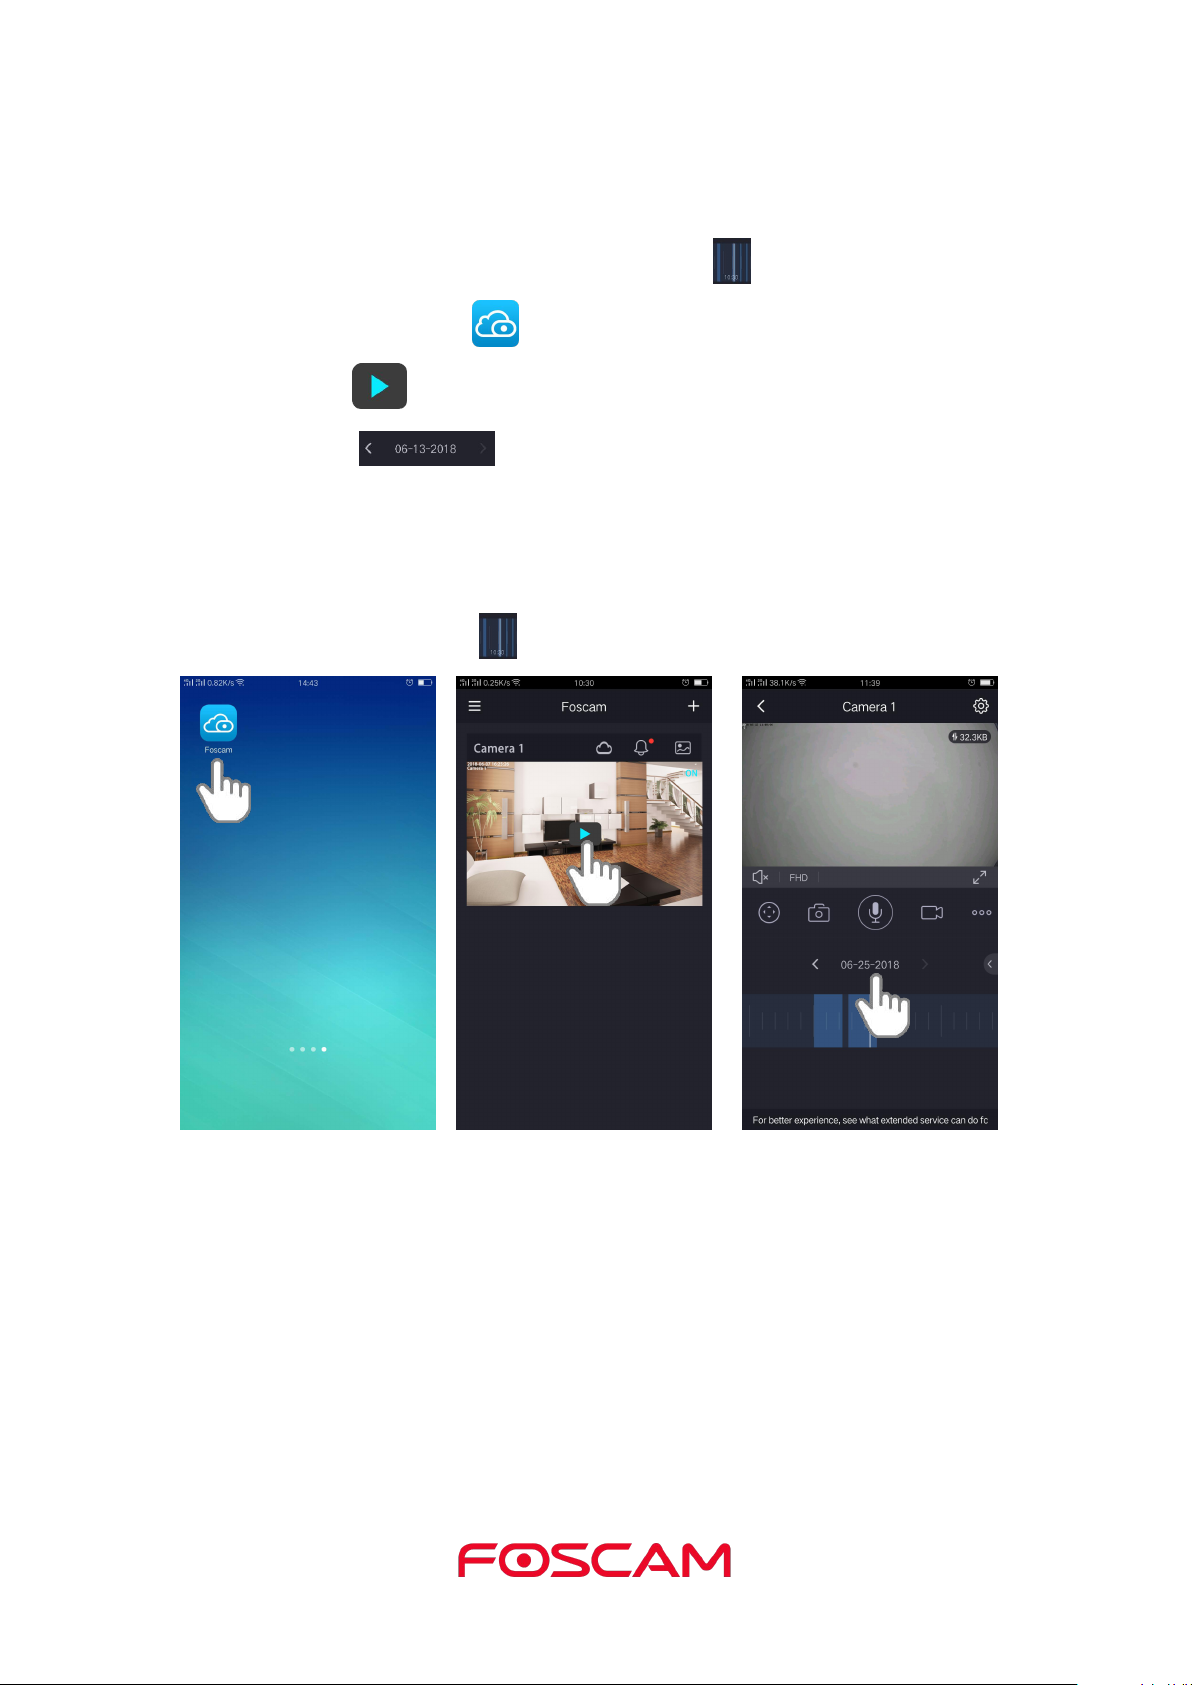
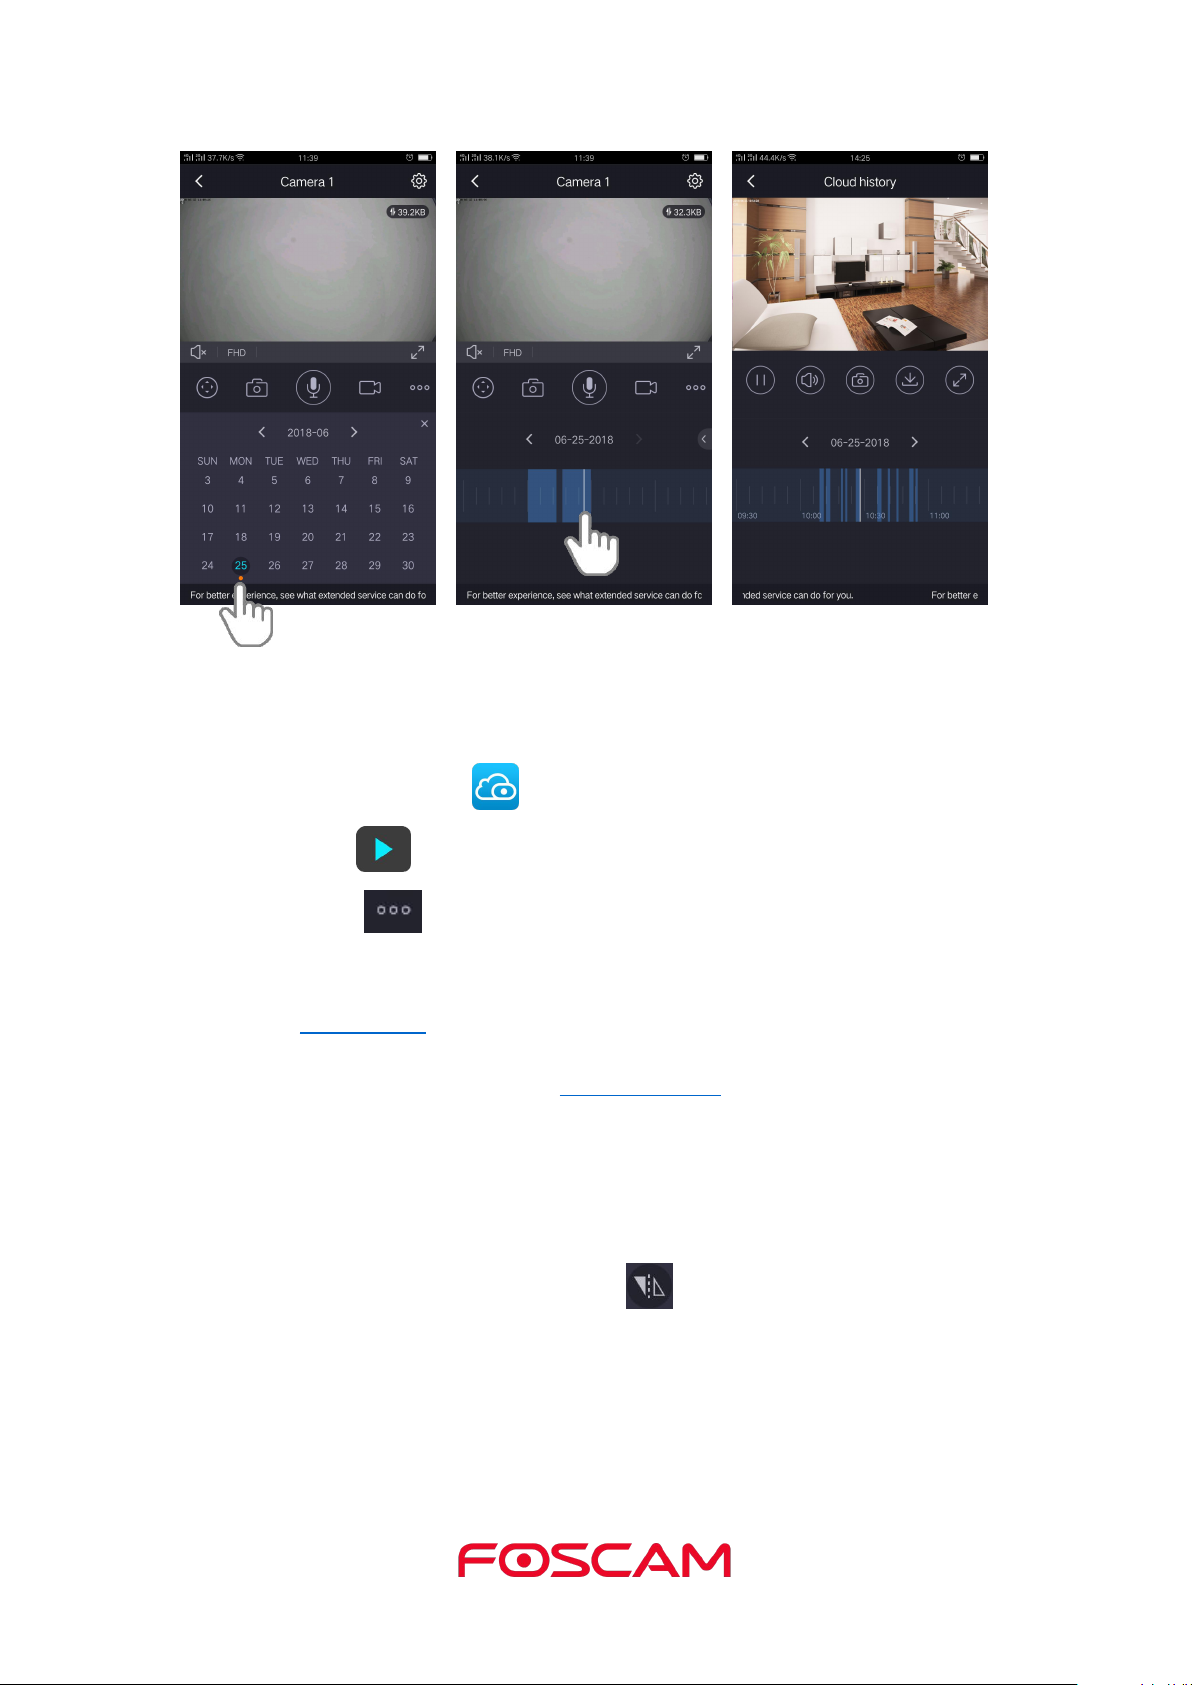
2.8. View Recordings in Foscam Cloud
View your video recordings in cloud by tapping Timeline .
1. Tap the Foscam icon on your mobile device.
2. Tap Live .
3. Tap Date to open the calendar.
4. select a day.
5. tapping the Timeline to select a clip to playback.
Note:
Days in which a video clip was recorded are indicated with an amber dot, tap a day to view
and listen to a recorded video.
Page 18
14
2.9. More Function
1. Tap the Foscam icon on your mobile device.
2. Tap Live .
3. Tap More to display more fuction.
4. As default, Motion Detection and Soud Detection are enable, You can disable the
alarm setting. If you need to set the Sensitivity, Trigger Interval and schedule, please
5. On this page, you can enable/disable the IR LED, and set the IR auto switch or
6. You can rotation the image by tapping .
refter to Alarm Setting.
you can schedule it, please refter to IR LED Schedule.
Auot: As default, the IR-Cut auto switch is ON, it means that the IR LED will be OFF
during 9:00~18:00, and the IR LED will be ON at the other time.
Day: it means that the IR LED will be OFF all the time.
Night: it means that the IR LED will be ON all the time.
Schedule: You can schedule the time to turn the IR LED OFF/ON.
Page 19

15
Page 20

16
3. Device Settings
3.1. Active / Deactivate 8-hour Video History
1. Tap the Foscam icon on your mobile device.
2. Tap Live > Camera Settings > My Plan .
3. Tap Setting > My Plan > Add Codes > Enter Coupon Code or
Scan the Coupon QR Code > Active, the cameras are active.
Page 21

17
3.2. Alarm Setting
3.2.1. Motion Detection
We provide 1 year free cloud storage for the camera. We store a rolling 8 hours of
recordings that are created when the camera detects motion or sound.
when the motion has been detected, the camera will push the message to the smartphone
if the Foscam App Notification is allowed to appear on your smartphone. Or you can view
the alert messages on View Alerts.
Page 22

18
1. Tap the Foscam icon on your mobile device.
2. Tap Live .
3. Tap Camera Settings .
4. Tap Alarm Settings > Motion Detection.
5. Enable/disable Motion detection fuction.
6. Set the Sensitivity
It supports five modes: Lowest, Lower, Low, medium and High. The higher the
7. Trigger interval
8. Alarm Schedule
sensitivity, the camera will be more easily alarmed. Select one motion sensitivity.
The interval time between two motion detections. Here supports 5s / 10s / 15s / 30s /
60s. Select one interval time.
As default, alarm anytime when motion is detected, you can schedule the alarm time
by yourshelf.
Page 23

19
3.2.2. Sound Detection
1. Tap the Foscam icon on your mobile device.
2. Tap Live .
3. Tap Camera Settings .
When the ambient sound over a certain decibel, the sound alarm will be triggered.
when the sound has been detected, the camera will push the message to the smartphone
if the Foscam App Notification is allowed to appear on your smartphone. Or you can view
the alert messages on View Alerts.
Page 24

20
4. Tap Alarm Settings > Sound Detection.
5. Enable/disable Sound detection fuction.
6. Set the Sensitivity
It supports five modes: Lowest, Lower, Low, medium and High. The higher the
7. Alarm Schedule
sensitivity, the camera will be more easily alarmed.
As default, alarm anytime when sound is detected, you can schedule the alarm time by
yourshelf.
Page 25

21
3.3. SD Card Video Playback
You can view the record files stored in the SD card On this page.
To search record files
1. Tap the Foscam icon on your mobile device.
2. Tap Live .
3. Tap Camera Settings .
4. Tap SD Card Video Playback to set the search conditions.
5. Tap to select a day
6. Tap All Type to select a recorded video type (Alert Records or
7. Click the Search button to search all record files which are satisfied the
Note: Days in which a video file was recorded are indicated with an amber dot.
Schedule Records).
conditions you selected.
Page 26

22
Page 27

23
3.4. Upgrade Camera Firmware
Warning:
1. Tap the Foscam icon on your mobile device.
2. Tap Live .
3. Tap Camera Settings .
4. Tap Firmware Upgrade .
5. Tap Upgrading.
6. Tap Upgrade, after a moment It will upgrade the firmware automatically if the
We recommend that you regularly update your camera to the latest available
firmware version to help ensure the best experience for your camera.
firmware of camera is not the latest.
Page 28

24
3.5. Share Your Camera
Important: Please make sure the camera is powered on, and do not move it while it is
updating and installing firmware.
For the security, Foscam App is only allow you to share the camera to your family member
who own Foscam account, and your family member can not .
Import: Before sharing your camera, please make sure your family member is added to
your Foscam account.
Page 29

25
Note:
You can view your family member by clicking Sidebar > (App) Settings
For how to add your family member, please refer to Foscam Account Foscam
1. Tap the Foscam icon on your mobile device.
2. Tap Live .
3. Tap Camera Settings .
4. Tap Share Camera.
5. Enable the Share my Camera.
6. Input the Sharing Code.
7. Select Share Days.
8. Tap Share To and select a family member (for example 942882586@sina.com),
> Foscam Account > My Family.
Account > My Family.
and tap OK.
Page 30

26
3.6. View / Rename Your Camera
1. Tap the Foscam icon on your mobile device.
2. Tap Live .
3. Tap Camera Setting
4. Tap Camera Info .
Page 31

27
5. You can view or enter a new name for the camera.
3.7. Network
1. Tap the Foscam icon on your mobile device.
2. Tap Live .
3. Tap Camera Setting .
The new name will be displayed in the app.
When the camera is offline, you can reconnect the network.
Page 32

28
4. Tap Network to reconnect the network.
5. Select a WiFi and input the password, then tap Connect.
3.8. Change Speaker Volume
1. Tap the Foscam icon on your mobile device.
2. Tap Live .
3. Tap Camera Setting
You can control the volume on your camera settings.
Page 33

29
4. Tap Camera Speaker Volume ..
5. To change the speaker volume, move the Speaker Volume slider.
3.9. Video Settings
1. Tap the Foscam icon on your mobile device.
2. Tap Live .
Your settings are saved.
Page 34

30
3. Tap Camera Setting .
4. Tap Video Settings .
Show Time Overlay: The date&time of the system will be shown on the upper left corner
of the video when it is ON; the date&time of the system will not be shown when it is OFF.
Show Camera Name Overlay: The camera name will be shown on the upper left corner
of the video when it is ON; the camera name will not be shown when it is OFF.
Page 35

31
Network Auto-Adaptability: It is OFF as default setting. The camera will change the
3.10. Security Settings
1. Tap the Foscam icon on your mobile device.
2. Tap Live .
3. Tap Camera Setting .
4. Tap Security Settings .
5. Input the camera name and password, and tap Save to save it.
Camera Date&Time
Camera Name
real-time rate to adapt different network conditions when it is ON, and It can supply better
preview experience.
Security Warning:
We recommend that you change the password of your Base Station regularly, using a
combination of numbers, letters and special characters.
Page 36

32
Page 37

33
3.11. Sync Time
1. Tap the Foscam icon on your mobile device.
2. Tap Live .
3. Tap Camera Setting .
4. Tap Sync Time .
The camera timewill be synced with the smart device time.
Page 38

34
3.12. IR LED Schedule
If the IR LED is in Scheduled mode, you can manage IR LED based on a
Set the IR LED in Scheduled mode
1. Tap the Foscam icon on your mobile device.
2. Tap Live .
3. Click More > Scheduled
Set the IR LED Schedule
1. Tap the Foscam icon on your mobile device.
2. Tap Live .
3. Tap Camera Setting
4. Tap IR LED Schedule .
5. Set the schedule .
schedule.
Page 39

35
3.13. Turn On / Off the Status LED
Note: During above times, the IR LED will be turned off; out of these time, night vision is
enabled, the camera automatically turns on infrared (IR) LEDs to record in low light
conditions.
The LEDs on the camera light in different colors. You can turn off these LED.
Page 40

36
1. Tap the Foscam icon on your mobile device.
2. Tap Live .
3. Tap Camera Setting
4. Tap Prompt Settings , then tap the button on the right side of Status LED
to turn on / off the camera LED.
Page 41

37
Your settings are saved.
3.14. Turn On / Off the Voice Prompt
1. Tap the Foscam icon on your mobile device.
2. Tap Live .
3. Tap Camera Setting
4. Tap Prompt Settings , then tap the button on the right side of Voice
The voice prompt is ON by default. You can turn off the voice prompt.
Prompt to turn on / off the voice prompt.
Page 42

38
3.15. Reboot Camera
1. Tap the Foscam icon on your mobile device.
2. Tap Live .
3. Tap Camera Setting
Your settings are saved.
Page 43

39
4. Tap Reboot Camera .
5. Tap OK to reboot the camera.
3.16. Delete Camera
1. Tap the Foscam icon on your mobile device.
2. Tap Live .
Page 44

40
3. Tap Camera Setting .
4. Tap Delete Camera .
5. Tap Continue to delete the camera.
3.17. Forgotten Camera User Name & Password?
To reset the camera user name and password, you had better unplug the network cable
firstly. After that, press and hold down the RESET BUTTON about 10 seconds. Releasing
Page 45

41
the reset button, the password will turn to the factory default.
Default administrator username / password: admin with blank password
Page 46

42
4. App Settings
4.1. Foscam Account
You can give a name to your account or change the password, and alse you can share the
Add Your Family
1. Tap the Foscam icon on your mobile device.
2. Tap Sidebar .
3. Tap (App) Settings .
4. Tap Foscam Account .
5. Tap My Family.
6. Tap Add family Member.
7. Type in family member’ s name and Email address.
8. The family member is invited.
9. When the family member accepts your invitation, the Invited will be Member.
camera to your family member.
Page 47

43
4.2. Sign in with Gesture
1. Tap the Foscam icon on your mobile device.
2. Tap Sidebar .
3. Tap (App) Settings .
4. Tap Sign in with Gesture.
5. Draw your sign in gesture.
When a sign in gesture is set, you can sign in with the gesture.
Page 48

44
6. Redraw your sign in gesture to confirm it.
4.3. View the Live Video Only in WiFi Environment
1. Tap the Foscam icon on your mobile device.
2. Tap Sidebar .
3. Tap (App) Settings .
4. Tap the WiFi Only for Streaming button to enable the setting.
Page 49

45
4.4. Push Messages
1. Tap the Foscam icon on your mobile device.
2. Tap Sidebar .
3. Tap (App) Settings .
When a trigger is detected, App will send you a message if the Push Messages of the
camera is ON.
Page 50

46
4. Tap Push Messages .
5. Enable the Push Messages function on camera 1.
4.5. Devices List Settings
1. Tap the Foscam icon on your mobile device.
2. Tap Sidebar .
Page 51

47
3. Tap (App) Settings .
4. Tap Devices List Settings .
5. Hold and drag a camera to the correct position on the list.
Your settings are saved.
Page 52

48
5. Sign Out
1. Tap the Foscam icon on your mobile device.
2. Tap Sidebar
3. Tap Sign Out .
4. Tap the Yes to sign out the App.
Page 53

49
6. Appendix
6.1. CE & FCC
Electromagnetic Compatibility (EMC)
This device may not cause harmful interference, and This device must accept any
FCC Statement
This device compiles with FCC Rules PART 15C of the FCC Rules. Operation is subject to
the following two conditions.
interference received, including interference that may cause undesired operation.
This equipment has been tested and found to comply with the limits for a Class A digital
device, pursuant to Part 15 of the FCC Rules. These limits are designed to provide
reasonable protection against harmful interference when the equipment is operated in a
commercial environment. This equipment generates, uses, and can radiate radio
frequency energy and, if not installed and used in accordance with the installation manual,
may cause harmful interference to radio communications. Operation of this equipment in a
residential area is like to cause harmful interference, in which case the user will be
required to correct the interference at his own expense.
FCC Caution
Any changes or modification not expressly approved by the party responsible for
compliance could void the user's authority to operate this equipment.
This equipment complies with FCC radiation exposure limits set forth for an uncontrolled
environment.
This equipment should be installed and operated with minimum distance 20cm (7.9in)
between the radiator& your body.
This transmitter must not be co-located or operating in conjunction with any other antenna
or transmitter.
CE Mark Warning
Page 54

50
This is a Class B product. In a domestic environment, this product may cause radio
6.2. WARRANTY
Software, including the software added to the products through our factory-integration
Usage that is not in accordance with product instructions.
Failure to follow the product instructions.
Abuse firmware upgrade without the authorized technician's guidance.
Normal wear and tear.
Please read FOSCAM warranty policy & policy of your reseller first before sending
Customer must first contact point-of-purchase to obtain a Return Merchandise
After receiving your RMA case number, pack the item(s) very well with the original
interference, in which case the user may be required to take adequate measures.
FOSCAM values your business and always attempts to provide you the very best of
service.
No limited hardware warranty is provided by FOSCAM unless your FOSCAM product
("product") was purchased from an authorized distributor or authorized reseller.
Distributors may sell products to resellers who then sell products to end users. No
warranty service is provided unless the product is returned to an authorized return center
in the region where the product was first shipped by FOSCAM or to the point-of-purchase,
which may have regional specific warranty implications.
If you purchase your FOSCAM product from online store, please contact the
point-of-purchase and ask for return / replacement / repair service.
Limited Hardware Warranty
FOSCAM products are warranted to be free from manufacturing defects in materials and
workmanship starting from the shipping date of FOSCAM.
This limited hardware warranty does not cover:
system, software,etc.
Return Procedures
items back to point-of-purchase.
Authorization (RMA) number before returning the product. If the product you received
is suspected to be defective and the product warranty has not expired, The RMA
number will allow your reseller to track your return much easier and help them
expedite processing your request.
box and all the original accessories included such as power adapters, brackets,
cables, manuals.
Page 55

51
Write your RMA number and the return reason (the problem of the product) on the
warranty card along with the complete package to send them back.
If customers ask for replacement service, please contact point-of-purchase and
Our technicians will inspect all items returned for replacement requests. If the retuned
If returned products are found defective, we will replace the product and assume the
If for any reason, we are unable to provide a replacement of the original returned
We do not provide exchange and replacement due to normal hardware upgrade
Our technicians will test the product before send out the replacement, any other
Replaced products are warranted from the balance of the former warranty
Warranty is void if purchase from unauthorized distributor or reseller.
Warranty is void if trade-mark, serial tags, product stickers have been removed,
Warranty is void for mishandling, improper use, or defacing the product.
Abuse firmware upgrade without the authorized technician's guidance.
Warranty is void for physical damage, altered, either internally or externally, improper
Warranty is void if damage has resulted from accident, dismantle, abuse, or service
Warranty is void if product is damaged due to improper working environment or
Warranty is void if damaged by the use of parts not manufactured or sold by
Damage caused by improper installation of third-party products.
Warranty is void if damaged for irresistible cause, such as earthquake, fire, lightning,
Product beyond limited warranty.
Replacement Services
follow their policy.
product is found in working order, we will return the same item received. However
customers shall be responsible for all shipping & handling charges incurred for
getting the units back to customers.
shipping cost for sending back the replacement unit to customers.
item(s). You will have a choice for a "Substitute" item at the same equal value.
according the market after 14 days after the product is delivered.
demand for more than two times replacement for the same product during
replacement limit will be rejected.
period.
Warranty Forfeiture
altered or tampered with.
or inadequate packaging when returned for RMA purposes.
or modification by someone other than the appointed vendor, souse, fission or the
spare part has been over the period of warranty.
operation. (For example, improper temperature, humidity, unusual physical or
electrical stress or interference, failure or fluctuation of electrical power, static
electricity, using wrong power adapter, etc.)
FOSCAM.
flood, etc.
Page 56

52
Shipping Fee
If products are defective or damaged under normal use or operation in the
During replacement limit, if customers ask for replacement due to the product does
Customers shall be responsible for both shipping fee if their product beyond the
FOSCAM provide extra repair service for product that out of warranty, it is chargeable.
Different region may have different service fee, please contact the point-of-purchase
Our technicians will quote the total price after detect the product, If customers refused
Repaired product out of warranty will obtains 3-month warranty from the date of the
FOSCAM is not responsible for other extra warranty or commitment promised by
FOSCAM does not offer refunds under any circumstances. Please contact the
FOSCAM shall not be liable under any circumstances for any consequential,
replacement limit, distributors or resellers are responsible for the shipping cost the
product back to customers, customers should assume the shipping cost send the
product to the point-of-purchase.
not fit for customer's personal expectation, customers should responsible for both
shipping fee.
replacement limit but still in warranty limit.
Repair Service Out Of Warranty
The total fee contains device cost and service fee. Device cost (including accessories)
is the standard uniform price provide by FOSCAM.
to confirm that before you ask for this service.
to repair after the quotation, customers need pay for the test fee, $3.5 / hour. If agree
with the quotation, test will be free.
product back to customers.
Limitation of Liability
resellers, if your reseller promised some extra commitment or warranty; please ask
for written documents to protect your rights and interests.
point-of-purchase and follow their refund / return policy.
incidental, special or exemplary damages arising out of or in any connection with this
agreement or the products, including but not limited to lost profits, or any claim based
on indemnity or contribution, or the failure of any limited or exclusive remedy to
achieve its essential purpose or otherwise. Purchaser's exclusive remedy, as against
FOSCAM, shall be the repair or replacement of defective parts. If FOSCAM lists a
product on its website specification in error or that is no longer available for any
reason, FOSCAM reserves the right to explain it without incurring any liability.
All rights reserved. FOSCAM and the FOSCAM logo are trademarks of
ShenZhen FOSCAM Intelligent Technology Limited., registered in the U.S. and
other countries.
Page 57

53
6.3. Statement
We advise that you take steps to safeguard your privacy. This includes keeping personal
account information private, changing your account and equipment password periodically,
and upgrading firmware whenever updates are available.
Our company makes no warranty, implied or otherwise, that this product is suitable for any
particular purpose or use. You need to abide by the relevant laws and regulations of the
use restrictions when using Foscam cameras. Our company takes no responsibility of
illegal activities by using our products.
Our company takes no responsibility of the loss by force majeure, such as failure or faults
of telecom system or the Internet network, computer viruses, malicious attacks of hackers,
information damage or loss, and faults of computer system.
Foscam company does not need to take any responsibility of the special, incidental or
corresponding loss by the products of our company or any software provide by our
company, including but not limited to operating loss, profit or purpose. The company only
takes the responsibility applicable to national and local legal requirements.
Our company takes no responsibility of the loss caused by the following at ant time:
1) loss of purchases;
2) loss of intangible property damage, such as data, programs;
3) loss of compensation claimed by third-party customers.
Delete images, format the memory card or other data storage devices does not
completely remove the original image data. You can restore deleted files from discarded
the storage device by commercial software, but which will potentially lead to personal
image data used maliciously by others. The privacy of the data security belongs to user
responsibility, the company takes no responsibility.
Parts mentioned in this statement should not be understood by the configuration
description of the product purchased by the customer, the product configuration must
accord to the specific models purchased by the customer.
Without the prior written permission of Foscam company, all the contents of relevant
operating instructions manual affiliated to the product must not be reproduced, transmitted,
transcribed or stored in a retrieval system, or translated into other languages.
Page 58

54
Our company will reserve the right to improve and modify the product and corresponding
manuals. The company reserves the right of final interpretation on our products.
Page 59

55
7. Obtaining Technical Support
While we hope your experience with the IP camera is enjoyable and easy to use, you may
1. Tap the Foscam icon on your mobile device.
2. Tap Sidebar > Support > Foscsam FAQ.
experience some issues or have questions that this User Manual has not answered.
If you experience any issues with your FOSCAM devices, please first contact the
FOSCAM resseler for assistance. If our reseller cannot provide service, please contact
our service department: support@foscam.com.
The Devices page displays.
Page 60

56
 Loading...