

Page 1

Page 2

Contents
Contents
BEFORE DRIVING .................................................... 1
1. INSTRUCTIONS FOR USE ................................. 1
2. INTRODUCTION ................................................ 2
3. GENERAL SAFETY INFORMATION ................... 3
4. GETTING TO KNOW YOUR SCOOTER ............ 15
5. PRODUCT SPECIFICATIONS .......................... 17
6. PUSHING AND TRANSPORTING THE SCOOTER
18
6.1 Parts ............................................................. 19
6.2 To Disassemble: .......................................... 21
6.3 ASSEMBLY .................................................. 22
7. ADJUSTING THE SCOOTER ............................ 24
7.1 SWIVELING THE SEAT TO GET ON AND
OFF ....................................................................... 24
7.2 ADJUSTING THE TILLER ANGLE .............. 24
7.3 TURNING THE SEAT .................................. 25
OPERATING ........................................................... 27
8. OPERATING THE SCOOTER ........................... 27
8.1 POWERING ON/OFF .................................. 28
Page 3

Contents
8.2 ADJUSTING THE SPEED ........................... 28
8.3 DRIVING FORWARDS AND BACKWARDS
.............................................................................. 29
8.4 OVERLOAD PROTECTION ........................ 30
8.5 SWITCHING ON THE HORN ...................... 30
8.6 DRIVING ON AN INCLINE .......................... 31
9. BATTERY AND CHARGING ............................ 32
9.1 BATTERY STATUS DISPLAY ..................... 33
9.2 CHARGING THE BATTERIES .................... 34
9.3 AFTER CHARGING ..................................... 37
9.4 ERROR CODE ............................................. 37
10.EMI.................................................................. 39
Page 4
INDICATION FOR USE
1
BEFORE DRIVING
11.. IINNSSTTRRUUCCTTIIOONNSS FFOORR UUSSEE
The scooter is a motorised electric scooter for use
outdoors primarily on flat surfaces such as pavements,
roads, parking lots and drive ways.
It is intended to increase the mobility of people who are
both physically and mentally capable of correctly
assessing driving situations and reacting
correspondingly to them at any time.
Uses:
DO NOT operate this equipment without first reading
and understanding the user manual. If you are unable
to understand the warnings, cautions, and instructions,
please contact your dealer; otherwise injury or damage
may result. Procedures other than those described in
this manual MUST be performed by a qualified
technician.
We reserve the right to make changes and update this
manual without further notice.
Copyright © 2014 Kymco HealthCare Inc.
Page 5

INTRODUCTION
2
22.. IINNTTRROODDUUCCTTIIOONN
DEAR CUSTOMER
With your K-Lite scooter, you have now purchased a
product which has been manufactured in accordance
with the latest technical capabilities and based on the
highest levels of user comfort.
We have placed great focus on the simplest possible
operation and long service life in both construction
and material selection.
This Operating Manual assumes that the suitability of
the user for scooter usage has been discussed with a
doctor, therapist and/or dealer before operation.
The operating manual will help you get to know the
function of your scooter and, in addition, describes
• operation
• care and maintenance
• repair
This manual has been drawn up using information
available at the time of printing with regard to
construction and operation of the scooter.
We reserve the right to make changes due to
technical improvements.
If you have any other questions about this scooter
please contact your retailer or supplier.
Page 6
GENERAL SAFETY INFORMATION
3
33.. GGEENNEERRAALL SSAAFFEETTYY IINNFFOORRMMAATTIIOONN
WARNING! Before you operate your scooter,
please read and understand all of the information
provided with your scooter for your safety. As operating
any vehicle, only drive with full alertness to ensure
safety.
WARNING! Please observe the warnings below
to avoid any damage or injury resulting from
improper use of your scooter. The scooter user is
responsible for taking proper safety measures. We will
not be held liable for personal injury and/ or product
damage resulting from improper use of the scooter.
Obey all local pedestrian traffic rules. It may be difficult
for others to see you when you are seated on your
scooter. Wait until your path is clear of traffic, and then
proceed with extreme caution. Use of safety equipment
such as reflectors/reflective clothing, lights, and safety
flags is advisory.
WARNING! Please consult your healthcare
professionals routinely to ensure there are no
health or physical conditions that may limit or impair
your ability to safely operate your scooter.
WARNING! Consult your physician if you are
taking prescription or over-the-counter
medications or if you have any physical limitations.
Some medications and physical limitations may impair
your ability to safely operate your scooter.
WARNING! Do not operate your scooter while
you are under the influence of alcohol, as this
may impair your ability to safely operate your scooter.
WARNING! Every scooter is different. Take time
to learn the feel of this scooter before driving.
WARNING! BE AWARE that becoming a capable,
safe scooter operator will take time and practice.
Page 7
GETTING TO KNOW YOUR SCOOTER
4
WARNING! Anti-tippers substantially reduce
your risk of tipping over backwards, which can
cause serious injury.
WARNING! Have someone help you practice
bending and reaching on the scooter and
transferring to and from the scooter until you learn how
to do it safely.
WARNING! NEVER try a new manoeuvre on your
own.
WARNING! Get to know the areas where you
plan to use your scooter. Look for hazards and
learn how to avoid them.
WARNING! Do not use the scooter other than for
its original purpose. Avoid any use, such as
weight training, sports, athletics, hauling, moving or
towing anything, that may lead to safety hazards and
undue stress on the scooter.
WARNING! Your scooter is designed for one
passenger only. Do not carry passengers on
your scooter.
WARNING! We strongly recommend that you do
not smoke cigarettes while seated on your scooter.
You must adhere to the following safety guidelines if
you decide to smoke cigarettes while seated in your
scooter: Do not leave lit cigarettes unattended.
Keep ashtrays at a safe distance from the seat
cushions. Always make sure cigarettes are
completely extinguished before disposal.
WARNING! Do not modify your scooter in any
way by yourself. For any accessories, please
contact your approved service provider for installation
by an authorized service technician.
Page 8
GETTING TO KNOW YOUR SCOOTER
5
WARNING! The addition of accessories to your
scooter may change certain specifications such as
overall weight, size, and /or the center of gravity of your
scooter. Please note how some of the changes may
damage any objects around you.
WARNING! Do not change your seating
configuration. Please contact your approved
service provider for any adjustments.
WARNING! Do not use any replacement on your
scooter, such as a different seating system. Only
use the seating system that has been tested for safety
and provided by the manufacturer.
WARNING! Do not remove the seat cushion
provided with the scooter. Do not place any
cushion, padding, or pillow on the seat. This could
create an unstable seat position, resulting in a fall from
the scooter.
WARNING! Exercise extreme caution when using
oxygen in close proximity to electrical circuits and
combustible materials. Contact your oxygen provider
for information on using oxygen safely.
WARNING! Do not change the settings of the
controller. Please call your approved service
provider to check the controller settings on your scooter
every six to twelve months. Please contact your
approved service provider if you notice any change in
your ability to control your scooter.
WARNING! Do not use your scooter in
“freewheel” mode without an attendant present.
Page 9
GETTING TO KNOW YOUR SCOOTER
6
WARNING! Do not place the scooter in
“freewheel” mode while the unit is powered up.
Always power off the scooter and remove the key from
the key switch before engaging or disengaging
“freewheel” mode.
WARNING! To prevent the scooter from rolling
uncontrollably on its own, never place the scooter
in “freewheel” mode on any incline or decline.
WARNING! If you anticipate being seated in a
stationary position for an extended period of time,
turn off the power to the scooter. This will prevent
unexpected or unintended scooter movement.
WARNING! Avoid using any accessories that
may interfere with the operation of the throttle
control lever, which may result in unintended or
uncontrolled movement of the scooter.
WARNING! Keep yourself, clothing, and all other
objects away from the tires while driving. Do not
allow any objects to drag behind the scooter when
driving. Loose-fitting clothing or other objects can get
caught in the tires and /or the running gear.
WARNING! Possible strangulation hazard! Be
aware that clothing, lanyards, necklaces, other
jewellery, purses, and other accessories worn or carried
by you while you are seated on or operating the scooter
may get caught around the armrests or throttle control
lever.
WARNING! Do not connect any device to the
scooter electrical system or use the scooter
batteries to power anything else other than your scooter.
WARNING! Always grasp the connector itself
when disconnecting any wires. Do not pull on
electrical harnesses directly.
Page 10
GETTING TO KNOW YOUR SCOOTER
7
WARNING! Keep all charger power cord
connectors clean, dry and away from sources of
dampness at all times to prevent damage to the
electrical system and /or personal injury. Check any
actuators for loose, worn, or damaged items and have
any damaged wires replaced immediately.
WARNING! Check electrical components
frequently for signs of corrosion and have them
replaced as necessary.
WARNING! Always secure the scooter and its
batteries when it is being transported. Batteries
should be secured in an upright position and protective
caps should be secured on the battery terminals. Do not
transport the scooter and /or batteries with any
flammable or combustible items.
WARNING! Do not handle batteries without
supervision by an authorized service technician.
Battery posts, terminals, and related accessories contain
lead and lead compounds and can be hazardous.
Scooter batteries are heavy. Anyone lifting scooter
batteries should use proper lifting techniques and avoid
lifting beyond his/her capacity.
WARNING! NEVER attempt to recharge the
batteries by attaching cables directly to the
battery terminals or clamps.
WARNING! DO NOT attempt to recharge the
batteries and operate the scooter at the same time.
WARNING! Always use two batteries of the exact
same type, chemistry, and amp-hour (Ah) capacity.
Follow the specifications provided in the user manual for
battery type and capacities.
WARNING! Do not mix old and new batteries.
Always replace both batteries at the same time.
Page 11
GETTING TO KNOW YOUR SCOOTER
8
WARNING! Only sealed batteries that meet DOT
CFR173.159 should be used in the scooter.
Replacement batteries should be obtained directly from
an authorized provider to ensure conformity, fit, and
function.
WARNING! Always protect the batteries from
freezing; for those living in cold climates, make
sure you store the scooter properly. Never charge a
frozen battery. Charging a frozen battery may result in
damage to the battery and could be dangerous.
WARNING! Do not remove any fuse links (if fitted)
from the battery harnesses. If the fuse links
appear damaged, contact your authorized provider.
WARNING! Do not operate the scooter with
depleted batteries; you could be stranded.
WARNING! Reduce your speed, do not make any
sharp turns and maintain a stable center of
gravity while turning /cornering. To prevent tipping,
avoid shifting your weight in the opposite direction of a
turn.
WARNING! While driving up inclines or low curbs,
drive your scooter straight on with the wheels
perpendicular to the incline and/or low curb; both front
wheels should contact the incline/low curb at the same
time. To reduce the possibility of a fall, do not drive at
an angle; do not get one wheel or side of the scooter on
the incline/low curb first. Always exercise extreme
caution when negotiating an incline.
WARNING! Do not travel up or down potentially
hazardous surfaces and/or inclines, including but
not limited to areas covered with snow, ice, cut grass,
or wet leaves.
WARNING! When climbing an incline, try to keep
the scooter moving. If stopping is necessary,
start up again slowly and then accelerate with caution.
Page 12
GETTING TO KNOW YOUR SCOOTER
9
WARNING! When descending an incline, use the
slowest speed possible. If the descent is faster
than you desire, release the throttle control lever to
stop the scooter. Then press the throttle control lever
slightly to control the speed of your descent.
WARNING! The maximum recommended incline
angles (see specifications) are tested in a
controlled environment. Your scooter’s ability to climb
up inclines is affected by your weight, speed and the
angle you approach the incline among other factors.
WARNING! Only drive backwards on a flat
surface. When driving backwards, operate your
scooter at a lower and even speed. Stop often and
check to make sure your path is clear of obstacles. To
prevent tipping, do not travel down an incline or ramp
backwards.
WARNING! To avoid overloading the scooters
and potential tipping, never carry anything or fill
the basket with contents weighing more than 15lbs
(6.8kg).
WARNING! Avoid any change of position or
movement that may change your center of
gravity while sitting on the scooter. This may cause your
scooter to tip.
WARNING! A drop-off (as small as 2 inches) at
the bottom of a slope can stop a front wheel and
cause the scooter to tip forward.
WARNING! Never reach or lean if you must shift
your weight sideways or rise up off the seat.
WARNING! Never reach or lean if you must move
forward in your seat to do so. Always keep your
buttocks in contact with the backrest.
WARNING! Never try to pick up an object from
the floor by reaching down between your knees.
Page 13
GETTING TO KNOW YOUR SCOOTER
10
WARNING! Never reach or lean over the top of
the seat back. This may damage the backrest and
cause you to fall.
WARNING! Do not use the armrests for any
weight bearing purposes. Such use may cause
the scooter to tip, which may result in a fall from the
scooter and personal injury.
WARNING! Do not put all of your weight on one
side of the scooter deck. Such use may cause
the scooter to tip.
WARNING! Even though your scooter may be
capable of handling greater obstacles, we
recommend that you do not attempt to negotiate a curb
that has a height greater than 2” (5cm). Doing so could
cause instability in your scooter. Riding over curbs or
obstacles can cause tipping and serious bodily harm. If
you have any doubt that you can safely cross any curb
or obstacle, ALWAYS ASK FOR HELP. Be aware of
your riding skills and personal limitations. You may need
to remove or cover threshold strips between rooms and
install a ramp at entry or exit doors.
WARNING! Do not try to climb an obstacle when
on an incline.
WARNING! Do not drive over an obstacle with
just one wheel.
WARNING! Do not drive on uneven terrain and/or
soft surfaces.
WARNING! Do not drive near tall grass that can
entangle the running gear.
WARNING! Avoid driving on loosely packed
gravel and/or sandy surfaces.
WARNING! Do not use your scooter on or near
railroad tracks or crossings.
Page 14
GETTING TO KNOW YOUR SCOOTER
11
WARNING! Do not ride your scooter along the
edges of streams, lakes, or the ocean. Never use
your scooter to cross waterways.
WARNING! If you feel unsure about a driving
surface, avoid that surface.
WARNING! Do not expose your scooter to open
flames.
WARNING! Keep your scooter in a dry and clean
condition. Never take your scooter into a shower,
tub, pool, or sauna. Rain, snow, salt, mist/spray
conditions, and icy/slippery surfaces can damage the
scooter components or cause the scooter frame to
prematurely rust.
WARNING! Avoid prolonged exposure to heat or
cold; it may affect the temperature of
upholstered and non-upholstered components on the
scooter. Exercise caution when using your scooter in
extremely hot or cold conditions.
WARNING! Do not tow your scooter. Towing may
exceed the maximum speed threshold, resulting
in damage to critical components of the scooter.
WARNING! Use extreme caution when it is
necessary to move an unoccupied scooter up or
down stairs. Remove the seat, batteries, and any
accessories before attempting the transfer. Use proper
lifting techniques and use only solid, non-removable
frame components to lift the scooter with multiple
physically capable attendants. Do not lift or move your
scooter or seating system by grasping or holding onto
any of its removable parts, including the armrest(s),
seat cushions, seatback, or shrouds.
Page 15
GETTING TO KNOW YOUR SCOOTER
12
WARNING! When your scooter is used with any
type of lift/elevation devices, always turn off the
power of the scooter; make sure the scooter is not in
“freewheel” mode and do NOT sit on your scooter.
Failure to follow this may result in unintended
movement and personal injury or product damage.
WARNING! Never use your scooter to negotiate
stairs or escalators.
WARNING! Never sit on the scooter while it is in
a moving vehicle.
WARNING! It is dangerous to transfer to and
from your scooter on your own. It requires good
balance and agility. Be aware that there is a point during
every transfer when the seat is not below you.
WARNING! To make a safe transfer: Always turn
off the power before you transfer to or from your
scooter. If you fail to do so you may touch the throttle
control lever and cause your scooter to move when you
do not expect it. Make sure motor locks are engaged;
this keeps the scooter from moving when you transfer.
Work with your health care professional to learn how to
position your body and how to support yourself during a
transfer. Have someone help you until you are sure you
do a safe transfer on your own. Move your scooter as
close as you can to the seat you are transferring to.
Transfer as far back onto the seat surface as you can.
This will reduce the risk that you will miss the seat or
fall.
WARNING! Never transport the scooter in the
front seat of a vehicle. It may shift and interfere
with the driver.
WARNING! Always secure the scooter so that it
cannot roll or shift.
Page 16
GETTING TO KNOW YOUR SCOOTER
13
WARNING! Should the fittings on your seating
system become loose, please call your approved
service provider.
WARNING! Replace worn or damaged upholstery
immediately to reduce the risk of fire hazard.
WARNING! Be aware that washing of
upholstered items may reduce the fabric’s
resistance to flammability.
WARNING! Radio wave sources, such as radio
stations, TV stations, amateur radio (HAM)
transmitters, two-way radios, and cellular phones ,can
affect motorised scooter control. Following the warnings
listed below should reduce the chance of unintended
brake release or motorised scooter movement, which
could result in serious injury.
1) Do not turn ON hand-held personal
communication devices, such as citizens band (CB)
radios and cellular phones, while the motorised
scooter is turned ON;
2) Be aware of nearby transmitters, such as radio or
TV stations, and try to avoid coming close to them;
3) If unintended movement or brake release occurs,
turn the motorised scooter OFF as soon as it is
safe;
4) Be aware that adding accessories or components,
or modifying the motorised scooter, may make it
more susceptible to interference from radio wave
sources (Note: There is no easy way to evaluate
their effect on the overall immunity of the
motorised scooter); and
5) Report all incidents of unintended movement or
brake release to the motorised scooter
manufacturer, and note whether there is a radio
wave source nearby.
Important Information
Page 17

GETTING TO KNOW YOUR SCOOTER
14
1) 20 volts per meter (V/m) is a generally achievable
and useful immunity level against interference
from radio wave sources (as of May 1994)(the
higher the level, the greater the protection);
2) This product has an immunity level of 20 volts per
meter (V/m)
Page 18
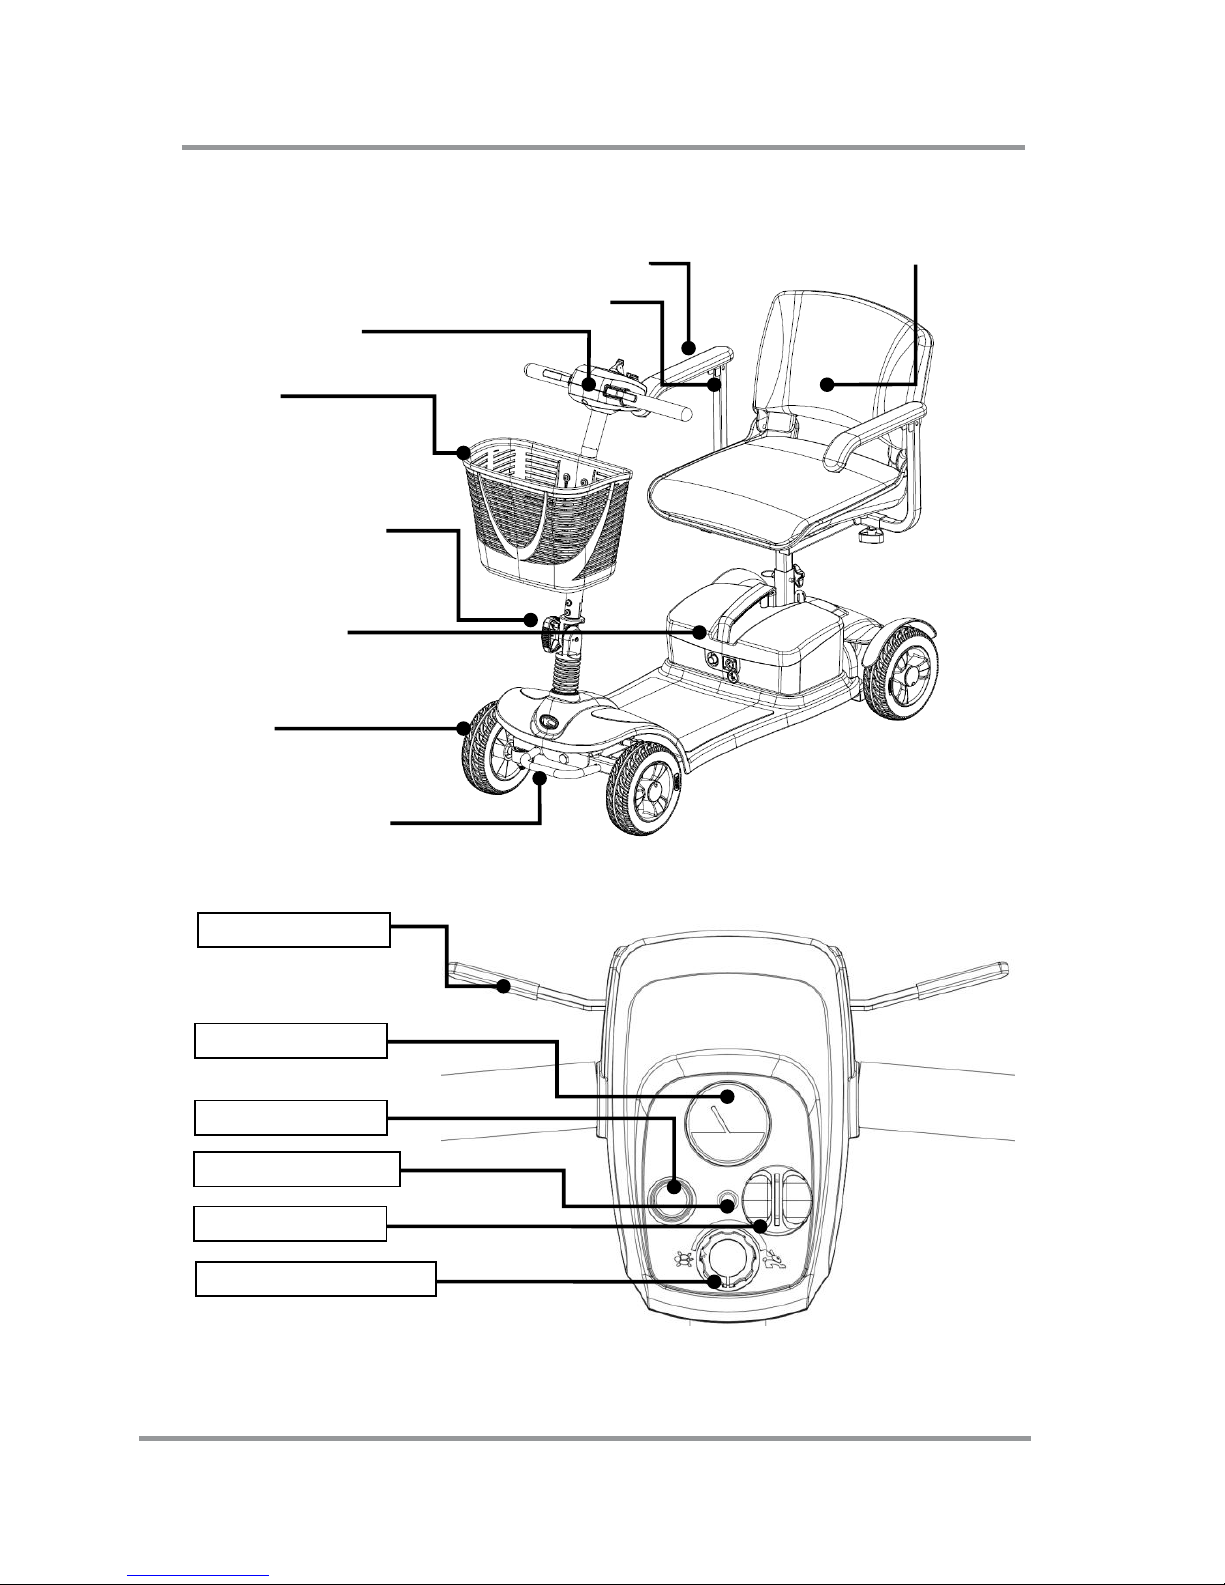
GETTING TO KNOW YOUR SCOOTER
15
44.. GGEETTTTIINNGG TTOO KKNNOOW
W YYOOUURR
SSCCOOOOTTEERR
Detachable seat with fold-down back
Removable flip-up arm rest
Control panel
Basket
Adjuster Knob
Battery Box
Wheel
Carrying handle
Battery gauge
Throttle lever
Seat
Horn button
Power light
Key switch
Speed control dial
Page 19
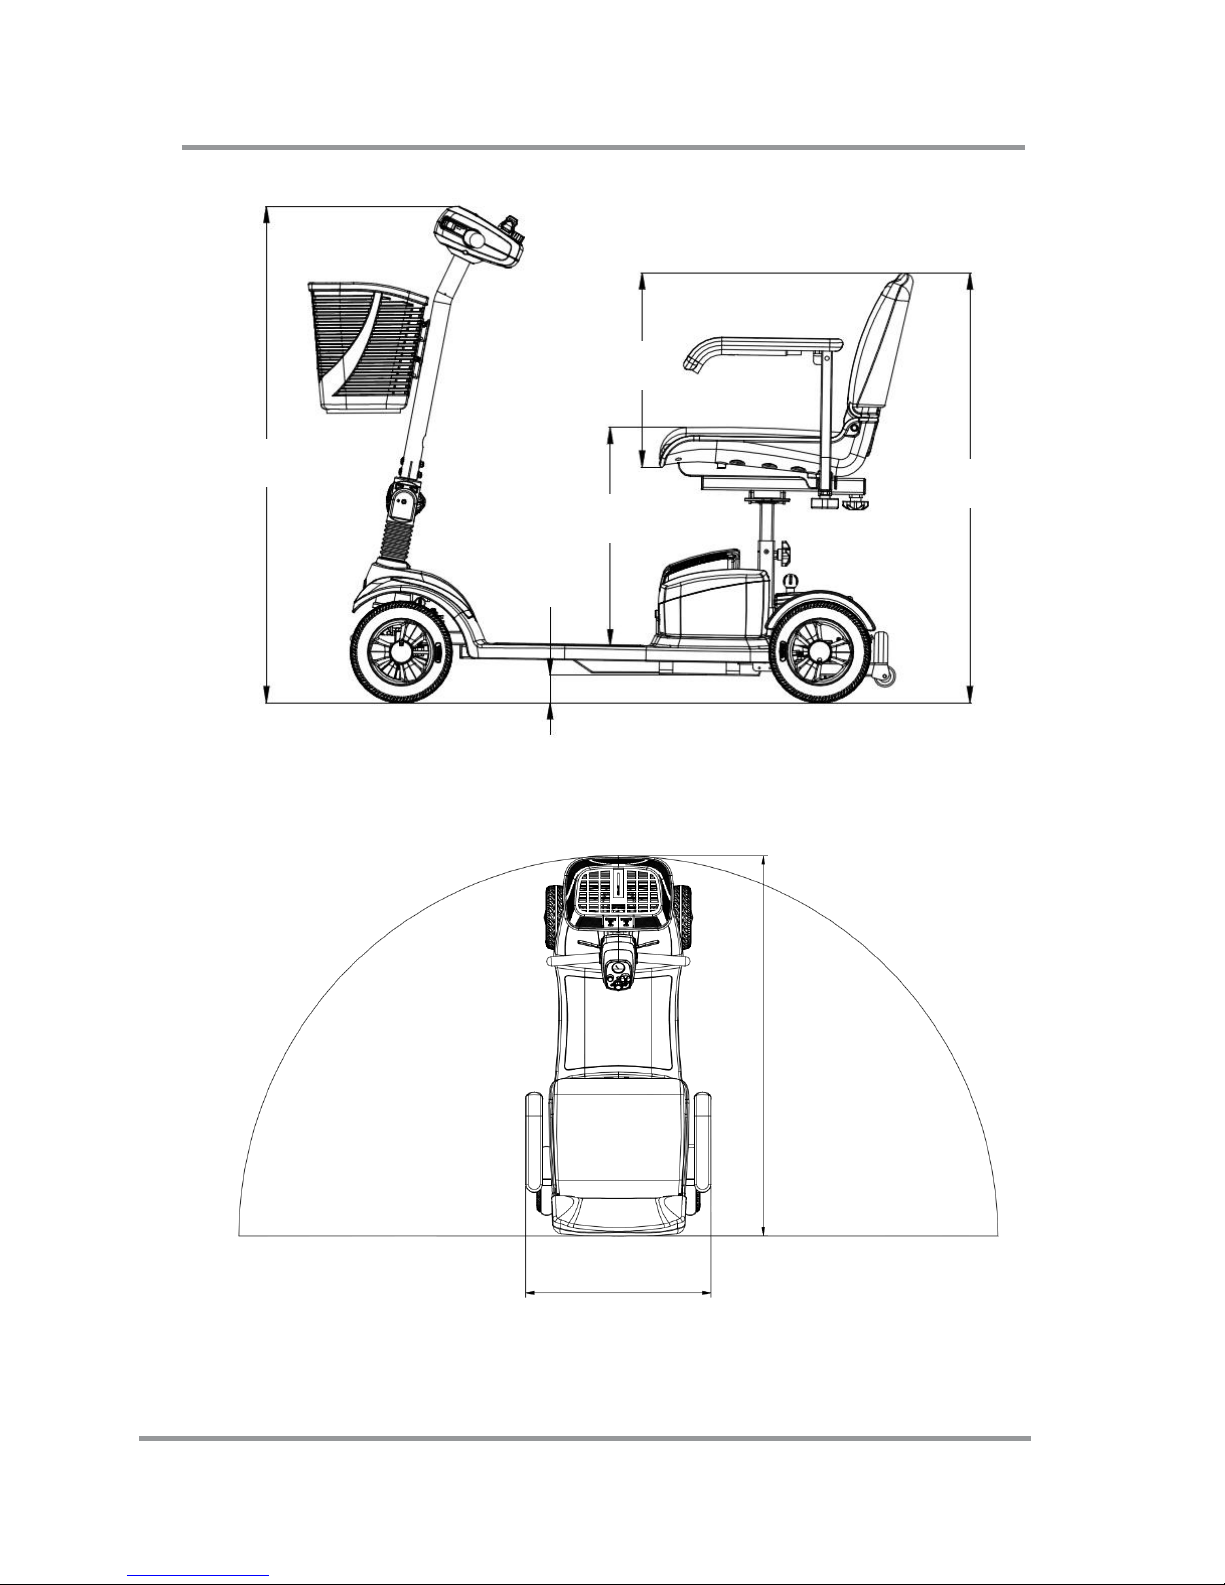
GETTING TO KNOW YOUR SCOOTER
16
36.8 in
2.0 in
15.5-18.5 in
31.6-34.6 in
16 in
19.7"
47.6"
47.6"
40.2"
Page 20
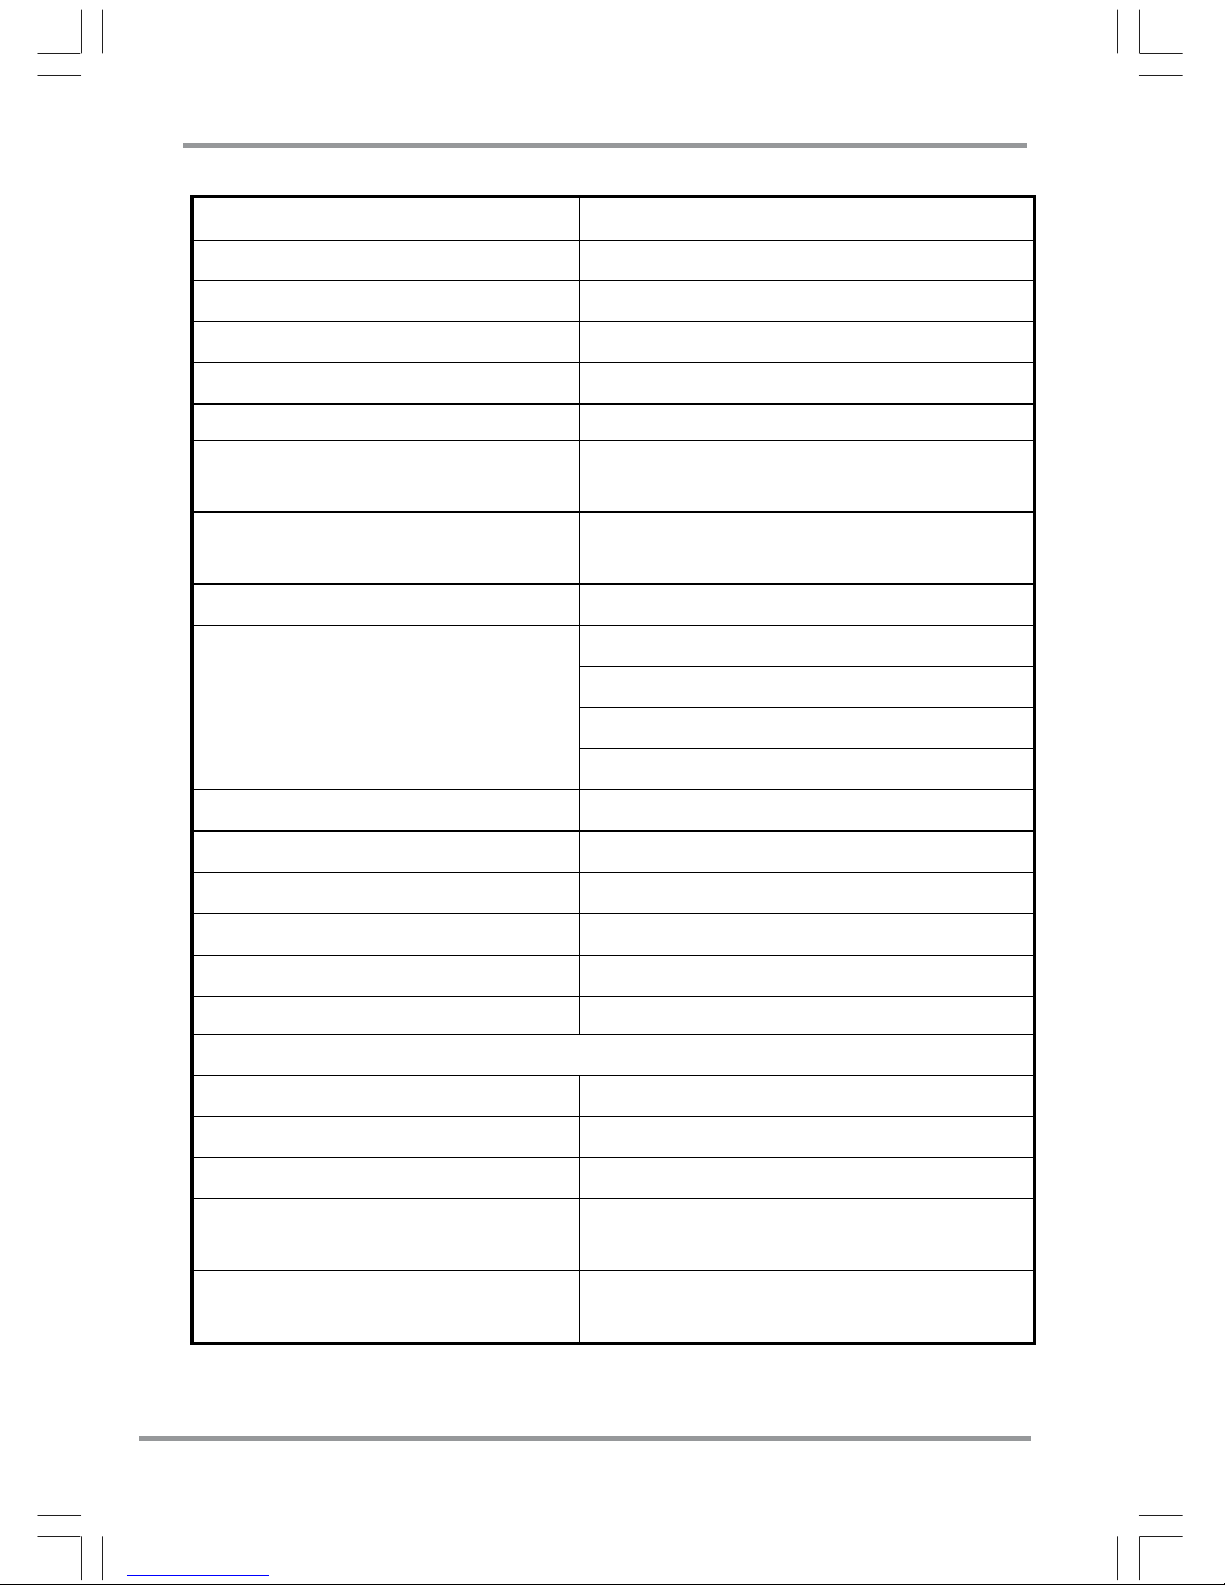
PRODUCT SPECIFICATIONS
17
55.. PPRROODDUUCCTT SSPPEECCIIFFIICCAATTIIOONNSS
Model Name
EQ10DA(UK)
Maximum weight capacity
275 lbs (125kg) – 19.7 Stone
Overall height
36.8 in (935 mm)
Overall length
40.2 in (1020 mm)
Overall width
19.7 in (500 mm)
Ground clearance
2.0 in (50 mm)
Total weight (in/excluding
Batt.)
92/74 lbs (42/33.5 kg)
Drive System
Direct drive rear wheels
(with differential gear)
Battery
12 V × 12 Ah × 2 Pcs
Battery charger
Off-board
Input voltage: 100-240 VAC,
Output voltage: 24 VDC
Output current: 2A
Front wheel
7.5X2.35(in), PU foam tyre
Rear wheel
7.5X2.35(in), PU foam tyre
Rear wheel drive system
Transaxle
Braking system
Motor electromagnetic brake
Maximum incline angle
8 degrees (see section 8.6)
Per-charge Run distance
Up to 10 miles (>16km) *1
Maximum speed
Forward
4.0 mph (6.4 kph)
Backward
2.7 mph (3.0 kph)
Turning radius
47.6 in (1210 mm)
Weight of Heaviest part
(Front Section)
30.8 lbs (14 kg)
Dimensions of Heaviest
part (Front Section)
L× W× H:850× 440× 400(mm)
*1. Range can be affected by; User weight, driving surfaces,
inclines, stop & starting, turning and battery condition!
Page 21
ADJUSTING THE SCOOTER
18
66.. PPUUSSHHIINNGG AANNDD TTRRAANNSSPPOORRTTIINNGG
TTHHEE SSCCOOOOTTEERR
1. Please carefully read the safety information in
section 3 related to transportation first.
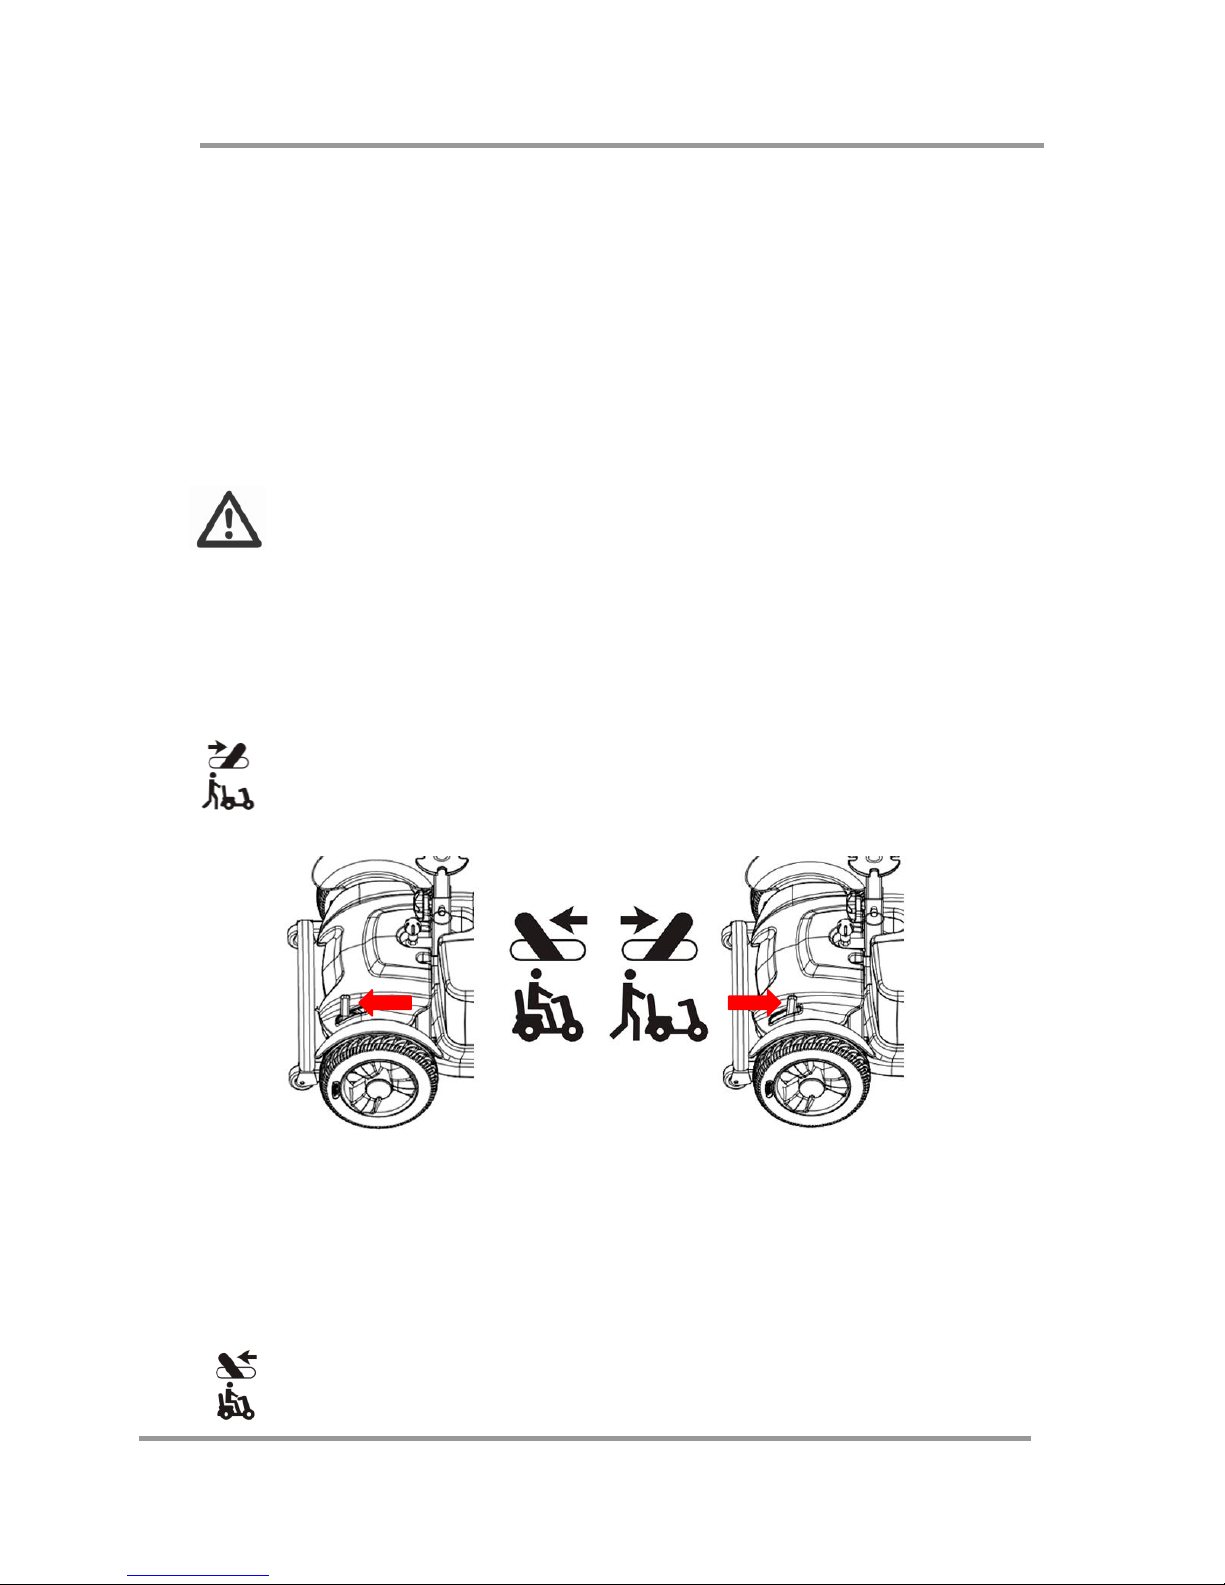
2. Pushing the scooter:
In order to push the scooter, you must place the scooter
in “freewheel” mode, which disengages the drive
motor. The release lever is located at the bottom righthand side of the scooter under the seat.
WARNING!
When the lever is pushed into the freewheel mode:
The scooter must be on a flat surface and stationary.
Do not sit on the scooter.
To push the scooter:
=Freewheel Mode: (Motor is disengaged.)
1. Power off the scooter and remove the key.
2. Push the lever forward as far as the stop for
freewheel mode (see diagram).
3. Push the scooter to your desired location.
4. Pull the lever back as far as the stop, to lock into
drive mode (see diagram).
=Driving Mode:(Motor is engaged.)
Page 22
ADJUSTING THE SCOOTER
19
1. Always switch the scooter off to push it.
2. Do not push the scooter too fast. If a pre-set
speed is exceeded while you are pushing the scooter,
the drive motor will switch on automatically and brake
the scooter.
After any adjustments, repair or service and
before use, make sure all hardware is tightened
securely - otherwise injury or damage may result.
6.1 Parts
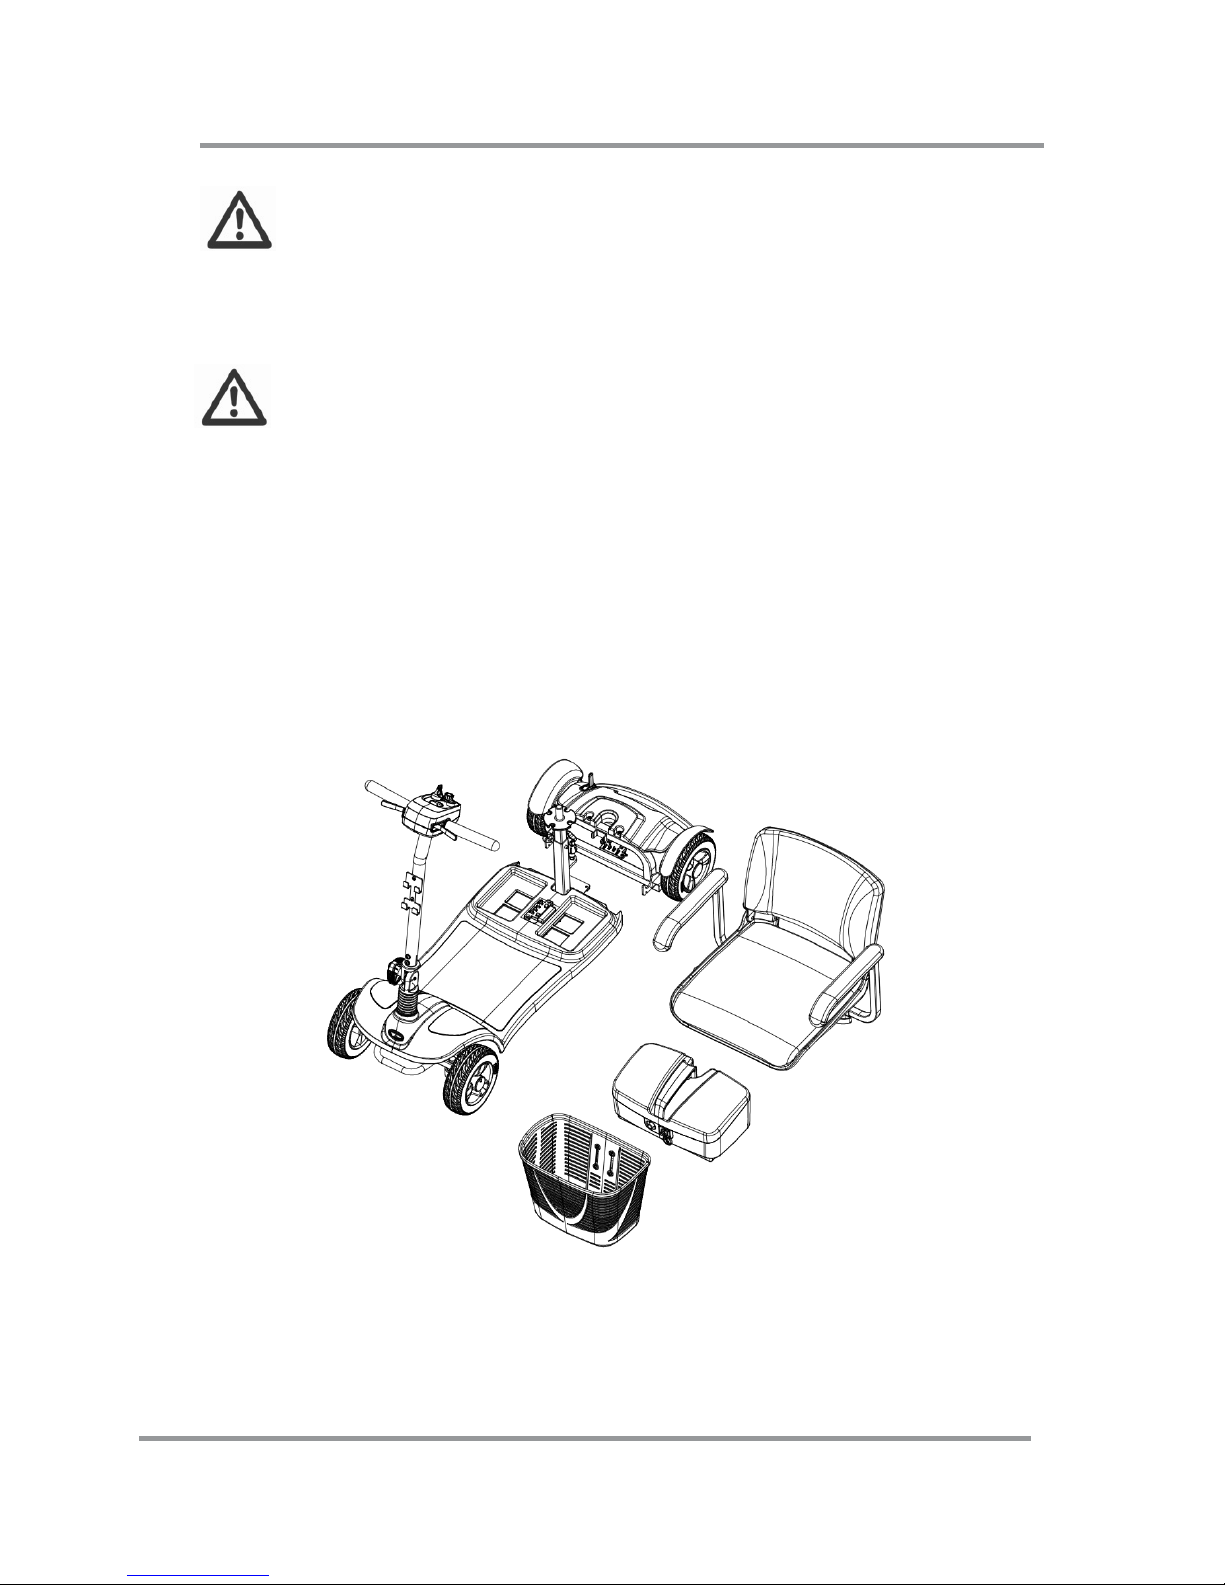
You can disassemble the scooter into five pieces: the
seat, the front section, the basket, the battery pack,
and the rear section.
1. Place the scooter in an area where you have
sufficient clearance to move the parts around. You
may need assistance to lift some of the scooter
Page 23

ADJUSTING THE SCOOTER
20
components.
2. See “Specifications” for individual component
weights.
3. No tools are required to disassemble or assemble
your scooter. Always disassemble or assemble your
scooter on a level, dry surface with sufficient space
for you to work and move around your scooter. Keep
in mind that the disassembled sections of the
scooter take up more floor space than the
assembled scooter.
Lifting a weight beyond your physical capability
may result in personal injury.
Ask for assistance when necessary while disassembling
or assembling your scooter.
Page 24
ADJUSTING THE SCOOTER
21
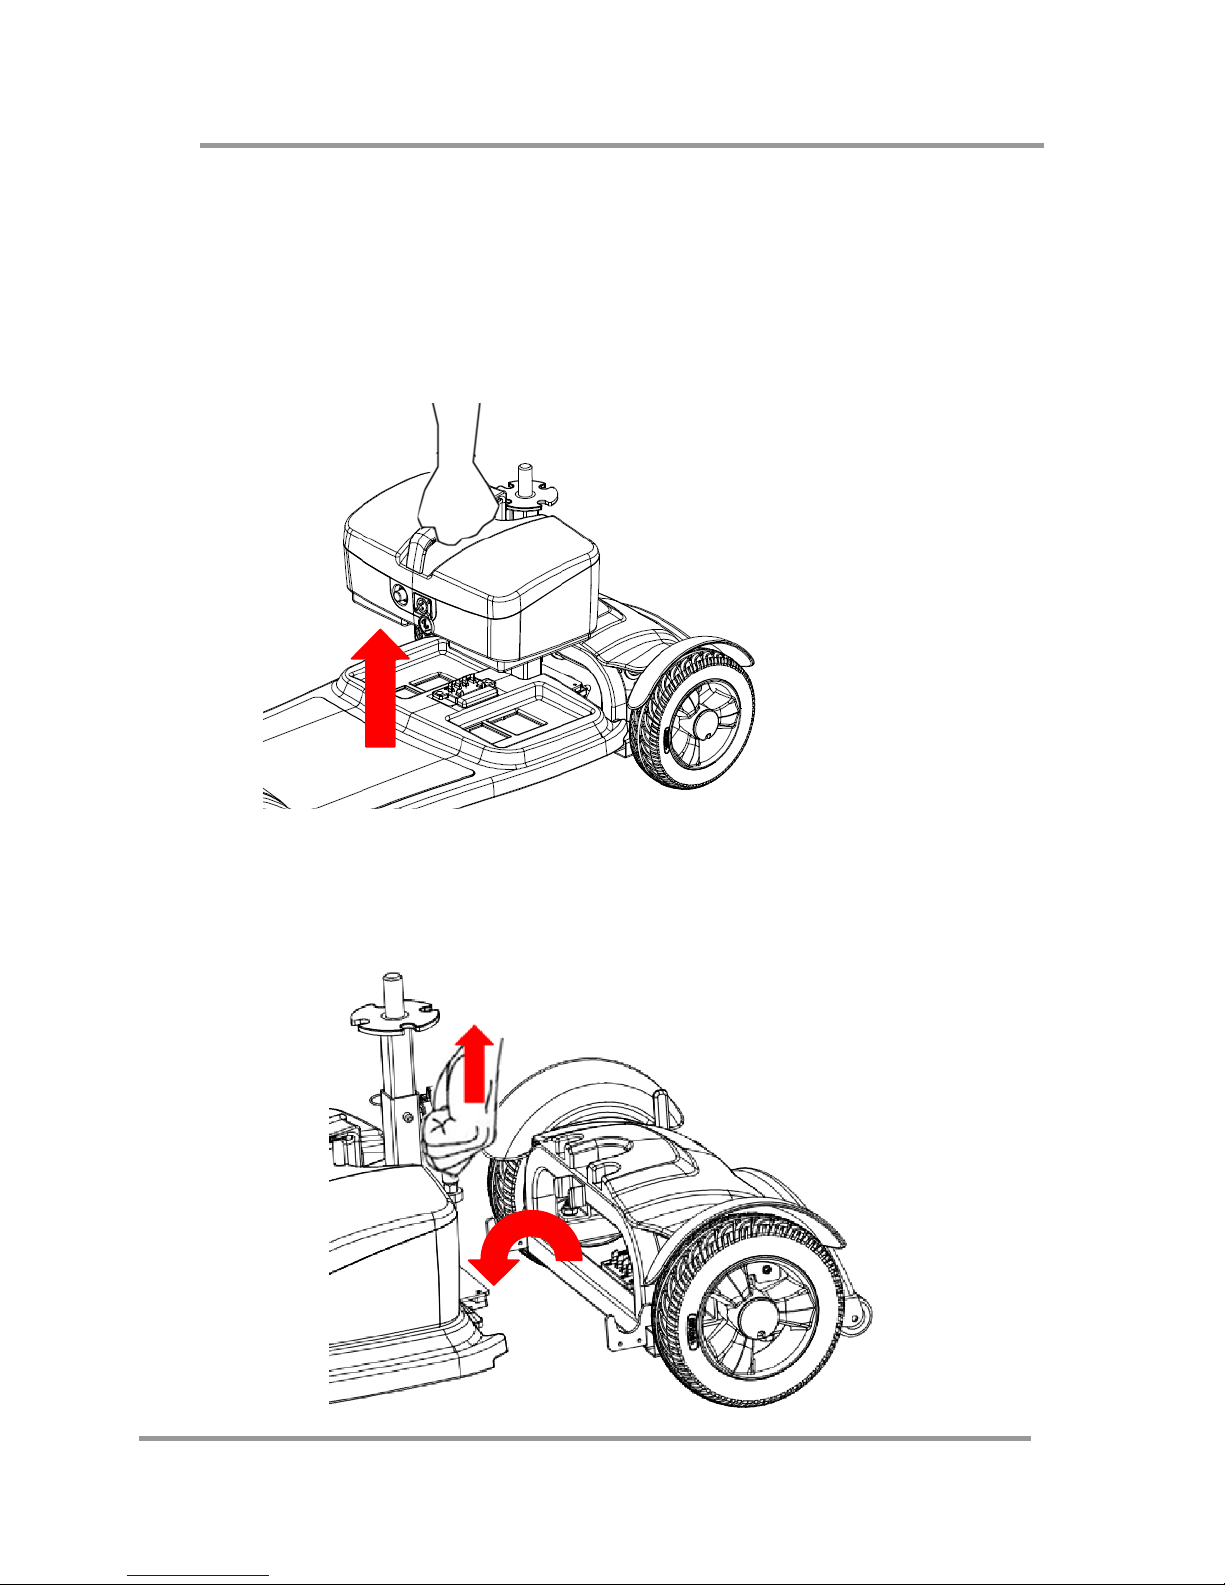
6.2 To Disassemble:
1. Turn key switch to “OFF”.
2. Place the free wheel mode lever in the drive position.
3. Pick up the battery pack and remove it from the
scooter. (See the Fig.)
4. Pull the release knob upward and lift and the front
section apart from the rear section.
(See the Fig.)
Page 25
ADJUSTING THE SCOOTER
22
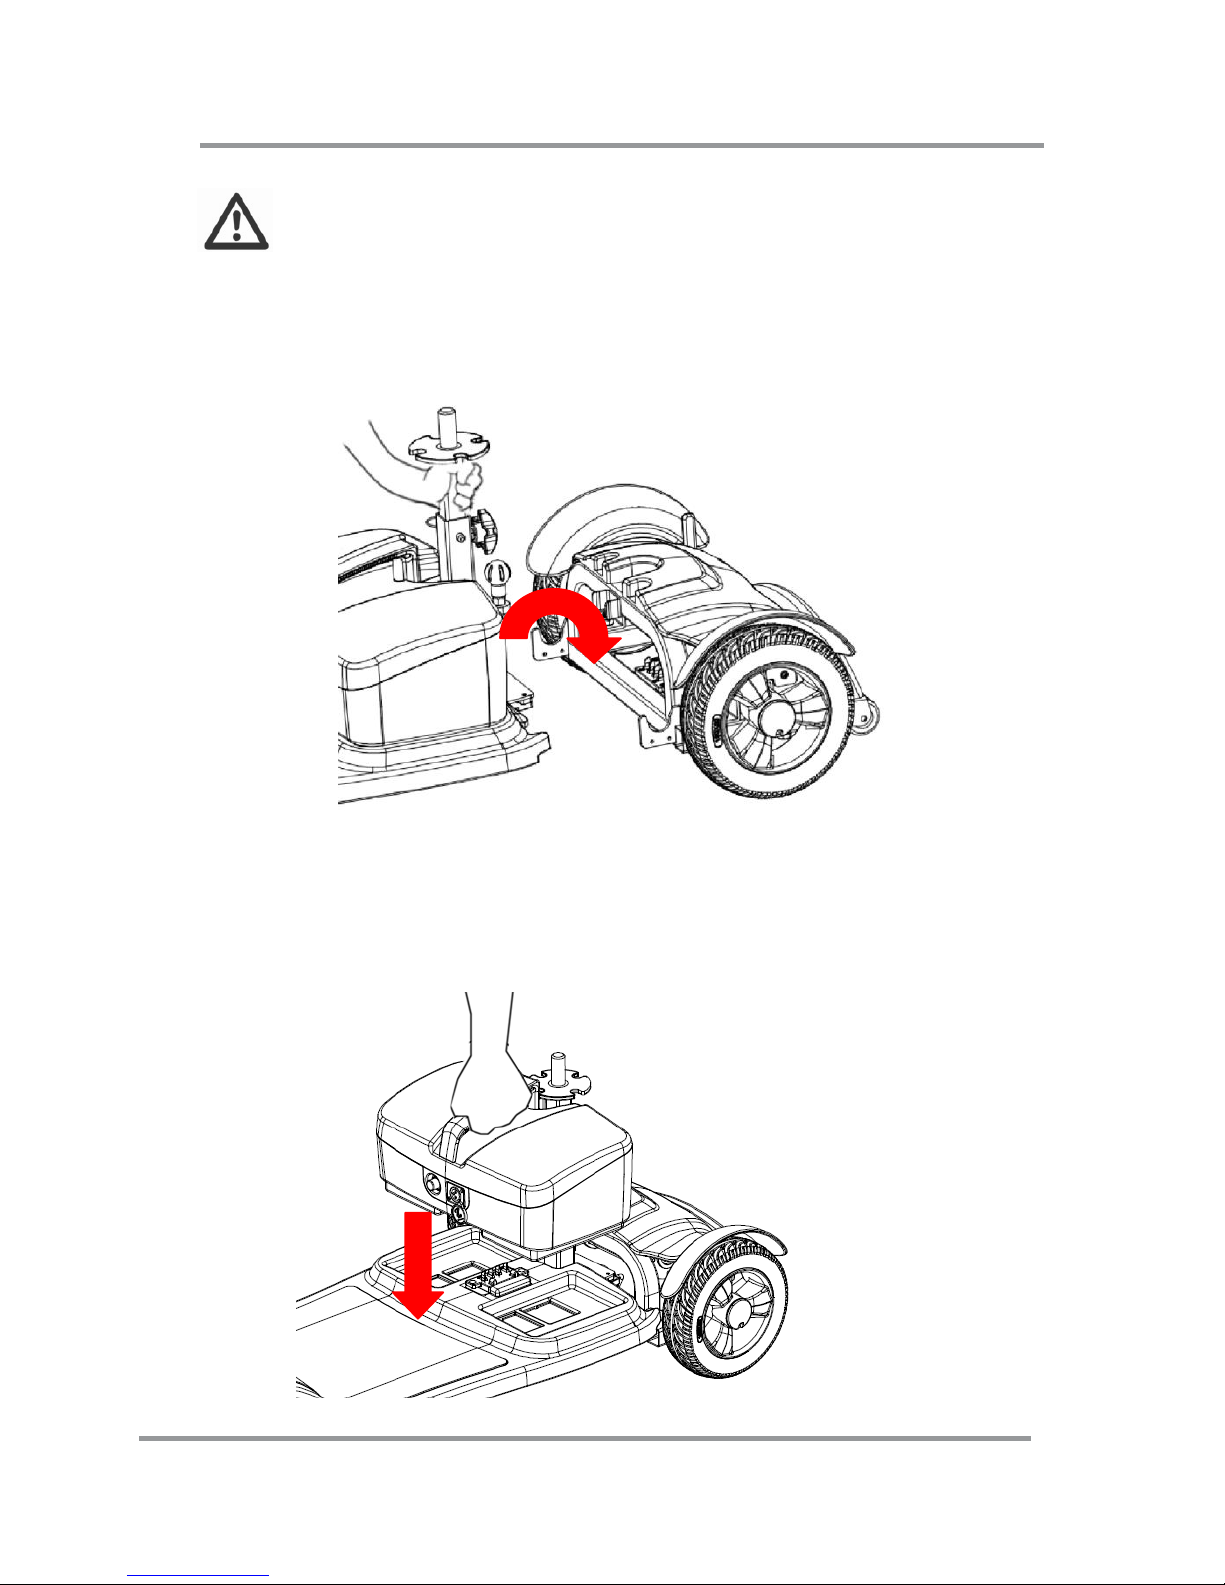
6.3 ASSEMBLY
Note: Raise the tiller before reassembling the
scooter.
1. Place the freewheel mode lever in the drive position.
2. Set the rear section in the up position and pick up
the front section to the connecting bracket of rear
section. (See Fig)
Make sure the release knob is re-enguaged fully
to the rear section and fully locked into place.
3. Make sure that the front and rear sections are level.
4. Fit the battery pack on the scooter. (See the Fig.)
Page 26
ADJUSTING THE SCOOTER
23
5. Fit the seat on the seat post, insert the seat post and
screw the knob .
6. Turn key switch to “ON”, make sure battery gauge
has sufficient power.
Make sure you connect all the pieces together
properly.
Turn off all power to your scooter and remove key
from key switch to previous accident before
disassembly.
Ensure the front and rear sections are in the right
position before driving.
Page 27
OPERATING THE SCOOTER
24
⑴
77.. AADDJJUUSSTTIINNGG TTHHEE SSCCOOOOTTEERR
The following describes how to set up and adjust your
Scooter in order to have a comfortable and safe drive.
7.1 SWIVELING THE SEAT TO GET ON AND
OFF
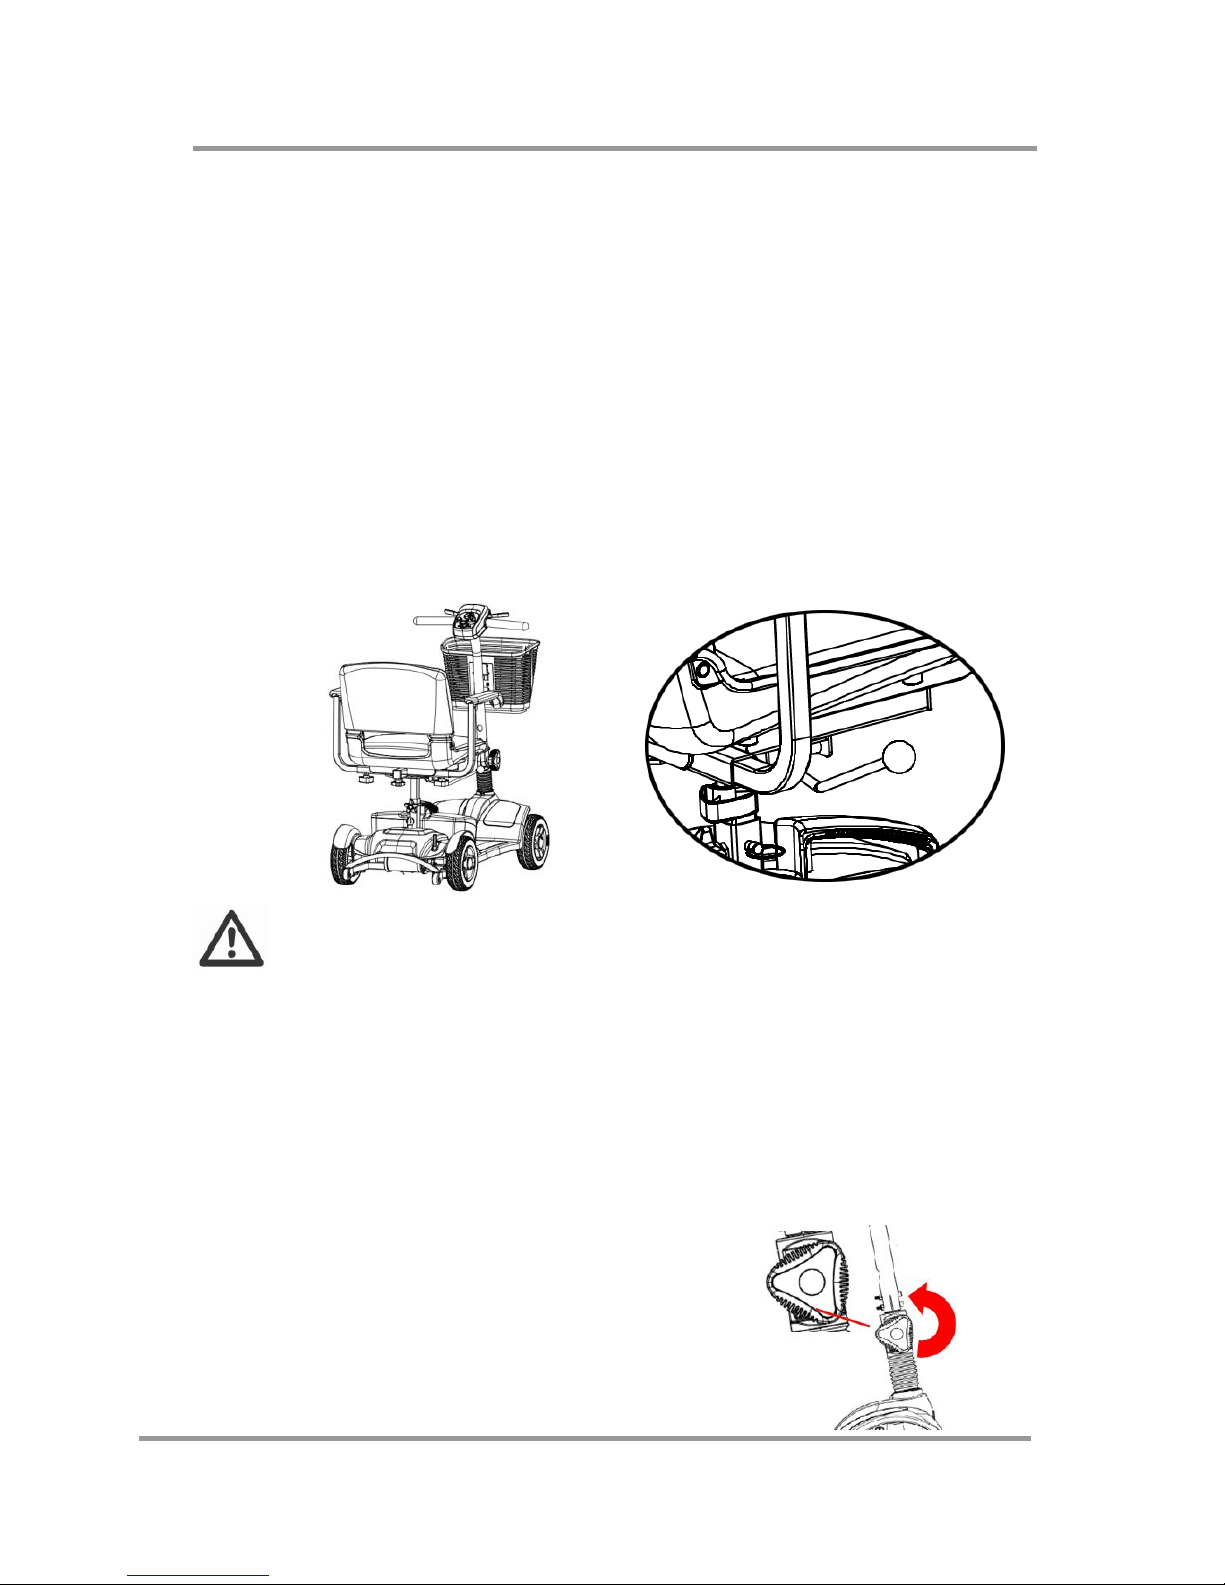
1. Lift the seat lever and rotate the seat to the side
(left or right) to get on.
2. Sit on the seat and turn the seat back to the
direction of travel. Lock the seat in place by
releasing the seat lever.
Ensure that the seat is properly engaged after
adjustment by seeing that the seat doesn’t move
when you try rotating it to either side
7.2 ADJUSTING THE TILLER ANGLE
Always adjust the tiller so that you can reach the
dashboard and control your scooter easily at any time.
The Tiller can be adjusted by the following steps.
1. Loosen the knob by turning
counter-clockwise.Adjust the
tiller angle.
Page 28
OPERATING THE SCOOTER
25
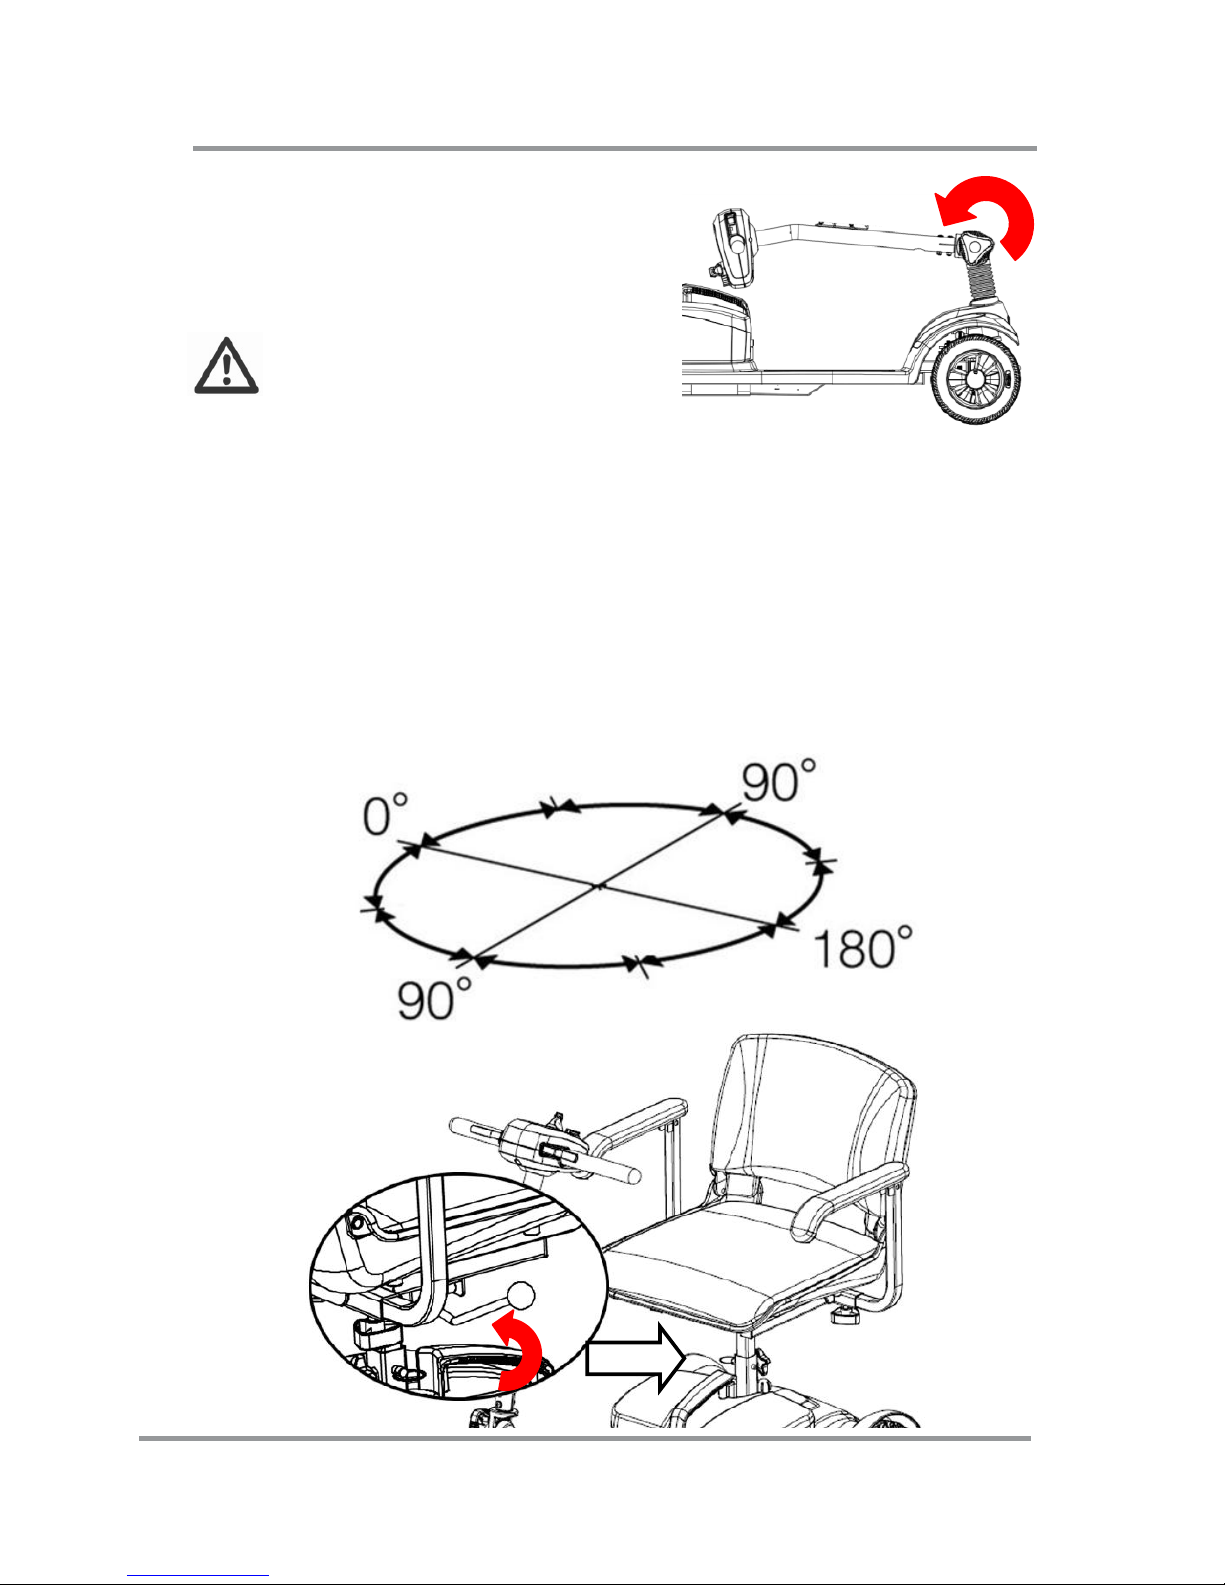
2. Tighten the knob by turning
clockwise, and make sure
the tiller is securely fixed.
Accident hazard due to
non-engaged tiller:
Ensure that the tiller is properly
locked after adjustment by seeing that it doesn’t move
when you try pushing it slightly forwards and backwards
7.3 TURNING THE SEAT
Pull swivel seat lever to rotate the seat.
The seat has 4 height adjustments.
After adjusting the height to the desired seat position,
secure the fixed nut.
Page 29

OPERATING THE SCOOTER
26
Accident hazard due to incorrect seat
position:
Always turn the seat to face forward and lock it before
driving.
If the seat has been turned, the possibility of tipping is
increased.
Before turning the seat, always ensure that the scooter
is on an even and solid surface.
Page 30
OPERATING THE SCOOTER
27
OPERATING
88.. OOPPEERRAATTIINNGG TTHHEE SSCCOOOOTTEERR
Always carry out the safety information described
in the “General Safety Information” section:
Before starting to drive, adjust the seat and tiller to a
comfortable position.
WARNING! Every scooter is different. Take the
time to learn the feel of your scooter before you
begin riding.
WARNING! BE AWARE that becoming a capable
and safe scooter operator will take time and
practice.
WARNING! Anti-tippers substantially reduce
your risk of tipping over backwards, which can
cause serious injury.
Please observe the following tips for a safe journey:
1. Always match your speed to the driving situation in
which you find yourself.
2. Always reduce your speed when you are driving
through:
- Unclear areas - narrow gaps
- Tight curves - inclines
- Ramps
3. Take a trial run with the scooter in an area with no
pedestrians, or in a closed-off area.
4. Always steer the scooter with both hands on the
handlebars.
5. Always keep your feet within the foot area while
driving the scooter.
Page 31
OPERATING THE SCOOTER
28
6. Check before you power on the scooter:
Ensure your scooter is in
drive mode (not in
“freewheel” mode)
Check the “freewheel”
mode lever is in the
pushed down position
Seat is locked into the
desirable position
Move the seat forwards
and backwards to ensure
it is stationary.
Are the batteries charged?
Check the dashboard to
verify the charge status of
the batteries
Are the brakes working?
Check by driving slowly
and stopping again
Are the tires and wheels
free from any damaged?
Visually check the tires
and wheels
8.1 POWERING ON/OFF
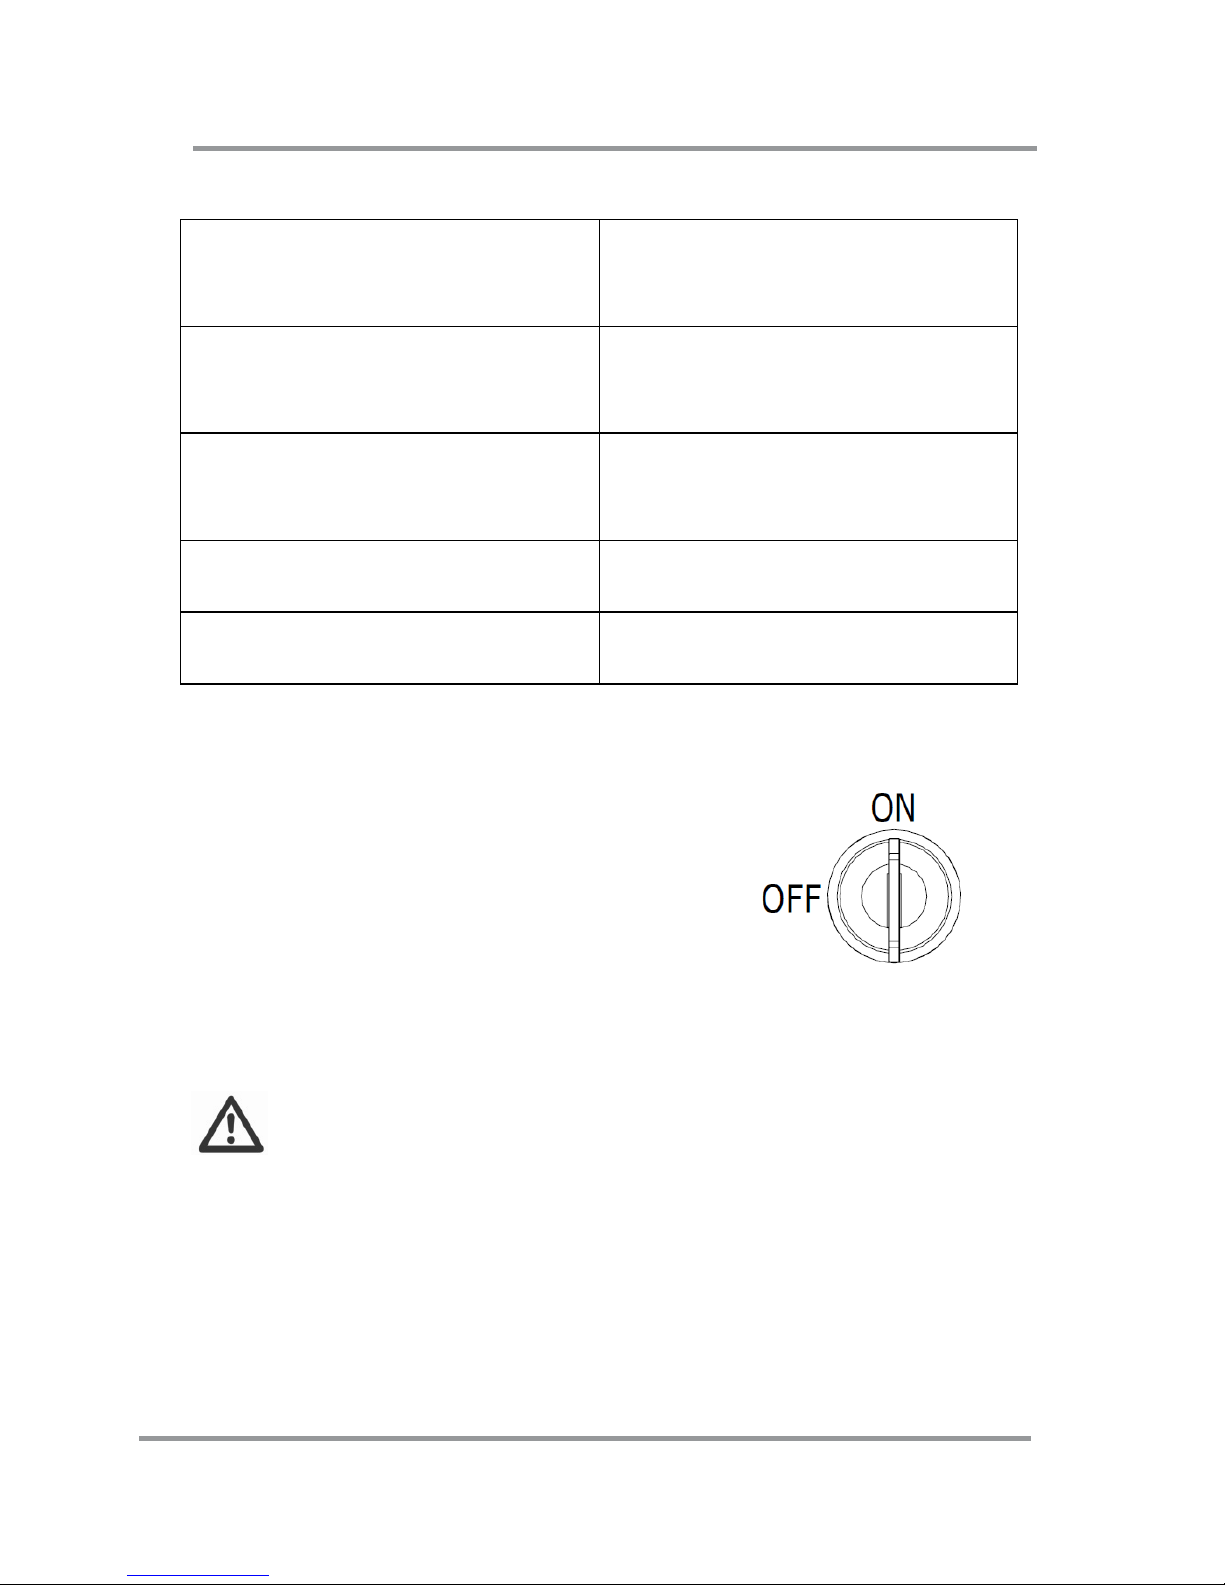
The switch is located near the right
side of the dashboard.
Insert the key into the switch and
turn it to the right to power on the
scooter.
Turn it to the left to power off the
scooter.
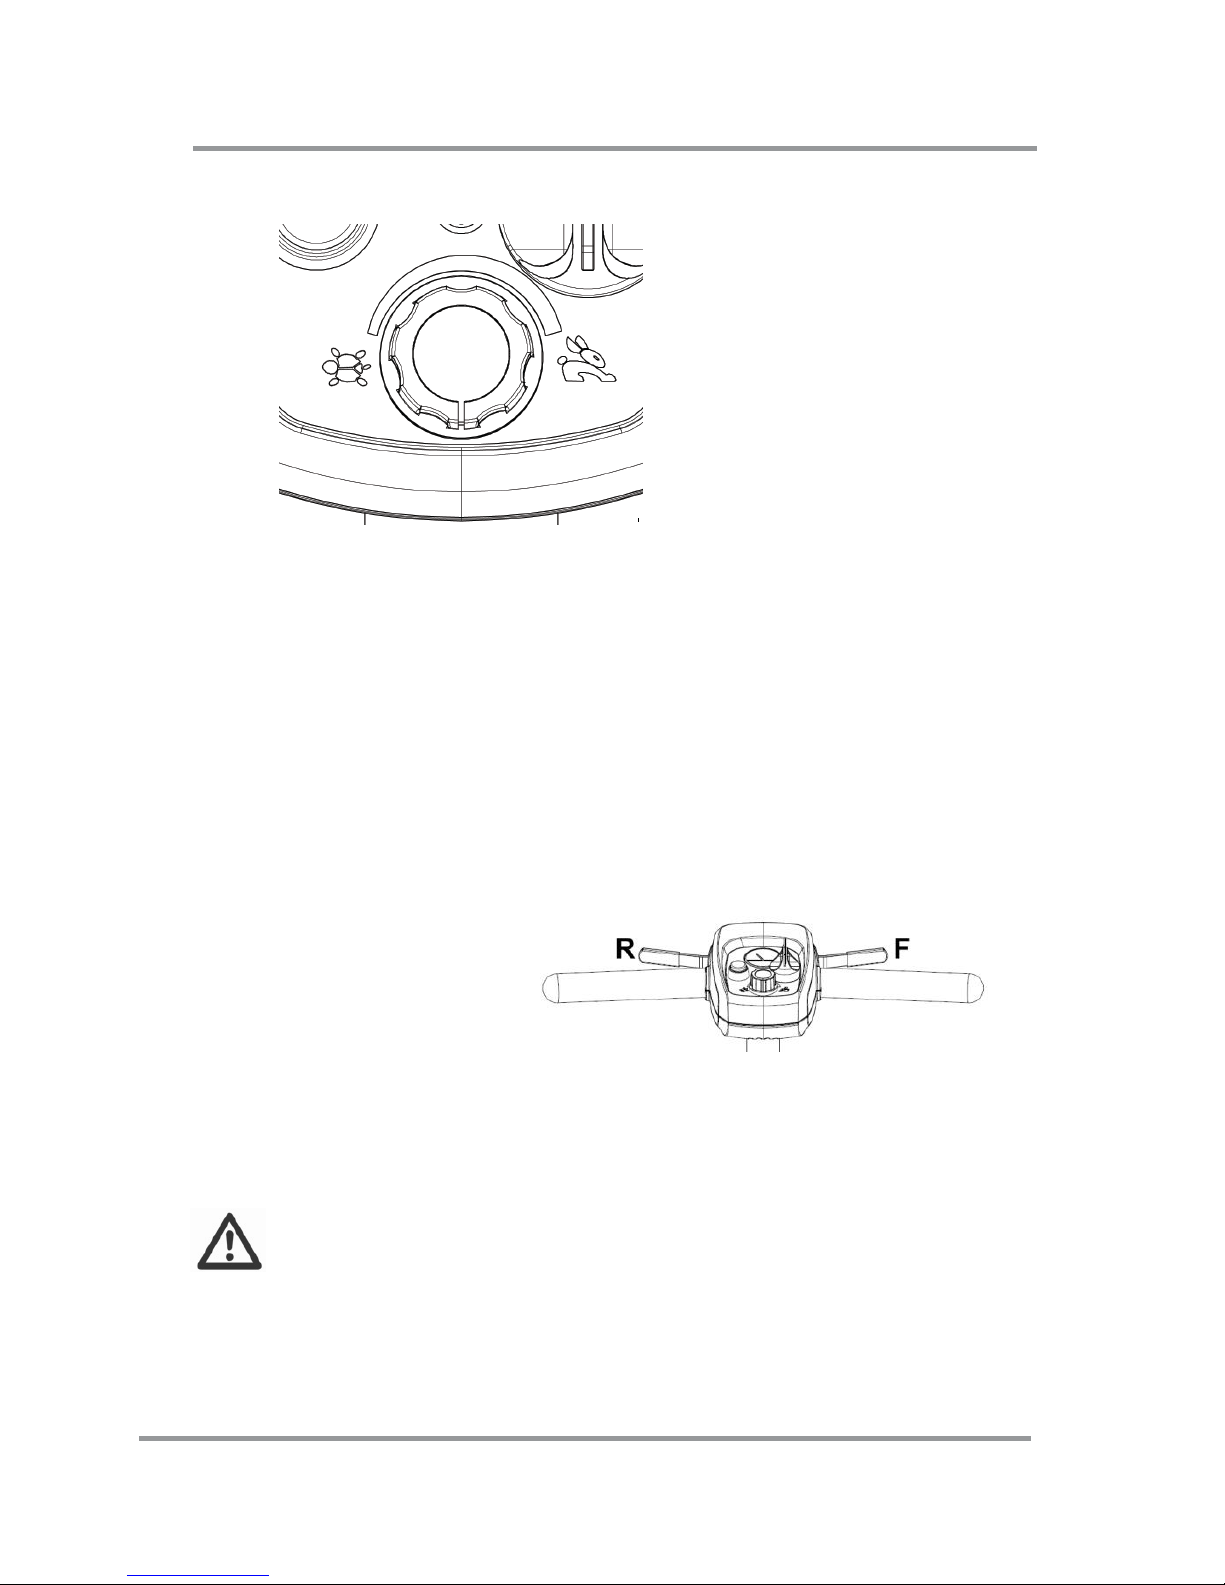
8.2 ADJUSTING THE SPEED
Use the speed adjustment mechanisms to adjust
the speed to suit your driving conditions.
Always use lower speed if you are uncertain about the
driving conditions.
There is one mechanism to control the speed of your
scooter.
1. Speed Control Dial:
a. It is located in the center of the dashboard.
Page 32
OPERATING THE SCOOTER
29
b. It is designed to allow you to adjust the speed
from low to maximum speed (Maximum = Rabbit).
Anticipated Speed levels:
c. The speed levels are tested under controlled
environments and your driving speed may vary
depending on the driving conditions and loads.
8.3 DRIVING FORWARDS AND
BACKWARDS
Hold the tiller handles firmly with both hands.
Use your right index and middle fingers to pull the right
side of the lever to move forward.
F= driving forwards
Release the lever and
allow the scooter to
come to a complete stop.
Use your left index and middle fingers to pull the left
side of the lever to move backwards.
R= driving backwards
Do not pull both sides of the throttle control lever
simultaneously.
Page 33
OPERATING THE SCOOTER
30
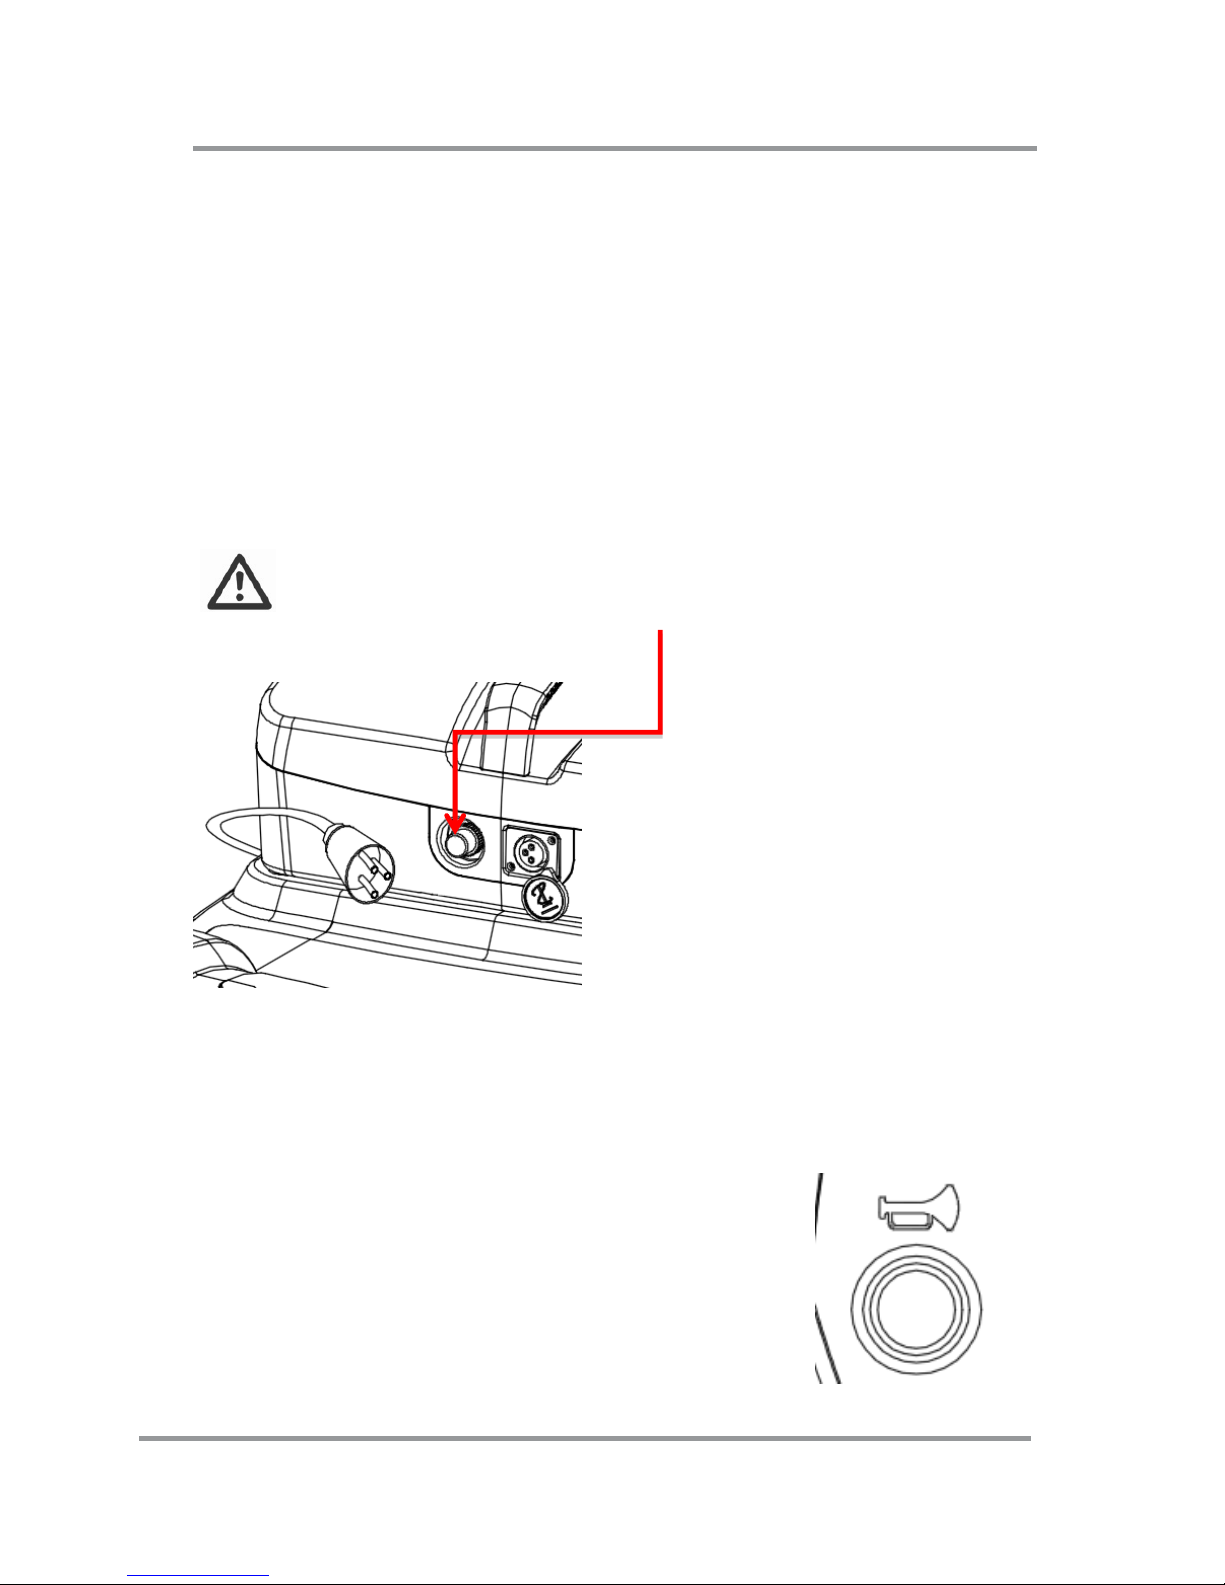
8.4 OVERLOAD PROTECTION
The overload protection switches the power off when the
motor becomes overloaded while trying to climb over
too high an obstacle, such as a curb or trying to climb
too steep of an incline.
If the motor is overloaded, the following happens:
• The scooter becomes noticeably slower and then stops
• The scooter system shuts down the scooter
To rectify this:
Switch the scooter off and allow it to cool down for a
few minutes.
Push to reset the overload switch located on the
battery box (see diagram).
Switch the scooter on and reverse away from the
obstacle (such as a curb) and then avoid the obstacle.
8.5 SWITCHING ON THE HORN
Press the horn button.
It will sound for as long as you hold the
button down.
Page 34
OPERATING THE SCOOTER
31
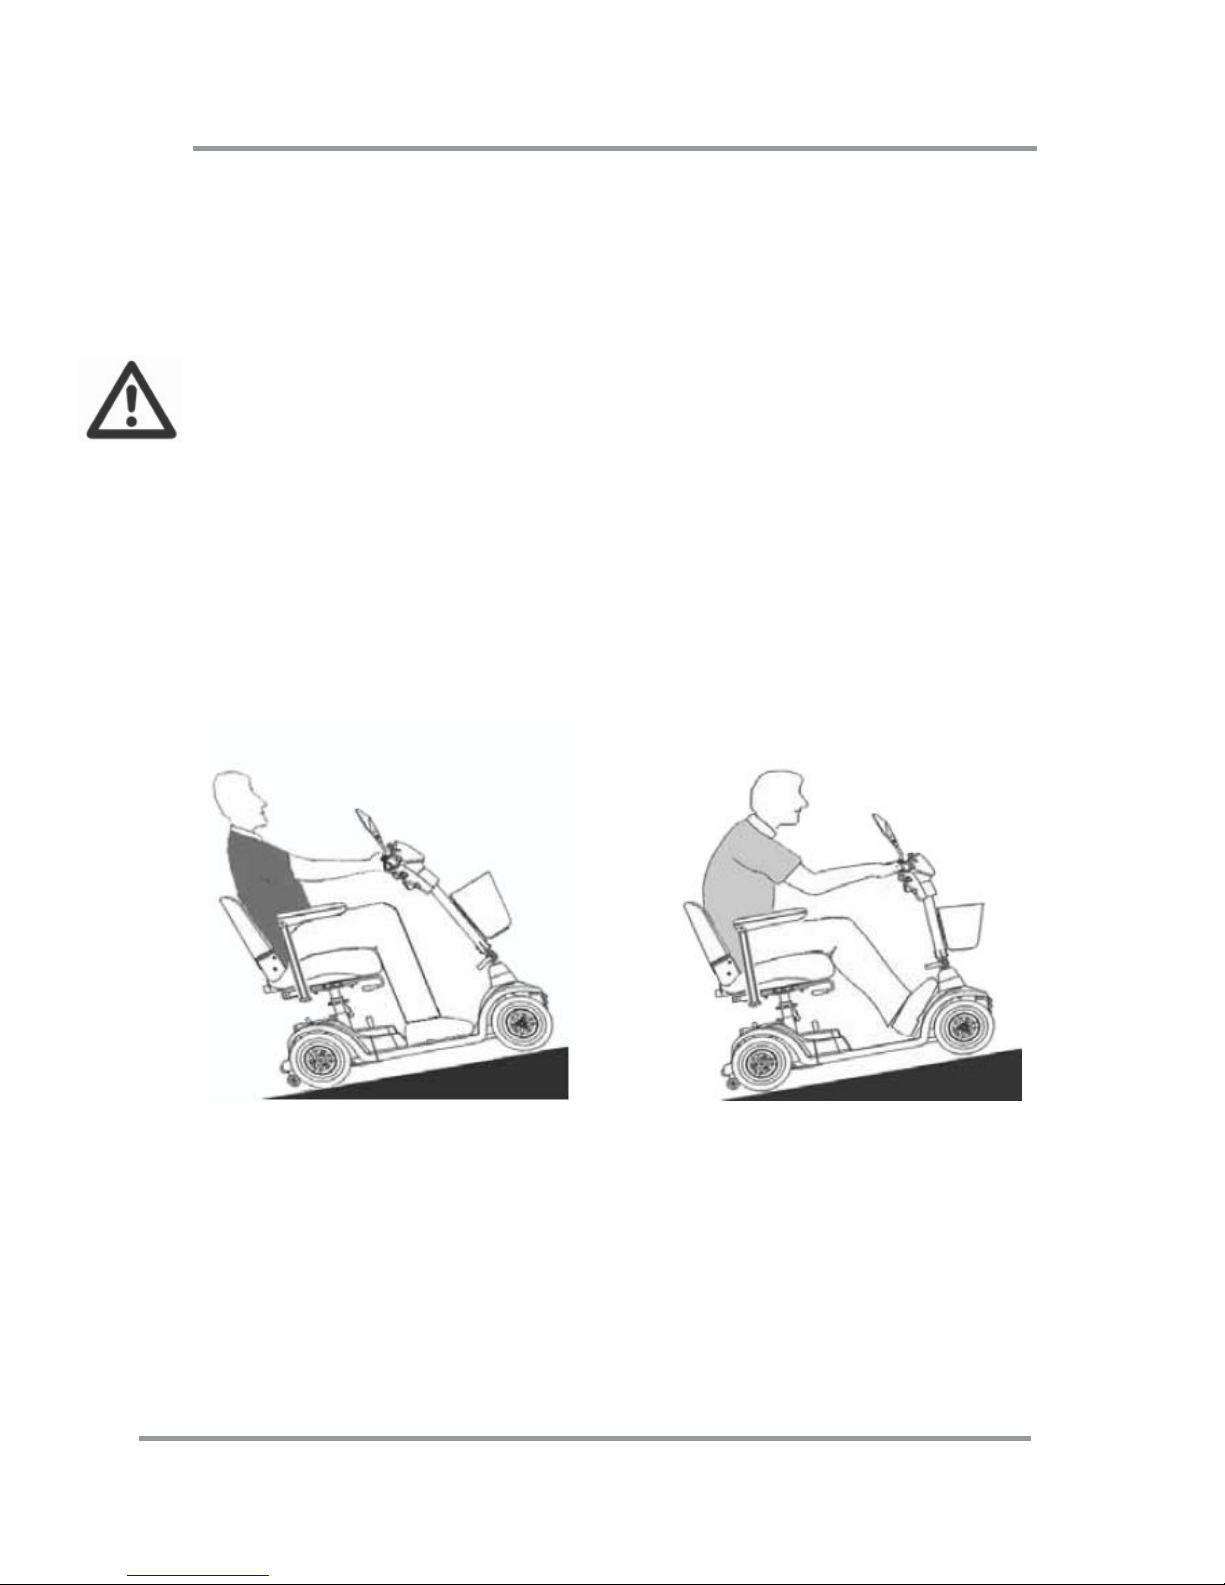
8.6 DRIVING ON AN INCLINE
TIPPING HAZZARD!
When driving on an incline reduce your speed. Lean
your body forward to increase your stability and to avoid
tipping backwards. Always avoid leaning backwards
while driving up an incline. Observe the safe climbing
angle in the product specifications and always access
the driving surface, as this can be a factor for safe
incline driving (For example ice and leaves can cause
loss of wheel traction and prevent safe incline driving).
Avoid stopping and re-starting on an incline if possible.
If you do need to stop, re-start driving very slowly and
then slowly increase your speed smoothly.
Avoid leaning backward Lean forwards to increase
(not recommended). stability (recommended).
NOTE: Maximum incline angle = 8 degrees !
Page 35
BATTERY AND CHARGING THE BATTERY
32
99.. BBAATTTTEERRYY AANNDD CCHHAARRGGIINNGG TTHHEE
BBAATTTTEERRYY
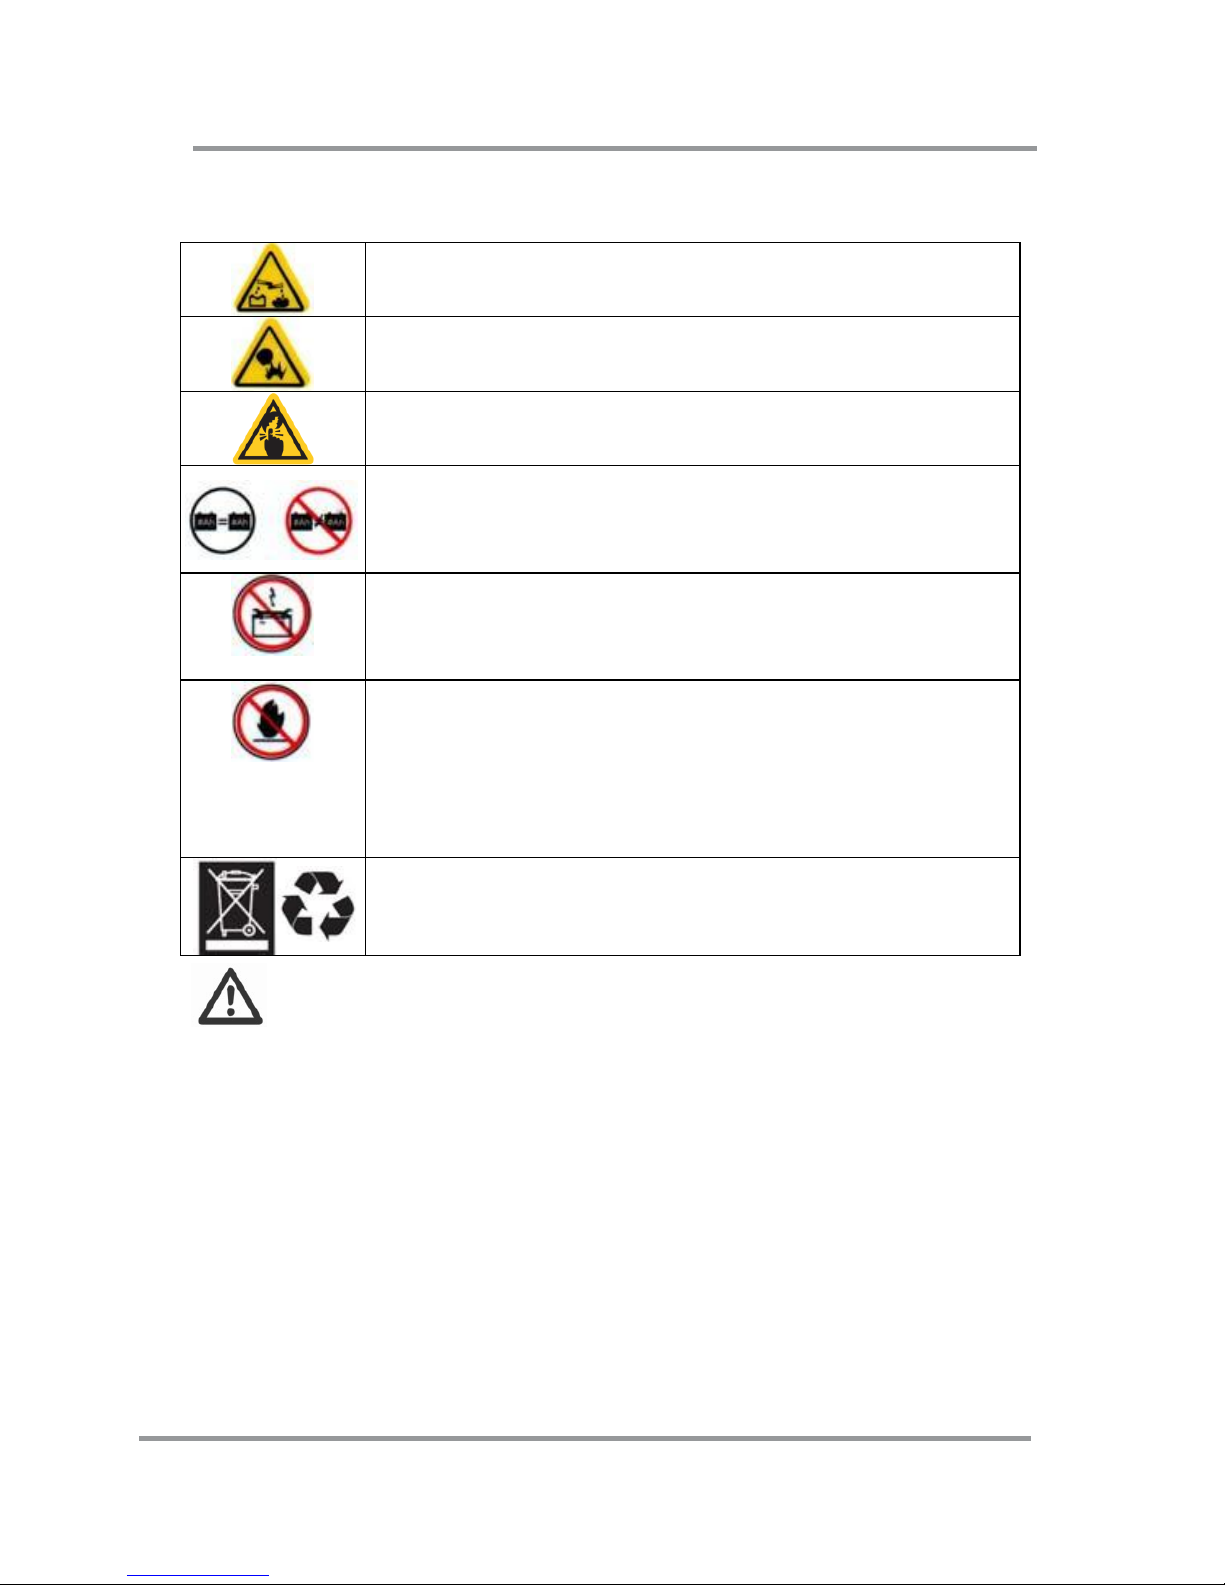
Corrosive chemicals contained in battery.
Explosive conditions exist!
Warning hands pinching!
Do not use batteries with different amphour (Ah) capacities.
Keep tools and other metal objects away
from battery terminals. Contact with tools
can cause electrical shock.
Flammable material contained in battery.
Do not expose to heat sources such as
open flame or sparks. Do not transport
batteries with flammable or combustible
items.
Disposal and recycling - Contact your
approved service provider.
New batteries MUST be fully charged
(approximately 24 hours) prior to initial use of
the equipment.
Always charge new batteries before initial use or battery
life will be reduced.
As a general rule, you should recharge your batteries as
frequently as possible to assure the longest possible life
and to minimize required charging time. Plan to
recharge them when you do not anticipate using the
equipment.
Page 36
BATTERY AND CHARGING THE BATTERY
33
The range per battery charge, using recommended
batteries, should be approximately 8 to 12 hours of
typical operation. Extensive use on inclines may
substantially reduce per charge mileage.
9.1 BATTERY STATUS DISPLAY
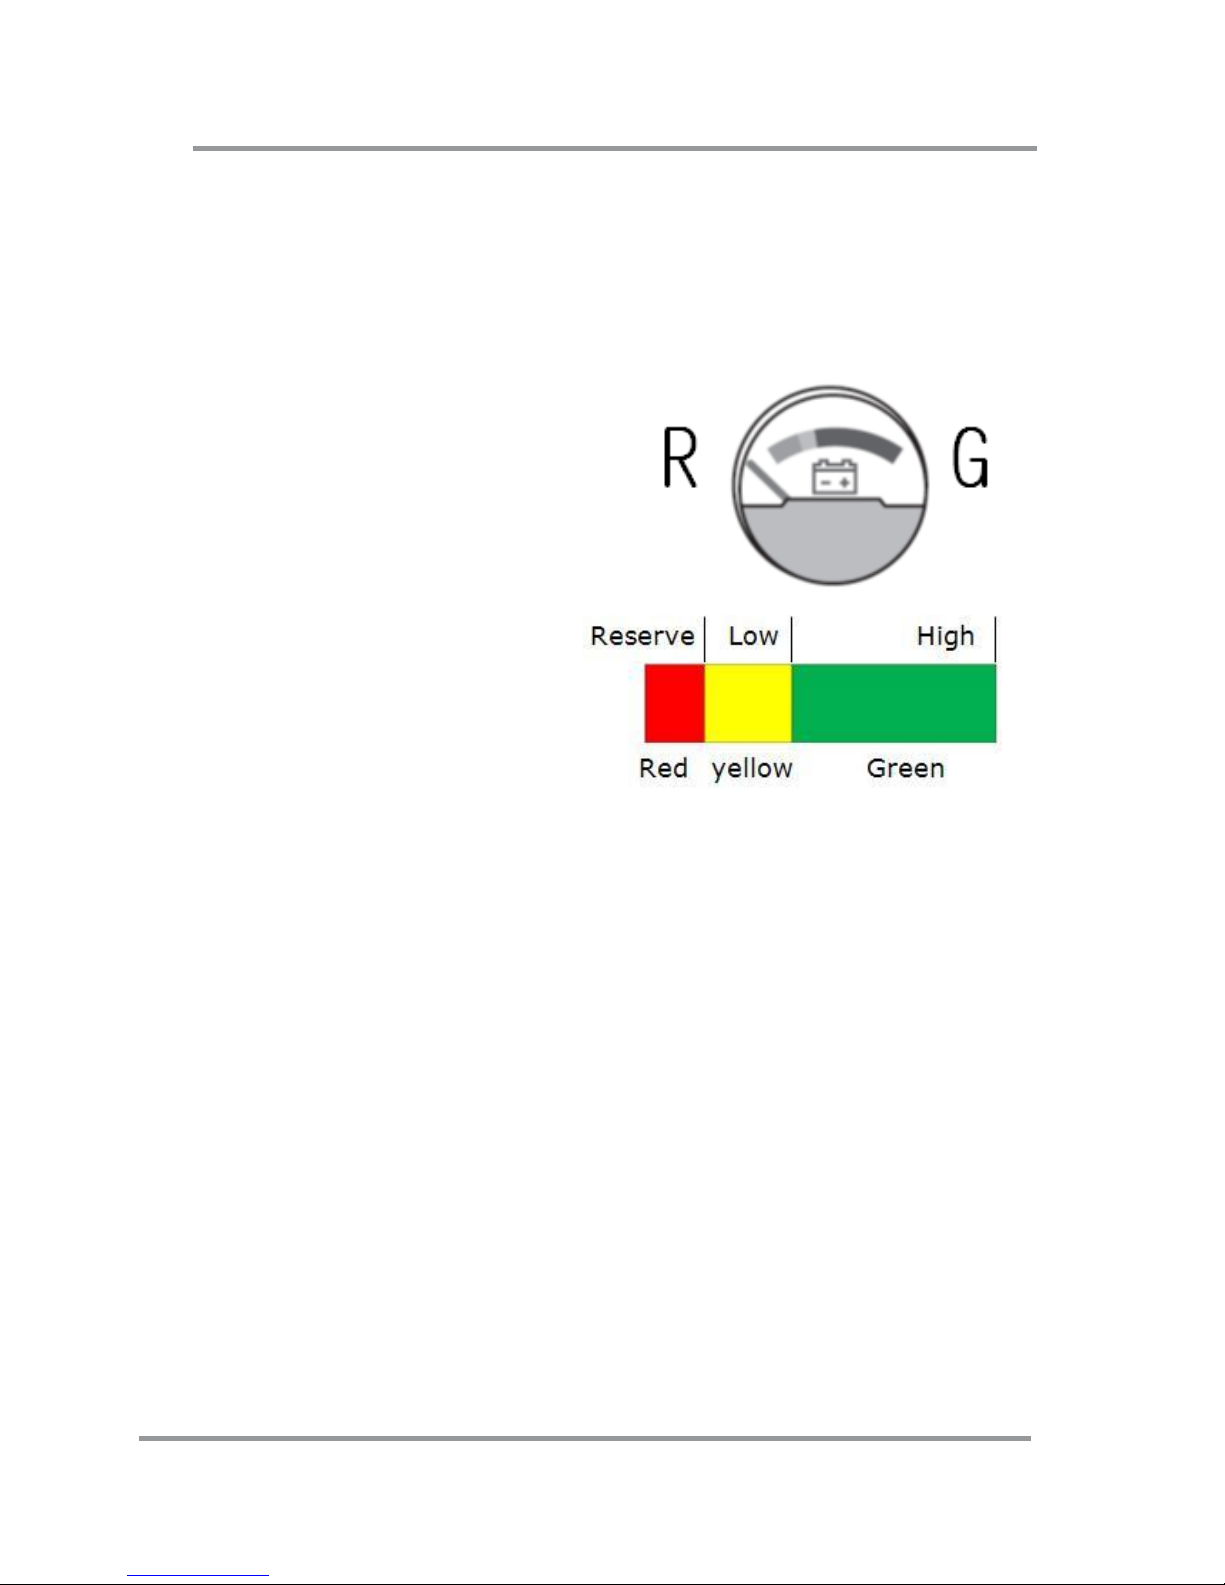
When the key is switched
“ON”, the battery gauge will
display the battery power
capacity by indicating red,
yellow and green areas
respectively.
Green area indicates a full
charge from the
battery. Red area
indicates low power.
The remaining power
indicated by the
battery gauge will be varied by the actual driving time
and how you drive. Repeated starting, stopping or
climbing will consume the power more quickly.
If the vehicle is under a heavier load, such as fast
acceleration or driving up inclines, the battery status
display may move towards the red zone.
This may not indicate the actual status of the batteries.
After a journey, the battery status display may move
towards the green zone after the scooter has been
turned off for a long period of time.
If a battery status display is in the red zone at the end
of a journey, the battery must be charged immediately.
Otherwise, it can lead to battery damage.
Page 37
BATTERY AND CHARGING THE BATTERY
34
9.2 CHARGING THE BATTERIES
It is imperative that you observe the sequence for
connecting and disconnecting the battery charger.
Be sure to follow the procedures shown below
accordingly.
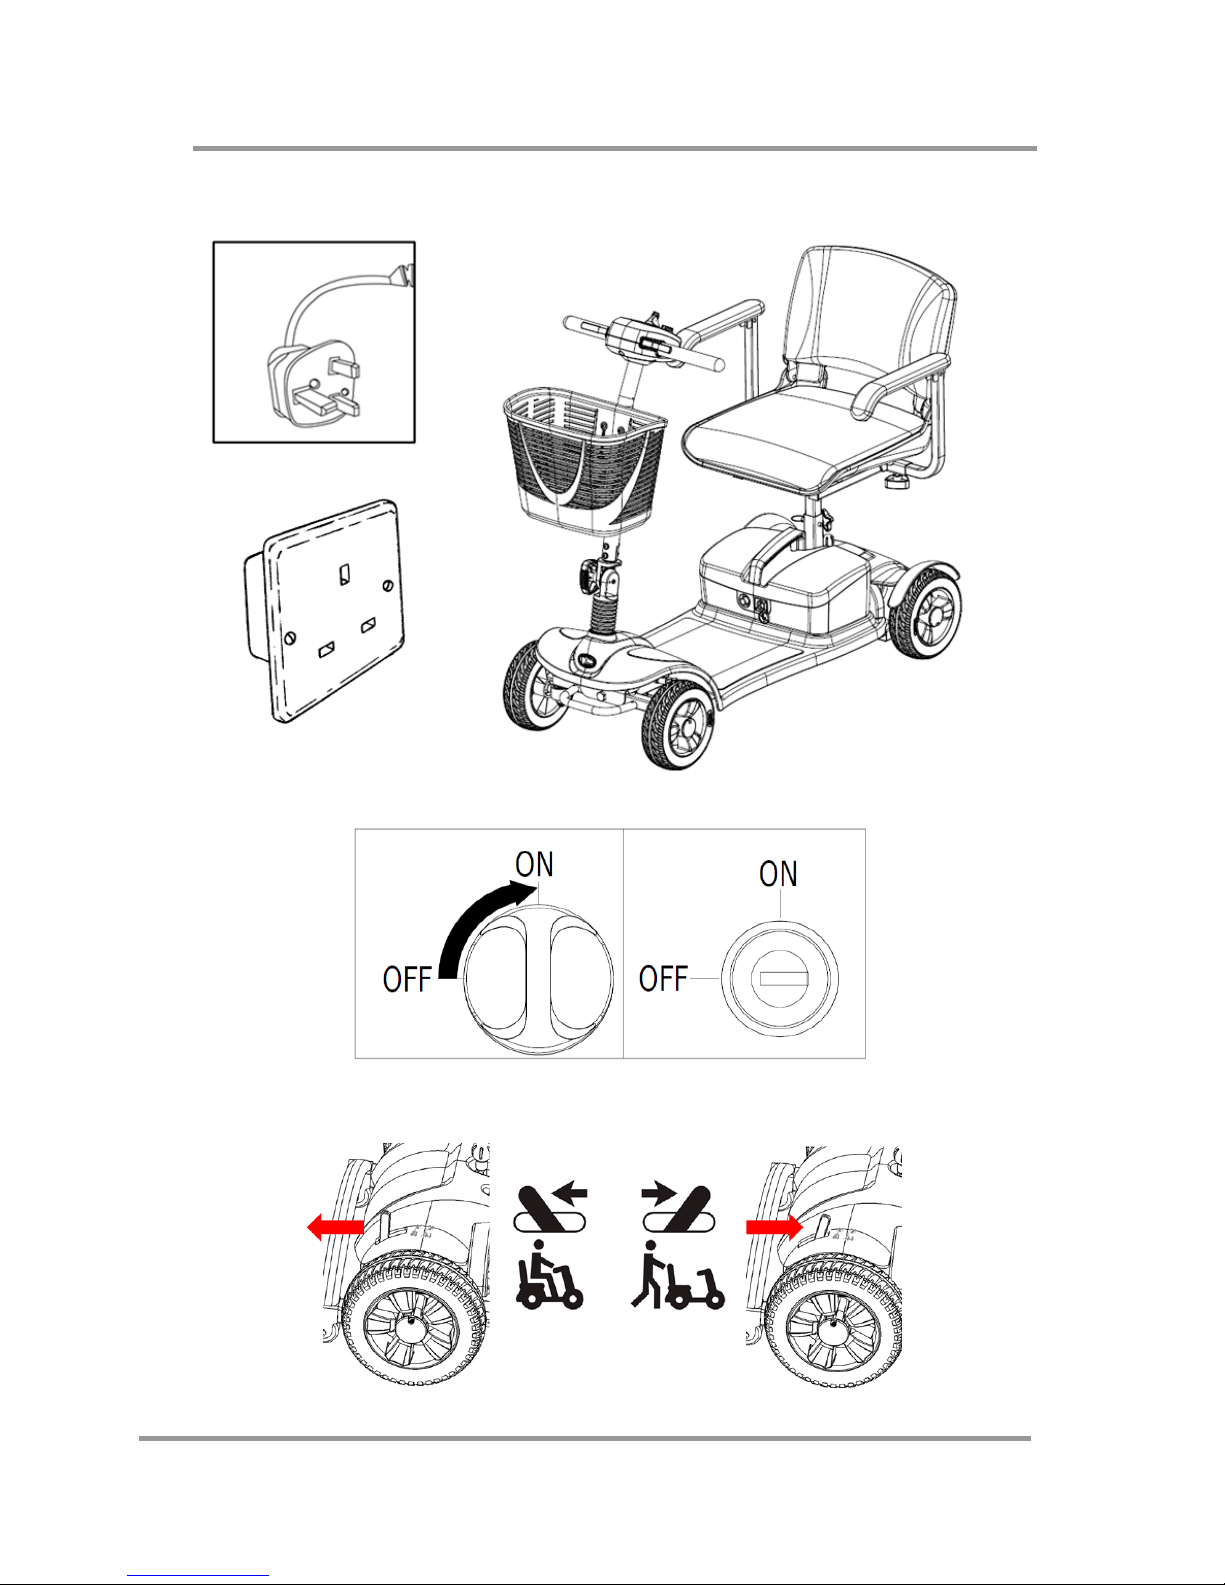
1. Turn the scooter key switch to ”OFF”.
2. Connect the charger cord to the power outlet.
3. Open the charging socket cap then connect the
charger plug to the charging socket.
4. The charger’s LED light will be red at the beginning
of a charge. The charging duration is at least 8 - 12
hours (but this will vary), based on the status of the
battery and temperature.
5. The red LED will turn to green when the charging is
complete.
6. Disconnect the cord and remove the round plug from
the charge socket.
Do not share the outlet with any other
device.
To avoid the risk of electric shock, this
equipment must only be connected to
a grounded supply main.
Never use an extension cord to plug in
your battery charger.
Page 38
BATTERY AND CHARGING THE BATTERY
35
Step 1. Position the scooter near an electric outlet.
Step 2. Switch the scooter off and remove the key.
Step 3. Ensure the lever for “freewheel” mode is
pushed down to the “drive” position.
Page 39
BATTERY AND CHARGING THE BATTERY
36
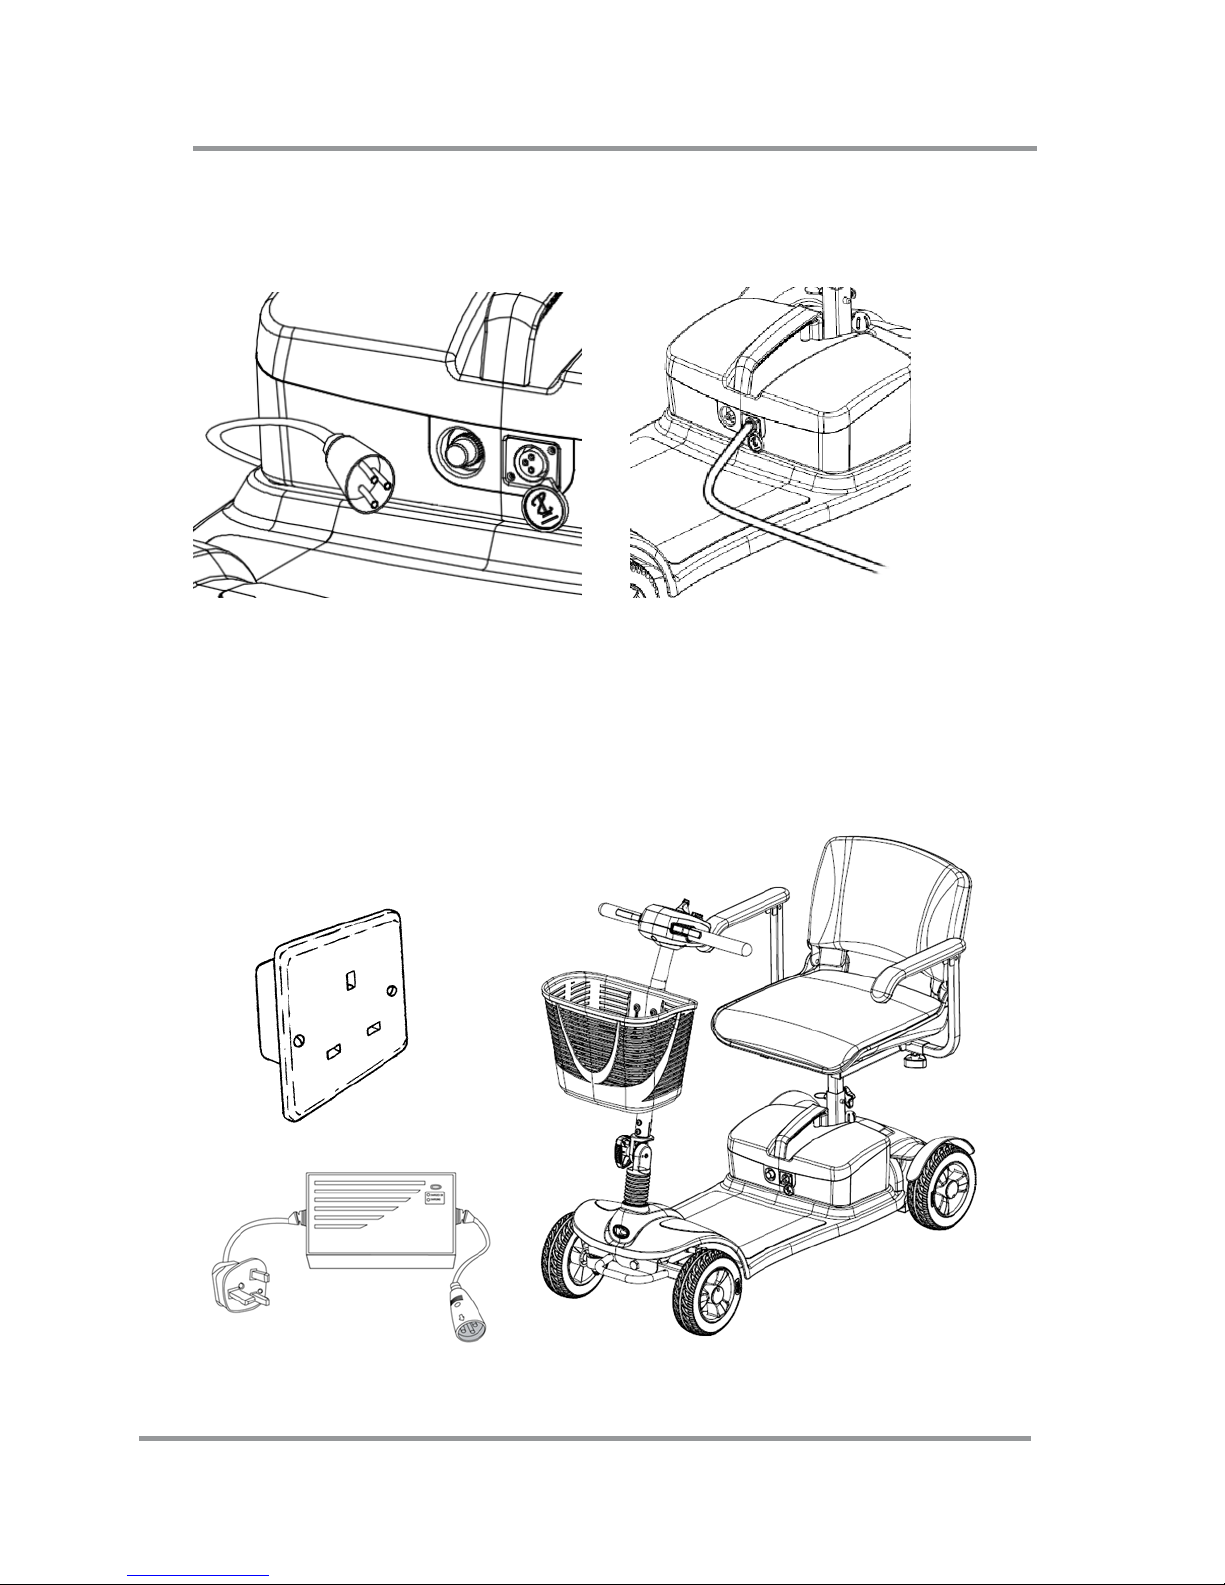
Step 4. Connect the battery charger plug into the
scooter charging socket located in the center of the
battery box.
Step 5. Connect the battery charger power plug into an
electrical outlet (AC100-240V, 50 to 60 Hz) and charge
the battery. (Note: There is no switch on the battery
charger).
Page 40

BATTERY AND CHARGING THE BATTERY
37
LED information at battery charger during
Charging:
LED-> Color-> Meaning
1 --- Red --- charging in progress
2 --- Green --- charging is complete
9.3 AFTER CHARGING
(1) Remove the battery charger jack plug from the
battery box socket.
(2) Remove the battery charger plug from the electric
outlet.
9.4 ERROR CODE
Flash
code
Possible
Solution
1
The battery
needs charging or
there is a bad
connection to the
battery.
Check the connections to
the battery. If the
connections are good,
try charging the battery.
2
There is a bad
connection to the
motor.
Check all connections
between the motor and
the controller.
3
The motor has a
short circuit to a
battery
connection.
Contact your service
agent.
4
Not used.
5
Not used.
Page 41

BATTERY AND CHARGING THE BATTERY
38
6
The controller is
being inhibited
from driving.
Check the battery
charger connector.
Remove the battery
charger from the
scooter.
7
A speed control
lever fault is
indicated.
Make sure that the
speed control lever is in
the rest position before
switching on the scooter.
8
A controller fault
is indicated.
Make sure that all
connections are secure.
9
The parking
brakes have a
bad connection.
Check the parking brake
and motor connections.
Make sure the controller
connections are secure.
10
Excessive voltage
has been applied
to the controller.
Check the battery
connections. This is
usually caused by a poor
battery connection.
If your meter diagnostic light shows any of the above
signals, please contact your approved service provider!
Page 42

EMI
39
1100..EEMMII
This portion of the content will provide the user with
basic information about the problems with EMI
(electromagnetic interference), protective measures can
be used to either lessen the possibility of exposure or to
minimize the degree of exposure; this section also
shows some conditions that unexpected or erratic
movements may cause.
It is very important that you read this
information regarding the possible effects of
electromagnetic interference on your electric KYMCO
SCOOTER.
ELECTROMAGNETIC INTERFERENCE (EMI) FROM
RADIO WAVE SOURCES
Powered scooters may be susceptible to electromagnetic
interference (EMI), which is interfering electromagnetic
energy (EM) emitted from sources such as radio stations,
TV stations, amateur radio (HAM) transmitters, two-way
radios, and cellular phones. The interference (from
radio wave sources) can cause the powered scooter to
release its brakes, move by itself, or move in
unintended directions. It can also permanently damage
the powered scooter’s control system. The intensity of
the interfering EM energy can be measured in volts per
meter (V/m). Each powered scooter can resist EMI up to
a certain intensity level”. The higher the immunity level
the greater the protection. At this time, current
technology is capable of achieving at least a 20 V/m
immunity level, which would provide useful protection
from the more common sources of radiated EMI. This
powered scooter model as shipped, with no further
modification, has an immunity level of 20 V/m without
any accessories.
Page 43

EMI
40
There are a number of sources of relatively intense
electromagnetic fields in the everyday environment.
Some of these sources are obvious and easy to avoid.
Others are not apparent and exposure is unavoidable.
However, we believe that by following the warning listed
below, your risk to EMI will be minimized.
The sources of radiated EMI can be broadly
classified into three types:
1. Hand-held portable transceivers ( transmitter-
receivers with the antenna mounted directly on the
transmitting unit). Examples include: citizens band
(CB) or hand held radios,(security, fire, and police
transceivers), cellular telephones and other personal
communication devices.
NOTE: some cellular telephones transmit a
signal while they are ON, even though they are
not being used.
2. Medium-range mobile transceivers, such as those
used in police cars, fire trucks, ambulances and taxis
usually have the antenna mounted on the outside of
the scooter.
3. Long-range transmitters and transceivers, such as
commercial broadcast transmitters (radio and TV
broadcast antenna towers) and amateur (HAM) radios.
NOTE: Other types of hand-held devices, such as
cordless phones, laptop computers, AM/FM
radios, TV sets, CD player, and cassette players,
and small appliances, such as electric shavers
and hair dryers, are not likely to cause EMI
problems to your powered scooter.
Page 44

EMI
41
POWERED SCOOTER ELECTROMAGNETIC
INTERFERENCE (EMI)
EM energy rapidly becomes more intense as one moves
closer to a transmitting antenna (source). The EM
fields from hand-held radio wave sources (transceivers)
are of special concern.. It is possible to unintentionally
bring high levels of EM energy very close to the
powered scooter’s control system while using these
devices; this can affect your scooters movement and
braking. Therefore, the warnings listed below are
recommended to prevent possible interference with the
control system of a powered scooter.
Electromagnetic interference (EMI) from sources
such as radio and TV stations, amateur radio
(HAM) transmitters, two-way radios, and cellular phones
can affect motorized scooters. Following the warnings
listed below should reduce the chance of unintended
brake release or powered scooter movement which
could result in serious injuries.
1. Do not operate hand-held transceivers-receivers,
such as citizens band (CB) radios, or turn ON
personal communication devices, such as cellular
phones, while the powered scooter is turned ON.
2. Be aware of nearby transmitters, such as radio or
TV stations, and try to avoid getting close to them.
3. If unintended movement or brake release occurs,
turn the powered scooter OFF as soon as it is safe.
4. Be aware that adding accessories or components,
or modifying the powered scooter, may make it
more susceptible to EMI.
5. Report all incidents of unintended movement or
brake release to the scooter manufacturer, and note
whether there were sources of EMI nearby.
Page 45

EMI
42
IMPORTANT INFORMATION
20 Volts per meter (V/m) is generally a useful
immunity level against EMI (the higher the level, the
greater the protection).
This product has an immunity level of 20 V/m without
any accessories connected to it.
Page 46

By KWANG YANG Motor Co., Ltd.
First Edition, OCT. 2014
All rights reserved. Any reproduction or
unauthorized use without the written permission of
KWANG YANG Motor Co., Ltd.
is strictly prohibited.
T300-EQ10DA-A1
Date printed:Oct.2014
Page 47

KWANG YANG MOTOR CO., LTD
No.35 Wan Hsing Street,San Min Distrist
Kaohsiung Taiwan, Republic of China
Telephone:886-7-3822526
FAX: 886-7-3950021
 Loading...