

Page 1
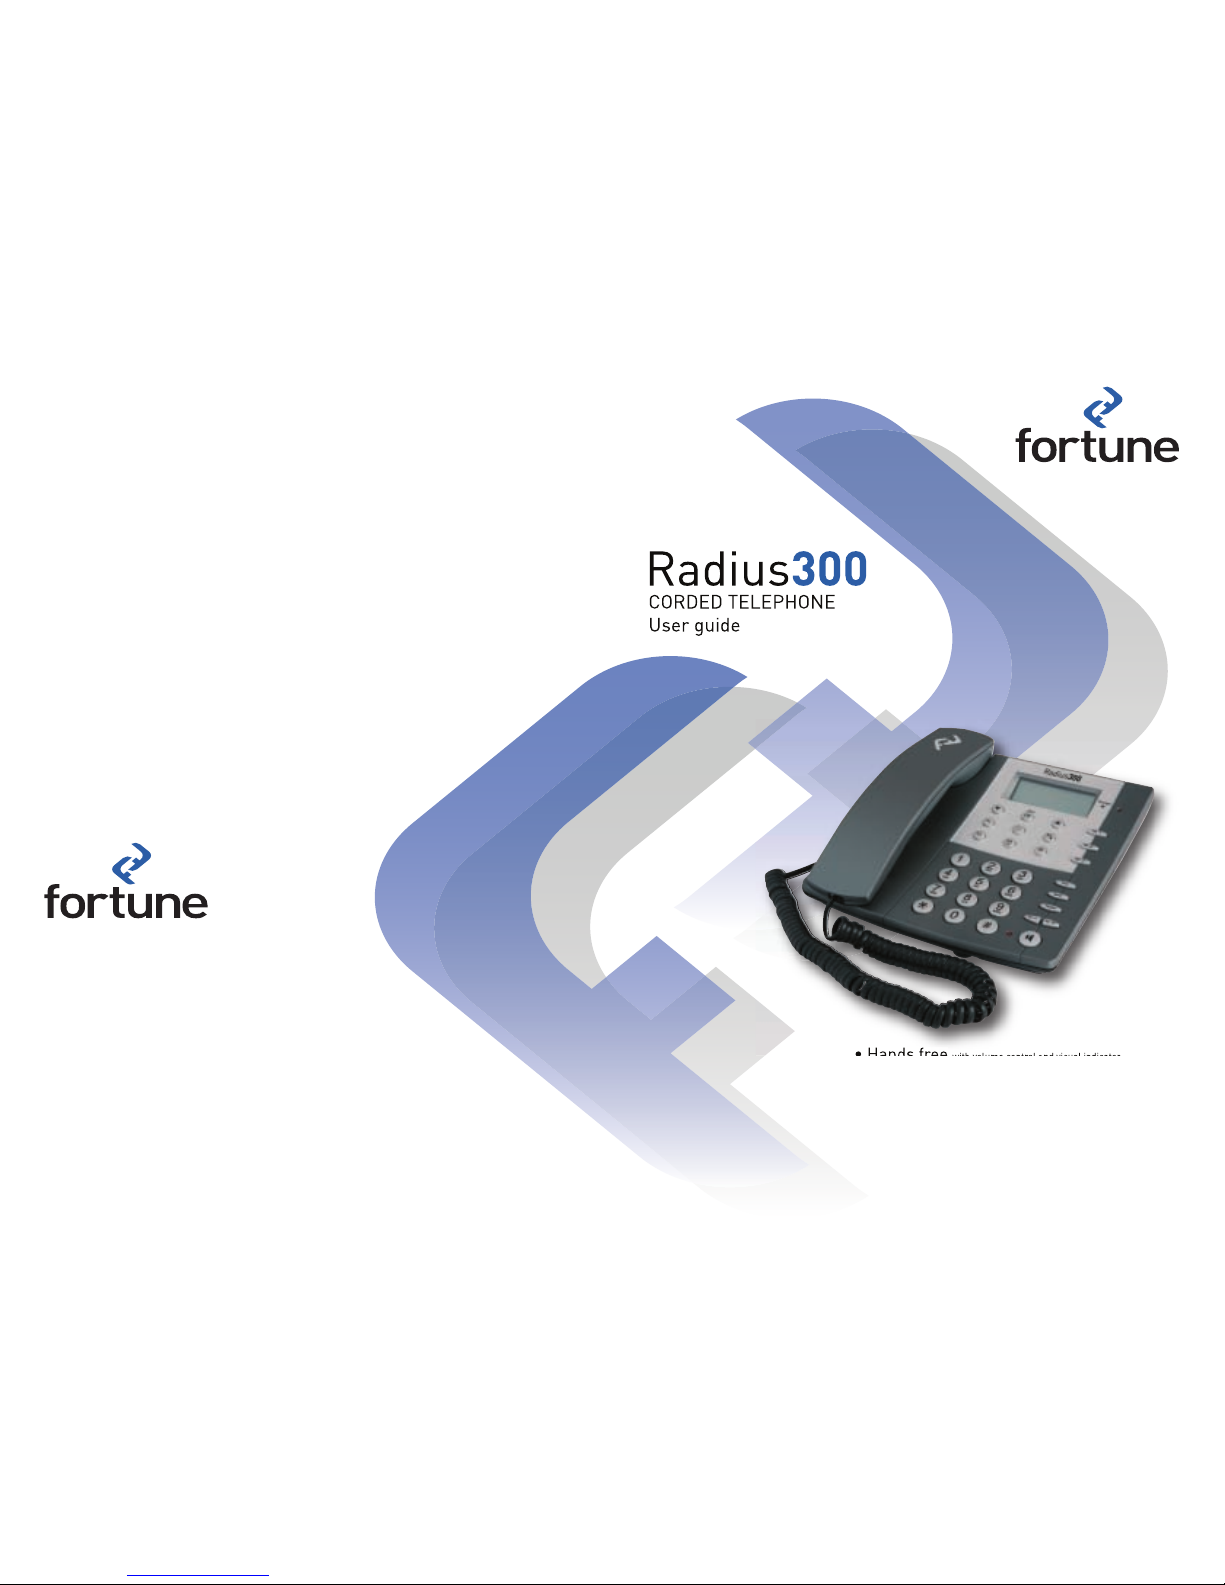
• Hands free
with volume control and visual indicator
• 50 entry name/number directory
• Large 3 line LCD with Caller Display
• Headset port (RJ9)
with amplifier
• Message waiting indicator
• 5 dual tone ring melodies
Item - Radius 300 Corded Telephone
Item Code - FORT/RADIUS300
Made in China
Fortune Products: Thorp Arch, Wetherby
West Yorkshire,Leeds, LS23 7RR
Registered in England No: 1543832
Printed in China - Issue 1
Page 2

32
Contents
Quick set up 4
Wall Mounting 5
Getting to know your Radius 300 telephone 6
Your Radius 300 display 8
Setting up your Radius 300 9
Audio 10
PBX setting 11
Settings 12
Using your Radius 300 14
Trouble shooting 18
General information 19
Warranty 20
Page 3
54
Quick set up
Follow these simple steps to prepare your
Fortune Radius 300 ready for use.
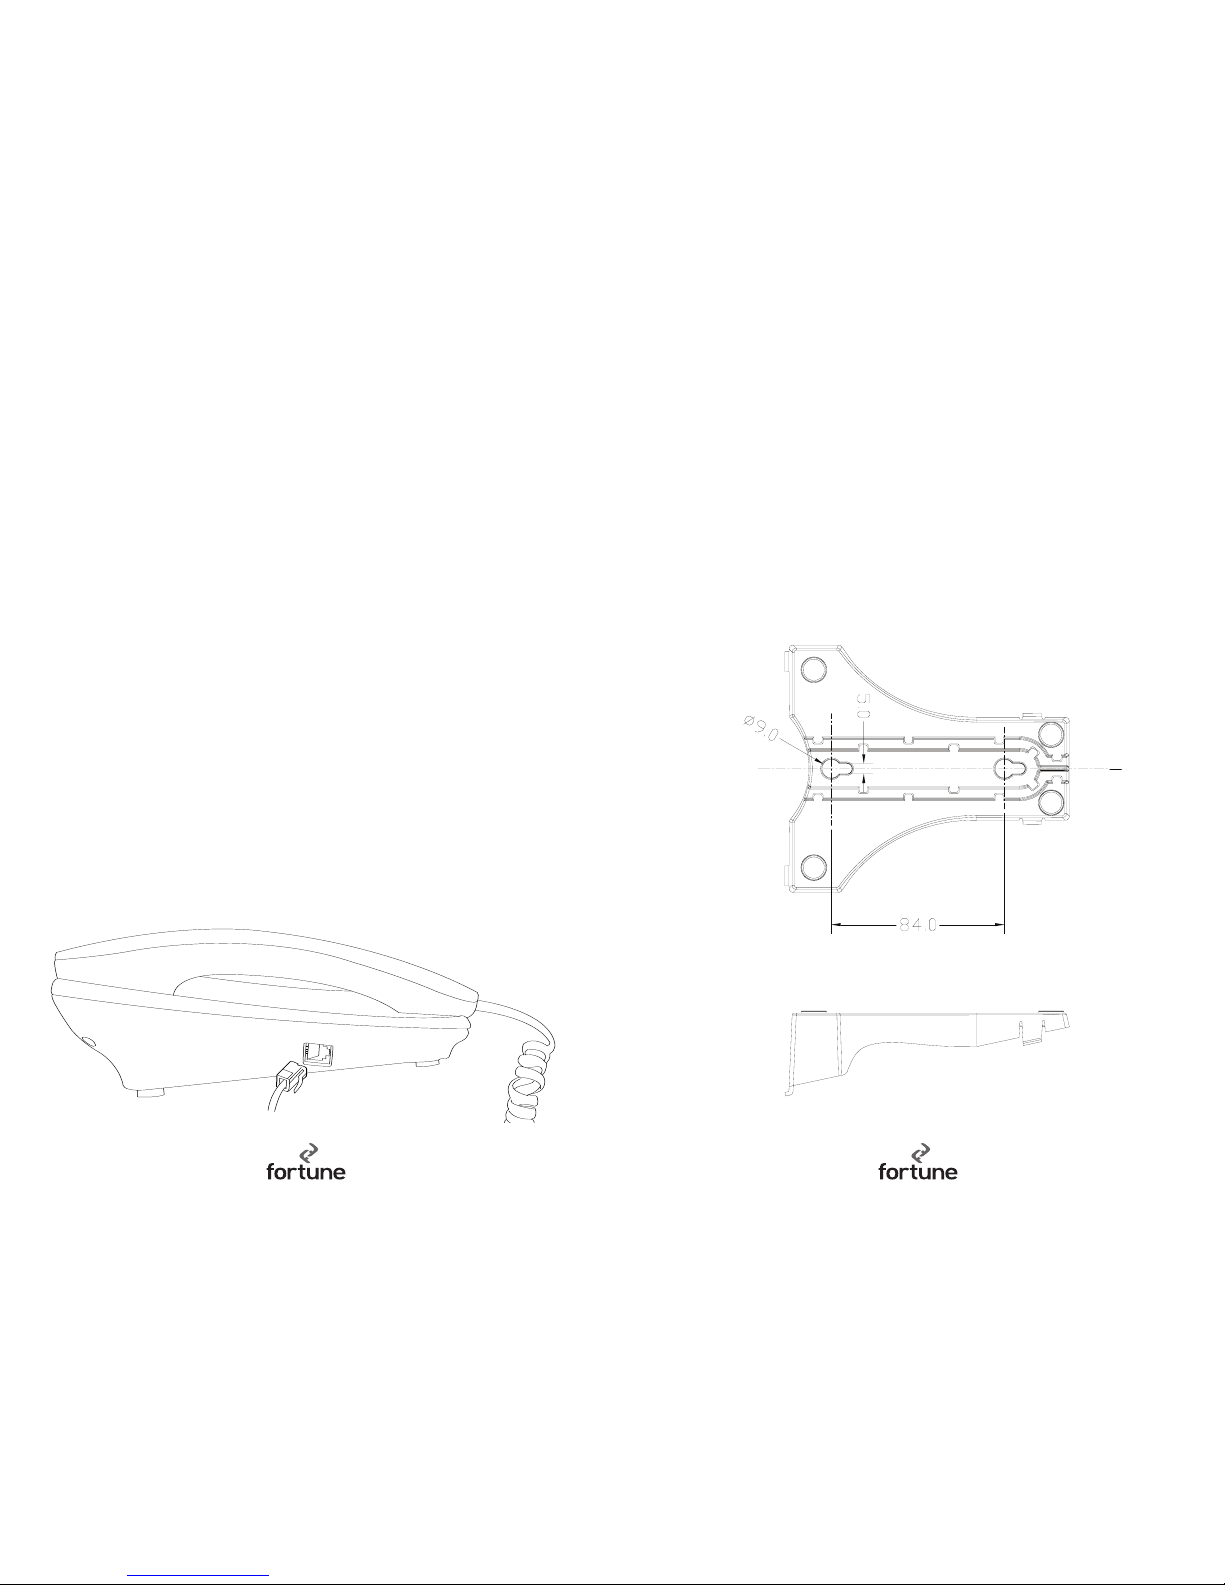
1) Plug the curly handset cord into the
bottom of the handset and into the side of
the telephone base adjacent to the speaker
grille.
2) Plug one end of the telephone line cord
into the socket on the rear of the
telephone, marked with a small telephone
icon, and the other into the telephone
socket on the wall.
3) Connect the round power connector into
the rear of the telephone and then connect
the mains power adaptor into the mains
socket and switch the power on.
4) The LCD will come on and display the
time and date flashing to indicate it has not
been set and the number of Caller ID
messages that have been received, which
will be 00.
5) To set the time and date, press the
menu/OK key, and using the up and down
arrows navigate to the ‘Settings’ menu,
then press menu/ OK to select.
The first option will be ‘time and date’.
Press menu/OK to select and enter the
date using the format; day, month, year.
Please note that you must enter leading
zeros, so the 3rd of Feb 2006, will be
entered as 03-02-06.
6) Then enter the time using the 24 hour
format.
7) Press menu/OK to save your settings
and then press Esc. To return to idle.
Your telephone is now ready for use
Wall Mounting
Your Fortune Radius 300 can be fixed
o the wall using the wall mount bracket,
two 20mm screws and two 6mm diameter
plugs supplied.
Page 4
76
Getting to know your
Fortune Radius 300
11
22
33
44
55
66
77
88
99
00
abc
Vol
Vol
Headset
Redial
Mute
M3
M2
M1
Menu
OK
Esc.
Del.
R
M
essages
def
jkl
mno
ghi
tuv
wxyz
pqrs
Calls
List
Menu/OK
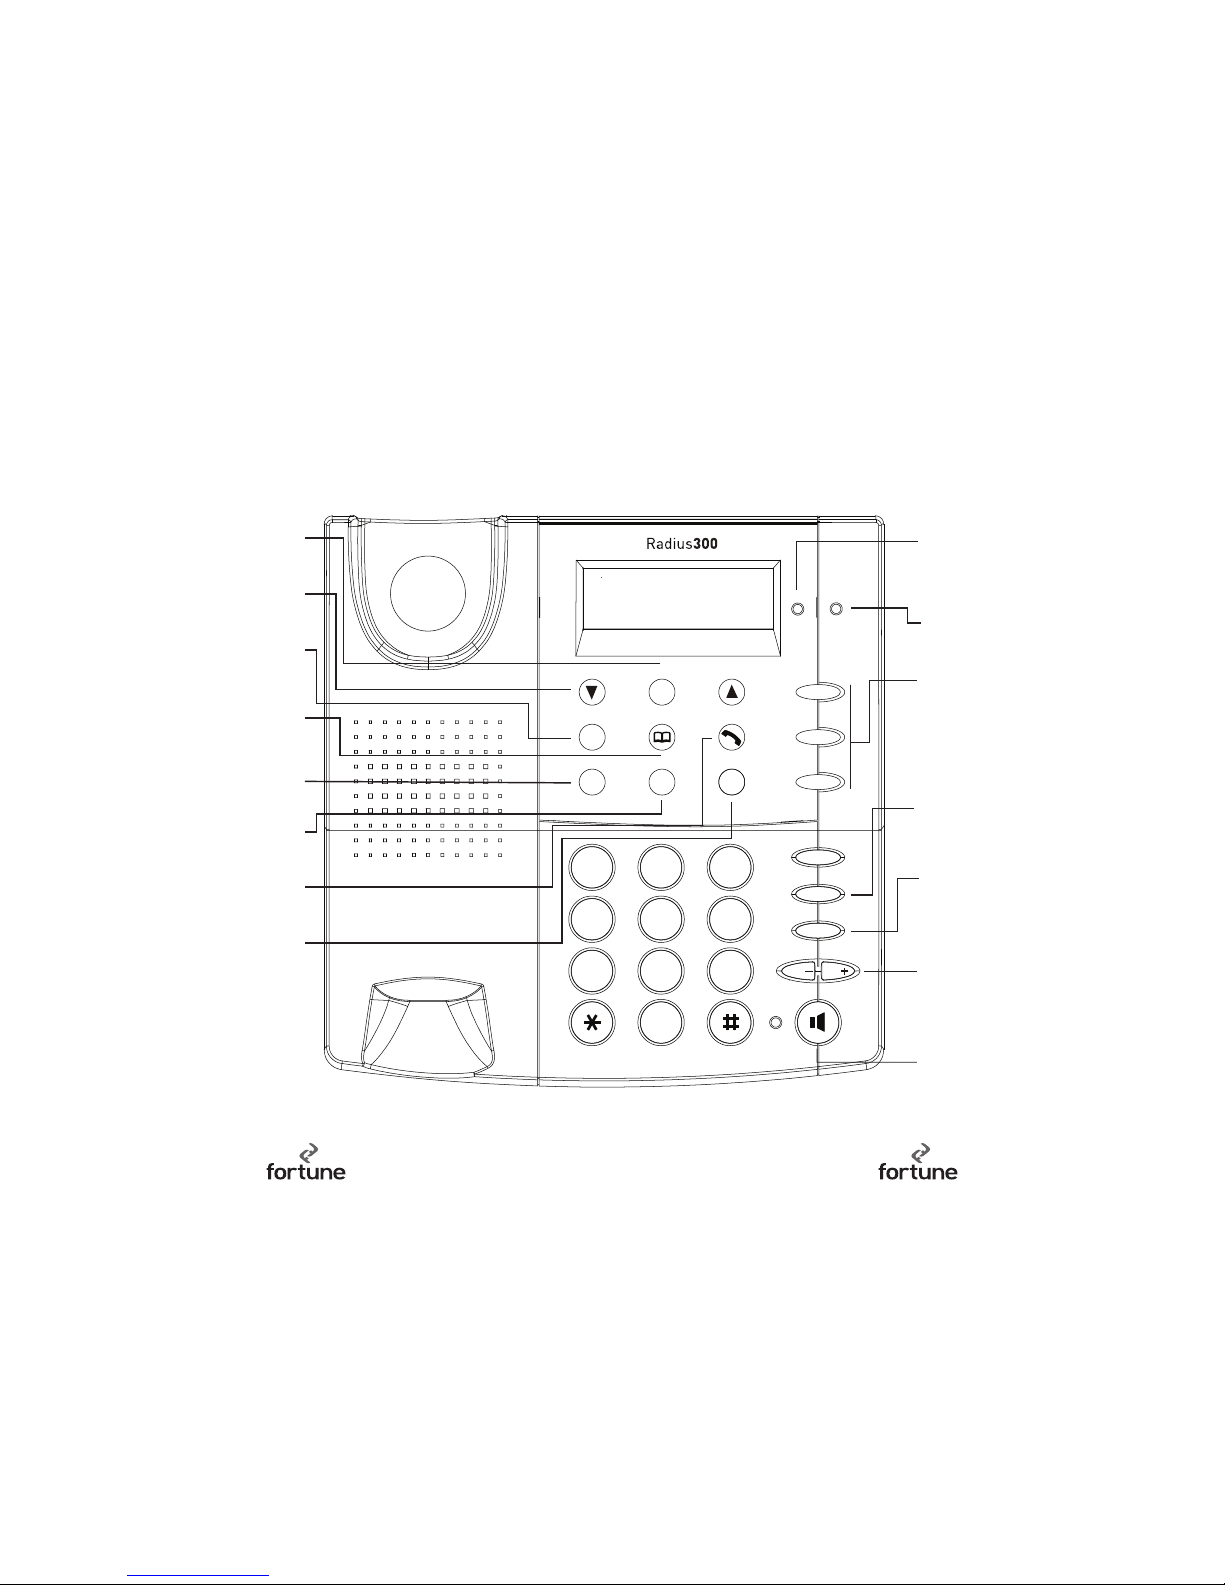
Use to access the set up menus and make
sel
ections within those menus.
Up and down arrows
Use to navigate through the menus and
make selections.
Esc.
Steps back one level of the menu from any
point. If pressed repeatedly will return to
idle from any menu.
Phonebook
Provides access to the phone book to review,
add and delete entries.
Del.
Deletes characters or digits in phonebook
mode or from the calls log.
Calls List
Accesses the list of the telephone numbers
that have called you.
Handset symbol
From idle dials the number shown on the
display.
R/Recall button
Use with special network services and
features, e.g. call divert.
Messages LED
Illuminates when you have messages
waiting on y
our telephone answering
service. It is compatible with most private
switchboards.
Ringer LED
(This is next to the messages one)
Flashes when you have an incoming call.
M1, M2 and M3
Direct one touch memories.
Mute
During a call, press once to mute the
microphone to stop the caller hearing you.
Press a second tome to be heard by the
caller once again.
Redial
Press when on line to redial the last number
called. When off line, repeated presses will
access the redial list.
Headset
Allows calls to be made and received via a
headset connected to the headset port
located on the side of the telephone.
Vol -/Vol +
Adjusts the volume in handset, handsfree
and headset modes.
On line LED
This illuminates when the phone is on line,
in handsfree or headset mode.
Hands free
Pr
ess to enter hands free mode
Page 5

98
Your Fortune Radius 300 display Setting up your
Fortune Radius 300
All the settings on your Radius 300
telephone are made through the menu.
The main menu is accessed via the
Menu/OK key under the display.
The menu structure is:
- Audio
--- Ring Tone
--- Ring Loudness
--- Key Tone
- PBX Settings
--- Recall Mode
--- Dialling Mode
- Setting
--- Date/Time
--- Contrast
--- MWI Setting
(Message Waiting Indication)
--- Reset
awaiting image of display
Page 6

1110
Audio
Ring Tone
Your Fortune Radius 300 telephone has five
different ring tones to select from.
From idle press the Menu/OK key, the first
displayed option is Audio.
Press Menu/OK to enter Audio, and the first
displayed option is Ring Tone.
Press Menu/OK to select Ring Tone.
You will hear a burst of the ring tone and
the display will show the ring tone number.
Using the /\ \/ navigation keys step
through all 5 ring tone options.
When the one you want is shown, press
Menu/OK to confirm.
Press Esc. To take you back to idle
Ring Loudness
Your Radius 300 has 5 ringer volumes plus
off to select from.
From idle press the Menu/OK key, the first
displayed option is Audio.
Press Menu/OK to enter Audio, and the first
displayed option is Ring Tone.
Using the /\ \/ arrow keys navigate to Ring
Loudness and press Menu/OK to select.
You will hear a burst of the current ring
tone and the display will show the ring tone
level.
Using the /\ \/ navigation keys step
through the ring level options.
When the one you want is shown, press
Menu/OK to confirm.
Press Esc. To take you back to idle.
Key Tone
The Key Tone feature gives you a
confidence tone every time a key is
pressed.
From idle press the Menu/OK key, the first
displayed option is Audio.
Press Menu/OK to enter Audio, and the first
displayed option is Ring Tone.
Using the /\ \/ arrow keys navigate to Key
Tone and press Menu/OK to select.
Using the /\ \/ arrow keys select either on
or off.
When the option you want is shown, press
Menu/OK to confirm.
Press Esc. To take you back to idle
PBX Setting
Recall Mode
Your Radius 300 can be set for either Earth
or Timed Break recall to match the
operation of your telephone system.
From idle press the menu/OK key, the first
displayed option is Audio.
Using the /\ \/ arrow keys to navigate to PBX
Settings.
Press Menu/OK to enter PBX Settings, and
the first displayed option is Recall Mode.
Press menu/OK select Recall Mode.
The current recall mode is displayed; TBR
for Timed Break Recall, or Earth.
Using the /\ \/ arrow keys, select the recall
setting that matches your telephone system
and press Menu/OK to confirm.
Press Esc. to take you back to idle.
Dialling Mode
Your Radius 300 can dial using DTMF tones,
or Pulse dialling (most telephone systems
use DTMF tones to dial).
From idle press the Menu/OK key, the first
displayed option is Audio.
Using the /\ \/ arrows navigate to PBX
Settings.
Press Menu/OK to enter PBX Settings, and
the first displayed option is Recall Mode.
Using the /\ \/ arrows navigate to Dialling
Mode and press Menu/OK to select.
The current Dialling Mode is displayed; T for
DTMF Tone, or P for Pulse.
Using the /\ \/ arrows select the recall
setting that matches your telephone system
and press Menu/OK to confirm.
Press Esc. To take you back to idle.
Page 7

1312
Settings
Date/Time
The date and time in your Fortune Radius
300 can be set automatically by the caller
display messages, or it can be set manually
by following these instructions.
From idle press the Menu/OK key, the first
displayed option is Audio.
Using the /\ \/ arrows navigate to Settings.
Press Menu/OK to enter Settings, and the
first displayed option is Date/Time.
Press Menu/OK to select and the display
will show the current date and time.
Enter the required date and time using the
24 hour clock and ensuring leading zeros
are used.
E.g. for the 22nd of Nov 2006, at 3:18pm,
enter:
22-11-06 15-18
Then press Menu/OK to confirm.
Press Esc. to take you back to idle.
Contrast
The LCD contrast has three setting options.
From idle press the Menu/OK key, the first
displayed option is Audio.
Using the /\ \/ arrows navigate to Settings.
Press Menu/OK to enter Settings, and the
first displayed option is Date/Time.
Using the /\ \/ arrows navigate to Contrast
and press Menu/OK to select.
The current contrast level is shown on the
display.
Using the /\ \/ arrows adjust the contrast
to the required setting.
Then press Menu/OK to confirm.
Press Esc to take you back to idle.
Message Waiting Indicator (MWI) Setting
Most telephone systems will record voice
messages when you are away from your
desk, or on the telephone. If your telephone
system does this it will send a notification
message to your telephone, to indicate
messages are waiting.
Your Radius 300 telephone can detect four
types of message waiting indication signals
from your telephone system:
1) Caller Display
If your telephone system can deliver the
message waiting information via the Caller
Display system, then your Fortune Radius
300 will detect this and the red Messages
LED on the top case will illuminate.
Your Radius 300 will constantly monitor for
these messages and you do not need to
turn this feature on.
2) Elevated Voltage
If your telephone system uses elevated
voltage to indicate messages are waiting,
then this will be detected and the red
messages LED on the top case will be
illuminated.
Your Radius 300 will constantly monitor for
these messages and you do not need to
turn this feature on.
3) Pulsed Line Reversal
If your telephone system uses a one second
pulsing line reversal (1Hz), then this will be
detected and the red messages LED on the
top case will be illuminated.
Your Radius 300 will constantly monitor for
these messages and you do not need to
turn this feature on.
4) Line Reversal
If your telephone system applies a
permanent line reversal when messages
are waiting, then you will need to set the
idle condition, so your Fortune Radius 300
knows what is the normal polarity and
what is the reversed (messages waiting)
polarity.
The easy rule is, if the red Messages LED is
constantly on when you do not have
messages the setting needs changing.
From idle press the Menu/OK key, the first
displayed option is Audio.
Using the /\ \/ arrows navigate to Settings.
Press Menu/OK to enter Settings, and the
first displayed option is Date/Time.
Using the /\ \/ arrows navigate to MWI
Setting and press Menu/OK to select.
The current setting (A or B) is shown on the
display.
Using the /\ \/ arrows adjust the setting.
Note A is just the opposite of B, so if the
indicator is on when you do not have
messages waiting, change to B, and vice
versa.
Then press Menu/OK to confirm.
Press Esc. To take you back to idle.
Reset
To reset your Radius 300 back to its ‘out of
box’ settings use this menu option. But be
sure that this is what you want as you will
lose all pre-programmed directory entries,
date and time etc.
From idle press the Menu/OK key, the first
displayed option is Audio.
Using the /\ \/ arrows navigate to Settings.
Press Menu/OK to enter Settings, and the
first displayed option is Date/Time.
Using the /\ \/ arrows navigate to Reset
and press Menu/OK to select.
The display will show ‘Reset’.
Pressing Menu/OK, will change the display
to ‘Sure?’
Remember, confirming this will reset the
phone and lose all your pre-programmed
settings and entries.
Then press Menu/OK to confirm.
Page 8

1514
Using your Fortune Radius 300
• Making calls
Lift the handset or press the handsfree key,
or, if the headset is attached, press the
headset key and wait for dial tone. Then
dial the number you require.
• Ending calls
Replace the handset or press the
handsfree button a second time, or if the
call was being made via the headset, press
the headset button.
• Receiving calls
When the phone rings, lift the handset, or
press the hands free key, or if the headset
is fitted press the headset key.
If your telephone system provides the
Caller ID service, then the telephone
number of the person calling you will be
displayed when the phone rings.
When a call is in progress the volume can
be adjusted by pressing the Vol– Vol+ or
key.
• Switching between handset, hands free
and headset mode
It is possible to start the call using the
handset, headset or hands free mode, and
to change between modes during the call.
To change between modes, just activate the
new mode, e.g. If you are using the handset
and want to change to hands free, just
press the hands free button and replace
the handset, the call will automatically
transfer to hands free.
• Redial
Your Radius 300 automatically stores the
last five numbers you dialled for easy
access.
The last number you dialled can be quickly
redialled, by seizing the telephone line and
pressing Redial.
Alternatively, if you want to dial one of the
last five numbers called. When the phone is
idle, press the Redial key repeatedly until
the number you want is displayed, then
seize the telephone line by lifting the
handset, pressing hands free or if the
headset is connected, pressing the headset
button. After a short pause, the number
you want is dialled to line.
• Pause
A pause can be inserted in a dialling string
by pressing the Redial key. This will insert a
three second pause, shown as a ‘P’ on the
display.
• Calls list
Your Radius 300 will store the details of the
last 30 callers in the calls list. The
information is stored in the sequence the
calls were received.
The idle display shows the number of new
calls and the number of viewed calls in the
calls list. For example the idle display:
CLIP – 05/25
Indicates you have five new calls in a list of
25 calls.
To view the caller information in the list,
press the Calls List key, the display will
show the most recent entry first, along with
the dat
e and time the c
all was r
eceived.
If the number that called you is stored in
the Radius 300’s directory with a name,
then the calls list entry will also show that
name, having looked it up in the directory.
You can step backwards and forwards
through entries in the calls list using the
/\ \/ navigation keys.
• Calling back an entry in the calls list
With the entry from the calls list shown on
the Radius 300’s display, seize the
telephone line by lifting the handset,
pressing the hands free button or if you
have a headset fitted, pressing the headset
button.
After a brief pause the telephone will dial
back the number shown on the display.
• Deleting a number from the calls list
Access the calls list and scroll to the entry
you want to delete using the /\ \/ arrows.
Then press the Del key and ‘Delete?’ will be
shown on the bottom line of the display.
Press Menu/OK to confirm the deletion and
the entry will be erased.
Press Esc. To take you back to idle
• Deleting the entire calls list:
Access the calls list, then press and hold
the delete key for two seconds, and ‘Delete
All?’ will be shown on the bottom line of
the display.
Press Menu/OK to confirm the selection.
The display will then change to ‘Sure ?’.
Pressing Menu/OK again will delete the
entire list.
• Copying a calls list entry to the Phone
Book
You can copy a telephone number from
the calls list to the phone book on your
Radius 300.
Press the calls list key, and scroll to the
entry to be stored, and press Menu/OK to
confirm.
The display will prompt ‘Store To Book’,
press Menu/OK to confirm.
The leading digit of the telephone number
will now flash to allow you to edit the entry.
Press Menu/OK to confirm the numeric
entry. The cursor will now appear in the
lower line to allow the name to be entered
using the alphanumeric keypad.
For example to enter the name John:
For J, press 5 once.
For O, press 6 three times.
For H, press 4 twice.
For N, press 6 twice.
When the name has been entered press the
Menu/OK key to confirm and the display
will show Saved!
• Copying a calls list entry to a direct
Memory:
You can copy a telephone number from the
calls list to one of the direct memories on
your Radius 300.
Press the Calls List key, and scroll to the
required entry using the /\ \/ keys, or by
pressing the first character of the entry
you are looking for.
Page 9

1716
Press Menu/OK to confirm.
The display will show ‘Store to Book’, using
the /\ \/ arrows navigate through the menu
until the correct direct memory location is
found, e.g. Store to M3.
Then press Menu/OK to confirm.
The leading digit of the telephone number
will now flash to allow you to edit the entry.
Press Menu/OK to confirm the numeric
entry. The cursor will now appear in the
lower line to allow the name to be entered
using the alphanumeric keypad.
The name can now be edited and confirmed
by pressing the Menu/OK key.
Press Esc. To take you back to idle
The full character set of the keyboard is
shown below.
* Upper or Lower Case selection
# à á â Ç
0 + & @ 0 / % * # $ £ ¥ § ¿ ¡
1 "Space" - ? ! 1 , . : ; " ' < = > ( ) { } _
2 (Upper Case) A B C 2 Ä Æ Å à á â Ç
3 (Upper Case) D E F 3 è É ê ë
4 (Upper Case) G H I 4 ì í î ï
5 (Upper Case) J K L 5 ?
6 (Upper Case) M N O 6 ñ ö ò ó ô
7 (Upper Case) P Q R S 7 ß
8 (Upper Case) T U V 8 ù ú û Ü
9 (Upper Case)
W X Y Z 9
2 (Lower Case) a b c 2 ä æ å à á â ç
3 (Lower Case) d e f 3 è é ê ë
4 (Lower Case) g h I 4 ì í î ï
5 (Lower Case) j k l 5 ?
6 (Lower Case) m n o 6 ñ ö ò ó ô
7 (Lower Case) p q r s 7 ß
8 (Lower Case) t u v 8 ù ú û ü
9 (Lower Case) w x y z 9
• Phone Book
The phone book can store 50 name and
number entries.
1. Creating a new entry
From idle press the phonebook key, and
using the /\ \/ arrows navigate to New.
Press menu/OK to confirm.
The cursor will flash on the left side of the
top line of the display.
Please enter the number you wish to store.
When the number has been entered, press
menu/OK to confirm.
The cursor will now flash on the lower line
and you can enter the name associated
with this entry.
When the name has been entered, press
menu/OK to confirm.
Press Esc. To take you back to idle
2. Editing an existing entry
From idle press the phonebook key, then
using the /\ \/ arrows navigate to the
Review option.
Press menu/OK to confirm.
Using the /\ \/ arrow keys, or by pressing
the first letter of the entry you are looking
for, move to the entry to be edited.
With the entry to be edited on the display,
press the menu/OK key.
The leading digit of the number will now
flash and can be edited.
When the number has been corrected,
press the menu/OK key to confirm.
The cursor will now flash on the lower line
and you can edit the name associated with
this entry.
When the name has been entered, press
menu/OK to confirm.
Press Esc. To take you back to idle
3. Dialling a phone book entry
From idle press the phonebook key, using
the /\ \/ arrow keys navigate to Review.
Press menu/OK to confirm.
Using the /\ \/ arrow keys, or by pressing
the first letter of the entry you are looking
for, move to the required entry.
Then seize the telephone line by lifting the
handset, pressing handsfree or if the
headset is connected, pressing the headset
button.
After a short pause, the number you want
is dialled to line.
4. Deleting a number from the phone book
From idle press the phonebook key, using
the /\ \/ arrow keys navigate to Review.
Press menu/OK to confirm.
Using the /\ \/ arrow keys, or by pressing
the first letter of the entry you are looking
for, move to the required entry.
Then press the delete key and ‘Delete?’ will
be shown on the bottom line of the display.
Press menu/OK to confirm the deletion and
the entry will be erased.
5. Deleting all numbers from the phone
book:
From idle press the phonebook key, the
first displayed option is Review.
Using the /\ \/ arrow keys to select “Delete
All”, then press menu/OK and ‘Sure?’ will
be shown on the bottom line of the display.
Press Menu/OK to confirm the selection.
The display will then change to ‘Sure ?
Pressing Menu/OK again will delete the
entire list.
• Direct Memories
The Radius 300 has three direct memories,
which can each store up to 24 digits and 16
characters.
1. Storing a new entry (if the memory is
empty)
Press the desired memory location
The display will show ‘New’
Press menu/OK to confirm
The cursor will flash on the left side of the
top line of the display.
Please enter the number you wish to store.
When the number has been entered, press
menu/OK to confirm.
The cursor will now flash on the lower line
and you can enter the name associated
with this entry.
Page 10

1918
3) Pulsed Line Reversal
If your telephone system uses a one second
pulsing line reversal (1Hz), then this will be
detected and the red messages LED on the
top case will be illuminated.
Your Radius 300 will constantly monitor for
these messages and you do not need to
turn this feature on.
4) Line Reversal
If your telephone system applies a
permanent line reversal when messages
are waiting, then you will need to set the
idle condition, so your Fortune Radius 300
knows what is the normal polarity and
what is the reversed (messages waiting)
polarity.
The easy rule is, if the red Messages LED is
constantly on when you do not have
messages the setting needs changing.
From idle press the Menu/OK key, the first
displayed option is Audio.
Using the /\ \/ arrows navigate to Settings.
Press Menu/OK to enter Settings, and the
first displayed option is Date/Time.
Using the /\ \/ arrows navigate to MWI
Setting and press Menu/OK to select.
The current setting (A or B) is shown on the
display.
Using the /\ \/ arrows adjust the setting.
Note A is just the opposite of B, so if the
indicator is on when you do not have
messages waiting, change to B, and vice
versa.
Then press Menu/OK to confirm.
Press Esc. To take you back to idle.
Reset
To reset your Radius 300 back to its ‘out of
box’ settings use this menu option. But be
sure that this is what you want as you will
lose all pre-programmed directory entries,
date and time etc.
From idle press the Menu/OK key, the first
displayed option is Audio.
Using the /\ \/ arrows navigate to Settings.
Press Menu/OK to enter Settings, and the
first displayed option is Date/Time.
Using the /\ \/ arrows navigate to Reset
and press Menu/OK to select.
The display will show ‘Reset’.
Pressing Menu/OK, will change the display
to ‘Sure?’
Remember, confirming this will reset the
phone and lose all your pre-programmed
settings and entries.
Then press Menu/OK to confirm.
When the name has been entered, press
menu/OK to confirm.
2. Storing a new entry (if the memory has
an existing entry)
Press the desired memory location
The display will show the existing entry
Press menu/OK to confirm this is the entry
to be edited
The leading digit of the number will now
flash and can be edited or overwritten.
When the number has been changed, press
the menu/OK key to confirm.
The cursor will now flash on the lower line
and you can edit the name associated with
this entry.
When the name has been entered, press
menu/OK to confirm.
3. Deleting an entry from a direct memory
From idle, press the desired memory
location
The display will show the existing entry
Press the delete key, then “Delete?” will be
shown on the bottom line of the display.
Press menu/OK to confirm the deletion and
the entry will be erased, or press ESC key
to exit.
Trouble shooting
• I cannot get dial tone
Check that:
The telephone line is correctly connected.
The curly handset cord is correctly
connected.
Use the hands free to see if you can get dial
tone.
• The phone does not ring
Check that the ringer is not set to off, the
bell with a line through it will be shown in
the display.
• My message waiting indication is
always on
Change it to the opposite polarity,
either A or B.
• My message waiting indication does not
work
Check with your communications manager
that the message waiting on your
telephone system is compatible with the
Radius 300 and that message waiting
signalling is enabled on your telephone
system.
• I do not have an idle display
Check that the mains adaptor is connected
and turned on.
• Recall does not work on my Telephone
system
Check with your communications
manager, or try the other setting, either
Earth or Timed Break recall.
turn this feature on.
Page 11

2120
Product Warranty
Guarantee
Your Fortune Radius 300 is guaranteed for
a period of 12 months from the date of
purchase.
Please keep your purchase invoice in a safe
place for future reference.
Subject to the terms listed below, the
guarantee will provide for the repair of, or
at Fortune’s or its agent’s discretion the
option of a replacement, or any component
thereof, which is identified as faulty or
below standard, or as a result of inferior
workmanship or materials.
Products over 28 days old from the date of
purchase may be replaced with a
refurbished or repaired product.
The conditions of this guarantee are:
• The guarantee shall only apply to
defects that occur within the 12 month
guarantee period.
• Proof of purchase is required.
• The equipment is returned to Fortune or
its agent as instructed.
• This guarantee does not cover any faults
or defects caused by accidents, misuse,
fair wear and tear, neglect, tampering
with the equipment or any attempt at
adjustment or repair other than through
approved agents.
• This guarantee does not affect your
statutory rights.
Product returns
Contact your supplier for return details.
Proof of purchase will be required.
Product
details:…………………………………………….
Product
model:…………………………………………….
Product serial
number:…………………………………….
Purchased
from:……………………………………………
Date of
purchase:………………………………………….
General information
• R&TTE
This product is intended for use within the
UK for connection to the public telephone
network and private telephone systems.
This equipment complies with the essential
requirements for the Radio Equipment and
Telecommunications Terminal Equipment
directive 1999/5/EC.
• Safety
Do not open or tamper with the handset or
base, you could expose yourself to high
voltages or other risks.
Do not expose your product
- To water (or use it in damp conditions,
such as bathrooms).
- To fire, explosive or other hazardous
conditions.
- Direct sunlight.
• Maintenance
Cleaning your product
Wipe clean with a damp (not wet) cloth, or
an anti static wipe.
Do not use sprays, abrasive cleaners or
household polish as this may damage the
product.
• How many telephones can I have?
All items of telephone equipment have a
Ringer Equivalent Number (REN), which is
used to calculate the number of items
which may be connected to any one
telephone line. The total REN on one main
exchange line is 4 (This may be different for
Private telephone systems). If you exceed
this REN then some or all of the phones
may fail to ring.
• Weee
Weee Directive – Directive 2002/96/EC OF
THE EUROPEAN PARLIAMENT AND
COUNCIL of the 27th January 2003 on
waste electrical and electronic equipment.
Products that include the WEEE symbol,
shown above, should not be placed in the
normal household rubbish, but should be
disposed of using the appropriate WEEE
disposal facility. These facilities may be
advised to you by your local council or the
organisation from which the product(s)
were purchased. For the latest information
on the WEEE directive please access the
following url.
www.dti.gov.uk/sustainability/weee/
or telephone Envirowise on 0800 585794
CE RoHS, Re-cycle
Version 1.
• Technical Helpline
01937 847 003
Page 12

2322
 Loading...