

Page 1
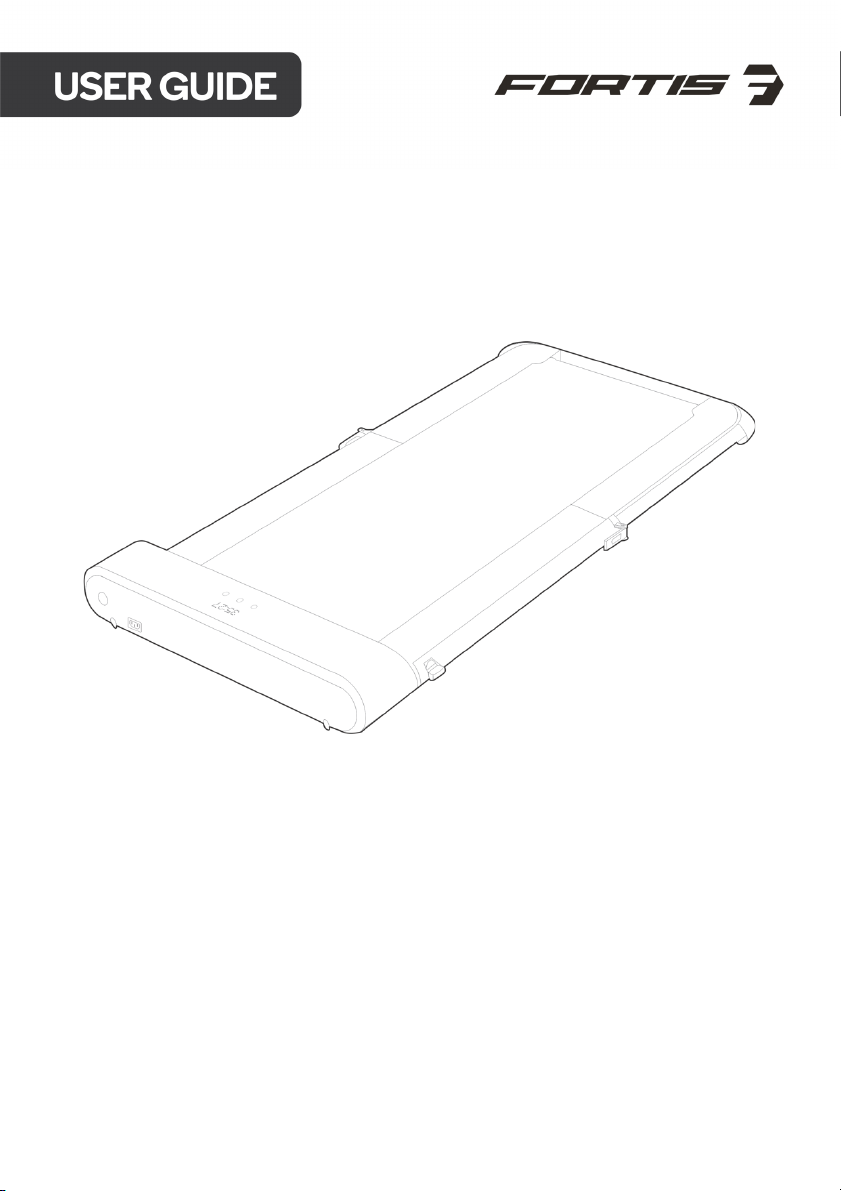
WALKINGPAD FOLDABLE
SMART TREADMILL
(T2 PRO)
FSWKPADT2PA
Page 2

Page 3

Read all of the instructions in this guide before using this product. Retain this guide for
future reference. Do not skip, substitute or modify any steps or procedures in this guide, as
doing so could result in personal injury or product damage.
• Before starting any exercise program, consult your physician to determine if you have
any medical or physical conditions that could put your health and safety at risk or
prevent you from using the equipment properly. Your physician’s advice is essential if
you are taking any medication that may affect your heart rate, blood pressure or
cholesterol level.
• Incorrect or excessive exercise can damage your health. Stop exercising if you
experience any of the following symptoms: pain, tightness in your chest, irregular
heartbeat, shortness of breath, light headedness, dizziness or feelings of nausea. If you
experience any of these conditions, you should consult your physician before continuing
with your exercise program.
• Always wear comfortable properly fitting sports shoes and clothing while using the
treadmill. If you experience any discomfort while exercising stop immediately and
consult your physician.
• This equipment is intended for adult use only. Keep children and pets away from the
machine. DO NOT leave children unattended in the same room with the equipment.
Contact with the moving surface may result in severe friction burns.
• Do not get on or off the treadmill whilst it is moving as this may result in serious injury
and possible damage of the treadmill.
• The treadmill has an emergency stop mechanism for your safety. We recommend
testing the safety lock is in working order before commencing any training.
• Always attach the safety key to your clothing while exercising. If the treadmill has
switched off due to the safety key being pulled out, insert it again to resume exercising.
• In an emergency situation you can pull the safety lock to stop the treadmill
immediately.
• When not in use, always remove the safety key and store in a safe place to avoid any
unintended or accidental usage.
• When not in use, unplug the power cord.
• This appliance is designed for consumer use. Follow directions and use only as
described.
• Once fully assembled, inspect to ensure all hardware parts such as bolts, nuts and
washers are positioned correctly and tightly secured.
• Dry after each use to remove moisture. Wipe regularly with a mild, non-abrasive cleaner
and water solution.
• To ensure safety, the equipment should have at least 50 cm of free space on each side
and 200cm behind.
• Prior to assembly, ensure you have all the components.
• Always use the equipment as intended. If you find any defective components while
assembling or checking the equipment, or if you hear any unusual noises coming from
the equipment during exercise, cease use immediately and contact help.kogan.com for
assistance. Do not use until resolved.
• Do not place fingers or any other objects into moving parts of the exercise equipment.
Ensure care is taken while setting up and folding the treadmill.
• Keep hands clear of the hinges while setting up and folding the treadmill.
• Do not exceed the maximum user weight of 110KG.
Page 4
• Be careful when lifting and moving the equipment. Always use proper lifting technique
and seek assistance if necessary.
• Your equipment is intended for use in cool, dry conditions. You should avoid storage in
extreme cold, hot or damp areas as this may lead to corrosion and other related
problems.
• This appliance contains no user-serviceable parts. If it suffers any failure or damage,
cease use immediately and contact help.kogan.com
• This equipment is designed and intended for indoor use only.
• The running belt on this treadmill has a visible joint mark. This is completely normal
and will not affect the performance or operation of your treadmill.
Page 5
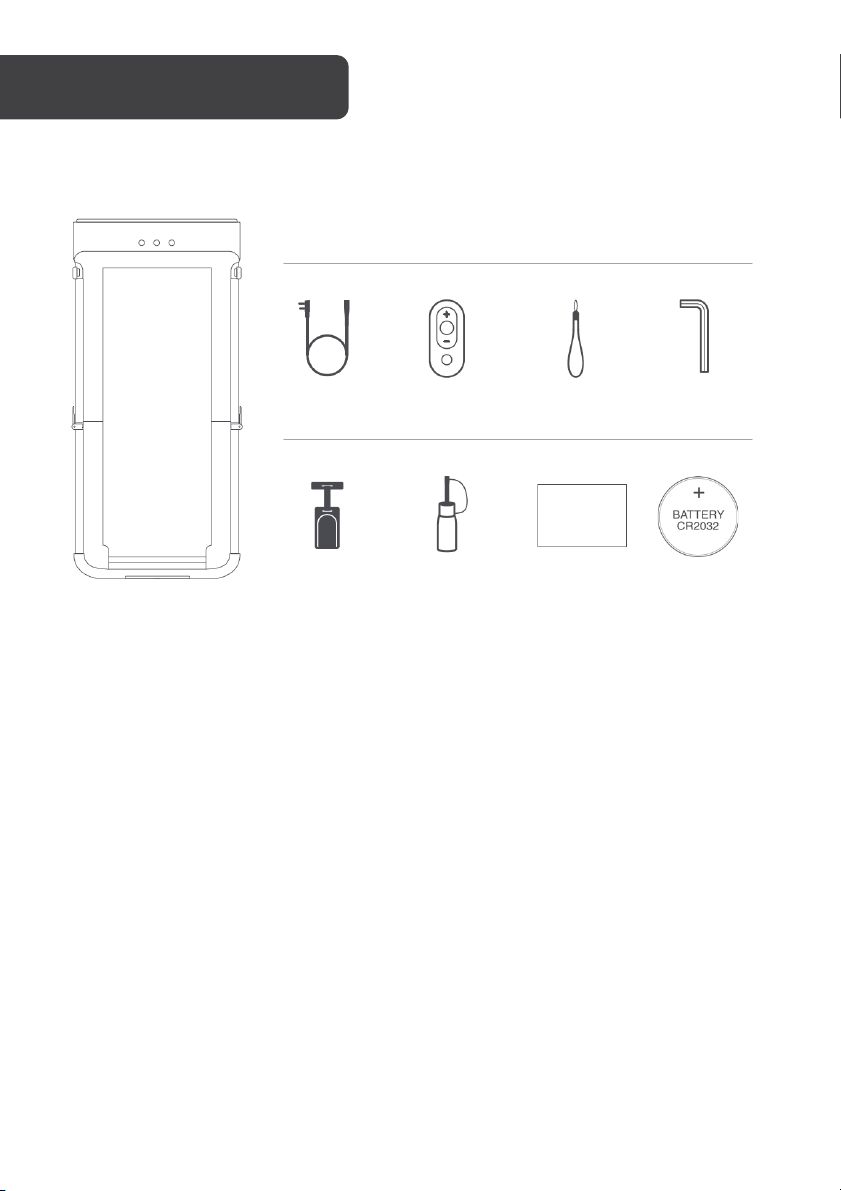
Tr e a d m i l l
Accessories
Power
cord
Remote
control
Allen
key
Remote
control lanyard
Safety key
Silicone oil
User guide
User guide
Battery
(CR2032)
Page 6
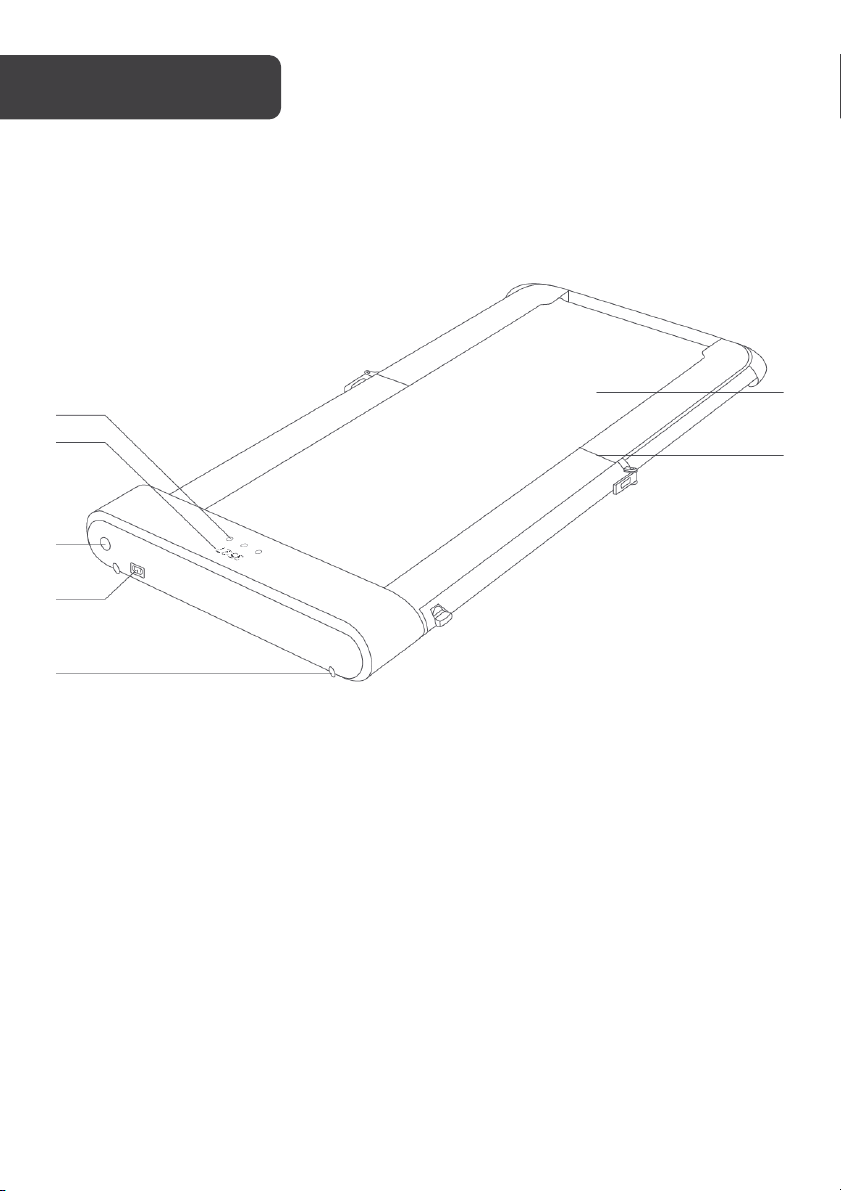
1
Functi on but tons
5
Tr a n s p o r t w h e e l s
2
Display
6
Belt
3
Power switch
7
Fol ding hi nge
4
Power input
1
2
3
4
5
6
7
Page 7
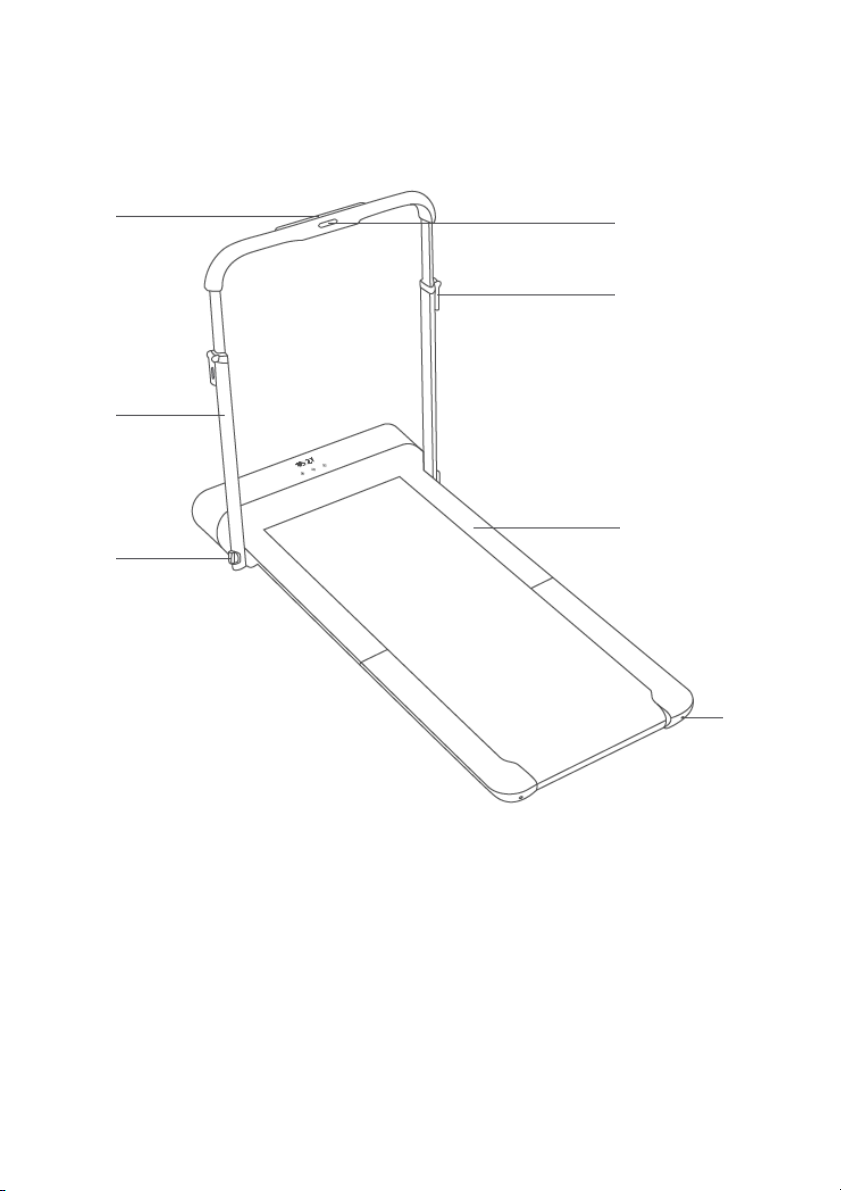
8
Mobile phone slot
12
Handrail adjustment lever
9
Handrail
13
Side step
10
Handrail lock
14
Belt adjustment hole
11
Safety key socket
8
9
10
11
12
13
14
Page 8
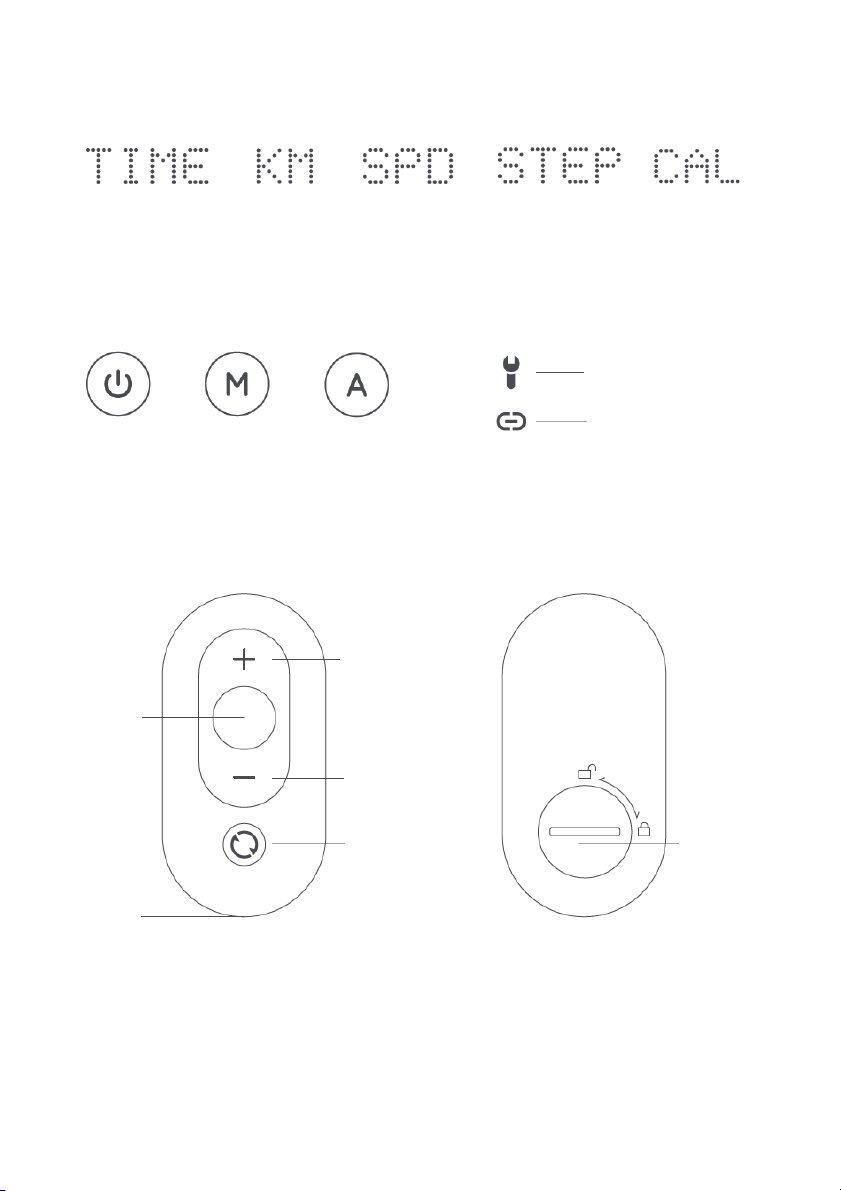
Lanyard
hole
Front
Rear
Battery
cover
Mode
Speed
increase
Speed
decrease
Time
Distance
Speed
Steps
Calories
Power
Manual
mode
Automatic
mode
Error
Connection
Indicators
Start/Stop
Fun ct ion Bu tt ons & Di spl ay
Remote Control:
Page 9
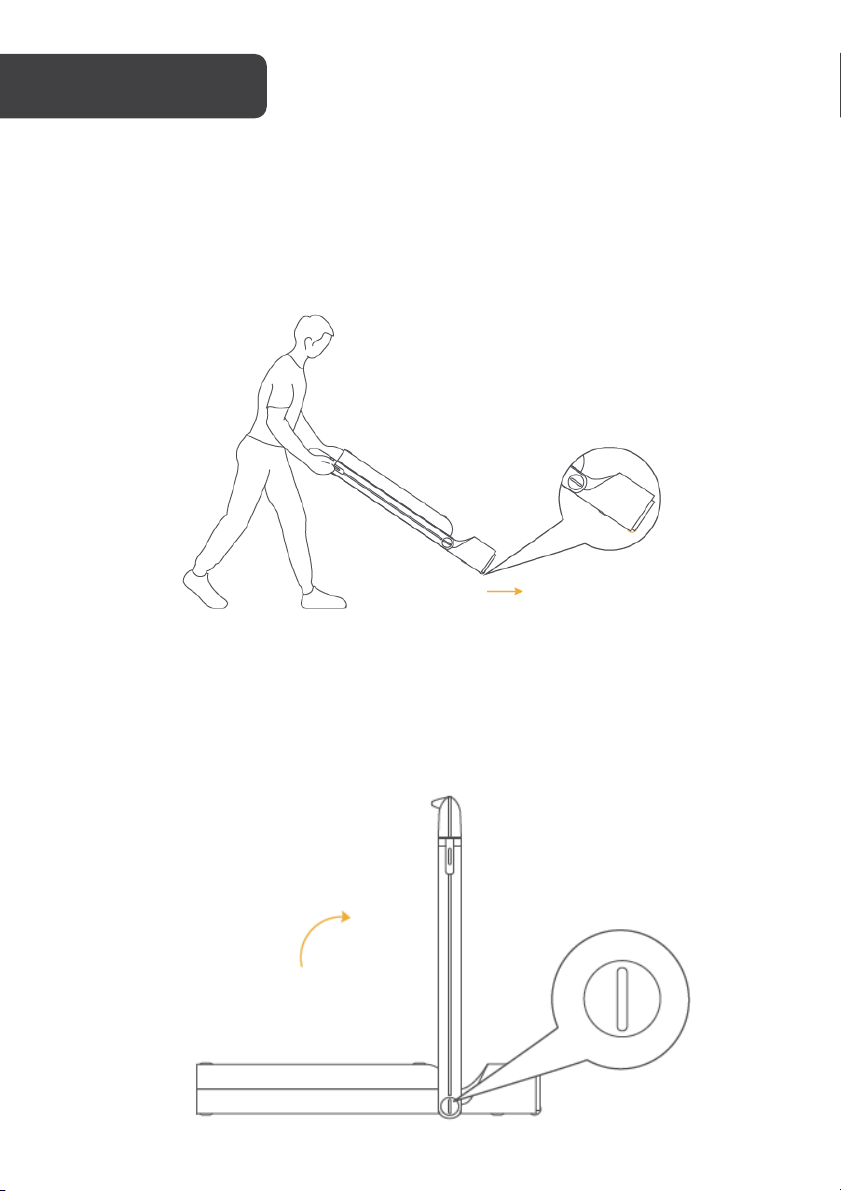
Step 1:
• Ensure the handrail is firmly locked in place.
• Lift the rear of the treadmill until the transport wheels come into contact with the floor.
• Move the treadmill into your desired location. Avoid placing the treadmill on soft
cushions or thick carpets.
Step 2:
• Loosen the handrail locks on both sides of the treadmill.
• Raise the handrail up into a vertical position.
• Tighten both the handrail locks.
Page 10
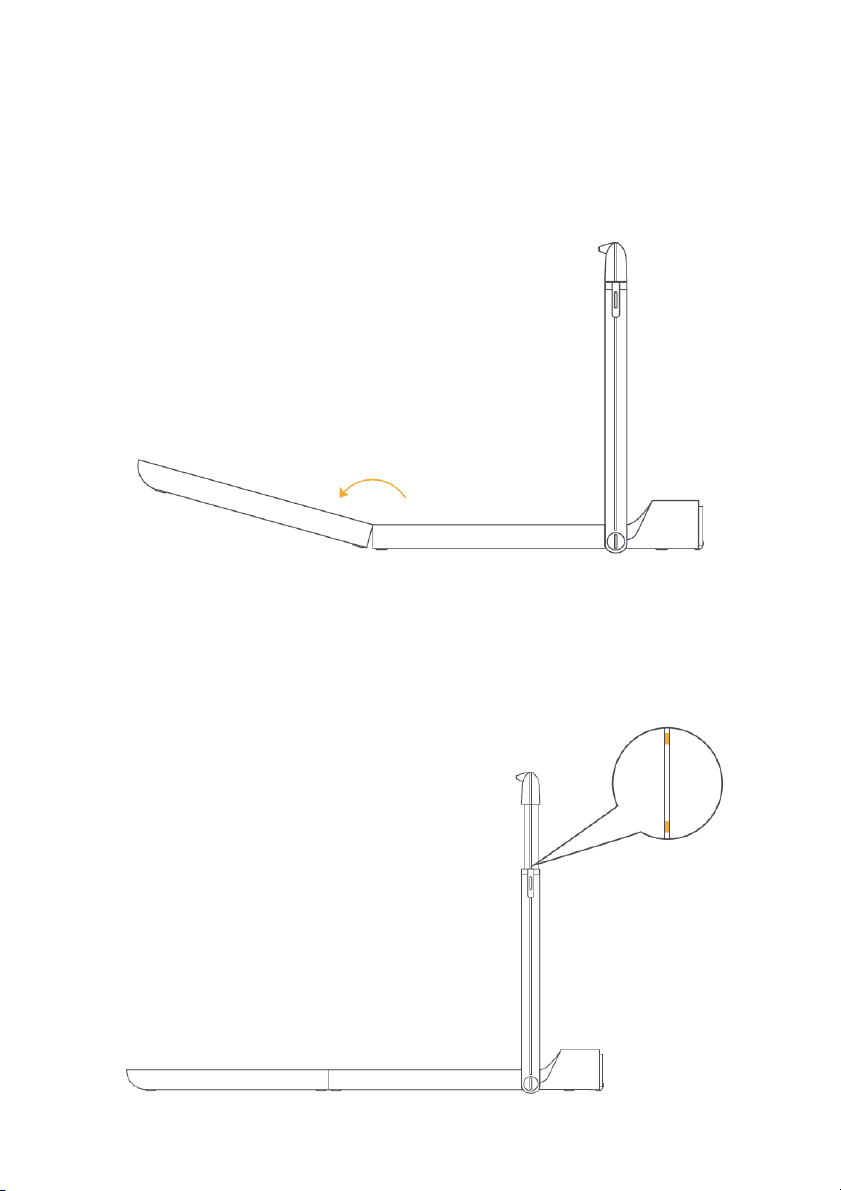
Step 3:
• Carefully unfold the treadmill, ensuring to keep your hands clear of the hinges.
• Press the rear of the treadmill down until it is completely flat.
• The treadmill feet can be rotated to ensure the treadmill is sitting perfectly flat.
Step 4:
• Unlock the handrail adjustment levers and raise the handrail to your desired height
paying attention to the minimum and maximum adjustment markings.
• Lock the handrail adjustment lever back in place.
Page 11
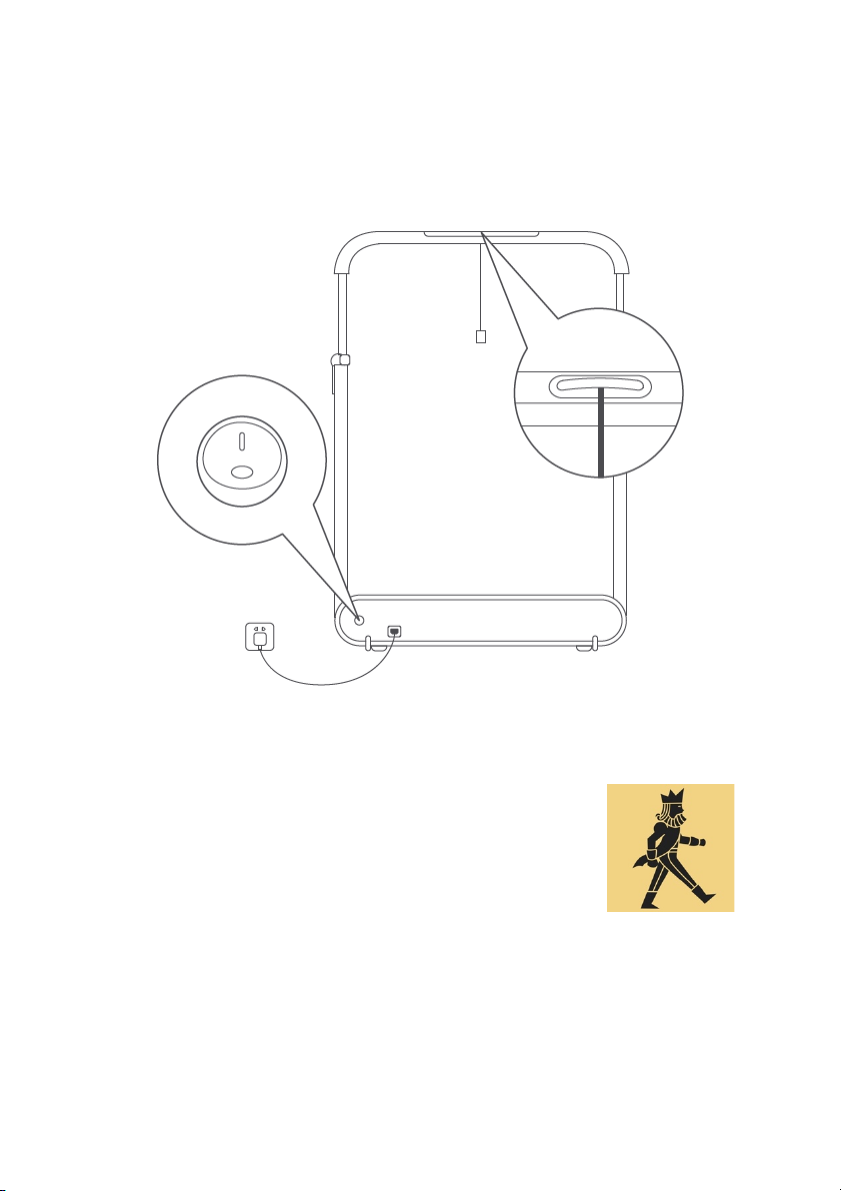
Step 5:
• Install the safety key.
• Connect the power cord to the treadmill power input.
• Plug the power cord into a power outlet and turn power switch to the on position.
Step 6:
• Download and install the "KS Fit" App from App Store (Apple)
or Google Play Store (Android).
• Open the App and follow the prompts to connect to your
treadmill.
Page 12
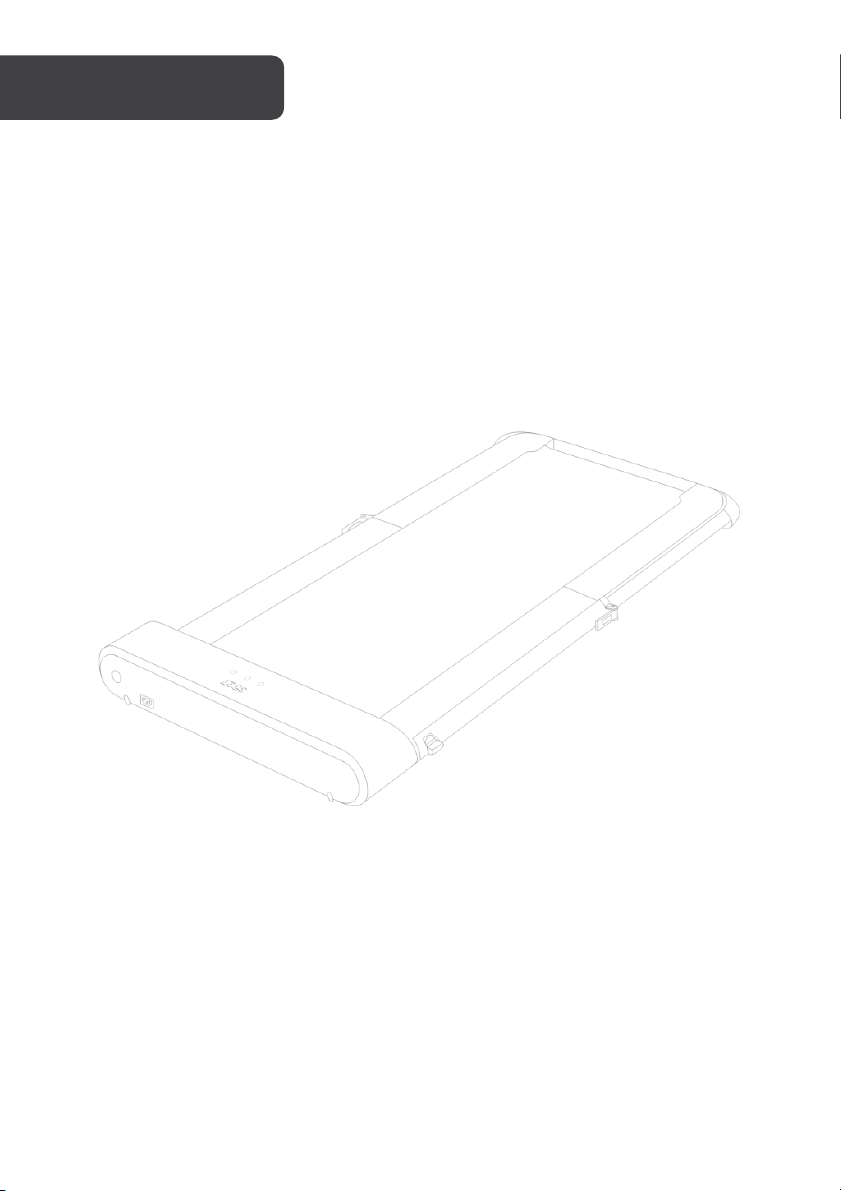
Wal kin g
In this configuration the handrail is placed in a horizontal position. The first time using the
treadmill in this configuration the maximum speed available will be limited to 3km/h.
A maximum speed of 6km/h can be unlocked by completing one of the following methods:
• completing the beginner guide on the “KS Fit” app.
• walking on the treadmill for 1km.
• setting the speed to 6km/h in the “KS Fit” app.
When the treadmill is setup for walking, both Manual and Automatic modes are available.
Page 13
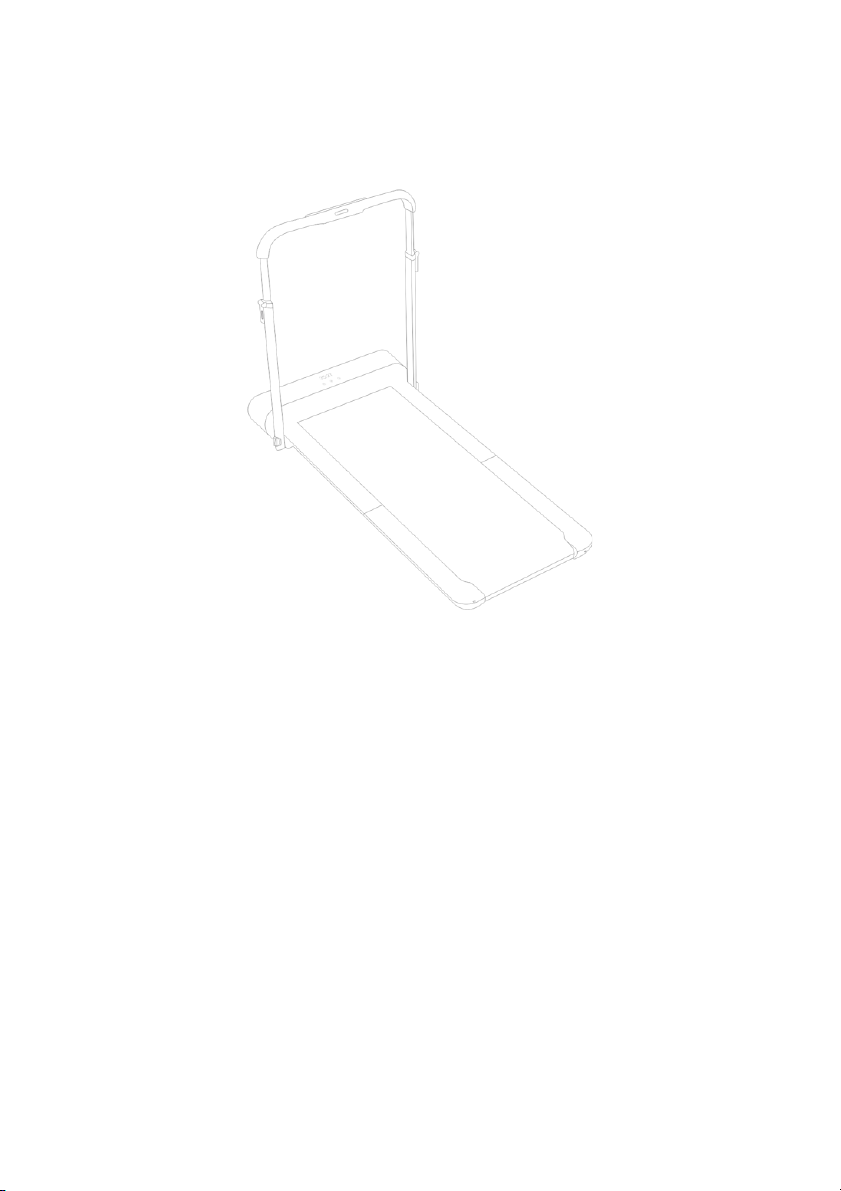
Running
In this configuration the handrail is placed in a vertical position. The maximum speed
available will increase to 10km/h.
When the treadmill is setup for running, only Manual mode will be available.
Tu r n i ng t h e t r e a d m il l O n a n d O f f
• Press the Power button on the treadmill or the Mode button on the remote control to
turn the treadmill on. The display will illuminate and the treadmill will enter Manual
mode by default.
• The user can also power on the treadmill by pressing either the Manual or Automatic
buttons. The display will illuminate and the treadmill will enter the respective function.
• To t u r n o f f the treadmill press the power button on treadmill or press and hold the Mode
button on the remote control.
Manual Mode
In Manual mode users can use the remote control to adjust the speed of the treadmill to
suit their needs. It is recommended to start with Manual mode when you are first getting
used to your treadmill.
• Speed increase button: Press the Speed increase button to raise the speed of the
treadmill by 0.5km/h.
• Speed decrease button: Press the Speed decrease button to lower the speed of the
treadmill by 0.5km/h.
• Start/Stop button: Press the Start/Stop button on the remote control to stop treadmill.
Press the button again when you are ready to resume exercising.
• Mode button: Press the Mode button on the remote control to switch between Manual
and Automatic mode.
Page 14
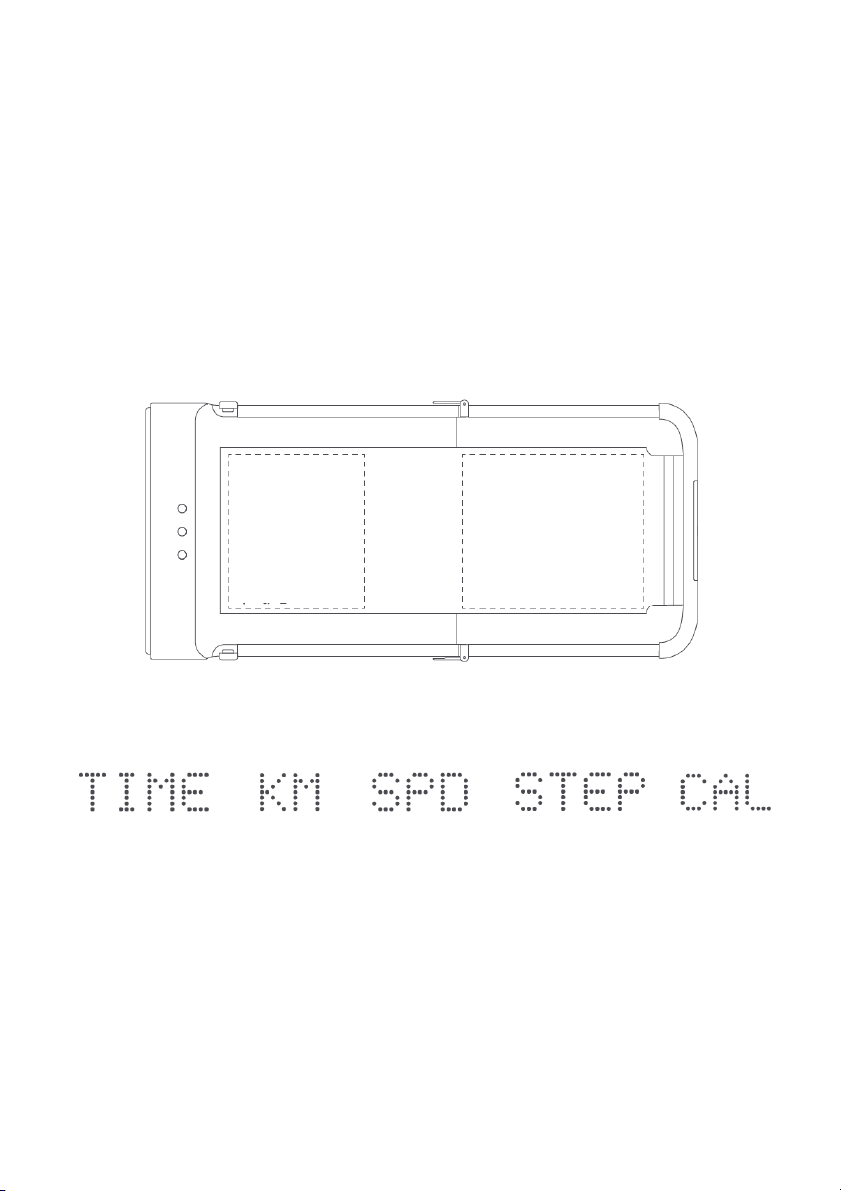
Time
Distance
Speed
Steps
Calories
Front
zone
Rear
zone
Automatic Mode
In Automatic mode, users can adjust the speed of the treadmill without using the remote
control. Automatic mode is recommended for more advanced users of the treadmill. As a
safety precaution Automatic mode is only available when the handrail is lowered, and the
treadmill is in Walking configuration.
• Increase speed: When the user enters the front zone of the treadmill belt the treadmill
speed will increase.
• Decrease speed: When the user enters the rear zone of the treadmill belt the treadmill
speed will decrease.
• Start/Stop button: Press the Start/Stop button on the remote control to stop treadmill.
Press the button again when you are ready to resume exercising.
• Mode button: Press the Mode button on the remote control to switch between Manual
and Automatic mode.
Display
Fun ct ion s a nd Fea tur es :
• TIME: Shows your elapsed workout time in minutes and seconds
• DISTANCE: Displays the accumulative distance travelled during your workout.
• SPEED: Displays your workout speed value in km/h.
• STEPS: Displays the accumulative steps travelled during your workout.
• CALORIES: Displays calories burned at any given time during your workout.
Page 15
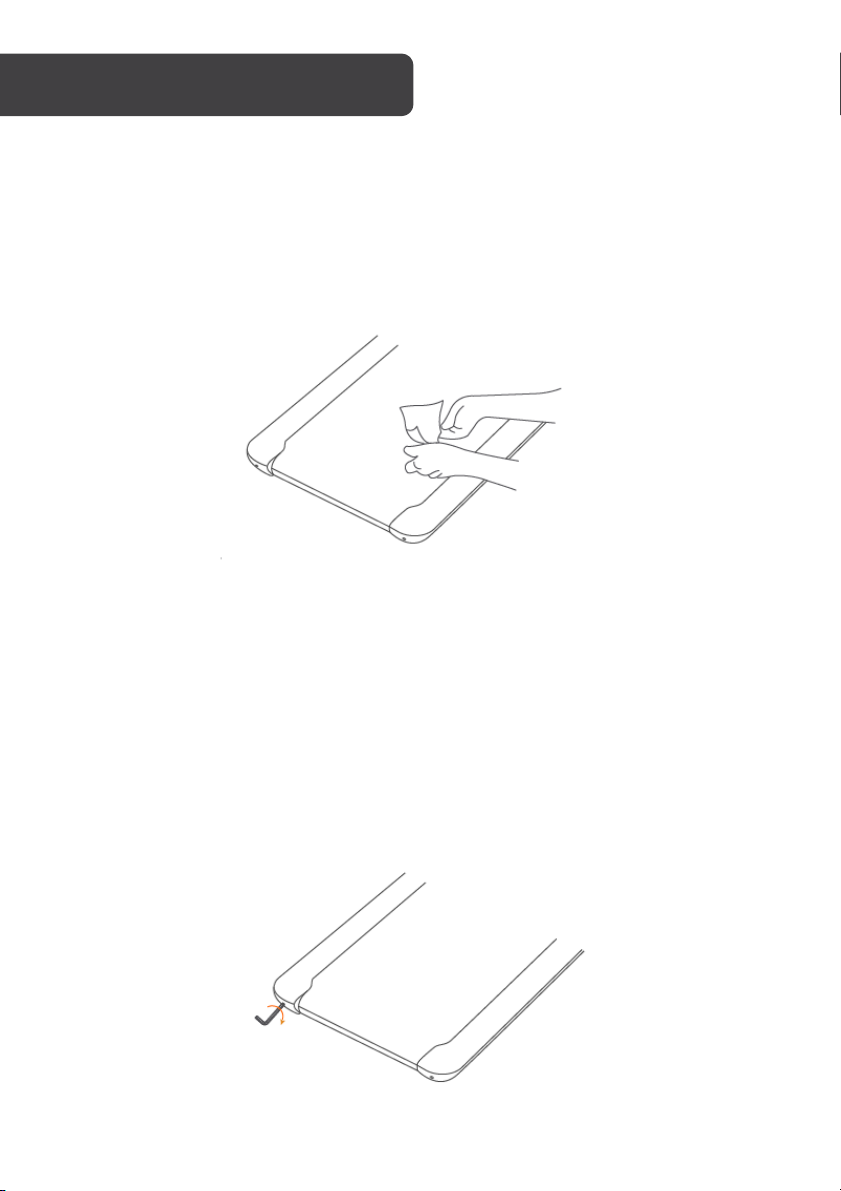
Cleaning the Treadmill
• Disconnect the power before cleaning the treadmill.
• Add a small amount of mild detergent to a 100% cotton cloth. Do not spray the
detergent directly on the belt or use any acidic and corrosive detergents.
• Do not wipe under the walking belt
Belt Adjustment Correction:
If the treadmill belt begins to slip or is out of alignment it will need to adjusted.
• Start the treadmill and run at a speed of 3 km/h
• To a djust belt to the left, turn the left adjusting hole screw clockwise by 1/4 turn.
• To a djust belt to the right, turn the right adjusting hole screw clockwise by 1/4 turn.
• To a djust belt tension, turn the left and right adjusting screws clockwise for 1/2 turn
at the same time.
• After each adjustment, run the treadmill for approximately (1-2 minutes) to observe
if the issue has been corrected. Adjust again if necessary.
Page 16
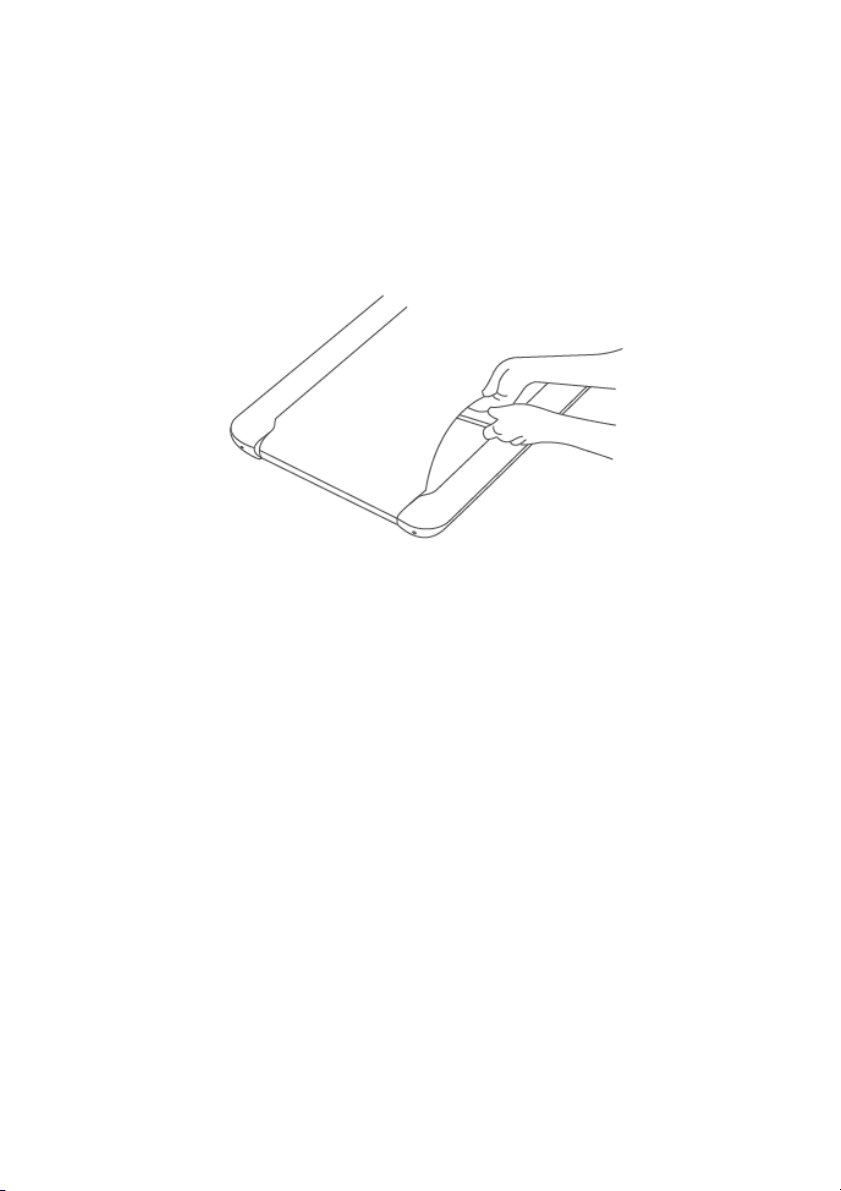
Belt Lubrication:
• Disconnect the power before lubricating the treadmill.
• Lift the edge of the walking belt and apply 5-10ml of silicone oil to the inner surface.
Do not apply too much oil as this may cause the belt to slip.
• Run the treadmill at 3km/h for approximately 10-20 seconds.
• Lubricate the belt every 3 months.
Page 17

Note:
If the remote control is not responding, the battery may be flat and will need to be
replaced.
Note:
The visible line or mark on the belt is the seam. This is not a fault and does not affect
operation of the treadmill.
Remote Control Pairing
If the remote control becomes unresponsive or if you have replaced the batteries, you will
need to re-pair the remote control by pressing and holding the mode button for 5 seconds.
Connection Indicator
• FLICKERING: The treadmill is NOT connected to the App.
• OFF: The treadmill is connected to the App.
Error Indicator
• E01: Software overcurrent
• E02: Hardware overcurrent
• E03: IPM Module Overheating
• E04: Low-voltage Protection
• E05: Overvoltage Protection
• E06: Motor phase loss protection
• E07: Motor phase loss protection
• E08: Sensor fault
• E09: Motor unable to start
• E12: Motor overcurrent
• E13: Overloading protection
• E14: Hall signal loss
• E15: Communication fault
Page 18
Age range
14-60 years
Speed range
0.5-10km/h
Running surface
440x1200mm
Max weight
110kg
Frequency
50/60Hz
Voltag e
220-240V
Power Input
918W
Gross weight
38kg
Net weight
33kg
Operation size
1460x720x900mm
Fol ded s ize
980x720x155mm
This symbol indicates that this appliance should not be disposed with other
house-hold wastes. To prevent possible harm to the environment or human
health from uncontrolled waste disposal, recycle it responsibly to promote the
sustainable reuse of material resources.
Disposal
Page 19
\\\
Page 20

Need more information?
We hope that this user guide has given you
the assistance needed for a simple set-up.
For th e mos t up-to-date guide for your product,
as well as any additional assistance you may require,
head online to help.kogan.com
 Loading...