

Page 1
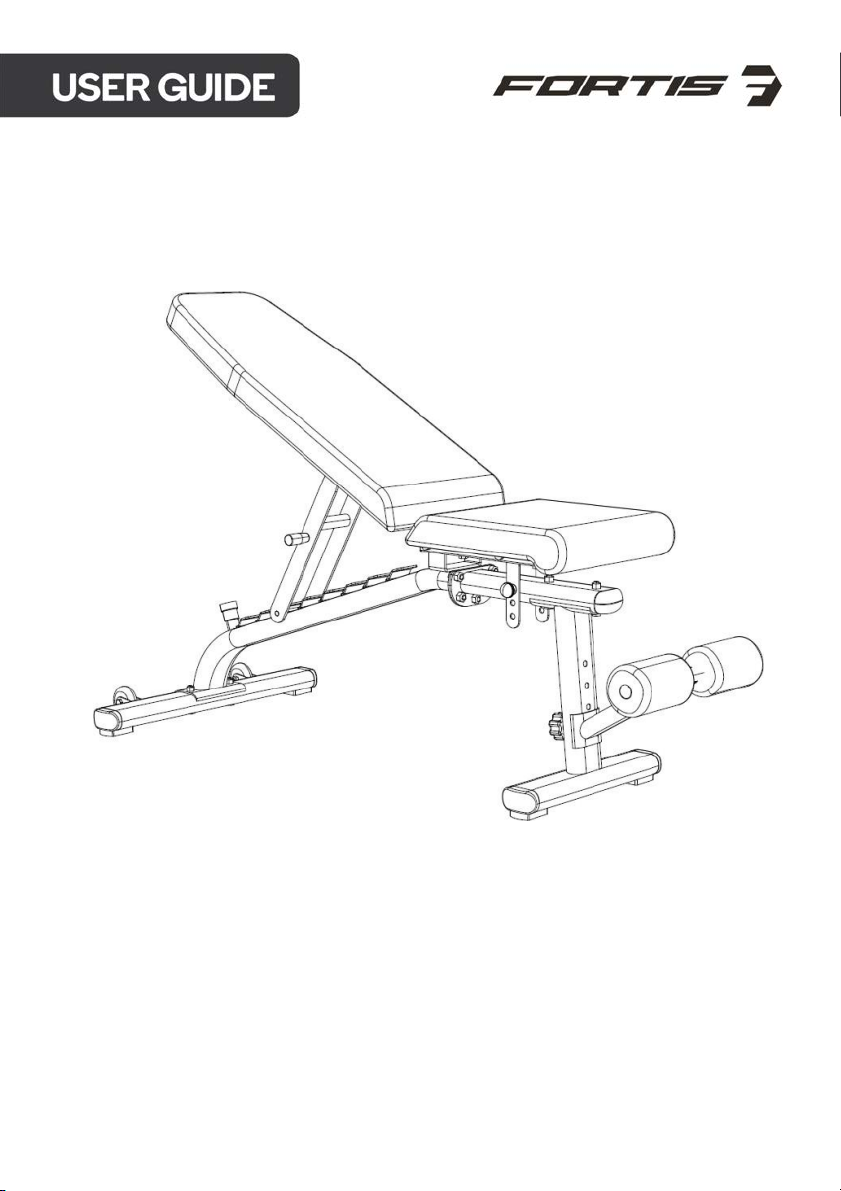
HEAVY DUTY ADJUSTABLE
FID WEIGHT BENCH
FSHDFIDBNCA
Page 2

Safety & Warnings
3
Components
4
Overview
5
Assembly
6
Adjustments
11
Exercise Guide
14
Cleaning & Care
16
Notes
17
2
Page 3

• Before use and assembly, read this user guide and keep for future reference.
• WARNING: Before beginning any exercise program, consult your physician. This is
especially important for persons with pre-existing health problems. The seller assumes
no responsibility for personal injury or property damage sustained by or using this
product.
• Maximum weight limit: 250 kg
• Keep out of reach of children and pets.
• This equipment is designed for one person at a time.
• If you experience nausea, chest pain or any other abnormal physical symptoms, stop
exercising immediately.
• Keep limbs away from moving parts.
• Place the machine on a flat, firm and clean surface.
• Always wear suitable sports clothing and shoes, do not wear loose clothing or jewellery.
• Use only for the purposes for which the machine was intended.
• Do not make modify this equipment in any way.
• Remove all sharp objects around the bench during use.
• For safety keep at least 0.6 m free space around the bench.
• People with limited mental or physical abilities must not use this equipment.
• Always warm up your muscles before training.
• If sharp edges appear on the machine, stop using the machine immediately.
• Do not put sharp items on the device. Adjustable parts should not interfere with user’s
movement.
• Inspect the machine before each use; make sure all connections are tightly secured.
3
Page 4
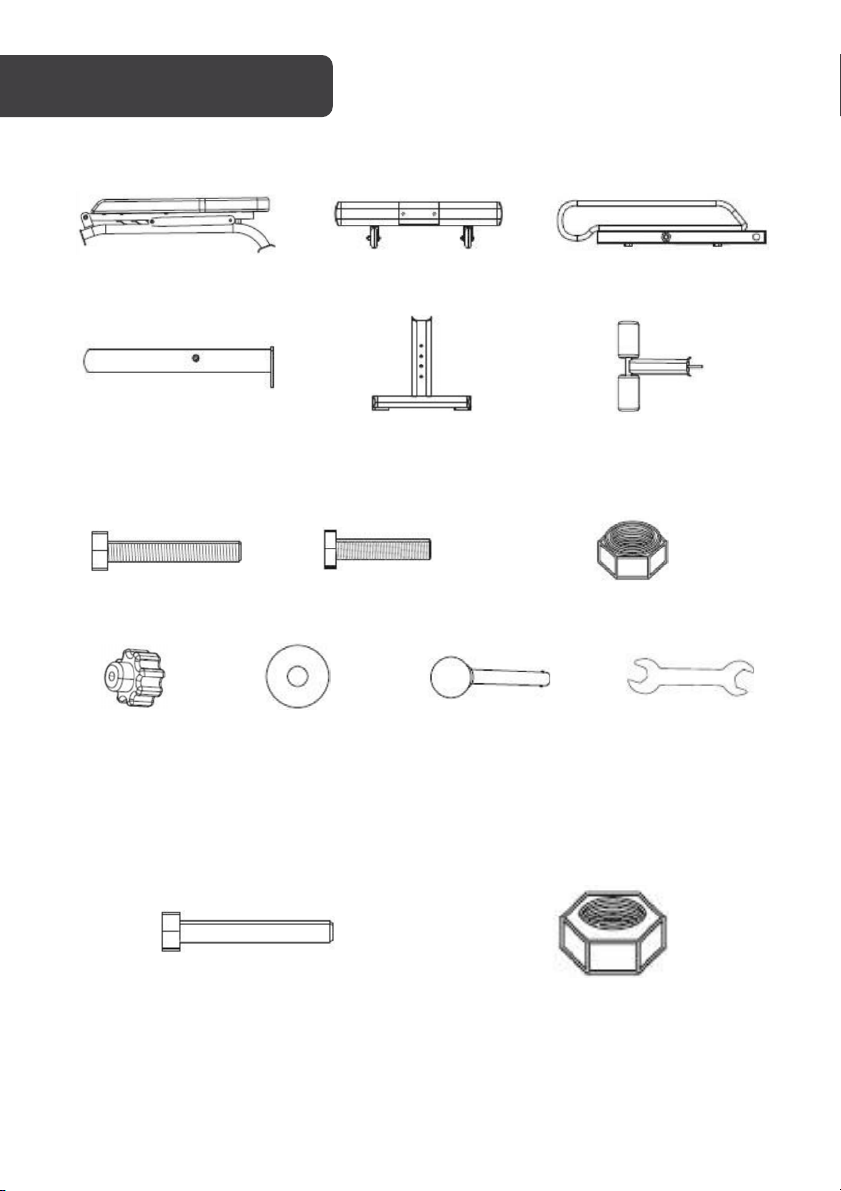
Parts
1 Frame
2 Rear stabiliser
3!Seat
4 Front stabiliser frame
5 Front stabiliser
6 Leg bar
Hardware
7 Bolt M10 – long (x4)
8 Bolt M10 – short (x5)
9 Nut (x9)
10 Hand knob
11 Washer
12 Pin for backrest
adjustment
13 Wrench (x2)
Attached to Frame
14 Backrest security pin
15!Nut
4
Page 5
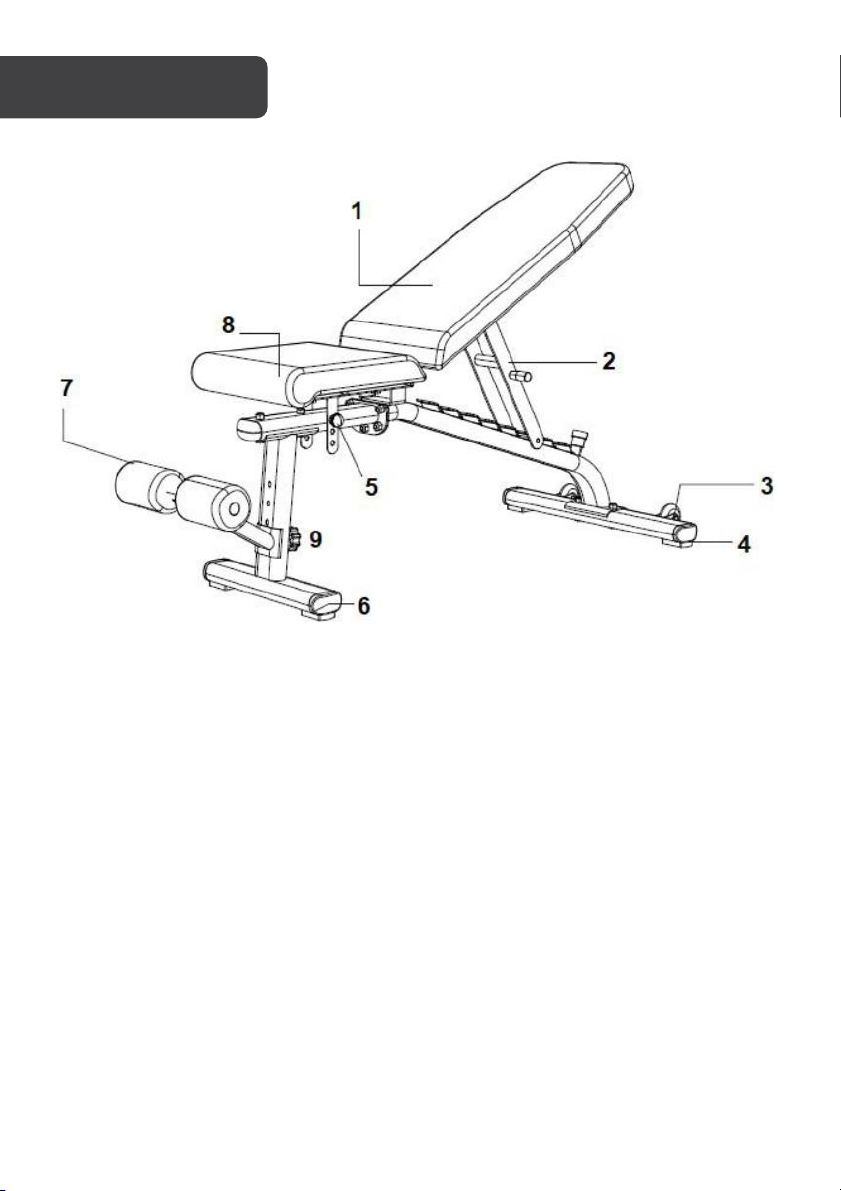
1
Backrest
6
Front stabiliser
2
Adjustable frame
7
Leg bar
3
Wheels
8
Seat
4
Rear stabiliser
9
Leg bar adjustment knob
5
Seat adjustment
5
Page 6
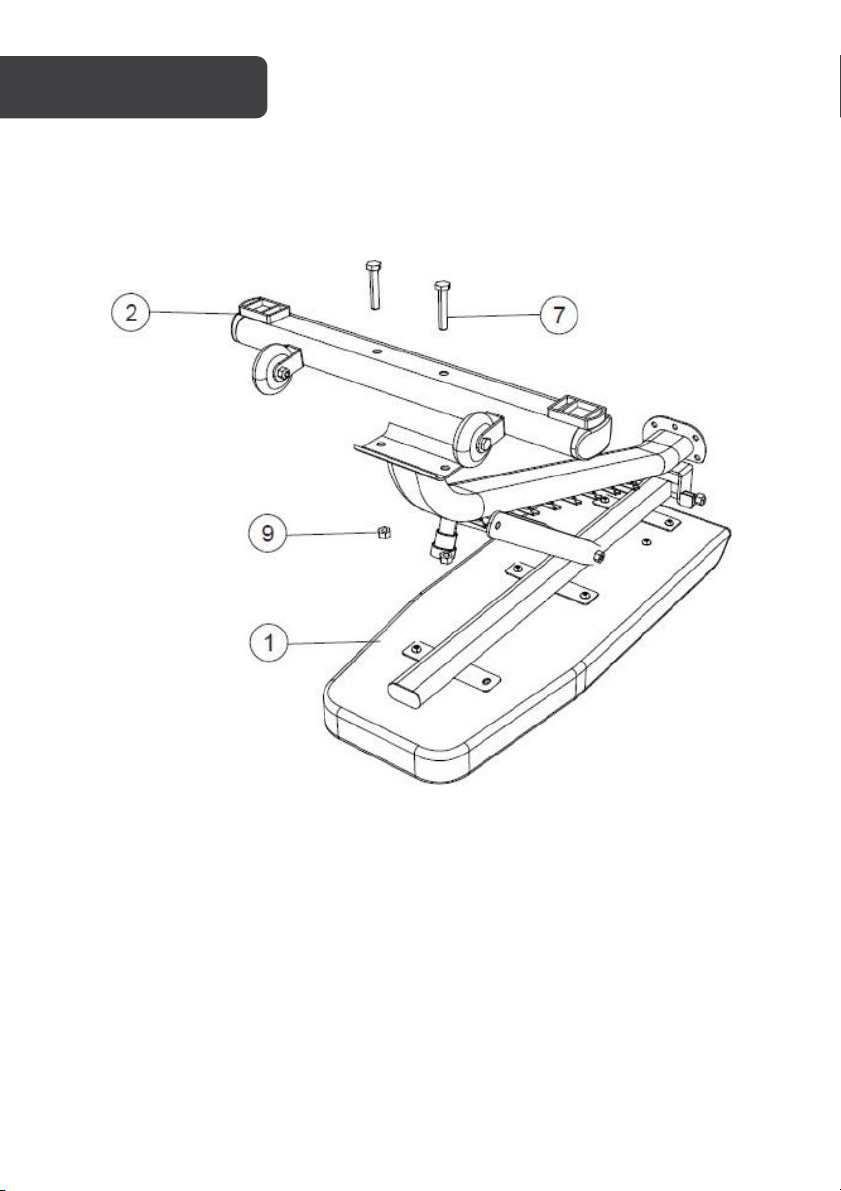
Step 1:
Turn the main frame (1) over and secure the rear stabiliser (2) to the main frame (1) with two
M10 long bolts (7) and two nuts (9).
6
Page 7
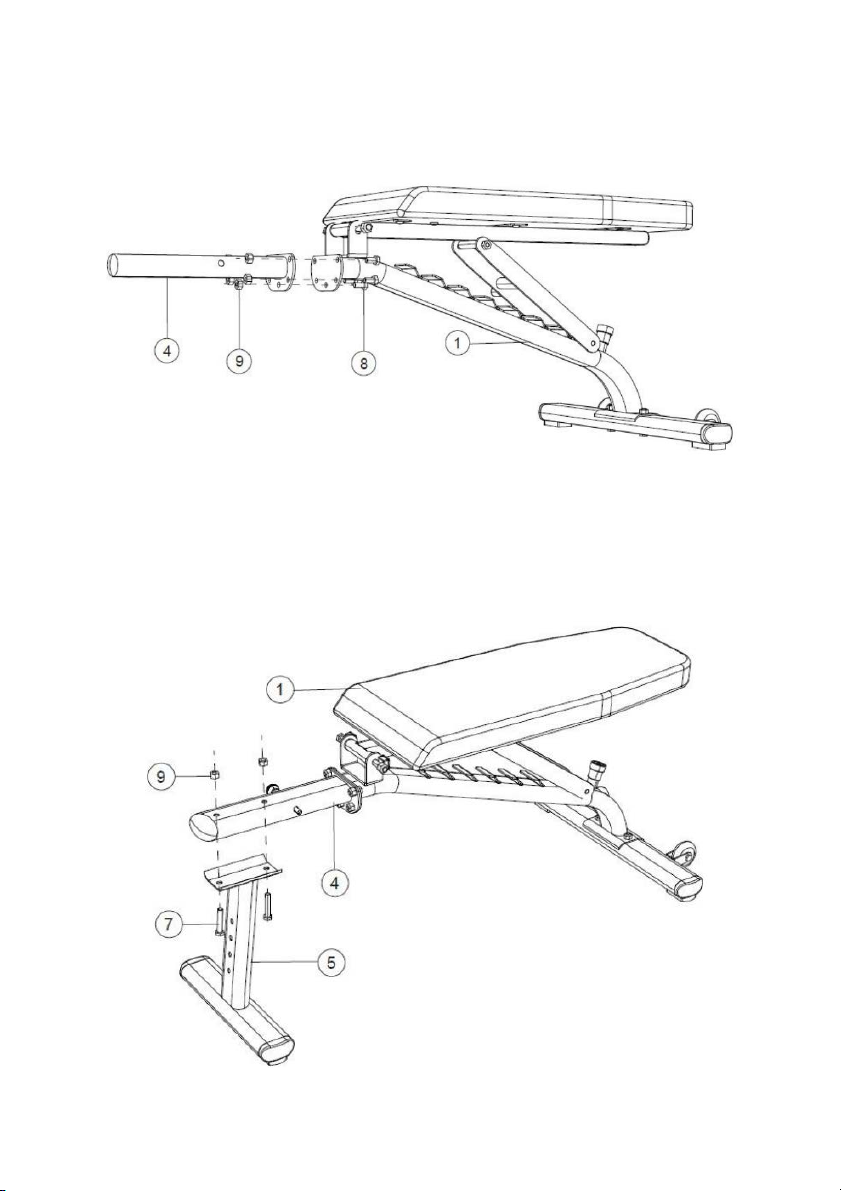
Step 2:
Turn the main frame (1) back over and attach the front stabiliser frame (4) to the main
frame (1) with five M10 short bolts (8) and five nuts (9).
Step 3:
Attach the front stabiliser (5) to the front stabiliser frame (4) with two M10 long bolts (7) and
two nuts (9).
7
Page 8
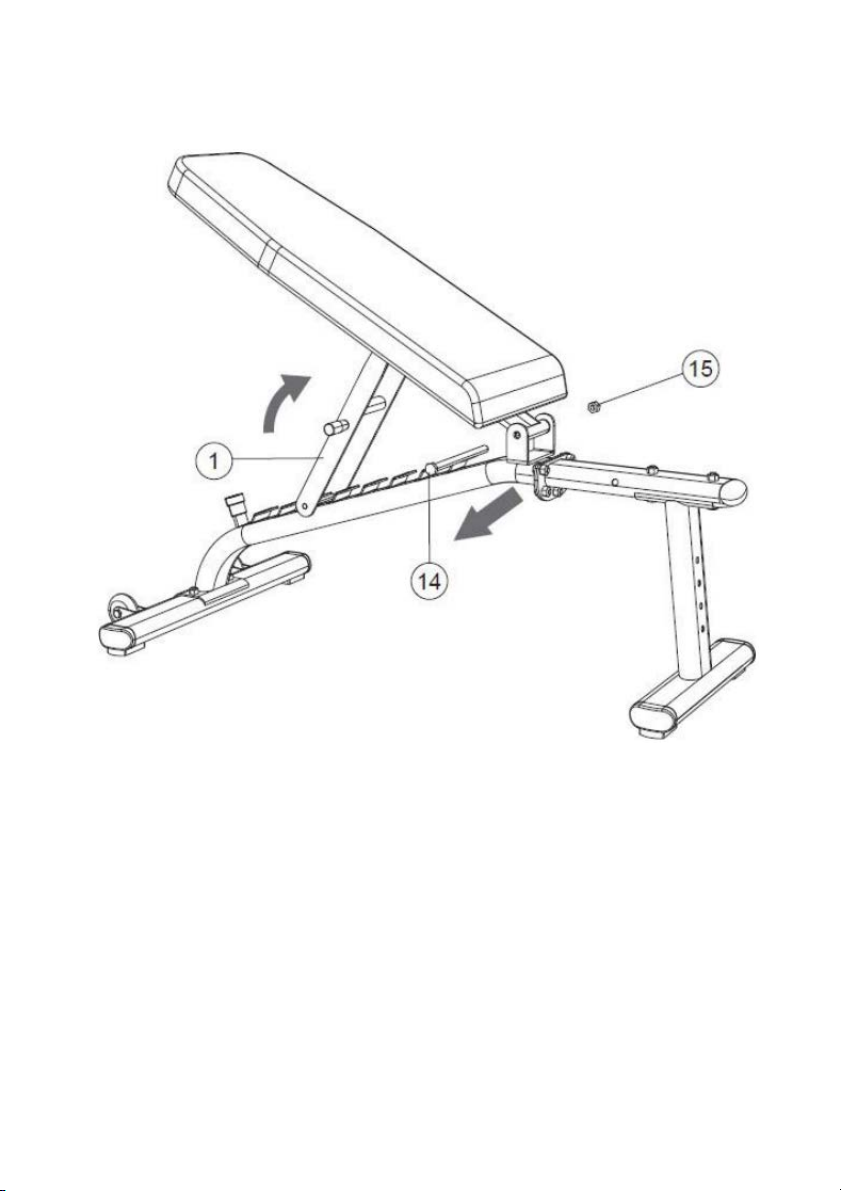
Step 4:
Adjust the backrest to the third level, loosen the nut (15) and pull out the pin (14).
8
Page 9
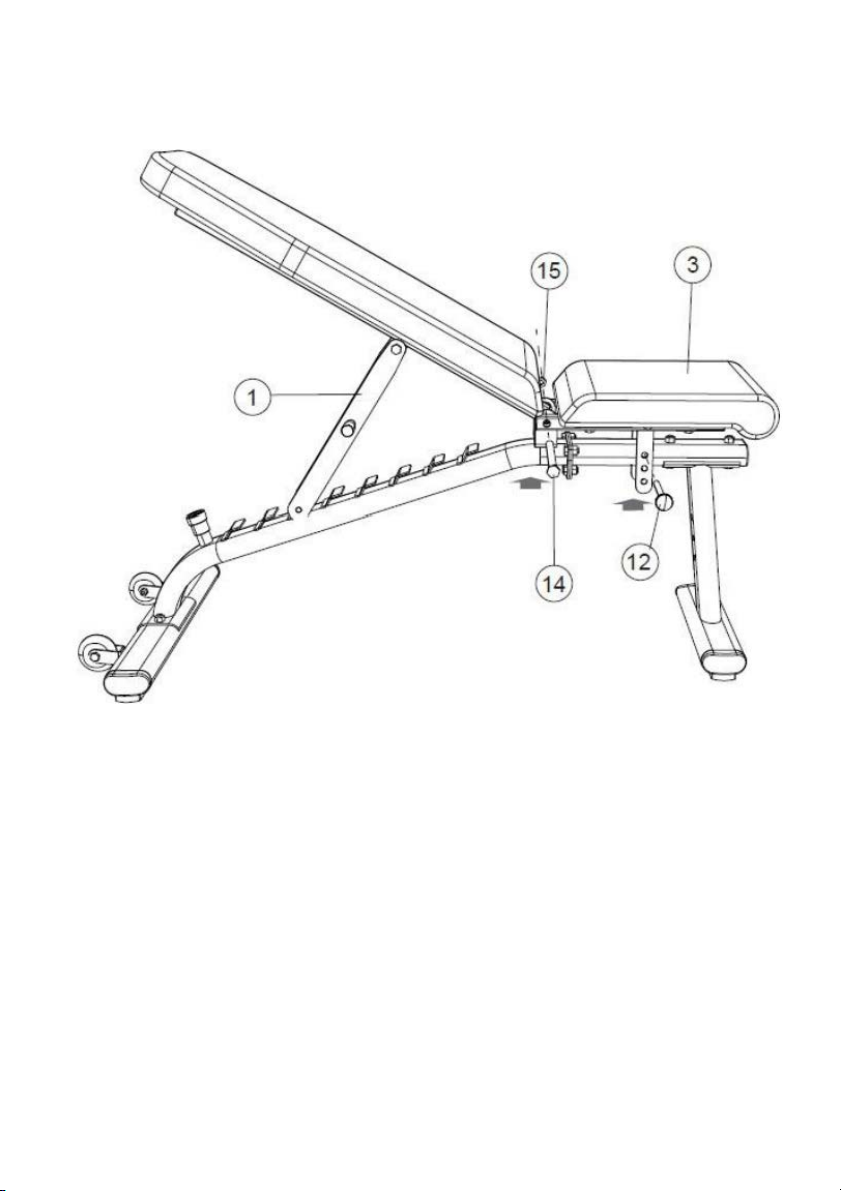
Step 5:
Align the backrest and seat holes (3) and then reattach the pin (14) and nut (15).
9
Page 10
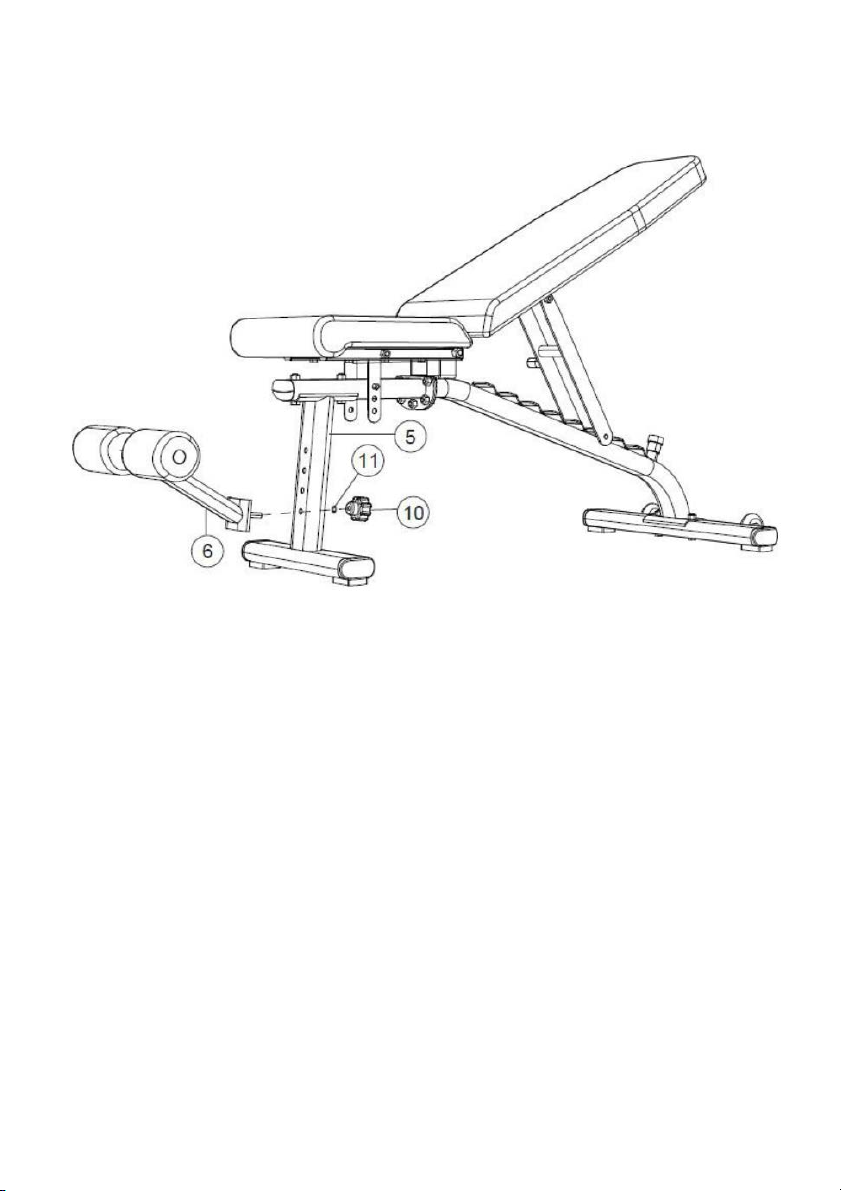
Step 6:
Attach the leg bar (6) to the front stabiliser (5) with a washer (11) and hand knob (10).
10
Page 11
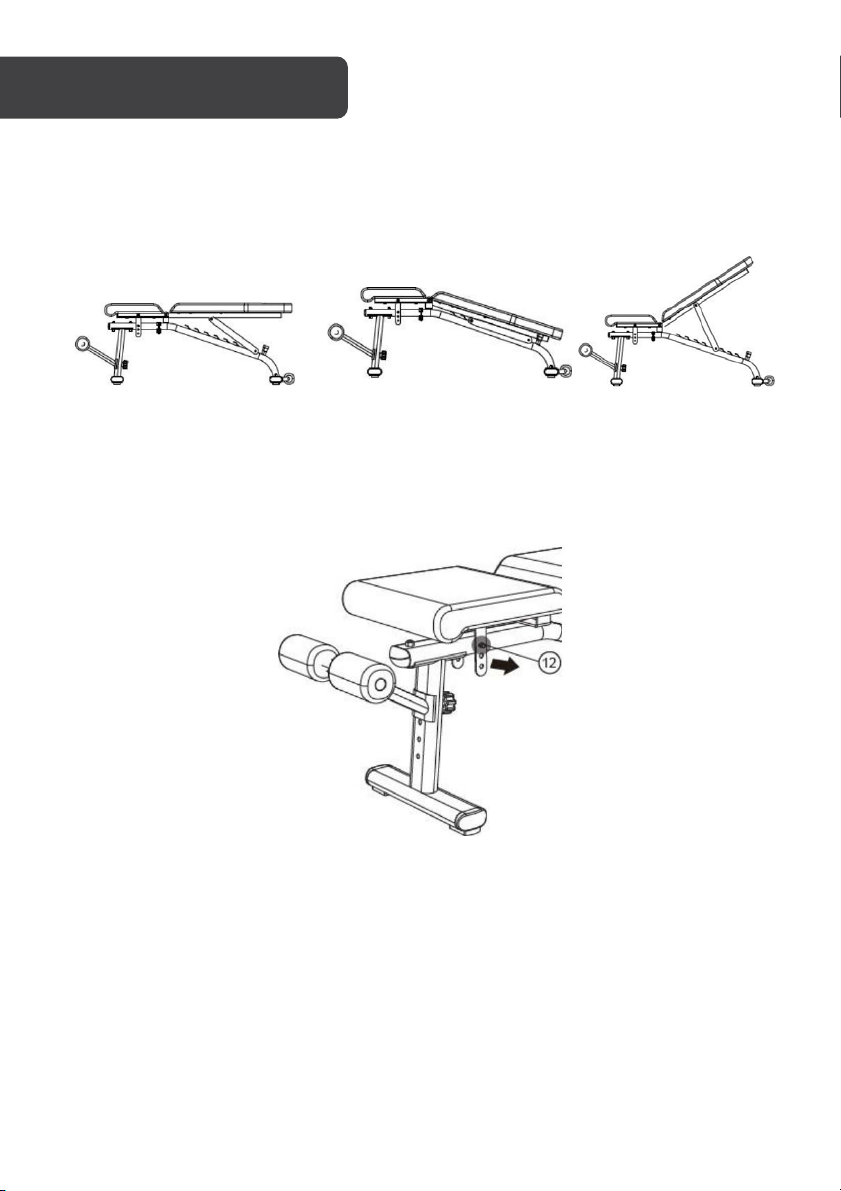
Flat
Down
Up
Bench Positions
Seat Position Adjustment
Pull out pin (12).
11
Page 12
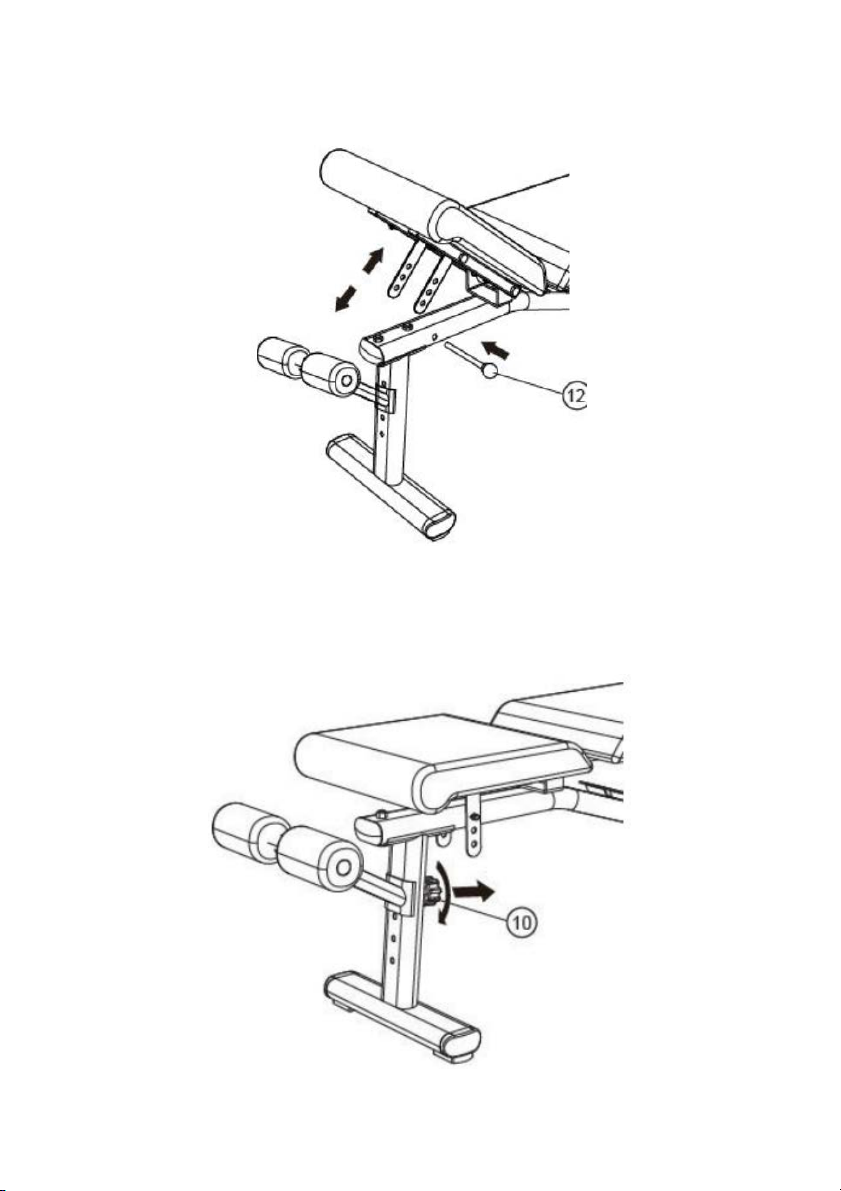
Set the required position and then replace the pin (12).
Foot Frame Position Adjustment
Remove the hand knob (10).
12
Page 13
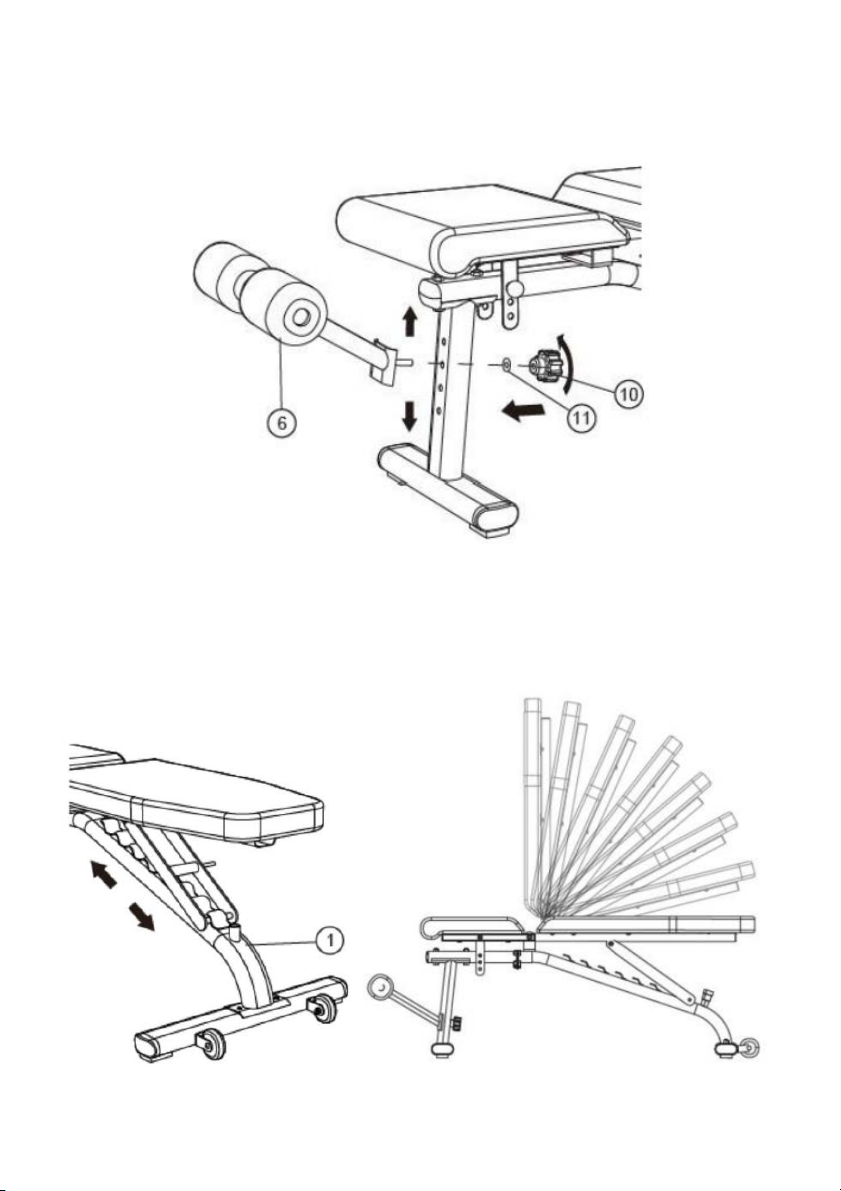
Set the required position of the frame (6) and then reattach the hand knob (10) and washer
(11).
Adjusting the Backrest Position
Adjust the position of the backrest according to your preferences.
13
Page 14
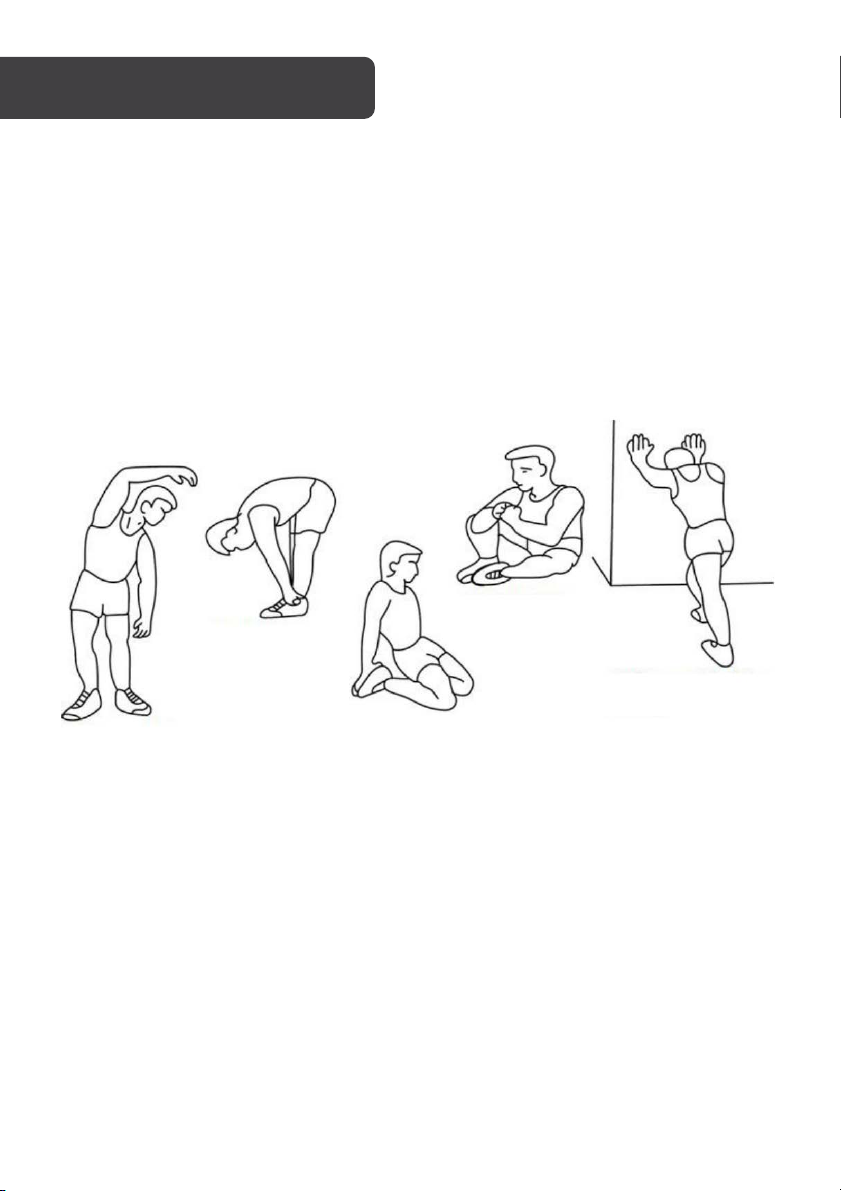
Sides & hips
Back thighs
Front things
Inner things
Calves & Achilles
tendon
Exercise is beneficial to your health, improves physical condition, shapes muscles and, in
combination with a calorie-balanced diet, leads to weight loss.
Warming Up
This phase serves to improve the blood circulation of the whole body and to warm up the
muscles, to reduce the risk of convulsions and muscle injury. It is recommend performing the
stretching exercises below. When dragging, stay in the end position for approximately 30
seconds, do not make sudden movements and do not vibrate.
14
Page 15
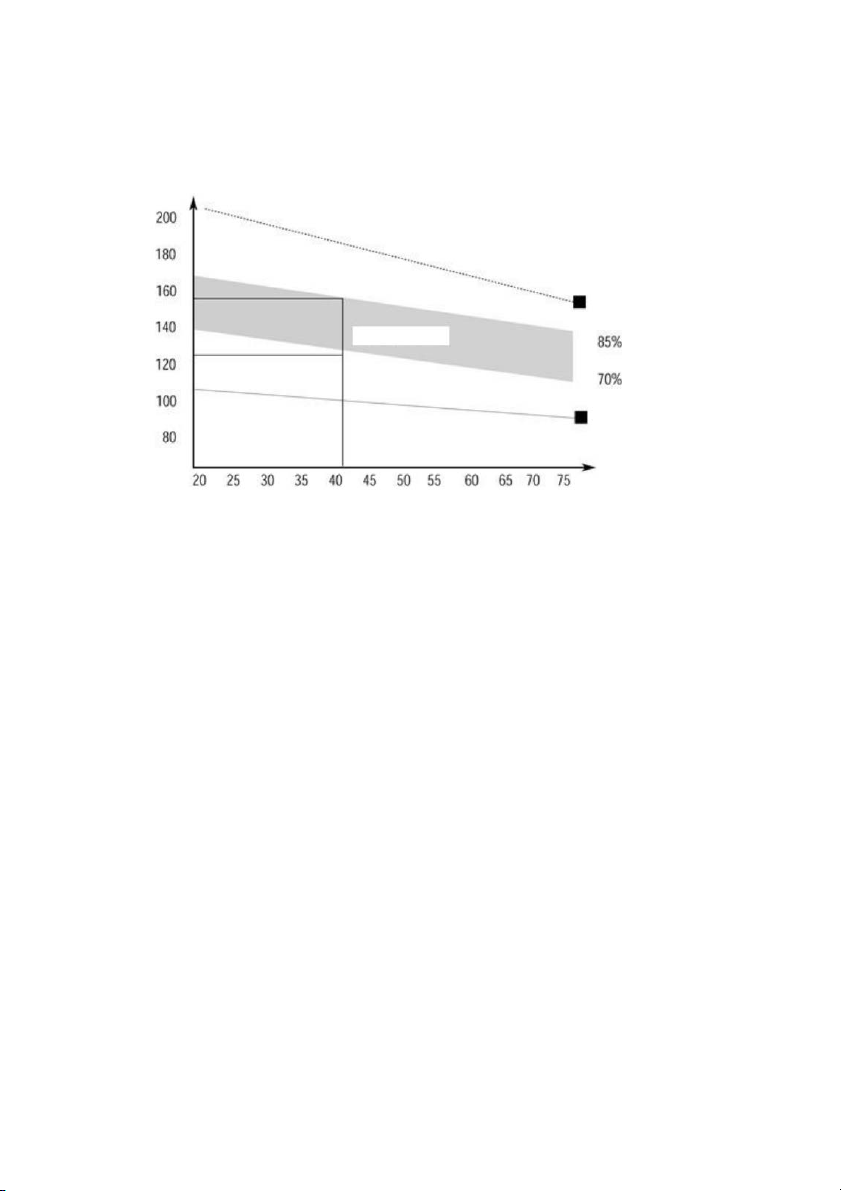
Exercising
TARGET ZONE
Age
Heart Rate
Maximum
Cool Down
This phase is the most physically demanding part. Regular exercise strengthens the
muscles. You can determine the tempo yourself, but it is very important that it is the same
throughout the exercise. Heart rate should be within the target zone (see figure below).
This phase should last at least 12 minutes. Most people exercise for 15-20 minutes.
Cooldown
This phase serves to soothe the cardiovascular system and relax the muscles. It should take
approximately 5 minutes. You can repeat warming up exercises or continue exercising at
slower pace. Stretching your muscles after exercise is extremely important - you need to
avoid sudden movements and vibrations.
With improved fitness, you can lengthen and increase exercise intensity. Train regularly, at
least three times a week.
Shaping Muscles
For muscle shaping, it is important to set a high load. The muscles will be more stressed,
which may cause that you will not be able to exercise as long as usual. If you are trying to
improve your condition at the same time, you need to adjust your training. Exercise in the
usual way during the warm-up and final stages of training but increase the resistance of the
device at the end of the exercise. You may need to slow down the speed to keep the heart
rate in the target area.
Weight Loss
The number of calories burned depends on the length and intensity of the exercise. The
essence is the same as in fitness exercise, but the goal is different.
15
Page 16
This marking indicates that this appliance should not be disposed with other
household wastes. To prevent possible harm to the environment or human
health from uncontrolled waste disposal, recycle it responsibly to promote the
sustainable reuse of material resources.
• Regularly lubricate all moving parts.
• Check and tighten all connections.
• Clean the device with damp cloth and a mild cleaning detergent.
• Regularly check the device for signs of wear or damage.
• Immediately replace worn or damaged parts.
Disposal
16
Page 17
17
Page 18
18
Page 19
19
Page 20
Need more information?
We hope that this user guide has given you
the assistance needed for a simple set-up.
For the most up-to-date guide for your product,
as well as any additional assistance you may require,
head online to help.kogan.com
20
 Loading...