

Page 1
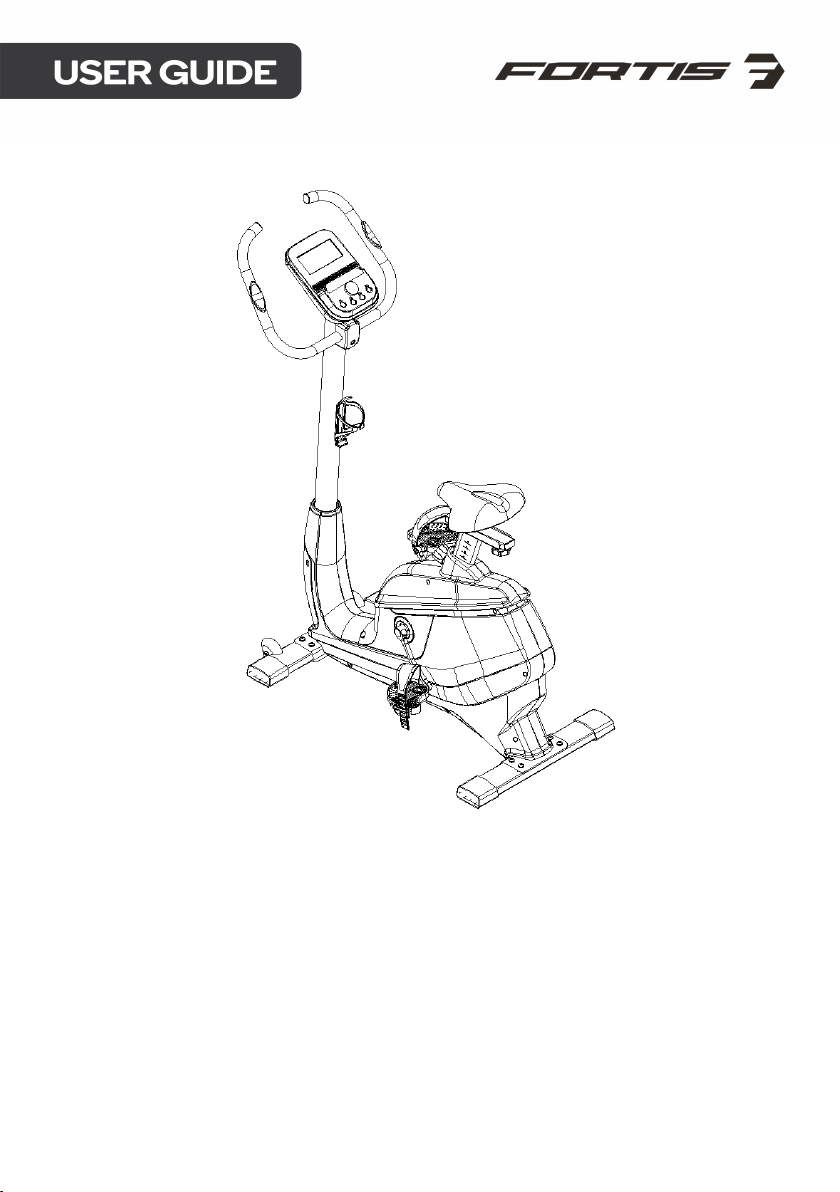
AUTOMATIC VARIABLE RESISTANCE
MAGNETIC FLYWHEEL UPRIGHT
EXERCISE BIKE
(EXR-620A)
FSEMEXR620A
Page 2

Page 3

SAFETY & WARNINGS
Read all the instructions in this guide before assembling or using this product. Do not skip,
substitute, or modify any steps or procedures in this guide, as doing so could result in
personal injury or product damage. Retain this guide for future reference.
• Before starting any exercise program, you should consult your physician to
determine if you have any medical or physical conditions that could put your
health and safety at risk or prevent you from using the equipment properly. Your
physician’s advice is essential if you are taking any medication that may affect
your heart rate, blood pressure or cholesterol level.
• Incorrect or excessive exercise can damage your health. Stop exercising if you
experience any of the following symptoms: pain, tightness in your chest, irregular
heartbeat, shortness of breath, light headedness, dizziness, or feelings of nausea. If
you experience any of these conditions, you should consult your physician before
continuing with your exercise program.
• This equipment is intended for adult use only. Keep children and pets away from
the machine. DO NOT leave children unattended in the same room with the
equipment. The equipment is not intended for medicinal use.
• This equipment is designed for consumer use. Follow directions and use only as
described. This bike does not suit for therapeutic use.
• During the exercise, hold the handle tightly. Ensure the feet is on the pedal and is
strapped tightly
• Do not exceed the maximum user weight of 100kgs.
• The braking system of the bike is speed dependent.
• Prior to assembly, ensure you have all the components and tools listed. Some
components are pre-assembled to help with the assembly process.
• Use the equipment on a solid, flat level surface with a protective cover for your floor
or carpet.
• Once fully assembled, inspect to ensure all hardware parts such as bolts, nuts and
washers are positioned correctly and tightly secured
• It is recommended to lubricate all moving parts monthly.
• Dry after each use to remove moisture. Wipe regularly with a mild, non-abrasive
cleaner and water solution. To avoid damaging the finish, never use a petroleumbased solvent.
• Use the equipment on a solid, flat level surface with a protective cover for your floor
or carpet. To ensure safety, the equipment should have at least 2 feet
(approximately 60 cm) of free space on each side.
• Always use the equipment as intended. If you find any defective components while
assembling or checking the equipment, or if you hear any unusual noises coming
from the equipment during exercise, cease use immediately and contact
help.kogan.com for assistance. Do not use until resolved.
Page 4

• Do not wear loose clothing while rowing.
• Do not place fingers or any other objects into moving parts of the exercise
equipment.
• Do not use the corrosive cleaning agents, to avoid the liquid from entering the
equipment.
• Be careful when lifting and moving the equipment. Always use proper lifting
technique and seek assistance if necessary.
• The equipment is intended for use in cool, dry conditions. You should avoid storage
in extreme cold, hot or damp areas as this may lead to corrosion and other related
problems.
• This equipment is designed and intended for indoor use only, not for commercial
use. This equipment can be used by only one person at a time.
• This equipment contains no user-serviceable parts. If it suffers any failure or
damage, cease use immediately and contact help.kogan.com.
Page 5
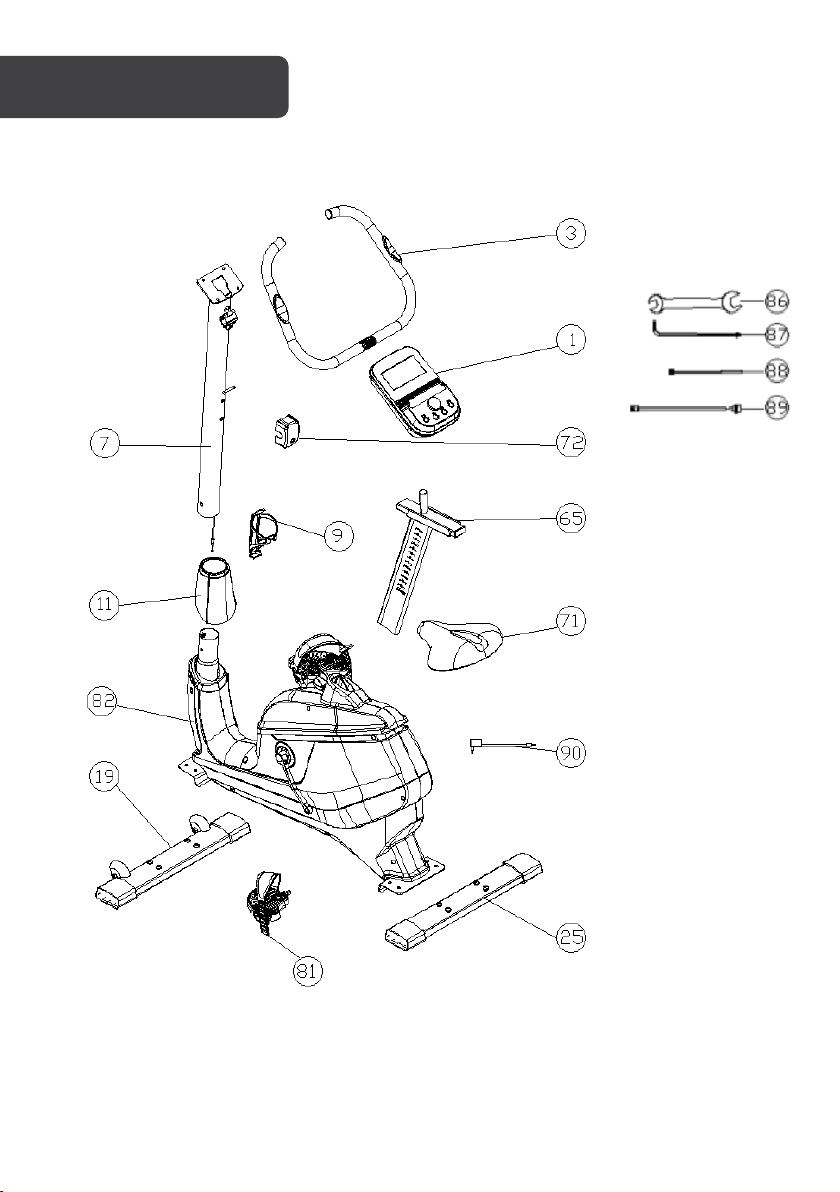
Page 6
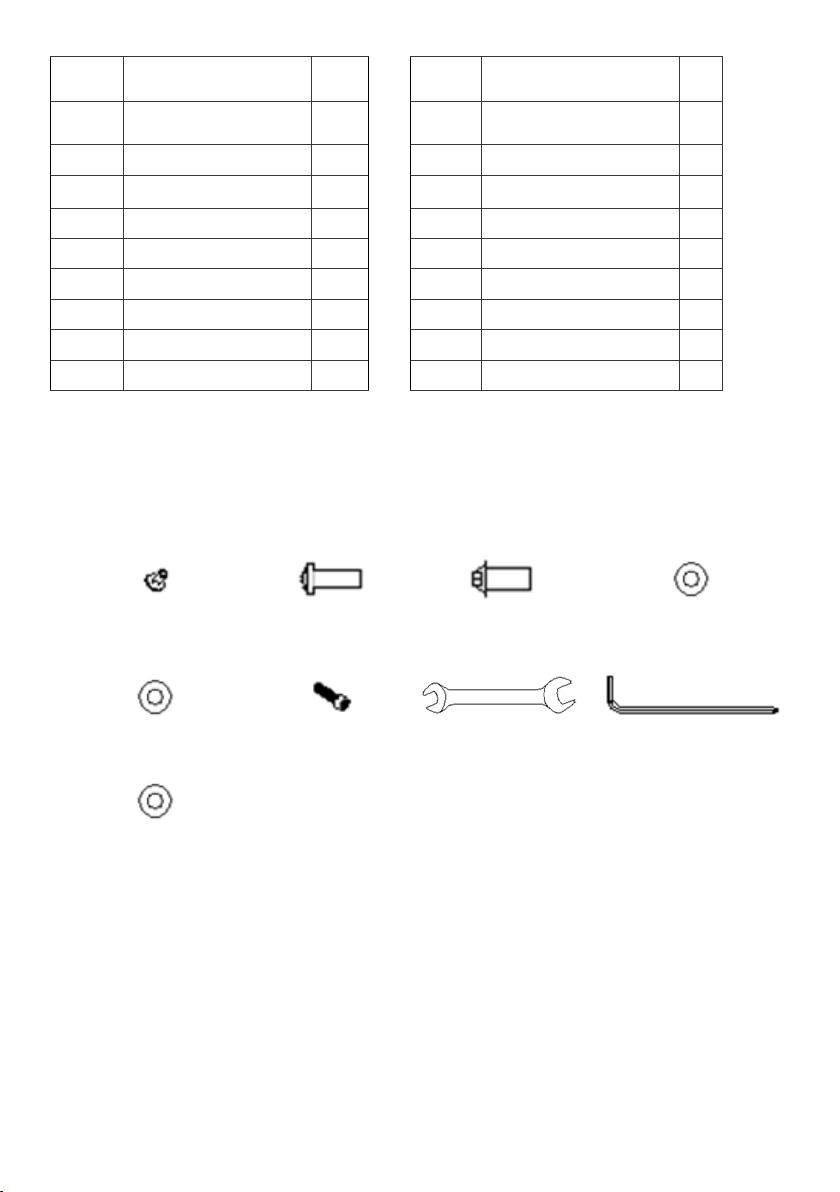
Part Description Qty
3
Handlebars
x1 73
Right Pedal
x1
7
Handlebar post φ60
x1 81
Left Pedal
x1
9
Bottle holder
x1 82
Main Frame
x1
11
Handlebar post cover
x1 86
Allen key 1
x1
19
Front Stabiliser
x1 87
Allen key 2
x1
25
Rear Stabiliser
x1 88
Assembly Wiring 1
x1
65
Seat Post
x1 89
Assembly Wiring 2
x1
71
Cushion
x1 90
Adaptor
x1
2 Screw M5x10L
10 M5x16L
12 M8x20L
13 (Φ8xΦ16x1.6T)
85 Washer
83 M8x20L
86 Spanner
87 Allen Key
84 Washer
Φ8xΦ12x1.6T (x1)
Part Description Qty
1 Console x1
Hardware
(x4)
(x2)
72 Cover x1
(x12)
(x12)
Φ8x2T (x1)
(x1)
(x1)
(x1)
Page 7
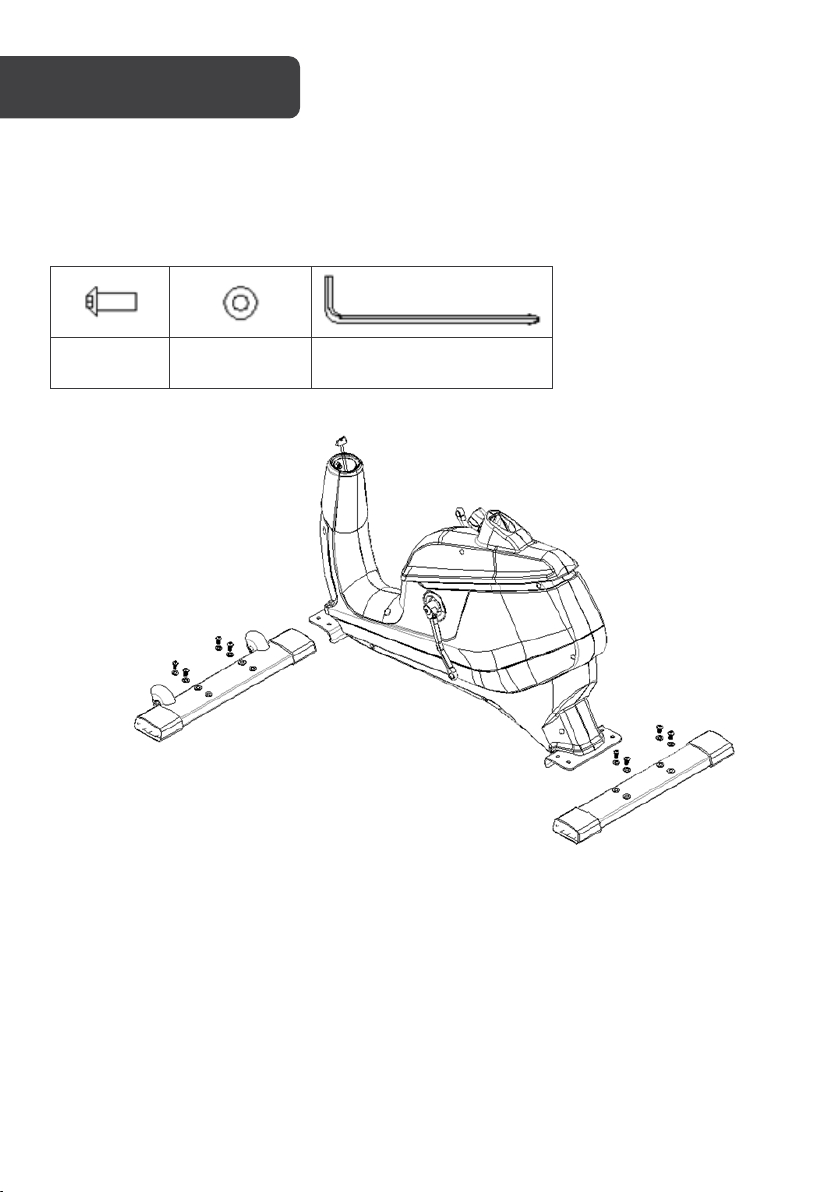
12# M8x20L
(8PCS)
13# Φ8xΦ16x1.6T
(8PCS)
ASSEMBLY
Step 1:
Attach the Front Stabiliser (19) and Rear Stabiliser (25) to the Main frame (82) using Screws
(12) and washer (13). Tighten with Allen key (87).
87#
Page 8
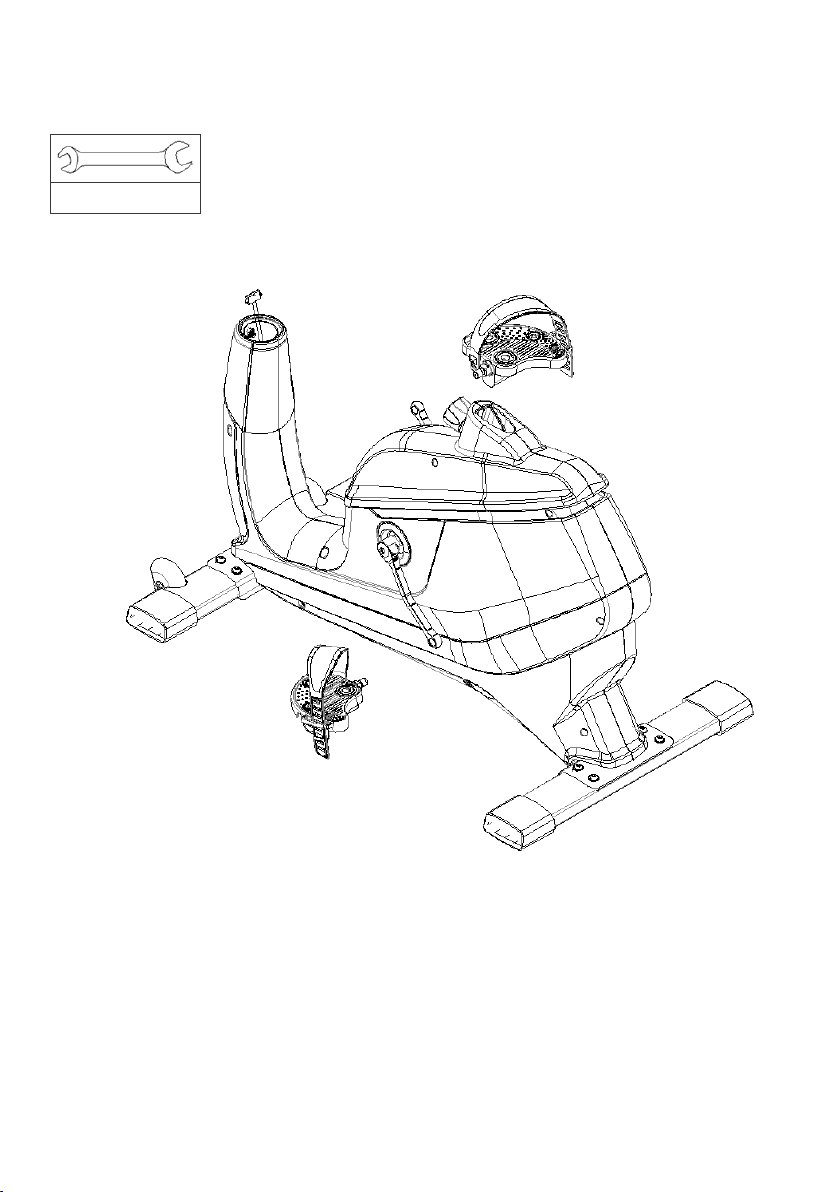
Step 2:
86#
Attach Pedals (73R) & (81L) to the crank of the Main Frame (82). Tighten with a Spanner
(86).
Page 9
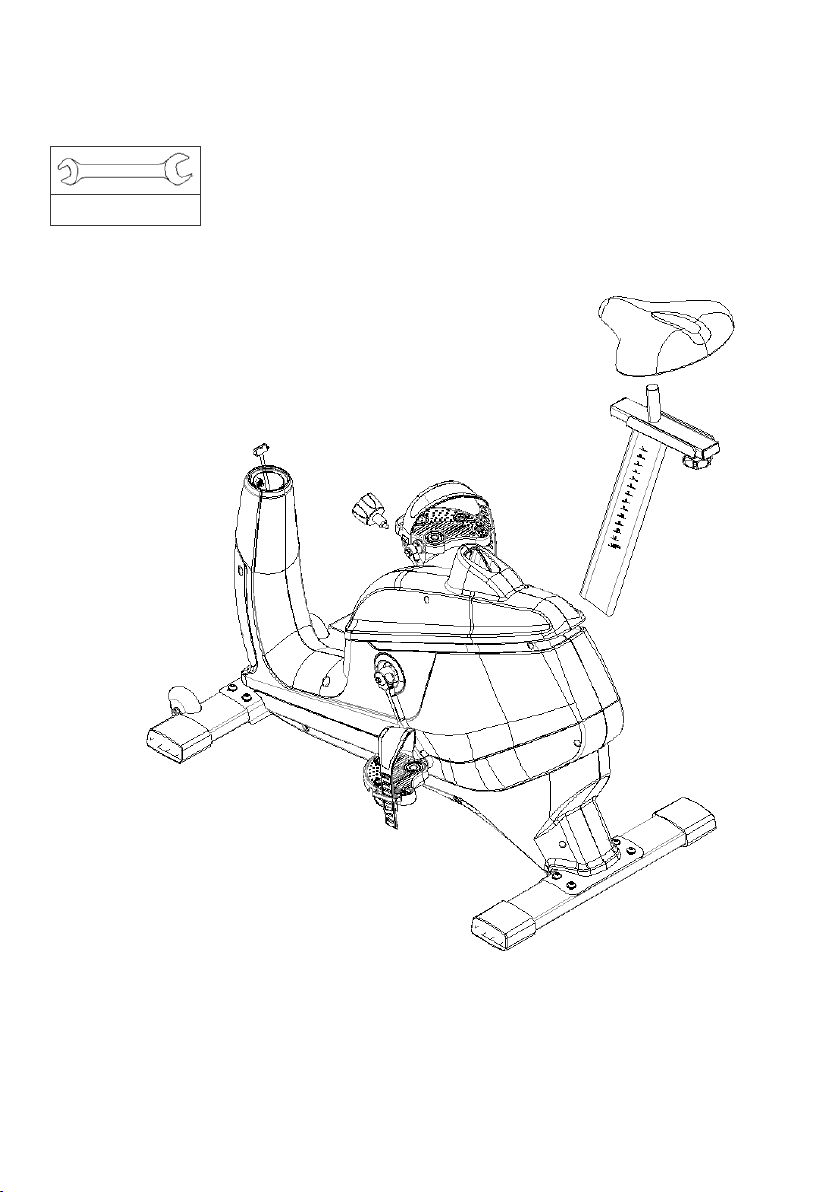
Step 3:
86#
Attach the Seat (71) to the Seat Post (65).
Insert the Seat Post (65) into the Main Frame (82).
Page 10
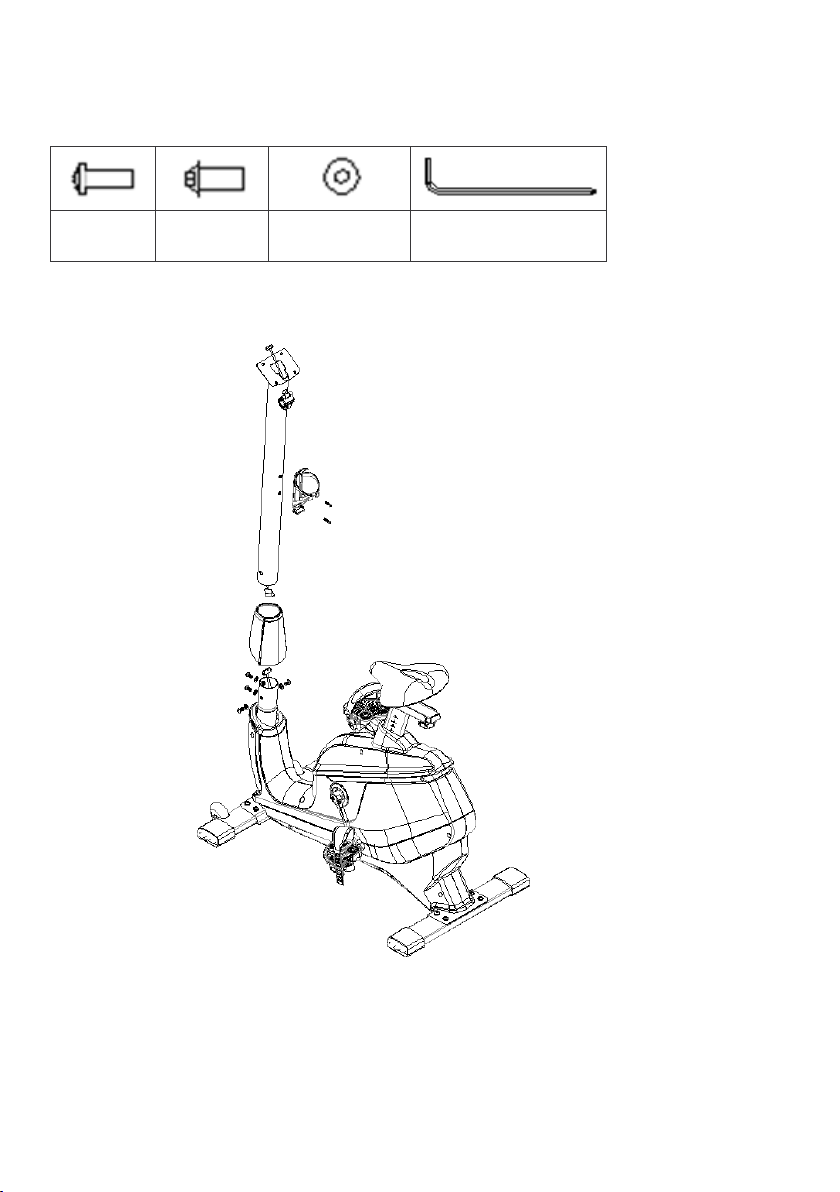
Step 4:
10# M5x16L
12# M8x20L
13# Φ8xΦ16x1.6T
(4PCS)
Attach the 88 and 89 wiring, then fit the handlebar post (7).
Attach the Bottle holder (9) to the handlebar post (7).
(2PCS)
(4PCS)
87#
Page 11
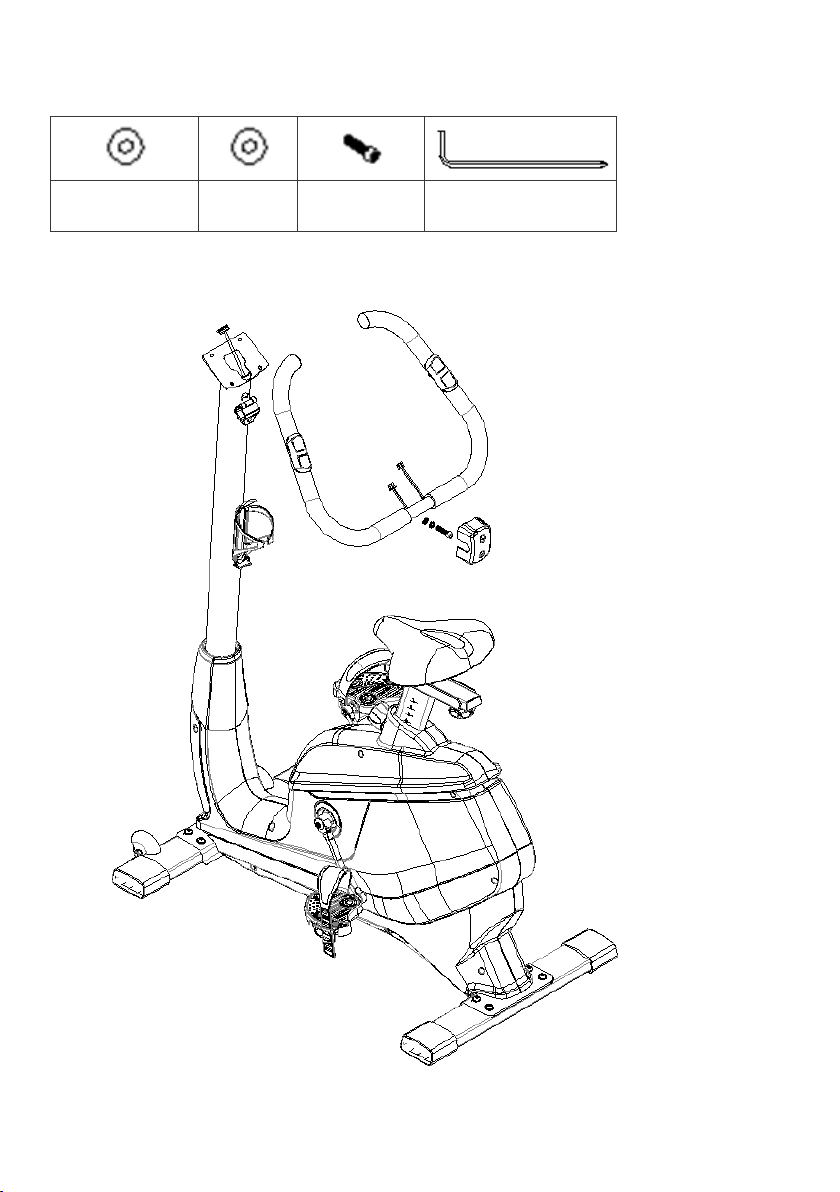
Step 5:
84# Φ8xΦ12x1.6T
(1PC)
85# Φ8x2T
(1PC)
83# M8x20L
Attach the cover (72) to the handlebar (3)
(1PC)
87#
Page 12
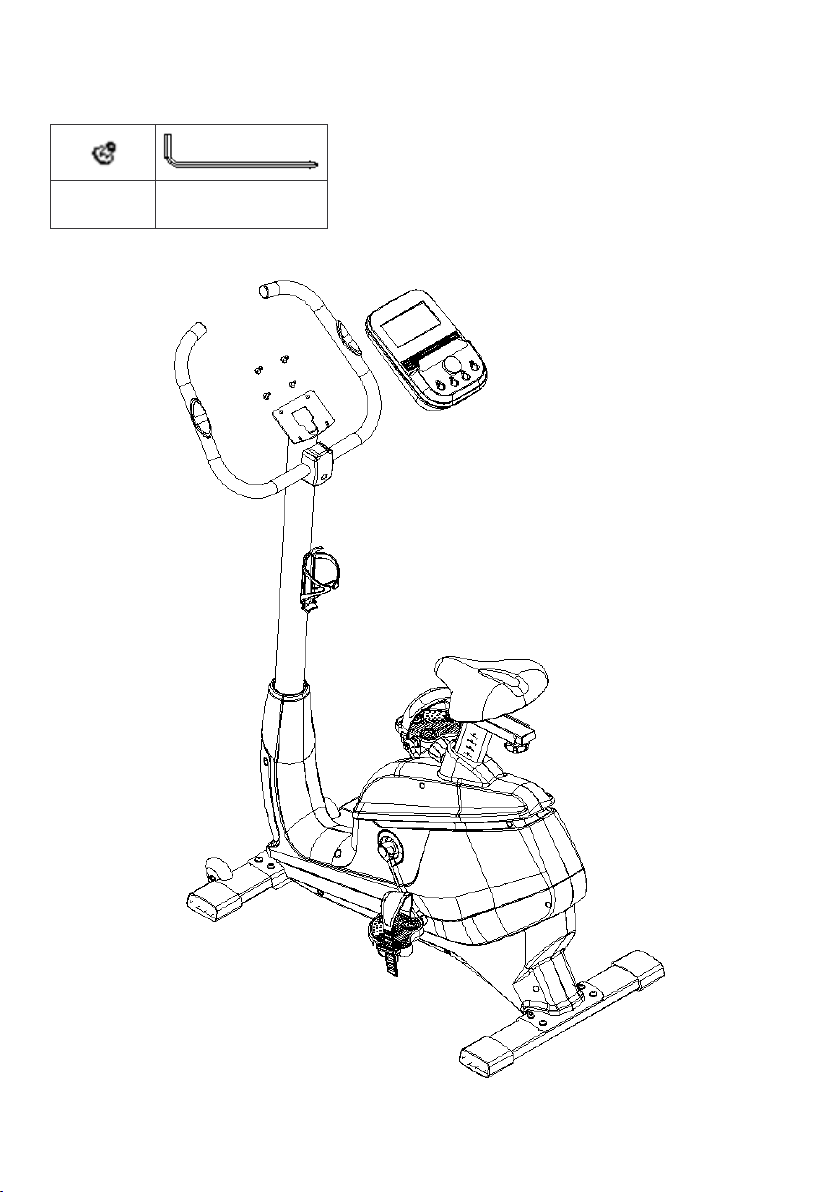
Step 6:
2# M5x10L
(4PCS)
Attach the handlebars (3). Attach the Console (1) using screws (2)
87#
Page 13
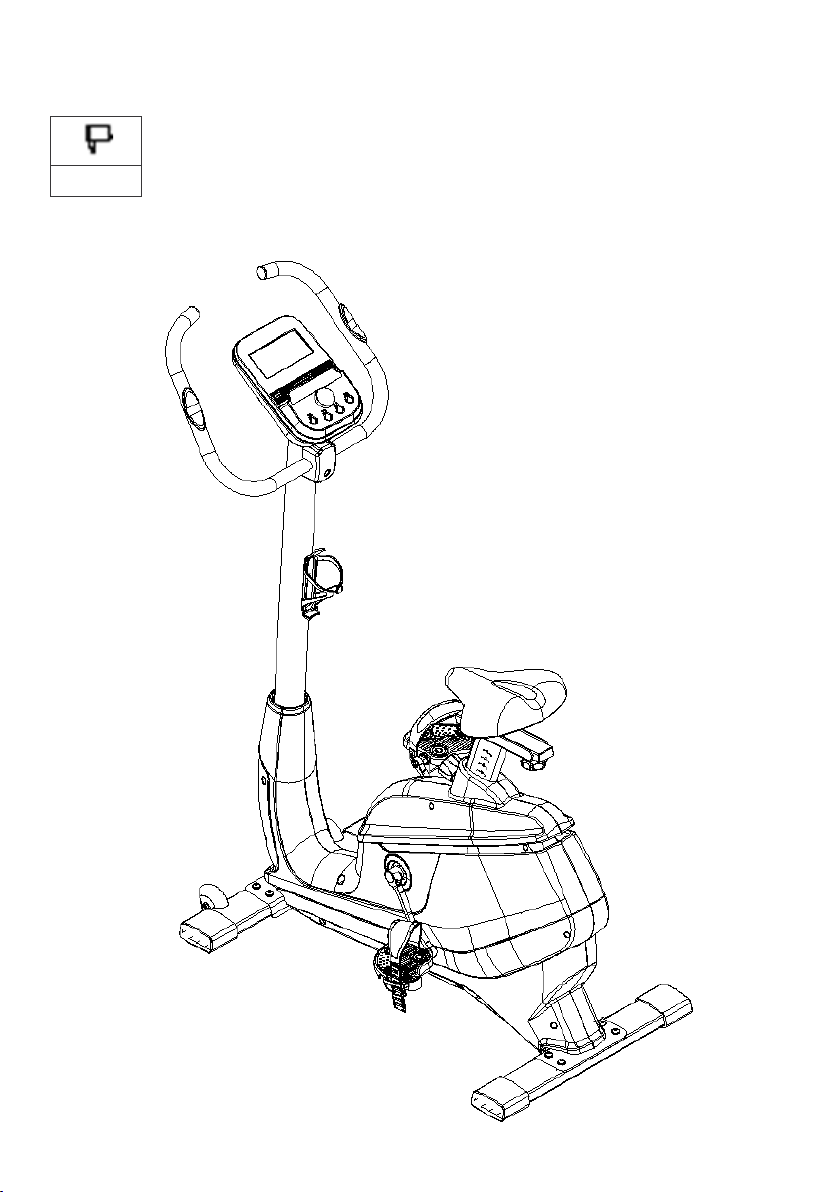
Step 7:
90#
Connect the Adaptor (90) to a power supply.
Page 14
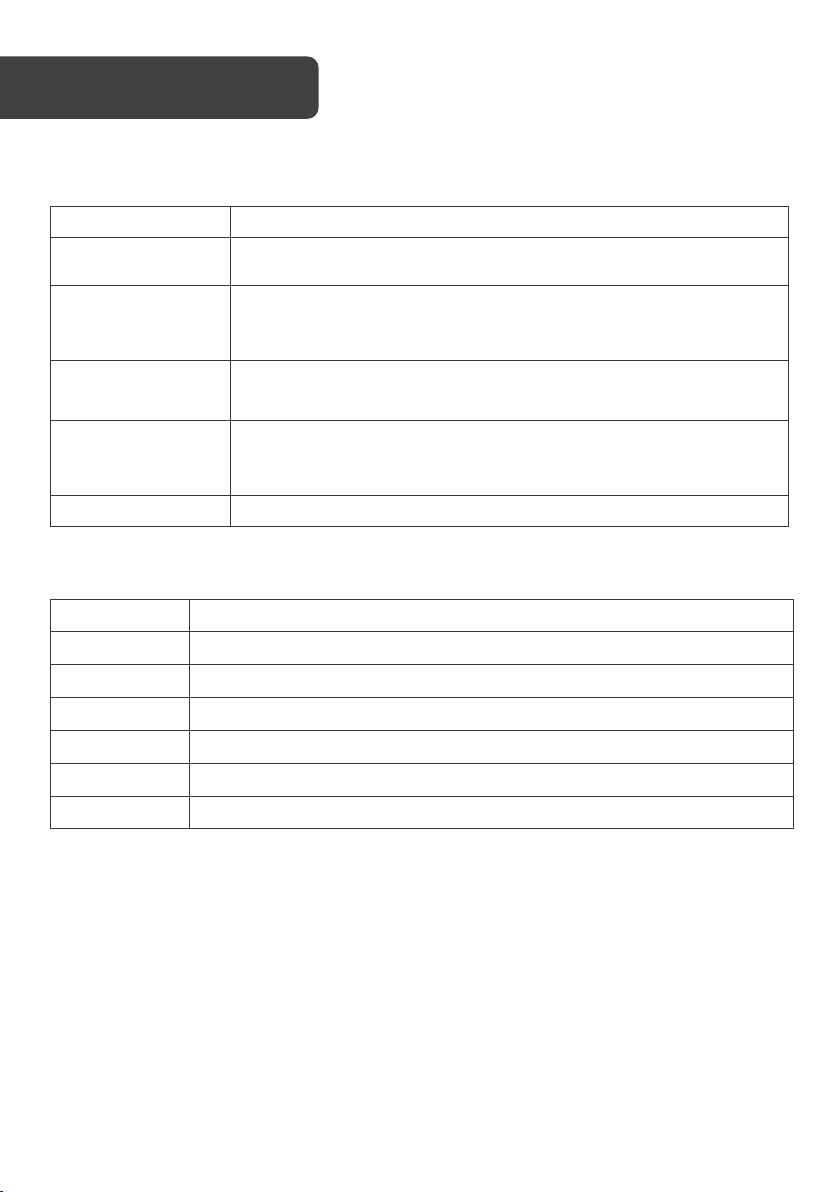
START/STOP
Start or stop exercising
In the stop mode, long press this button for 2 seconds to return to the
main menu.
• Move up to select a mode.
data value.
•
data value.
RECOVERY
Heart rate recovery
TIME
Display range 0:00 ~ 99:99; Set the range from 0:00 to 99:00 minutes
DISTANCE
Display range 0 ~ 99.99; Set the range from 0 ~ 99.90 km
CALORIES
Display range 0 ~ 9999; Set the range from 0 to 9990 calories
PULSE
Display range p-30 ~ 230; Set the range from 0-30 ~ 230
WATT
Display range 0 ~ 999 watts; Set the range from 10 to 350 watts
SPEED
0.0~99.9 km/h
RPM
0~999 times
OPERATION
Function
RESET
UP (+)
MODE
DOWN (-)
Data Display Range
• After a mode is selected, press this button to increase the mode
In the stop mode, the press this button to confirm the settings and
enter that program mode.
Move down to select a mode.
• After a mode is selected, press this button to decrease the mode
Page 15
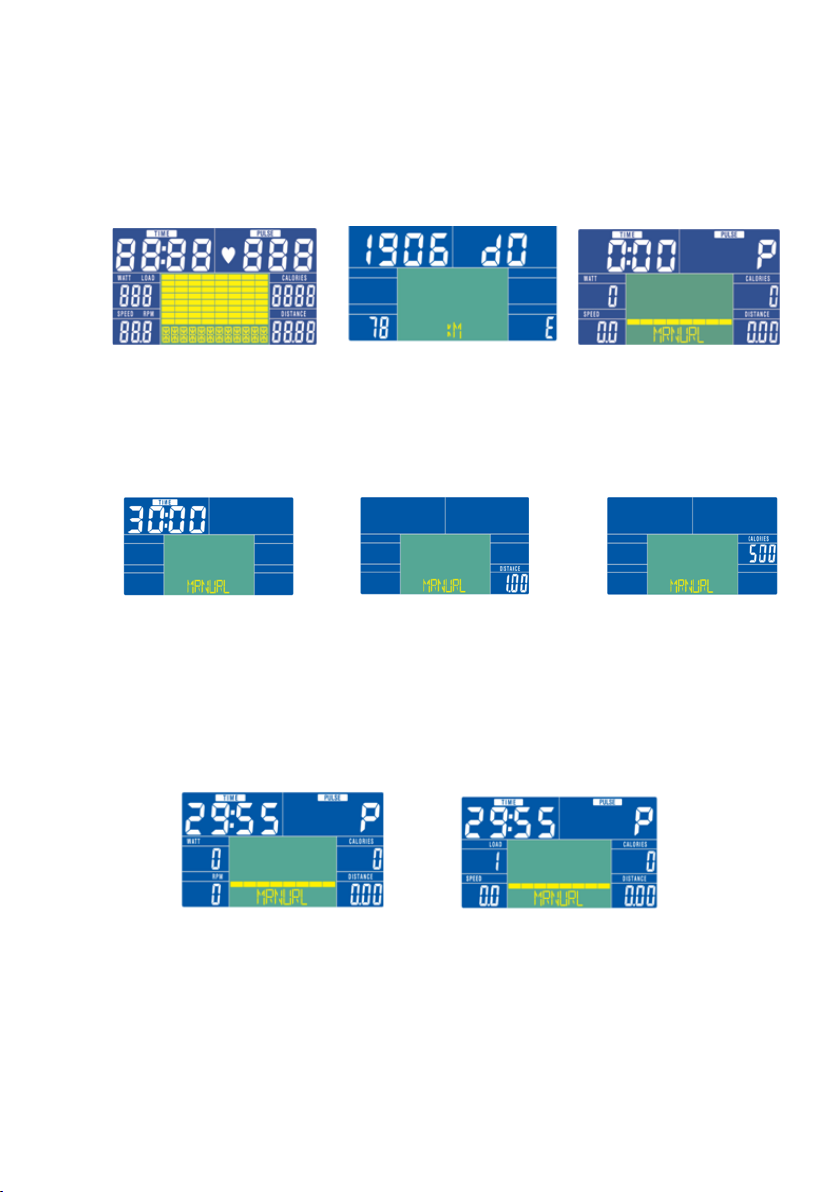
Operation Function
Figure 1
Figure 2
Figure 3
Figure 4
Figure 5
Figure 6
Figure 7
Figure 8
1. After connecting to a power supply, press the RESET KEY for 2 seconds, you will
hear a buzzer beep for 1 second and full LCD display for 2 seconds.
2. After displaying the wheel diameter, Eurasian gauge/fat symbol E and unit KM for
1 second (as shown in Figure 2), the console will enter the motion standby screen
(see Figure 3). The values must be reset to 0, then go to LOAD=1 and choose each
setting.
3. Press MODE key, then press the UP/DOWN key to set a time as shown in figure 4.
Press MODE key, then press the UP/DOWN key to set distance as shown in figure
5. Press MODE key, then press the UP/DOWN key to set the calories as shown in
figure 6.
4. Press the START/STOP key to start the bike. Press the UP/DOWN to view the
LOAD section as shown in figure 8. Press the START/STOP to stop the bike. Press
the RESET button for to reset the values. Long press the RESET button for 3
seconds to restart.
5. The selection sequence is MANUAL > BEGINNER > ADVANCE > SPORTY >
CARDIO > WATT and other exercise patterns (in a cycle).
6. Repeat the steps in this section to adjust BEGINNER, ADVANCE, SPORTY,
CARDIO AND WATT modes.
Page 16

Key function description
A. UP or DOWN
(with quick adjustment function, hold 1.5 seconds for each advance and retreat step 8 and
stop when put DOWN).
1. Select MANUAL, BEGINNER, ADVANCE, SPORTY, CARDIO, WATT, etc.
• After entering the setting mode, press UP or DOWN to make cyclic selection.
If not, press START directly
• The key goes straight to START.
• When you press UP or DOWN, follow MANUAL, BEGINNER, ADVANCE,
SPORTY, CARDIO and WATT Iso-motion pattern (recyclable).
2. Adjust the LEVEL of QUICK START
Under the START state, MANUAL LEVEL can be adjusted and the LOAD text and its
number can be displayed. It does not press UP or DOWN for 3 seconds and the display
WATT value is restored. It presses UP or DOWN for each carry or desktop.
3. Adjust the set value (such as TIME, DISTANCE and DISTANCE)
• When selecting TIME, DISTANCE, DISTANCE, PULSE from the MANUAL
function, press UP or DOWN Key to adjust the set value of each function, with
cycle function.
• Only TIME may be set in BEGINNER, ADVANCE, SPORTY, WATT, HRC.
• Press UP or DOWN to carry or abdicate one step at a time. Hold for 1.5
seconds, then +/-8 steps per second.
4. Select from the CARDIO (H.R.C) options
If CARDIO (H.R.C) is selected, click MODE to determine and the preset values by age
are displayed in the PULSE window;
If you select TARGET, the PULSE window displays the TARGET value after selection
and flashes to set by pressing UP or DOWN
TARGET, set the time, age and heart rate according to the MODE cycle.
Value, UP or DOWN key with loop function.
5. Select WATT
When entering, WATT value flashes and waits for setting (preset value, 30 minutes,
WATT 120). The user presses UP or DOWN to set WATT value and sets it according to
the MODE loop.
After START, automatically adjust the LEVEL value according to the user's input WATT
value and practice status.
Page 17

B. The MODE key
1. Select configurable functions (such as TIME, DST, CAL)
• Press this KEY to select MANUAL for TIME, DST and CAL in turn. When you
select a function, then
• The number of the function displayed on LCD flashes at 1Hz to indicate that
the function is currently configurable.
2. Functions of this KEY and ENTER:
After selecting or setting, press this KEY to proceed to the next operation.
•
After pressing this KEY, the previous function will no longer work
• Select Settings.
3. The above actions can only be performed under the state of STOP.
4. Pressing this KEY when START has no effect.
C. RESET button
• General RESET: Press this key once in system STOP state and then go back
to MANUAL
• Press UP or DOWN to
select→BEGINNER→ADVANCE→SPORTY→CARDIO→WATT and all values of
set TIME, DISTANCE, PULSE and (WATT) are cleared.
D.START/STOP KEY
Press this KEY to START the operation of the system and then press this KEY
•
to STOP the operation.
• If in MANUAL mode, only press STRAT to start the exercise or RSET to return
to the first page option.
Page 18
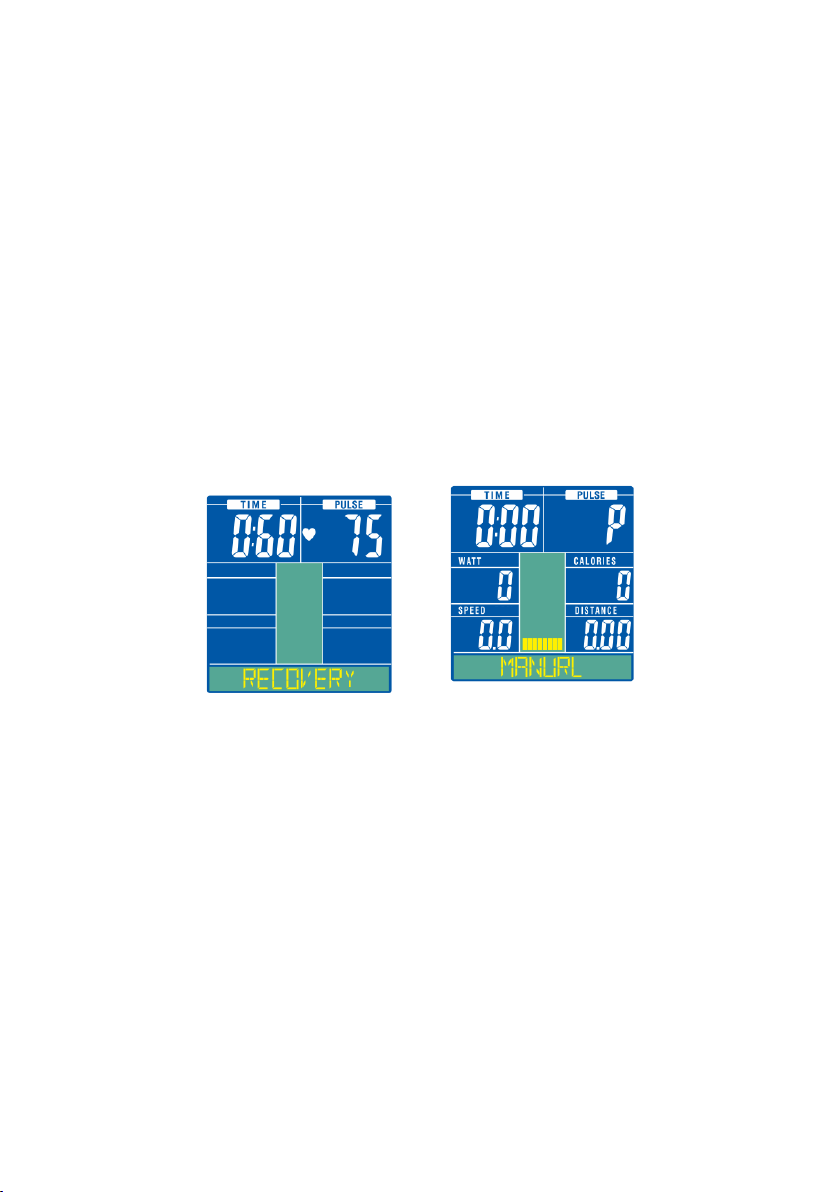
E. The RECOVERY key
Figure 9
Figure 10
1. If no PULSE input is available, press The RECOVERY key to disable the function.
2. Press this KEY once after the PULSE value is displayed;
• The TIME and PULSE functions of RECOVERY are enabled, while the
remaining functions are enabled and not displayed (See Figure 9).
• The TIME window displays "0:60" seconds and begins the countdown (the
countdown does not affect the TIME when PULSE is automatically shut down
without input), the PULSE window displays the actual heartbeat and when
countdown to zero, "FX" is displayed (Figure 26, X value 1~6) and "Beep" and
in the big 8 area, the heartbeat value will be displayed continuously. Then
press RECOVERY to jump to normal Display (motor returns to zero and moves
LEVEL 1, waiting for each setting).
3. After "FX" is displayed, press this KEY to restore general display. If this KEY is
pressed again, it will be executed from the first item (As shown in Figure 10).
4. During the RECOVERY period, the RECOVERY can be restored by pressing this
key.
Heart rate sensing
This product is compatible with Polar wireless heart rate monitors, and other 5.3kHz wireless
heart rate monitors. The PULSE meter will automatically show the heart rate reading when
a wireless monitor is detected.
There is no heart rate sensor built into the product’s handlebars.
Page 19
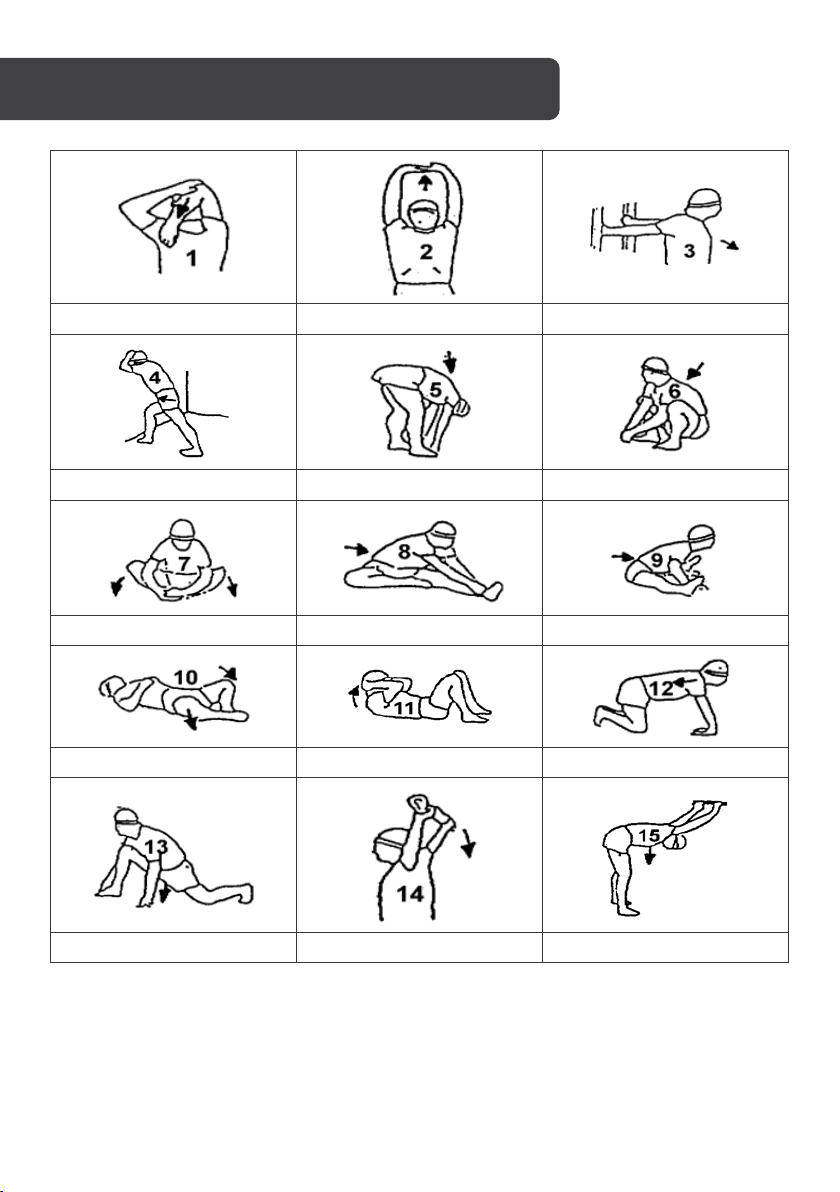
15 Seconds for each
20 Seconds
20 Seconds
25 Seconds
20 Seconds
20 Seconds
30 Seconds
25 Seconds for each leg
30 Seconds
20 Seconds
5 Seconds x 3 times
20 Seconds
20 Seconds for each leg
5 times
15 Seconds
Page 20

CLEANING & CARE
• Examine the equipment periodically to detect any damage.
• Lubricate moving parts with light oil periodically to prevent premature wear.
• Inspect and tighten all parts before using the equipment, replace any defective
parts immediately and do not use the equipment again until it is in perfect working
order.
• The equipment can be cleaned using a damp cloth and mild non-abrasive
detergent. Do not use solvents.
• Do not attempt to repair this equipment yourself. Should you have any difficulty
with assembly, operation or use of your exercise product or if you think that you
may have parts missing, contact the manufacturer.
Page 21
Page 22

Page 23
Page 24

Need more information?
We hope that this user guide has given you
the assistance needed for a simple set-up.
For the most up-to-date guide for your product,
as well as any additional assistance you may require,
head online to help.kogan.com
 Loading...