

Page 1

Utilities User Guide
FortiDB
Version 3.2
www.fortinet.com
Page 2

FortiDB Utilities User Guide
Version 3.2
December 19, 2008
15-32000-81369-20081219
© Copyright 2008 Fortinet, Inc. All rights reserved. No part of this publication including text, examples,
diagrams or illustrations may be reproduced, transmitted, or translated in any form or by any means,
electronic, mechanical, manual, optical or otherwise, for any purpose, without prior written permission of
Fortinet, Inc.
Trademarks
ABACAS, APSecure, FortiASIC, FortiBIOS, FortiBridge, FortiClient, FortiDB, FortiGate, FortiGuard,
FortiGuard-Antispam, FortiGuard-Antivirus, FortiGuard-Intrusion, FortiGuard-Web, FortiLog,
FortiManager, Fortinet, FortiOS, FortiPartner, FortiProtect, FortiReporter, FortiResponse, FortiShield,
FortiVoIP, and FortiWiFi are trademarks of Fortinet, Inc. in the United States and/or other countries. The
names of actual companies and products mentioned herein may be the trademarks of their respective
owners
Page 3
Table of Contents
Table of Contents
FortiDB MA Utilities ................................................................................................. 3
Auto Discovery......................................................................................................... 4
DB2 .....................................................................................................................................6
MS-SQL ..............................................................................................................................6
Connection Summary .............................................................................................. 8
Rule Chaining ........................................................................................................... 9
Chaining with Parameterized User-Defined Rules............................................................11
General PUDR Steps...................................................................................................12
PUDR Process.............................................................................................................12
PUDR Eligible Rules....................................................................................................13
Chaining the UBM Policy and PUDR Together ...........................................................14
Alert Behavior ..............................................................................................................17
PUDR Alert Behavior with Multiple SELECT-List Objects
in the Violating SQL Statement...................................................................................18
Report Manager...................................................................................................... 20
Alert Report Manager........................................................................................................20
Setting a Report Schedule...........................................................................................20
Reporting by Time .......................................................................................................23
Enabling Email Recipients ...........................................................................................23
Specifying Report Parameters.....................................................................................23
Activating ARM ............................................................................................................27
Running and Analyzing Reports ..................................................................................27
Custom Reports ................................................................................................................30
Using This Feature ......................................................................................................30
Scheduling ...................................................................................................................30
Customer and Company Information...........................................................................32
Report and Template Generation and Management ...................................................33
Report History..............................................................................................................39
Licensing and Administration ............................................................................................40
Custom Report Properties ...........................................................................................40
SOX Compliance Reports.................................................................................................42
Reports and Acronyms ...............................................................................................43
Common Report Header Fields ...................................................................................43
SOX Report Specifics ........................................................................................... 44
History of Privilege Changes Report (HPC)......................................................................44
COBIT Objectives and Setup Requirements ..............................................................44
FortiDB Version 3.2 Utilities User Guide
15-32000-81369-20081219 1
Page 4
Table of Contents
Report Body Columns ................................................................................................. 44
Abnormal or Unauthorized Changes to Data Report (AUC) .............................................45
COBIT Objectives and Setup Requirements .............................................................. 45
Report Body Columns ................................................................................................. 45
Abnormal Use of Service Accounts Report (AUS) ........................................................... 46
COBIT Objectives and Setup Requirements .............................................................. 46
Report Body Columns ................................................................................................. 46
Abnormal Termination of Database Activity Report (ATD) ...............................................47
COBIT Objectives and Setup Requirements .............................................................. 47
Report Body Columns ................................................................................................. 47
End of Period Adjustments Report (EPA) ........................................................................48
COBIT Objectives and Setup Requirements .............................................................. 48
Report Body Columns ................................................................................................. 48
Determining Your Reporting Period.............................................................................49
Verification of Audit Settings Report (VAS) ......................................................................50
COBIT Objectives and Setup Requirements .............................................................. 50
Report Body Columns ................................................................................................. 50
Licensing and Administration.......................................................................................51
Index ........................................................................................................................ 53
FortiDB Version 3.2 Utilities User Guide
2 15-32000-81369-20081219
Page 5
FortiDB MA Utilities
FortiDB MA Utilities
FortiDB MA provides several utilities to help you use other modules:
• Auto Discovery to ease the burden of manually setting up database
connections
• Connection Summary to show which database connections are Open or are
Open and Running
• Rule Chaining to trigger one rule based upon another
• Report Manager for custom, offline reports
FortiDB Version 3.2 Utilities User Guide
15-32000-81369-20081219 3
Page 6
Auto Discovery
FortiDB MA provides the ability to search for, and establish connections to,
databases on your network. Rather than manually entering all of the connection
information, you can have FortiDB MA automatically discover it for you.
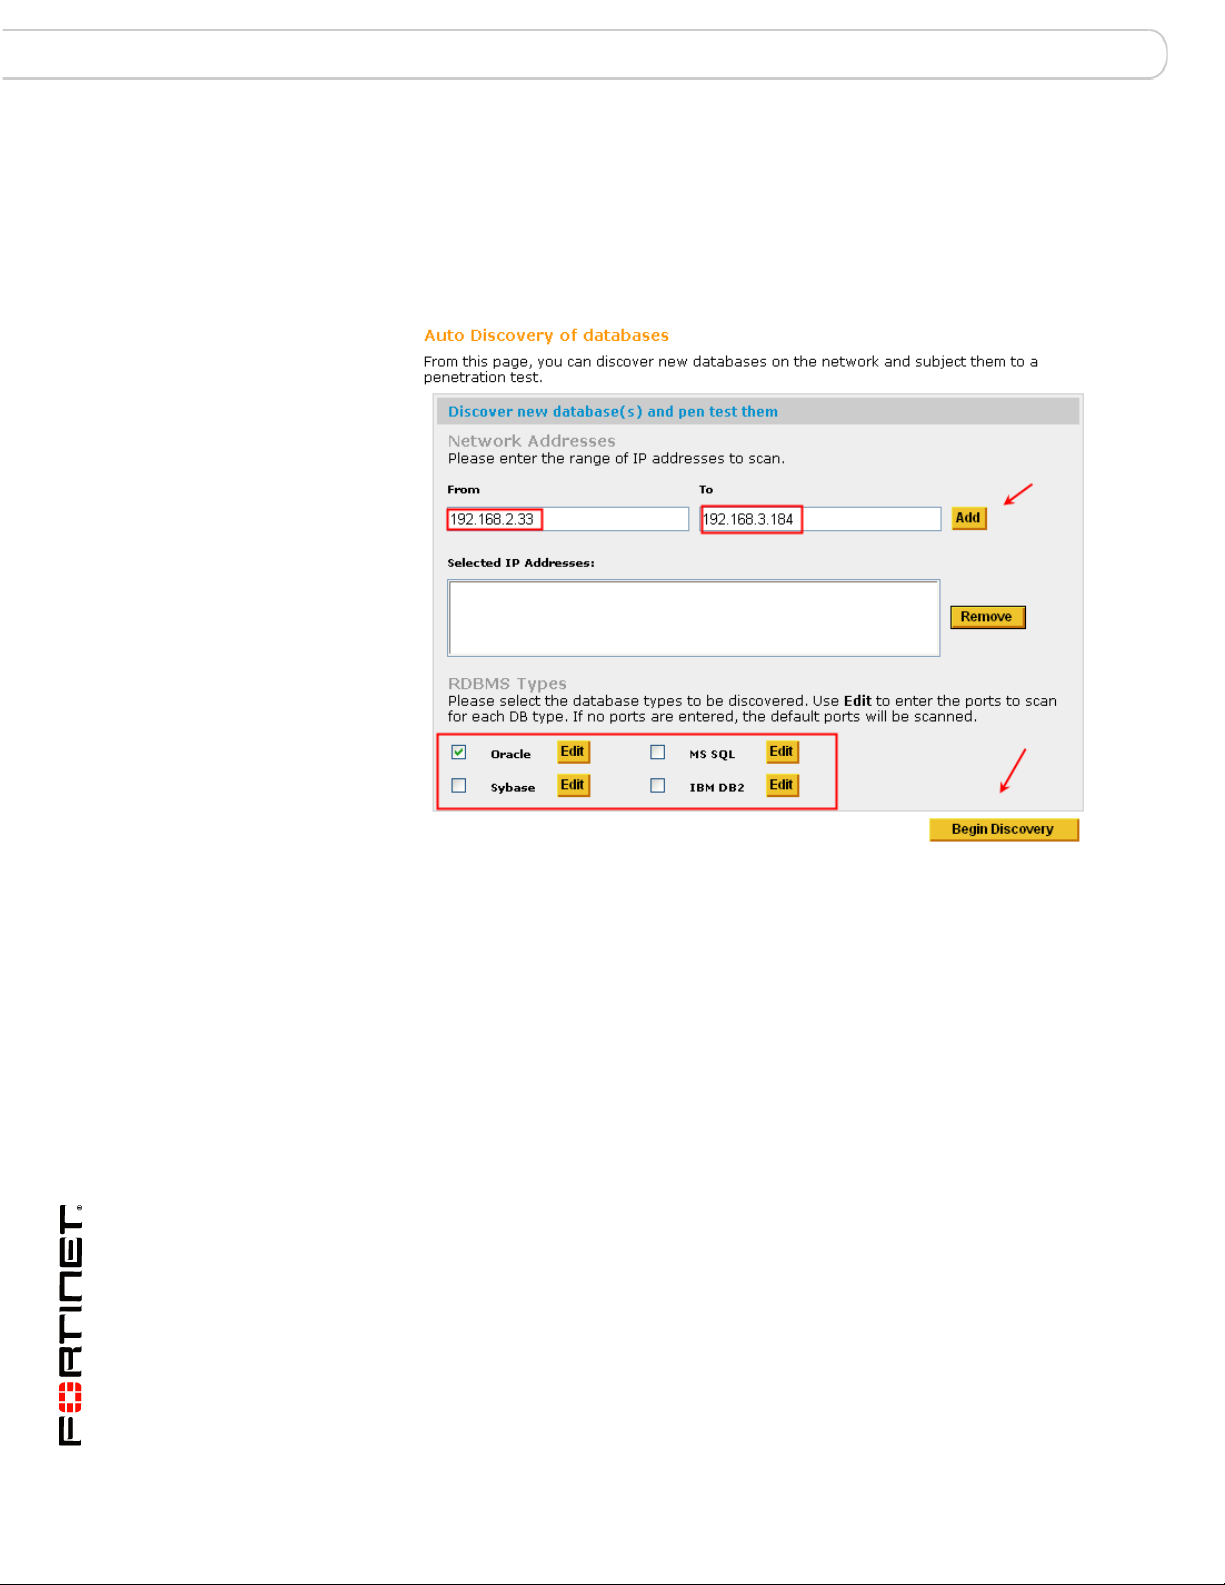
Auto Discovery
Selecting Addresses for Auto-Discovery
In order to use this feature:
1 Select the Database->New menu, and click the Auto Discovery button on the
Create New Database Connection screen. Or you can just select Auto Discovery
from the Main page.
2 Enter an IP address range and specify the RDBMS type you are interested in.
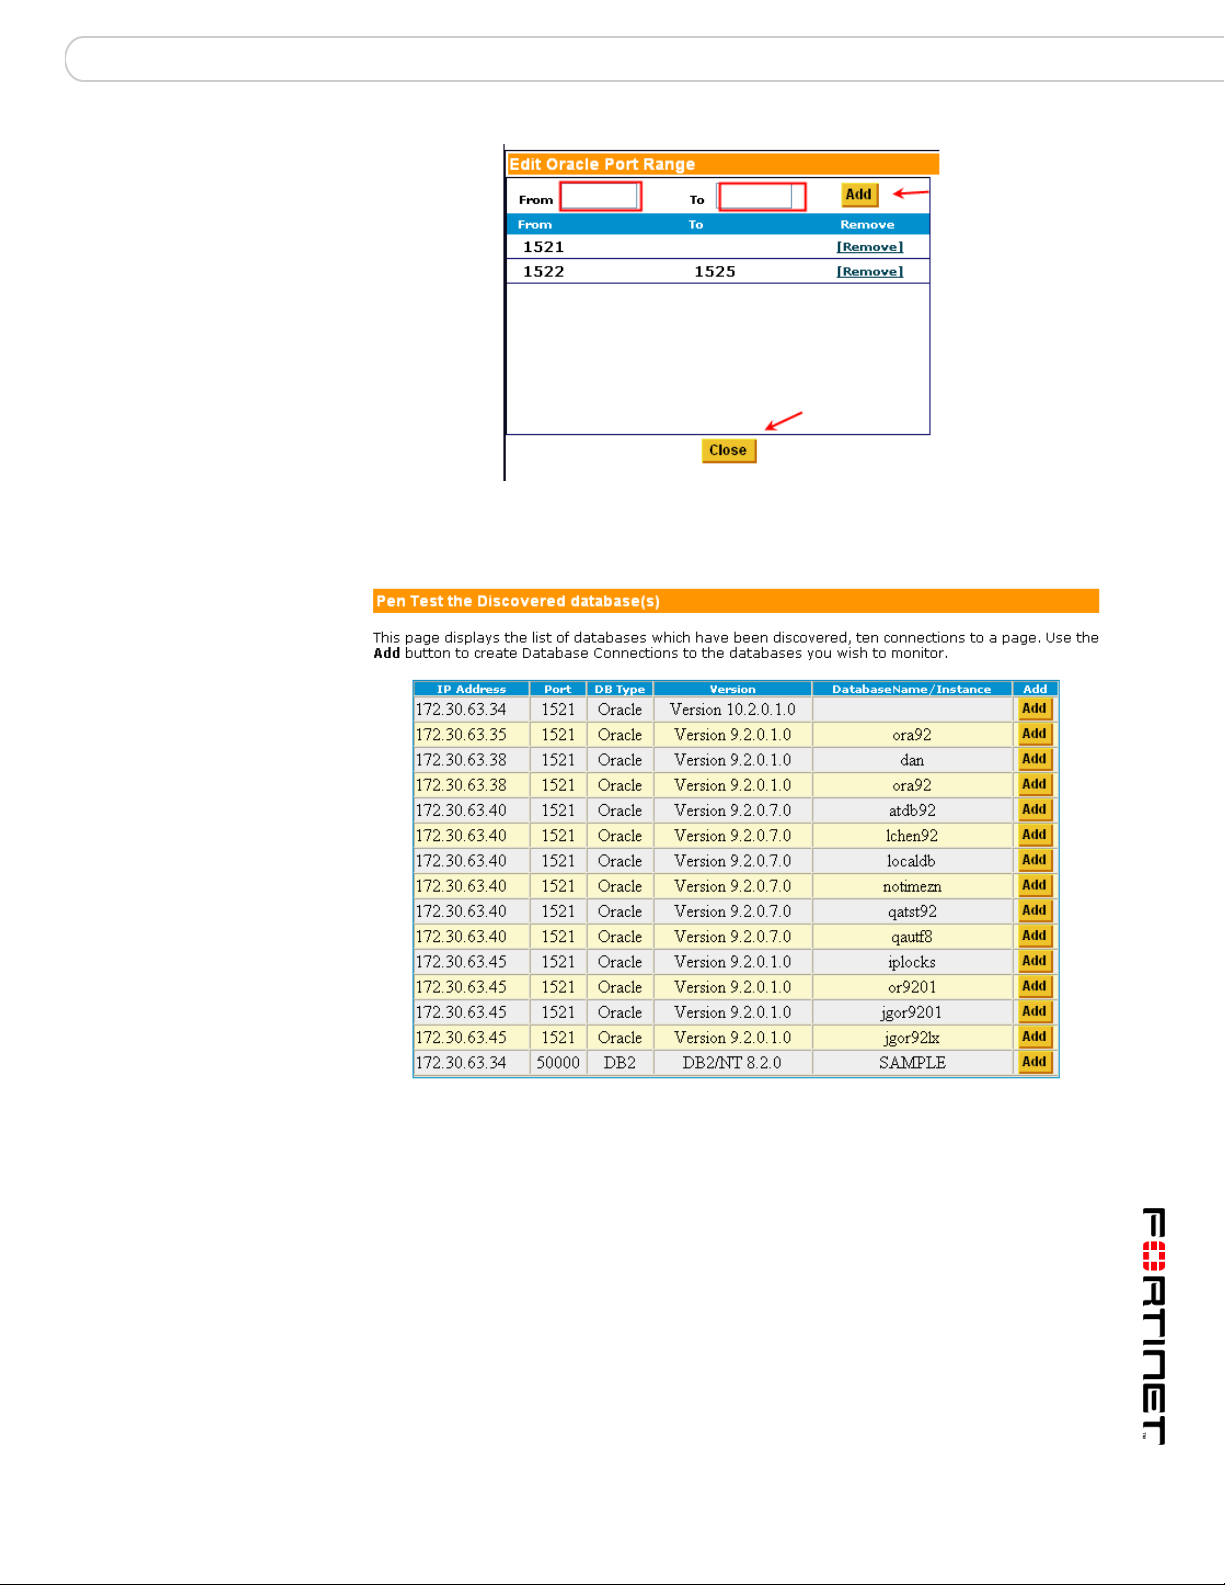
3 By clicking the Edit button next to the desired type of database, you can enter a
range of ports, in case there are databases listening on non-default ports.
4 Click Close to close the Edit Port Range screen.
FortiDB Version 3.2 Utilities User Guide
4 15-32000-81369-20081219
Page 7
Auto Discovery
Selecting Non-Standard Ports for Auto-Discovery
5 Click the Begin Discovery button.
Results from Auto-Discovery
FortiDB Version 3.2 Utilities User Guide
15-32000-81369-20081219 5
Page 8

DB2 Auto Discovery
Discovered Database Information Populating Connection Form
DB2
MS-SQL
The process will automatically return:
• Database Type and version
• IP address (with port if applicable)
• Database name/instance
Once the Auto Discovery list is returned, you can create, by clicking the Add
button on the Discovered Database Applications screen, the database
connections you wish to assess or monitor.
The additional required and recommended fields will need to be completed
manually. (See the FortiDB MA Administration Guide for more information on
setting up connections)
Auto Discovery does not return the database name and version for DB2 UDB with
V8 Fix Pack 10.
It is sometimes necessary to temporarily open another port in your firewall to
make sure the Auto Discovery program communicates with all SQL Server
versions. You should configure the firewall on your target machine so that it allows
UDP packets:
FortiDB Version 3.2 Utilities User Guide
6 15-32000-81369-20081219
Page 9
Auto Discovery MS-SQL
• Destined for port 1434
Note: FortiDB MA sends a packet to port 1434, which MSSQL uses in order to
return information about itself such as instance name, version, etc. (Even though
this is an MSSQL-specific port number, FortiDB MA uses it for all Auto-Discoveryrelated transmissions.)
• Originating from the port whose number is specified in the dss.udpport
property in dssConfig.properties.
FortiDB Version 3.2 Utilities User Guide
15-32000-81369-20081219 7
Page 10
MS-SQL Connection Summary
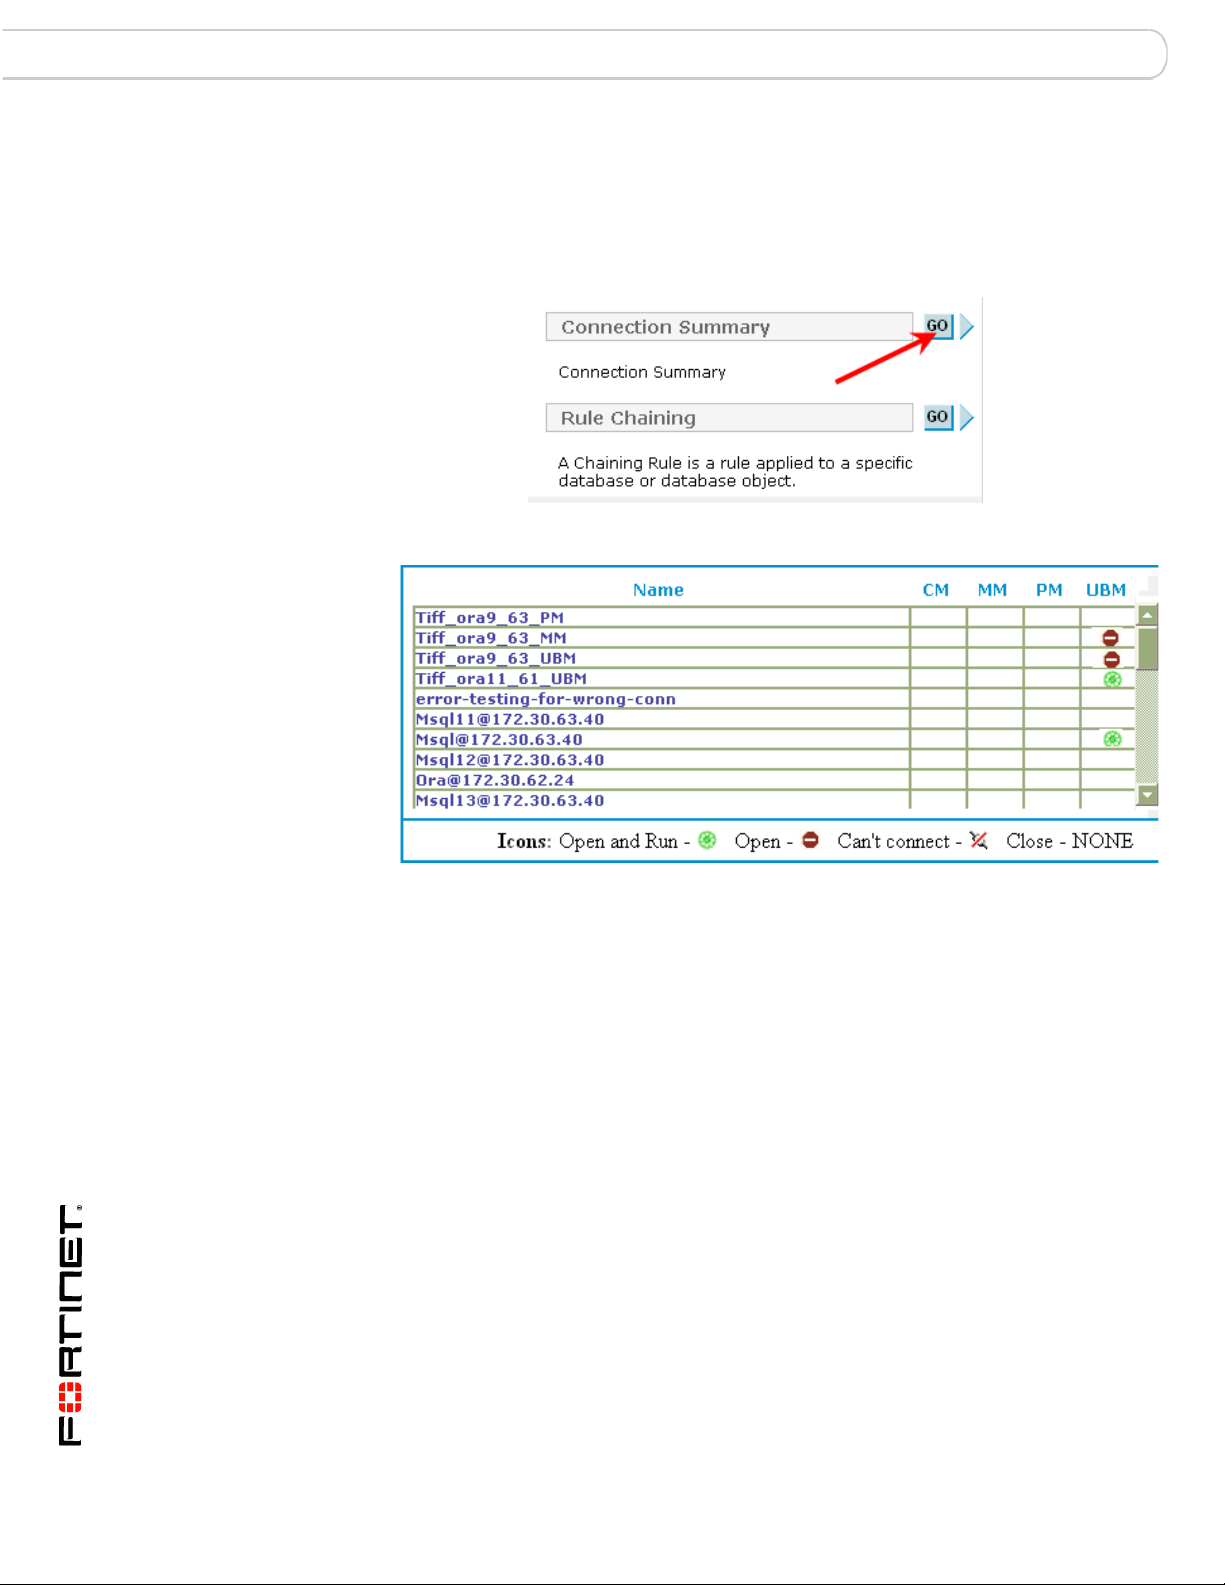
Connection Summary
The Connection Summary utility allows you to see, by FortiDB MA module and in
one place, a dashboard view of all of your database connections.
Connection Summary Button
Connection Summary Output
FortiDB Version 3.2 Utilities User Guide
8 15-32000-81369-20081219
Page 11
Rule Chaining MS-SQL
Rule Chaining
The Rule Chaining module allows you to associate rules so that one, the source1
rule, can influence the execution of another, the target
established with the same target database.
2
rule. Both rules are
Rule Chaining Setting Screen
FortiDB MA offers two types of chained-rule pairs:
• Rule pairs in which there are no parameters passed. (In this case, you may
use Guarded Items from Privilege Monitor (PM), Metadata monitor (MM),
Content Monitor (CM), and User Behavior Monitor (UBM))
• Rule pairs in which there are parameters passed(In this case, you may use
Guarded Items only from User Behavior Monitor (UBM))
You invoke Rule Chaining from the tree navigator on the left.
1. This is sometimes called the original rule.
2. This is sometimes called the chained rule.
FortiDB Version 3.2 Utilities User Guide
15-32000-81369-20081219 9
Page 12
MS-SQL Rule Chaining
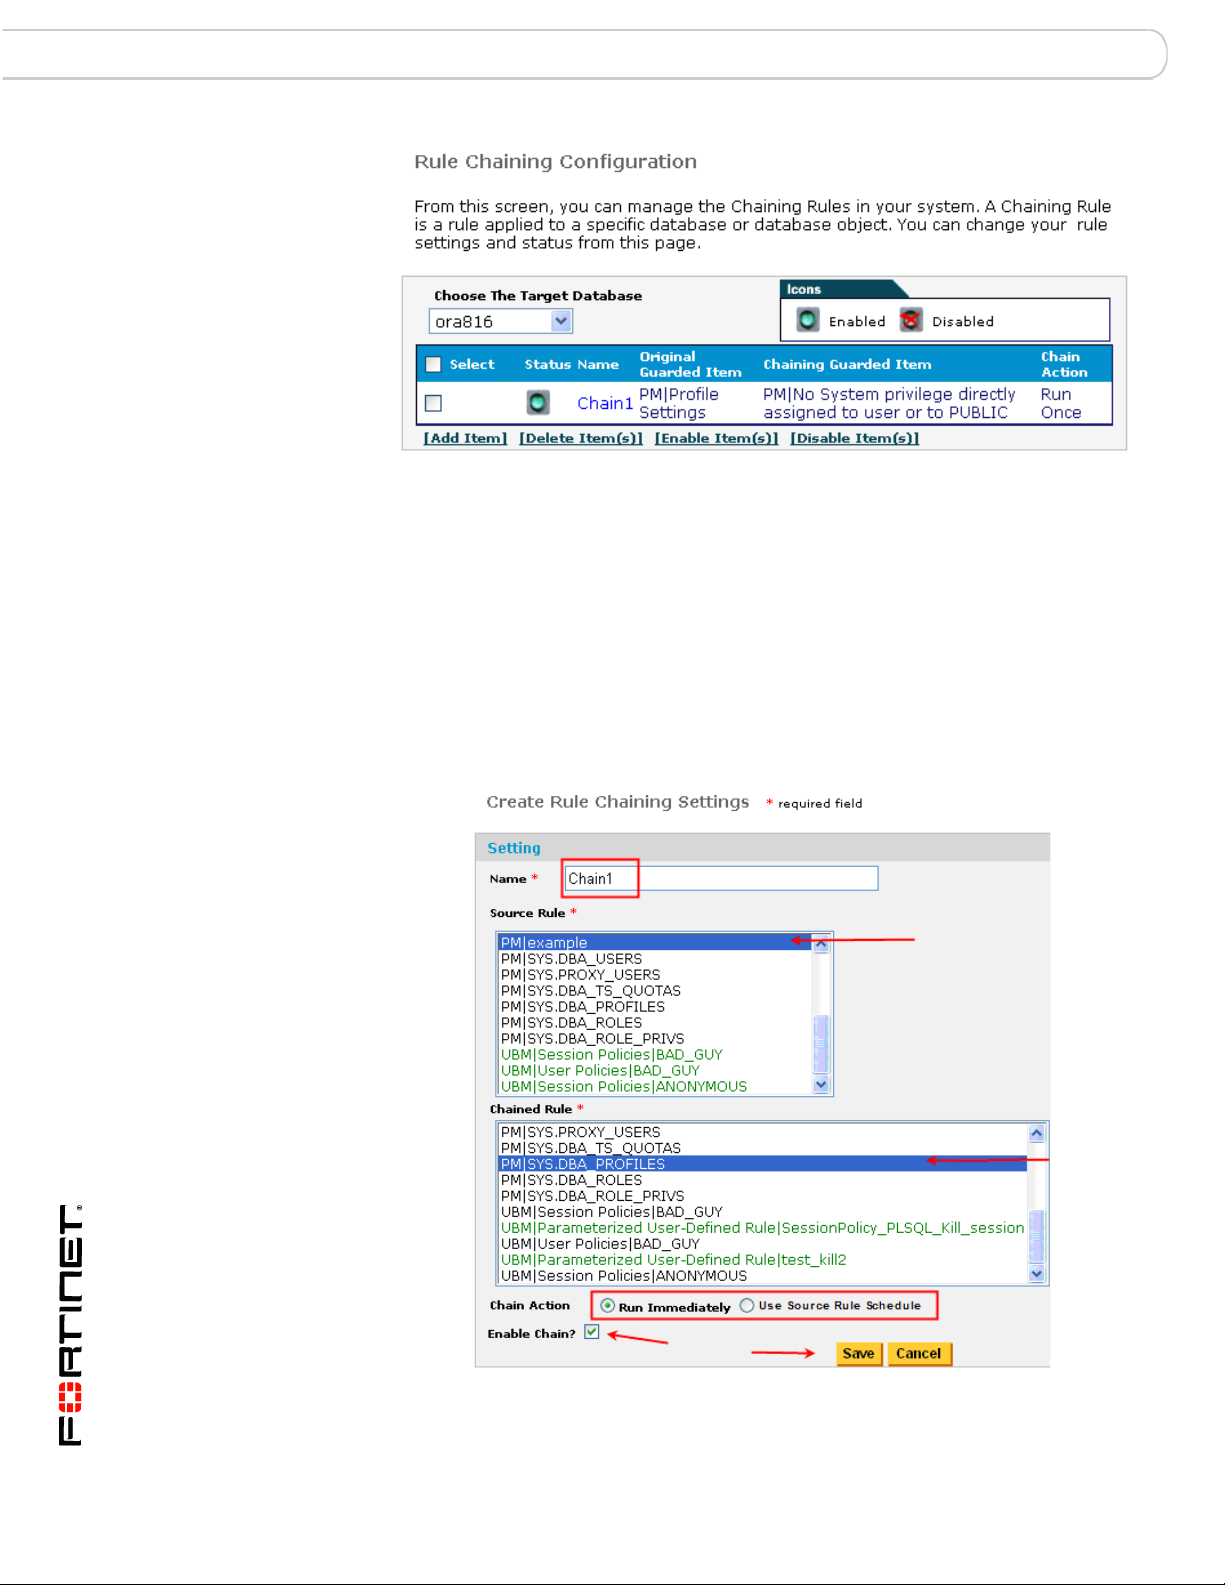
Configuring a Rule Chain for a Specific Target Database Connection
You can perform the following:
• Choose the target database (the database you want to run the rules against)
• Add item (new chain)
• Delete item
• View/Modify item (make changes to an existing chain)
• Enable item (a chain does not have to be enabled when it is created)
• Disable item
Rule Chaining Setting Screen
FortiDB Version 3.2 Utilities User Guide
10 15-32000-81369-20081219
Page 13
Rule Chaining Chaining with Parameterized User-Defined Rules
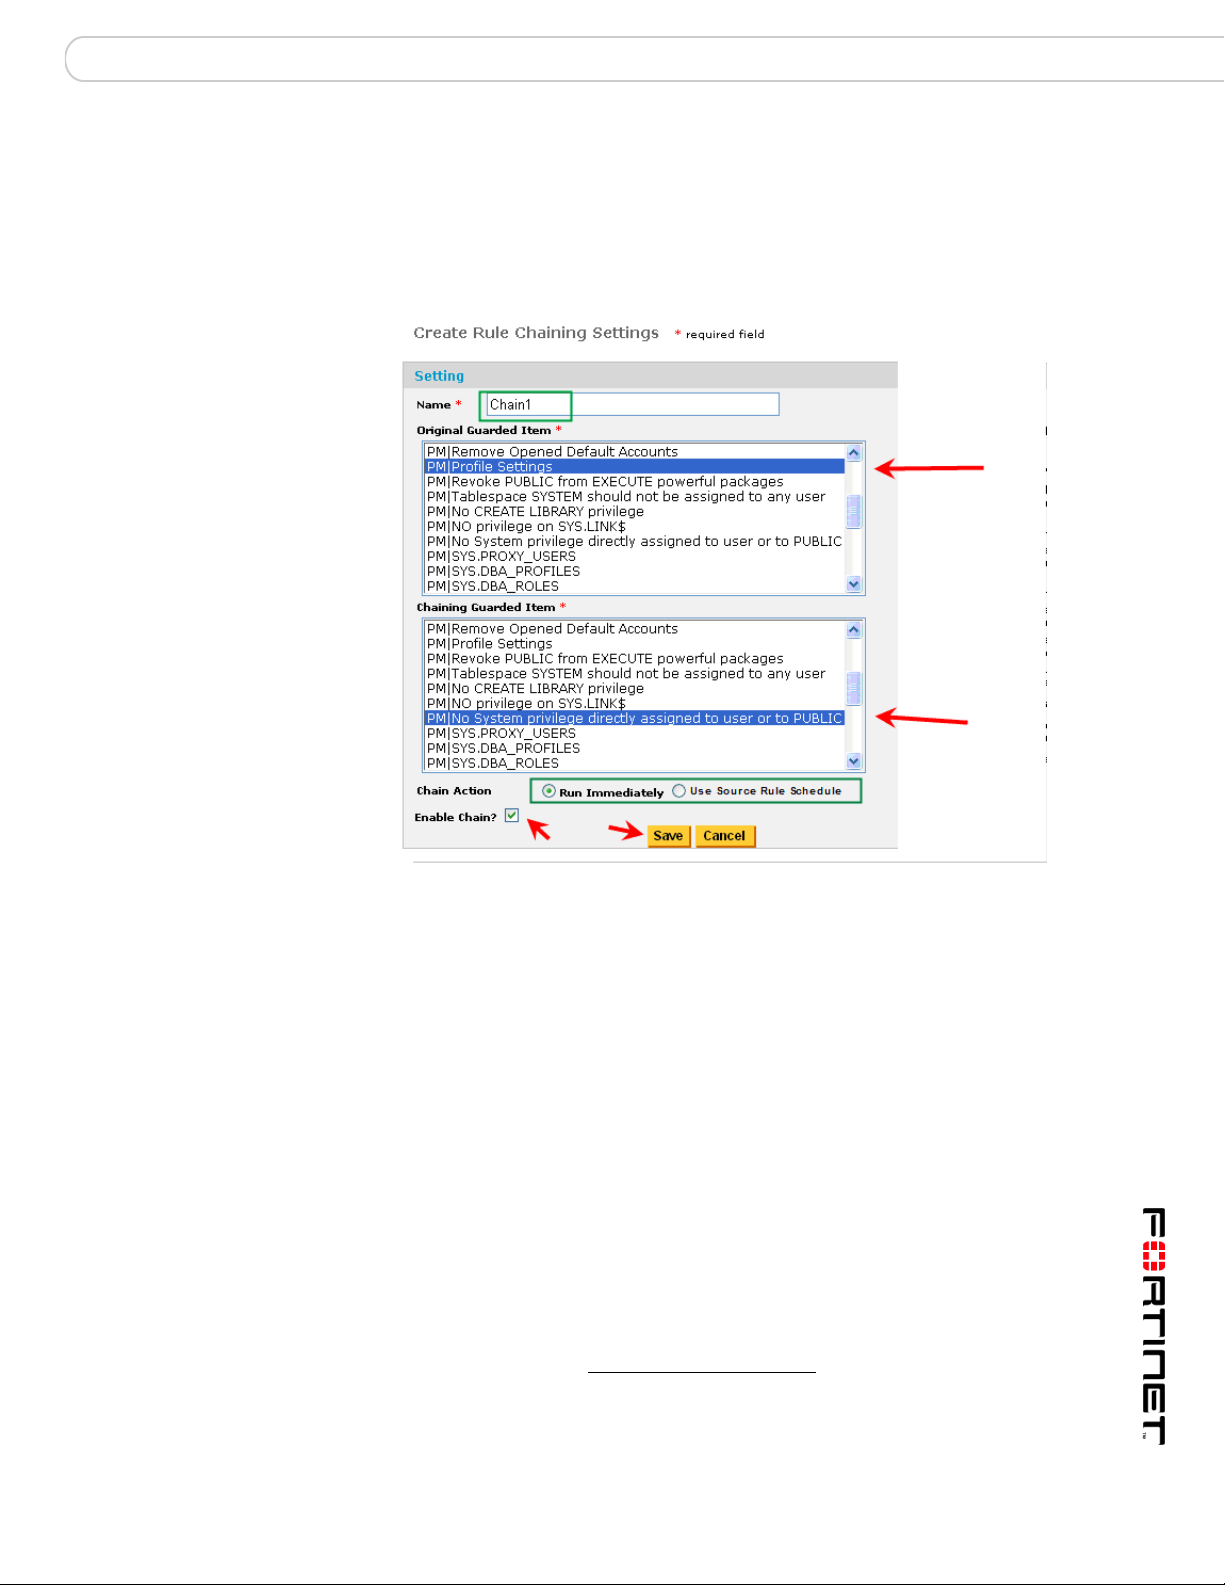
After the database has been specified and you have clicked on [Add Item], you
will be presented with the Create Rule Chaining Settings page.
Here, you need to:
• Name the Rule Chain
• Select the policy you want to use as the Source Rule
• Select the target rule (Chained Rule) you want to execute, once the first rule
had been violated.
• Specify whether you want the chain to run immediately upon source-rule
violation or not. Run Immediately means that the target rule will run as soon
as there is a source-rule violation. Run as Scheduled means that the target
rule will run according to the module-, database-, or item-specific schedule that
is in effect for the source rule.
• Decide whether you want to immediat
1
ely enable the chain or not. Unless you
check the Enable Chain? checkbox, the chain won't be in effect. This allows
you to create the chain and then only use it when needed.
You can see the Module and the name of the available guarded items for all
policies. For example, 'PM|' or 'UBM|' preceding the rule name indicates the PM,
or UBM module, respectively.
After the Rule Chain is invoked, alerts will appear with those of other policies.
Note: For UBM policies, which are indicated in green, you can pass parameters
from the Source Rule to the Chained Rule, if the latter is a Parameterized UserDefined Rule (PUDR) and if the Chain meets certain other conditions. For more
information on how to create a PUDR see the FortiDB MA User Behavior Monitor
(UBM) User Guide. For more information on using PUDRs in a chain, see
Chaining with Parameterized User-Defined Rules).
Chaining with Parameterized User-Defined Rules
Parameters, specific to the RDBMS type of your target database, can be passed
from the source to the target in order to permit the target to perform specific tasks,
such as to kill the session of a suspicious user.
The source rule can be a UBM User, Object, or Session Policy. The target rule can
only be a User-Defined Rule (UDR) and specifically one that can accept
parameters: a Parameterized User Defined Rule (PUDR). The PUDR functionality
can be accessed within the UBM module. (See the FortiDB MA User Behavior
Monitor (UBM) User Guide)
When there is a violation of the source rule, the target UDR gets executed, with
the parameters passed from the source rule. An alert is generated both for the
source violation and for the PUDR execution.
1. A module schedule will be overridden by a database-specific schedule, if one is set. A
database-specific schedule will be overridden by an item-specific schedule if one is set.
FortiDB Version 3.2 Utilities User Guide
15-32000-81369-20081219 11
Page 14
Chaining with Parameterized User-Defined Rules Rule Chaining
General PUDR Steps
The general step for creating a chain that uses a PUDR are:
1 In UBM, define an Object, User, or Session policy that will be your Source Rule.
2 In UBM, define a PUDR that will be your Target Rule
3 In the Rule Chaining module, define a chain which associates the UBM policy and
the PUDR.
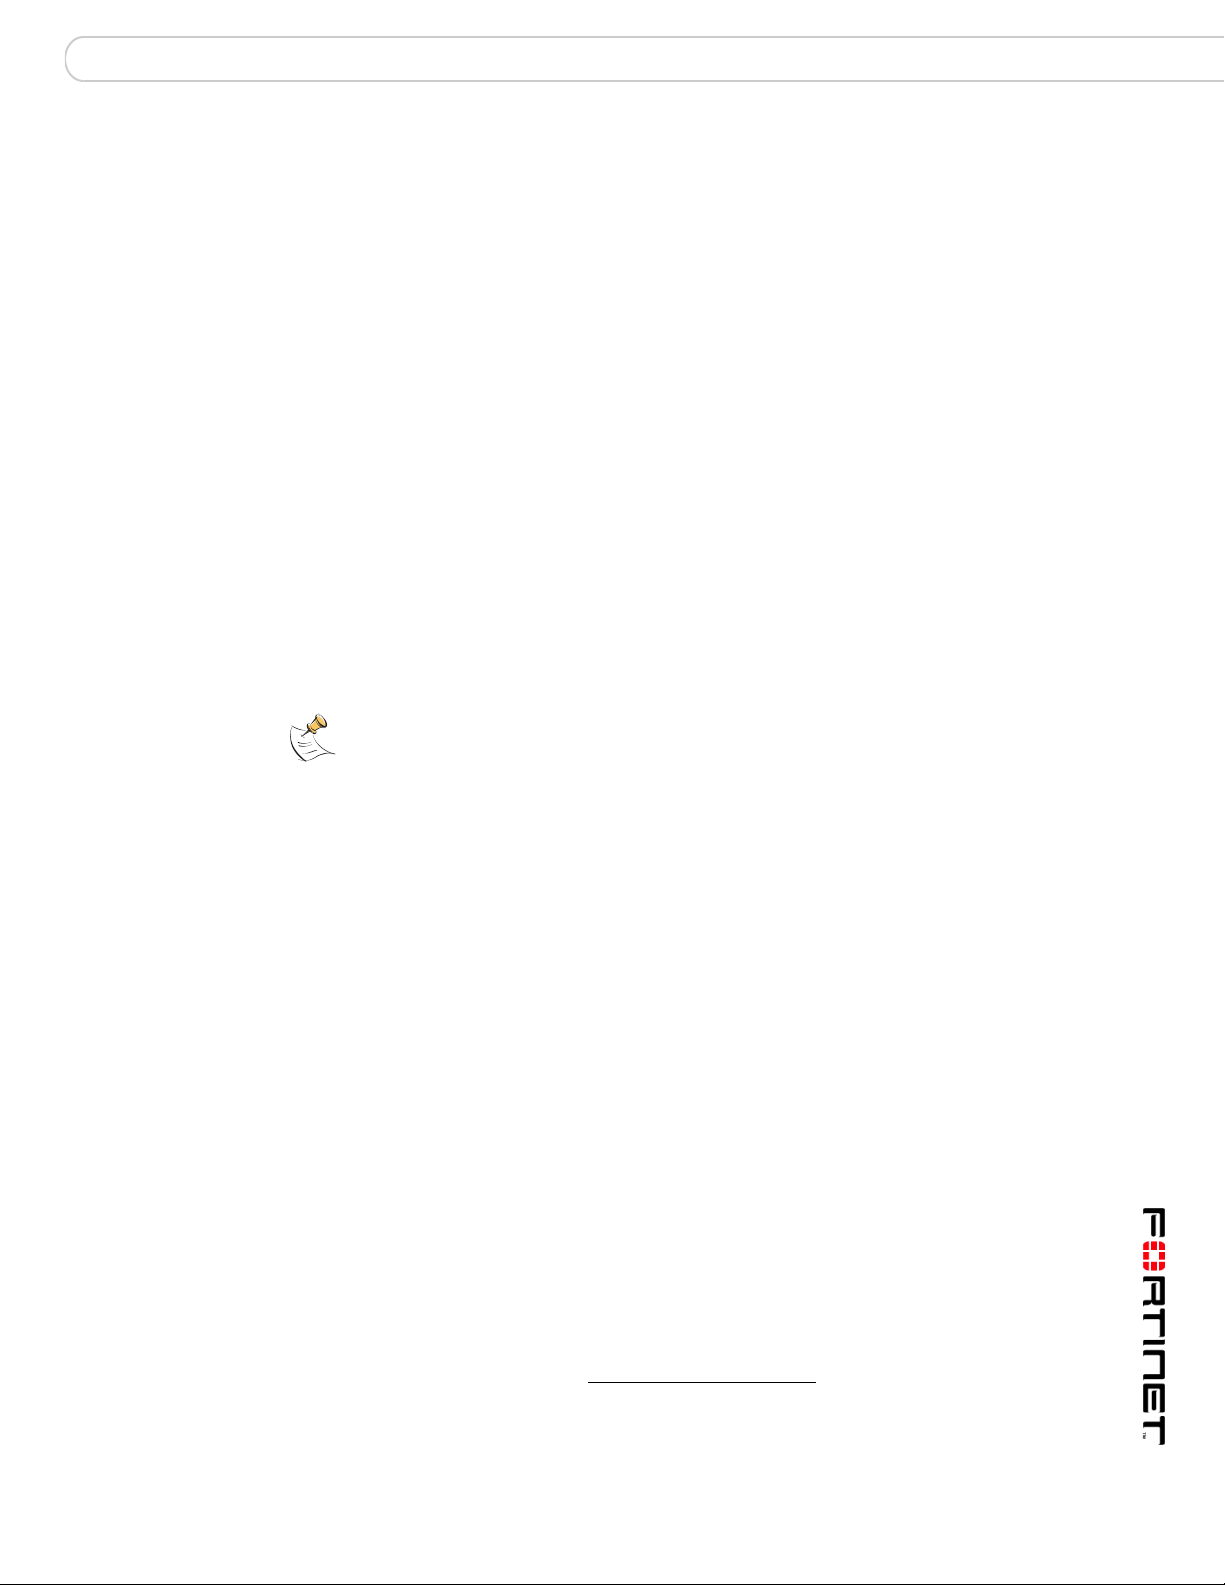
PUDR Process
Parameterized User-Defined Rule Flow Diagram
The PUDR process involves these steps.
1 The source rule is violated and an alert is generated.
2 FortiDB MA determines if there is a PUDR that is chained to the source rule.
• If a rule is chained, FortiDB MA fetches the information on the chain
relationship
3 FortiDB MA checks to see if the source rule is to be run immediately or not.
4 FortiDB MA checks to see if the chained rule is a PUDR vs. a regular policy
a If a regular UDR, FortiDB MA runs the UDR without passing any
variables.
b If the rule is a PUDR and is set to be run immediately, FortiDB MA
passes the parameters defined in the rule chain to the PUDR.
c If the rule is a PUDR and is set to be run with the schedule settings of
the source rule, FortiDB MA indicates that parameters have to be
passed for the successful execution of the PUDR.
5 An alert is generated for the PUDR.
FortiDB Version 3.2 Utilities User Guide
12 15-32000-81369-20081219
Page 15
Rule Chaining Chaining with Parameterized User-Defined Rules
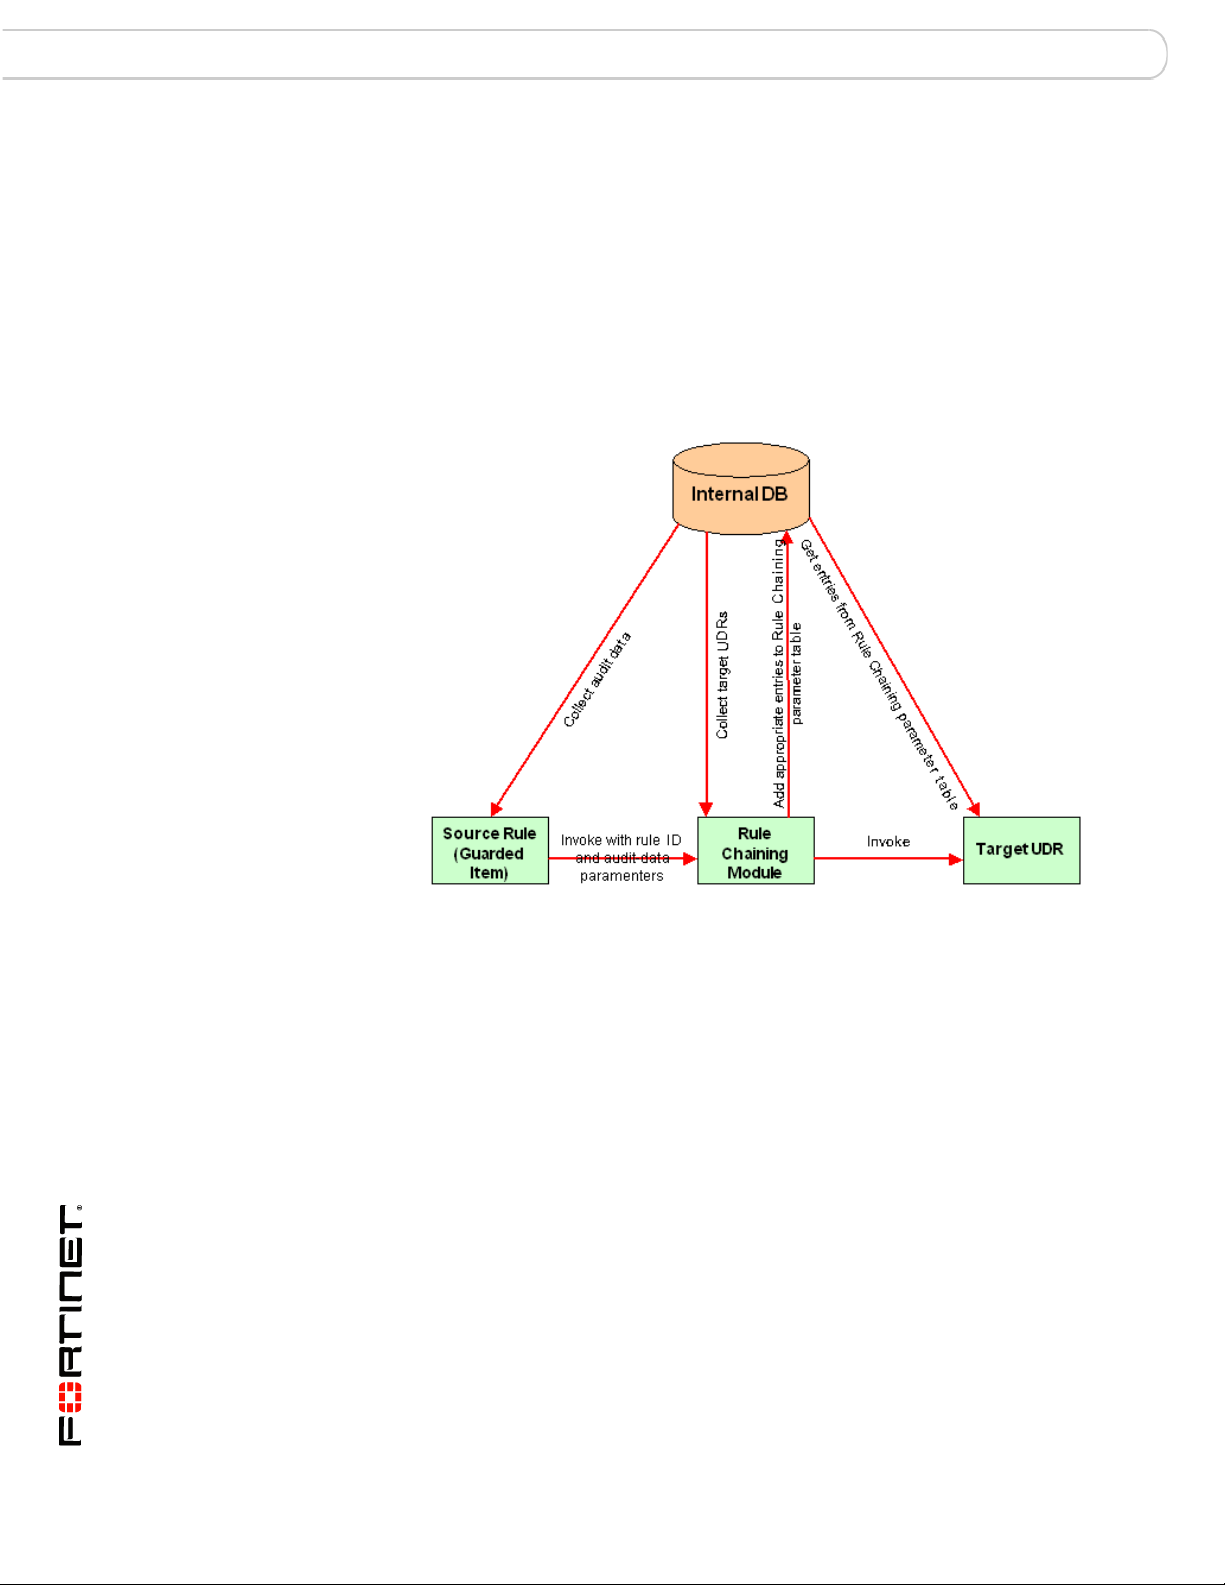
PUDR Eligible Rules
Disabled Parameter Checkboxes
If the chosen target rule cannot accept parameters, they will be grayed out.
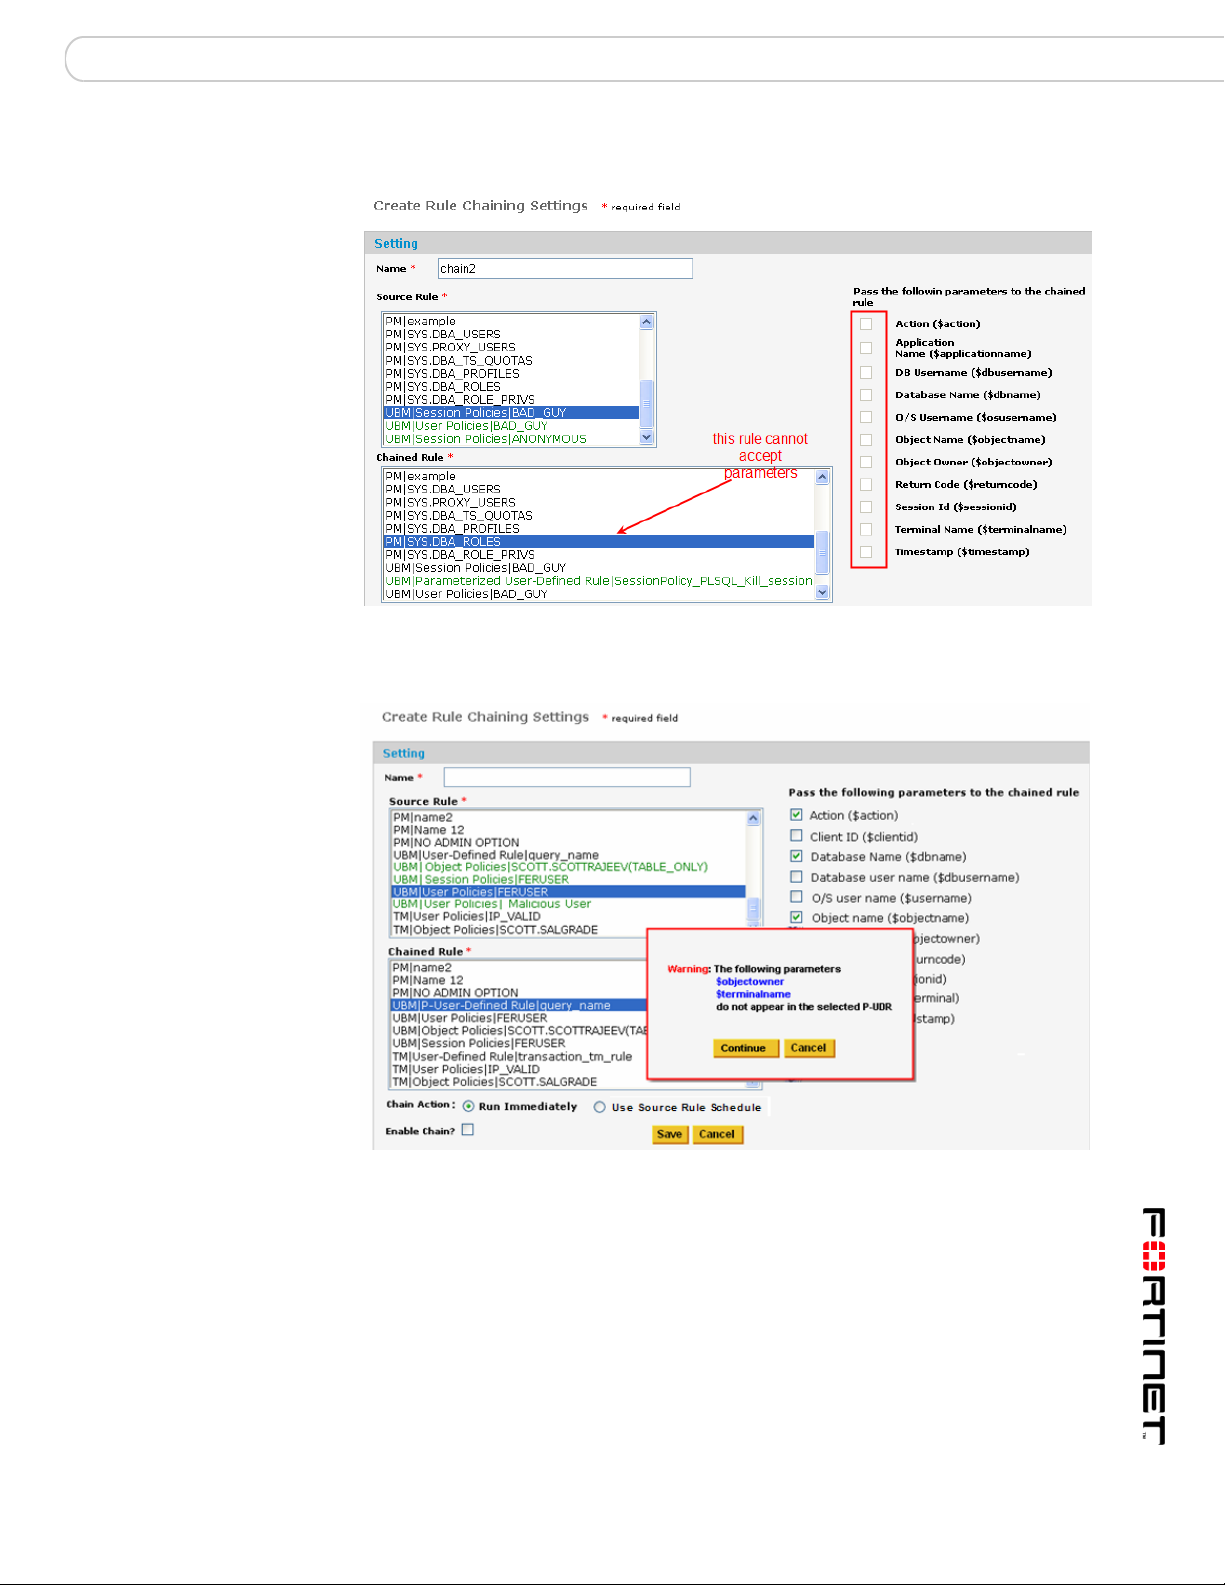
Validating the PUDR before Saving
If one or more variables selected do not appear in the PUDR, FortiDB MA
presents a warning message.
FortiDB Version 3.2 Utilities User Guide
15-32000-81369-20081219 13
Page 16
Chaining with Parameterized User-Defined Rules Rule Chaining
Chaining the UBM Policy and PUDR Together
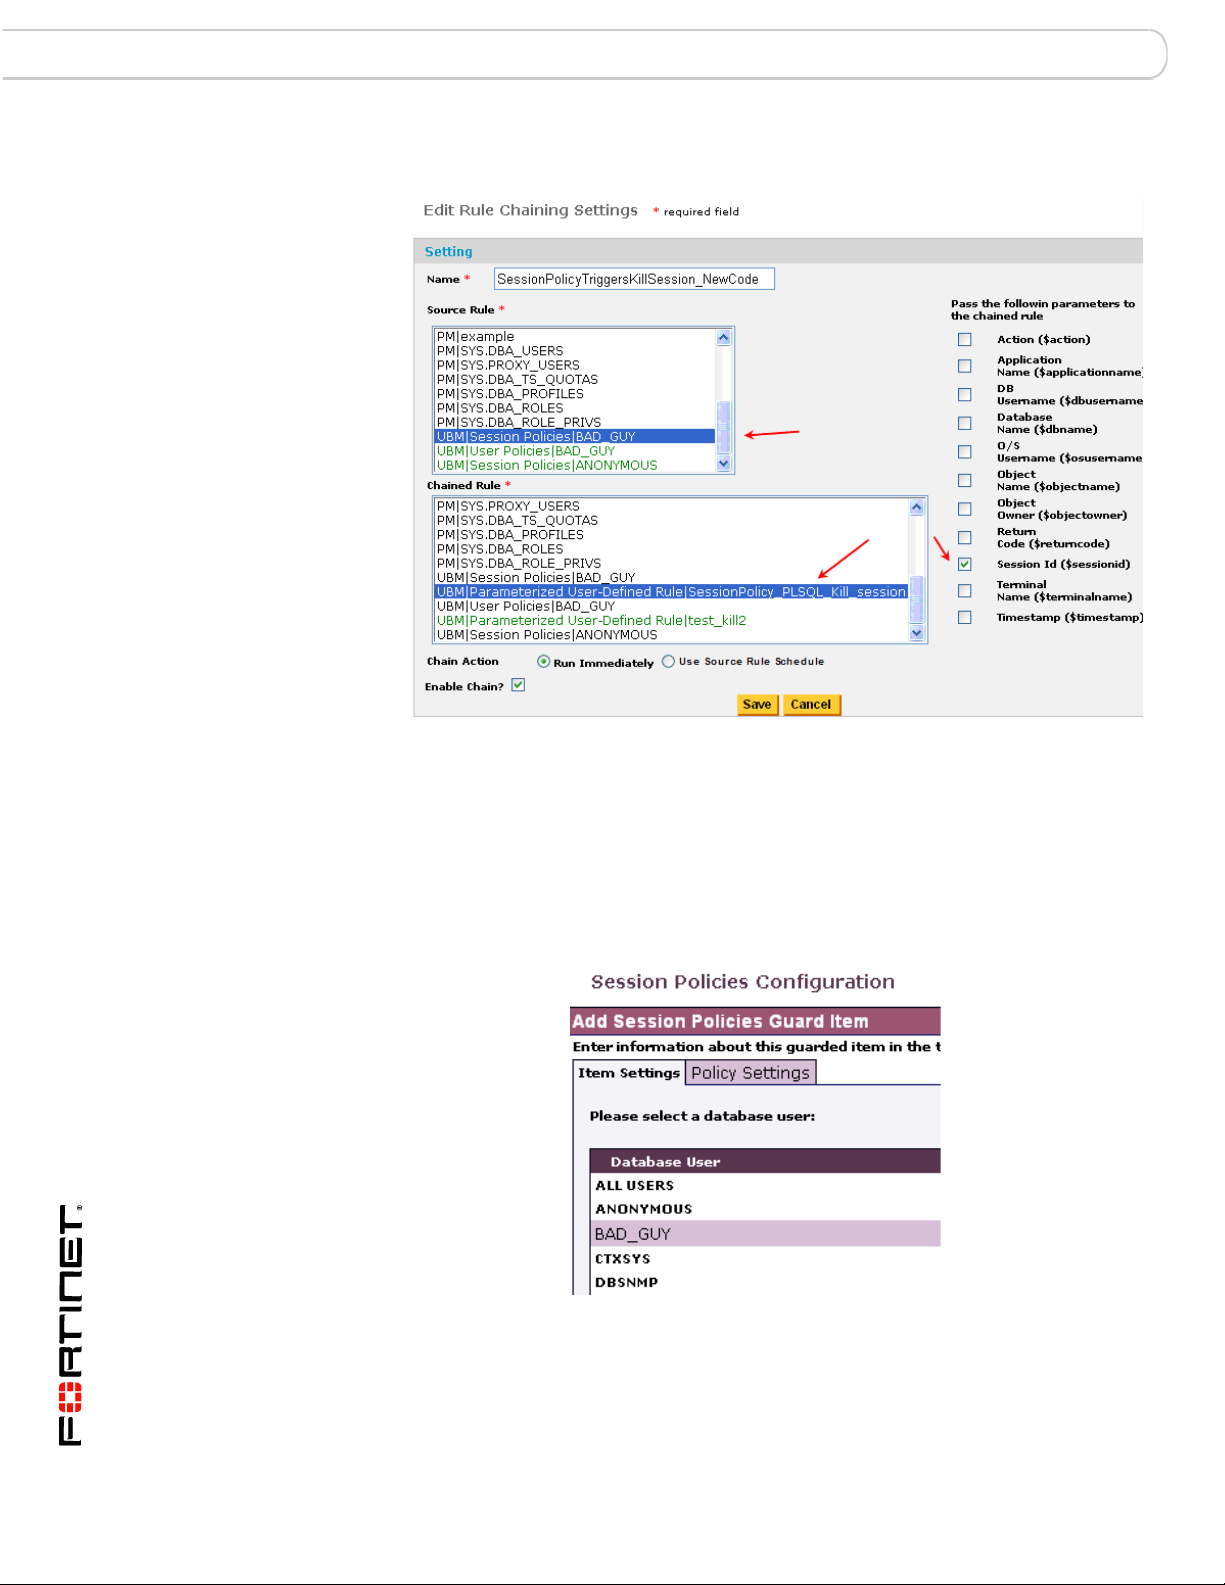
Associating a Source Rule That Can Pass parameters with a PUDR
Example of Chaining to a PL/SQL-based PUDR
In this Oracle PL/SQL kill-session example, we:
1 Create a DB user, BAD_GUY, whose session we will monitor, in our Oracle target
database.
Item Setting for Session Policy
FortiDB Version 3.2 Utilities User Guide
14 15-32000-81369-20081219
Page 17
Rule Chaining Chaining with Parameterized User-Defined Rules
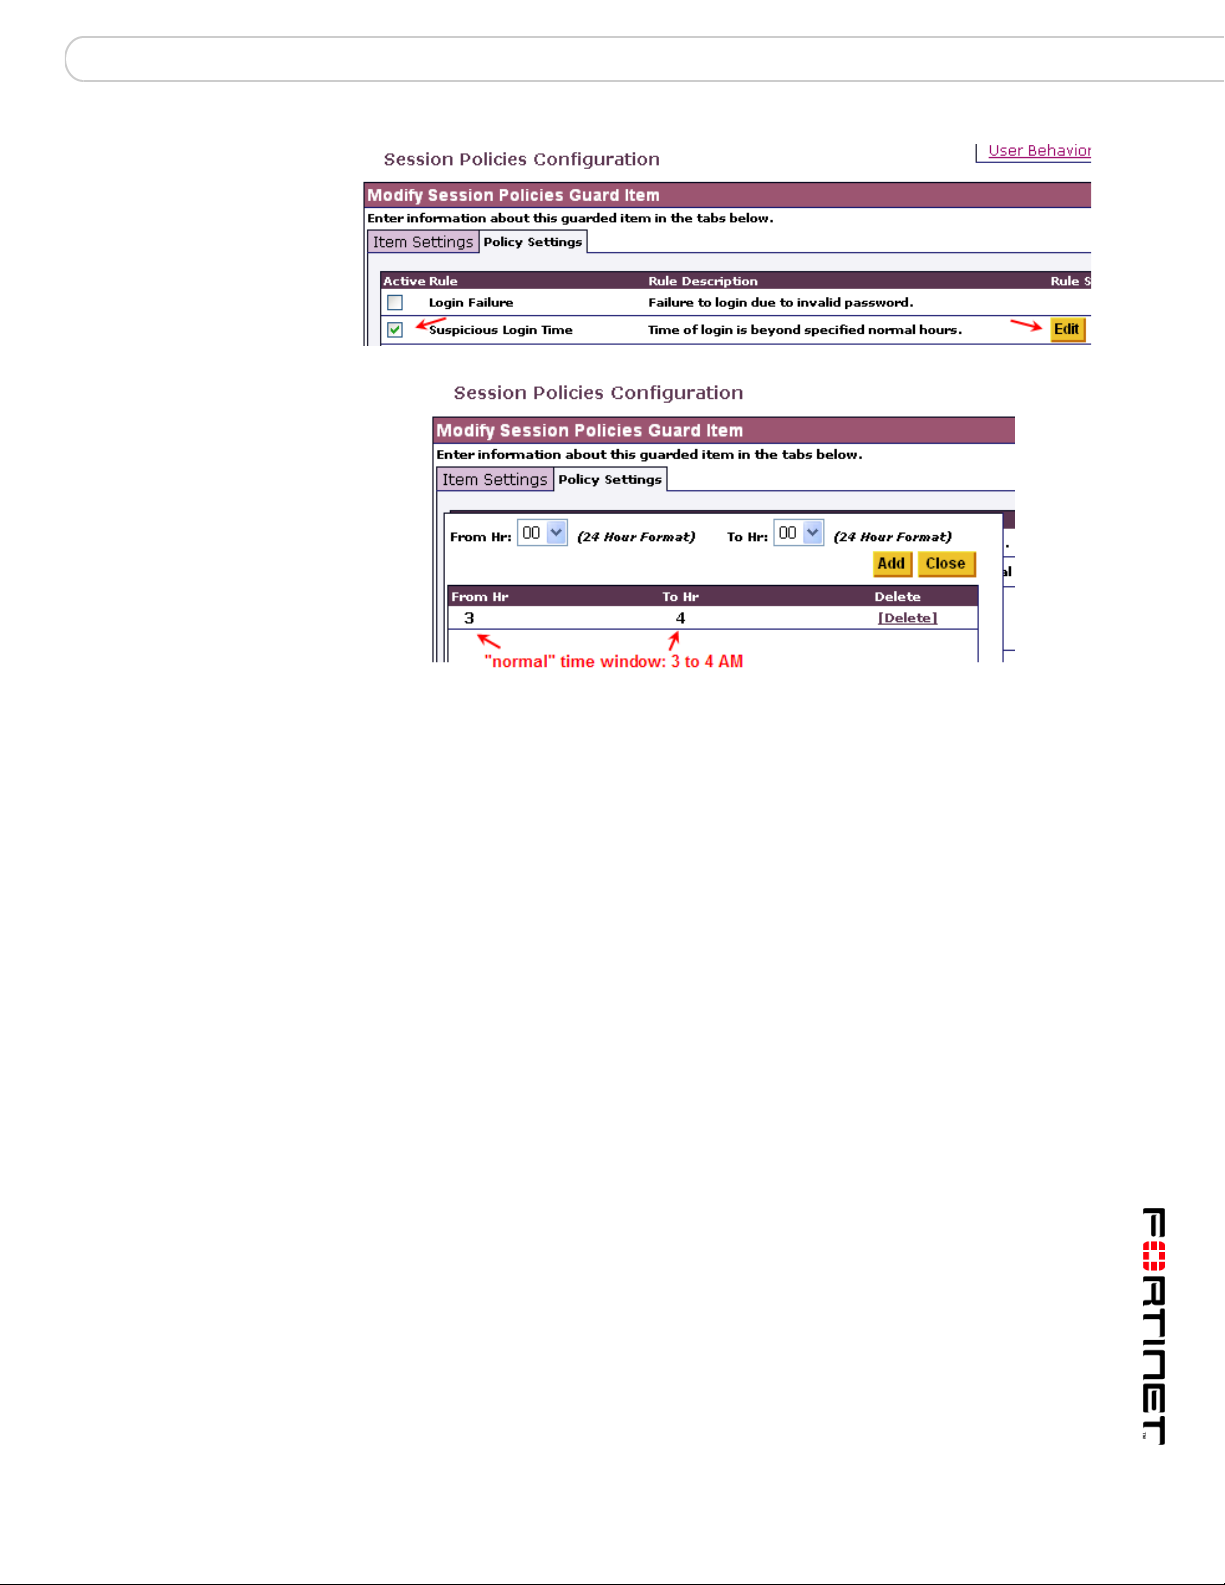
Policy Settings for Suspicious Login Time
2 Create a UBM Session Policy, our Source rule, in order to monitor BAD_GUY and
generate an alert to trigger our Target rule, a PUDR. We will pass the Session ID
from the Source to the Target rule.
3 Create a Target PUDR, in the UBM module, which will contain the following kill-
session code. That code, in turn, will accept our passed Session ID parameter
(shown in red):
FortiDB Version 3.2 Utilities User Guide
15-32000-81369-20081219 15
Page 18

Chaining with Parameterized User-Defined Rules Rule Chaining
DECLARE
v_str VARCHAR2(80) := 'ALTER SYSTEM KILL SESSION
'||chr(39);
v_statementVARCHAR2(80);
sesid NUMBER;
serial NUMBER;
usernameVARCHAR(50);
osuser VARCHAR(50);
machine VARCHAR(50);
program VARCHAR(50);
BEGIN
SELECT sid, serial#,username,osuser,machine,program
INTO sesid,serial,username,osuser,machine,program
FROM v$session
WHERE audsid =$sessionid;
v_statement := v_str||sesid||','||serial||chr(39)||'
IMMEDIATE';
EXECUTE IMMEDIATE v_statement;
DBMS_OUTPUT.PUT_LINE
(TO_CHAR
(SYSDATE,'YYYY/MM/DD HH24:MI:SS') ||
' A suspicious session has been killed.'||
' [Username]'||username||
' [Osuser]'||osuser||' [Machine]'||machine||
' [Program]'||program) ;
EXCEPTION
WHEN no_data_found THEN
DBMS_OUTPUT.PUT_LINE
(TO_CHAR
(SYSDATE,'YYYY/MM/DD HH24:MI:SS') ||
' A suspicious session is not found at this moment.');
END;
4 Login as BAD_GUY at an "abnormal" time (Here, that is anytime except between 3
and 4 AM)
FortiDB Version 3.2 Utilities User Guide
16 15-32000-81369-20081219
Page 19

Rule Chaining Chaining with Parameterized User-Defined Rules
Chained-Rule Alerts: (UBM Session Policy and PUDR)
5 Get an alert when the (the Session Policy) Source rule is violated.
Alert Behavior
6 Get another alert when the chained PUDR executes and, in this case kills the
session of BAD_GUY.
7 And, in the Alert Details dialog, display DB user name, OS user name, machine
name, and source-program name as shown above.
Resulting Killed Session
8 Notice that our SQLPlus session has been killed
This topic describes various alert behavior users should be aware of.
Table Columns That Could Appear in Alerts
Be careful when specifying the SQL for your UDRs. Statements like "SELECT *
FROM <table_name>", where <table_name> has a lot of columns, may produce
alerts that are difficult to read due to the large number of columns. It is better to be
more specific like "SELECT <column_name1>, ... , <column_nameN> from
<table_name>".
For example using Oracle, v$session has over 40 columns, so instead of this
statement:
SELECT * FROM v$session WHERE osuser = '$osusername'
you might want to use one with specific columns, like:
FortiDB Version 3.2 Utilities User Guide
15-32000-81369-20081219 17
Page 20

Chaining with Parameterized User-Defined Rules Rule Chaining
SELECT username, osuser, terminal FROM v$session WHERE osuser =
'$osusername'
Multiple Source-Rule-Violation Behavior
When using the Rule Chaining feature with PUDRs, you might expect a targetpolicy alert for each source-policy alert. However, unless there is a change in the
passed parameter, there will be only one PUDR alert--despite multiple sourcepolicy alerts.
For example, assume you have a session policy for your source rule, are passing
the terminal name to the target PUDR, and that the session policy is violated
twice. In this case, you will get two session-policy alerts because, due to different
timestamps, the session policy alerts are not the same. However, you will get only
one PUDR alert because the terminal name doesn't change.
DB Example
For example, when using a DB2 target database and passing $objectowner,
only one PUDR (target rule) alert will show up, regardless of how many times the
source rule gets violated. (A source-rule alert will appear for each violation.)
$objectowner is replaced by the creator parameter which represents the
authorization ID of the user who pre-compiled the application
1
. This ID does not
change when a user executes multiple SQL queries thereby triggering multiple
source-rule alerts. Therefore, you can expect only one PUDR alert.
For example, assume:
a You set up a source-rule User Policy that monitors user X.
b You have a target-rule PUDR that expects $objectowner to be
passed; like this:
SELECT '$objectowner' FROM SYSIBM.SYSDUMMY1 AS
SYSDUMMY1
c User X issues these two queries:
SELECT * from my.employee
SELECT * from x.table1
In this case, two source-rule alerts should show up but only one PUDR (target
rule) alert.
PUDR Alert Behavior with Multiple SELECT-List Objects in the Violating SQL Statement
FortiDB MA can detect, and alert on, only the first item in a multiple-object
SELECT list.
For example, assume you have created a user policy which gets violated by a
user's executing:
SELECT * FROM vje.test, vje.test1
1. For more information, see
http://publib.boulder.ibm.com/infocenter/db2luw/v8/index.jsp?topic=/com.ibm.db2.udb.doc/admin/r000
7595.htm
FortiDB Version 3.2 Utilities User Guide
18 15-32000-81369-20081219
Page 21

Rule Chaining Chaining with Parameterized User-Defined Rules
In this case, the alert will be generated only for first object in the SELECT list;
namely: vje.test.
FortiDB Version 3.2 Utilities User Guide
15-32000-81369-20081219 19
Page 22

Alert Report Manager Report Manager
Report Manager
In order to access the FortiDB MA Report Manager module, click on the Report
Manager link on the left-side navigator on the main FortiDB MA screen.
The FortiDB MA Report Manager module offers:
• Alert Reports to summarize your alert data
• Custom Reports to enable you to design your own reports
Alert Report Manager
Due to the potential for a large number of alerts to accumulate in your system, the
Alert Report Manager (ARM) enables you to create reports that organize the alert
information. You filter and sort this information by:
• Severity Level
1
(critical, informational, etc.)
• Status (handled or not)
• Database connection
• Type of rule (PDR or UDR)
• Guarded Item Name or Description
• Alert-Generated Time or Day
ARM can retrieve historical reports and alerts, thus providing a basis for regulatory
or legal compliance. And you can export reports in comma- or tab-delimited format
for further enhancements.
Setting a Report Schedule
Schedules are either timer-or calendar-based. For a timer-based schedule, you
set a time interval for monitoring. For a calendar-based schedule, you choose to
have the monitoring run at a specific day and/or time. (You can also combine the
two types and randomize the interval you specify.)
To set up a schedule, use the Set Defaults-> Schedule Settings menu.
Setting a Timer-based Schedule
For a Timer-based Schedule:
1 Specify the monitoring Interval or the Time to start scanning
2 Click the Set Timer button
1.
2. By default, reports will run every 24 hours. You must click on the Set Timer button to activate this, however.
20 15-32000-81369-20081219
Severity levels are user-defined attributes. For example, you can define what 'Critical' means for your organization.
2
in order to save the settings.
FortiDB Version 3.2 Utilities User Guide
Page 23

Report Manager Alert Report Manager
Setting a Timer-Based Schedule
Deleting a Previously Set Timer Schedule
You can delete a previously set Timer schedule by clicking on the Delete Timer
button.
Deleting a Timer Schedule
Setting a Calendar-based Schedule
For a Calendar-based Schedule:
1 Click on the [Add Schedule] button at the bottom of the Schedule Setting
screen.
2 Specify the days and/or times you want. In the example shown, we are setting up
a schedule for monitoring to occur each week on Saturday at 2 am.
3 Click on the Add Schedule button at the bottom of the Add Schedule popup
screen in order to save the settings.
FortiDB Version 3.2 Utilities User Guide
15-32000-81369-20081219 21
Page 24

Alert Report Manager Report Manager
Setting a Calendar-Based Schedule
Setting a Combined Schedule
You can also specify a combined schedule which consists of both a timer- and a
calendar-based schedule.
Setting a Randomized Interval
In order to make it difficult to predict your monitoring times, you may also set a
reporting schedule that, while dependent on your chosen Interval value, won't run
exactly that often.
Setting a Randomized Interval
If you check the Randomized checkbox, a random number is used to modify your
specified interval, in order to establish the time of the next monitoring. After each
monitoring, the calculation is performed again--with another random number. This
makes it extremely difficult to predict the time of your next monitoring. (However,
the average of all of the random-number-calculated intervals will, over time and
after a sufficient number of monitoring, be equal to your specified interval.)
FortiDB Version 3.2 Utilities User Guide
22 15-32000-81369-20081219
Page 25

Report Manager Alert Report Manager
Reporting by Time
The Alert Report Manager module generates reports based on alerts generated
by the various other modules.
ARM: Reporting by Time
ARM: Reporting by Time: Calendar Pop-up
In order to reduce the number of alerts on your report to only those you are
interested in, you may now filter alerts based on time.
Enabling Email Recipients
Please see the FortiDB MA Administration Guide for a discussion of this topic.
Specifying Report Parameters
You can begin designing reports via the Reports -> New Reports menu.
FortiDB Version 3.2 Utilities User Guide
15-32000-81369-20081219 23
Page 26

Alert Report Manager Report Manager
New Reports Menu
In the New Reports page, fill in the necessary data information that you want to
show in the report.
New Report Setting Screen (top)
FortiDB Version 3.2 Utilities User Guide
24 15-32000-81369-20081219
Page 27

Report Manager Alert Report Manager
New Report Setting Screen (bottom)
You may specify these parameters for your new report:
• Report Name (name you choose; this is required)
• ID (Alarm ID(s); each alarm
1
has a unique ID)
• Alert Status (handled, acknowledged, or not)
• Alert Severity (Critical, Informational, etc.)
• FortiDB MA module from which you want to see the alert report
• Database you are assessing
• Rule type you want to use to assess vulnerabilities )
• Guarded Items (the specific rules you want to use in order to assess
vulnerabilities )
1. An alarm is an internal notification of a potential security violation; customers experience
alarms indirectly through Alert Messages. An alert is an external notification of a potential security
violation; alerts contain, and are triggered by, one or more alarms.
FortiDB Version 3.2 Utilities User Guide
15-32000-81369-20081219 25
Page 28

Alert Report Manager Report Manager
• Alert Generated Time (day or time interval that the alerts occurred)
• Report Generate Schedule:
• One Time Only (snapshot of current alerts typically used for archiving
purposes)
• Schedule (run according to the schedule specified in Set Defaults->Schedule
Settings)
• Report Format (Columns you want to appear and/or be used to sort your
report):
• File Format
• Aggregate Violations checkbox (enables whether similar violations are put in a
single Alert record; otherwise, each violation has its own record.)
You must check the Enable Report checkbox for your report to run.
You must click the Save button to save your report settings.
Saved and Enabled Report
Once saved, your report will show up on the Current Reports page.
Using the Select Checkbox to Affect Multiple Reports
You can Delete, Enable, or Disable one or more reports from the Current Reports
screen using the [Delete], [Enable], or [Disable] buttons, respectively. To
perform these operations all of the reports in your list, check the Select checkbox
in the column-header row first.
FortiDB Version 3.2 Utilities User Guide
26 15-32000-81369-20081219
Page 29

Report Manager Alert Report Manager
Activating ARM
In order to begin running scheduled reports, you should use the Reports->Status
menu. Check the Yes checkbox and click the Save button.
Status Menu
Running and Analyzing Reports
You may elect to see all reports, or just those created since a specified number of
days have occurred, by using the View Reports dropdown.
View Reports Dropdown List on Current Reports Screen
Status Dialog
FortiDB Version 3.2 Utilities User Guide
15-32000-81369-20081219 27
Page 30

Alert Report Manager Report Manager
Current Report Configuration
In the row corresponding to your report of interest, you can choose which report
version to preview via the Report History dropdown and you can specify reportspecific email recipients by clicking on the Email Receivers icon.
Report Summary Action
Choosing Summary Report Action
By clicking the [Summary] Action button, you can get to a screen provides
summary information for each alert.
The Summary Action gives high-level information about each alert.
By clicking on the Id number in the row of interest, you can get details on the alert
related to that specific alarm ID.
You can update the Status of the alert and enter a Reason for update on the
Alert Details screen. After making your changes, click the Update Status button.
Summary-Action Output Types
You can choose among the output types shown above. If you can’t export your
report to your local machine, you might need to change your Internet Options
settings. Please see a note in Report Result section.
FortiDB Version 3.2 Utilities User Guide
28 15-32000-81369-20081219
Page 31

Report Manager Alert Report Manager
Report Detailed Action
By clicking the [Detailed] Action] button, you can get to a screen provides
detailed information for each alert.
The Detailed Report gives specific information about each alert. The Id is a
hyperlink that you can click on for more information.
As was the case for the Summary Report information screen, you can also click
on the Id for the alarm of interest and be taken to the Alert Details screen.
Limitation
Report Size
The reporting functionality has been tested up to a size of about 40,000 rows per
report in PDF and HTML. Generating reports larger than this may produce out-ofmemory errors.
Archiving Reports
You will not be able to generate the same reports after you archive as you were
able to prior to archiving, since reports are not archived.
Note: The FortiDB MA Administrative user must explicitly assign one or more of
the above Report Manager roles in order for users to be able to run and view
these reports.
FortiDB Version 3.2 Utilities User Guide
15-32000-81369-20081219 29
Page 32

Custom Reports Report Manager
Custom Reports
Custom Reports
Using the open-source JasperReports library
chart generating Kavachart libra
3
ry, and the open-source iReport design too4l,
you can produce your own custom reports to complement those offered by the
FortiDB MA Report Manager.
As an example, FortiDB MA is shipping with an Alert Statistics Report and
Template, produced by the above tools and libraries.
Reports can be generated in PDF, HTML, or Excel format.
1
, the Quartz scheduling librar2y, the
Using This Feature
Scheduling
In general, the steps to use the Custom Reports feature are.
1 Set a schedule for all reports or for an individual report
2 Go to the Company Information page and provide the appropriate information
3 Generate the report
a Choose the report and template combination you want
b Filter the report by time or data categories
c Choose an output format type
4 (Optionally) view the Report History page to manage which reports you want to
keep or discard.
You can set a schedule for running all of your Custom Reports at once or set an
individual report's schedule.
To set a schedule, click the Schedule Settings link from the left-side navigation
menu or go to Set Defaults -> Schedule Settings from the top menu.
1. See http://jasperreports.sourceforge.net/
2. See http://www.opensymphony.com/quartz/
3. See http://www.ve.com
4. See http://ireport.sourceforge.net/
FortiDB Version 3.2 Utilities User Guide
30 15-32000-81369-20081219
Page 33

Report Manager Custom Reports
You can select:
• Time only schedule
• Daily schedule
• Weekly schedule
• Monthly schedule
Time-only Schedule Settings
Daily Schedule Settings
You can have your reports run on a daily basis at a certain time.
FortiDB Version 3.2 Utilities User Guide
15-32000-81369-20081219 31
Page 34

Custom Reports Report Manager
Weekly Schedule Settings
You can have your reports run on a weekly basis on day(s).
Monthly Schedule Settings
You can have your reports run on a monthly basis.
Customer and Company Information
You can have a custom logo and address (or other descriptive text) appear on
each report.
To set a customer and company information, click the Customer and Company
Information link from the left-side navigation menu or go to Set Defaults ->
Customer and Company Information from the top menu.
FortiDB Version 3.2 Utilities User Guide
32 15-32000-81369-20081219
Page 35

Report Manager Custom Reports
Company Information Dialog
Note: The name of the file containing the logo cannot contain spaces.
Report and Template Generation and Management
Custom Reports Main Page
From the Custom Reports main page, you can:
• Add a report
• Modify a report
• Delete a report
• Modify a report's template
FortiDB Version 3.2 Utilities User Guide
15-32000-81369-20081219 33
Page 36

Custom Reports Report Manager
• Generate a Report
Adding Reports
To add a new report, take the following steps:
1 Click on the Custom Reports Manager link on the left-side navigator or select
from the top bar menu, Reports -> Custom Reports Manager.
2 Click the Add Report button. The Add Report dialog displays.
3 Enter your report name and description.
4 Click the Add Report button.
Adding a Report
Modifying Reports
To modify a report, take the following steps:
1 Click on the Custom Reports Manager link on the left-side navigator or select
from the top bar menu, Reports -> Custom Reports Manager.
2 Select the report you want to modify.
3 Click the Modify Report button. The Modify Report dialog displays.
4 Modify your report name and/or description.
5 Click the Modify Report button.
FortiDB Version 3.2 Utilities User Guide
34 15-32000-81369-20081219
Page 37

Report Manager Custom Reports
Modifying a Report
Deleting Reports
1 Select the report you want to delete.
2 Click the Delete Report button. The confirmation window displays.
3 Click the OK.
Deleting a Report
FortiDB Version 3.2 Utilities User Guide
15-32000-81369-20081219 35
Page 38

Custom Reports Report Manager
Modifying Report Templates
You can import your template (*.jrxml) file and save it in the internal reports
database. You can also export the template from the internal reports database and
store it as a (*.jrxml)) file on local file system.
Templates Manager Page
Click on the Manage Template(s) button on the Custom Reports Manager page
in order to bring up the Templates Manager page, where you can add, modify,
delete templates as well as set your default template.
Templates Manager: Adding a Template Page
FortiDB Version 3.2 Utilities User Guide
36 15-32000-81369-20081219
Page 39

Report Manager Custom Reports
Templates Manager: Modifying a Template Page
Generating Reports
To generate a report, take the following steps:
1 From the Custom Reports Manager page, click the Generate Report button.
2 In the Template parameters page, select the template you want to use from the
pull-down list.
3 To set parameter values to filter the report data, click the Settings button.
You may limit the rows returned by:
• Specifying a "like" or "not like" Column Name condition.
•The Filter Value is case sensitive
• You can use a % wild card with your search strings there. In the
Application filter row, %B% will return records whose application is
'UBM', for example.
• Specifying a specific Time Period
• Using the Limit Rows text box to specify the number of data rows you want in
your report.
Report Result
You can display your report in PDF, Excel, Tab delimited, or Comma delimited
formats. You can also export your report and save in your local computer.
FortiDB Version 3.2 Utilities User Guide
15-32000-81369-20081219 37
Page 40
Custom Reports Report Manager
Generated HTML Report Example
Note: In order to export and save your report files in a tightly secured machine,
you might need to change the Internet Option settings of the machine. You can
change your Internet Option settings as follows:
1 Open Control Panel, and open Internet Options.
2 In the Internet Properties window, click the Security tab.
3 Select Trusted sites.
4 Click the Sites button. The Trusted sites dialog displays.
5 Enter URL of FortiDB host server (for example, http://myserver.mydomain.com
you enter a URL with http:// prefix, you need to uncheck Require server
verification (https: ) for all sites in this zone check box.
6 Click the Add button.
7 Click the Close button.
8 Set the Security Level for this zone to Low.
9 Click OK.
). If
FortiDB Version 3.2 Utilities User Guide
38 15-32000-81369-20081219
Page 41

Report Manager Custom Reports
Report History
Report History
Report History allows you to:
• View a list of previously generated reports
• Regenerate a particular report
• Delete reports or your entire report history
FortiDB Version 3.2 Utilities User Guide
15-32000-81369-20081219 39
Page 42

Licensing and Administration Report Manager
Licensing and Administration
In order to enable a user to utilize the Custom Reports feature, select the Custom
Reports radio button on the User Administration screen.
Note: Selecting SOX Reports will automatically enable Custom Reports.
The FortiDB MA license file excerpt shown above includes a license to use the
Custom Reports and SOX Reports features.
Custom Report Properties
The following Custom report-related properties are available in the
dssConfig.properties:
Property Purpose Possible Values Default
cr.reportdbtype
Defines the RDBMS type
of the FortiDB MA internal
database
User Administration for Custom Reports and SOX Reports
1
pg pg
FortiDB Version 3.2 Utilities User Guide
40 15-32000-81369-20081219
Page 43

Report Manager Licensing and Administration
Property Purpose Possible Values Default
cr.reportDatabase Defines the location of the
FortiDB MA Custom
Reports database
cr.user
Defines the user name for
the FortiDB MA Custom
Reports database
cr.password Defines the encrypted
password for the FortiDB
MA Custom Reports
database
1. Initial value when FortiDB MA is installed.
Note: FortiDB MA has set up what it considers optimal Quartz-library schedule
settings in reportmanager.properties. If you wish to set your own, see
http://www.opensymphony.com/quartz/.
Limitations
1
jdbc\:postgresql\://localho
st/reportdb
jdbc\:oracle\:thin\:@192.1
68.5.12\:1521\:ipref
fortidbma
The Custom Reports feature has this limitation:
• The maximum number of bar-chart columns for each report is 15. If the data
being presented requires more than 15 columns, no bar chart is generated for
that data.
• Your browser must allow Popup in order to successfully generate reports.
• Logos or other images will not show up in Excel reports, like they will for PDF
and HTML reports.
• Logos with multi-byte characters in their filenames or paths cannot be
imported.
Note: You should schedule the running of long or complex reports for after normal
business hours.
Note: Since Custom Reports use information that is currently in the internal
reports database, a currently Open, or Open and Running, (target) Database
Connection is not necessary.
FortiDB Version 3.2 Utilities User Guide
15-32000-81369-20081219 41
Page 44
SOX Compliance Reports Report Manager
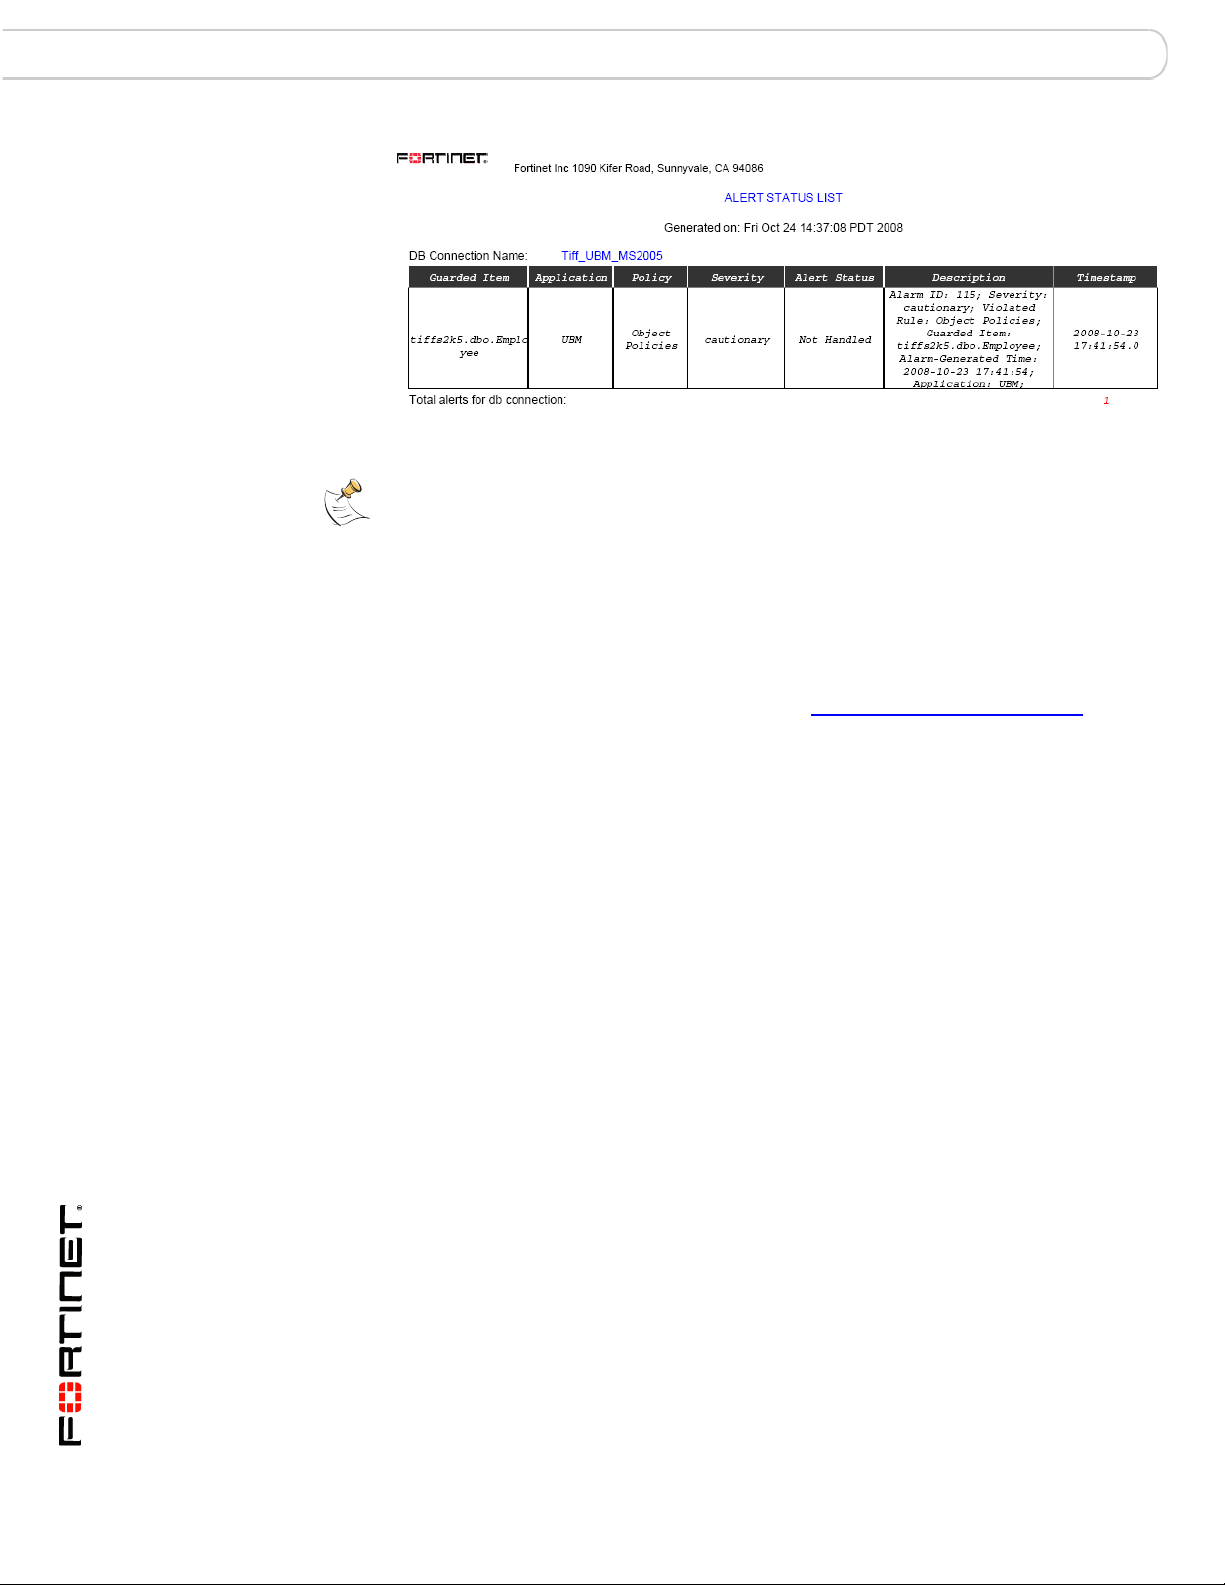
Description of Shipped Sample Report
Alert Statstics Report Contains detailed information about alerts:
• Database Connection name
• Guarded item name
• Application name
• Policy type
•Alert Severity
• Alert Status,
• Alert Description
• Alert Timestamp.
Report data is grouped by Database Connection name.
Report statistics include: total alerts for database, and
total records at the end of report.
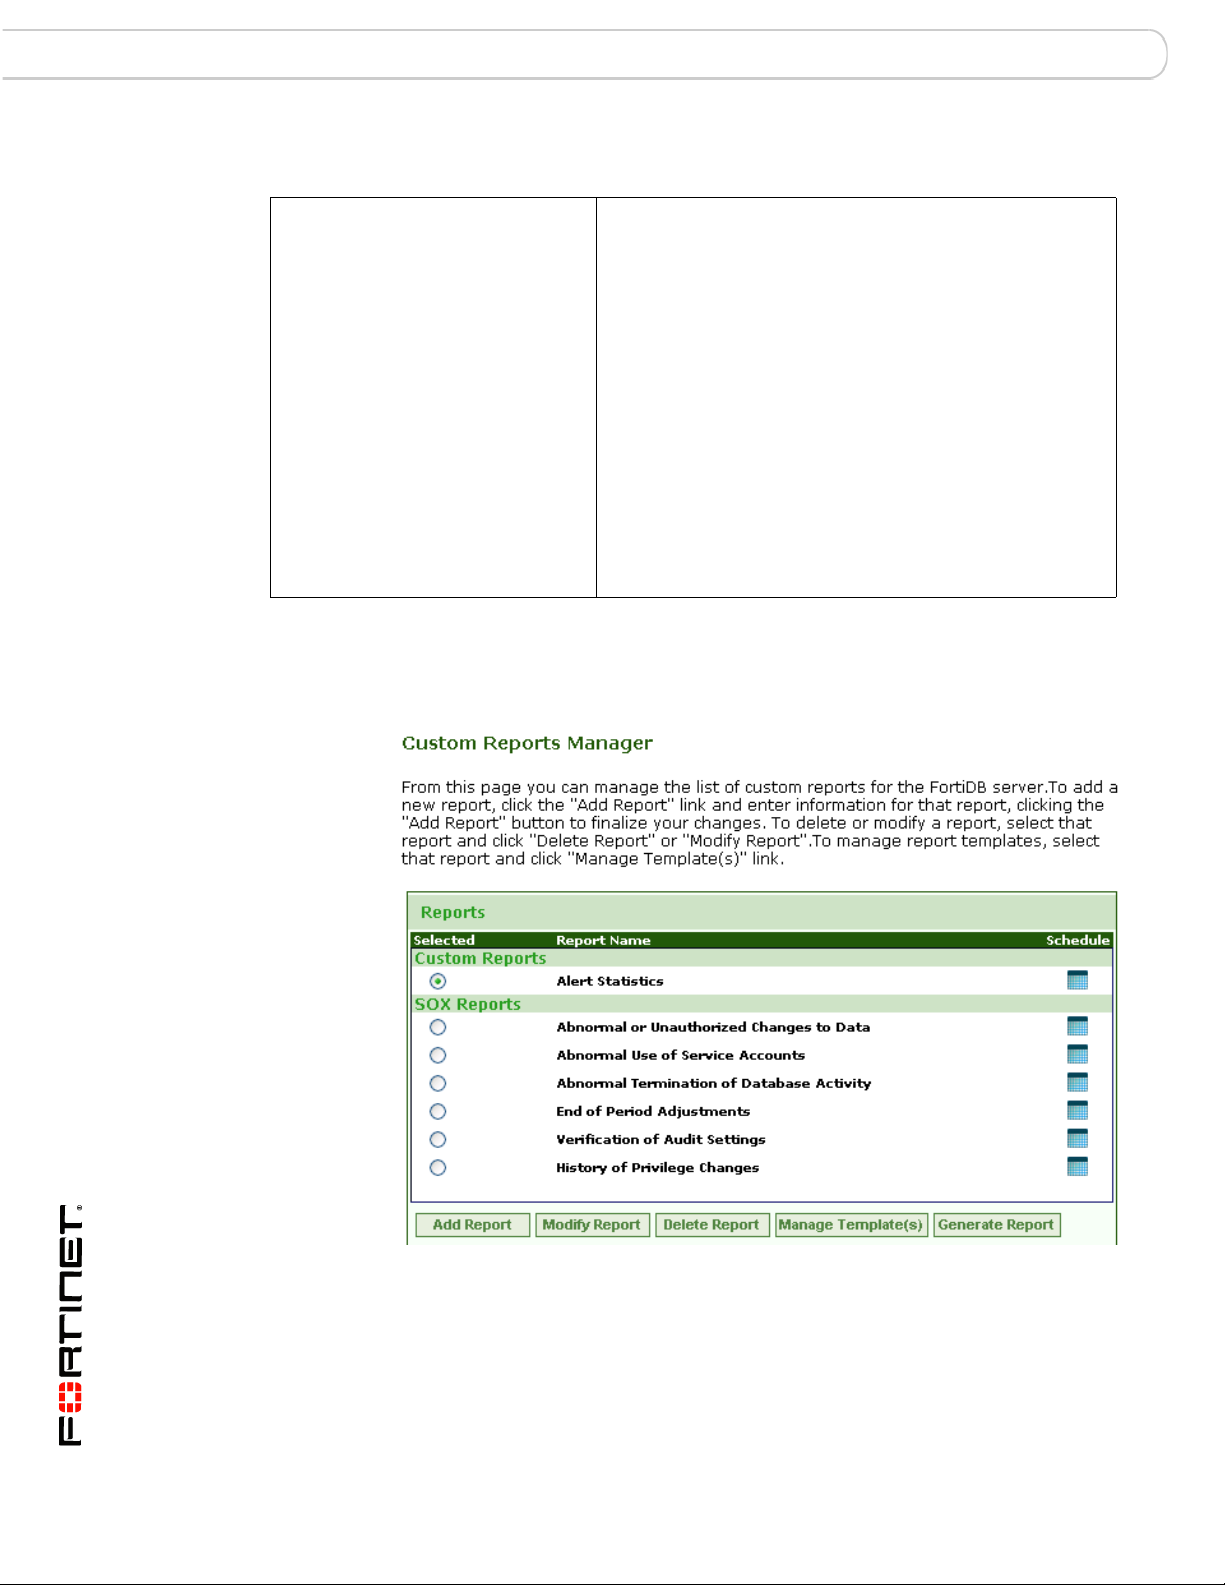
SOX Compliance Reports
SOX Reports within Custom Reports Manager Page
One type of Custom Reports is the Sarbanes-Oxley (SOX) Compliance reports.
FortiDB Version 3.2 Utilities User Guide
42 15-32000-81369-20081219
Page 45
Report Manager SOX Compliance Reports
Reports and Acronyms
This release includes these SOX reports:
Report Name Acronym
History of Privilege Changes Report HPC
Abnormal or Unauthorized Changes to Data Report
Abnormal Use of Service Accounts Report
Abnormal Termination of Database Activity Report ATD
End of Period Adjustments Report
Verification of Audit Settings Report
Acronym representing all SOX Compliance reports
Common Report Header Fields
Here are the common report-header fields for the current SOX reports.
Customer Name
Generated by:
AUC
AUS
EPA
VAS
ALL
Field Description
Indicates the title or name
of the Customer
producing the report.
Indicates that the report
was generated utilizing
FortiDB MA technology.
Date Created: Indicates the date and
time the report was
created.
Period-end:
W/P Reference: The “W/P Reference” or
Indicates the last date
covered by the report.
Work Paper Reference
field represents a tracking
mechanism used by
customers to identify and
place controls around
reports.
General Setup Instructions
See the FortiDB MA Administration Guide
FortiDB Version 3.2 Utilities User Guide
15-32000-81369-20081219 43
Page 46

History of Privilege Changes Report (HPC) SOX Report Specifics
SOX Report Specifics
This section lists the COBIT objectives and descriptions, the FortiDB MA module-setup requirements, and
individual-column detail for each report in this release.
History of Privilege Changes Report (HPC)
HPC Report Sample
COBIT Objectives and Setup Requirements
Objective
Number(s) Objective Description
AI2.4, DS3.5,
DS5.3, DS5.4
Changes to escalate or reduce database-user
access privileges are tracked for review on a
quarterly basis by the IT manager and the
application business manager.
FortiDB MA Module
Setup Requirement
PM: using the Audit data
retrieval method
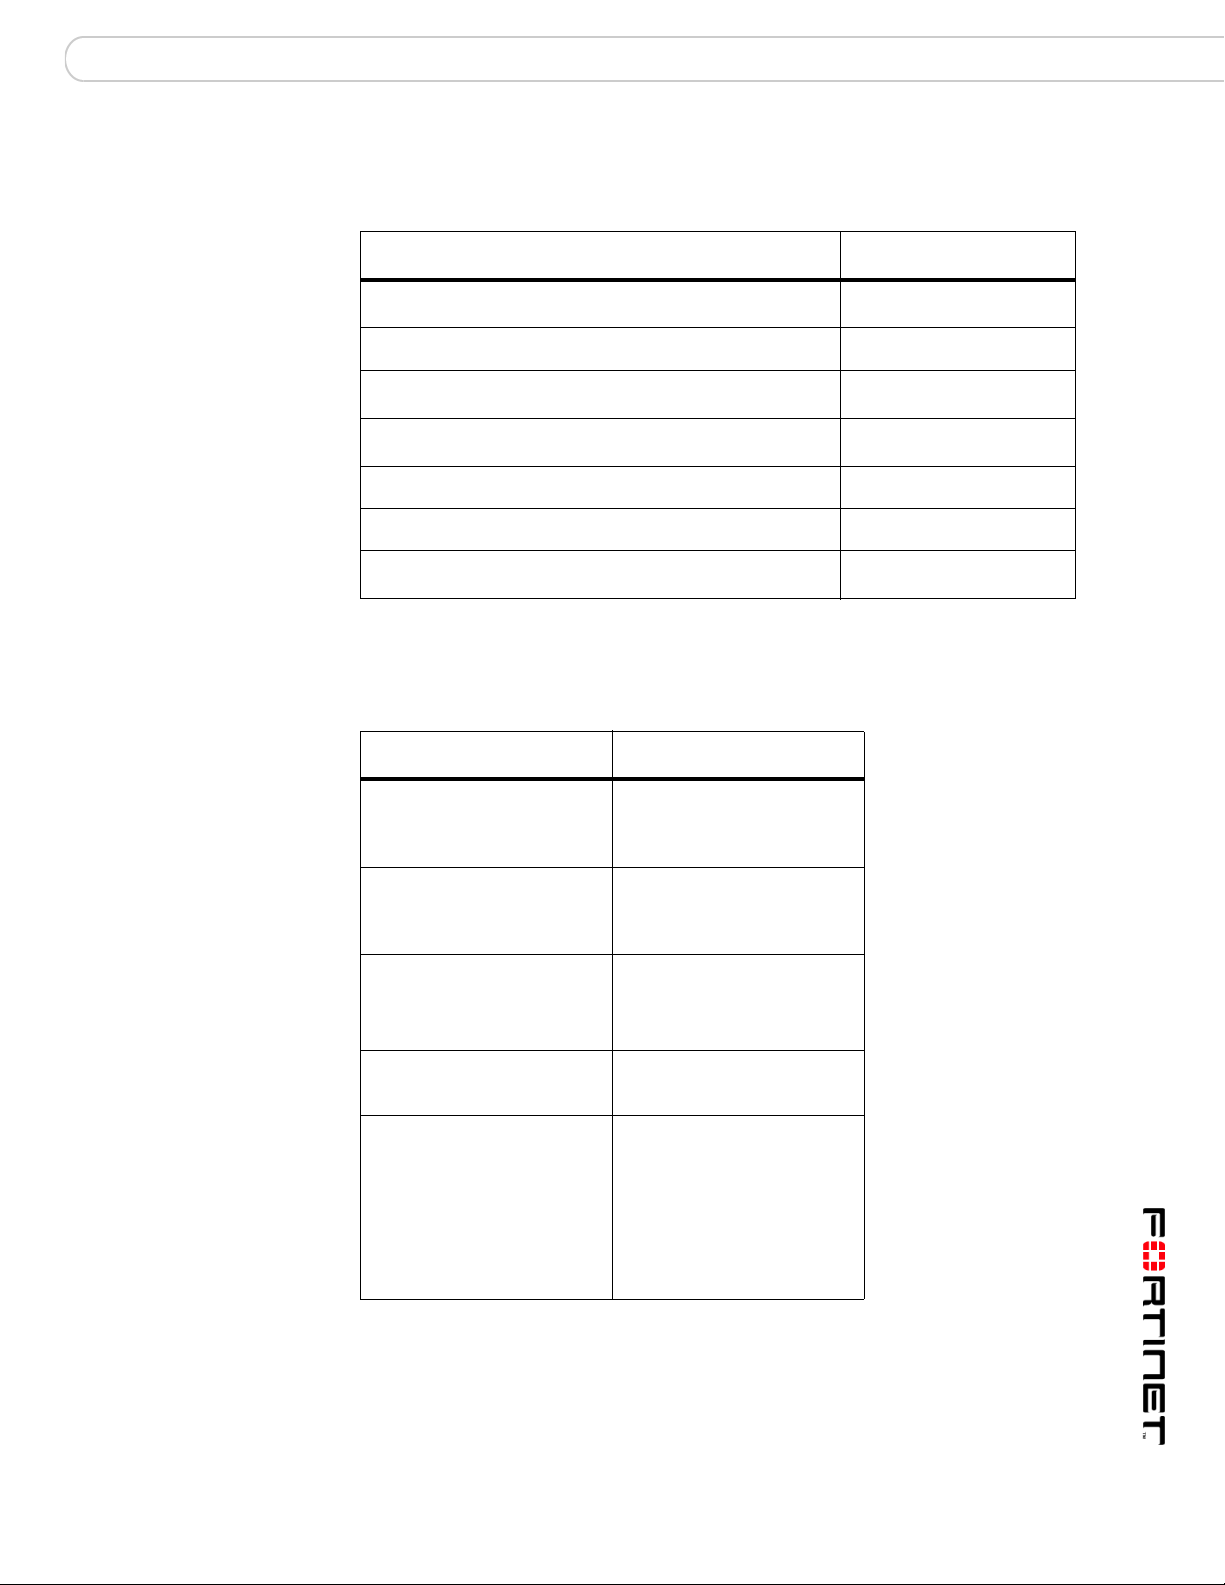
Report Body Columns
The following columns are displayed in the report body:
Column
User ID
Grantee The name of the user for whom privileges were changed.
Action The type of action successfully enacted by a non-application user account.
Description
The ID of the database user that initiated the privilege change.
Actions include UPDATE, INSERT, and GRANT.
Target
Sys Privilege The type of system privilege GRANTed to, or REVOKEd from, the grantee.
Obj Privilege
Time Stamp The exact time the flagged activity was conducted.
44 15-32000-81369-20081219
The object on which the privileges were changed.
The type of object privilege GRANTed to, or REVOKEd from, the grantee.
FortiDB Version 3.2 Utilities User Guide
Page 47
SOX Report Specifics Abnormal or Unauthorized Changes to Data Report (AUC)
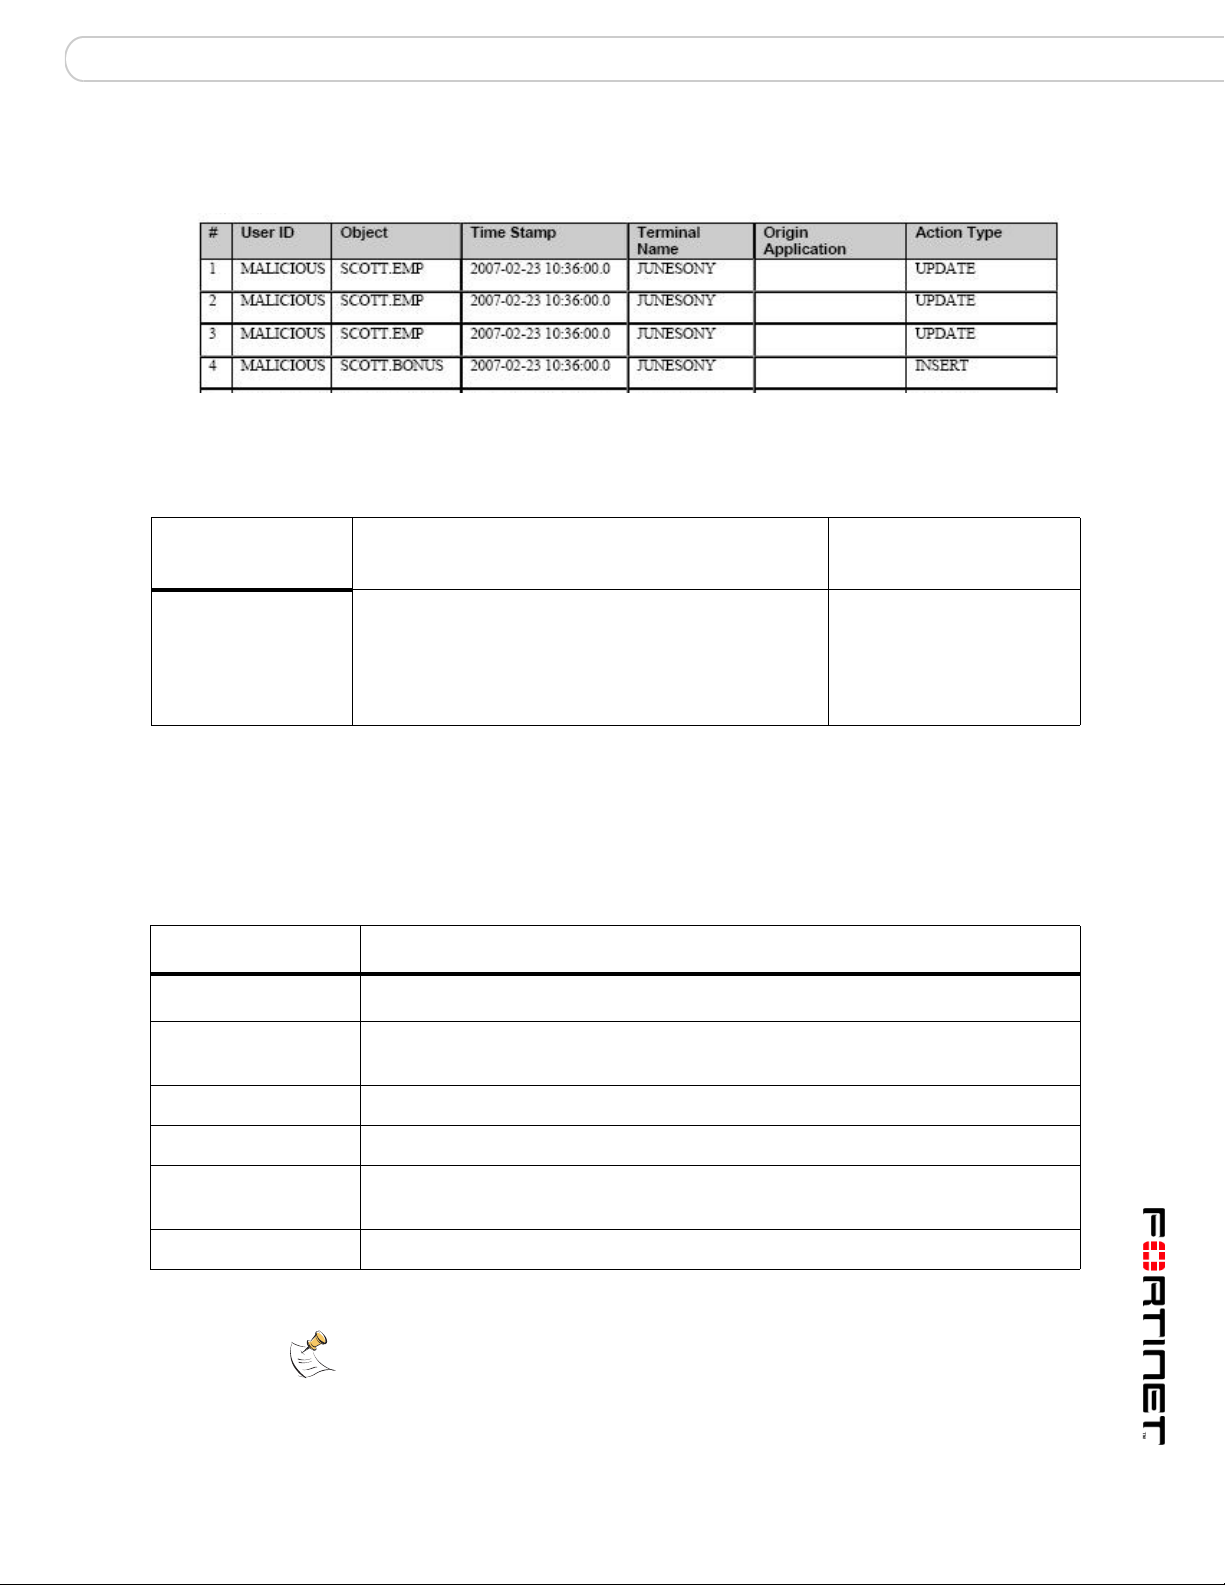
Abnormal or Unauthorized Changes to Data Report (AUC)
AUC Report Sample
COBIT Objectives and Setup Requirements
Objective
Number(s) Objective Description
AI2.3
1. Non-application accounts have User IDs that belong to individual users. Application accounts have User IDs
as well but they are not typically associated with individual users.
Unauthorized changes to data by non-application
accounts are tracked and reviewed by IT
Management on a quarterly basis.
1
FortiDB MA Module
Setup Requirement
UBM: Object policies,
since this will focus on
data changes in specific
tables containing financial
information.
Report Body Columns
The following columns are displayed in the report body:
Column
User ID
Object The name and owner of the database object that was directly manipulated by
Time Stamp The exact time the flagged activity was conducted.
Description
The ID of the database user that conducted the flagged activity.
the flagged activity
Terminal Name The terminal IP address or name.
Origin Application The name, or other identifier, for the originating application, if the activity
originated from an external application or from an application server.
Action Type The type of action successfully enacted by the User ID.
Note: By default, all actions are considered unauthorized. If you want, for
example, to only mark UPDATEs as unauthorized actions, use an Action Type
filter in the Settings dialog in order to filter out the other action types You can also
distinguish (un)authorized users by defining a User ID filter in the Settings dialog.
FortiDB Version 3.2 Utilities User Guide
15-32000-81369-20081219 45
Page 48

Abnormal Use of Service Accounts Report (AUS) SOX Report Specifics
Abnormal Use of Service Accounts Report (AUS)
AUS Report Sample
COBIT Objectives and Setup Requirements
Objective
Number(s) Objective Description
DS5.3 Database transactions from unauthorized sources
are tracked and reviewed by IT Management on a
weekly basis.
FortiDB MA Module
Setup Requirement
PM: using the Audit data
retrieval method
MM: using the Audit data
retrieval method
UBM: Object or User
policies
Report Body Columns
The following columns are displayed in the report body:
Column
User ID
Terminal Name The terminal IP address or name.
Origin Application The name, or other identifier, for the originating application, if the activity
# of Actions The number of actions attempted by the account associated with the User ID.
Description
The ID of the database user that conducted the flagged activity.
originated from an external application or from an application server.
Time Stamp The exact time the flagged activity was conducted.
Note: If you are using an Oracle internal database and use the Limit Rows
checkbox in the report's Settings dialog in order to limit the number of report
rows, the limit that you specify applies to the number of actions and not to the the
number of rows.
FortiDB Version 3.2 Utilities User Guide
46 15-32000-81369-20081219
Page 49

SOX Report Specifics Abnormal Termination of Database Activity Report (ATD)
Abnormal Termination of Database Activity Report (ATD)
ATD Report Sample
COBIT Objectives and Setup Requirements
Objective
Number(s) Objective Description
DS10.1 Routine transactions and processes between the
application and the database are reviewed on a
daily basis for successful completion by IT
Management.
Report Body Columns
The following columns are displayed in the report body:
Column
User ID
Description
The ID of the database user that conducted the flagged activity.
FortiDB MA Module
Setup Requirement
PM: using the Audit data
retrieval method
MM: using the Audit data
retrieval method
UBM object policies or
user policies, and the
failed logins policy
within the session
policy(to capture failed
logins)
Object The name and owner of the database object that was directly manipulated by
the flagged activity
Time Stamp The exact time the flagged activity was conducted.
Terminal Name The terminal IP address or name.
Origin Application The name, or other identifier, for the originating application, if the activity
originated from an external application or from an application server.
Action Type The action that was attempted, butt failed to fully process or transact. The
action might be, for example, an INSERT, UPDATE, DELETE, logon, or logoff.
FortiDB Version 3.2 Utilities User Guide
15-32000-81369-20081219 47
Page 50
End of Period Adjustments Report (EPA) SOX Report Specifics
Column
Error Code The proprietary error code generated by the originating application.
Description
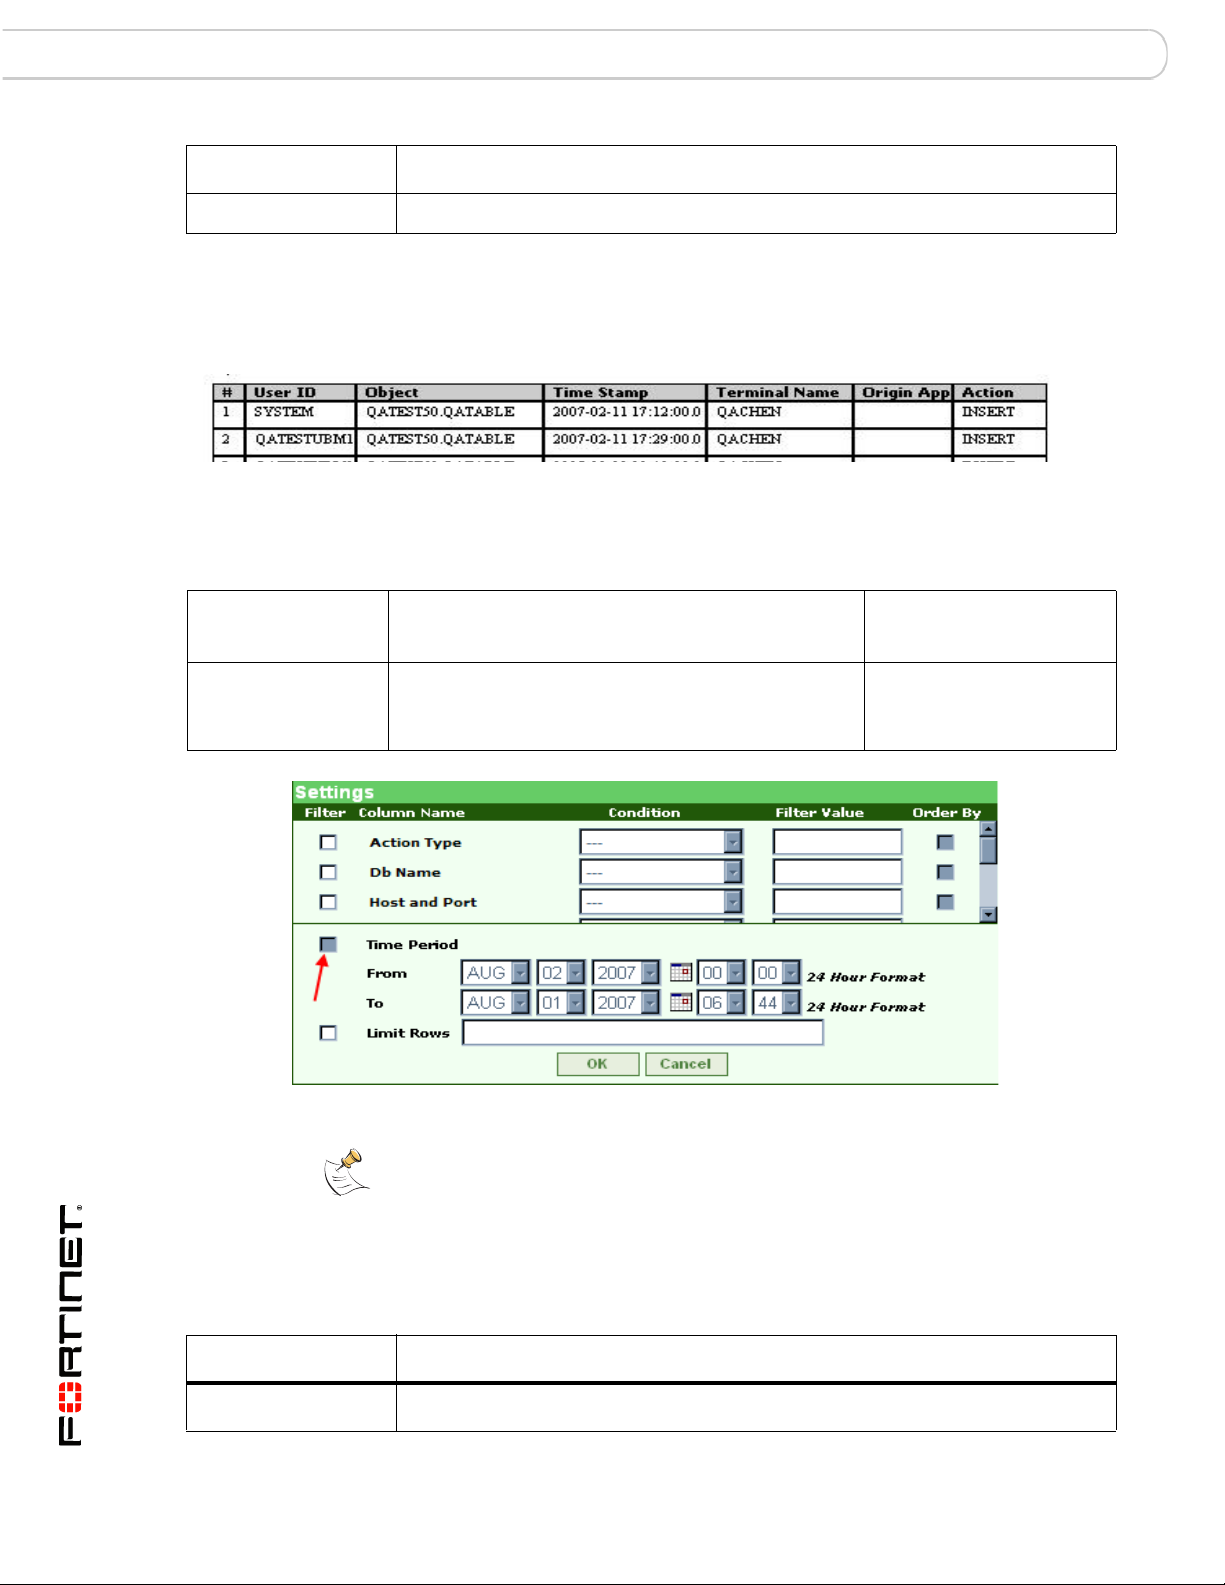
End of Period Adjustments Report (EPA)
EPA Report Sample
COBIT Objectives and Setup Requirements
Objective
Number(s) Objective Description
AI2.3 End of period adjustments to the general ledger are
tracked and reviewed by Business Management on
a monthly basis.
FortiDB MA Module
Setup Requirement
UBM object policies,
focusing on tables
containing financial data.
Settings Dialog for the EPA Report
Note: By design, you cannot change the From and To (Time Period) values in
the Settings dialog.
Report Body Columns
The following columns are displayed in the report body:
Column
User ID
48 15-32000-81369-20081219
Description
The ID of the database user that conducted the flagged activity.
FortiDB Version 3.2 Utilities User Guide
Page 51

SOX Report Specifics End of Period Adjustments Report (EPA)
Column
Object The name and owner of the database object that was directly manipulated by
Time Stamp The exact time the flagged activity was conducted.
Terminal Name The terminal IP address or name.
Origin Application The name, or other identifier, for the originating application, if the activity
Action The type of action successfully completed by the User ID.
Description
the flagged activity
originated from an external application or from an application server.
Determining Your Reporting Period
Reporting Period is the time frame surrounding a user-defined period-end day
(PED). The reporting period extends a user-defined number of days before
(UDDB) and a user-defined number of days after (UDDA) the PED.
Assumptions:
PED = the 1st day of each month
UDDB = 8
UDDA = 15
Case 1
Assumption:
You are running your End of Period Adjustments (EPA) report sometime before
midnight on the first day of August
Assertions:
a) the most recent PED is the first day of July
b) the reporting period is (July 1)- 8 days until (July 1) + 15 days
Conclusion:
The resulting report period is June 23 until July 16, inclusive.
Case 2
Assumption:
You are running your End of Period Adjustments (EPA) report sometime before
midnight on the second day of August
Assertions:
a) the most recent PED is the first day of August
b) the reporting period is (Aug 1)- 8 days until (Aug 1) + 15 days
Conclusion:
FortiDB Version 3.2 Utilities User Guide
15-32000-81369-20081219 49
Page 52

Verification of Audit Settings Report (VAS) SOX Report Specifics
The resulting report period is July 24 until August 16, inclusive.
Note: Since the time frame from August 3rd and beyond is a future time frame,
there will be no data for it in the report.
Verification of Audit Settings Report (VAS)
VAS Report Sample
COBIT Objectives and Setup Requirements
Objective
Number(s) Objective Description
DS3.5, DS5.5,
DS13.3
Audit tracking is configured on all financial
databases, changes to audit functionality is
reviewed by IT Management on a quarterly
basis.
FortiDB MA Module Setup
Requirement
There are two requirements:
1. At least one of the following
modules must be run in order to
collect audit data:
•UBM
• PM: using the Audit data
retrieval method
• MM: using the Audit data
retrieval method
2. For tracking audit activity with the
UBM module, run the following
commands:
audit system audit;
audit audit system;
audit audit any;
and then Close and Open your
database connection in UBM.
Report Body Columns
The following columns are displayed in the report body:
Column
User ID
50 15-32000-81369-20081219
Description
The ID of the database user that conducted the flagged activity.
FortiDB Version 3.2 Utilities User Guide
Page 53

SOX Report Specifics Verification of Audit Settings Report (VAS)
Column
Object The name and owner of the database object that was directly manipulated by
Time Stamp The exact time the flagged activity was conducted.
Terminal Name The terminal IP address or name.
Origin Application The name, or other identifier, for the originating application, if the activity
Action The type of action successfully completed by the User ID.
Description
the flagged activity
originated from an external application or from an application server.
Licensing and Administration
For SOX Reports licensing and administration information, please refer to the
FortiDB MA Administration Guide
Limitations
Report Size
The reporting functionality has been tested up to a size of about 40,000 rows per
report in PDF and HTML. Generating reports larger than this may produce out-ofmemory errors.
Archiving Reports
You will not be able to generate the same reports after you archive as you were
able to prior to archiving, since reports are not archived.
FortiDB Version 3.2 Utilities User Guide
15-32000-81369-20081219 51
Page 54

Verification of Audit Settings Report (VAS) SOX Report Specifics
FortiDB Version 3.2 Utilities User Guide
52 15-32000-81369-20081219
Page 55

Index
Index
A
activate 20
Alert Behavior 17
Alert Report Manager 20
ARM 20
activating 27
Auto Discovery
DB2 6
MS-SQL 6
Auto Discovery 4
C
Calendar-based Schedule 21
compliance 20
Connection Summary 8
Custom Report Properties 40
Custom Reports 30
D
DB2 6
dssConfig.properties 7, 40
L
license 40
Licensing 40
P
policy 11, 12, 18, 47
privilege 44
property 7
R
Randomized Interval 22
Report Detailed 29
Report History 39
Report Manager 20
Report Result 37
Report Summary 28
Rule Chaining
Parameterized User-Defined Rules 11
PL/SQL-based PUDR 14
Rule Chaining 9
S
Severity level 20
SOX 42
Reports and Acronyms 43
SOX report
Abnormal or Unauthorized Changes to Data Report
(AUC) 45
Abnormal Termination of Database Activity Report
(ATD) 47
End of Period Adjustments Report (EPA) 48
History of Privilege Changes Report 44
Verification of Audit Settings Report (VAS) 50
T
Timer-based Schedule 20
V
violation 11, 18, 25, 26
FortiDB Version 3.2 Utilities User Guide
15-32000-81369-20081219 53
Page 56

Index
FortiDB Version 3.2 Utilities User Guide
54 15-32000-81369-20081219
 Loading...