

Page 1
VX 520
Quick Reference Guide
v1.0
Page 2

Howdy,
Welcome to Forte!
This is your VX 520 Quick Reference Guide, a helpful
and handy document that can walk you through the
easy setup and common operations of your device.
This guide shouldn’t have come alone. Make sure
you also received the correct point of sale device(s)
that you ordered.
If you have any questions, you can fi nd our contact
information listed on the back of this guide.
Thanks for choosing us as your payment provider.
We’re thrilled to off er you a reliable and secure, swift
and smooth payments experience. Let’s get started.
Sincerely,
Forte Payment Systems
Page 3
Table of Contents
Terminal Setup
Hybrid Terminal Setup - (RS232)
Hybrid Terminal Setup - (Mini USB)
Standalone Terminal Setup
Sale
Manual Keyed Entry Sale
Refund
Forced Sale
Void
Reprint Receipt
Print Reports
Troubleshooting Tips
FAQs
Terminal Packaging List
Notes
Page 4
Terminal Setup
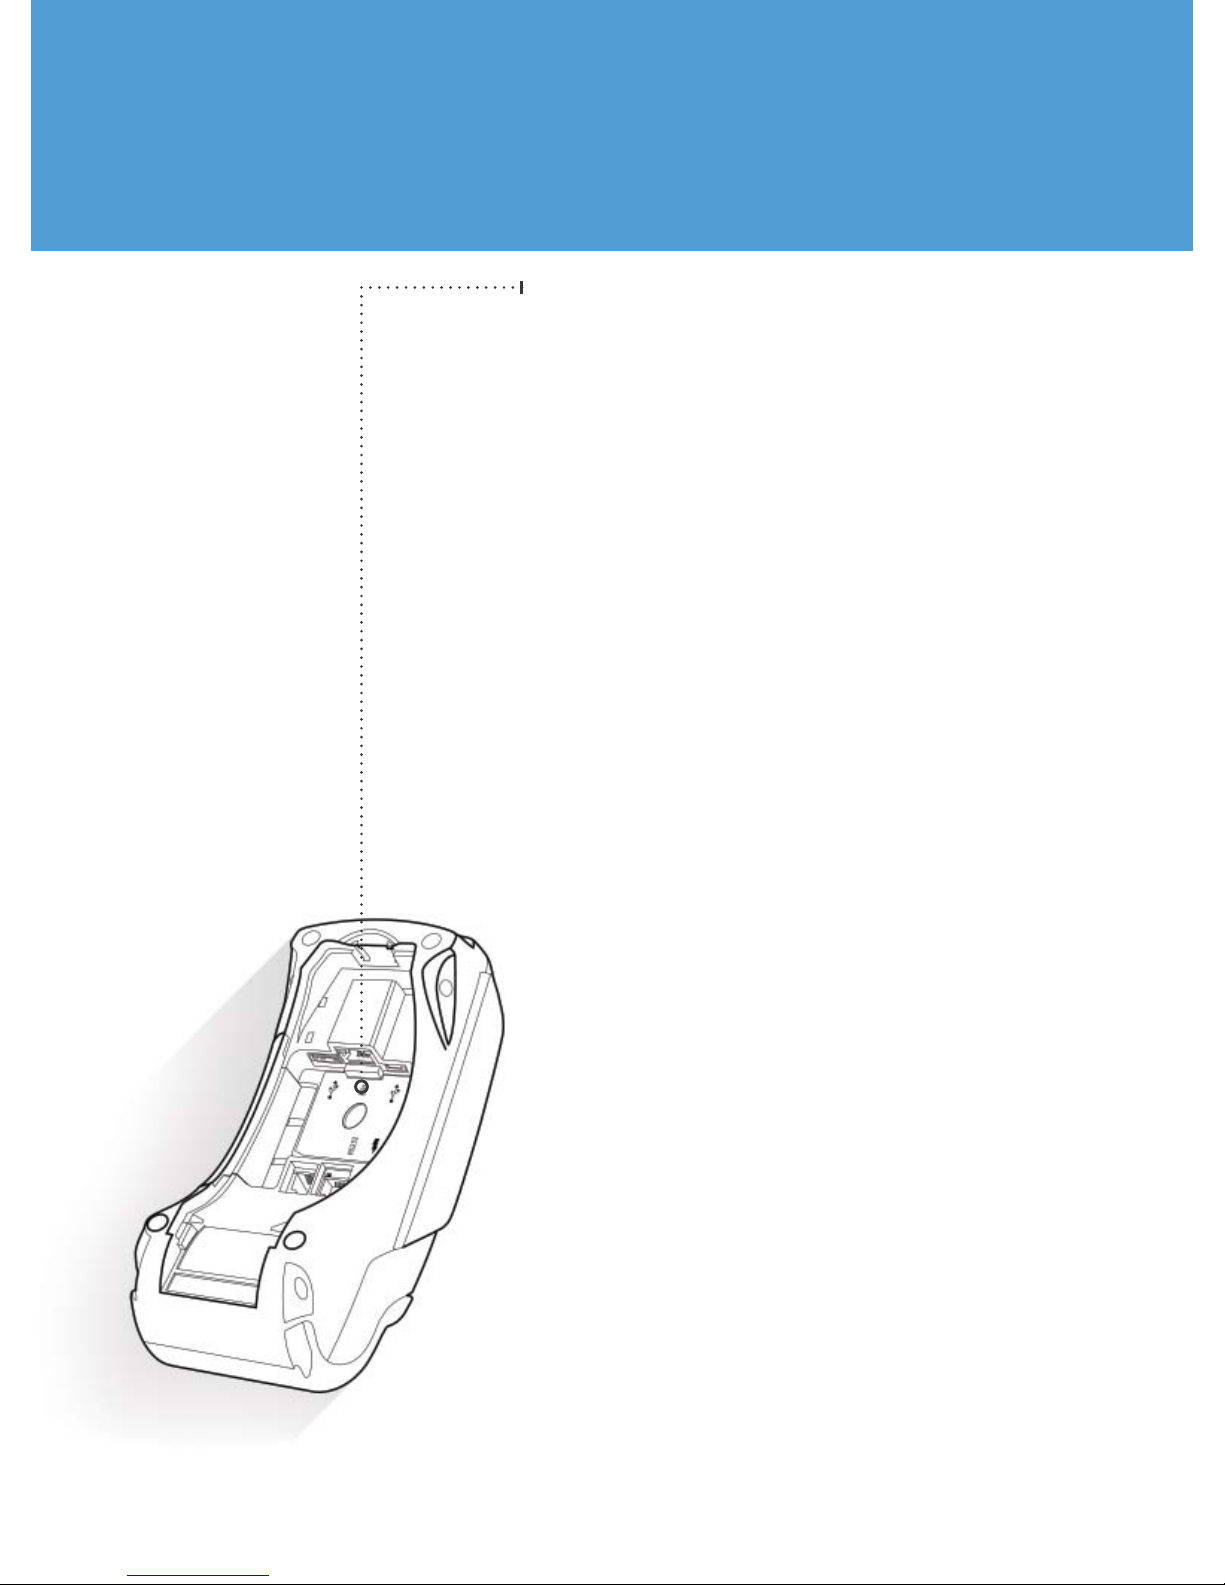
1. Plug network (Ethernet) cable into the
bottom of the terminal (labeled ETH).
NOTE: Do not use a phone cord.
2. Plug in the terminal’s power cable. A
blank screen will appear momemtarily.
3. Wait for the CommServer, Forte and
CAM screen.
4. Press F3 for Forte.
5. The screen will cycle through the
following messages:
Reading Batch File for Merchant I
Communication Status - Connected
6. Wait for the Credit/Debit/Check screen.
a. Reading Batch File for Merchant I
b. Communication Status
c. Initializing Pin Pad
d. Initializing - Please wait
7. The terminal is now ready to use.
8. We recommend running a test
transaction to ensure functionality. A
good option is to charge $0.01 and then
to void the transaction.
4
Page 5
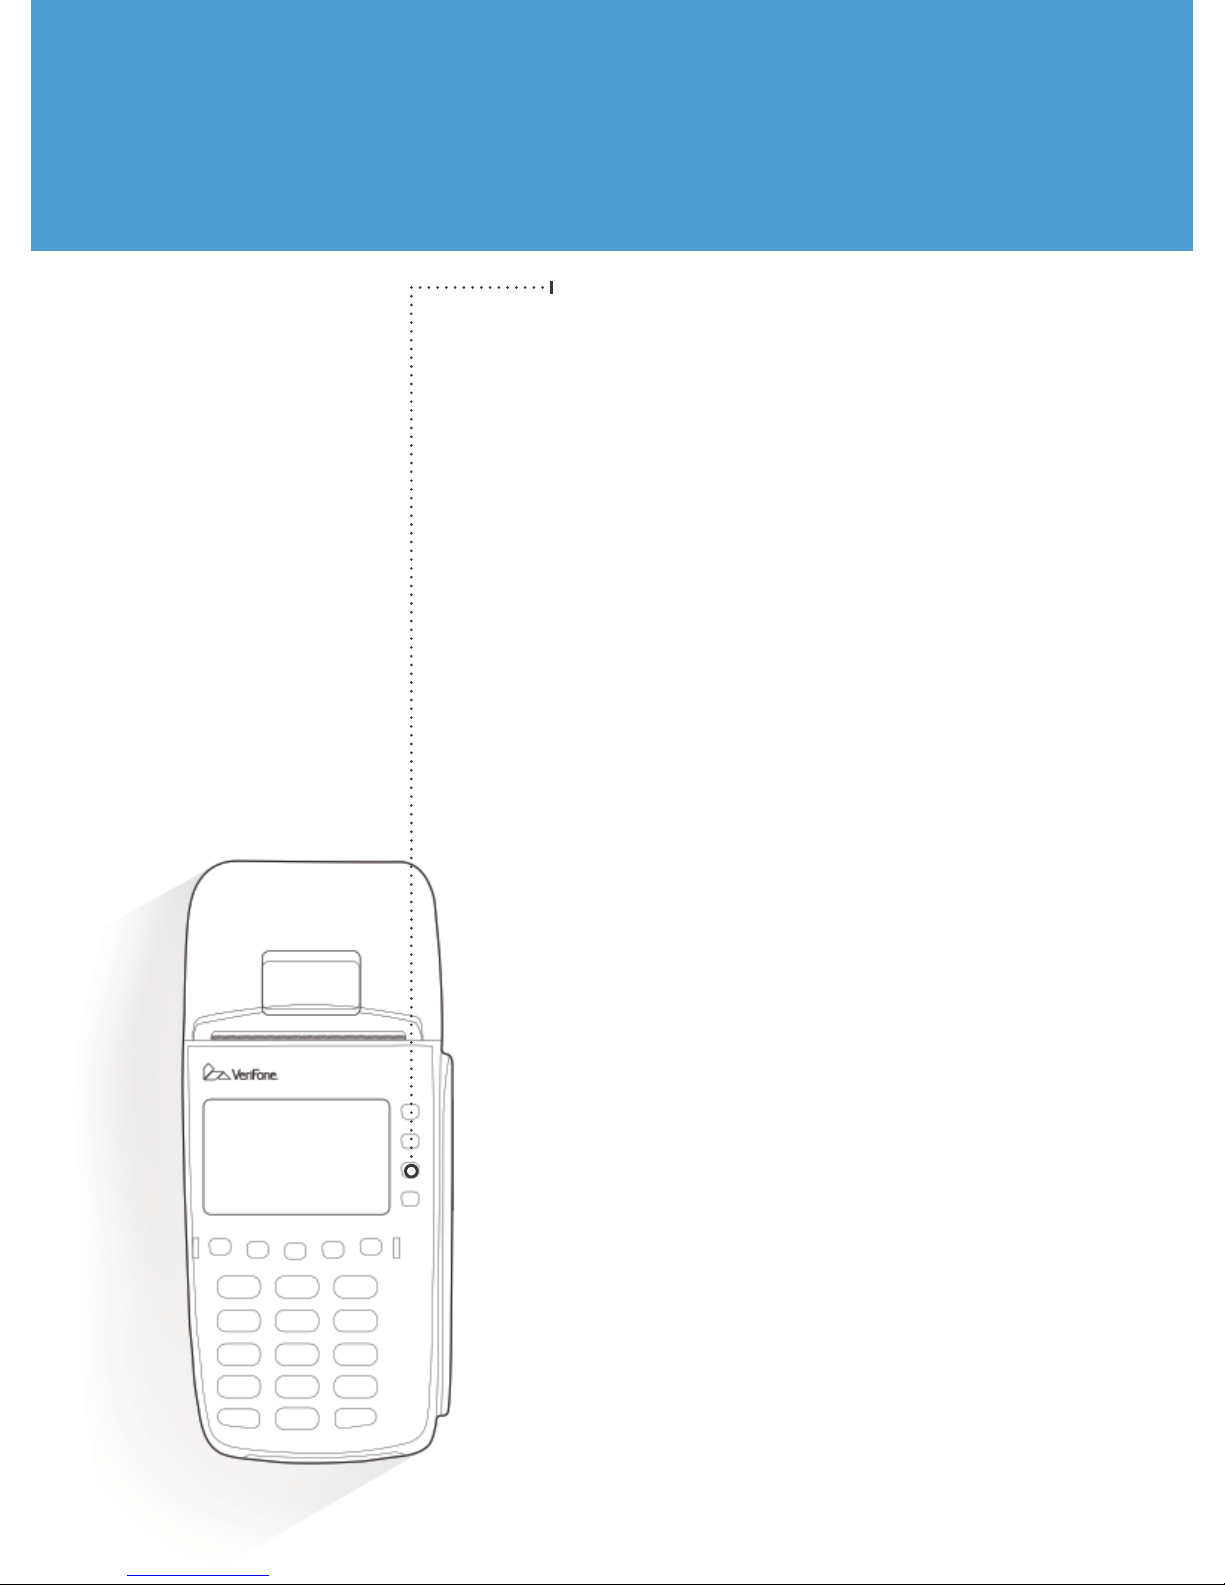
1. Press the F3 Key to the right of
Forte.
2. The screen displays “Reading
Batch File for Merchant
1” for about 15 seconds, then
“Communication Status –
Connected –“ before going to the
Main Menu.
3. The terminal is now set up and
ready for use.
4. You can swipe or manually enter a
Credit Card (F2), Debit Card (F3) or
Check (F4).
NOTE: Your Forte merchant account
must be set up for the payment
method you use.
5. We recommend running a test
transaction (for a penny and then
voiding it) to ensure functionality.
Page 6
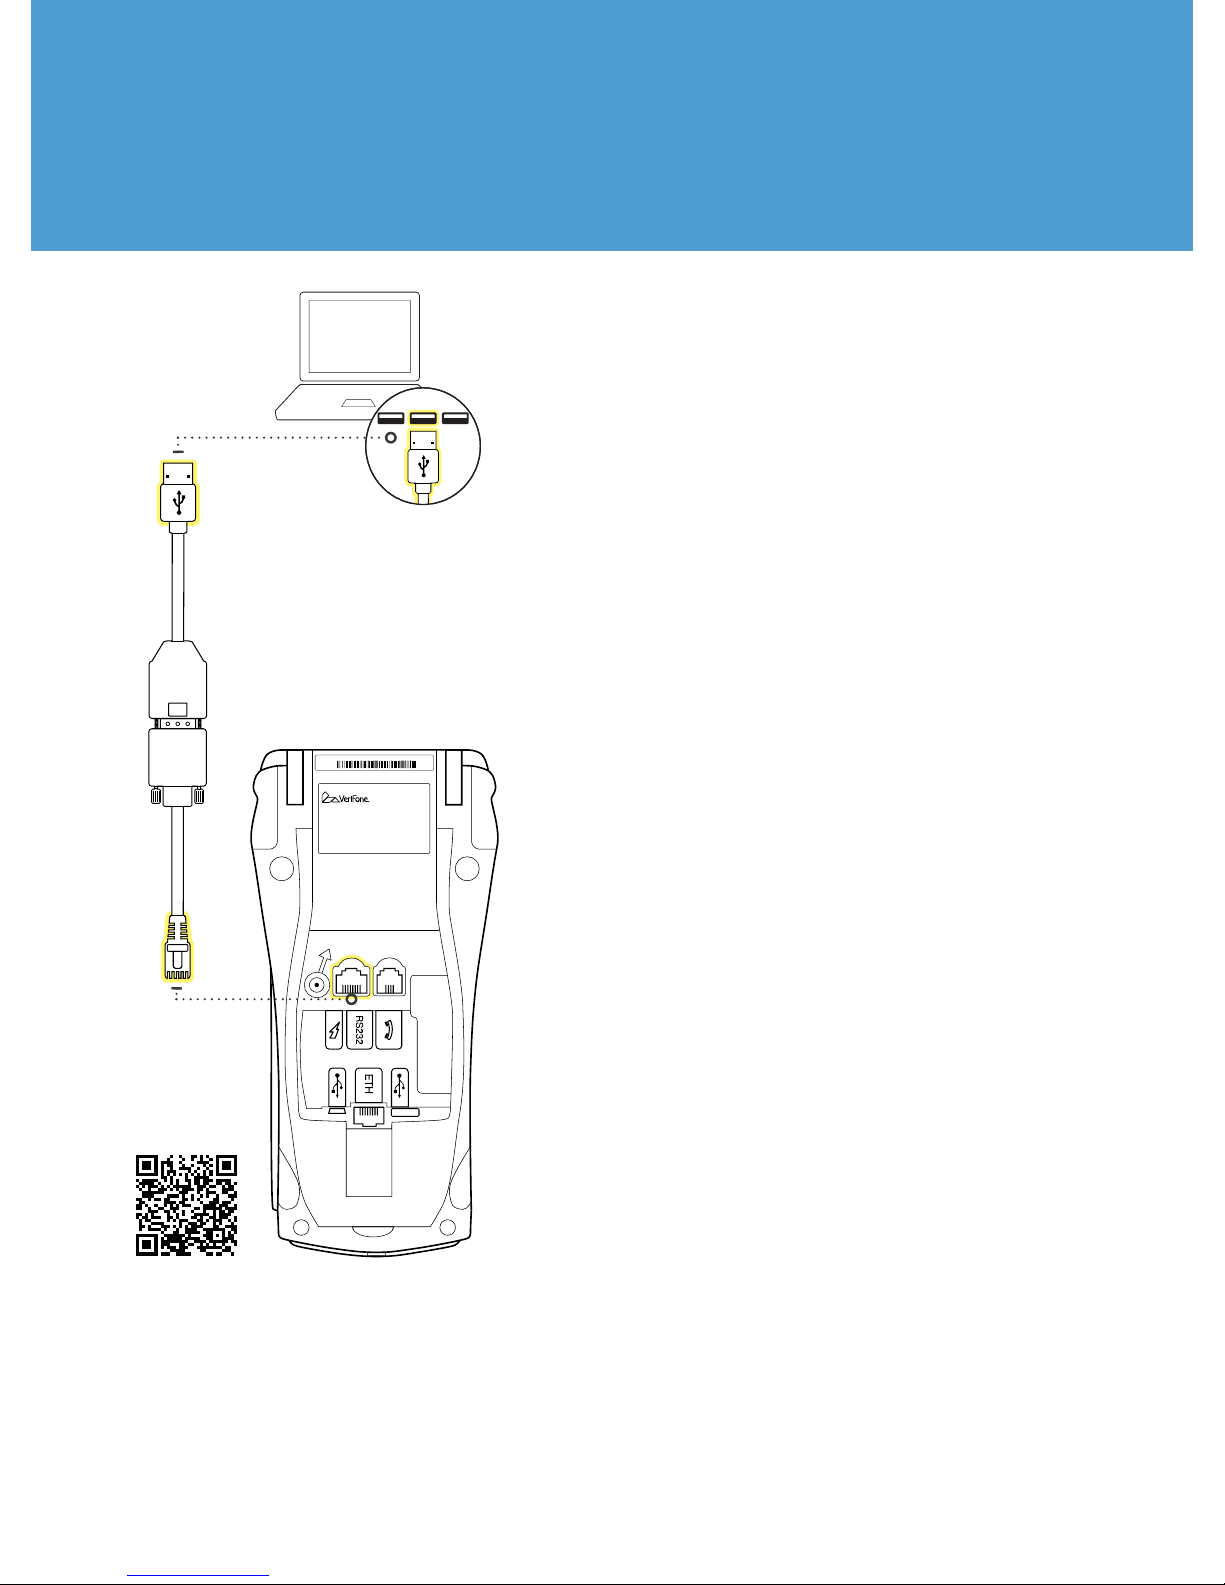
Hybrid Terminal Setup - (RS232)
1. Plug the network (Ethernet) cable into the
bottom of the terminal (labeled ETH).
NOTE: Do not use a phone cord.
USB
RS232
2. Plug the USB end of the cable into the
computer.
3. Plug the opposite end of the cable into
the RS232 port.
4. Plug in the terminal’s power cable.
5. It takes about 15 seconds to come to
the screen that has CommServer, XPI
and Forte. Select Forte from the options
displayed on the terminal screen.
6. The screen will display:
“Reading Batch File For
Merchant 1”, “Communication
Status-CONNECTED”
and
“Initializing PINpad”.
The terminal will then display a blank
screen.
Scan for
more Info
7. This completes this phase of the terminal
setup.
8. Follow any additional instructions from
your software provider for terminal
setup.
*You may need to know the COM Port, which can be
identifi ed using your computer’s Device Manager.
Windows users can download the device driver
located in the Code Samples section of our DevDocs.
Web-based application users require the device
handler, which is available through Tech Support.
Page 7
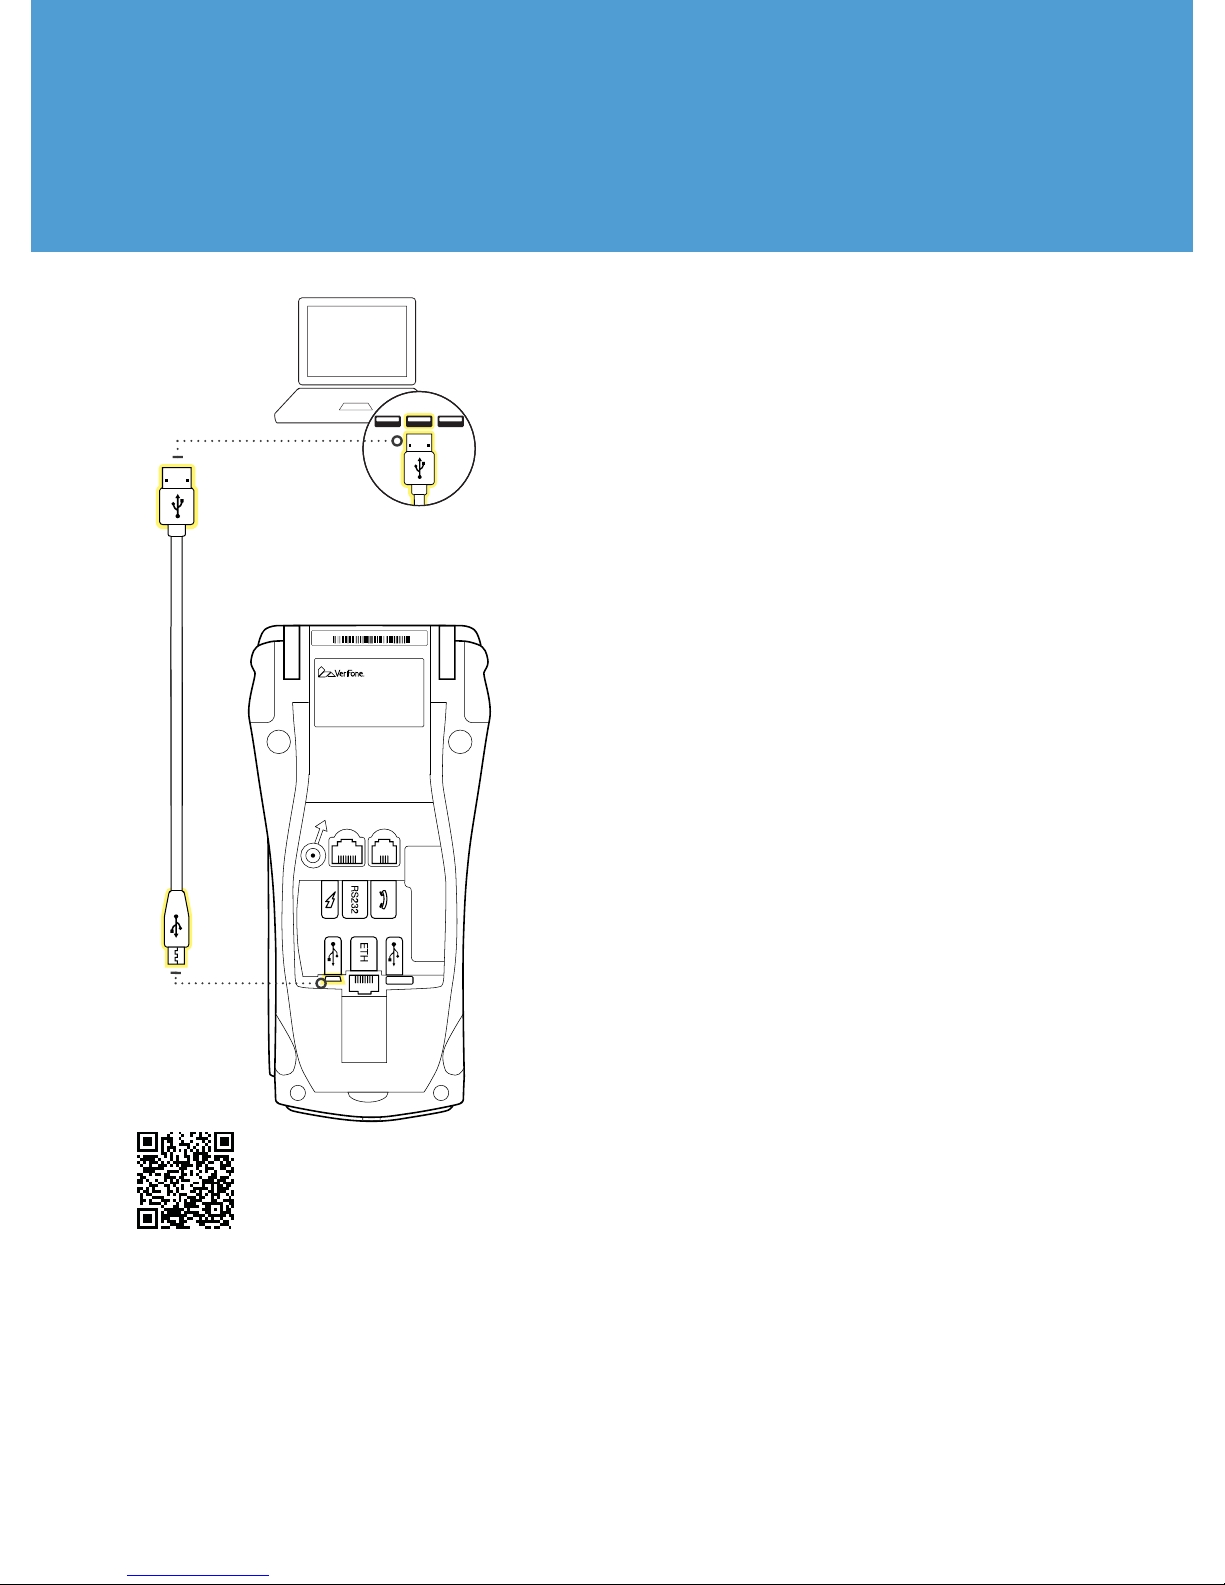
Hybrid Terminal Setup - (Mini USB)
1. Plug the network (Ethernet) cable into the
bottom of the terminal (labeled ETH).
NOTE: Do not use a phone cord.
USB
mini USB
2. Plug the USB end of the cable into the
computer.
3. Plug the opposite end of the cable into
the mini USB port.
4. Plug in the terminal’s power cable.
5. It takes about 15 seconds to come to
the screen that has CommServer, XPI
and Forte. Select Forte from the options
displayed on the terminal screen.
6. The screen will display:
“Reading Batch File For
Merchant 1”, “Communication
Status-CONNECTED”
and
“Initializing PINpad”.
The terminal will then display a blank
screen.
Scan for
more Info
7. This completes this phase of the terminal
setup.
8. Follow any additional instructions from
your software provider for terminal
setup.
*You may need to know the COM Port, which can be
identifi ed using your computer’s Device Manager.
Windows users can download the device driver
located in the Code Samples section of our DevDocs.
Web-based application users require the device
handler, which is available through Tech Support.
Page 8
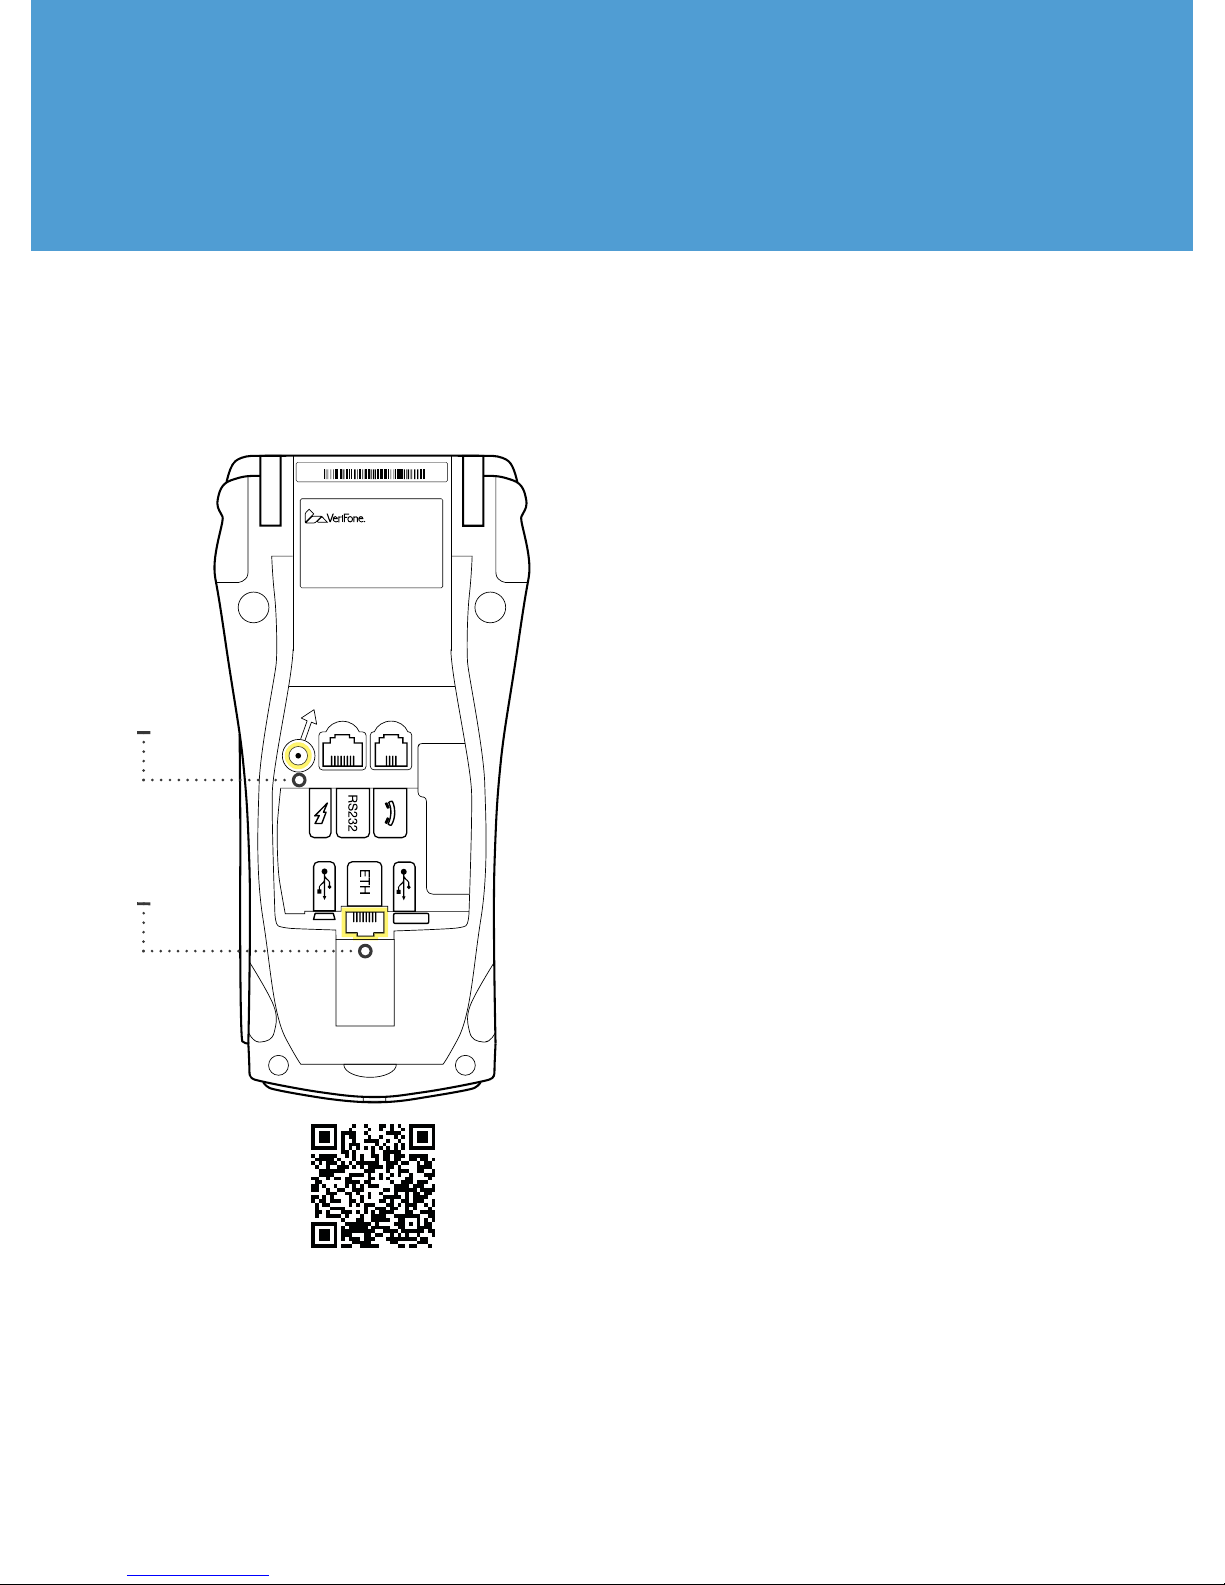
Standalone Terminal Setup
1. Plug the network (Ethernet) cable into
bottom of the terminal (labeled ETH).
Note: Do not use a phone cord.
2. Plug in the terminal’s power cable.
After turning on the equipment, you
will come to a screen that will display
the following:
CommServer - Used to confi gure
static IP addresses and check network
connectivity.
Power
cable
ETH
Scan for
more Info
XPI - Cosmetic that indicates the EMV
software is installed. Do not choose
this option, otherwise you will have to
unplug/plugin the terminal.
Forte - Used to manage transaction
processing. Choose this option.
3. After choosing Forte, the bottom of
the screen will display the following in
order:
• Reading Batch File for
Merchant 1
• Communication Status
-- Connected --
• “Initializing PINpad”
Once in the Forte Application, the screen
will display:
Your Merchant Name
• Credit Card
• Debit Card
• Check
Select payment type to begin processing.
Page 9
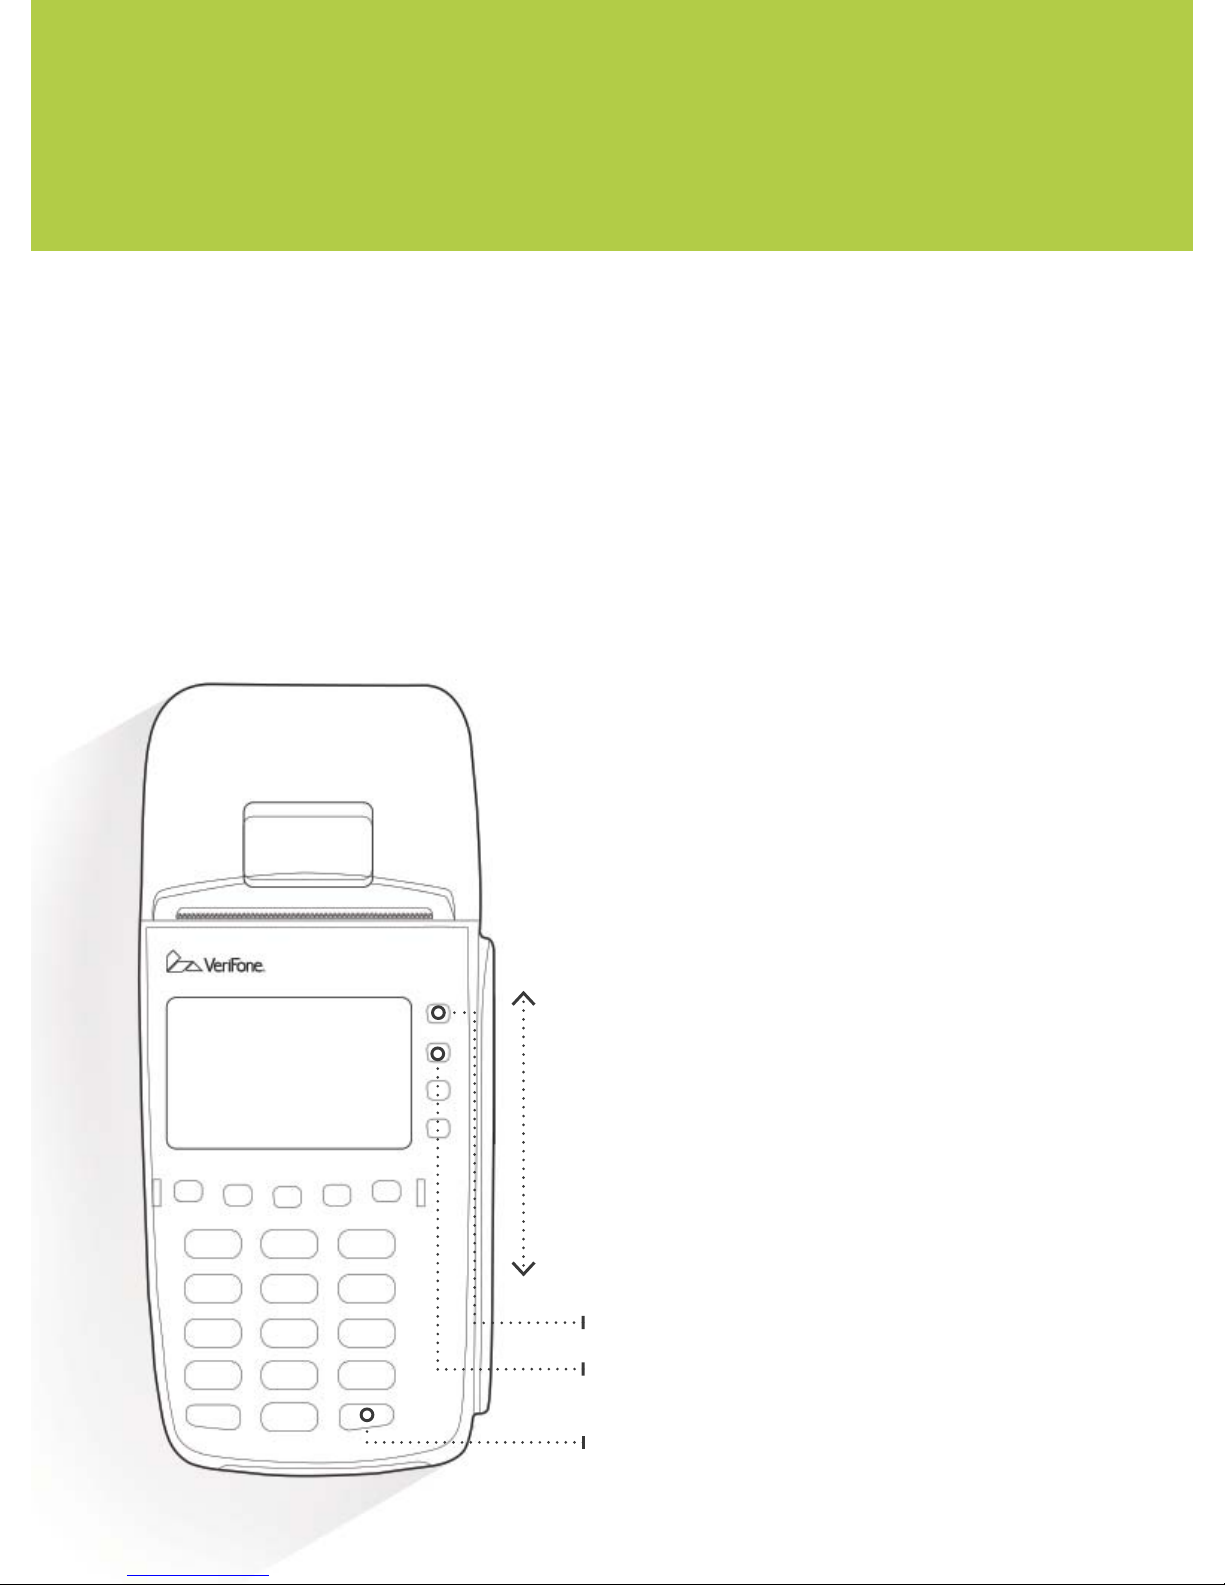
Sale
1. Press F2 for credit or F3 for debit.
2. Press F1 for SALE.
3. Input the amount and press Enter
(Green Key in the lower right
corner).
4. Dip or swipe the card (magnetic
stripe facing inside).
5. Input any optional identifi er(s)
(parcel number, account number,
etc.) and press Enter.
6. A screen will appear with the
amount and service fee (if used).
Press Enter.
7. Upon approval, a merchant
receipt will print.
8. Press F1 to print a customer copy
or F2 for no customer copy.
Credit card swipe
F1
F2
Enter
Page 10
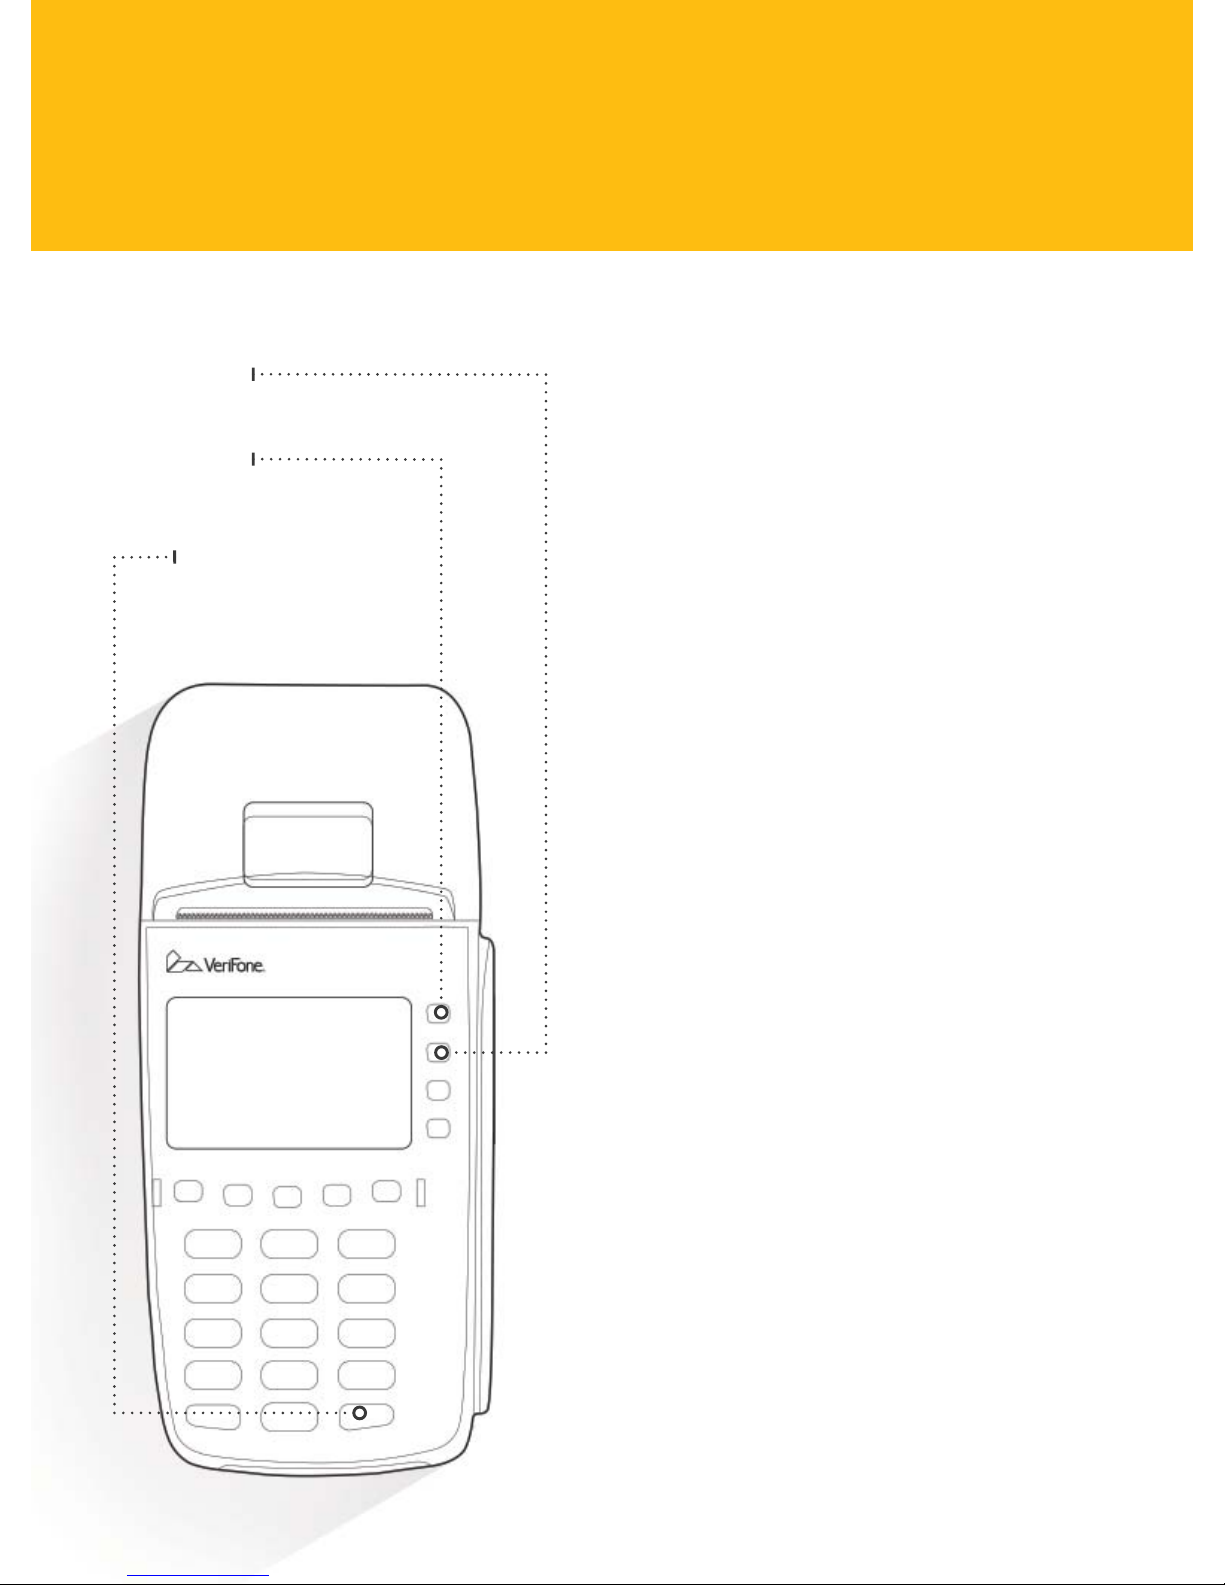
Manual Keyed Entry Sale
1. Press F2 for credit or F3 for debit
2. Select SALE
F2
3. Input the amount and press Enter.
F1
Enter
4. Press the Red “X” Key. The screen
will momentarily say “Operation
canceled.” However, this does not
aff ect any functionality and you will
be directed to the sale screen.
5. Input the card number and Press
Enter.
6. Input the expiration date (MMYY) and
press Enter.
7. Input the 3-4 digit CVV code found on
the card and press Enter.
8. Input the zip code of the card holder
and press Enter.
9. Input the optional identifi er(s) and
press Enter.
10. A screen will appear with the amount
and service fee (if used). Press Enter.
11. Upon approval, a receipt will print.
Press F1 to print a customer copy.
Page 11
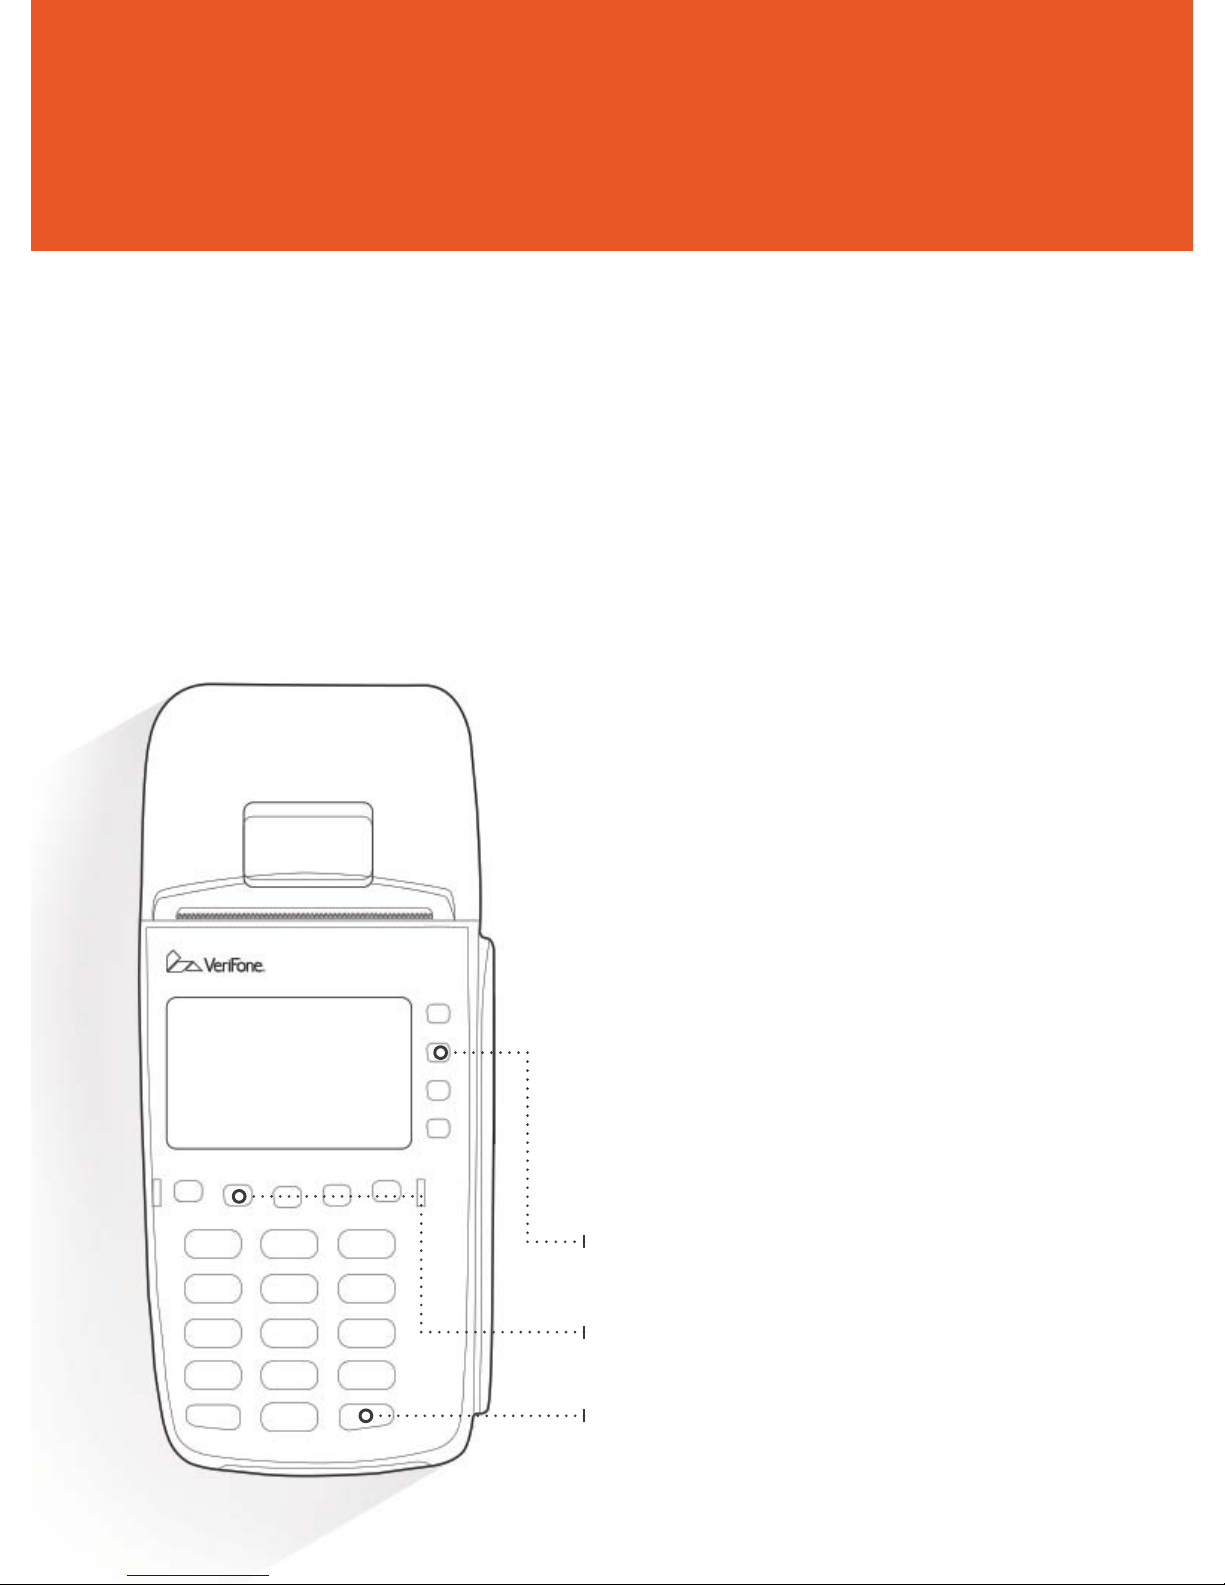
Refund
1. Press F2 for credit card.
2. Select REFUND.
3. Enter the amount and press Enter.
4. Swipe, dip or manually input the
credit card number. Press Enter
a. If the credit card number was
manually entered, input the
credit card expiration date
(MMYY) and press Enter.
5. Input the terminal password and
press Enter.
6. The receipt will print. Press F1 to
print a customer copy.
F2
Purple Key
Enter
Page 12
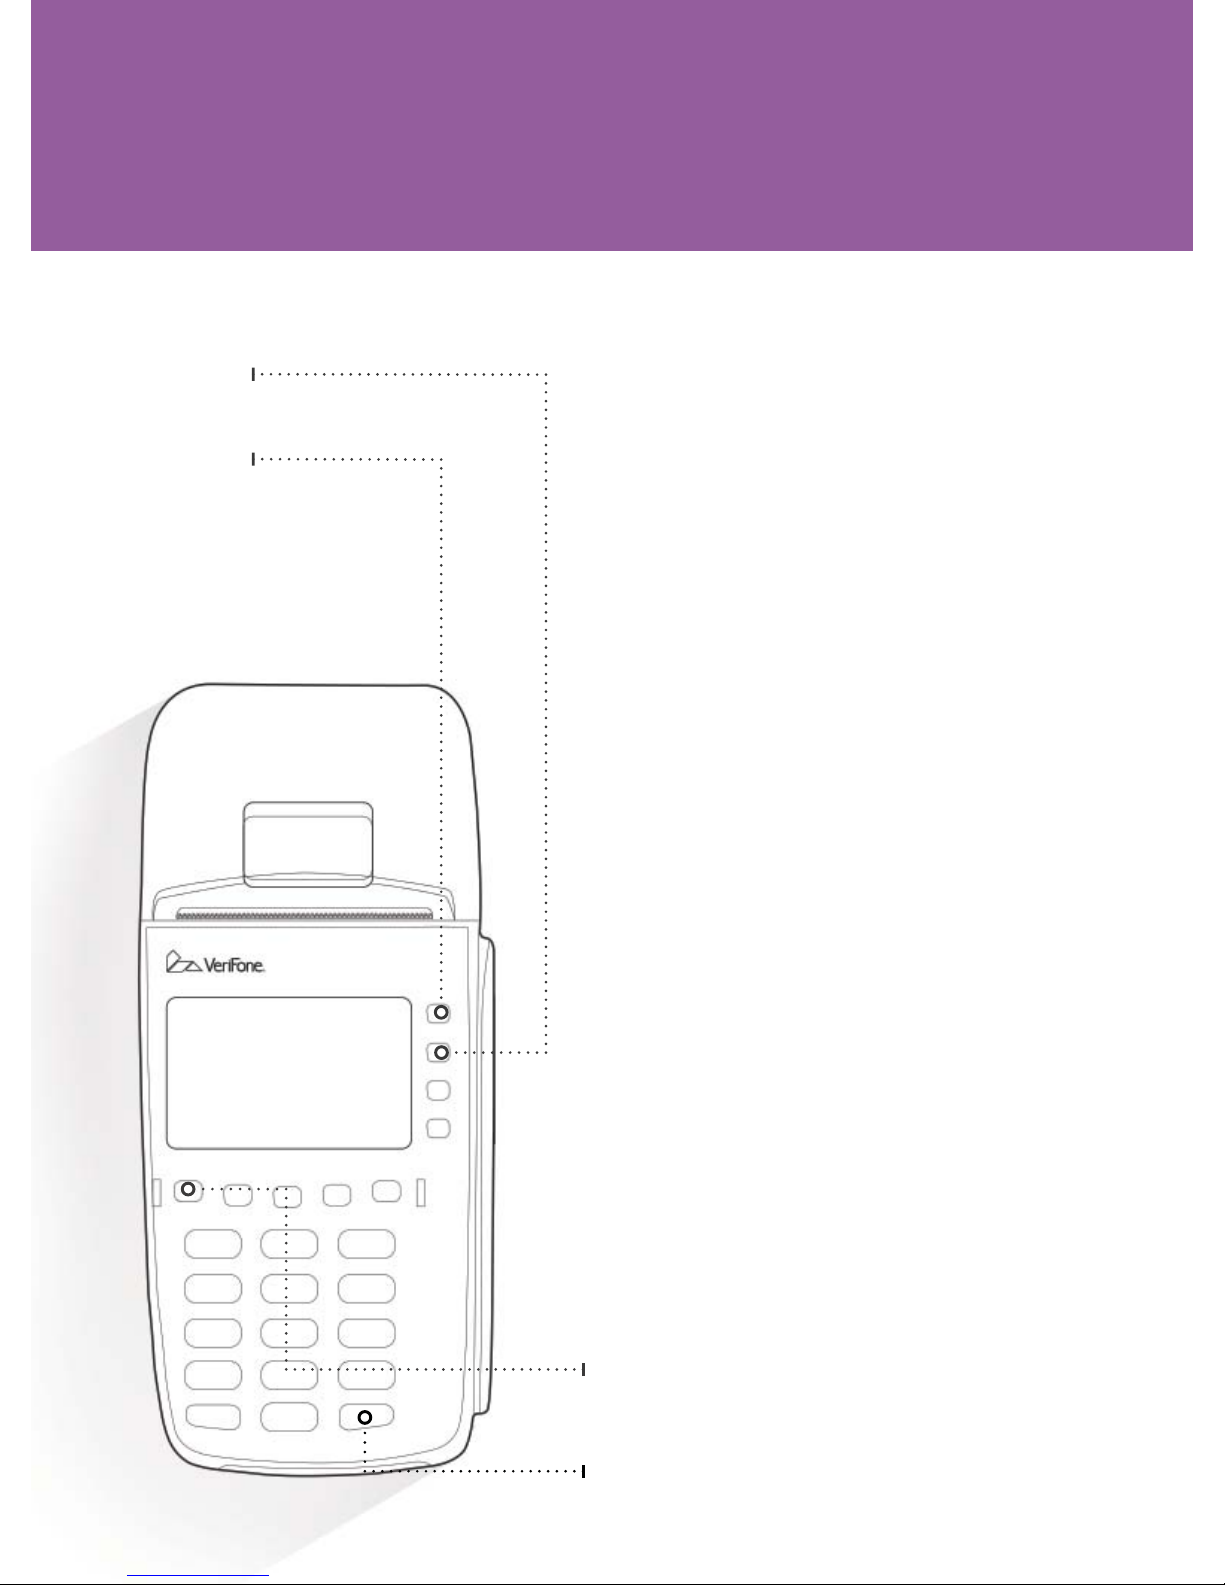
Forced Sale
F2
F1
1. Press F2 for credit card.
2. Select FORCE.
3. Swipe, dip or manually input the
credit card number. Press Enter
a. If the credit card number was
manually entered, input the
credit card expiration date
(MMYY) and press Enter.
4. Input the terminal password and
press Enter.
5. Input the auth code provided by
your credit card processor. Press
Enter.
6. Input the amount and press Enter.
7. Input any optional identifi er(s)
(parcel number, etc.) and press
Enter.
8. A screen will appear with the
amount and service fee (if used).
Press Enter.
9. Upon approval, a receipt will print.
Press F1 to print a customer copy.
Purple Key
Enter
Page 13
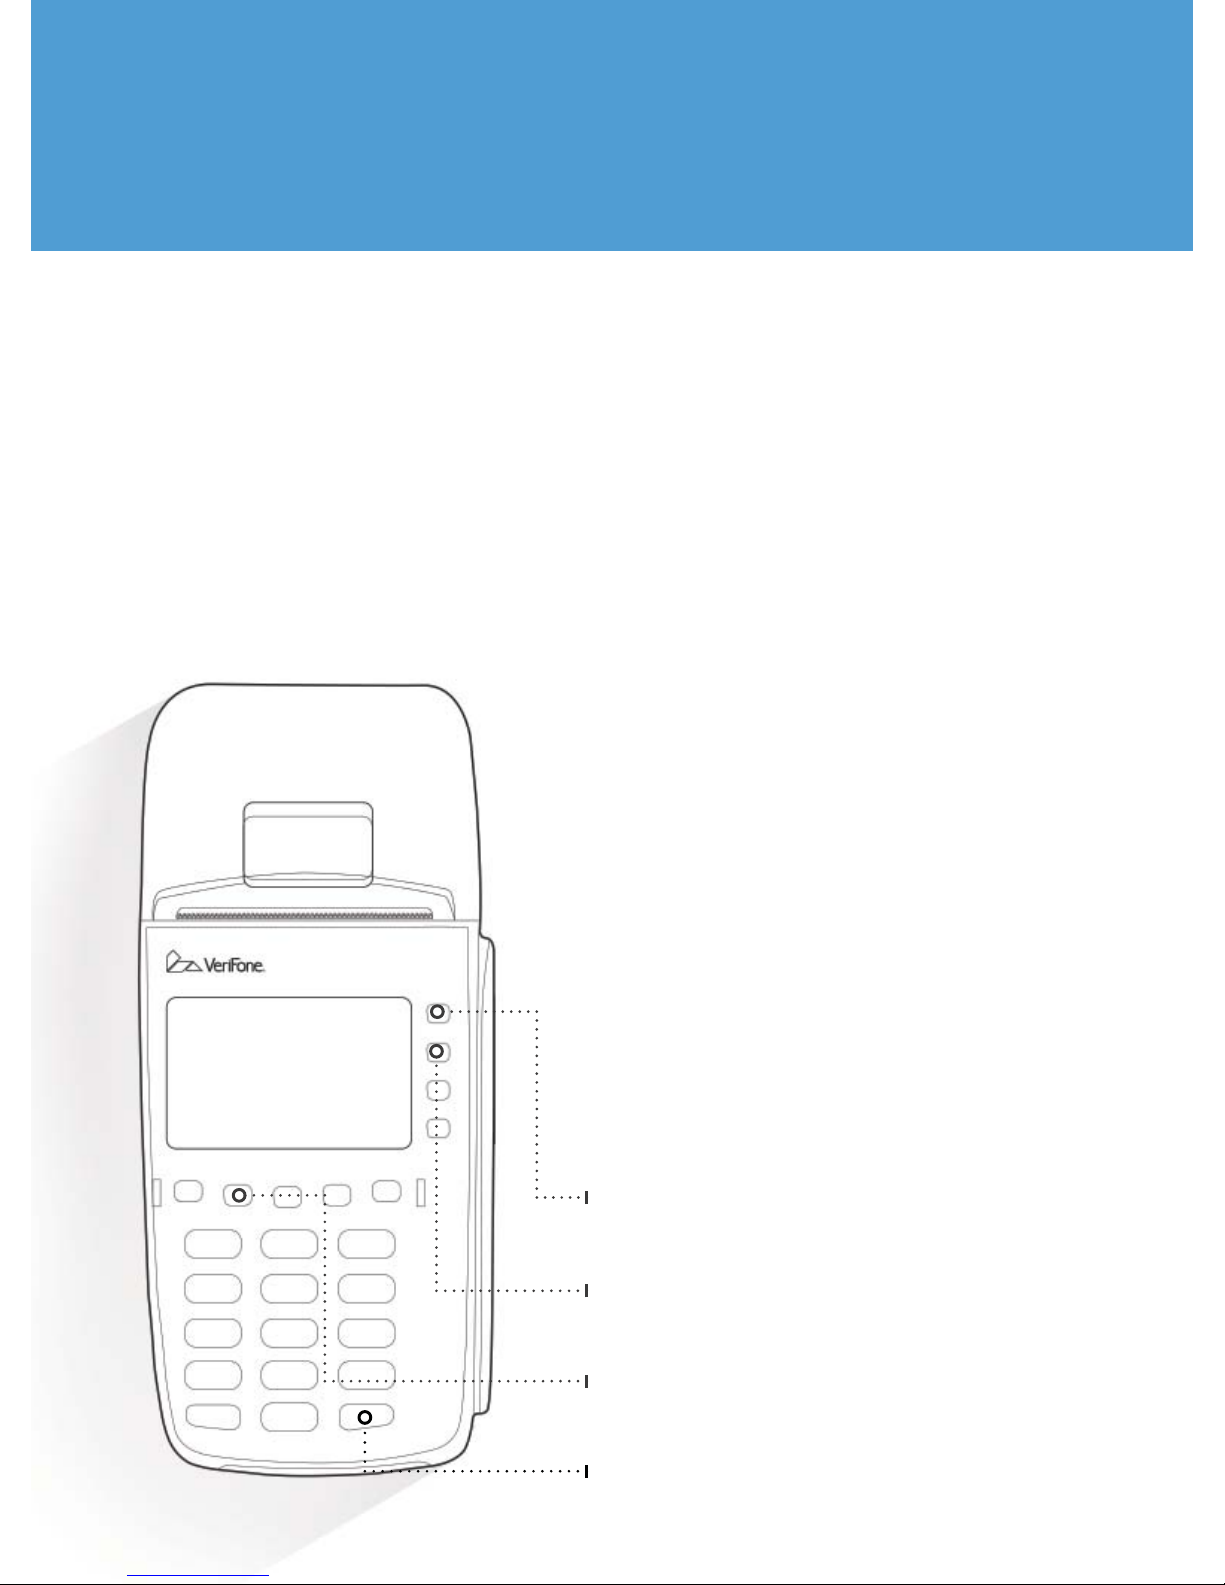
Void
1.
Press F2 for credit card.
2. Select VOID.
3. Input the sequence number from
the receipt and press Enter.
4. Input the void password and press
Enter.
5. The voided transaction amount will
be displayed. Complete the void by
pressing Enter.
6. After the void is approved, a receipt
will print. Press F1 to print the
customer copy.
F1
F2
Purple Key
Enter
Page 14
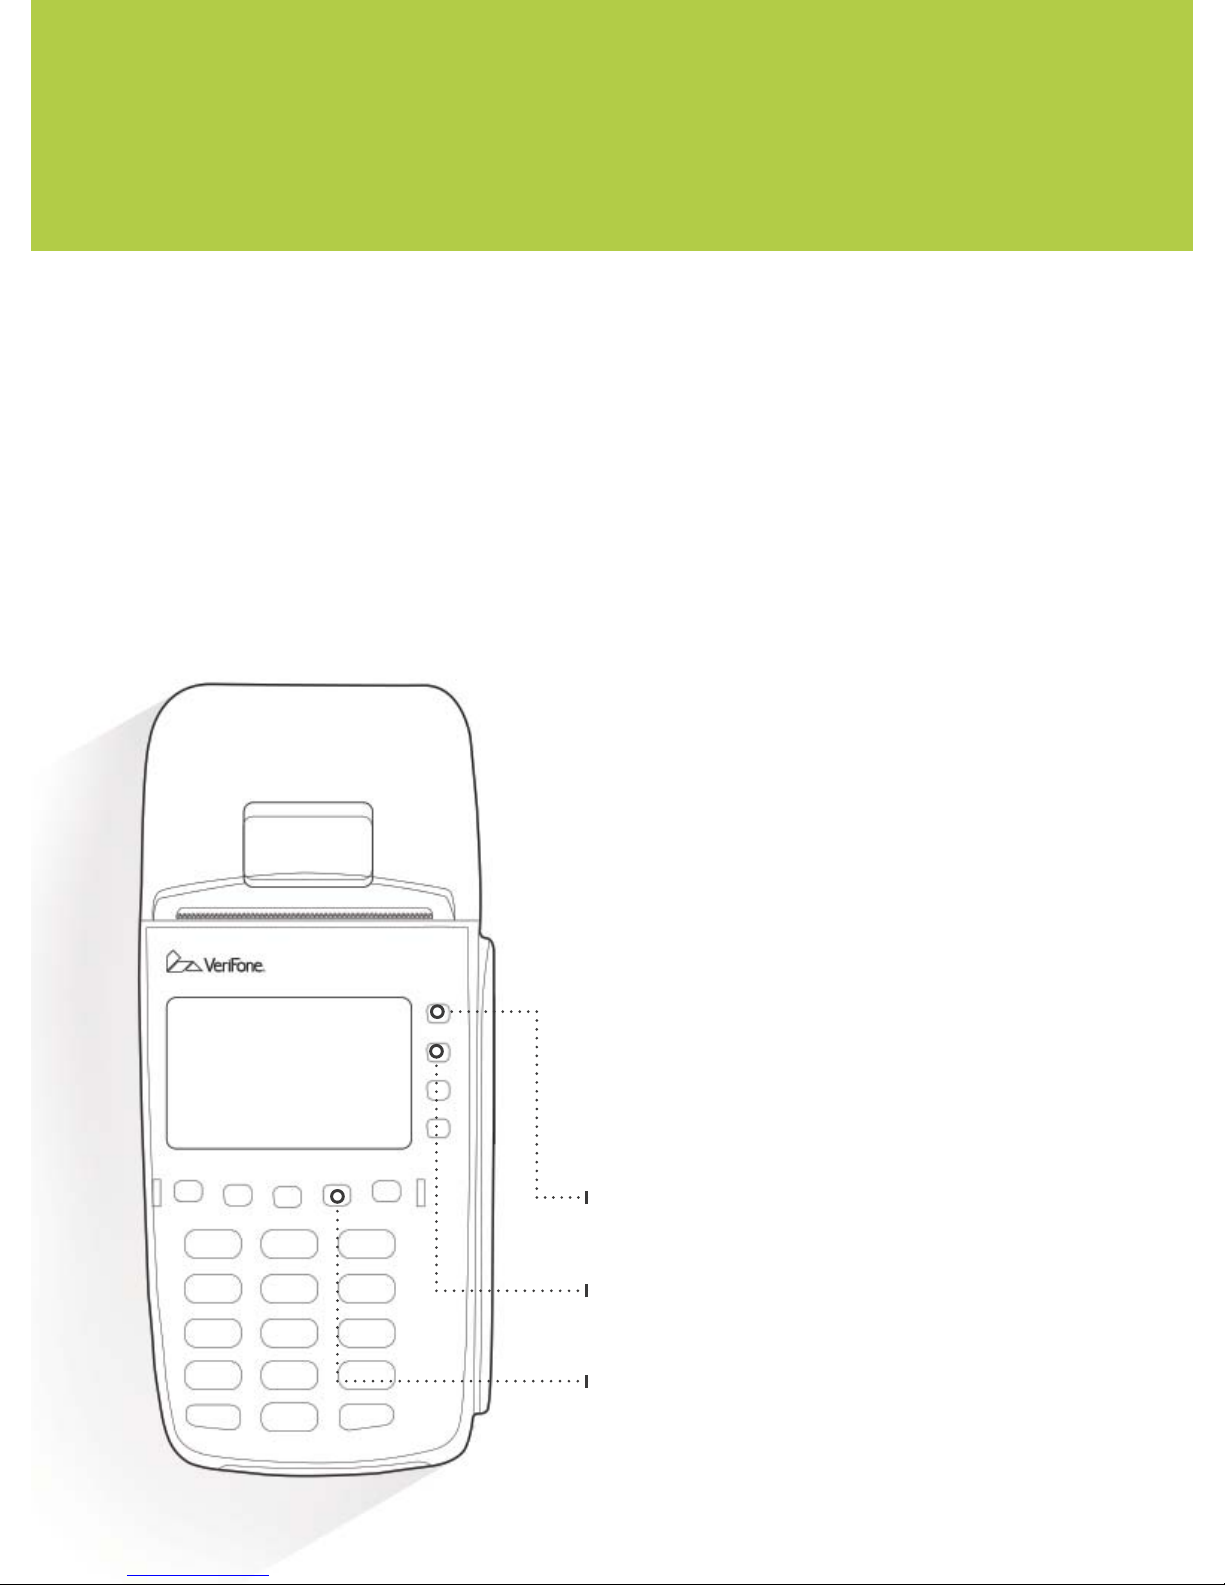
Reprint Receipt
1.
2. Press F1 to reprint the last
3. Select Merchant Copy (F1) or
Note: This can only be done the same day,
i.e., before midnight.
Press the Reprint Key. It is the
second Purple Key from the right.
transaction or Press F2 to reprint a
transaction by sequence number
(found on the receipt).
Customer Copy (F2).
F1
F2
Purple Key
Page 15
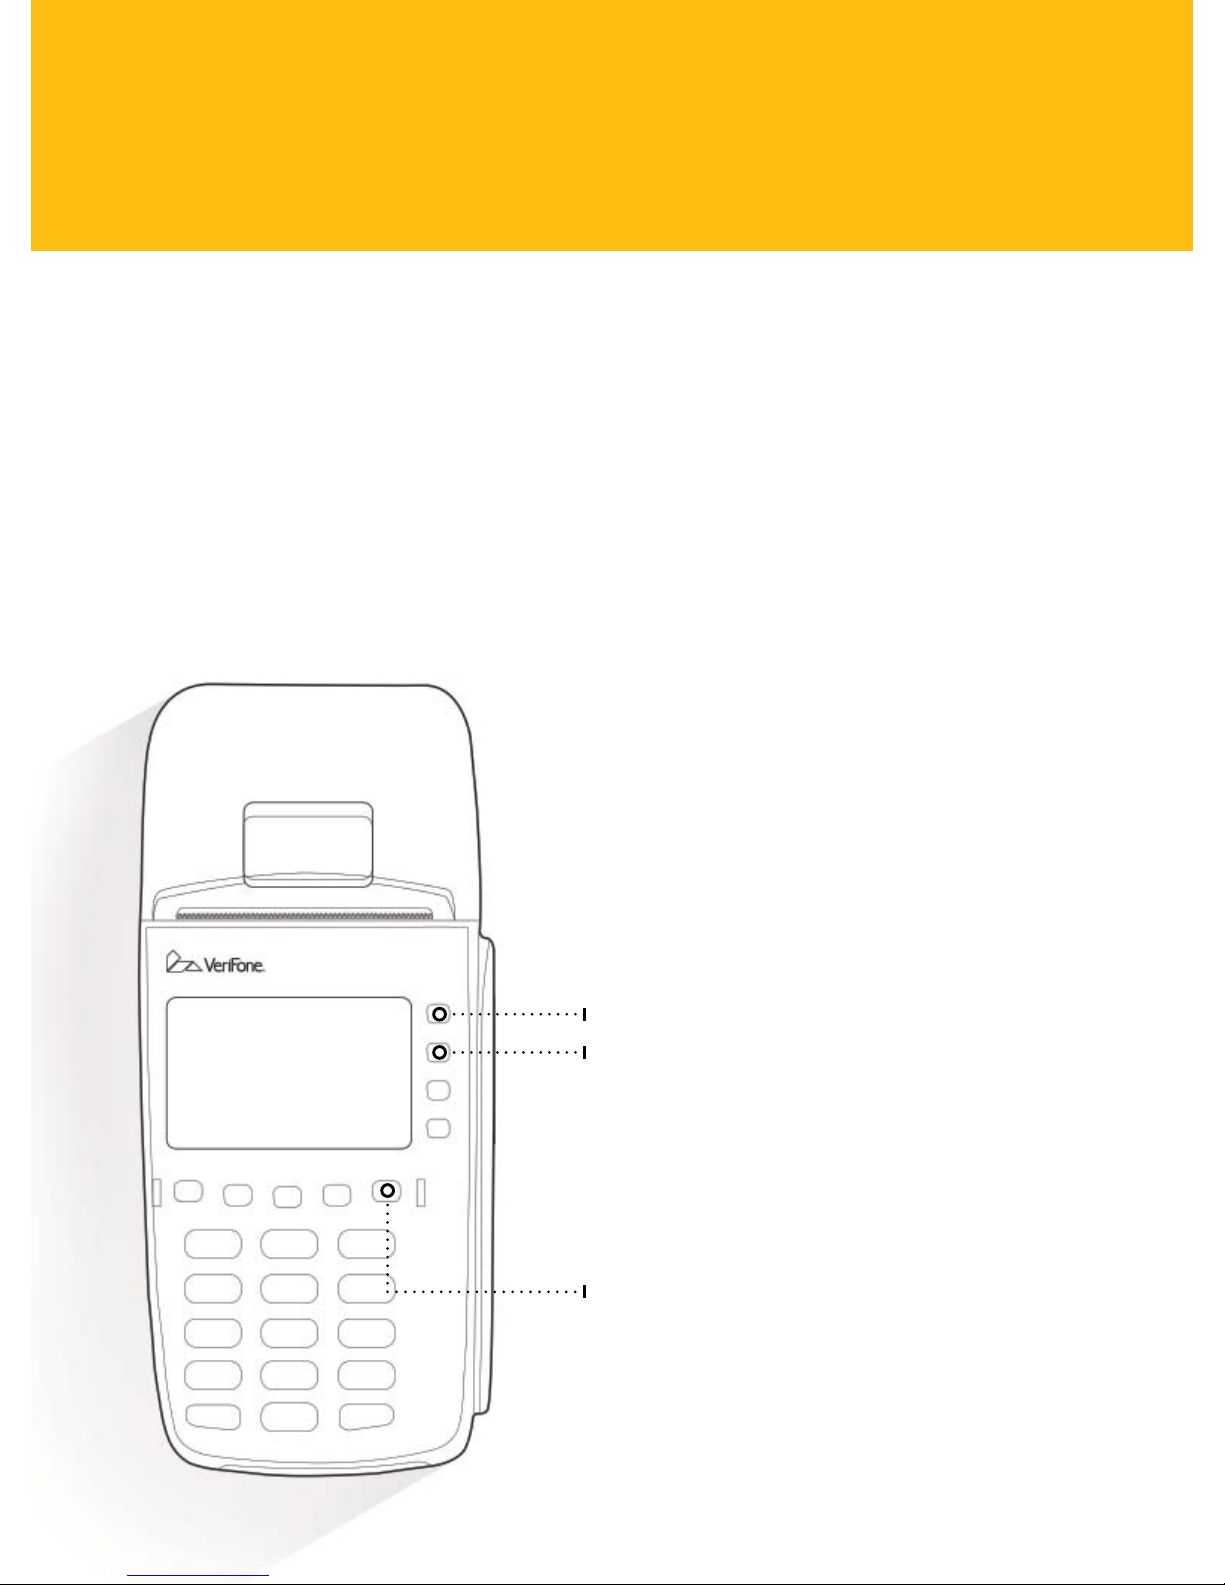
Print Reports
1.
Press the Report Key (the rightmost
Purple Key).
2. For a summary report of the total
sales amount and service fee totals,
if applicable, press F1.
3. For a detailed report of each
transaction, including items like the
transaction type, card type, last four
of the account number and amount,
press F2.
F1
F2
Purple Key
Page 16
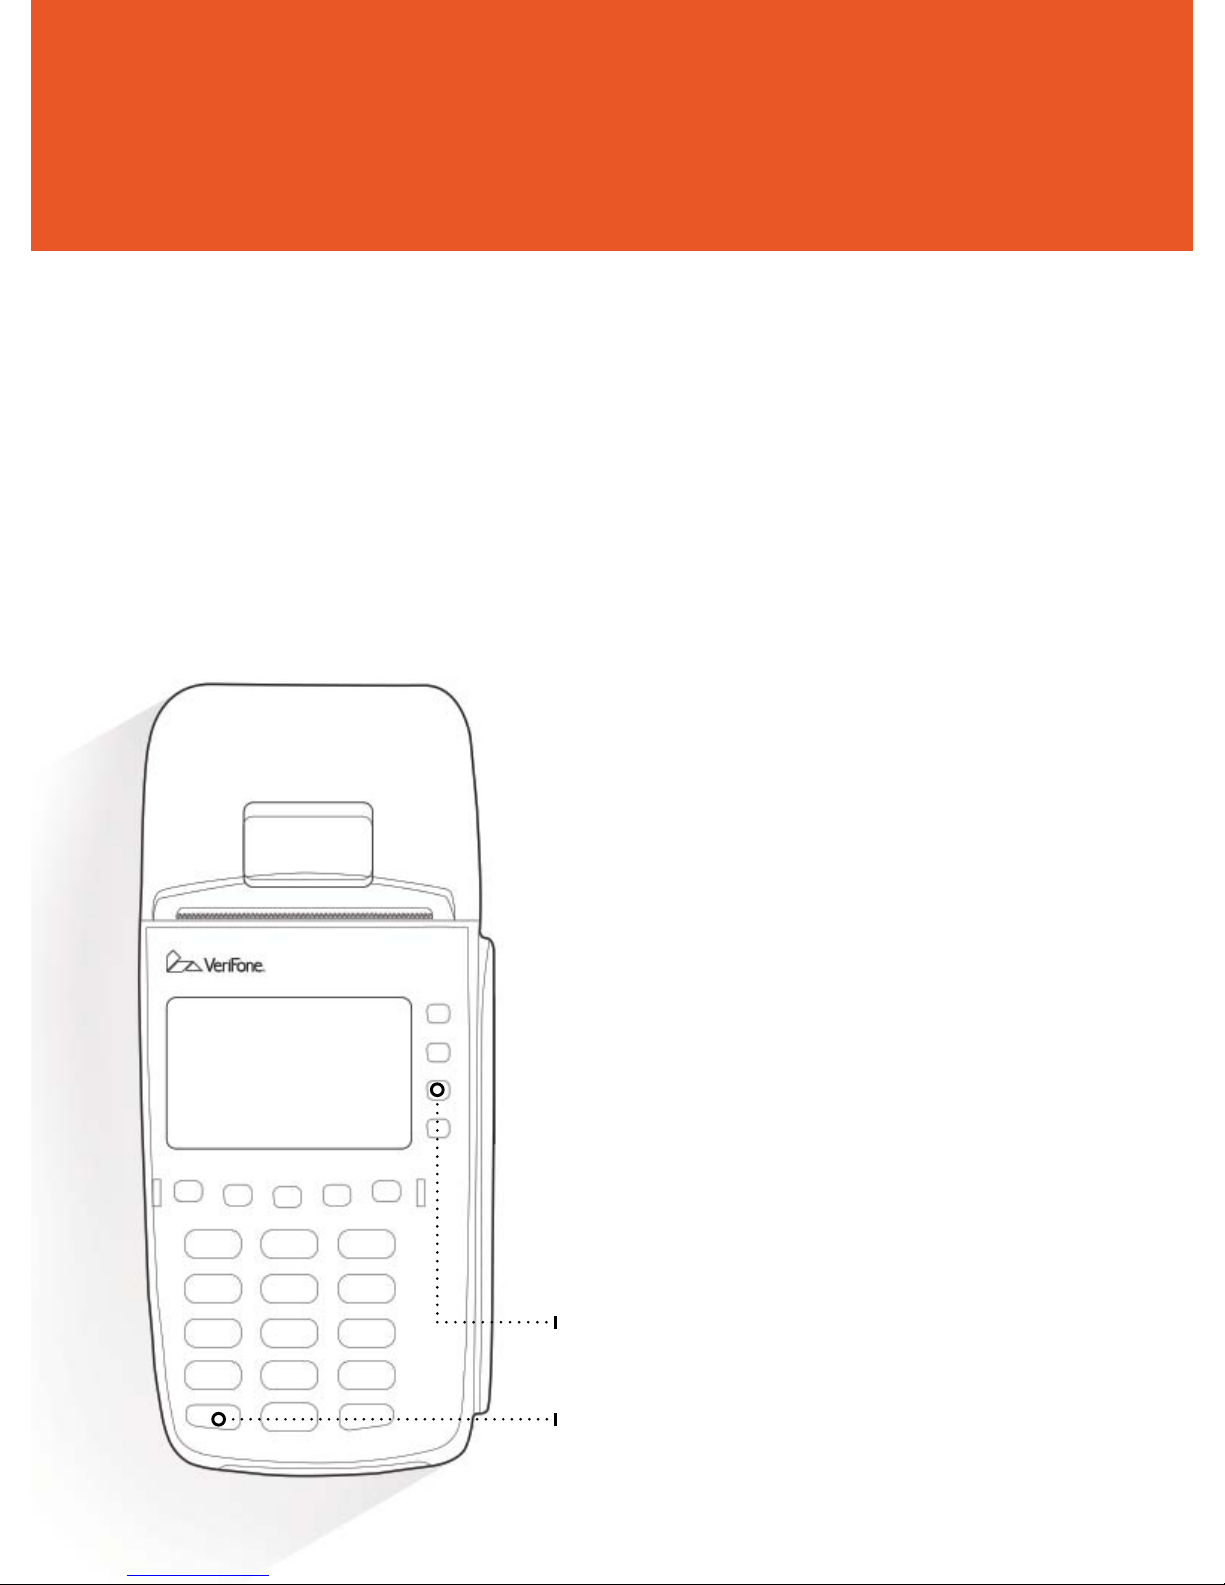
Troubleshooting Tips
1. If the terminal cannot connect,
check the Ethernet cable to ensure
that it is connected to the portal on
the bottom of the terminal labeled
ETH.
2. If you get interrupted after you start
the transaction and can’t remember
where you are, press the Red “X” Key
and start the transaction over. Once
you receive an approval code, you
cannot hit the Red “X” Key.
3. If you unplug the terminal to
perform a hard re-start, plug the
terminal back in and press F3 Forte.
4. If you receive either of the following
error messages: “Application not
available” or “Enter PIN number,”
press the leftmost Purple Key and
then press F2 for EMV Init. This
turns on the EMV application and
fi xes the errors.
F3
Red “X” Key
Page 17

FAQs
Technical Support
866.290.5400 Option 5
M-F: 7AM – 7PM Central
Feel free to reach out to our Technical Support team for
troubleshooting steps, technical issues, missing equipment and
terminal-related support.
Q: Is there a way I can scan checks?
A: You have a couple of options. You can either manually
enter the checking account information or purchase an
optional check reader.
Q: How can I input the PIN for debit cards?
A: Forte does not support PIN-based transactions. The debit
option is only available for use with VISA debit cards for
those merchants participating in the VISA debit program.
Q: I’ve run out of paper. Where can I get more?
A: Send an email request for more paper to
[email protected].
Q: I am getting the message “Send Error” when I run a
transaction. What do I do?
A: Your terminal is either not properly confi gured or not
properly connected. You will need to visit
www.forte.net/terminal-faqs for more information.
Q: When does the terminal batch itself out?
A: The terminal batches itself out at midnight each night.
Please visit www.forte.net/resources for answers to additional
FAQs.
Page 18

FAQs (cont.)
For the following questions, please contact us at 866.290.5400
Option 5 for assistance.
Q: The terminal has paper, but it won’t print or is unreadable.
Q: The receipt has incorrect information. How do I change it?
Q: How do I change the date and time on the terminal?
Please visit www.forte.net/terminal-faqs for answers to additional
FAQs.
* For questions related to account changes, transactions,
reporting and funding/billing, please contact Customer
Service at 866.290.5400 Option 1.
Page 19

Terminal Packaging List
One VeriFone VX 520 device
One power cable
One thermal paper roll
(2/14 in. by 50 ft.)
One VeriFone VX 520 Declaration
of Conformity
Page 20

Notes:
____________________________________________________________
____________________________________________________________
____________________________________________________________
____________________________________________________________
____________________________________________________________
____________________________________________________________
____________________________________________________________
____________________________________________________________
____________________________________________________________
____________________________________________________________
____________________________________________________________
____________________________________________________________
____________________________________________________________
____________________________________________________________
____________________________________________________________
____________________________________________________________
____________________________________________________________
____________________________________________________________
____________________________________________________________
Page 21
Additional
Information
Equipment Issues
For assistance with equipment issues, see the
information sticker on the bottom of your device.
If the sticker is not present, call Technical Support
at 866.290.5400 Option 5.
Internet Failure
& Voice Authorization
For assistance with equipment issues, see the
information sticker on the inside of the back cover
of your device.
Technical Support
866.290.5400 Option 5
M-F: 7AM – 7PM Central
Customer Service
866.290.5400 Option 1
M-F: 7AM – 7PM Central
866.290.5400
500 W. Bethany Dr. Suite #200
Allen, TX 75013
forte.net
 Loading...