

Page 1

Case-neck turning is standard practice for all types of shooters these days. If your cases have .002"
or more of wall variation, neck turning undeniably delivers you some of the greatest accuracy return
on your investment in handloading time. The Forster Handheld Outside Neck Turner is easily adjusted to remove brass from the thick side of case neck walls. A case-holder handle is included.
FEATURES
CARBIDE NECK THICKNESS CUTTER — This long-life, smooth-cutting carbide is preci-
sion ground with special angles and reliefs designed for neck turning. The cutter approach
angle allows turning right up to the case shoulder.
MICROMETER ADJUSTMENT KNOB — This knob makes it simple to make fine adjust-
ments in either direction. Index marks at increments of .001” are clearly stamped on the
knob of the tool, and adjustments to half-a-thousandth of an inch can easily be made.
PRECISION GROUND PILOT (mandrel) — Our standard pilots are precision ground
.0020” to .0025” smaller than bullet diameter. This will produce a slip fit for most cases that
have been drawn over a standard size expander. Standard size pilots are available in 28
sizes for bullet diameters ranging from .224” up to .513”. Any special-size pilot is available
on a special-grind basis. We ship special orders quickly. This service can provide you with
an infinite number of ground pilot sizes, made to your specifications. A $10 special grinding fee will be added to the price of the pilot.
Remember that very few changes will provide a more sensational improvement in accuracy
than the act of turning eccentric case necks to a consistent wall thickness. At the point of ignition, your brass has to expand to allow bullet release. If the brass is thicker on one side than the
other, the thin side releases the bullet first and causes a slight bullet to bore misalignment that
can have disastrous effects on accuracy.
T
IPS FOR PREPARING YOUR CASES
Use older, less-favorite brass cases until you get a feel for neck turning.
Full length or fully neck size and expand the cases before neck turning.
Chamfer the inside of the case mouth, then clean the necks internally and externally.
Purchase a good sizing lubricant such as Forster High Pressure Case Lube, to lightly lube
the pilot.
www.forsterproducts.com
HANDHELD OUTSIDE NECK TURNER INSTRUCTIONS
Page 1
Page 2
INSTRUCTIONS FOR TURNING
Insert the head of the case to be turned into the
Case Handle (-101) and tighten the Knurled Screw
to secure the case. A larger handle is available for
50 BMG caliber (HOT100-021).
Install the pilot (mandrel) in the Body (-011) and
tighten the pilot set screw against the flat that is
ground on the pilot’s shank. The amount the pilot protrudes from the turning tool Body determines the
length of the neck turning that will occur.
Put a small amount of Forster High Pressure
Case Lube or any good case lube onto the pilot. Slip
the case onto the pilot until the case mouth stops
against the shoulder of the pilot.
The fit of the pilot to the case is very important.
Specially ground pilots are available from Forster.
Please supply three sized cases so that we may
grind a pilot to be a perfect slip fit for your specific
reloading needs. A $10 special grinding fee applies.
Turn the large, knurled Carbide Cutter Depth Adjustment Knob (-013) clockwise until the Carbide Cutter is
almost touching the case neck. Loosen the pilot and position it so that the cutter will almost start to blend with
the shoulder angle, then retighten the pilot set screw. NOTE — Do not cut into the shoulder of the case.
Doing so will weaken the case and can contribute to neck separations. Your Hand Outside Neck Turner is
now set for the length of the cut.
Next, set the depth of cut. Turn the Carbide Cutter Depth Adjustment Knob (-013) down until the cutter just
barely contacts the case neck. Remove the case from the pilot and turn the Micrometer Adjustment Knob clockwise one half a graduation (.0005"). Your depth of cut adjustment is controlled by this Micrometer Adjustment
Knob. The index marks stamped on this Micrometer Adjustment Knob advance or retract the cutter by .001"
(one-thousandth of an inch). Your Hand Outside Neck Turner is now set to take a first cut.
The gold anodized Neck Turner Body (-011) may be held by hand or locked in a vise for best consistency.
Guide the case neck onto the pilot while you turn the Case Holder clockwise. Turn it slowly enough to provide
a smooth, even cut over the entire case neck's outside diameter. Turn the case until the case mouth stops
against the pilot's step. Continue to turn the case clockwise as you remove the neck-turned case off of the
pilot.
Make adjustments to the depth of cut by using the Micrometer Adjustment Knob. After your neck-wall thickness adjustment is correct, it is not necessary to lock the cutter in place, as it will hold its setting from case to
case. If you do feel more comfortable locking the cutter in place, tighten the top button-head screw only. The
front-slotted screw is for keeping tension on the Carbide Cutter. This should only be tightened if the cutter
moves too freely while adjusting the depth of cut.
There is no definite tolerance for the correct neck thickness. Many reloaders feel that a .002" to .003" clearance between the outside diameter of the case neck and the chamber is optimal. We feel that it is best to just
barely clean up the necks so that they are uniform. This will extend the life of your brass.
IMPORTANT OUTSIDE NECK TURNING POINTERS
It is important to note that a .001" depth of cut adjustment alters your neck diameter by .002".
When backing out the carbide cutter, the backlash must be removed from the Micrometer Adjustment
Knob before the cutter starts backing out in thousandths.
Use the Forster Case & Cartridge Inspector to check case neck wall thickness. It may be appropriate
to turn each case twice at the same depth setting to ensure consistency among the neck walls.
Thank you for purchasing a Forster Precision Product. Please wear safety glasses.
Forster Catalogs are available upon request.
HOT100-001 Rev. 1
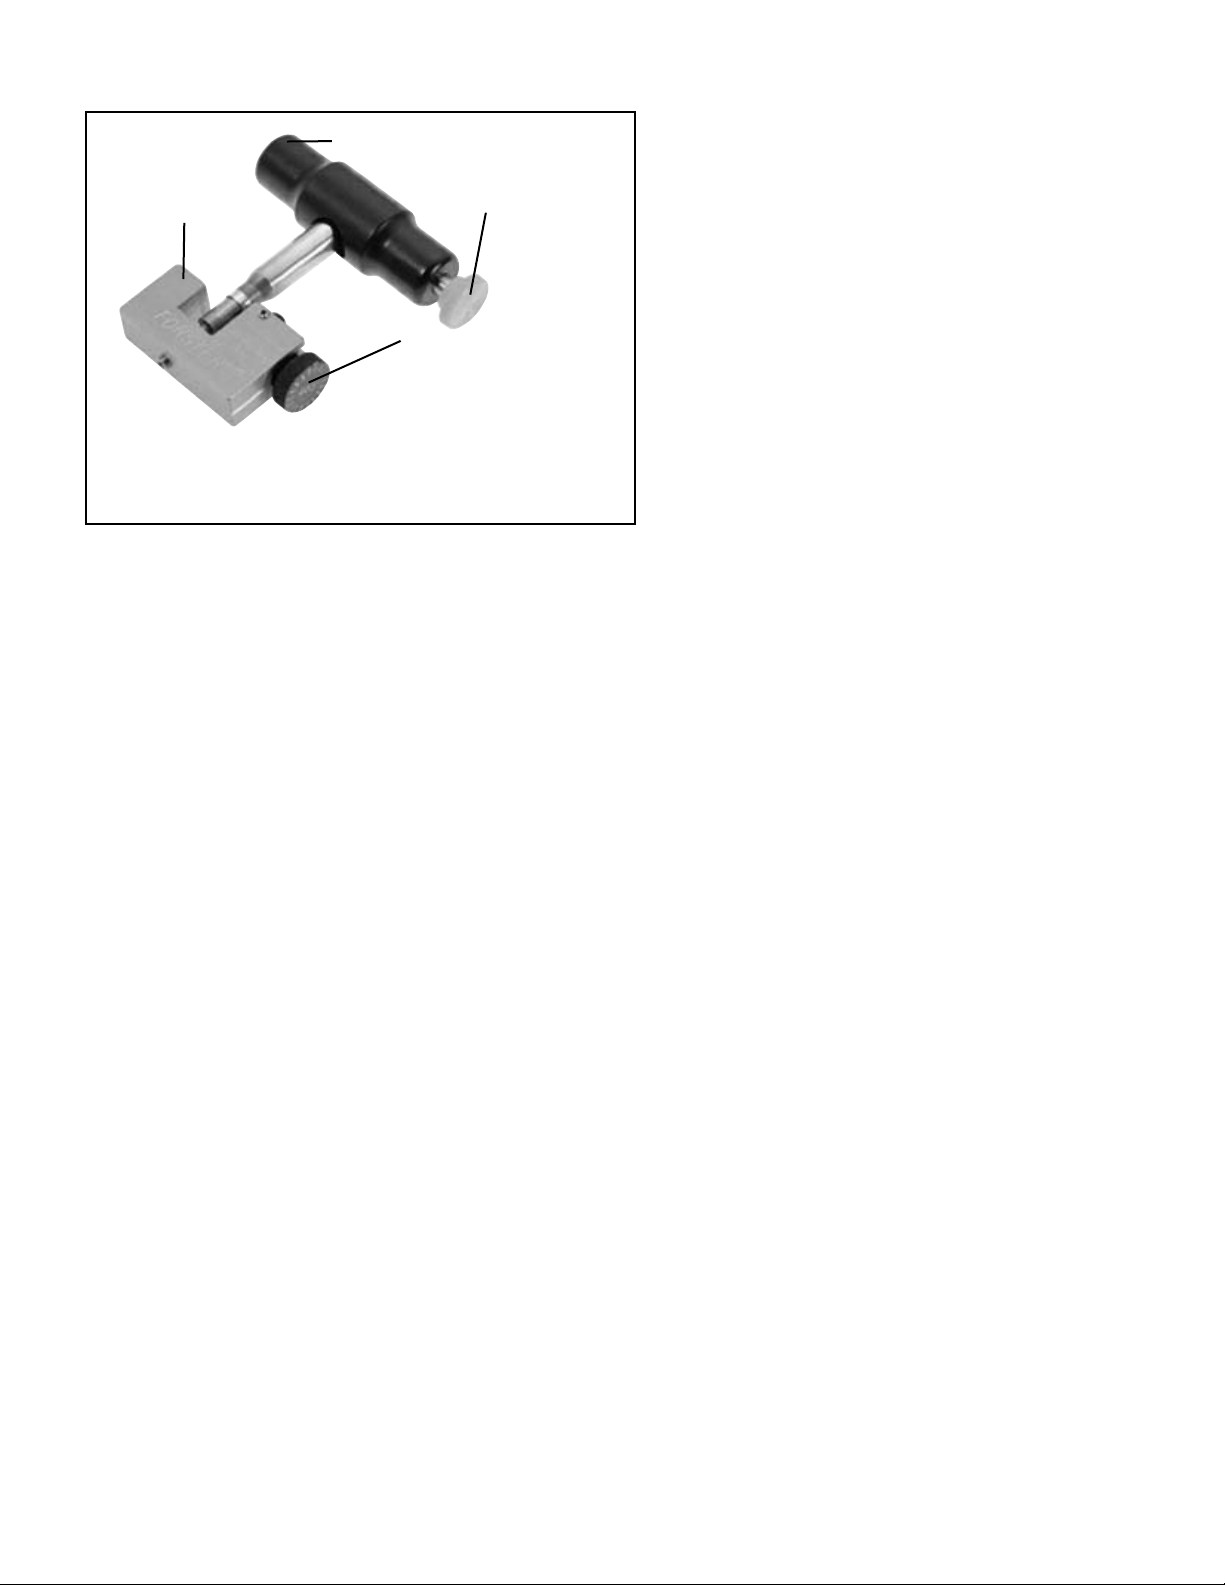
Case Handle (HOT100-101)
Knurled Screw
(HOT100-022/023)
Body
(HOT100-011)
Micrometer Carbide
Cutter Depth
Adjustment Knob
(HOT100-013)
Order # HOT100 — The Handheld Outside Neck Turner
includes an anodized aluminum Body with Carbide Cutter,
Micrometer Adjustment Knob, and a universal Case Handle.
Precision ground pilots (mandrels) are available separately.
Page 2
 Loading...