

Page 1
P
REPARATION
Note: Half-inch yellow square tab is a anti-rust agent--keep with dies. We suggest that you clean the dies’ inside surfaces using a
patch saturated with gun-cleaning solvent. This will help to prevent scratching of your dies and cases. Clean and inspect all cases
before resizing. Dispose of split or separated cases. Check the case length and trim to length if necessary. Chamfer the sharp corners
of trimmed cases with a Forster Deburring Tool.
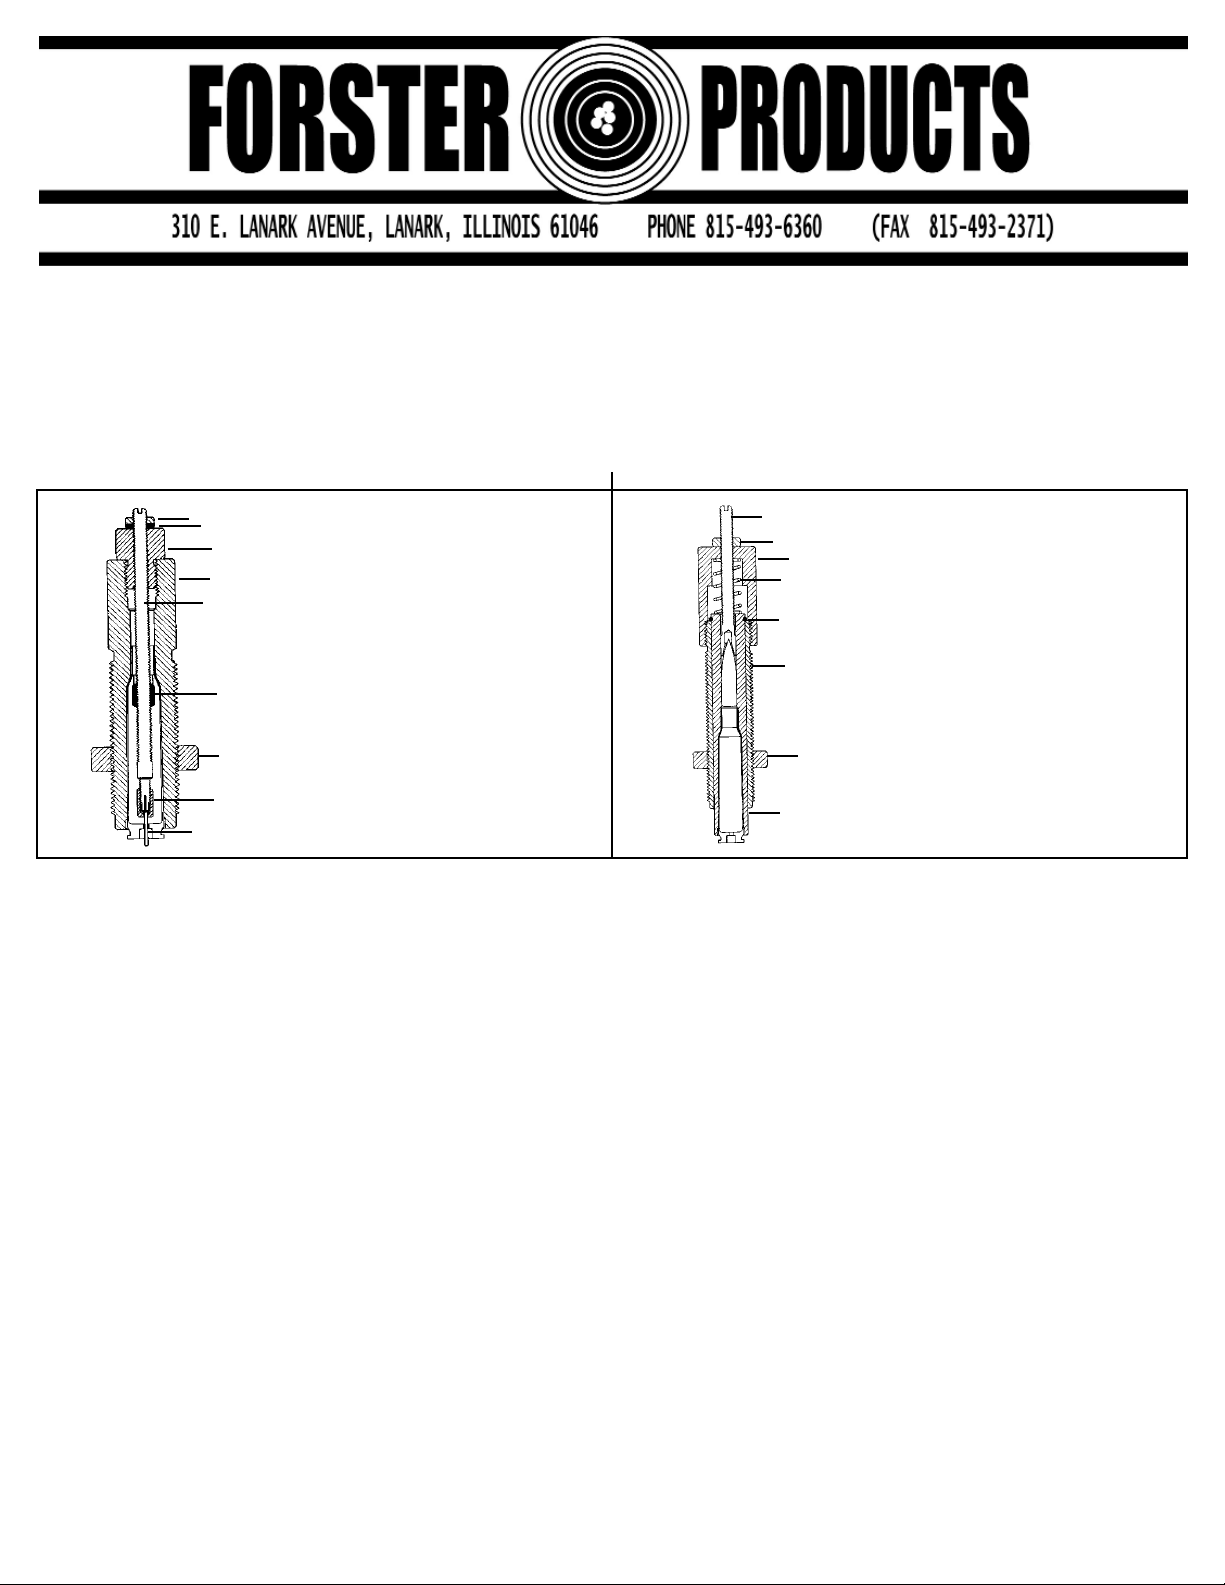
CASE RESIZING (SEE FIGURE A)
With the shellholder at its highest point, screw the sizing die in the press until the bottom of the die firmly contacts the top of
the shellholder. Tighten the Die Lock Ring (G) against the top of the press and tighten the set screw.
Apply a thin coat of Forster/Bonanza Case Lube to your cases. Do not overlubricate, as this may create pressure dents during resizing. Next, push your cases down over the brushes of a Forster Case Graphiter. This will apply a thin coat of dry lubricant to the inside of the case neck.
Resize the case. This operation reduces the outside diameter of your case, removes the spent primer, and expands the
inside of the case neck. Resizing will stretch the case neck, so check the overall length and trim if necessary. Refer to a reliable
reloading manual for repriming and powder weighing and charging instructions.
BENCH REST®BULLET SEATING (NON-CRIMPING) (SEE FIGURE B)
A
CCURACY INFORMATION
Before setting up your new Forster Bench Rest®Seater Die, give some thought to how the system works. This understanding
will help you make necessary adjustments.
In order to guarantee uniform alignment of bullet and casing, both are held in a Die Chamber (P-30) which travels up inside a
Sleeve (O-30) where both components are joined by the Bullet Seating Stem (J-30). This puts the components in concentric alignment before and during the seating operation to ensure match-grade alignment. Only Forster Bench Rest
®
Dies provide this degree
of accuracy.
ADJUSTING THE SEATER DIE IN YOUR PRESS
First, check to see that the Die Body (L-30) is securely threaded to the Sleeve (O-30). With the press ram and shellholder at
their highest points, screw the seater die in the press until the bottom of the Die Chamber (P-30) touches the shellholder.
Continue screwing the seater die until you have compressed the Die Chamber (P-30) 1/4” to 1/2". Tighten the Die Lock Ring (G)
and secure the lock-ring screw. Screw the Bullet Seating Stem (J-30) almost all the way out of the Die Body (L-30). Lower the
shellholder and place a prototype cartridge in it. Raise the shellholder into the die completely. Screw the Bullet Seating Stem (J-
30) down until it contacts the bullet. Tighten the Lock Nut (K-30). Check the overall cartridge length when you seat the first bullet.
SIZER DIE PARTS
Spindle Lock Nut A-10
Spindle Bushing B-10
Sizer Die Body C-10
Spindle D-10
Expander Ball E-10
Die Lock Ring G
Lock Nut H-10
Decapping Pin I *
(S-short, L-long)
Co-Ax
®
Washer W-10
* PPC and BR cases with small flash
holes require special decapping pins.
SEATER DIE PARTS
Bullet Seating Stem J-30
Lock Nut K-30
Die Body L-30
Return Spring M-30
Retainer Ring N-30
Sleeve O-30
Die Sliding Chamber P-30
Die Lock Ring G
Parts J, K, L, O and P vary with
caliber.
A-10
J-30
K-30
L-30
M-30
N-30
O-30
G
P-30
W -10
B-10
C-10
D-10
E-10
G
H-10
I
Figure B
www.forsterproducts.com
FORSTER BENCH REST®DIE INSTRUCTIONS
Figure A
Page 1
Page 2
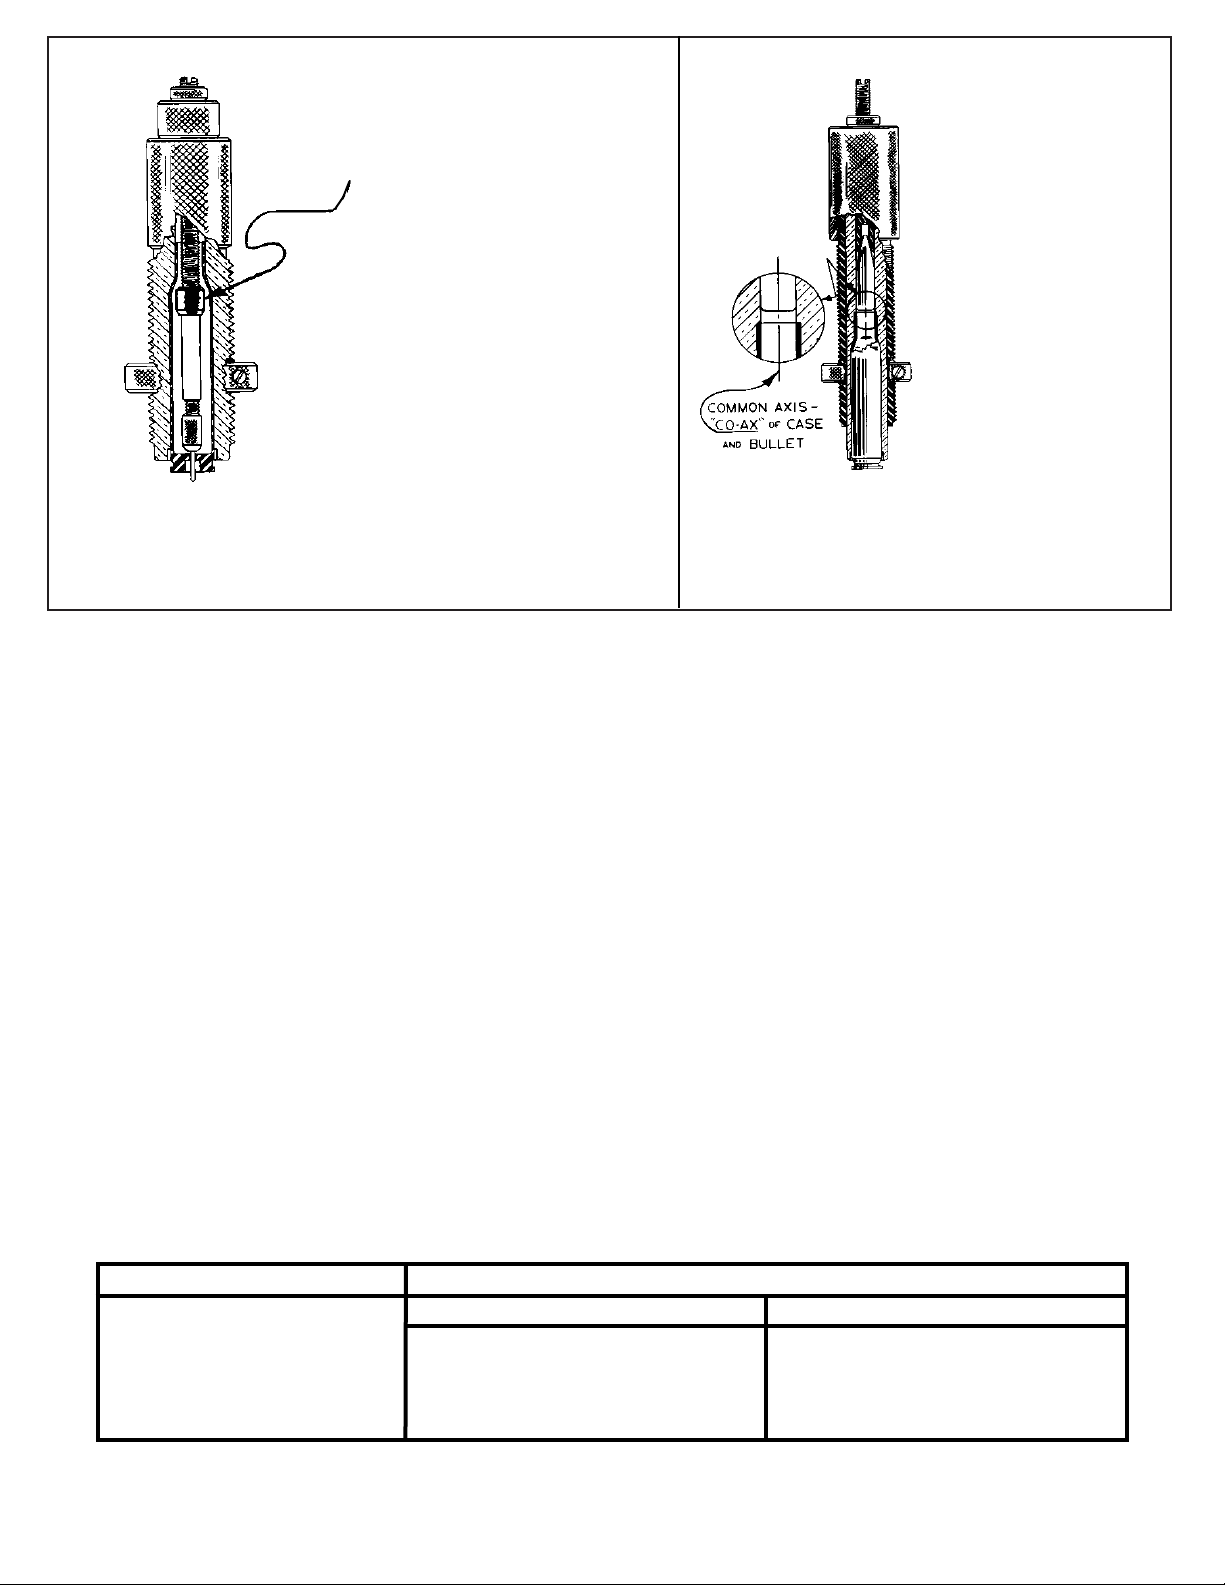
BENCH REST®SIZING DIE
Figure C. When the cartridge case
has been full length sized, our "E-Z"
OUT Expander Ball is in its elevated
position near the neck of the case.
When the case is withdrawn from the
die, most of the neck is still in the
neck-sizing portion of the die. This
tends to keep the axis of neck and
case in alignment. Furthermore, you
will scarcely feel the effort required to
draw the expander through the case
neck. The neck expanding, in this
design, is done at a point where you
have the full mechanical advantage of
the power developed in the linkage of
your press. (See the diagram of the
Co-Ax
®
Press). This unique feature is
supplied on all our full-length and
neck sizers for bottleneck cases at no
extra cost. This is the type of sizer we
supply with all our Quality Bench
Rest
®
Die Sets. As a result of the "EZ" OUT Expander used on our sizer, you will not need as heavy a loading bench
as would be required with the standard or conventional sizing die.
BENCH REST
®
SEATING DIE
Figure D. The bullet is
held in a close-fitting
Chamber (P-30). The
cartridge case also is
held in a close-fitting
Chamber (P-30) for its
entire length. Both your
bullet and case are
held in perfect alignment while the bullet is
being seated. Figure D
shows the position of
the sliding Unisleeve
(P-30) after the bullet
has been seated. This
seater is supplied with
all Forster Bench Rest
®
Die Sets.
Patent 3440923.
FINE-TUNING THE SIZING DIE
Rifle chambers and cartridge cases are made within a range of tolerances. Bench Rest®resizing dies must be made to resize
the cases smaller than a minimum acceptable rifle chamber. Because most rifle chambers are larger than minimum, you should
only resize your cases enough to fit your particular rifle chamber. The following procedure will custom-fit your cases to your rifle
and enhance your accuracy potential. We recommend this precision resizing method when you're loading for accuracy in one rifle.
Remove the decapping-expander assembly from your die. With the shellholder at its highest point, turn the sizing die down
until it contacts the shellholder. Size a fired case in the die and check its fit in your rifle. If the bolt will not close or closes hard,
turn the die down slightly and size the case again. Continue this process until you obtain the feel (resistance to closing) on the
bolt that you want. Now tighten the Lock Ring (G) in place. The headspace of the die is now adjusted for your rifle.
Reinstall the decapping-expander assembly which is preset at the factory. You should check the decapping assembly to
ensure that shipping vibration did not change the critical settings. Refer to the yellow Spindle Adjustment instructions.
The Expander Ball (E-10) should be lined up with the small hole drilled in the coarse, outside threads of your die. The primer
decapping pin should be centered at the bottom of the die. If you must adjust the assembly, be sure to position the Expander
Ball (E-10) just below the neck portion of the die. This is accomplished by setting the Lock Nuts (A-10 and B-10) so that the
Expander Ball (E-10) is even with the small hole located in the threads of your die.
WARNING — Positioning the expander too high will crush your case neck and may damage the decapping assembly.
Tighten the Lock Nuts (A-10 and B-10). This position will ensure that the Expander Ball (E-10) is as true (co-axial) as possible with the inside of the case neck. Your sizing die is now accurately customized for your rifle.
F
INE-TUNING THE SEATING DIE
The Forster Bench Rest®Seater holds the bullet, case and seater stem in perfect alignment for straight line (co-axial) seating. Minor
variations (.005") in bullet-seating depth can cause significant changes in accuracy. It is important to position the bullet as close to the
rifling as possible. Remember, the overall length measured from the head of the loaded cartridge to the tip of the bullet is not as critical
as the distance from the head of the case to the ogive (point at which the bullet contacts the lands of the rifling). Tools that measure this
dimension are available. The following chart will help you adjust seating depth. NOTE — Brass from oversize or otherwise out-of-tol-
erance chambers may not fit in Bench Rest
®
Seater Dies.
ELEVATED
“E - Z” OUT
EXPANDER
BUTTON
SEATING DEPTH CHART
BULLET MOVEMENT
17-243 caliber Dies
Seating Stem (J-30)
Adjustment
257-375 caliber Dies
.004”
.008”
.016”
.0045”
.009”
.018”
1/8 Turn
1/4 Turn
1/2 Turn
Figure D
Figure C
DIE0005 Rev. 2
Page 2
Thank you for purchasing a Forster Precision Product. Please wear safety glasses.
Forster Catalogs are available upon request.
 Loading...