

Page 1
INSTALLATION, CARE & MAINTENANCE GUIDE
Page 2

Formica® Laminate Flooring Commercial Collection
In keeping with today’s commercial interior design
requirements, fl ooring must be visually appealing yet
functional. From the modern environment, to the formality
of a corporate offi ce, Formica Laminate Flooring has the
range and style to enhance any commercial environment.
Formica Laminate Flooring is one of the most
comprehensive and economical fl ooring ranges available.
Developed for the Australian market, it incorporates
European style with the latest in laminate fl ooring
technology. Formica Laminate Flooring provides design
professionals with greater choice than ever before with a
range of 20 decors, and many special options available
on request. The collection features a range of embossed
fi nishes delivering a beautifully authentic appearance rarely
achieved by any other laminate fl ooring.
2
Page 3

Index
Page 4 Pre-Installation Checklist
Page 5 Sub-Floor Preparation
Page 5 Accessories Needed
Page 6 Additional Accessories Recommended
Page 6 Tools Needed
Page 7 Room Calculator
Page 8 Flooring Installation
Page 12 Trim Guide
Page 12 Profi les
Page 13 End Profi le Transitions
Page 15 Recommended Accessories
Page 15 Important Product Information
Page 16 Cleaning the Floor
Page 16 Care & Maintenance
Page 17 Flooring Options
Page 17 Technical Information
Page 18 Limited Warranty Information
3
Page 4

Pre-installation checklist
• Formica Laminate Flooring is to be laid as a fl oating
fl oor.
It must not be glued or nailed onto the sub-
fl oor.
• Defective planks must not be laid. Carefully check
each plank before installing. Planks that are
damaged or do not fi t together are to be returned
to the retailer for replacement.
Do not heat or air condition the building prior to
•
and during the installation period.
Only open one
pack at a time when installing the fl ooring.
• Leave an expansion gap around the perimeter
of the laid fl oor.
2
– Floor area 1m
– Floor area 100m
– Floor area 200m
– Floor area 300m
– 100m2: requires 10mm gap
2
– 200m2: requires 20mm gap
2
– 300m2: requires 30mm gap
2
or greater: install an expansion
profi le to divide the fl oor into even parts.
Note: around pipes, columns and door jams that
obstruct the fl oor leave an expansion gap of
10mm. Fill the gap with Unika ColorSealant.
• Formica Laminate Flooring planks should be laid
along the length of the fl oor, so as to maximise the
appearance of the fl oor’s pattern.
• Check that you have all the correct accessories
and tools to complete the installation - refer to
pages 5 & 6.
• For further information on laying Formica Laminate
Flooring please refer to the Formica Laminate
Flooring installation DVD or visit
www.formica.com.au
• For the complete colour range, please refer to the
Formica Laminate Flooring Consumer and
Commercial Brochures.
Important Point
If the counter bench top or furniture weighs more
•
than 500kg, then the fl oor must be divided into
2
areas of less than 150m
using a Multifl oor Trim.
• Retail shop fi xtures cannot be fi xed to the
laminate fl oor.
• Formica Laminate Flooring must be laid with an
expansion gap between door frames separating
different rooms. Allow for a 20mm gap between
the door frame and cover the gap with an
expansion profi le.
Note:
for fl ooring laid in high moisture areas –
kitchens, cafes, restaurants, bars and
hairdressing salons - Formica Lock Seal must
be used between planks.
• Ensure that an allowance of 5% extra fl ooring is
added to the amount of fl ooring to be laid to cover
wastage during the installation process.
• A commercial grade skirting product may need to
be used to conceal the fl oor’s perimeter expansion
gap.
4
Page 5

Sub-fl oor preparation
Accessories needed
• All sub-fl oors (concrete, solid timber fl oor boards,
plywood, particleboard, vinyl, cork & ceramic tiles)
must be level, clean and dry.
• Carpets are not suitable sub-fl oors.
• Existing sub-fl oors must be checked to ensure
they are securely fi xed and level. If any parts of the
existing sub-fl oor are loose it must be re-fi xed prior
to installing Formica Laminate Flooring.
• Depressions in the sub-fl oor must not exceed
3mm under a 1m straight edge. Depressions
greater than 3mm must be fi lled in with a fl oor
levelling compound.
• Formica Flooring Underlay must be laid over all
existing sub-fl oors.
• Formica Flooring Underlay should be laid along
the length of the room.
• Formica Flooring Underlay (with self adhesive
strip) laid on top of sub-fl oor for moisture protection
and insulation.
• Installation Spacers, such as plastic wedges used
for expansion gaps.
• Unika Multifl oor Trim, used as a threshold between
doorways or when dividing the fl oor into multiple
sections.
• Quad Beading is used to conceal the expansion
gap left around the perimeter of the laid fl oor and
skirting board. Note: The quad base must be
minimum of 20mm to effectively cover a typical
expansion gap.
• Lock Seal Adhesive Sealant is used for joining cut-
off pieces around pipes, columns and for joining
planks in high moisture areas.
• Ensure you have the correct quantity of
accessories to complete the installation. Please
refer to page 7 of this brochure or visit
www.formica.com.au for a copy of the Flooring
Planner.
5
Page 6

Additional accessories
recommended for
installation, care
& maintenance
Tools needed
• Pencil & set square to draw straight lines.
• Sharp knife to cut the Formica Flooring Underlay.
• Saw & hammer.
• Lock Seal Adhesive Sealant adds water resistance
to fl oor joints in areas susceptible to accidental
water spillage.
• Unika ColorSealant fi lls expansion joints.
• Unika Deep Cleaner is a specially developed deep
cleaner for laminate fl ooring. Recommended for
use every six months or following heavy soiling.
• Unika Zip Clean is a regular cleaning product for
laminate fl ooring. Recommended for use weekly.
• Unika ColorFill repairs chips and scratches for
laminate fl ooring.
• Measuring tape & 2m straight edge ruler.
• Electric drill.
• Long thin nails approx 30mm, used to affi x Quad
Beading onto skirting board (or liquid nail adhesive
for cement walls).
• Screws and screw driver for affi xing Multifl oor
Trim.
6
Page 7

PLANNER: What you need to get the job done
FORMICA LAMINATE FLOORING ROOM CALCULATOR
ROOM NAME
Room 1
Room 2
Room 3
LENGTH WIDTH m
2
(LxW)
Total of each column =
AB C
Add 5% extra for wastage to part C fi gure D = C + 5%
Divide part D fi gure by the number below that corresponds to the thickness of fl ooring
selected, e.g. D÷2.7. This calculates the approximate quantity of packs required.
| 6mm = 2.7 | 7mm = 2.1 | 8mm = 1.9 | 10mm = 1.3 | 12mm = 1.3 |
FORMICA LAMINATE FLOORING ACCESSORIES CALCULATOR
PRODUCT
Formica Flooring Underlay
(laid on top of the sub-fl oor underneath Formica Laminate
Flooring for moisture protection and sound insulation)
Quad Beading
(used to conceal the expansion gap left around the perimeter
of the laid fl oor & skirting board)
ColorSealant
(used to fi ll expansion joins/gaps)
Multifl oor Trim
(used as threshold between doorways. When dividing
the fl oor into sections. Available in 900mm or 1800mm)
E
Room calculator
Total part D
= (2 x A) + (2 x B)
= (2 x A) + (2 x B)
No. of doorways
F
Pack qty
2
30m
per roll
(i.e. ÷ by 30)
Quad beading comes
in 2.4m lengths
(i.e. ÷ by 2.4)
1 cartridge will cover
10-12 lineal metres
(i.e. ÷ by 10)
900mm for
each doorway
D
G
Amount needed
No. of rolls
No. of lengths
No. of cartridges
No. of trims
Lock Seal Adhesive Sealant
(used for joining cut-off pieces around pipes, columns
and doorways. For joining planks in areas of high moisture
or accidental spills)
Note: We recommend the use of Unika brand of accessories and cleaning products to be used with Formica Laminate Flooring.
Room Specifi c
500ml bottle
= 50 lineal metres
(5 packs)
No. of bottles
7
Page 8
Flooring installation
Note: Do not use a tapping block or pull bar in the installation of
Formica Laminate Flooring. Under no circumstances use a
hammer to connect the planks, as this will damage the locking
system.
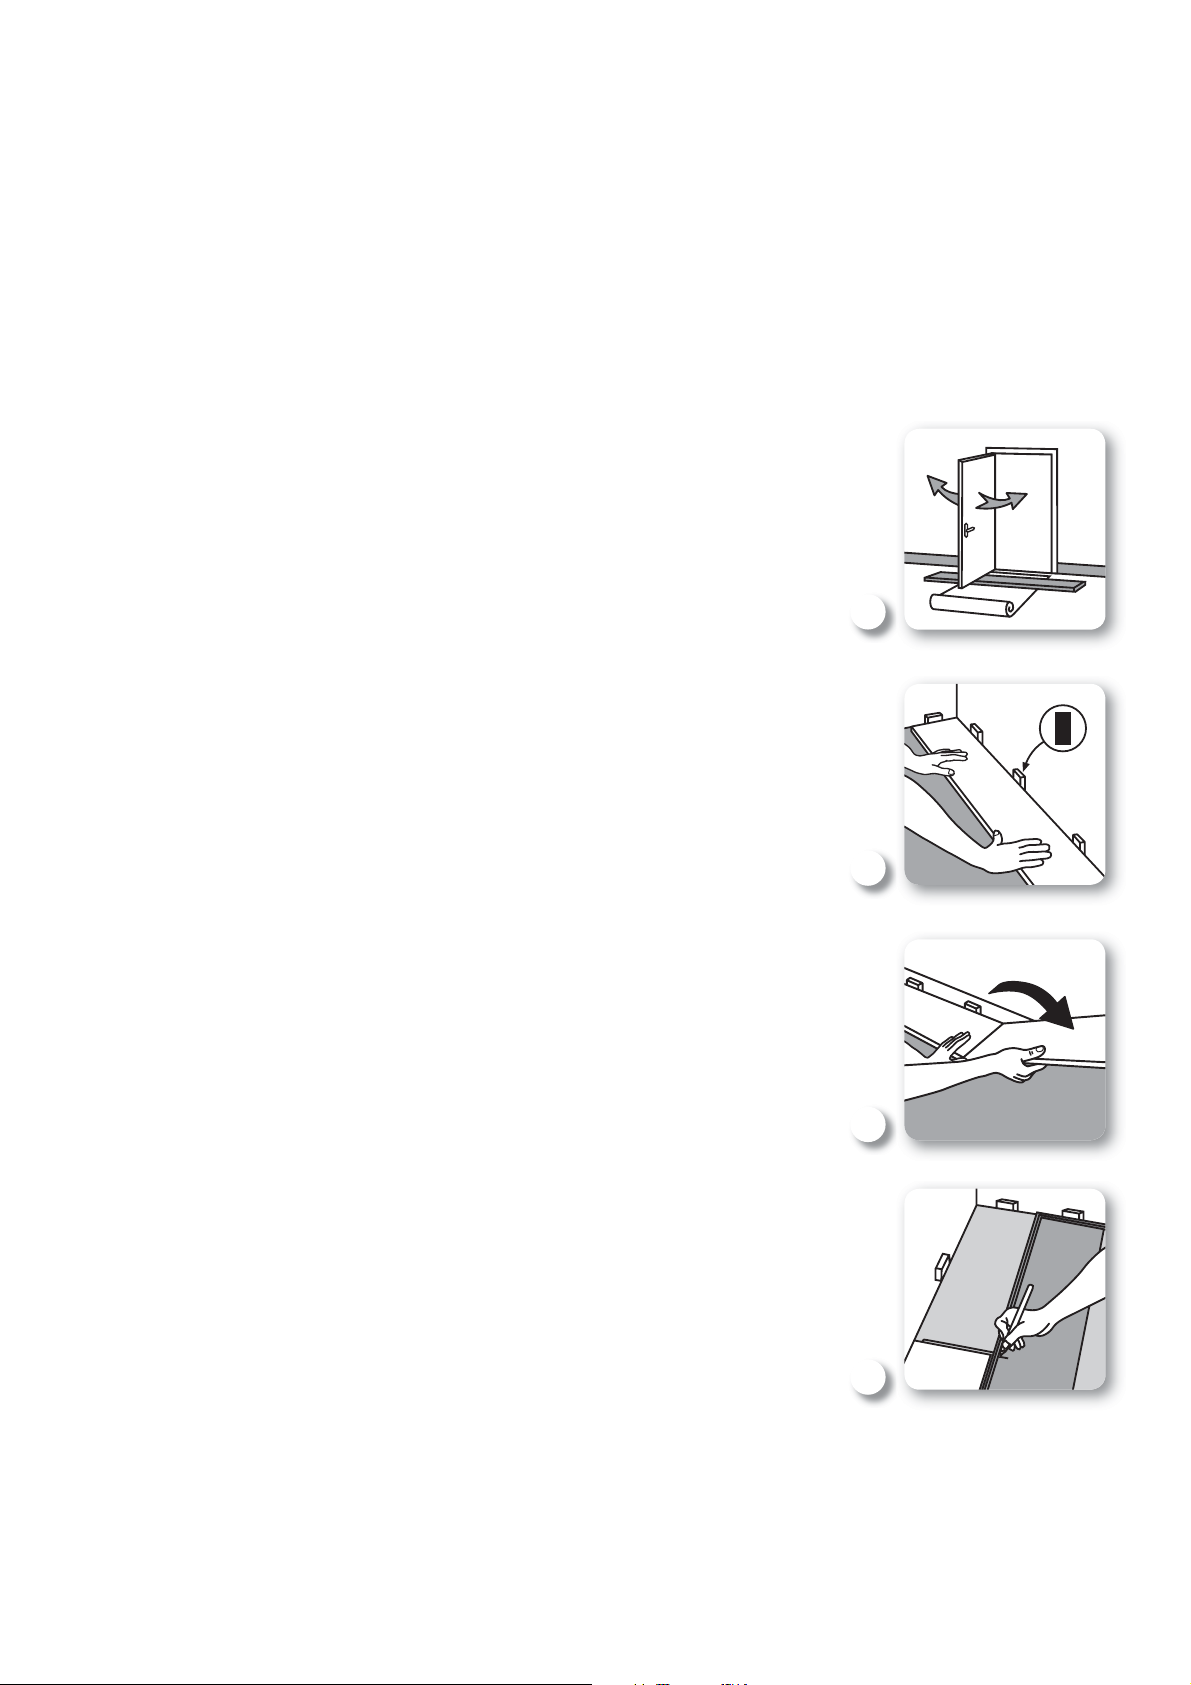
Step 1: Prepare the sub-fl oor as per the instructions listed in the sub-
fl oor preparation section. Do not remove the skirting board.
Use quad beading to conceal the perimeter expansion gap.
Step 2: (refer diagram 1) Check the bottom of the door fi ts over the
laminate fl oor and underlay. If the door touches the plank the
door will need to be trimmed.
Step 3: (refer diagram 2) Start laying the planks from the left corner,
1
working left to right. Place the plank with the groove on the
end and side facing the wall. (Note: the protruding long lip on
the side referred to as the tongue should be facing you and
not the wall). Then insert installation spacers for the perimeter
expansion gap. Refer to the Pre-installation Check List for the
correct gap depending on fl oor size.
Step 4: (refer diagram 3) Connect the next plank in the row by placing
the groove on the end into the end tongue of the adjoining
plank. Repeat until you reach the end of the row. Continue to
place installation spacers at 300mm intervals along wall.
Step 5: (refer diagram 4) For the last piece in the row, place the tongue
side of the plank to face the tongue of the adjoining plank with
the groove on the end to face the wall. Insert installation spacer
to allow for expansion gap, and then mark where the plank is
2
3
to be cut. Once cut, the plank with the groove on the end is
connected into the end tongue of the adjoining plank. (refer
diagram 3). Note: When cutting planks face the decorative
side down when using a jigsaw. When using a handsaw face
the decorative side up. Always use a sharp fi ne saw tooth.
4
8
Page 9
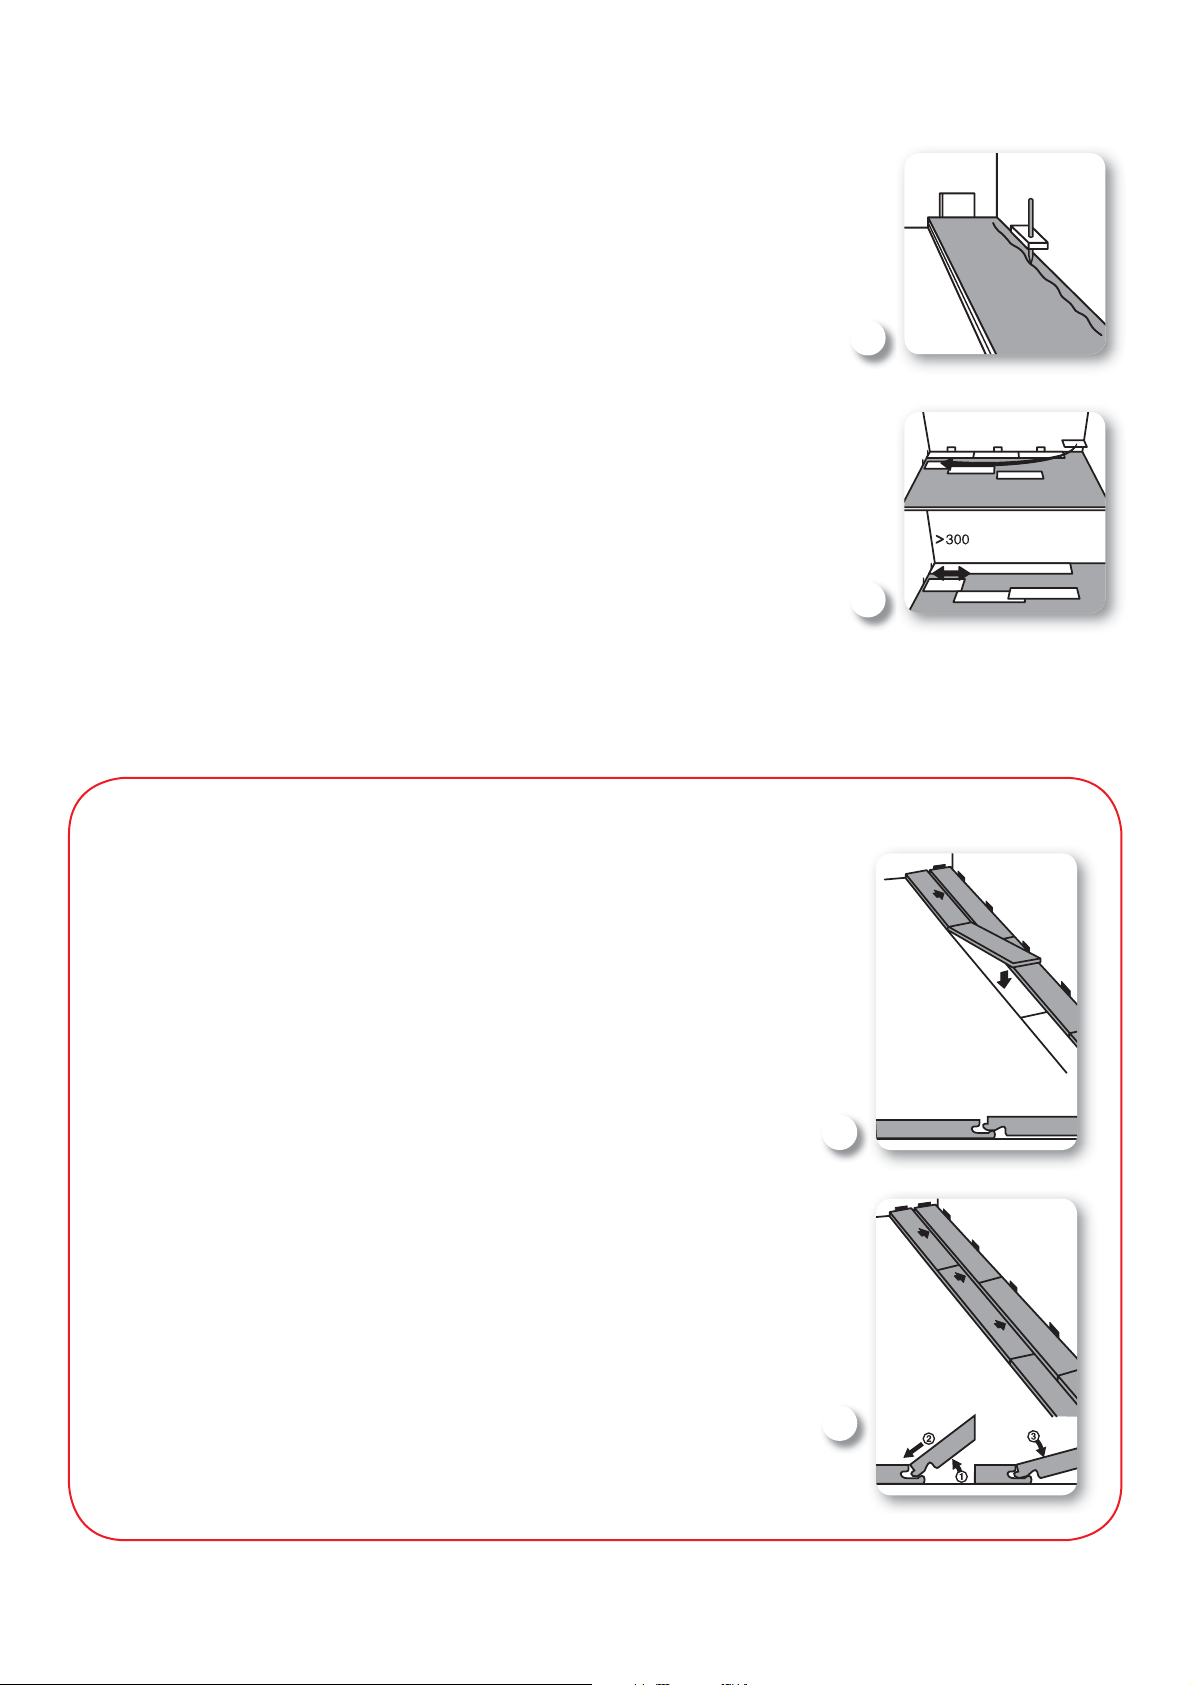
Step 6: (refer diagram 5) Before starting the next row check the fi rst
row is straight with a string line or 2m straight edge ruler,
aligned against the protruding tongue. More installation
spacers may be needed to make the fi rst row straight. Should
the wall be too uneven, then the line of the wall must be
marked onto the plank surface and the plank cut length wise
to fi t the profi le of the wall.
Step 7: (refer diagram 6) To start the next row, use the off cut from the
previous row or use a new plank. Ensure minimum length is
300mm.
5
6
6mm, 7mm & 8mm planks (Angle – Angle locking)
Step 8: Connect the planks of the second row end to end and
place them on top of the bottom lip of the protruding
tongue (refer diagram 7a). Then lift the planks gently and
slot into the protruding tongue of the adjoining row of
planks, working left to right (refer diagram 8a) Note: you
may need to use a masking tape to hold down the planks
already laid so they do not move. Once the planks are
connected in the row you can remove the tape.
7a
Important:
For 6mm, 7mm & 8mm planks only. Please refer to page 10 for 10mm & 12mm planks.
8a
9
Page 10
Wall
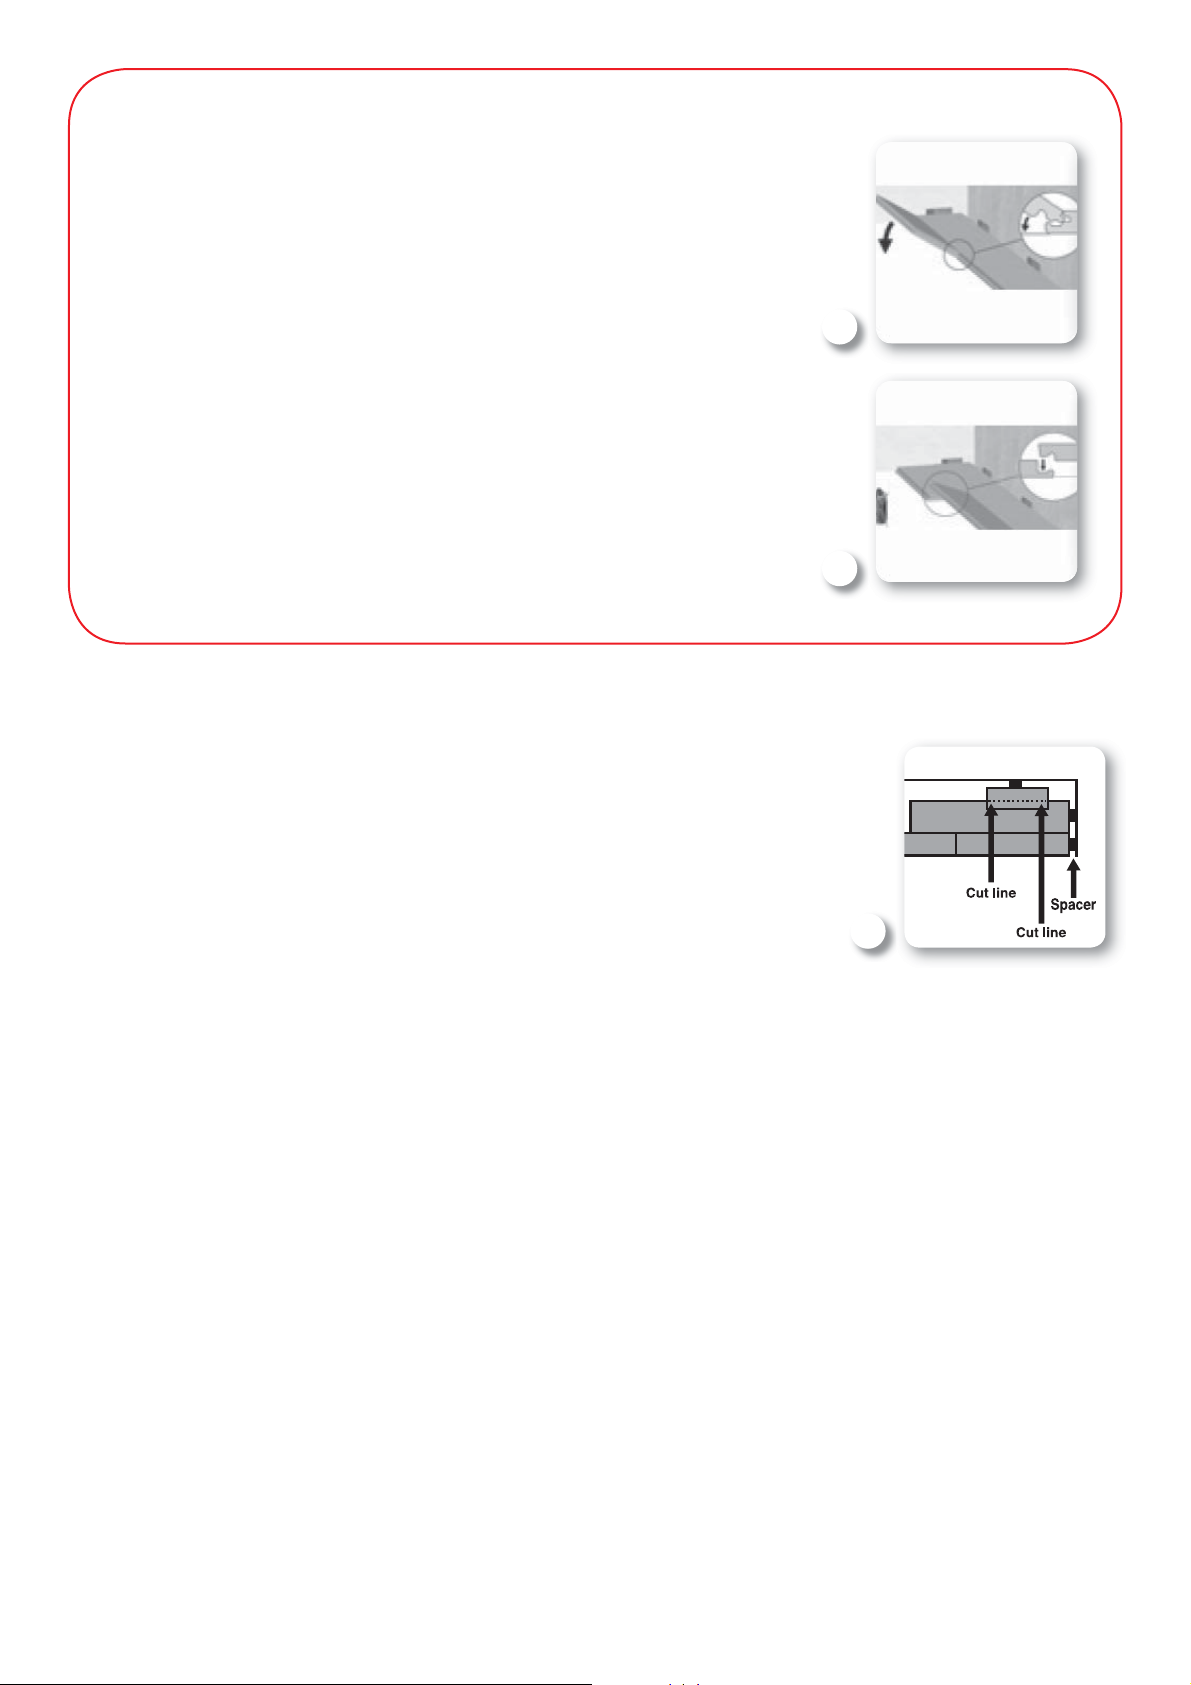
10mm & 12mm planks (Angle – Drop locking)
Step 8: (refer diagrams 7b & 8b). Insert the panel at an angle of
approximately 25º and lower the panel to lock it into place.
No glue required. Repeat this process with all successive
planks.
7b
8b
Important:
For 10mm & 12mm planks only. Please refer to page 9 for 6mm, 7mm & 8mm planks.
Step 9: (refer diagram 9) When laying the last row using the off-cut
from the previous row – turn the plank over with the groove
side facing the wall and the decorative side facing down. Then
mark a line indicating where to cut away. Ensure installation
spacers are placed against wall for required expansion gap.
Once the plank has been cut, take the piece with the groove
side (decorative side facing up) and place on top of the bottom
lip of the protruding tongue and repeat step 8.
Step 10: Fitting around door jams and between door frame: Allow
for a 10mm expansion gap when laying planks around door
jams. Then fi ll in the gap with Unika ColorSealant (as per the
instructions on the tube/cartridge) colour matched to the
laminate fl oor. (Same technique as for ceramic fl oor tiles).
Allow a 20mm expansion gap for door frames between
different rooms and cover the gap with an expansion profi le.
Formica Laminate Flooring recommends Unika Multifl oor
9
10
Trim, as suitable, for the installation of Formica Laminate
Flooring.
Page 11

Special cases: Fitting around pipes and columns (refer
diagram 10).
When installing around pipes and columns, mark the centre
of the pipe/column on the plank. Do this by placing the plank
in front of, and then alongside the pipe/column. This should
give an accurate centre point to drill holes.
Drill holes 10mm larger than the pipes/columns (to allow for
the expansion gap), onto the plank where the points have
been marked. Next, cut the plank across through the centre
of the holes that have been drilled.
Fit the largest piece of the planks fi rst, then apply Formica
Lock Seal (as per the instructions on the tube), to the sawn off
smaller piece. Be careful not to glue the sawn off piece to the
sub-fl oor, pipes/columns or wall.
Then fi ll in the gap with Unika ColorSealant that’s colour
matched to the fl oor.
10
Step 11: Finishing off the laid fl oor: When laying of the fl oor is
complete remove all the installation spacers and affi x the
quad beading onto the skirting board (on top of the laminate
fl oor), to cover the perimeter expansion gap. Use long thin
nails approx 30mm to affi x the quad beading onto the skirting
board or liquid nail adhesive for cement walls. Note: for quad
beading placed around corners, cut at a 45˚ degree angle at
both joining ends for a neat fi t.
Finally, inspect the fl oor and if there are any small chips on the
plank surface they will need to be fi lled using Unika Colorfi ll
Repairer (as per the instructions on the pack), to colour match
the fl oor.
11
Page 12
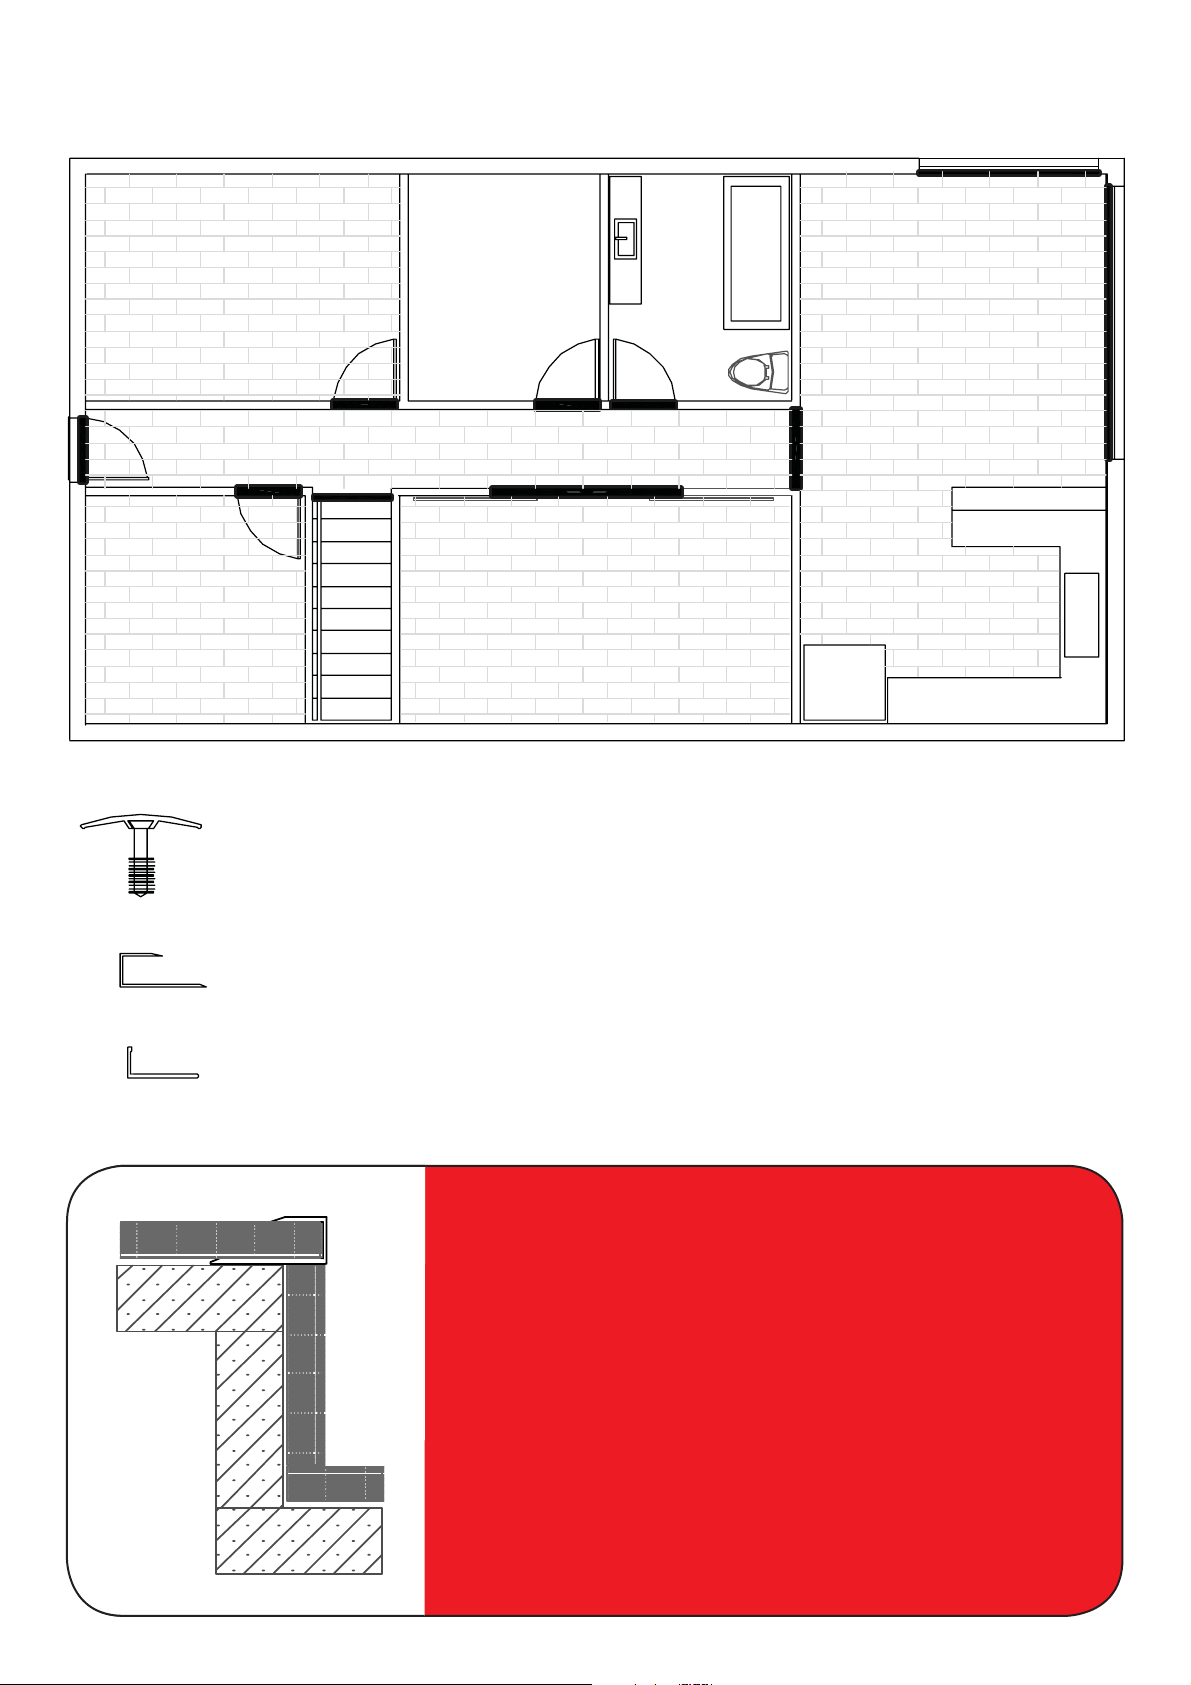
Trim guide
ADAPT
FORMICA LAMINATE FLOORING
ADAPT
MULTIFLOOR MULTIFLOOR
FORMICA LAMINATE
FLOORING
Profi les
T profi le transition between level and lower fl oors.
CARPET
MULTIFLOOR MULTIFLOOR
FORMICA LAMINATE FLOORING
ADAPT
FORMICA LAMINATE FLOORING
Multifl oor T1
VINYL /
TILES
MULTIFLOOR
ADAPT
FORMICA LAMINATE FLOORING
MULTIFLOOR
Adapt T5
End profi le transition to walls and higher fl oors.
Tilers Mate – L angle
End and level profi le transition.
Transition examples
Adapt T5
End profi le transition for stairs.
Formica Laminate Flooring must be glued to sub-fl oor.
12
Page 13
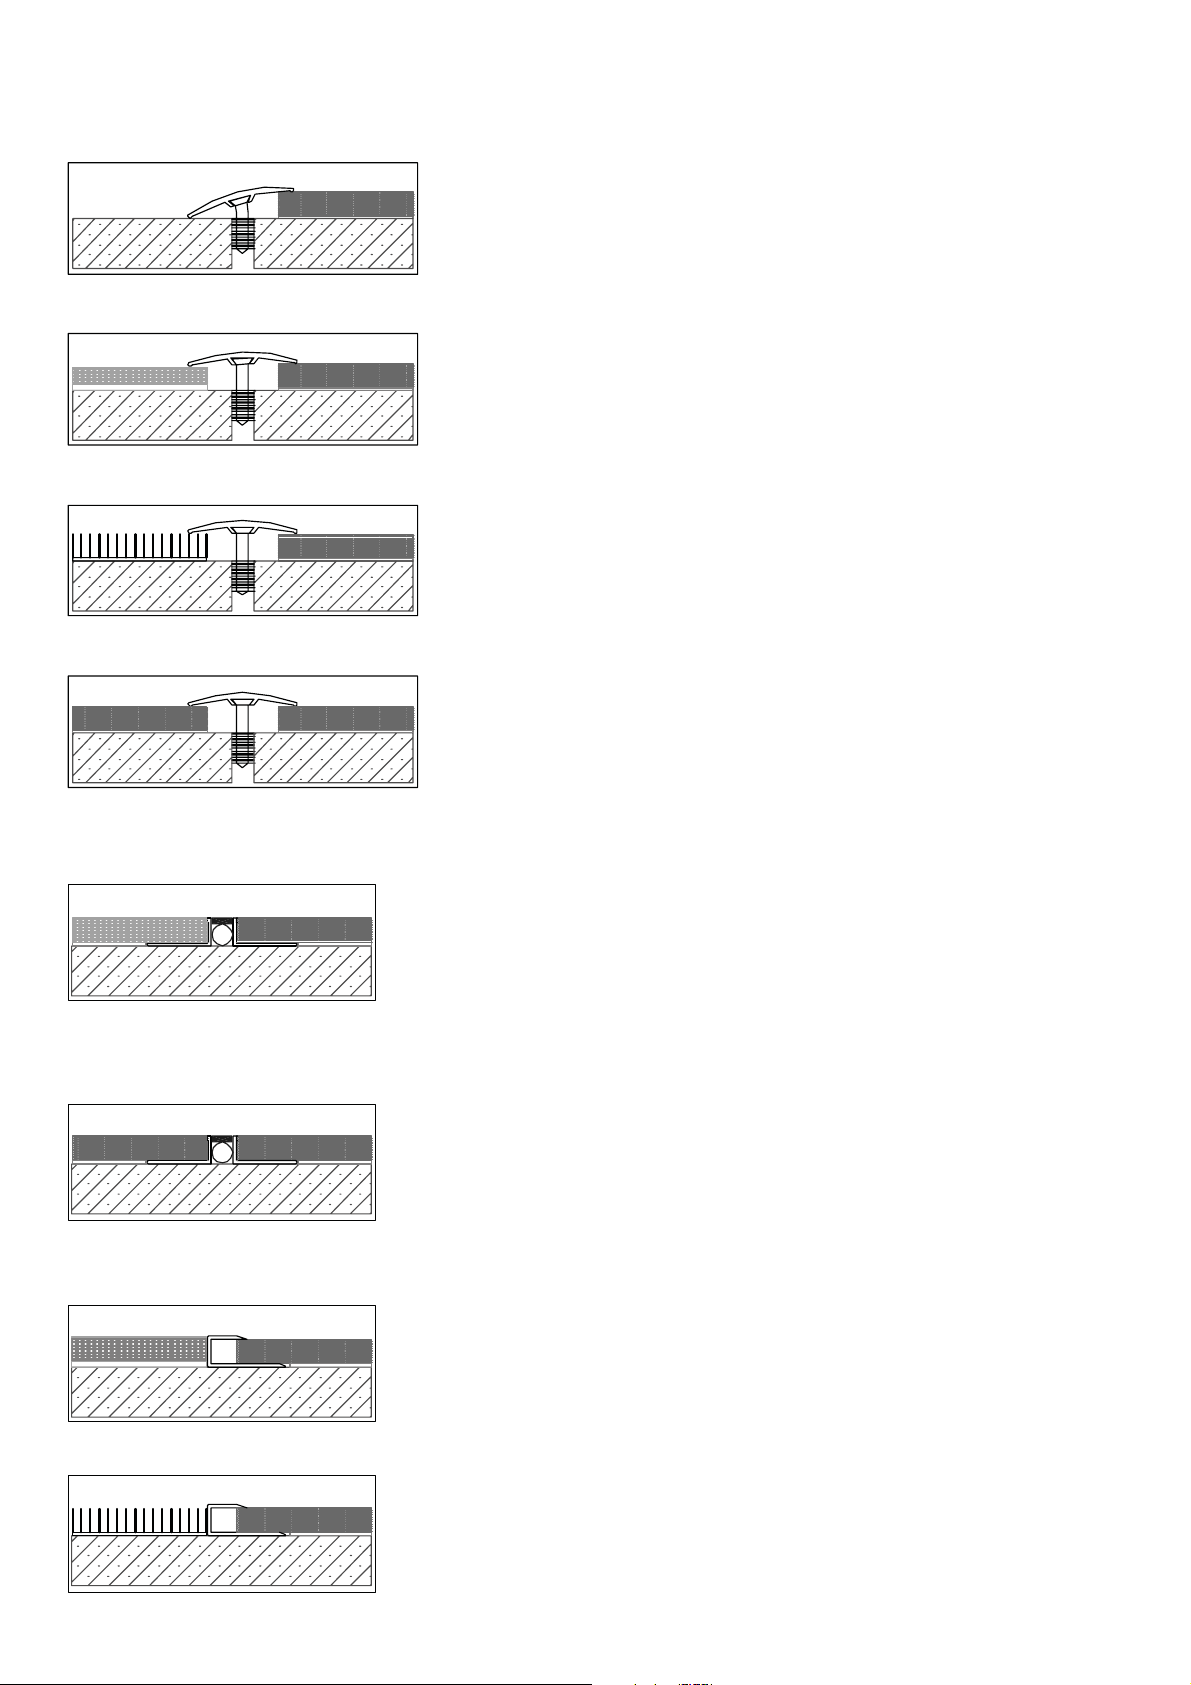
End profi le transitions
Multifl oor T1
Transition from Formica Laminate Flooring to a lower hard fl oor
surface, such as tiles, wood or vinyl.
Multifl oor T1
Transition from Formica Laminate Flooring to a raised fl oor surface,
such as ceramic tiles.
Multifl oor T1
Transition from Formica Laminate Flooring to carpet.
Multifl oor T1
Transition from Formica Laminate Flooring to Formica Laminate
Flooring for doorways and expansion joints.
Tiler mate – L angle
Transition from Formica Laminate Flooring to a level hard fl oor surface,
(+/-2mm) such as tiles, wood or vinyl. Keep minimum gap, fi ll gap
with Unika ColorSealant.
Tiler mate – L angle
Transition from Formica Laminate Flooring to Formica Laminate
Flooring. Keep minimum 10mm gap, fi ll gap with sealant used at
expansion joints and doorways.
Adapt T5
End profi le transition from Formica Laminate Flooring to a level hard
fl oor surface, (+/-2mm) such as tiles, wood or vinyl.
Adapt T5
End profi le transition from Formica Laminate Flooring to carpet.
13
Page 14
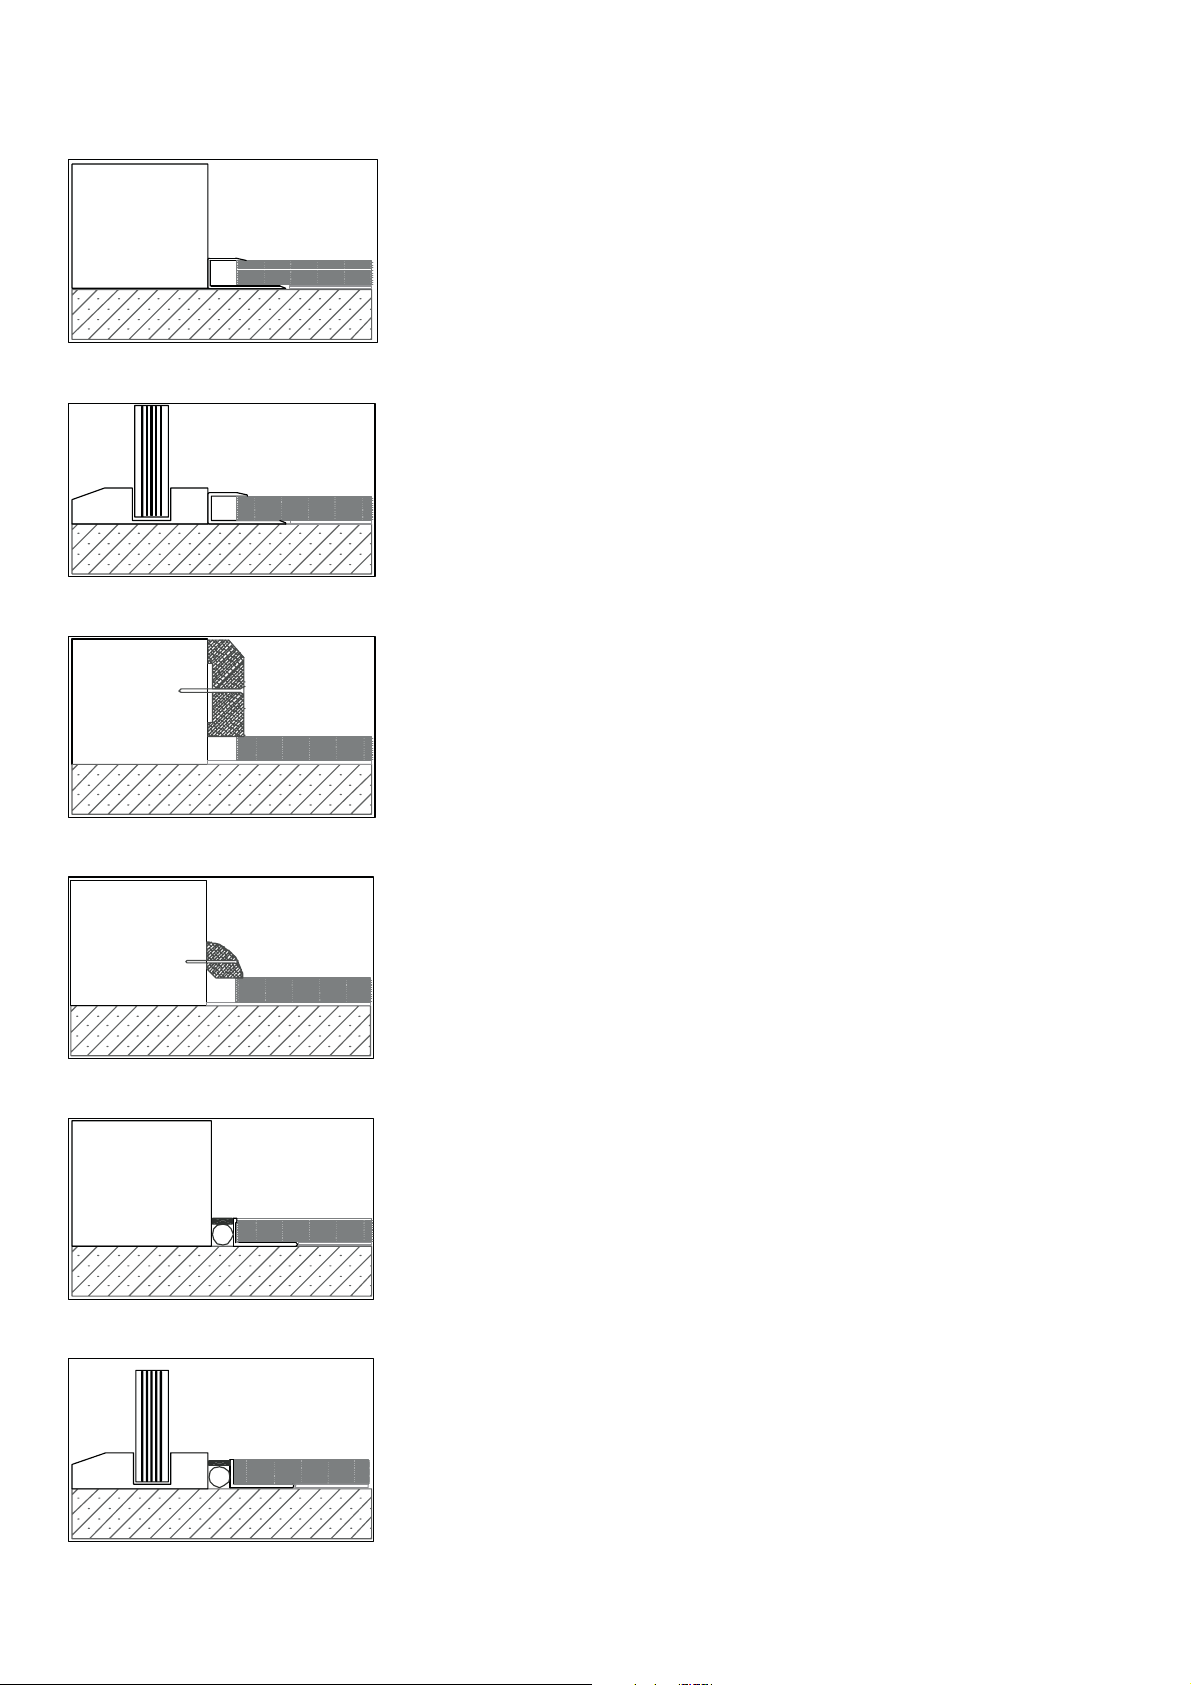
End profi le transitions
Adapt T5
End profi le transition from Formica Laminate Flooring to other higher
and vertical surfaces, such as walls, fi replace hearths.
Adapt T5
End profi le transition from Formica Laminate Flooring to other higher
and vertical surfaces, such as walls, fi replace hearths.
Skirting 12mm +
Use to cover expansion gaps around room perimeter.
Quarter Round 20mm +
Use to cover expansion gaps around room perimeter.
Tiler mate – L angle
Use for expansion gaps where skirting not applicable. Keep minimum
10mm gap, fi ll gap with sealant. Use at expansion joints and
doorways.
14
Tiler mate – L angle
Use for expansion gaps at sliding doors, glazing beads. Keep
minimum 10mm gap, fi ll gap with sealant. Use at expansion joints
and doorways.
Page 15

Recommended
Important product
accessories
Formica Flooring Underlay is a 2.5mm high-
density polyethylene, low compression foam that is
laminated to a heavy duty insulating foil. Formica
Flooring Underlay has a self adhesive joining fl ap for
easy installation, provides an excellent moisture
barrier and insulation barrier for added energy
effi ciency.
Unika ColorSealant is a fl exible acrylic latex
sealant used for laminate fl ooring expansion joints.
ColorSealant is colour matched to fl ooring and
provides a water-resistant fl exible seal around fl oor
perimeter and cut out areas.
Unika ColorFill Repairer is a hardwearing
compound developed to repair chips and scratches
that may accidentally occur when installing laminate
or timber fl ooring. Colorfi ll is colour matched to
fl ooring for almost invisible repairs and may be used
to fi ll open joints that may appear between planks.
Unika Lockseal Adhesive Sealant adds
additional water resistance to fl oor joints in areas
where accidental water spillage may occur. Its
adhesive properties also allow added strength to
the end lock of the plank or when the tongue is
removed to allow fi tting in confi ned areas.
Unika Deep Cleaner is a strong activating cleaner
that will remove wax residue, fl oor polish, diffi cult
stains, pen markings and scuffmarks without
harming the fl ooring surface.
Unika Zip Clean is a high quality cleaning product
developed for regular use to maintain laminate
fl ooring.
information
• Do not install Formica Laminate Flooring in
bathrooms, laundries and toilets due to potential
fl ooding. It is also not recommended for installation
on sub-fl oors with under fl oor heating.
• Take care when transporting the boxes to avoid
possible damage. Damaged boxes may void the
product warranty. Place unopened boxes inside
the building where the fl oor is to be laid. Do not
leave outside.
• Before commencing the installation open one
box only and carefully read the laying instructions.
• Always use the correct accessories when laying
Formica Laminate Flooring to ensure the product
warranty does not become void.
• Formica Laminate Flooring is manufactured from
approx 90% natural wood fi bre, and like all wood
based products, it will expand and contract with
changes in room temperature and humidity.
Therefore uneven joints and gaps between planks
of 0.1mm and 0.2mm are within normal product
tolerances.
• Formica Laminate Flooring meets Australian
Standards for UV resistance, however fl ooring
may fade according to the degree of exposure to
UV sunlight and ageing of the fl oor. This is within
normal product tolerances.
• For dark colour planks, white lines may appear
between joints after fl ooring has been installed
and may be removed with Unika Zip Clean or
Deep Cleaner. This is within normal product
tolerances and will fade away as fl oor is being
used.
15
Page 16

Cleaning the fl oor
Care & maintenance
• Always clean Formica Laminate Flooring with a
vacuum cleaner or fi bre mop.
• If the fl oor is very dirty or has stains, vacuum fi rst
to remove dust and loose dirt. Then use Unika
Deep Cleaner as per the instructions on the bottle
(available from major Flooring Retail outlets).
• Do not wash the fl oor with wet cloths or mops.
This only spreads the dirt, and can cause
swelling of the joints.
• Do not clean Formica Laminate Flooring with
wax, polish, fl oor cleaner, detergent or scouring
materials.
• Steam mops must not be used on Formica
Laminate Flooring. It can cause irreversible
damage and will void the product’s warranty.
• Persistent stains can be removed with acetone
applied onto a dry clean cloth and wiped over the
stain.
• Wipe up accidental spills immediately, with a
clean dry cloth. Liquid spills left on Formica
Laminate Flooring will cause swelling of the
joints.
• Fit all movable furniture, like tables and chairs with
felt pads.
• Place a doormat outside all external doors, as
sand, dirt and grit act like abrasive paper and will
damage the Formica Laminate Flooring surface
layer.
• Place a plastic mat or rug under rolling chairs.
• Lay dirt-absorbing mats down in areas of high dirt
incidence (such as entrance halls or hallways).
• Do not wax or varnish Formica Laminate Flooring
as it has been designed and manufactured with a
high strength coated surface layer, and applying
wax or varnish will damage this layer.
• Should accidental scratches occur on the surface
layer of the plank, this can be fi xed by applying
Unika ColorFill Repairer (available from major
Flooring Retail outlets).
16
Page 17

Flooring options
Whether it’s a small room on a budget or a large scale heavy duty commercial application,
Formica Laminate Flooring has the range and styles to suit.
COMMERCIAL COLLECTION RESIDENTIAL USE ONLY
LAMINATE FLOOR
THICKNESS
Product suitability
Product features
Residential Limited
Warranty
*
Commercial Limited
Warranty
*
12mm
Standard Plank
(includes silent underlay)
• Suitable for large
residential &
general
commercial fl oor
areas
• Restaurants,
hotel rooms,
retail & public
spaces
• Heavy residential
& general
10mm
Narrow Plank
• Suitable for large
residential &
general
commercial fl oor
areas
• High use
residential &
general
commercial traffi c
8mm
Standard Plank
• Suitable for large
residential &
general
commercial fl oor
areas
• High use
residential &
general
commercial traffi c
7mm
Standard Plank
• Suitable for
medium
residential fl oor
areas
• General residential
traffi c
6mm
Standard Plank
• Suitable for small
residential fl oor
areas only
(excluding
hallways, family
rooms & kitchens)
• Light residential
traffi c
commercial traffi c
• High strength
locking profi le
• Premium grade
quality &
appearance
• Silent underlay
attached to plank
for superior
sound insulation
• Stronger
protective wear
layer on surface
• High strength
locking profi le
• Thicker substrate
for reduced foot
noise
• Durable surface
overlay for high
traffi c areas
• Australian
woodgrain décors
• Authentic traditional
plank design
• High strength
locking profi le
• Thicker substrate
for reduced foot
noise
• Durable surface
overlay for high
traffi c areas
• Good general
fl ooring product
• Ideal for small
to medium size
residential
fl oor areas
• Ideal for cost
effective room
makeover
20 years 15 years 15 years 10 years 7 years
7 years 7 years 7 years ––
Note: Formica Laminate Flooring is not recommended for use in bathrooms, laundries and toilets. It is also not recommended for installation on sub-fl oors with
underfl oor heating.
*Please obtain a copy of the Formica Laminate Flooring Limited Warranty from The Laminex Group or from an approved supplier.
Technical information
LAMINATE FLOOR THICKNESS
Product Class
Commercial Limited Warranty
Residential Limited Warranty
Size per plank
Planks per pack
m2 per pack
Weight per pack (approx)
Substrate
Silent Underlay
Formaldehyde Emission
Swelling (EN 317)
Impact Resistance (EN 685)
Abrasion Resistance (EN 685)
Slip Resistance (AS/NZS 4586)
Fire Resistance ISO 9239
• Average Critical Radiant Flux 7.1kW/m
• Mean Distance of Flame Travel 343.3mm 343.3mm 343.3mm – –
• Average Smoke Observation 6% 6% 6% – –
12mm 10mm 8mm 7mm 6mm
32 32 32 31 23
7 years 7 years 7 years — —
20 years 15 years 15 years 10 years 7 years
1380 x 193 x 12mm 1380 x 116 x 10mm 1380 x 19 3 x 8mm 1380 x 193 x 7 mm 1380 x 193 x 6mm
587810
1.331m
Aquastop 6 HDF Aquastop 6 HDF Aquastop 6 HDF Standard HDF Standard HDF
2
15kg 10kg 15kg 15kg 15kg
Yes – – – –
E1 E1 E1 E1 E1
<6% <6% <6% <12% <12%
IC2 IC2 IC2 IC1 IC1
AC4 AC4 AC4 AC3 AC3
R9 R9 R9 – –
2
1.281m
7.1kW/m
2
2
1.864m
7.1kW/m
2
2
2.130m
2
––
2.663m
2
17
Page 18

Limited Warranty information
FORMICA® LAMINATE FLOORING
RESIDENTIAL LIMITED WARRANTY
Floor Thickness Limited Warranty Period
6mm 7 years
7mm 10 years
8mm 15 years
10mm 15 years
12mm 20 years
Terms and Conditions: 1.The Laminex Group as the
distributor of Formica Laminate Flooring, guarantees to the
fi rst purchaser that the product is free from manufacturing
defects notifi ed in writing to The Laminex Group within 15
Years from the date of original supply. 2.The Laminex
Group's liability to the fi rst purchaser for defects is limited to
those defects caused directly by the manufacturing process
for Formica Laminate Flooring. 3.This warranty given by
The Laminex Group is in addition to, and in no way limits,
any warranty enjoyed by the fi rst purchaser pursuant to the
Australian Trade Practices Act 1974 or relevant State Fair
Trading legislation, New Zealand Fair Trading Act and the
New Zealand Consumer Guarantees Act. 4.This warranty
guarantees the product against splitting, delamination,
twisting, structural deformation and wearing through of
the wear and stain resistant coating in a residential
environment for the nominated period. It is conditional
upon the product being used in normal wear residential
situations only and installed, maintained and protected
from damage strictly in accordance with the
manufacturer’s guidelines as supplied with the product
(see reverse side of this label). 5.This warranty is restricted
to the replacement of the defective product only and does
not extend to cover claims for any consequential loss,
damage or expense incurred (including but not restricted to
labour and other costs in replacing the product,
inconvenience and physical injury). In the event of a colour
no longer being available in the range, a selection from the
current range will be offered in its place.
FORMICA
COMMERCIAL LIMITED WARRANTY
Floor Thickness Limited Warranty Period
8mm 7 years
10mm 7 years
12mm 7 years
Terms and Conditions: 1.The Laminex Group as the
distributor of Formica Laminate Flooring, guarantees to the
fi rst purchaser that the product is free from manufacturing
defects notifi ed in writing to The Laminex Group within 7
Years from the date of original supply. 2.The Laminex
Group's liability to the fi rst purchaser for defects is limited to
those defects caused directly by the manufacturing process
for Formica Laminate Flooring. 3.This warranty given by
The Laminex Group is in addition to, and in no way limits,
any warranty enjoyed by the fi rst purchaser pursuant to the
Australian Trade Practices Act 1974 or relevant State Fair
Trading legislation, New Zealand Fair Trading Act and the
New Zealand Consumer Guarantees Act. 4.This warranty
guarantees the product against splitting, delamination,
twisting, structural deformation and wearing through of
the wear and stain resistant coating in a general
commercial environment for a period of 7 Years. It is
conditional upon the product being used in normal wear
general commercial situations only and installed,
maintained and protected from damage strictly in
accordance with the manufacturer’s guidelines as
supplied with the product (see reverse side of this label).
5.This warranty is restricted to the replacement of the
defective product only and does not extend to cover claims
for any consequential loss, damage or expense incurred
(including but not restricted to labour and other costs in
replacing the product, inconvenience and physical injury).
In the event of a colour no longer being available in the
range, a selection from the current range will be offered in
its place.
®
LAMINATE FLOORING
The following exclusions are applicable to both residential and commercial limited warranties: 1.Movement in the fl ooring
resultant from incorrect installation methods. 2.Expansion caused as a direct result of the following: (a) Moisture rising from
the sub-fl oor and being absorbed into the product. (b) Moisture being absorbed into the product as a direct result of water/
liquid spillage or excess water being used to clean the product. 3.Damage caused as a direct result of the following: (a)
Vehicular traffi c (b) Abnormal use (c) Abusive use (d) Poor maintenance (e) The fl oor being exposed to excessive sand, grit
or gravel. 4.Where the product has been used in high humidity areas (wet areas, etc). 5.Outdoor applications. 6.Defective
planks used in the installation. Upon making a warranty claim you will need to provide proof of purchase along with an original
Formica Laminate Flooring product label. Upon approval of a claim, The Laminex Group will supply replacement product in
the closest décors available in the range at the time of the claim.
18
Page 19

19
Page 20
For more information call 132 136 or visit www.formica.com.au. For the location of your closest retailer phone 1800 002 204.
Formica Laminate Flooring is marketed and distributed by The Laminex Group. A division of Laminex Group Pty Limited ABN 98 004 093 092. Made in Europe to The Laminex Group
specifi cations. The colours of the photographs depicted in the brochure are as close to the Formica Laminate Flooring range as photographic lighting and modern printing processes
allow. The Laminex Group recommends the use of laminate fl ooring cleaning products, please visit www.formica.com.au for specifi c care and cleaning information. Formica Laminate Flooring
is no different than any other material in that darker colours will always show scratches and superfi cial wear and tear more readily than lighter colours. Formica Laminate Flooring should
be protected from strong direct sunlight as continuous exposure may cause discolouration or fading to the surface over time. Please obtain a copy of the terms and conditions of the
Formica Laminate Flooring limited warranty from The Laminex Group or visit www.formica.com.au. This Warranty is in addition to any rights that may exist under the Trade Practices Act.
®
Formica
 Loading...