

Page 1
Instruction Manual
for Snap Lock Chicken Coop Model LG12
Page 2
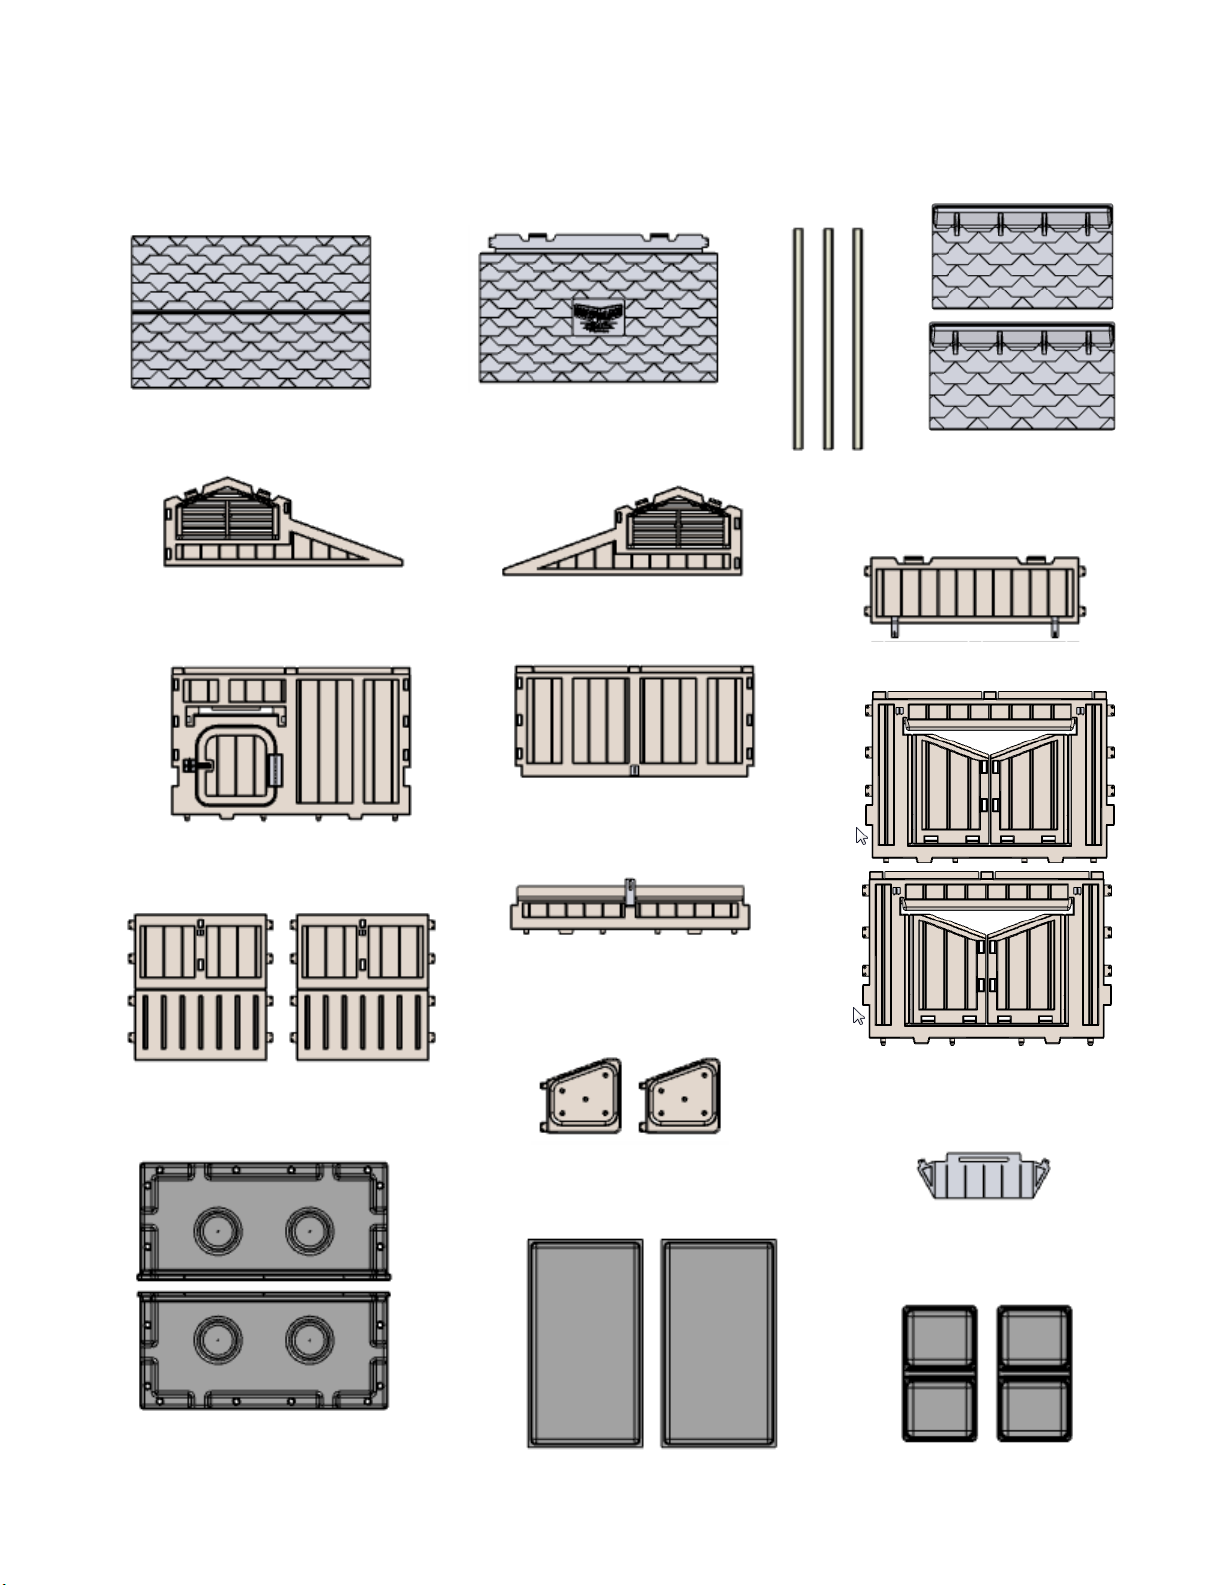
This kit for the Large Model SNAP LOCK CHICKEN COOP includes the following:
• one envelope containing instructions, the warranty, five nylon ratchet fasteners, and eight carabiners.
• It also includes all the parts listed on this page.
Hip Roof (1) Lid Roof (1)
Nest Box Lids (2)
Coop Base halves (2)
(one “A” side and one “B” )
Litter Trays (2) Nest Trays (2)
Roosts (3)
Front Gable (1)
Back Gable (1)
Front Wall (1)
Back Wall (1)
Removable Panel (1)
Awning (1)
Nest Boxes (2)
Nest Side Walls (2)
Upper Side Wall (1)
Nest Dividers (2)
PARTS LIST FOR LARGE MODEL SNAP LOCK CHICKEN COOP
Page 3
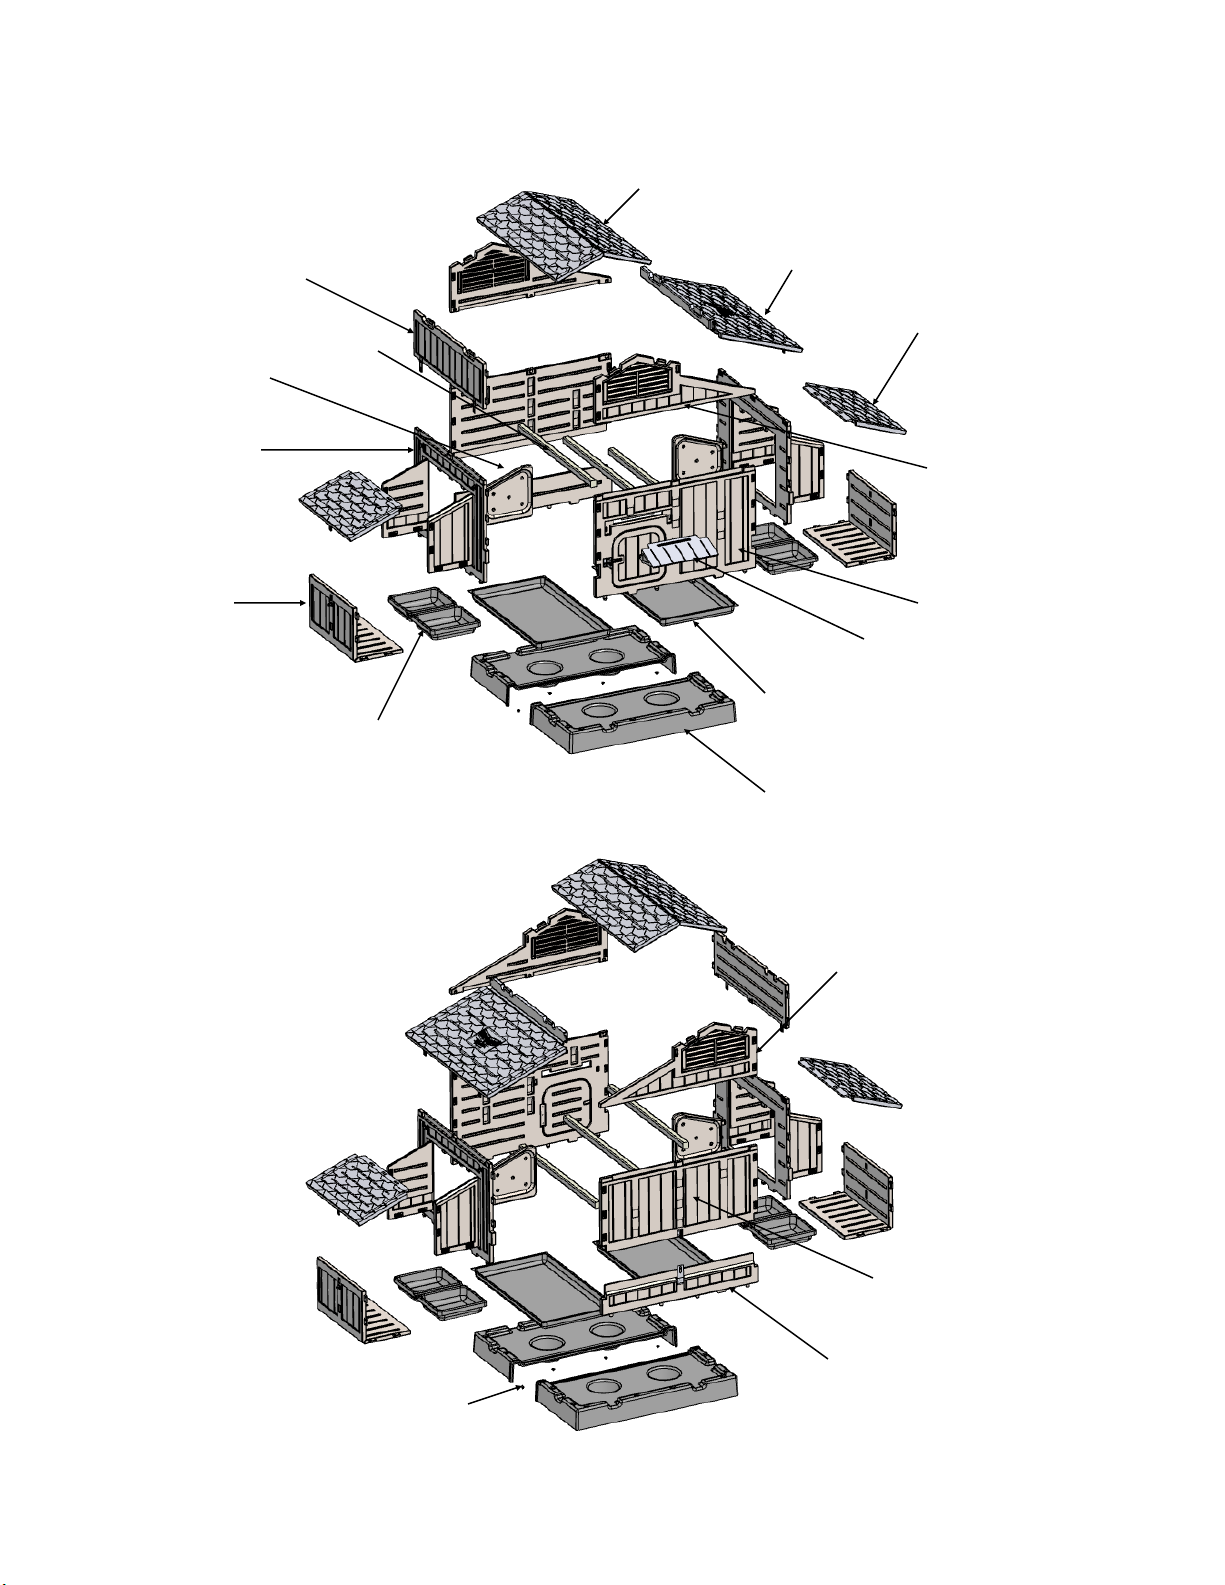
Exploded Views with Part Descriptions
[Front View]
[Back View]
Hip Roof
Lid Roof
Roost
Nest Box Lid
Front Gable
Front Wall
Back Gable
Back Wall
Removable Panel
Upper Side Wall
Nest Side Wall
Nest Box
Nest Divider
Awning
Coop Base halves
Litter Tray
Nest Trays
Nylon Ratchet Fastener
Page 4
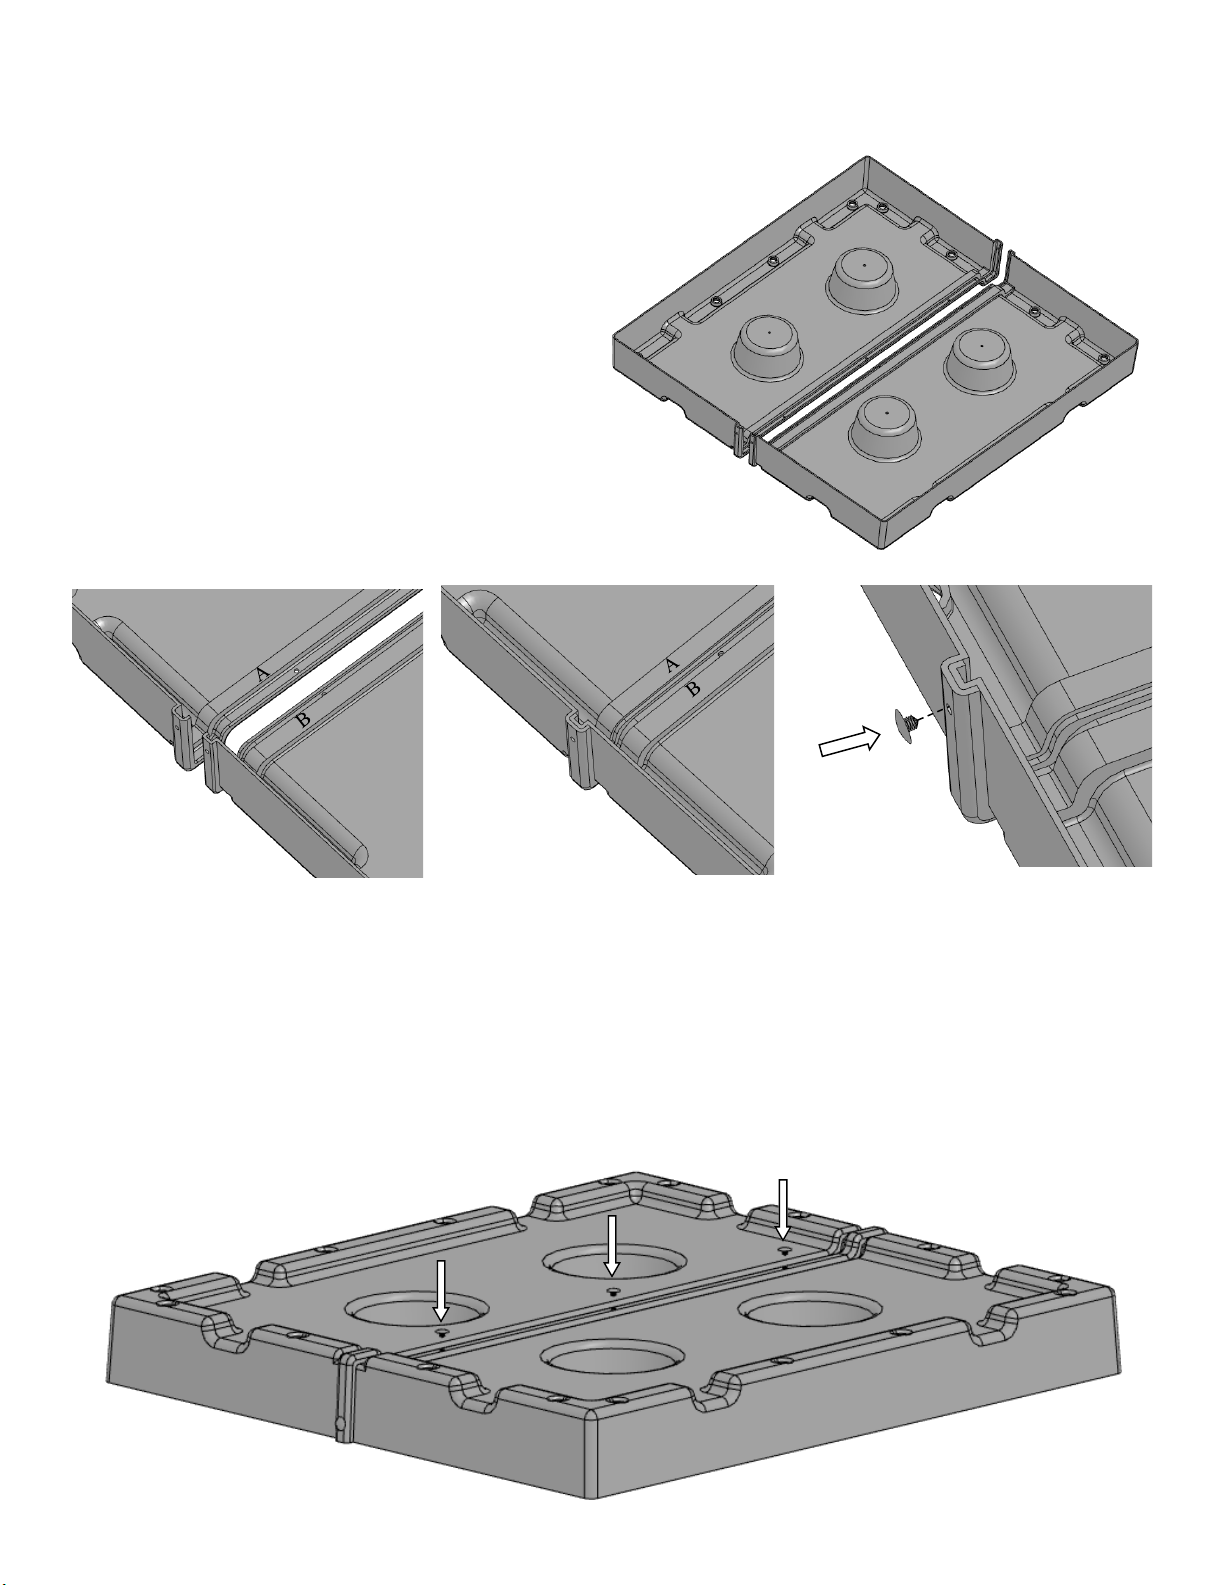
Coop Base Assembly
Step 1: Assemble the Coop Base. Start by
flipping both halves upside down (Fig.a), so
that you can see the underside of the coop
base. On the underside, you will see that one
Coop Base half is marked with an “A” and one
is marked with a “B”.
The “A” half has the larger
channel and the “B” half has the
smaller channel. (Fig. 1b)
Place the “B” side’s channel into
the “A” side’s channel, overlapping both halves together. There
are five 1/4” holes in both the
channels that will line up when
finished. (Fig. 1c)
Take one of the five nylon ratchet
fasteners and insert it through one of
the side holes, being sure to penetrate both halves. Take the second
fastener and do the same on the other side. (Fig. 1d)
Now you can flip the Coop Base over and insert the last three fasteners into the three 1/4” holes remaining (Fig.
1e). In order to make sure that you penetrate the “B” half, you may need to support the base from underneath,
while you press down the fastener. Stacking two of the roosts and placing them underneath the Coop Base may
help.
Fig. 1a
Fig. 1b
Fig. 1c
Fig. 1d
Fig. 1e
Page 5
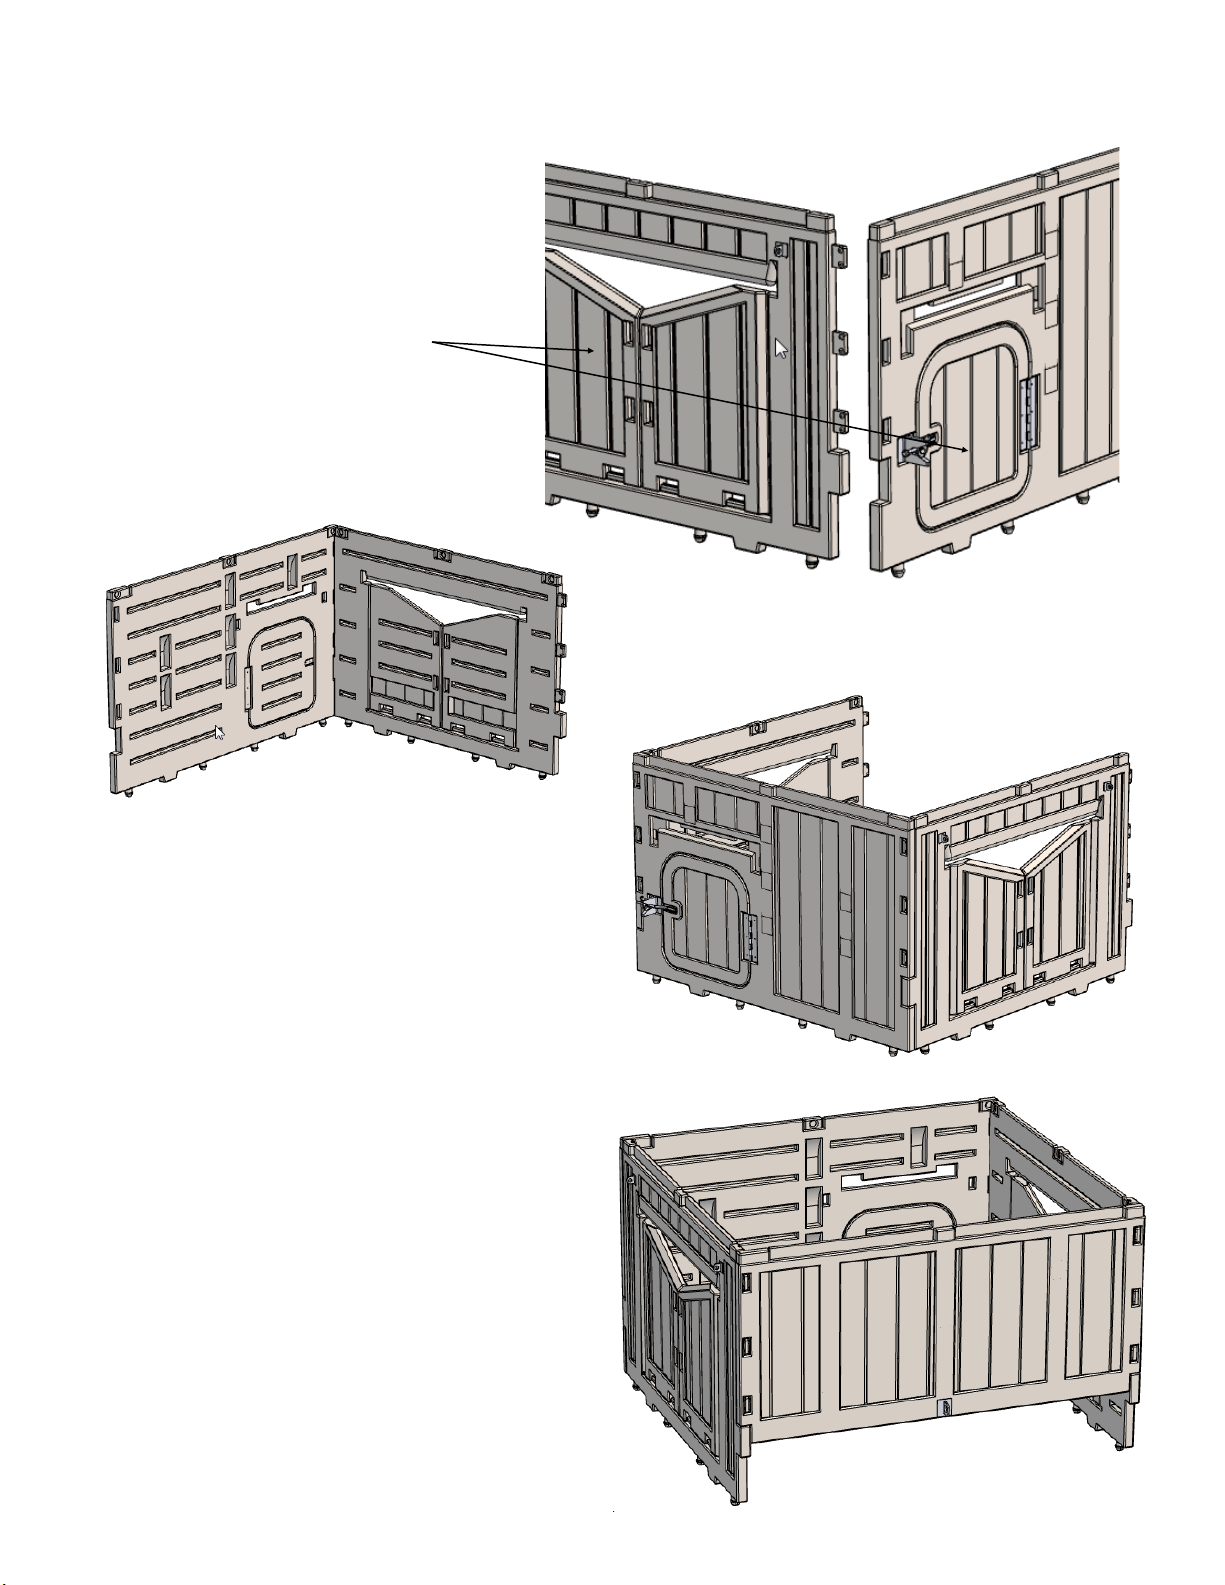
Coop Wall Assembly
Step 2: Assemble the Front Wall to a Nest Side
Wall by aligning, and then inserting the tabs on
the Nest Side Wall into the slots of the Front
Wall. (Fig.2a)
Please note the difference between what the exterior of the
walls look like and what the interior of the walls look like. Vertical
lines and hardware face out.
This is what the interior of
the walls look like. (Fig.2b)
Step 3: Assemble the Front Wall to the other
Nest Side Wall by aligning, and then inserting
the tabs on the Nest Side Wall into the slots of
the Front Wall. (Fig. 3)
Step 4: Assemble the two Nest Side Walls to
the Back Wall by aligning, and then inserting
the tabs on the Nest Side Walls into the slots
of the Back Wall. (Fig. 4)
Fig. 2a
Fig. 2b
Fig. 3
Fig. 4
Page 6
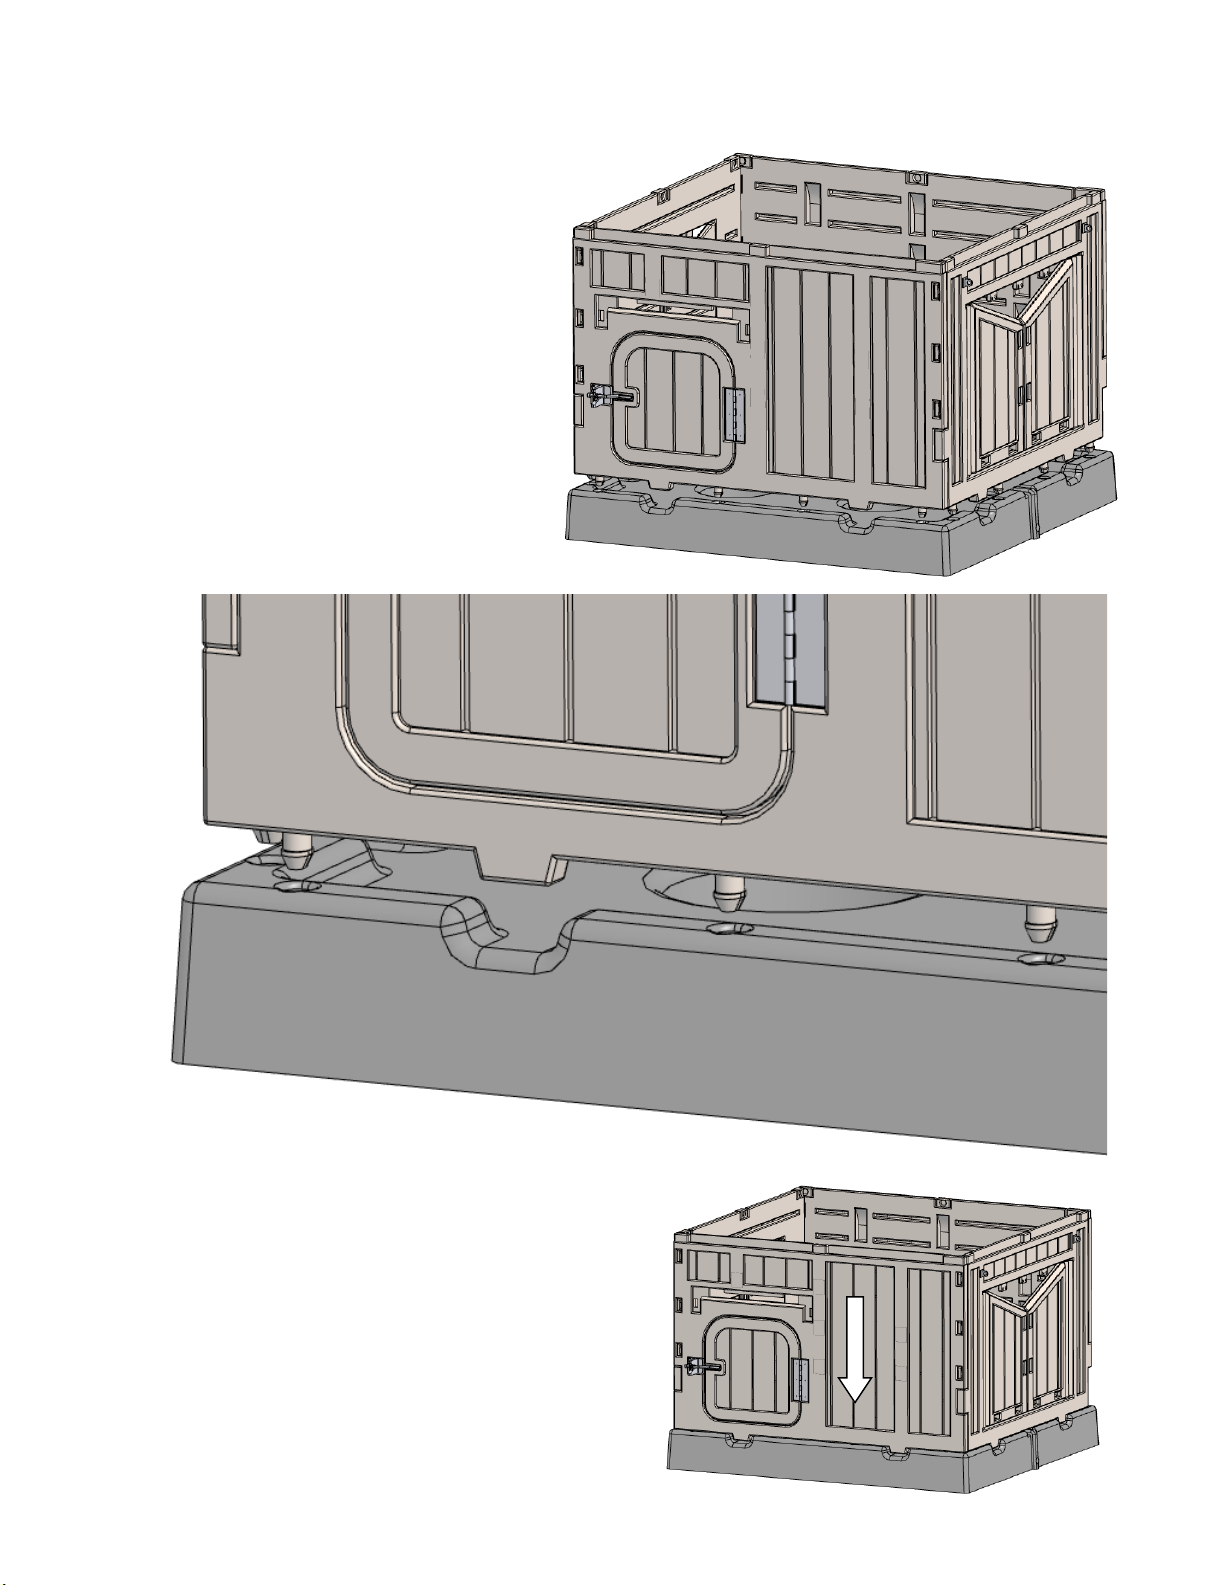
Coop Wall to Coop Base Assembly
Step 5: Assemble the four walls to the Coop
Base by aligning the pegs on the bottom of
the walls with the corresponding holes in the
Coop Base (Fig. 5a). Please note that the Coop Base is not square and measures 40” by
37”. The Front Wall and the Back Wall is longer Than the Nest Side Walls. Align the Front
Wall with the 40” side of the Coop Base and
all the pegs will line up.
Press down firmly on the walls, making sure that
the head on every peg has fully penetrated the
holes in the Coop Base and is snapped in. (Fig. 5c)
Fig. 5a
Fig. 5b
Fig. 5c
Page 7
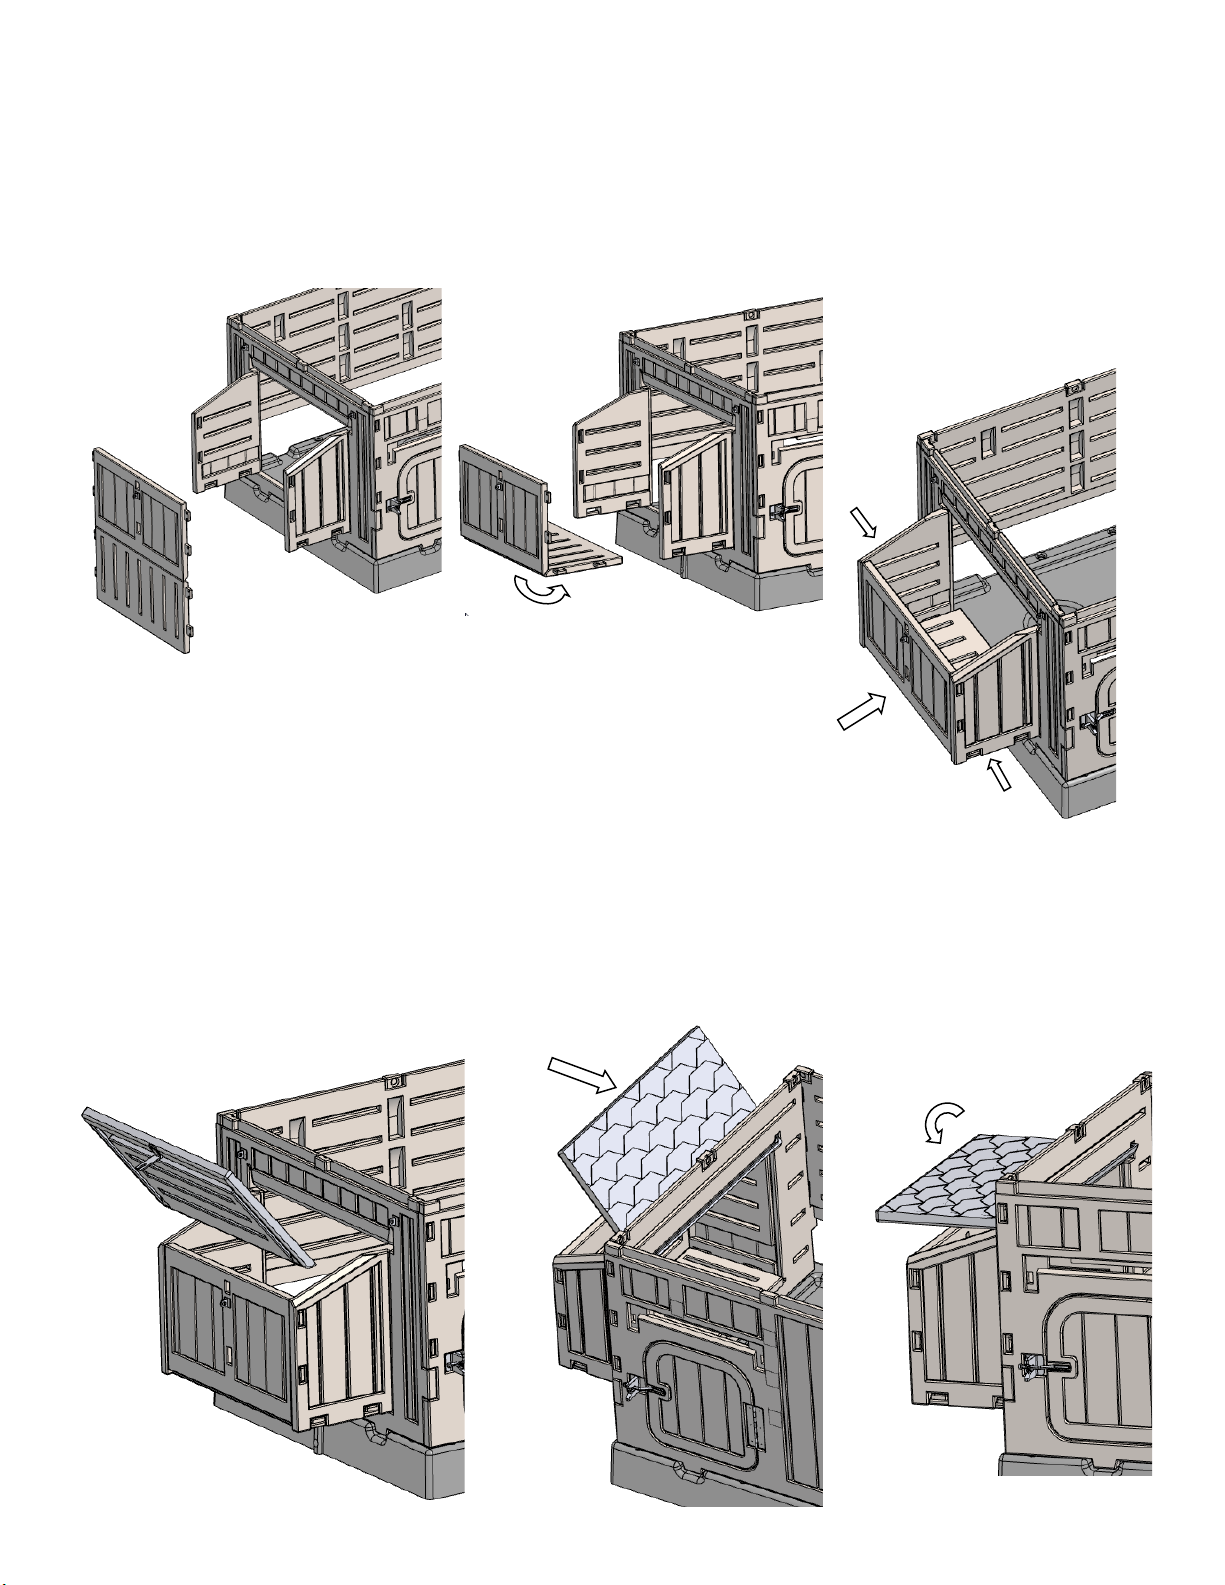
Nest Box Assembly
Step 6: Assemble the Nest Box to the Nest Side Wall by first folding the two flaps on the Nest Side Wall outward
(Fig. 6a). Then fold the Nest Box panel 90 degrees (Fig. 6b) and place it between the flaps, aligning the tabs on the
Nest Box with the slots on the Nest Side Wall (Fig. 6c). Now, firmly apply pressure to both the flaps until all eight
tabs snap into place.
Fig. 6a
Fig. 6b
Fig. 6c
Fig. 7a
Fig. 7b
Fig. 7c
Step 7: Assemble the Nest Box Lid to the Nest Side Wall by first inserting the Nest Box Lid into the Nest Side Wall
at an angle (Fig. 7a) that will allow the back end of the lid to slide underneath the upper tab on the Nest Side Wall
(Fig. 7b). Sing down and the Nest Box Lid is in place. (Fig. 7c)
Page 8
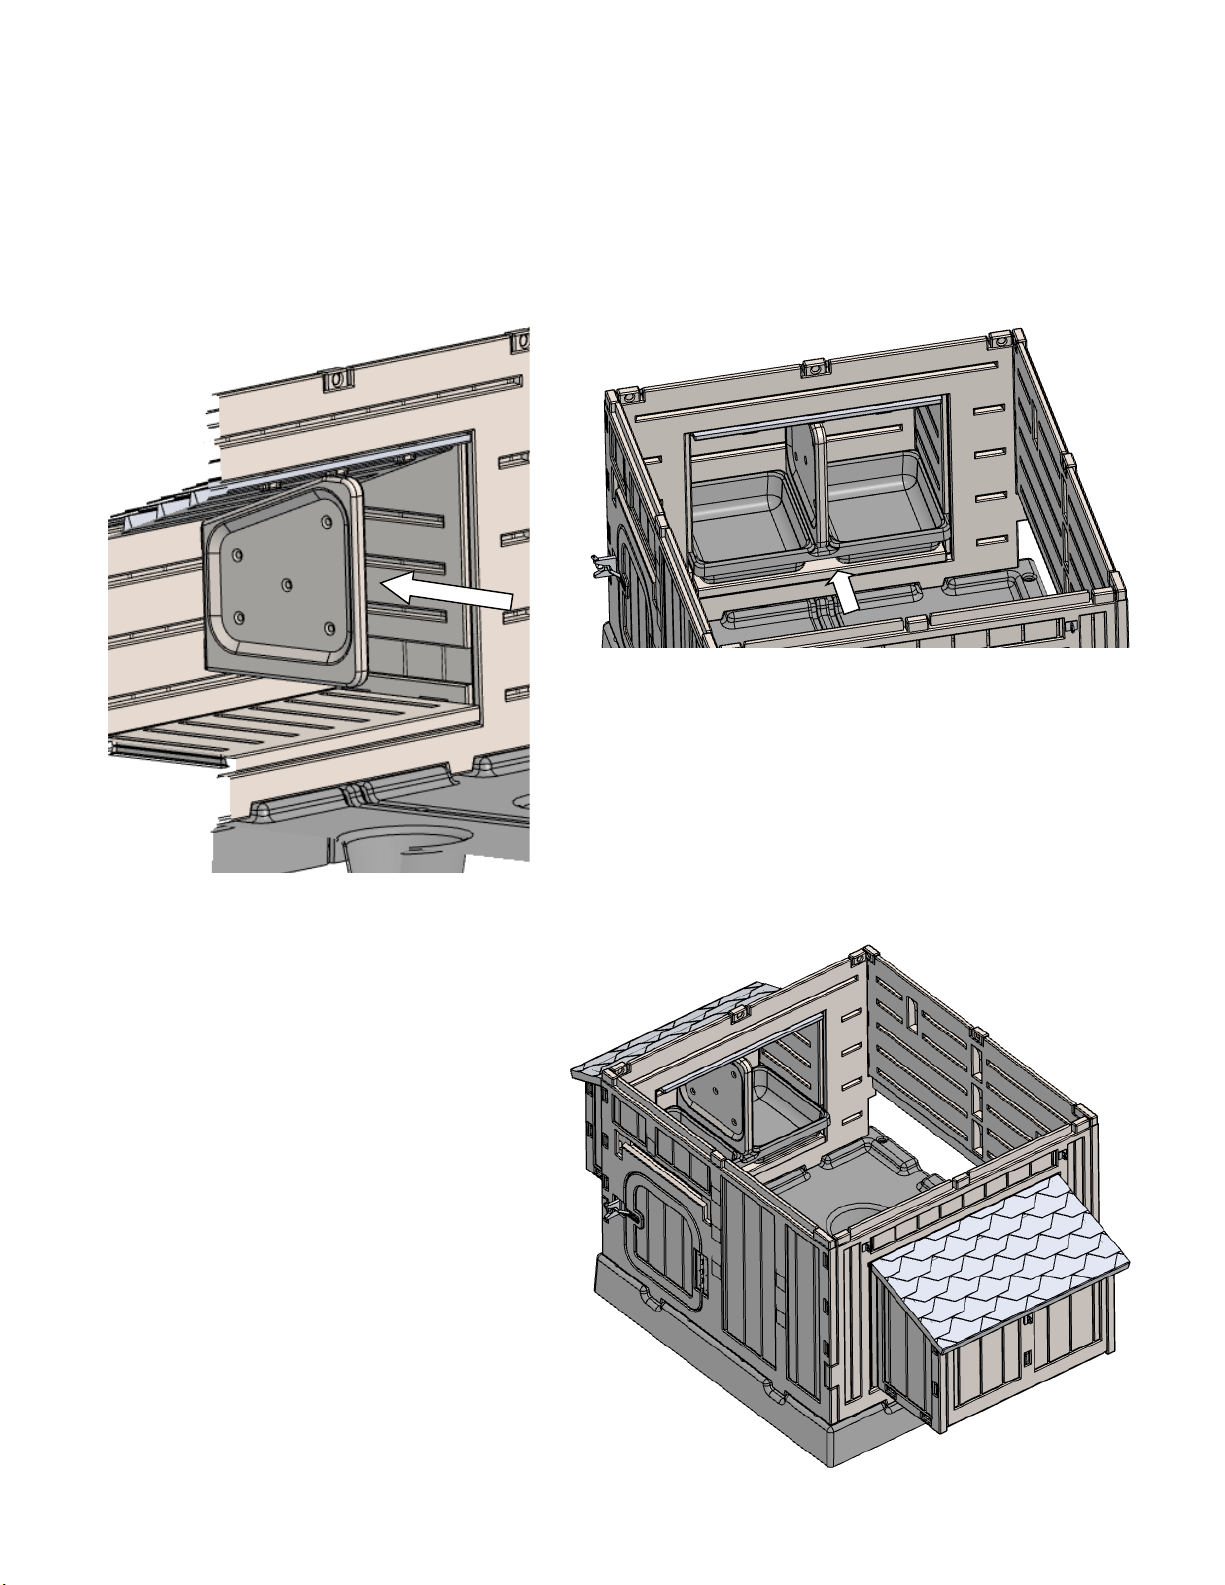
Nest Box Assembly
Step 8: Assemble the Nest Divider to the Nest
Box by aligning the two tabs on the Nets Divider to the slots in the Nest Box and inserting
the tabs until they snap into place (Fig. 8).
Fig. 8
Step 9: From inside the coop, slide the Nest
Tray into the Nest Box, underneath the Nest
Divider. (Fig. 9)
Fig. 9
Step 10: Repeat steps 6 through 9 to complete the Nest Box Assembly on the other
Nest Side Wall.(Fig. 10)
Fig. 10
Page 9
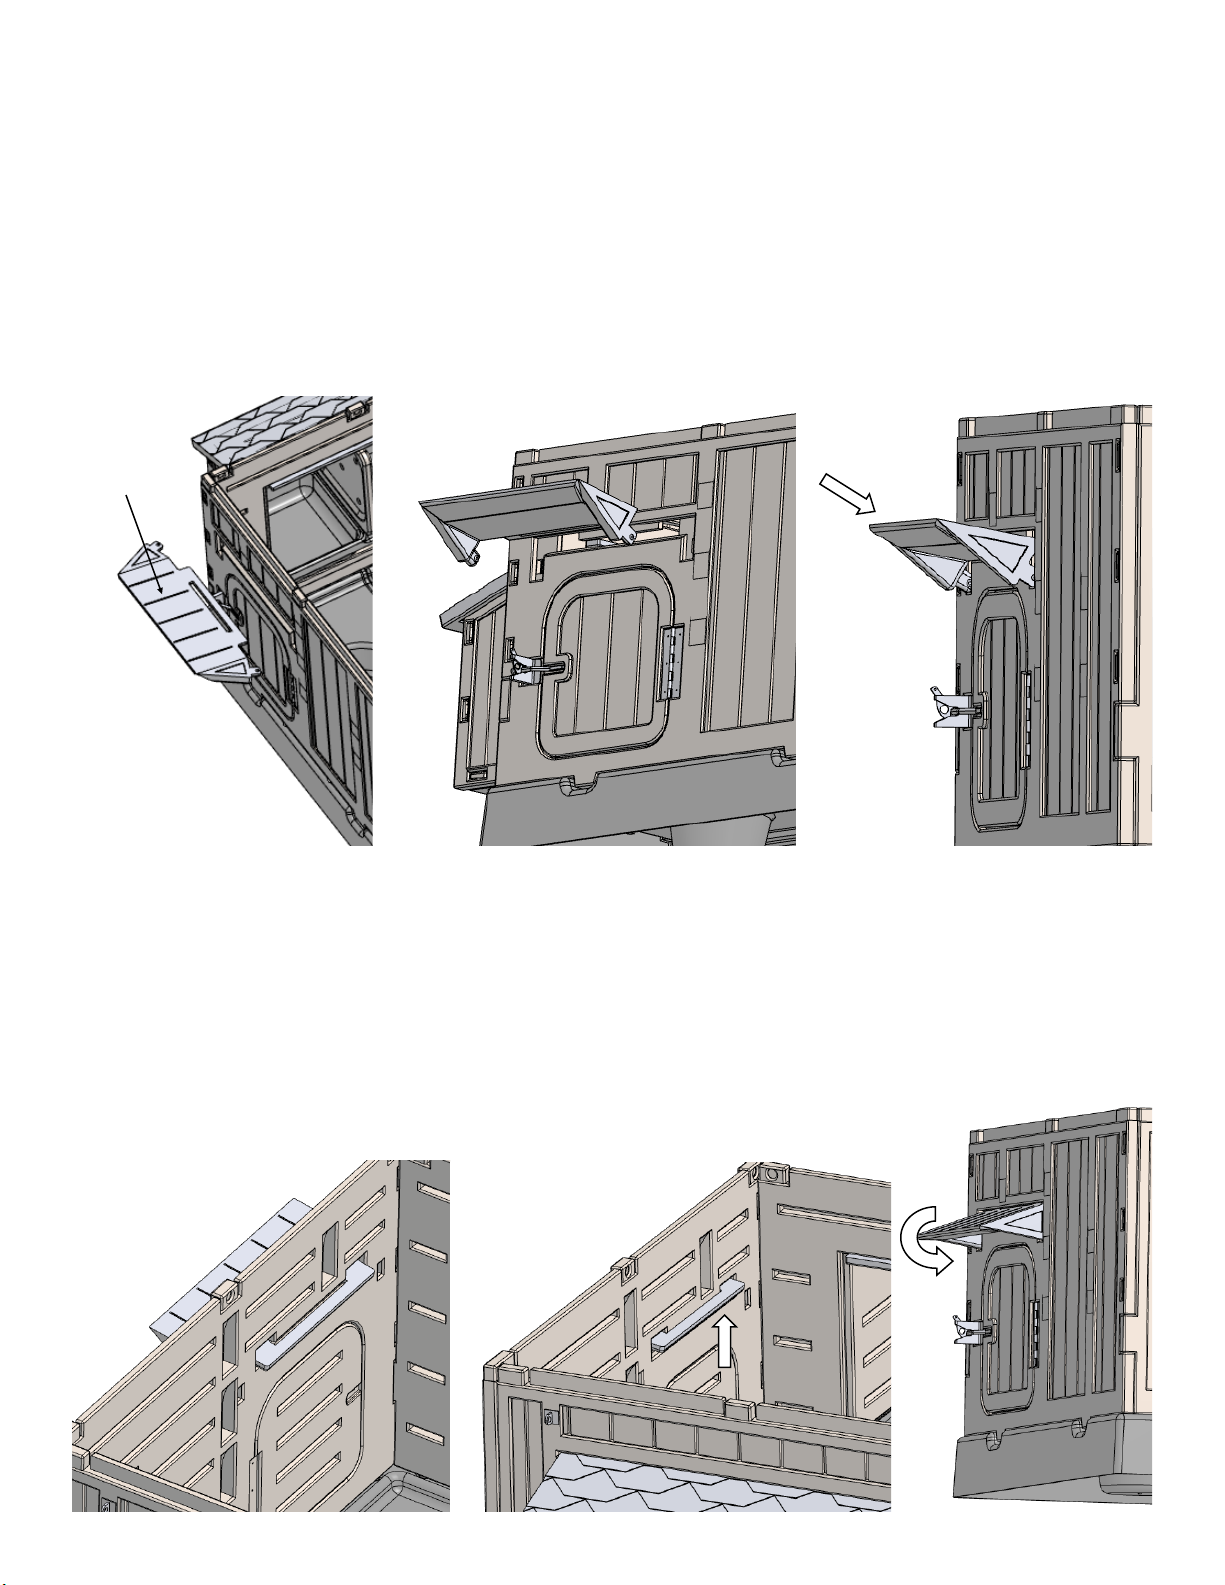
Awning Assembly
Step 11: Assemble the Awning to the Front Wall. The top of the Awning is the side that has
five lines formed in it (Fig. 11a). Fold both ends of the Awning down 90 degrees (Fig. 11b).
Insert the Awning into the opening above the door of the Front Wall at an angle (Fig.11c).
Fig. 11a
Fig. 11b
Fig. 11c
Fig. 11d
Fig. 11e Fig. 11f
Once the slot on the Awning is aligned with the tab on the Front Wall (Fig. 11e),
pull up on the Awning until the tab is in the slot (Fig. 11f). Now the tabs on each
end of the Awning should align with the two small slots on the Front Wall. Rotate
the Awning down, snapping the two side tabs into place. (Fig. 11d)
Top side
of Awning
Page 10
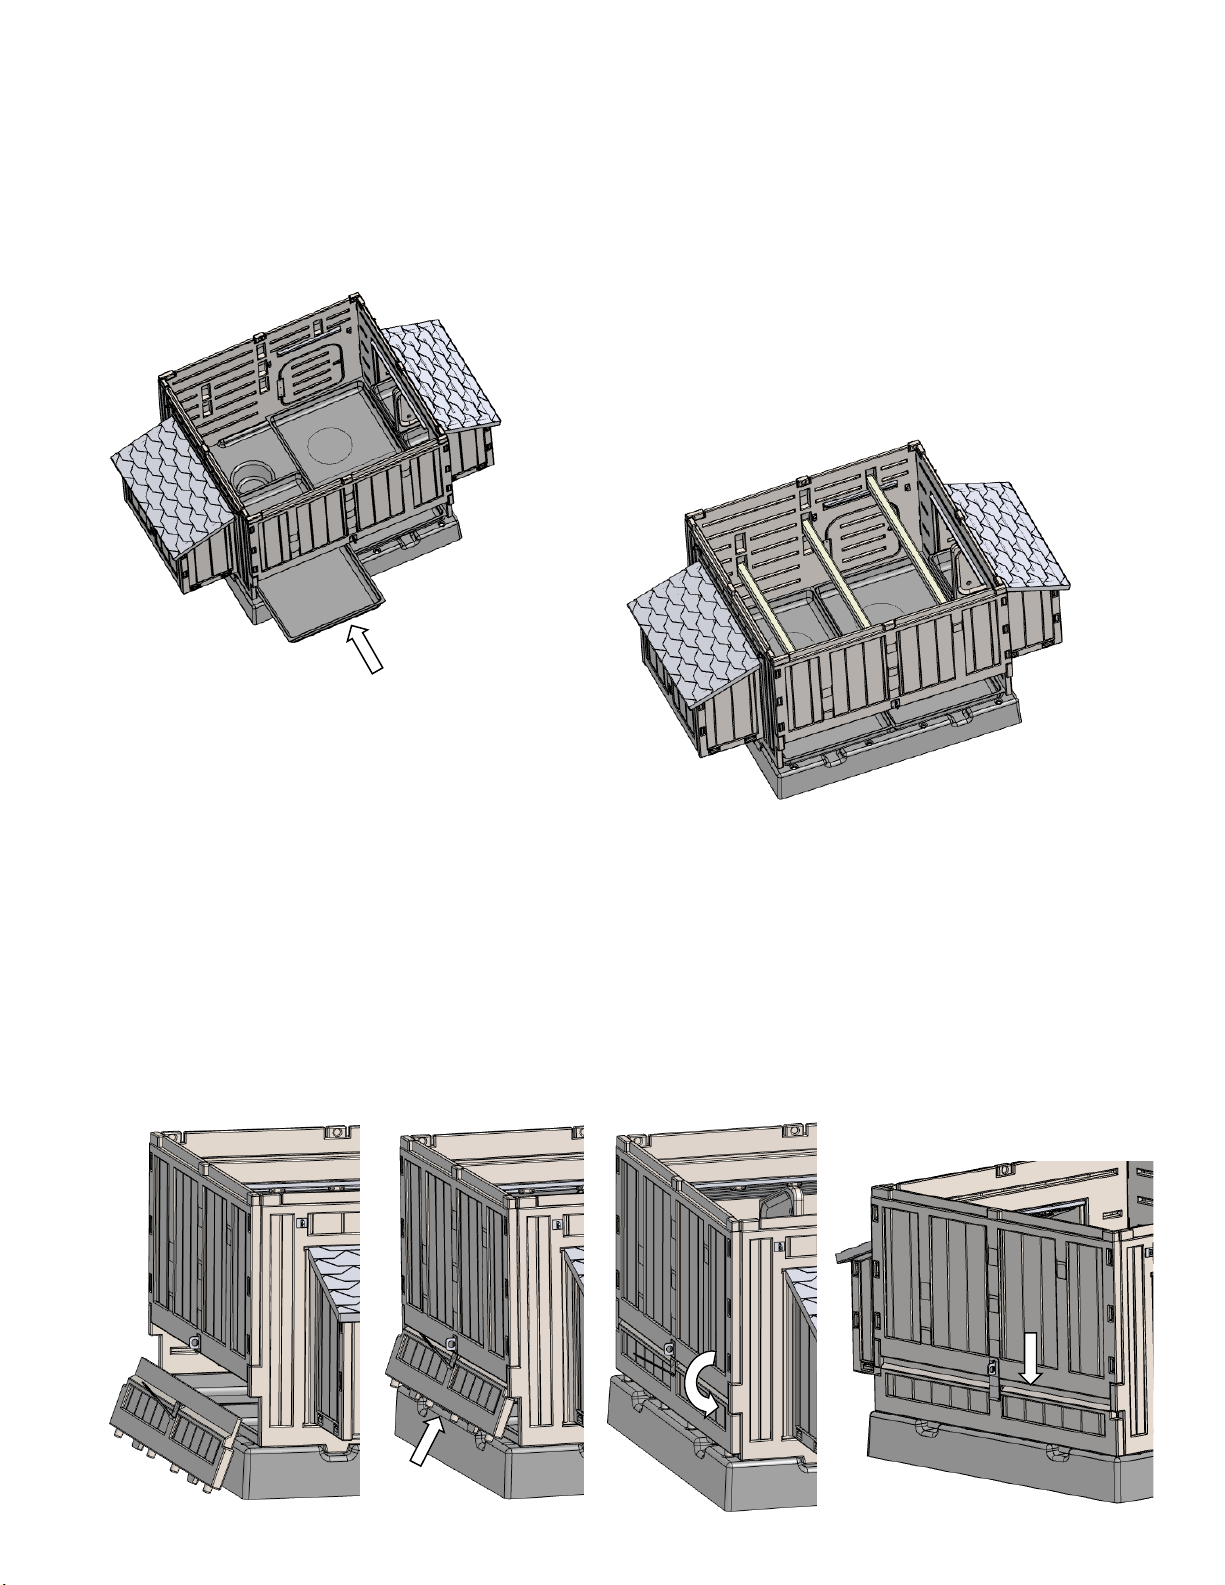
Litter Trays, Roosts, & Removable Panel
Step 12: Slide the two Litter Trays into
place. (Fig. 12)
Fig. 12
Step 13: Install the Roosts by seating them
into the recesses found in the Front and
Back Walls. (Fig. 13) What height and
whether or not you want to install all three
roosts depends on your situation.
Fig. 13
Step14: Install the Removable Panel by sliding it up, from underneath the Back Wall (Fig. 14a),
until the top of the Removable Panel is to the inside of the bottom of the Back Wall (Fig. 14b). Rotate the Removable Panel until it is vertical and the pegs on the bottom of the Removable Panel
are aligned with the holes in the Coop Base (Fig. 14c). Slide the Removable Panel down, inserting
the pegs into the holes, and close the hasp over the hasp eye. (Fig. 14d)
Fig. 14a Fig. 14b Fig. 14c Fig. 14d
Page 11
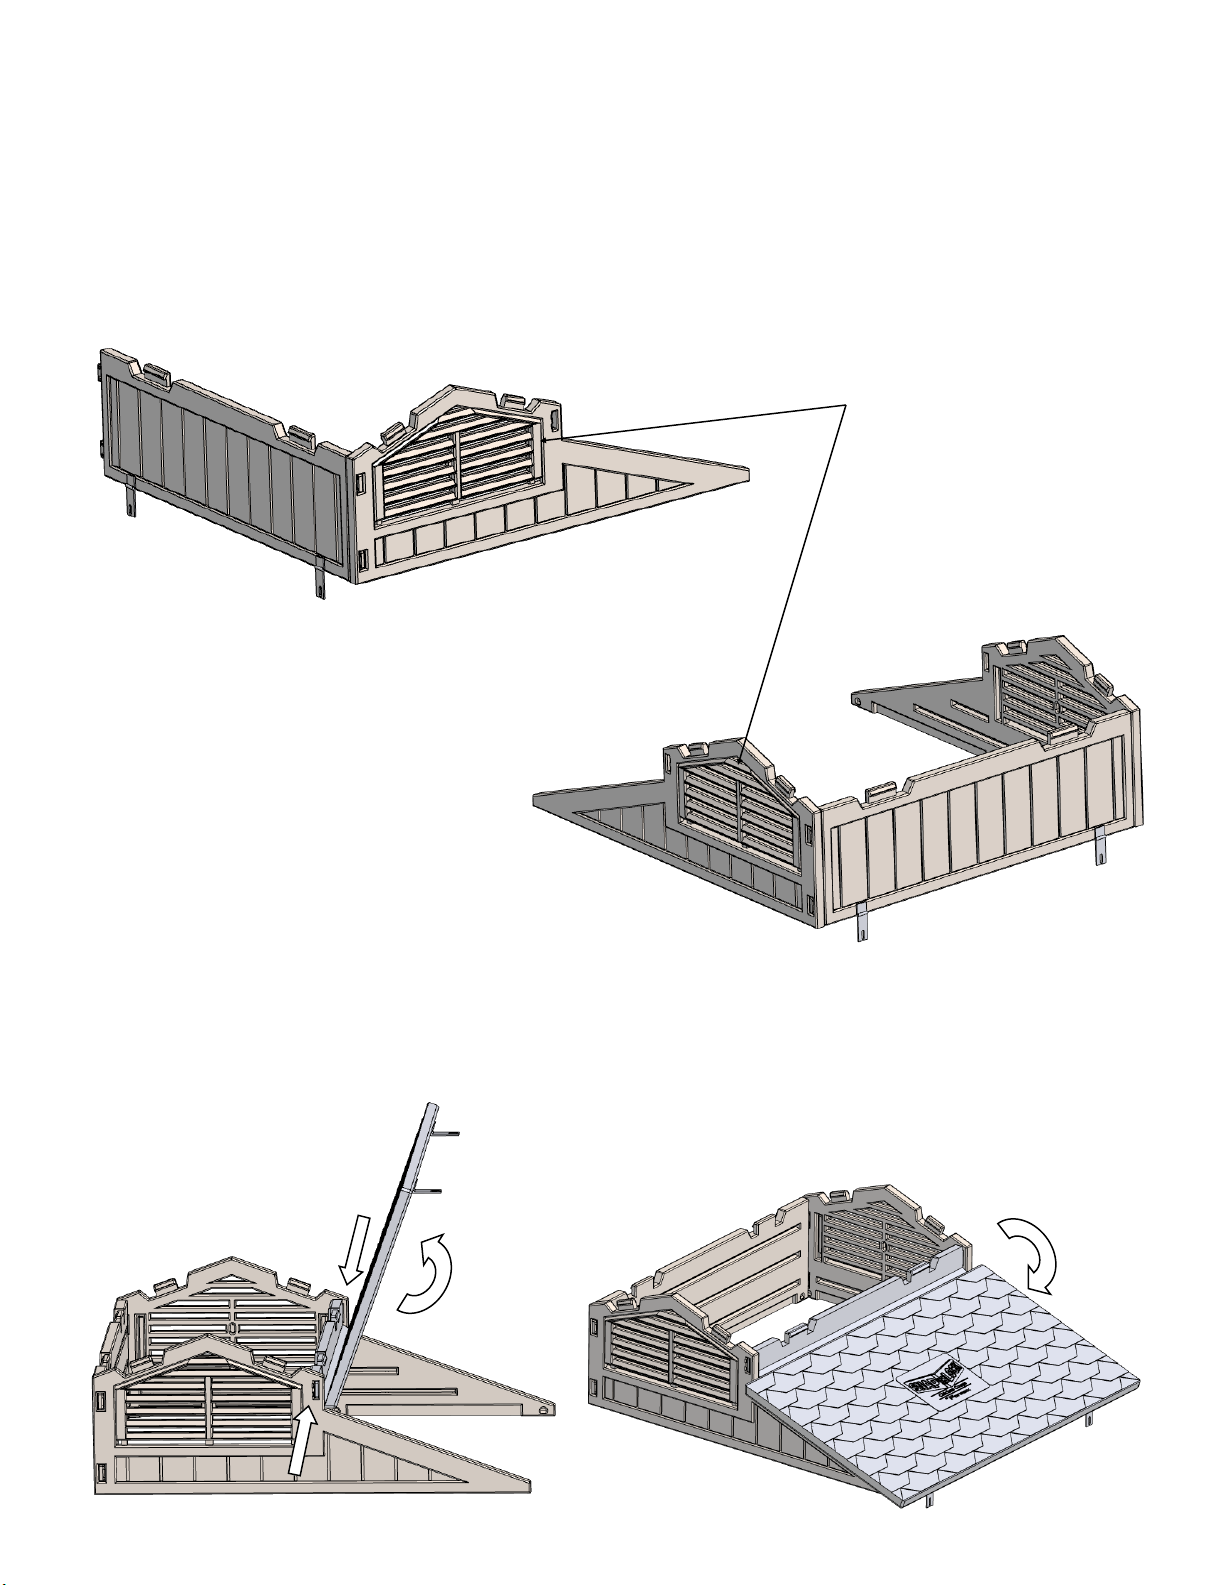
Roof Assembly
Step 15: Assemble the Front Gable and the Upper Side
Wall by inserting the tabs of the Upper Side Wall into the
slots of the Front Gable. (Fig. 15)
Fig. 15
Step 16: Assemble the Back Gable and the
Upper Side Wall by inserting the tabs of the
Upper Side Wall into the slots of the Back Gable. (Fig. 15)
Fig. 16
Adjustable vent covers are
pre-mounted to the outside
of the Gables.
Step 17: Assemble the Lid Roof by first folding it up at the hinge point, until it has enough clearance to insert
the tab on each end into the slot in the Front Gable and the slot in the Back Gable. (Fig. 17a)
Fig. 17a
Fig. 17b
Page 12
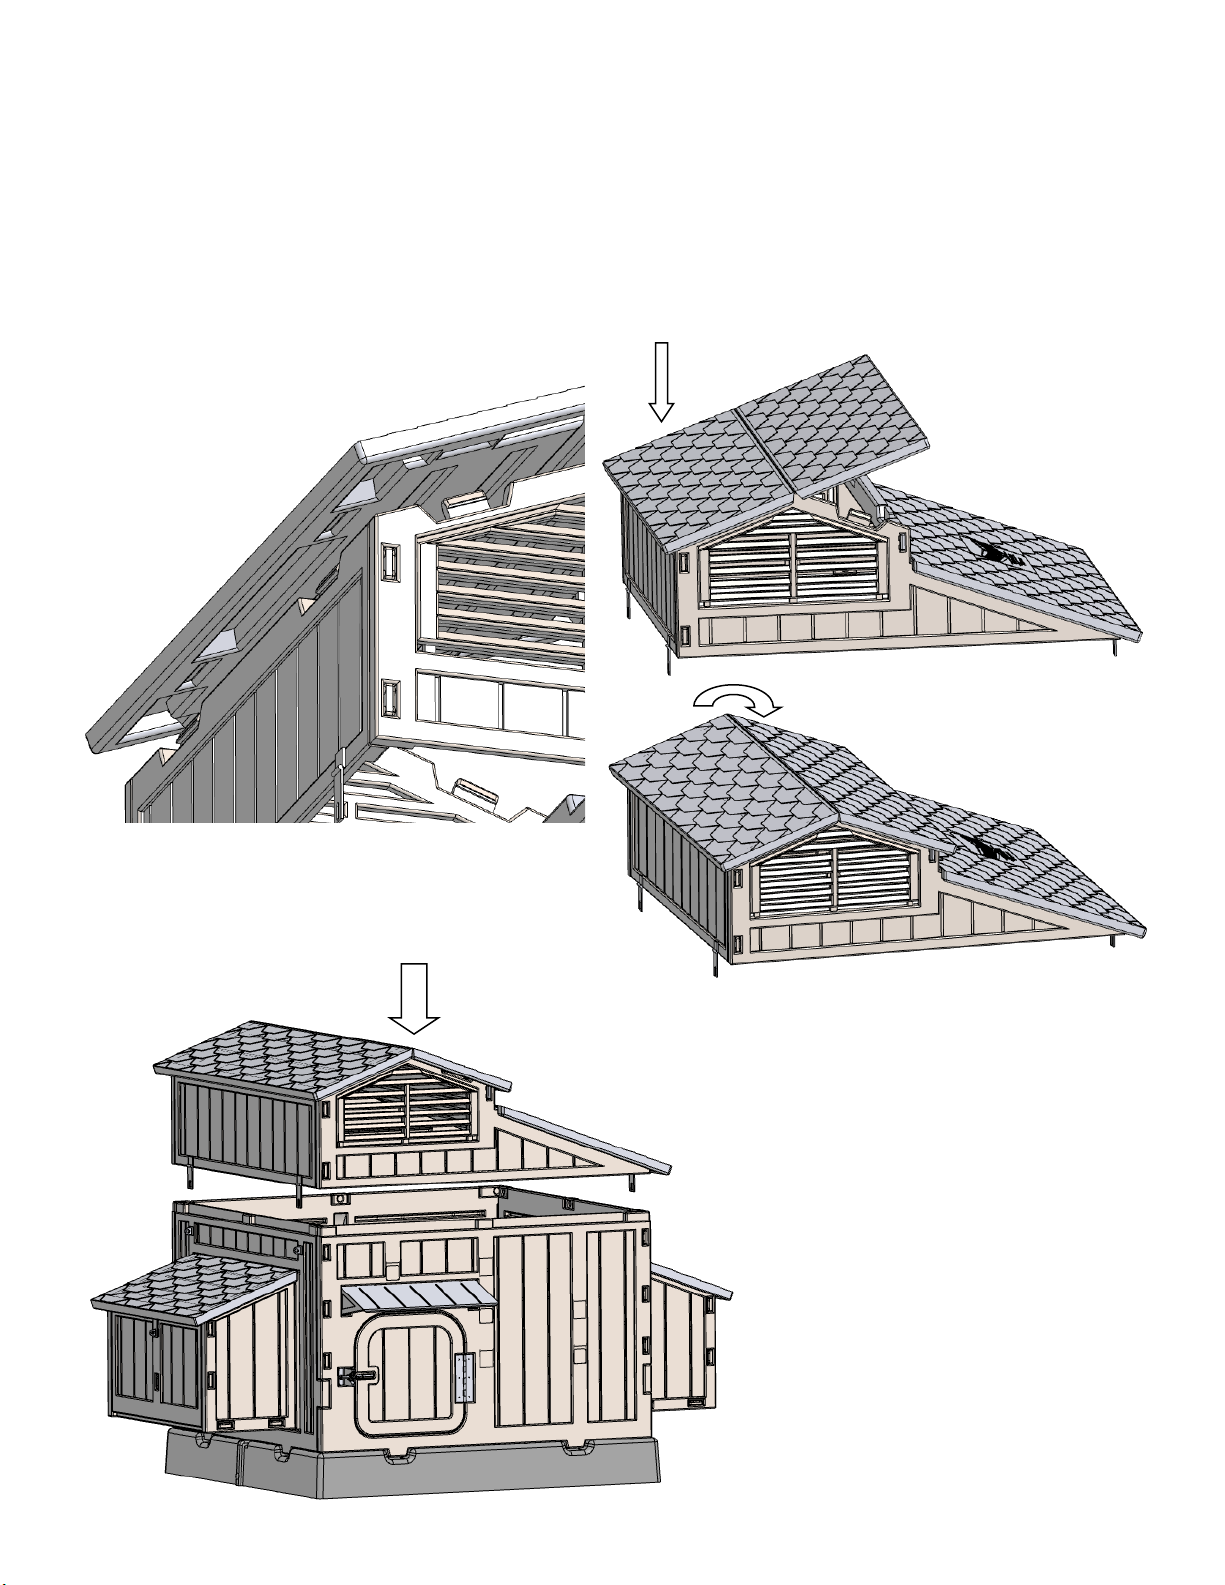
Roof Assembly
Step 18: Align the tabs located on the top of the Front Gable, Upper Side Wall, and Back Gable to
the slots located underneath the Hip Roof (Fig. 18a). First press down on one side of the Hip Roof
until all the tabs are snapped in (Fig. 18b), and then press down on the other side of the Hip Roof,
folding it down, until the rest of the tabs are snapped in. (Fig. 18c)
Fig. 18a Fig. 18b
Fig. 18c
Fig. 19
Step 19: Align the Roof Assembly
with the peek of the Front Gable
over the door of the Front Wall (Fig.
19). Then the entire Roof Assembly
can be snapped down to the rest of
the coop. All though you will have
easy access to the inside of the coop by simply lifting the Lid Roof, you
will also be able to remove the entire Roof Assembly for greater access.
Page 13
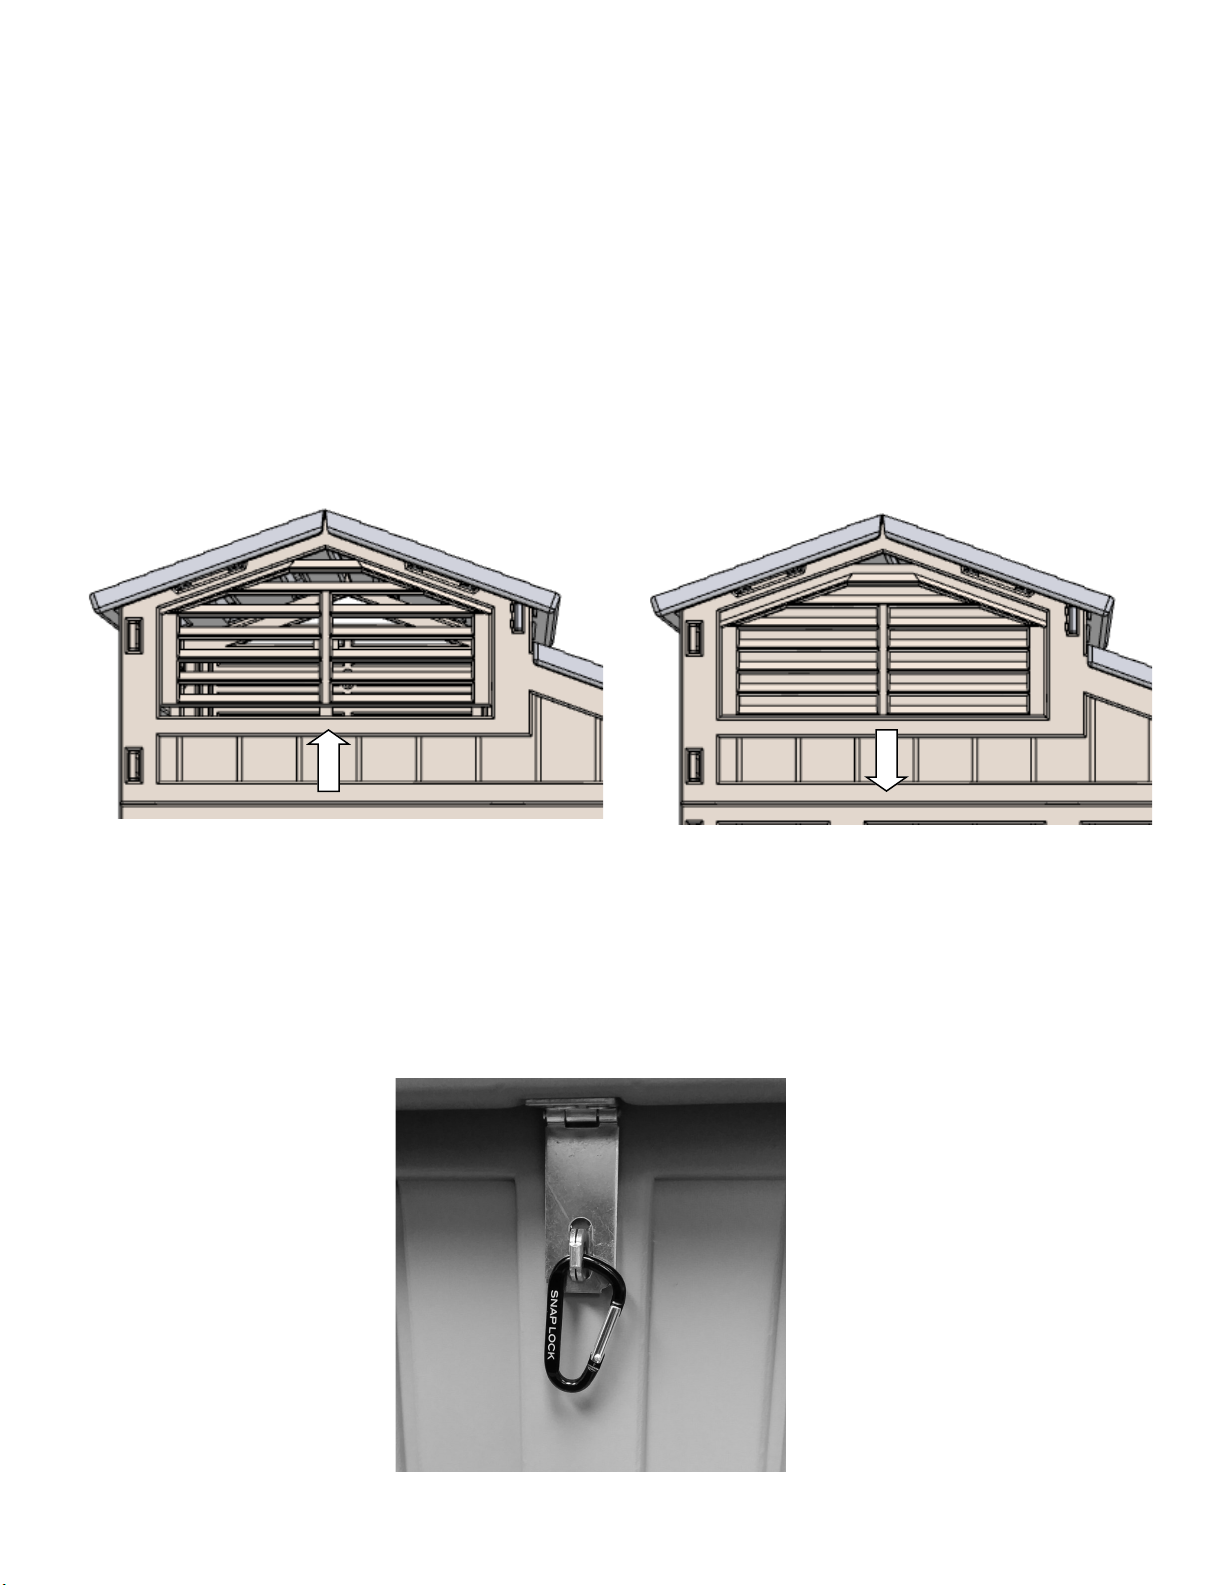
Adjustable Ventilation
Air circulation in the coop can be adjusted by simply lowering or raising the vent cover
that has been installed on both the Front Gable and the Back Gable. Raised all the way
up provides maximum ventilation and lowered all the way down will provide the maximum protection from draft. It also can be set at increments in-between. When the cover
is lowered all the way down, it shuts off most of the openings except for the very top
opening. This is to ensure that ammonia, water vapor, and other gases can still be vented even when the vent is closed. It is not recommended for ventilation ever to be completely shut off, even during very cold weather.
FULLY OPEN FULLY CLOSED
The carabiners provided with this coop can be attached to each hasp and
the gravity latch on the front door. This will help secure each entry point
from predators.
 Loading...