

Page 1
11
.
.
.
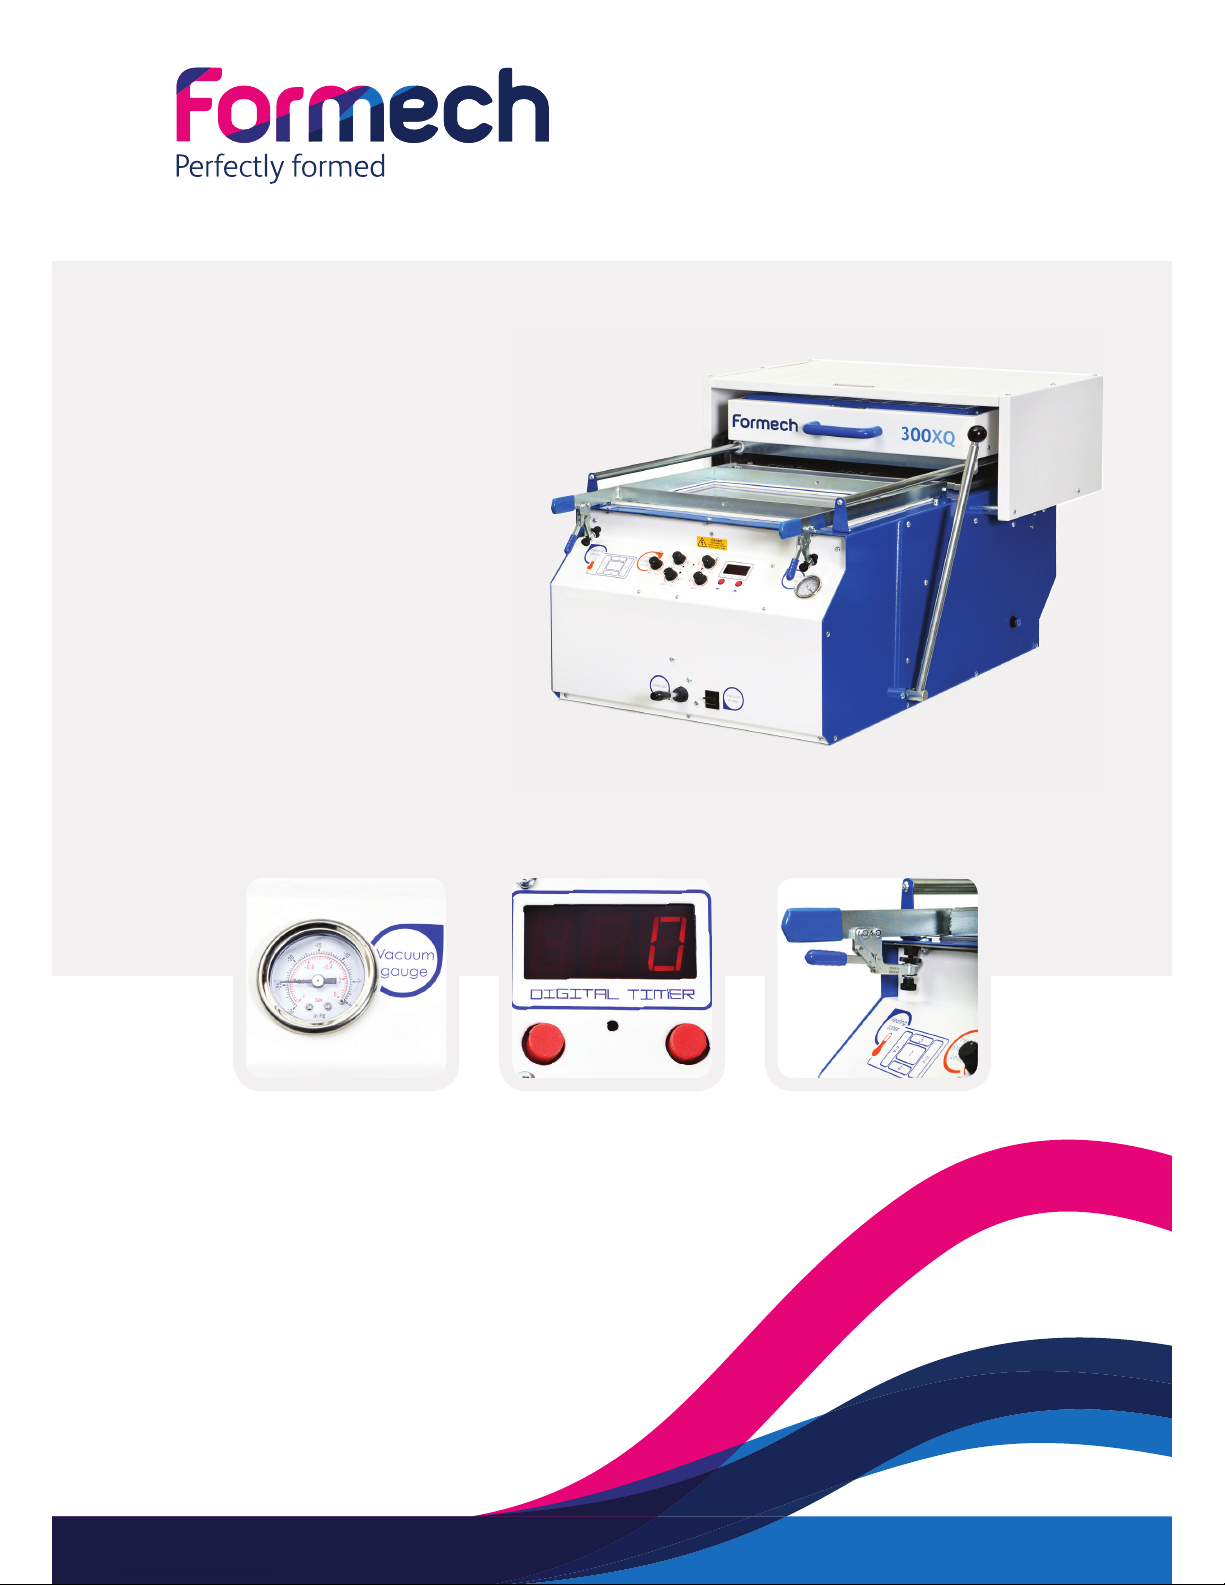
Installation, Operating and Service Manual
Desktop Vacuum
Forming Machine
For Parts, Service & Technical Assistance
Telephone: +44 (0) 1582 496797
Fax: +44 (0) 1582 496646
300XQ
Page 2

Manual - Formech 300XQ
2
Table Of Content
Safety 3
Introduction and initial assembly 6
General Arrangement 7
Mechanical specifications 7
Transportation / Positioning 7
Noise emissions 7
Machine storage 7
Electrical specifications 7
Machine arrangement 8
Reducing windows 10
Operating Procedures 12
Basic Operation 12
Operating Techniques 14
Heaters 14
Optional Extras 15
Tools 16
Plastics 18
Post Forming Operations 19
After forming 19
Trimming 19
Warranty 20
Heating elements 20
Vacuum system 20
Service / Repair 21
Replacing seals 21
Replacing heating element 22
Electrical troubleshooting 24
Vacuum / Pressure troubleshooting 26
Cleaning 27
Lubrification 27
Wiring Diagram Formech 300XQ 28
Spare Parts Listing 29
EC Machinery Directive 30
Page 3

Manual - Formech 300XQ
3
Thank you for choosing Formech.
Please read and follow the below safety instructions before attempting to install or operate your machine.
>Do not operate the machine until you have been trained and are fully conversant with it.
>Read and understand all of this user manual.
>This is a ‘single person operating’ machine.
>Check your supply voltage and frequency. Make sure it is compatible with your machine. Your machine’s
electrical specifi cation is on the plate on the right hand side.
>You must ensure that the machine is properly earthed and fused.
>If your machine is not equipped with a moulded mains connector then note that:
The earth wire is GREEN with a YELLOW stripe.
The live wire is BROWN
The neutral wire is BLUE
>Only suitably qualifi ed personnel should make electrical connections
>Turn off the machine and disconnect the power supply when the machine is not in use.
>The heater and pump on this model are not intended to be left running indefi nitely.
>Never remove any panels unless the electrical supply has been isolated.
>Always let the machine cool down before attempting to work on it. Some parts of the heater and heat
shield become extremely hot during operation.
>Note the safety warning labels situated on the front and rear panels. Never remove any warning labels from
the machine.
>Note the ‘HOT SURFACES’ safety labelling on the heater & heater guard. These areas can become VERY
HOT.
>Only use the machine for vacuum forming plastic. It is not intended for any other purpose.
>Ensure that the area you are working in is properly ventilated and that you are aware of the potential
hazards from the plastics you are forming. It is the responsibility of the owner or designated responsible
person to assess the risks associated with any dangerous fumes given off and to determine any necessary
precautions required such as fume extraction. Contact your plastics supplier to gain information regarding
hazardous fumes.
>There is a risk of being burnt when handling heated plastics. Always wear suitable personal protective
equipment such as gloves.
>Ensure that the area surrounding the machine is clean and frequently cleared of fi nished product and any
scrap.
>This machine is fi tted with a dry running vacuum pump. Do not lubricate. Do not allow any liquid to enter
the vacuum system. Ensure that moulds are properly sealed to prevent ingress of dust into the vacuum
circuit. Severe damage may be caused if the above is not observed.
>Daily repetitive use of this or any other machine may lead to a) fatigue and loss of concentration b)
possible strains.
>Operators should be trained in the use of correct lifting techniques in order to minimise these effects.
>Users of this machine should complete regular competence tests.
Safety
Page 4
Manual - Formech 300XQ
4
Safety
It is vital that any person using this machine and the person(s) responsible for the health & safety is
made fully aware of the potential hazards that could arise from the use and misuse.
These can be broadly categorised as: -
1. Electric Shock.
This machine uses Voltages up to 415Vac.
NEVER ATTEMPT ANY REPAIR UNLESS THE ELECTRICAL SUPPLY DISCONNECTED ONLY SWITCH ON WHEN
ALL COVERS HAVE BEEN REPLACED.
ONLY A QUALIFIED ELECTRICAL TECHNICIAN MAY WORK ON ANY PARTS CARRYING MAINS VOLTAGE
AND SHOULD BE RESPONSIBLE FOR ENSURING THAT THE MACHINE IS IN A SAFE CONDITION BEFORE
ALLOWING SERVICES TO BE RESTORED.
2. Burning.
Parts of this machine reach temperatures in excess of 300°C over large areas.
WAIT UNTIL THE MACHINE HAS COOLED DOWN BEFORE SERVICE WORK COMMENCES.
SPECIAL PRECAUTIONS MUST BE TAKEN TO ENSURE THAT ONLY THE MACHINE OPERATOR IS IN THE
OPERATING AREA DURING USE.
USE PERSONAL PROTECTIVE EQUIPMENT SUCH AS GLOVES WHEN TESTING THE HEATED PLASTIC,
HANDLING HOT VACUUM FORMED PARTS, MANUALLY ASSISTING THE FORMING PROCESSS AND
TOUCHING HOT SURFACES.
INFRARED RADIATION IS EMITTED BY THE QUARTZ HEATERS, ENSURE THAT ANY EXPOSURE TO THIS TYPE
OF RADIATION IS SHORT OR COMPLETELY AVOIDED.
4. Toxic Fume Inhalation.
When large sheets of plastic are heated fumes will be given off.
ENSURE THAT THE MACHINE IS POSITIONED IN AN ADEQUATELY VENTILATED PLACE. ASSESS THE RISKS
OF THE MATERIALS TO BE FORMED PRIOR TO USE.
5. Fire.
RISK OF FIRE AS A RESULT OF HEAT AND PLASTICS PRESENTS AN EMERGENCY SITUATION. ENSURE FIRE
SAFETY TRAINING IS PERFORMED & CONTROLLED.
IT IS ESSENTIAL TO HAVE FIREFIGHTING EQUIPMENT AVAILABLE AT OR NEAR THE MACHINE. USE DRY
POWDER (BLUE) OR CARBON DIOXIDE (BLACK) FIRE EXTINGUISHERS.
Page 5

Manual - Formech 300XQ
5
6. Prohibited Uses
DO NOT USE THIS MACHINE FOR ANY PURPOSES OTHER THAN THE VACUUM FORMING AND BLOW
MOULDING OF PLASTICS SHEET.
DO NOT USE THE HEATER TO APPLY HEAT TO ANY MATERIAL OTHER THAN PLASTIC SHEET AS PART OF
THE VACUUM FORMING PROCESS SUCH AS: FOOD PRODUCTS, ALL TYPES OF PARTICLES, POWDER, DUST,
ALL TYPES OF LIQUID, WOOD, PAPER, METALS AND ANY FORMS OF COMBUSTABLE MATERIALS.
DO NOT USE THE TABLE MECHANISM TO CLAMP, COMPRESS, FOLD OR APPLY FORCE TO ANY ITEM UNDER
ANY CIRCUMSTANCES.
DO NOT USE THE CLAMPING FRAME TO CLAMP COMPRESS, FOLD OR APPLY FORCE TO ANY ITEM OTHER
THAN THE CLAMPING OF SHEET PLASTICS AS PART OF THE VACUUM FORMING PROCESS.
DO NOT USE THE TOP OF THE HEATER OR TOP OF THE HEATER GUARD TO STACK PLASTICS OR OTHER
MATERIALS.
DO NOT USE THE MACHINE TO STACK OR LEAN ITEMS AGAINST THE SIDES.
DO NOT USE ANY OTHER PART OF THE HEATER TO MOVE THE HEATER FORWARDS AND BACKWARDS
OTHER THAN THE HEATER HANDLE.
Safety
Page 6
Manual - Formech 300XQ
6
Introduction and initial assembly
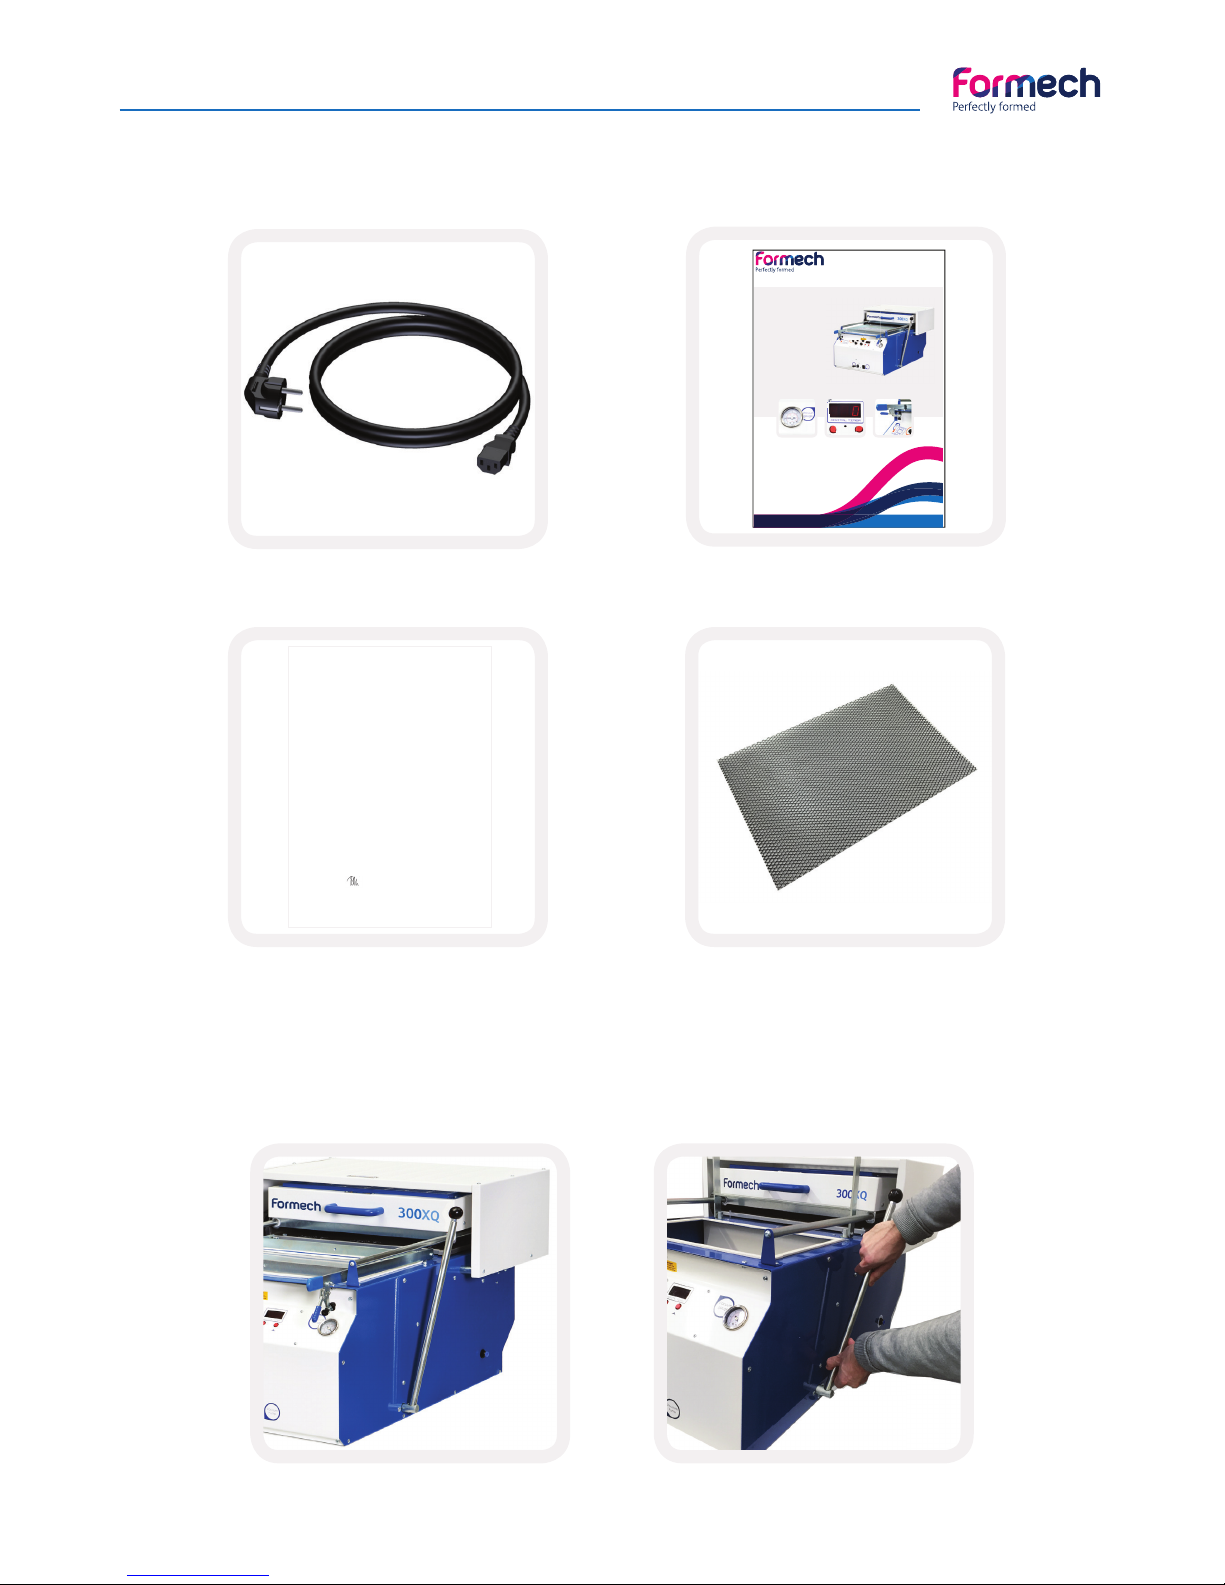
Your Formech machine is supplide with:
1x Electrical cable
1x Installation/Operations/Repair
Manual
1x EC Certifi cate of Conformity
1x Table Mesh
ENSURE THAT THE TABLE LEVER IS TIGHTLY SCREWED INTO THE CRANK MECHANISM ON THE
RIGHT HANDSIDE OF THE MACHINE. IF OPERATED WITH THE LEVER LOOSENED YOU MAY
DAMAGE THE CRANK OR THE HANDLE.
EC Machinery Directive
2006/42/EC
Declaration of Conformity
We hereby certify that the machinery stipulated below complies with all the relevant provisions
of the EC Lachinery Directive and the National Laws and regulations adopting this Directive
Modifi ctions to this machinery without prior approval from the undersigned will render this
declaration null and void.
Machine description: Vacuum Forming Machine
Machine Function: Thermoforming of Plastic Sheet
Model/Type: Compac Mini
Serial Number:
Date of Manufacture:
Is in conformity with the provisions of the following other EC Directives:
2004 / 108/EC - EMC
2006 / 95/EC - LVD
Technical File Compiled by: Andrew Berry at address below
Signifi cant harmonised standards applied:
EN ISO 12100 : 2010
EN ISO 13849 : 2006
EN 60204 - 1 : 2006
EN 12409: 2008
Signed:
Date:
Name: Paul Vukovich
Position: Managing Director
Being the responsible person appointed by the manufacturer
66
.
.
.
Installation, Operating and Service Manual
Desktop Vacuum
Forming Machine
For Parts, Service & Technical Assistance
Telephone: +44 (0) 1582 496797
Fax: +44 (0) 1582 496646
300XQ
Page 7
Manual - Formech 300XQ
7
General Arrangement
Mechanical Specifi cations
Max Material Size: 450mm x 300mm
Max Forming Area: 430mm x 280mm
Max Depth of Draw: 160mm
Overall Width: 650mm
Overall Height: 530mm
Overall Length: 970mm
Weight: 75Kg
Electrical Specifi cations
Standard Voltage: 208V-240V ac
Frequency: 50-60Hz
Power: 2.3Kw
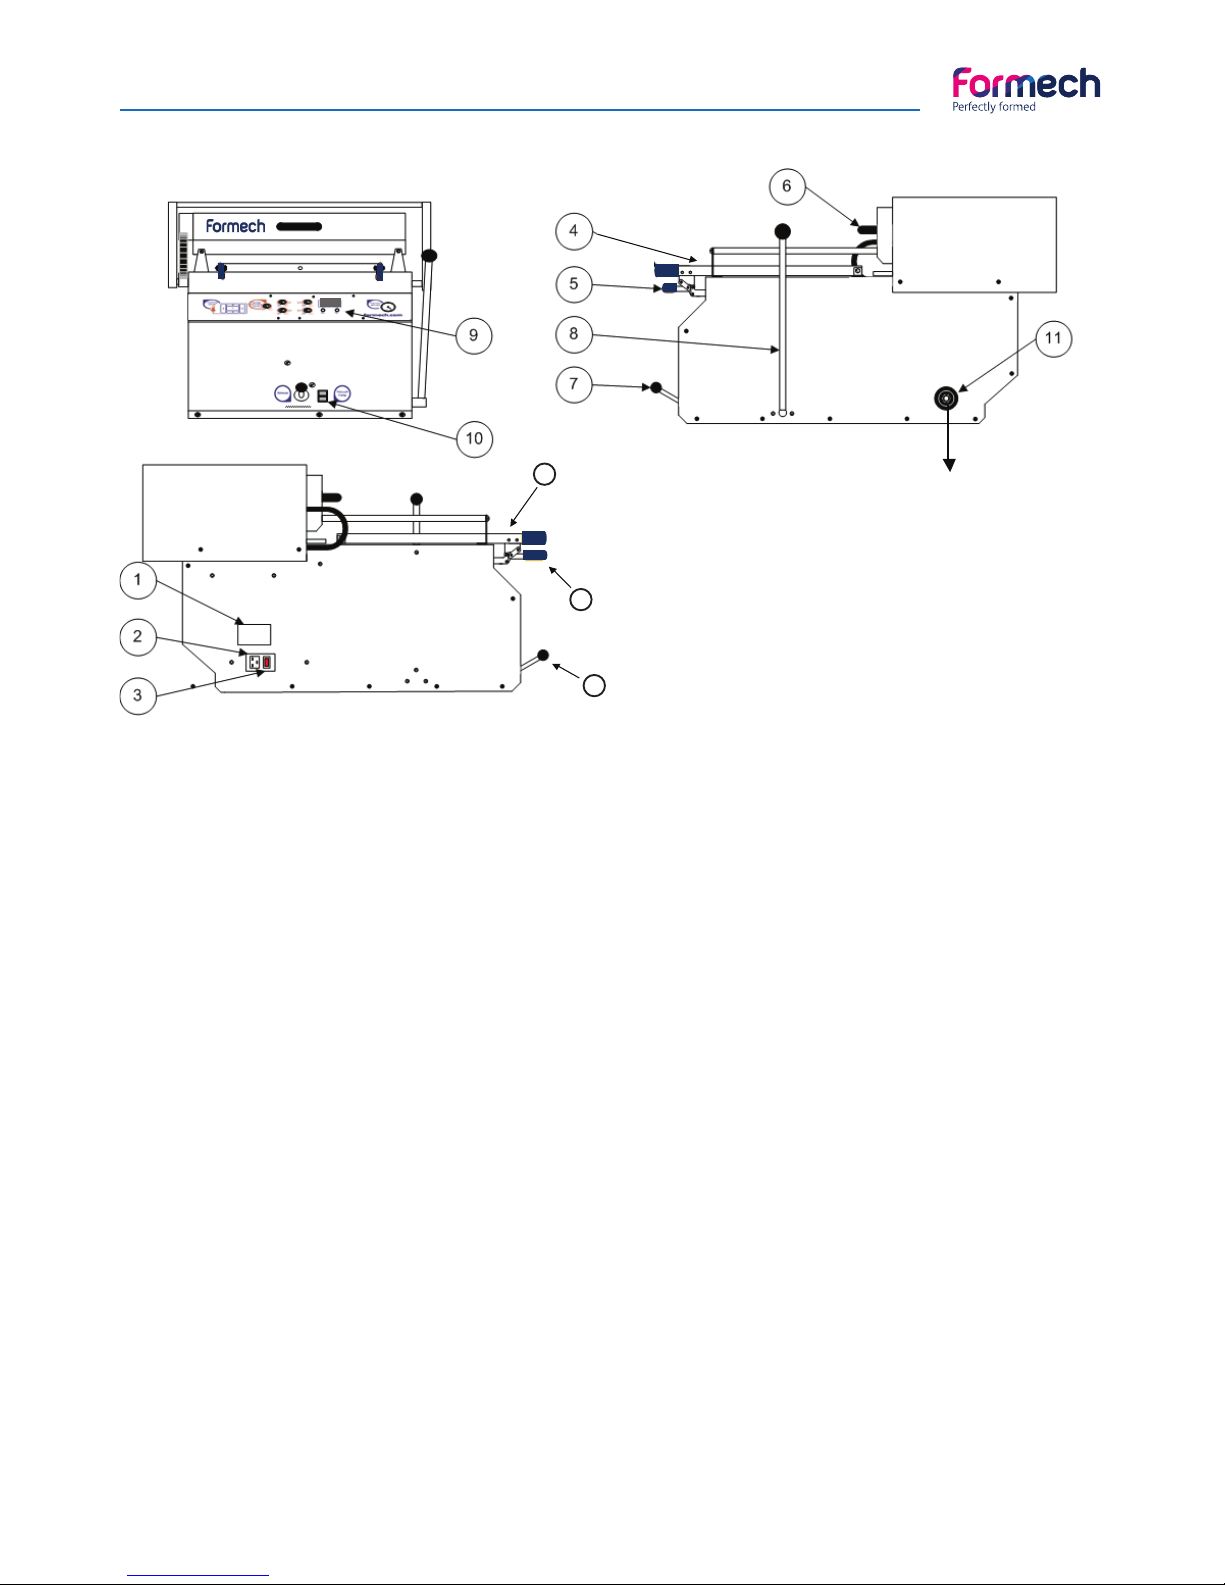
1-Specifi cation Plate
2-Power Inlet (EC)
3-Power switch ON/OFF
4-Clamp Frame
5-Material Clamps
6-Heater Box
7-Vacuum / Pressure Valve
8-Table Lever
9-Control panel
10-Pump switch ON/OFF
11-Air output
300XQ
Do not connect
air supply here
Transportation / Positioning
The 300XQ will be supplied strapped to a Pallet or in a crate. The machine may unpacked and placed on a
bench, table or 300XQ trolley. Ensure that the structure, size and load bearing capacity of the bench or table
is suffi cient for the machine weight. A minimum of 2 persons are required to lift the machine. In the case
of the 300XQ trolley, ensure that the 2 machine retaining screws are fi tted to the under side of the trolley /
Machine.
Noise emissions
Noise emissions on the Formech 300XQ are less than 70dB(A).
Machine storage
The Formech 300XQ must be stored in a dry environment. If the machine is not used for a long period of
time, run the pump periodically (once a month).
4
5
7
Page 8

Manual - Formech 300XQ
8
General Arrangement
Machine arrangement
1. Specification Plate.
This states the essential machine data & CE marking.
2. Power Inlet receptacle.
The machine is supplied complete with a power cable that plugs into this receptacle and then into a suitable
power socket. If your machine is a special voltage or frequency then it may be supplied with a lead not
terminated into a mains plug. See Safety section at the beginning of this manual. Note the safety labelling.
3. Power Switch ON/OFF.
This is the main switch. When in the OFF position power is cut to all functions. Before commencing any
repair work always remove the mains lead from the Power Inlet Receptacle.
4. Clamp Frame. This holds the plastic material in position during the forming and release processes.
5. Material Clamps.
These clamps fix the Clamp Frame firmly down. After placing the plastic under the clamp frame the material
clamps are adjusted by tightening or loosening the orange nutlets. The levers are pulled up until they are
fully over-centre. Adjustment may only be carried out while not under pressure. The rear of the clamp frame
is self adjusting.
6. Heater Box.
This carries the heating elements and is drawn forward by pulling the centrally mounted handle.
7. Vacuum/Pressure Valve.
When the vacuum pump is running this valve switches between removing air from between the mould and
moulding during forming (vacuum) and introducing air between the mould and moulding for finished part
release (pressure).
8. Table Lever.
When pulled towards you the table will rise to the upper limit. A further application of pressure will lock the
table in this position. During forming the table complete with mould is lifted into the hot plastic and locked
in place to ensure a good vacuum seal. At the end of the cycle the table is returned to the lower position by
pushing the handle back and away.
NOTE: A mechanical interlock designed to prevent a mould being raised into the heating elements stops the
table being raised unless the heater box is fully back.
9. Control Panel.
See below control panel layout.
Page 9
Manual - Formech 300XQ
9
General Arrangement
10. Vacuum Pump ON/OFF switch.
This turns the vacuum pump on and off. The vacuum pump evacuates the air between the plastic sheet and
the mould. It also provides pressure to release the fi nished moulding from the mould.
11. Air pressure outlet.
When the vacuum pump is running, the pressure is diverted to this outlet. This can be used to supply or
run other equipment when not being used for vacuum forming. Do not block this outlet or attempt to
connect air supply. This machine DOES NOT require air supply.
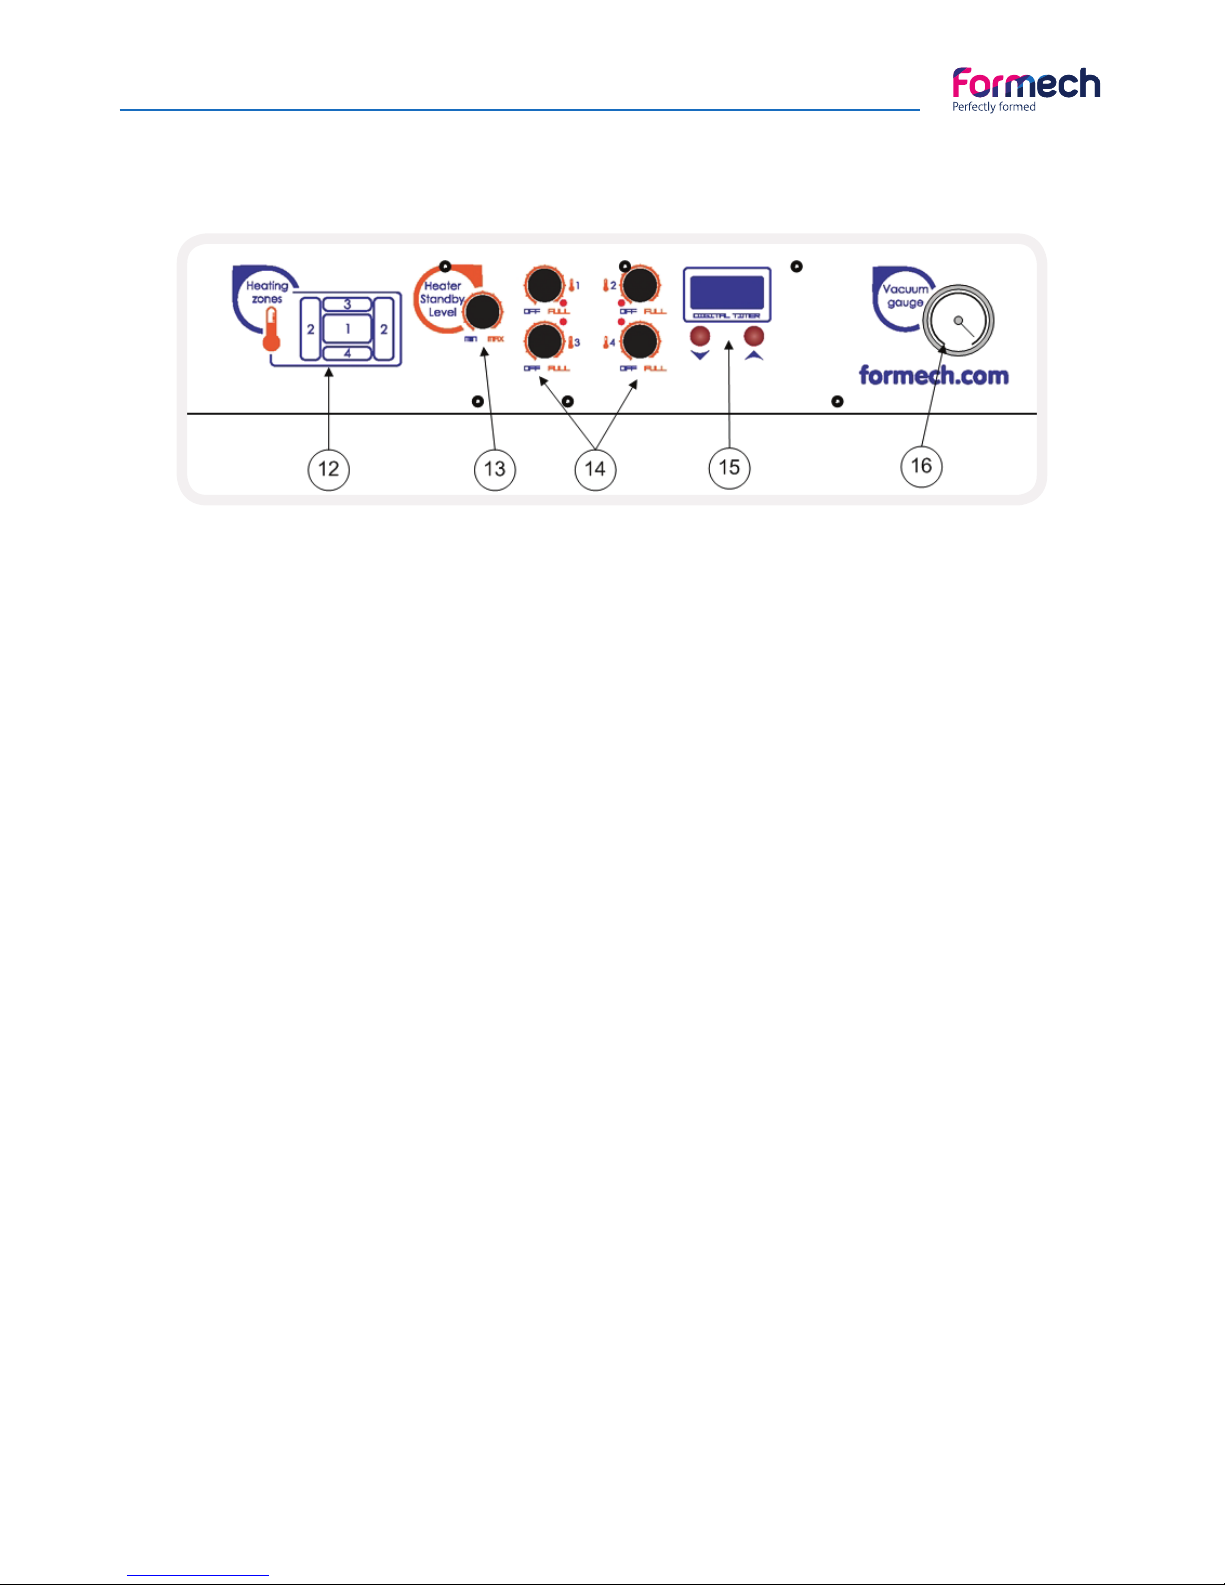
12. Heater Zone layout.
Pictogram showing the corresponding zone layout of the quartz heater zones.
13. Heater Standby Level (Power Saving Feature).
The 300XQ is supplied with fast acting heating elements. This means that when the heater is not actually
heating plastic the power can be turned down. As the heater is moved from the rear position the elements
begin to heat up to the set power level.
For this feature to work effectively the power level at rest or standby must be set to approx. 30%. For
continuous usage the standby level may be set lower. For infrequent usage it may be required for the
standby level to be set higher. For non-time critical uses the standby level can be set at about 10%.
Although the plastic may take a few extra seconds to heat, the overall power saving will be substantial.
Safety Notice: It is advisable to monitor the heating stage by making frequent observations.
Never leave the machine unattended when actively heating plastic.
14. Heater Zone Controls.
The 300XQ heater is divided into 4 zones as shown by the diagram (12) on the control panel. This is to
allow the user maximum fl exibility especially when producing mouldings from diffi cult moulds or diffi cult
plastics. It is usual to turn the centre zone 1 down slightly because it gains extra heat from the other zones
surrounding it.
Machine arrangement (continuation)
Page 10
Manual - Formech 300XQ
10
Machine arrangement (continuation)
The back zone 3 also tends to stay hotter than the front zone 4 because the rear of the machine is heated by
the heater when it is not heating plastic. A key feature of quartz heating is the response time for changing
to different power levels. The zone controllers are highly accurate and keep the element power level within
1% of the requested setting. Beginners to vacuum forming will quickly become accustomed to setting the
zone controls for best results.
15. Digital Timer.
When producing a quantity of mouldings using the same mould and plastic the heating time will be nearly
constant for each one. In this case the timer can be used. Record the heating time for the fi rst moulding
then set the timer (in seconds) using the UP / DOWN buttons the buttons. When the heater is pulled
forward the timer counts down from the set time and sounds a buzzer when zero is reached. The heater is
then pushed back. The set time is stored until it is altered. If you don’t want to use the timer, set the time to
zero.
The timer has built in safety features. If the heater is forward for more than 2 minutes after the timer has
completed the set time the heater will switch to the standby setting. If the heater is not returned to the
standby position after a further 2 minutes then the heater will turn off all power to the heating elements.
16. Vacuum Gauge.
This is situated on the top RHS of the front panel and gives indication of the vacuum level achieved at the
table mould area during moulding. It is usual to expect approx 25”Hg / -750mbar of vacuum. If such levels
are not achieved check your mould / table confi guration & clamp / plastic sealing.
Reducing Windows
Reducing windows allow the use of smaller sheet material for smaller mouldings. Reducing windows allow
for better sheet utilisation. To fi t the reducing window:
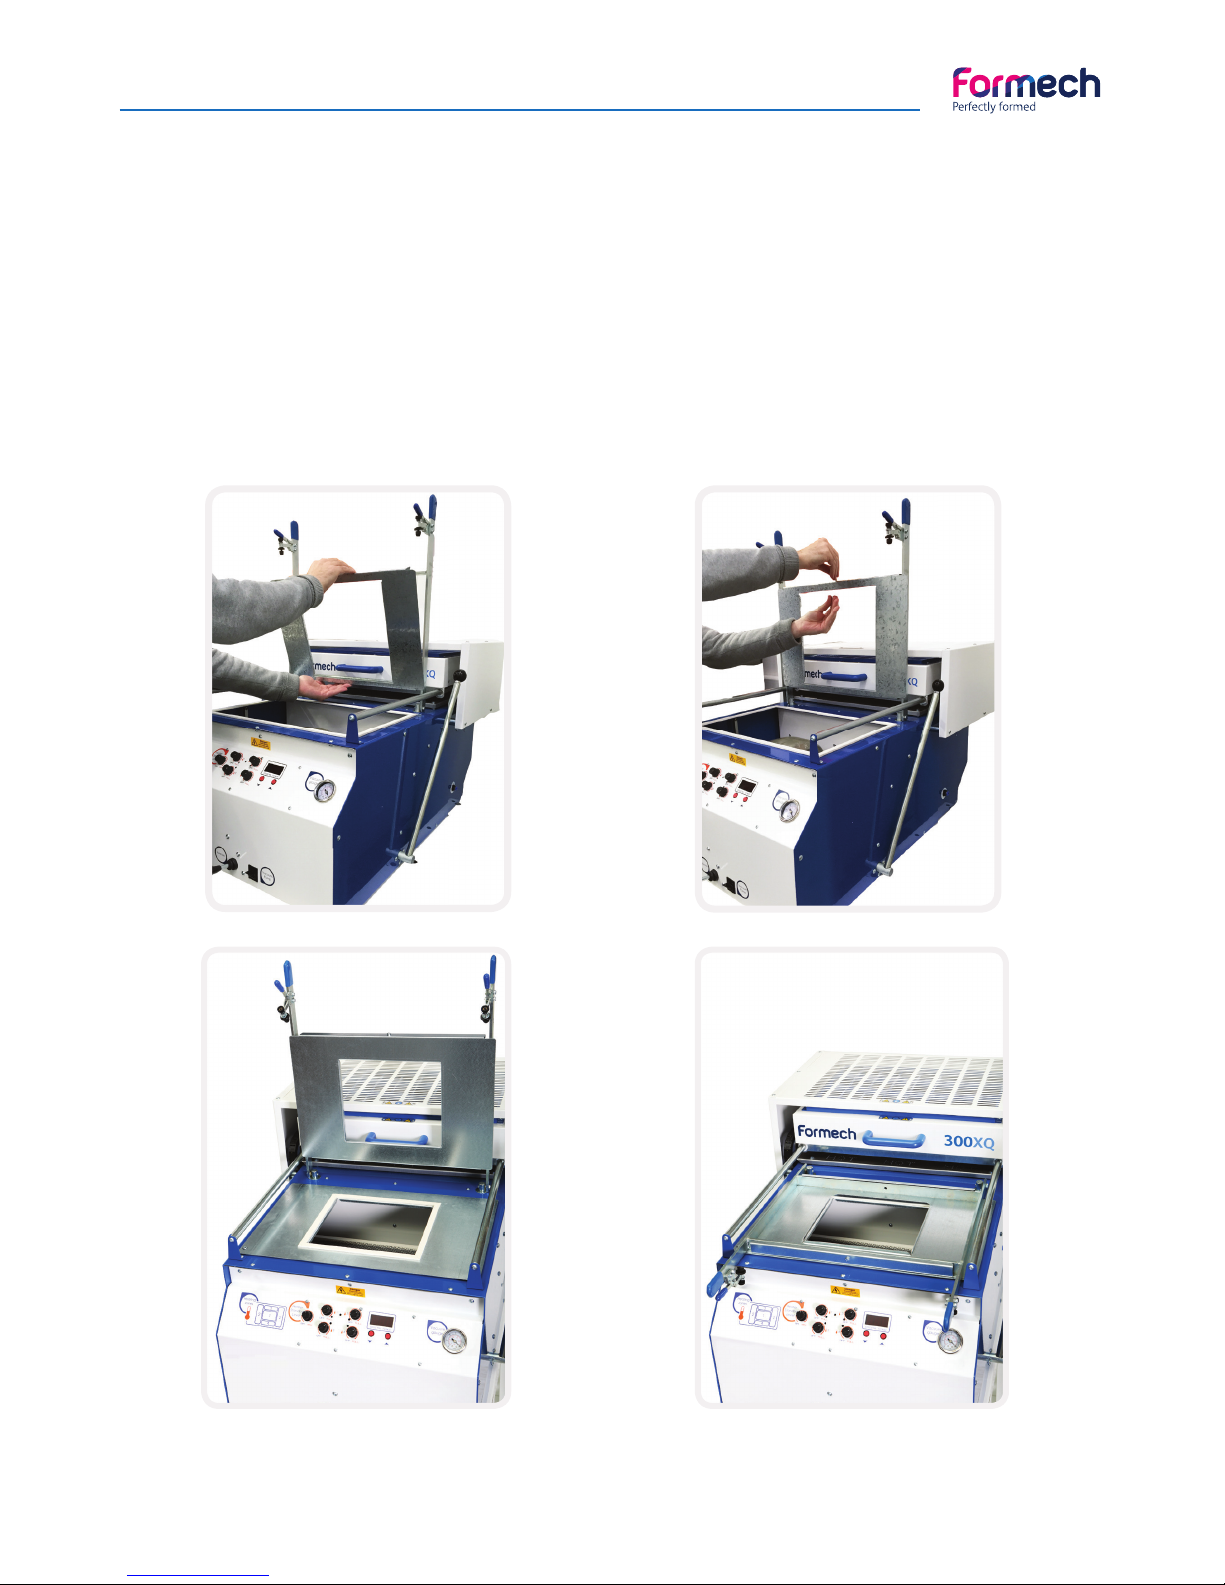
1. Lift the clamp frame.
2. Place the lower reducing window on to the top frame aperture so that the corner locating screws are
aligned.
General Arrangement
Page 11
Manual - Formech 300XQ
11
General Arrangement
Reducing Windows (continuation)
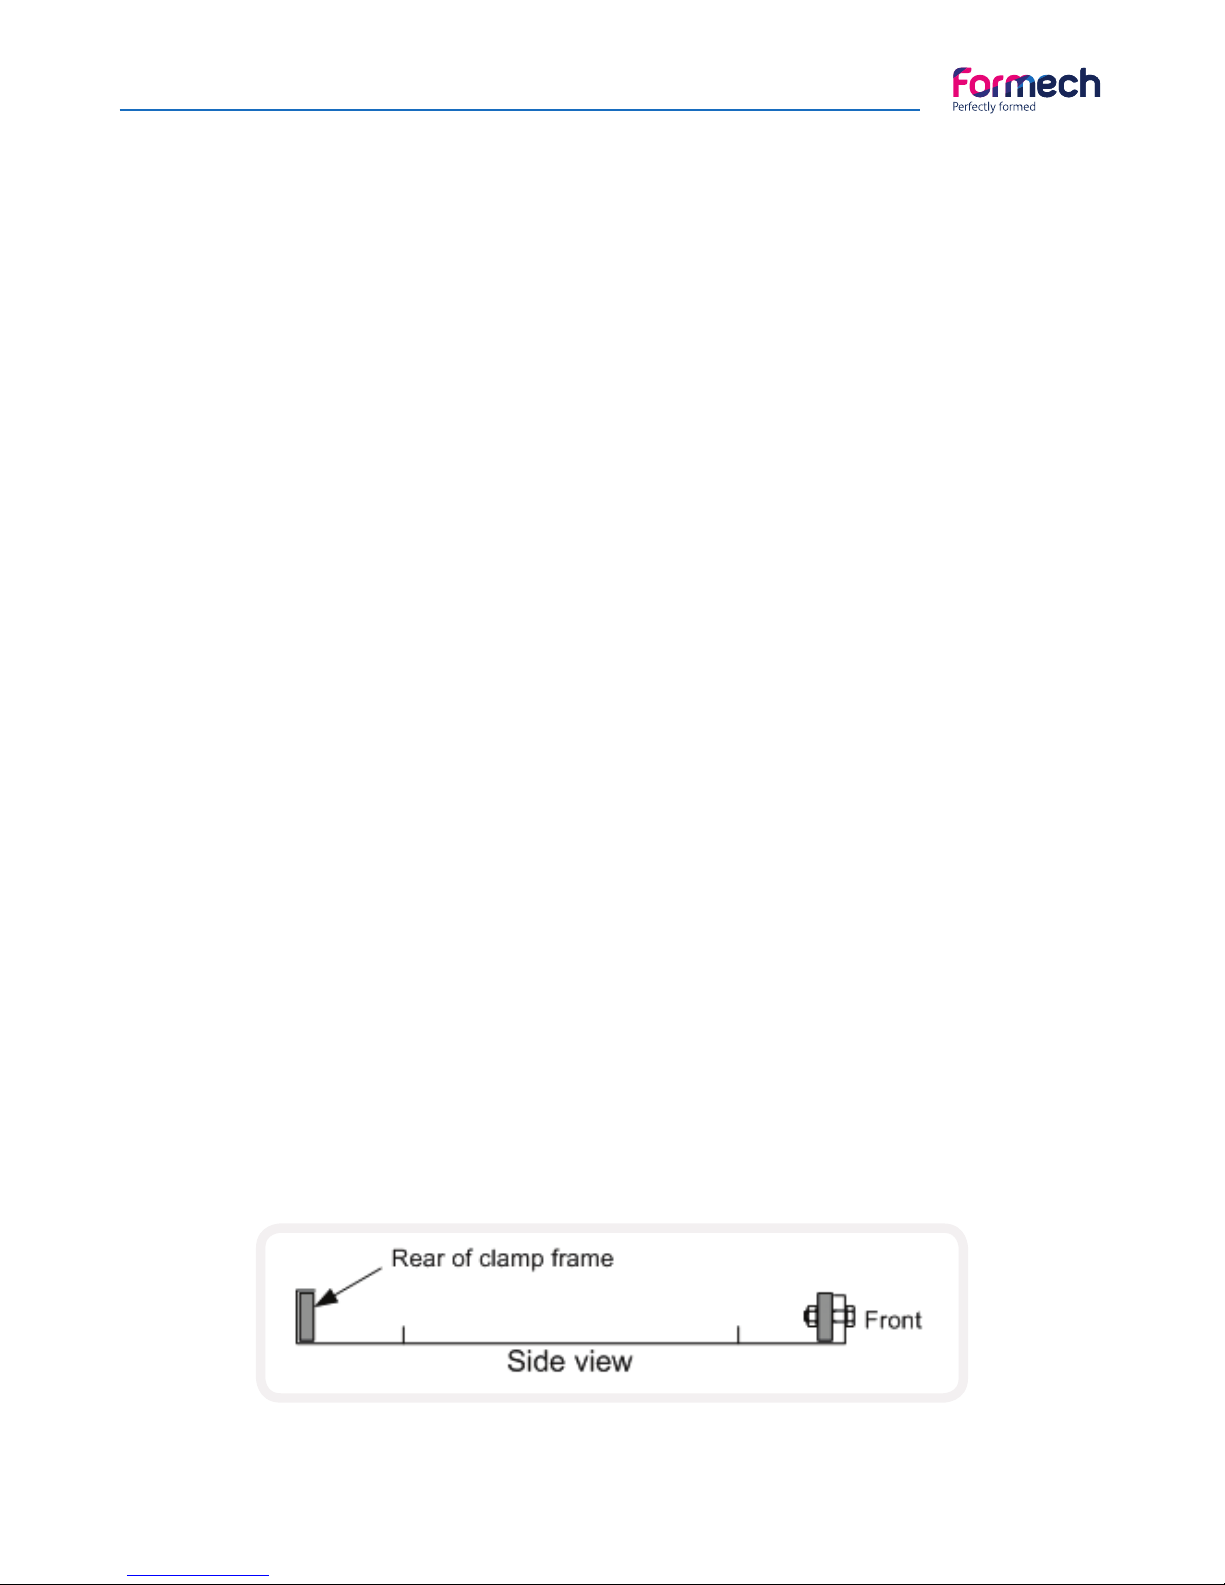
3. Place the top reducing window on the underside of the clamp frame. There are folded sections on the
front and rear. The rear edge has the larger return and wraps completely around the clamp frame bar. The
front fold is smaller and returns against the front clamp frame bar. The fi xing bolt is fi tted through the clamp
frame bar and reducing window and secured using the fi xing nut.. See diagram below of side view of the top
window fi tting above and images below.
4. Close the clamp frame. Check alignment of top and bottom window. Fit the required plastic material on
the sealed lower reducing plate. The material toggle clamps will need adjusting so that the clamp.
Top and bottom reducing
windows in place
Machine fi tted with a
reducing window
Page 12
Manual - Formech 300XQ
12
Operating Procedures
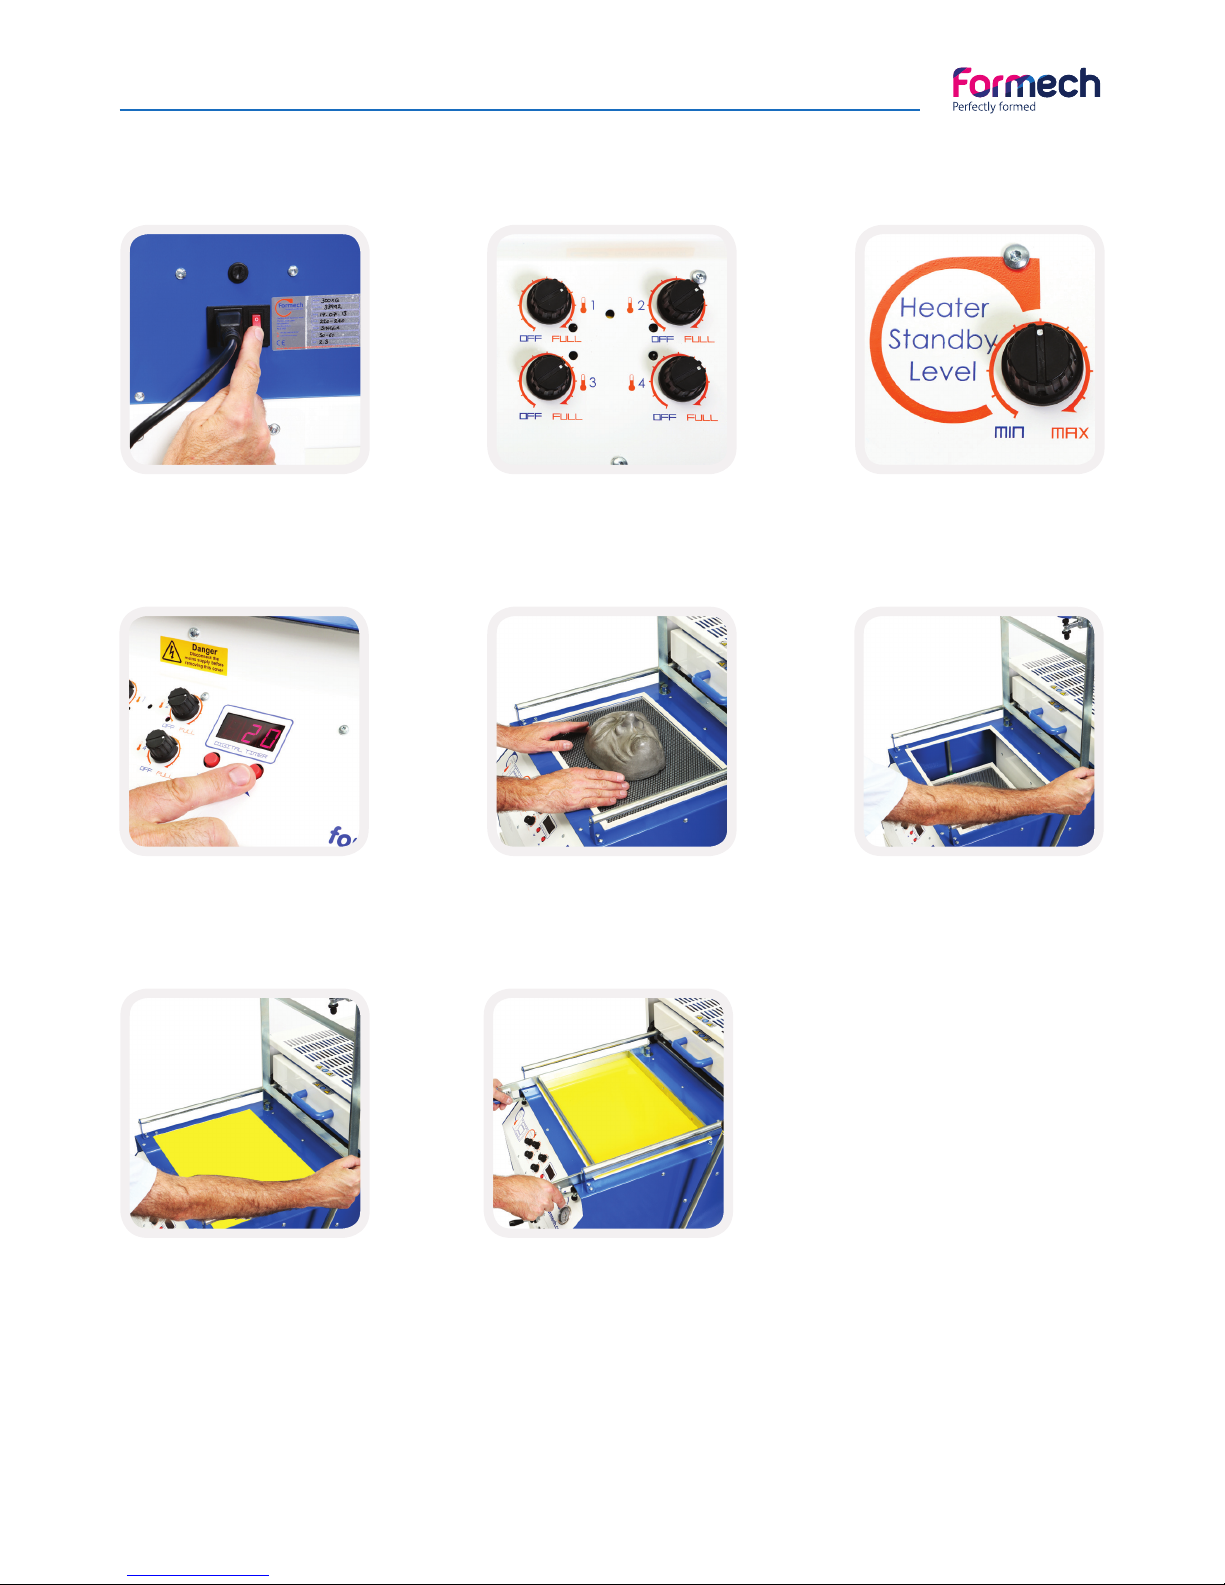
Turn the power switch to ON.
The digital timer in the front
panel will illuminate.
Set the zone controls as below:
- Zone 1 at 60%,
- Zones 2, 3 & 4 at about 75% (1)
Set the heater standby level
to about 30%.
Set the timer to zero using
‘DOWN’ button.
(2)
With the heater fully back
and the mould table in the
up position place your mould
onto it. (3)
Place the table into the lower
position by pushing the table
lever away from you.
Position a sheet of plastic
over the aperture. The plastic
should completely cover
the white seals around the
aperture.
Pull the clamp frame down
and close the material
clamps.
Basic Operation
(1) Each line in the heating zone corresponds to 10% power.
(2) When set to zero the timer will count up. This will help you establish the time for the heating cycle.
(3)A wire mesh is supplied with your machine to be placed under the mould to assist with vacuum airflow.
Page 13
Manual - Formech 300XQ
13
Operating Procedures
Basic Operation (continuation)
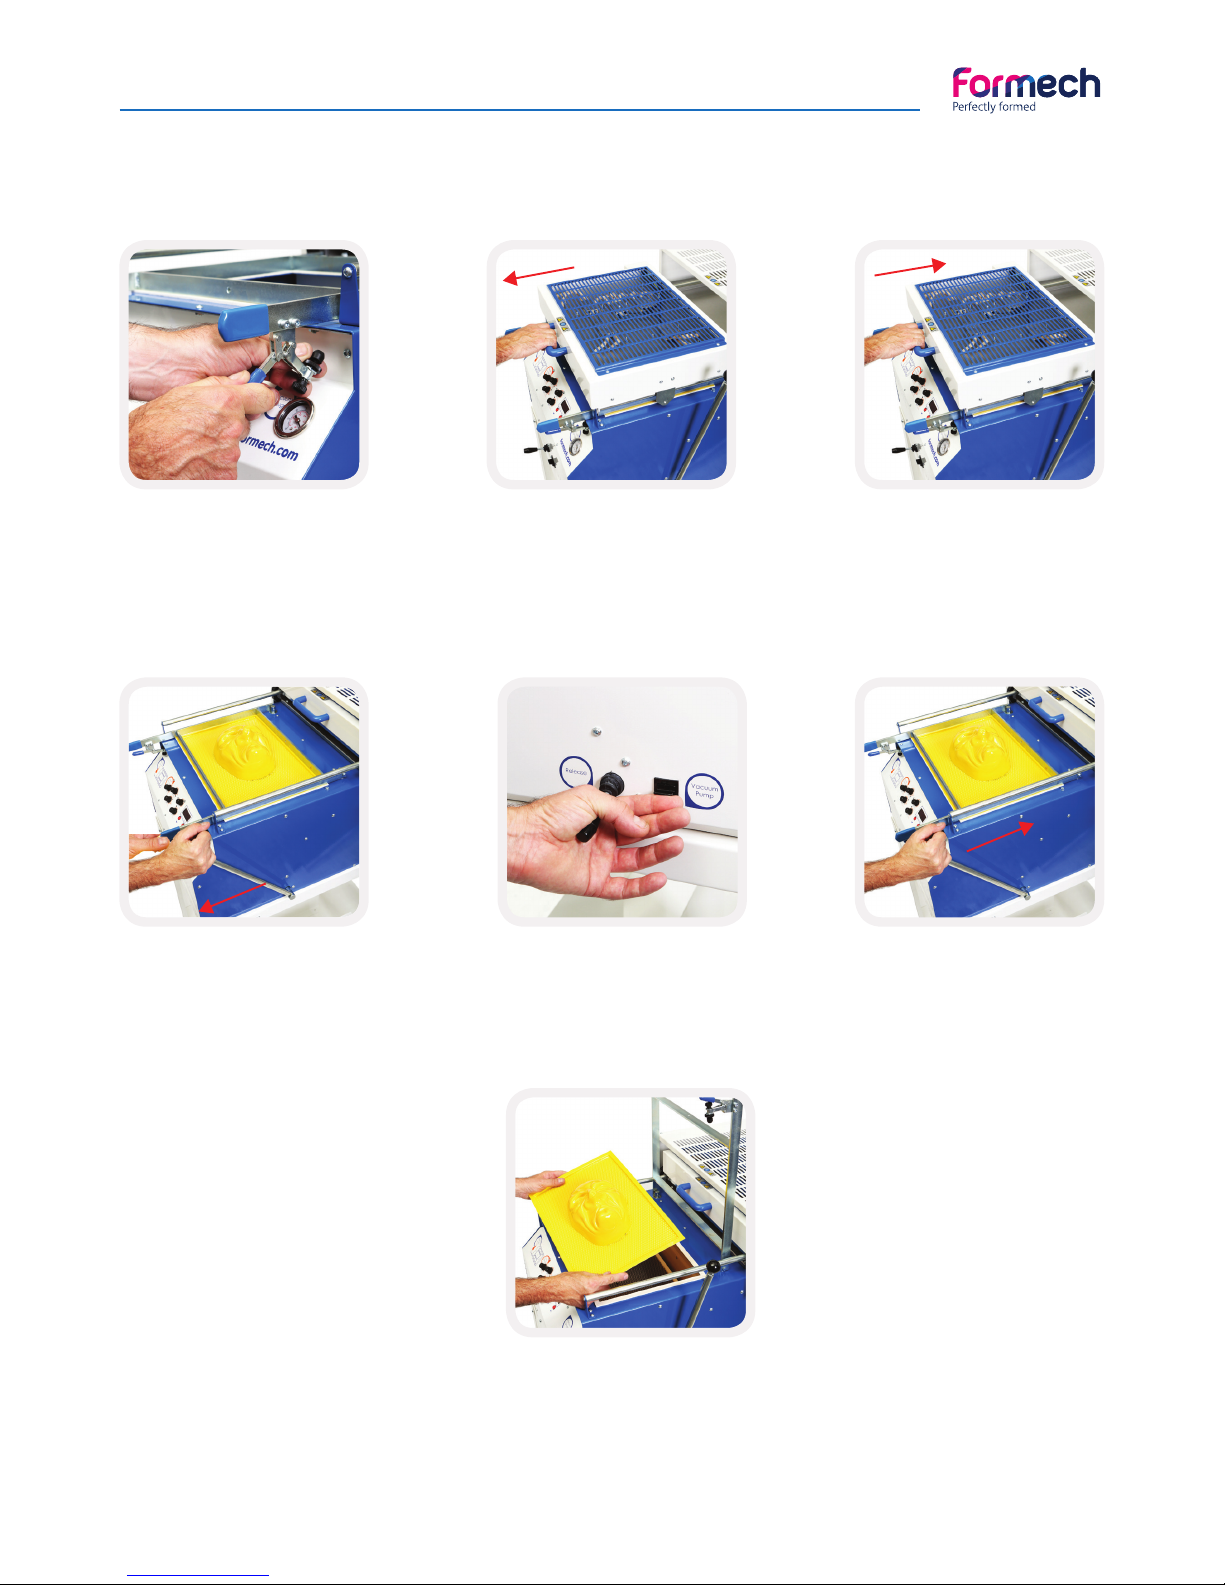
1. Depending on the plastic
thickness you may need to
use the adjusting screws
on the material clamps to
properly grip the plastic.
2. Pull the heater forward
over the plastic. As the plastic
heats up it will begin to rise
slightly. It will then soften
and begin to drop back.
4. Turn on the vacuum pump
and raise the table until you
can feel it lock into place.
(4)
The plastic will form around
the mould tool. You may need
to assist this process.
3. Push the heater back
slightly to test the softness of
the plastic. Continue to heat
until it is soft enough to form.
At this point, push back the
heater all the way back.
6. Finally, lower the table
and release the material
clamps to remove the fi nished
moulding.
5. Let the fi nished moulding
cool down a little before
pulling the release valve
downwards. (5)
Finished mould.
(4) Remember that the heater must be fully back before the table can be raised
(5) If the plastic is still too soft when you try to release it, some distortion may occur.
Page 14

Manual - Formech 300XQ
14
Operating Techniques
Heaters
The powerful quartz heaters are designed to heat the plastic rapidly without burning the surface. The time
required to heat the plastic sheet remains fairly constant once the heaters have reached their operating
temperature.
Heating cycle times vary according to a number of factors. With a little experience, timings may be easily
estimated.
Some plastics such as styrene have a wide tolerance to heating times giving consistently good mouldings.
Care must be taken with other materials such as ABS, as the surface will blister if the temperature limit is
exceeded.
The moulding should be formed when the plastic is sufficiently relaxed to become indented by the blunt end
of a pencil but not soft enough to sag.
A properly heated sheet will give an excellently defined moulding. If the sheet is not hot enough while
forming the moulding will not pick up all the detail from the tool.
The times below were recorded using styrene at an ambient temperature of 20 degrees C
With the machine at operating temperature. Please note that these times are a guide only.
Various factors will affect the heating time including the colour and surface finish of the material.
1.5mm Thick = 60 seconds
2.0mm Thick = 95 seconds
4.0mm Thick = 240 seconds
Digital Timer - When producing a quantity of mouldings using the same mould and plastic the heating time
will be nearly constant for each one. In this case the timer can be used. Record the heating time for the
first moulding then set the timer (in seconds) using the UP / DOWN buttons the buttons. When the heater
is pulled forward the timer counts down from the set time and sounds a buzzer when zero is reached. The
heater is then pushed back. The set time is stored until it is altered. If you don’t want to use the timer, set
the time to zero.
Page 15
Manual - Formech 300XQ
15
Optional Extras
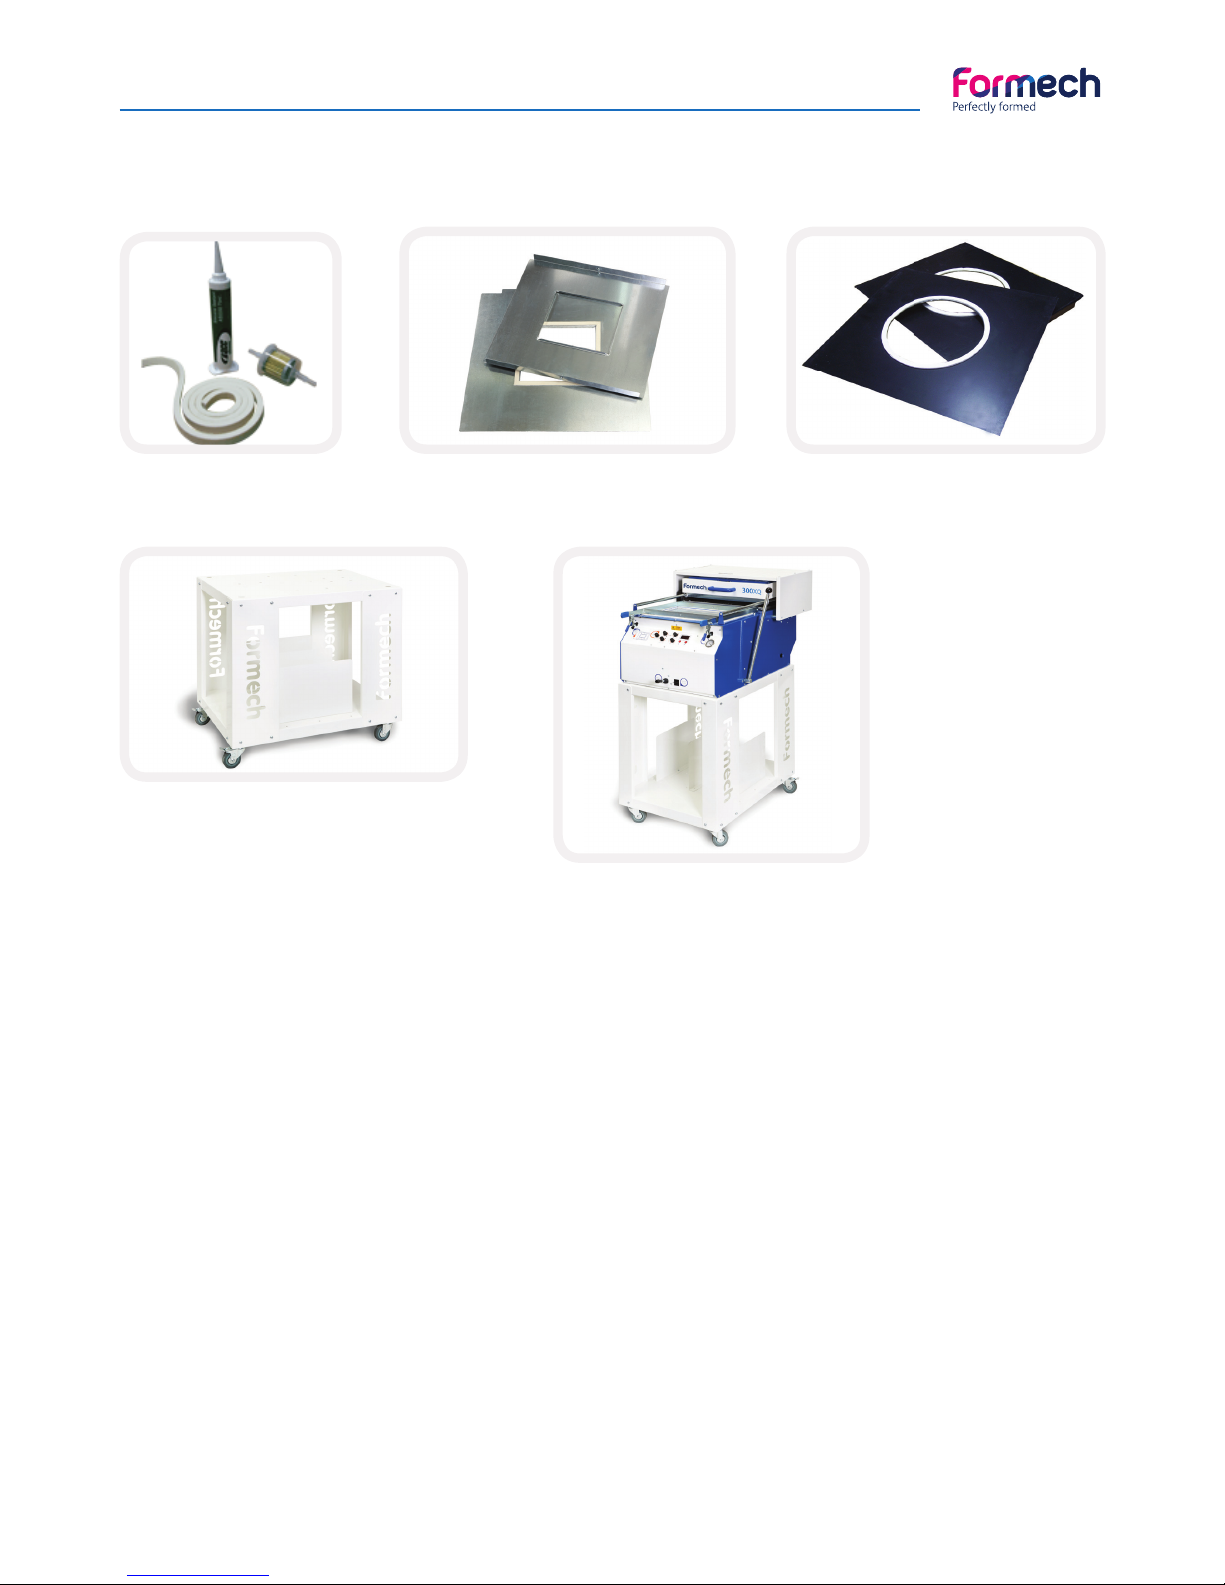
1. Service kit 2. Reducing windows 3. Blow mould windows
4. 300XQ Machine trolley
The following items can be purchased for your 300XQ vacuum forming machine:
1. It is unlikely that you will need to service or repair your machine for many years provided you follow
the maintenance information contained in this manual; however the table and clamp seals, which are
considered to be consumable items, will need to be replaced depending on the usage of the machine.
Therefore this kit contains the essential consumables (seals and pump fi lter) to ensure a good performance
of your machine year on year.
2. Formech has available a standard size of reducing windows. This reducing window has an aperture of
228mm x 203mm, to use plastic size of 248mm x 223mm. Formech can also produce special size reducing
windows. For more information please contact our sales department.
3. You can use your vacuum forming machine to do blow moulding by fi tting a special circular reducing
window to your machine. The maximum diameter you will get on the 300XQ is 270mm. For more
information please contact our sales department.
4. The Formech machine trolley allows you to easily move your 300XQ machine. The 2 locking castors
assure the trolley remains in position all the time. Underneath there is also space to store plastic material
and moulds.
Page 16
Manual - Formech 300XQ
16
Tools
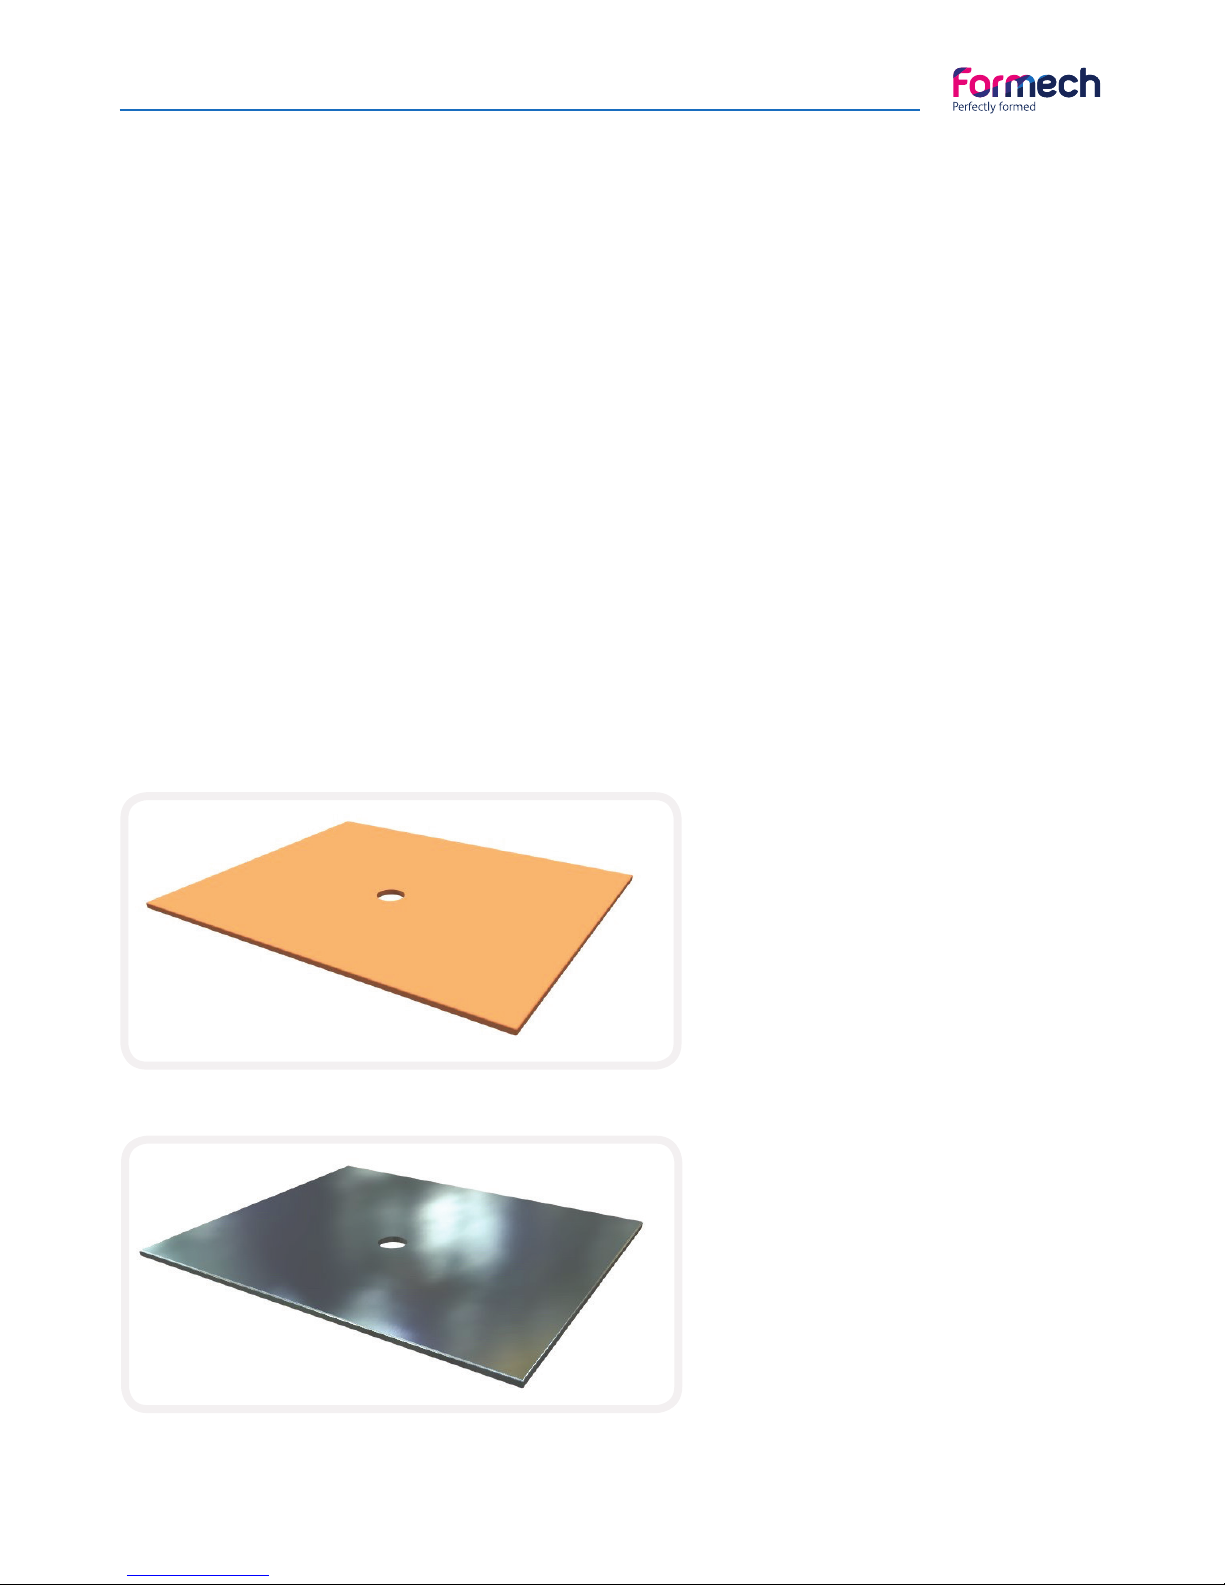
All tools should be mounted on a baseboard. They cannot have undercuts and must be produced with
slightly angular sides (‘draft angle’) to aid release. Vent holes are needed to allow the air to be evacuated
from pockets and sharp angles on the tool. Providing these holes are kept small they will not leave marks on
the surface of the finished moulding.
Tools made from wood or medium density fibreboard (MDF) are easily constructed and can give short runs
of good quality mouldings at a low cost. (see notes below)
The use of close-grained wood will avoid grain patterns appearing on the mouldings.
Plaster of Paris may be used for one-offs but the plaster must be allowed to properly dry out. (See notes
below)
Metal tools have the advantages of carrying fine detail and being more resistant to both distortion and
surface damage. Metal tools should be pre-heated before use. A cool metal mould will absorb some of the
heat from the plastic sheet before it can take up the full definition.
Resin tools combine most of the advantages of metal moulds with relative ease of manufacture. Various
resinous materials are commercially available especially for vacuum forming tool production.
Repairs to the vacuum circuit can be costly. The use of talc as a release agent is not recommended.
It may clog the vacuum circuit.
MDF Baseboard
Aluminium Baseboard
Page 17
Manual - Formech 300XQ
17
Tools
NOTES:
Porous mould materials such as wood and plaster should be properly sealed to prevent the vacuum pump
from sucking out any moisture or sawdust, loose plaster etc. The vacuum circuit may quickly become
blocked with dust or slurry if moulds are not properly sealed.
As the plastic cools after forming it will contract, gripping the tool tightly. If the tool has been made with
sloping sides and has a good surface finish it will release more easily. Where the draft angle must be kept
to a minimum a release agent may be used to assist release.
Sealed moulds will usually release more easily. Silicon based release agents may be used on more difficult
moulds. Silicon based release agents are rapidly absorbed by porous (unsealed) moulds, rendering them
ineffective.
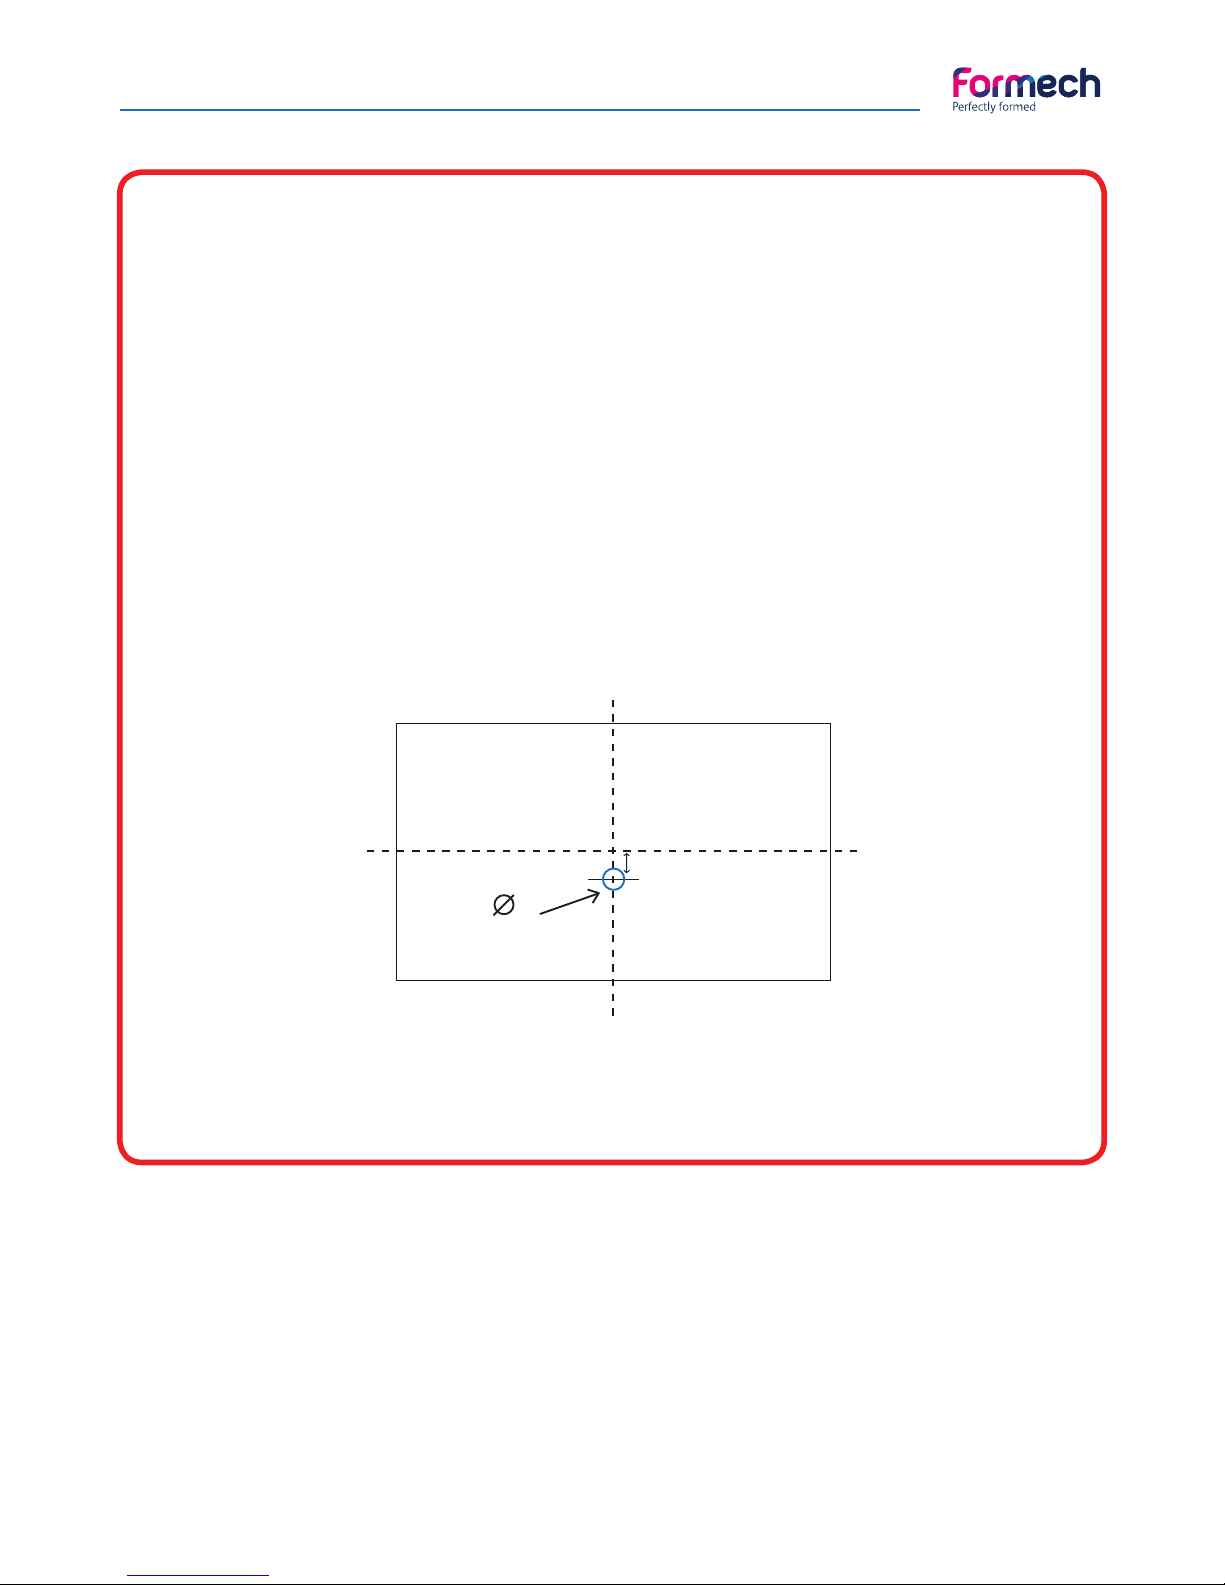
The baseboard can be made from either MDF or aluminium and needs to be 3.00 – 4.00mm (1/8”) thick.
The vacuum hole can be 19.00 – 20.00mm (3/4”) diameter and needs to be positioned 15mm forward of
the centre of the table.
The baseboard has to be 4mm shorter in both directions than the forming aperture of the machine e.g.
Forming aperture 280mm x 430mm = baseboard size 276mm x 426mm.
19-20mm
15mm
Page 18

Manual - Formech Compac Mini
18
Plastics
Plastic sheet is commercially available in a wide variety of grades, thickness and colours. Materials such as
styrene and PVC are most suited to vacuum forming. Other materials such as acrylic, polypropylene and
polycarbonate will mould but difficulties may be encountered.
It is not within the scope of this manual to attempt to list all the potential problems and their solutions. It is
recommended that the newcomer to vacuum forming gains experience and confidence with easily formed
materials before moving onto the more difficult materials.
Formech has available a Vacuum Forming Guide which will cover some of these topics in more details. Please
contact Formech to gain access to this guide.
Page 19

Manual - Formech 300XQ
19
After forming
After forming, most plastics can be subsequently heat formed to add such details as folds or clips. Although
many plastics can be printed, and in some cases painted, the presence of release agent used to help free a
tight moulding may make the surface resistant to further decoration.
Trimming
An ideal moulding will be ready for use when removed from the machine and requires no finishing. However,
most mouldings do require trimming before they can be used.
There are numerous methods available for this process.
Thin materials can be trimmed with a sharp knife. Shaped cutting dies can be used to cut out intricate
shapes. If no flange is required on the finished product then a trimming saw mounted in a pillar drill will cut
the moulding in a horizontal plane to free it from the surrounding material.
In mass production environments the range of equipment available for this requirement encompasses
clicking presses, roller presses, routers, horizontal band saws, water jet cutters, laser cutters and many others.
Formech has available a Vacuum Forming Guide which will cover some of these topics in more details. Please
contact Formech to gain access to this guide.
Post Forming Operations
Page 20

Manual - Formech 300XQ
20
Warranty
Reliability and a long service life are synonymous with the Formech brand. However, as with any machinery,
certain parts will require periodic replacement.
The silicon seals applied to the mould table and to the top aperture of the machine (clamp) are seen as
being consumable parts, their service life will depend on how the machine is treated and how often it is used.
The table and clamp seals are not covered by our warranty.
Heating elements
The infrared heating elements supplied with this machine are manufactured from a ceramic material and
are very brittle. A shock to the machine may break an element.
An interlock system is built into the machine to prevent a mould being pushed up into the heater and
damaging the elements.
The heating elements contain a length of resistance wire internally, which becomes extremely hot when
electricity is applied. The wire expands and contracts as it heats and cools.
Eventually, due to the continual expansion and contraction, the wire will fracture and a new element will be
needed. This may take a decade or more. Alternatively it could happen as a result of an impact or shock.
Because of this we are unable to apply our standard warranty to ceramic heating elements.
The heating elements are not covered by our warranty.
Vacuum system
The vacuum system on this machine is fairly simple but uses high quality components throughout. The life
expectancy of the vacuum system will be compromised by the ingress of dirt, shavings, dust, liquid etc.
THE VACUUM CIRCUIT INCLUDING THE VACUUM PUMP WILL NOT BE COVERED BY OUR WARRANTY IF
THEY ARE FOUND TO BE BLOCKED WITH FOREIGN MATTER OR CORRODED BY THE INGRESS OF LIQUID.
Page 21
Manual - Formech 300XQ
21
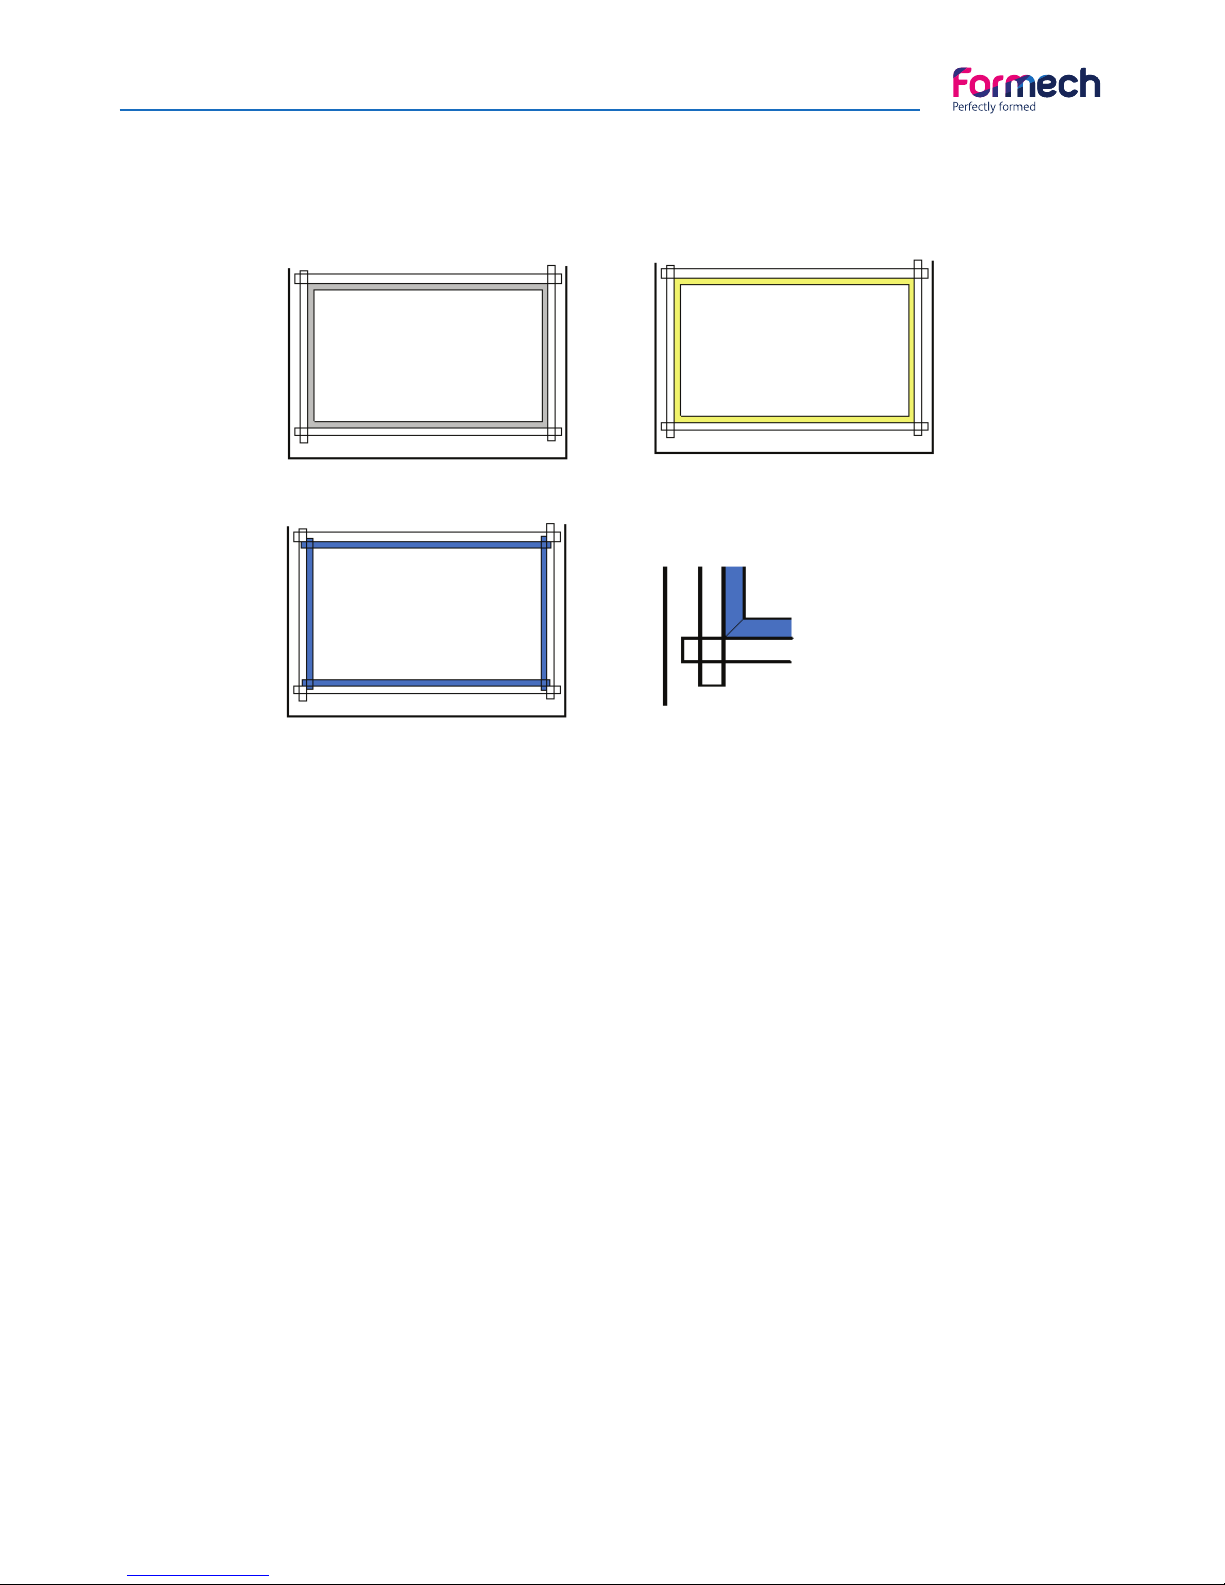
Service / Repair
Replacing seals
Clean up completely,
mask the area and ‘key’
the surface.
Apply the sealant
evently.
Fit overlapping silicone
strips and ‘bed’ into
sealant.
Apply a 45 degree mitre
at the corners. Ensure
the joint is sealed.
1
2
3 4
1. Remove all the existing seal and adhesive with a sharp blade. Mask off the sealing area with masking tape
or similar (Mask the outside for top frames or reducing windows & the inside for table seals). Prepare the
sealing area with emery cloth or similar to achieve a good surface for the new adhesive to key with. Ensure
that the surface is clean from dust, dirt and grease.
2. Apply a generous bead of high modulus silicone sealant to the masked area and smooth down to give a
consistent layer.
3. Cut the silicone strip in lengths long enough to overlap the corners. Do not stretch the seal strip when
measuring or applying. Lay each strip on to the seal area overlapping at the corners. Ensure the seal strip is
bedded down well by pressing fi rmly along the full length.
4. With a sharp blade cut a 45° mitre joint at all corners. Fill gaps in the joints with sealant. Remove the
masking tape before the sealant has set. For best performance leave seal to set overnight.
Page 22
Manual - Formech 300XQ
22
Service / Repair
Replacing a heating element
ELECTRICAL MAINTENANCE SHOULD ONLY BE ATTEMPTED BY SUITABLY QUALIFIED TECHNICIANS.
How to check a heating element
If you notice there is a cold area on heated plastics, it may be that a heating zone or heating element is not
working correctly. In either case the fi rst step is to check the wiring at the terminal block. It is not always
obvious that they are loose or disconnected.
1- First, check that the heating zones are set correctly, set all the zones to 70% and check for even heat and
softening plastic when the heater is held over the forming are with plastic sheet fi tted. Make a note of areas
where the plastic remains hard to determine if it is a single element of entire zone.
2- If an entire zone is not functioning then remove the top cover and check that the wiring is not loose or
has become disconnected for that particular zone. You will have to remove relevant terminal block covers
to determine this. If all appears OK then set the defective zone to 100% and check the voltage at the zone
using a suitable volt meter.
3- If no voltage is present then contact Formech for service and advice.
If a single element is found to be faulty then it will require replacement.
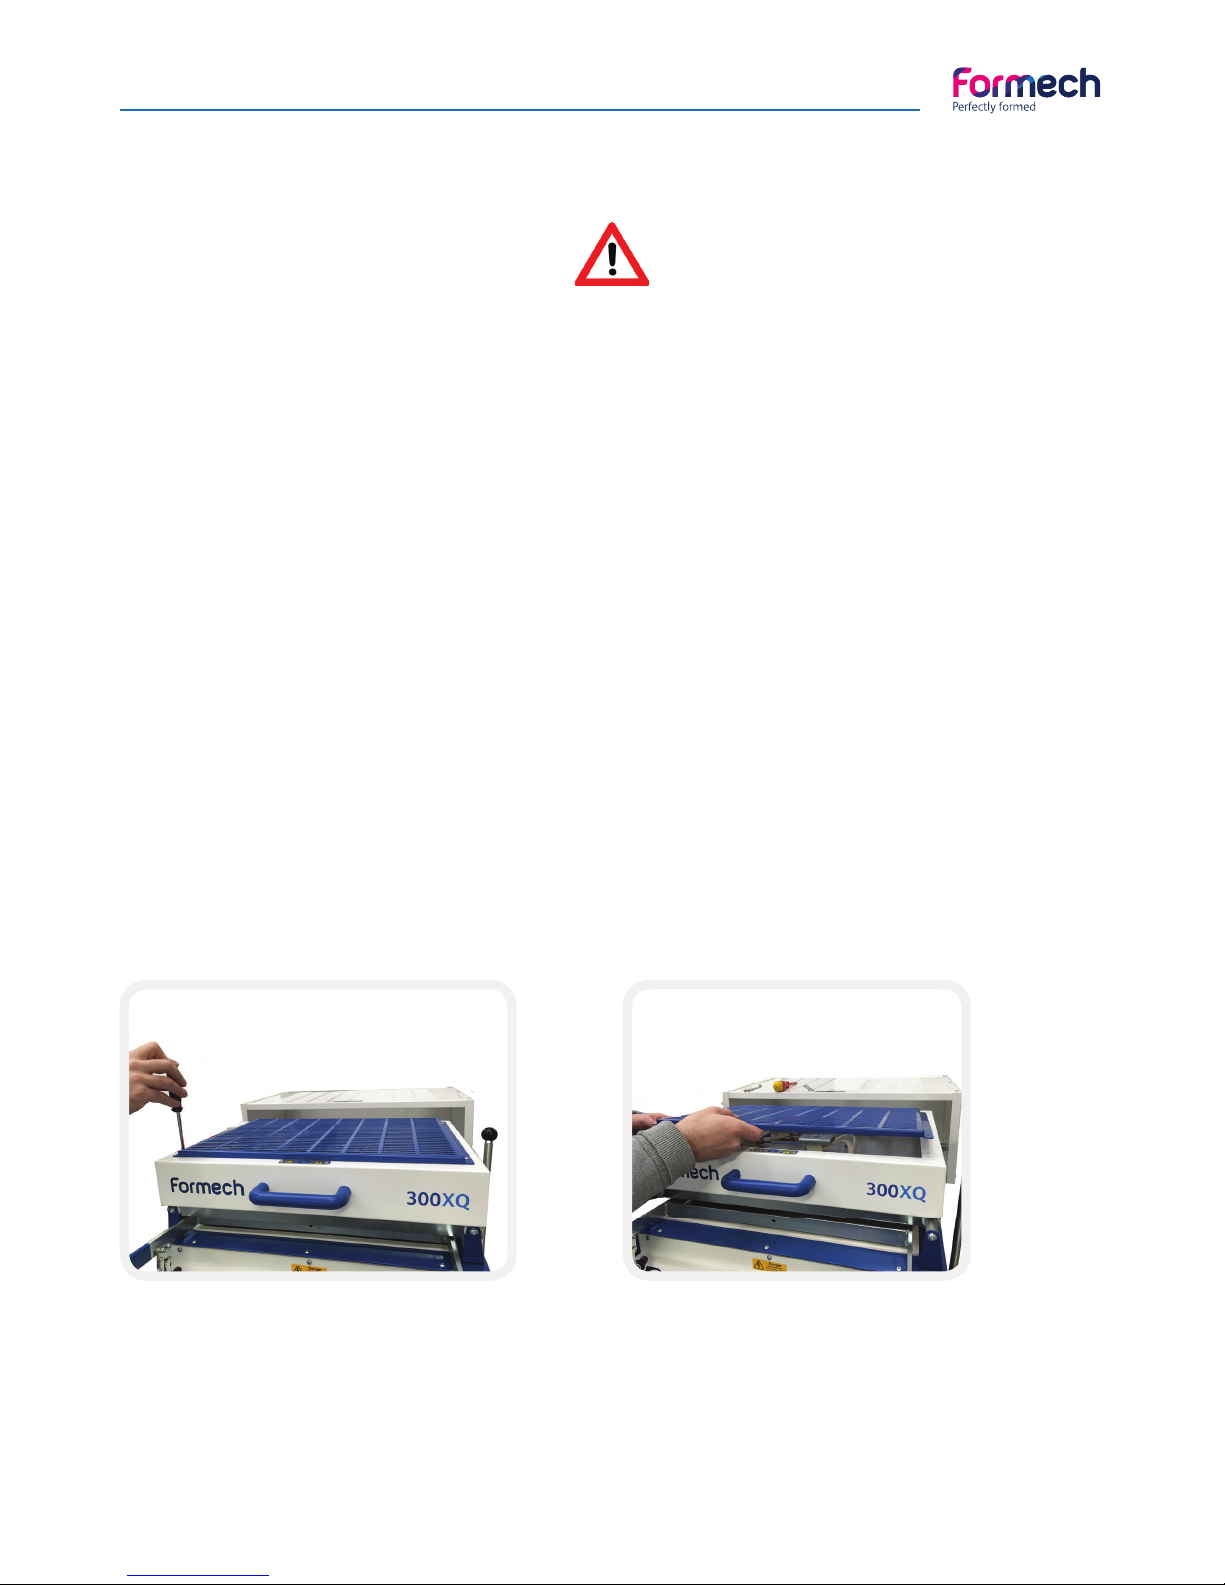
Unplug the machine from the mains
Bring the heater completely
forward and remove the 4 screws
retaining the cover on top of the
heater.
The front 2 screws are retained with
an internal plate that will fall when the
screws are removed. Retain this plate
for fi tting during reassembly.
Page 23
Manual - Formech 300XQ
23
Service / Repair
Replacing a heating element (continuation)
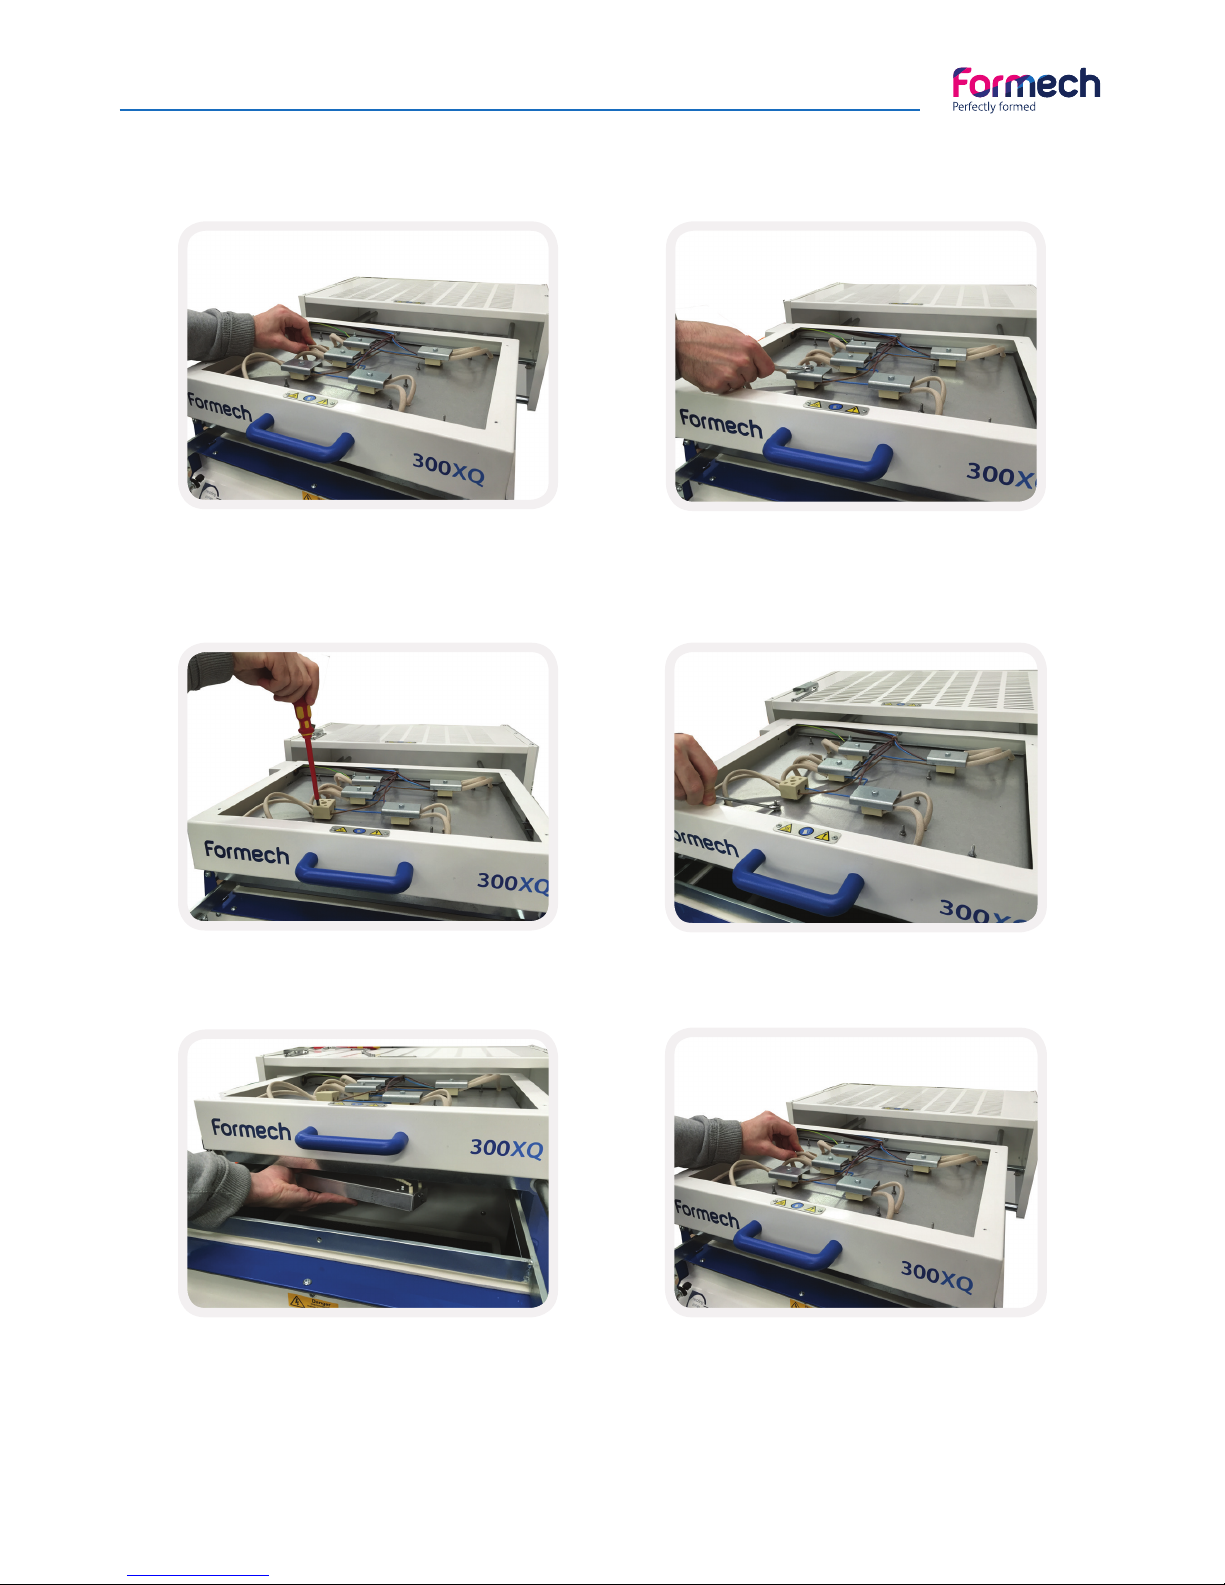
At this stage check that all the element
wires and interconnecting wires are fully
tightened and that the fault was not
merely a loose connection.
Remove the relevant terminal block
cover(s).
Loosen and remove the element wires
from the appropriate connector block.
Remove the nuts and washers holding the
faulty element. Spanner key n°8
Remove element and fit the replacement
new heating element ensuring the fixing
screws are secured.
Ensure that the connections are
correctly fitted and the connector block
screws are fully tightened. Replace the
connector cover and test the heater.
Finally reassemble the heater top cover
and retaining plate for the front fixings.
Page 24
Manual - Formech 300XQ
24
Service / Repair
Electrical Troubleshooting
Before any maintenance work is carried out, electrical supply must be locked in the OFF position
or the mains lead removed.
Faults on electrical & electronic modules are rare but loose plugs and terminals are responsible for most
electrically based failures. A logical approach to detecting the fault begins with a complete appraisal of the
faults and symptoms.
Much time can be wasted looking in the wrong areas for a problem that, when found, was obvious.
See also section dealing with Electrical circuit information.
Only a qualifi ed electrical technician may work on any parts carrying mains voltage and should
be responsible for ensuring that the machine is in a safe condition before allowing services to be
restored.
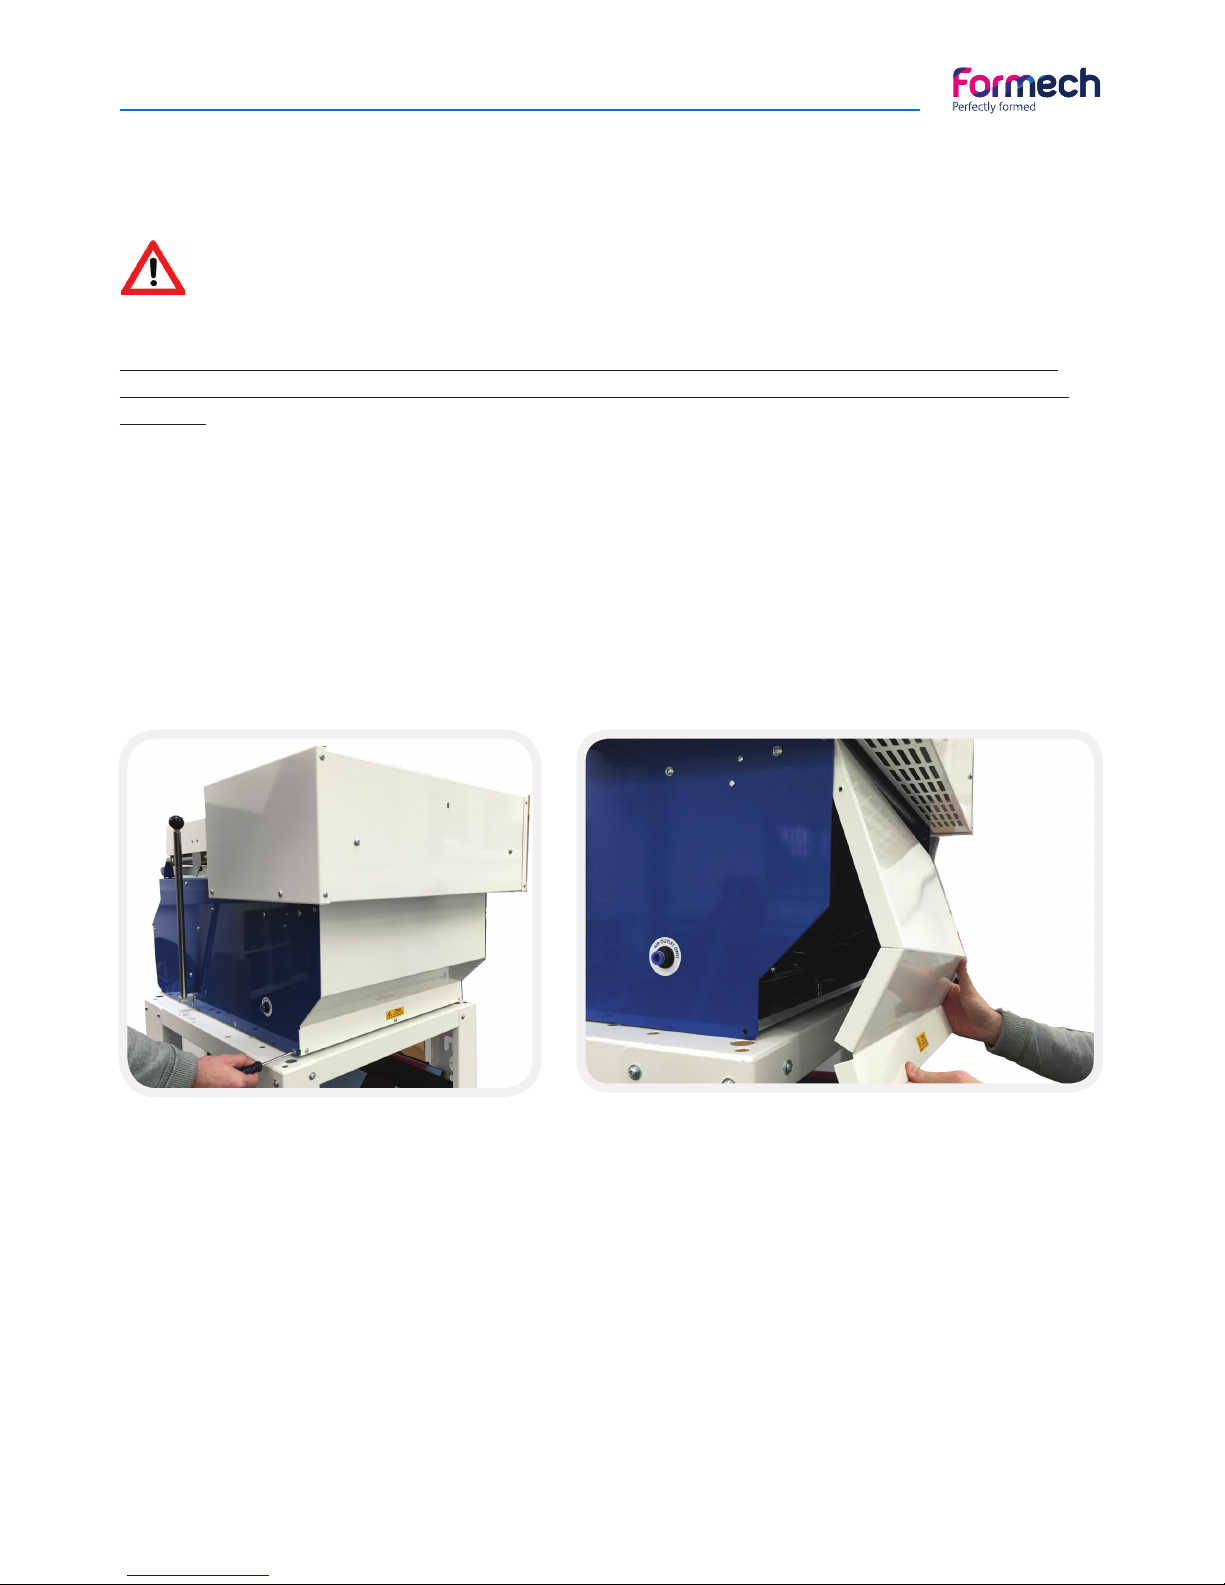
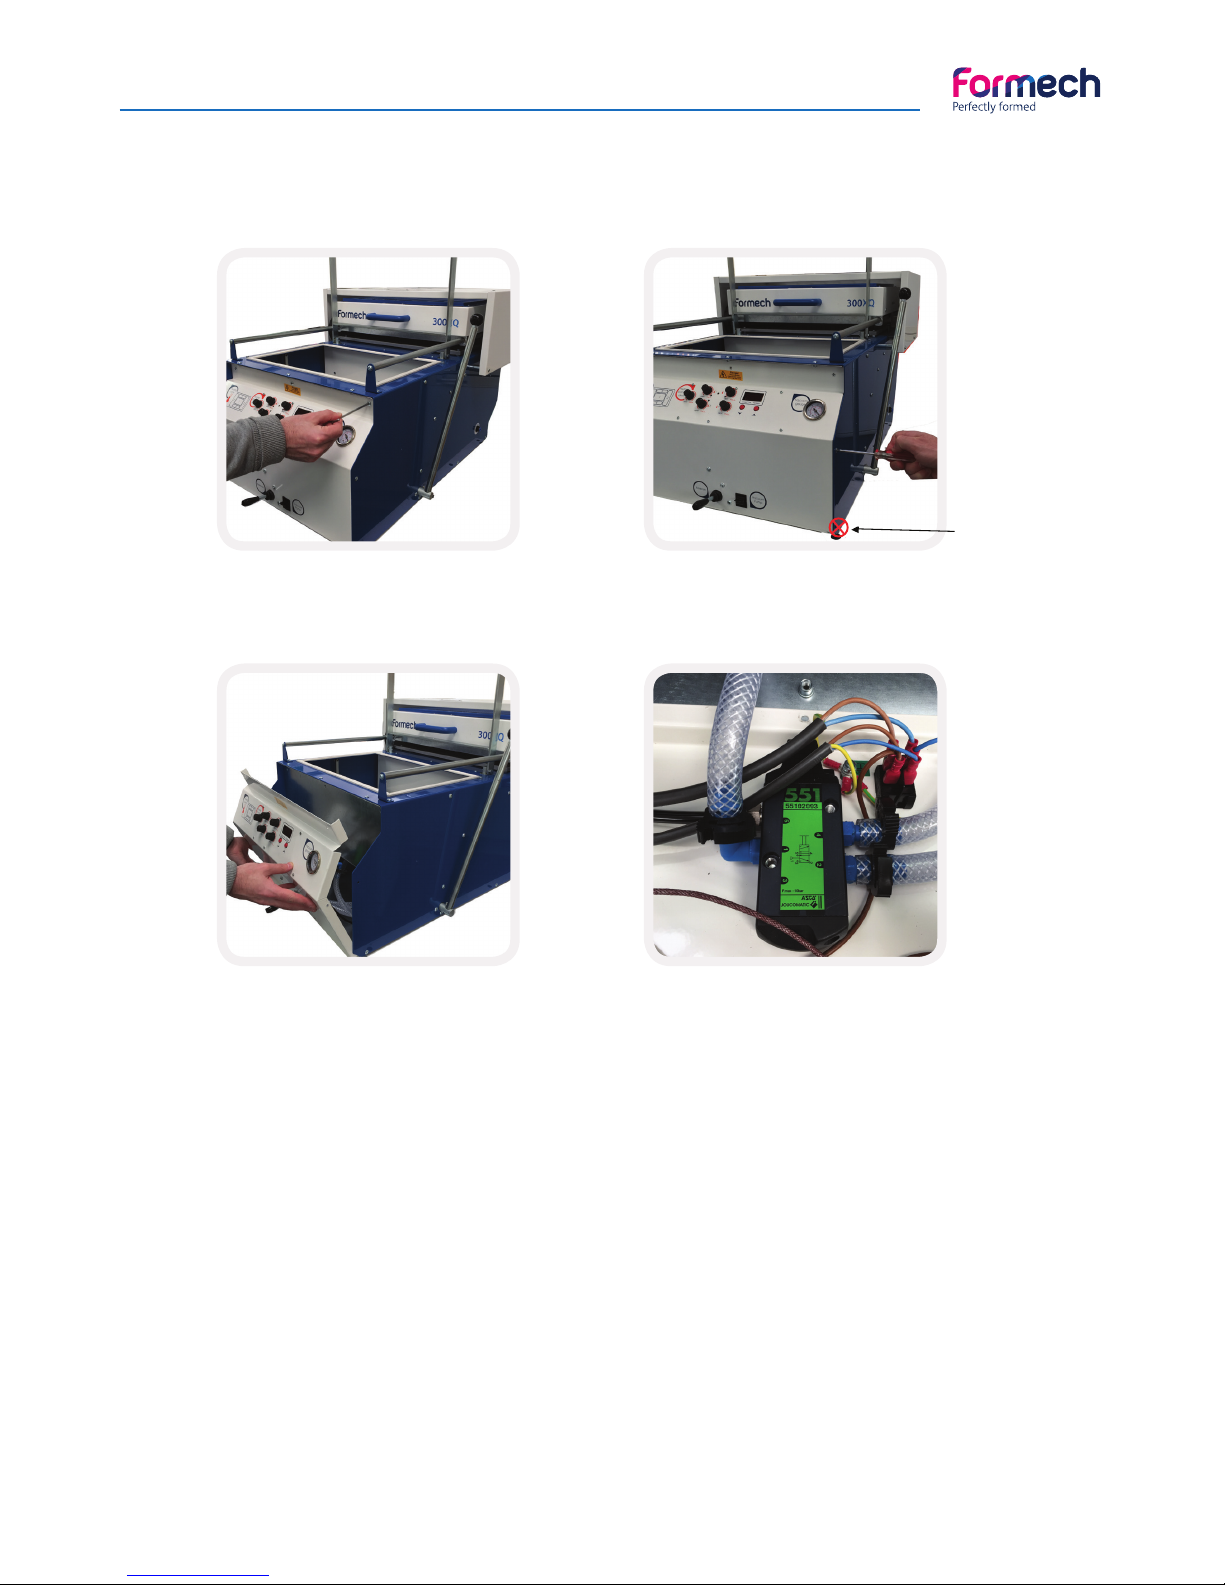
Remove the 7 self-tapping screws
retaining the rear panel.
Check all the connections to the
inlet receptable, the fuse holder
and the power switch located in
the inside back of the machine.
Check the internal fuse located in the fuse holder connected to the power inlet and switch. The fuse
is 20MM, 12.5A .
Page 25
Manual - Formech 300XQ
25
If the vacuum pump motor does not run, check the electrical supply. If the motor smells strongly of burnt
lacquer then it is probably burnt out and the entire pump\motor assembly needs replacing.
If all the connections are good then the switches can be checked for continuity.
Note: Continuity should be obtained between the top and bottom contacts of the switch not side to side.
If the supply is present but the motor hums and does not run, the capacitor may be faulty or has become
disconnected. Check the connections to the capacitor by carefully removing its black cover.
Service / Repair
Remove the 3 cap head screws with an allen key 3mm plus the 5 self-tapping
screws retaining the front panel.
Electrical Troubleshooting (continuation)
Do not remove
this bottom
screw but the
top one
Remove the front panel and check the pump switch connections.
Page 26
Manual - Formech 300XQ
26
Service / Repair
Vacuum / Pressure Troubleshooting
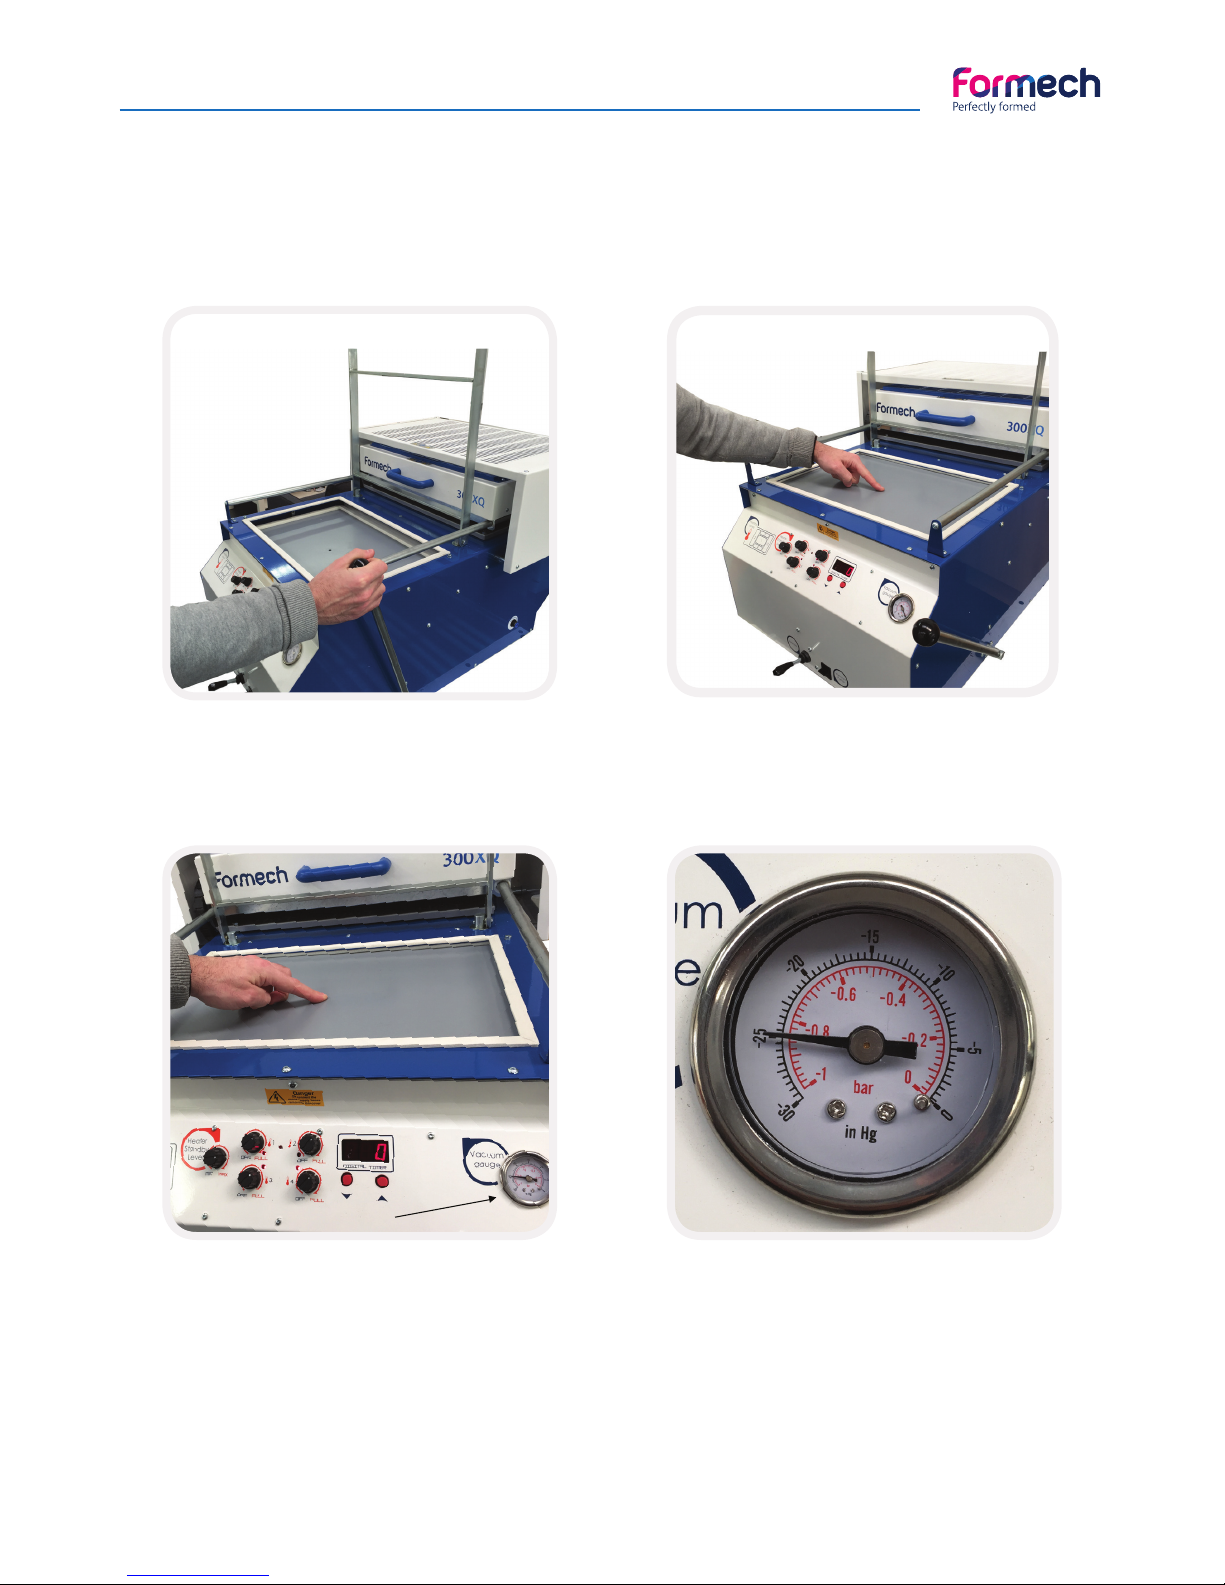
If the vacuum or pressure appears to be weak or non-existent check the following.
Raise and lock the mould
table in the up position
Turn the vacuum on and
place your finger over the
vacuum hole
Check the reading you
get on the vacuum gauge
If the vacuum gauge reading of
25”Hg or higher is Normal. A lower
reading indicates poor vacuum
where attention is required.
Page 27

Manual - Formech 300XQ
27
Vacuum / Pressure Troubleshooting (continuation)
The possible causes of poor vacuum are:
a) mould or baseboard is blocking and covering the vacuum hole preventing air flow (*)
b) Top frame or table seals are worn or damaged and may need replacing.
c) The mould table, top frame or reducing plates are damaged or distorted.
d) Vacuum table pipe has been disconnected from underside of table.
e) Vacuum pump filter is blocked.
f) Vacuum circuit has loose or damaged pipes.
g) Vacuum valve is blocked.
h) Pump diaphragm is damaged.
i) Pump is faulty.
(*) Use the table mesh provided with the machine
Service / Repair
Cleaning
Ensure the inside of the machine and the heater tray is cleared of dust, dirt and debris. Do not allow dirt and
loose particles to build up, particularly on the heater tray.
Lubrication
The 300XQ requires minimum lubrication.
Apply general purpose grease to the table guide bars when required to assist with table movement.
Apply a small amount of fine silicone oil or fine oil to the heater slide bars when required to assist free
movement of the heater.
Page 28
Manual - Formech 300XQ
28
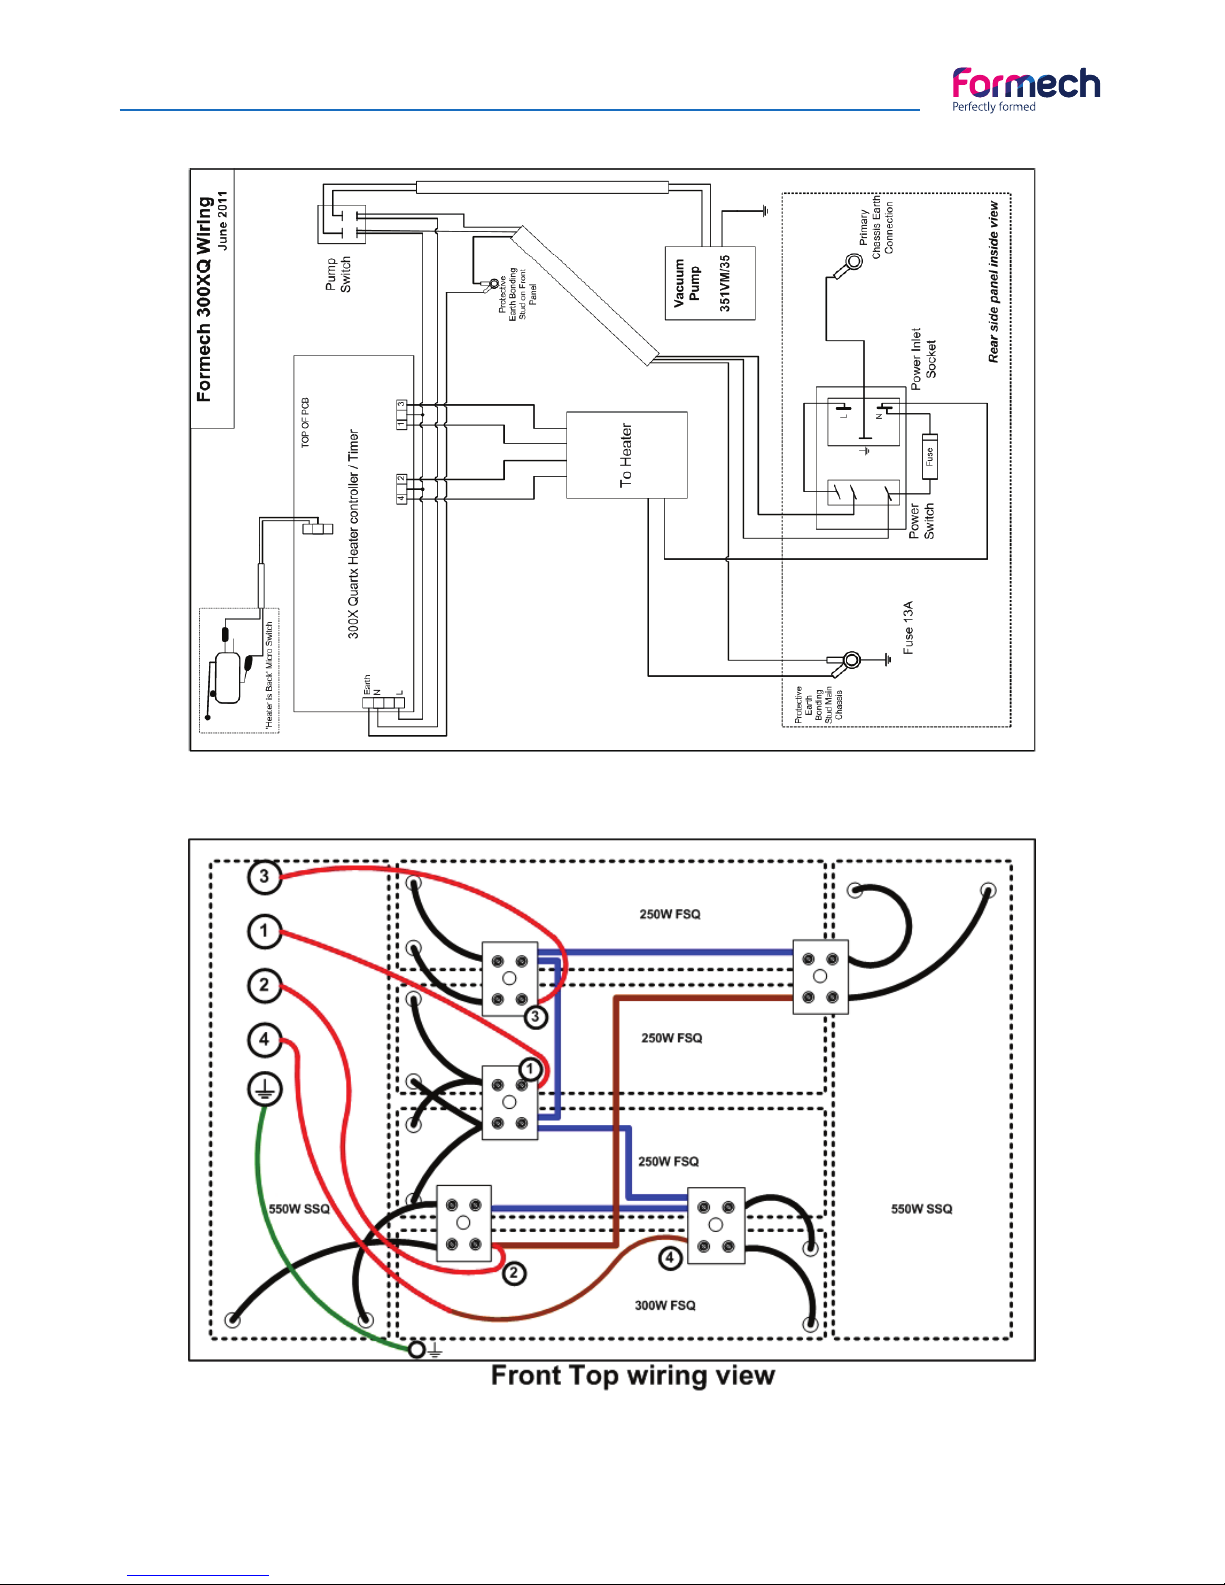
Wiring Diagram Formech 300XQ
Page 29
Manual - Formech 300XQ
29
Spare Parts Listing
Qty Description Part No
2 Quartz Heating Element, Zone 2 550 Watt SSQ
3 Quartz Heating Element, Zone 1,3 250 Watt FSQ
1 Quartz heating Element, Zone 4 300 Watt FSQ
1 Heater Cabling (m) 1.63mm DFGL Bl /Br
1 Heater Cabling (m) 1.5mm SIAF Blue
1 Heater Cabling (m) 1.00mm SIFGL Brown
1 Sleeving HT Mar 310
5 Ceramic Terminal Block 30A Ceramic block
1 Cable chain Chain 20012
1 Cable chain end Bracket set Brkt 20012
1 Heater handle 107 Black 300XQ
2 Toggle Clamps Toggle Clamp 300XQ
2 Toggle Clamp Nutlet Small Clamp Nutlet M5
2 Clamp Frame Grip 300XQ Clamp frame grip
1 Crank Handle Knob, 32dia M8 ball M8 ball knob
1 Spring, Interlock Std Interlock spring
1 5M Seal kit, 5M Top seal, 3m table seal, sealant Seal kit A 300XQ
1 10M Seal kit, 10M Top seal, 3m table seal, sealant Seal Kit B 300XQ
1 Sealant 85ml Sealant 85ml
4 Foot Std rubber foot
1 Vacuum Valve, 5/3, 1/4" Std 1/4, 5/3, Lever valve
1 Vacuum Pump 351 VM 35
1 1/4" bore PVC tube (m) Pipe 63/115
1 3/8" bore PVC tube (m) Pipe 10/16
4 1/4" to 6mm Hosetail, Straight 468 46 048
1 1/4" to 10mm Hosetail, Elbow 469 50 048
8 Pipe Clip for 1/4" pipe Clip C
2 Pipe Clip for 3/8" pipe Clip F
1 Vacuum Gauge 40mm Vac gauge
1 Pump Filter Std In-line filter
1 300XQ Heat Controller / Timer AG 300XQ CTRL PCB
5 Knob 300XQ CTRL Knob
1 Paddle Switch H11 E
1 Mains Inlet & Switch, C20 S1821
1 In line fuse Holder R1583
1 Fuse 12.5A R1080
1 Limit Switch S4562
1 Mains lead, 16A. UK to C19 R6470
1 Mains lead, 16A, Schuko to C19 S9321
3 Label 'Hot Surfaces' Hot Label
1 Mesh 300XQ Mesh
Page 30
Manual - Formech 300XQ
30
EC Machinery Directive
2006/42/EC
Declaration of Conformity
We hereby certify that the machinery stipulated below complies with all the relevant provisions
of the EC Lachinery Directive and the National Laws and regulations adopting this Directive
Modifictions to this machinery without prior approval from the undersigned will render this
declaration null and void.
Machine description: Vacuum Forming Machine
Machine Function: Thermoforming of Plastic Sheet
Model/Type: 300XQ
Serial Number:
Date of Manufacture:
Is in conformity with the provisions of the following other EC Directives:
2004 / 108/EC - EMC
2006 / 95/EC - LVD
Technical File Compiled by: Andrew Berry at address below
Formech International Limited, Unit 4, Thrales End Farm, Thrales End Lane, Harpenden
Hertfordshire AL5 3NS, United Kingdom
Significant harmonised standards applied:
EN ISO 12100 : 2010
EN ISO 13849 : 2006
EN 60204 - 1 : 2006
EN 12409: 2008
Signed:
Date:
Name: Paul Vukovich
Position: Managing Director
Being the responsible person appointed by the manufacturer
EC Machinery Directive
Page 31

31
For Parts, Service & Technical Assistance UK,
Europe and Rest of the World
Telephone: +44 (0) 1582 469 797
Fax: +44 (0) 1582 469646
For Parts, Service & Technical Assistance North
and South America
Telephone: 312.396.4072
Fax: 312.396.4073
Formech International Limited
Unit 4, Thrales End Farm, Thrales End Lane, Harpenden, Hertfordshire, AL5 3NS U.K.
Tel: +44 (0)1582 469797 Fax: +44 (0)1582 469646
Accounts: +44 (0)1582 469028 Email: [email protected]
Registered office as above address. Registered in England Number 2999925 VAT no. GB 604 0796 55
 Loading...