

for Living Essex Assembly Instructions Manual

Essex Gazebo
Product No. 088-1336-8
Model No. L-GZ340PST-3
Assembly Instructions
Toll-free: 1-877-483-6759
IMPORTANT: Please read this manual carefully before beginning assembly of this product.
Production Number: xxxxxxxx

Imported for Trileaf Distribution Trifeuil Toronto, Canada M4S 2B8
Table of Contents 3
Important Safety Instructions 3
Part List 4-5
3
Assembly
Cleaning and Maintenance
Technical Data
Warranty
6-54
55
55
56
Warning! To reduce the risk of serious injury, read the following safety instructions before
assembling and using the gazebo.
Caution! Always keep children under close supervision while they are using or around this product.
Never leave children unattended.
• This product is intended for domestic outdoor use only.
• The product should be placed on a flat horizontal ground.
• Ensure enough clearance around the product. Before assembling the product, find level ground not less than
1.8 m (6 ft) away from any structures or obstructions, such as fences, garages, houses, overhanging branches,
laundry lines, or electrical wires.
• The gazebo must be anchored with stakes onto the ground for added safety. It cannot be permanently attached
to a concrete floor or platform. Do not assemble the gazebo on sandy, muddy or loose soil, as stakes do not have
enough anchorage in these types of soil.
• In case you setup more than one gazebo, keep a minimum distance of 3 m (10 ft) between the gazebos.
• Any assembly or maintenance of the product must be carried out by adults only.
• Arrange necessary manpower when assembling or moving the product.
• Some parts may contain sharp edges. Wear protective gloves if necessary.
• Keep children and pets away while setting up the gazebo.
• Check all nuts and bolts periodically for tightness. When required, tighten them again.
• Reparing and replacing parts should be done by a qualified technician.
• This gazebo is intended for decorative and sunshade purposes only, and is not designed to withstand harsh
weather, including high winds, rain, and snow.
• Always remove the canopy in heavy wind conditions, otherwise it might tip over and cause damage to the
product or injuries to passersby.
• Always ensure that the roof canvas is tensioned, so as to avoid water accumulation on the roof.
• Remove accumulated water on the roof immediately, or disassemble the gazebo in order to avoid damages.
• If the product will not be used for a longer period (e.g. winter time), it should be stored in a clean,
dry environment.
• Do not light any fires inside or near the product!
• Stay calm if fire breaks out. Search for the nearest exit. Do not return to the gazebo before firemen allow you to do so.
• Do not hang any weights on the roof frame.
• Do not climb onto the roof of the gazebo. Falling off the gazebo can result in serious injury.
• Retain the original packaging to store the gazebo.
Table of ContentsImportant Safety Instructions
IMPORTANT: RETAIN FOR FUTURE REFERENCE, AND READ CAREFULLY

Product No. 088-1336-8
• Model No.
L-GZ340PST-3
4
P10161A01131
A1
Big Top Frame - 2
B1
P10162A01131
Big Top Bar - 2
P10227A01131
C1
Small Top Support Beam - 4
P10183B01131
D1
Part List
Small Top Connector - 1
P12601C01131
E1
Hook - 1
P11971C05131
F1
Top Roof Small Panel - 2
P11972C05131
G1
Top Roof Long Panel - 2
O2
P11078D01131
Short Beam - 4
P2
P11079D01131
Long Beam - 4
P11833B05131
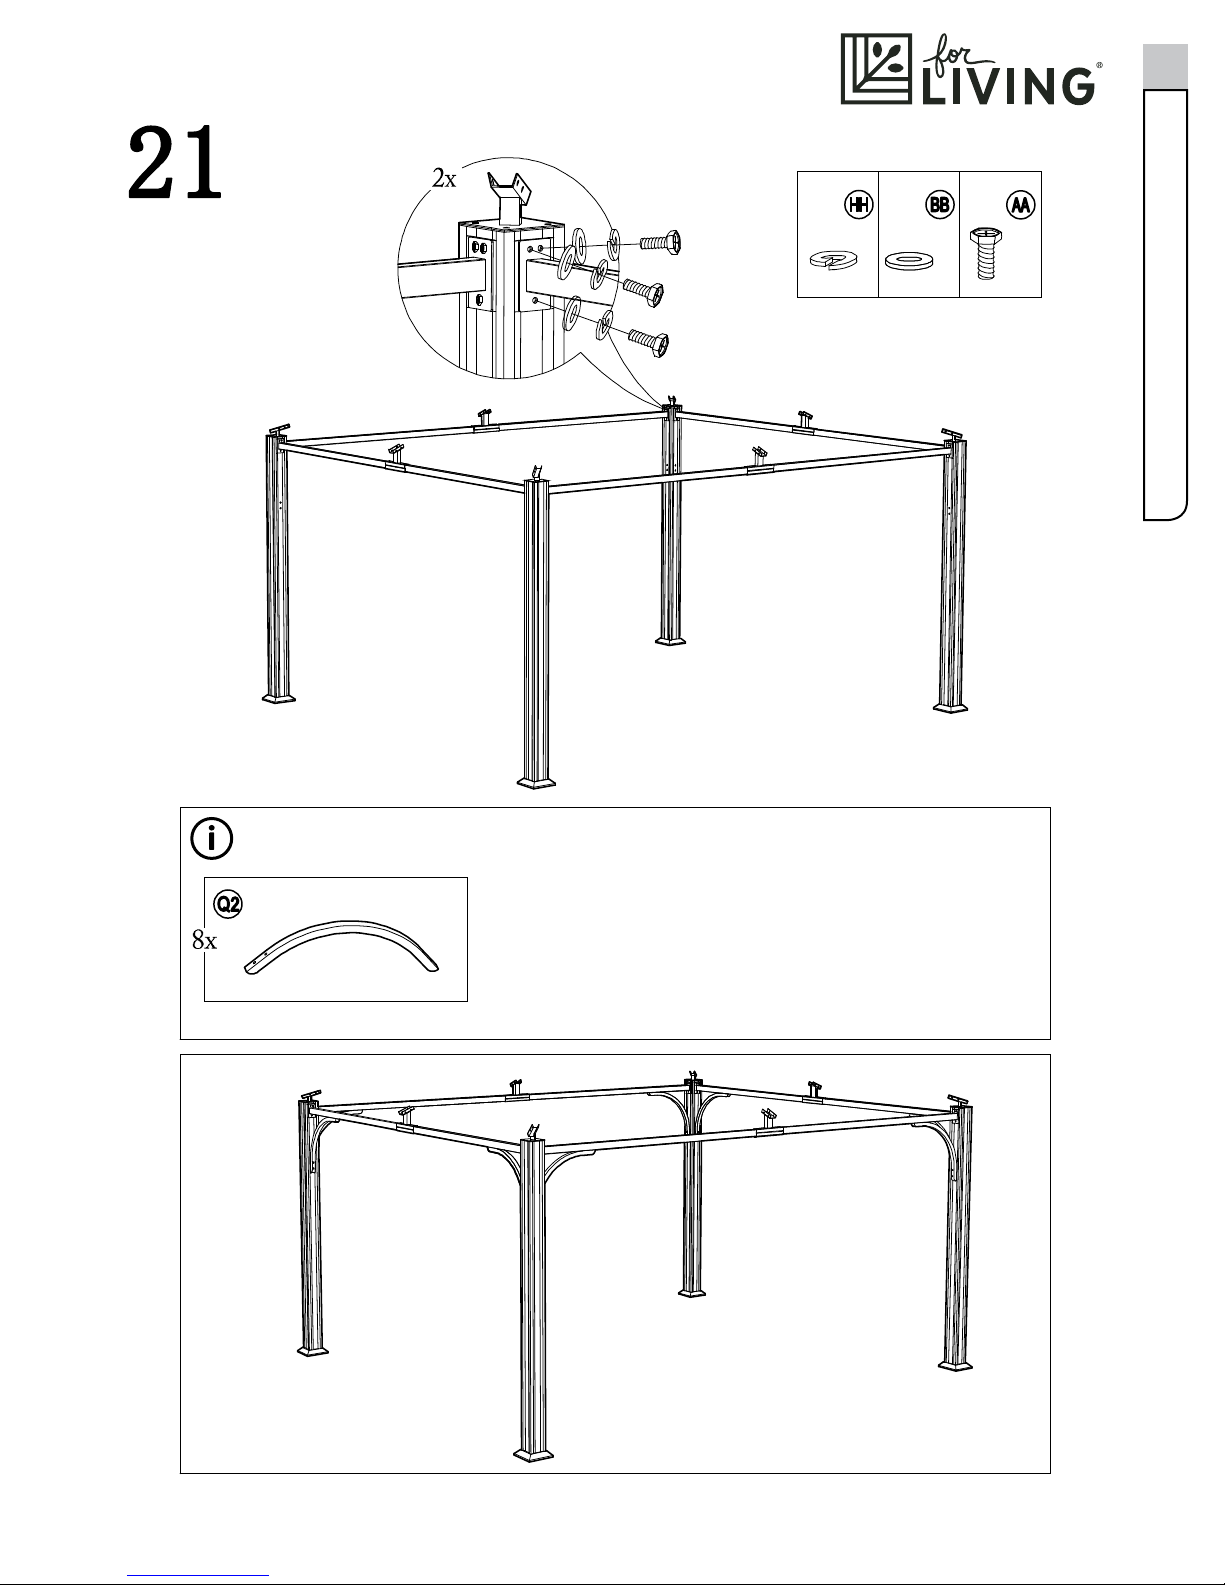
Q2
Arc Support - 8
P12136A01131
R2a
Long Pipe 1 - 2
P12137A01131
R2b
Long Pipe 2 - 2
S2a
P12138A01131
Short Pipe 1 - 2
S2b
P12139A01131
Short Pipe 2 - 2
H1
P12087A01131
Small Top Cover - 4
I1
P12086A01131
Small Top Roof Cover - 1
B2
P11114C05131
Post - 4
D2
P11527A06131
Base Cover - 4
E2
P11630A01131
Base -4
N2
P10718A01131
Slanting Bar Connector- 4
G2
P10817
Middle beam connector - 4
A01131
P10364B05131
P3
Top Slanting Bar- 4
P10445A01131
B3
Top Beam - 4
P11982C05131
C3
Long Side Left Roof Panel - 2
D3
P11983C05131
Long Side Right Roof Panel 1 - 2
E3
E3
P11980C05131
Long Side Left Roof Panel 2 - 2
P11981C05131
F3
F3
Long Side Right Roof Panel 2 - 2
G3
G3
P11978C05131
Long Side Left Roof Panel 3 - 2
H2
P10818A01131
Lower Beam Connector - 4
P11979C05131
H3
H3
Long Side Right Roof Panel 3 - 1

5
P11977C05131
I3
I3
Short Side Roof Panel 1 - 2
P11975C05131
J3
Short Side Left Roof Panel 2 - 2
P11976C05131
K3
Short Side Left Roof Panel 3- 2
P11973C05131
L3
Short Side Left Roof Panel 3- 2
P11974C05131
M3
Short Side Right Roof Panel 3 - 2
N3
P12088A01131
Big Roof Panel Cover (Corner)- 4
P12089A01131
O3
Big Roof Panel Cover (Middle)- 4
H19001C11
BB
Flat Washer M6(Large)- 318 + 16
CC H02055C1
Bolt M6*55 - 14 + 1
H14001C11
DD
Nut M6 - 28 + 2
H02065C11
FF
Bolt M6*65 - 16 + 1
GG
H02045C11
Bolt M6*45 - 48 + 2
H02035C11
JJ
Bolt M6*35 -8+1
H13001C11
HH
Spring Washer M6 - 56 + 3
Part List
P13095B01131
Q3
Big Roof Top Beam (Short Side) (1) - 4
P13096B01131
R3
Big Roof Top Beam (Short Side) (3) - 4
P13097B01131
S3
Big Roof Top Beam (Short Side) (5) - 4
P13098B01131
T3
Big Roof Top Beam(LongSide) (1) -4
P13099B01131
U3
Big Roof Top Beam(LongSide) (3) -4
P13001C01131
V3
Big Roof Top Beam (LongSide) (5) - 4
P12401A01001
II
Stake ¢8*180 -8
H00001C12
Z
Wrench M6 -2
H02020C11
AA
Bolt M6*20 - 204 + 11

Product No. 088-1336-8 • Model No. L-GZ340PST-3
6
Caution!
• Proper placement of your gazebo is essential.
Do not place the product underneath electrical lines.
• Keep children away during assembly.
This product contains small parts which can be swallowed by children.
• Keep fingers away from the places where they can be pinched or trapped.
• Do not attempt to assemble the gazebo if any parts are missing.
Let us help you!
Assembly
DO NOT RETURN YOUR PRODUCT TO THE STORE. CALL US FIRST!
1-877-483-6759
If you have questions regarding your product, require warranty assistance,
or have damaged or missing parts, please call our customer service toll-free helpline.
Contact us for assistance, we’re here to help.
IMPORTANT: Please read and understand this manual before any assembly. Before beginning assembly of product,
make sure all parts are present. Compare parts with packaging contents list. If any part is missing, or if you have
any questions, contact the service center at 1-877-483-6759 (toll free).
Place all parts from the box in a cleared area and position them on the floor in front of you. Remove all packing
materials and place them back into the box. Do not dispose of the packing materials until assembly is complete.
Read each step carefully before beginning any assembly and make sure you understand each step. If you are
missing a part, please call our toll-free number for assistance 1-877-483-6759.
Needed for assembly:
Hammer Screwdriver Ladder
4 people
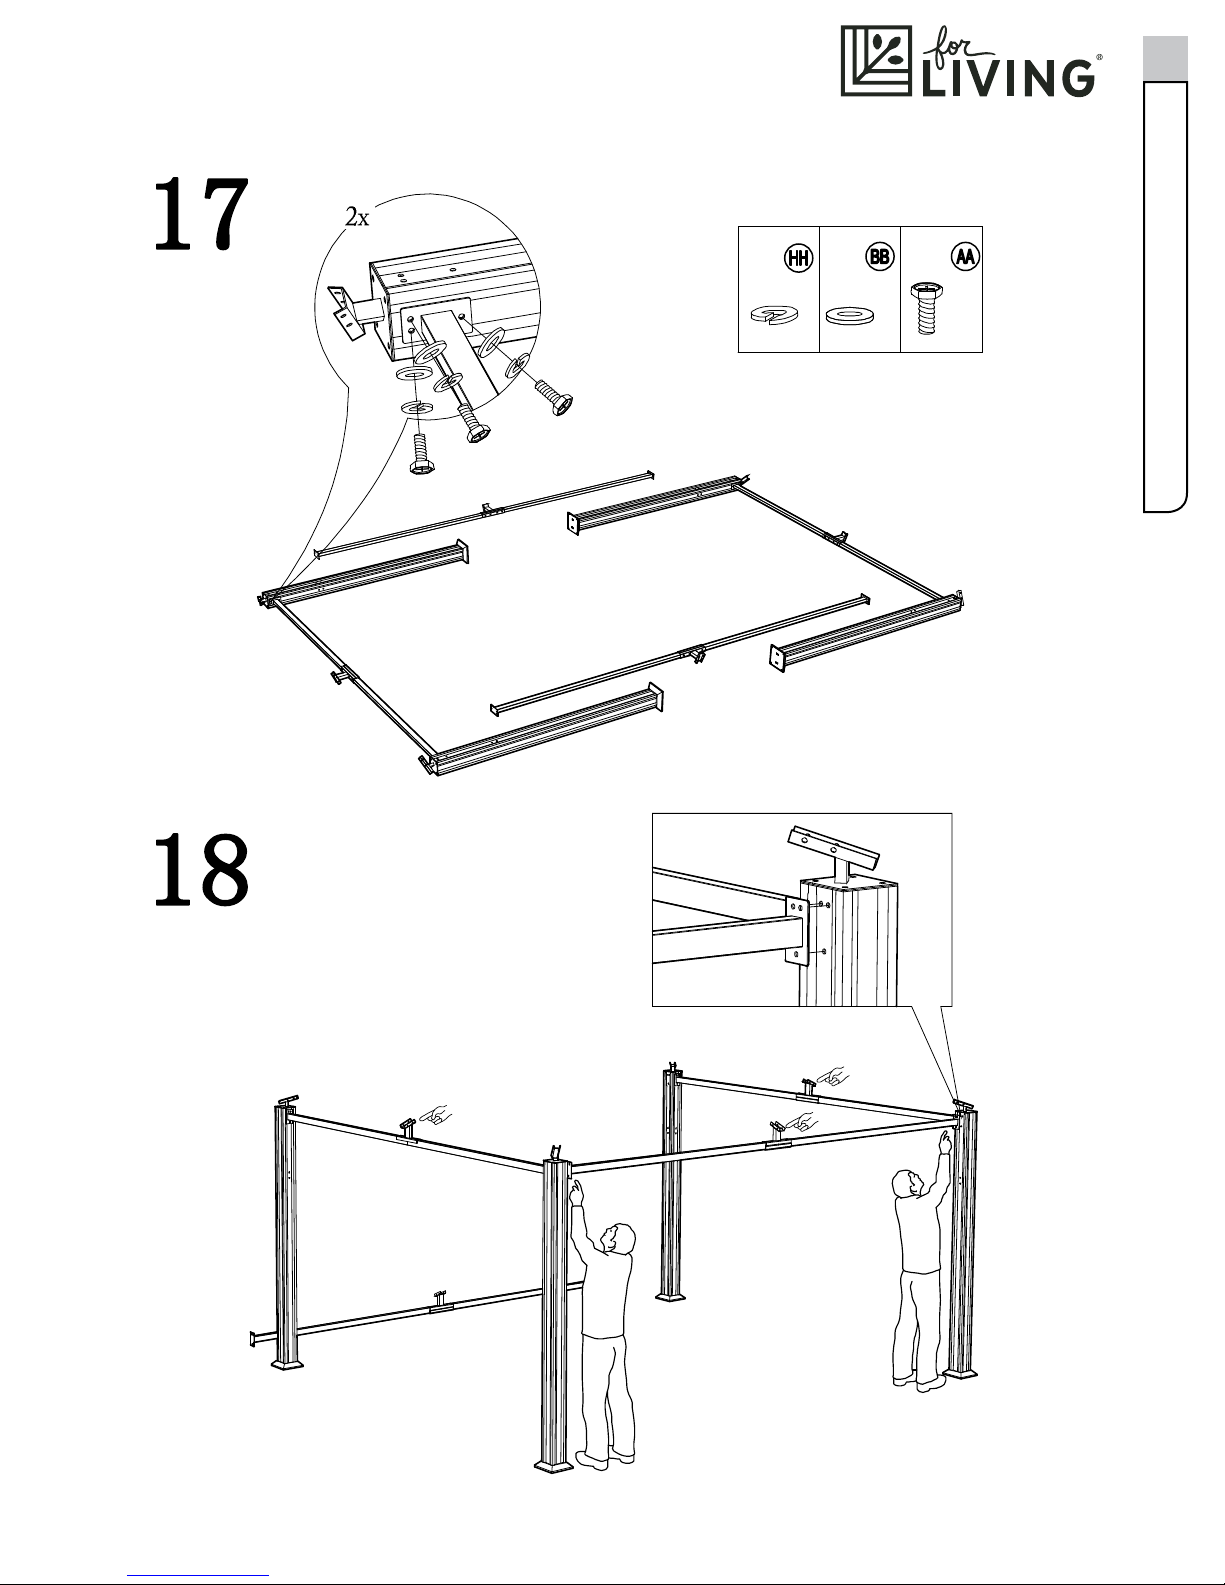
Step 5 - requires K, L, W, X
7
Assembly
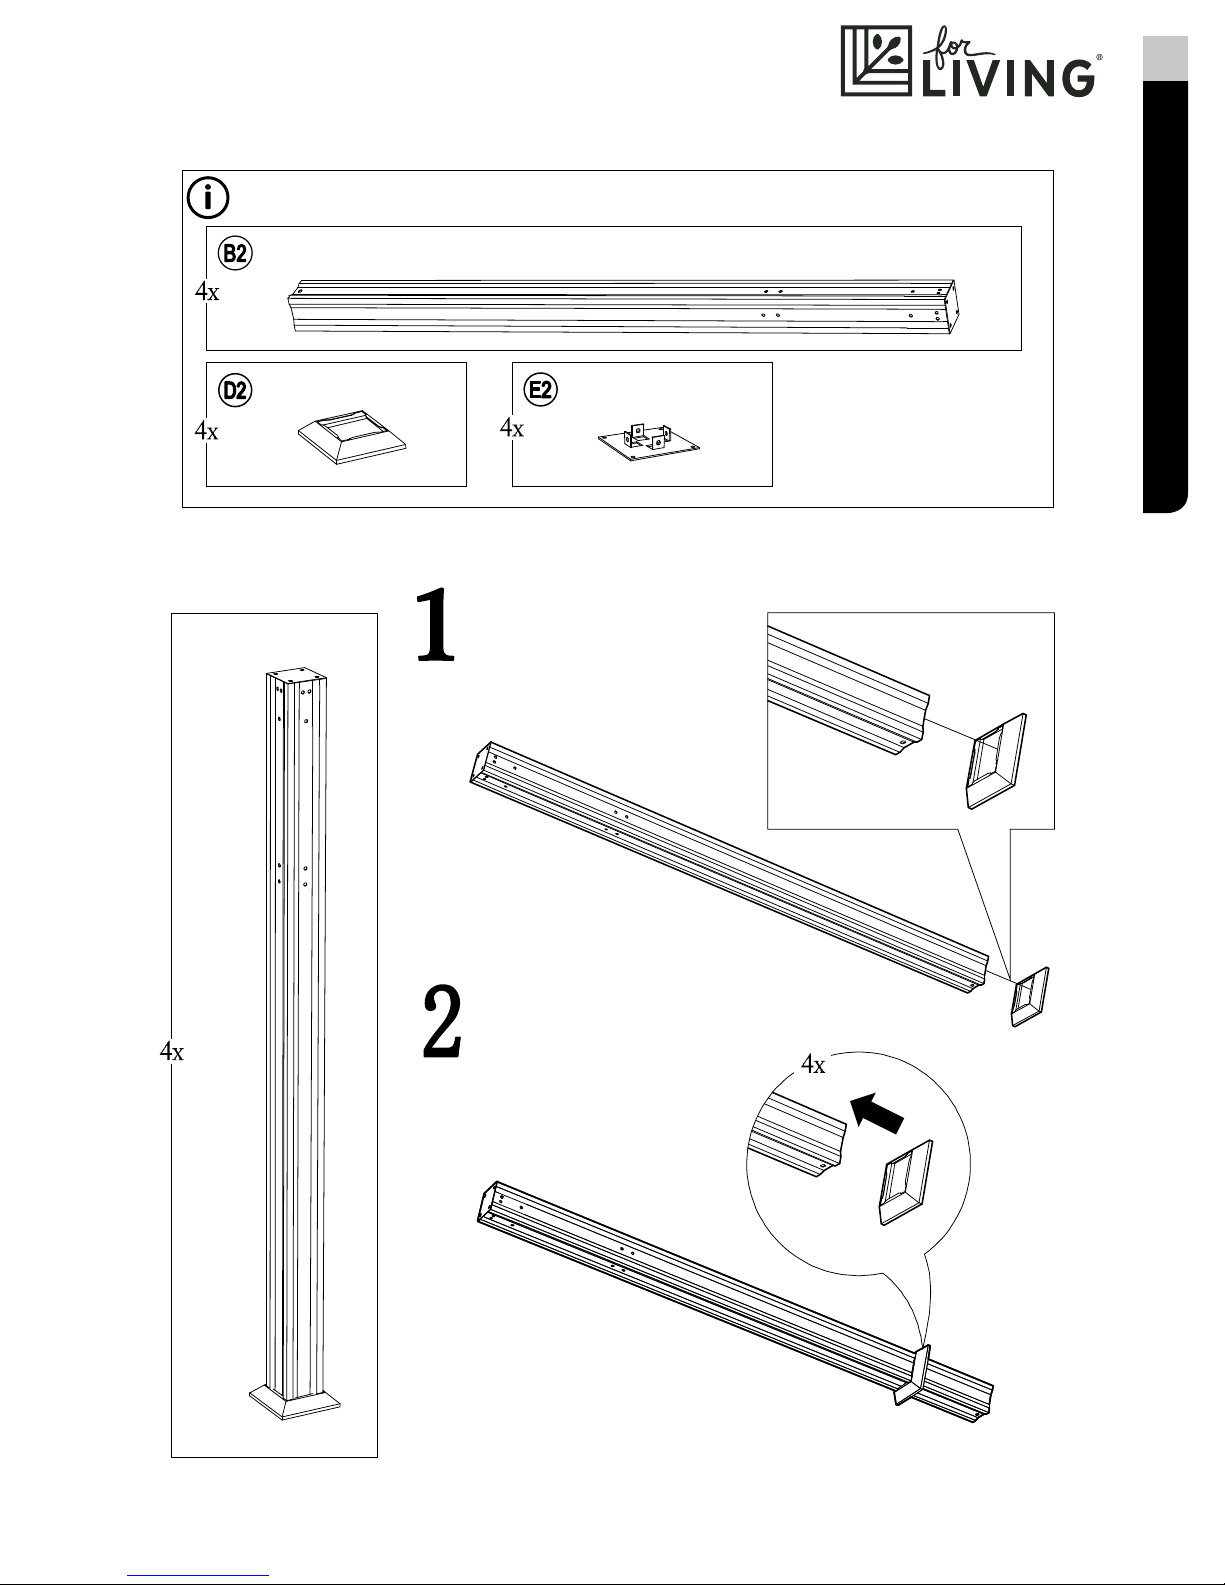
Step 1 - requires E, F, I, G, H, P
Step 1 - requires E, F, I, G, H, P
Step 2 - requires C, W, X
Step 1 - requires E, F, I, G, H, P
Step 2 - requires C, W, X
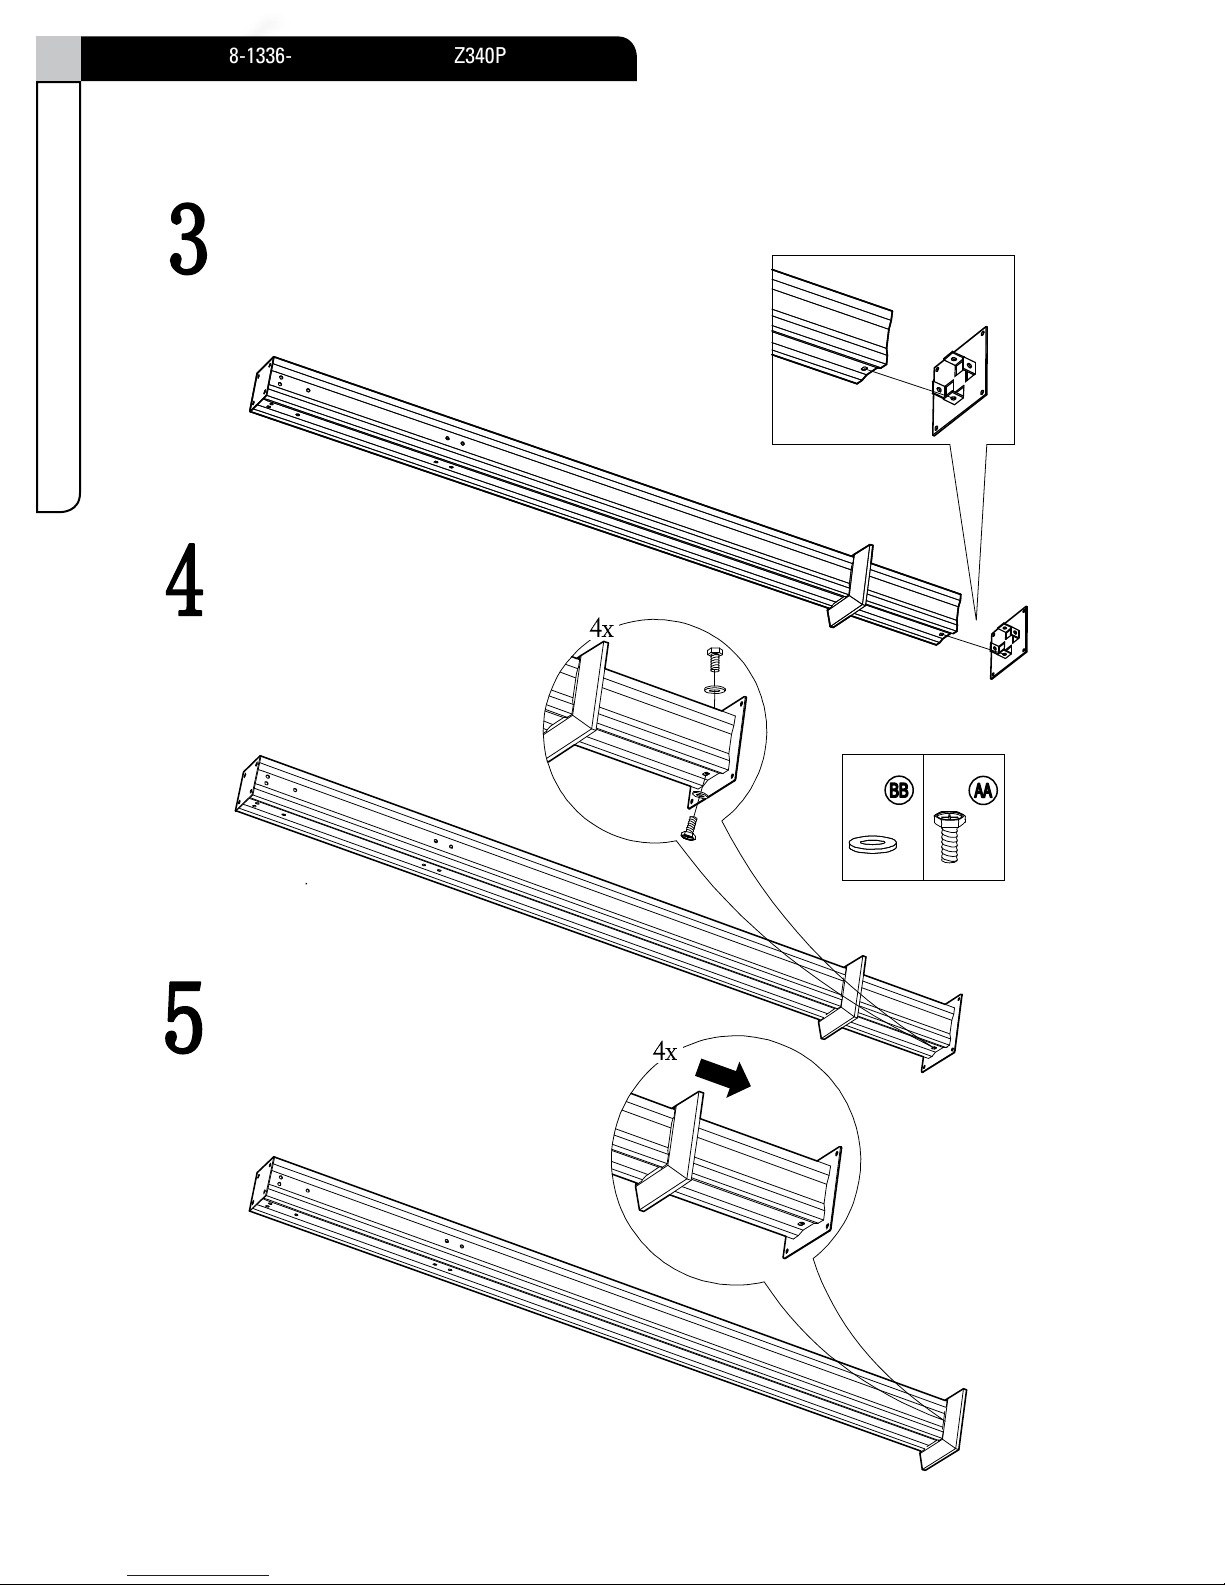
Step 3 - requires D, W, X
Product No. 088-1336-8
• Model No.
L-GZ340PST-3
Step 2 - requires C, W, X
Step 3 - requires D, W, X
Step 4 - requires J, W, X
8
Assembly
Step 1 - requires E, F, I, G, H, P
Step 2 - requires C, W, X
equires D, W, X
Step 2 - requires C, W, X
Step 3 - requires D, W, X
Step 4 - requires J, W, X
9
Assembly
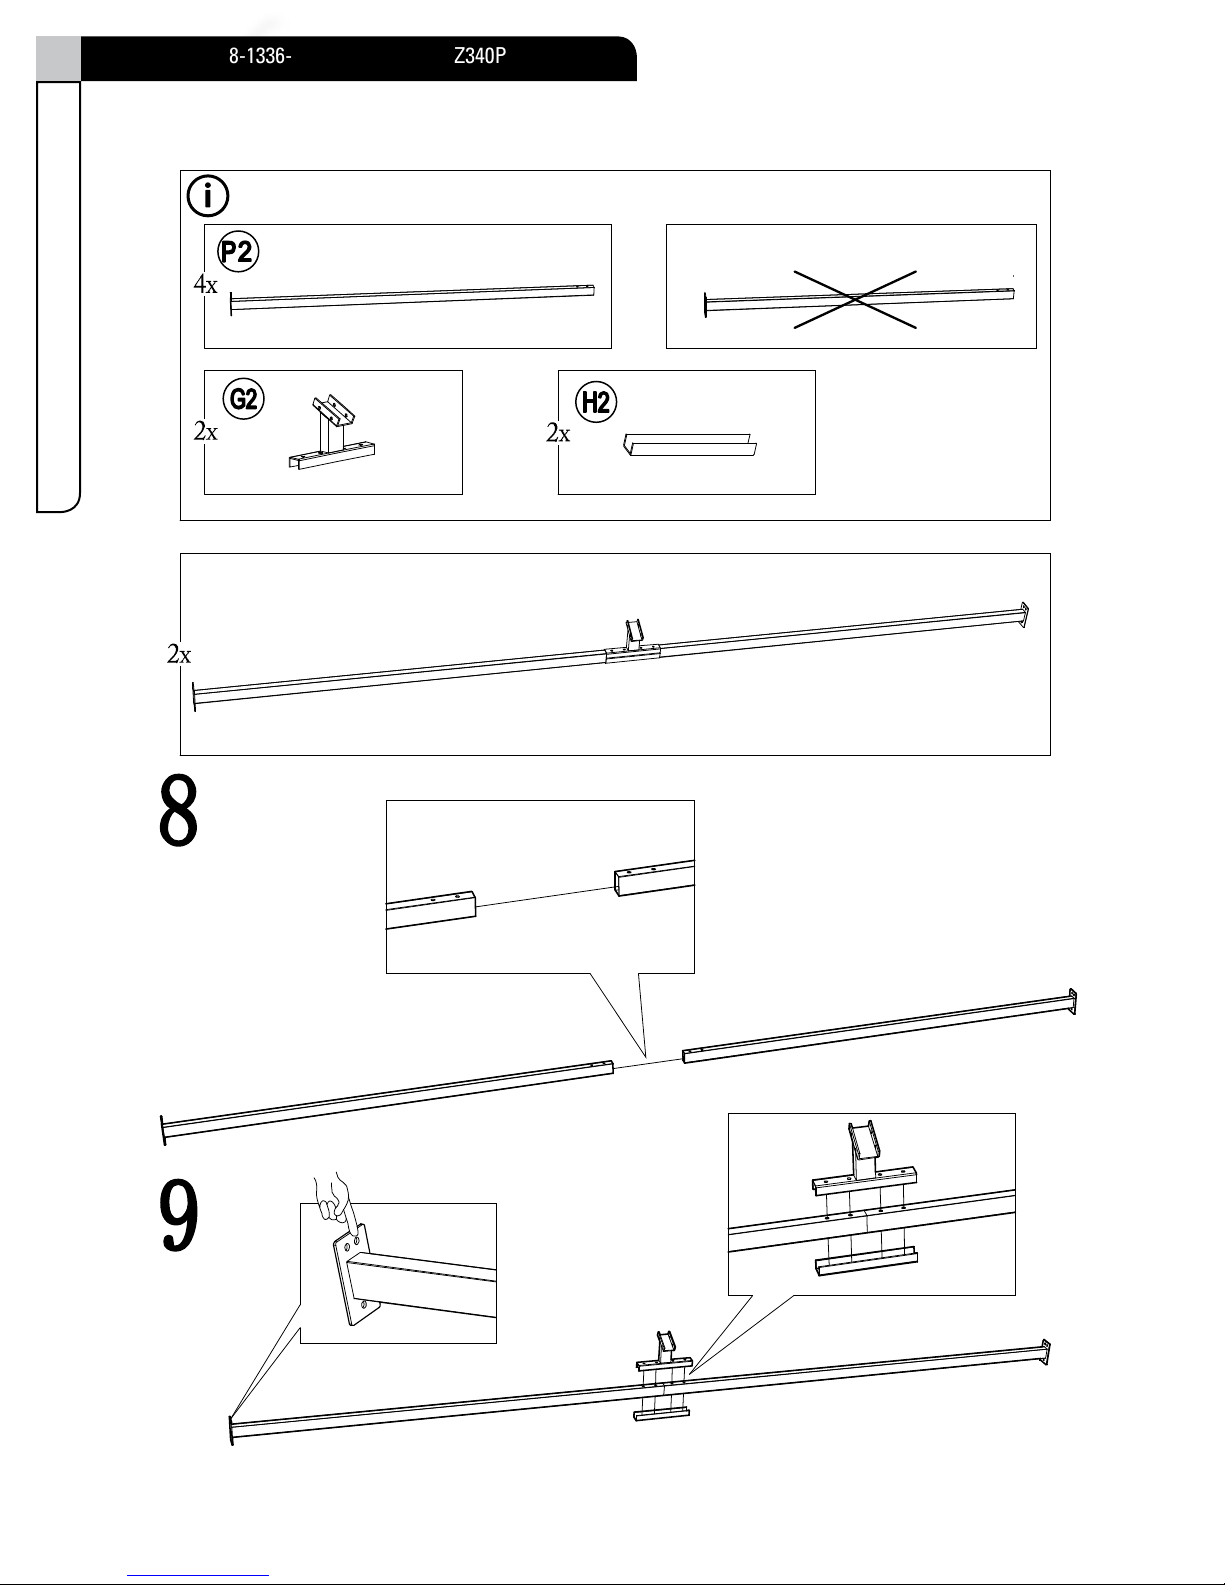
Step 5 - requires K, L, W, X
Step 9 - requires W, X
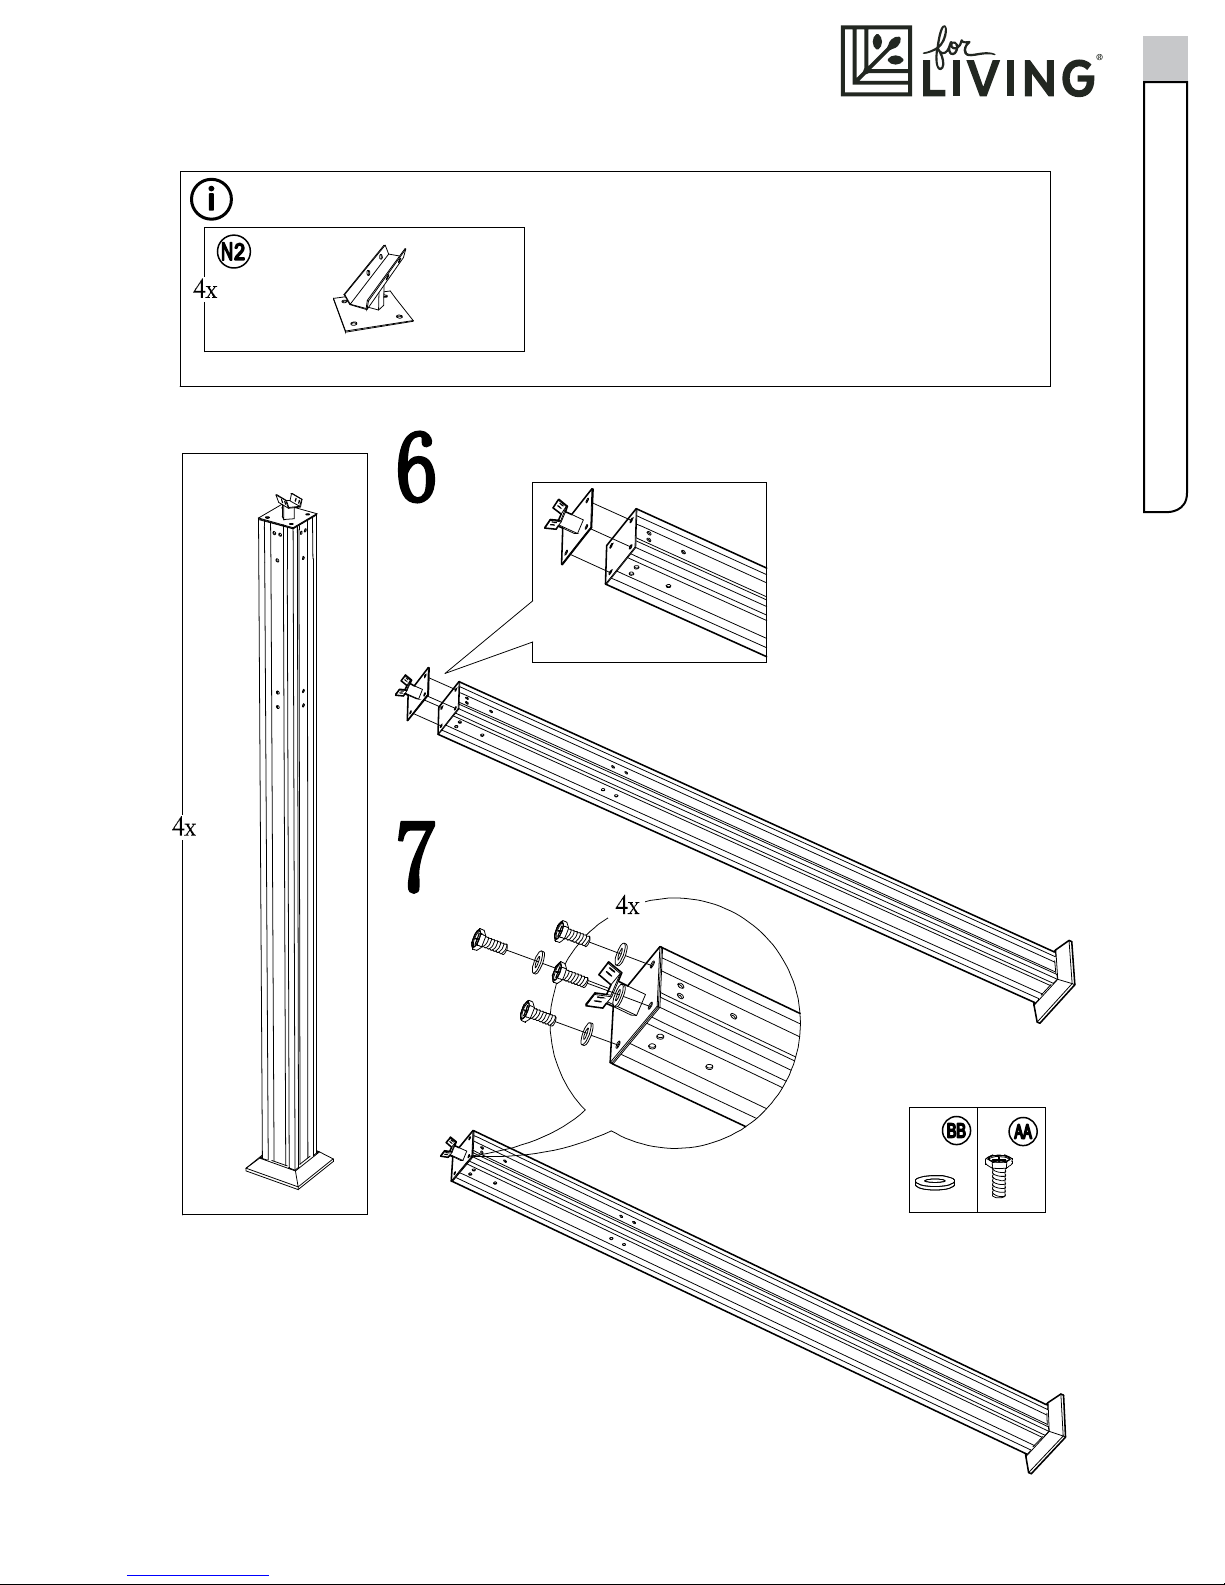
Step 6 - requires A, B, Y, Z, CC
Step 7
Step 8 - requires Q, R, S, W, X
Step 9 - requires W, X
Step 10 - requires M, V
Product No. 088-1336-8
• Model No.
L-GZ340PST-3
10
Assembly
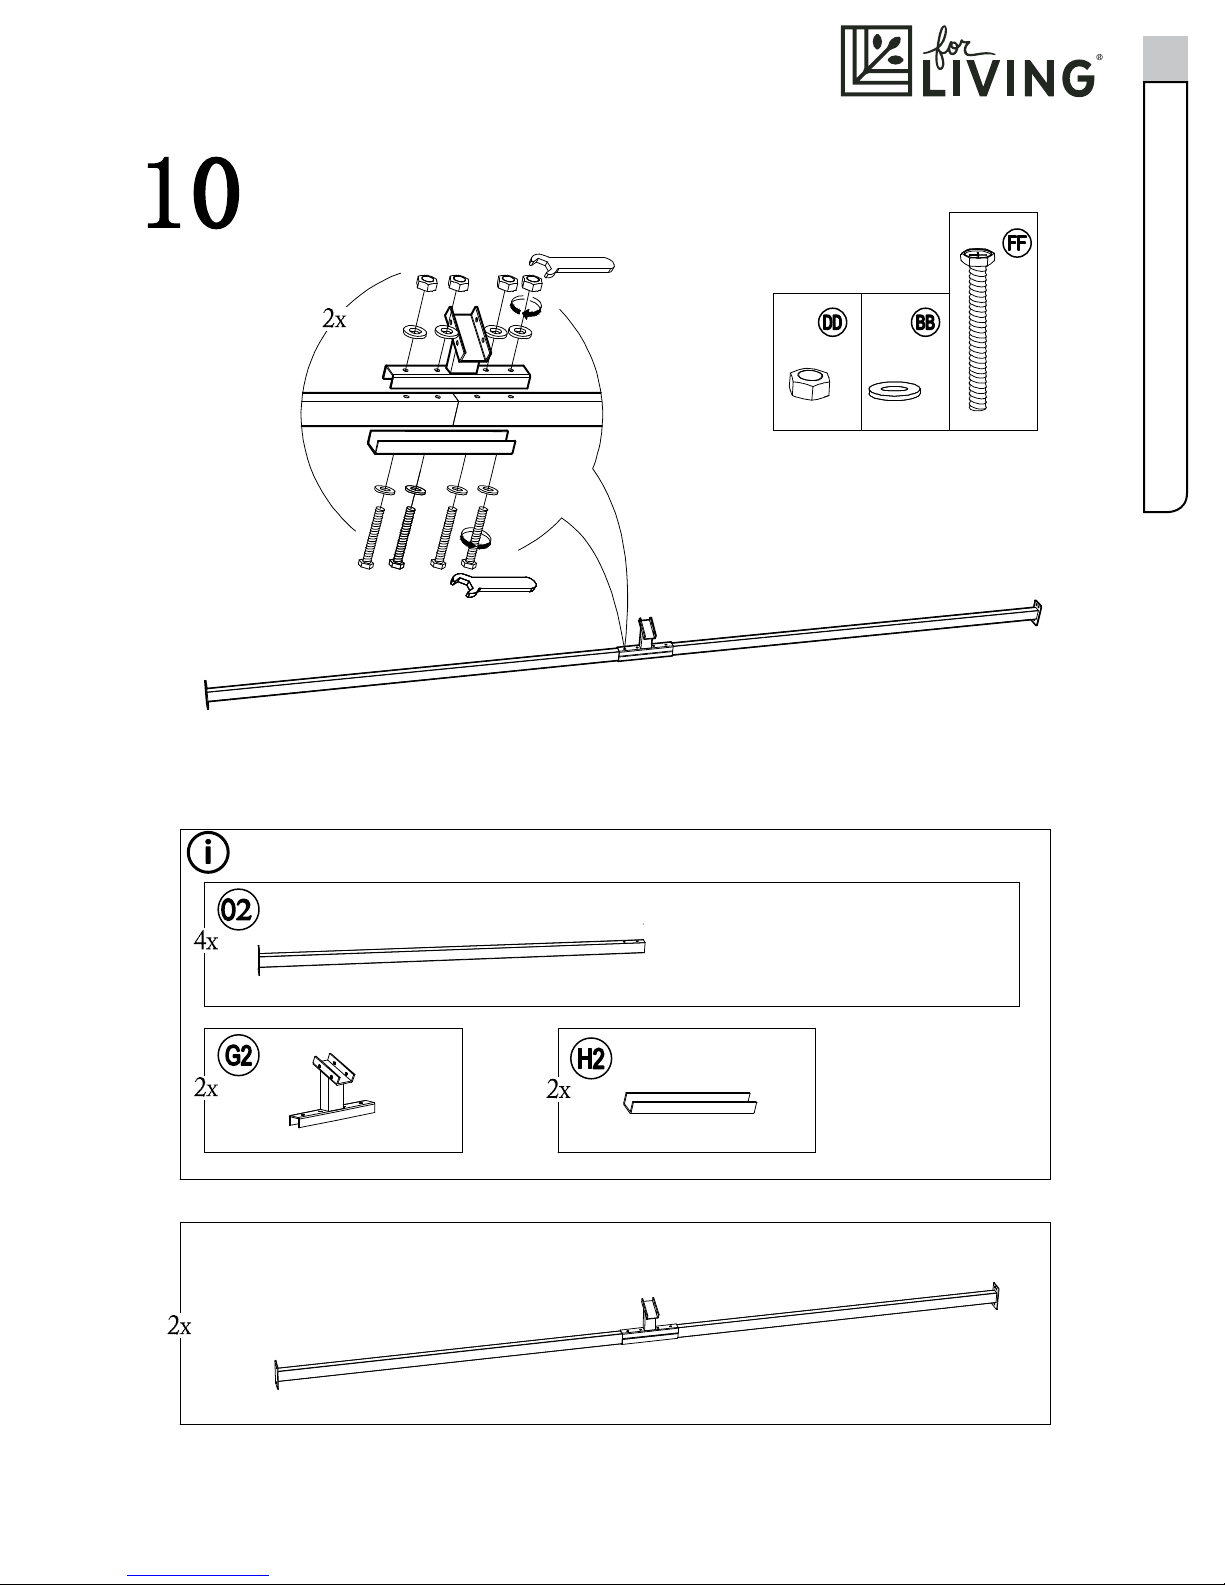
Step 6 - requires A, B, Y, Z, CC
Step 7
Step 8 - requires Q, R, S, W, X
11
Assembly
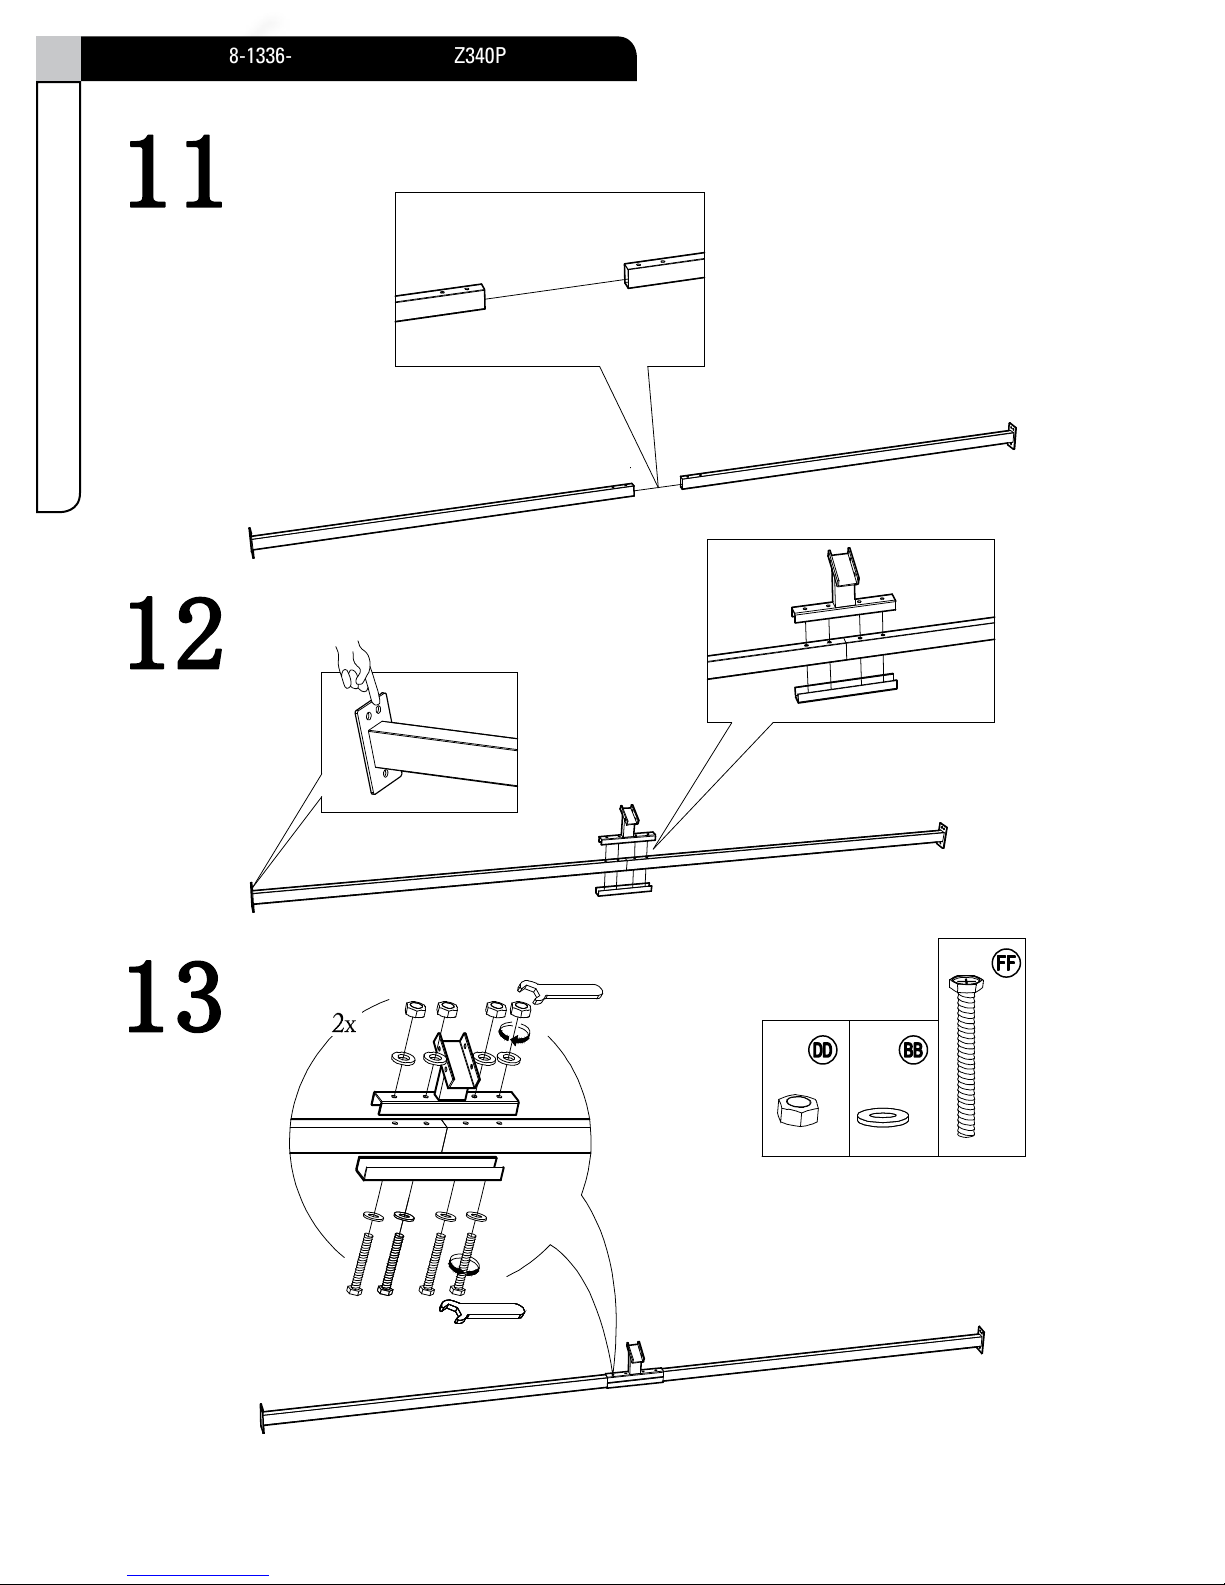
Step 13
Step 12 - requires N, Z, CC
Step 10 - requir
es M, V
Step 13
Step 14 - requires BB
Step 12 - requires N, Z, CC
Product No. 088-1336-8
• Model No.
L-GZ340PST-3
12
Assembly
Step 10 - requires M, V
Step 11 - requir
es O, X, A
A
Step 13
Step 14 - requires BB
Step 15 - requires T, U
Step 12 - requires N, Z, CC
13
Assembly

Step 13
Step 14 - requires BB
Step 13
Product No. 088-1336-8
• Model No.
L-GZ340PST-3
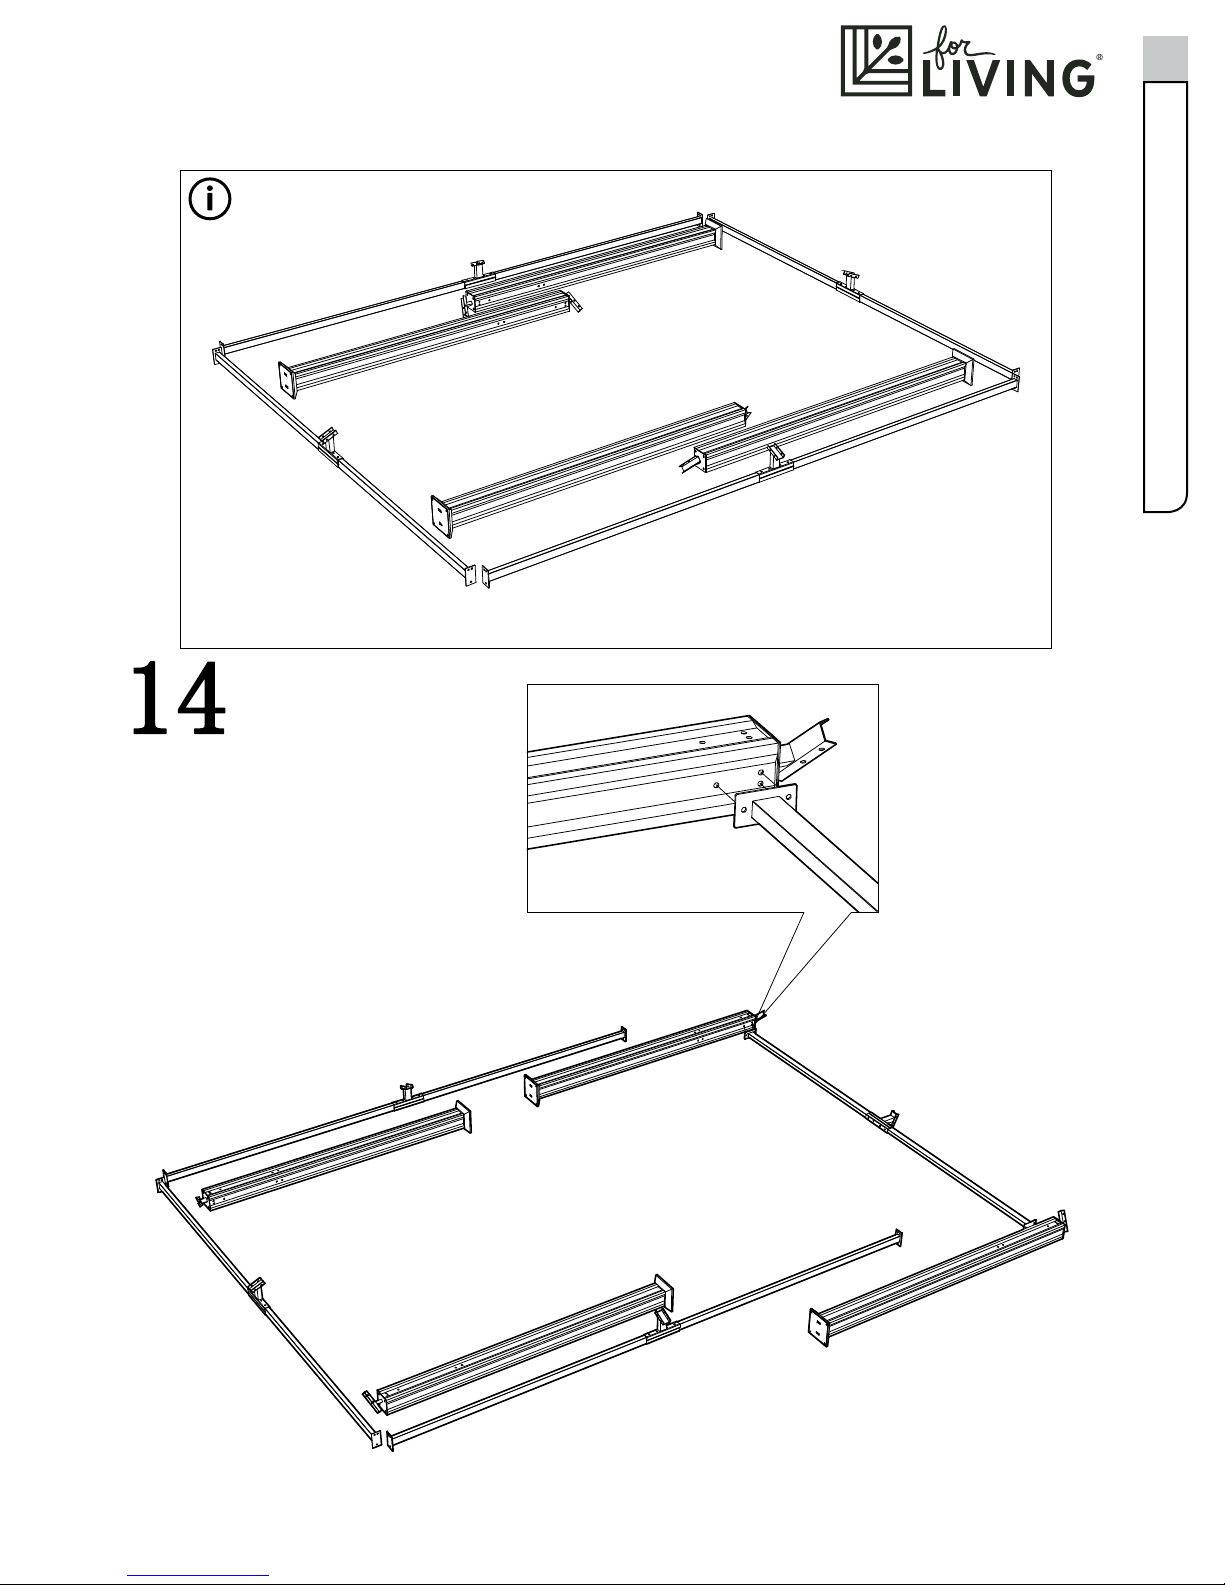
14
Assembly
Step 14 - requires BB
Step 15 - requires T, U
15
Assembly

16
Product No. 088-1336-8 • Model No. L-GZ340PST-3
Assembly
17
Assembly
 Loading...